

You're often at the same point when a frameless shower screen becomes a real decision. The tiles are in, the room finally looks like a bathroom, and the last major piece seems simple enough: measure the opening, order the glass, fix it in place, run a bead of silicone, done.
That's where plenty of problems start.
A frameless shower screen installation looks clean because there's nowhere for mistakes to hide. No aluminium frame to disguise a crooked wall. No chunky channel to distract from a floor that falls the wrong way. In bathroom renovations, the screen doesn't forgive poor prep. It exposes it. As a Melbourne registered builder, I'm often brought into bathrooms where the glass wasn't the first mistake. The fundamental issue was earlier: out-of-plumb walls, weak substrate, rushed waterproofing, or hardware fixed without thinking through movement and load.
Table of Contents
- Is DIY Frameless Shower Screen Installation for You
- Preparing Your Site for a Perfect Installation
- The Art of Measurement and Hardware Selection
- Fitting and Fixing the Glass Panels
- Sealing, Finishing, and Common Pitfalls to Avoid
- When to Hire a Registered Builder for Your Installation
Is DIY Frameless Shower Screen Installation for You
If your shower opening is square, the walls are plumb, the hob is solid, and you've handled delicate drilling into finished tile before, a simple install might look manageable. If any of those conditions are uncertain, DIY gets risky quickly.
A frameless shower screen installation isn't hard because there are lots of parts. It's hard because the tolerances are tight. The screen has to line up with finished surfaces that are rarely perfect, and every small error ends up visible in the final reveal. The door binds. The gaps look uneven. Water escapes where you didn't expect it to. In the worst jobs, the panel is put under stress from the day it's installed.
The real DIY question
The right question isn't “Can I fit a shower screen?” It's “Is my bathroom ready for frameless glass?”
That means checking a few things:
- Wall accuracy matters: If the wall leans or bellies, frameless glass won't hide it.
- Tile drilling needs control: One rushed hole near an edge can crack a finished tile.
- Substrate strength is essential: Heavy glass needs a stable fixing point and a rigid base.
- Water management has to be understood: A clean-looking screen can still produce a wet bathroom if placement and sealing are wrong.
Practical rule: If you're relying on silicone to make up for bad alignment, the job is already off track.
Homeowners also underestimate how much cost sits behind a failed attempt. Replacing one cracked tile in a completed shower can be awkward. Reworking waterproofing after hardware has been drilled through the wrong spot is worse. If you're still deciding whether to DIY or hand it over, it helps to compare the broader shower screen installation cost considerations against the cost of rework, not just the cost of the initial labour.
What tends to work and what doesn't
A straightforward opening with good site prep can work with a basic frameless layout.
What doesn't work well is confidence without checking the conditions first. In bathroom renovations, that's usually how people end up paying twice. The visual simplicity of frameless glass gives the impression that the install is forgiving. It isn't. It's one of the least forgiving items in the room.
Preparing Your Site for a Perfect Installation
The screen is the last thing people see, but site preparation is what determines whether it performs properly. By the time the glass arrives, most of the important decisions should already be settled.
What has to be true before glass is ordered
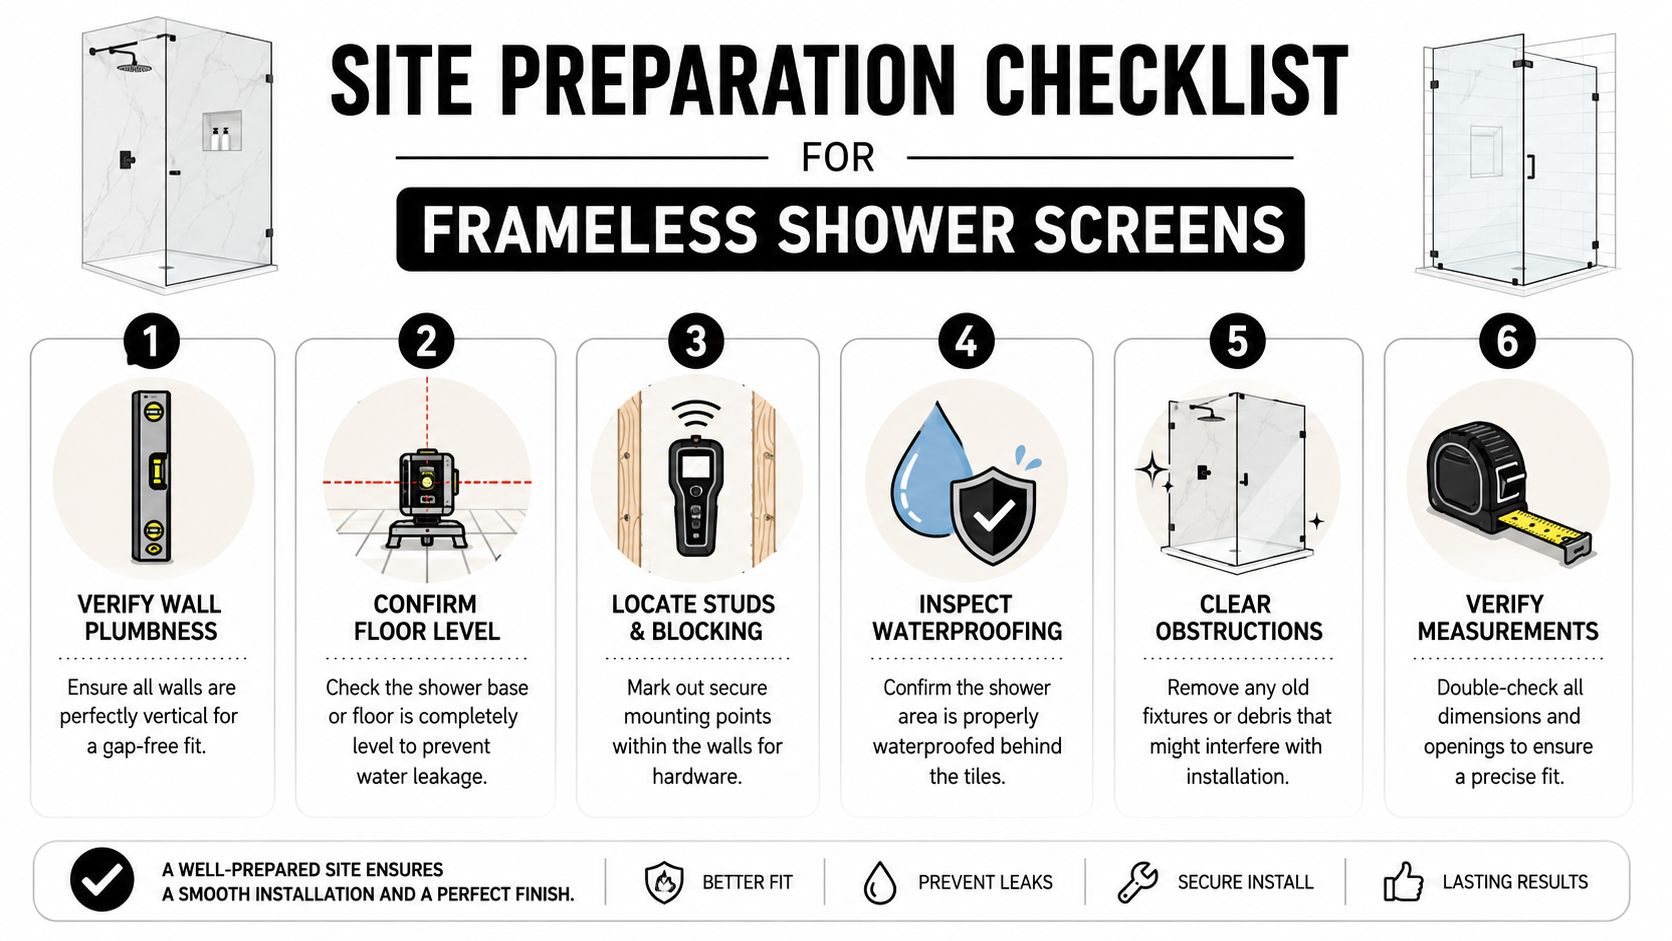
Start with the opening itself. Check the walls for plumb with a long spirit level or laser. Check the hob or floor for level. Check the corners for square. If there's a bow in the wall, a dip in the base, or a twist through the opening, note it before anyone measures for glass.
Industry guidance used in frameless work sets a clear threshold for panel sizing. For 3/8-inch glass, about 10 mm, the maximum recommended height is 84 inches, about 2134 mm, while 1/2-inch glass, about 12 mm, can extend to 120 inches, about 3048 mm, when the panel is supported on two vertical edges and the base or on two horizontal edges, as outlined in Glass Magazine's discussion of frameless design limits. That matters in Melbourne bathroom renovations because the glass choice isn't just a design preference. It has to suit the support conditions and the actual geometry on site.
Here's the basic site checklist I use before signing off on measurement:
- Plumb walls: Hardware must sit flat and true.
- Level base or hob: The panel should sit evenly on packers, not rock or twist.
- Rigid fixing zones: Know where brackets, clamps, or channels will anchor.
- Finished tile quality: Lipping, hollow spots, and weak edges create drilling problems.
- Clear drainage logic: Water has to fall back into the shower area, not toward the room.
Why waterproofing and substrate come first
Many DIY guides become insufficient here. They show the glass going in, but skip the fact that frameless hardware is being installed into a wet area assembly that already has layers doing important work.
Your waterproofing membrane must be intact and properly planned before the screen goes anywhere near the room. In bathroom renovations, the screen isn't a substitute for waterproofing. It's a finishing element that sits on top of a waterproofed and properly graded substrate. If the membrane is poor, the glass won't save the bathroom. If the falls are wrong, the screen won't solve that either.
For homeowners comparing methods and materials, a proper understanding of waterproofing in Melbourne bathrooms helps more than any generic installation checklist.
Good frameless installs start before the tiler leaves site. If the screed, tile set-out, and hob details are wrong, the glass installer inherits a problem rather than a clean opening.
A solid hob or tiled substrate is critical because the panel load needs to transfer into something stable. Movement under the panel leads to failed seals, poor alignment, and stress in the glass and hardware.
If you're doing a full renovation rather than a simple replacement, treat the shower screen as part of the bathroom build. That's how registered builders and experienced bathroom renovations teams avoid the common chain reaction where one trade finishes neatly, but leaves the next trade an impossible fixing condition.
The Art of Measurement and Hardware Selection
A lot of the call-backs I see start here. The bathroom looks ready, the tiles are in, and someone has taken a quick measure off the widest points of the opening. The glass arrives, the gaps are wrong, the door binds, or the panel needs to be forced into position. Frameless glass does not forgive that kind of guesswork.
How professionals measure openings
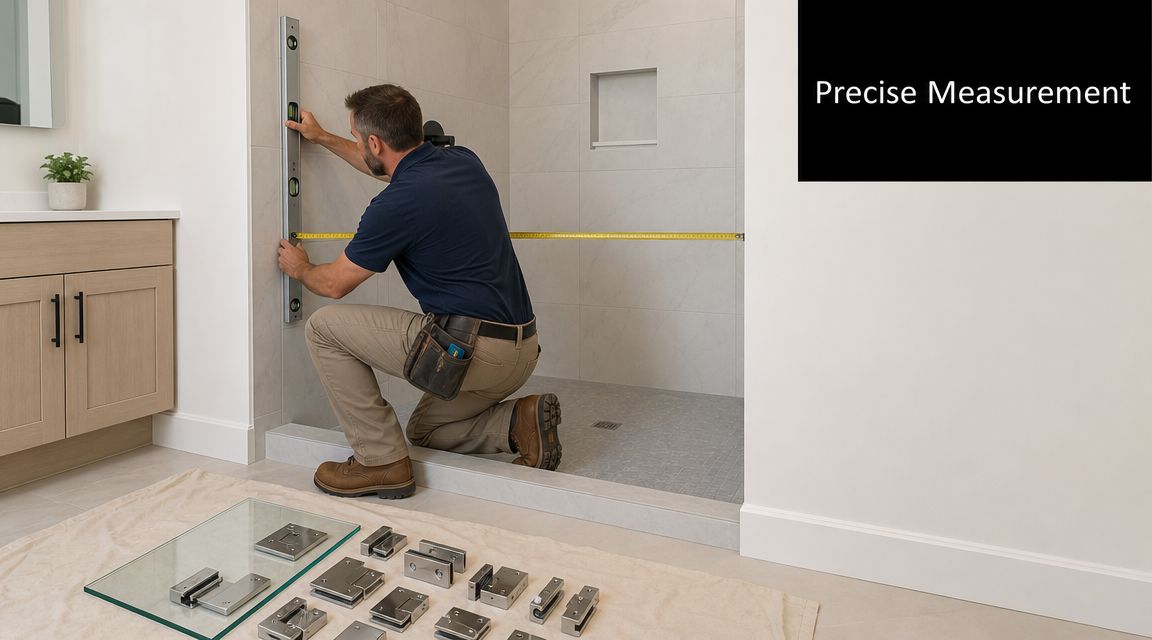
A proper measure-up is taken from the finished room, not from the plan and not from a rough set-out. Walls are rarely perfectly plumb, hobs can drift out of level, and tiled corners often carry small variations that become obvious once clear glass is installed. On a framed screen, some of that can be hidden. On a frameless screen, it stays visible every day.
The opening needs to be checked at several points because the dimension often changes from bottom to top. The smallest usable measurement usually controls the panel size, and then allowances are worked out for hardware, door swing, and the clearances needed so the glass does not clip tile, stone, or adjoining glass.
A measure-up usually includes:
- Width at the bottom, middle, and top
- Height on both sides
- Plumb check on each fixing wall
- Level check across the base, hob, or floor
- Door swing path and clearance to vanities, toilets, and tapware
- Locations of niches, taps, shower heads, and any projections that affect the glass line
Good installers also check how the door will behave in the room. A door can fit on paper and still be wrong on site if it opens into a towel rail, misses the preferred entry path, or leaves an awkward gap at the return panel.
Choosing glass thickness and hardware
Glass thickness is a structural decision as much as a visual one. In residential work, the common discussion is usually 10 mm versus 12 mm toughened safety glass. The heavier panel can suit taller screens and give a more solid feel, but the extra weight increases the demand on hinges, fixings, and the wall or hob receiving that load.
That trade-off matters. Heavier glass is not automatically better if the substrate is marginal or the opening leaves very little tolerance.
Hardware selection also changes how much adjustment is available during installation. A wall channel gives more room to deal with slight irregularities in the opening, but it adds visible bulk. Clamps and brackets give a cleaner frameless look, but they rely on tighter set-out and a truer fixing surface. Hinges and pivots need accurate positioning, solid fixing points, and enough clearance for the door to operate without stressing the glass.
| Hardware type | Best suited to | Main trade-off |
|---|---|---|
| Wall channel | Openings with minor variation or limited tolerance | More visible aluminium |
| Clamps or brackets | Cleaner frameless appearance | Less adjustment on uneven walls |
| Pivot or hinge sets | Door panels that need a full swing path | Higher demand on fixing accuracy and substrate strength |
Cheap hardware often causes expensive problems later. I have seen covers loosen, clamp pressure vary across the glass, and hinge sets lose alignment because the tolerances were poor from the start. Good hardware costs more, but it gives a more stable install and a better chance of keeping the door true over time.
For custom bathroom renovations, some homeowners engage a specialist glass contractor directly. Others have the screen coordinated through Melbourne Tiling Services P/L as part of wider bathroom works. The practical benefit is coordination across trades. The final measurements, the tile set-out, the fixing locations, and the hardware choice are handled as one build sequence instead of being split between separate contractors who may never check each other's work.
Fitting and Fixing the Glass Panels
A lot of the call-backs I get happen after the glass is already on site, the holes are already drilled, and the bathroom already looks finished. Then the door drags, the fixed panel sits under stress, or water starts working into places it should never reach. By that stage, the expensive part is not the glass. It is correcting the substrate, the fixings, and sometimes the waterproofed surfaces around them.
What goes wrong on site
Frameless panels have no trim to hide bad set-out. Every millimetre shows.
The usual problems are not dramatic at first. A bracket gets fixed from a reference line that looked straight but was taken off a wall that was out. A panel gets set hard onto tile without proper packers. A hinge is tightened before the door position is fully checked. Each mistake looks minor on its own. Together, they create twisted glass, uneven margins, dropped doors, and stress on tiles and fixings.
These are the failures I see most often on Melbourne renovation jobs:
- Fixings marked from the room, not the actual glass position: The panel ends up true to the wrong line.
- No isolation under the glass: Direct contact with tile or stone puts the glass edge at risk.
- Forced alignment during install: If pressure is needed to make it sit, the opening or fabrication is wrong.
- Weak or unknown fixing points behind tile: Hardware may hold initially, then loosen with use.
- Rushed drilling through brittle finishes: Chips, cracks, and broken waterproof details are common results.
The structural side gets ignored in DIY guides. Frameless hardware transfers load into a small number of fixing points, especially at hinges and pivots. If the wall build-up is weak, if the tile adhesive bed is inconsistent, or if the fixing lands in the wrong place, the screen can move even when the glass itself is cut correctly.
This is the video I'd show a client who wants to understand the handling side of the process before trying it themselves:
The professional fitting sequence
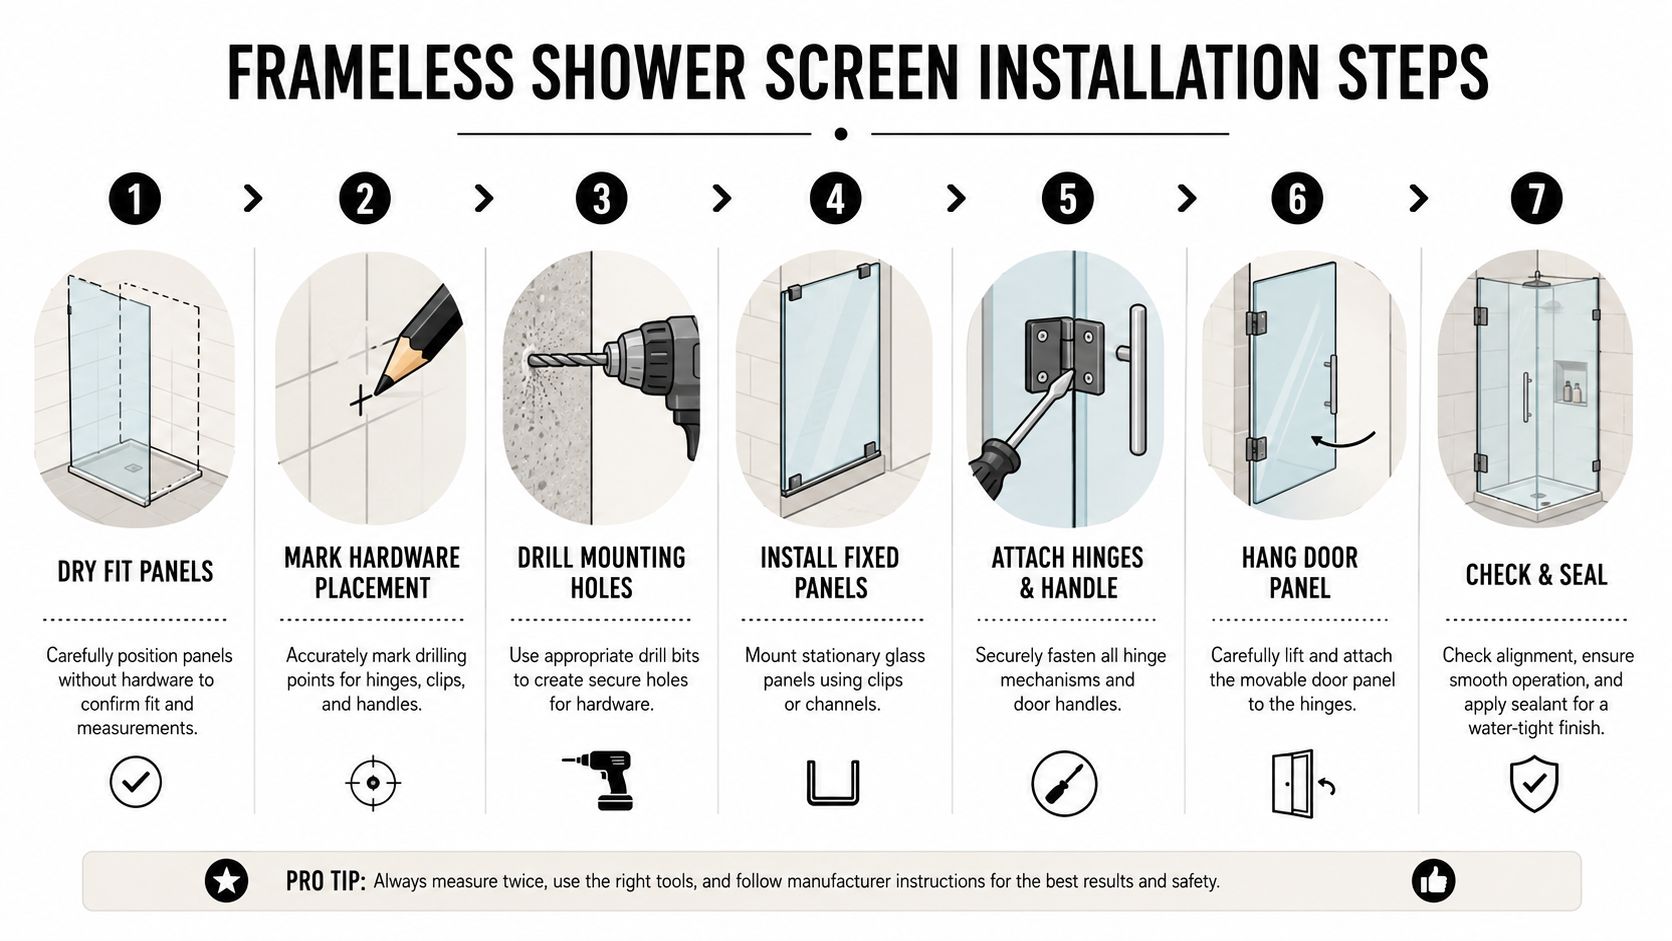
A proper install starts with a dry fit and a hard look at how the load will be carried. The fixed panel should sit on packers or setting blocks so the glass is isolated from the floor or hob. From there, the installer checks reveals, plumb, door clearance, and whether the hardware still lands on sound fixing points. If any of that is off, drilling should wait.
I have stopped installs at this stage more than once. It is far cheaper to pause and correct a wall, a nib, or a tile edge than to hang toughened glass into a bad opening and hope adjustment will save it.
A sound sequence usually looks like this:
- Stand the fixed panel on packers and confirm the opening suits the fabricated glass.
- Check plumb, level, and reveal lines off the actual panel position.
- Confirm fixing locations into solid backing before any hole is drilled.
- Mark and drill tiled surfaces carefully with the correct bit, speed, and support.
- Install channels, brackets, or hinges without distorting the hardware.
- Set the fixed panel back in place with isolation maintained at all contact points.
- Hang and adjust the door until the swing, gap, and latch line are all consistent.
- Tighten hardware in a controlled sequence so clamp pressure stays even across the glass.
One trade-off matters here. Channels can forgive a little variation, but clamp-fixed panels and hinge sets demand a truer opening and better fixing accuracy. The cleaner the look, the less tolerance the installation usually has.
The other issue is restraint. Over-tightening hardware is a common mistake. Installers trying to remove a small rattle or pull a panel into line can load the glass, crush packers, or stress the tile face. The right result comes from correct set-out, correct support, and controlled fixing pressure, not brute force.
Where perimeter support or finishing details are being coordinated with professional shower screen caulking and sealing work, the glass installation needs to stay clean and deliberate so the final sealing stage works as intended.
One simple test applies on every job. If the panel only works when somebody is holding it, pushing it, or pulling the door back into line, the installation is not ready to fix off.
Sealing, Finishing, and Common Pitfalls to Avoid
A lot of shower screens look fine on the day they go in. Then the first long shower sends water under the panel, the silicone skins over unevenly, and a door that seemed acceptable starts clipping or drifting out of line. I get called to these jobs after the tiles, waterproofing, and glass are already finished, which is exactly why the sealing stage needs more discipline than many DIY guides suggest.
Where sealing works and where it causes trouble
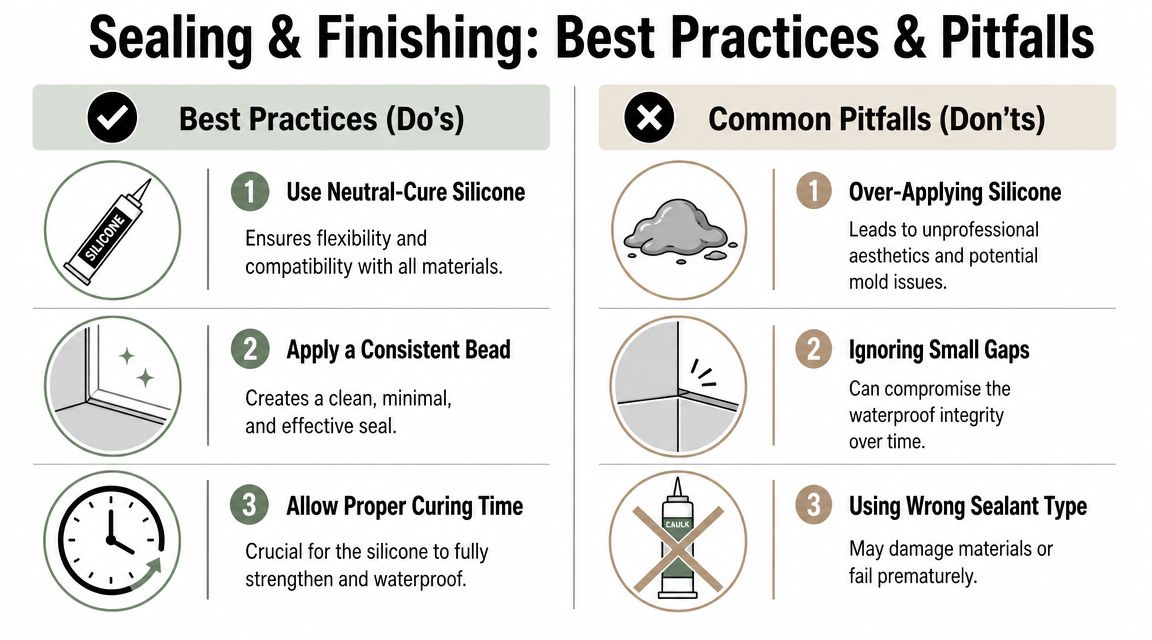
Silicone is a finishing material, not a fix for poor set-out, movement, or bad water control. On a frameless screen, the goal is a neat perimeter seal where the system is meant to be sealed, with clean junctions and no contamination under the bead. If the panel is under stress, the wall is out, or the floor falls the wrong way, more silicone will not solve it.
Neutral-cure silicone is generally the right product around glass, tile, and metal hardware. Cure time matters. A bathroom that looks complete still should not be used until the sealant has cured properly, or the bead can tear, lift, or trap moisture against the edge.
Good finishing usually comes down to a few disciplined steps:
- Seal only where the detail calls for it: Random beads around hinges, brackets, and channels usually create a mess and can interfere with drainage paths.
- Keep the bead small and consistent: Heavy silicone lines attract dirt and announce every mistake.
- Clean and dry all contact surfaces first: Dust, soap residue, or moisture under the bead shortens the life of the seal.
- Test the door and fixed panels before sealing: Adjustment after silicone goes in is slower, dirtier, and more likely to damage the finish.
If you want a clear reference for what neat, durable wet-area finishing should look like, this guide to professional shower screen caulking and sealing is useful.
Mistakes that lead to leaks, movement, and broken glass
The biggest errors at this stage usually started earlier and only become obvious once water hits the enclosure.
A common one is relying on the screen to compensate for a bad substrate. Frameless glass needs a stable base and reliable fixing points. If the hob moves, the wall packs out inconsistently, or the tile build-up changes across the opening, the screen can twist under load. What shows up first is often a failing silicone joint. What follows can be chipped tile, loose hardware, or a cracked panel.
Another frequent problem is sealing before the shower has been checked as a working system. Water should fall back to the drain, not sit against the outside edge of the screen or run toward a bathroom floor junction. If the falls are wrong, or if the bottom detail has been chosen for appearance without enough containment, the leak is not a sealant problem. It is a design or construction problem.
Watch for these finish-stage mistakes:
- Forcing a panel to close a gap: Glass should sit in its natural position. If it only lines up under pressure, the opening or the fabrication is wrong.
- Ignoring wall taper or tile lippage: Small variations matter with frameless glass, especially on premium clamp-fixed installations.
- Sealing the inside and outside indiscriminately: That can trap water where the system is supposed to shed it.
- Using silicone to hide poor cuts or oversized holes: It looks rough and usually fails early.
- Installing frameless glass over movement-prone bases: Flex at the base transfers stress into the screen and the sealant joints.
My rule on site is simple. If the screen needs persuasion to sit right before sealing, it is not ready to finish.
A frameless shower screen should look restrained and boring at this stage. Straight lines, even gaps, controlled sealant, no visible stress, and no water path that relies on luck. That is what keeps a high-end bathroom looking sharp six months later, not just on handover day.
When to Hire a Registered Builder for Your Installation
Some frameless shower screen jobs are straightforward. Many aren't. The point where DIY should stop is earlier than commonly believed.
Projects that should not be treated as a kit install
If the opening is angled, the niche is out of plumb, the shower is doorless, or the layout uses return panels and custom reveals, you're no longer dealing with a basic enclosure. You're dealing with a design and construction problem that happens to involve glass.
A known gap in DIY advice is the treatment of non-standard openings such as angled walls and out-of-plumb niches, which are common in premium Melbourne renovations. These installations can be feasible, but they require professional verification of wall geometry, fall to drain, and waterproofing details, and getting that wrong can compromise water control and trigger expensive rework, as shown in this discussion of angled frameless shower layouts.
That's where a registered builder becomes useful, not because builders are the only people who can fit glass, but because complex bathroom renovations are never just about the glass.
What a registered builder coordinates
In a proper bathroom renovation, the screen sits at the end of a chain:
- Structural support for where the hardware loads go
- Waterproofing integrity before the finished tile goes on
- Screed and falls that return water to the drain
- Tiling set-out so hardware lands in sensible positions
- Glass specification that suits the opening and support conditions
When those elements are coordinated, the frameless screen looks effortless because the room has been built to receive it. When they aren't, the installer ends up trying to solve structural or waterproofing defects with hardware and silicone. That never ends well.
If your bathroom involves custom geometry, movement concerns, premium finishes, or any uncertainty about the substrate, professional involvement isn't an admission that you can't do it. It's the sensible way to protect the bathroom, the waterproofing, and the value of the renovation.
If you're planning a frameless shower screen installation as part of bathroom renovations in Melbourne, Melbourne Tiling Services P/L can coordinate the full scope through registered builders, tilers, waterproofers, and shower screen installation within one project workflow.
Write a Comment