
Most guides to standard bathroom dimensions hand you a number first: 2.4 by 2.1 metres, or a square metre figure lifted from a North American code book, with a note to fit a toilet, basin and shower inside it. Australian bathrooms don't answer to that. There's no single universal room-size rule here, and a plan that satisfies one on paper can fail the moment a door opens.
What decides an Australian bathroom is circulation, fixture clearance and access. Two rooms with identical floor area behave completely differently depending on which wall the door sits on and how far the vanity projects past the tiled line.
The bigger trap is where a measurement starts. A set of standard bathroom dimensions drawn from the stud frame is fiction. Wall lining, waterproofing, adhesive and tile each take space out of the room, and the loss lands exactly where clearance was tightest.
So every number below is measured from finished surfaces, every door arc gets tested before demolition, and every figure traces back to Australian guidance rather than a blog.
Table of Contents
- Typical Bathroom Sizes at a Glance
- Fixture Sizes and Heights to Plan Around
- Clearances You Need Today and for Later Use
- Future-Ready Bathroom Dimensions
- How to Test-Fit Your Layout Before Building
- Shower Zone Dimensions That Keep Walls Dry
- Permits and Registered Builders by Renovation Scope
- Confirm Your Dimensions Before You Order Tiles
Typical Bathroom Sizes at a Glance
A bathroom can fit every fixture on paper and still fail once the door swings or the finished walls reduce the clearances. Measure between tiled surfaces, then test the door arc before settling on a footprint.
The five footprints you'll meet in Melbourne
The ranges below are planning guides for conventional layouts, measured from finished wall to finished wall. Fixture sizes, door position and circulation all affect whether a particular room works.
| Bathroom type | Typical finished-wall footprint | Planning note |
|---|---|---|
| Powder room (toilet and basin) | 1,200–1,500 × 900–1,200 mm | A wall-hung basin can keep more floor space clear. Check that the door does not conflict with the toilet or basin. |
| Compact bathroom (shower, toilet, basin) | 1,800–2,400 × 1,500–1,800 mm | Door swing and fixture clearances decide whether the layout fits. |
| Ensuite | 2,400–3,000 × 1,800–2,400 mm | A shower-over-bath or walk-in shower may suit, depending on the door position and available wall length. |
| Family bathroom with bath | 3,000–3,600 × 2,400–2,700 mm | Allow for a bath, separate shower, vanity and a clear route between them. |
| Accessible bathroom compartment | Approximately 2,100 × 2,700 mm (5.67 m²) | The cited access guidance gives this approximate footprint; confirm applicable requirements for the project. |
These conventional footprints are starting points, not guarantees. A compact room can work with a carefully placed door and fixtures, while a larger room can feel cramped if circulation crosses the bath or the door clips the vanity.
The accessible compartment is approximately 2,100 × 2,700 mm, or 5.67 m², under access guidance based on the AS 1428 series. Its larger footprint makes room for circulation as well as fixtures.
Measure between the finished walls at floor level, then draw the door arc and mark each fixture's full projection. Use clear standard floor plan annotation rules so dimensions and door swings are easy to read. If the layout only works before finishes are added, revise it before construction.
Fixture Sizes and Heights to Plan Around
A plan can fit every fixture and still fail once doors swing and tile goes on the walls. Lock sizes and heights first, and measure them from the finished face.
Fixture dimensions and mounting heights
Seat height, basin height and grabrail height in the table follow access guidance built on the AS 1428 series.
| Fixture | Width or length | Height or depth | Reference |
|---|---|---|---|
| Toilet pan | Set by the model, so take the projection from the pan's data sheet | Seat 460–480 mm high | AS 1428 access guidance |
| Washbasin | 450 mm wide | 800–830 mm high | AS 1428 access guidance |
| Vanity unit | Set by the cabinet, so take width from the product data sheet | Set by the basin and benchtop you choose | No fixed standard |
| Shower base (minimum) | 900 × 900 mm | Floor level, with a hob only if the base needs one | Australian planning guidance |
| Shower base (most common) | 1,000 × 1,000 mm | Floor level, with a hob only if the base needs one | Australian planning guidance |
| Accessible shower area | About 1,160 × 1,100 mm | Floor level, step-free entry | AS 1428 access guidance |
| Bath | Set by the model, so take length and rim width from the bath data sheet | Rim height set by the bath and its frame | No fixed standard |
| Grabrail | Length set by the rail and the wall it fixes to | 800–810 mm above finished floor | AS 1428 access guidance |
The shower base is the sizing decision that matters most. Recent Australian planning guidance puts the recommended minimum at 900 × 900 mm, with 1,000 × 1,000 mm described as the most common size, in The Plumbette's standard bathroom design rules. A 900 mm base is a usable shower floor. I would not treat it as a comfortable one, and it leaves no room for a seat later.
The cheap moment: grabrail blocking costs a few dollars of timber while the frame is open. After waterproofing and tiling, the same rail costs a strip-out.
Vanity widths and bath lengths have no fixed figure worth planning to. Take both from the data sheet for the model you have chosen, then draw the footprint and the door or drawer arc from the tiled wall. A vanity that grows 100 mm during selection can shove the toilet out of its clear zone.
Before the plan goes to a builder, confirm these in order:
- Toilet model and seat height, because the pan's projection is what sets the front clearance.
- Basin width and height, since a 450 mm basin still needs waste and support set-out.
- Vanity width and door arc, the two numbers that steal the toilet zone once the door is drawn open.
- Shower base size, minimum or most common, and which wall the screen hinges on.
- Bath length if one is staying, measured to the rim rather than the carcass.
- Grabrail heights if rails are planned now, so blocking goes in before sheeting.
Clearances You Need Today and for Later Use
A bathroom can fit every fixture on paper and still fail once doors swing and tiles go on. Measure clearances between finished surfaces, then test each door arc against the space people need to use.
The ABCB Livable Housing Design handbook sets a minimum clear circulation space of 900 × 1,200 mm immediately in front of the toilet pan. It also calls for at least 900 mm between finished wall surfaces where the toilet sits between opposite walls. Wall lining, waterproofing, adhesive and tile reduce the room's usable width, so allow for them before setting out the fixtures.
A vanity, shower-screen return, towel rail or open door can intrude into the toilet zone. Draw each at its finished size before the plumber sets out the waste.
| Clearance | Minimum guidance | Beyond minimum | Measure from |
|---|---|---|---|
| Clear zone in front of toilet | 900 × 1,200 mm | 1,200 × 1,200 mm | Finished wall surfaces |
| Width between walls around toilet | 900 mm | 1,200 mm | Finished wall surfaces |
| Accessible toilet circulation | 1,900 × 2,300 mm | , | Finished floor and walls |
| Toilet centreline to vanity or bath in a shared room | Keep fixtures clear of the toilet-use area | , | Toilet centreline |
| Toilet pan edge to washbasin, accessible | 1,400 mm | , | Toilet pan edge |
| Main circulation route | 1,000 mm wide over 2,700 mm length | 1,200 mm clear path | Finished walls |
| Accessible shower circulation | 1,600 × 2,350 mm | , | Finished walls |
| Clear doorway | 850 mm | , | Door opening between finished linings |
The ABCB's voluntary Beyond Minimum standard proposes 1,200 mm clear width between walls around a separate toilet and 1,200 × 1,200 mm in front of it, as set out in the NCC 2025 Livable Housing Design Standard. That extra 300 mm takes floor area from elsewhere, so check the trade-off against the room's overall layout.
Accessible circulation needs more room: 1,900 × 2,300 mm around the pan, 1,400 mm from the pan edge to the basin, 1,600 × 2,350 mm around an accessible shower, and an 850 mm clear doorway. These dimensions can change what fits in the room and whether walls or fixture positions need to move.
Choose the clearance target your room can support, then protect it in the drawing. Keep the shower and door swing outside the toilet-use area, and check the vanity edge against the finished-wall dimensions before choosing its width.
Future-Ready Bathroom Dimensions
Meeting today's minimum doesn't produce a bathroom that still works when someone needs a shower seat, a carer in the room, or a walker to get through the door. Minimum compliance and future-ready are different targets, and the gap is cheapest to close on paper.
Victoria's planning guidance for certain residential developments asks that at least 50 percent of dwellings include an adaptable bathroom, and calls for a hobless, step-free shower with a removable screen positioned on the wall furthest from the doorway, per the Victorian planning provisions for adaptable housing.
Four allowances worth making at planning stage
- Clear floor area inside the shower zone for a fold-down or fixed seat, positioned so the seat doesn't block the drain, the screen track or the mixer.
- Grabrail blocking at framing, in the shower and beside the pan, so a rail can be fixed later without opening a waterproofed wall.
- A door type that keeps zones clear, either a cavity slider or an outward swing, so nothing sweeps through the toilet clear zone.
- A basin and vanity position that leaves the route open, wide enough for a second person to stand beside the pan without asking anyone to move.
These cost almost nothing while the frame is open. After tiling, each one becomes a demolition line item. A universal design bathroom approach starts from the same place: decide who has to use the room in ten years, then place the fixtures around that person.
Run one test on the finished plan. Can someone with a walker get into the shower, turn around and sit down without touching the vanity or the door? If not, the drawing isn't finished.
How to Test-Fit Your Layout Before Building
A bathroom can hold every fixture and still fail as a room. The toilet, vanity and shower all fit inside the walls, then the door arc, the circulation zone and the fixture projections overlap, and what you've drawn is a storage cupboard with plumbing.
Here's the process to run on any plan before demolition.
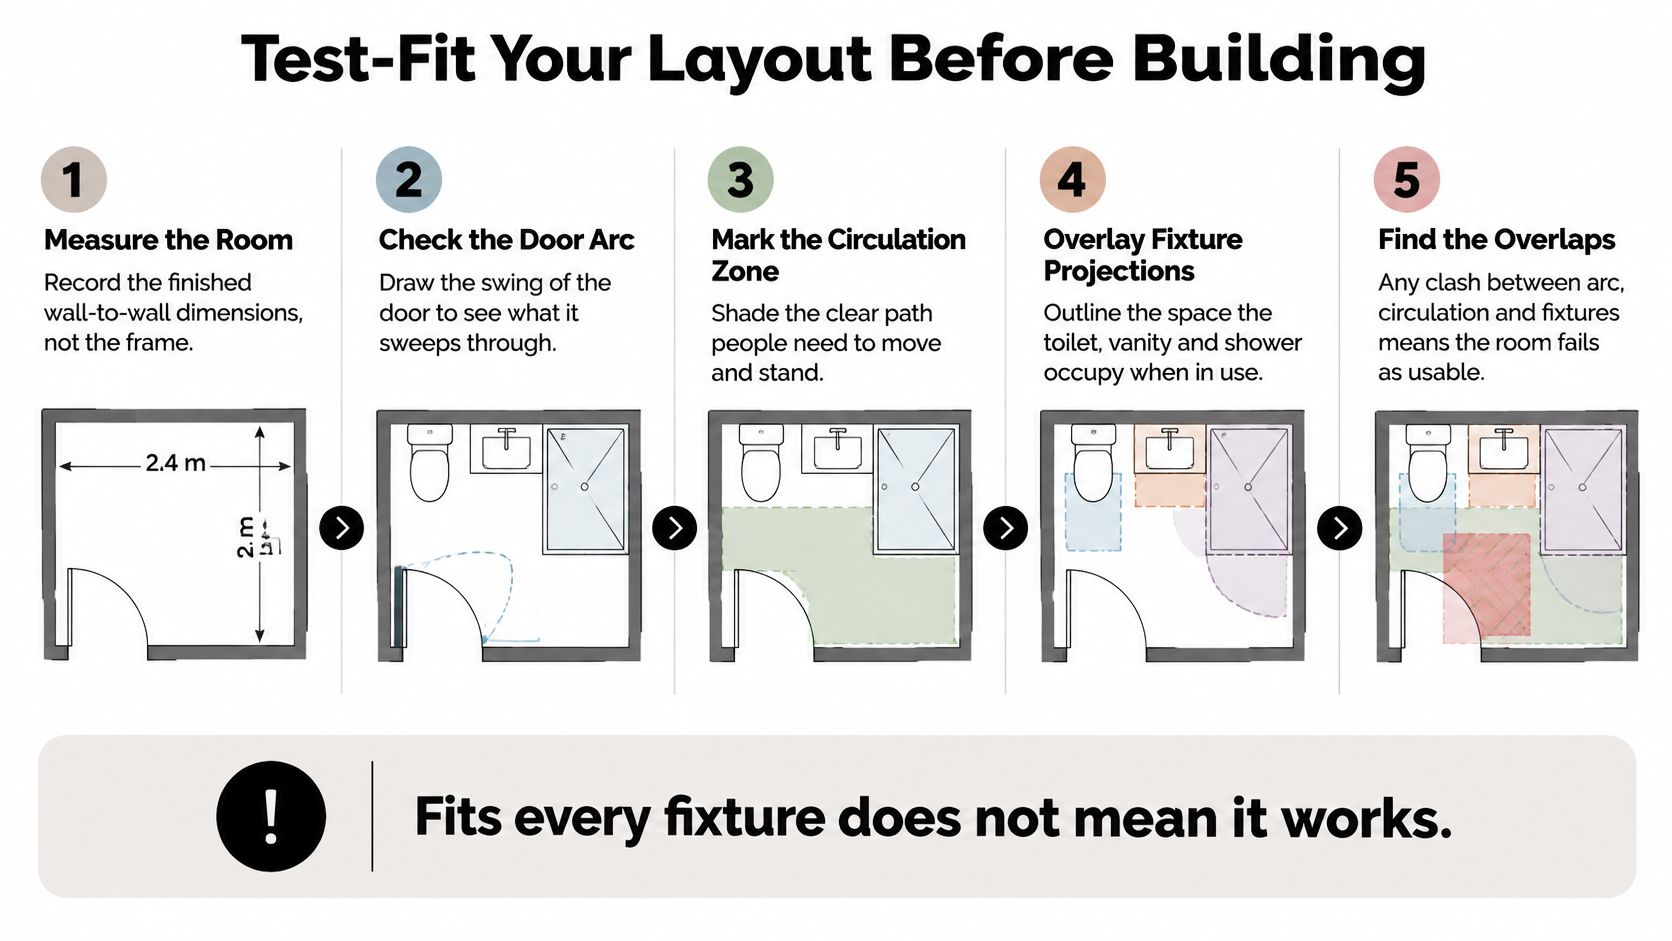
- Measure at floor level and at 1,800 mm, wall to wall, noting recesses, ducts and any step in the slab. The height measurement matters because the shower membrane line and any bulkhead change what you can hang.
- Subtract the finished wall build-up from every wall: lining, waterproofing, adhesive and tile. Two walls at 12 mm each cost you 25 mm of the clearance you were counting on.
- Draw each fixture at its real size, including the pan's projection from the wall and the vanity's door or drawer swing. Catalogue images flatter. Data sheets don't.
- Draw the door arc, inward and outward, plus the cavity slider's pocket. If the arc crosses the toilet clear zone on either swing, that's a layout problem rather than a preference.
- Shade the 900 by 1,200 mm toilet zone and the walk line from door to shower. Anything touching the shading is a clash.
- Check the screen, hinge side and opening direction, against both the entrance and the basin clearance.
A worked example
Say a compact ensuite measures about 1,500 by 2,100 mm with the door on the long wall, hinged inward. Drawn at finished size, the door arc sweeps straight through the toilet clear zone, so the pan has to shift 300 mm to escape it. That shift eats the shower.
Switching to a cavity slider removes the arc from the room entirely, and nudging the vanity 100 mm along its wall buys back the basin clearance. Same fixtures, same floor area, workable room.
When a client needs to see it rather than read it, a floor plan to 3D template converts the tested plan into a walkthrough, and the clash that looked harmless in two dimensions becomes obvious.
The bathroom renovation design stage is where this test belongs: before tiles are ordered, while moving a wall is still a decision rather than a variation.
Your own check is simpler than any of it. With the door fully open, can a person stand square in front of the toilet without touching the vanity? If not, keep drawing.
Shower Zone Dimensions That Keep Walls Dry
The shower zone is a performance boundary, not a tiled area. For Australian residential bathrooms, NCC 2025 requires a waterproof floor, including any hob or step-down, and waterproof wall linings to at least 1,800 mm above the floor substrate, per the NCC 2025 wet area waterproofing provisions.
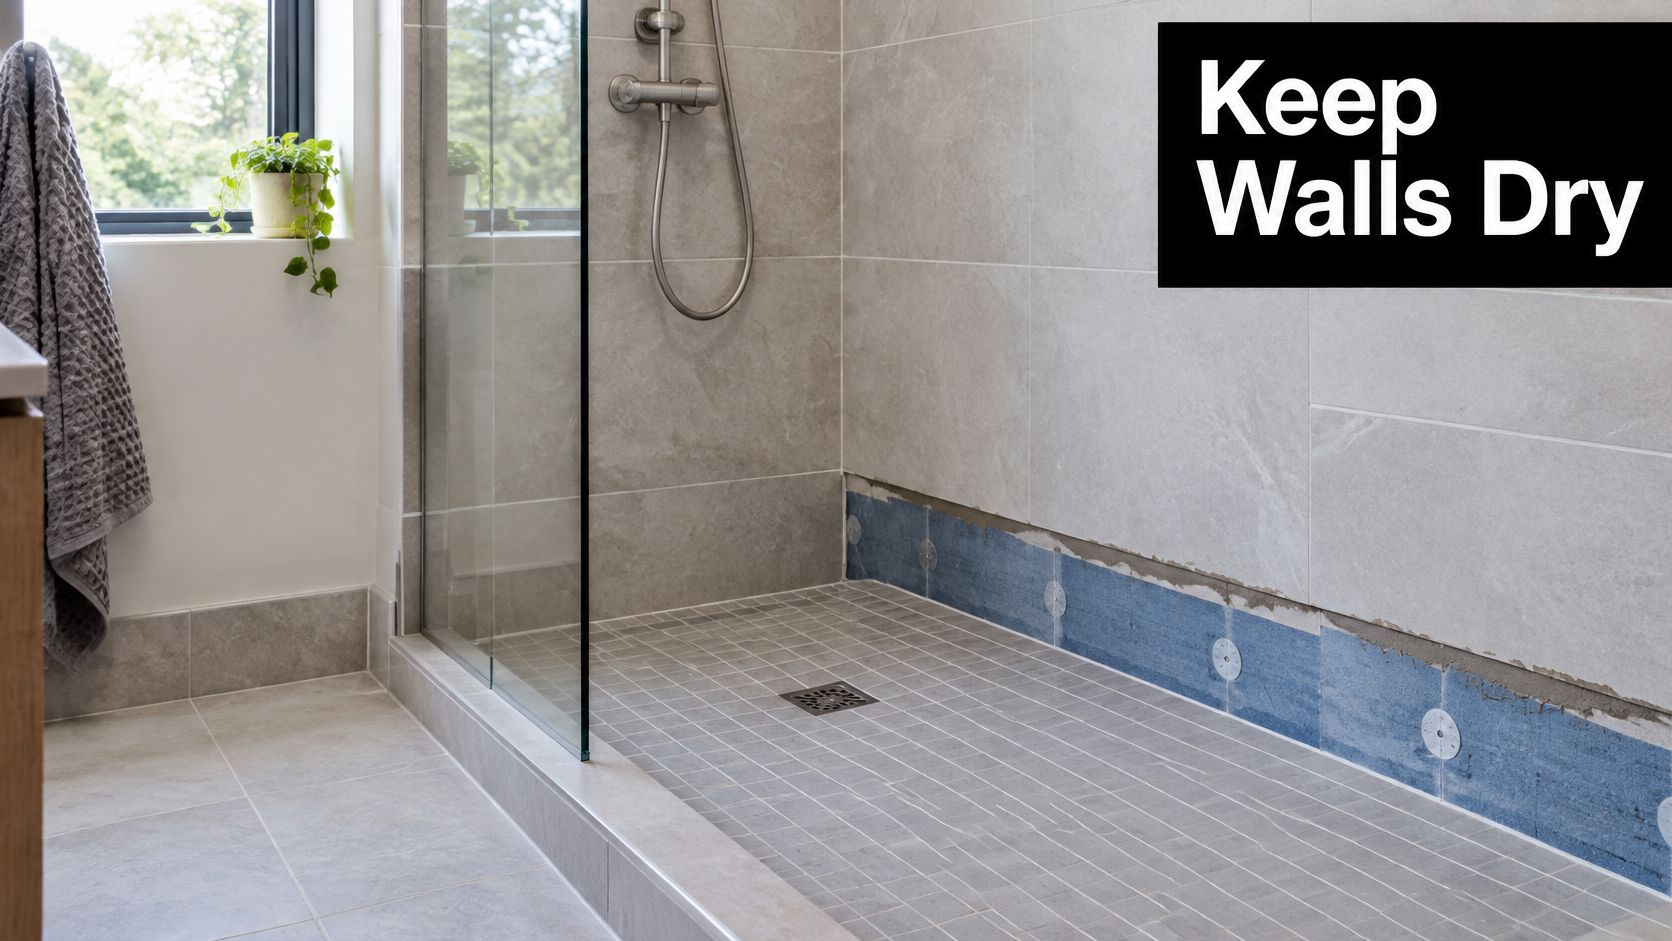
That 1,800 mm figure surprises homeowners, because it's well above a shower rose and well above the line many tile to for looks. It's a moisture boundary. Spray, splashback and capillary action all move water behind a tile face, and a membrane that terminates too low, or that isn't properly joined to the floor fall, lets that water sit against the frame.
Where the membrane line lands on your plan
Reserve wall area above the shower base for a continuous membrane termination, then place the mixer, the niche and the screen track around it. A niche set too low is the classic conflict: it interrupts the membrane run and forces a detail that should have been designed, not improvised.
The sequencing protects the room more than any finish does. Waterproofing is completed and inspected before tiling, because tiles and grout aren't the primary waterproof barrier. Tiling first and hoping is how concealed wet-area failures start.
Consider a 1,000 by 1,000 mm shower with a niche set at 1,200 mm. On paper it looks generous. In the build, that niche sits inside the membrane zone and has to be flashed and sealed as part of the wet-area system before a single tile goes on, and the screen track has to land where the fall doesn't pool water against it.
Screen choice ties into the same set of decisions. Frameless shower screen installation depends on knowing the finished floor level and the fall before the screen is measured, because a frameless panel has no frame tolerance to hide a floor that runs the wrong way.
Your check before fixing large-format tiles: confirm finished floor level, substrate falls and membrane height, in that order, and confirm them in writing.
Permits and Registered Builders by Renovation Scope
A layout can fit every fixture on paper and still fail once doors swing, finishes go on and clearances are measured from tiled walls. Sorting the finished sizes does not settle who is allowed to build them, or whether a permit is required before demolition starts.
In Victoria, a practitioner generally must be registered with the Building and Plumbing Commission once the contract or work is worth more than $10,000, and a major domestic building contract should be used above that amount, per the Building and Plumbing Commission's guidance. Registration is also required whenever the work needs a building permit, whatever the value. Below $10,000, the permit position decides whether registration applies. A single listed trade still sits apart from a coordinated renovation: a tiler doing only tiling, an electrician doing only electrical work, or a plasterer doing only plastering is not treated as a builder running several trades.
| Renovation scope | Permit usually needed | Registration required | Check before starting |
|---|---|---|---|
| Tiling only (single listed trade) | No, unless walls, floors or structure change | No, for a single listed trade | Confirm no structural or wall changes are planned |
| Waterproofing only | Most likely yes, so confirm with the relevant building surveyor | Yes, waterproofing class | Confirm the builder holds the waterproofing class |
| Full bathroom renovation over $10,000 | Often yes, where walls, floors or shower bases change | Yes, bathroom, kitchen and laundry class | Check the builder on the public practitioner search |
| Combined renovation of $10,000 or less | Only if the work needs a permit | Only if a permit is required | Confirm whether a permit applies, then check registration |
The permit question runs alongside registration. Proposed building work needs a building permit unless a specific exemption applies, and the relevant building surveyor signs off when satisfied the work complies with the Building Act 1993 and Building Regulations 2018, as the Victorian Building Authority's technical FAQs explain. Waterproofing sits inside that system. Where the work is not plumbing work under the Plumbing Regulations 2018, it must be done by a competent builder or a person the surveyor approves.
Registration class has to match the actual scope, not the trade name on the van. A domestic builder limited to bathroom, kitchen and laundry renovations covers wet-area renovation where the work does not extend beyond the existing external walls, floor or ceiling. A separate class covers installation, application and repair of waterproofing membranes, including showers, the areas beside baths and spas, laundries and WCs, as the Building and Plumbing Commission explains on domestic building work.
If you are weighing up what you can legally do yourself, check permit rules before DIY repairs rather than assuming small work is exempt. Then match the registration class to the scope, verify the practitioner and any conditions on their registration, and settle permit responsibility before the first skip arrives.
Confirm Your Dimensions Before You Order Tiles
The moment tiles, a shower screen and a vanity are ordered, the plan stops being flexible. Changes after tiling are rework, not design.
Three things to lock first.
- The numbers. Finished room size, the footprint row that fits, and the fixture sizes and mounting heights you're building to.
- The paperwork. The registration class that matches your actual scope, and the permit position, confirmed with the relevant building surveyor.
- The agreement. Any change to the plan settled in writing before work starts, not on site on the first morning.
We work from sketches and plans, with any modification agreed before work commences, and we offer free quotes and 3D drawings so fixture positions, screen locations and the floor waste are resolved on paper rather than in the room. Confirm the registration class against your scope before you sign, whoever you build with.
Have the room measurements and the fixture list ready before you brief anyone. That's the point at which a plan can still change for free.
Melbourne Tiling Services P/L plans bathroom and ensuite renovations from measured, finished dimensions, with sketches, plans and a scope agreed before work starts, plus free quotes and 3D drawings and a bathroom renovation calculator on the site to test scope against budget. The clearance questions in this article are the ones we settle at drawing stage rather than after waterproofing, and we've worked on Melbourne bathrooms since 2003. Send your room measurements and fixture list through Melbourne Tiling Services P/L and we'll tell you which footprint your room can hold.
Write a Comment