
You've chosen the tiles, booked the electrician and measured the ensuite. Then the floor shows a dip beside the shower, the heating mat sits proud of the slab, and the tiler warns that a quick pour could leave ridges, voids or a cracked finish. In a Melbourne bathroom renovation, the leveller is not just a smoothing product. It controls floor height, moisture, heat transfer and the point at which the next trade can safely start.
A successful self levelling compound underfloor heating installation depends on the complete floor system. The substrate, primer, heating element, compound depth, curing conditions and compliance paperwork all need to work together. A fast-setting bag can be useful in a tight programme, but it can also punish poor preparation.
Table of Contents
- When Self Levelling Compound Is the Right Call Over Underfloor Heating
- Electric and Hydronic Systems Compared for Leveller Compatibility
- Preparing the Substrate Before You Pour
- Mixing Ratios and Application Technique
- Drying Times and the Heating-Up Schedule
- Troubleshooting Common Failure Modes
- Melbourne and VIC Compliance for Heated Bathroom Renovations
When Self Levelling Compound Is the Right Call Over Underfloor Heating
A Melbourne ensuite can look straightforward until the heated floor goes wrong. On one failed job, the installer selected a compound designed for shallow correction, then used it to bury a deeper uneven area. The mix was placed too thickly in one zone, too thinly over the heating mat in another, and the edges weren't isolated. The tiles eventually reflected the movement and the heated floor developed uneven warm spots. The expensive part wasn't the bagged compound. It was removing the tile, correcting the build-up and starting the wet-area work again.
The decision checklist is simple, but it has to be applied before ordering materials.
What the compound does
A self-levelling compound is a polymer-modified cementitious pour. Over electric cables, mats or low-build hydronic components, it creates a flat layer that protects the heating element and gives tile adhesive a consistent surface. It also provides a more continuous path for heat than isolated blobs of adhesive or a rough hand-applied screed.
The height advantage matters in Melbourne apartments. A leveller build-up is commonly around 10–40 mm, while a traditional sand-cement screed is commonly around 40–70 mm, as outlined in Australian trade guidance from Melbourne Tiling Services on self-levelling compound for concrete. Saving floor depth can preserve a bathroom threshold, keep a door swinging freely and reduce the chance of creating a step into a second-storey ensuite.
Self-leveller is usually the sensible choice for:
- Electric cable or mat systems: The low-profile element can be encapsulated without the height of a full screed.
- Low-build hydronic retrofits: A suitable compound can cover shallow pipework where the manufacturer permits it.
- Minor slab correction: A concrete floor needing roughly 1–15 mm of correction is a natural candidate for a finishing layer.
When the pour is the wrong tool
Deep hollows beyond the product's permitted thickness need a bulk-fill approach, not a single thin leveller poured into a large depression. Construction joints and structural movement joints must remain active through the floor build-up. A leveller also isn't a substitute for stiffening a flexible timber joist floor.
Site rule: Choose the compound after measuring the floor and heating system together. Don't choose it because the label says “self-levelling”.
The cost-versus-risk calculation is practical. A thinner pour can save height and reduce drying mass, but it leaves less room for error. A deeper liquid screed can solve a badly uneven slab, but it adds weight, height and curing considerations. For broader heating options and layout decisions, the bathroom heating guide 2026 Western is a useful companion resource. The right product is the one that matches the floor build-up, not automatically the fastest product on the shelf.
Electric and Hydronic Systems Compared for Leveller Compatibility
Electric and hydronic floors behave differently before the compound is even mixed. An electric mat or cable system is generally low profile, while hydronic pipework occupies more of the available floor depth and relies on the slab or screed as thermal mass. That difference determines whether a thin levelling coat is realistic.
Electric systems suit bathroom renovations where the floor height is tight. The cable and mesh may occupy roughly 4–6 mm, and a compatible leveller can provide a practical covering layer in the 10–25 mm range. The main installation risk is trapped air around cable loops. A mix that's too stiff won't flow under and around the element, leaving voids that create cold patches and weaken support below the tile.
Hydronic systems are a different proposition. Pipework commonly sits around 16–20 mm, so the installer may need a deeper cap in the 30–50 mm range or a full liquid screed pour, depending on the system design. The floor responds more slowly than electric heating, but the additional mass can hold warmth for longer. A compound must be approved for the pipe system, the intended depth and the final floor finish.
| Attribute | Electric Mat/Cable | Hydronic Pipe |
|---|---|---|
| Heat-up behaviour | Generally faster response | Slower response, greater thermal mass |
| Typical pour depth | About 10–25 mm where approved | About 30–50 mm cap, or a designed liquid screed |
| Leveller type | Compatible cement-based leveller, securely fixed element | Compatible cement-based leveller or liquid screed system |
| Build-up height | Lower profile | Greater depth around pipework |
| Cost band per m² | Must be quoted for the selected system and floor area | Must be quoted for the selected system, pipe layout and floor area |
The table gives planning direction, not a product approval. Read the technical data sheet for the exact compound. Australian product data, including Sika Australia's Sikafloor Level Ultra information summarised for heated-floor planning, identifies suitability for underfloor heating and gives tile and moisture-sensitive flooring windows at 23°C. Those times depend on temperature, humidity, thickness and ventilation.
Most cement-based levellers can be selected for either system when the manufacturer permits it. Anhydrite screeds require particular care under electric cable systems and may need a primer barrier. The heating element must also be fixed firmly. A fluid pour can float loose mesh or displace poorly secured cable, leaving the finished floor with a heating pattern that doesn't match the design.
Preparing the Substrate Before You Pour
Day one starts with the slab, not the bag. I begin by checking movement because a smooth surface won't correct a moving substrate.
Check movement and moisture first
Shrinkage cracks crossing a planned cable run need assessment before the heating is installed. Some require repair or stitching, while construction joints must be carried through the leveller rather than buried. If the joint is concealed, the finished tile layer may crack along the same line.
Moisture comes next. Use a hygrometer or a plastic sheet test to identify residual damp. A reading above 75% RH, or visible dampness, blocks the pour until the moisture source is addressed and the specified moisture-barrier primer is used, as reflected in Australian levelling guidance from Melbourne Tiling Services on self-levelling compound primer.
Then profile the surface. Concrete may need mechanical keying or a compatible primer. Existing tile needs degreasing, removal of contaminants and a bonding primer such as ARDEX P9 or Mapei Eco Prim Grip, provided the selected system approves that substrate and primer combination.
Secure the system before covering it
Electric cable needs a resistance test recorded before pouring. Hydronic pipework needs to be securely clipped and pressure-tested. These tests create a baseline, so a later fault can be separated from a pre-existing installation issue.
Seal the perimeter with a 10 mm compressible foam expansion strip. The strip allows the heated floor to move independently at the walls and helps prevent the compound from escaping beneath skirtings, door frames or temporary dams.
My pre-pour checklist is short:
- Clean surface: Dust, laitance, grease and loose material removed.
- Correct primer: Applied evenly and allowed to reach the specified condition.
- Sealed edges: Perimeter foam and threshold dams fixed.
- Heating secured: Cable or pipe cannot float, fold or move during the pour.
- Tests recorded: Electric resistance or hydronic pressure results placed in the project file.
- Datum confirmed: Finished compound height checked against doors, wastes and shower falls.
If the substrate isn't ready, mixing another bucket only makes the mistake more expensive.
Mixing Ratios and Application Technique
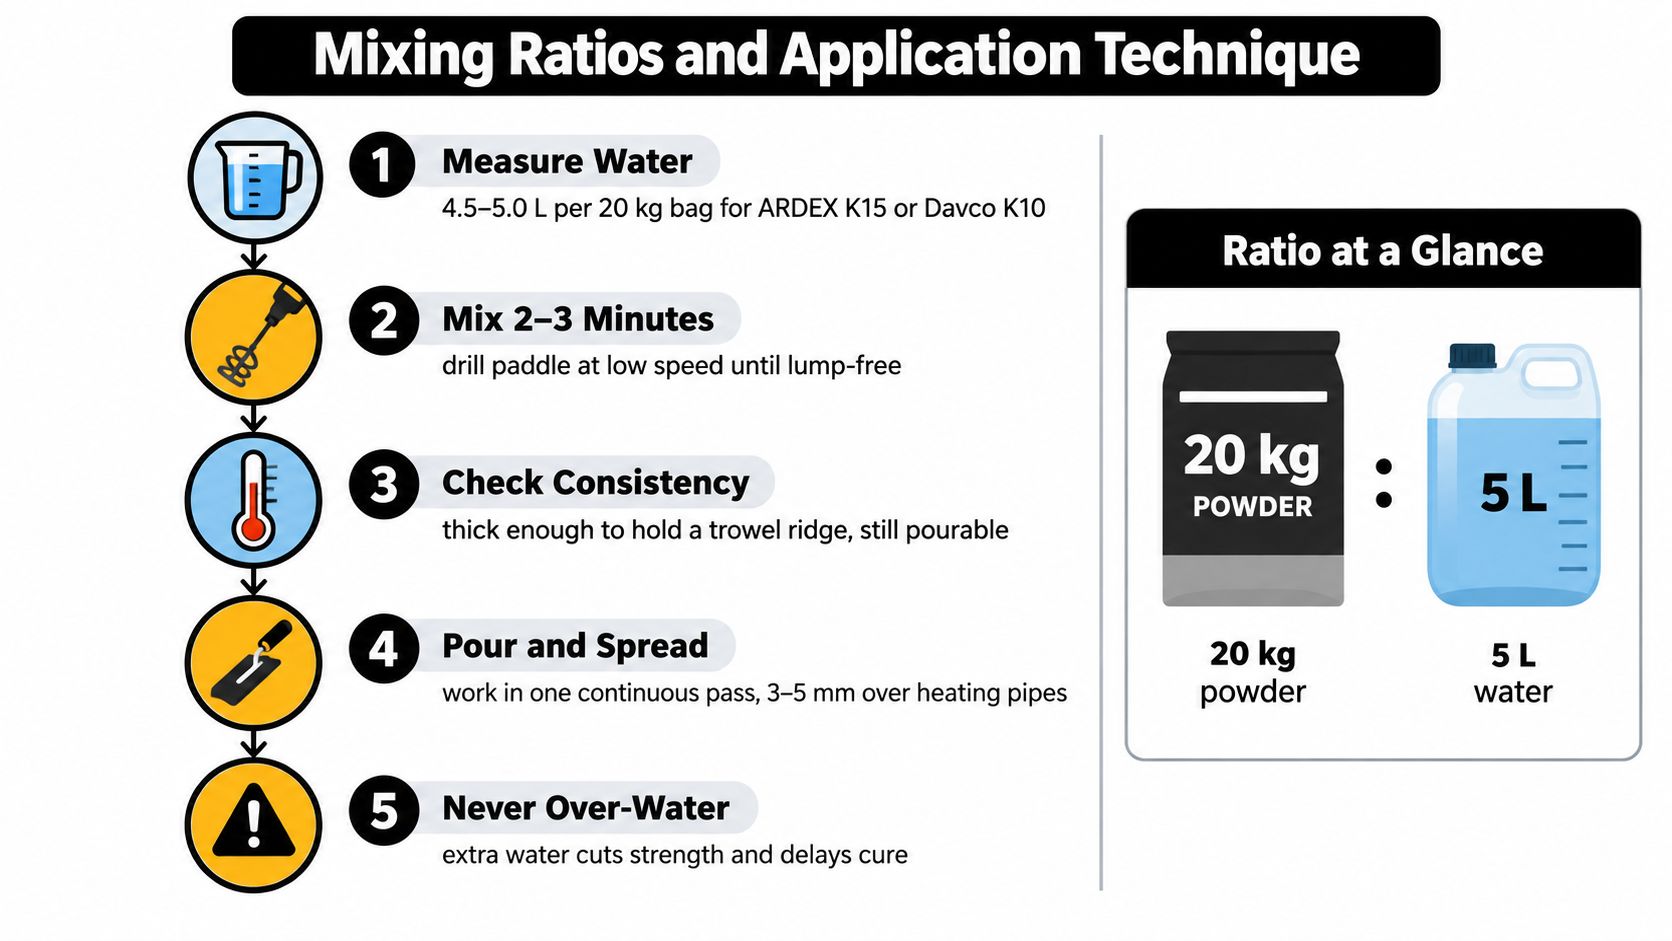
The bag's technical sheet controls the water ratio. For standard products such as ARDEX K15 or Davco K10, a working reference is commonly 4.5–5.0 litres per 20 kg bag, while some rapid-set variants shift closer to 4.0–4.25 litres. Confirm the exact figure for the product on site, because excess water reduces strength, encourages pinholes and changes the flow behaviour.
Mix consistently, then keep moving
Set up two clean buckets and a low-speed drill paddle. Measure water into the first bucket, add powder gradually and mix until lump-free. Allow the batch to slake for around 2 minutes, then remix before pouring. The second bucket keeps production continuous while the first batch is being placed.
Don't add water to rescue a batch that has started to stiffen. That re-tempering weakens the material and produces inconsistent curing across the floor.
For a standard fibre-reinforced leveller approved for the application, the permitted single-pour range may sit around 1–40 mm. Directly over electric cable or mat, the practical covering layer may reduce to around 5–10 mm so the element is properly encapsulated without creating an unnecessary thermal build-up. Product limits always override a general range.
Place depth gauges at 1 m centres and set them to a confirmed datum. Pour from the farthest point towards the exit, maintaining a wet edge. Spread with a gauge rake or smoothing tool, then use a spiked roller while the compound still flows. Roll carefully across the area to release trapped air, but don't drag the cable or disturb the mesh.
Practical rule: A continuous pour gives the compound its best chance to flow as one surface. Stop-start placement creates ridges that later appear as tile lippage.
A rapid-set product changes the crew requirement. Working time can collapse from 30 minutes to 10 minutes, so a 3 x 3 m ensuite needs the substrate, buckets, gauges, dams and tools ready before the first bag is opened. I'd use two people, pre-cut foam strips at thresholds and a clear route from mixing station to pour area. Fast set is valuable only when preparation is faster than the material.
Drying Times and the Heating-Up Schedule
Drying time isn't the same as full commissioning. A floor can be walkable while still containing moisture that must be managed before adhesive, membrane or final tile work proceeds.
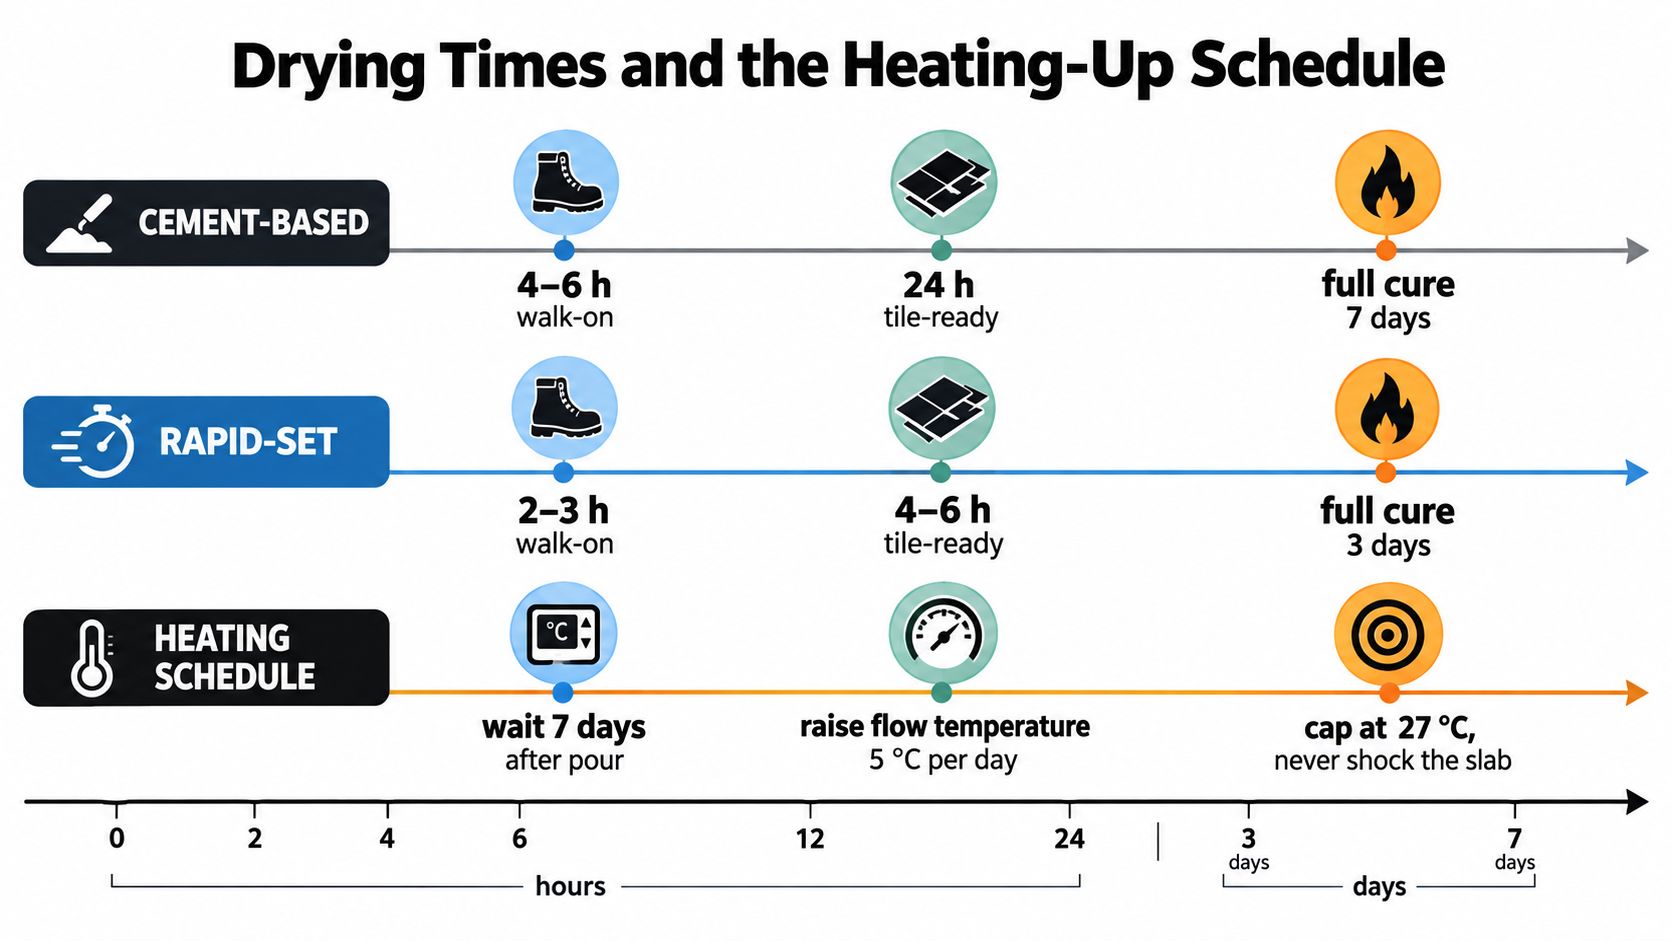
| Leveller family | Typical walk-on window | Tile-ready window |
|---|---|---|
| Standard cement-based | About 4–6 hours | About 24 hours |
| Rapid-set | About 2–3 hours | About 4–6 hours |
| Fibre-reinforced bulk fill | About 12 hours | About 24–48 hours |
These are planning ranges, not guarantees. Australian product guidance notes that some compounds suitable for underfloor heating can accept tiles after around 5–6 hours and moisture-sensitive flooring after around 7–8 hours at 23°C, while other systems take longer. Thickness, temperature, humidity and ventilation can move the window considerably.
Commission the embedded system carefully
For heated substrates, the commissioning sequence matters more than a rushed tile date. ARDEX guidance for Australia requires the heating units to run for a minimum of seven days before floor covering is laid, then be switched off 48 hours before installation and kept off until 48 hours after completion, as set out in this Australian technical bulletin for self-levelling compound over heated floors.
For hydronic systems, raise water temperature by 5°C per day until operating temperature, hold it for 48 hours, then cool at the same rate before tiling. Follow the heating manufacturer's commissioning instructions where they are more specific. Never energise an electric mat early to force drying. Early heat can drive uneven moisture loss and create micro-cracking beneath the tile layer.
Before tiling, confirm the compound is ready with a flooring moisture test. A commonly used benchmark is below 75% RH, or a calcium chloride result below 55 g/m²/24 h, where that test is appropriate to the flooring system. Record the result with the product batch and site conditions rather than relying on a calendar date alone.
Troubleshooting Common Failure Modes
The fastest cure doesn't automatically produce the safest floor. Rapid products shorten the window for mixing, spreading and correcting defects, so they reward organised crews and expose poor preparation quickly.
| Failure Mode | Likely Cause | Fix if Caught Early | Rebuild Scope if Late |
|---|---|---|---|
| Cracking over cable zones | Pour too thin, no fibre where required, or heating started early | Stop heating, assess cracks and follow the compound repair system | Remove affected tiles and unstable compound, then rebuild the heated floor layer |
| Debonding at the perimeter | Foam strip missing or primer skipped, especially on timber | Cut out loose edge, isolate movement and repair with approved materials | Strip the debonded perimeter and retile after correcting the bond |
| Pinholes and air bubbles | Over-watered mix, poor rolling or a re-tempered bucket | Prime or patch the surface as permitted before tiling | Remove weak areas and re-level if voids compromise support |
| Soft spots that powder | Damp or frost-affected bag, or pour over a cold slab below 10°C | Remove soft material locally and test the remaining substrate | Break out the affected pour and replace it under controlled conditions |
| Uneven finish at the shower screen | Depth gauges weren't set to a common datum | Grind high spots or apply a compatible finishing layer | Remove and re-pour where tile lippage or drainage cannot be corrected |
| Cold zones over heating loops | Compound bridged over cable and left voids | Inspect, fill compatible voids if the system allows it | Lift the floor finish and rebuild the encapsulation around the loop |
The diagnosis should follow the pattern of the defect. A cable-shaped crack points towards thickness, movement or premature heating. A cold strip beside a warm strip suggests the compound hasn't fully surrounded the element. A powdery patch isn't a cosmetic flaw. It's a bond failure waiting for tile adhesive.
The quick fix is only valid while the compound is sound. Once it powders, debonds or moves, tile adhesive won't turn it into a stable substrate.
Older Melbourne homes on stumps often need a different solution altogether. A thin leveller finish around 1–10 mm can correct final tolerance, but it isn't bulk structural fill. Where the floor needs a deeper correction, a liquid screed or bulk-fill system in the 10–40 mm range may be more appropriate, subject to the product and floor design. Australian guidance also distinguishes liquid screeds that can bulk-fill substantially uneven slabs from thin levellers intended to finish the tolerance over heating systems. Pouring a standard finishing compound into a deep hollow is how a neat-looking floor becomes a cracked floor.
Melbourne and VIC Compliance for Heated Bathroom Renovations
Technical quality doesn't remove the legal requirements. In Victoria, domestic building work valued above $10,000 must be carried out by a registered builder or tradesperson, and the rule can also apply below that value when the work combines multiple trade skills, according to Consumer Affairs Victoria's guidance on builders and tradespeople. That matters in a bathroom because waterproofing, drainage, electrical heating, floor preparation and tiling rarely sit in one trade package.
A small ensuite can cross the threshold once the heating, leveller, waterproofing and coordination are added together. For work above $10,000, Victoria requires a written major domestic building contract. For work above $16,000, the builder must provide current domestic building insurance before taking a deposit or starting, as explained in Consumer Affairs Victoria's renovation checklist.
Registration and owner-builder decisions
Owner-builders need to obtain a Certificate of Consent from the Building and Plumbing Commission before carrying out domestic building work above $16,000, while work above $10,000 still requires registered builders for the relevant scope. Structural work requires registration and a building permit regardless of price. A floor assembly change, structural alteration or wet-area intervention should be checked with the appropriate Victorian authority before demolition begins.
The electrical element must be installed and connected by a licensed A-grade electrician under AS/NZS 3000, with RCD protection and a clearly identified circuit at the switchboard. Waterproofing must follow the applicable wet-area requirements, including NCC 2022 Volume Two Part 3.8.1 and AS 3740. Confirm the current permit and certification pathway rather than assuming a leveller is only a tiling issue.
| Work Scope | Registration Required | Key Standard / Trigger |
|---|---|---|
| Electric heating connection | Licensed electrical contractor | AS/NZS 3000, RCD protection and circuit identification |
| Bathroom waterproofing | Qualified registered trade or builder for the scope | NCC 2022 Volume Two Part 3.8.1 and AS 3740 |
| Structural floor changes | Registered builder | Building permit required regardless of price |
| Multi-trade renovation above $10,000 | Registered builder or appropriately registered trades | Victorian domestic building rules |
| Domestic building work above $16,000 | Current domestic building insurance before deposit or start | Written contract and insurance requirements |
| Owner-builder work above $16,000 | Certificate of Consent before starting | Building and Plumbing Commission requirements |
The completion documents matter as much as the pour records. Depending on the work, a Form 2 or Form 7 may be required at completion. Keep the compound data sheet, batch details, moisture readings, heating tests, electrical certificate, waterproofing records and permit documents together.
For readers comparing how other markets coordinate premium bathroom work, this example of high-end bathroom fitting Dublin shows why heating, plumbing and finish trades are often planned as one system, even though Victorian compliance must be checked against local rules. Before signing, verify the contractor's current registration and insurance, and use the Melbourne bathroom waterproofing standards guide to understand the wet-area documentation you should expect.
Melbourne Tiling Services P/L coordinates bathroom renovations, substrate preparation, self-levelling, waterproofing, heated-floor tiling and licensed trade work for residential projects across Melbourne. If your ensuite needs a measured floor build-up rather than a rushed pour, visit Melbourne Tiling Services P/L to discuss the layout, compliance pathway and a practical renovation quote.
Recent Comments