

If you're looking at cracked grout, drummy wall tiles, mouldy silicone, or a shower that never quite dries properly, you're probably already asking the right question. Is this a simple re tile, or is the bathroom telling you there's a bigger problem underneath?
In Melbourne homes, re tiling a bathroom often starts as a cosmetic update and ends up exposing loose plasterboard, failed waterproofing, poor falls, or old work that was never done to standard. That's why the smartest projects begin before the first tile comes off. You need to know what you're keeping, what you're replacing, what the rules are in Victoria, and when bathroom renovations move out of DIY territory and into registered builder territory.
Table of Contents
- Planning Your Bathroom Retiling Project
- Removing Old Tiles and Preparing Surfaces
- Mastering Waterproofing and Floor Levelling
- Selecting The Perfect Tiles and Materials
- Tiling Installation and Shower Screen Integration
- Melbourne Costs Timelines and Builder Rules
Planning Your Bathroom Retiling Project
A good bathroom job is won in the planning. Once demolition starts, changes get expensive fast.
Work out whether it is a re tile or a full renovation
Start with the room as it is now. If the layout stays the same, the plumbing points stay put, and the fixtures are still serviceable, you may be looking at a straight re tile. If the shower leaks, the floor feels uneven, the vanity is being replaced, or wall linings are damaged, you're closer to a full bathroom renovation.
Look for these signs before you commit:
- Loose or hollow tiles: These often point to poor bonding or movement underneath.
- Swollen skirtings or door jambs: Water may already be escaping the wet area.
- Out of level floors: A new tile finish won't fix bad falls by itself.
- Old shower recesses: Many older Melbourne bathrooms need more than fresh tiles.
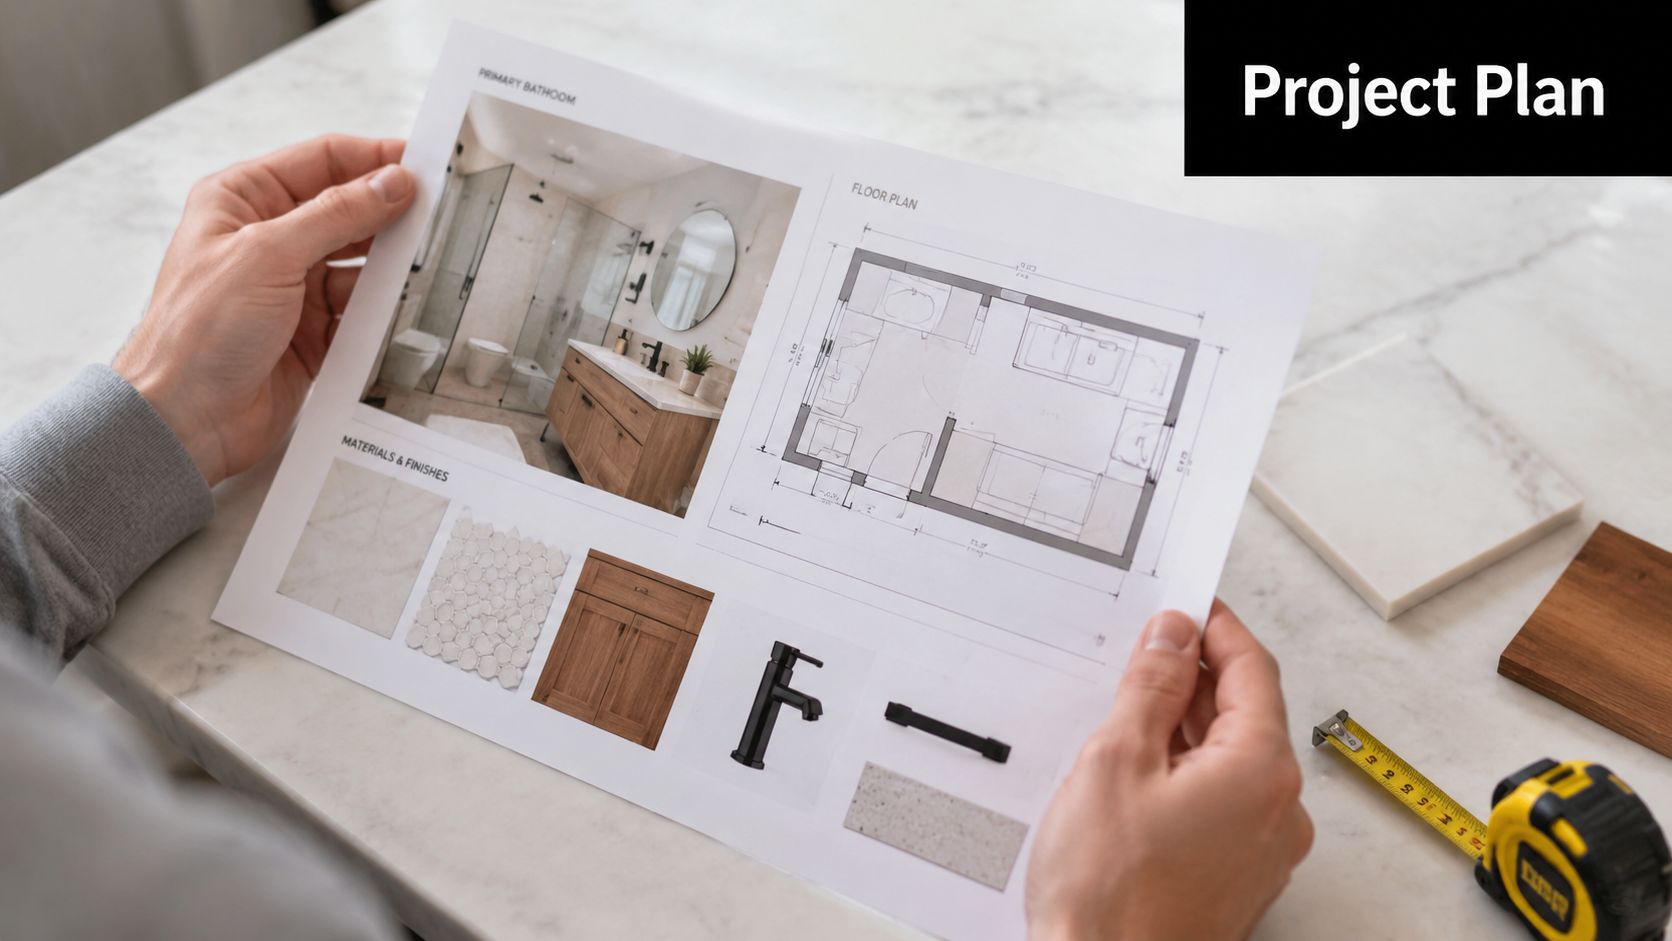
If you're comparing quotes, ask each contractor the same direct question. Are they pricing for tile replacement only, or have they allowed for substrate repair, screeding, waterproofing, and refitting the room properly? A cheap quote often assumes the old surface underneath is perfect. It rarely is.
Practical rule: If you don't know what condition the substrate is in, you don't know the real scope yet.
Decide early who is doing the work
Homeowners can handle very minor cosmetic jobs, but bathroom re tiling becomes specialised the moment waterproofing, floor correction, or compliance enters the picture. Wet areas don't forgive shortcuts.
Victoria also has builder rules that matter. In Victoria, a registered builder is required for domestic building contracts exceeding $10,000. If the value of the work organised by the builder exceeds $16,000, that registered builder must also provide domestic building insurance for the project to protect the homeowner, as noted in this Victorian registered builder and insurance threshold reference.
That isn't paperwork for its own sake. It affects who can legally manage the work, whether insurance applies, and whether the job stands up if something fails later.
A practical planning checklist looks like this:
- Lock the scope first. Re tile only, or complete bathroom renovation.
- Confirm who coordinates trades. Tiler alone, or registered builder managing plumbers, electricians and waterproofers.
- Check the contract value. Victoria's builder thresholds are important.
- Allow for hidden repairs. Older bathrooms often need more prep than owners expect.
If you want one contractor to manage demolition, substrate repair, waterproofing, tiling and fit-off, a registered builder setup is usually the cleaner path. It keeps responsibility clear, which matters when trades overlap.
Removing Old Tiles and Preparing Surfaces
The noisiest part of the job is demolition. The most important part is what you find after it.
Demolition tells you what the bathroom has been hiding
Old tiles come off with rotary hammers, floor scrapers, pry bars and patience. Wall tiles might release cleanly, or they might bring half the plasterboard with them. Floor tiles might reveal a solid bed, or cracked screed, patchwork levelling compounds, and old adhesive ridges that need grinding back.
What you want after demolition is simple. A clean, stable, dry surface.
That means checking:
- Wall linings for softness, swelling, mould, and broken paper faces
- Concrete or screed for cracks, drummy spots, and uneven levels
- Corners and junctions for past leak staining
- Shower bases for movement and poor falls to waste
A bathroom doesn't fail because one tile looked old. It fails because the layer under the tile couldn't support the system.
When tiling over tiles goes wrong
Tiling over existing tiles is the shortcut owners ask about most. Sometimes people want to save demolition costs. Sometimes they want to avoid dust. Sometimes they've been told it's easier.
It can be done in the right circumstances, but only with the right preparation and the right adhesive system. The failure point is usually bonding.
A common shortcut is tiling over existing tiles, but 40% of DIY tiling failures in Victoria result from improper adhesive bonding over non-porous tiles. A 2025 Master Builders Victoria survey found that the important step of priming the original tiles was skipped in 65% of failed renovations, according to this Victorian bathroom tiling guidance on existing tiles and priming.
That lines up with what turns up on site. If the original tiles are glossy, contaminated, loose, or sitting on a poor wall, tiling over them just traps the problem underneath.
If the old tile bed is unreliable, putting new tiles on top doesn't solve anything. It just delays the failure.
There's also a practical issue owners rarely think about. When someone eventually removes that second layer, they may tear the wall apart with it.
A quick decision guide
| Existing condition | Better move |
|---|---|
| Sound substrate, firm tiles, correct preparation possible | Assess carefully before over-tiling |
| Loose tiles, drummy walls, water damage, poor falls | Full removal |
| Unknown waterproofing history | Full removal |
| DIY plan with ready-mixed adhesive | Don't do it |
For most bathroom renovations, especially showers, stripping back and rebuilding properly is the safer long-term decision.
Mastering Waterproofing and Floor Levelling
This is the stage that protects the structure, not just the finish. A bathroom can look immaculate and still be built to fail if the waterproofing and substrate work are poor.
Waterproofing is the part that protects the house
A re tiling bathroom job in a wet area has to follow AS 3740. That standard isn't optional. It governs how wet areas are waterproofed so water doesn't migrate into framing, adjacent rooms, or lower levels.
Re-tiling a bathroom in Australia requires strict adherence to AS 3740 for waterproofing; failures to meet this standard result in a 30–40% recurrence rate of water leaks within 3 years, and 95% of long-term failures stem from inadequate substrate preparation, making pre-installation verification essential, based on this Australian bathroom waterproofing and substrate guidance.
That's why professional wet area prep matters more than the tile brand, grout colour, or feature niche. If the substrate isn't right, the waterproofing won't perform as intended. If the waterproofing fails, the tile finish won't save the room.
For a practical breakdown of compliant wet area prep, this guide on how to waterproof a shower is useful if you want to understand the sequence before work begins.
Falls levels and membrane details matter
The floor has to drain. That sounds obvious, but plenty of bathrooms hold water because the screed was rushed or the set-out didn't account for the waste location.
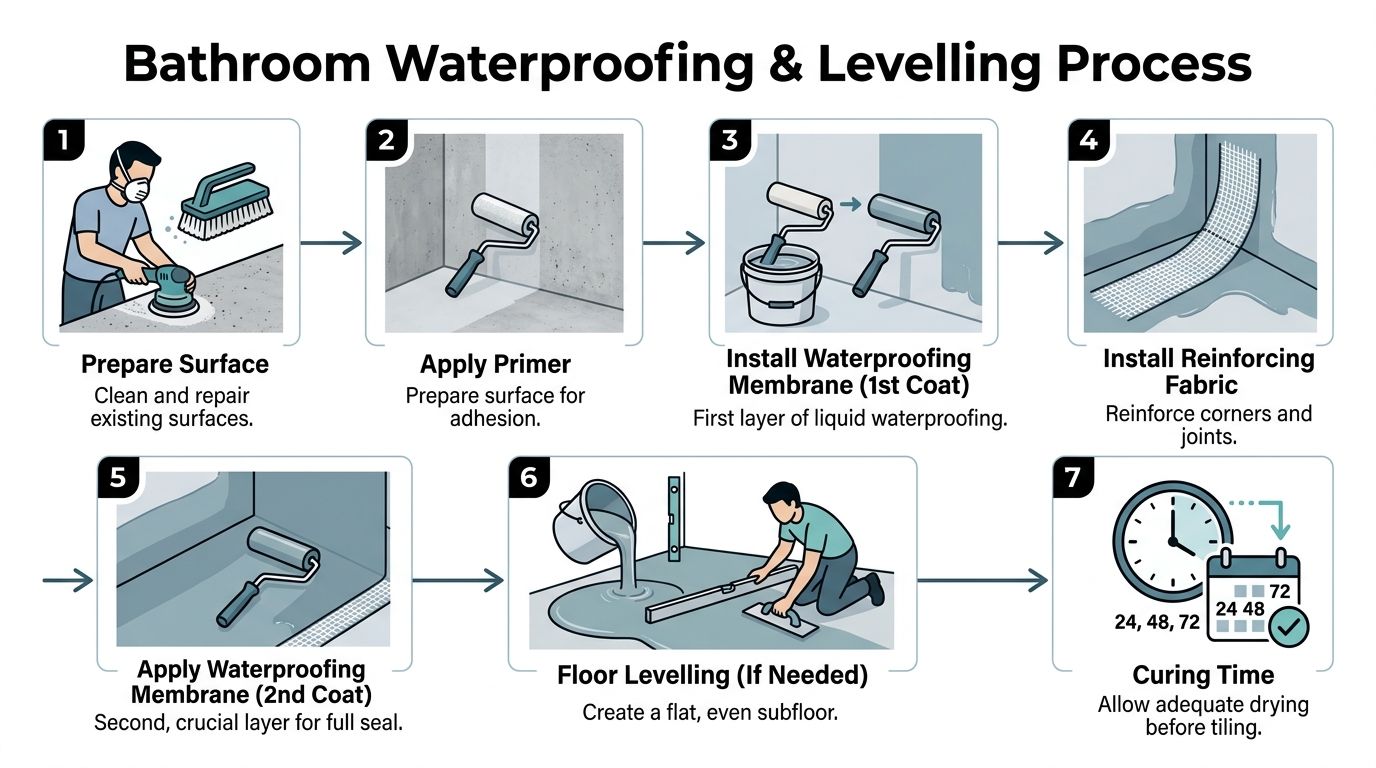
In practice, proper prep usually includes:
- Surface repair and cleaning: Dust, soap residue and weak patches must be removed before primers or membranes go on.
- Priming: The membrane system needs the correct base to bond to.
- Bond breakers and reinforcing fabric: These are used at movement points and junctions.
- Screeding or self-levelling where required: The floor has to support the tile and create the right falls.
- Membrane application to the required areas: Done in the specified sequence and allowed to cure.
Later in the process, many professionals also carry out a flood test before final fit-off in shower areas. That's a sensible way to confirm the system is holding before screens, trims and fixtures lock everything in.
A visual walkthrough helps if you haven't seen the sequence before.
When owners try to save money here, they usually spend more later. Waterproofing is one of the few parts of bathroom renovations where there's no such thing as a harmless shortcut.
Selecting The Perfect Tiles and Materials
Tile selection affects how the bathroom wears, how easy it is to clean, and how well the finished room suits the way your household uses it. In Melbourne bathrooms, I start with slip resistance, tile porosity, maintenance, and the size of the room before I worry about colour.
Choose tiles for the room not just the look
A tile that looks great in a showroom can be the wrong product for a wet floor or a heavily used family bathroom. Gloss wall tiles can work well on vertical surfaces. They are often a poor choice underfoot in a shower. Natural stone can look excellent, but owners need to accept sealing, product-specific cleaners, and more upkeep over time.
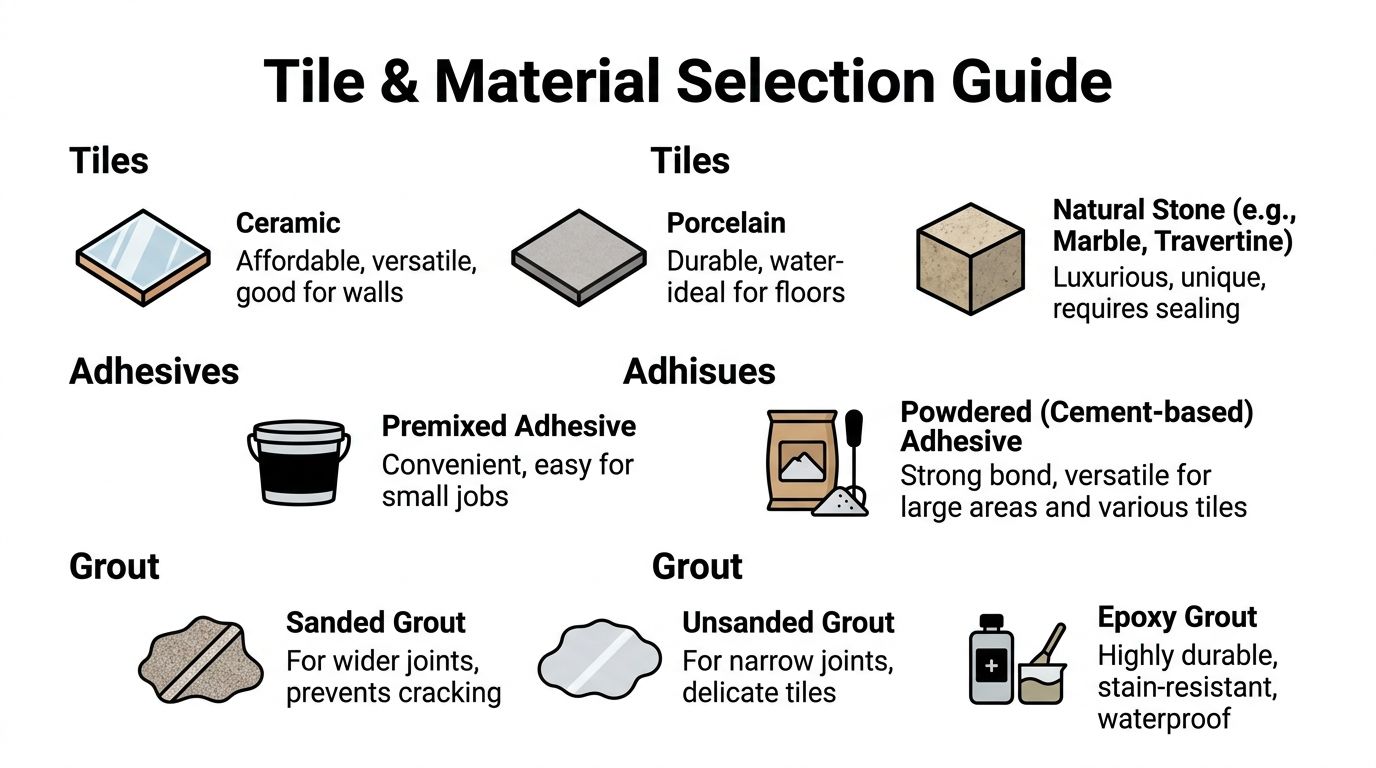
Here is the practical difference between the common options:
| Material | Where it works well | Watch for |
|---|---|---|
| Ceramic | Bathroom walls, lighter-duty areas | Chips more easily than porcelain in harder-wearing spaces |
| Porcelain | Floors, showers, family bathrooms | Dense body. Harder cutting and drilling, especially around fittings |
| Natural stone | Premium feature walls and selected floors | Sealing, ongoing maintenance, and batch variation |
| Large-format panels such as Kerlite | Contemporary walls and floors with fewer joints | Handling, substrate flatness, and installer experience matter a lot |
Porcelain is often the safe choice for Melbourne bathrooms because it is dense, hard-wearing, and available in finishes that suit wet areas. If you are comparing options for floors or shower walls, this guide to porcelain tiles for bathroom use gives a useful overview.
Large-format tiles reduce grout joints, which many owners prefer for cleaning and appearance. They also make any substrate issue more obvious. A bowed wall, an uneven floor, or a poor set-out will show up faster with a 600 x 1200 tile than with a smaller format tile. Smaller tiles still have a place, especially on shower floors where they help form falls to the waste.
Good tile selection balances appearance, slip resistance, maintenance, and the condition of the room you are tiling.
Adhesive and grout choices affect the result
The tile is only one part of the system. Adhesive, grout, trims, sealants, and movement treatment all need to suit the tile type and the bathroom conditions.
For dense porcelain and most wet-area work, ready-mixed adhesive is usually the wrong product. A cement-based adhesive rated for the tile and substrate is the standard approach. Large-format tiles may also need a higher-performance adhesive and careful trowelling to get proper coverage. If coverage is poor, tiles can sound hollow, crack under load, or fail around corners and fittings.
Grout choice matters as well. Light grout looks sharp on day one, but it shows staining faster in family bathrooms. Very narrow joints can look clean, but they leave less room to manage tile size variation. Stone may need a compatible grout and pre-sealing. In shower areas, changes in plane should be treated with the correct flexible sealant rather than hard grout.
A practical selection check looks like this:
- For bathroom floors: Choose a tile finish with suitable grip for wet conditions.
- For shower floors: Smaller formats often work better because they follow the falls more cleanly.
- For porcelain: Use an adhesive rated for dense, low-porosity tiles.
- For stone: Confirm sealing, cleaning, and maintenance before ordering.
- For large-format tiles: Make sure the walls and floors are flat enough to carry them properly.
In Melbourne, product selection also needs to line up with the scope of the job. If the re-tiling forms part of broader bathroom building work, the registered builder and waterproofer should be selecting systems that work together and can be documented properly for compliance and warranty purposes. That part gets missed in generic advice, but it matters once a bathroom moves beyond a simple tile replacement.
Tiling Installation and Shower Screen Integration
This is the stage people notice. Straight lines, balanced cuts, neat mitres and crisp silicone all matter. What most owners don't see is how much of that finish depends on layout decisions made before the first tile is bedded.
Set the layout before the adhesive is mixed
Good tilers don't start in a random corner and hope the room works out. They measure the walls, check the floor, locate the centre lines, review the focal points, and work out where the cuts will land around the niche, waste, vanity and door.
A clean set-out usually aims for:
- Balanced cuts at edges, not a full tile one side and a sliver on the other.
- Level starting lines on walls, especially when floors aren't perfectly true.
- Controlled joint alignment through corners and around fixtures.
- Full adhesive coverage, not isolated blobs behind the tile.
Spot fixing is where many cracked tiles start. Tiles need support across the back, especially on floors and in showers where movement and moisture are constant factors. If a tile sounds hollow, there's often a reason.
Grouting and sealing are also part of the finish, not an afterthought. Joint widths need to suit the tile. Changes of plane should be treated correctly. Silicone work around trays, walls, screens and fixtures needs to be neat and properly bonded.
A bathroom can have expensive tiles and still look average if the set-out is poor.
Shower screen planning starts before final fit off
Frameless shower screens need more planning than people think. The tile lines, wall plumb, hob dimensions, falls, and fixing points all affect whether the final screen sits properly and seals well.
That means the screen installer shouldn't be the first person thinking about the screen. The tiler and builder should already have allowed for:
- Straight and plumb walls
- Enough fixing support where hardware lands
- Clean falls back to waste
- Correct clearances around doors and fittings
If you're comparing enclosure options, this guide to frameless shower screen installation gives a clear picture of what needs to be allowed for before measure and install.
Before handover, a careful check matters. Doors should swing properly, seals should sit cleanly, wastes should clear, and water should remain where it's meant to stay. That's the difference between a bathroom that photographs well and one that works every day.
Melbourne Costs Timelines and Builder Rules
A lot of Melbourne homeowners start with a simple plan. Keep the layout, swap the tiles, freshen the bathroom, done. Then the old tiles come off, the screed is out, the wall sheeting is tired, and the job stops being a basic re tile.
What re tiling and bathroom renovations typically cost
The first step is separating a tile replacement job from a bathroom renovation. They price very differently, and consequently, many quote comparisons are inaccurate.
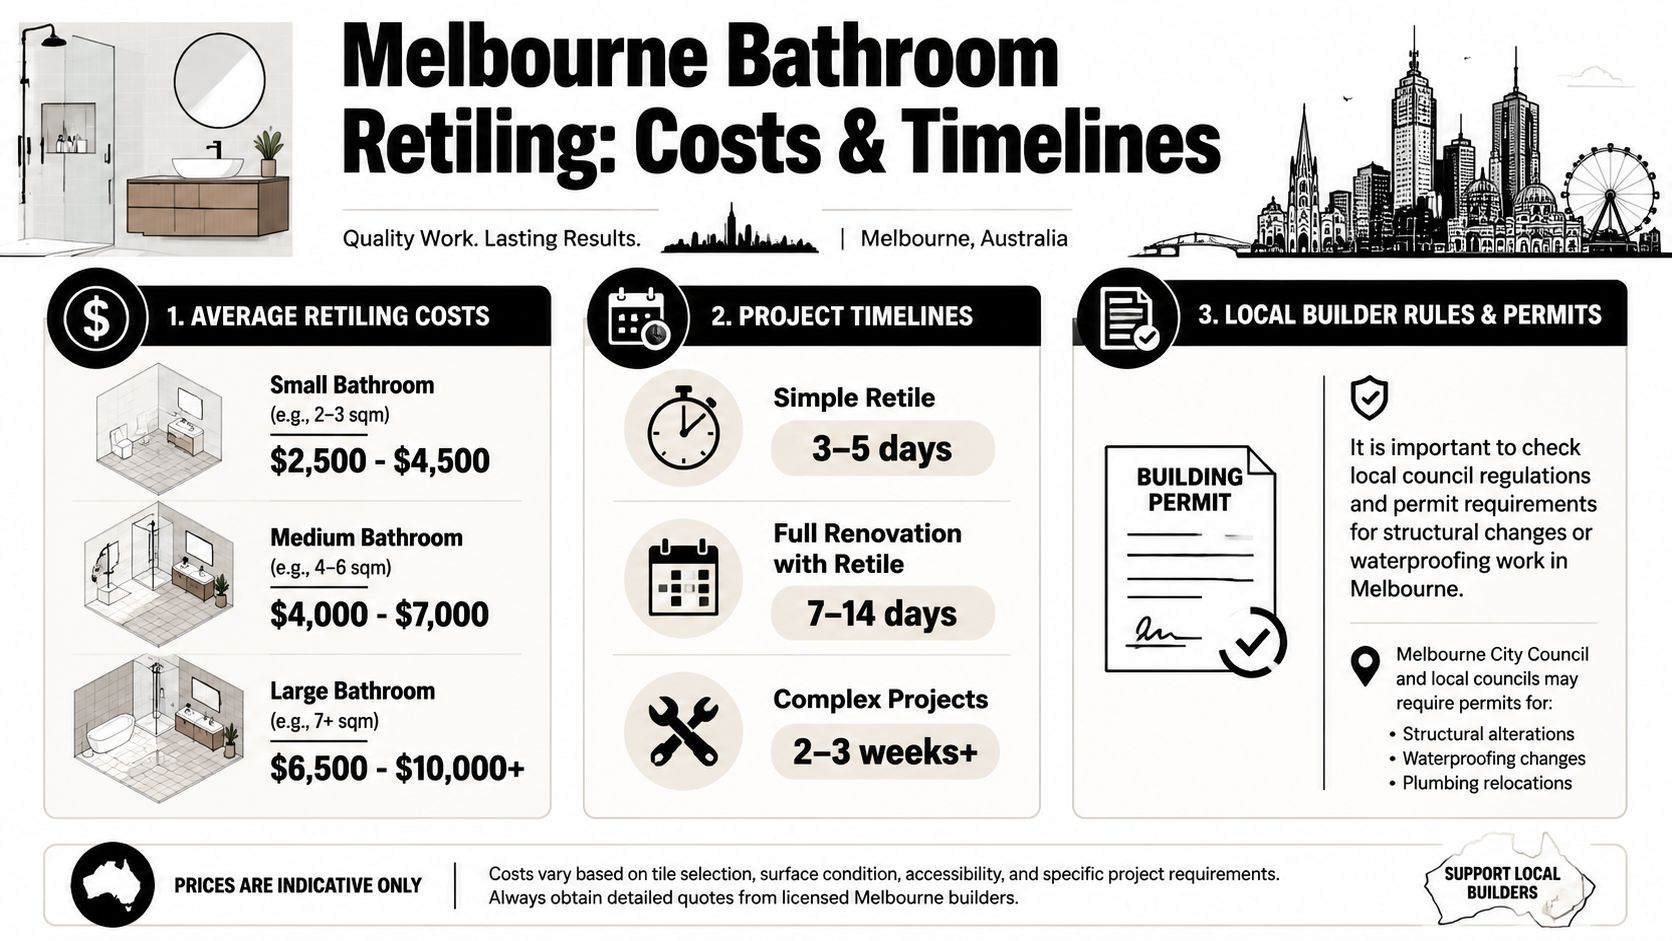
The average cost to retile a bathroom in Melbourne ranges from $50 to $230 per square meter, with labour from $45-$85 per hour. A complete small bathroom renovation typically costs $5,000–$15,000, according to this Australian bathroom tiling and renovation cost guide.
Once the scope includes new waterproofing, plumbing changes, electrical work, new fixtures, or shower screen replacement, the budget shifts out of "retile only" territory. A full bathroom renovation budget also needs room for labour, fittings, materials, and a contingency. Analysts cited in this Australian bathroom renovation budget breakdown found that full bathroom renovation costs in Australia commonly sit well above a basic retile, with a large share of the spend going to trades and installation.
In practice, Melbourne jobs usually fall into three groups:
- Retile only: Demolition, substrate prep, waterproofing, adhesives, grout, tiling labour, and waste removal.
- Bathroom update: Includes tile work plus new tapware, vanity, screen, toilet, and trade fit-off.
- Full renovation: Includes layout changes, plumbing relocation, electrical changes, new linings, and sometimes structural work.
Tile selection changes the budget fast. So does access. A ground-floor bathroom with standard porcelain tiles is a different job from a tight upstairs ensuite with large-format tiles, a frameless screen, and out-of-plumb walls that need correction before setting out starts.
Timelines permits and registered builder rules in Victoria
Timeframes depend on what sits behind the finished tile, not just the size of the room. A straightforward retile can move quickly if the structure is sound and the substrate is ready to go. If demolition exposes water damage, loose sheeting, failed screeds, or framing issues, the timeline extends because those items need to be fixed properly before waterproofing starts.
Industry guidance in this Australian bathroom renovation timeline guide aligns with what happens on site. Cosmetic work is quicker. Structural changes, custom finishes, and multi-trade coordination take longer.
Victoria also has rules that generic renovation articles often skim past. If the bathroom work includes structural changes, such as altering loadbearing walls, changing window openings, or extending the footprint, a building permit is required. That is not a paperwork detail. It affects who can do the work, how it is documented, and whether the project is compliant at handover.
Builder registration matters too. In Victoria, the Building Practitioner's Board mandates that all building work valued at $5,000 or more must be carried out by a registered building practitioner, explicitly covering domestic work including kitchen, bathroom, and laundry renovations, according to this state-by-state bathroom water and renovation regulation guide.
For a homeowner, the practical points are straightforward:
- A like-for-like retile can turn into regulated building work once the room is opened up.
- Permit requirements depend on scope, especially where structure is involved.
- Registered builders and properly qualified waterproofing trades are part of risk control, not just administration.
- Quotes should allow for rectification work, not just tile laying.
- Busy periods can push labour rates higher and slow scheduling.
If you are comparing Melbourne quotes, check what is included. Ask whether demolition, substrate repairs, waterproofing, waste removal, silicone, grout, trims, and final fit-off allowances are in the price. Melbourne Tiling Services P/L can inspect the bathroom, confirm whether the work is a straightforward retile or part of a larger renovation, and price it under a registered builder framework where that is required.
Write a Comment