
You're probably standing in a bathroom with the tile lifter booked, a slab that's a bit rougher than you hoped, and a trade sequence that leaves no room for guesswork. That's the moment where self levelling compound primer stops being a shopping-list item and becomes the thing that decides whether the floor holds together under tile, membrane, and daily use.
On Melbourne jobs, I treat primer as a substrate equaliser, not a generic pre-coat. It's the layer that deals with suction, locks down dust, and gives a fast-setting pour something reliable to bite into, especially on older slabs, damp-prone balcony substrates, and renovated bathrooms where the demolition team left more dust than anyone wanted.
Table of Contents
- Why Primer Decides Whether Your Bathroom Floor Holds Up
- Reading the Substrate Before You Open the Primer Tin
- Matching Primer Type to Substrate and Project
- Application Method and the Pour Sequence That Follows
- Drying Times, Cure Windows and Coverage Rates That Matter
- Common Mistakes and Failure Modes on Melbourne Jobs
- Safety, Wet-Area Compliance and Your Renovation Checklist
Why Primer Decides Whether Your Bathroom Floor Holds Up
A common Melbourne ensuite scenario looks like this. The old bathroom is stripped back, the concrete slab shows its age, the waterproofing crew is lined up, and the tiler wants the floor ready before next week. That's when a Registered Builder has to decide whether the slab is ready for self levelling compound primer, because once the leveller goes down, there's no friendly way to fix a weak bond at the interface.
What primer actually fixes
Primer doesn't level the floor. It deals with the part most DIY guides gloss over, the substrate behaviour that makes a fast pour fail. On porous concrete, primer controls suction and stops the slab from pulling moisture out of the leveller too quickly, which helps reduce bond problems and surface defects. Manufacturer guidance commonly says a primed surface can receive self-levelling compound as soon as it's dry, often within 1 hour under good drying conditions, while very porous floors may need a second coat and a 1:2 dilution with clean water on porous substrates (Bostik primer guidance).
Why the call happens before the bucket is mixed
Most self-levelling compounds only make sense when the floor varies by more than 3 mm over a 1.8 m span, and many products have a working window of just 15–20 minutes after mixing (floor tolerances and pot life). That's a narrow margin. If the primer isn't right, the pour can start breaking down at the interface before the crew even finishes the room.
Practical rule: if the substrate is dusty, thirsty, or inconsistent, primer is doing structural work for the finish system, not cosmetic work for the trade bag.
Melbourne makes this more unforgiving because older slabs often behave differently from room to room, humidity can shift quickly, and balcony substrates bring weather exposure into a job that already has tight sequencing. Primer choice is a substrate decision made before the leveller is mixed, not a product decision made at the counter.
Reading the Substrate Before You Open the Primer Tin
The right primer starts with reading the floor properly. If the slab is still holding moisture, has a weak surface skin, or feels sound in one corner and chalky in another, the primer choice changes. On bathroom renovations, that inspection is usually quicker than people expect, but it has to be deliberate.
The inspection sequence that matters
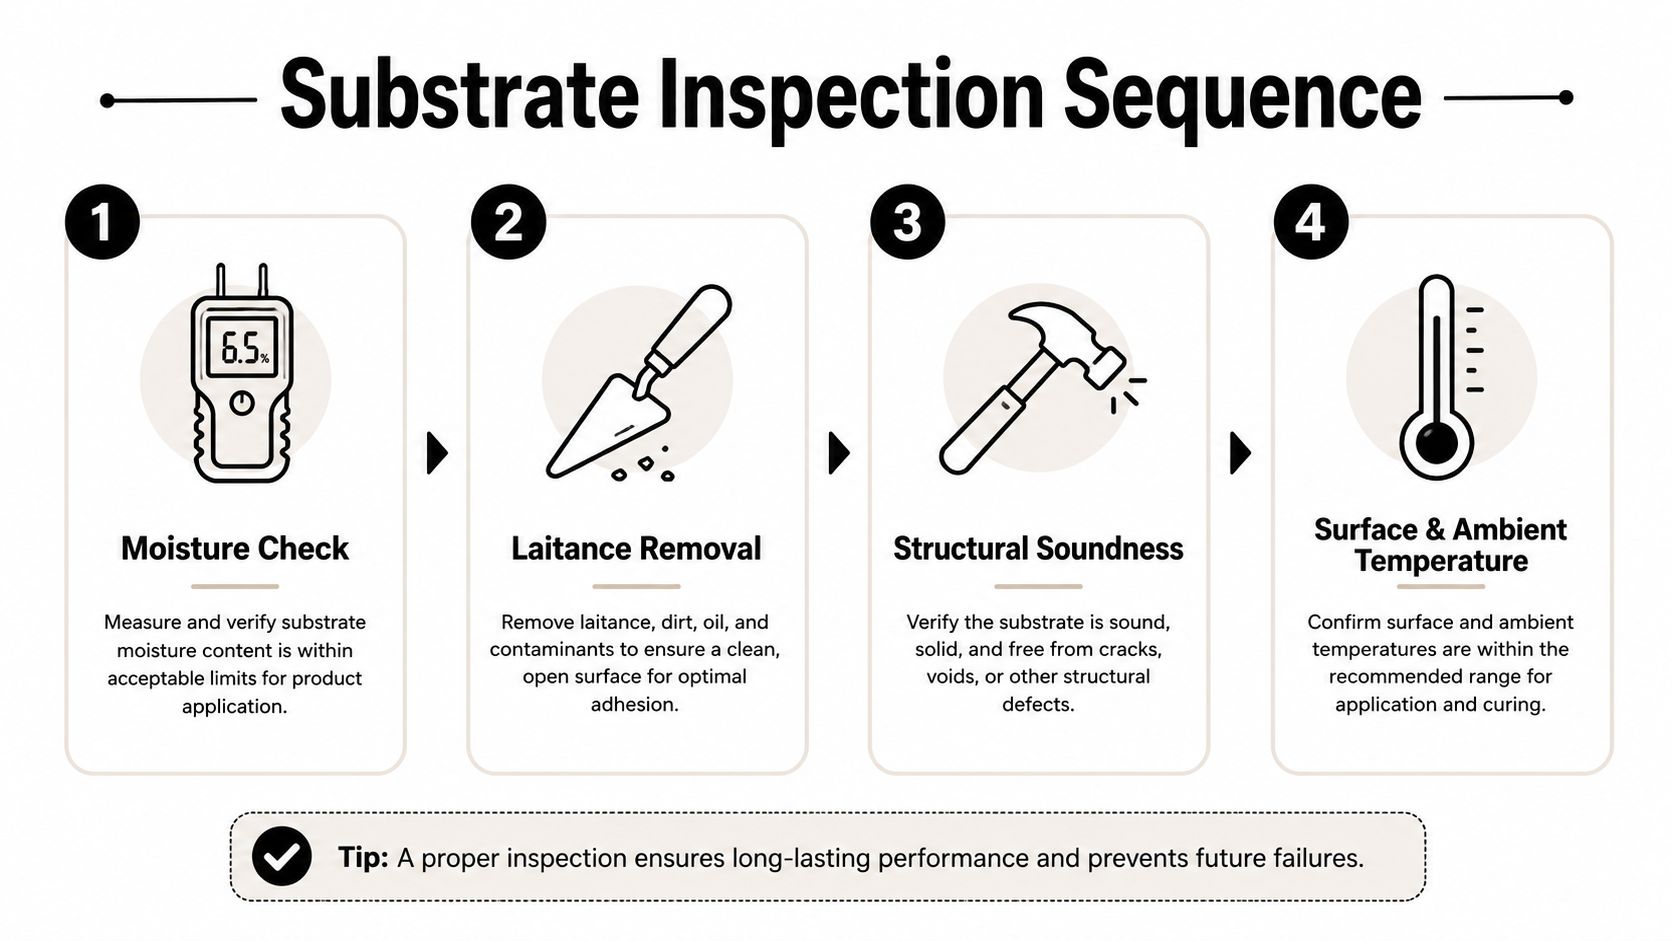
Start with a moisture check, then remove laitance, dust and curing residues mechanically, then confirm the slab is dry and sound. After that, check both the floor temperature and the ambient range. Manufacturer guidance for a quality workflow puts primer application after the floor temperature is at least 4°C and the ambient temperature is within 10–32°C, with the surface protected from weather and direct sun for at least 72 hours after application (LATICRETE substrate preparation and primer guide).
What good looks like before priming
A ready substrate feels clean, firm and even in its absorbency. It doesn't shed dust when brushed, and it doesn't have patchy shiny areas from lingering residues. If a slab still has weak surface contamination, the primer can't compensate for it, because the bond coat ends up sticking to dust instead of concrete.
Older Melbourne bathrooms and balconies deserve extra caution here. Demolition leaves fine dust in corners, and balcony slabs often carry weather exposure that makes the moisture picture harder to read. If the floor hasn't passed the soundness check, primer selection is premature.
For screeding and floor build-up sequencing, the installation logic in this screeding reference sits neatly alongside this prep stage, because the substrate has to be read before any leveller or screed goes down.
Matching Primer Type to Substrate and Project
Primer choice gets easier once you stop treating every slab as if it behaves the same. On Melbourne renovation sites, I usually separate the job into porous concrete, standard suction cementitious substrates, and problem or non-porous surfaces. Each one needs a different approach, because the primer is there to equalise the substrate, not to act as a cure for a poor floor.
The three primer families that actually matter
For porous concrete, water-based acrylic primers are commonly used because they slow suction and help steady the surface before the pour. On normal suction substrates, dilution is often part of the system, with one manufacturer guide specifying a 1:3 primer-to-water mix. For highly porous floors, the same guidance allows 1:2 dilution and sometimes a second coat, while non-porous floors may need undiluted use or a specialist bond coat, depending on the product system.
Melbourne jobs often expose the weak point between primer and pour. Older slabs can be dusty, patchy, or uneven in absorbency, and balcony substrates may hold weather exposure that changes how the primer sits and dries. If the surface still drinks product in some areas and rejects it in others, the leveller will follow that inconsistency.
A simple decision matrix
| Primer Selection by Substrate Type | Primer type | Dilution | Second coat or DPM |
|---|---|---|---|
| Porous concrete | Acrylic water-based primer | 1:2 or 1:3 depending on suction | Second coat may be needed on very porous floors |
| Normal suction cementitious floor | Standard primer | 1:3 per manufacturer guide | Usually no, if coverage is even |
| Non-porous or problem surface | Specialist bond coat or compatible primer | Undiluted if the system allows it | May need a different system entirely |
| Damp slab over moisture threshold | Primer plus liquid damp-proof membrane | Follow system spec | DPM before leveller if RH is too high |
The trade-off is simple. A lighter mix can suit a thirsty slab, but it also needs even application and the right dry-back before the pour. A heavier mix or undiluted primer can give better hold on difficult surfaces, but only if the product system is designed for it. On a busy bathroom reno, that choice usually comes down to whether the slab is behaving like concrete or like a patchwork of different substrates.
When primer is not enough
Primer improves bond, but it does not deal with trapped moisture. Independent guidance says that if relative humidity exceeds 75% RH, a liquid damp-proof membrane is needed before the levelling compound, not just primer. That matters on old Melbourne slabs, bathrooms, and balconies where moisture conditions can change the whole system choice.
A water-drop test tells you a lot in practice. If the slab drinks it instantly, you're dealing with high suction. If it beads or sits oddly, treat the surface as a problem substrate until proven otherwise.
The floor still has to fit the wet-area requirements that sit behind bathroom work. That means the build-up cannot compromise the waterproof layer beneath the tiles, and the primer choice has to suit the rest of the system, not just the slab in front of you. For a related substrate example, see self levelling compound for concrete.
Application Method and the Pour Sequence That Follows
A good primer job looks boring. That's exactly what you want. It should cover evenly, avoid puddles, and leave no dry patches, because the leveller can't recover from missed coverage once the pour starts.
How to apply it without creating weak spots
Use a roller for the open field, a brush for edges and corners, and a lambswool applicator when the room is large enough that speed matters. Work back towards the exit so you don't box yourself in. Don't let primer pool in low spots, because excess liquid gives you an uneven film and can create soft or cloudy areas under the compound.
The timing matters as much as the tool. One Australian product sheet shows systems designed for immediate placement after mixing and spreading, with a working time of about 10 minutes and a maximum single-lift thickness of up to 50 mm (Australian self-level compound product sheet). That short window is why primer readiness has to be sorted before the compound is mixed, not while the bucket is already going off.
The pour sequence that follows the primer
Once the primer is dry, mix multiple buckets and pour in continuous ribbons so the wet edge stays alive across the room. Intermittent pours create cold joints, hollow spots and poor corner fill. That sequence matters more on larger renovations than on a tiny powder room, because the moment you stop and restart, the compound starts telling you where the weak lines are.
Sequencing beats speed. A neat primer coat that's fully dry is worth more than a rushed one that still feels tacky at the edges.
I've seen crews lose more time by under-preparing the primer stage than by spending an extra few minutes on coverage. For a coordinated Melbourne renovation, this self-levelling reference fits naturally with the pour stage, because the bond coat and the leveller have to be planned as one system.
Drying Times, Cure Windows and Coverage Rates That Matter
Primer timing is one of those jobs that looks simple until the clock starts. If the film is dry, the leveller can go down. If it is still open or patchy, the pour risks failure at the bond line, and that risk is higher on Melbourne slabs that pull moisture unevenly or on balcony substrates that never seem to behave the same way twice. A Registered Builder keeps an eye on that handover point because the gap between primer and pour is where a lot of floors are won or lost.
The timing block that gets checked on site
The surface has to be dry enough for the next coat to bite properly, but the actual waiting time depends on the product and the conditions on the day. On a clean, prepared floor, some primers are ready for self-levelling compound once they have dried, and that can be around 1 hour under good drying conditions. In the levelling sequence itself, the compound may be walkable in 2–4 hours and can often be ready for further work within 24 hours, depending on the system (floor timing reference).
That window matters more than the tin label. Older Melbourne slabs, damp winter air and enclosed bathrooms can stretch drying, while a sunny room with good airflow can tighten it up. The right call is to check the film, not guess from the calendar.
Coverage is a planning issue, not just a product spec
Coverage shifts with how thirsty the substrate is. Porous floors pull in more primer, tighter surfaces need less, and that difference decides whether one tub covers the room or whether the job stalls halfway through a bathroom or open-plan area. Primer is doing two jobs at once here. It is binding the surface, and it is setting the pace for the pour that follows.
A missed allowance causes trouble fast. If the primer is spread too thin, the floor can show dry patches, weak bond, or uneven suction when the leveller lands. If too much product is ordered with no plan for substrate absorbency, you still lose time because the crew has to stop, measure again, and work out whether the surface is ready to receive the compound.
Why missed spots matter more than brand loyalty
The failures do not usually start with the brand name on the bucket. They start with a patch that was missed, a corner that dried differently, or a section that looked ready but was not.
Once the leveller is moving, there is very little room to stop, fix the primer, and restart without creating another problem. That is why missed coverage shows up later as pinholing, edge build-up, poor flow-out and weak corners, especially on Melbourne renovations where suction, humidity and substrate age vary from room to room. A floor can look fine for a while and still fail at the points that were never properly equalised.
If you are briefing a tiler or project manager, ask for primer coverage and dry-to-pour readiness, not just “primer applied”. That is the detail that protects the pour.
Common Mistakes and Failure Modes on Melbourne Jobs
The line “any primer will do” causes more trouble than many crews admit. On live jobs, the failures usually come back to a few bad calls, and they show up after the compound has already set.
What actually goes wrong
Under-priming on a porous slab leaves the substrate thirsty, so the leveller loses bond or cures unevenly at the interface. Over-diluting to stretch coverage weakens the film and leaves the bond coat too lean to do its job. Priming over dust means the primer sticks to loose material instead of concrete. Skipping primer on a non-porous substrate removes the bridge the leveller needed in the first place.
A clean, even coat matters more than brand loyalty. If the surface is not sealed consistently, the pour starts fighting itself before it has a chance to flatten.
The moisture problem DIY guides miss
A damp slab is a different category entirely. When relative humidity is above 75% RH, primer alone is not enough, a liquid damp-proof membrane has to go in before the leveller. That matters in Melbourne bathrooms, balconies and older concrete where moisture movement can be hard to predict. The sequence has to suit the slab, not the product label.
If the job includes a wet-area build-up, the floor system has to match the waterproofing below it. Waterproofing in Melbourne is part of that planning, because primer cannot fix a slab that is still holding moisture.
How the failures show up later
- De-bonding: usually follows poor suction control or primer on a dirty slab.
- Pinholing: often shows up where suction was uneven or primer was too thin.
- Edge build-up: happens when the primer pools and the leveller does not flow uniformly.
- Cloudy haze under tile: often points to moisture or an incompatible sequence.
- Hollow sounding areas after tiling: usually trace back to a weak bond layer below.
Melbourne conditions make these faults more visible because variable humidity and older slab behaviour expose shortcuts quickly. Balcony substrates and bathroom floors do not hide poor sequencing for long.
The rough patch is usually between primer and pour. That window is where crews get caught by dry edges, missed corners, dust settling back onto the slab, or a floor that looked ready but never really was.
Safety, Wet-Area Compliance and Your Renovation Checklist
Bathroom floors do not get a free pass because they are indoors. They sit inside a wet-area build-up that has to work with the waterproofing, the leveller, and the finish above it. The National Construction Code framework treats bathrooms and showers as water-resistant or waterproof wet areas depending on exposure, so the primer step has to support that system rather than work against it.
Older Melbourne slabs, balcony substrates, and bathrooms with patchy humidity expose weak prep fast. Primer is the substrate equaliser in that system. It helps the leveller bond to a surface that may be thirsty in one patch, dusty in another, or sealed inconsistently because of previous repairs, but it cannot rescue a floor that is still moving moisture through the slab. Where the wet-area build-up needs waterproofing below the leveller, this Melbourne waterproofing reference belongs in the sequence planning, because the primer is only one part of the floor system.
Why a Registered Builder matters here
A Registered Unlimited Builder keeps the sequence intact. The tiler, waterproofer, plumber and other trades can all do good work, but the floor prep still needs one person making sure the primer is correct, dry, and ready before the pour. That coordination is what keeps a bathroom renovation tight. Without it, the floor starts drifting, and the trades end up working around avoidable mistakes.
On-site checklist
- Substrate test: confirm the slab is sound, clean and free of laitance.
- Primer family: match the primer to the slab type, not the product aisle.
- Dilution: follow the exact water ratio, do not improvise.
- Coverage: check that the whole field and edges are coated evenly.
- Tack-free time: wait until the primer is dry before mixing the leveller.
- Pour window: have buckets, tools and crew ready before the mix starts.
- Moisture check: if the slab is suspect, test it before you commit to the system.
That checklist is the part homeowners usually skip, then wonder why the floor lifts, crazes, or bonds poorly after tiling. The primer, the waterproofing, and the pour all have to line up. If one step is rushed, the next trade inherits the problem.
If you want the floor read properly before anyone opens a bag of leveller, Melbourne Tiling Services P/L can scope the substrate, coordinate the wet-area sequence, and provide a bathroom renovation plan that keeps the primer, waterproofing and tiling steps in order. Visit Melbourne Tiling Services P/L to organise a quote, a 3D drawing, or a proper scope conversation before the slab starts dictating the schedule.
Write a Comment