Self Levelling Compound Primer Guide for Renovations

You're probably standing in a bathroom with the tile lifter booked, a slab that's a bit rougher than you hoped, and a trade sequence that leaves no room for guesswork. That's the moment where self levelling compound primer stops being a shopping-list item and becomes the thing that decides whether the floor holds together under tile, membrane, and daily use.

On Melbourne jobs, I treat primer as a substrate equaliser, not a generic pre-coat. It's the layer that deals with suction, locks down dust, and gives a fast-setting pour something reliable to bite into, especially on older slabs, damp-prone balcony substrates, and renovated bathrooms where the demolition team left more dust than anyone wanted.

Table of Contents

Why Primer Decides Whether Your Bathroom Floor Holds Up

A common Melbourne ensuite scenario looks like this. The old bathroom is stripped back, the concrete slab shows its age, the waterproofing crew is lined up, and the tiler wants the floor ready before next week. That's when a Registered Builder has to decide whether the slab is ready for self levelling compound primer, because once the leveller goes down, there's no friendly way to fix a weak bond at the interface.

What primer actually fixes

Primer doesn't level the floor. It deals with the part most DIY guides gloss over, the substrate behaviour that makes a fast pour fail. On porous concrete, primer controls suction and stops the slab from pulling moisture out of the leveller too quickly, which helps reduce bond problems and surface defects. Manufacturer guidance commonly says a primed surface can receive self-levelling compound as soon as it's dry, often within 1 hour under good drying conditions, while very porous floors may need a second coat and a 1:2 dilution with clean water on porous substrates (Bostik primer guidance).

Why the call happens before the bucket is mixed

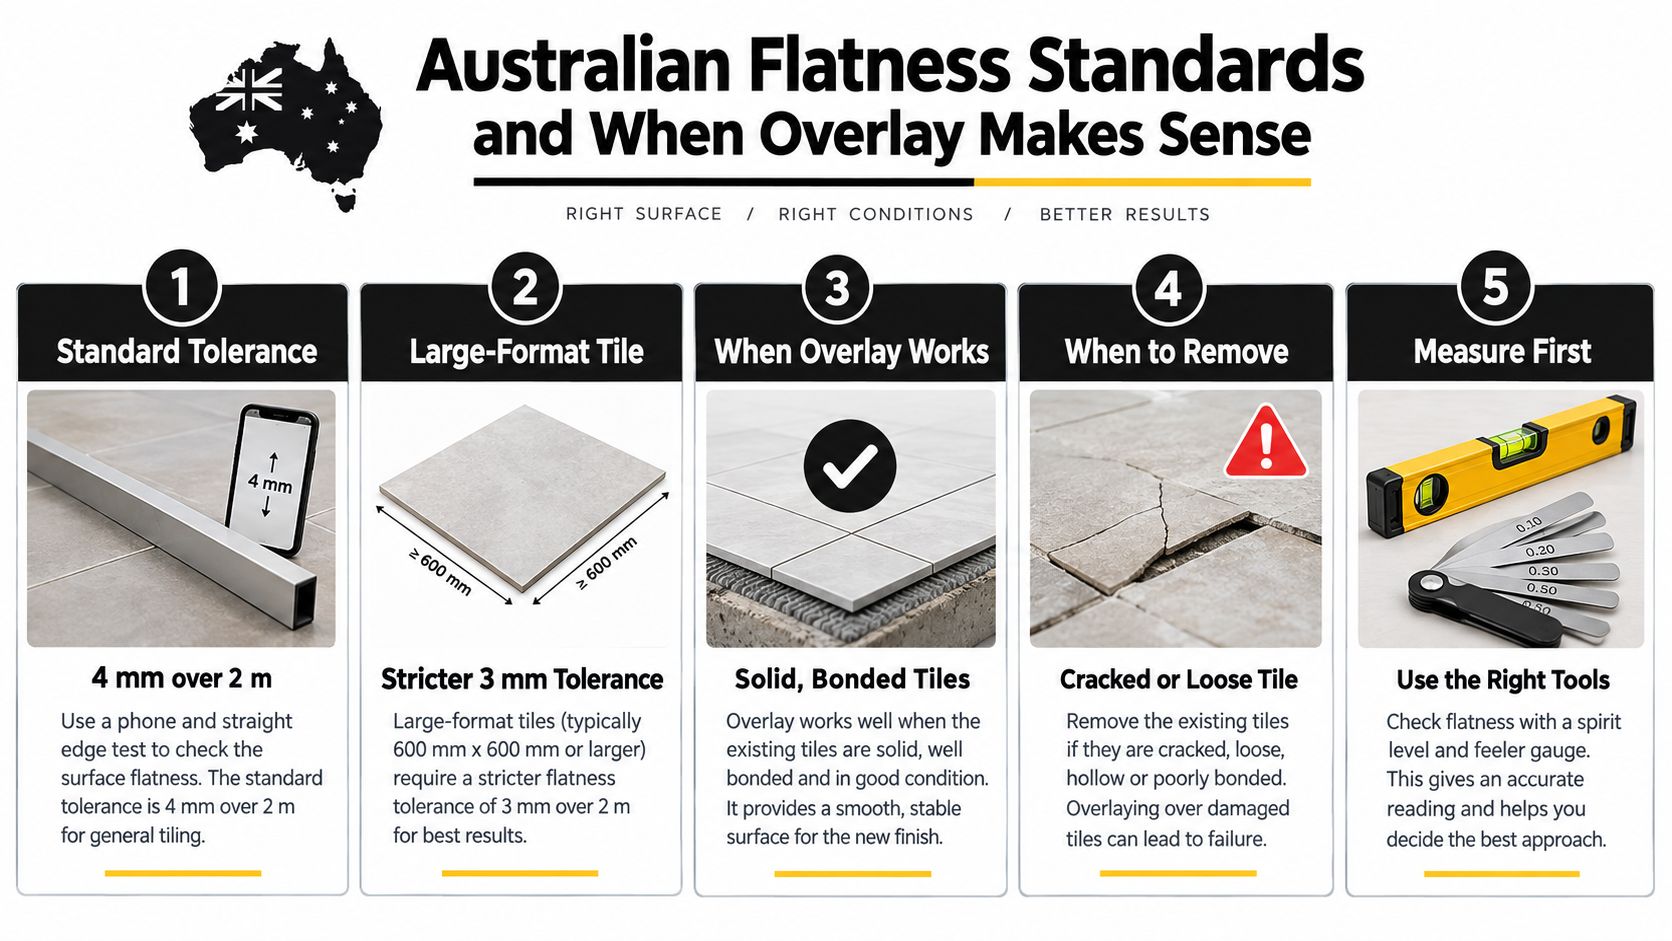
Most self-levelling compounds only make sense when the floor varies by more than 3 mm over a 1.8 m span, and many products have a working window of just 15–20 minutes after mixing (floor tolerances and pot life). That's a narrow margin. If the primer isn't right, the pour can start breaking down at the interface before the crew even finishes the room.

Practical rule: if the substrate is dusty, thirsty, or inconsistent, primer is doing structural work for the finish system, not cosmetic work for the trade bag.

Melbourne makes this more unforgiving because older slabs often behave differently from room to room, humidity can shift quickly, and balcony substrates bring weather exposure into a job that already has tight sequencing. Primer choice is a substrate decision made before the leveller is mixed, not a product decision made at the counter.

Reading the Substrate Before You Open the Primer Tin

The right primer starts with reading the floor properly. If the slab is still holding moisture, has a weak surface skin, or feels sound in one corner and chalky in another, the primer choice changes. On bathroom renovations, that inspection is usually quicker than people expect, but it has to be deliberate.

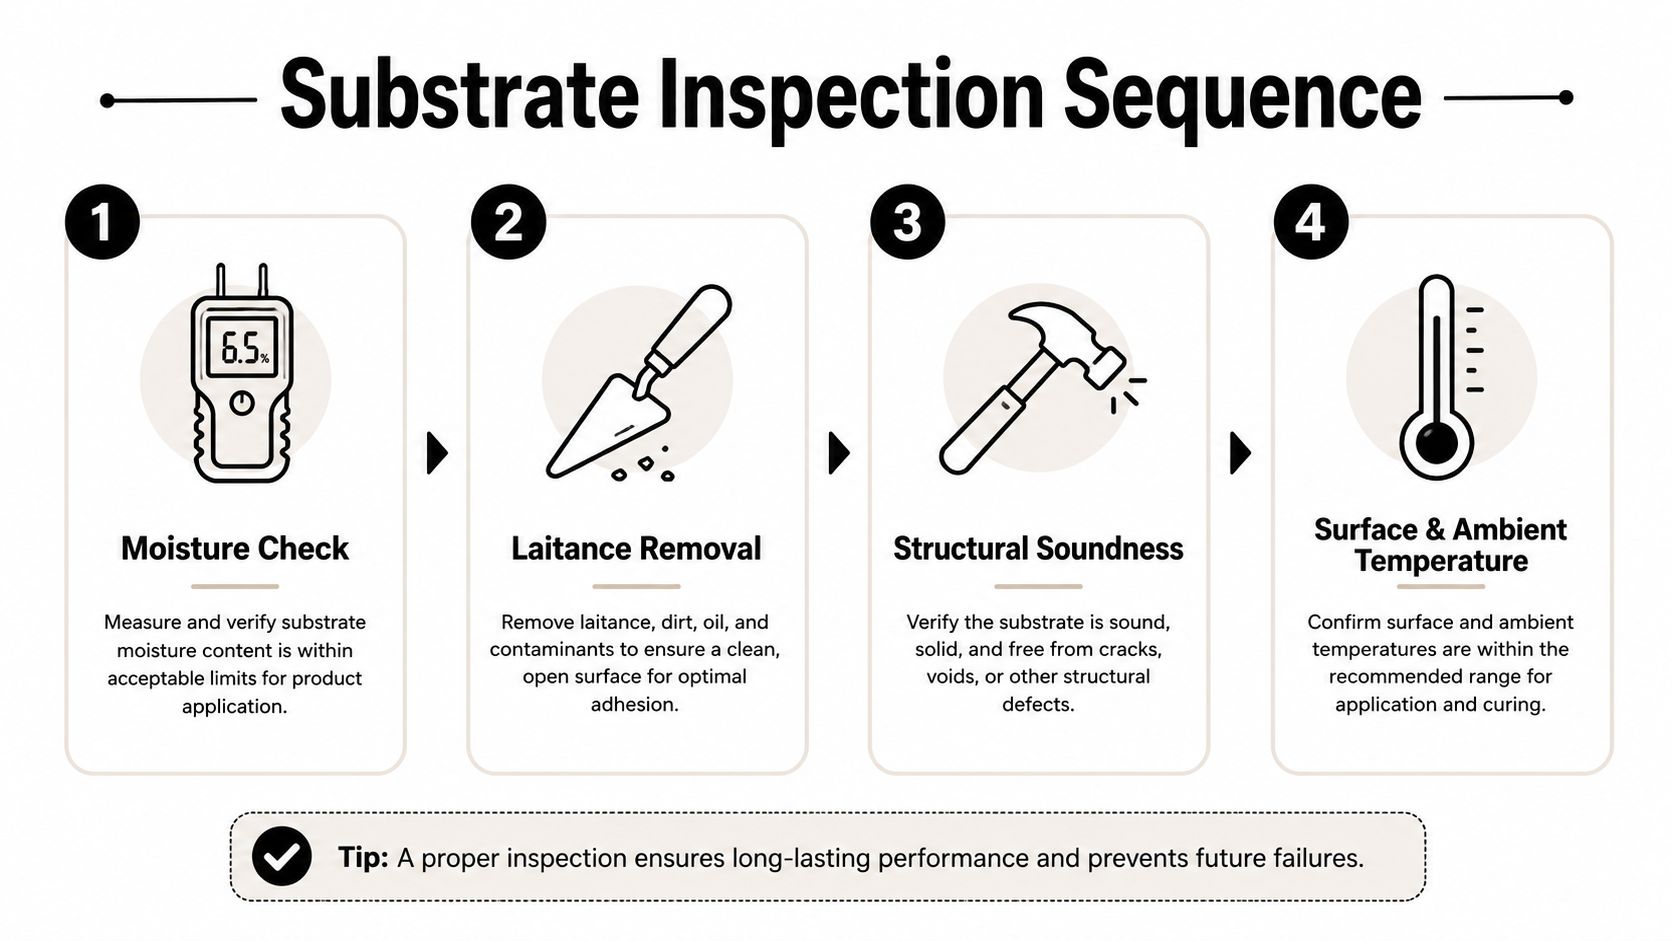
The inspection sequence that matters

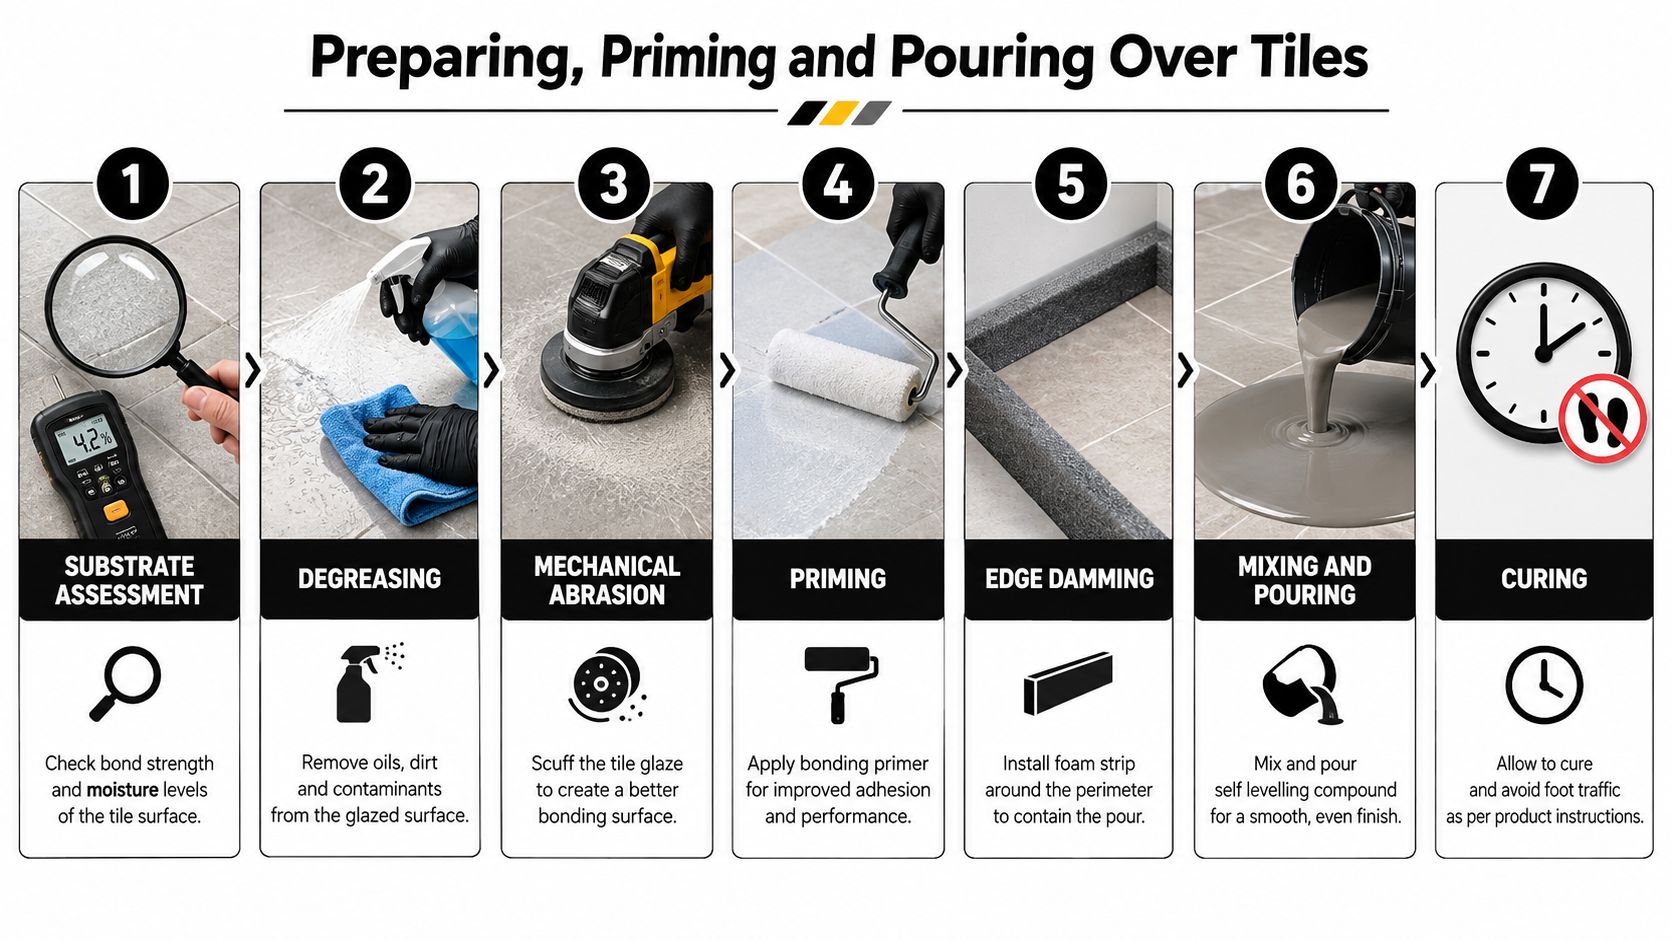
Start with a moisture check, then remove laitance, dust and curing residues mechanically, then confirm the slab is dry and sound. After that, check both the floor temperature and the ambient range. Manufacturer guidance for a quality workflow puts primer application after the floor temperature is at least 4°C and the ambient temperature is within 10–32°C, with the surface protected from weather and direct sun for at least 72 hours after application (LATICRETE substrate preparation and primer guide).

A four-step infographic illustrating the professional substrate inspection sequence required before applying floor coating systems.

What good looks like before priming

A ready substrate feels clean, firm and even in its absorbency. It doesn't shed dust when brushed, and it doesn't have patchy shiny areas from lingering residues. If a slab still has weak surface contamination, the primer can't compensate for it, because the bond coat ends up sticking to dust instead of concrete.

Older Melbourne bathrooms and balconies deserve extra caution here. Demolition leaves fine dust in corners, and balcony slabs often carry weather exposure that makes the moisture picture harder to read. If the floor hasn't passed the soundness check, primer selection is premature.

For screeding and floor build-up sequencing, the installation logic in this screeding reference sits neatly alongside this prep stage, because the substrate has to be read before any leveller or screed goes down.

Matching Primer Type to Substrate and Project

Primer choice gets easier once you stop treating every slab as if it behaves the same. On Melbourne renovation sites, I usually separate the job into porous concrete, standard suction cementitious substrates, and problem or non-porous surfaces. Each one needs a different approach, because the primer is there to equalise the substrate, not to act as a cure for a poor floor.

The three primer families that actually matter

For porous concrete, water-based acrylic primers are commonly used because they slow suction and help steady the surface before the pour. On normal suction substrates, dilution is often part of the system, with one manufacturer guide specifying a 1:3 primer-to-water mix. For highly porous floors, the same guidance allows 1:2 dilution and sometimes a second coat, while non-porous floors may need undiluted use or a specialist bond coat, depending on the product system.

Melbourne jobs often expose the weak point between primer and pour. Older slabs can be dusty, patchy, or uneven in absorbency, and balcony substrates may hold weather exposure that changes how the primer sits and dries. If the surface still drinks product in some areas and rejects it in others, the leveller will follow that inconsistency.

A simple decision matrix

Primer Selection by Substrate Type Primer type Dilution Second coat or DPM
Porous concrete Acrylic water-based primer 1:2 or 1:3 depending on suction Second coat may be needed on very porous floors
Normal suction cementitious floor Standard primer 1:3 per manufacturer guide Usually no, if coverage is even
Non-porous or problem surface Specialist bond coat or compatible primer Undiluted if the system allows it May need a different system entirely
Damp slab over moisture threshold Primer plus liquid damp-proof membrane Follow system spec DPM before leveller if RH is too high

The trade-off is simple. A lighter mix can suit a thirsty slab, but it also needs even application and the right dry-back before the pour. A heavier mix or undiluted primer can give better hold on difficult surfaces, but only if the product system is designed for it. On a busy bathroom reno, that choice usually comes down to whether the slab is behaving like concrete or like a patchwork of different substrates.

When primer is not enough

Primer improves bond, but it does not deal with trapped moisture. Independent guidance says that if relative humidity exceeds 75% RH, a liquid damp-proof membrane is needed before the levelling compound, not just primer. That matters on old Melbourne slabs, bathrooms, and balconies where moisture conditions can change the whole system choice.

A water-drop test tells you a lot in practice. If the slab drinks it instantly, you're dealing with high suction. If it beads or sits oddly, treat the surface as a problem substrate until proven otherwise.

The floor still has to fit the wet-area requirements that sit behind bathroom work. That means the build-up cannot compromise the waterproof layer beneath the tiles, and the primer choice has to suit the rest of the system, not just the slab in front of you. For a related substrate example, see self levelling compound for concrete.

Application Method and the Pour Sequence That Follows

A good primer job looks boring. That's exactly what you want. It should cover evenly, avoid puddles, and leave no dry patches, because the leveller can't recover from missed coverage once the pour starts.

How to apply it without creating weak spots

Use a roller for the open field, a brush for edges and corners, and a lambswool applicator when the room is large enough that speed matters. Work back towards the exit so you don't box yourself in. Don't let primer pool in low spots, because excess liquid gives you an uneven film and can create soft or cloudy areas under the compound.

The timing matters as much as the tool. One Australian product sheet shows systems designed for immediate placement after mixing and spreading, with a working time of about 10 minutes and a maximum single-lift thickness of up to 50 mm (Australian self-level compound product sheet). That short window is why primer readiness has to be sorted before the compound is mixed, not while the bucket is already going off.

The pour sequence that follows the primer

Once the primer is dry, mix multiple buckets and pour in continuous ribbons so the wet edge stays alive across the room. Intermittent pours create cold joints, hollow spots and poor corner fill. That sequence matters more on larger renovations than on a tiny powder room, because the moment you stop and restart, the compound starts telling you where the weak lines are.

Sequencing beats speed. A neat primer coat that's fully dry is worth more than a rushed one that still feels tacky at the edges.

I've seen crews lose more time by under-preparing the primer stage than by spending an extra few minutes on coverage. For a coordinated Melbourne renovation, this self-levelling reference fits naturally with the pour stage, because the bond coat and the leveller have to be planned as one system.

Drying Times, Cure Windows and Coverage Rates That Matter

Primer timing is one of those jobs that looks simple until the clock starts. If the film is dry, the leveller can go down. If it is still open or patchy, the pour risks failure at the bond line, and that risk is higher on Melbourne slabs that pull moisture unevenly or on balcony substrates that never seem to behave the same way twice. A Registered Builder keeps an eye on that handover point because the gap between primer and pour is where a lot of floors are won or lost.

The timing block that gets checked on site

The surface has to be dry enough for the next coat to bite properly, but the actual waiting time depends on the product and the conditions on the day. On a clean, prepared floor, some primers are ready for self-levelling compound once they have dried, and that can be around 1 hour under good drying conditions. In the levelling sequence itself, the compound may be walkable in 2–4 hours and can often be ready for further work within 24 hours, depending on the system (floor timing reference).

That window matters more than the tin label. Older Melbourne slabs, damp winter air and enclosed bathrooms can stretch drying, while a sunny room with good airflow can tighten it up. The right call is to check the film, not guess from the calendar.

Coverage is a planning issue, not just a product spec

Coverage shifts with how thirsty the substrate is. Porous floors pull in more primer, tighter surfaces need less, and that difference decides whether one tub covers the room or whether the job stalls halfway through a bathroom or open-plan area. Primer is doing two jobs at once here. It is binding the surface, and it is setting the pace for the pour that follows.

A missed allowance causes trouble fast. If the primer is spread too thin, the floor can show dry patches, weak bond, or uneven suction when the leveller lands. If too much product is ordered with no plan for substrate absorbency, you still lose time because the crew has to stop, measure again, and work out whether the surface is ready to receive the compound.

Why missed spots matter more than brand loyalty

The failures do not usually start with the brand name on the bucket. They start with a patch that was missed, a corner that dried differently, or a section that looked ready but was not.

Once the leveller is moving, there is very little room to stop, fix the primer, and restart without creating another problem. That is why missed coverage shows up later as pinholing, edge build-up, poor flow-out and weak corners, especially on Melbourne renovations where suction, humidity and substrate age vary from room to room. A floor can look fine for a while and still fail at the points that were never properly equalised.

If you are briefing a tiler or project manager, ask for primer coverage and dry-to-pour readiness, not just “primer applied”. That is the detail that protects the pour.

Common Mistakes and Failure Modes on Melbourne Jobs

The line “any primer will do” causes more trouble than many crews admit. On live jobs, the failures usually come back to a few bad calls, and they show up after the compound has already set.

What actually goes wrong

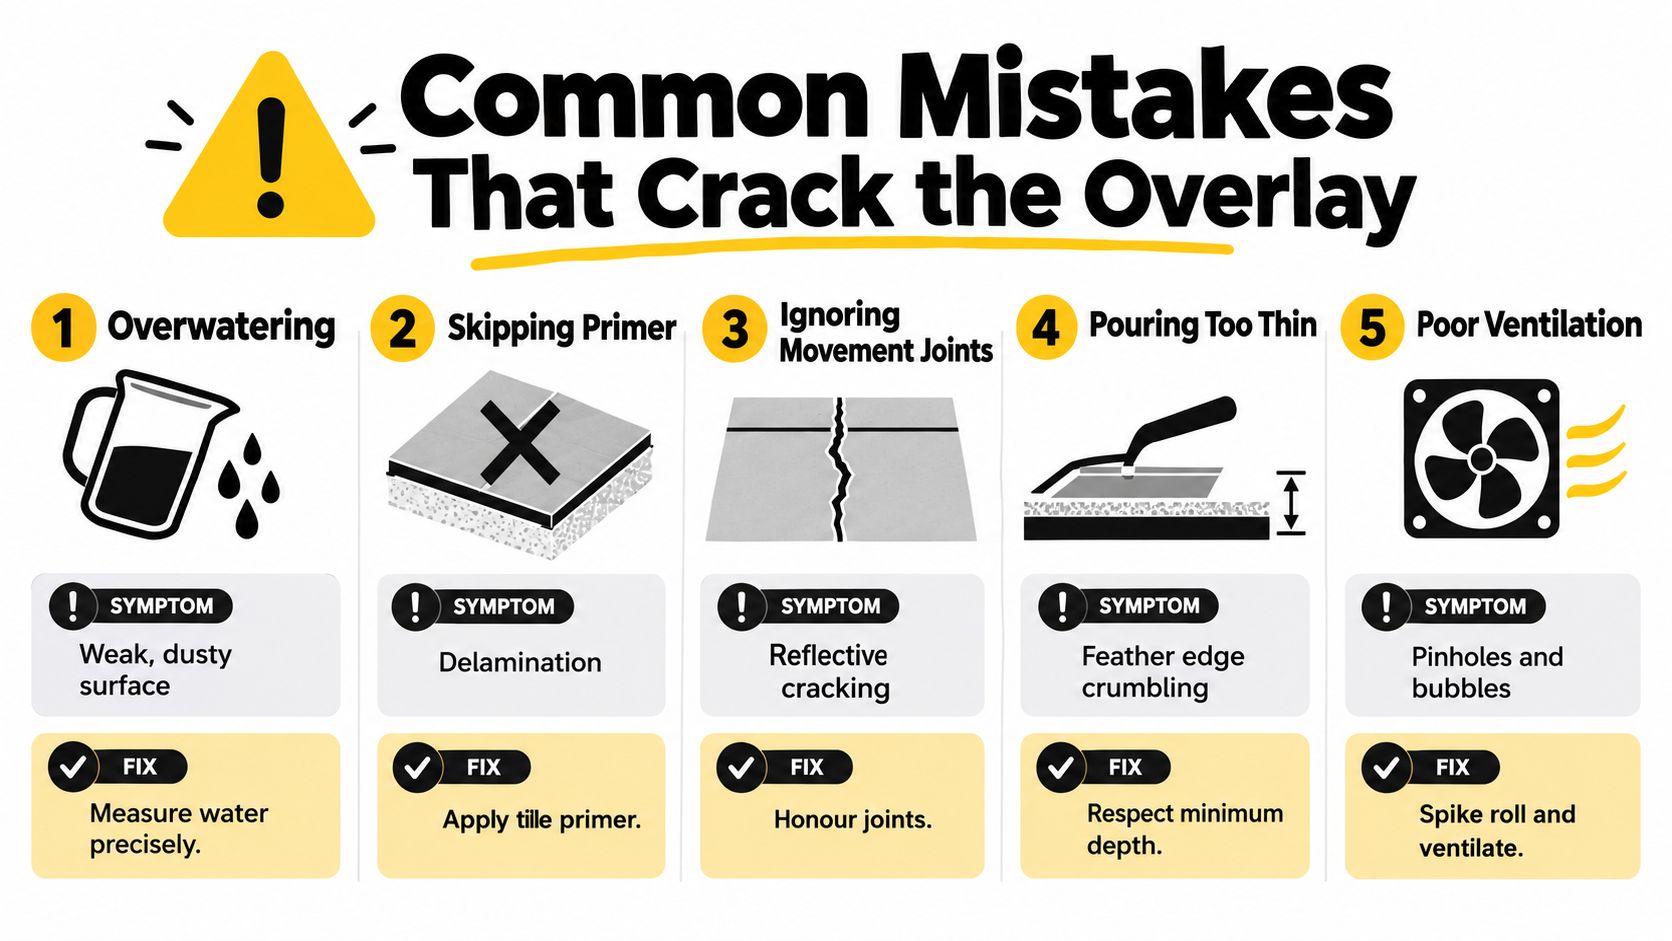
Under-priming on a porous slab leaves the substrate thirsty, so the leveller loses bond or cures unevenly at the interface. Over-diluting to stretch coverage weakens the film and leaves the bond coat too lean to do its job. Priming over dust means the primer sticks to loose material instead of concrete. Skipping primer on a non-porous substrate removes the bridge the leveller needed in the first place.

A clean, even coat matters more than brand loyalty. If the surface is not sealed consistently, the pour starts fighting itself before it has a chance to flatten.

The moisture problem DIY guides miss

A damp slab is a different category entirely. When relative humidity is above 75% RH, primer alone is not enough, a liquid damp-proof membrane has to go in before the leveller. That matters in Melbourne bathrooms, balconies and older concrete where moisture movement can be hard to predict. The sequence has to suit the slab, not the product label.

If the job includes a wet-area build-up, the floor system has to match the waterproofing below it. Waterproofing in Melbourne is part of that planning, because primer cannot fix a slab that is still holding moisture.

How the failures show up later

  • De-bonding: usually follows poor suction control or primer on a dirty slab.
  • Pinholing: often shows up where suction was uneven or primer was too thin.
  • Edge build-up: happens when the primer pools and the leveller does not flow uniformly.
  • Cloudy haze under tile: often points to moisture or an incompatible sequence.
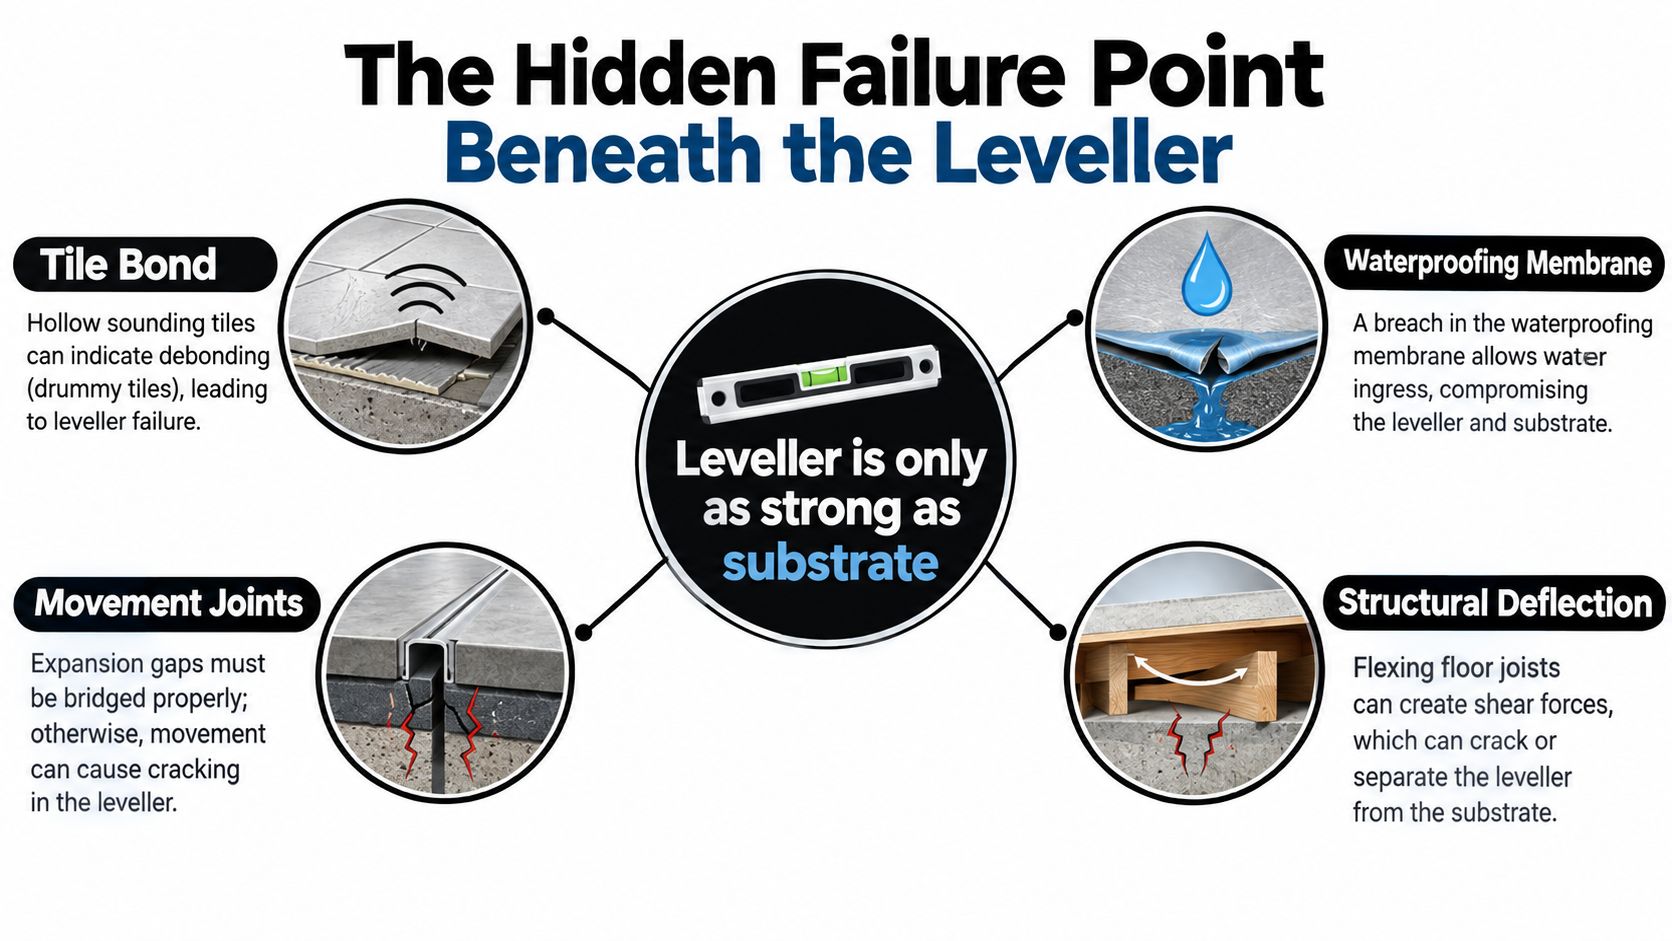
  • Hollow sounding areas after tiling: usually trace back to a weak bond layer below.

Melbourne conditions make these faults more visible because variable humidity and older slab behaviour expose shortcuts quickly. Balcony substrates and bathroom floors do not hide poor sequencing for long.

The rough patch is usually between primer and pour. That window is where crews get caught by dry edges, missed corners, dust settling back onto the slab, or a floor that looked ready but never really was.

Safety, Wet-Area Compliance and Your Renovation Checklist

Bathroom floors do not get a free pass because they are indoors. They sit inside a wet-area build-up that has to work with the waterproofing, the leveller, and the finish above it. The National Construction Code framework treats bathrooms and showers as water-resistant or waterproof wet areas depending on exposure, so the primer step has to support that system rather than work against it.

Older Melbourne slabs, balcony substrates, and bathrooms with patchy humidity expose weak prep fast. Primer is the substrate equaliser in that system. It helps the leveller bond to a surface that may be thirsty in one patch, dusty in another, or sealed inconsistently because of previous repairs, but it cannot rescue a floor that is still moving moisture through the slab. Where the wet-area build-up needs waterproofing below the leveller, this Melbourne waterproofing reference belongs in the sequence planning, because the primer is only one part of the floor system.

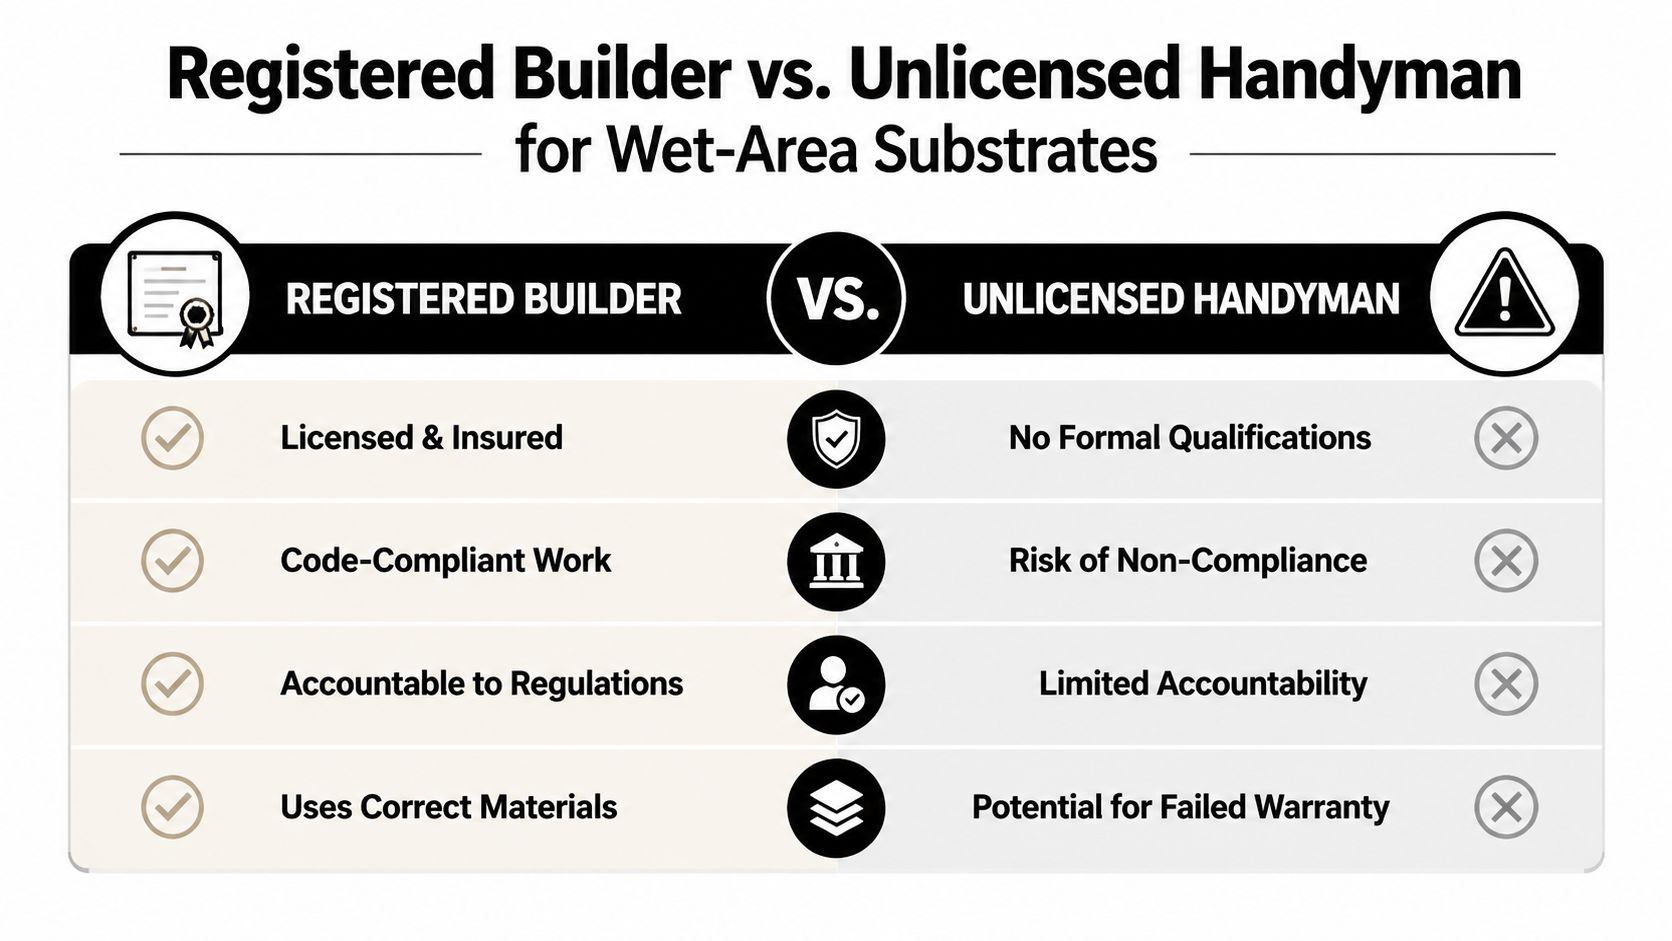
Why a Registered Builder matters here

A Registered Unlimited Builder keeps the sequence intact. The tiler, waterproofer, plumber and other trades can all do good work, but the floor prep still needs one person making sure the primer is correct, dry, and ready before the pour. That coordination is what keeps a bathroom renovation tight. Without it, the floor starts drifting, and the trades end up working around avoidable mistakes.

On-site checklist

  • Substrate test: confirm the slab is sound, clean and free of laitance.
  • Primer family: match the primer to the slab type, not the product aisle.
  • Dilution: follow the exact water ratio, do not improvise.
  • Coverage: check that the whole field and edges are coated evenly.
  • Tack-free time: wait until the primer is dry before mixing the leveller.
  • Pour window: have buckets, tools and crew ready before the mix starts.
  • Moisture check: if the slab is suspect, test it before you commit to the system.

That checklist is the part homeowners usually skip, then wonder why the floor lifts, crazes, or bonds poorly after tiling. The primer, the waterproofing, and the pour all have to line up. If one step is rushed, the next trade inherits the problem.

If you want the floor read properly before anyone opens a bag of leveller, Melbourne Tiling Services P/L can scope the substrate, coordinate the wet-area sequence, and provide a bathroom renovation plan that keeps the primer, waterproofing and tiling steps in order. Visit Melbourne Tiling Services P/L to organise a quote, a 3D drawing, or a proper scope conversation before the slab starts dictating the schedule.

What Is Screed in Tiling: A Comprehensive Guide

Screed is the cement and sand layer that creates the flat base and drainage falls under your tiles, and for an unbonded screed in tiling the minimum thickness is 40 mm, with 50 mm recommended to help prevent curling and lifting. In a bathroom, it acts like a precision-engineered foundation for the tile finish, because even beautiful tiles won't perform properly if the base underneath is uneven, weak, or shaped incorrectly.

If you're planning bathroom renovations and reviewing quotes from tilers or registered builders, screed is often one of the most misunderstood line items. Homeowners usually focus on tile selection, tapware, niches, stone tops, and shower screens. The trouble is that the part you don't see often decides whether the whole floor drains properly, sounds solid underfoot, and stays crack-free.

In Melbourne bathrooms, screed matters even more when you're using large-format porcelain, natural stone, or slim tile panels. Those finishes don't forgive poor preparation. A floor can look close enough before tiling and still be wrong once the tiles go down. That's why experienced trades treat screeding as part of the system, not an optional extra.

Table of Contents

An Introduction to Floor Screed for Home Renovators

If you've seen "floor screed" in a quote and wondered whether it's just another way of saying concrete, it isn't. In tiling, screed is a carefully placed layer that gives the tile installer the exact surface needed for a proper finish. In wet areas, that includes the right shape so water moves where it should.

Think of screed as the difference between hanging cabinetry on a straight wall and trying to fit it to a crooked one. Tiles are no different. If the base is off, the finished room will show it. You might see lippage at tile edges, water sitting in corners, or hollow sounds when you walk across the floor.

Registered builders and experienced tilers don't treat screed as filler. They treat it as a control layer. It lets the team correct what the slab or substrate gives them, then build the bathroom floor to suit the waterproofing, the waste position, the tile size, and the final floor heights.

For homeowners planning high-end work, that's where the value sits. You're not paying for mud on the floor. You're paying for accuracy, drainage, and a tiled surface that feels solid for years, not just on handover day.

If you're comparing finishes for a renovation, it's worth understanding how screed fits into the broader floor build-up used in floor tiling services in Melbourne.

Practical rule: Expensive tiles don't fix a bad base. They expose it.

The Critical Role of Screed in a Flawless Tiling Job

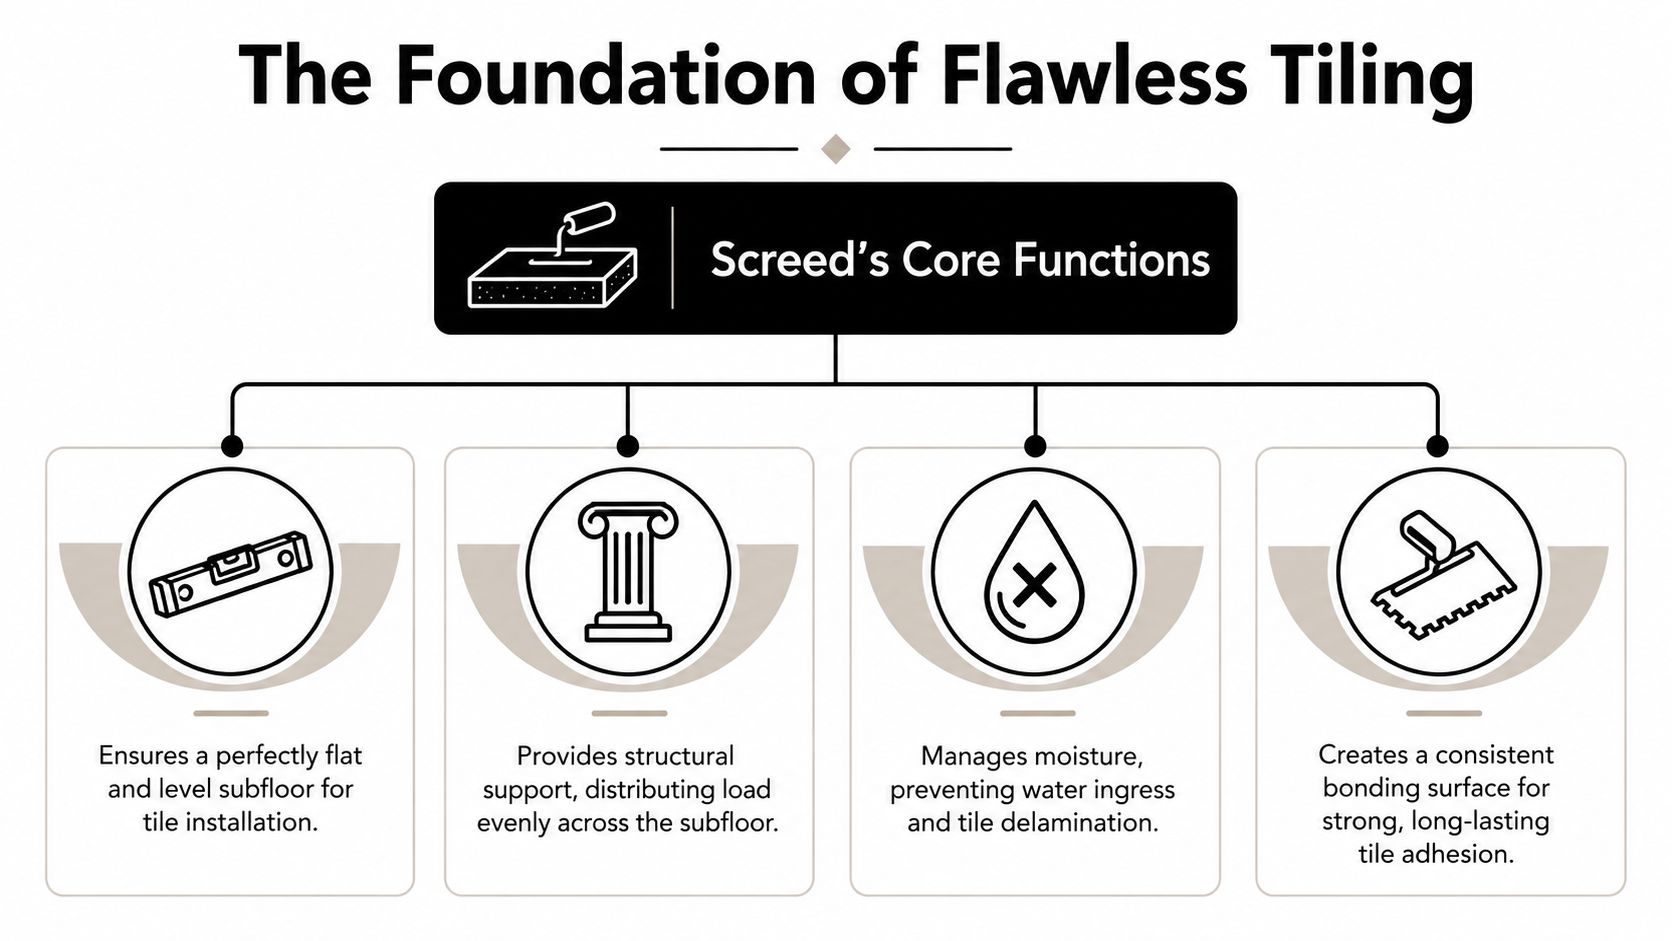
A lot of failures blamed on tiles begin underneath them. Screed has several jobs at once, and when one of those jobs is done poorly, the problem usually appears later as pooling water, cracked grout, drummy tiles, or a floor that never looks quite right.

Screed shapes the bathroom floor

In a bathroom, the floor shouldn't just be flat. It needs the right falls. That means the surface is shaped so water moves toward the waste instead of drifting to the doorway or sitting against a wall. This is one of the most important parts of waterproofing integrity.

When falls are wrong, the waterproofing membrane may still be intact, but the room won't perform properly. Water lingers. Grout stays wet longer than it should. Cleaning becomes harder. In shower areas, the room starts feeling poorly built even if the tiles themselves were laid neatly.

It corrects the substrate below

Concrete slabs and existing floors are rarely perfect. Some are out of level. Some have minor undulations. Some have old patching, service penetrations, or transitions between materials. Screed gives the tiler or builder a way to create a controlled surface over those irregularities.

An infographic detailing the four core functions of floor screed for achieving a flawless tile installation.

A good way to picture the floor build-up is this:

  • Subfloor or slab: The structural base
  • Preparation layer: Cleaning, priming, repairs, or slip sheet depending on the system
  • Screed: The shaping and flattening layer
  • Waterproofing and tile assembly: The protective and finished surface layers

That middle layer gives the installer control. Without it, you're trying to tile directly over whatever shape the substrate happens to be.

It creates a reliable bed for the tile system

Screed also helps where the floor build includes services such as underfloor heating or where exact finished heights matter at doorways and shower entries. In premium bathroom renovations, this becomes especially important because multiple trades need the floor to land at the correct level.

A straight tile finish starts well before the first tile comes out of the box.

The biggest misunderstanding is thinking screed exists only to make a floor look smooth. Its real role is broader. It supports drainage, flatness, adhesion, and the way the whole bathroom performs once people start using it every day.

Exploring the Different Types of Tiling Screed

Not all screeds are the same, and the right choice depends on the substrate, the room, the height available, and how the rest of the tiling system is being built. Homeowners often hear one word, "screed", as though it means a single product. On site, it doesn't.

Traditional sand and cement screed

This is the standard option typically referred to in residential tiling. It gives the installer a workable bed for shaping falls and flattening floors. In bathroom work, it's commonly used because it can be formed with precision around wastes, shower set-downs, and transitions.

Traditional screed suits jobs where the installer needs hands-on control. That's why it's still the backbone of many quality bathroom floors.

Polymer-modified screed

A polymer-modified mix is used when extra bond performance, reduced water demand, or tighter site conditions call for a more engineered product. It can be useful where the substrate is challenging or where the specification needs more than a basic sand and cement bed.

This doesn't mean every bathroom needs a modified screed. It means the builder or tiler should choose it for a reason, not because it sounds more advanced.

Liquid and self-levelling compounds

These products are often confused with traditional screed, but they serve a different purpose. A self-levelling compound is typically used to refine flatness, not to hand-shape shower falls in the way a dry-pack screed can. On some projects, it complements the system. On others, it's the wrong material for the task.

That distinction matters. A floor can be level and still be wrong for a wet area if it hasn't been shaped correctly for drainage.

Bonded and unbonded systems

This is one of the more important technical distinctions. A bonded screed adheres directly to the prepared substrate. An unbonded screed is separated from it by a slip layer. The choice affects thickness, reinforcement, and how the screed behaves.

According to Australian Standards guidance for unbonded screeds, AS 3958.1 and AS 4654.2 require a minimum thickness of 40 mm for an unbonded screed used in tiling, with AS 4654.2 specifically recommending 50 mm to help prevent curling and lifting. The same guidance states that unbonded screeds must be reinforced with either fibreglass mesh or small gauge steel mesh to control shrinkage-induced damage.

That isn't trivia. It's what separates a compliant assembly from one that looks acceptable on day one and starts moving later.

If you're comparing materials or trying to understand what your contractor has specified, it helps to know the basics of tiling materials used in floor and bathroom work.

Screed Type Typical Thickness Approx. Curing Time Before Tiling Best For
Traditional sand and cement screed Depends on the system and site conditions Requires full curing before tiling Shaping falls and building bathroom floors
Polymer-modified screed Product and application dependent Follow the product specification Jobs needing improved bond or tighter control
Liquid or self-levelling compound Usually thinner than traditional screed applications Product dependent Correcting flatness outside hand-shaped wet area falls
Unbonded screed Minimum 40 mm, with 50 mm recommended in AS 4654.2 Requires proper curing before tiling Floors where the screed is separated from the substrate

Screed Thickness Curing Times and Substrate Preparation

A bathroom floor can look fine on Friday, feel hard on Monday, and still be nowhere near ready for waterproofing or tiles. I see that mistake in Melbourne renovations more often than homeowners expect, especially where someone assumes a firm surface means the screed has finished moving.

Thickness, curing, and preparation control whether the tiled floor stays flat, drains properly, and holds the waterproofing system together. On high-end bathroom work with large-format tiles, there is very little tolerance for a screed that shrinks, powders, or debonds from the base.

What the mix and curing rules mean on site

For a traditional sand and cement screed, the mix needs to be consistent, the water needs to be controlled, and the curing period needs to be respected. A wet, sloppy mix is easier to spread, but it usually creates more shrinkage and a weaker result. A drier, well-compacted mix takes more skill to place, but it gives better control over shape, strength, and long-term stability.

Australian Standards and manufacturer specifications set the framework, but the on-site judgement matters just as much. The right curing time depends on the screed system, thickness, ventilation, temperature, and what layer is going over it next. In a bathroom, that sequencing matters because the screed does not work in isolation. It becomes the base for waterproofing, adhesive, and tile. If the screed is still shedding moisture or shrinking, the stress shows up higher in the assembly.

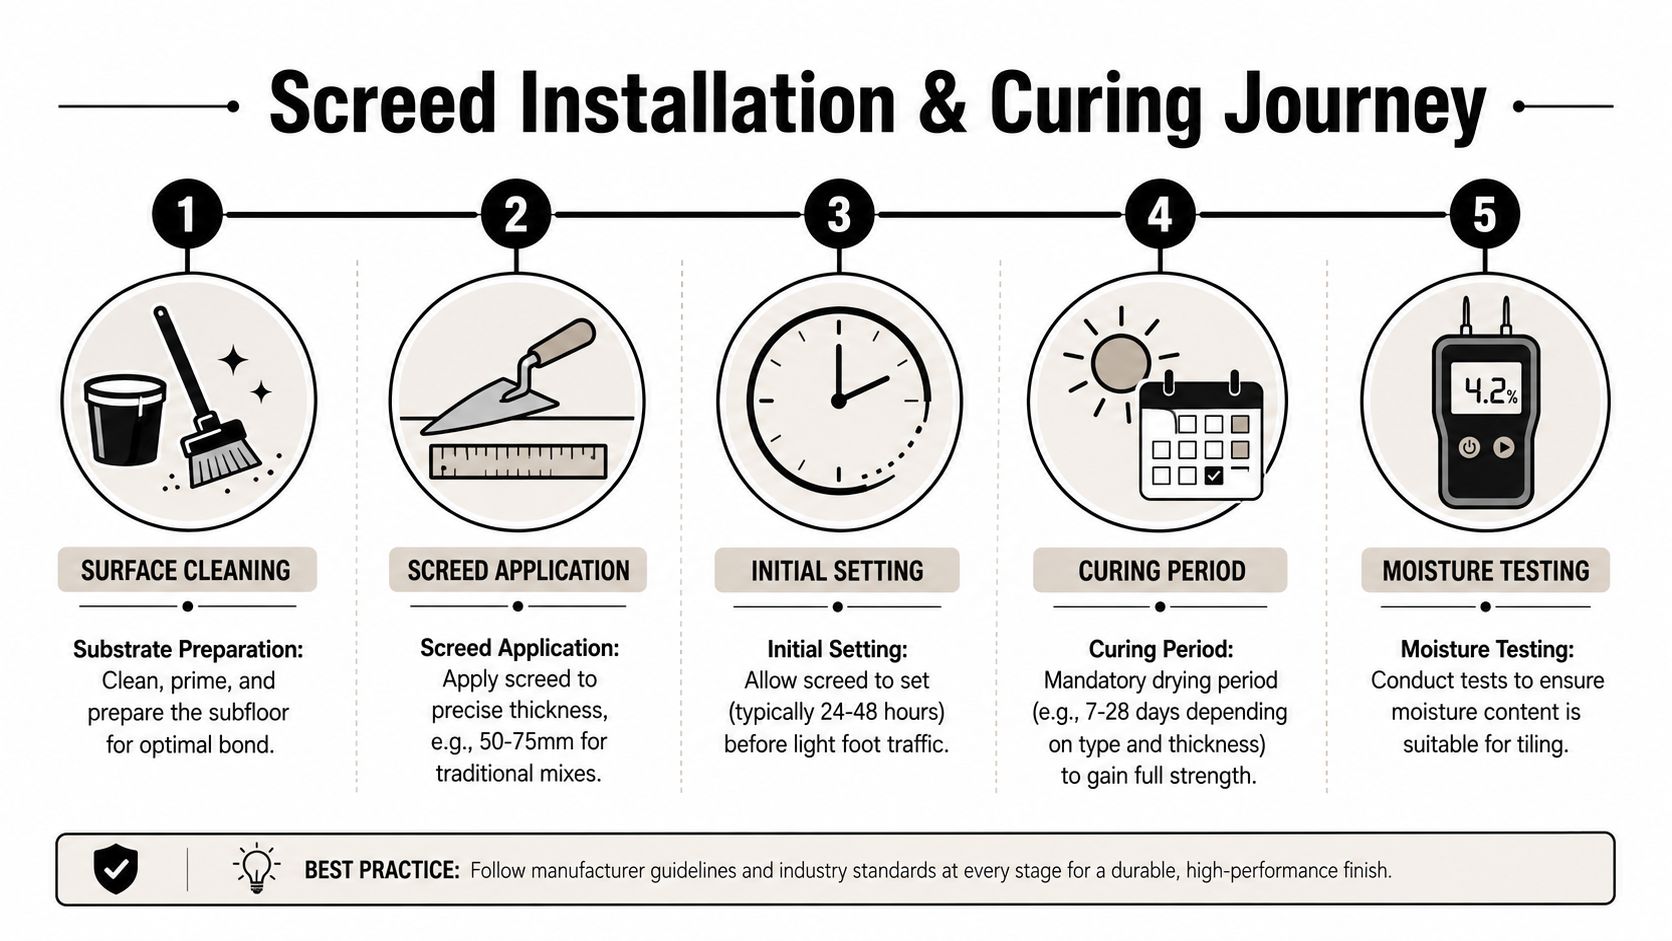
A step-by-step infographic showing the five stages of screed installation and curing process for tiling.

On site, the sequence usually runs like this:

  1. Prepare the substrate: Remove dust, laitance, paint, adhesive residue, oil, and loose material so the screed system has a sound base.
  2. Check levels and falls: Mark finished heights, waste locations, and door transitions before mixing starts.
  3. Place and compact the screed: Build the required thickness and shape with proper compaction, not just a quick spread-and-rub finish.
  4. Cure it to suit the system: Protect the screed from drying too fast and follow the specified cure and drying process before the next trade starts.
  5. Confirm readiness before tiling or waterproofing: Surface hardness alone is not the test. Moisture condition, bond, and stability matter.

That last point catches people out. A screed can be walkable long before it is ready to receive the next layer.

Why substrate preparation decides whether the screed lasts

Good screed over a poor base is like laying a luxury stone benchtop on a cabinet with a twisted frame. The finish might look straight for a while, but the support underneath is already setting up the failure.

In Melbourne bathroom renovations, the existing substrate often has old glue, paint overspray, cracked patches, saw cuts, plumbing penetrations, or soft surface laitance. If those defects are left in place, the screed can lose bond, dry unevenly, or crack at weak points. On a bonded screed, that bond line is everything. On an unbonded or floating system, the separation layer and edge treatment still need to be correct or the bed can move in ways it should not.

Preparation usually includes mechanical cleaning, checking for drummy or weak areas, repairing cracks where required, confirming the substrate is suitable for the selected screed system, and using the right primer or slip membrane. Trade discipline is evident. The result depends heavily on correct use of straightedges, lasers, grinders, mixers, and finishing tools, not guesswork or improvised gear. The right tiling tools for screed preparation and installation make it possible to hit levels accurately and keep falls honest.

For a Registered Builder, the bigger concern is compliance across the whole bathroom assembly. Screed has to suit the substrate, the waterproofing method, and the tile finish. Get that order wrong, or rush the drying stage, and the expensive part of the renovation ends up relying on the weakest layer in the room.

Why Modern Tiles Demand a Perfect Screed

A homeowner chooses 600 x 1200 rectified porcelain for a new Melbourne bathroom because the room needs to feel sharp, flat, and expensive. The tile looks flawless in the showroom. On site, that same tile will expose every low spot, every hump, and every lazy fall in the screed.

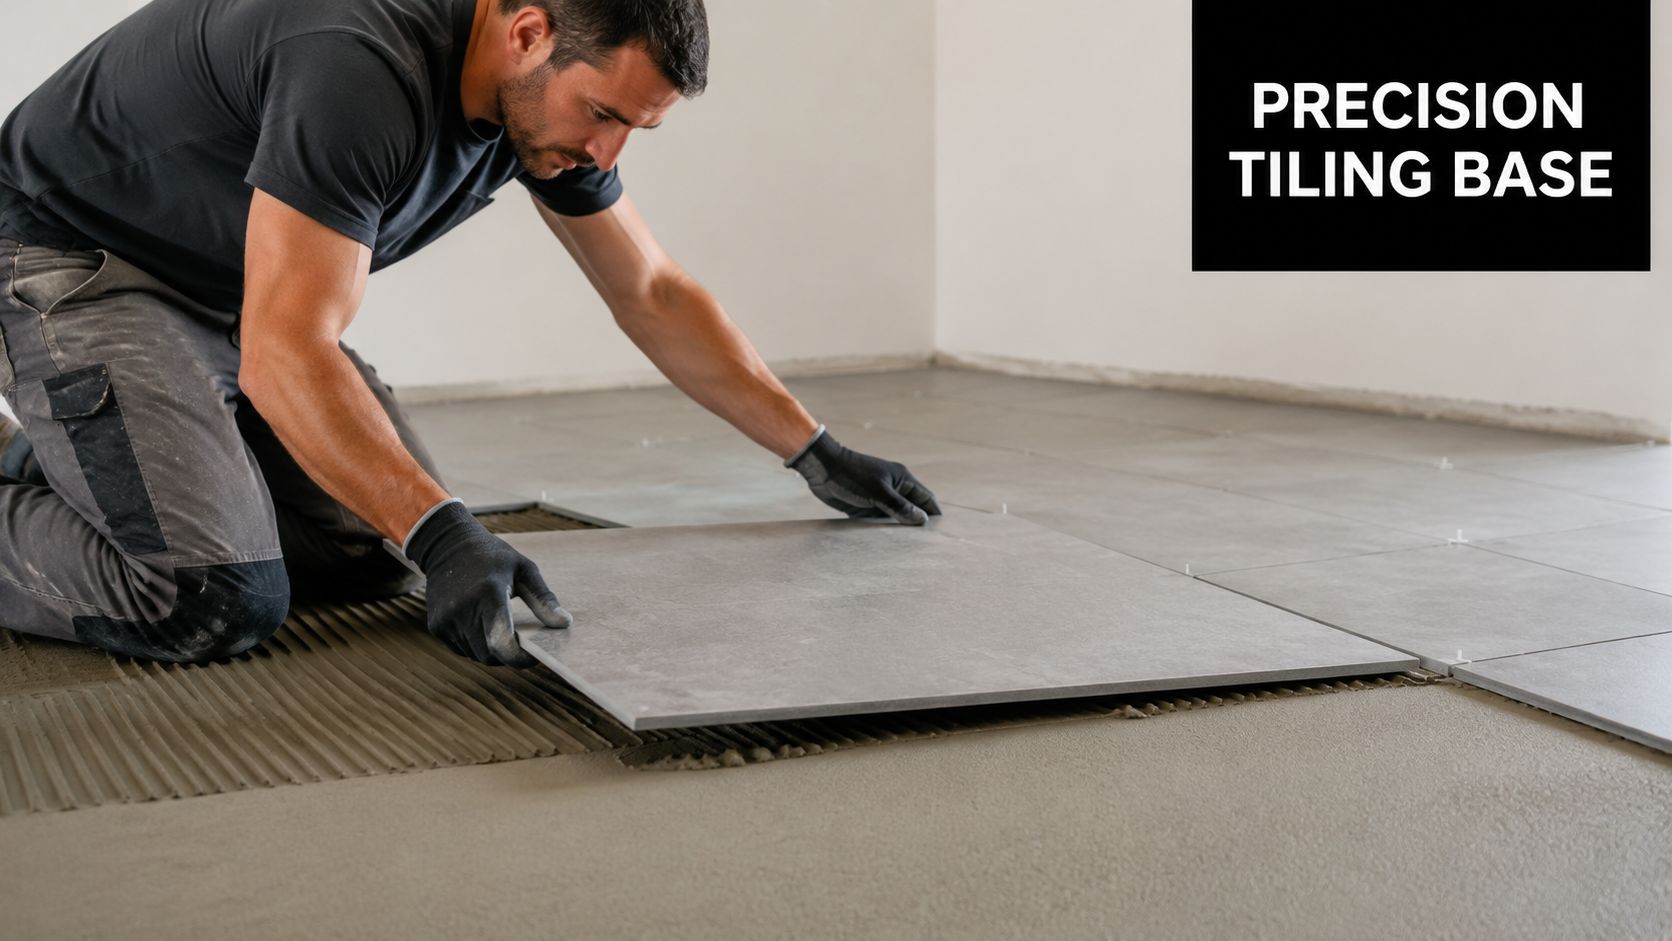
A professional construction worker laying a large grey tile onto a freshly applied screed flooring base.

Large-format tiles magnify every defect

Older bathrooms could hide a fair bit with smaller tiles and wider grout joints. Modern tile selections do the opposite. Large-format porcelain, rectified edges, natural stone, and slim panels leave very little tolerance for an uneven base.

A small mosaic can follow minor variation without drawing attention to it. A large tile spans across the highs and lows. That creates lippage, hollow support under parts of the tile, uneven reflections, and extra stress at edges and corners. In a high-end bathroom, those defects are easy to see and expensive to correct once the room is waterproofed and tiled.

I see this regularly in Melbourne renovations where clients want clean lines, narrow joints, and flush transitions. The finish only looks premium if the screed is set out with the same care as the tile.

Screed quality affects both tile performance and waterproofing integrity

Screed is not just there to give the tiler something to stick to. In many bathroom builds, it also controls the falls to the waste, supports the waterproofing strategy, and helps the whole floor system meet the standard expected under Australian practice.

If the falls are inconsistent, water sits where it should drain. If the surface is out of plane, the installer has to chase flatness with adhesive. That creates another problem. Adhesive works best as a bonding layer at the right bed thickness, not as a substitute for proper screeding.

The trade-off is straightforward. Spending more time getting the screed right saves trouble later with tile alignment, drainage, and finish quality. Rushing the screed usually shifts the problem to the waterproofing contractor or the tiler, and by then the room is already on the back foot.

Good coverage starts with a flat, accurate base

As noted earlier, tile installations over screed need proper adhesive contact between the tile and the substrate. That becomes harder to achieve when the base is wavy, powdery, or badly shaped around wastes and corners.

A short demonstration helps homeowners see what proper preparation is trying to achieve:

In practical terms, a well-finished screed gives the tiler control. Trowel lines collapse properly. Large tiles bed down evenly. Falls can be kept honest without creating birdbaths or proud edges at the doorway. That matters even more in bathrooms using large-format tiles, where the margin for error is small and the visual standard is high.

Premium tiles do not improve a bad base. They expose it.

Common Screed Problems and Professional Solutions

Most screed failures leave clues. Homeowners notice cracks in grout, tiles that sound hollow, or shower floors that never quite drain. The visible symptom isn't always the root cause, so it helps to look at the problem the way a builder or tiler would.

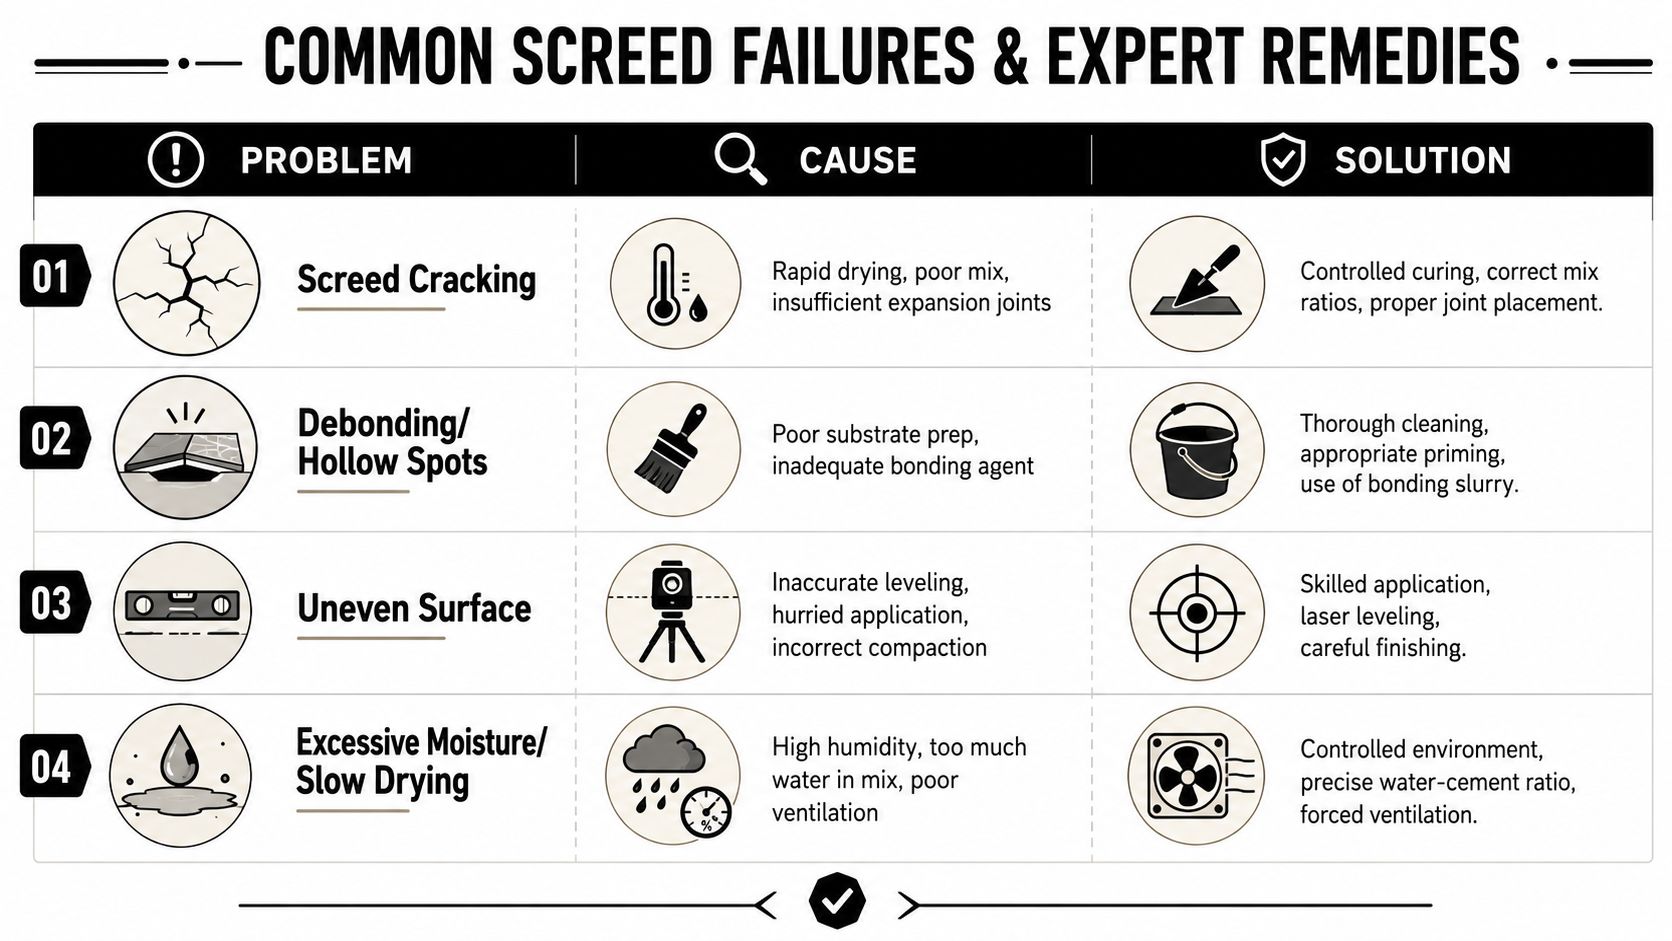
A chart illustrating four common screed problems, their underlying causes, and expert solutions for flooring installations.

Cracking and curling

Cracking often points to poor mix control, rushed curing, movement in the substrate, or weak compaction. In practice, it usually isn't one single mistake. It's a chain. Too much water in the mix, inconsistent placement, and drying too quickly can all contribute.

Curling and lifting at edges commonly shows up when moisture behaviour in the screed isn't controlled properly. In unbonded work, inadequate thickness or poor reinforcement can also make the problem worse.

Professional prevention usually includes:

  • Correct mix discipline: The sand and cement ratio can't be made up by eye on a rushed site.
  • Controlled curing: The screed has to be protected so it doesn't dry unevenly.
  • Proper reinforcement where required: Especially in systems that call for mesh.
  • Accurate thickness control: Thin spots become weak spots.

Drummy spots uneven falls and slow drying

A drummy or hollow sound under tiles often suggests debonding somewhere in the assembly. Sometimes the issue starts with contamination on the substrate. Dust, residue, weak surface material, or poor priming can stop the screed from anchoring the way it should.

Incorrect falls are a different failure, but one homeowners notice quickly. Water sits near the shower screen, tracks toward the door, or forms a puddle in a corner. That's a workmanship problem, not bad luck. It usually means the floor wasn't set out with enough care before screeding and tiling began.

Slow drying or persistent moisture can come from excess water in the mix, poor ventilation, or a rushed programme that pushes the next trade in too early.

A useful way to assess risk is to ask whether the contractor has a method, not just confidence.

Problem Likely Cause Professional Solution
Cracking Poor mix, rapid drying, weak compaction, movement Controlled mix, proper curing, sound substrate assessment
Hollow or drummy areas Dirty or weak substrate, poor bond preparation Thorough preparation, suitable primer or bond method
Water pooling Falls set incorrectly Careful set-out and shaping before tiles are laid
Curling or lifting Moisture imbalance, excess water, inadequate system design Correct system choice, proper thickness, disciplined curing

If a screed job is rushed, the floor usually tells on it later.

Hiring a Pro and Melbourne-Specific Screed FAQs

Bathroom screeding isn't a weekend DIY job. In a wet area, the screed affects drainage, tile performance, and how well the waterproofing system does its job over time. If the floor is wrong, fixing it usually means removing finished work. That's why this part of bathroom renovations is best handled by experienced tilers working with registered builders who understand the full assembly, not just the visible surface.

Questions worth asking before work starts

When you're speaking with contractors, ask direct questions:

  • Are you a Registered Builder or working under one? That matters when multiple trades and compliance issues need coordination.
  • How will you form the falls to the waste? A clear answer is better than vague reassurance.
  • What screed system are you proposing for this substrate? The answer should reflect the actual floor condition.
  • How do you manage curing and sequencing before tiling starts? If the reply sounds rushed, that's a warning sign.
  • Who is responsible for coordinating screed, waterproofing, and tiling? In failed bathrooms, this is often where accountability disappears.

Melbourne bathroom screed FAQs

How much does screeding a bathroom cost in Melbourne?
It depends on the bathroom size, access, substrate condition, waste location, floor height constraints, and whether the work is part of a full renovation. A simple rescreed and a custom floor build for large-format tiles are not the same scope, so fixed assumptions are risky.

Do I need council approval to re-screed a bathroom?
In many cases, screeding itself isn't the issue. The wider renovation scope is. Structural changes, plumbing relocation, and broader building work can affect approvals and compliance requirements. A Registered Builder can guide that process properly.

What about older Melbourne homes?
Older homes often come with uneven floors, previous patching, timber movement, and legacy waterproofing failures. They can produce excellent results, but they reward careful preparation and punish shortcuts.


If you're planning a bathroom or ensuite and want the floor built properly from the base up, Melbourne Tiling Services P/L handles complete bathroom renovations, screeding, waterproofing, and premium tile installation across Melbourne. Their team of Registered Builders coordinates the whole process so the screed, falls, waterproofing, and tile finish work together the way they should.

Screeding for Tiles: Flawless Finish Guide

You're probably choosing tiles right now. Maybe you've shortlisted a soft stone-look porcelain, or you're weighing up a large-format Kerlite panel against a more forgiving standard tile. The exciting part of a bathroom renovation is always what you can see. The part that decides whether that finish still looks right years later is what sits underneath it.

That hidden layer is often where good renovations separate themselves from expensive call-backs. A bathroom floor can look close enough before tiling, but “close enough” is how you end up with poor falls, proud tile edges, drummy spots, and water that hangs around where it shouldn't. In Melbourne homes, especially in older properties with uneven slabs or awkward transitions, the floor usually needs correction before the first tile goes down.

That's where screeding for tiles matters. In practical terms, it gives the tiler a controlled base to work from and gives the homeowner a better chance of getting the finish they paid for. In renovation work, that base also has to work with waterproofing, existing floor heights, shower set-downs, and door clearances. Those aren't decorative details. They affect whether the bathroom performs properly.

A registered builder looks at screed differently from someone treating it as a quick prep step. It isn't just about making the floor look flatter. It's about coordinating levels, drainage, curing time, and sequencing so the finished room works as a whole. If you're planning floor tiling in a wet area, the standard of the base will often decide the standard of the result, including the quality of the floor tiling outcome in Melbourne homes.

Table of Contents

Your Foundation for a Flawless Renovation

A bathroom renovation often starts with a clean visual idea. Better tiles. Cleaner lines. A walk-in shower. Maybe a stone niche and a frameless screen. Then demolition starts, the old finishes come out, and the actual condition of the floor shows itself.

In Melbourne renovations, it's common to uncover a slab that's not flat, not true, or not suitable for direct tiling. Sometimes the issue is subtle. A dip near the doorway. A high edge where an old wall sat. A floor that seems acceptable until you start setting large-format tiles and every minor variation telegraphs straight through the finish. Other times the problem is obvious. Water has nowhere sensible to run, or the shower area can't be formed properly without rebuilding the substrate.

That's why screeding for tiles isn't a luxury step. It's the part that turns an uneven, unpredictable base into one that can support a premium finish.

Good tile work starts before tile work

Homeowners usually notice tile colour, grout lines, and feature walls. Trades notice the base first. A floor that's out of shape forces compromise into every stage after it.

A proper screed can help resolve practical renovation problems such as:

  • Floor build-up control: It helps manage the finished height where the new bathroom meets adjoining rooms.
  • Drainage formation: It gives the installer the ability to create the right falls in shower and wet zones.
  • Tile presentation: It reduces the chance of visible lippage, especially with long or large-format pieces.
  • Waterproofing compatibility: It allows the floor preparation to be coordinated with membrane work rather than treated as an afterthought.

A beautiful bathroom can still be a poor renovation if the water doesn't move properly and the tile bed isn't stable.

Why registered builder oversight matters

In a bathroom, the floor can't be assessed in isolation. Screed thickness affects transitions, waterproofing detail, fixtures, and scheduling. A registered builder is accountable for how those pieces interact, not just for whether one trade completed one task.

That matters most in renovation work, where every existing condition pushes against the plan. The difference between a tidy result and a recurring defect often comes down to whether someone looked at the whole system early enough.

What Is Floor Screed and Why Is It Essential for Tiling

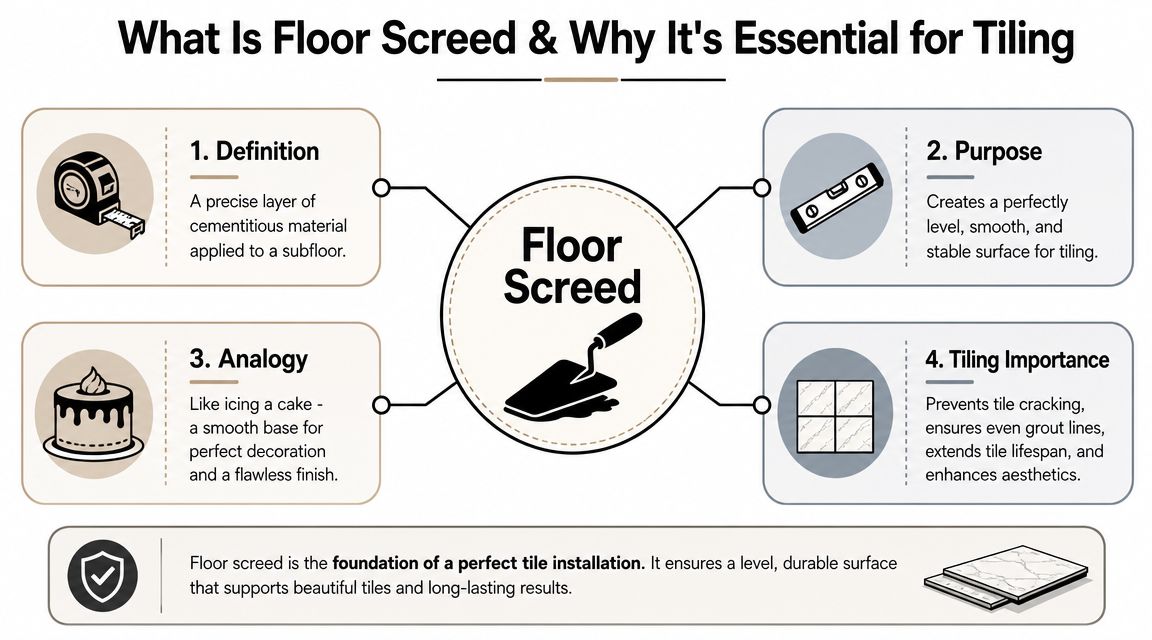
Floor screed is a cementitious layer applied over a subfloor to create a surface that's flatter, more stable, and more usable for tile installation. If the slab underneath is the structure, the screed is the correction layer that gives the tiler control.

The simple way to think about screed

The easiest analogy is cake icing. You can have a solid cake underneath, but if the top is uneven, the final decoration won't sit or present properly. Tiles behave the same way. They need a base that has been brought into line before the finish goes on.

An infographic explaining what floor screed is, its purpose, an analogy, and its importance for tile installation.

In Australian tiling practice, screed is used to create a smooth, level base before tiles are fixed, and the minimum thickness depends on whether the screed is bonded or unbonded. A bonded screed is typically laid at a minimum of 20 mm, while an unbonded screed must be at least 40 mm thick. The same guidance notes that a slurry coat is used before laying screed and that the floor should be allowed to cure properly before operational use, which affects renovation timing and floor build-up in bathrooms and wet areas (Mapei screed guidance for tiling works).

That thickness matters more than most homeowners expect. It influences the finished floor level, the threshold at the door, the relationship to the shower waste, and whether the renovation can tie neatly into the rest of the home.

Why flatness and falls both matter

Screeding for tiles has two jobs. The first is flatness. The second is falls.

Flatness matters because tiles don't hide substrate problems. They expose them. That becomes even more important with large-format porcelain and thin panel products where the eye picks up every irregularity. Guidance on tile substrate preparation notes that bumps bigger than 4 to 5 mm over a 2 m straight edge should be rectified before tiling, and that a liquid or traditional screed is often needed to make the surface tile-ready for a professional finish (UK Screeds guidance on common tiling mistakes).

Falls matter because wet areas must drain. A bathroom floor isn't meant to be flat everywhere. It needs intentional shape. Around showers, that shape has to send water where it belongs without creating birdbaths, awkward edge conditions, or tile cuts that look forced.

Here's what screed does well when it's planned properly:

  • Corrects uneven slabs: Minor highs and lows can be brought under control before tiling starts.
  • Forms drainage paths: Shower floors and wet area transitions can be built with purpose rather than guessed on the day.
  • Supports premium materials: Kerlite, natural stone, and rectified porcelain all benefit from a better substrate.
  • Reduces finish compromise: The tiler doesn't have to “fix” substrate problems with adhesive thickness and hope.

Practical rule: If the floor only looks flat by eye, it hasn't been assessed properly for tile.

Exploring the Main Types of Floor Screed

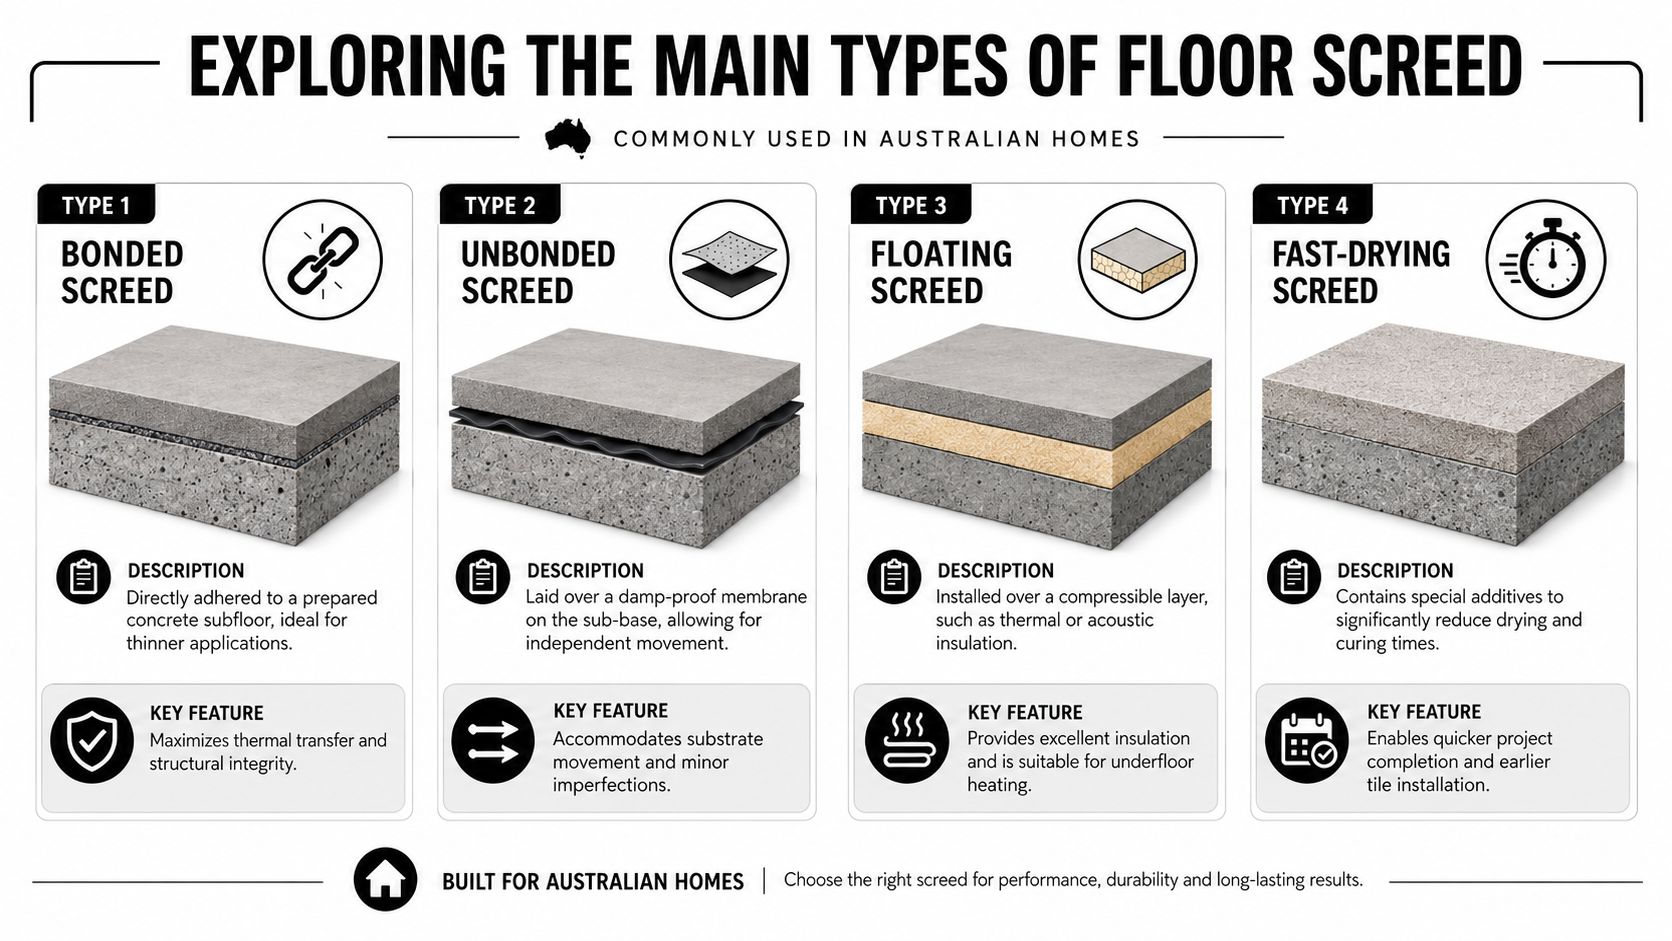
Not every screed does the same job. The right choice depends on the substrate, the room, the thickness available, and what sits under or over it. Homeowners often hear terms like bonded, unbonded, floating, and self-levelling as though they're interchangeable. They're not.

A diagram illustrating the four main types of floor screed commonly used in Australian residential construction.

How the main systems differ

A simple comparison helps.

Screed type What it sits on Typical use Key consideration
Bonded screed Directly bonded to prepared concrete Renovations where build-up needs to be kept tighter Substrate prep is critical because the screed relies on adhesion
Unbonded screed Separated from the base by a membrane or layer Floors needing movement separation or where direct bond isn't suitable Needs more thickness and movement control
Floating screed Over insulation or a compressible layer Areas with acoustic or thermal requirements, including some heated floors The whole build-up must be designed as a system
Self-levelling compound Over a prepared substrate as a correction layer Fine correction where the floor is close but not tile-ready It's not a substitute for every full screed application

In Australian practice, a bonded screed is typically laid at a minimum of 20 mm, while an unbonded screed requires at least 40 mm. For external areas, ARDEX technical guidance specifies bonded screeds at about 15 to 65 mm and unbonded screeds at about 40 to 80 mm, with welded wire mesh required for unbonded systems under AS 3958.1 to control movement (ARDEX Australia external floor screed detail).

That split is practical, not academic. Bonded systems transfer load through adhesion to the slab. Unbonded and floating arrangements need more depth because they behave more independently and have to deal with bending and shrinkage differently.

Which type suits which renovation

For a standard bathroom renovation, bonded screed is often the starting point if the slab can be prepared properly and the build-up needs to stay controlled. It's commonly the right answer when a registered builder is trying to maintain sensible transitions into the hall or adjacent bedroom.

An unbonded screed makes more sense where a membrane, substrate condition, or movement concern means direct adhesion isn't the best path. That extra separation can be helpful, but it comes with thickness implications. In a tight renovation, those extra millimetres can affect everything from threshold trims to vanity clearances.

A floating screed is usually part of a bigger build-up decision. If you're incorporating insulation or looking at under-tile heating in bathroom renovations, the floor assembly needs to be considered as one package rather than pieced together trade by trade.

Self-levelling compounds sit in a different category. They're useful when the substrate is close to acceptable but still outside what the tile finish needs. They don't replace every screed, and they're not a cure for major structural or drainage problems.

More material isn't automatically better. Too much build-up can create drying delays and compatibility issues with later waterproofing and adhesive stages.

A good contractor doesn't start by asking, “Should we screed?” The better question is, “What type of correction does this floor need?”

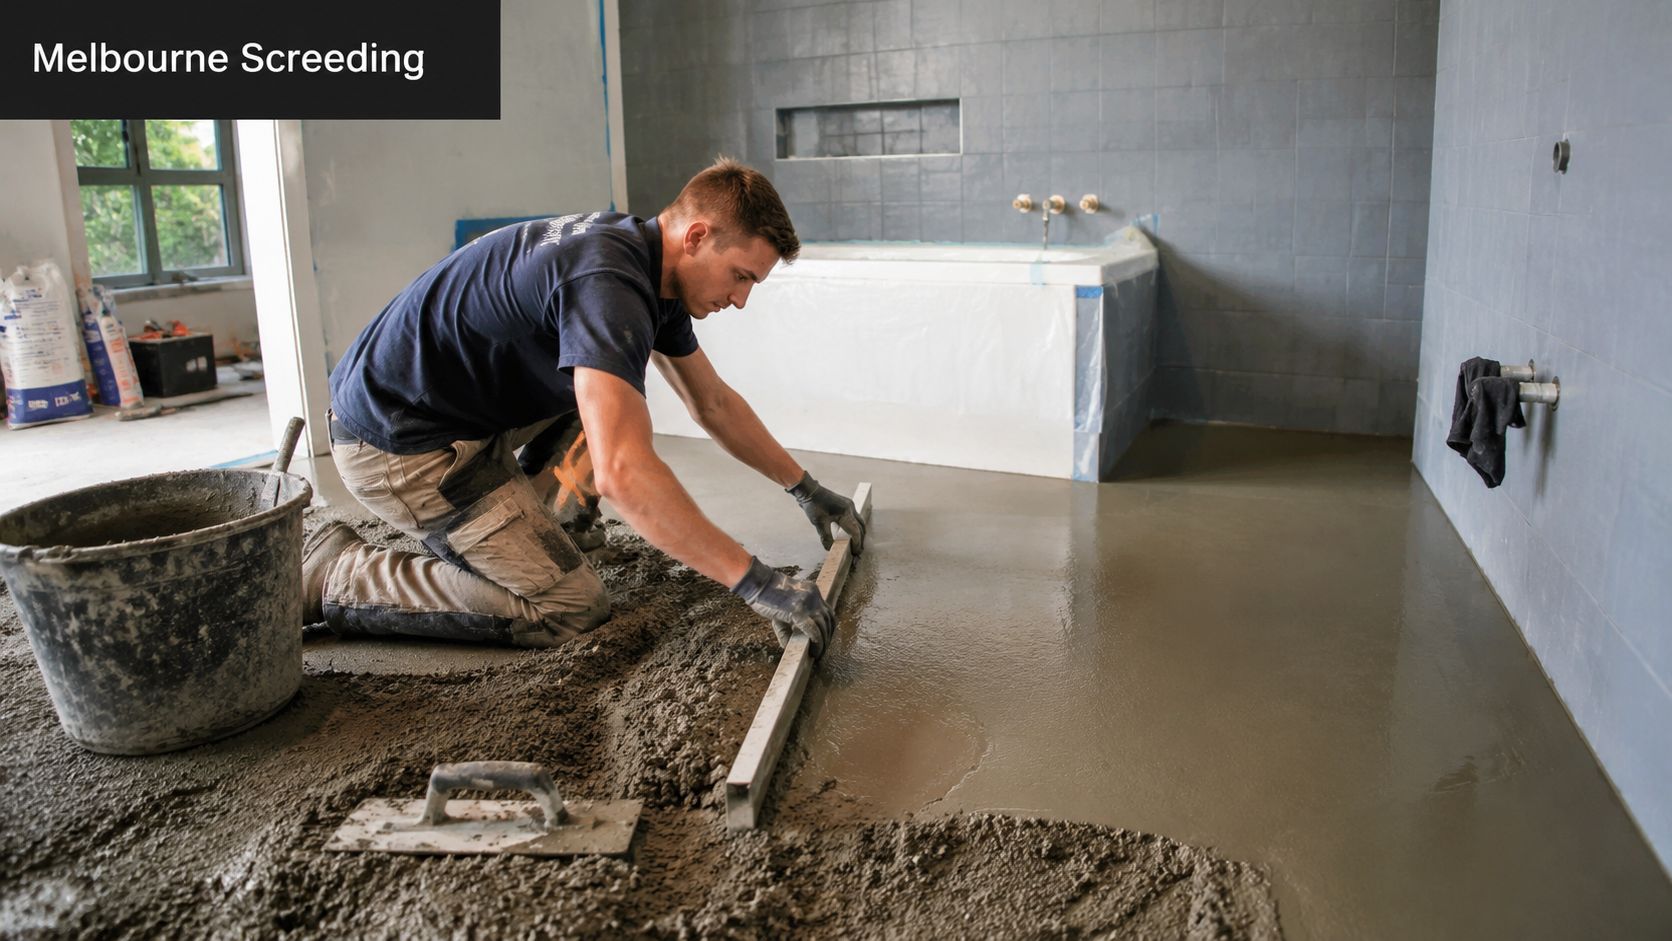
The Screeding Process in a Melbourne Bathroom Renovation

A proper screeding job on a bathroom floor is methodical. It isn't a bag of mix tipped on the slab and shaped by eye. The quality comes from assessment, preparation, sequencing, and patience.

Early in the renovation, the floor needs to be checked for height, condition, cleanliness, and how it relates to the rest of the room. That includes the shower area, doorway, waste positions, and any transition into adjoining finishes.

A professional construction worker kneeling on the floor, leveling wet cement screed in a modern bathroom renovation.

What happens before the screed goes down

The first serious step is substrate preparation. If the base is dusty, contaminated, weak, or poorly keyed, the screed won't perform the way it should. In Australian guidance for tiling works, a slurry coat is used before laying screed, which shows how important the bond interface is in practice.

On site, the process usually looks like this:

  1. Assess the substrate: Check flatness, soundness, levels, and whether the base is suitable for bonded correction or needs another system.
  2. Prepare the floor: Remove contamination, loose material, and anything that could interfere with adhesion or consistency.
  3. Set heights and falls: Establish where the finished tile level needs to land and how water will move in the wet area.
  4. Place and shape the screed: Work to the planned lines, not to visual guesswork.
  5. Protect the area: Keep traffic and follow-on work from damaging the fresh screed.

Australian product data also shows how controlled modern screeding materials have become. One local screed mix product specifies a pot life of about 1 hour at 20°C, an open time of about 20 minutes at 20°C, a final setting time of 24 hours at 20°C, a coverage rate of approximately 3.7 m² per 20 kg bag at 3 mm thickness, an application temperature range of 5°C to 30°C, and a shelf life of 6 months from production (Australian screed product data sheet).

Those figures are useful because they explain why experienced installers pay attention to batch size, room temperature, and staging. Screed has a working window. Once you miss it, finish quality suffers.

Why timing is part of the build quality

The part homeowners most want shortened is curing. It's also the part that shouldn't be rushed.

For ceramic floor finishes in Australia, AS 3958-based guidance cited in local construction commentary recommends continuous curing for at least 7 days followed by about 2 weeks of air-drying before tiling can commence. The same commentary notes movement joints at roughly 4.5 m intervals and that AS 4654.2 prefers a 50 mm minimum unbonded screed, above the 40 mm minimum referenced elsewhere for AS 3958.1. The reason is practical: proper curing and jointing help reduce curling, shrinkage cracking, debonding, and tile tenting (This is Construction on floor screed design).

That's why registered builders and disciplined tilers protect this stage in the programme. Drying time isn't wasted time. It's part of what makes the floor dependable.

A short visual on site practice helps most homeowners understand what that shaping stage involves:

Common Screed Failures and How to Prevent Them

When screeds fail, the symptom is often seen in the tiles. The underlying cause usually started underneath. That's why defects can be misread. Homeowners see cracked grout, hollow sounds, water sitting in the wrong place, or movement at tile edges. The earlier mistake may have been poor prep, wrong product choice, bad curing practice, or rushed sequencing.

Where failures usually begin

Some failures are material-related. A screed can end up weak or crumbly if the mix or application is wrong. Others come from movement and moisture. A floor that dries unevenly or is tiled over too soon can create problems that don't fully show until the bathroom is back in service.

Common failure patterns include:

  • Weak surface strength: The screed powders, breaks down, or doesn't provide a reliable bed for adhesive.
  • Cracking and curling: The floor moves as it dries, especially if curing and protection were poor.
  • Poor drainage: Falls weren't formed correctly, so water ponds instead of clearing.
  • Tile lippage and debonding: The substrate wasn't flat enough, or movement wasn't controlled properly.
  • Tenting or stress transfer: Expansion and contraction weren't managed across the floor build-up.

Poor subfloor preparation has a habit of showing up later as a “tile problem” even when the root cause sits below the adhesive.

Prevention starts before the screed is mixed. The floor has to be assessed thoroughly. If the base needs repair first, it should be repaired. If it only needs local correction, don't overspecify the build-up. If the wet area needs engineered falls, don't leave them to be improvised during tiling.

Why screeding is a risk decision not a line item

General tiling guidance links many failures, from cracking to leaks, to poor subfloor preparation and unsuitable substrate decisions. It also stresses that surfaces need to be properly prepared and free of contaminants before tile work starts. That's why investing in professional screeding is better viewed as a risk-management decision, especially in bathrooms and balconies where later rectification can become far more disruptive than the original prep work (Rubi guidance on common tile-laying mistakes).

For wet areas, this connects directly to the broader relationship between tile, substrate, and membrane. Homeowners comparing quotes should pay close attention to how the contractor handles tiling and waterproofing integration, because that interface is where a lot of avoidable problems begin.

The cheap version of screeding usually isn't cheaper. It just delays the bill until the bathroom is finished and occupied.

Hiring a Screeding and Tiling Expert in Melbourne

A lot of bathroom problems are locked in before the first tile is laid. I see it regularly in Melbourne renovations. The tiles look like the issue, but the underlying problem is an uneven floor, poor set-out, or a screed that was done without enough thought to levels, drainage, and the finish being installed.

That matters even more if the project includes large-format Kerlite or natural stone. Those materials don't hide errors. They show lipping, inconsistent falls, and movement quickly, which is why hiring the right screeding and tiling expert is less about finding someone to spread mud and more about choosing who takes responsibility for the floor build-up as a whole.

Questions worth asking before work starts

A good contractor should be able to explain the floor build-up in plain terms and tell you why they are choosing one method over another. If the answers are vague, or everything is treated as “standard,” treat that as a warning.

Ask questions like:

  • How will you assess whether the floor needs patching, self-levelling, or a full screed?
  • How will the finished height affect the doorway, shower recess, waste position, and adjoining floors?
  • How will falls be formed and checked in the wet area?
  • How will the screed work with the waterproofing system and the tile type selected?
  • What curing time is allowed before waterproofing or tiling starts?

In bathroom work, coordination matters as much as installation skill. A registered builder brings value here because the screed, waste location, membrane detail, and tile layout all have to line up. If those decisions are made in isolation, the risk usually shows up later in the finish.

Screenshot from https://melbournetilingservices.com.au

What to look for in the quote

A useful quote should show how the contractor is thinking, not just give you a price.

Look for detail around:

  • Scope clarity: whether substrate prep, screeding, and any floor correction are included
  • Wet area planning: whether falls, waste positioning, and membrane sequencing have been allowed for
  • Material suitability: whether the screed system suits the room conditions and the tile being installed
  • Programme realism: whether enough time has been allowed for curing, drying, and trade coordination

One local example is Melbourne Tiling Services P/L, which includes screeding within its broader bathroom renovation and floor preparation work. The more important point is who owns the result. For a high-end bathroom, especially one using thin porcelain panels or stone, the right contractor should be able to explain the build-up clearly, identify the risks early, and stand behind how the finished floor performs after handover.

If a contractor talks only about tile selection and not about levels, substrate condition, and falls, they are missing the part that usually causes the defect.

Frequently Asked Questions About Screeding for Tiles

Can I tile straight onto my concrete slab

Sometimes, yes. Often, no.

If the slab is sound, clean, appropriately flat, and already gives you the right levels and drainage, direct tiling may be possible. In many bathroom renovations, though, the existing slab isn't good enough for the finish being installed. Large-format porcelain, Kerlite, and natural stone are less forgiving than people expect. If the floor is out, the tiles will show it.

How much does screeding a bathroom floor cost in Melbourne

The price depends on the condition of the existing floor, the thickness required, access, the type of screed or levelling product, and how the work fits into the wider renovation. There isn't one honest number that suits every bathroom.

A better way to assess value is to compare the scope. Is the quote allowing for substrate preparation, proper falls, curing time, and coordination with waterproofing? A low figure can leave out exactly the work that prevents defects later.

Is screeding a DIY job

For a laundry or a simple utility area, some homeowners attempt minor floor correction themselves. In a bathroom, especially a shower area, DIY screeding is risky. The margin for error is small, and the consequences sit under every layer that follows.

The hard part isn't only spreading the mix. It's reading the substrate, setting the heights, forming reliable falls, and sequencing the work with waterproofing and tiling. That's why this step is usually better handled by an experienced tiler or a registered builder managing the renovation.

Is self-levelling the same as screeding

Not really. Self-levelling compounds are useful correction products, but they don't replace every screed application. If a bathroom floor needs shaped falls or a more substantial build-up, a traditional screed system is often the more appropriate solution.

Is screeding always worth it

No. If the floor is already suitable, unnecessary build-up can create new problems. The right approach depends on the substrate, tile format, wet area detail, and renovation constraints. The point isn't to add screed by default. The point is to correct the floor properly, and only as much as needed.


If you're planning a bathroom or ensuite and want clear advice on whether your floor needs patching, self-levelling, or full screeding for tiles, speak with Melbourne Tiling Services P/L. As registered builders handling bathroom renovations, waterproofing, screeding, and tiling, they can assess the full floor build-up and explain the practical options before work begins.