
You notice damp skirting outside the shower after your morning routine. A musty smell has appeared, the paint beside the bathroom feels swollen, or water is collecting on the floor beyond the screen. The tiles still look intact, so you may be wondering, why is my shower leaking?
For Melbourne homeowners, landlords and property managers, the visible symptom is often several steps away from the actual defect. Water can travel behind tiles through a failed junction, a pipe penetration, a poorly sealed screen track or a shower floor that holds water instead of directing it to the waste. By the time staining appears in an adjoining room, the shower may have been allowing moisture into the building system for some time.
A quick silicone patch can sometimes contain surface water, but it can't repair a failed membrane or incorrect fall. This guide explains how a shower is designed to stay watertight, which failure points deserve attention, how to carry out safe observations at home and when bathroom renovations or registered builders are the sensible next step.
Table of Contents
- Introduction Why Your Shower Leak Needs Attention Now
- How a Shower Is Supposed to Stay Watertight
- Common Reasons Why Your Shower Is Leaking
- How to Diagnose Where the Leak Is Coming From
- Temporary Fixes You Can Try Before Calling a Professional
- Bathroom Renovations and When to Call Registered Builders
- Take Action Before a Small Leak Becomes Major Damage
Introduction Why Your Shower Leak Needs Attention Now
You finish a shower and notice a dark mark beside the bathroom. The floor outside the screen feels damp, or a skirting board has started to soften. Nothing looks seriously wrong inside the shower, yet the moisture keeps returning. That is often how a concealed leak begins to announce itself.
A shower can remain usable while water is escaping from the system around it. Moisture may pass through a failed joint, pipe penetration, screen seal or membrane, then travel sideways before appearing in a wall, ceiling or adjoining room. The visible stain is therefore more like the end of a trail than a map of the original defect.
Possible sources include concealed plumbing, mixer cartridges, showerheads, hoses, wall penetrations, grout, seals and membranes. Recent guidance on common shower leak causes also separates leaks that occur during use from moisture that becomes visible after the shower has finished. That timing can help narrow the investigation, but it does not prove that the wettest spot is the source.
Why the tiles aren't the whole barrier
Tiles provide the hard, washable surface you see and touch. They are part of the finish, not the complete waterproofing system. The layers behind them work together, much like a sealed container with a protective outer surface. If the hidden barrier is interrupted at a corner, wall-to-floor junction, hob, step-down or pipe penetration, water can enter the structure while the tiles still look sound.
Grout can crack, powder or allow surface water through, but replacing grout alone will not restore a membrane that has been damaged or poorly connected. A recurring damp patch should be treated as a building-system problem until inspection shows that a simple seal is the only fault.
What to do first
Do not start by assuming regrouting will solve the leak. Note whether the dampness appears during showering or later, photograph stains and loose finishes, and keep the area as dry as practical. Avoid removing tiles or cutting into walls before the source has been assessed, because those actions can hide useful evidence and create further damage.
Arrange an inspection if the moisture returns, spreads, smells musty or affects another room. The next steps are to identify how a shower is designed to stay watertight, then separate safe temporary containment from repairs that require a qualified plumber or waterproofer.
How a Shower Is Supposed to Stay Watertight
A properly built shower keeps water moving through connected layers. The substrate supports the walls and floor, the screed creates the fall, the waterproof membrane blocks moisture from reaching the structure, and tiles protect the finished surface. Flexible sealant joints accommodate movement where walls meet, floors change direction and fittings pass through the surface.
The membrane works like a raincoat beneath a shirt. Tiles provide the visible, hard-wearing finish, while the membrane stops water entering the building. Grout fills tile joints, but neither grout nor tiles should be treated as the primary waterproof barrier. A shower can therefore look sound while its hidden system is failing.
The barrier must continue through vulnerable points
The NCC 2022 wet-area provisions require waterproofing across the shower floor, including a hob or step-down. Shower walls must be waterproofed to at least 1800 mm above the floor substrate. The waterproofing must also continue through wall junctions, wall-to-floor junctions and penetrations within the shower area, with not less than 40 mm either side of wall junctions within the shower area.
These measurements correspond to places homeowners can see. A shower rose can wet an area well above a low splash line, and corners repeatedly expand and contract as they become wet and dry. A mixer, shower rose or screen fixing interrupts the wall surface, so the membrane detail around each penetration must remain continuous.
The floor needs to move water, not store it
The floor screed should guide water towards the waste. Australian wet-area guidance aligned with AS 3740 commonly cites a shower fall of about 1:80 to 1:100, while other guidance may use about 1:80 to 1:50 depending on the application. Waterproofing and tiling guidance explains how falls, drainage and testing work together. This practical overview of shower and wet-area falls also explains the geometry that helps prevent ponding.
A flat or interrupted fall leaves water sitting beside the waste, at the base of the screen, against a wall junction or near a threshold. Even with an intact membrane, standing surface water keeps grout, silicone and perimeter details visibly wet. It can also mask a deeper fault behind the tiles.
For a closer look at the construction sequence, this guide to how to waterproof a shower shows why surface preparation and junction detailing matter as much as the final tile finish.
Common Reasons Why Your Shower Is Leaking
A shower leak can follow several pathways, and the visible clue depends on where water leaves the system. A stained skirting board may point to moisture moving through a wall, while a puddle outside the screen may be a surface containment problem. The same symptom can have different causes, so avoid treating the first damaged joint as conclusive proof.
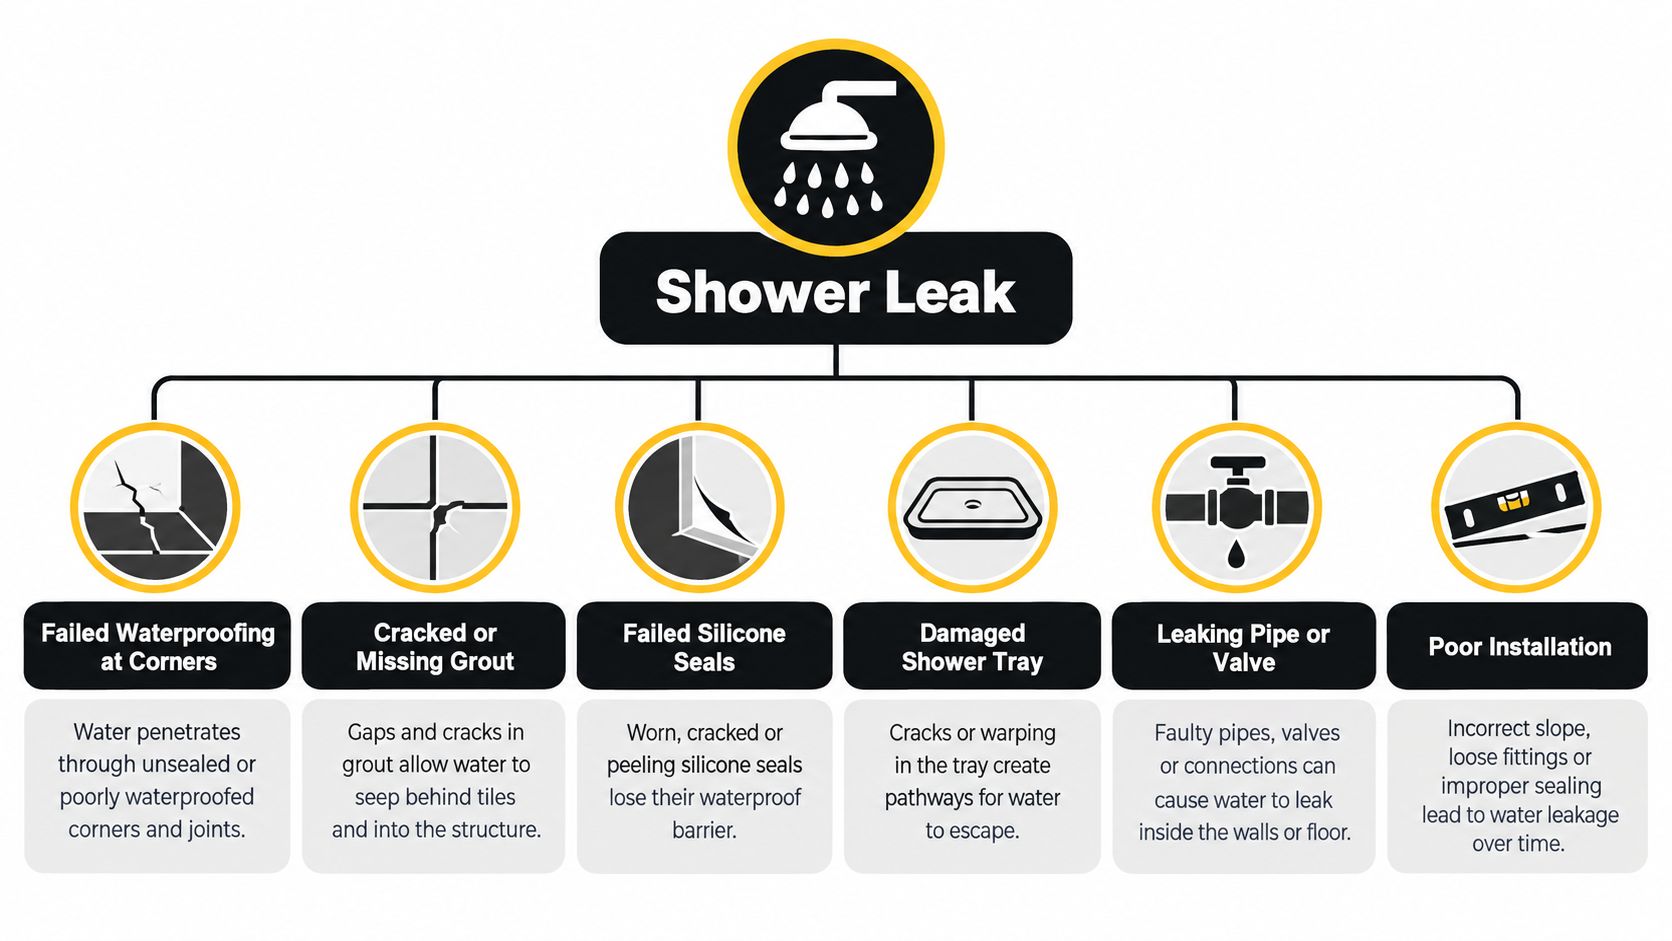
Six failure pathways to check
Failed membrane at corners and junctions is a high-probability cause because these areas require continuous waterproofing. If the membrane stops short, wrinkles, separates or fails around a wall-to-floor transition, water can pass behind the tiles and migrate into the substrate. Loose tiles, swollen skirtings and staining in an adjacent room may appear after repeated use rather than immediately.
Cracked or missing grout can allow water into the tile assembly, especially where joints have opened or tiles move. Regrouting may improve the surface, but it won't restore a missing membrane beneath the finish. Cracks beside corners, fixtures or a shower waste deserve more attention than an isolated cosmetic mark.
Failed silicone seals often appear as peeling, mould-stained or separated beads at changes of plane. Silicone is a flexible surface joint, not a substitute for waterproofing. If water is entering because the substrate or membrane is defective, applying a new bead only covers the symptom.
Screen seals and tracks can direct water outside the shower even when the wall system is sound. A worn bottom seal, blocked track or poorly sealed frame may leave a neat trail across the bathroom floor. This is a surface escape, but persistent water at the screen base can also expose weaknesses in the floor junction.
Leaking plumbing connections can occur at the mixer, shower rose, flexible hose, valve or another wall penetration. Water that appears when the shower is running suggests one set of possibilities, while dripping after the shower is off may indicate a concealed valve or cartridge problem. Don't cut into the wall to investigate. A licensed plumber can test the fitting and identify whether the source is plumbing rather than waterproofing.
Waterlogged substrates, screeds or adjoining wet areas can confuse the diagnosis. Moisture from a balcony, neighbouring bathroom or shared wall may travel into the same room and imitate a shower leak. Substandard original construction, inadequate falls and missing or poorly installed flashings are why surface patching often fails to deliver lasting results, as discussed in this Australian review of waterproofing failures.
A useful first distinction is whether water escapes visibly during showering or appears later as delayed staining. The first pattern often points towards the screen, hose, showerhead or surface joints. Delayed moisture is more consistent with water moving through concealed building or plumbing components, although only inspection can confirm that.
How to Diagnose Where the Leak Is Coming From
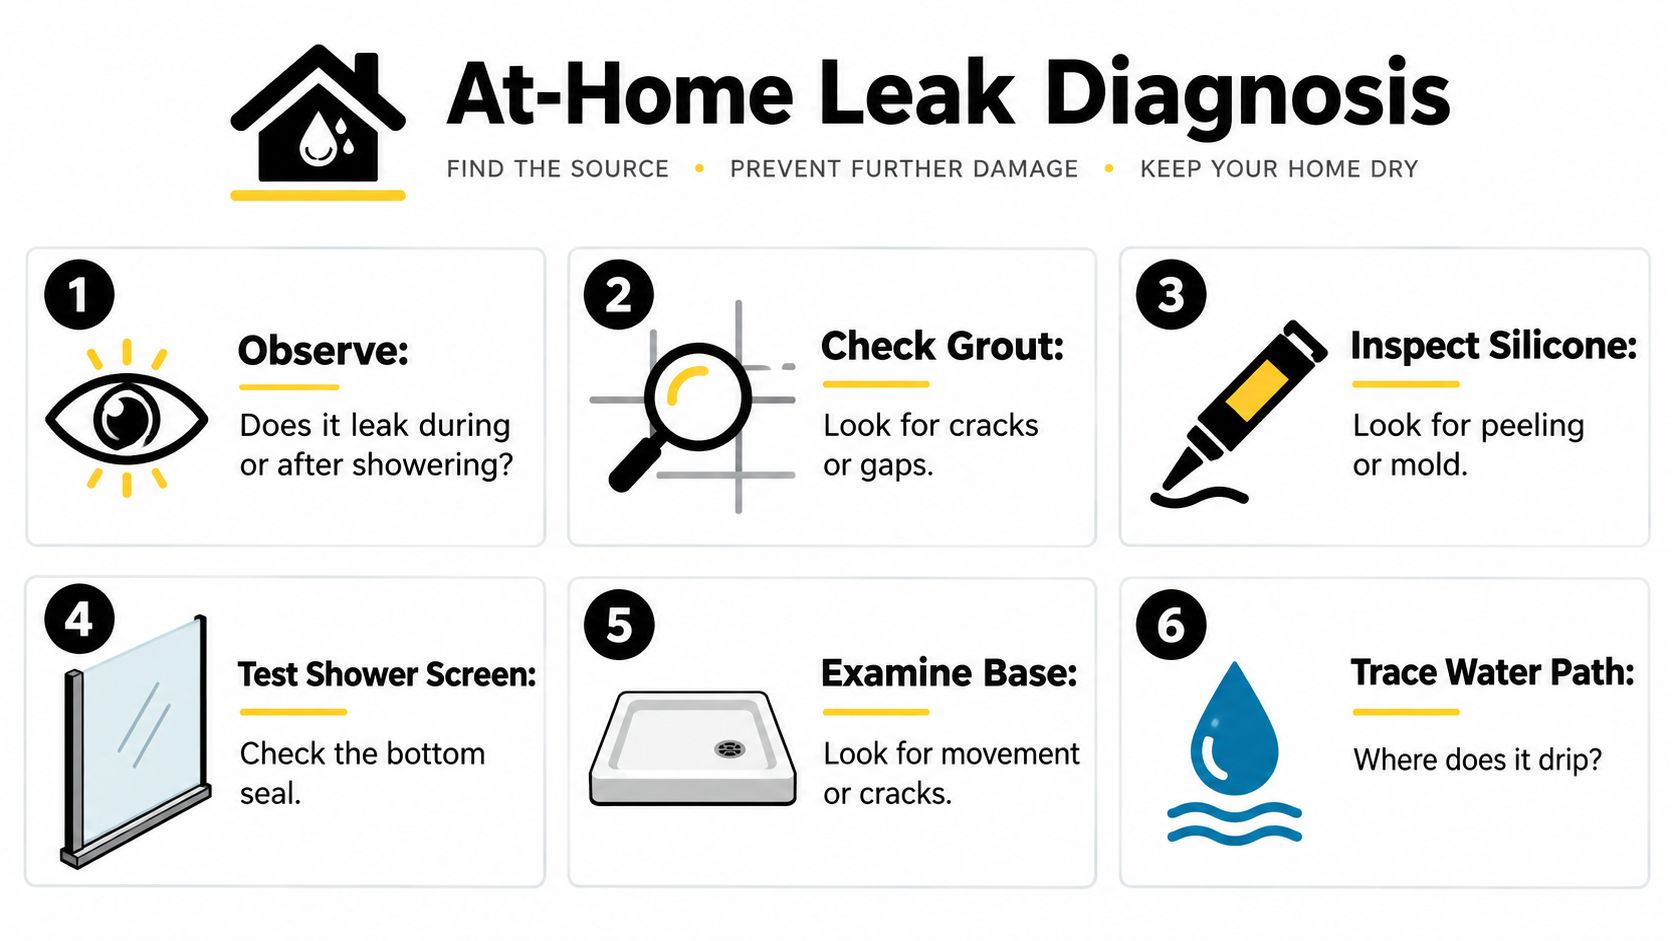
Start with observation, not demolition. Dry the bathroom as thoroughly as practical, note the condition of the floor and nearby walls, then record what changes when the shower operates. A simple timeline can separate a leak that happens at the fixture from moisture that travels through the building after use.
Work from visible water to concealed defects
Observe the timing. Does water appear while the shower is running, shortly afterwards or without recent use? A showerhead or hose connection is easier to suspect when droplets appear directly during operation. Moisture that returns later needs a wider inspection.
Inspect the grout and silicone. Look for open joints, hairline cracks, peeling beads and mould concentrated along a corner. These observations help identify entry points, but they don't prove the membrane below has failed.
Check the screen and track. Run your eyes along the bottom seal, corners and frame. Water escaping at the screen can be a containment defect rather than a waterproofing defect.
Watch the waste. During normal use, look for water pooling at the wall, screen track or threshold instead of moving steadily to the waste. Poor geometry can keep the perimeter wet and increase pressure on joints.
Inspect nearby rooms. Check skirtings, flooring, cupboards, ceilings below and the reverse side of the shower wall. Don't rely only on the point directly outside the shower, because moisture can travel laterally.
Record evidence. Photograph damaged finishes and write down when the mark changes. This gives a waterproofer or plumber useful information without invasive testing.
For concealed valve problems, this guide on how to spot hidden shower valve leaks offers helpful background on why a fitting behind the wall can mimic a waterproofing failure. If the shower continues dripping when it isn't being used, arrange a plumbing assessment rather than sealing over the visible fitting.
A specialist service such as shower leak detection in Melbourne can then use controlled inspection and targeted testing to narrow the source before repair work begins.
Shower leak clues and what they suggest
| What You See | Most Likely Source | Next Check |
|---|---|---|
| Water runs outside the screen during use | Screen seal, track or surface containment | Inspect the bottom seal, frame corners and track |
| Damp skirting appears after showering | Membrane, junction or plumbing penetration | Photograph timing and inspect the adjoining wall |
| Showerhead drips after being turned off | Showerhead connection, hose, valve or cartridge | Check visible washers and arrange plumbing inspection if it persists |
| Water sits at the wall or screen base | Poor fall, ponding or blocked drainage path | Observe movement towards the waste |
| Loose tiles or staining near a corner | Failed junction waterproofing or substrate moisture | Avoid surface-only patching and seek professional assessment |
| Mould is concentrated in silicone | Persistently wet joint or poor ventilation | Clean safely, dry the area and inspect the underlying cause |
Don't remove tiles or drill inspection holes unless a qualified professional has planned the investigation. Uncontrolled opening can damage waterproofing further and make the original moisture path harder to identify.
Temporary Fixes You Can Try Before Calling a Professional
Temporary work is useful when it reduces water exposure while you arrange a proper assessment. It becomes risky when it creates confidence that a failed waterproofing system has been repaired. Keep that distinction clear.
Clean and dry surface joints first. Remove loose residue from a failing silicone bead, allow the area to dry, then apply a compatible bathroom-grade silicone only where the defect is clearly a surface seal. Follow the product instructions and keep the shower unused for the required curing period.
Low-risk containment measures
- Limit water spread: Use a shower curtain or temporary barrier where appropriate, dry the floor after use and keep towels away from prolonged contact with damp skirtings.
- Improve ventilation: Run the exhaust fan, open suitable windows and leave the bathroom dry between uses. Ventilation won't repair a membrane, but it can reduce lingering humidity.
- Check visible fittings: A loose shower hose or showerhead connection may respond to careful tightening or a replacement washer. Don't force corroded fittings or disturb concealed wall connections.
- Monitor the result: Photograph the area before and after the temporary measure, then record whether dampness returns during or after use.

What patches can't achieve
Painting grout with a surface sealer, adding silicone over mouldy joints or spreading a waterproof coating across tiles won't rebuild a failed membrane. It also won't correct a reversed fall, repair a waterlogged screed or seal a pipe penetration hidden behind the wall.
A proper caulking service in Melbourne may be suitable when the inspection confirms that a deteriorated surface joint is the actual source. If dampness continues after the patch, stop repeating the same repair and arrange a system-level diagnosis.
Don't use the shower if water is reaching electrical fittings, causing a slip hazard or spreading into flooring and walls. A short period of careful containment is reasonable, but persistent moisture needs a qualified plumber, waterproofer, tiler or builder to identify the cause and specify the correct rectification.
Bathroom Renovations and When to Call Registered Builders
A leak becomes a renovation issue when access to the failed component requires removal of tiles, screed, substrate or fittings. At that point, replacing one visible joint can leave the surrounding system untouched. Coordinating the work properly matters because waterproofing, plumbing, falls, tiling and screen installation must work together.
Registered Unlimited Builders can manage that coordination by engaging licensed carpenters, plumbers, electricians, tilers and waterproofers. For a Melbourne bathroom or ensuite, the scope may include removing affected finishes, checking framing and substrate, rebuilding screeds, correcting falls, applying a compliant membrane, testing the wet area and reinstalling the selected finishes.
What a durable rectification should include
The repair brief should identify the suspected source, the areas requiring removal and the tests planned before the bathroom is closed up again. Australian guidance aligned with AS 3740 and current wet-area practice commonly describes a flood test holding water to a minimum depth of 25 mm for at least 24 hours, with no drop in level. This waterproofing reference also explains the practical importance of continuous shower waterproofing under NCC requirements.
A controlled test before tiling gives the team an opportunity to find membrane or drainage problems while the work remains accessible. It is much more useful than discovering a leak after the screen, vanity and finished floor have been installed.
Choosing the right renovation scope
A registered builder should explain whether the work is a local repair, a partial rebuild or a full bathroom renovation. Ask for a written scope that covers demolition, waste removal, plumbing alterations, substrate preparation, waterproofing, testing, tile installation, silicone joints and screen reinstatement.
Premium finishes such as porcelain, marble and large-format Kerlite can be installed successfully, but they still depend on a correctly prepared base. Three-dimensional drawings and a renovation calculator can help homeowners understand layout, material choices and the likely scope before work starts. In the publisher's stated planning information, a typical renovation budget is discussed around a median $10,000, though the actual price depends on the condition, design and finishes of each project.
Landlords and property managers should also keep inspection records, photographs and compliance documents. Those records help separate a fixture repair from concealed building damage and make it easier to plan urgent access without approving a cosmetic fix that won't address the source.
Take Action Before a Small Leak Becomes Major Damage
A shower can look presentable while moisture is reaching framing, flooring or an adjoining room. Start by documenting the timing, location and visible clues. Then reduce water exposure, avoid invasive DIY work and ask a qualified professional to determine whether the source is a fitting, screen, fall, substrate or waterproofing detail.
A practical when-to-call checklist
- Call a plumber when water drips from a mixer, showerhead, hose or concealed valve, especially when dripping continues while the shower is off.
- Call a waterproofer or builder when tiles loosen, staining spreads, dampness is delayed or the shower repeatedly fails after surface repairs.
- Ask about testing before approving retiling. The scope should address falls, membrane continuity, junctions, penetrations and pre-tile flood testing.
- Record the damage with photographs and dates, including the reverse side of walls, skirtings, cupboards and ceilings below.
- Clean mould carefully with suitable precautions. This resource on how to clean shower mould safely can help with surface hygiene, but mould removal doesn't replace leak rectification.
For Melbourne and greater Victoria, request a free inspection and quote that explains the cause and the proposed repair sequence. A durable result comes from correcting the system behind the tiles, not only making the visible joint look new.
Melbourne Tiling Services P/L provides bathroom renovations, shower leak rectification, waterproofing, screeding, tiling and shower-screen installation across Melbourne and greater Victoria, with registered builder coordination for connected trades. Visit Melbourne Tiling Services P/L to arrange an inspection, request a free quote and discuss the right repair scope for your leaking shower.
Write a Comment