Why Is My Shower Leaking and How to Fix It Fast

You notice damp skirting outside the shower after your morning routine. A musty smell has appeared, the paint beside the bathroom feels swollen, or water is collecting on the floor beyond the screen. The tiles still look intact, so you may be wondering, why is my shower leaking?

For Melbourne homeowners, landlords and property managers, the visible symptom is often several steps away from the actual defect. Water can travel behind tiles through a failed junction, a pipe penetration, a poorly sealed screen track or a shower floor that holds water instead of directing it to the waste. By the time staining appears in an adjoining room, the shower may have been allowing moisture into the building system for some time.

A quick silicone patch can sometimes contain surface water, but it can't repair a failed membrane or incorrect fall. This guide explains how a shower is designed to stay watertight, which failure points deserve attention, how to carry out safe observations at home and when bathroom renovations or registered builders are the sensible next step.

Table of Contents

Introduction Why Your Shower Leak Needs Attention Now

You finish a shower and notice a dark mark beside the bathroom. The floor outside the screen feels damp, or a skirting board has started to soften. Nothing looks seriously wrong inside the shower, yet the moisture keeps returning. That is often how a concealed leak begins to announce itself.

A shower can remain usable while water is escaping from the system around it. Moisture may pass through a failed joint, pipe penetration, screen seal or membrane, then travel sideways before appearing in a wall, ceiling or adjoining room. The visible stain is therefore more like the end of a trail than a map of the original defect.

Possible sources include concealed plumbing, mixer cartridges, showerheads, hoses, wall penetrations, grout, seals and membranes. Recent guidance on common shower leak causes also separates leaks that occur during use from moisture that becomes visible after the shower has finished. That timing can help narrow the investigation, but it does not prove that the wettest spot is the source.

Why the tiles aren't the whole barrier

Tiles provide the hard, washable surface you see and touch. They are part of the finish, not the complete waterproofing system. The layers behind them work together, much like a sealed container with a protective outer surface. If the hidden barrier is interrupted at a corner, wall-to-floor junction, hob, step-down or pipe penetration, water can enter the structure while the tiles still look sound.

Grout can crack, powder or allow surface water through, but replacing grout alone will not restore a membrane that has been damaged or poorly connected. A recurring damp patch should be treated as a building-system problem until inspection shows that a simple seal is the only fault.

What to do first

Do not start by assuming regrouting will solve the leak. Note whether the dampness appears during showering or later, photograph stains and loose finishes, and keep the area as dry as practical. Avoid removing tiles or cutting into walls before the source has been assessed, because those actions can hide useful evidence and create further damage.

Arrange an inspection if the moisture returns, spreads, smells musty or affects another room. The next steps are to identify how a shower is designed to stay watertight, then separate safe temporary containment from repairs that require a qualified plumber or waterproofer.

How a Shower Is Supposed to Stay Watertight

A properly built shower keeps water moving through connected layers. The substrate supports the walls and floor, the screed creates the fall, the waterproof membrane blocks moisture from reaching the structure, and tiles protect the finished surface. Flexible sealant joints accommodate movement where walls meet, floors change direction and fittings pass through the surface.

The membrane works like a raincoat beneath a shirt. Tiles provide the visible, hard-wearing finish, while the membrane stops water entering the building. Grout fills tile joints, but neither grout nor tiles should be treated as the primary waterproof barrier. A shower can therefore look sound while its hidden system is failing.

The barrier must continue through vulnerable points

The NCC 2022 wet-area provisions require waterproofing across the shower floor, including a hob or step-down. Shower walls must be waterproofed to at least 1800 mm above the floor substrate. The waterproofing must also continue through wall junctions, wall-to-floor junctions and penetrations within the shower area, with not less than 40 mm either side of wall junctions within the shower area.

These measurements correspond to places homeowners can see. A shower rose can wet an area well above a low splash line, and corners repeatedly expand and contract as they become wet and dry. A mixer, shower rose or screen fixing interrupts the wall surface, so the membrane detail around each penetration must remain continuous.

The floor needs to move water, not store it

The floor screed should guide water towards the waste. Australian wet-area guidance aligned with AS 3740 commonly cites a shower fall of about 1:80 to 1:100, while other guidance may use about 1:80 to 1:50 depending on the application. Waterproofing and tiling guidance explains how falls, drainage and testing work together. This practical overview of shower and wet-area falls also explains the geometry that helps prevent ponding.

A flat or interrupted fall leaves water sitting beside the waste, at the base of the screen, against a wall junction or near a threshold. Even with an intact membrane, standing surface water keeps grout, silicone and perimeter details visibly wet. It can also mask a deeper fault behind the tiles.
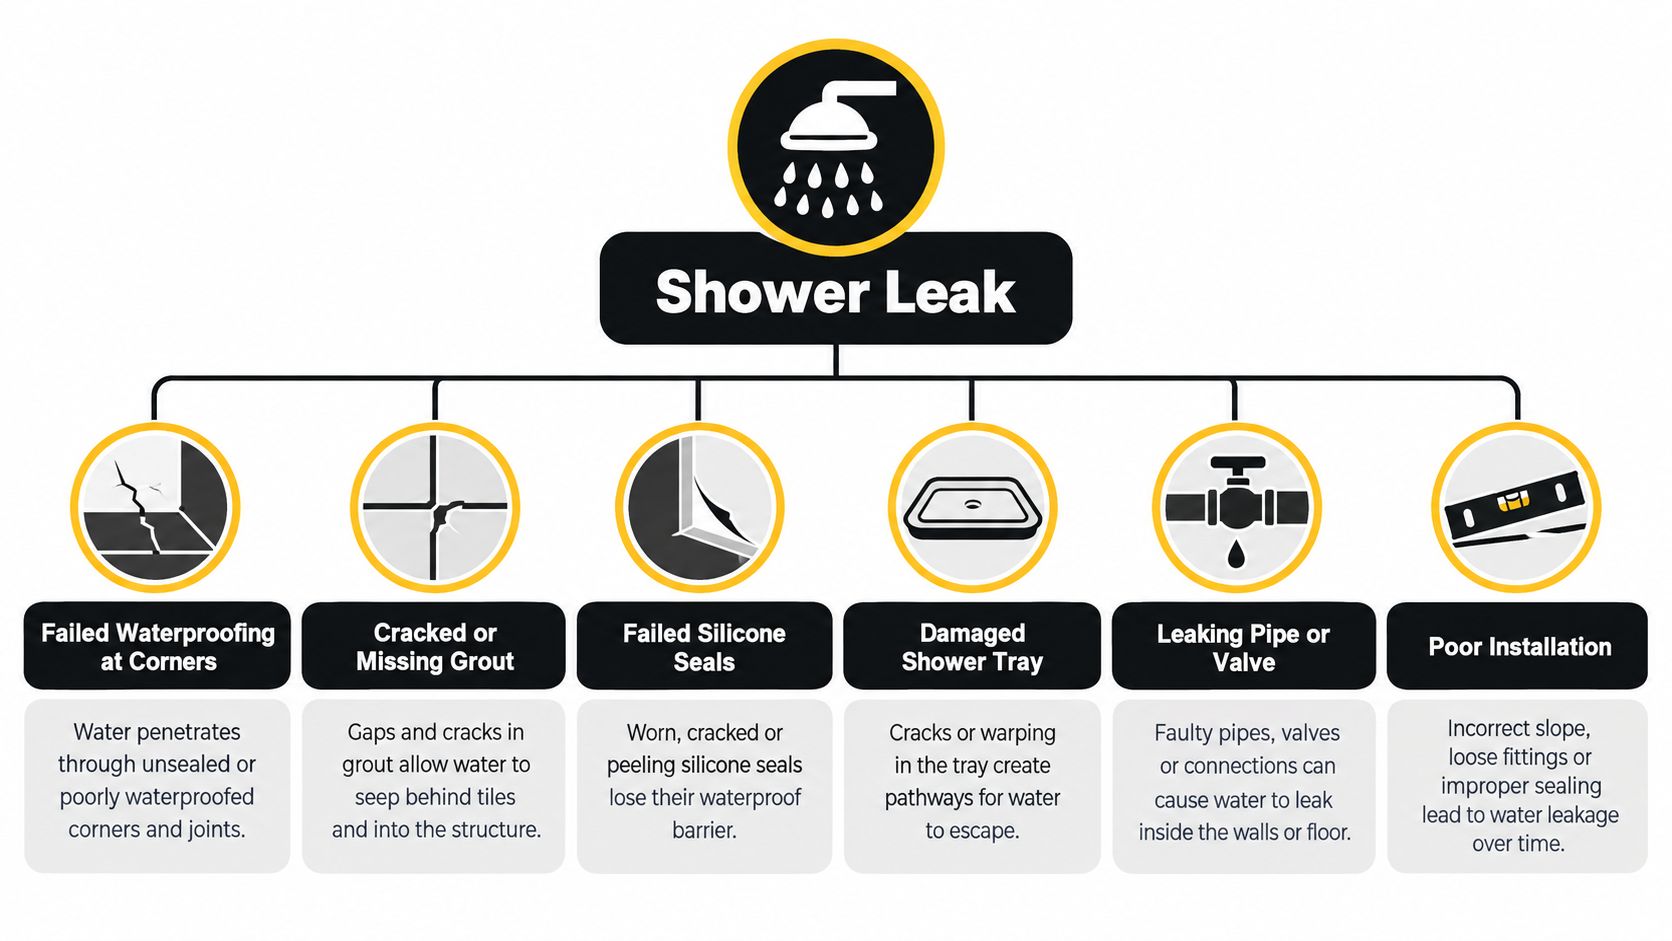
A diagram illustrating common causes of shower leaks, including cracked grout, failed seals, and poor installation.

For a closer look at the construction sequence, this guide to how to waterproof a shower shows why surface preparation and junction detailing matter as much as the final tile finish.

Common Reasons Why Your Shower Is Leaking

A shower leak can follow several pathways, and the visible clue depends on where water leaves the system. A stained skirting board may point to moisture moving through a wall, while a puddle outside the screen may be a surface containment problem. The same symptom can have different causes, so avoid treating the first damaged joint as conclusive proof.

Six failure pathways to check

Failed membrane at corners and junctions is a high-probability cause because these areas require continuous waterproofing. If the membrane stops short, wrinkles, separates or fails around a wall-to-floor transition, water can pass behind the tiles and migrate into the substrate. Loose tiles, swollen skirtings and staining in an adjacent room may appear after repeated use rather than immediately.

Cracked or missing grout can allow water into the tile assembly, especially where joints have opened or tiles move. Regrouting may improve the surface, but it won't restore a missing membrane beneath the finish. Cracks beside corners, fixtures or a shower waste deserve more attention than an isolated cosmetic mark.

Failed silicone seals often appear as peeling, mould-stained or separated beads at changes of plane. Silicone is a flexible surface joint, not a substitute for waterproofing. If water is entering because the substrate or membrane is defective, applying a new bead only covers the symptom.

Screen seals and tracks can direct water outside the shower even when the wall system is sound. A worn bottom seal, blocked track or poorly sealed frame may leave a neat trail across the bathroom floor. This is a surface escape, but persistent water at the screen base can also expose weaknesses in the floor junction.

Leaking plumbing connections can occur at the mixer, shower rose, flexible hose, valve or another wall penetration. Water that appears when the shower is running suggests one set of possibilities, while dripping after the shower is off may indicate a concealed valve or cartridge problem. Don't cut into the wall to investigate. A licensed plumber can test the fitting and identify whether the source is plumbing rather than waterproofing.

Waterlogged substrates, screeds or adjoining wet areas can confuse the diagnosis. Moisture from a balcony, neighbouring bathroom or shared wall may travel into the same room and imitate a shower leak. Substandard original construction, inadequate falls and missing or poorly installed flashings are why surface patching often fails to deliver lasting results, as discussed in this Australian review of waterproofing failures.
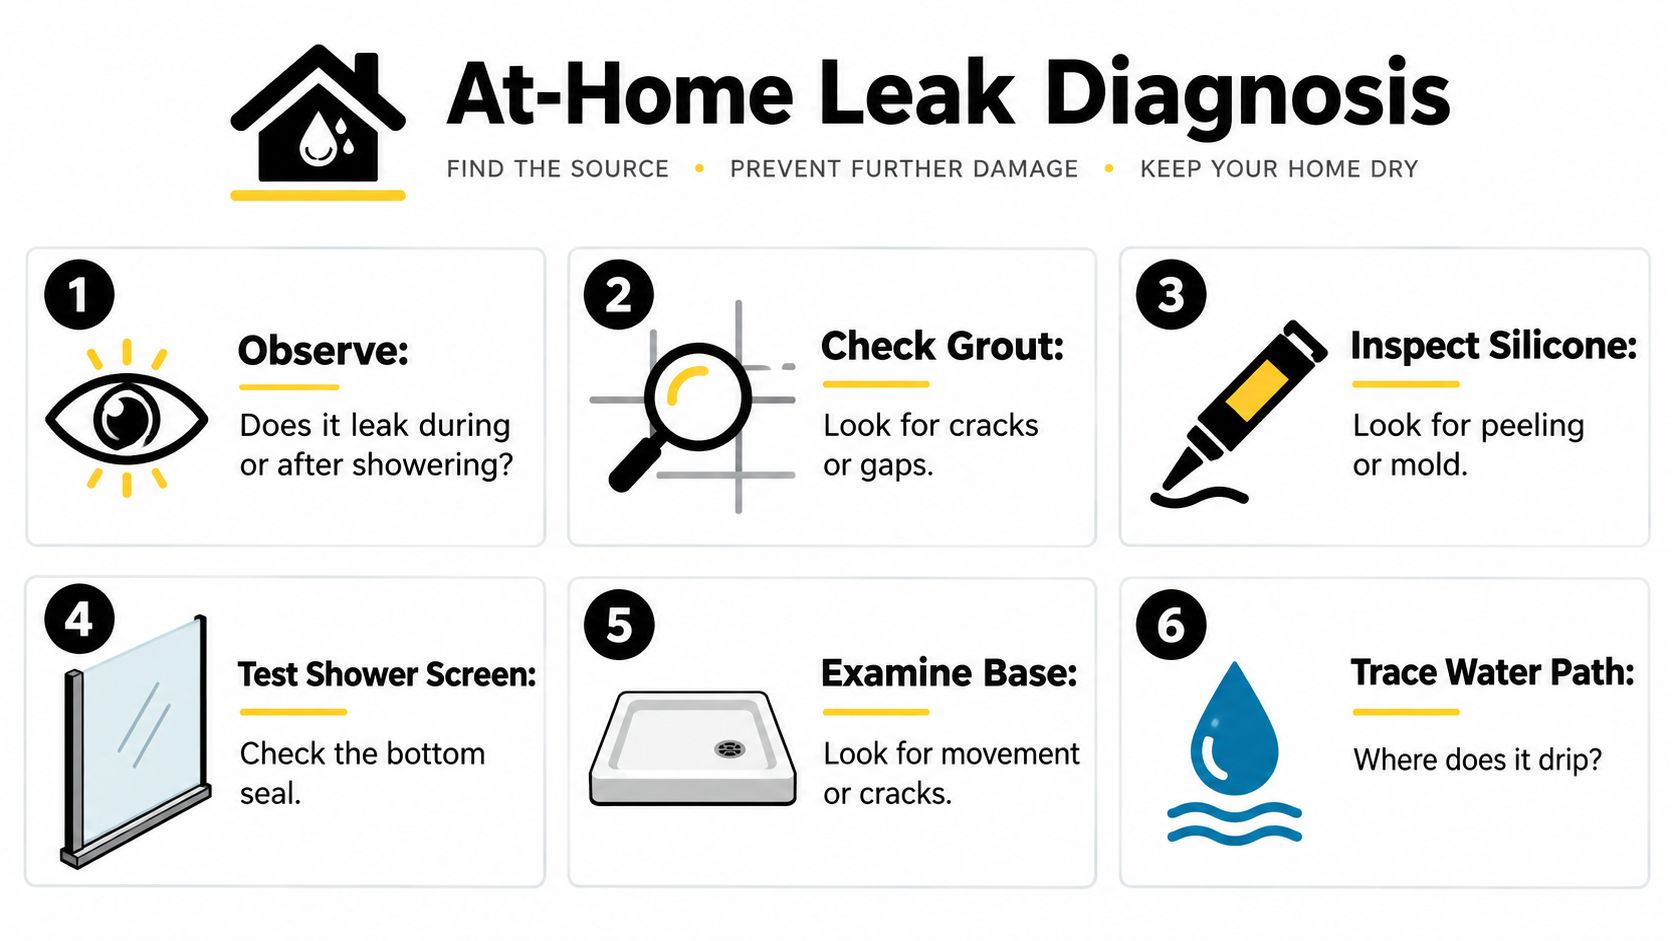
An infographic titled At-Home Leak Diagnosis providing six steps to identify and prevent shower water leaks.

A useful first distinction is whether water escapes visibly during showering or appears later as delayed staining. The first pattern often points towards the screen, hose, showerhead or surface joints. Delayed moisture is more consistent with water moving through concealed building or plumbing components, although only inspection can confirm that.

How to Diagnose Where the Leak Is Coming From

Start with observation, not demolition. Dry the bathroom as thoroughly as practical, note the condition of the floor and nearby walls, then record what changes when the shower operates. A simple timeline can separate a leak that happens at the fixture from moisture that travels through the building after use.

Work from visible water to concealed defects

  1. Observe the timing. Does water appear while the shower is running, shortly afterwards or without recent use? A showerhead or hose connection is easier to suspect when droplets appear directly during operation. Moisture that returns later needs a wider inspection.

  2. Inspect the grout and silicone. Look for open joints, hairline cracks, peeling beads and mould concentrated along a corner. These observations help identify entry points, but they don't prove the membrane below has failed.

  3. Check the screen and track. Run your eyes along the bottom seal, corners and frame. Water escaping at the screen can be a containment defect rather than a waterproofing defect.

  4. Watch the waste. During normal use, look for water pooling at the wall, screen track or threshold instead of moving steadily to the waste. Poor geometry can keep the perimeter wet and increase pressure on joints.

  5. Inspect nearby rooms. Check skirtings, flooring, cupboards, ceilings below and the reverse side of the shower wall. Don't rely only on the point directly outside the shower, because moisture can travel laterally.

  6. Record evidence. Photograph damaged finishes and write down when the mark changes. This gives a waterproofer or plumber useful information without invasive testing.

For concealed valve problems, this guide on how to spot hidden shower valve leaks offers helpful background on why a fitting behind the wall can mimic a waterproofing failure. If the shower continues dripping when it isn't being used, arrange a plumbing assessment rather than sealing over the visible fitting.

A specialist service such as shower leak detection in Melbourne can then use controlled inspection and targeted testing to narrow the source before repair work begins.

Shower leak clues and what they suggest

What You See Most Likely Source Next Check
Water runs outside the screen during use Screen seal, track or surface containment Inspect the bottom seal, frame corners and track
Damp skirting appears after showering Membrane, junction or plumbing penetration Photograph timing and inspect the adjoining wall
Showerhead drips after being turned off Showerhead connection, hose, valve or cartridge Check visible washers and arrange plumbing inspection if it persists
Water sits at the wall or screen base Poor fall, ponding or blocked drainage path Observe movement towards the waste
Loose tiles or staining near a corner Failed junction waterproofing or substrate moisture Avoid surface-only patching and seek professional assessment
Mould is concentrated in silicone Persistently wet joint or poor ventilation Clean safely, dry the area and inspect the underlying cause

Don't remove tiles or drill inspection holes unless a qualified professional has planned the investigation. Uncontrolled opening can damage waterproofing further and make the original moisture path harder to identify.

Temporary Fixes You Can Try Before Calling a Professional

Temporary work is useful when it reduces water exposure while you arrange a proper assessment. It becomes risky when it creates confidence that a failed waterproofing system has been repaired. Keep that distinction clear.

Clean and dry surface joints first. Remove loose residue from a failing silicone bead, allow the area to dry, then apply a compatible bathroom-grade silicone only where the defect is clearly a surface seal. Follow the product instructions and keep the shower unused for the required curing period.

Low-risk containment measures

  • Limit water spread: Use a shower curtain or temporary barrier where appropriate, dry the floor after use and keep towels away from prolonged contact with damp skirtings.
  • Improve ventilation: Run the exhaust fan, open suitable windows and leave the bathroom dry between uses. Ventilation won't repair a membrane, but it can reduce lingering humidity.
  • Check visible fittings: A loose shower hose or showerhead connection may respond to careful tightening or a replacement washer. Don't force corroded fittings or disturb concealed wall connections.
  • Monitor the result: Photograph the area before and after the temporary measure, then record whether dampness returns during or after use.

A leaky pipe with repair tools and tape displayed on a white background, suggesting plumbing solutions.

What patches can't achieve

Painting grout with a surface sealer, adding silicone over mouldy joints or spreading a waterproof coating across tiles won't rebuild a failed membrane. It also won't correct a reversed fall, repair a waterlogged screed or seal a pipe penetration hidden behind the wall.

A proper caulking service in Melbourne may be suitable when the inspection confirms that a deteriorated surface joint is the actual source. If dampness continues after the patch, stop repeating the same repair and arrange a system-level diagnosis.

Don't use the shower if water is reaching electrical fittings, causing a slip hazard or spreading into flooring and walls. A short period of careful containment is reasonable, but persistent moisture needs a qualified plumber, waterproofer, tiler or builder to identify the cause and specify the correct rectification.

Bathroom Renovations and When to Call Registered Builders

A leak becomes a renovation issue when access to the failed component requires removal of tiles, screed, substrate or fittings. At that point, replacing one visible joint can leave the surrounding system untouched. Coordinating the work properly matters because waterproofing, plumbing, falls, tiling and screen installation must work together.

Registered Unlimited Builders can manage that coordination by engaging licensed carpenters, plumbers, electricians, tilers and waterproofers. For a Melbourne bathroom or ensuite, the scope may include removing affected finishes, checking framing and substrate, rebuilding screeds, correcting falls, applying a compliant membrane, testing the wet area and reinstalling the selected finishes.

What a durable rectification should include

The repair brief should identify the suspected source, the areas requiring removal and the tests planned before the bathroom is closed up again. Australian guidance aligned with AS 3740 and current wet-area practice commonly describes a flood test holding water to a minimum depth of 25 mm for at least 24 hours, with no drop in level. This waterproofing reference also explains the practical importance of continuous shower waterproofing under NCC requirements.

A controlled test before tiling gives the team an opportunity to find membrane or drainage problems while the work remains accessible. It is much more useful than discovering a leak after the screen, vanity and finished floor have been installed.

Choosing the right renovation scope

A registered builder should explain whether the work is a local repair, a partial rebuild or a full bathroom renovation. Ask for a written scope that covers demolition, waste removal, plumbing alterations, substrate preparation, waterproofing, testing, tile installation, silicone joints and screen reinstatement.

Premium finishes such as porcelain, marble and large-format Kerlite can be installed successfully, but they still depend on a correctly prepared base. Three-dimensional drawings and a renovation calculator can help homeowners understand layout, material choices and the likely scope before work starts. In the publisher's stated planning information, a typical renovation budget is discussed around a median $10,000, though the actual price depends on the condition, design and finishes of each project.

Landlords and property managers should also keep inspection records, photographs and compliance documents. Those records help separate a fixture repair from concealed building damage and make it easier to plan urgent access without approving a cosmetic fix that won't address the source.

Take Action Before a Small Leak Becomes Major Damage

A shower can look presentable while moisture is reaching framing, flooring or an adjoining room. Start by documenting the timing, location and visible clues. Then reduce water exposure, avoid invasive DIY work and ask a qualified professional to determine whether the source is a fitting, screen, fall, substrate or waterproofing detail.

A practical when-to-call checklist

  • Call a plumber when water drips from a mixer, showerhead, hose or concealed valve, especially when dripping continues while the shower is off.
  • Call a waterproofer or builder when tiles loosen, staining spreads, dampness is delayed or the shower repeatedly fails after surface repairs.
  • Ask about testing before approving retiling. The scope should address falls, membrane continuity, junctions, penetrations and pre-tile flood testing.
  • Record the damage with photographs and dates, including the reverse side of walls, skirtings, cupboards and ceilings below.
  • Clean mould carefully with suitable precautions. This resource on how to clean shower mould safely can help with surface hygiene, but mould removal doesn't replace leak rectification.

For Melbourne and greater Victoria, request a free inspection and quote that explains the cause and the proposed repair sequence. A durable result comes from correcting the system behind the tiles, not only making the visible joint look new.


Melbourne Tiling Services P/L provides bathroom renovations, shower leak rectification, waterproofing, screeding, tiling and shower-screen installation across Melbourne and greater Victoria, with registered builder coordination for connected trades. Visit Melbourne Tiling Services P/L to arrange an inspection, request a free quote and discuss the right repair scope for your leaking shower.
Drainage System Installation: Melbourne Guide 2026

You can live with a tired bathroom for years, but you can't ignore a drain that's been set wrong. Once the screed is poured and the tiles are down, a bad slope, a poor outlet, or a missed waterproofing detail becomes an expensive problem, not a minor inconvenience. In a Melbourne bathroom renovation, drainage system installation has to be treated as part of the building itself, not a hidden afterthought.

Table of Contents

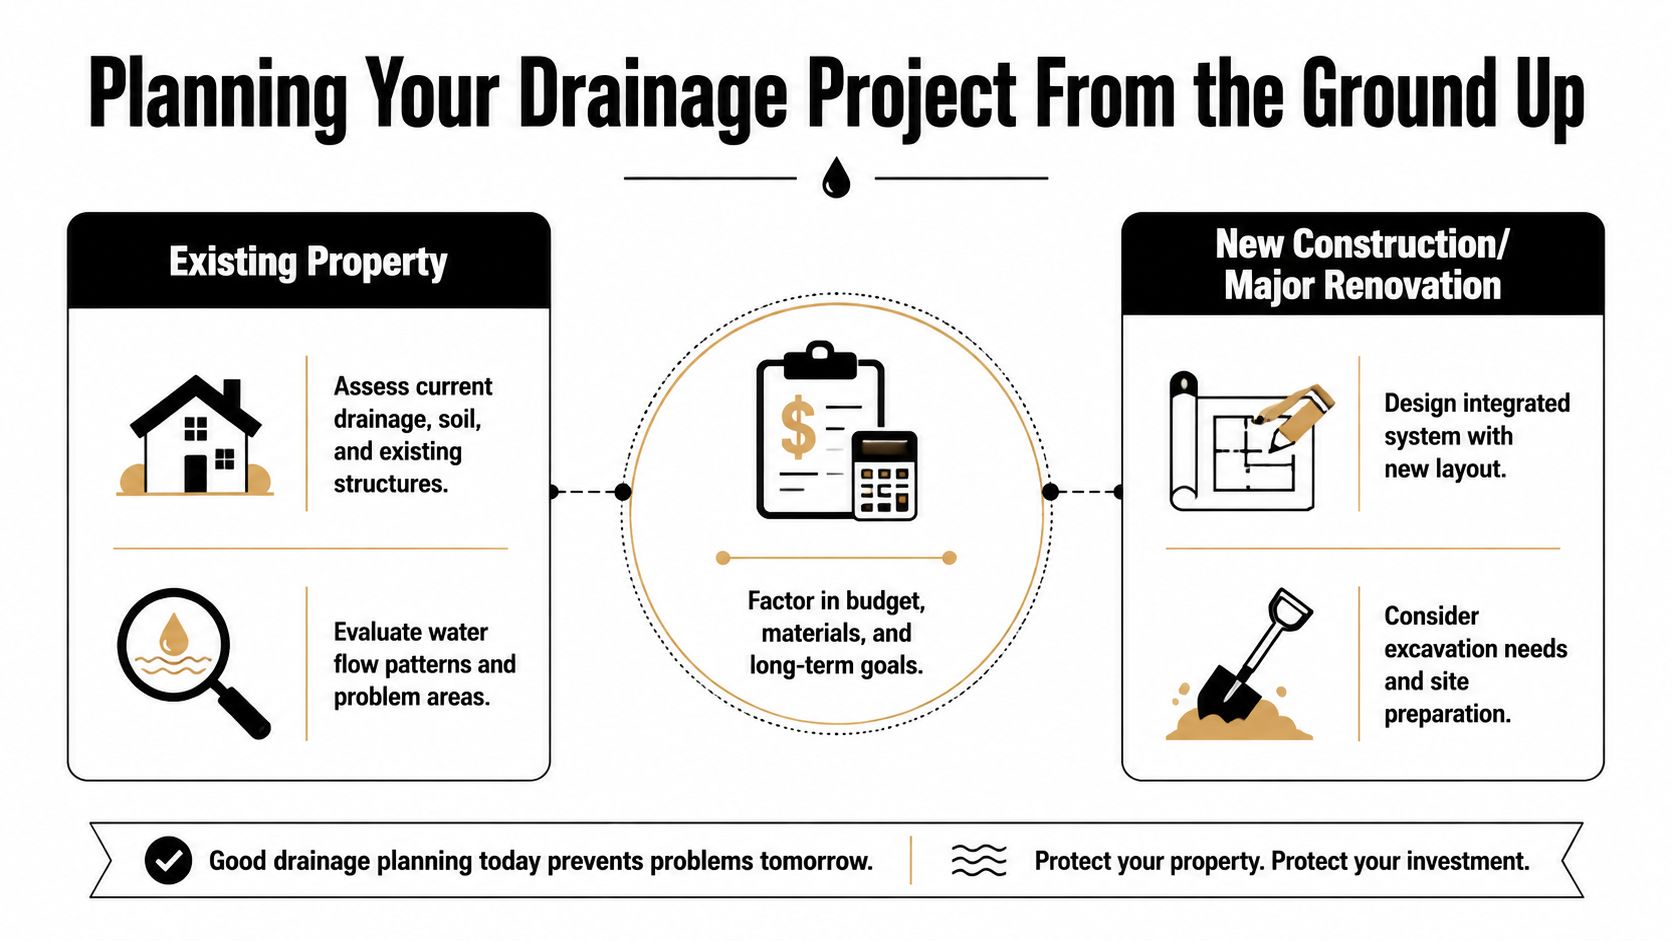
Planning Your Drainage Project From the Ground Up

The best drainage outcomes start before anyone opens a trench or cuts a slab. A Melbourne homeowner needs to know where the water is coming from, where it can legally go, and what the site can realistically support once walls, tiles, membranes, and fixtures are all in place. That matters in bathrooms, but it matters just as much in yards, courtyards, balconies, and side passages where water likes to pool.

An infographic titled Planning Your Drainage Project showing steps for existing properties and new construction projects.

Start with the site, not the product

Ask a few practical questions first. Where does water sit after rain? Is the floor level already locked in by existing framing or slab height? Will the drain serve a shower, a whole bathroom, or an external strip that catches stormwater from a paved area?

On flat or tight inner-city sites, the outlet often presents a primary constraint. Many guides assume one can easily run to a lower discharge point, but Melbourne sites frequently have boundary limits, council rules, and awkward levels to work around. That's where the trade-off between deeper excavation, pumped discharge, and a permitted gravity fall becomes a design issue rather than a preference.

Practical rule: if you can't show a clear outlet path on paper, you don't yet have a drainage plan.

Compare the common residential options

For bathrooms, floor wastes and linear channel drains are the main visible choices. Floor wastes suit compact wet areas and traditional layouts, while linear drains give more flexibility with tile falls and a sharper, more contemporary finish. Linear systems also help when the bathroom design calls for large-format tiles and a more minimal look.

Outside the bathroom, a French drain or yard drain is often better for surface water control, especially where water is spreading across a garden bed or collecting against a wall. A stormwater connection is different again, because it's tied to the property's legal discharge path rather than just moving water away from a wet patch. The right choice comes down to volume, finish quality, and whether you're managing bathroom water, surface runoff, or subsurface seepage.

Drain Type Primary Use Pros Cons
Floor waste Bathroom wet areas Simple, familiar, compact Less flexible for larger layouts
Linear channel drain Showers and high-end bathrooms Clean finish, suits modern tiling Needs precise set-out and waterproofing coordination
French drain Yard and boundary water issues Good for subsurface moisture Needs suitable outlet and space
Stormwater connection Roof and site runoff Moves larger volumes away from the building Must align with site and council requirements

The right answer is rarely the most dramatic product. It's the system that matches the site, the renovation sequence, and the final finish you want to live with.

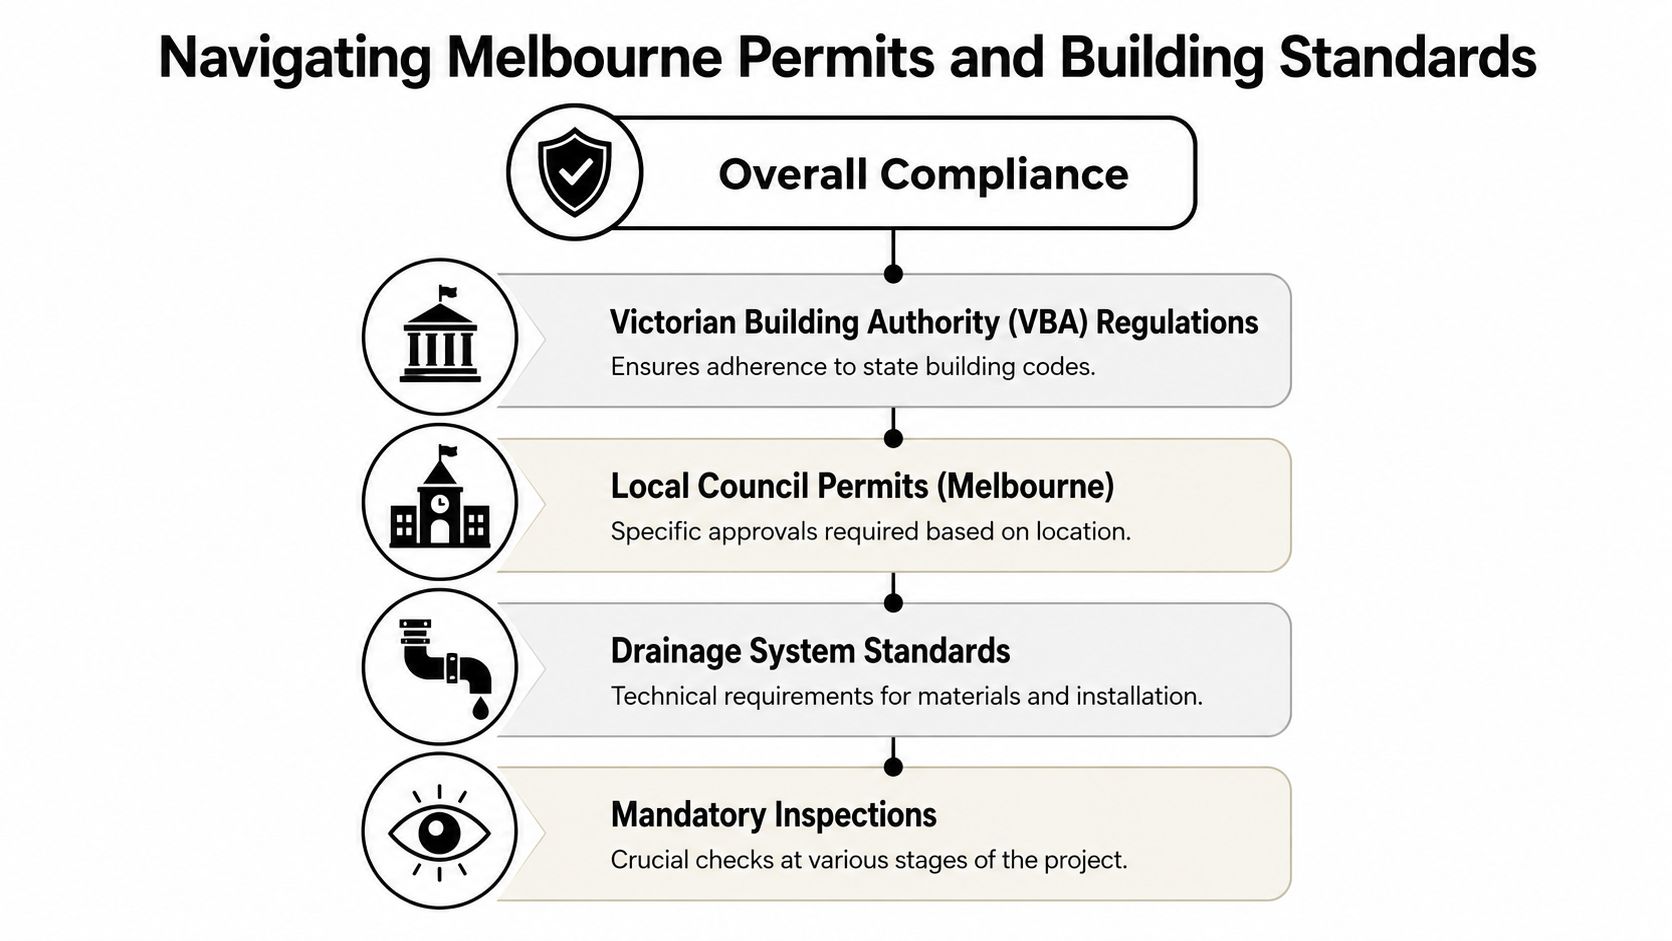
Navigating Melbourne Permits and Building Standards

Drainage work goes wrong when people treat compliance as paperwork instead of risk control. In Melbourne, the legal frame starts with the National Construction Code (NCC), and the technical design of stormwater drainage sits under AS/NZS 3500.3. The NCC requires a building's drainage system to prevent surface and subsurface water from damaging the building or its foundations, and it treats roof, surface, and site drainage as part of site preparation and waterproofing-related controls. That's the standard a serious renovation has to meet, not a rough guideline. NCC drainage requirements

A flowchart diagram explaining the four key components for navigating Melbourne building permits and standards.

Know who controls what

A licensed plumber handles the drainage pipework and the technical installation of the system itself. A registered builder coordinates the whole renovation, which is especially important when drainage, waterproofing, screeding, and tiling all depend on one another. If one trade gets ahead of the next, the job stops being elegant and starts becoming expensive.

Local council rules matter too. On some Melbourne sites, the issue isn't whether the drain can be built, it's whether the discharge point is lawful and practical. That's why flat blocks and tight inner-urban sites need early planning, not a last-minute scramble once demolition has already started.

Keep the waterproofing conversation inside the permit conversation

Bathroom drainage isn't separate from waterproofing, because the two systems have to work together. The drain set-out, membrane turn-up, fall direction, and tile finish all need to line up before the tiles go down. If you're comparing renovation operators, ask how they sequence waterproofing and drainage, not just who installs the pipe.

For Melbourne homeowners who want a compliance trail that makes sense, the paperwork should support the build, not slow it down. If you're reviewing documentation for a renovation, this waterproofing compliance certificate resource is a useful place to understand how the compliance side is usually handled in practice.

Compliance isn't a separate job. It's the method that keeps the renovation legal, dry, and durable.

The Core Installation Process Done Right

A bathroom can look finished while the drainage work underneath is still wrong. In a high-end Melbourne renovation, the drain needs to be set with the rest of the build, because the pipe line, membrane junctions, screed, and tile build-up all depend on each other. Get the order wrong and the finish starts to fail in ways that are hard to hide.

Set the levels before anything is buried

Poor gradient is the failure I see most often. Under Australian standards like AS/NZS 3500.3, pipe runs need a continuous fall of about 1% (1:100) to 2% (1:50) so water clears the line and sediment does not sit in low points drainage installation guidance. If the fall is too flat, water pools and blockages build up. If the line runs back on itself, even slightly, you end up with a hidden problem that keeps returning.

That is why levels get set before excavation starts, then checked again with string lines or laser levels before backfill goes in. It is a practical step, not a fancy one. It keeps the system working, and it stops dirt, soap residue, and debris from settling where they should not.

Coordinate the wet area layers

In a bathroom renovation, the drain does not sit by itself. It has to match the subfloor, the screed, the membrane, and the finished tile thickness. A linear drain can give a cleaner fall and a sharper shower line, but only if the build-up around it is measured properly from the start.

The drain is only as good as the surface above it. If the falls, membrane, and tile layout do not agree, the finish will show it.

A registered builder's oversight matters because the sequence protects the result. The plumber sets the line and level. The waterproofer takes the membrane to the right junctions. The tiler then works to a fall that has already been established, not one guessed after the fact. That coordination is what gives a high-end bathroom renovation a proper finish instead of a patched-together look.

Choose details that help the system last

A neat drain is pointless if it turns into a maintenance headache. Near tree-root zones, sealed pipes are the safer choice, and inspection chambers belong at changes of direction so future cleaning stays manageable field drainage renewal and installation guidance. Cleanout-friendly geometry matters inside a bathroom too, where access later on may be limited by cabinetry or finished tiling.

The goal is simple. Build the drainage so water moves away cleanly, the structure stays dry, and nobody has to rip up a finished bathroom to fix a mistake that should have been caught at set-out stage.

Testing Commissioning and Project Handover

A drainage system isn't ready because the pipes are in the ground. It's ready when it's been tested under controlled conditions and proven to hold up before the expensive finishes go on top. That's the point where a professional job starts to feel like a finished system rather than a collection of parts.

Test before the tile layer commits

Flood testing and pressure testing are the checks that matter most in wet areas. They tell you whether the joints, connections, and transitions are behaving properly before the membrane is hidden and the bathroom is fully closed in. If there's a leak, an alignment issue, or a faulty join, you want to find it when a repair is still straightforward.

That timing matters. Testing comes after waterproofing is complete but before tiling begins, which keeps any correction practical instead of destructive. Once the tiles are down, every mistake becomes slower to reach and harder to fix.

Ask for evidence, not reassurance

A good handover should leave you with confidence, not just a verbal promise. If you're engaging trades for a bathroom renovation, ask how the drainage was tested, who signed off the wet area sequence, and what was checked before tiling started. That isn't being difficult. It's basic due diligence.

For homeowners worried about hidden failures, this leak detection Melbourne resource is worth reviewing alongside your renovation planning. Hidden water damage often starts with a small issue that looked harmless during the build.

If the system can't be verified before finishing, the finish is doing too much work.

Commissioning should leave you with a bathroom that drains correctly, seals correctly, and has a clear record of what was checked. That's what separates a polished renovation from one that just looks finished on day one.

Maintaining Your System and Understanding Costs

A drainage installation should be built for years of use, not just for the day the bathroom is handed over. In a Melbourne renovation, that means planning for hair, soap residue, fine debris, and the realities of a wet area that will be tiled, sealed, and used every day. External drains have a different burden. They catch leaf litter, silt, and whatever weather drives across the site. If access and cleaning were not considered from the start, those small materials eventually become a blockage.

Design for maintenance before maintenance becomes urgent

The best drainage details are the ones that let you clean and inspect the system without disturbing finished work. Sealed pipework near roots, inspection chambers at direction changes, and bends that can be cleared properly all reduce the chance of repeat problems. In bathrooms, that same thinking matters even more because the drain often sits under a finished layout that leaves little room for access after tiling and waterproofing are complete.

A few simple habits help keep the system reliable:

  • Check visible grates regularly. Hair, grit, and soap residue build up quickly in bathroom outlets.
  • Clear leaves and debris early. External grates work best when they are not packed with garden matter.
  • Keep access points clear. If an inspection chamber exists, do not bury it under landscaping or storage.
  • Book cleaning before a blockage becomes obvious. Preventative work is far easier than emergency work.
  • Keep trusted trades on hand. Fast response matters when a drain starts backing up, especially in a finished bathroom.

Practical rule: the easiest drainage system to live with is the one designed to be cleaned without tearing anything apart.

For homeowners planning a high-end bathroom renovation, it helps to work with Melbourne bathroom renovation specialists who understand drainage, waterproofing, and tiling together. That coordination matters because maintenance access starts with the original build, not with the first blockage.

Budget for the quality of the build

Drainage costs depend on access, depth, the type of drain, and how closely the work ties into the renovation sequence. A bathroom renovation itself often sits around a median budget of $10,000, so drainage should be judged in the context of the whole project rather than as a separate line item [publisher background]. A cheap drain installed poorly can cost far more later when it starts affecting tiles, membranes, or cabinetry.

Homeowners usually end up comparing upfront discipline with future repair risk. Proper excavation, accurate falls, and sensible access for cleaning can look more expensive on paper than a shortcut taken on day one. They also tend to look far cheaper once the bathroom is finished and staying dry.

Why a Registered Builder Is Your Best Insurance

A licensed plumber is essential, but a bathroom renovation needs more than pipework skill. It needs one person responsible for the full sequence, because drainage, waterproofing, screeding, and tiling are inseparable once the project starts. That's where a Registered Builder earns their keep.

Coordination is the real value

If the plumber sets the outlet too high, the tiler loses finish quality. If the waterproofing stops short, the drain can't protect the structure the way it should. If the screed isn't set to the correct falls, the whole room starts fighting itself. A registered builder keeps those trades aligned so the bathroom works as one system.

That kind of oversight matters even more in high-end bathroom renovations where the finish has to be clean and durable. The visible surface is only as good as the hidden build-up underneath it. Good builders protect both.

Compliance sits with the build, not with wishful thinking

The historical shift from basic channels to modern engineered drainage shows why this work belongs inside building regulation, not outside it historical drainage background. Modern drainage isn't a plumbing add-on. It's part of a building's structure, moisture control, and long-term performance. That's why a single accountable builder is so valuable on a renovation site.

If you're comparing renovation teams, look for the one that can explain the drainage path, the waterproofing sequence, and the handover process without hand-waving. That's the team most likely to leave you with a bathroom that still feels right years later.

For homeowners wanting a renovation partner who understands this full sequence, review bathroom renovation specialists and choose a team that treats drainage, waterproofing, and tiling as one coordinated job.


If you're planning a bathroom renovation in Melbourne and want the drainage done properly from the outset, Melbourne Tiling Services P/L can help coordinate the waterproofing, tiling, and hidden drainage details that make a bathroom last. Get in touch to discuss a renovation that's built for compliance, clean finishes, and long-term performance.

Bathroom Renovation Cost Melbourne 2026: Your Complete Guide

In Melbourne, a full bathroom renovation usually lands between $15,000 and $35,000, while a smaller cosmetic refresh can start from around $8,000. If your plan includes layout changes, premium finishes, or structural work, costs often move beyond that range.

That's the part most homeowners want answered first. The harder part is working out what those numbers include, and whether the quote in front of you covers a real end-to-end renovation or just a collection of partial trade costs.

A lot of the stress around bathroom renovation cost in Melbourne comes from comparing apples with oranges. One price might include demolition, waterproofing, tiling, plumbing, electrical, and project coordination. Another might leave out fixture installation, waste removal, compliance, or the cost of fixing what turns up once the room is stripped back. On paper, both can look similar until the work starts.

That's why the builder model matters. When a Registered Builder manages the renovation, you're not just paying for labour on site. You're paying for scope control, trade sequencing, responsibility for licensed work, cleaner handovers, and fewer gaps between what was quoted and what gets built.

Table of Contents

Understanding Your Melbourne Bathroom Renovation Budget

The first budget mistake is treating a bathroom like a simple fixture swap. It isn't. Once you involve demolition, waterproofing, tiling, plumbing, electrical, and finishing trades, the price moves into full construction territory.

The clearest benchmark for homeowners is this: the Housing Industry Association-backed guide puts the average bathroom renovation in Australia at about A$26,000, with a practical spread of roughly A$8,000 to A$35,000+, depending on scope, materials, and whether it's a basic or high-end rebuild, as outlined in Canstar's bathroom renovation cost guide.

What that means in a Melbourne home

A cosmetic refresh sits at the lower end. That usually means keeping the layout largely intact and avoiding major changes to plumbing or electrical positions. It can improve the look of the room, but it won't solve every underlying issue.

A full renovation is different. It typically includes strip-out, preparation, waterproofing, tiling, licensed trade work, and new fixtures installed properly. In Melbourne, where labour and finish expectations are generally higher, that's where many standard bathrooms sit.

Practical rule: If the quote sounds cheap for a full bathroom rebuild, check what's missing before you compare it with anything else.

Why a Registered Builder changes the cost conversation

Homeowners often ask whether it's cheaper to organise a plumber, electrician, tiler, waterproofer, and shower screen installer themselves. On paper, it can look that way. In practice, self-managing trades often creates scope gaps, scheduling clashes, and disputes over who's responsible when one stage affects the next.

A Registered Builder gives you a single point of accountability. That matters in bathrooms because every stage depends on the one before it being done correctly. If framing is off, tiling suffers. If waterproofing is delayed or incomplete, the whole job is exposed. If fixtures arrive late, trades stand around or get rescheduled.

Budgeting for the whole job, not the cheapest line item

Those looking into bathroom renovation cost Melbourne usually want to answer one practical question: what will I really spend to get the room finished properly? The useful number is the all-in cost, not the cheapest trade-by-trade estimate.

That all-in figure should account for:

  • Site preparation and demolition
  • Licensed plumbing and electrical work
  • Waterproofing and compliance
  • Wall and floor tiling
  • Fixture installation and finishing
  • Project management by one responsible party

That's the difference between a room that looks done and a renovation that is complete.

Bathroom Renovation Scopes and Typical Price Ranges

“Bathroom renovation” can describe three very different jobs. That's where homeowners get caught. They ask for a quote on a renovation, but one contractor prices a refresh while another prices a full rebuild.

Cosmetic refresh

At the lower end, projects can start from around $8,000, which aligns with the lower bracket noted in the verified cost guides. This scope usually suits a small bathroom or ensuite where the layout stays put and the work focuses on presentation rather than major reconfiguration.

A cosmetic refresh often includes selected updates such as:

  • Replacing dated fixtures while keeping plumbing points where they are
  • Refreshing surfaces without changing the room structure
  • Upgrading the look with simpler tile choices and standard fittings
  • Avoiding major trade complexity by not moving the toilet, shower, or vanity positions

This scope can work well for landlords, resale preparation, or homeowners who want the room improved without opening up every hidden issue in the walls and floor.

What it doesn't usually allow for is significant redesign. If you want a walk-in shower where a bath used to be, a floating vanity with altered services, or a more custom finish, you're usually past refresh territory.

Standard full renovation

This is the range most Melbourne homeowners shop in. A standard full renovation typically sits between $15,000 and $35,000, which matches the national benchmark and practical spread in the verified data.

This scope usually means the bathroom is stripped back and rebuilt properly. It may include new waterproofing, new tiling, updated plumbing and electrical, new fixtures, and a more cohesive finish throughout. It's the right category for bathrooms that are tired, leaking, poorly laid out, or due for a proper reset.

A standard full renovation tends to suit:

Scope type Typical range Usually includes
Cosmetic refresh $8,000 to $15,000 Surface-level improvements, minor fixture changes, limited disruption
Standard full renovation $15,000 to $35,000 Demolition, licensed trades, waterproofing, tiling, new fixtures
High-end custom renovation $35,000+ Layout changes, premium materials, bespoke detailing, structural complexity

The trade-off is straightforward. You spend more upfront, but you're paying to rebuild the wet area correctly rather than just cover over ageing materials.

A cheap refresh can make an old bathroom look newer. It won't necessarily make it perform like a new one.

High-end custom renovation

Once the job includes structural changes, high-end stone or porcelain, custom joinery, frameless screens, or specialist tile installation, costs frequently move beyond $35,000. That aligns with the upper end of the verified benchmarks for premium bathrooms.

Design decisions begin to drive labour just as much as materials. Large-format tiling, feature niches, flush finishes, and layout changes all require more precision. Premium bathrooms also tend to involve more planning because tolerances are tighter and the visual standard is higher.

Common triggers that push a bathroom into this category include:

  • Moving plumbing locations to create a different layout
  • Using premium tiling materials such as marble or specialist porcelain
  • Installing custom frameless shower screens
  • Reworking structure or openings as part of the new design
  • Adding bespoke joinery and detail work instead of off-the-shelf pieces

Why scope clarity matters before you request pricing

Homeowners often think they need “a bathroom quote” when what they need is a scope decision. If you don't decide whether you want a refresh, a full rebuild, or a custom redesign, every quote will be based on different assumptions.

That's one reason managed bathroom renovations tend to produce clearer pricing. A builder-led quote is more likely to define what's included, what's excluded, and what level of finish the price is based on. That saves a lot of confusion later.

An Itemised Breakdown of Renovation Costs

A bathroom can be one of the smallest rooms in the house and still be one of the most labour-heavy. Every stage depends on the one before it being done properly. Strip-out affects set-out. Set-out affects waterproofing. Waterproofing affects tiling. That flow is a big reason an all-in builder quote often gives a clearer picture of the actual cost than a stack of separate trade prices.

Typical Bathroom Renovation Cost Breakdown in Melbourne

For a mid-range Melbourne bathroom around the $25,000 mark, the budget usually spreads across the job like this. The exact split changes with the room, the finish level, and whether services stay put.

Cost Component Typical Cost Range (for a ~$25k reno) Percentage of Budget
Demolition and strip-out Often A$1,000 to A$2,500 depending on access, waste removal, and how much is being removed Lower share
Carpentry and preparation Often A$1,500 to A$4,000 depending on framing repairs, floor correction, and wall straightening Lower to mid share
Plumbing Often A$2,500 to A$6,000 depending on fixture count and whether services move Mid share
Electrical Often A$1,000 to A$2,500 depending on lighting, power points, heated rails, and exhaust upgrades Mid share
Waterproofing Usually a modest line item compared with the full budget, but a failure here is expensive to rectify Smaller but critical share
Tiling labour Often one of the bigger labour costs, especially with large-format tiles, niches, mitres, or difficult set-outs Mid to high share
Shower screen Usually A$800 to A$2,000+ depending on framed, semi-frameless, or custom frameless glass Mid share in premium jobs
Fixtures and fittings Can range from budget retail selections to several thousand dollars in tapware, vanity, toilet, and accessories Mid share
Labour and project management A major share of the budget once trade coordination, supervision, scheduling, and defect responsibility are included Major share

The line items that catch homeowners out are usually the ones that are hard to compare online. Preparation is one. If walls are out, floors need packing, or the old substrate is not fit to tile over, the room needs extra work before finishes can start. That work is not glamorous, but it decides how the finished bathroom performs.

Tiling is another area where quotes can vary sharply. The tile itself is only part of the cost. Labour changes with tile size, pattern, substrate condition, waste allowance, trims, and the number of cuts around wastes, niches, windows, and tap penetrations. If you are comparing floor tiling services in Melbourne, check whether the price covers floor preparation, tile pattern, edge details, and final set-out, not just square metres.

The costs homeowners often miss when managing trades themselves

The biggest gap in owner-managed budgets is usually not a single trade rate. It is the coordination sitting between the trades.

If you hire the demo crew, plumber, waterproofer, tiler, electrician, glazier, and painter separately, someone still has to book them in the right order, make sure each stage is ready, answer questions on site, and carry the cost if one trade delays the next. In practice, that someone is usually the homeowner. The price may look lower at the start, but the risk sits with you.

A builder-managed renovation wraps those costs into one all-in number and puts responsibility in one place. That matters when:

  • the plumber opens a wall and finds damaged framing
  • the tiler needs falls adjusted before waterproofing can proceed
  • the shower screen cannot be measured until final tile lines are confirmed
  • one trade blames another for a defect or delay

That is where many "cheaper" bathrooms get expensive. Extra site visits, rebooking fees, repeated labour, and small scope gaps add up fast.

Where the budget is best spent

Money is usually best spent on the parts buried behind the finishes. Straight walls, correct falls, sound waterproofing, reliable plumbing rough-in, and careful tile installation have a bigger effect on the end result than upgrading a mixer from one retail range to another.

A vanity, basin, or tap can be changed later. Replacing failed waterproofing or redoing poor tile falls means pulling the bathroom apart.

The practical way to assess bathroom renovation cost in Melbourne is to look at the complete, managed build cost for a finished wet area that is compliant, functional, and properly handed over. That number tells you far more than a collection of low trade quotes that leave gaps between them.

Key Factors That Influence Your Final Cost

A bathroom budget isn't fixed just because you've set one. The final cost moves with design choices, site conditions, and how clearly the work is scoped before demolition starts.

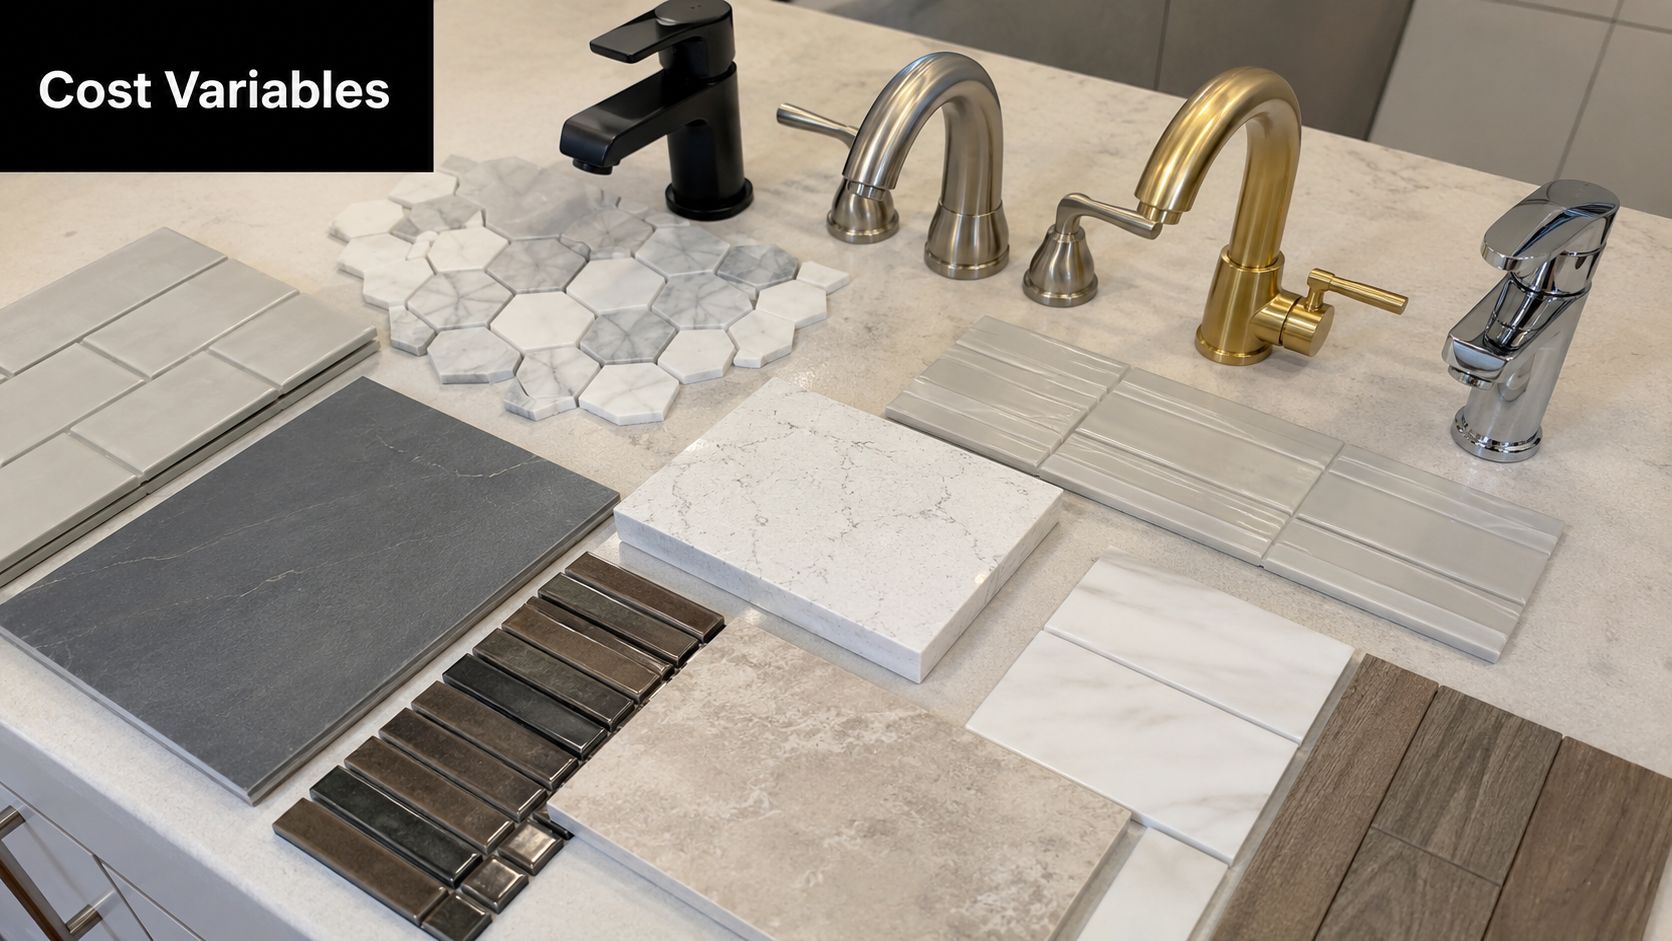
An assortment of interior design material samples, including faucets, tiles, and stone countertop slabs for renovation.

One of the more important facts homeowners should know is that approximately 40% of renovation projects in Australia go over budget due to poor planning or unexpected structural issues, according to Hipages' summary of 2023 HIA bathroom renovation data. In Melbourne, older homes and higher trade costs make those surprises more painful.

Layout changes cost more than most people expect

The biggest jump in price often comes from changing the wet-area layout. Moving a toilet, relocating the shower waste, or shifting the vanity wall seems simple on a plan, but each change can trigger extra plumbing, extra labour, and more coordination between trades.

If the current layout works reasonably well, keeping services in place usually protects the budget better than almost any other decision.

Material selection changes labour as well as supply cost

Premium materials don't just cost more to buy. They can also cost more to install. Large-format tiles, mitred edges, natural stone, and tighter visual detailing slow the job down and demand more care.

That's especially true in bathrooms where wall straightness, floor falls, and trim detail are obvious at close range. The room may be small, but there's nowhere to hide poor workmanship.

For wet areas, the practical side matters just as much as the look. That's why proper waterproofing in Melbourne should be treated as an essential part of the scope, not an afterthought.

Existing conditions can change everything

The unknowns are usually behind the tiles. Once demolition starts, builders sometimes find water damage, unstable substrates, out-of-square framing, or signs that previous work wasn't done well. Those aren't luxury upgrades. They're issues that need to be corrected before the new bathroom goes in.

A renovation usually blows out when the quote was based on hope instead of inspection.

Homeowners who coordinate trades themselves often come unstuck. One contractor strips the room, another discovers a problem, and then everyone starts debating who owns the extra work and how the schedule shifts.

The type of finish affects the amount of site time

A clean, straightforward bathroom with standard porcelain, a simple niche, and an off-the-shelf vanity is faster to deliver than a room with feature walls, custom cuts, stone, recessed storage, and a frameless screen that needs exact tolerances.

That difference matters because bathrooms are labour-heavy jobs. More detail means more hours on site, more checking, and tighter sequencing.

A short visual walk-through helps explain where those details add time and cost:

What homeowners can control

You can't eliminate every surprise, but you can reduce the expensive ones. The best cost control usually comes from a few disciplined decisions:

  • Lock the layout early unless there's a strong reason to change it
  • Choose materials before quoting so labour assumptions are realistic
  • Inspect the site properly instead of pricing from photos alone
  • Use one responsible party to manage sequencing, quality, and trade accountability

That's how budgets stay closer to plan. Not through unrealistically low allowances, but through clearer decisions before work begins.

Sample Budgets and A Typical Project Timeline

A budget feels more real when you attach it to an actual type of project. Melbourne bathrooms vary a lot, but most jobs fall into one of three common patterns.

Three sample budget scenarios

A smaller ensuite refresh in Highett might land around the lower end of the market if the layout stays the same and the selections are straightforward. That kind of job usually focuses on lifting presentation, replacing tired fixtures, and keeping disruption under control.

A family bathroom in Hawthorn often sits in the mid-range. That's the category where many homeowners want a proper rebuild, better waterproofing, improved storage, and a cleaner tile finish throughout.

A master bathroom in Toorak can move into premium territory quickly when the brief includes large-format tile, custom detailing, frameless glazing, and more design-led finishing. The room may still be a bathroom, but the labour profile is different.

The suburb doesn't set the price. The scope does. But in practice, premium expectations often mean more site time and tighter tolerances.

Why labour makes such a difference in Melbourne

For Victoria, the average spend on a bathroom renovation is approximately $19,000, but Melbourne's demand for higher-end finishes lifts median project costs to $22,000 to $29,000, with labour accounting for 40% to 65% of the total, according to OpenAgent's renovation cost guide. The same source notes plumbers commonly charge $100 to $150 per hour and electricians $80 to $100 per hour.

That's why two bathrooms of similar size can price very differently. If one needs more electrical work, more plumbing alteration, or more detailed tile installation, the labour share climbs fast.

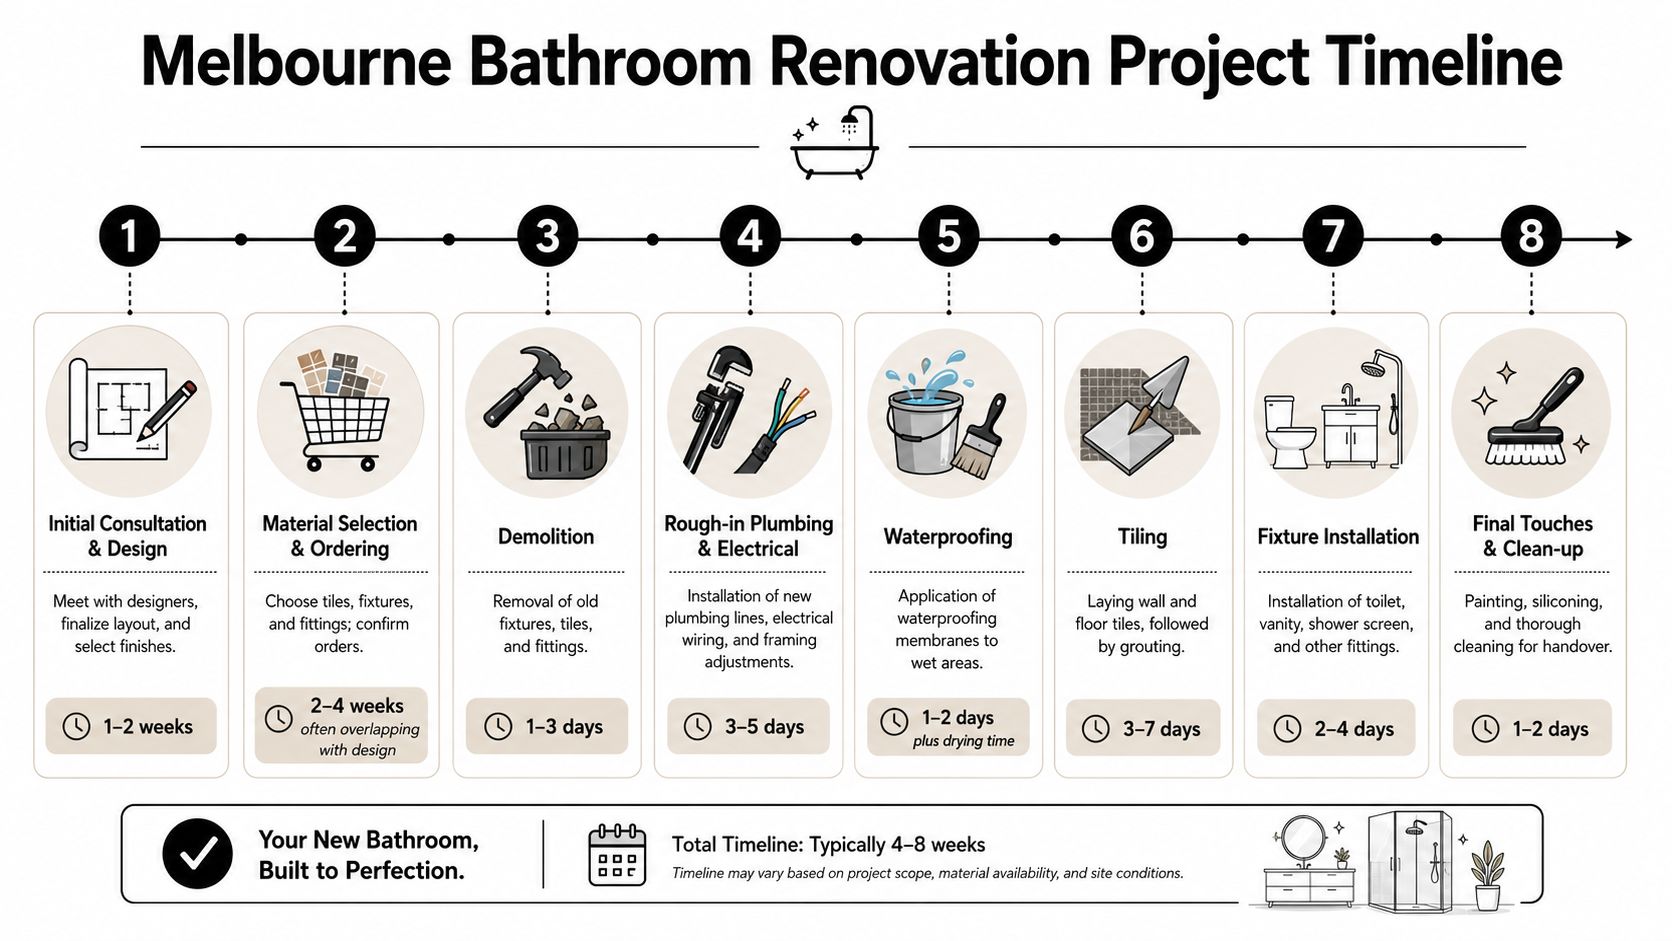
A practical timeline homeowners can expect

The pricing discussion is only half the story. Time on site affects access, family routine, and how quickly trades need to be sequenced.

An infographic showing the 8-step timeline for a professional bathroom renovation project in Melbourne.

The broad pattern is consistent even when exact timing varies:

  1. Initial consultation and design
    Layout decisions, finish selections, and scope clarification.

  2. Material selection and ordering
    Tiles, tapware, vanity, screen, and fittings need to be locked in.

  3. Demolition
    Existing fixtures, tiles, and finishes are removed.

  4. Rough-in plumbing and electrical
    Services are adjusted before walls and floors are closed up.

  5. Waterproofing
    Wet areas are prepared and treated before tiling.

  6. Tiling
    Walls and floors are laid, detailed, and grouted.

  7. Fixture installation
    Vanity, toilet, taps, screen, and fittings are installed.

  8. Final touches and clean-up
    Silicone, painting touch-ups, testing, and handover.

What delays a bathroom renovation

Delays usually come from late selections, missing materials, hidden damage, or poor trade coordination. This is another reason a builder-led process often runs smoother. Someone is tracking dependencies before the job stalls.

If you're trying to compare timelines between quotes, ask one question: who is coordinating every trade from demolition to handover? The answer matters as much as the quoted duration.

How to Get an Accurate Quote from Registered Builders

A homeowner gets three bathroom quotes. One looks cheap, one looks high, and one sits in the middle. Then the true comparison starts. Does the low quote include waterproofing, waste removal, fixture installation, compliance paperwork, and trade coordination, or are those costs about to land on you later?

That is why an accurate quote depends on more than price. It depends on scope, responsibility, and whether one Registered Builder is pricing the whole job from demolition to handover.

What to decide before requesting quotes

You do not need every finish selected before asking for pricing. You do need enough detail for the builder to price the same job each time.

The key decisions are practical:

  • Keep or change the layout
    Keeping plumbing and drainage in place usually keeps the price tighter. Moving a shower, toilet, or vanity adds plumbing work, patching, and often extra electrical work.

  • Set the finish standard
    Basic tiles and standard fittings produce a very different quote from large-format tiles, custom joinery, recessed niches, underfloor heating, or frameless glass.

  • Be clear about retained items
    If the mirror cabinet, window, or door stays, say so upfront. If you are unsure, the quote may carry allowances or exclusions that make comparison harder.

  • Disclose known problems
    Water damage, mould, rotten subfloors, out-of-plumb walls, and previous patch repairs affect labour and risk. Hiding them does not save money. It only shifts the cost to a variation later.

A simple written brief and a few site photos can improve quote quality fast.

What a good builder quote should make clear

A proper builder quote should read like a build plan, not a one-line price.

Look for detail in the following areas:

Quote item What you want to see
Scope Clear inclusions and exclusions
Trade coverage Demolition, plumbing, electrical, waterproofing, tiling, carpentry, installation
Site assumptions Access, parking, apartment rules, waste removal, protection of adjacent areas
Layout assumptions Whether services remain in place or move
Material assumptions Tile range, tapware level, vanity type, shower screen type
Compliance items Waterproofing, testing, certificates, and any permit-related work if required

The best quotes also explain who is supplying what. That matters. If you plan to supply your own tiles, tapware, vanity, or toilet suite, the builder should state whether delivery timing, breakage, missing parts, and warranty responsibility sit with you or with them.

That is one of the biggest differences between an all-in price from a Registered Builder and a pile of separate trade quotes. With separate trades, gaps open up fast. The plumber blames the tiler, the tiler waits on the waterproofer, the screen installer says the walls are out, and you end up coordinating the dispute while the bathroom sits unfinished.

Why Registered Builders are easier to compare

A Registered Builder is usually pricing the whole sequence of work, not just their own part of it. That gives you a clearer picture of the actual all-in cost.

It also makes risk easier to see.

If one quote covers demolition, waterproofing, tiling, plumbing fit-off, electrical fit-off, carpentry, screen install, rubbish removal, supervision, and defect rectification, you are comparing a finished bathroom. If another quote only covers tiles and labour, you are comparing a partial job with missing costs still to come.

Documentation matters too. Ask how the builder handles waterproofing records and handover documents, including any waterproofing compliance certificates in Victoria. A quote that ignores compliance is not cheaper. It is incomplete.

One practical way to compare quotes properly

Put the quotes side by side and mark up three things.

First, check what is excluded.
Second, check who is coordinating every trade.
Third, check who carries responsibility if something goes wrong.

That last point gets overlooked. Homeowners who hire individual trades themselves can save money on paper, but they also take on scheduling, supplier follow-up, site access, defect disputes, and missed handovers between trades. In practice, that often costs more than expected.

A reliable quote gives you a realistic total, a defined scope, and one party responsible for the result. That is the quote worth taking seriously.

Plan Your Melbourne Bathroom Renovation with Confidence

A lot of budget blowouts start the same way. A homeowner lines up separate quotes for plumbing, tiling, waterproofing, electrical, and shower screen installation, then finds out each trade is pricing only its own piece. The total looks cheaper at first. The true cost shows up later in return visits, delays between trades, missing scope, and arguments over who is responsible when one stage affects the next.

A bathroom renovation is easier to budget properly when one Registered Builder prices and manages the full job. That gives you an all-in figure tied to a defined scope, a build sequence that works, and one point of responsibility from demolition through to handover. It also cuts down the hidden costs that come with coordinating trades yourself.

Start with the room you have, not a square metre estimate pulled out of context. Site access, wall condition, floor levels, fixture locations, and product choices can shift the final price quickly.

A simple way to assess your next step

  1. Test the likely budget range
    Use a calculator or early estimate to work out whether your project sits closer to a cosmetic update, a standard renovation, or a full rebuild with layout changes.

  2. Get the room inspected on site
    A site quote picks up the items that often get missed early, including difficult access, damaged framing or flooring, older plumbing, and electrical work that needs upgrading.

  3. Ask for one fully scoped price
    The quote should cover demolition, waste removal, waterproofing, tiling, plumbing, electrical, carpentry, fittings, supervision, and defect rectification. If those items are split across multiple quotes, the total cost is still incomplete.

For homeowners weighing up builder-led renovations against self-managed trade packages, Melbourne Tiling Services P/L is one local example offering bathroom renovations through Registered Builders, along with free quotes, 3D drawings, and a renovation calculator. That approach gives homeowners a clearer price for the finished bathroom, not a collection of partial trade costs that still need to be coordinated.

Screenshot from https://melbournetilingservices.com.au

The safest budget is the one that reflects the whole build. That is usually what saves money in the end.

Expert Commercial Tilers Melbourne: Flawless Results 2026

A commercial fit-out usually reaches the same pressure point. The joinery is nearly in, services are being finalised, the opening date is fixed, and suddenly the floor and wet areas become critical path. If the tiling slips, the whole programme slips with it. If the tiling goes in over a bad substrate or failed waterproofing, the problem doesn't show up at handover. It shows up later, when the tenant is operating, the bathrooms are in use, and the defect becomes your problem.

That's why choosing between commercial tilers in Melbourne isn't a styling decision. It's a delivery decision. The work has to look sharp, but it also has to perform under traffic, cleaning, moisture, movement and compliance scrutiny. In a market as broad as commercial tiling, there are plenty of operators. At the national level, Australia's Tiling & Carpeting Services industry was estimated to reach $8.0 billion in revenue in 2026, comprising 20,099 businesses, while the current year was projected to contract by 4.8% because of weaker commercial and industrial construction activity, according to IBISWorld's Australia Tiling & Carpeting Services industry report. In practical terms, that means buyers need to be selective about stability, systems and accountability.

From a Registered Builder's point of view, good commercial tiling starts well before the first tile is cut. It starts with scope clarity, substrate assessment, waterproofing responsibility, slip resistance selection, sequencing with other trades, and clear sign-off points. That matters just as much in a commercial bathroom renovation as it does in a lobby, kitchen, amenities block, balcony or public entry.

Table of Contents

Introduction Why Your Choice of Commercial Tiler Matters

A poor commercial tiling decision usually looks fine for a short while. The lines are straight, the grout is clean, and the client signs off. Then the test begins. Cleaners hit the floor daily. Tenants drag furniture. Wet areas stay wet. Door thresholds take traffic. If the falls are wrong, water sits. If the substrate moves, grout cracks. If the membrane was never properly addressed, the leak returns and everyone argues about who owns it.

That's why the right contractor has to think beyond finish. Commercial tilers in Melbourne deal with environments that punish shortcuts. Restaurants need floors that can cope with grease and washing. Office amenities need durable detailing around fixtures and penetrations. Retail tenancies need finishes that can be delivered on programme, often after hours, without disrupting adjoining trades.

Practical rule: If a tiler talks mainly about tile style and barely mentions substrate, falls, movement, waterproofing or compliance, you're probably talking to the wrong contractor for a commercial site.

The best outcomes come from teams that understand sequencing and defects risk, not just installation. On commercial work, the tiler has to read the site properly, identify what must be rectified before tiling begins, and push back when another trade leaves an issue behind. That pushback saves time later.

For bathroom renovations in commercial settings, this becomes even more important. Amenities upgrades in offices, medical suites, hospitality venues and shared facilities often involve demolition, plumbing changes, waterproofing, floor correction and new finishes in a tight footprint. A Registered Builder can coordinate those moving parts under one scope instead of leaving the client to chase separate trades and separate excuses.

Beyond the Surface What a Commercial Tiler Really Does

The work before the tile matters most

People outside the trade often think tiling starts with tile selection. On a commercial site, it starts with the base. If the substrate is out, damp, weak, contaminated or poorly set out, the finish will never perform properly.

A competent commercial tiler should be dealing with work such as:

  • Substrate assessment: checking whether the slab, screed, wall sheeting or existing surface is suitable to receive tile.
  • Moisture and condition checks: identifying dampness, contamination, bond breakers and signs of previous failure.
  • Floor correction: using screeding or self-levelling where needed so levels, falls and transitions work in real use.
  • Set-out planning: making sure cuts, movement joints, drain positions and thresholds are resolved before installation begins.
  • Adhesive and grout selection: matching the system to the tile type, format, traffic demands and exposure conditions.

That's the difference between basic laying and professional commercial delivery. One puts tiles down. The other builds a tiled system that can survive use.

A lot of defects trace back to rushed preparation. Large-format porcelain over an uneven slab will produce lippage. A bathroom floor with poor falls will pond around pans and vanities. Balcony tiling over a compromised base will fail no matter how expensive the tile is.

Why a Registered Builder changes the outcome

This is where builder-led coordination matters. Commercial bathroom renovations aren't just tiling packages. They usually involve demolition, carpentry, plumbing, electrical work, waterproofing, glazing and finishing trades. If nobody controls the sequence, one trade buries another trade's mistake.

A Registered Builder gives the client a single point of responsibility. Instead of the tiler saying the plumber caused the issue, and the plumber saying the waterproofer caused it, the scope is managed as one buildable package. That reduces the usual communication gaps around penetrations, hob details, floor wastes, wall straightness and door clearances.

For teams comparing delivery models, Melbourne commercial tiling services is a useful example of a contractor structure that sits within a broader renovation and building workflow rather than operating as tile labour only.

On commercial work, the neatest finish often comes from the least glamorous decisions made early: straight framing, correct falls, clean penetrations and disciplined trade sequencing.

That's also why experienced commercial tilers ask harder questions at tender stage. Who owns waterproofing design? Is the substrate new or existing? Are there after-hours access restrictions? Has the hydraulic layout changed? Those questions aren't a delay. They're part of delivering a floor or wet area that won't come back as a defect.

Core Commercial Tiling Services for Melbourne Projects

Some commercial projects need pure installation. Many don't. In Melbourne, the stronger operators are usually the ones who can handle specialty wet area work, remediation and high-finish architectural surfaces as part of a broader build scope.

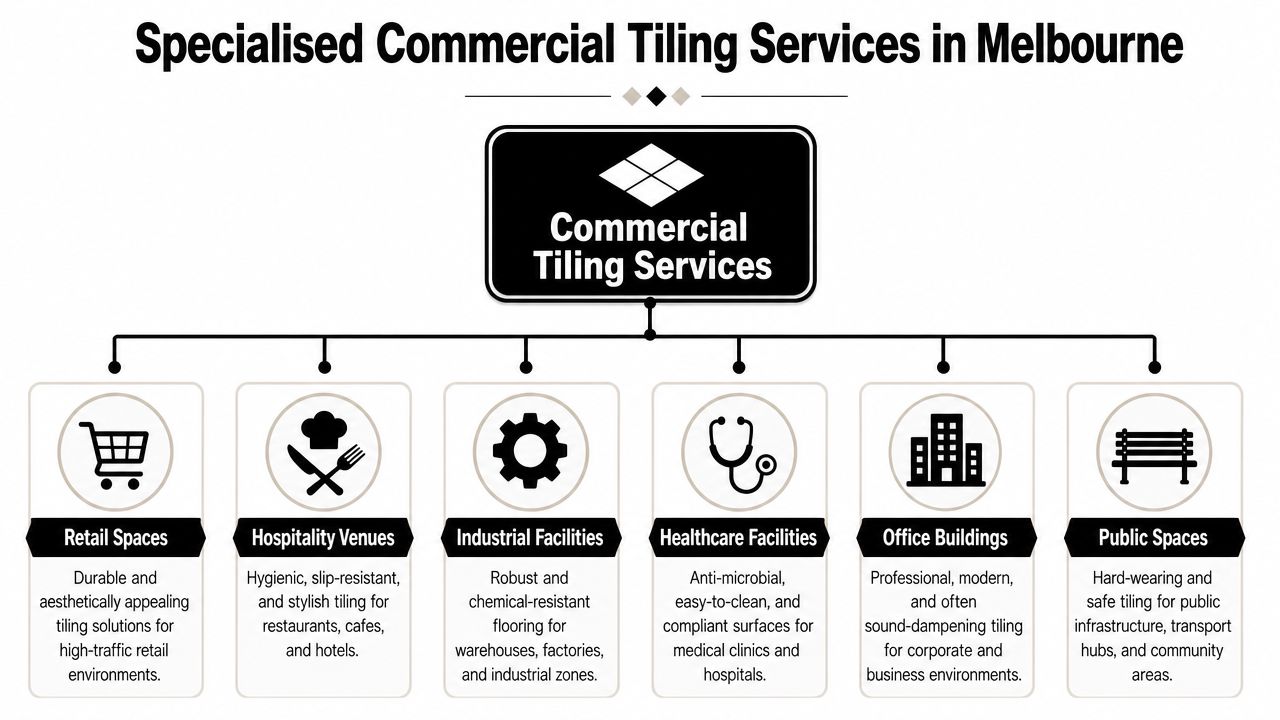
A diagram illustrating diverse commercial tiling services offered in Melbourne for various facility types and environments.

Commercial bathroom renovations

Commercial bathrooms wear out differently from residential ones. The problem isn't just age. It's traffic, aggressive cleaning, vandal resistance, accessibility needs and downtime pressure. A bathroom in an office, café, clinic or retail site has to be easy to maintain and quick to return to service.

The tiling component usually includes:

  • Wall and floor retiling: often with more durable edge detailing and cleaner junctions than a domestic bathroom.
  • Floor fall correction: especially where existing amenities have poor drainage or standing water.
  • Penetration detailing: around pans, mixers, basins and service points.
  • Integration with other trades: because a bathroom renovation rarely stops at tiles.

In these jobs, appearance matters, but serviceability matters more. Tight grout joints, clean silicone work and well-resolved floor wastes make maintenance easier. Poor detailing does the opposite.

Balcony tiling and remediation

Balconies fail when water management fails. The visible symptom may be drummy tiles, stained soffits, cracked grout or leaks into spaces below. The underlying issue is usually deeper. Falls may be wrong. Water may be trapped. The membrane may be compromised. Edge detailing may never have been resolved properly.

A proper balcony scope often includes strip-out, assessment of the base, repair or replacement of screed, membrane work, then retiling. Retiling without remediation is mostly cosmetic. It doesn't fix the pathway water is already using.

Critical waterproofing and wet area preparation

Waterproofing is where many commercial sites either get disciplined or get expensive. Wet areas need clear responsibility, clean substrates, correct junction detailing and proper sequencing with plumbing and carpentry. A membrane applied to a poor base is still a poor system.

For property managers and builders assessing integrated scopes, commercial tiling and waterproofing services are relevant because they address preparation and moisture protection together rather than as disconnected trades.

Here's what tends to work, and what doesn't:

Situation What works What fails
Existing wet area with leak history Open up, inspect, diagnose, rectify substrate and membrane before retiling Tiling over the old problem to improve appearance
New amenities build Confirm penetrations, floor wastes and set-downs before membrane and tile Letting trades alter details after waterproofing is complete
High-use bathroom Durable tile, suitable grout system, cleanable detailing Prioritising a decorative finish that's hard to maintain

Large format and architectural finishes

Large-format panels and slim-profile products can look exceptional in foyers, premium amenities, feature walls and selected external applications. They also punish bad preparation. The flatter the tile, the flatter the substrate has to be. There's nowhere to hide.

These installations require careful handling, accurate cutting, consistent adhesive coverage, and realistic planning around access and breakage risk. A contractor who mainly handles small-format domestic work may not have the right systems for this sort of package. With Kerlite, porcelain slabs, stone-look panels and minimal-joint layouts, the substrate and set-out do most of the heavy lifting.

Navigating Melbourne Tiling Compliance and Licensing

Commercial tiling in Melbourne sits inside a broader compliance framework. Clients often treat this as paperwork. It isn't. Compliance determines whether the finished space is safe to use, defensible if there's a claim, and less likely to come back as rectification.

Slip resistance is a specification issue

One of the biggest mistakes on commercial projects is choosing tile by appearance first and function second. In wet and transitional areas, that approach creates risk. For commercial projects in Melbourne, specifying the correct tile is governed by slip resistance compliance under AS 4586, which classifies floor performance in wet conditions. In practice, that means selection has to prioritise safety and function over appearance alone in areas such as kitchens and bathrooms, as outlined in this commercial tile specification guide discussing AS 4586.

That affects more than the tile face. It also affects:

  • Cleaning regimes: some surfaces perform differently depending on contamination and maintenance.
  • Location decisions: an entry, commercial kitchen and toilet area don't all need the same finish.
  • Risk allocation: if a slip occurs, people will review what was specified and why.

A polished tile that looks good in a sample board can be the wrong product for a busy wet entry. On a commercial site, the right tile is the one that suits the actual use.

Licensing and accountability on site

Licensing matters because defects rarely sit neatly within one trade line. Waterproofing, tile installation, drainage falls, substrate condition and bathroom renovation sequencing overlap. When there's a failure, the first question isn't “who laid the tile nicely?” It's “who was responsible for the compliant system?”

That's why clients should ask who is carrying the build responsibility, especially where bathrooms are being reconfigured, penetrations are moved, or remediation is involved. A Registered Builder understands the interfaces between trades and can manage documentation, sequencing and rectification in a way that pure labour-only tiling outfits often can't.

For projects that need formal wet-area documentation, Victorian waterproofing compliance certificate information is worth reviewing before works start, not after a dispute begins.

A compliant project doesn't just pass inspection. It leaves a record of who did what, what system was used, and how the work was signed off. That record becomes valuable if the tenancy changes hands, if a leak appears later, or if the owner needs to show due diligence.

How to Hire the Right Commercial Tiler A Checklist

Most hiring mistakes happen before demolition starts. The quote looks neat, the tile allowance seems workable, and the client assumes all tilers are pricing the same scope. They rarely are. One contractor may be pricing full preparation, coordination and compliance. Another may be pricing tile laying only, with half the risk left out.

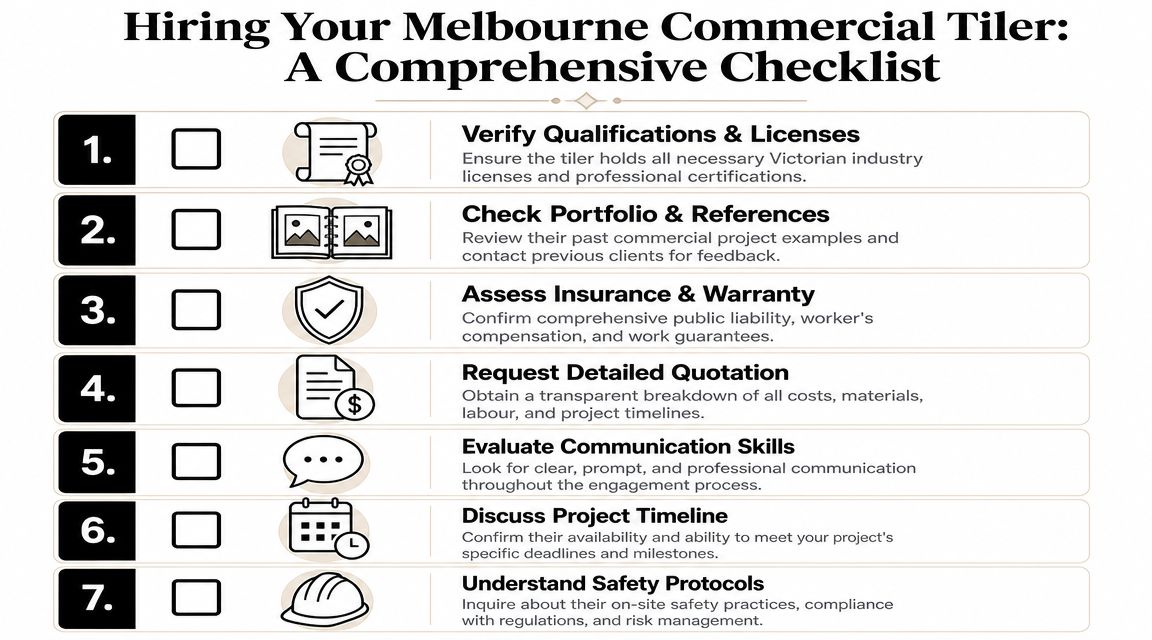
A checklist infographic outlining seven essential steps for hiring professional commercial tilers in Melbourne, Victoria.

What to ask before you accept a quote

Use the first meeting to test how the contractor thinks. Don't just ask whether they can do the job. Ask how they'd control the risk.

  • Registration and trade structure: Ask whether they operate only as tilers or whether a Registered Builder is managing the package where renovation works are involved.
  • Comparable commercial work: Request examples of projects with similar access, programme pressure, wet area complexity or tenant constraints.
  • Insurance position: Confirm they carry the appropriate current insurances and that the scope they're quoting matches the work they're insured to perform.
  • Defect approach: Ask what they do if they find moisture, poor falls, movement, or a compromised substrate after strip-out.
  • Trade coordination: In bathroom renovations, ask who coordinates plumbing, electrical, carpentry and waterproofing interfaces.

The good contractors usually answer directly. They'll talk about process, hold points and exclusions. The weak ones tend to stay vague.

What a solid commercial quote should include

A commercial tiling quote should tell you where the responsibility starts and where it stops. If it doesn't, expect variation disputes later.

Look for these inclusions:

  1. Demolition and disposal clarity
    If old finishes are being removed, the quote should say what comes out, what gets retained, and who disposes of waste.

  2. Preparation scope
    It should identify whether screeding, self-levelling, grinding, patching or substrate repair is included, excluded, or provisional.

  3. Waterproofing responsibility
    Wet areas need explicit wording. Don't assume the membrane is included because the space is a bathroom.

  4. Tile installation details
    Ask what adhesive system, grout type, trims, movement joints and sealants are included.

  5. Site access assumptions
    After-hours work, restricted access, staged works and live-site conditions all affect labour and sequencing.

  6. Programme and hold points
    A realistic contractor will allow for curing, inspection and coordination, not just a neat finish date.

A quick comparison helps:

Quote type Typical warning sign
Very cheap Preparation is vague, waterproofing is assumed, exclusions are buried
Very short No mention of falls, substrate condition, movement joints or access limits
Very polished Looks complete, but doesn't identify who owns defect discovery after strip-out

If a quote doesn't explain what happens when the existing substrate is worse than expected, it's incomplete. Commercial renovation work regularly uncovers hidden conditions.

For buyers who want a builder-led option rather than a labour-only crew, Melbourne Tiling Services P/L is one example of a Melbourne contractor that combines bathroom renovations, waterproofing, screeding, self-levelling and tiling under a Registered Builder structure. That model suits projects where accountability matters as much as finish quality.

Common Tiling Problems and Expert Solutions

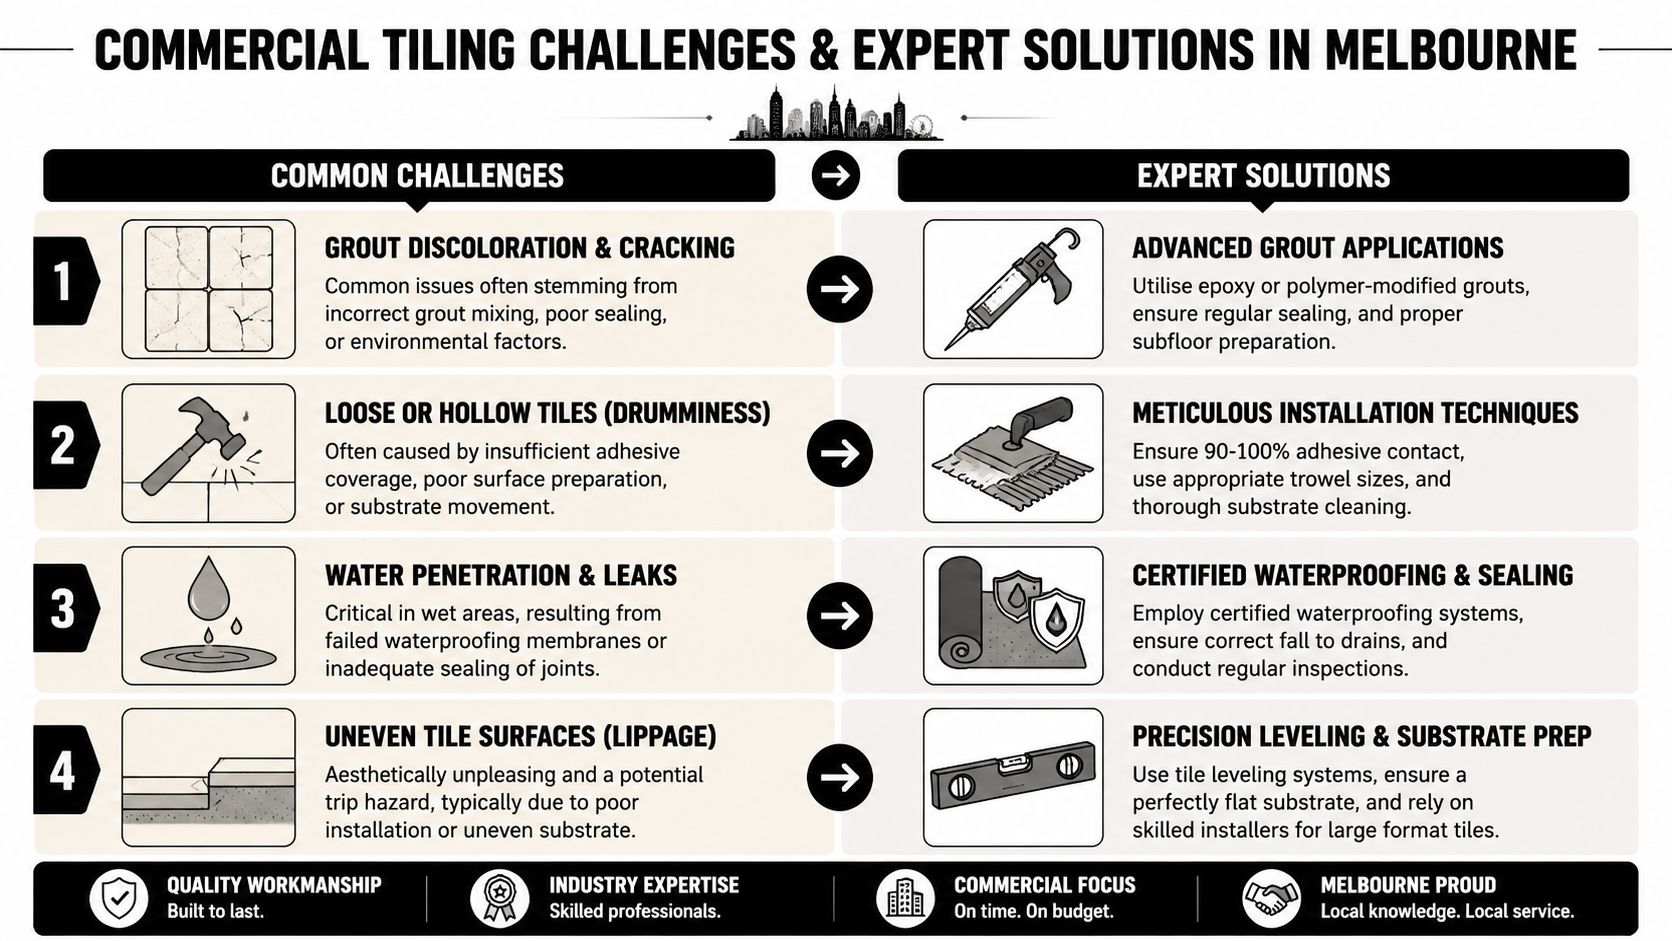
The most expensive tiling defects are the ones people try to patch. A cracked grout joint gets regrouted. A leaking shower gets new silicone. A drummy balcony gets a few tiles replaced. The surface looks better for a while, but the underlying failure stays in place.

A professional infographic highlighting common commercial tiling challenges and expert solutions provided by Melbourne tilers.

Leaks are rarely a tile problem

In Victoria, waterproofing failures in bathrooms and on balconies are among the most common building defect claims, and the practical issue for clients is who diagnoses the leak and ensures compliance before retiling. Replacing tiles alone often hides the underlying structural issue, as noted in this discussion of commercial tiling, leak diagnosis and waterproofing responsibility.

That matches what happens on site. The tile is usually not the waterproof layer. If water is getting through, the professional response is to investigate the full assembly. That can involve removing tiles, checking the screed, examining falls, looking at junctions and penetrations, and confirming whether the membrane has failed or was never adequate.

The shortcut is obvious. Replace cracked grout, reseal, and hope. The proper fix is slower, but it addresses the cause.

Other failures that show up too late

Some common commercial problems are less dramatic than a leak, but they still point to process failures.

  • Lippage on floors or walls: usually traced back to poor substrate preparation, rushed set-out, or unsuitable installation methods for large-format tile.
  • Efflorescence or staining: often indicates moisture movement through the substrate or salts being carried to the surface.
  • Loose or hollow tiles: commonly linked to bond failure, poor coverage, contamination, or movement underneath.
  • Recurring grout cracks: often a sign of movement, poor control joints, or a substrate issue rather than a grout-only problem.

The difference between a patch and a remedy is simple:

Problem Quick fix Professional solution
Leak in a shower or balcony Regrout and reseal Open up, diagnose source, rectify membrane or substrate, then retile
Uneven finished surface Replace one or two visible tiles Correct flatness issue and reset affected area properly
Hollow-sounding floor Ignore until more tiles fail Investigate bond and substrate movement before localised or broader rectification

Commercial tilers in Melbourne who understand remediation don't rush to save the visible finish at the expense of the system underneath. They know that the client will judge the job later, when the area is back in service.

Understanding Project Timelines and Investment

Timelines and price depend less on the tile itself than on what the site demands before installation starts. A straightforward new-build tenancy with a clean, flat substrate moves very differently from a bathroom renovation inside an operating building with restricted access, demolition, service changes and wet area remediation.

What drives time on site

The main programme variables are access, preparation, curing time, trade coordination and defect discovery after strip-out. Bathroom renovations often slow down not because tiling is difficult, but because hidden conditions appear once the old finishes are removed. The same applies to balconies and leak-rectification work.

A practical way to think about timing is to separate the job into three parts:

  • Pre-tiling work: demolition, substrate correction, screeding, service adjustments, waterproofing
  • Installation: set-out, cutting, laying, grouting, sealing
  • Post-installation return to service: curing, fit-off, cleaning, defect checks

What drives price

In Melbourne, commercial tiler labour-hire rates can range from $53 to $126 per hour plus GST, depending on skill, site complexity and whether after-hours work is required, according to Harrison Barratt's Melbourne tiler labour-hire rates. That spread tells you why one quote can look nothing like another even before material choices are considered.

A few things push projects toward the higher end of effort and cost:

  • Complex wet area work
  • After-hours or staged access
  • Specialist large-format installation
  • Balcony remediation and leak rectification
  • Detailed bathroom renovation coordination under a builder-led scope

The only reliable way to price commercial tiling is to inspect the site, define the hidden-risk items and separate installation from remedial work. That provides the client with a quote they can rely on, rather than a low number that grows once the project starts.

Frequently Asked Questions

Do commercial tilers handle bathroom renovations or just the tiling?

Some do only the tiling package. Others work within a broader renovation scope. For commercial bathroom renovations, a builder-led team is usually easier to manage because plumbing, electrical, carpentry, waterproofing and tiling all have to line up.

Why does a bathroom leak return after retiling?

Because the tiles often weren't the original problem. If the substrate, falls or waterproofing membrane weren't rectified, new tiles only cover the same failure again.

Are balconies a tiling job or a waterproofing job?

Usually both. If the balcony is leaking, drummy or ponding, the tile finish and the waterproofing system need to be assessed together. Treating them separately often leads to incomplete rectification.

Should I choose tile based on appearance first?

Not on a commercial project. Start with location, traffic, moisture exposure, cleaning method and safety. Then choose the finish that suits those conditions.

What should I have ready before requesting a quote?

Plans if you have them, photos, site address, access details, whether the building is occupied, and a clear note on whether it's new work, renovation, or leak rectification. If it's a bathroom renovation, include whether fixtures are moving.


If you need a commercial tiling contractor who can also manage bathroom renovations, waterproofing, screeding, self-levelling and leak rectification under a Registered Builder structure, Melbourne Tiling Services P/L offers quotes, 3D drawings and project planning support across Melbourne and greater Victoria.