

The usual advice for damaged bathroom tiles is to rake out the grout, replace the cracked tile and reseal the joints. That works only when the surface is the problem. If water has reached the substrate or the waterproofing has failed, a neat patch can hide damage that will cost more to repair later.
For bathroom tiles repairing advice, the useful starting point isn't the adhesive aisle. It's working out whether you've got an isolated tile defect, a movement problem or a leaking wet-area system.
Table of Contents
- Tile Problems, Causes and Repairs at a Glance
- How to Check for Hidden Water Damage
- Waterproofing Rules That Change Your Repair
- How to Replace a Cracked or Loose Tile
- When to Call a Registered Builder in Victoria
- Confirm the Scope and Book an Inspection
Tile Problems, Causes and Repairs at a Glance
| Symptom | Likely cause | Repair | DIY or pro |
|---|---|---|---|
| Hairline grout cracks in a wall | Grout failing where the joint needs to accommodate movement | Regrout ordinary tile joints with suitable flexible grout; use wet-area silicone at movement joints | DIY where dry, localised and clear of concealed waterproofing |
| Single cracked tile | Impact damage or a lost bond | Replace the tile and re-bed it with compatible wet-area adhesive | DIY if accessible and removal won't damage waterproofing |
| Hollow or drummy tile | Adhesive voids or loss of bond behind the tile | Assess the bond, remove and re-bed where necessary, and check the substrate for water | Pro if several tiles are affected or the tile is in a shower |
| Dark or mouldy grout | Porous grout retaining moisture in a damp room | Clean, regrout or reseal as appropriate, and improve ventilation | DIY for surface maintenance without leak indicators |
| Loose tiles beyond the original damage | Substrate movement or a failed membrane | Investigate waterproofing and substrate stability before retiling | Suitably qualified tiler or registered builder |
| Damp walls, swollen skirting or a leak below the shower | Failed waterstop, membrane, drain junction or plumbing | Selectively open the affected construction, identify the source and rectify it | Registered builder, with licensed plumbing trades where needed |
The table identifies a likely repair, not a confirmed diagnosis. A cracked tile beside a dropped shampoo bottle suggests impact damage. A crack continuing through neighbouring tiles and grout suggests something different, particularly if the floor moves underfoot.
Hairline grout cracks need careful interpretation. Flexible grout can accommodate limited movement within an ordinary tiled field, but it isn't a substitute for silicone at a wall corner, bath edge or wall–floor junction. Filling those junctions with grout recreates the weak point.
Warning signs that change the job
A hollow sound alone doesn't prove a membrane has failed. Compare the suspect tile with surrounding tiles, then look for movement, broken joints and moisture indicators before deciding to remove it.
Dark grout also needs context. Surface mould in a poorly ventilated room calls for cleaning and ventilation checks; grout that remains dark beside a swollen door jamb calls for a moisture investigation. Don't assume a penetrating sealer will solve both.
Practical rule: If the same symptom appears elsewhere or returns after a surface repair, stop treating it as an isolated blemish.
Recurring grout cracks, loose tiles spreading beyond the original area, damp adjoining walls and mould behind tiles mean the visible repair isn't the whole job. The regional evidence explains why that distinction matters.
Victorian fact box: The Building and Plumbing Commission's examination of 6,299 residential building disputes lodged between July 2018 and June 2023 found that almost 31% of individual dispute items were water-related, with missing waterstops the most frequently noted bathroom issue.
How to Check for Hidden Water Damage
Start with observations that don't disturb the bathroom. Selective tile removal can be destructive, including damage to a membrane that was previously intact, so don't begin by levering off the worst-looking tile.
The following visual highlights signs worth recording before any removal.
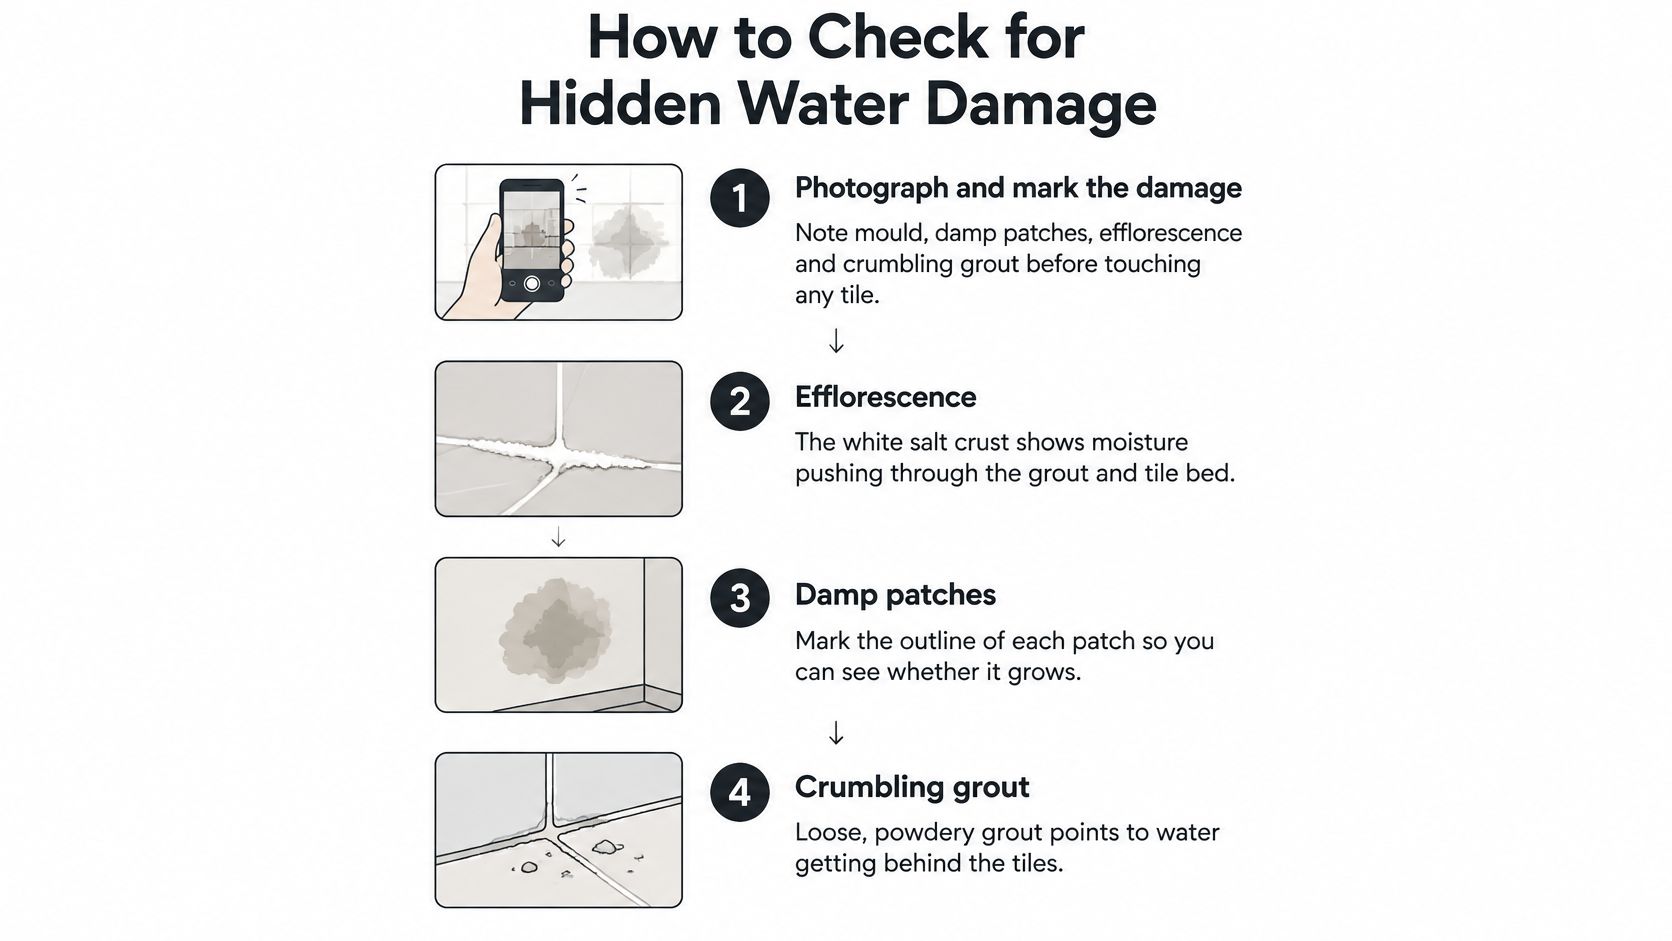
Work from evidence to targeted testing
Photograph and mark the damage. Take an overall room photo and close-ups of mould, damp patches, crumbling grout and efflorescence, the white salt crust left as moisture evaporates. Mark the boundary of a damp patch lightly in pencil on a suitable surface, and record the date so changes are visible.
Tap tiles gently with a screwdriver's plastic handle, comparing sounds across the affected area. A hollow response can indicate a void or lost bond, but sound alone isn't a diagnosis. Don't strike harder to make the difference clearer.
Check moisture comparatively. A moisture meter can help map suspect areas against apparently dry material of the same type. Metal, salts and the construction beneath tiles can distort readings, so don't interpret a high reading as proof of membrane failure. A plastic sheet taped over a suspect area overnight may reveal trapped moisture, but it can't establish the source or confirm that concealed material is dry.
Check for a possible plumbing leak with all taps and water-using appliances off, while keeping the property supply open and observing the meter. Unexplained movement warrants a licensed plumber's assessment; closing the main supply and watching a stationary meter doesn't rule out a leak. Waste-pipe leaks may require separate testing because they occur only when fixtures discharge.
Inspect the water pathways. Look at ponding near the waste, silicone separation, shower-screen bases, pipe penetrations and wall–floor junctions. Record where water appears rather than assuming the nearest damaged grout joint is its entry point.
Decide whether the evidence supports a local repair or selective opening. Dry, stable, isolated damage may suit a tile repair. Wet backing, spreading defects or uncertainty about the membrane calls for controlled removal by someone who can assess and reinstate the wet-area system.
Know what the investigation must establish
The AS 3740 preview treats waterproofing as a complete system that retains water within the wet area and directs it to an outfall. That makes the substrate, junctions and drainage just as relevant as the tile face.
Don't drill exploratory holes through a shower wall or seal damp backing beneath a fresh finish. Where the source remains unclear, arrange leak detection in Melbourne rather than extending the repair by guesswork.
Keep photos, moisture readings, meter observations and marked defect locations together. They give the tiler, plumber or builder a factual starting point for investigation and pricing.
Waterproofing Rules That Change Your Repair
| Requirement | Benchmark | Why it matters for repairs |
|---|---|---|
| Shower-area wall waterproofing | Minimum 1,800 mm above finished floor level, identified by the NCC waterproofing guidance | Tile height doesn't establish membrane height; check installation records or exposed construction |
| Unenclosed shower waterproofing | Extends 1.5 m from the shower rose connection, under the Victorian regulator's technical guidance | The waterproofed zone must account for water spreading beyond the immediate shower position |
| Waterstop position for an unenclosed shower | At least 1,500 mm horizontally from the shower rose, under the same Victorian guidance | A misplaced or missing waterstop can let water migrate beyond the intended wet area |
| Floor fall where a floor waste is installed | Continuous fall of at least 1:80 to the waste, under the same Victorian guidance | Ponding needs assessment before replacement tiles lock in the existing floor geometry |
What you can check without demolition
Measure shower dimensions from the reference points stated in the table, not from the shower-screen edge. Use a spirit level or straightedge to identify obvious backfalls and depressions, but have the tiler verify the actual gradient before screeding or retiling.
A waterstop is usually concealed within the tiled assembly. You can inspect an accessible threshold or construction photograph, but you can't confirm its continuity by looking at silicone along the wall–floor junction. Likewise, a fully tiled wall doesn't prove there's a membrane behind it.
Australian wet-area compliance uses the National Construction Code and AS 3740. The code's approach has shifted between performance requirements and construction detailing, so an older bathroom's appearance isn't a reliable guide to what rectification now requires. The applicable provisions and extent of any upgrade need confirmation for the proposed work, rather than an assumption that every minor repair requires a complete rebuild.
Tiles provide the finish. They don't provide evidence that concealed waterproofing was installed correctly.
A Western Australian government inspection found only 60% of individual waterproofing checks satisfactory, including defective or missing waterstops and unsatisfactory treatment of penetrations. This wasn't a Melbourne inspection, but the concealed details are directly relevant to what a repairer must examine.
The video provides additional visual context for waterproofing work.
Discuss waterproofing compliance documentation in Victoria before the membrane is covered. If dimensions, drainage or concealed junctions can't be verified, arrange a waterproofing assessment before committing to a surface-only repair.
How to Replace a Cracked or Loose Tile
Only proceed when the damage is dry and localised, the backing is stable, and removal won't compromise concealed waterproofing. A tile inside a shower isn't automatically a safe DIY repair just because it's easy to reach.
Controlled removal matters more than speed.
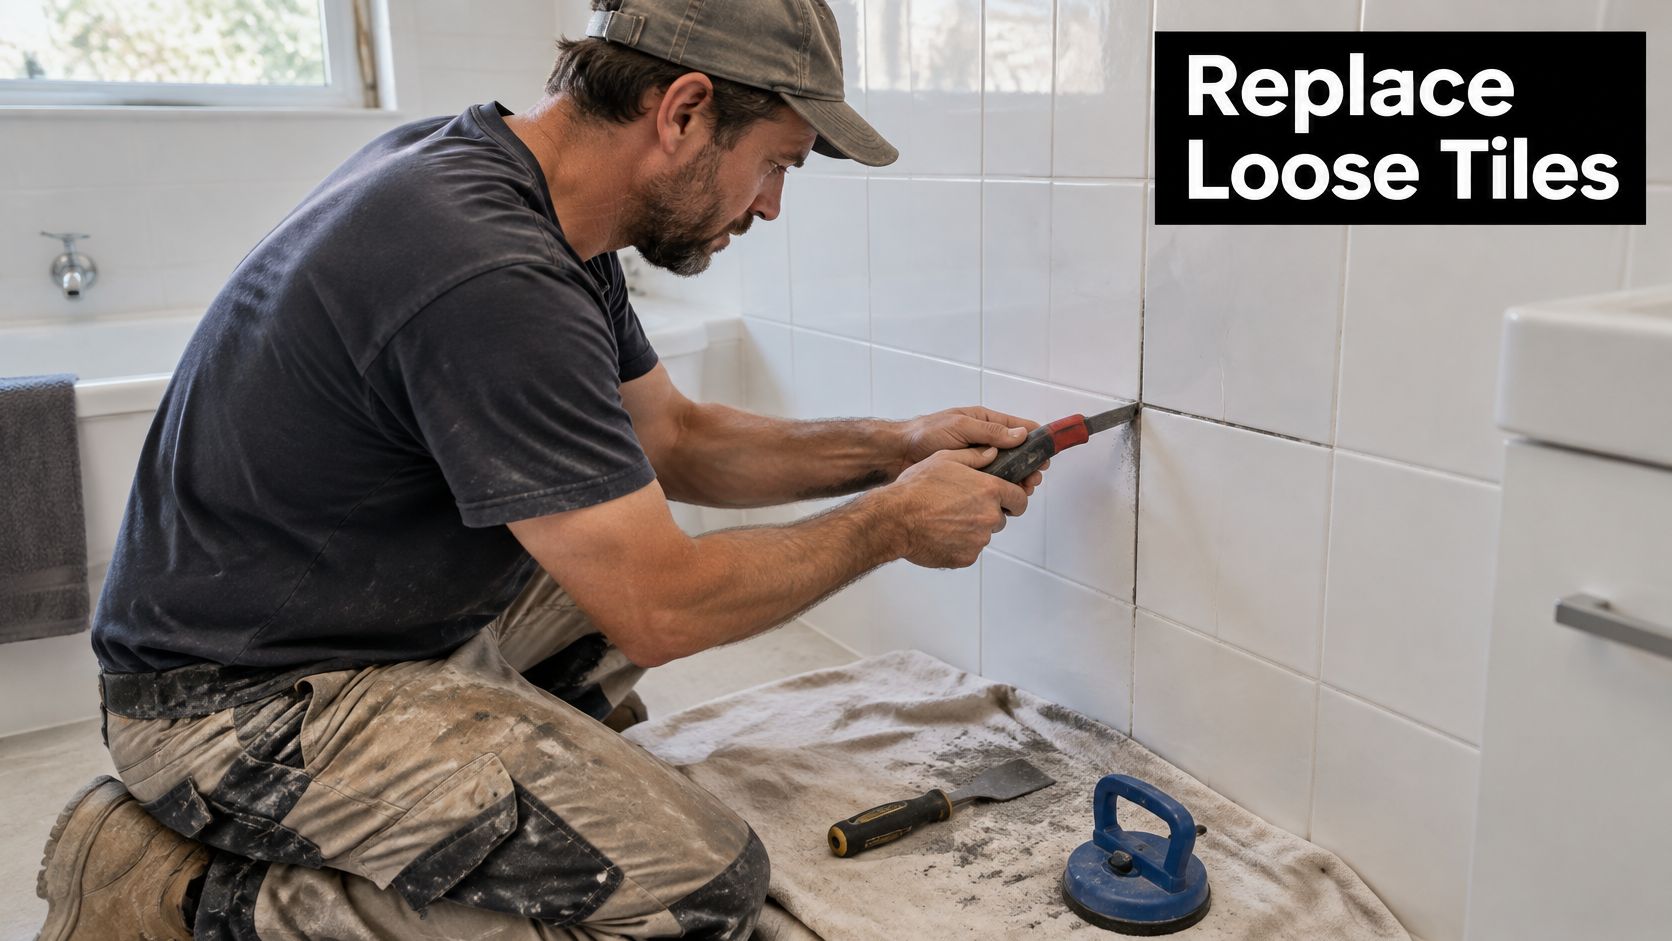
Remove and reset without extending the damage
Separate the grout joints. Use a hand grout saw or an oscillating tool with a depth-controlled grout blade. Stay within the joint and wear eye protection; don't run the blade down into the backing.
Lift an already loose tile with a suction cup where possible. For a broken tile, carefully remove fragments from the centre towards the edges with a flat chisel, without levering against neighbouring tiles. Stop if removal starts tearing the substrate or membrane.
Prepare the exposed surface. Remove loose adhesive and dust without gouging the backing. This is a common DIY failure point: fresh adhesive can't stabilise powdery, swollen or moving material. Don't scrape a membrane back to make room for the replacement.
Dry-fit the replacement. Check shade, batch, calibre and thickness, then place a straightedge across the surrounding tiles to confirm the finished face will sit flush.
Bed with compatible adhesive. Use a flexible wet-area tile adhesive suited to the tile, substrate and any membrane. Comb adhesive with an appropriate notched trowel, back-butter where needed, and press with a sliding motion to collapse the ridges rather than fixing the tile on isolated blobs.
Leave the tile undisturbed for the adhesive's specified curing period. Rushing this stage is another common failure point, particularly where cool conditions or dense porcelain slow drying.
Finish the joints correctly. Pack matching grout into ordinary tile joints and wipe off residue without flooding the surface. Keep changes of plane clear for compatible wet-area silicone, then allow all products to cure before shower use.
Regrout only when the backing is sound
For grout-only repairs, rake out failed material to a depth that meets the replacement grout's requirements. A thin smear over old grout won't provide a durable repair.
- Clean the joint: Vacuum out debris, wipe away remaining dust and let the joint dry.
- Pack the grout: Use colour-matched flexible grout suited to the joint width, pressing it fully into the gap.
- Protect the finish: After curing, apply a compatible penetrating sealer where the grout and tile system calls for it. Not every grout requires sealing.
- Control room moisture: Check that the exhaust fan works and discharges appropriately, rather than relying on cleaning products alone.
Don't impose a universal curing time or resealing schedule on different products. Follow the selected adhesive, grout, silicone and sealer instructions, including their restrictions on water exposure.
When to Call a Registered Builder in Victoria
A tiling-only repair and a bathroom renovation involving several trades are different jobs under Victorian building rules. The visible tile area doesn't determine the category; the complete scope does.
According to Consumer Affairs Victoria's renovation guidance, bathroom renovations valued at more than $10,000 generally require a registered contractor, unless the work consists solely of an exempt single trade such as wall or floor tiling; structural work requires registration regardless of value and normally requires a building permit.
Choose the contractor for the complete scope
- Dry, localised tiling work: A suitably qualified tiler can assess an isolated tile or grout repair. Don't assume that single-trade tiling carries the same registration requirements as a multi-trade renovation.
- Waterproofing and concealed damage: Involve a registered builder when opening the bathroom is likely to require coordination of demolition, backing replacement, waterproofing and other building work. Licensed plumbers and electricians must handle their respective regulated work.
- Structural alteration: Get the builder and relevant building surveyor involved before changing supports, framing or other structural elements.
- Whole-bathroom work: Use registered builders whose registration covers the proposed bathroom renovations, rather than dividing responsibility informally between unrelated trades.
For applicable renovation and repair contracts exceeding $10,000, Consumer Affairs Victoria's contract guidance requires a written major domestic building contract, even where the price is divided into smaller amounts. The written scope should make demolition, waterproofing, finishes and trade responsibilities clear.
Confirm responsibility before work starts
Check the contractor's registration category and status with the Building and Plumbing Commission. A business name, insurance certificate or tiling portfolio doesn't establish that a person holds the registration needed for the broader work.
Confirm whether a building permit is required and who will arrange it. Homeowners remain responsible for ensuring necessary permits are obtained, even where an authorised builder manages the application.
Keep the signed contract, agreed specifications, variations and inspection records together. That documentation is particularly useful when concealed damage changes the work after demolition.
Confirm the Scope and Book an Inspection
Before authorising replacement tiles, put the investigation into a short job record. A clear record helps the contractor distinguish what's established from what still needs opening or testing.
Prepare an inspection brief
- Gather the evidence: Include dated photographs, marked damp boundaries, comparative moisture readings and the locations of moving or hollow-sounding tiles. Note whether symptoms change after shower use.
- Classify the likely work: Identify whether you're seeking a dry tile repair, wet-area rectification or a bathroom renovation involving several trades. Leave uncertain items clearly marked for investigation.
- Record the constraints: Include spare-tile availability, access restrictions, shower availability and any adjoining room affected by moisture.
- Confirm the compliance pathway: Have the proposed contractor identify the relevant waterproofing requirements, registration category and permit needs for the actual scope.
- Request a written inclusions list: Each quote should address substrate repairs, drying, waterproofing, movement joints, waste removal, inspection stages and permits where applicable.
Compare scope before comparing totals
A cheap quote that includes only tile replacement isn't comparable with a quote that includes opening the backing and repairing a junction. Ask for investigation allowances and the process for approving additional work, rather than expecting a firm concealed-damage price from photographs alone.
Tile matching is another decision to settle early. Bring a spare tile to the inspection if you have one, and discuss whether a deliberately contrasting replacement would be preferable to unnecessary demolition of otherwise serviceable finishes.
For a small, dry repair, use the small-job tiler enquiry to describe the damage and available access. Where damage is spreading, the shower leaks or the membrane may be disturbed, book a site inspection with a suitably qualified tiler or registered builder before replacing more tiles.
Before you approve: The quote should identify what will be repaired beneath the tile, not merely the tile that will be supplied.
Melbourne Tiling Services P/L offers tile repairs, shower leak rectification, waterproofing and bathroom renovations. Visit Melbourne Tiling Services P/L to arrange an inspection and discuss whether your bathroom needs a targeted repair or a broader rectification scope.
Write a Comment