
You've probably got one of two jobs in front of you right now. The shower still looks fine from the doorway, but the grout line at the tray edge keeps darkening, the fan fogs the mirror for too long, or a renovated ensuite in Highett has started picking up the same mould line again after cleaning. In Melbourne, that's rarely just a cosmetic issue. It usually means bathroom tile sealing sits inside a wider wet-area maintenance problem, where ventilation, grout condition, and waterproofing all matter at once.
That's the part most homeowners miss. Australian construction guidance treats showers, bathroom floors, and other wet areas as high-risk moisture zones that need sealed or waterproofed systems, not just a quick grout touch-up, and resealing in showers is commonly done every 6–12 months while less exposed tiled areas can stretch to 1–3 years. In practice, sealing is part of a maintenance cycle, not a one-off finish, especially in Melbourne and Victoria where humidity and older housing stock make bathroom failures expensive and messy. The Australian wet-area sealing benchmark shows why routine upkeep matters, while the repair side of the ledger is why sealing is treated as preventive asset protection rather than a nice extra.
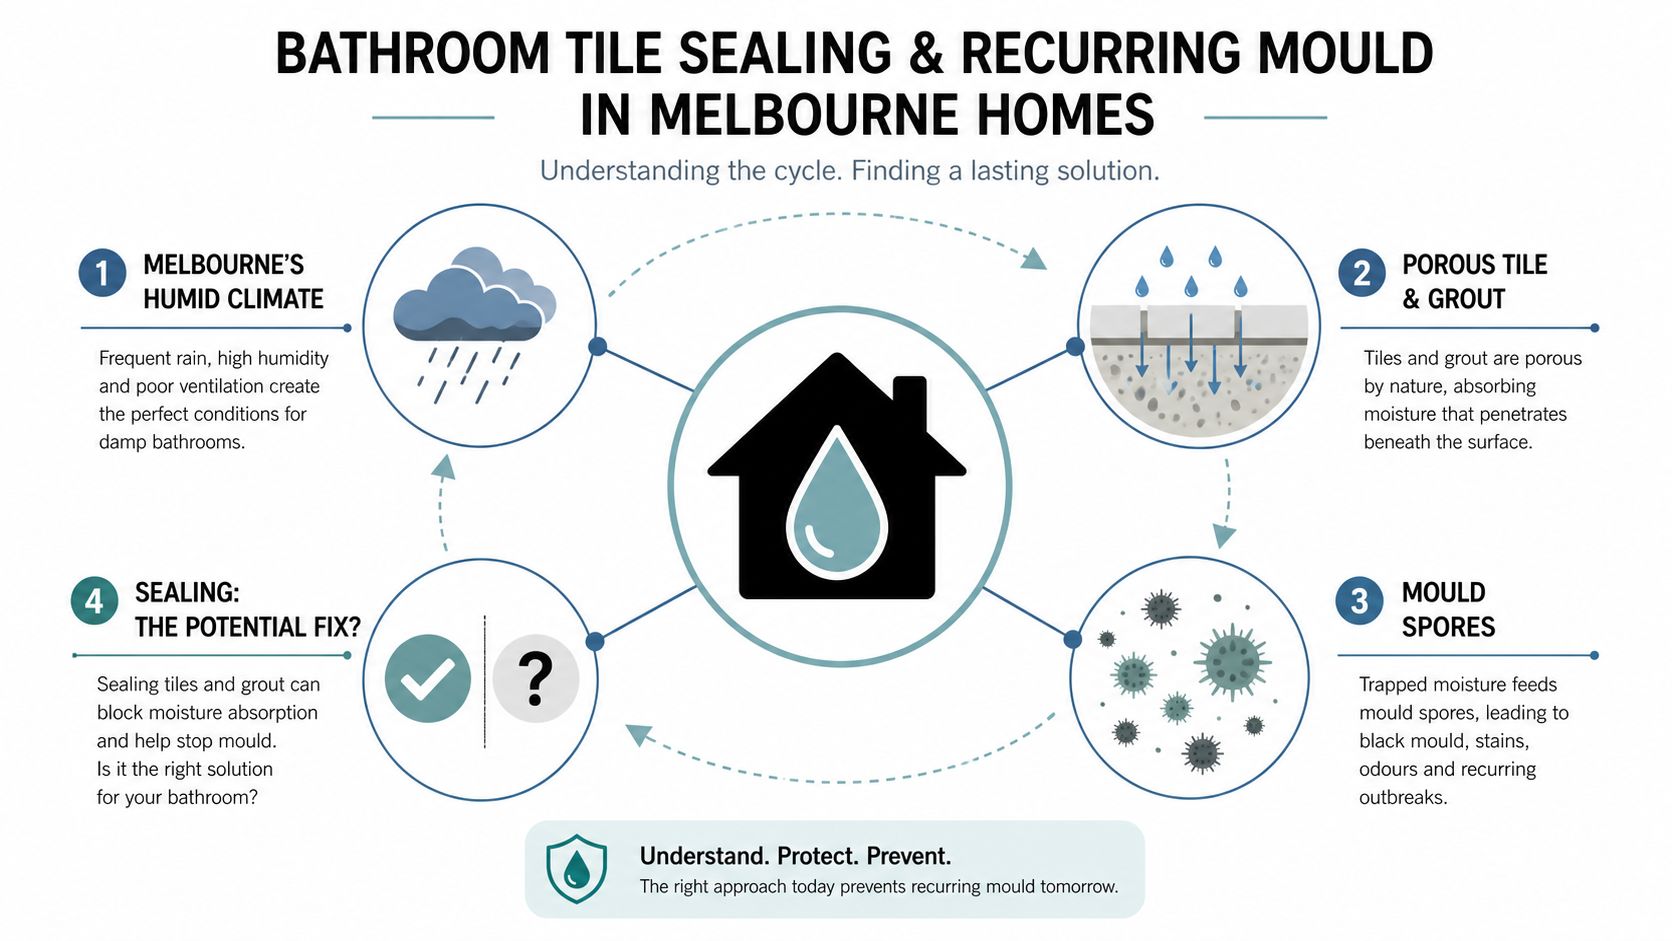
Table of Contents
- Why Bathroom Tile Sealing Matters in Melbourne Homes
- Which Tiles and Grout Actually Need Sealing
- Choosing the Right Sealer for Your Bathroom
- Step-by-Step Sealing Process for a Melbourne Bathroom
- When Sealing Is Not the Actual Problem
- Costs, DIY vs Professional Service, and Reseal Timelines
- Melbourne-Specific Tips and Your Next Steps
Why Bathroom Tile Sealing Matters in Melbourne Homes
A common Melbourne job starts the same way. A bayside ensuite has already been renovated, the shower looks sharp, and yet mould keeps returning along the floor line where the tray meets the wall. The owner asks whether another round of sealer will solve it, and that question tells you most of what you need to know. Sealing can help, but only if the problem is porous grout or stained stone, not a failed wet-area system.
Melbourne conditions change the maintenance equation
Bayside humidity, older brick homes, and bathrooms with weak exhaust fans all make moisture linger longer than people expect. That matters because the national move toward mandatory waterproofing and wet-area detailing shifted the job away from ad hoc sealing and toward a broader moisture-management system. Bathroom tile sealing now protects surfaces, but it doesn't replace the waterproofing layer beneath them.
Practical rule: if the shower smells damp after use, or the grout keeps changing colour after cleaning, start with moisture management before you buy another sealer.
For homeowners, the decision usually falls into three buckets. You're either protecting a new renovation, maintaining an existing bathroom, or figuring out whether DIY sealing is enough before you bring in a professional. Those are different jobs, and they need different answers.
Treat sealing as scheduled maintenance
The better way to think about it is simple. Sealing is a planned service, like gutter cleaning or repainting, not a decorative afterthought. In wet areas, that schedule is what helps keep water, mould, and substrate damage from turning into major remedial work later.
That's why a tile seal in Melbourne should be read as part of the room's moisture strategy. If the bathroom is already leaking, spongy, or lifting, sealing is only a short-term surface treatment. If the structure is sound, sealing can extend the life of the grout, keep cleaning easier, and buy time between more invasive repairs.
Which Tiles and Grout Actually Need Sealing
Not every bathroom surface needs the same treatment, and that's where money is often wasted. The usual mistake is buying one product for the whole room, then assuming everything from glazed porcelain to cracked grout reacts the same way. It doesn't. A Melbourne bathroom has at least four material cases worth separating before you open a bottle.
The materials behave differently
Glazed porcelain and ceramic tile bodies generally don't need sealing, because the face is already dense and low-absorbency, but the grout joints still do. Natural stone, including marble and travertine, is different again, because both the stone surface and the grout usually need protection. Cement-based grout is the most common maintenance target, since it's porous and vulnerable to staining and moisture uptake.
| Material | Needs Sealing? | Notes |
|---|---|---|
| Glazed porcelain | Usually no | Tile face is generally low-absorbency, grout still needs attention |
| Ceramic tile | Usually no | Same practical rule as glazed porcelain in most bathrooms |
| Natural stone | Yes | Surface and grout often need protection |
| Cement-based grout | Yes | Most common resealing target in showers and bathroom floors |
Independent consumer guidance on tile materials supports that split between tile and grout, and it's the right way to think about maintenance in mixed bathrooms. Floor & Decor's guidance on tile sealing is useful because it separates tile body from grout rather than treating them as one surface. For a broader grout choice discussion, see the practical comparison at epoxy grout versus cement grout.
The edge cases matter more than the easy ones
Mixed-material showers are where real-world jobs get messy. A feature wall might be ceramic, the niche might be stone, and the floor might have pre-sealed grout from the factory. Add cracked or discoloured joints, and you're no longer asking “Do I seal this bathroom?” You're asking which parts are still sound and which ones are already failing.
If water beads on one surface but darkens another, the bathroom is telling you where the porous material is.
The safest move is to inspect each surface separately. If the tile face is glazed, skip unnecessary topical products. If the grout is cement-based, protect it. If natural stone is present, treat it as a different substrate entirely.
Choosing the Right Sealer for Your Bathroom
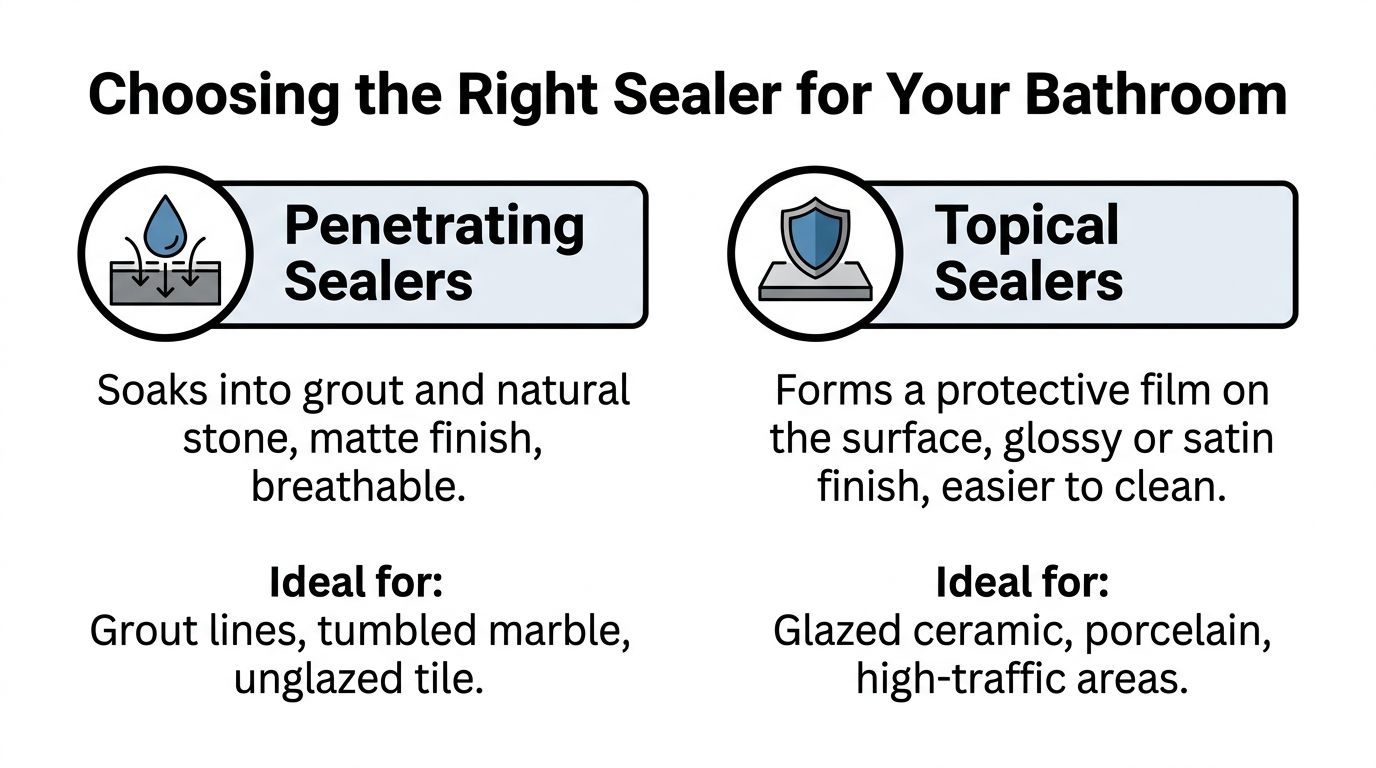
Sealer choice matters more than most hardware-store labels suggest. In wet areas, there are really two families that count. Penetrating sealers soak into porous material, while topical sealers sit on the surface and form a film. In a Melbourne bathroom, that difference decides whether the finish keeps working or turns into a maintenance headache.
Penetrating sealers suit porous substrates
Penetrating sealers are the safer default for cement grout and many natural stones. They work by soaking into the pores rather than sitting on top, so the surface still looks natural and can breathe better than a film coating. That makes them more practical for showers, niches, and bathroom floors where constant cleaning and steam are part of daily use.
The chemistry matters too. For stone, fluoropolymer and silane/siloxane systems are the kinds of products that belong in this conversation, because they're built for porous mineral surfaces rather than decorative shine. For grout, dedicated grout sealers are the cleaner option.
Topical sealers have a narrower place
Topical sealers can look tidy on decorative feature walls, but they're a poor match for most shower floors. They sit on the surface, which can create a glossy or satin finish, but in a humid bathroom with limited ventilation that film can trap moisture or wear unevenly. Wax and acrylic finishes are especially risky in showers, because residue build-up and poor adhesion are common failure points.
The trade-off is simple. A topical product may look better on day one, but a penetrating product usually ages more sensibly in a working bathroom. That's the reason serious tilers tend to match chemistry to substrate rather than reach for the cheapest bottle on special.
For stone-specific work, the detail matters enough that I'd point people to the guidance on sealing stone tiles. If you're choosing between product types, the distinction is less about marketing and more about whether the substrate accepts the treatment.
Step-by-Step Sealing Process for a Melbourne Bathroom
The jobs that fail are usually rushed at the start, not the end. A bathroom in Melbourne can look dry on the surface while the grout is still holding moisture deep in the joints, especially after cleaning or a recent renovation. If you seal too early, the product can sit on contamination, haze on the tile face, or fail to penetrate where it's supposed to.
Start with the surface, not the bottle
Inspect the grout and stone for cracks, powdering, staining, or loose sections. If the joints are soft or missing material, sealing won't fix that. Clean out soap residue first, then treat any mould growth before you think about the sealer itself.
The key is clean, rinsed, and fully dry joints. Trade guidance is blunt here, because wax, soap, and residue can block uptake and leave a film on glazed tile. Bromley Tilers' sealing guidance reinforces the same point, and it's the mistake I see most often in DIY bathrooms.
Apply in small sections and respect dwell time
Work in short runs with a brush or foam applicator. On new bathroom grout, the practical sequence is to let the grout cure 48–72 hours before sealing, apply the sealer in small sections, wipe residue off the tile face within about 5 minutes, and then let the bathroom cure for 24–48 hours before wet use. Product guidance also commonly calls for 2 coats on porous grout lines. Loctite's grout sealing guide matches the curing and wipe-off windows people need to plan around.
A simple working rhythm helps:
- Prepare the room: Vacuum or wipe dust, then deep-clean grout and tile faces.
- Dry fully: Leave the bathroom ventilated until the joints are completely dry.
- Seal in sections: Use a foam applicator or brush, don't flood the joint.
- Watch the clock: Remove residue before haze forms on the tile face.
- Let it cure: Keep the shower dry for the full cure period.
Rushing the drying stage is the fastest way to waste a good sealer.
Ventilation matters during cure. Run the exhaust fan, leave the door ajar if the room can stay secure, and don't put the shower back into service early just because the surface feels dry to the touch. In Melbourne humidity, touch-dry and fully cured are two different things.
When Sealing Is Not the Actual Problem
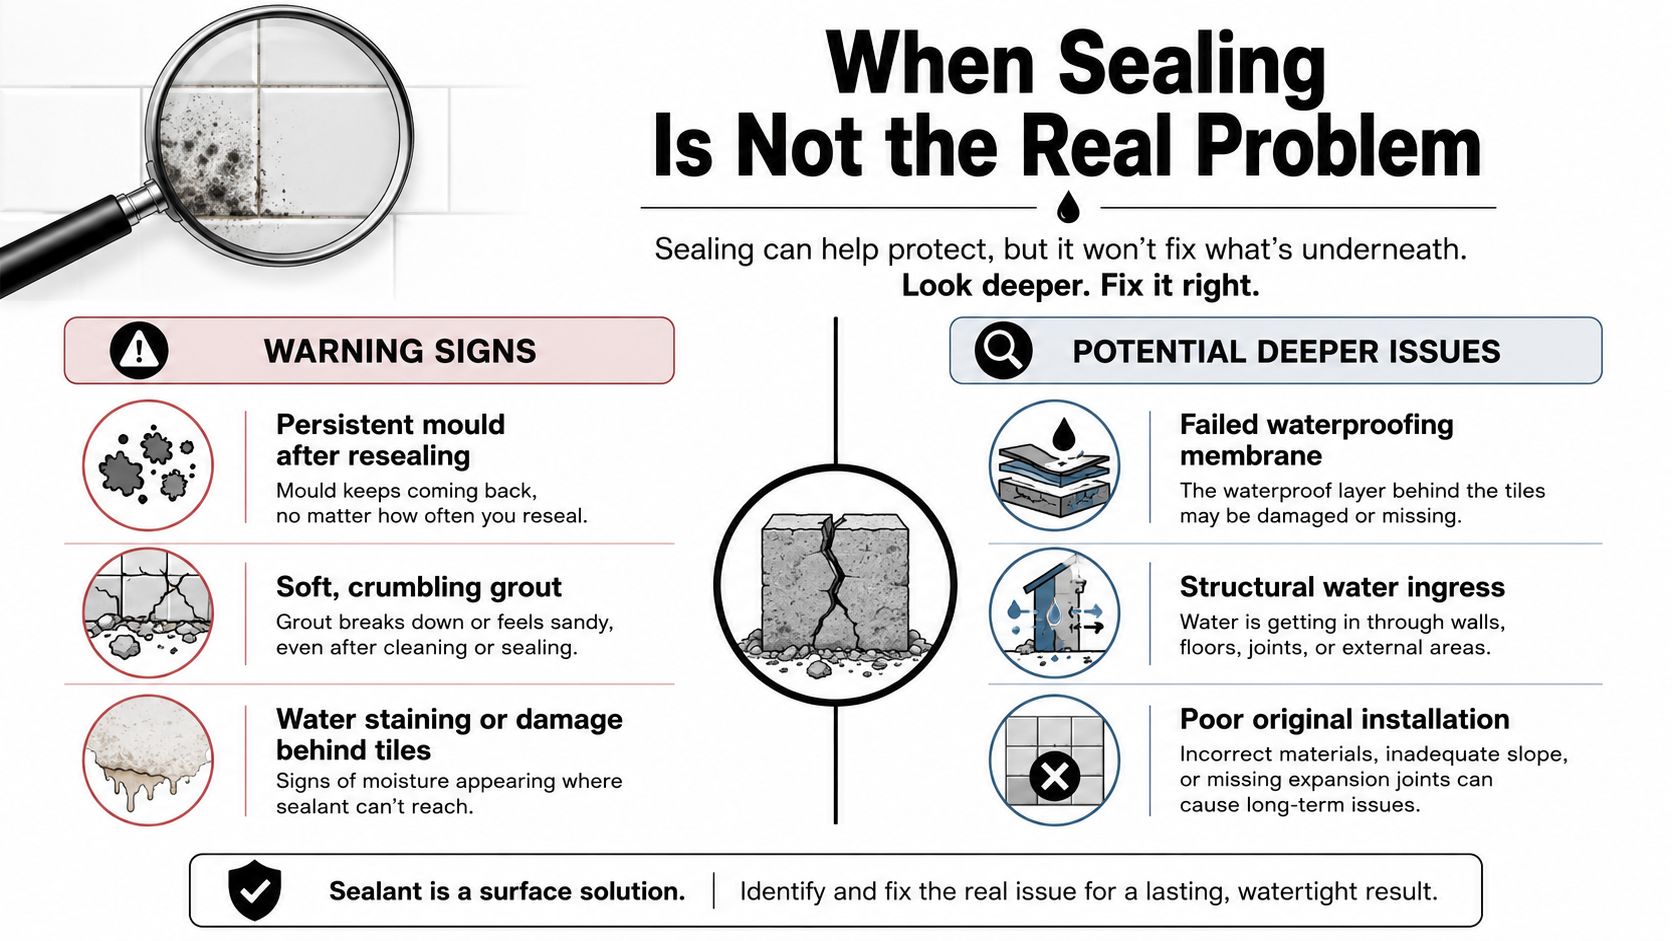
Some bathrooms keep failing because sealing is the wrong fix. If mould comes back soon after resealing, the grout keeps breaking apart, or water marks appear on an adjacent wall, the room is pointing to a problem below the tile surface. Sealer can slow down absorption. It cannot repair a failed membrane or stop water moving through a bad junction.
Warning signs point past cosmetic maintenance
Soft or crumbling grout means the joint is failing, not just staining. Efflorescence, swollen door jambs, and musty smells that return within days all point to moisture moving where it should not. If the shower floor still darkens after careful resealing, the water path is likely deeper than the surface layer.
That distinction matters because sealing over a failed waterproofing membrane only buys time. It does not correct structural water ingress, poor original installation, or hidden leakage around the tray, wall junctions, or penetrations. A proper inspection is the better call than another coat of product, especially in Melbourne bathrooms where humidity can keep problems active long after the surface looks dry. For a broader look at how waterproofing fits into Melbourne bathroom work, the membrane under the tiles is the layer doing the actual protection.
Renovation work can cross into builder territory
Bathroom renovations in Victoria often combine tiling, waterproofing, plumbing, and carpentry. Once the work becomes structural or high-risk, it may need to be handled by a Registered Unlimited Builder, not only a tiler or handyman. Under Victorian Domestic Building Contracts law, a domestic building contract is generally required for residential building work over AUD 10,000, so the paperwork and the scope matter as much as the tile finish.
If the bathroom needs leak rectification, waterproofing replacement, framing repairs, or a full renovation, sealing is only one small part of the job. The work has moved into a larger remedial scope, and that is the point where a registered builder should be on the job description.
Costs, DIY vs Professional Service, and Reseal Timelines
Bathroom tile sealing is cheap compared with the damage it helps prevent. International benchmarks put grout sealing at about US$0.30–US$0.50 per square foot for DIY-equivalent work and around US$1–US$2 per square foot when professionally applied, with one published estimate placing an average job at US$150–US$250 for 160 square feet. Those numbers aren't Australia-specific, but they show why sealing is treated as routine maintenance rather than major expenditure. Angi's grout sealing cost guide gives a useful baseline.
DIY works for simple maintenance
For a straightforward grout reseal, DIY usually makes sense when the surface is sound, the joints are clean, and the area isn't crossing into waterproofing work. You're buying the sealer, applicator, cleaner, and time. The payoff is decent if you're protecting a small bathroom floor or a few metre runs of grout and you're careful with prep.
Professional help makes more sense when the bathroom is large, the surfaces are mixed, or the work sits beside a renovation scope that already needs a trades sequence. That's especially true for bathrooms, balconies, and any job where waterproofing or leak rectification is involved. A professional tiler or registered builder isn't just selling labour, they're managing substrate condition, cure windows, and the risk of rework.
Reseal timing depends on exposure
The practical Melbourne schedule is straightforward. High-exposure shower zones usually want resealing every 6–12 months, while less exposed tiled areas can run 1–3 years depending on use and ventilation. In wet rooms with better airflow and gentler cleaners, those intervals can stretch. In humid bathrooms with heavy daily use, they shorten.
If water stops beading on the grout, it's time to check the surface again.
Cleaning products matter too. Soap-based residue and harsh cleaners can leave films that interfere with future sealer uptake, so a pH-neutral, residue-free cleaner is the better maintenance habit. If you're budgeting a full bathroom refresh, Melbourne Tiling Services P/L also offers tile sealing as part of larger bathroom work, but only where it fits the surface and scope.
Melbourne-Specific Tips and Your Next Steps
Melbourne bathrooms don't age uniformly. Bayside homes deal with humid air, inner-city apartments often rely on weak ventilation, and hill suburbs can swing between damp mornings and warm, closed-up evenings. That's why the same sealing product can behave differently from one suburb to the next. The fix is usually less about a magic brand and more about ventilation, cleaner choice, and knowing when the job has become renovation work.
Keep the maintenance plan tied to the room
Use the exhaust fan during showers and leave it running long enough to clear the room. Avoid cleaning products that leave soap films or strip the sealer early, because that shortens the life of the joints. If the shower is repeatedly showing mould at the base, stop treating it as a stain problem and check the whole moisture path.
Bring in the right licence when the scope changes
A Registered Unlimited Builder should be involved when the work includes waterproofing, leak rectification, balcony remediation, or a full bathroom renovation with multiple trades. That's not red tape for its own sake, it's the difference between surface maintenance and building work. Ask for credential details, waterproofing warranties, material specs, and a clear timeline before anyone starts.
A practical checklist helps keep the project grounded:
- Identify the substrate: porcelain, ceramic, natural stone, or cement grout.
- Inspect the failure mode: staining, mould, cracking, or deeper water damage.
- Match the product: penetrating for porous materials, not a glossy film everywhere.
- Check the scope: if waterproofing or plumbing is involved, ask for builder oversight.
- Plan the cure time: don't book the shower back in too early.
If you want a bathroom that holds up in Melbourne conditions, treat sealing as part of the renovation and maintenance cycle, not as a last-minute fix. For a local assessment, quote, or a bathroom scope that may involve tiling, waterproofing, or builder coordination, visit Melbourne Tiling Services P/L and talk through what your shower, grout, and wet-area details need.
Write a Comment