

You're usually standing in the same spot when the problem shows up, looking at a new bathroom or balcony and wondering why the stone has already picked up a dark patch, a grout haze line, or a water mark that won't wipe away. That's the point where sealing stone tiles stops being a vague maintenance chore and becomes a practical decision about moisture, staining, and how long the finish will hold up in real use. In Melbourne homes, that decision also affects renovation timing, because sealing, waterproofing, and builder coordination often overlap in the same job.
Table of Contents
- Understanding When and Why to Seal Stone Tiles
- Preparing Different Stone Surfaces for Sealing
- Choosing the Right Sealer for Each Tile Type
- Application Techniques and Drying Guidelines
- Cost Estimates and Maintenance Schedule
- Common Mistakes and When to Hire Professionals
Understanding When and Why to Seal Stone Tiles
A homeowner rings up after a bathroom renovation because the new stone around the shower is already showing a faint tea-coloured stain near the base. The tile looked flawless on day one, but the first few weeks of real moisture exposure exposed what the eye missed. That's the common pattern with porous stone, because the finish can look clean while still absorbing water and contaminants below the surface.
The bigger issue is that not every stone tile needs the same treatment. A major underserved question is whether all stone tiles need sealing, because many guides focus on how to seal but do not clearly distinguish between stone types, finishes, or whether the tile is already low-porosity, as noted in this Australian stone-sealing discussion. In practice, marble, travertine, limestone, and slate often behave very differently from porcelain-look surfaces or denser ceramics.
Use a simple water test before you assume anything
A water-drop test is the quickest reality check. If water beads and stays on the surface, the tile may already have protection or low absorption. If it darkens quickly, the surface is taking in moisture and needs attention.
Practical rule: if the stone darkens, it's telling you the surface is open enough to absorb spills, grout residue, and cleaning chemicals.
Wet areas raise the stakes. Bathrooms, showers, balconies, and other exposed zones don't just face spills, they face repeated moisture cycling, which is exactly what shortens sealer life and increases the need for periodic resealing. If you're planning a renovation, it's also worth checking the tile and waterproofing sequence against the Melbourne tiling and waterproofing service approach, because sealing shouldn't be treated as a random afterthought.
Think in terms of exposure, not just material
Indoor walls and decorative areas often need less frequent attention than floors, especially in wet zones. By contrast, balconies, shower floors, and busy family spaces take constant wear from foot traffic, soap residue, and cleaning products. That's why the same stone can be suitable for one space and demanding in another.
Some tiles only need periodic touch-ups, but once moisture gets into the pores, the maintenance cycle usually gets shorter.
A good habit is to inspect grout lines and edges as carefully as the tile face. Grout often reveals failure first, and that can tell you whether the problem is the sealer, the surface prep, or the wrong product for the tile.
Preparing Different Stone Surfaces for Sealing
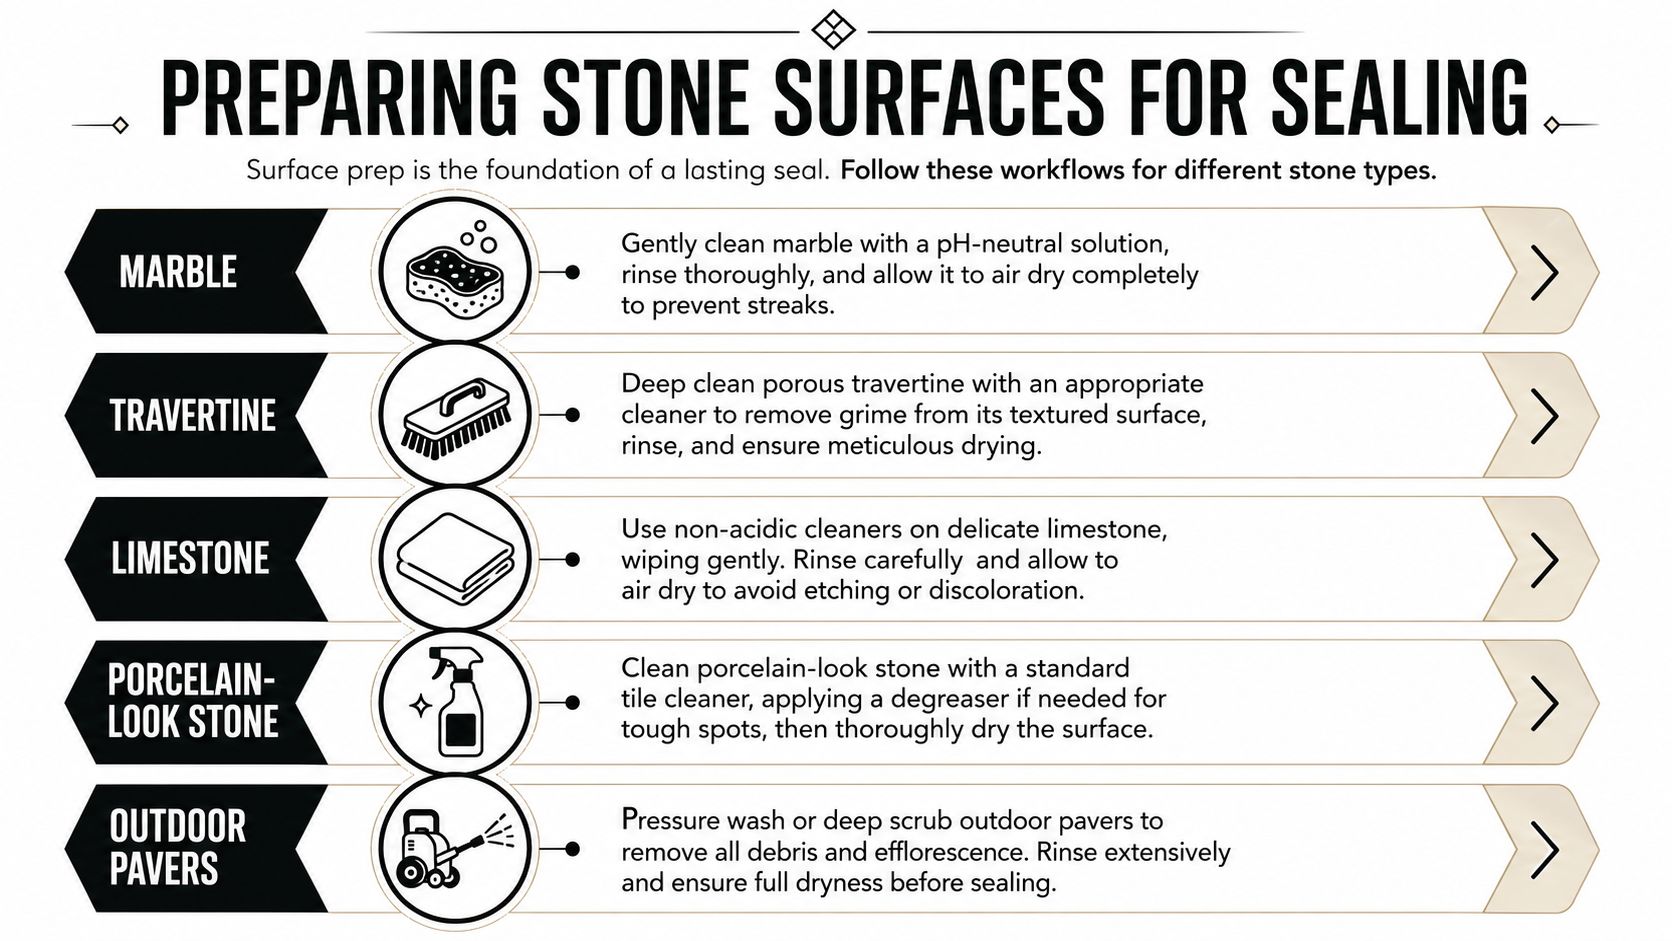
Surface prep is where most long-term failures start. Stone that looks clean can still carry grout haze, soap residue, dust, or cleaning product film, and any of those can block penetration. The safest approach is to match the prep to the material, not use one blanket method for everything.
Clean each stone type the right way
Marble needs the gentlest handling. Use a pH-neutral cleaner, rinse well, and let it air dry fully so you don't leave streaks or residue behind. Travertine usually needs deeper cleaning because its texture can trap grime in the pits, so a careful scrub with the right cleaner works better than a quick wipe.
Limestone is more sensitive than many homeowners realise. Avoid acidic cleaners, because they can etch or discolour the surface. For porcelain-look stone, a standard tile cleaner usually does the job, and a degreaser can help with stubborn spots, especially in kitchens or shared bathrooms where body oils and cosmetics build up.
Outdoor pavers need a different mindset again. Remove debris, efflorescence, and embedded dirt before you even think about sealing, because any contamination left behind becomes part of the finish. A thorough rinse and full dry period matter more outdoors than many DIY guides admit.
Drying isn't optional
For sealing natural stone tiles in wet areas, Australian trade guidance recommends a dry-surface, test-first, penetrating-sealer workflow, with a water-drop test held for 5 to 20 minutes and a 24 to 48 hour dry or cure window before light use, according to Dunlop Trade's technical bulletin. That matters because trapped moisture is the fastest route to haze, weak bonding, and patchy absorption.
Ventilation helps, but it doesn't replace time. If the room feels humid, the stone often needs longer than the label suggests. Keep showers, bath edges, and balcony zones dry while the surface is curing, and don't rush back onto the floor just because it looks dry on top.
If the stone is still cool and damp to the touch, it's not ready, even if the surface appears fine.
Gloves, eye protection, and knee pads make sense on real jobs, especially when you're deep-cleaning grout and working close to corners. Those edges are where missed residue tends to hide.
Choosing the Right Sealer for Each Tile Type
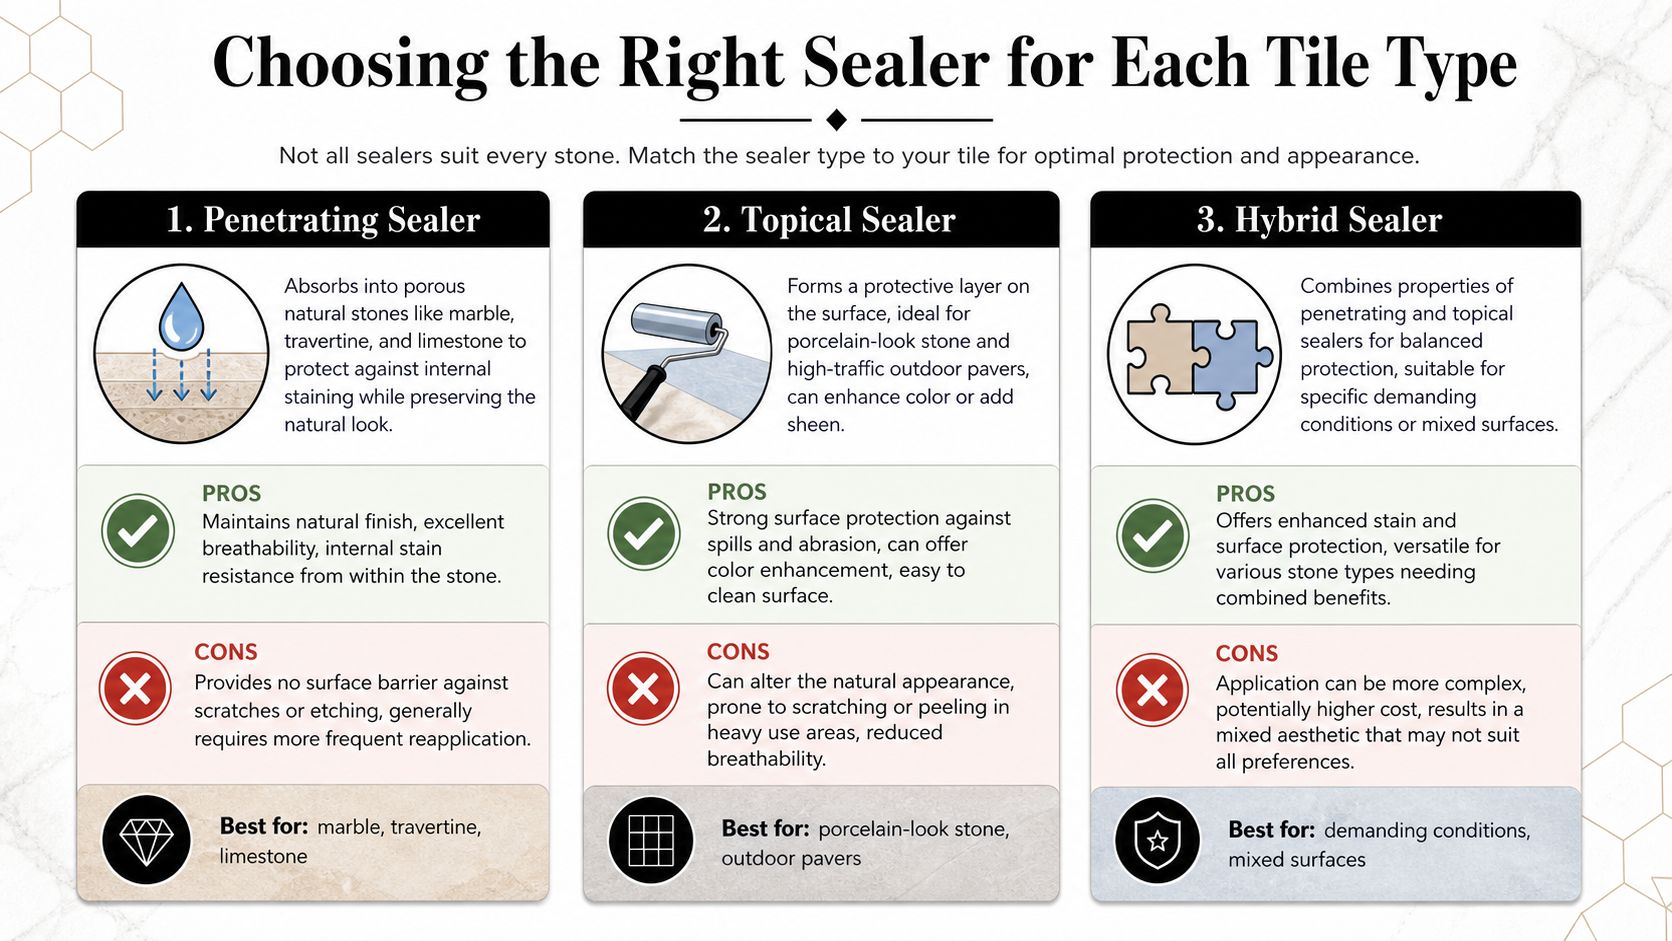
Not every sealer belongs on every tile. The main choice is between a penetrating sealer, which absorbs into the stone, and a topical sealer, which sits on the surface. A hybrid product can make sense in specific mixed conditions, but it's not a universal answer.
Penetrating sealers suit porous stone best
Penetrating sealers are the usual fit for marble, travertine, and limestone because they protect from within while keeping the natural finish visible. They're especially useful where you want breathability and don't want a glossy film changing the appearance.
The trade-off is clear. They don't create a hard surface layer, so they won't stop scratches or etching, and they usually need more frequent reapplication than topical products. That's why they're a maintenance solution, not a cosmetic shortcut.
Topical sealers behave differently
Topical sealers form a layer on the face of the tile, which can help with surface protection and may add sheen or deepen colour. That can be useful on some porcelain-look stones or certain high-traffic outdoor pavers where surface cleaning is a priority.
They also bring compromises. Surface films can scratch, peel, or alter the stone's natural look, and reduced breathability can be a problem in wet or moisture-prone settings. If you're working on a bathroom floor, that trade-off needs real thought before you commit.
Hybrid products belong in niche cases
Hybrid sealers sit between those two approaches. They can be useful on mixed surfaces, or where a project needs some surface resistance without giving up all of the stone's natural character. They're not the first product I'd reach for on a straightforward job, but they're worth considering when the installation has unusual wear patterns or design constraints.
If you're choosing for a renovation with marble finishes, the product you pair with the tile matters as much as the tile itself. For that kind of planning, the marble tile guidance used in Melbourne projects is a sensible reference point because marble is less forgiving than glazed ceramic and usually benefits from a carefully matched penetrating system.
Here's the simplest selection logic.
| Tile type | Better fit | Why it usually works |
|---|---|---|
| Marble | Penetrating sealer | Preserves the natural look and allows breathability |
| Travertine | Penetrating sealer | Handles porous structure without building a surface film |
| Limestone | Penetrating sealer | Better for delicate stone that needs internal protection |
| Porcelain-look stone | Topical or no sealer, depending on surface | Denser surfaces often need less treatment |
| Outdoor pavers | Topical or hybrid in specific cases | Surface wear and exposure can make film protection useful |
Application Techniques and Drying Guidelines
The cleanest application starts with restraint. Stone sealer works best in small sections, because once it begins to dry unevenly, you're fighting streaks and haze instead of protecting the tile. Thin coats, even pressure, and prompt wipe-back are the difference between a professional result and a cloudy mess.
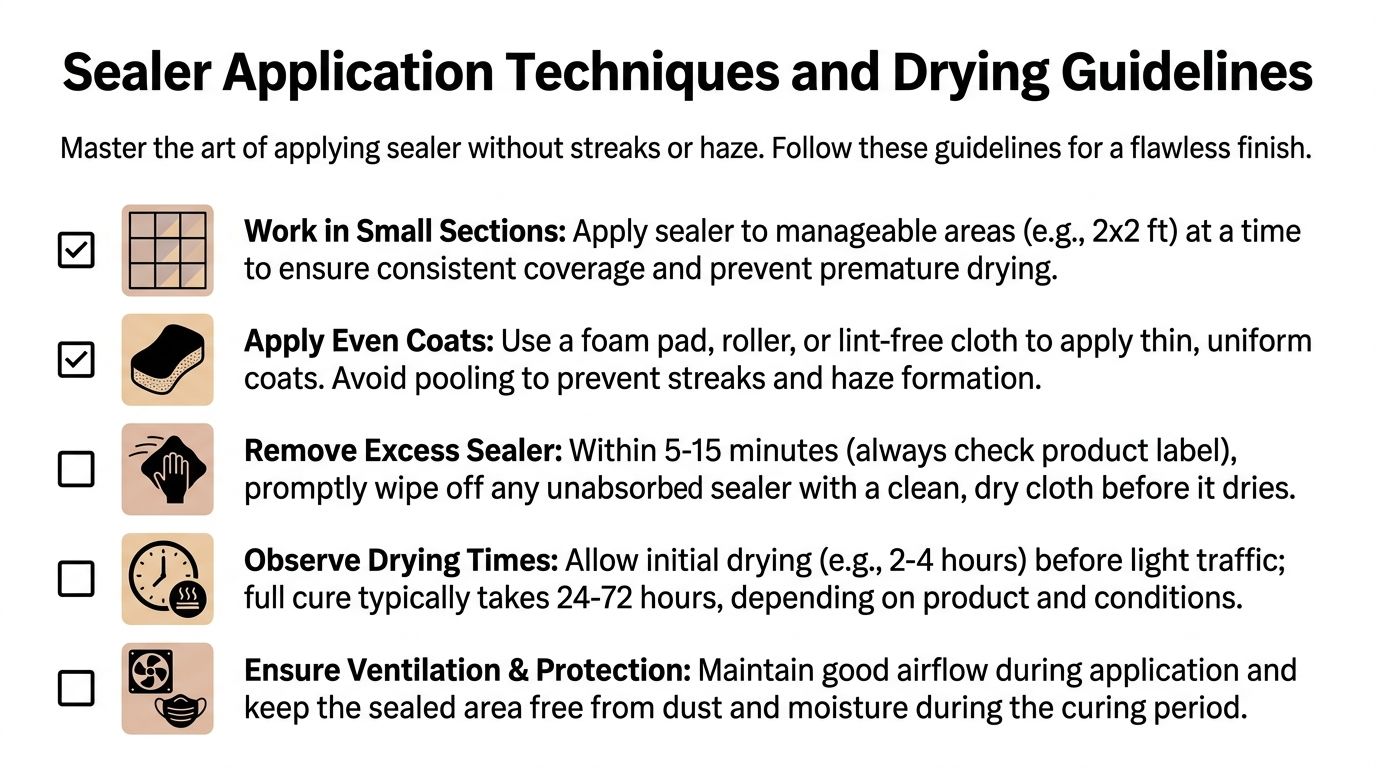
The practical sequence is simple. Work in a manageable area, apply with a foam pad, lint-free cloth, or small roller, and don't flood the surface. Let the product sit long enough to penetrate, then wipe away anything that hasn't absorbed before it dries on top.
Timing makes or breaks the finish
Australian guidance treats dryness and cure time as foundational, noting that new installations should bond for 24 hours before sealing, penetration can take up to 5 minutes, surface traffic may resume after 2 hours, and a 24-hour full cure is the basic benchmark, with 30-minute gaps between coats, according to Aquamix's natural-look penetrating sealer guide. Those timings matter because sealing too soon traps moisture and weakens the bond.
Melbourne weather can stretch those windows. Cool mornings, damp air, and low airflow all slow down evaporation, so the same product that behaves neatly in a warm, dry room can turn sticky in a bathroom that hasn't been ventilated properly.
Keep the room open to airflow, but keep dust and splashes away while the cure is active.
Work methodically, not quickly
A good applicator keeps the edge wet enough to blend but small enough to control. If you're back-rolling grout lines, keep the pressure light so you don't overfill the pores or leave puddles in corners. The goal is even absorption, not a shiny coat sitting on top.
Heavy water exposure needs more patience. Even if the floor feels touch-dry, showers, balconies, and similar areas are better left alone for longer when the product label and site conditions suggest it. The label matters, but the room conditions matter just as much.
A quality finish is easy to recognise. The tile looks consistent, the grout isn't streaked, and there's no residue bloom around edges or cut lines.
Cost Estimates and Maintenance Schedule
Budgeting for sealing is easier when you treat it as part of the maintenance cycle, not a one-off expense. In Australian practice, local sealing work is commonly priced at about $25 to $35 per square metre indoors and $35 to $45 outdoors, according to this stone sealing guide. That difference makes sense, because outdoor work usually needs more prep, more exposure control, and more labour around access and weather.
The bigger cost question is frequency. Natural stone floors are commonly resealed every 1 to 2 years, while walls and less exposed areas can stretch to 3 to 5 years. The wear pattern is the deciding factor, not just the material name on the box.
Maintenance intervals and costs by tile type
| Tile Type | Reseal Interval Indoors | Reseal Interval Outdoors | Cost Indoor m² | Cost Outdoor m² |
|---|---|---|---|---|
| Natural stone floors | 1 to 2 years | 1 to 2 years | $25 to $35 | $35 to $45 |
| Natural stone walls | 3 to 5 years | 3 to 5 years | $25 to $35 | $35 to $45 |
| Wet-area stone | Check regularly, reseal as needed | Not usually the main use case | $25 to $35 | $35 to $45 |
| Porcelain or unglazed ceramic, if required | 3 to 5 years | 3 to 5 years | $25 to $35 | $35 to $45 |
Those figures are useful because they remind owners that sealing sits inside the long-term maintenance budget. A bathroom floor that sees constant water and foot traffic is not on the same timetable as a decorative wall panel.
Match the schedule to the space
Balconies and outdoor paving need closer inspection because weather, UV, and drainage issues pile on faster than indoor wear. Bathroom floors need checks around grout and shower edges, since those are the spots most likely to start absorbing water first.
If you're planning a broader renovation, sealing should also be weighed against the overall bathroom budget. Current Australian bathroom-renovation guides place a full project around A$26,000, with many projects falling between A$8,000 and A$35,000+, while Melbourne guides place standard local renos in a wider band of roughly A$15,000 to A$22,000 for many full jobs, depending on scope and finishes. For cost context around those ranges, see the current bathroom renovation benchmark and the Melbourne renovation market guide.
Common Mistakes and When to Hire Professionals
The worst sealing jobs usually fail for boring reasons. Someone seals damp stone, skips the grout cure, uses an acidic cleaner, or leaves excess product on the surface long enough to haze. None of those mistakes look dramatic at the time, but each one can leave a bathroom harder to clean and more vulnerable to staining.
Know the mistakes that cause real damage
Acidic cleaners like vinegar are a frequent problem, especially on marble and limestone. So is sealing too early after installation, because trapped moisture gets in the way of proper bonding. If the tile is still damp or the grout hasn't cured, the sealer often performs badly no matter how expensive it is.
The other common problem is over-application. More product doesn't mean more protection, it usually means residue. If you can feel a film on the surface after curing, the tile probably wasn't wiped back properly.
If the finish looks cloudy, the first thing to check is residue, not the brand name.
Bring in a registered builder when the job crosses into renovation work
Some sealing jobs are straightforward enough for a skilled tiler or owner-occupier. Others sit inside a bigger building task and need a registered builder to coordinate compliance, waterproofing, and the trade sequence. In Victoria, when bathroom works involve structural changes, plumbing alterations, or waterproofing, permits and compliance paperwork come into play, with typical costs of A$400 to A$800 for building permits, A$300 to A$500 for plumbing compliance certificates, A$200 to A$400 for electrical certificates, and A$300 to A$500 for waterproofing inspection certification, according to Melbourne bathroom compliance guidance.
That matters on bigger jobs, especially if the project includes shower niches, balcony remediation, or large-format installations that need careful substrate prep. In those cases, coordination matters as much as the sealant itself.
For repair-heavy jobs, the practical route is to start with a proper inspection rather than guessing at the cause of the stain or leak. If the issue is beyond a simple reseal, the tile repair process used in Melbourne is the kind of structured approach that avoids repeated patchwork.
A DIY reseal is fine when the stone is sound, dry, and clearly compatible with the product. Once there's movement, failed waterproofing, or recurring moisture at corners and junctions, a registered builder is the safer call.
If you're planning stone tile sealing as part of a bathroom renovation, balcony refresh, or leak repair in Melbourne, contact Melbourne Tiling Services P/L for a clear scope, proper sequencing, and a finish that holds up beyond the first clean.
Write a Comment