
Bathroom Floor Waterproofing: A 2026 Melbourne Guide

You're probably looking at tile samples, tapware finishes, vanity sizes and shower screen options. That's how most bathroom renovations start. The part that decides whether the room lasts, though, sits under the tiles and behind the walls.

Bathroom floor waterproofing is where good-looking bathrooms either become durable wet areas or expensive repair jobs. A bathroom can look flawless on handover day and still be set up to fail if the substrate is wrong, the falls are poor, the corners aren't reinforced, or the membrane never reaches compliant coverage. In Melbourne homes, especially older properties and second-storey bathrooms, those misses show up later as loose tiles, swollen skirting, mould, and insurance headaches.

Table of Contents

The Hidden Weakness in Your Bathroom Renovation

A bathroom can look nearly finished and still be set up to fail.

I see it in Melbourne renovations all the time. Demolition is complete, the plumbing rough-in is done, tile selections are locked in, and everyone is focused on the visible progress. Then the floor waterproofing goes in, gets covered, and no one wants to slow the job down to question what sits underneath it.

That hidden layer carries the risk that causes the expensive call-back.

In bathroom failures, the problem is often not the tile or the grout line the homeowner can see. It is the substrate, the falls, the bond, the junction detailing, or the way the membrane was treated at the drain and floor-to-wall connection before tiling started. Once tiles are down, those defects are hard to inspect and expensive to rectify.

A failed waterproofing job can lead to water tracking into adjoining rooms, damp screed, movement at junctions, swelling in nearby timber, persistent odours, and a strip-out that arrives years earlier than expected. On an upper floor, the consequences are worse because the leak path can damage ceilings, framing and finishes below.

Practical rule: If the waterproofing details are not clear before tiling starts, the renovation is not ready for tiles.

For Melbourne homeowners, two compliance points get missed more often than they should. First, the substrate under the membrane has to be legal for a wet area under AS 3740:2021. Older bathrooms often uncover particleboard or timber-based flooring that should not remain under the waterproofed area. Second, second-storey bathrooms need more careful treatment than many DIY guides suggest, because the cost of failure below is far higher than the cost of doing the floor properly the first time.

That is also why I pay close attention to the base before any membrane discussion starts. If the floor needs correction, a properly prepared bed or screeding for bathroom floor tiles is often part of getting the waterproofing system to work as intended.

A bathroom that appears finished is easy to build. A bathroom that stays watertight for years depends on the parts no one sees after handover.

Laying the Groundwork for a Watertight Floor

A membrane can only perform as well as the surface under it. If the base moves, sheds dust, holds contaminants, or uses a non-compliant sheet material, the membrane is already being asked to fail.

What has to be removed before waterproofing starts

In older Melbourne bathrooms, the first job is often discovering what the last renovation left behind. Vinyl adhesive residue, old paint, flaky levelling compounds, and water-damaged sheet flooring all interfere with bond. Surface contamination isn't a cosmetic issue. It stops primer and membrane from grabbing properly.

The bigger compliance issue is the substrate itself. The 2021 version of AS 3740 explicitly bans particle board and timber flooring substrates in wet areas, which is a major shift many DIY videos still miss, as outlined in this discussion of current Australian waterproofing requirements. If you're renovating an older home and uncover particleboard or timber sheeting in the wet area, the answer isn't to seal over it and hope for the best. It needs to be replaced with a compliant substrate.

That's the part many budgets don't allow for early enough. Homeowners price the visible renovation items, then get caught when the floor has to come up.

Preparation that actually matters

The preparation sequence is usually straightforward, but every part has to be done properly:

  • Remove weak material: Any loose topping, brittle patching, or swollen board has to go. Membrane over failure is still failure.
  • Mechanically prepare the surface: Grinding is often the right call because it removes contaminants and opens the surface for primer adhesion.
  • Vacuum thoroughly: Dust left behind acts like a release layer.
  • Prime to suit the substrate: Primer isn't optional. It controls suction and helps the membrane bond evenly.
  • Correct levels and falls before waterproofing: Membrane follows the shape beneath it. It won't fix bad drainage.

Where falls are wrong, the floor usually needs proper screeding before waterproofing starts. That's why screeding for tiles matters so much in wet areas. If water sits instead of moving to the waste, the room is already underperforming before the membrane goes down.

A quick site check can tell you whether the room is ready:

Check What you want to see What goes wrong if ignored
Substrate Compliant, stable, dry, solid Membrane loses bond or cracks
Surface condition Clean, ground, dust-free Primer and membrane don't adhere consistently
Junctions Sharp defects removed, transitions clean Weak points appear at corners and edges
Falls Water directed to the waste Ponding, staining, and ongoing wetting

A clean floor isn't the same as a prepared floor. Sweeping alone won't fix contaminants, movement, or a non-compliant base.

For a confident DIYer, this is the stage where honesty matters. If you don't know what the substrate is, don't proceed until you do.

Choosing Your Waterproofing System

Homeowners often ask which membrane is “best”. The better question is which system suits the room, the detailing, and the installer's skill.
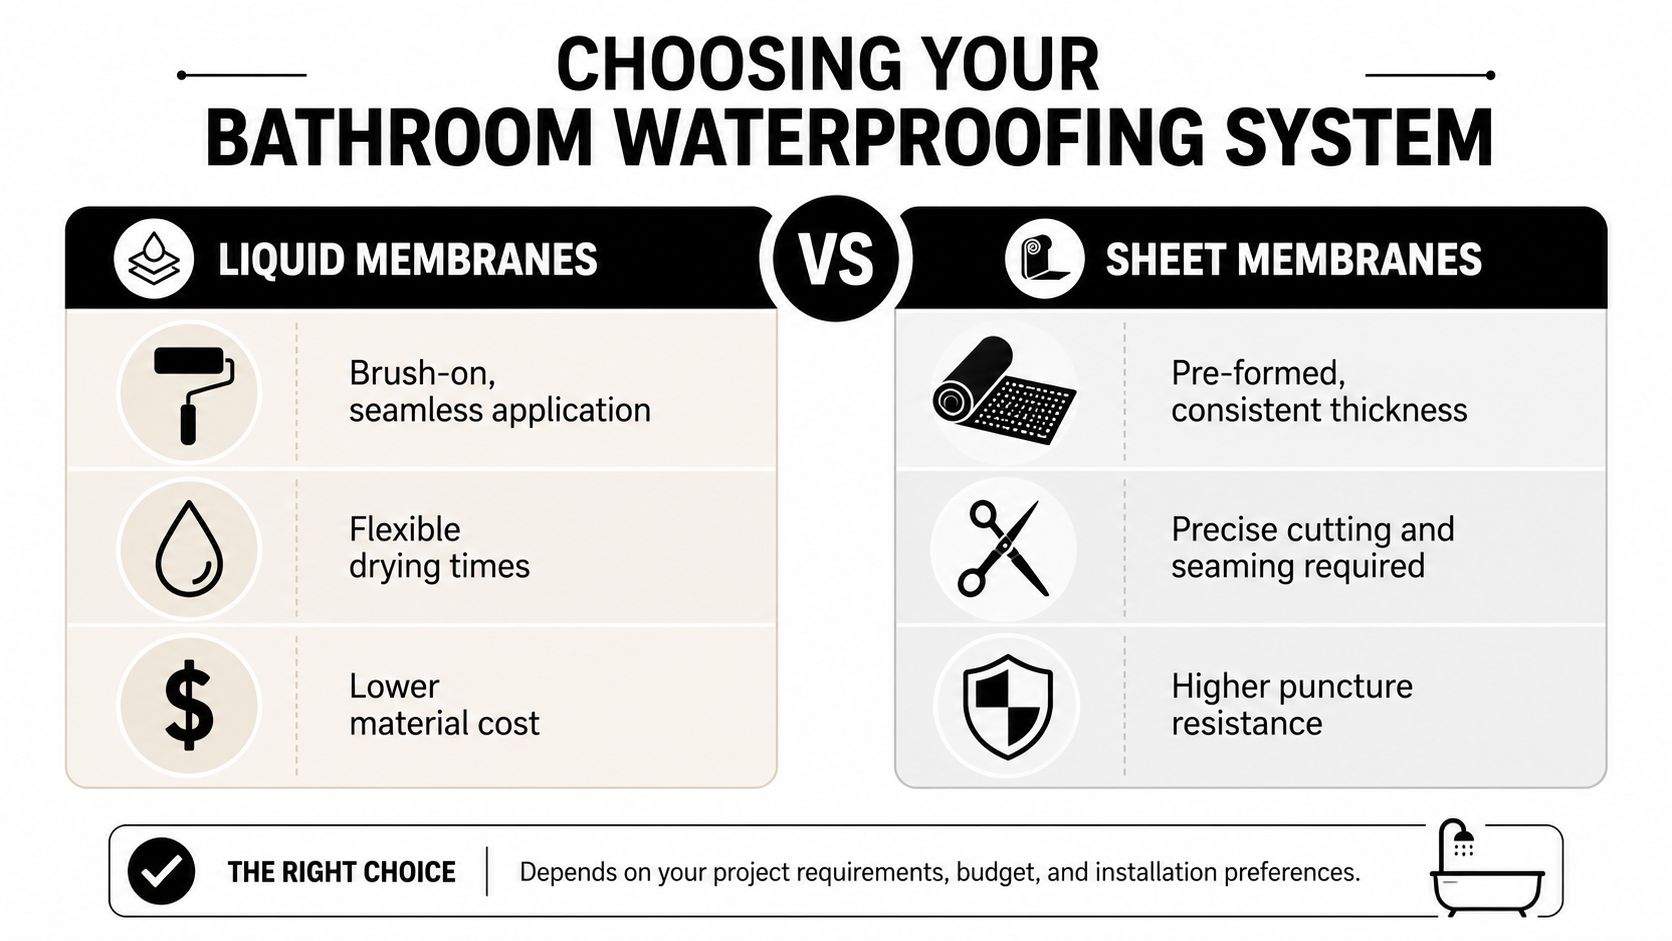
A comparison chart outlining the pros and cons of liquid versus sheet membranes for bathroom waterproofing projects.

Where liquid membranes make sense

Liquid-applied systems are common in residential bathroom floor waterproofing because they handle awkward shapes well. Around puddle flanges, nib walls, pipe penetrations, recesses, and mixed junctions, a brush-and-roller system gives the installer flexibility.

They're also easier for homeowners to understand. You can see the coverage building. You can cut in edges with a brush and roll broad areas with a medium nap roller. For standard bathrooms and ensuites, that makes liquid membrane the system many people reach for first.

The catch is consistency. Liquid products only work when the installer respects drying times, reinforcement details, and final film build. A membrane that looks continuous can still be too thin.

Where sheet membranes earn their place

Sheet systems appeal to trades for a different reason. Thickness is more controlled from the outset. On flatter areas, especially where layouts are simple, sheet membranes can provide a very reliable barrier when they're installed correctly.

Their weakness is detailing. Seams, corners, upturns, drains, and penetrations demand accuracy. A poor overlap or sloppy bond at a corner can undo the advantage of factory thickness. That's why sheet products usually reward experience more than enthusiasm.

A simple comparison helps:

System Strength Weak point Best fit
Liquid membrane Seamless application over complex shapes Easy to apply too thin or inconsistently Typical residential bathrooms with detailed junctions
Sheet membrane Consistent material thickness Seams and detailing require high precision Simple layouts and experienced installers

A simple way to decide

If the bathroom has multiple corners, a recessed shower, several penetrations and a lot of fussy geometry, liquid systems are usually more forgiving in shape but less forgiving in workmanship. If the room is simpler and the installer is experienced with seaming and detailing, sheet systems can be excellent.

This is also where product system compatibility matters. Primer, bond breaker, reinforcing fabric, drain detail and top membrane should belong to one compliant approach, not a grab-bag of whatever was on the shelf. A clear explanation of different waterproofing systems helps homeowners ask better questions before work starts.

Pick the system your installer can execute cleanly, not the system that sounds best in a brochure.

A Practical Guide to Membrane Application

Good membrane application looks calm and methodical. The bad jobs usually look rushed. You see patchy coverage, missed edges, excess buildup in one area and barely any in another.

A visual workflow helps homeowners understand what should happen on site.
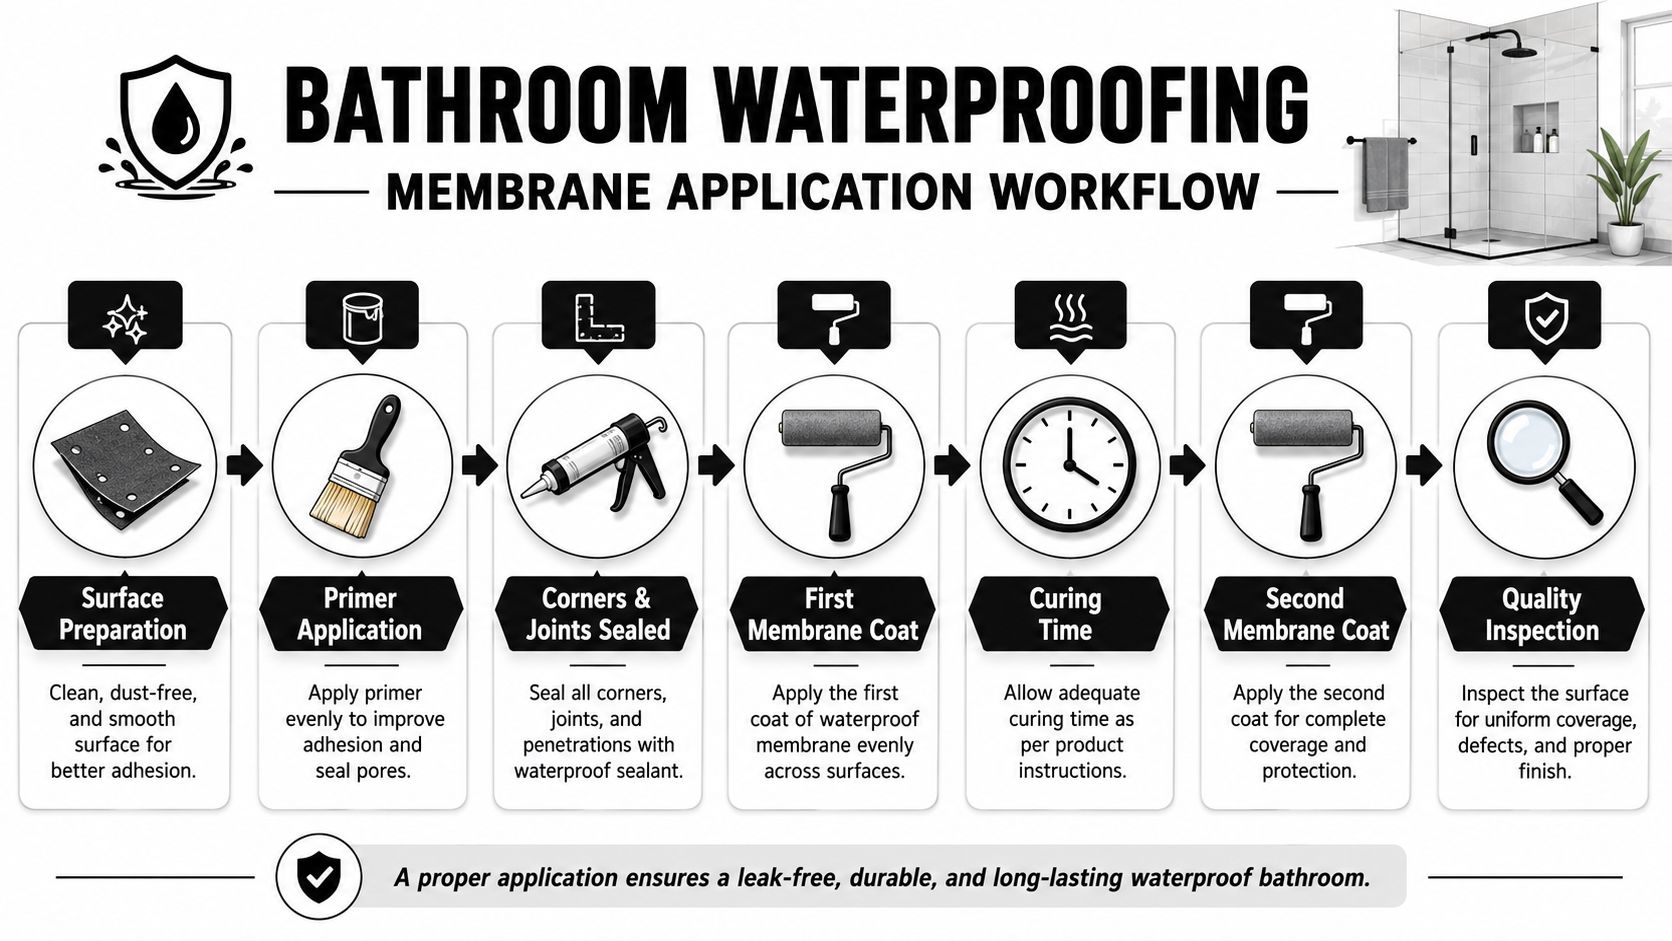
A step-by-step infographic showing the workflow for applying bathroom floor waterproofing membranes, from surface preparation to inspection.

Corners drains and penetrations first

Before broad membrane coats begin, the vulnerable points need detailing. Internal corners, wall-floor junctions, hob edges, around wastes, and pipe penetrations move more than open floor areas. That movement is exactly where failures start.

The correct method demands embedding reinforcing tape in high-risk junctions and applying a liquid membrane to achieve a minimum total dry thickness of 1mm after two coats, as detailed in this guide to Australian-standard bathroom waterproofing. If the tape is skipped, the membrane has to bridge movement on its own. That's where stress cracks tend to appear.

The drain detail deserves special attention. The puddle flange must be secure, correctly set, and integrated cleanly so the membrane terminates and bonds as part of a complete system. If water can track around the drain detail, the rest of the floor waterproofing won't save the job.

Pipe penetrations need the same care. A rough cut around plumbing with a dab of sealant isn't proper detailing. The membrane has to seal those penetrations as part of the system.

For homeowners who want to see the workflow in action, this video is a useful reference point.

Getting the coats right

Once the detailing is done and cured as required by the product system, the first full coat goes on. On floors, that usually means working from the perimeter back toward the exit so the installer doesn't trap themselves in a corner. Coverage needs to be even, with no pinholes, dry patches, or heavy ridges.

After the first coat cures properly, the second coat goes on to build the system to the required total thickness. Cross-rolling or changing direction between coats often helps produce more uniform coverage.

The common mistakes are predictable:

  • Rushing cure times: A second coat applied too early can drag or compromise the first.
  • Leaving thin edges: Perimeters and upturns are often where installers get stingy.
  • Treating corners like open floor: Junctions need reinforcement and deliberate buildup.
  • Guessing thickness: If the membrane doesn't reach the required dry film build, appearance won't save it.

The membrane has to be continuous, reinforced where movement occurs, and thick enough when dry. Looking glossy isn't a compliance test.

What a careful homeowner should inspect

You don't need to be a waterproofer to spot warning signs before tiling starts. Ask the installer to walk you through the finished membrane. Look for neat corner reinforcement, clean drain detailing, consistent upturns, and full coverage without missed areas.

A useful homeowner checklist looks like this:

  • Corners and junctions: Reinforcing tape should be visible beneath or within the membrane build where required.
  • Around drains: The membrane should terminate neatly into the drain detail, not stop short.
  • Pipe penetrations: Openings should be sealed and dressed properly, not left as rough cut-outs.
  • Coat consistency: The floor shouldn't show obvious roller holidays or translucent weak spots.

If the installer gets defensive about reasonable inspection before tiles go down, that's not a good sign.

Meeting Australian Standards and Avoiding Costly Mistakes

Compliance in wet areas isn't a style preference. It's a set of hard rules that control where water can go and how quickly it must drain away.
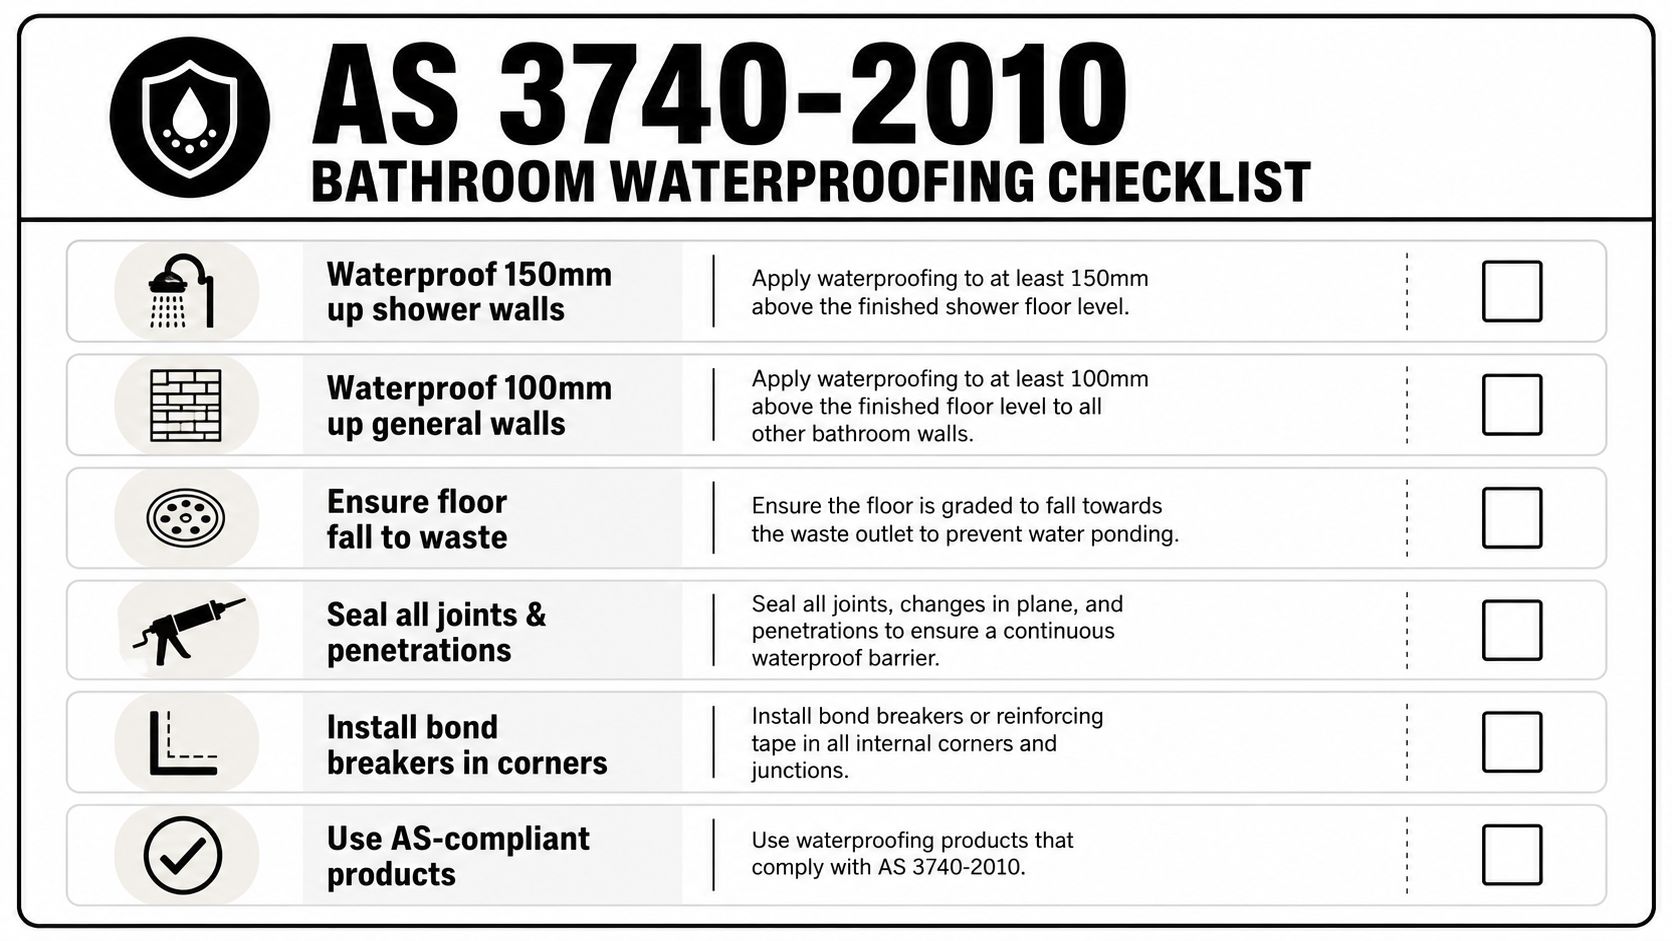
A checklist for bathroom waterproofing standards based on AS 3740-2010 regulations, including installation and product compliance requirements.

The compliance points that catch people out

Under AS 3740-2010, shower walls must be waterproofed to a minimum of 1800 mm, the entire shower floor must be treated, and bathrooms on a second storey require the entire floor to be waterproofed, as explained in this Australian bathroom waterproofing guide. That same guidance also sets the required floor falls. Wet area floors need a minimum fall of 1:60 to the waste, and shower recess floors need 1:40 in the immediate drain vicinity.

Those aren't rough targets. They're compliance points.

The mistakes I see homeowners misunderstand most often are these:

  • Wall height confusion: People assume a short upturn is enough because the tile runs higher anyway. It isn't.
  • Falls left to the tiler: Falls are a substrate and set-out issue, not something to hope adhesive can fix.
  • Frameless shower underestimation: Open and frameless layouts allow more splash migration, so the treated area becomes more critical.
  • Hob and transition details missed: Water finds weak transitions fast.

Second-storey bathrooms need different thinking

Many DIY guides oversimplify the rules. People hear that only the shower recess floor needs waterproofing in some situations and assume that applies universally. It doesn't.

On a second storey, the risk sits below the room as much as inside it. Water that escapes the shower zone doesn't just mark a skirting board. It can affect ceilings, insulation, framing, and rooms underneath. For apartments, townhouses and upper-floor ensuites, that risk is multiplied by neighbours, strata issues and harder access for rectification.

Best practice often goes beyond the bare minimum, especially where damage can travel into adjacent rooms or levels below.

If your renovation sits above another habitable space, treat floor waterproofing decisions with that reality in mind. A legal minimum approach and a low-risk approach aren't always the same thing. For certificate and handover questions in Victoria, it's worth understanding the role of a waterproofing compliance certificate in Victoria before the job begins, not after a leak appears.

Check before tiles go down

The best time to find a problem is before adhesive covers the membrane. Once tiling starts, inspection becomes far more limited.

A practical pre-tiling review should include:

Item What to confirm
Coverage Required areas are fully waterproofed
Height Wall waterproofing reaches compliant heights where required
Falls Water is directed toward the waste, not into corners or doorways
Junctions Corners, penetrations and transitions are properly detailed
Drain detail Waste connection is integrated and watertight

Where appropriate, a flood test before tiling can reveal issues while the system is still exposed and fixable. That test only has value if the room has been detailed properly and the waste is set up correctly for testing.

When to Call a Registered Builder for Your Renovation

A common Melbourne renovation story goes like this. The bathroom looks fine after handover, then six or twelve months later paint starts lifting on the ceiling below, or water shows up at a doorway, skirting, or adjoining room. By then the tiles, screen, vanity and finishes are in, and finding the fault means pulling a finished bathroom apart.

That is usually the point where homeowner oversight has ended and licensed responsibility should have started.

Where confident DIY ends

A capable homeowner can do a lot well. Demolition, product selection, checking the scope, and asking the right questions all help. Some can also manage minor preparation. The handover point comes earlier than many expect once the job involves a wet area floor, structural repair, substrate replacement, drain set-out, or any bathroom above another storey.

The two points I see missed most often in Melbourne are not about brushing on membrane. They are about whether the substrate is suitable and lawful under AS 3740:2021, and whether an upstairs bathroom has been detailed for the higher consequence of failure. Many DIY guides skip both. They jump straight to products and application, which is the easy part to film and the hard part to verify once covered.

A second-storey bathroom is where I stop treating waterproofing as a simple trade task and start treating it as renovation risk management. If water gets through on the ground floor, you may be replacing skirtings and a section of wall. If it gets through upstairs, you can be dealing with ceilings, insulation, framing moisture, electrical fittings, and damage to rooms below. In apartments, add neighbours and strata.
Screenshot from https://melbournetilingservices.com.au

What registered builders bring to bathroom renovations

A registered builder coordinates the parts of the job that tend to fail at the joins between trades. That is its core value.

The carpenter or installer sets the substrate. The plumber fixes the waste location and penetrations. The waterproofer relies on both being right. The tiler then covers the evidence. If no one is checking those interfaces, defects can pass through the whole job unnoticed until the room is in use.

In practice, a good builder improves the job in a few specific ways:

  • Substrate control: checks that the sheeting, movement, framing condition and floor build-up are suitable before waterproofing starts
  • Set-out and falls: makes sure waste positions and heights allow proper falls without creating birdbaths, sharp lips or ponding at the doorway
  • Trade sequencing: stops waterproofing being rushed to suit another booking and stops tiling over work that has not been inspected
  • Scope clarity: makes one party responsible for the junctions between plumbing, carpentry, screeding, waterproofing and tiling
  • Records: keeps the paperwork and product information needed if there is a dispute, sale, defect claim or insurance question later

One clear supervisor saves a lot of arguments.

Why the certificate matters

For homeowners, the paperwork often feels secondary until there is a leak. It is not secondary. It is part of proving who did the work, what system was used, and whether the wet area was completed by the right party.

An official installation certificate or compliance record is not something a homeowner can issue to themselves after watching a few videos and buying membrane from a trade counter. If the job needs documented compliance, insurance support, or a clear chain of responsibility, use a qualified waterproofer and have the renovation managed properly from the start.

That matters most in four situations. Upstairs bathrooms. Apartments and multi-residential buildings. Older Melbourne homes where floors and walls are rarely as straight or sound as they first appear. Full renovations where several trades affect the wet area before it is closed up.

If your project sits in one of those categories, bring in a registered builder early and get the substrate, set-out and sequencing resolved before waterproofing day. That is the point where expensive failures are prevented.


If you're planning bathroom renovations and want the job handled by registered builders who understand waterproofing, screeding, tiling and compliance from start to finish, speak with Melbourne Tiling Services P/L. They work across Melbourne and greater Victoria, coordinating the right trades for durable, fully finished wet areas that don't just look good on completion, but hold up properly over time.

Bathroom Floor Waterproofing: A 2026 Melbourne Guide

You're probably looking at tile samples, tapware finishes, vanity sizes and shower screen options. That's how most bathroom renovations start. The part that decides whether the room lasts, though, sits under the tiles and behind the walls.

Bathroom floor waterproofing is where good-looking bathrooms either become durable wet areas or expensive repair jobs. A bathroom can look flawless on handover day and still be set up to fail if the substrate is wrong, the falls are poor, the corners aren't reinforced, or the membrane never reaches compliant coverage. In Melbourne homes, especially older properties and second-storey bathrooms, those misses show up later as loose tiles, swollen skirting, mould, and insurance headaches.

Table of Contents

The Hidden Weakness in Your Bathroom Renovation

A bathroom can look nearly finished and still be set up to fail.

I see it in Melbourne renovations all the time. Demolition is complete, the plumbing rough-in is done, tile selections are locked in, and everyone is focused on the visible progress. Then the floor waterproofing goes in, gets covered, and no one wants to slow the job down to question what sits underneath it.

That hidden layer carries the risk that causes the expensive call-back.

In bathroom failures, the problem is often not the tile or the grout line the homeowner can see. It is the substrate, the falls, the bond, the junction detailing, or the way the membrane was treated at the drain and floor-to-wall connection before tiling started. Once tiles are down, those defects are hard to inspect and expensive to rectify.

A failed waterproofing job can lead to water tracking into adjoining rooms, damp screed, movement at junctions, swelling in nearby timber, persistent odours, and a strip-out that arrives years earlier than expected. On an upper floor, the consequences are worse because the leak path can damage ceilings, framing and finishes below.

Practical rule: If the waterproofing details are not clear before tiling starts, the renovation is not ready for tiles.

For Melbourne homeowners, two compliance points get missed more often than they should. First, the substrate under the membrane has to be legal for a wet area under AS 3740:2021. Older bathrooms often uncover particleboard or timber-based flooring that should not remain under the waterproofed area. Second, second-storey bathrooms need more careful treatment than many DIY guides suggest, because the cost of failure below is far higher than the cost of doing the floor properly the first time.

That is also why I pay close attention to the base before any membrane discussion starts. If the floor needs correction, a properly prepared bed or screeding for bathroom floor tiles is often part of getting the waterproofing system to work as intended.

A bathroom that appears finished is easy to build. A bathroom that stays watertight for years depends on the parts no one sees after handover.

Laying the Groundwork for a Watertight Floor

A membrane can only perform as well as the surface under it. If the base moves, sheds dust, holds contaminants, or uses a non-compliant sheet material, the membrane is already being asked to fail.

What has to be removed before waterproofing starts

In older Melbourne bathrooms, the first job is often discovering what the last renovation left behind. Vinyl adhesive residue, old paint, flaky levelling compounds, and water-damaged sheet flooring all interfere with bond. Surface contamination isn't a cosmetic issue. It stops primer and membrane from grabbing properly.

The bigger compliance issue is the substrate itself. The 2021 version of AS 3740 explicitly bans particle board and timber flooring substrates in wet areas, which is a major shift many DIY videos still miss, as outlined in this discussion of current Australian waterproofing requirements. If you're renovating an older home and uncover particleboard or timber sheeting in the wet area, the answer isn't to seal over it and hope for the best. It needs to be replaced with a compliant substrate.

That's the part many budgets don't allow for early enough. Homeowners price the visible renovation items, then get caught when the floor has to come up.

Preparation that actually matters

The preparation sequence is usually straightforward, but every part has to be done properly:

  • Remove weak material: Any loose topping, brittle patching, or swollen board has to go. Membrane over failure is still failure.
  • Mechanically prepare the surface: Grinding is often the right call because it removes contaminants and opens the surface for primer adhesion.
  • Vacuum thoroughly: Dust left behind acts like a release layer.
  • Prime to suit the substrate: Primer isn't optional. It controls suction and helps the membrane bond evenly.
  • Correct levels and falls before waterproofing: Membrane follows the shape beneath it. It won't fix bad drainage.

Where falls are wrong, the floor usually needs proper screeding before waterproofing starts. That's why screeding for tiles matters so much in wet areas. If water sits instead of moving to the waste, the room is already underperforming before the membrane goes down.

A quick site check can tell you whether the room is ready:

Check What you want to see What goes wrong if ignored
Substrate Compliant, stable, dry, solid Membrane loses bond or cracks
Surface condition Clean, ground, dust-free Primer and membrane don't adhere consistently
Junctions Sharp defects removed, transitions clean Weak points appear at corners and edges
Falls Water directed to the waste Ponding, staining, and ongoing wetting

A clean floor isn't the same as a prepared floor. Sweeping alone won't fix contaminants, movement, or a non-compliant base.

For a confident DIYer, this is the stage where honesty matters. If you don't know what the substrate is, don't proceed until you do.

Choosing Your Waterproofing System

Homeowners often ask which membrane is “best”. The better question is which system suits the room, the detailing, and the installer's skill.

A comparison chart outlining the pros and cons of liquid versus sheet membranes for bathroom waterproofing projects.

Where liquid membranes make sense

Liquid-applied systems are common in residential bathroom floor waterproofing because they handle awkward shapes well. Around puddle flanges, nib walls, pipe penetrations, recesses, and mixed junctions, a brush-and-roller system gives the installer flexibility.

They're also easier for homeowners to understand. You can see the coverage building. You can cut in edges with a brush and roll broad areas with a medium nap roller. For standard bathrooms and ensuites, that makes liquid membrane the system many people reach for first.

The catch is consistency. Liquid products only work when the installer respects drying times, reinforcement details, and final film build. A membrane that looks continuous can still be too thin.

Where sheet membranes earn their place

Sheet systems appeal to trades for a different reason. Thickness is more controlled from the outset. On flatter areas, especially where layouts are simple, sheet membranes can provide a very reliable barrier when they're installed correctly.

Their weakness is detailing. Seams, corners, upturns, drains, and penetrations demand accuracy. A poor overlap or sloppy bond at a corner can undo the advantage of factory thickness. That's why sheet products usually reward experience more than enthusiasm.

A simple comparison helps:

System Strength Weak point Best fit
Liquid membrane Seamless application over complex shapes Easy to apply too thin or inconsistently Typical residential bathrooms with detailed junctions
Sheet membrane Consistent material thickness Seams and detailing require high precision Simple layouts and experienced installers

A simple way to decide

If the bathroom has multiple corners, a recessed shower, several penetrations and a lot of fussy geometry, liquid systems are usually more forgiving in shape but less forgiving in workmanship. If the room is simpler and the installer is experienced with seaming and detailing, sheet systems can be excellent.

This is also where product system compatibility matters. Primer, bond breaker, reinforcing fabric, drain detail and top membrane should belong to one compliant approach, not a grab-bag of whatever was on the shelf. A clear explanation of different waterproofing systems helps homeowners ask better questions before work starts.

Pick the system your installer can execute cleanly, not the system that sounds best in a brochure.

A Practical Guide to Membrane Application

Good membrane application looks calm and methodical. The bad jobs usually look rushed. You see patchy coverage, missed edges, excess buildup in one area and barely any in another.

A visual workflow helps homeowners understand what should happen on site.

A step-by-step infographic showing the workflow for applying bathroom floor waterproofing membranes, from surface preparation to inspection.

Corners drains and penetrations first

Before broad membrane coats begin, the vulnerable points need detailing. Internal corners, wall-floor junctions, hob edges, around wastes, and pipe penetrations move more than open floor areas. That movement is exactly where failures start.

The correct method demands embedding reinforcing tape in high-risk junctions and applying a liquid membrane to achieve a minimum total dry thickness of 1mm after two coats, as detailed in this guide to Australian-standard bathroom waterproofing. If the tape is skipped, the membrane has to bridge movement on its own. That's where stress cracks tend to appear.

The drain detail deserves special attention. The puddle flange must be secure, correctly set, and integrated cleanly so the membrane terminates and bonds as part of a complete system. If water can track around the drain detail, the rest of the floor waterproofing won't save the job.

Pipe penetrations need the same care. A rough cut around plumbing with a dab of sealant isn't proper detailing. The membrane has to seal those penetrations as part of the system.

For homeowners who want to see the workflow in action, this video is a useful reference point.

Getting the coats right

Once the detailing is done and cured as required by the product system, the first full coat goes on. On floors, that usually means working from the perimeter back toward the exit so the installer doesn't trap themselves in a corner. Coverage needs to be even, with no pinholes, dry patches, or heavy ridges.

After the first coat cures properly, the second coat goes on to build the system to the required total thickness. Cross-rolling or changing direction between coats often helps produce more uniform coverage.

The common mistakes are predictable:

  • Rushing cure times: A second coat applied too early can drag or compromise the first.
  • Leaving thin edges: Perimeters and upturns are often where installers get stingy.
  • Treating corners like open floor: Junctions need reinforcement and deliberate buildup.
  • Guessing thickness: If the membrane doesn't reach the required dry film build, appearance won't save it.

The membrane has to be continuous, reinforced where movement occurs, and thick enough when dry. Looking glossy isn't a compliance test.

What a careful homeowner should inspect

You don't need to be a waterproofer to spot warning signs before tiling starts. Ask the installer to walk you through the finished membrane. Look for neat corner reinforcement, clean drain detailing, consistent upturns, and full coverage without missed areas.

A useful homeowner checklist looks like this:

  • Corners and junctions: Reinforcing tape should be visible beneath or within the membrane build where required.
  • Around drains: The membrane should terminate neatly into the drain detail, not stop short.
  • Pipe penetrations: Openings should be sealed and dressed properly, not left as rough cut-outs.
  • Coat consistency: The floor shouldn't show obvious roller holidays or translucent weak spots.

If the installer gets defensive about reasonable inspection before tiles go down, that's not a good sign.

Meeting Australian Standards and Avoiding Costly Mistakes

Compliance in wet areas isn't a style preference. It's a set of hard rules that control where water can go and how quickly it must drain away.

A checklist for bathroom waterproofing standards based on AS 3740-2010 regulations, including installation and product compliance requirements.

The compliance points that catch people out

Under AS 3740-2010, shower walls must be waterproofed to a minimum of 1800 mm, the entire shower floor must be treated, and bathrooms on a second storey require the entire floor to be waterproofed, as explained in this Australian bathroom waterproofing guide. That same guidance also sets the required floor falls. Wet area floors need a minimum fall of 1:60 to the waste, and shower recess floors need 1:40 in the immediate drain vicinity.

Those aren't rough targets. They're compliance points.

The mistakes I see homeowners misunderstand most often are these:

  • Wall height confusion: People assume a short upturn is enough because the tile runs higher anyway. It isn't.
  • Falls left to the tiler: Falls are a substrate and set-out issue, not something to hope adhesive can fix.
  • Frameless shower underestimation: Open and frameless layouts allow more splash migration, so the treated area becomes more critical.
  • Hob and transition details missed: Water finds weak transitions fast.

Second-storey bathrooms need different thinking

Many DIY guides oversimplify the rules. People hear that only the shower recess floor needs waterproofing in some situations and assume that applies universally. It doesn't.

On a second storey, the risk sits below the room as much as inside it. Water that escapes the shower zone doesn't just mark a skirting board. It can affect ceilings, insulation, framing, and rooms underneath. For apartments, townhouses and upper-floor ensuites, that risk is multiplied by neighbours, strata issues and harder access for rectification.

Best practice often goes beyond the bare minimum, especially where damage can travel into adjacent rooms or levels below.

If your renovation sits above another habitable space, treat floor waterproofing decisions with that reality in mind. A legal minimum approach and a low-risk approach aren't always the same thing. For certificate and handover questions in Victoria, it's worth understanding the role of a waterproofing compliance certificate in Victoria before the job begins, not after a leak appears.

Check before tiles go down

The best time to find a problem is before adhesive covers the membrane. Once tiling starts, inspection becomes far more limited.

A practical pre-tiling review should include:

Item What to confirm
Coverage Required areas are fully waterproofed
Height Wall waterproofing reaches compliant heights where required
Falls Water is directed toward the waste, not into corners or doorways
Junctions Corners, penetrations and transitions are properly detailed
Drain detail Waste connection is integrated and watertight

Where appropriate, a flood test before tiling can reveal issues while the system is still exposed and fixable. That test only has value if the room has been detailed properly and the waste is set up correctly for testing.

When to Call a Registered Builder for Your Renovation

A common Melbourne renovation story goes like this. The bathroom looks fine after handover, then six or twelve months later paint starts lifting on the ceiling below, or water shows up at a doorway, skirting, or adjoining room. By then the tiles, screen, vanity and finishes are in, and finding the fault means pulling a finished bathroom apart.

That is usually the point where homeowner oversight has ended and licensed responsibility should have started.

Where confident DIY ends

A capable homeowner can do a lot well. Demolition, product selection, checking the scope, and asking the right questions all help. Some can also manage minor preparation. The handover point comes earlier than many expect once the job involves a wet area floor, structural repair, substrate replacement, drain set-out, or any bathroom above another storey.

The two points I see missed most often in Melbourne are not about brushing on membrane. They are about whether the substrate is suitable and lawful under AS 3740:2021, and whether an upstairs bathroom has been detailed for the higher consequence of failure. Many DIY guides skip both. They jump straight to products and application, which is the easy part to film and the hard part to verify once covered.

A second-storey bathroom is where I stop treating waterproofing as a simple trade task and start treating it as renovation risk management. If water gets through on the ground floor, you may be replacing skirtings and a section of wall. If it gets through upstairs, you can be dealing with ceilings, insulation, framing moisture, electrical fittings, and damage to rooms below. In apartments, add neighbours and strata.

Screenshot from https://melbournetilingservices.com.au

What registered builders bring to bathroom renovations

A registered builder coordinates the parts of the job that tend to fail at the joins between trades. That is its core value.

The carpenter or installer sets the substrate. The plumber fixes the waste location and penetrations. The waterproofer relies on both being right. The tiler then covers the evidence. If no one is checking those interfaces, defects can pass through the whole job unnoticed until the room is in use.

In practice, a good builder improves the job in a few specific ways:

  • Substrate control: checks that the sheeting, movement, framing condition and floor build-up are suitable before waterproofing starts
  • Set-out and falls: makes sure waste positions and heights allow proper falls without creating birdbaths, sharp lips or ponding at the doorway
  • Trade sequencing: stops waterproofing being rushed to suit another booking and stops tiling over work that has not been inspected
  • Scope clarity: makes one party responsible for the junctions between plumbing, carpentry, screeding, waterproofing and tiling
  • Records: keeps the paperwork and product information needed if there is a dispute, sale, defect claim or insurance question later

One clear supervisor saves a lot of arguments.

Why the certificate matters

For homeowners, the paperwork often feels secondary until there is a leak. It is not secondary. It is part of proving who did the work, what system was used, and whether the wet area was completed by the right party.

An official installation certificate or compliance record is not something a homeowner can issue to themselves after watching a few videos and buying membrane from a trade counter. If the job needs documented compliance, insurance support, or a clear chain of responsibility, use a qualified waterproofer and have the renovation managed properly from the start.

That matters most in four situations. Upstairs bathrooms. Apartments and multi-residential buildings. Older Melbourne homes where floors and walls are rarely as straight or sound as they first appear. Full renovations where several trades affect the wet area before it is closed up.

If your project sits in one of those categories, bring in a registered builder early and get the substrate, set-out and sequencing resolved before waterproofing day. That is the point where expensive failures are prevented.


If you're planning bathroom renovations and want the job handled by registered builders who understand waterproofing, screeding, tiling and compliance from start to finish, speak with Melbourne Tiling Services P/L. They work across Melbourne and greater Victoria, coordinating the right trades for durable, fully finished wet areas that don't just look good on completion, but hold up properly over time.