

In Melbourne, a feature wall usually sits inside a bathroom reno that's already around the $10,000 mark, and the wall itself only works when the wall behind it is flat, waterproofed, and detailed properly. For a realistic 2026 project, the right question isn't “what tile looks best”, it's “which wall system will still hold up after years of steam, cleaning, and movement?”
A homeowner usually gets to this point after staring at a tired ensuite or shower wall and deciding the room needs more than another coat of paint. That's where feature wall tiling comes in, not as a cosmetic add-on, but as a precision wet-area finish that has to look sharp and perform at the same time. In Melbourne and greater Victoria, the decision usually comes down to three things, material, layout, and who installs it.
Table of Contents
- Why a Feature Wall Changes the Whole Bathroom
- Substrate, Adhesive and Wall Tolerance Explained
- Comparing Feature Wall Materials for Melbourne Bathrooms
- Waterproofing, Screeding and the Installation Sequence
- Cost Ranges and Budgeting for a Melbourne Feature Wall
- DIY Versus Hiring a Licensed Melbourne Tiler
- How Melbourne Tiling Services Plans a Feature Wall Project
- Maintenance, Longevity and Your Final Decision Checklist
Why a Feature Wall Changes the Whole Bathroom
A Melbourne homeowner might start with a single wall in the shower, then realise the whole room needs to be treated as one visual and waterproofing system. That's the shift with feature wall tiling, it changes the feel of the bathroom, but it also changes the standard the wall has to meet. What used to be a small decorative strip now often runs full height and reads like part of the architecture, especially in modern bathrooms and ensuites.
The practical role of the wall
The design side matters, but the wall also has a job to do in a wet area. Australian feature-wall guidance now leans heavily towards large-format porcelain around 1,200 x 600 mm and above, because fewer grout joints create a more continuous slab effect and a cleaner visual line in bathrooms across Melbourne and greater Victoria (Australian tile design guide). That's why small tiles are often kept for niches or accent details rather than the main feature wall.
A feature wall in a bathroom isn't a wallpaper decision. It's a substrate, waterproofing, and fixing decision that happens to look good when it's done properly.
The project scope is broad enough to suit a shower wall, vanity wall, ensuite splashback, or a full-height wall behind a freestanding bath, but the room has to support the material. Australian renovation guidance treats the job as a wet-area detail with surface preparation, adhesive application, spacers, grouting, and sealing built into the sequence, not as a decorative afterthought (feature wall installation guidance). That's the part homeowners don't see on the mood board.
What drives the decision
A good result usually comes down to three questions.
- What material suits the room? Porcelain, ceramic, stone, and slab-like panels all behave differently in moisture and light.
- How flat is the wall? Large-format tiles expose substrate defects fast.
- Who is installing it? In Victoria, that matters for both quality and compliance.
If you're reading this to decide whether a feature wall belongs in your bathroom renovation, the practical answer is yes, if you want the room to feel finished and you're prepared to build it as a system, not a surface.
Substrate, Adhesive and Wall Tolerance Explained
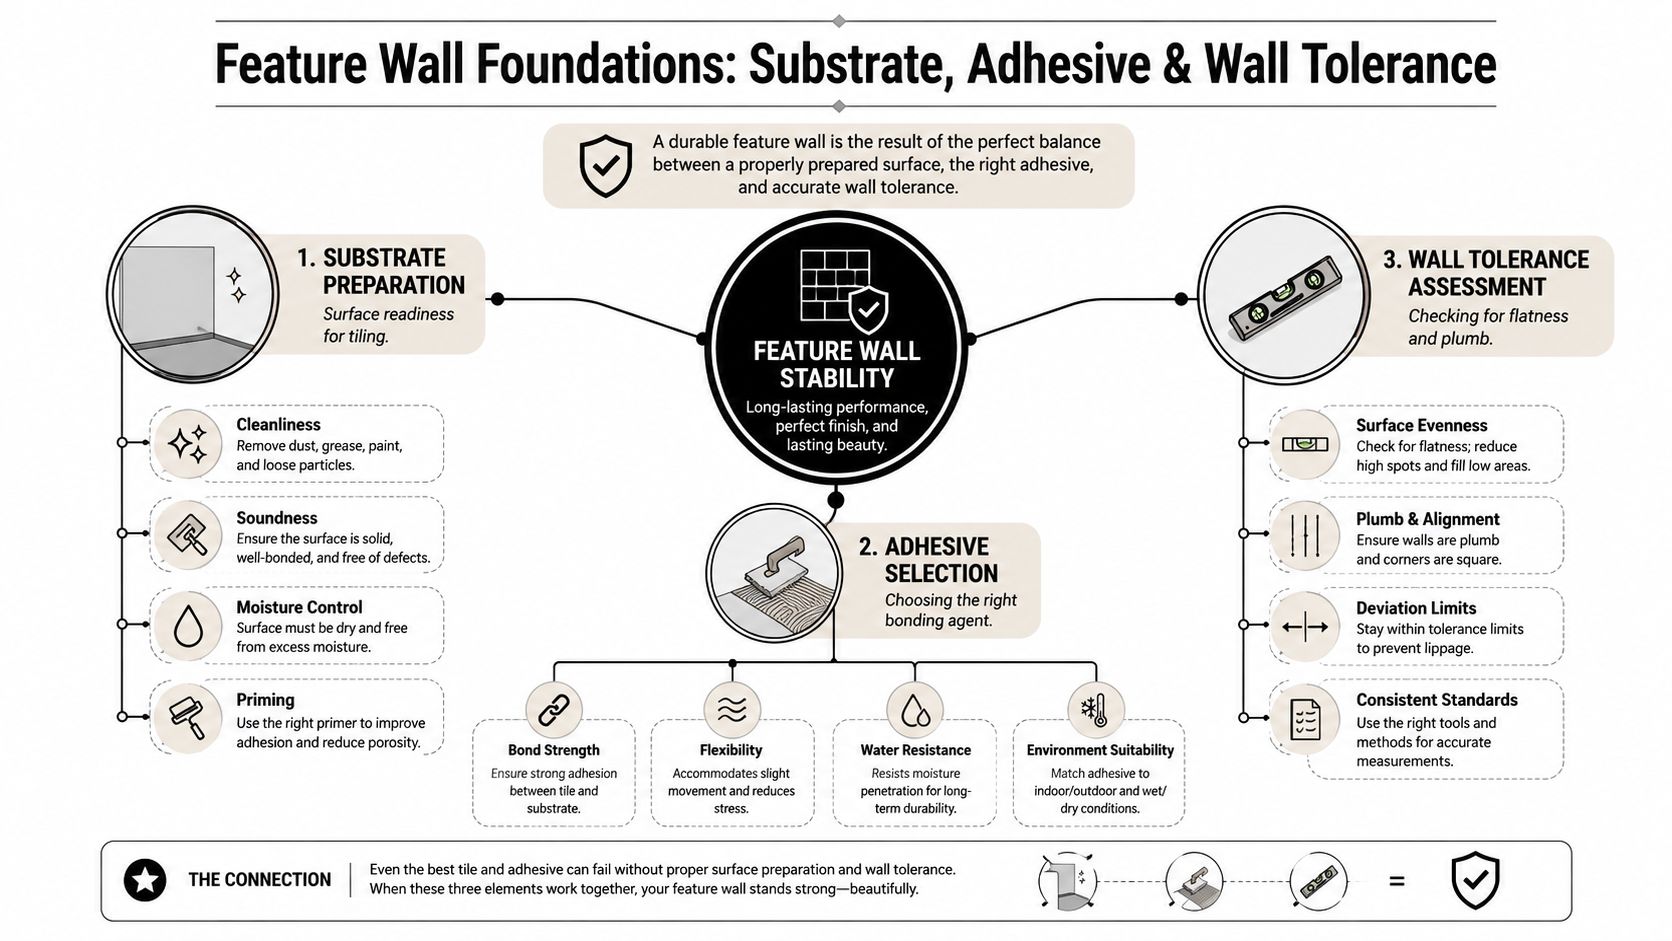
A feature wall is only as flat as the wall behind it. That sounds obvious, but it's where most disappointing bathrooms start, because large-format tiles don't hide much and low-absorption surfaces can make every bump or hollow look worse once the light hits the wall.
Flatness decides the finish
Australian tiling practice expects a stable, clean, dry substrate, and for internal wall tiling, industry guidance points to at least 80% adhesive coverage plus vertical deviation below 3 mm over 2 m to control lippage and alignment (wall tiling guide). In plain terms, if the wall bows, dips, or carries old adhesive ridges, those flaws will telegraph through the tile face. That's why a straightedge check before quoting is not optional.
Why adhesive choice matters more on big tiles
Large-format panels commonly used in feature walls sit around 6–20 mm thickness, with sizes up to 1200 × 2400 mm, and porcelain wall systems are typically engineered around ≤0.5% water absorption and ≥35 MPa flexural strength (panel specification guidance). Those figures matter because the bigger and denser the panel, the more it depends on full bedding, good coverage, and careful handling. In practical terms, installers often use 2–3 mm grout joints on properly prepared walls and back-butter where needed to keep edges aligned.
Practical rule: if the quote says “feature wall” but doesn't mention wall prep, levelling, or adhesive coverage, the quote is incomplete.
That's also where screeding and self-levelling come in. They're not upsells when the wall is out of tolerance, they're the reason a premium wall stays flat after curing. If you want to understand what an adhesive line item is really doing, see the technical overview at this adhesive guide.
Comparing Feature Wall Materials for Melbourne Bathrooms
The material choice sets the tone, but it also sets the maintenance burden and the installer's workload. For Melbourne bathrooms, the four materials that come up most often are porcelain, ceramic, natural stone, and large-format Kerlite or panel systems.
| Material | Wet-area suitability | Finish range | Durability | Substrate demand | Installed cost (per m², indicative) |
|---|---|---|---|---|---|
| Porcelain | Strong for bathrooms and showers | Broad, from stone-look to matte slab styles | High | Moderate to high | Not stated in verified data |
| Ceramic | Suitable for many bathroom walls | Broad, especially decorative and budget-friendly looks | Moderate | Moderate | Not stated in verified data |
| Natural stone | Suitable with correct sealing and maintenance | Premium, natural variation | High, but maintenance-sensitive | High | Not stated in verified data |
| Large-format Kerlite / panels | Strong for premium wet areas when installed correctly | Seamless, slab-like, minimalist | High when substrate is excellent | Very high | Not stated in verified data |
Porcelain, the safest all-rounder
Porcelain is the material most homeowners end up with when they want durability without constant upkeep. It handles moisture well, comes in a wide finish range, and suits the cleaner slab effect that's now common in Australian bathrooms. For that reason, I'd treat it as the default option unless the room demands a specialist finish.
Ceramic, the budget-friendly wall option
Ceramic can work well on a feature wall when the design is lighter, the tile format is manageable, and the budget needs to stay contained. It's often easier to source in decorative ranges, which makes it useful in powder rooms, smaller ensuites, and walls that aren't under constant water exposure. It's less demanding than stone, but it also doesn't give the same premium weight in a large wet area.
Natural stone and large-format panels
Natural stone gives depth and variation that manufactured products can't fully mimic, but it also asks more of the owner. Sealing, maintenance, and careful product selection matter more with stone. Large-format Kerlite-style panels go in the opposite direction, they create the cleanest visual result, but they demand the flattest substrate and the most experienced installer, which is why they suit higher-end bathroom renovations where the wall can be brought to tolerance before the tile is set.
For a broader look at porcelain wall applications in bathrooms, see porcelain tile bathroom guidance.
Waterproofing, Screeding and the Installation Sequence
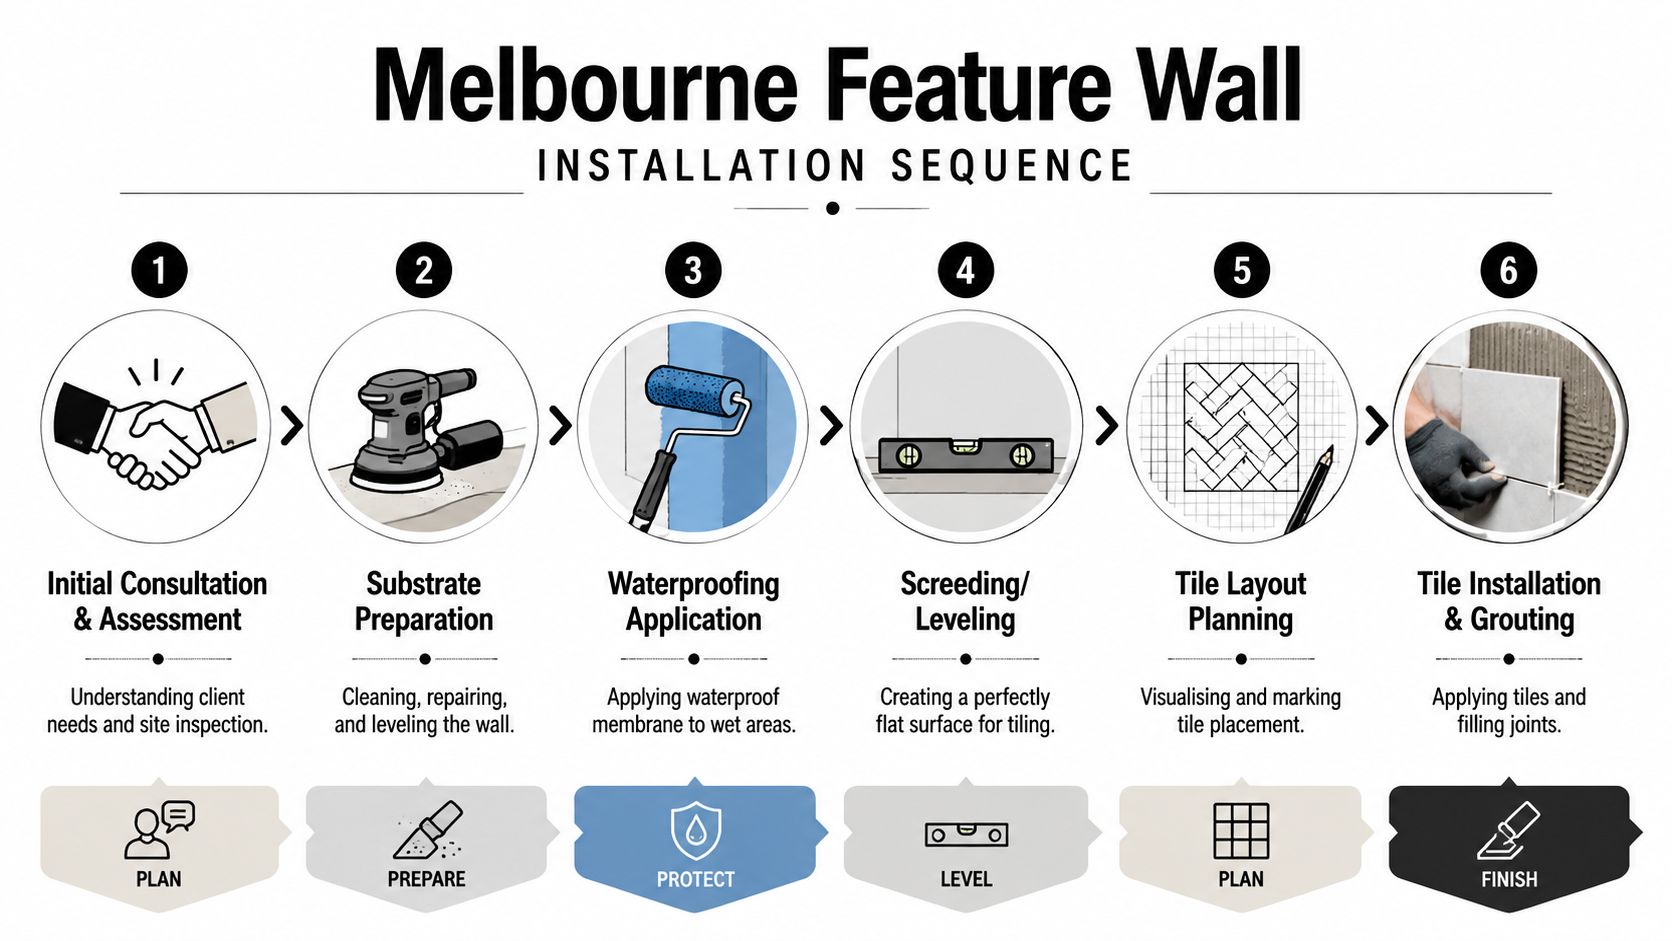
A Melbourne feature wall in a bathroom starts well before the first tile goes on. If the substrate is out of tolerance, damp, or poorly prepared, the finish will show it later as cracked grout, hollow patches, or movement that was there from day one but only becomes visible after a few months in service.
The compliant build order
The wall comes first. It needs to be checked for stability, cleanliness, and dryness before any membrane or adhesive is applied. If the surface is not flat enough, it needs screeding or levelling first, because membrane is not a substitute for a true substrate. After that, waterproofing is applied to the wet area in line with AS 3740, and the surface is left to cure before tiling begins.
A membrane that has not cured properly becomes a soft layer under a rigid finish. That is a common starting point for bathroom failures.
Once the wall is ready, the tiler sets out the tile layout, checks the cut positions, and starts fixing with enough adhesive coverage to avoid voids. Internal corners and perimeter joints should be treated with flexible silicone rather than grout, because grout is too rigid for the movement those joints need to absorb. Industry guidance also calls for 2–5 mm grout joints and at least 24 hours of undisturbed curing for adhesive, which is why rushed jobs often fail early (wall tiling guidance).
The shortcuts that cause problems
The common misses are easy to spot once you know what to look for.
- Skipping levelling: large tiles magnify wall defects and make lippage obvious.
- Using grout in movement joints: corners and perimeters crack sooner when they are locked with rigid grout.
- Poor membrane continuity: one break in the waterproofing detail can compromise the whole wall.
- Thin adhesive coverage: hollow sounds and edge lift usually come from poor bedding.
Australian bathroom renovation work also has a licensing side. In Victoria, domestic building work with a contract price of $10,000 or more must be carried out by a registered builder, and waterproofing-related work can sit within the domestic building regulation framework as well. That is why feature wall sequencing and licensing are part of the same job, not separate issues.
For a practical look at how substrate prep affects tile performance, see screeding for tiles.
Cost Ranges and Budgeting for a Melbourne Feature Wall
A realistic feature wall budget starts with the wall size, then gets shaped by the tile format, the wall prep, and what has to happen around the room to install it properly. The reason quotes vary so much is that the visible tile is only part of the job.
What actually drives the price
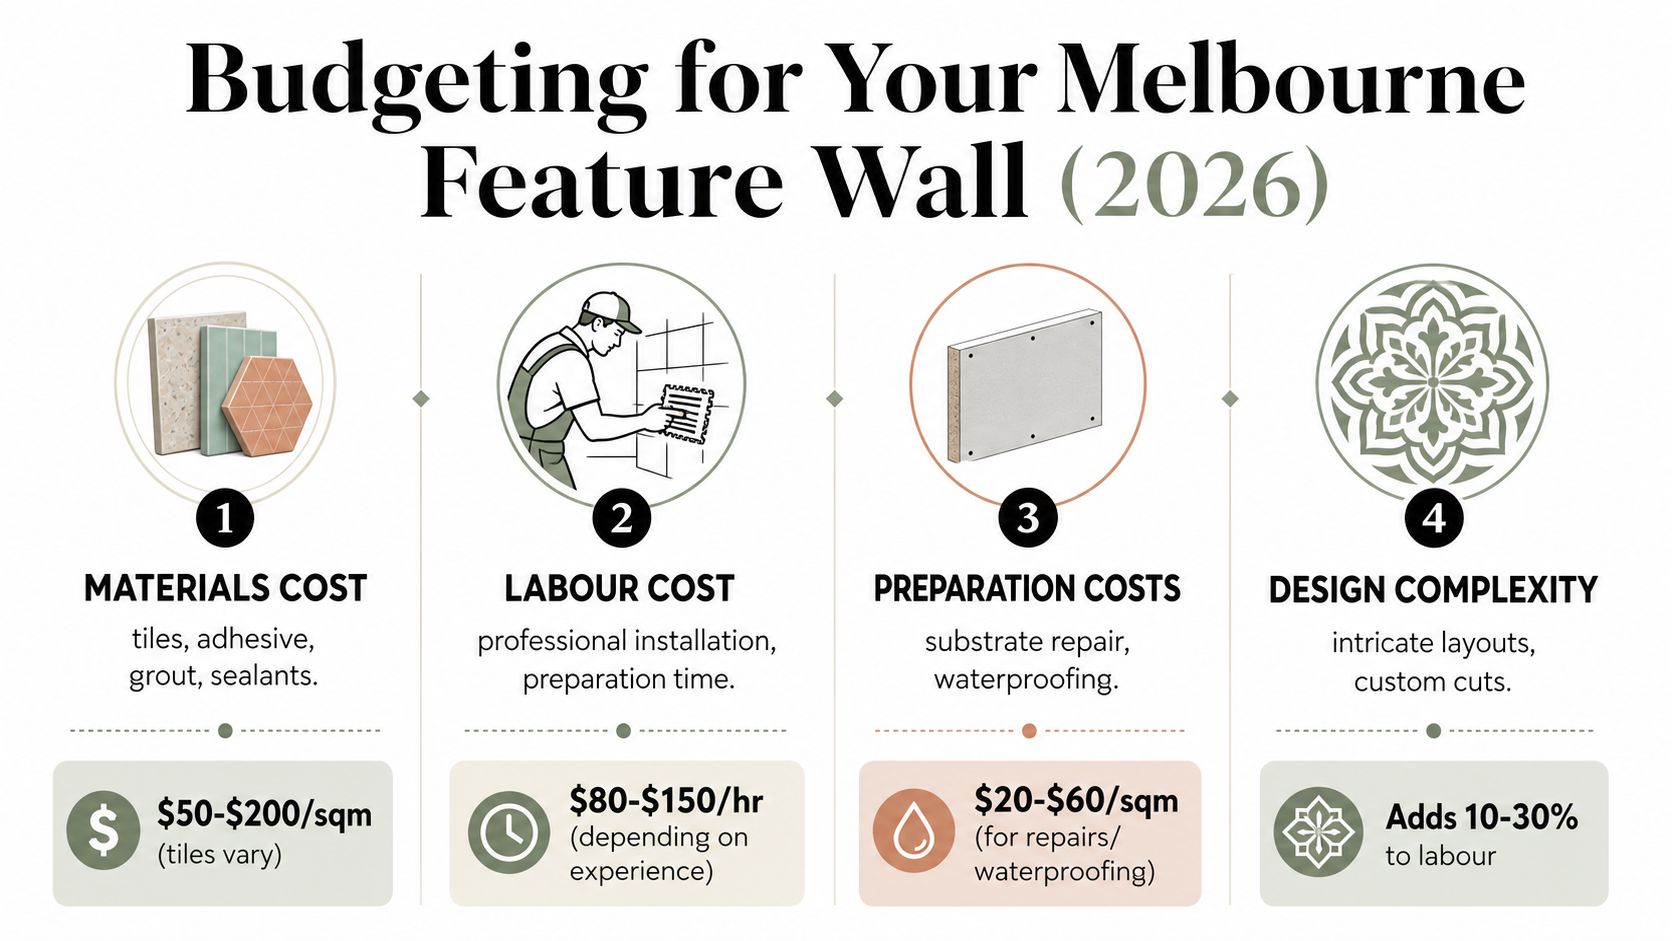
The main cost buckets are materials, labour, preparation, and design complexity. Materials cover the tile, adhesive, grout, and sealants. Labour covers cutting, setting, alignment, finishing, and cleanup. Preparation covers substrate repair, waterproofing, and levelling. Design complexity rises when you add mitred corners, tight herringbone or stacked layouts, shower screen removal, or awkward cuts around niches and vanities.
Why cheap quotes get expensive later
The cheapest quote is often the one that leaves out the work nobody wants to explain. If the wall needs levelling, if the membrane is thin or incomplete, or if the room needs shower screen removal and refitting, those items show up later as variations. That's where homeowners get caught, because the tile price looked manageable, but the system underneath wasn't priced transparently.
A sensible budget also needs to sit inside the wider renovation context. In Melbourne, many bathrooms and ensuites land around the $10,000 renovation mark for mid-range work, so a feature wall shouldn't be priced in isolation from the rest of the room. If the wall is the statement piece, the rest of the bathroom still has to support it.
Budget checks before you sign
- Confirm the substrate work: ask whether levelling, patching, or screeding is included.
- Check waterproofing scope: make sure the membrane detail is priced, not assumed.
- Ask about corners and trims: mitred edges take time and skill.
- Clarify removal works: shower screens, old tiles, and rubbish disposal can all alter the quote.
- Match the material to the wall: a panel that the substrate can't support is a false economy.
If you want the renovation scope managed as a single project, Melbourne Tiling Services P/L handles bathroom and feature wall coordination alongside tiling, waterproofing, and screeding, which is the kind of setup that reduces missed items rather than adding them.
DIY Versus Hiring a Licensed Melbourne Tiler
A feature wall sounds like a finish decision until the wall starts acting like part of the bathroom's wet-area system. That is the point where DIY stops being a casual savings exercise and starts carrying real risk, because the visible tile is only as good as the substrate, waterproofing, and fixings behind it.
What a capable homeowner can handle
A careful homeowner can still do useful work on the front end. Demolition, removing old tiles, basic room prep, and even simple splashback-style tiling in a dry zone can be manageable if the wall is straight and the scope is small. Those jobs take time and effort, but they do not usually carry the same failure risk as a shower wall or an ensuite feature wall.
The practical difference is the setting. A small laundry wall or vanity splashback can tolerate a modest mistake far better than a bathroom wall that sits behind waterproofing or meets regular spray. If the wall is dry, the surface is sound, and the layout is simple, DIY has a place.
Where the licensed trades start to matter
Waterproofing, structural changes, and large-format panel installation are the jobs that deserve a professional from the start. In Victoria, domestic building work for a bathroom renovation must be carried out by a registered builder when the contract price is $10,000 or more, and that is the level many feature-wall bathrooms quickly move into (Victorian domestic building reference). For a homeowner, that affects warranty cover, insurance, and the confidence a buyer or inspector may place in the work later.
A Registered Unlimited Builder can coordinate the trades that have to be sequenced properly, including carpenters, plumbers, electricians, tilers, and waterproofers. That matters most where the wall meets a shower screen, niche, vanity, or an area with past leaks, because each trade can affect the next one if the order is wrong.
DIY saves money only when the scope stays small and the wall remains dry. Once the room becomes wet-area work, the cost of a failed membrane, loose substrate, or poorly set-out feature panel can exceed the labour saved on day one.
For a small feature wall, a capable DIYer can still strip the room, remove rubble, and prepare surfaces for the licensed installer. For an ensuite or main bathroom, the safer move is to leave the wet-area work to a registered professional and use your own effort on the parts that do not sit behind waterproofing.
How Melbourne Tiling Services Plans a Feature Wall Project
A well-run Melbourne project starts with a site visit, not a sales pitch. The first step is usually a free on-site quote, where the wall is measured, the substrate is checked, and the layout constraints are identified before anyone orders material. That saves a lot of guesswork later, especially when the feature wall has to sit cleanly against a vanity, niche, or shower screen.
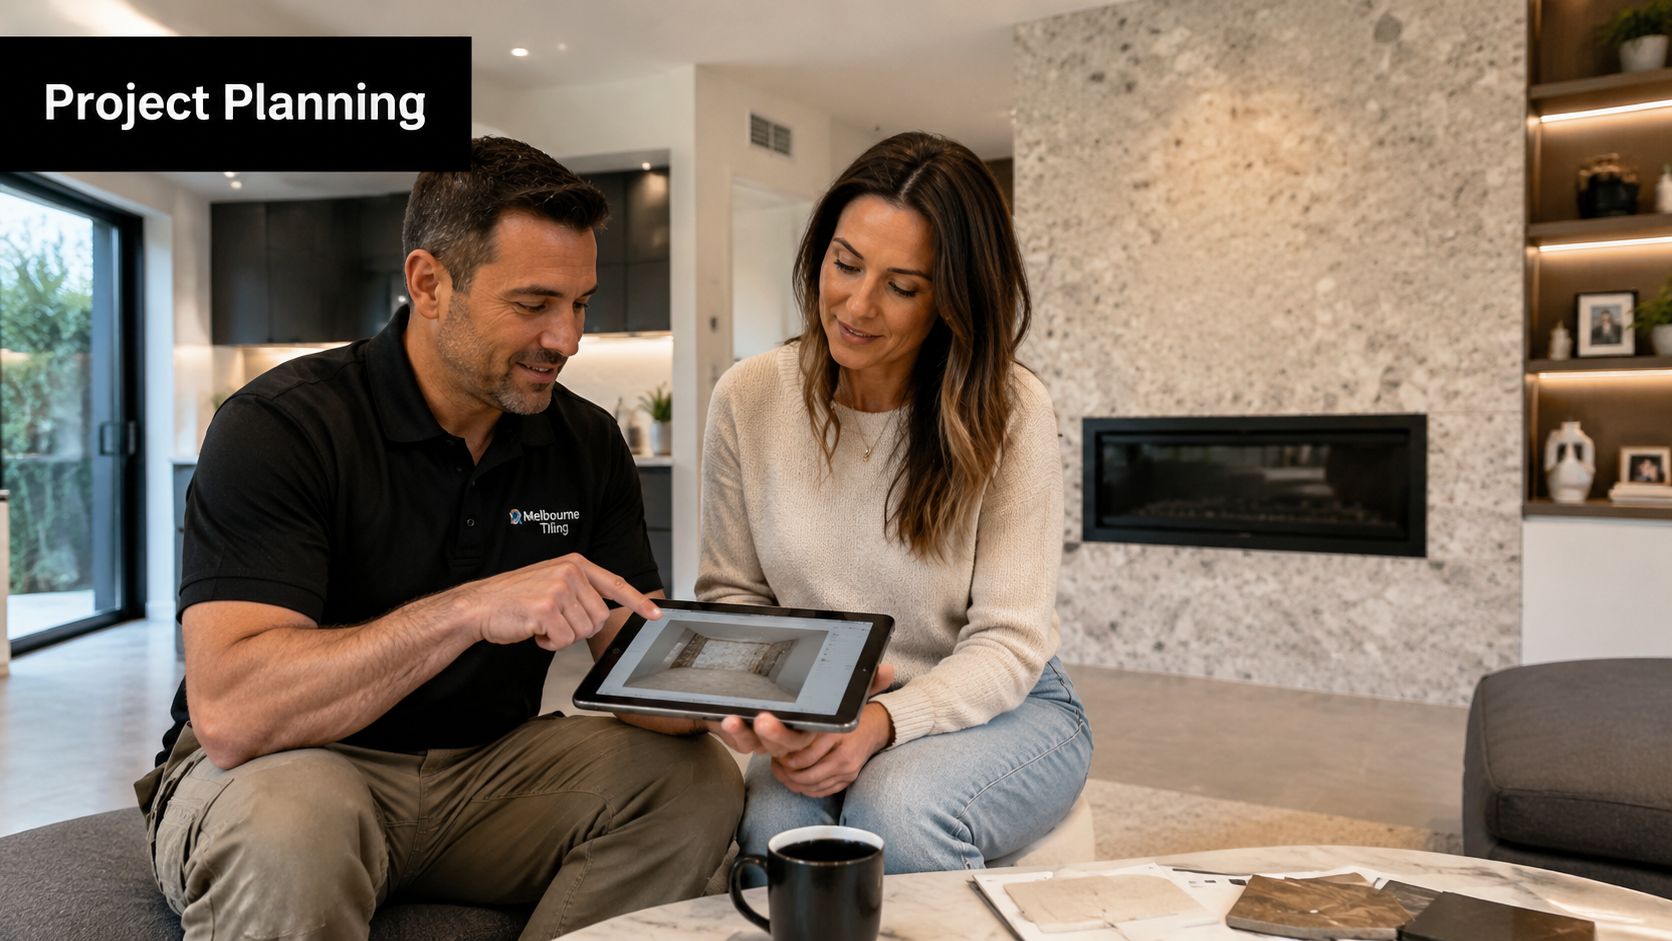
The next step is usually design refinement with 3D drawings, so the homeowner can see the wall in context before demolition starts. A renovation calculator then turns the scope into a clearer budget figure, which helps when the job includes more than just tile setting. Material selection follows, then scheduling of the licensed trades needed for the room, including carpenters, plumbers, electricians, tilers, and waterproofers.
When the wall intersects with a leak issue or an awkward enclosure, the same planning process also covers rectification work, shower screen coordination, and cleanup controls. That's the benefit of a Registered Unlimited Builder approach, the work gets sequenced as one renovation rather than a set of disconnected trades. It's also where feature wall tiling stops being guesswork and starts being a managed build.
Maintenance, Longevity and Your Final Decision Checklist
A good feature wall should still look intentional years later, not tired after the first humid summer. The easiest walls to maintain are the ones built with the right material and the right jointing from the start, because cleaning is only one part of the long-term equation.
What lasts and what wears
Porcelain is the easiest of the main wall finishes to keep clean. Natural stone needs more attention because sealing and top-ups become part of the maintenance routine. Grout and silicone are the wear points to watch, especially at corners, edges, and around the shower opening. If you see cracked grout, soft silicone, musty smells, or visible lippage at corners, the wall needs checking, not just wiping.
The final decision checklist
- Confirm substrate tolerance before you choose a large-format tile.
- Match the material to the wet area, not just the style board.
- Treat waterproofing and movement joints as essential.
- Decide what's DIY and what needs a licensed builder.
- Read the quote for prep work, not only for the tile price.
- Ask who coordinates the trades if the wall touches a shower, niche, or screen.
The clearest feature wall is the one that feels simple because the system underneath was done properly. That's the standard worth aiming for in a Melbourne bathroom renovation, whether the wall is porcelain, ceramic, stone, or a large-format panel.
If you're planning bathroom renovations and want the feature wall built as part of a proper wet-area system, Melbourne Tiling Services P/L can assess the substrate, waterproofing, screeding, and tile selection together. Visit Melbourne Tiling Services P/L to organise a quote and discuss a feature wall that's designed to look sharp and hold up in a Melbourne bathroom.
Recent Comments