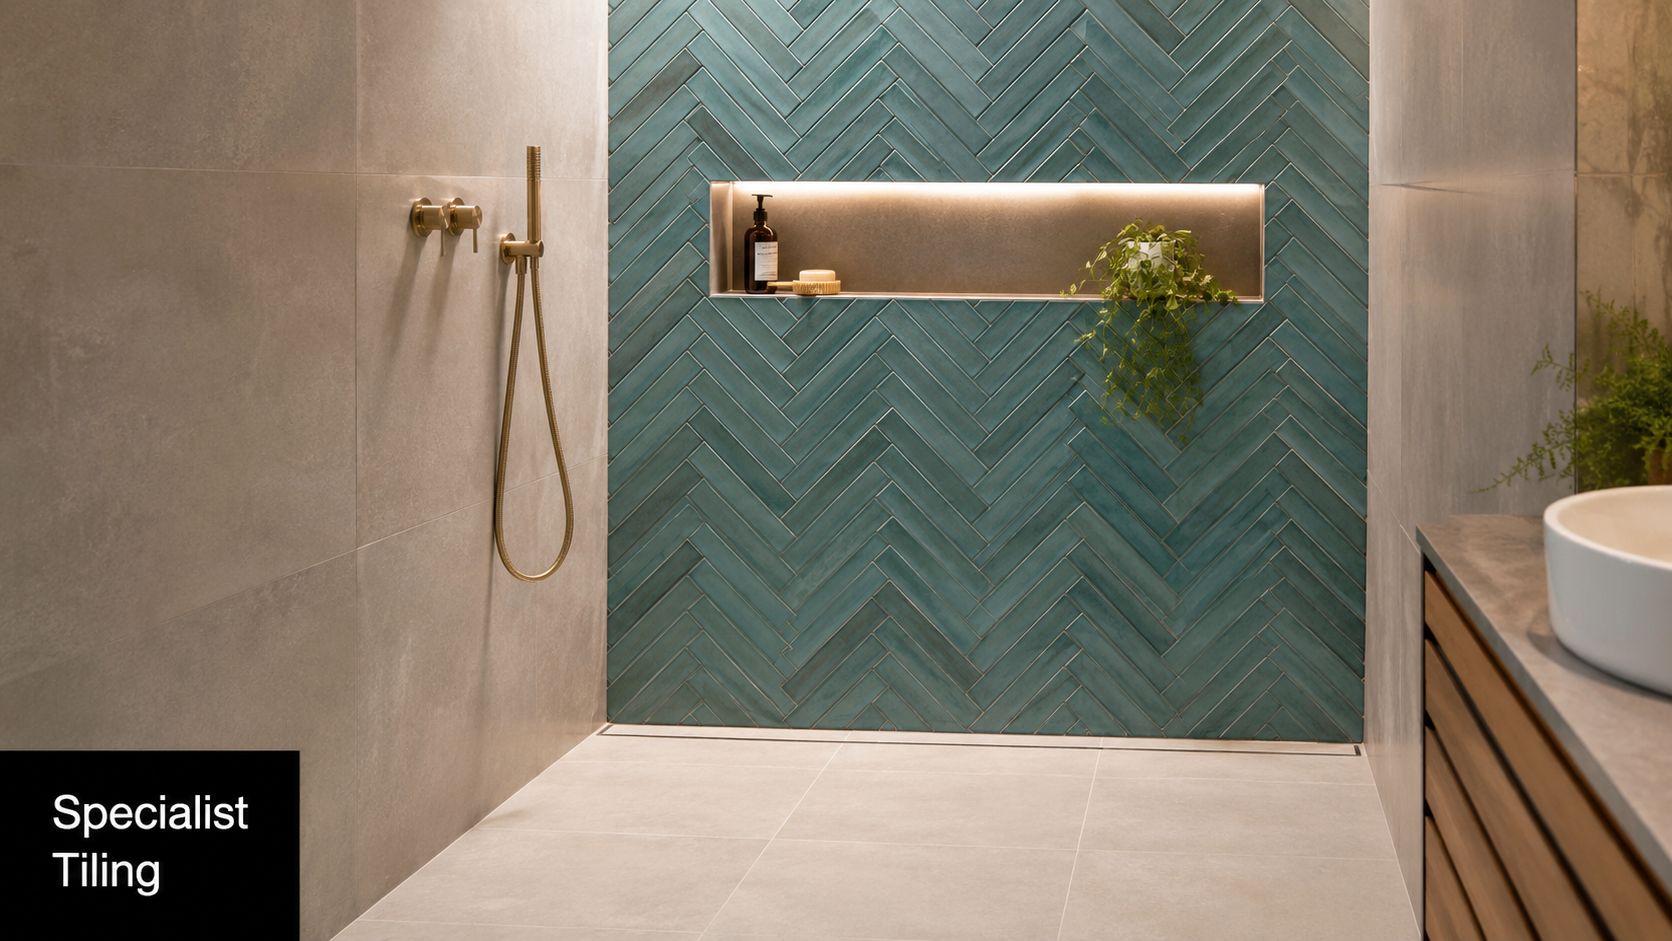
Feature Wall Tiling in Melbourne: A Complete Guide for 2026

In Melbourne, a feature wall usually sits inside a bathroom reno that's already around the $10,000 mark, and the wall itself only works when the wall behind it is flat, waterproofed, and detailed properly. For a realistic 2026 project, the right question isn't “what tile looks best”, it's “which wall system will still hold up after years of steam, cleaning, and movement?”

A homeowner usually gets to this point after staring at a tired ensuite or shower wall and deciding the room needs more than another coat of paint. That's where feature wall tiling comes in, not as a cosmetic add-on, but as a precision wet-area finish that has to look sharp and perform at the same time. In Melbourne and greater Victoria, the decision usually comes down to three things, material, layout, and who installs it.

Table of Contents

Why a Feature Wall Changes the Whole Bathroom

A Melbourne homeowner might start with a single wall in the shower, then realise the whole room needs to be treated as one visual and waterproofing system. That's the shift with feature wall tiling, it changes the feel of the bathroom, but it also changes the standard the wall has to meet. What used to be a small decorative strip now often runs full height and reads like part of the architecture, especially in modern bathrooms and ensuites.

The practical role of the wall

The design side matters, but the wall also has a job to do in a wet area. Australian feature-wall guidance now leans heavily towards large-format porcelain around 1,200 x 600 mm and above, because fewer grout joints create a more continuous slab effect and a cleaner visual line in bathrooms across Melbourne and greater Victoria (Australian tile design guide). That's why small tiles are often kept for niches or accent details rather than the main feature wall.

A feature wall in a bathroom isn't a wallpaper decision. It's a substrate, waterproofing, and fixing decision that happens to look good when it's done properly.

The project scope is broad enough to suit a shower wall, vanity wall, ensuite splashback, or a full-height wall behind a freestanding bath, but the room has to support the material. Australian renovation guidance treats the job as a wet-area detail with surface preparation, adhesive application, spacers, grouting, and sealing built into the sequence, not as a decorative afterthought (feature wall installation guidance). That's the part homeowners don't see on the mood board.

What drives the decision

A good result usually comes down to three questions.

  • What material suits the room? Porcelain, ceramic, stone, and slab-like panels all behave differently in moisture and light.
  • How flat is the wall? Large-format tiles expose substrate defects fast.
  • Who is installing it? In Victoria, that matters for both quality and compliance.

If you're reading this to decide whether a feature wall belongs in your bathroom renovation, the practical answer is yes, if you want the room to feel finished and you're prepared to build it as a system, not a surface.

Substrate, Adhesive and Wall Tolerance Explained

A feature wall is only as flat as the wall behind it. That sounds obvious, but it's where most disappointing bathrooms start, because large-format tiles don't hide much and low-absorption surfaces can make every bump or hollow look worse once the light hits the wall.

Flatness decides the finish

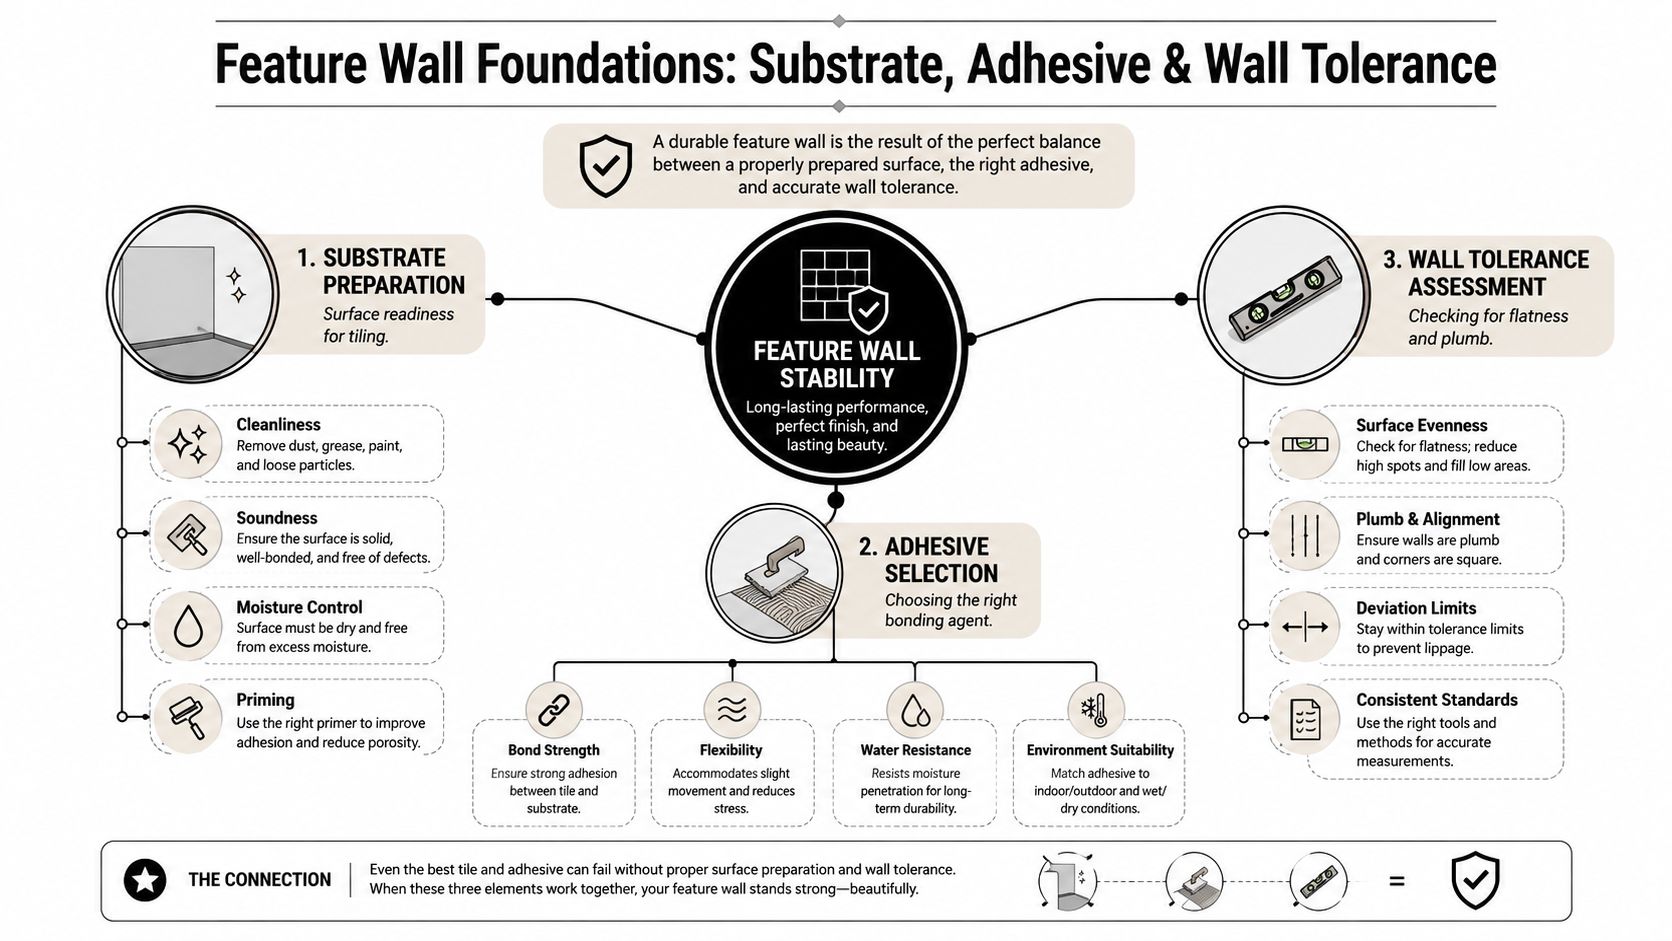
Australian tiling practice expects a stable, clean, dry substrate, and for internal wall tiling, industry guidance points to at least 80% adhesive coverage plus vertical deviation below 3 mm over 2 m to control lippage and alignment (wall tiling guide). In plain terms, if the wall bows, dips, or carries old adhesive ridges, those flaws will telegraph through the tile face. That's why a straightedge check before quoting is not optional.

An infographic detailing the three essential foundations for a durable feature wall tiling project: substrate preparation, adhesive selection, and wall tolerance.

Why adhesive choice matters more on big tiles

Large-format panels commonly used in feature walls sit around 6–20 mm thickness, with sizes up to 1200 × 2400 mm, and porcelain wall systems are typically engineered around ≤0.5% water absorption and ≥35 MPa flexural strength (panel specification guidance). Those figures matter because the bigger and denser the panel, the more it depends on full bedding, good coverage, and careful handling. In practical terms, installers often use 2–3 mm grout joints on properly prepared walls and back-butter where needed to keep edges aligned.

Practical rule: if the quote says “feature wall” but doesn't mention wall prep, levelling, or adhesive coverage, the quote is incomplete.

That's also where screeding and self-levelling come in. They're not upsells when the wall is out of tolerance, they're the reason a premium wall stays flat after curing. If you want to understand what an adhesive line item is really doing, see the technical overview at this adhesive guide.

Comparing Feature Wall Materials for Melbourne Bathrooms

The material choice sets the tone, but it also sets the maintenance burden and the installer's workload. For Melbourne bathrooms, the four materials that come up most often are porcelain, ceramic, natural stone, and large-format Kerlite or panel systems.

Material Wet-area suitability Finish range Durability Substrate demand Installed cost (per m², indicative)
Porcelain Strong for bathrooms and showers Broad, from stone-look to matte slab styles High Moderate to high Not stated in verified data
Ceramic Suitable for many bathroom walls Broad, especially decorative and budget-friendly looks Moderate Moderate Not stated in verified data
Natural stone Suitable with correct sealing and maintenance Premium, natural variation High, but maintenance-sensitive High Not stated in verified data
Large-format Kerlite / panels Strong for premium wet areas when installed correctly Seamless, slab-like, minimalist High when substrate is excellent Very high Not stated in verified data

Porcelain, the safest all-rounder

Porcelain is the material most homeowners end up with when they want durability without constant upkeep. It handles moisture well, comes in a wide finish range, and suits the cleaner slab effect that's now common in Australian bathrooms. For that reason, I'd treat it as the default option unless the room demands a specialist finish.

Ceramic, the budget-friendly wall option

Ceramic can work well on a feature wall when the design is lighter, the tile format is manageable, and the budget needs to stay contained. It's often easier to source in decorative ranges, which makes it useful in powder rooms, smaller ensuites, and walls that aren't under constant water exposure. It's less demanding than stone, but it also doesn't give the same premium weight in a large wet area.

Natural stone and large-format panels

Natural stone gives depth and variation that manufactured products can't fully mimic, but it also asks more of the owner. Sealing, maintenance, and careful product selection matter more with stone. Large-format Kerlite-style panels go in the opposite direction, they create the cleanest visual result, but they demand the flattest substrate and the most experienced installer, which is why they suit higher-end bathroom renovations where the wall can be brought to tolerance before the tile is set.

For a broader look at porcelain wall applications in bathrooms, see porcelain tile bathroom guidance.

Waterproofing, Screeding and the Installation Sequence

A Melbourne feature wall in a bathroom starts well before the first tile goes on. If the substrate is out of tolerance, damp, or poorly prepared, the finish will show it later as cracked grout, hollow patches, or movement that was there from day one but only becomes visible after a few months in service.

The compliant build order

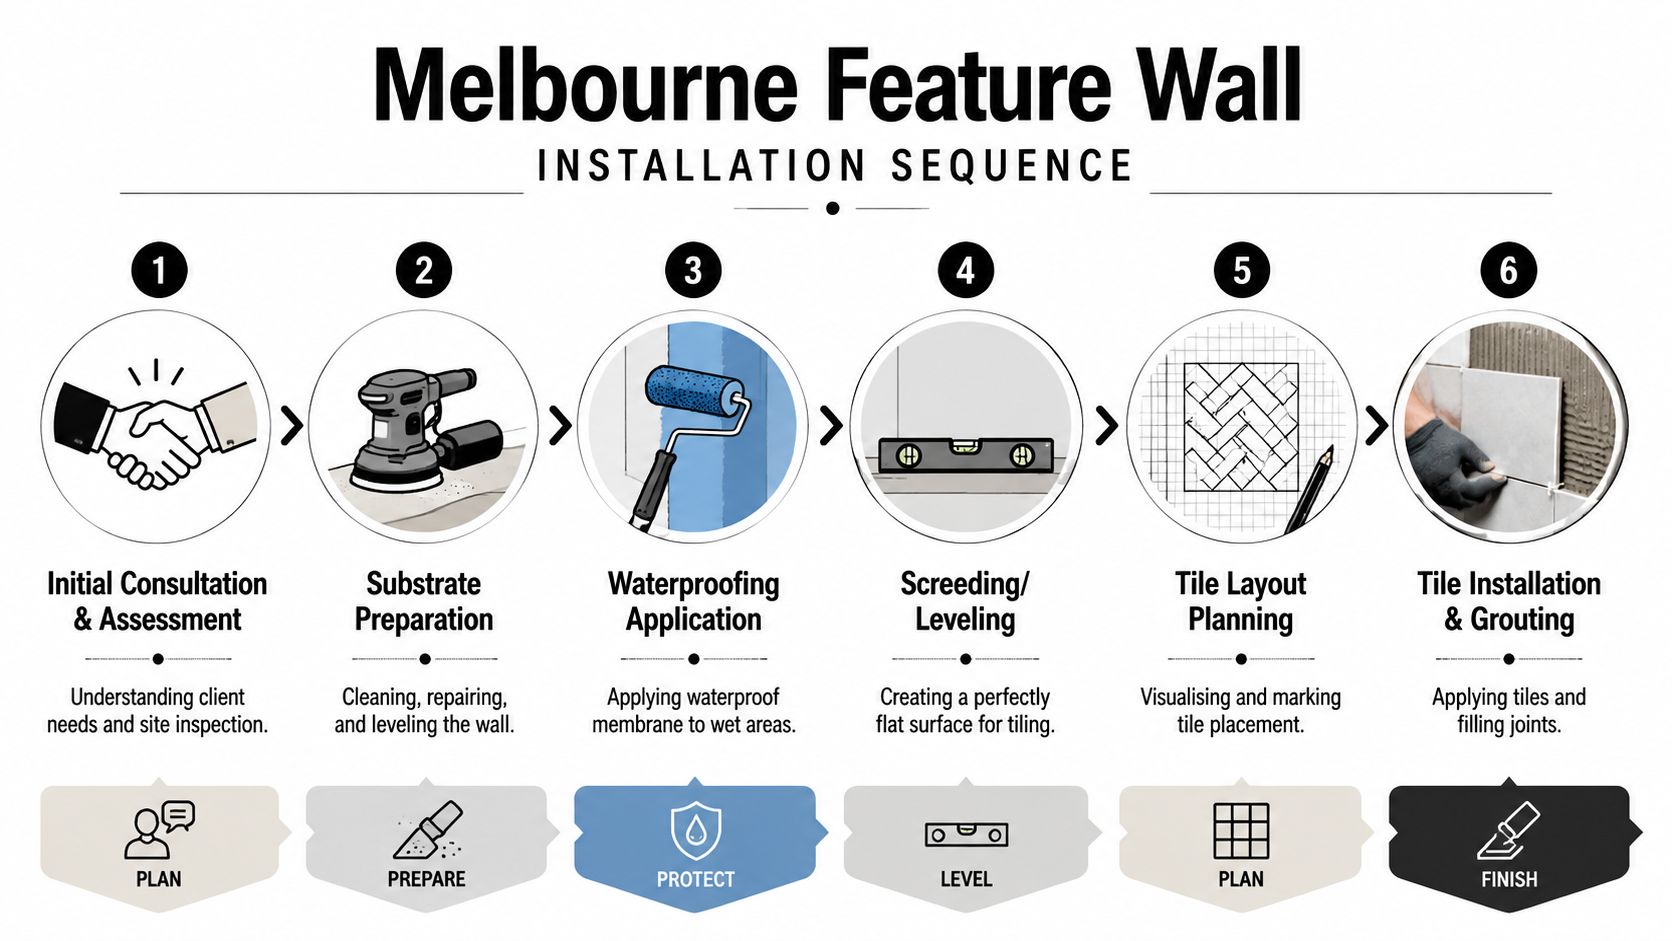
The wall comes first. It needs to be checked for stability, cleanliness, and dryness before any membrane or adhesive is applied. If the surface is not flat enough, it needs screeding or levelling first, because membrane is not a substitute for a true substrate. After that, waterproofing is applied to the wet area in line with AS 3740, and the surface is left to cure before tiling begins.

A membrane that has not cured properly becomes a soft layer under a rigid finish. That is a common starting point for bathroom failures.

Once the wall is ready, the tiler sets out the tile layout, checks the cut positions, and starts fixing with enough adhesive coverage to avoid voids. Internal corners and perimeter joints should be treated with flexible silicone rather than grout, because grout is too rigid for the movement those joints need to absorb. Industry guidance also calls for 2–5 mm grout joints and at least 24 hours of undisturbed curing for adhesive, which is why rushed jobs often fail early (wall tiling guidance).

The shortcuts that cause problems

The common misses are easy to spot once you know what to look for.

  • Skipping levelling: large tiles magnify wall defects and make lippage obvious.
  • Using grout in movement joints: corners and perimeters crack sooner when they are locked with rigid grout.
  • Poor membrane continuity: one break in the waterproofing detail can compromise the whole wall.
  • Thin adhesive coverage: hollow sounds and edge lift usually come from poor bedding.

Australian bathroom renovation work also has a licensing side. In Victoria, domestic building work with a contract price of $10,000 or more must be carried out by a registered builder, and waterproofing-related work can sit within the domestic building regulation framework as well. That is why feature wall sequencing and licensing are part of the same job, not separate issues.

For a practical look at how substrate prep affects tile performance, see screeding for tiles.

A six-step infographic illustrating the professional installation process for a Melbourne feature wall with tiles.

Cost Ranges and Budgeting for a Melbourne Feature Wall

A realistic feature wall budget starts with the wall size, then gets shaped by the tile format, the wall prep, and what has to happen around the room to install it properly. The reason quotes vary so much is that the visible tile is only part of the job.

What actually drives the price

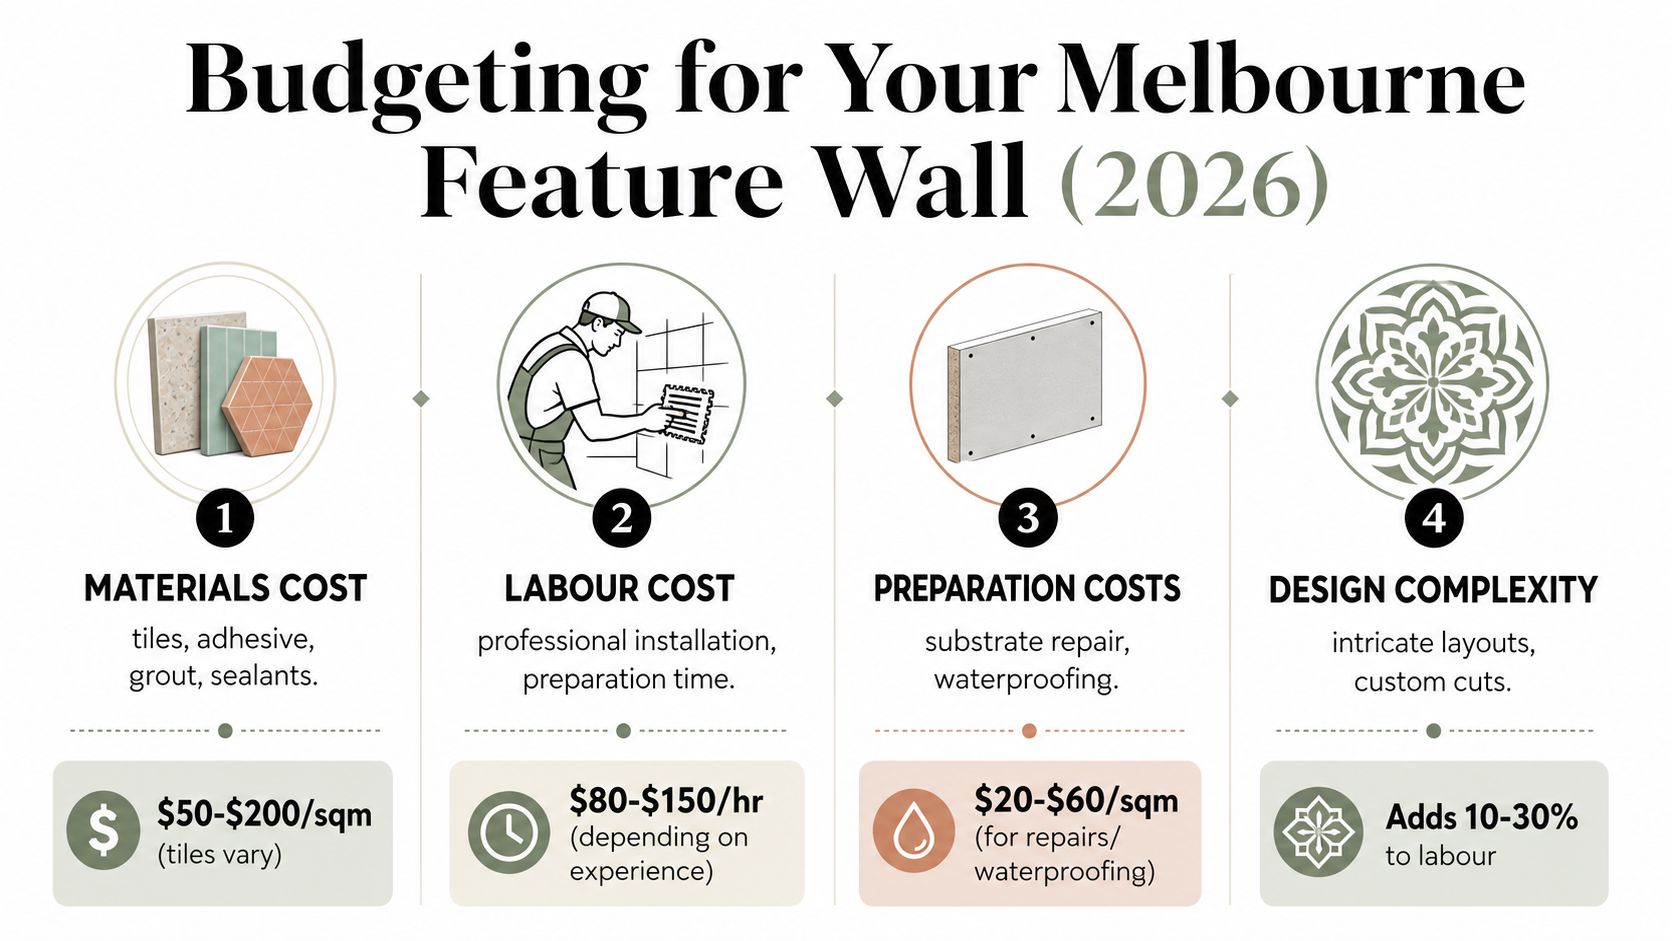
The main cost buckets are materials, labour, preparation, and design complexity. Materials cover the tile, adhesive, grout, and sealants. Labour covers cutting, setting, alignment, finishing, and cleanup. Preparation covers substrate repair, waterproofing, and levelling. Design complexity rises when you add mitred corners, tight herringbone or stacked layouts, shower screen removal, or awkward cuts around niches and vanities.

An infographic detailing the budget factors for installing a Melbourne feature wall including materials, labour, and preparation costs.

Why cheap quotes get expensive later

The cheapest quote is often the one that leaves out the work nobody wants to explain. If the wall needs levelling, if the membrane is thin or incomplete, or if the room needs shower screen removal and refitting, those items show up later as variations. That's where homeowners get caught, because the tile price looked manageable, but the system underneath wasn't priced transparently.

A sensible budget also needs to sit inside the wider renovation context. In Melbourne, many bathrooms and ensuites land around the $10,000 renovation mark for mid-range work, so a feature wall shouldn't be priced in isolation from the rest of the room. If the wall is the statement piece, the rest of the bathroom still has to support it.

Budget checks before you sign

  • Confirm the substrate work: ask whether levelling, patching, or screeding is included.
  • Check waterproofing scope: make sure the membrane detail is priced, not assumed.
  • Ask about corners and trims: mitred edges take time and skill.
  • Clarify removal works: shower screens, old tiles, and rubbish disposal can all alter the quote.
  • Match the material to the wall: a panel that the substrate can't support is a false economy.

If you want the renovation scope managed as a single project, Melbourne Tiling Services P/L handles bathroom and feature wall coordination alongside tiling, waterproofing, and screeding, which is the kind of setup that reduces missed items rather than adding them.

DIY Versus Hiring a Licensed Melbourne Tiler

A feature wall sounds like a finish decision until the wall starts acting like part of the bathroom's wet-area system. That is the point where DIY stops being a casual savings exercise and starts carrying real risk, because the visible tile is only as good as the substrate, waterproofing, and fixings behind it.

What a capable homeowner can handle

A careful homeowner can still do useful work on the front end. Demolition, removing old tiles, basic room prep, and even simple splashback-style tiling in a dry zone can be manageable if the wall is straight and the scope is small. Those jobs take time and effort, but they do not usually carry the same failure risk as a shower wall or an ensuite feature wall.

The practical difference is the setting. A small laundry wall or vanity splashback can tolerate a modest mistake far better than a bathroom wall that sits behind waterproofing or meets regular spray. If the wall is dry, the surface is sound, and the layout is simple, DIY has a place.

Where the licensed trades start to matter

Waterproofing, structural changes, and large-format panel installation are the jobs that deserve a professional from the start. In Victoria, domestic building work for a bathroom renovation must be carried out by a registered builder when the contract price is $10,000 or more, and that is the level many feature-wall bathrooms quickly move into (Victorian domestic building reference). For a homeowner, that affects warranty cover, insurance, and the confidence a buyer or inspector may place in the work later.

A Registered Unlimited Builder can coordinate the trades that have to be sequenced properly, including carpenters, plumbers, electricians, tilers, and waterproofers. That matters most where the wall meets a shower screen, niche, vanity, or an area with past leaks, because each trade can affect the next one if the order is wrong.

DIY saves money only when the scope stays small and the wall remains dry. Once the room becomes wet-area work, the cost of a failed membrane, loose substrate, or poorly set-out feature panel can exceed the labour saved on day one.

For a small feature wall, a capable DIYer can still strip the room, remove rubble, and prepare surfaces for the licensed installer. For an ensuite or main bathroom, the safer move is to leave the wet-area work to a registered professional and use your own effort on the parts that do not sit behind waterproofing.

How Melbourne Tiling Services Plans a Feature Wall Project

A well-run Melbourne project starts with a site visit, not a sales pitch. The first step is usually a free on-site quote, where the wall is measured, the substrate is checked, and the layout constraints are identified before anyone orders material. That saves a lot of guesswork later, especially when the feature wall has to sit cleanly against a vanity, niche, or shower screen.

A professional tiler discussing home renovation project plans with a client using a digital tablet.

The next step is usually design refinement with 3D drawings, so the homeowner can see the wall in context before demolition starts. A renovation calculator then turns the scope into a clearer budget figure, which helps when the job includes more than just tile setting. Material selection follows, then scheduling of the licensed trades needed for the room, including carpenters, plumbers, electricians, tilers, and waterproofers.

When the wall intersects with a leak issue or an awkward enclosure, the same planning process also covers rectification work, shower screen coordination, and cleanup controls. That's the benefit of a Registered Unlimited Builder approach, the work gets sequenced as one renovation rather than a set of disconnected trades. It's also where feature wall tiling stops being guesswork and starts being a managed build.

Maintenance, Longevity and Your Final Decision Checklist

A good feature wall should still look intentional years later, not tired after the first humid summer. The easiest walls to maintain are the ones built with the right material and the right jointing from the start, because cleaning is only one part of the long-term equation.

What lasts and what wears

Porcelain is the easiest of the main wall finishes to keep clean. Natural stone needs more attention because sealing and top-ups become part of the maintenance routine. Grout and silicone are the wear points to watch, especially at corners, edges, and around the shower opening. If you see cracked grout, soft silicone, musty smells, or visible lippage at corners, the wall needs checking, not just wiping.

The final decision checklist

  • Confirm substrate tolerance before you choose a large-format tile.
  • Match the material to the wet area, not just the style board.
  • Treat waterproofing and movement joints as essential.
  • Decide what's DIY and what needs a licensed builder.
  • Read the quote for prep work, not only for the tile price.
  • Ask who coordinates the trades if the wall touches a shower, niche, or screen.

The clearest feature wall is the one that feels simple because the system underneath was done properly. That's the standard worth aiming for in a Melbourne bathroom renovation, whether the wall is porcelain, ceramic, stone, or a large-format panel.


If you're planning bathroom renovations and want the feature wall built as part of a proper wet-area system, Melbourne Tiling Services P/L can assess the substrate, waterproofing, screeding, and tile selection together. Visit Melbourne Tiling Services P/L to organise a quote and discuss a feature wall that's designed to look sharp and hold up in a Melbourne bathroom.

Small Bathroom Renovation Cost: Your Melbourne Guide For

A small bathroom renovation in Melbourne typically starts around $8,000 for a basic job, usually sits at $15,000 to $25,000 for a mid-range finish, and can reach $25,000 to $40,000 for a premium project. If you're pricing a proper renovation rather than a cosmetic touch-up, that's the range you should plan around.

If you're reading this, you're probably standing in a tired ensuite or family bathroom wondering how a room this small can cost so much to renovate. That's a fair question. Small bathrooms look cheaper on paper because there's less floor area, fewer tiles, and less cabinetry. In practice, bathroom renovations still need waterproofing, plumbing, electrical, tiling, and coordination across multiple trades, and those costs don't shrink just because the room does.

Melbourne adds another layer. Compliance matters here, moisture issues in older homes are common, and once your project crosses the legal threshold, registered builders aren't optional. That's why a cheap-looking quote can become an expensive problem later.

Table of Contents

The Real Cost of a Small Bathroom Reno in Melbourne

A lot of homeowners start with the same assumption. It's a compact room, so the small bathroom renovation cost should be modest. That only holds true if you're repainting, swapping a vanity, and leaving the waterproofed shell untouched.

Once you strip the room out and rebuild it properly, the numbers move quickly. For 2026, a small bathroom renovation in Australia for a 3 to 5 m² space sits at $8,000 to $15,000 for a basic finish, $15,000 to $25,000 for mid-range, and $25,000 to $40,000 for premium quality, while the average spend on any bathroom renovation in Australia is about $26,000, according to What's The Damage's small bathroom cost guide.

That gives you the broad market view. In Melbourne, the practical reality is this. A genuine full renovation with compliant waterproofing, licensed trades, and decent fixtures usually doesn't behave like a bargain project.

What changes the number

The first major split is cosmetic refresh versus full renovation.

  • Cosmetic work: Keeping the room largely intact, repainting, changing fittings, and improving appearance without rebuilding the wet area.
  • Full renovation: Demolition, substrate preparation, waterproofing, tiling, plumbing, electrical, fixtures, and finishing.
  • Layout changes: Moving a shower, vanity, or toilet adds complexity fast because more trades need to rework the service locations.

Practical rule: If the room is being stripped back and rebuilt, price it as a construction project, not as a decorating job.

Why Melbourne owners need a realistic baseline

The biggest mistake is budgeting from a national headline number without checking local conditions. Inner and middle-ring Melbourne homes often come with old substrates, out-of-level floors, moisture damage, or previous bathroom work that wasn't done well.

If you want a rough planning tool before requesting quotes, a bathroom renovation cost calculator for Melbourne projects can help you map your likely spend against finish level and scope. It won't replace a site inspection, but it will stop you anchoring to an unrealistic figure.

A Complete Small Bathroom Renovation Cost Breakdown

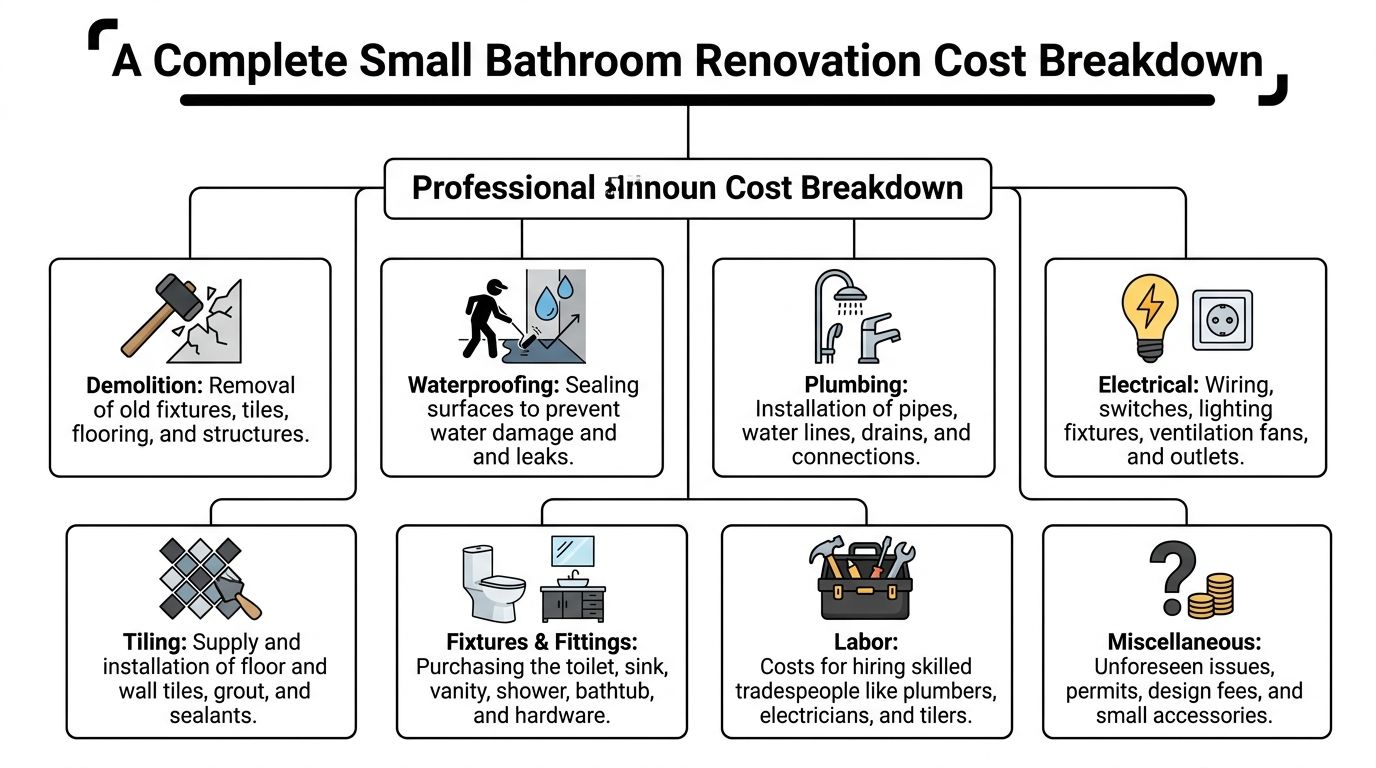
The total price only makes sense when you look at the moving parts. A bathroom quote isn't one cost. It's a stack of trade costs, product selections, and labour hours compressed into a small footprint.

A useful way to think about it is this. The room may be small, but the trade sequence isn't.

A comprehensive infographic illustrating the various cost categories involved in a small bathroom renovation project.

Why small rooms still cost real money

Labour is the main driver. Labour expenses account for 40% to 60% of the total cost to renovate a bathroom in Australia. For a $10,000 small bathroom project, roughly $4,000 to $6,000 goes to trades. Tiling labour costs $45 to $120 per square metre, excluding tiles, and plumbing hourly rates range from $100 to $150, based on Domain's bathroom renovation cost guide.

That matters because the fixed work still has to happen:

  • Demolition and disposal: Old tiles, screed, sheeting, fittings, and waste removal.
  • Plumbing: Disconnect, rough-in, fit-off, and any service adjustments.
  • Electrical: Lighting, exhaust, power points, switches, and compliance.
  • Waterproofing: The wet area has to be prepared and sealed correctly before tile goes down.
  • Tiling and fit-off: The visible finish that everyone notices, but only after the hidden work is done properly.

A small room can feel less forgiving than a larger one. Every cut tile is visible. Falls to waste matter more. Tight tolerances show mistakes immediately.

Here's a visual walkthrough of how those stages come together in a real-world bathroom job.

Typical line-item costs

Below is a practical planning table. It's not a substitute for a formal quote, but it does show where the money usually goes in bathroom renovations.

Item / Trade Budget Range (AUD) Mid-Range Range (AUD)
Waterproofing $500 to $750 $500 to $750
Plumbing $3,000 to $5,500 $3,000 to $5,500
Tiling $3,500 to $6,000 $3,500 to $6,000
Shower screen installation around $400 up to $600
Vanity, cabinetry and fixtures $2,000 to $5,000 $2,000 to $5,000

A few points matter more than the table itself.

The cheapest quote often looks cheaper because something has been left vague, excluded, or pushed into a provisional allowance.

What these allowances usually mean

Waterproofing is rarely where you want to chase the lowest number. If substrate prep is poor or detailing is rushed, the room may look fine at handover and fail later.

Plumbing costs jump when fixtures move. Keeping the shower, vanity, and toilet in their existing positions usually protects the budget better than any styling compromise.

Tiling isn't just tile laying. It includes set-out, cuts, edge details, surface prep, and working with walls and floors that are often not perfectly square.

Fixtures and fittings can considerably sway the project. One off-the-shelf vanity and a standard shower screen keep things controlled. Custom cabinetry, frameless glass, and premium tapware change the result and the spend.

Why a Registered Builder is Essential for Your Melbourne Renovation

In Victoria, one threshold changes the conversation completely. Once your bathroom renovation contract value goes over $10,000, the job must be handled by a Registered Builder. That's not a preference. It's a legal requirement for work scopes that regularly exceed that number.

A professional registered builder wearing a white hard hat and yellow high-visibility vest examining construction blueprints.

The legal line homeowners miss

According to Baron Constructions' Victorian bathroom renovation cost guide, in Victoria, bathroom renovation projects must be undertaken by a Registered Builder if the total contract value exceeds $10,000. That same source notes that small bathroom work scopes often land between $15,000 and $22,000, which means many full bathroom renovations automatically sit above the threshold.

People often get caught when they compare quotes, see one that comes from an unregistered operator, and think they're saving money. What they're often doing is stepping outside the legal framework that protects the homeowner.

If the work isn't set up correctly, insurance can become a problem and liability gets murky very quickly.

What registered builders actually do

A proper renovation isn't one trade turning up with a ute and a tile cutter. It's coordination.

  • Scope control: Registered builders pull the full scope together so demolition, rough-in, waterproofing, tiling, and fit-off happen in the correct sequence.
  • Trade coordination: Plumbers, electricians, waterproofers, carpenters, and tilers need to work to the same plan.
  • Compliance management: Wet areas need to be built to standard, and the paperwork matters as much as the visible finish.
  • Contract clarity: Homeowners need a proper contract, not a vague text message list of inclusions.

For waterproofing in particular, this isn't a casual detail. If you want to understand why wet area compliance carries so much weight in Melbourne, this guide to bathroom waterproofing in Melbourne gives useful context around what proper work should include.

Hiring one person for a whole bathroom sounds simpler. In most full renos, it usually creates gaps between trades, responsibility, and compliance.

The practical difference is peace of mind. Registered builders don't just arrange the work. They own the process in a way that protects the project from becoming a patchwork of assumptions.

Uncovering Hidden Costs and Planning Your Contingency

The quote you receive before demolition is rarely the final financial story. Bathrooms hide problems well. Once tiles come off and the floor is opened up, defects that were invisible from the outside can become impossible to ignore.

That doesn't mean every project blows out. It means smart planning assumes some risk from the start.

What blows out a quote

One of the most overlooked parts of small bathroom renovation cost is the contingency. A hidden 10% to 20% buffer is recommended for Melbourne's moisture and compliance risks, and a $10,000 quote can realistically become $12,000 to $14,000 once issues such as subfloor rot are factored in, based on Site Pro Bathrooms' budget remodel guide.

The common triggers are usually found after demolition:

  • Subfloor damage: Water may have travelled beyond the shower area.
  • Wall straightening: Tiling over badly bowed walls creates visible problems later.
  • Levelling and screeding: Small rooms still need proper falls and levels.
  • Previous poor work: The old bathroom may have failed long before you saw obvious signs.

On-site reality: Hidden damage isn't a variation because someone got the quote wrong. It's work no one can price properly until the room is opened up.

How to budget without getting caught short

The safest approach is to separate your budget into two buckets. One is the planned renovation spend. The other is the contingency you don't touch unless the room demands it.

That buffer matters more in older Melbourne properties, where bathrooms have often been renovated more than once and not always to the same standard. A room can look serviceable and still have compromised substrate, poor falls, or failed membrane work underneath.

If compliance paperwork is part of your planning, this overview of a Victorian waterproofing compliance certificate is worth reading before you sign a contract. It helps you ask sharper questions about what is, and isn't, included in a quote.

A tight budget isn't the problem. A tight budget with no contingency is.

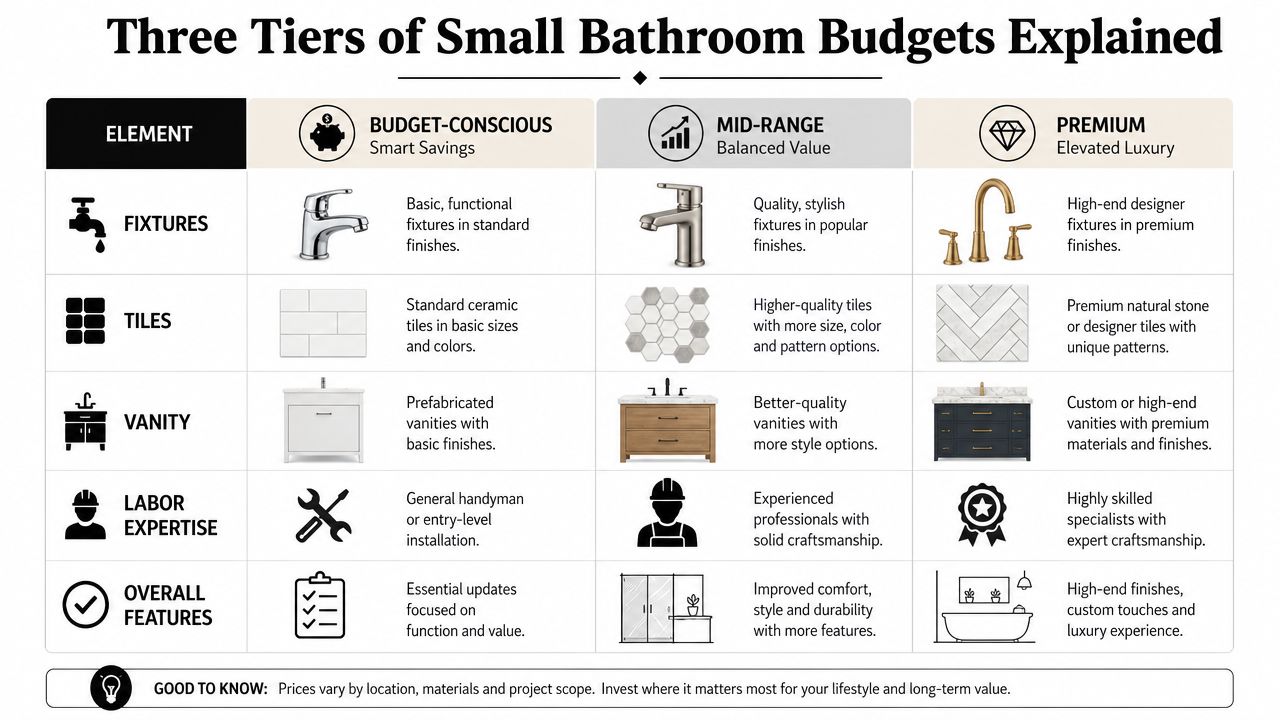
Three Tiers of Small Bathroom Budgets Explained

Most homeowners don't need more numbers. They need a clearer picture of what each price band buys.

For 2026, a small bathroom renovation in Australia for a 3 to 5 m² room typically costs $8,000 to $15,000 for basic, $15,000 to $25,000 for mid-range, and $25,000 to $40,000 for premium, with the tier mainly driven by finish and fixture quality rather than huge changes to the fixed trade cost base, according to What's The Damage's bathroom reno budget breakdown.

A comparison chart outlining three tiers of small bathroom renovation budgets: Budget-Conscious, Mid-Range, and Premium.

Budget-conscious

This tier is about restraint, not cutting corners. The best version keeps the existing layout, avoids custom joinery, and uses standard fittings that are easy to source and replace later.

Typical choices often include:

  • Standard ceramic tiles
  • Off-the-shelf vanity
  • Basic shower screen
  • Simple tapware and accessories

What works here is discipline. Pick clean, durable finishes and don't chase too many feature details in one small room.

What doesn't work is trying to make a budget renovation look premium by mixing in one or two expensive pieces while keeping everything else at the lowest spec. The room ends up visually uneven.

Mid-range

Most Melbourne homeowners opt for this level of renovation when they want a bathroom that feels properly renovated rather than merely updated. The finishes are more refined, the tile selection is stronger, and the overall fit-out feels intentional.

A mid-range job usually suits owners who want:

  1. Better tile choice and cleaner detailing
  2. A vanity that improves storage and proportion
  3. Nicer fittings in the areas you touch every day
  4. A result that still feels current years from now

You don't need extravagance to get a strong result. You need a cohesive palette, good set-out, and trades who know how to finish a wet area neatly.

Premium

Premium projects aren't defined by size. They're defined by finish level, detail, and often by how much custom work is involved.

Premium spend usually goes into the things homeowners notice every day. Better tile, cleaner glass, stronger vanity design, more precise detailing, and less compromise.

That can mean frameless glass, custom joinery, premium porcelain, feature niches, upgraded tapware, and a tighter architectural feel. It can also mean more labour because premium products often need more careful installation.

The mistake here is assuming premium only means expensive products. In reality, premium bathrooms are built on planning, proportion, and workmanship. If the detailing is poor, high-end fixtures won't rescue the room.

Smart Strategies to Save on Your Renovation Budget

Saving money on a bathroom isn't about finding the cheapest line on a quote. It's about protecting the parts that matter and simplifying the parts that don't.

The smartest budget reductions happen before work begins, when decisions are still cheap to change.

Savings that work

  • Keep the plumbing layout where it is: If the shower, toilet, and vanity stay put, the project is usually much easier to control.
  • Choose standard-sized fixtures: Standard vanities, shower screens, and mirrors are easier to source and easier to replace later.
  • Use one hero finish, not five: A well-chosen tile or vanity can carry the room without layering every surface in a premium product.
  • Simplify tile patterns: Straight lay or larger-format planning can reduce complexity compared with layouts that involve heavy cutting and intricate borders.
  • Decide early: Late product changes create friction across multiple trades and often push labour time out.

A good budget bathroom doesn't feel cheap. It feels edited.

Savings that usually backfire

Some cost-cutting choices look sensible and then create avoidable problems.

  • DIY in waterproofed areas: Wet areas are not the place for experimentation.
  • Buying fittings without checking compatibility: Cheap online fixtures can create delays if rough-in requirements don't match the plan.
  • Changing products mid-job: A discontinued tile, delayed vanity, or revised shower screen size can force rework.
  • Choosing solely on quote total: If inclusions are thin, you'll pay later through variations or compromised finish quality.

Spend where failure is expensive. Save where appearance can be simplified without affecting performance.

The best conversations with builders are specific. Ask what happens if you keep the layout. Ask whether a standard shower screen works better than a custom one. Ask which tile sizes install cleanly in your room. Those questions usually save more money than haggling over a headline number.

From Timeline to Trowel How to Plan Your Project

The cleanest bathroom renovations are usually the best-planned ones. Not the most expensive ones. Not the most ambitious ones.

Once the scope is settled, the process becomes much easier to manage.

Get the scope right before work starts

Start with the essentials. Do you need a full strip-out or a lighter refresh? Are you keeping the layout? Are there any products you already know you want, such as frameless glass, a wall-hung vanity, or large-format porcelain?

Then get the project documented properly. That means a clear quote, a written scope, and product selections that match the budget you're willing to carry.

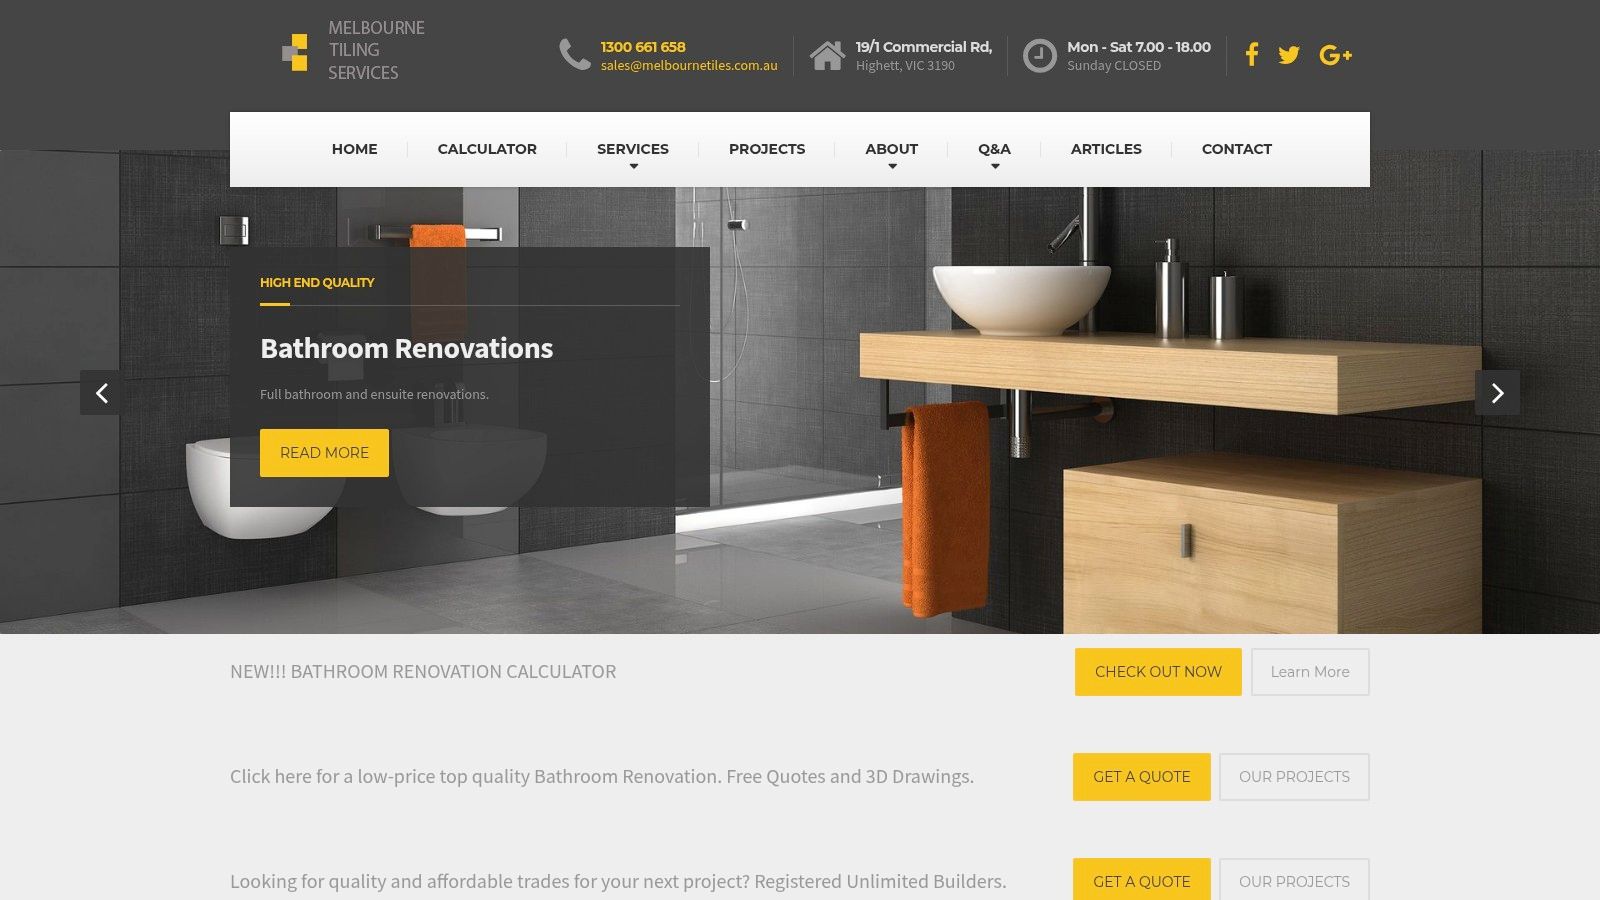
This kind of visual planning helps homeowners make better decisions before demolition starts.

Screenshot from https://melbournetilingservices.com.au

Build decisions in the right order

The order matters more than people expect.

  1. Lock the layout first
    Every later choice depends on fixture positions.

  2. Confirm finishes second
    Tiles, shower screen type, vanity style, and tapware affect both labour and lead times.

  3. Check compliance early
    Builder registration, waterproofing scope, and documentation shouldn't be afterthoughts.

  4. Allow for site reality
    Once demolition starts, the room may reveal work that wasn't visible beforehand.

A small bathroom can move quickly when the decisions are made upfront and the trades are coordinated properly. It drags when the design is still changing after the room has been stripped out.

If you want a smoother job, get the selections, scope, and legal setup right before the first tile comes off the wall.


If you're planning bathroom renovations in Melbourne and want straight advice from registered builders who handle the full scope from design through waterproofing, tiling, and fit-off, Melbourne Tiling Services P/L is worth contacting for a detailed quote. They offer practical planning support, transparent scopes, and the kind of on-the-ground experience that helps homeowners avoid expensive mistakes before the work begins.

Small Bathroom Renovation Cost: Your Melbourne Guide For

A small bathroom renovation in Melbourne typically starts around $8,000 for a basic job, usually sits at $15,000 to $25,000 for a mid-range finish, and can reach $25,000 to $40,000 for a premium project. If you're pricing a proper renovation rather than a cosmetic touch-up, that's the range you should plan around.

If you're reading this, you're probably standing in a tired ensuite or family bathroom wondering how a room this small can cost so much to renovate. That's a fair question. Small bathrooms look cheaper on paper because there's less floor area, fewer tiles, and less cabinetry. In practice, bathroom renovations still need waterproofing, plumbing, electrical, tiling, and coordination across multiple trades, and those costs don't shrink just because the room does.

Melbourne adds another layer. Compliance matters here, moisture issues in older homes are common, and once your project crosses the legal threshold, registered builders aren't optional. That's why a cheap-looking quote can become an expensive problem later.

Table of Contents

The Real Cost of a Small Bathroom Reno in Melbourne

A lot of homeowners start with the same assumption. It's a compact room, so the small bathroom renovation cost should be modest. That only holds true if you're repainting, swapping a vanity, and leaving the waterproofed shell untouched.

Once you strip the room out and rebuild it properly, the numbers move quickly. For 2026, a small bathroom renovation in Australia for a 3 to 5 m² space sits at $8,000 to $15,000 for a basic finish, $15,000 to $25,000 for mid-range, and $25,000 to $40,000 for premium quality, while the average spend on any bathroom renovation in Australia is about $26,000, according to What's The Damage's small bathroom cost guide.

That gives you the broad market view. In Melbourne, the practical reality is this. A genuine full renovation with compliant waterproofing, licensed trades, and decent fixtures usually doesn't behave like a bargain project.

What changes the number

The first major split is cosmetic refresh versus full renovation.

  • Cosmetic work: Keeping the room largely intact, repainting, changing fittings, and improving appearance without rebuilding the wet area.
  • Full renovation: Demolition, substrate preparation, waterproofing, tiling, plumbing, electrical, fixtures, and finishing.
  • Layout changes: Moving a shower, vanity, or toilet adds complexity fast because more trades need to rework the service locations.

Practical rule: If the room is being stripped back and rebuilt, price it as a construction project, not as a decorating job.

Why Melbourne owners need a realistic baseline

The biggest mistake is budgeting from a national headline number without checking local conditions. Inner and middle-ring Melbourne homes often come with old substrates, out-of-level floors, moisture damage, or previous bathroom work that wasn't done well.

If you want a rough planning tool before requesting quotes, a bathroom renovation cost calculator for Melbourne projects can help you map your likely spend against finish level and scope. It won't replace a site inspection, but it will stop you anchoring to an unrealistic figure.

A Complete Small Bathroom Renovation Cost Breakdown

The total price only makes sense when you look at the moving parts. A bathroom quote isn't one cost. It's a stack of trade costs, product selections, and labour hours compressed into a small footprint.

A useful way to think about it is this. The room may be small, but the trade sequence isn't.

A comprehensive infographic illustrating the various cost categories involved in a small bathroom renovation project.

Why small rooms still cost real money

Labour is the main driver. Labour expenses account for 40% to 60% of the total cost to renovate a bathroom in Australia. For a $10,000 small bathroom project, roughly $4,000 to $6,000 goes to trades. Tiling labour costs $45 to $120 per square metre, excluding tiles, and plumbing hourly rates range from $100 to $150, based on Domain's bathroom renovation cost guide.

That matters because the fixed work still has to happen:

  • Demolition and disposal: Old tiles, screed, sheeting, fittings, and waste removal.
  • Plumbing: Disconnect, rough-in, fit-off, and any service adjustments.
  • Electrical: Lighting, exhaust, power points, switches, and compliance.
  • Waterproofing: The wet area has to be prepared and sealed correctly before tile goes down.
  • Tiling and fit-off: The visible finish that everyone notices, but only after the hidden work is done properly.

A small room can feel less forgiving than a larger one. Every cut tile is visible. Falls to waste matter more. Tight tolerances show mistakes immediately.

Here's a visual walkthrough of how those stages come together in a real-world bathroom job.

Typical line-item costs

Below is a practical planning table. It's not a substitute for a formal quote, but it does show where the money usually goes in bathroom renovations.

Item / Trade Budget Range (AUD) Mid-Range Range (AUD)
Waterproofing $500 to $750 $500 to $750
Plumbing $3,000 to $5,500 $3,000 to $5,500
Tiling $3,500 to $6,000 $3,500 to $6,000
Shower screen installation around $400 up to $600
Vanity, cabinetry and fixtures $2,000 to $5,000 $2,000 to $5,000

A few points matter more than the table itself.

The cheapest quote often looks cheaper because something has been left vague, excluded, or pushed into a provisional allowance.

What these allowances usually mean

Waterproofing is rarely where you want to chase the lowest number. If substrate prep is poor or detailing is rushed, the room may look fine at handover and fail later.

Plumbing costs jump when fixtures move. Keeping the shower, vanity, and toilet in their existing positions usually protects the budget better than any styling compromise.

Tiling isn't just tile laying. It includes set-out, cuts, edge details, surface prep, and working with walls and floors that are often not perfectly square.

Fixtures and fittings can considerably sway the project. One off-the-shelf vanity and a standard shower screen keep things controlled. Custom cabinetry, frameless glass, and premium tapware change the result and the spend.

Why a Registered Builder is Essential for Your Melbourne Renovation

In Victoria, one threshold changes the conversation completely. Once your bathroom renovation contract value goes over $10,000, the job must be handled by a Registered Builder. That's not a preference. It's a legal requirement for work scopes that regularly exceed that number.

A professional registered builder wearing a white hard hat and yellow high-visibility vest examining construction blueprints.

The legal line homeowners miss

According to Baron Constructions' Victorian bathroom renovation cost guide, in Victoria, bathroom renovation projects must be undertaken by a Registered Builder if the total contract value exceeds $10,000. That same source notes that small bathroom work scopes often land between $15,000 and $22,000, which means many full bathroom renovations automatically sit above the threshold.

People often get caught when they compare quotes, see one that comes from an unregistered operator, and think they're saving money. What they're often doing is stepping outside the legal framework that protects the homeowner.

If the work isn't set up correctly, insurance can become a problem and liability gets murky very quickly.

What registered builders actually do

A proper renovation isn't one trade turning up with a ute and a tile cutter. It's coordination.

  • Scope control: Registered builders pull the full scope together so demolition, rough-in, waterproofing, tiling, and fit-off happen in the correct sequence.
  • Trade coordination: Plumbers, electricians, waterproofers, carpenters, and tilers need to work to the same plan.
  • Compliance management: Wet areas need to be built to standard, and the paperwork matters as much as the visible finish.
  • Contract clarity: Homeowners need a proper contract, not a vague text message list of inclusions.

For waterproofing in particular, this isn't a casual detail. If you want to understand why wet area compliance carries so much weight in Melbourne, this guide to bathroom waterproofing in Melbourne gives useful context around what proper work should include.

Hiring one person for a whole bathroom sounds simpler. In most full renos, it usually creates gaps between trades, responsibility, and compliance.

The practical difference is peace of mind. Registered builders don't just arrange the work. They own the process in a way that protects the project from becoming a patchwork of assumptions.

Uncovering Hidden Costs and Planning Your Contingency

The quote you receive before demolition is rarely the final financial story. Bathrooms hide problems well. Once tiles come off and the floor is opened up, defects that were invisible from the outside can become impossible to ignore.

That doesn't mean every project blows out. It means smart planning assumes some risk from the start.

What blows out a quote

One of the most overlooked parts of small bathroom renovation cost is the contingency. A hidden 10% to 20% buffer is recommended for Melbourne's moisture and compliance risks, and a $10,000 quote can realistically become $12,000 to $14,000 once issues such as subfloor rot are factored in, based on Site Pro Bathrooms' budget remodel guide.

The common triggers are usually found after demolition:

  • Subfloor damage: Water may have travelled beyond the shower area.
  • Wall straightening: Tiling over badly bowed walls creates visible problems later.
  • Levelling and screeding: Small rooms still need proper falls and levels.
  • Previous poor work: The old bathroom may have failed long before you saw obvious signs.

On-site reality: Hidden damage isn't a variation because someone got the quote wrong. It's work no one can price properly until the room is opened up.

How to budget without getting caught short

The safest approach is to separate your budget into two buckets. One is the planned renovation spend. The other is the contingency you don't touch unless the room demands it.

That buffer matters more in older Melbourne properties, where bathrooms have often been renovated more than once and not always to the same standard. A room can look serviceable and still have compromised substrate, poor falls, or failed membrane work underneath.

If compliance paperwork is part of your planning, this overview of a Victorian waterproofing compliance certificate is worth reading before you sign a contract. It helps you ask sharper questions about what is, and isn't, included in a quote.

A tight budget isn't the problem. A tight budget with no contingency is.

Three Tiers of Small Bathroom Budgets Explained

Most homeowners don't need more numbers. They need a clearer picture of what each price band buys.

For 2026, a small bathroom renovation in Australia for a 3 to 5 m² room typically costs $8,000 to $15,000 for basic, $15,000 to $25,000 for mid-range, and $25,000 to $40,000 for premium, with the tier mainly driven by finish and fixture quality rather than huge changes to the fixed trade cost base, according to What's The Damage's bathroom reno budget breakdown.

A comparison chart outlining three tiers of small bathroom renovation budgets: Budget-Conscious, Mid-Range, and Premium.

Budget-conscious

This tier is about restraint, not cutting corners. The best version keeps the existing layout, avoids custom joinery, and uses standard fittings that are easy to source and replace later.

Typical choices often include:

  • Standard ceramic tiles
  • Off-the-shelf vanity
  • Basic shower screen
  • Simple tapware and accessories

What works here is discipline. Pick clean, durable finishes and don't chase too many feature details in one small room.

What doesn't work is trying to make a budget renovation look premium by mixing in one or two expensive pieces while keeping everything else at the lowest spec. The room ends up visually uneven.

Mid-range

Most Melbourne homeowners opt for this level of renovation when they want a bathroom that feels properly renovated rather than merely updated. The finishes are more refined, the tile selection is stronger, and the overall fit-out feels intentional.

A mid-range job usually suits owners who want:

  1. Better tile choice and cleaner detailing
  2. A vanity that improves storage and proportion
  3. Nicer fittings in the areas you touch every day
  4. A result that still feels current years from now

You don't need extravagance to get a strong result. You need a cohesive palette, good set-out, and trades who know how to finish a wet area neatly.

Premium

Premium projects aren't defined by size. They're defined by finish level, detail, and often by how much custom work is involved.

Premium spend usually goes into the things homeowners notice every day. Better tile, cleaner glass, stronger vanity design, more precise detailing, and less compromise.

That can mean frameless glass, custom joinery, premium porcelain, feature niches, upgraded tapware, and a tighter architectural feel. It can also mean more labour because premium products often need more careful installation.

The mistake here is assuming premium only means expensive products. In reality, premium bathrooms are built on planning, proportion, and workmanship. If the detailing is poor, high-end fixtures won't rescue the room.

Smart Strategies to Save on Your Renovation Budget

Saving money on a bathroom isn't about finding the cheapest line on a quote. It's about protecting the parts that matter and simplifying the parts that don't.

The smartest budget reductions happen before work begins, when decisions are still cheap to change.

Savings that work

  • Keep the plumbing layout where it is: If the shower, toilet, and vanity stay put, the project is usually much easier to control.
  • Choose standard-sized fixtures: Standard vanities, shower screens, and mirrors are easier to source and easier to replace later.
  • Use one hero finish, not five: A well-chosen tile or vanity can carry the room without layering every surface in a premium product.
  • Simplify tile patterns: Straight lay or larger-format planning can reduce complexity compared with layouts that involve heavy cutting and intricate borders.
  • Decide early: Late product changes create friction across multiple trades and often push labour time out.

A good budget bathroom doesn't feel cheap. It feels edited.

Savings that usually backfire

Some cost-cutting choices look sensible and then create avoidable problems.

  • DIY in waterproofed areas: Wet areas are not the place for experimentation.
  • Buying fittings without checking compatibility: Cheap online fixtures can create delays if rough-in requirements don't match the plan.
  • Changing products mid-job: A discontinued tile, delayed vanity, or revised shower screen size can force rework.
  • Choosing solely on quote total: If inclusions are thin, you'll pay later through variations or compromised finish quality.

Spend where failure is expensive. Save where appearance can be simplified without affecting performance.

The best conversations with builders are specific. Ask what happens if you keep the layout. Ask whether a standard shower screen works better than a custom one. Ask which tile sizes install cleanly in your room. Those questions usually save more money than haggling over a headline number.

From Timeline to Trowel How to Plan Your Project

The cleanest bathroom renovations are usually the best-planned ones. Not the most expensive ones. Not the most ambitious ones.

Once the scope is settled, the process becomes much easier to manage.

Get the scope right before work starts

Start with the essentials. Do you need a full strip-out or a lighter refresh? Are you keeping the layout? Are there any products you already know you want, such as frameless glass, a wall-hung vanity, or large-format porcelain?

Then get the project documented properly. That means a clear quote, a written scope, and product selections that match the budget you're willing to carry.

This kind of visual planning helps homeowners make better decisions before demolition starts.

Screenshot from https://melbournetilingservices.com.au

Build decisions in the right order

The order matters more than people expect.

  1. Lock the layout first
    Every later choice depends on fixture positions.

  2. Confirm finishes second
    Tiles, shower screen type, vanity style, and tapware affect both labour and lead times.

  3. Check compliance early
    Builder registration, waterproofing scope, and documentation shouldn't be afterthoughts.

  4. Allow for site reality
    Once demolition starts, the room may reveal work that wasn't visible beforehand.

A small bathroom can move quickly when the decisions are made upfront and the trades are coordinated properly. It drags when the design is still changing after the room has been stripped out.

If you want a smoother job, get the selections, scope, and legal setup right before the first tile comes off the wall.


If you're planning bathroom renovations in Melbourne and want straight advice from registered builders who handle the full scope from design through waterproofing, tiling, and fit-off, Melbourne Tiling Services P/L is worth contacting for a detailed quote. They offer practical planning support, transparent scopes, and the kind of on-the-ground experience that helps homeowners avoid expensive mistakes before the work begins.

Expert Tilers Sunshine Coast: Your 2026 Renovation Guide

You're probably doing what most Sunshine Coast homeowners do at the start of a bathroom project. You search for tilers, save a few photos, request a couple of quotes, and try to work out why one price looks sharp, another feels vague, and a third contractor starts asking questions about waterproofing, screeds, and who's managing plumbing.

That confusion matters because a bathroom renovation isn't just a tiling job with better fixtures. In a coastal setting, the finish you see is only as good as the preparation underneath it. If the floor isn't flat, if the membrane isn't handled properly, or if trades arrive out of sequence, the room can look excellent at handover and still fail early.

The labour market doesn't make that choice any easier. The broader Australian construction industry faces a critical shortfall of approximately 12,000 qualified wall and floor tilers nationally in 2026, which often translates to higher labour premiums and potential scheduling delays for homeowners, according to the 2026 tiler shortage report. Good trades are busy. The best ones usually aren't available next week.

That's why the smartest way to approach tilers on the Sunshine Coast is to think bigger than tile selection and per-square-metre rates. Start by deciding whether you need a standalone tiler or someone who can run the whole renovation properly, the way full-scope bathroom renovation and tiling services are typically coordinated on more complex jobs.

Table of Contents

Your Sunshine Coast Renovation Starts Here

A lot of bathroom projects begin with a simple assumption. The tiles are old, the shower leaks a bit, the vanity feels tired, so hiring a tiler should sort it out. Sometimes that's true. If the room is otherwise sound and you're only replacing finishes, a capable tiler may be exactly the right trade.

But many bathrooms on the Sunshine Coast aren't that simple. The old substrate may be out of level, the shower area may need rectification, and the existing layout might no longer suit how the household uses the space. Once plumbing, waterproofing, demolition, and fixture coordination enter the picture, the job stops being “just tiling”.

What homeowners usually run into first

The first quote often focuses on visible surfaces. You'll see line items for floor tiling, wall tiling, perhaps feature work, and maybe removal. What's often less clear is who checks the substrate, who signs off on sequencing, and who takes responsibility if another trade's work compromises the tile finish later.

That's the point where many homeowners get stuck. A solo tiler may do excellent laying work, but if no one owns the whole renovation, gaps appear fast.

Practical rule: If multiple trades are involved, someone needs clear responsibility for programming, compliance, and final finish quality.

Why booking the right professional matters more now

With skilled labour under pressure nationally, rushed decisions usually cost more than patient ones. Good tradespeople can be selective. They'll often prioritise projects with a clear scope, realistic access, and a client who understands that quality bathrooms are built in layers, not rushed in one pass.

On the Sunshine Coast, that matters even more because bathrooms live in a humid, coastal environment. Materials move, moisture lingers, and weak preparation gets exposed. Choosing between tilers on the Sunshine Coast isn't only about finding someone available. It's about finding someone who recognises where a standard tile install ends and where renovation risk begins.

The better starting question

Instead of asking, “Who can tile my bathroom?”, ask this first:

  • Is this a tiling job or a renovation job
  • Who is managing waterproofing and trade sequence
  • Who carries responsibility if defects show up after completion
  • Is the quote based on existing conditions, or assumptions that may change after demolition

Those questions will tell you far more than a polished gallery ever will.

Why a Licensed Builder is Key for Bathroom Renovations

A bathroom renovation has moving parts that need control, not just attendance. Tiles go in near the end. Long before that, someone has to manage demolition, rough-ins, substrate preparation, waterproofing, set-out, and fit-off. If those stages aren't coordinated properly, the final tiling can't rescue the result.

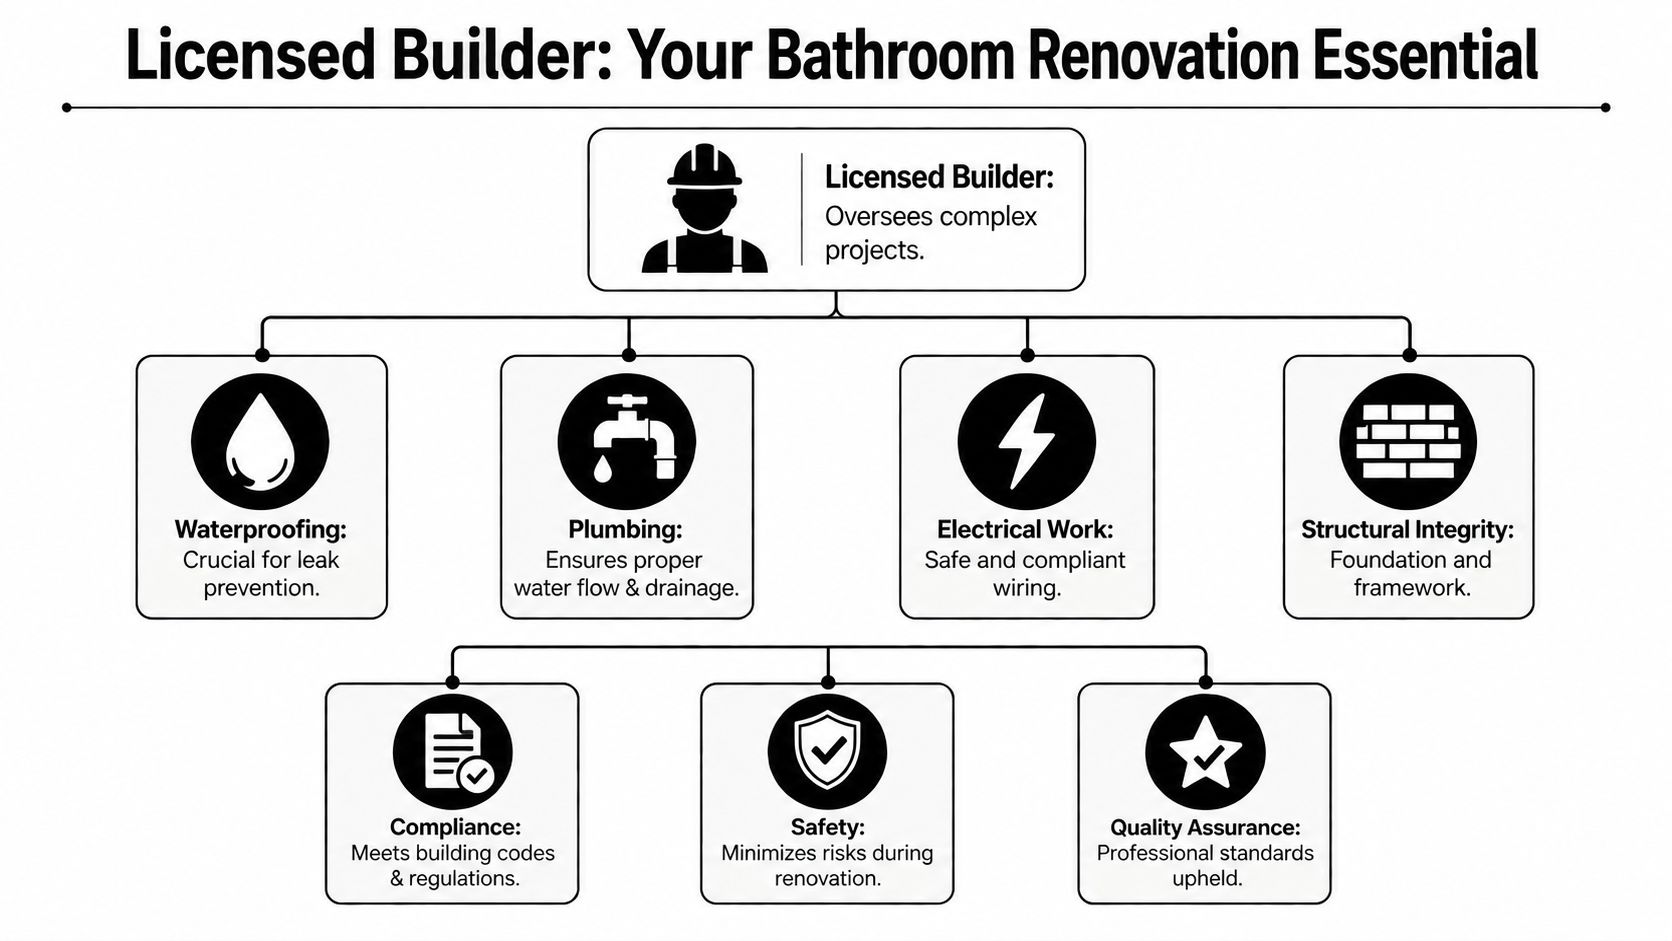
A diagram illustrating the essential roles of a licensed builder in managing professional bathroom renovation projects.

A solo tiler and a renovation lead are not the same role

A solo tiler is usually engaged to tile. A licensed builder managing bathroom renovations is engaged to deliver the whole room. That difference sounds obvious, but it changes accountability completely.

If the walls are out, if the falls are wrong, or if the plumbing penetrations aren't ready, a standalone tiler can only work with what's there or stop and wait. A builder-led renovation model reduces that drift because one party controls sequencing and trade interfaces from the start.

Why the builder model protects the job

In regulated states like Victoria, any domestic building work contract exceeding $10,000 legally requires a registered builder, and using a fully licensed contractor for major renovations is presented as the safest way to protect your investment in the Victorian bathroom renovation guide. Queensland doesn't mirror Victoria exactly, but the principle still holds. When a bathroom is being rebuilt rather than merely retiled, builder-level oversight is the safer model.

Here's where that matters in practice:

Project issue Solo tiler approach Licensed builder approach
Plumbing delays Waits for plumber Reprograms job and coordinates access
Waterproofing scope confusion May rely on others Clarifies scope before tiling starts
Defect responsibility Can become fragmented One lead contractor manages resolution
Layout changes mid-project Limited authority Can assess broader renovation impact

What tends to go wrong without one lead contractor

Separate trades can all be competent and still produce a poor result if no one is running the job. The plumber may finish late. The waterproofer may arrive before prep is complete. The tiler may inherit a floor that should have been corrected earlier. Then every trade starts protecting its own scope instead of the room as a whole.

The cleanest bathrooms are usually built by teams with one person making final calls on sequence, standards, and handover quality.

For homeowners comparing tilers on the Sunshine Coast, this is the key distinction. If you're replacing a splashback or laying a small floor, a tiler may be enough. If you're doing a full bathroom renovation, a licensed builder is often the difference between a coordinated project and a chain of subcontractor assumptions.

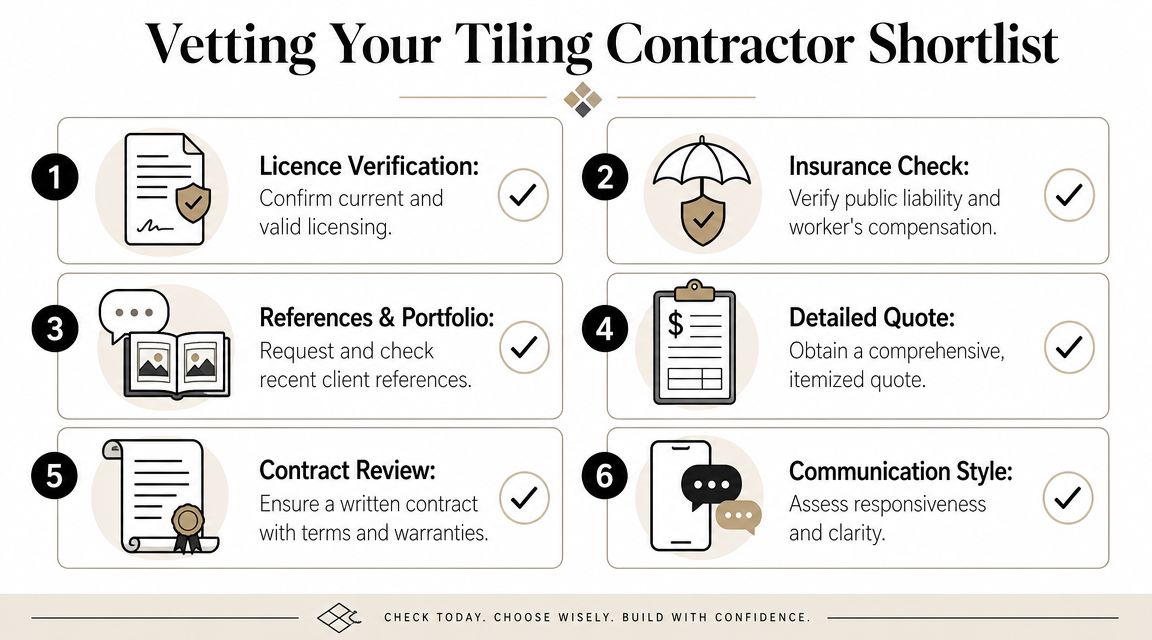
How to Choose the Best Tilers on the Sunshine Coast

Once you know whether you need a tiler or a renovation lead, the shortlist gets easier. The next step is filtering out quotes that look acceptable on paper but won't hold up once demolition starts.

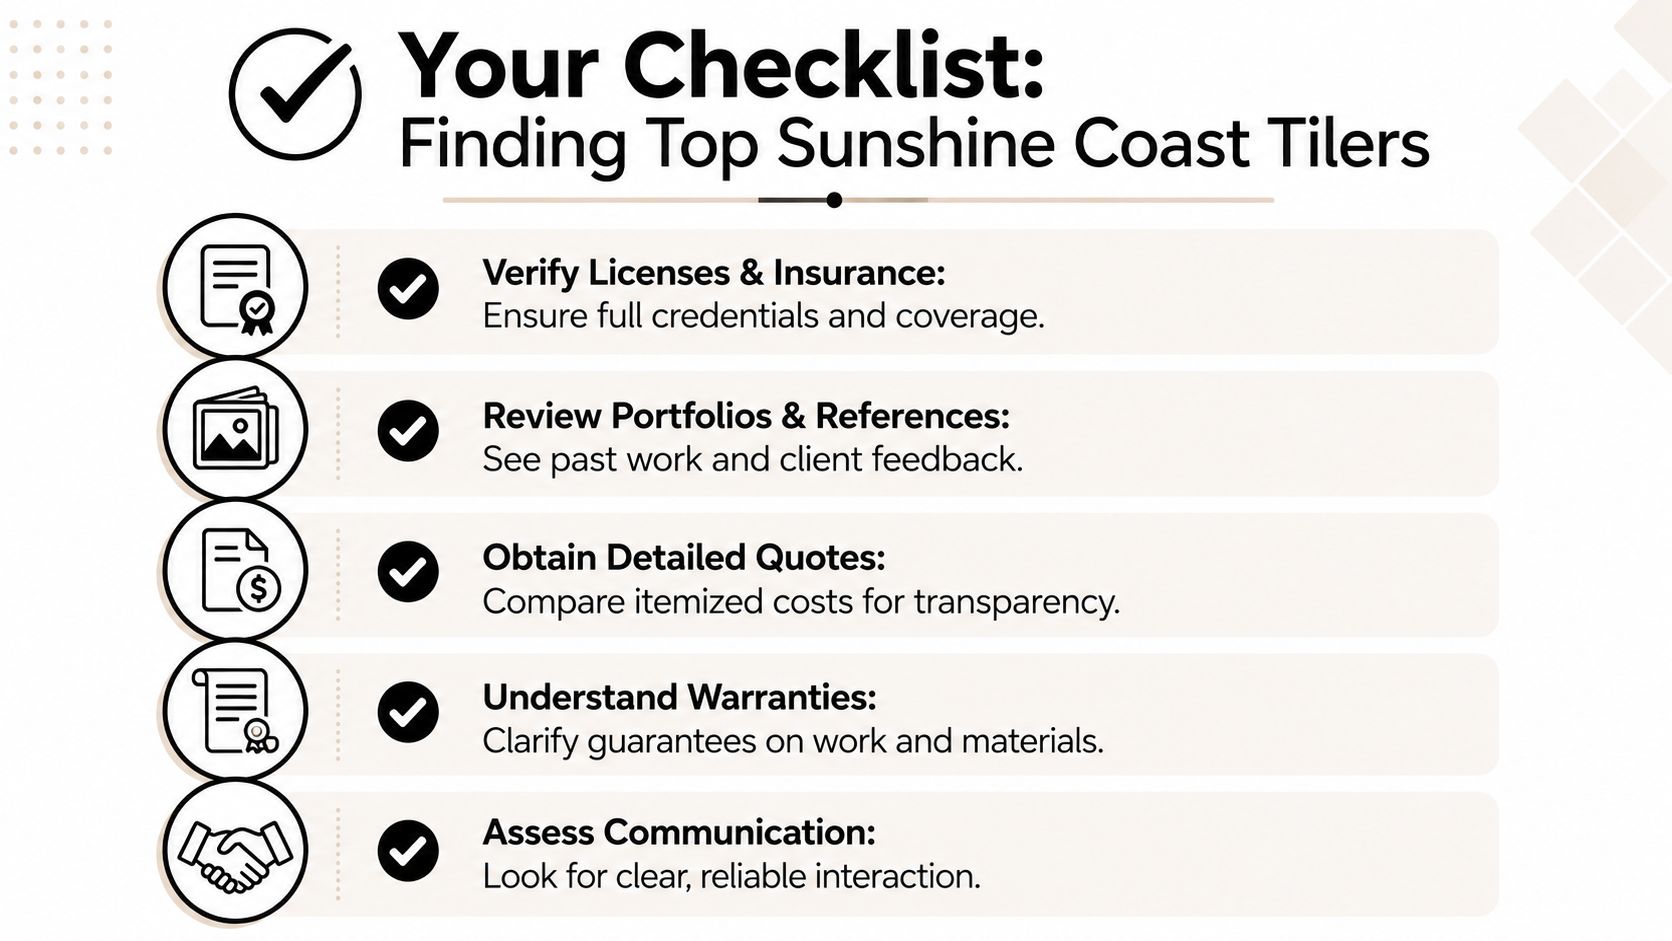
A checklist for choosing top-rated tilers on the Sunshine Coast with steps like verifying insurance and warranties.

Start with credentials, then move to evidence

Before you discuss tile patterns or grout colour, verify the contractor's licence status and make sure the scope they're proposing matches the work you want done. If they're quoting a renovation, they should be able to explain exactly who manages demolition, waterproofing, plumbing, and electrical coordination.

Insurance matters too. Public liability should be current, and the contractor should be comfortable discussing who is responsible for each stage of the work.

Review the portfolio with the right questions

A portfolio should show more than pretty finished rooms. Look for evidence that the contractor understands full wet-area work, not just the decorative layer. If you're assessing examples of local tiling contractors near you, ask what happened before the photos were taken.

Use this checklist:

  • Ask what was corrected before tiling: Was the floor self-levelled, screeded, or rebuilt in parts?
  • Check for large-format experience: Bigger porcelain tile demands tighter prep and cleaner set-out than smaller ceramics.
  • Look at junctions and edges: Niches, returns, trims, and transitions reveal care faster than hero shots do.
  • Request local references: A contractor should be able to point to nearby work and explain the project type.
  • Read the quote line by line: Vague wording around prep and waterproofing usually creates disputes later.

Pay attention to how they communicate

Good contractors ask specific questions. They'll want to know whether you're changing the layout, keeping fixtures in place, supplying tiles yourself, or working around access issues. That isn't overcomplication. That's job control.

Poor communication early usually becomes poor communication on site. If someone can't explain their scope clearly before the deposit, don't expect better once the room is stripped out.

“A clear quote is usually a sign of a clear process.”

Red flags worth taking seriously

Some warning signs show up fast:

  • Extremely fast availability: Sometimes that's luck. Sometimes it means the schedule is empty for a reason.
  • One-price-only quoting: If there's no discussion of possible substrate issues, the number may not survive demolition.
  • No mention of waterproofing responsibility: Wet-area work needs explicit ownership.
  • Dismissive answers about prep: Tile doesn't hide movement, poor falls, or unstable backgrounds for long.

The best tilers on the Sunshine Coast don't just sell neat lines. They show how they'll control the conditions that make neat lines last.

Understanding Tiling and Renovation Costs

Pricing gets messy when homeowners compare unlike scopes. One quote may cover tile laying only. Another may include removal, prep, screeding, and full bathroom coordination. If you don't separate labour, materials, and renovation management, the cheapest number can be the most expensive decision.

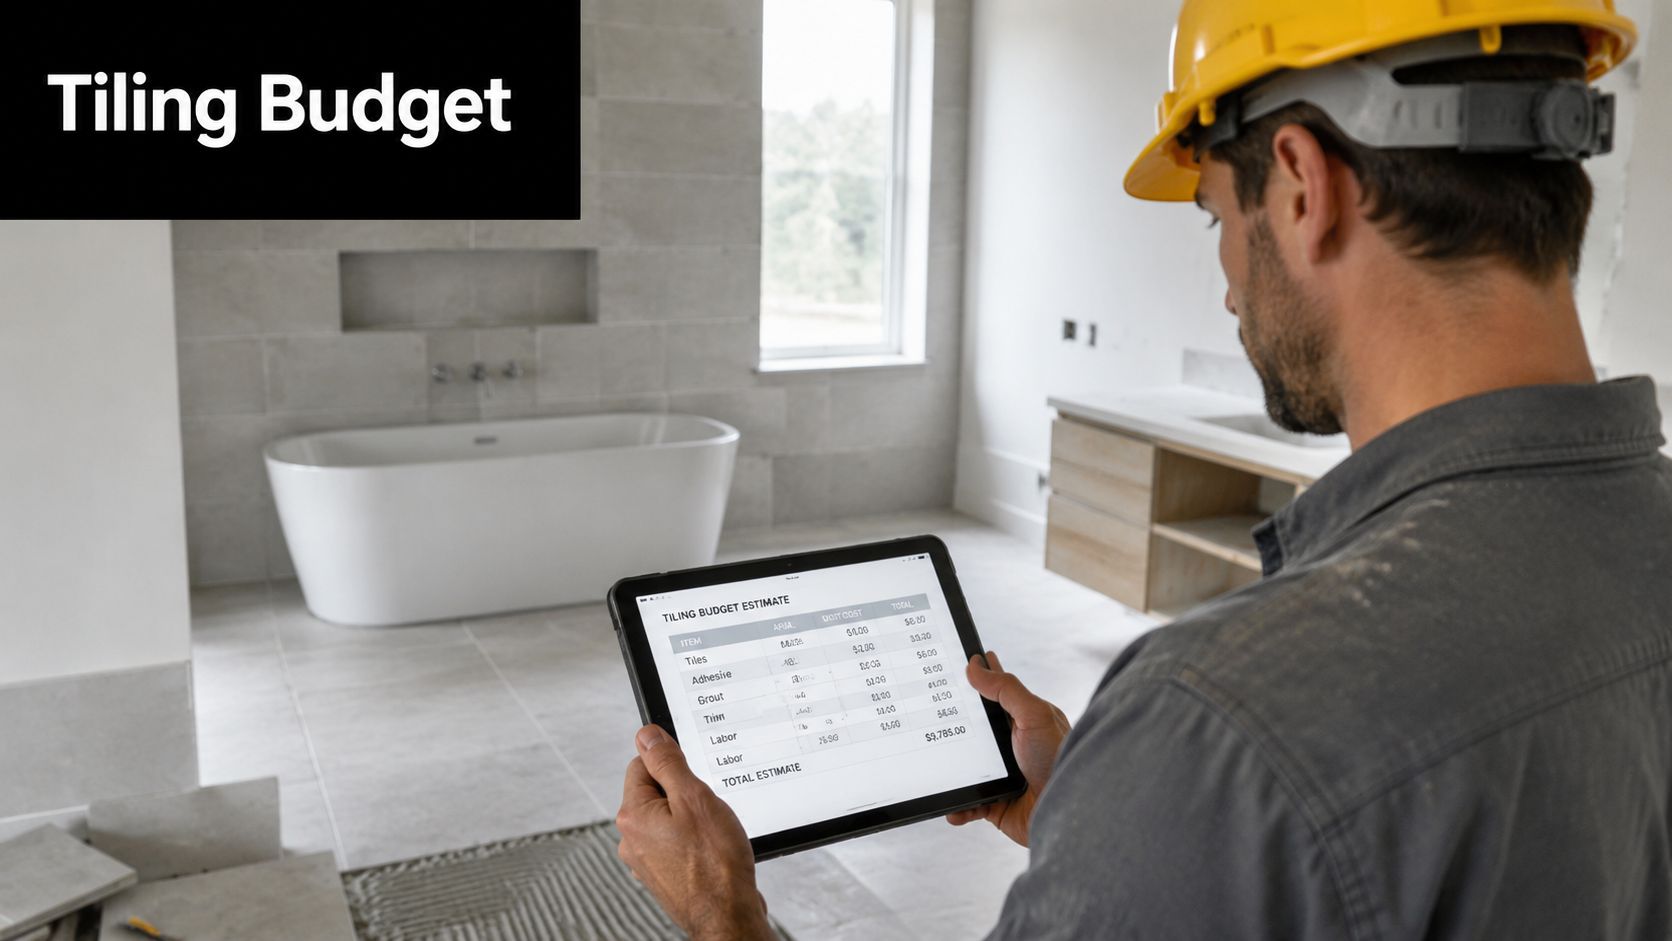
A professional contractor in a hard hat reviewing a digital tiling budget estimate on a tablet.

On the Sunshine Coast, standard floor tiling labour ranges from $34 to $87 per square metre, wall tiling ranges from $39 to $97 per square metre, and a complete bathroom tiling job typically requires a labour investment of $580 to $1,550, excluding tile supply costs, according to this Sunshine Coast tiling cost guide. The same guide notes that tile supply can add $20 to $250 per square metre, depending on the material selected.

What changes the number

The rate isn't driven by tile size alone. Cost usually moves because of condition and complexity.

A plain square room with stable walls and straightforward set-out is one thing. A bathroom with niches, hob details, feature strips, uneven backgrounds, or extensive cutting is another. Mosaic and feature work also sit in a higher labour bracket than standard floor or wall tile work.

Labour and materials are different conversations

Here's a clean way to clarify:

Cost area What it usually covers
Labour Laying, cutting, alignment, grouting, finish detail
Tile supply Porcelain, ceramic, natural stone, feature products
Preparation Levelling, screeding, substrate correction, removal
Renovation management Trade coordination, scheduling, compliance oversight

A cheap tile can still be costly to install if the room needs major prep. A premium porcelain can be economical long term if it lays cleanly and suits the space.

For a practical look at how trade pricing discussions often unfold, this walkthrough is useful before comparing quotes:

What a good quote should spell out

You want itemised scope, not just a grand total.

  • Preparation allowances: If demolition exposes defective substrate, how is that handled?
  • Tile format assumptions: Large-format porcelain, mosaics, and natural stone don't install the same way.
  • Supply responsibilities: Clarify who is supplying tiles, trims, grout, adhesives, and sealants.
  • Exclusions: If waterproofing, fixture removal, or disposal isn't included, it should be stated plainly.

That's how you compare tilers on the Sunshine Coast properly. Not by headline price, but by what the contractor has allowed for.

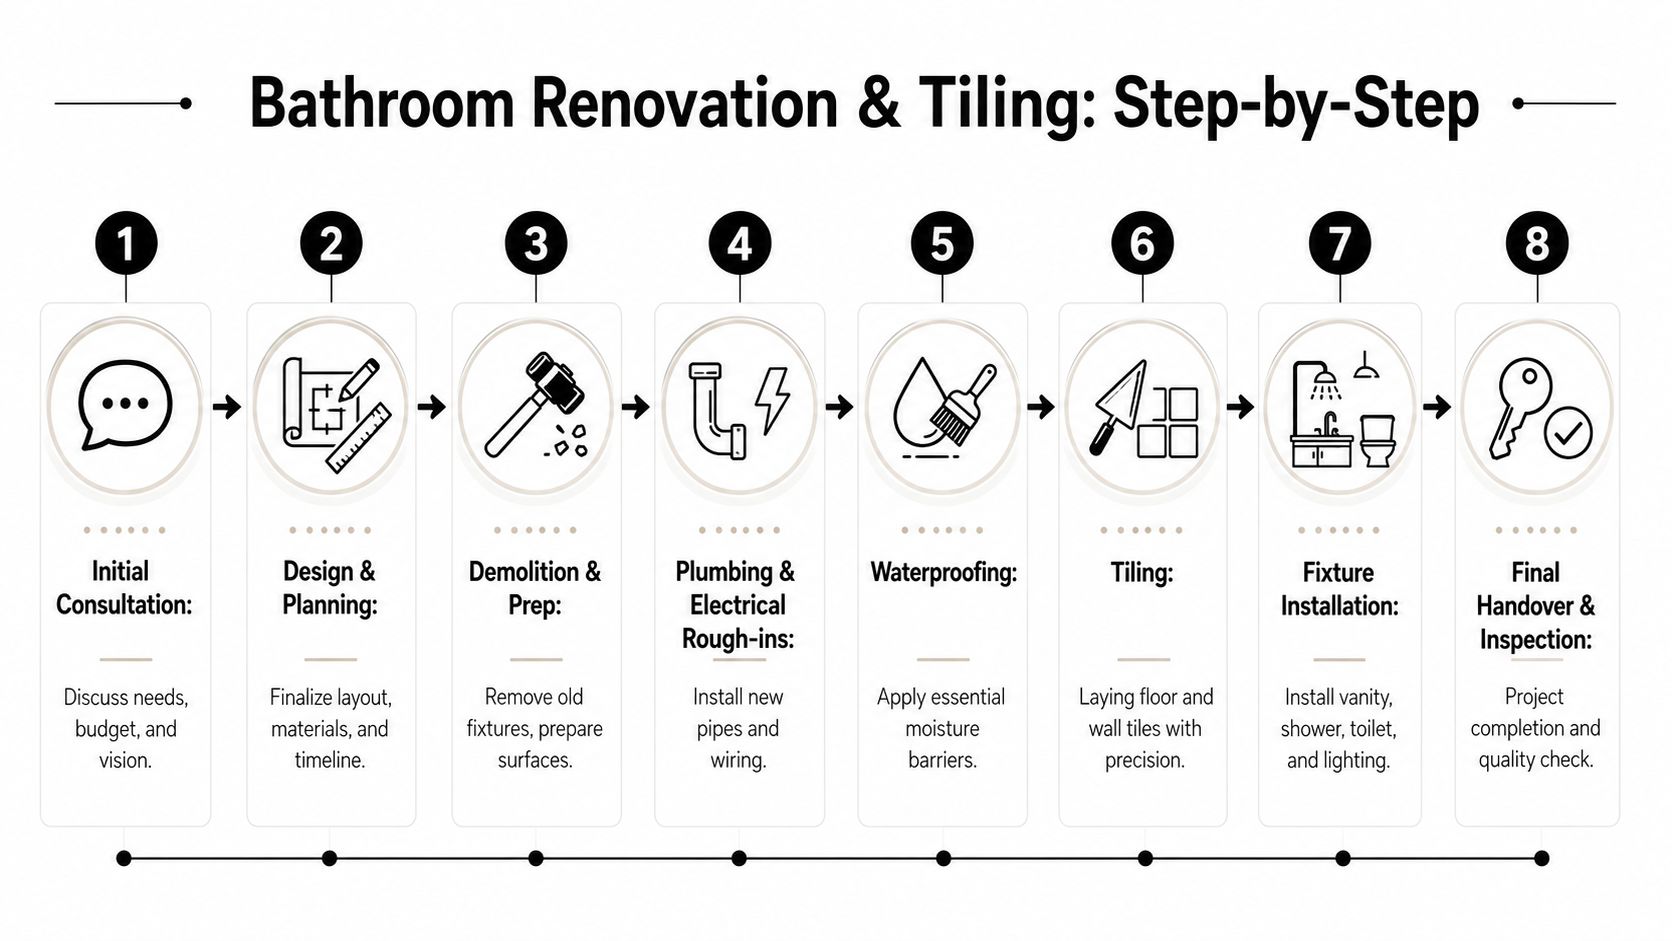
The Renovation and Tiling Process Step-by-Step

A good bathroom build follows a sequence. If that sequence gets compressed or rearranged to save time, the defects usually appear in the layers you can't see once the room is finished.

A step-by-step infographic illustrating the eight stages of a professional bathroom renovation and tiling process.

Consultation and planning

The job starts with scope, not demolition. Layout decisions, fixture selection, tile format, drainage details, and access all affect the build path. On better-run renovations, this stage also identifies likely substrate issues before anyone starts pricing as if the room is perfect.

If the client wants recessed niches, large-format wall tiles, or a curbless shower look, those choices need to be resolved early because they affect framing, falls, and set-out.

Strip-out and rough-in work

Demolition exposes the truth of the room. Old water damage, movement, poor sheeting, and non-compliant previous work often become visible only once finishes are removed.

After demolition, the rough-in phase begins. Plumbers and electricians do their work before the room is closed back up. This stage needs discipline because rushed penetrations and late changes can compromise later waterproofing.

Site rule: Don't let the tiler inherit unresolved plumbing, loose sheeting, or uncertain floor falls.

Surface preparation and waterproofing

Successful bathroom renovations hinge on meticulous preparation. Floors may need screeding or self-levelling. Walls may need correction for plumb and alignment. Shower zones need a proper moisture management strategy before a single tile is laid.

Waterproofing must be complete and protected before the tile phase begins. If other trades damage the membrane after application, the problem doesn't disappear because tile goes over it.

Tiling, grouting, and finish detail

Once the room is ready, set-out matters. A skilled tiler doesn't just start at the easiest wall. They work backward from visual lines, cuts, drainage points, and fixture positions so the room looks balanced when complete.

Then comes grouting, sealing where appropriate, and final detail work. This is the stage most homeowners notice, but by then the room's success has already been determined by everything underneath.

Fit-off and handover

The final stage is fixture installation, trim-out, clean-up, and defect inspection. Vanity alignment, screen fitting, silicone work, and drainage performance all need checking before handover.

A sound handover should leave the homeowner with clear care guidance, a realistic understanding of what to monitor in the first weeks of use, and no uncertainty about who to call if an issue appears.

Waterproofing and Materials for Coastal Durability

The Sunshine Coast is hard on wet areas for reasons that aren't always obvious at quoting stage. Bathrooms hold moisture already. Add humid air, coastal conditions, and daily temperature movement, and weak material choices show up faster.

The essential layer is waterproofing. In real bathrooms, the membrane system, the junction treatment, and the protection of that work during later trades matter more than any tile brand or feature wall. If that stage is compromised, the visible finish becomes cosmetic cover over a future defect. Homeowners comparing systems should understand how professional wet-area waterproofing systems fit into the broader renovation, especially where showers and floor wastes are involved.

Large-format tile needs flatter substrate

Large-format porcelain is popular for good reason. It looks cleaner, reduces grout lines, and suits contemporary bathrooms. But it is less forgiving.

According to this guidance on large-format tiling requirements in coastal conditions, large-format porcelain tiles require a substrate variance of no more than 3mm over 3m, and failure to achieve that flatness in the Sunshine Coast's tropical climate can lead to a 40% increase in crack propagation at tile edges due to thermal expansion. That is a technical issue, not a styling issue.

What works and what doesn't

Here's the practical split:

Material or method Where it works Where it fails
Large-format porcelain On properly levelled, stable substrate Over uneven floors or rushed wall prep
Mosaic or feature tile In controlled feature areas and curved details As a shortcut to hide poor backgrounds
Natural stone Where sealing and maintenance are understood Where homeowners expect zero upkeep
Tile-over-tile In limited situations with sound substrate and proper prep As a shortcut over doubtful wet-area conditions

The mistake isn't choosing ambitious materials. The mistake is choosing them without upgrading the preparation standard to match.

Coastal durability is a maintenance issue too

Bathrooms on the Sunshine Coast need sensible ongoing care. Grout, silicone, and movement joints don't stay at day-one condition forever. That doesn't mean a bathroom is failing. It means wet areas are service environments, not static displays.

Coastal bathrooms last longer when owners treat maintenance as part of the build outcome, not as a separate problem for later.

For homeowners searching for tilers on the Sunshine Coast, the right question isn't only “Can you lay this tile?” It's “Can this room support this tile format, in this climate, for the long term?”

Frequently Asked Questions

Do you need to move out during bathroom renovations

Not always. If it's your only bathroom, daily life gets awkward fast, especially during demolition, waterproofing, and fixture downtime. If the house has a second bathroom, most families stay put and isolate the work area. The decision usually comes down to access, dust tolerance, and whether children or older occupants are in the home.

How long should waterproofing cure before tiling starts

Follow the product system and the installer's process. This isn't the stage to compress because another trade is waiting. In bathrooms, patience at membrane stage is cheaper than leak rectification later.

What's the difference between rectified and non-rectified tiles

Rectified tiles are mechanically finished to a more precise edge. They suit tighter joints and a sharper contemporary look, but they also expose poor set-out more quickly. Non-rectified tiles are a bit more forgiving visually and can suit softer layouts.

Is tile-over-tile a good option

Sometimes, but only when the existing substrate is sound, the levels work, and the wet-area conditions have been properly assessed. It shouldn't be used as a shortcut around deeper renovation issues. If there's any doubt about movement, moisture damage, or previous waterproofing quality, removal is usually the safer path.

What should you do to maintain new grout and silicone

Keep the bathroom ventilated, clean gently, and pay attention to changes rather than waiting for obvious failure. Such vigilance is key, as waterproofing failures are the leading cause of bathroom renovation repairs in Australia, as noted in this industry overview of tiling and waterproofing issues. The visible signs often start small, such as discoloured joints, cracked silicone, or persistent damp smells.

What's the biggest mistake homeowners make when hiring tilers

They compare only the finish and the price. The actual difference between contractors usually sits in prep standards, scope clarity, and who takes responsibility when the project involves more than tile laying.


If you want a builder-led approach to bathroom renovations, waterproofing, and high-end tiling, Melbourne Tiling Services P/L offers start-to-finish project coordination with registered builder oversight, detailed quoting, and a strong focus on durable wet-area work.

Tiling Contractors Near Me: Qualified & Vetted

You're probably standing in a tired bathroom right now, looking at dated tiles, old grout, a shower that never quite feels clean, and a list of renovation ideas that grew faster than expected. Then you type tiling contractors near me into Google and get a flood of names, ads, reviews, and promises that all sound roughly the same.

That search is fine if you need a simple splashback or a straight tile replacement. It's not enough if you're renovating a bathroom in Melbourne. A bathroom renovation isn't just a tiling job. It touches waterproofing, substrates, falls to waste, plumbing penetrations, shower screens, trim details, and in many cases the kind of building coordination that sits beyond what a standalone tiler should be managing.

The mistake many homeowners make is hiring for the visible finish only. The tiles are what you see, so the tiler becomes the whole decision. In reality, the success of a bathroom renovation is usually decided earlier, in the parts behind and under the tile. In Melbourne, that means your search should shift from “Who can lay tiles?” to “Who is qualified to deliver a compliant bathroom renovation and manage the trade risk properly?” For many projects, that points to a registered builder, not just a tiler.

Table of Contents

Starting Your Melbourne Tiling Project

A common Melbourne renovation starts the same way. The bathroom still works, but only just. The tiles are tired, the shower base feels dated, silicone has seen better days, and every improvement idea seems to lead to another decision. New vanity. Better storage. Walk-in shower. Larger wall tiles. Frameless screen. Heated floor maybe. Then the search begins.

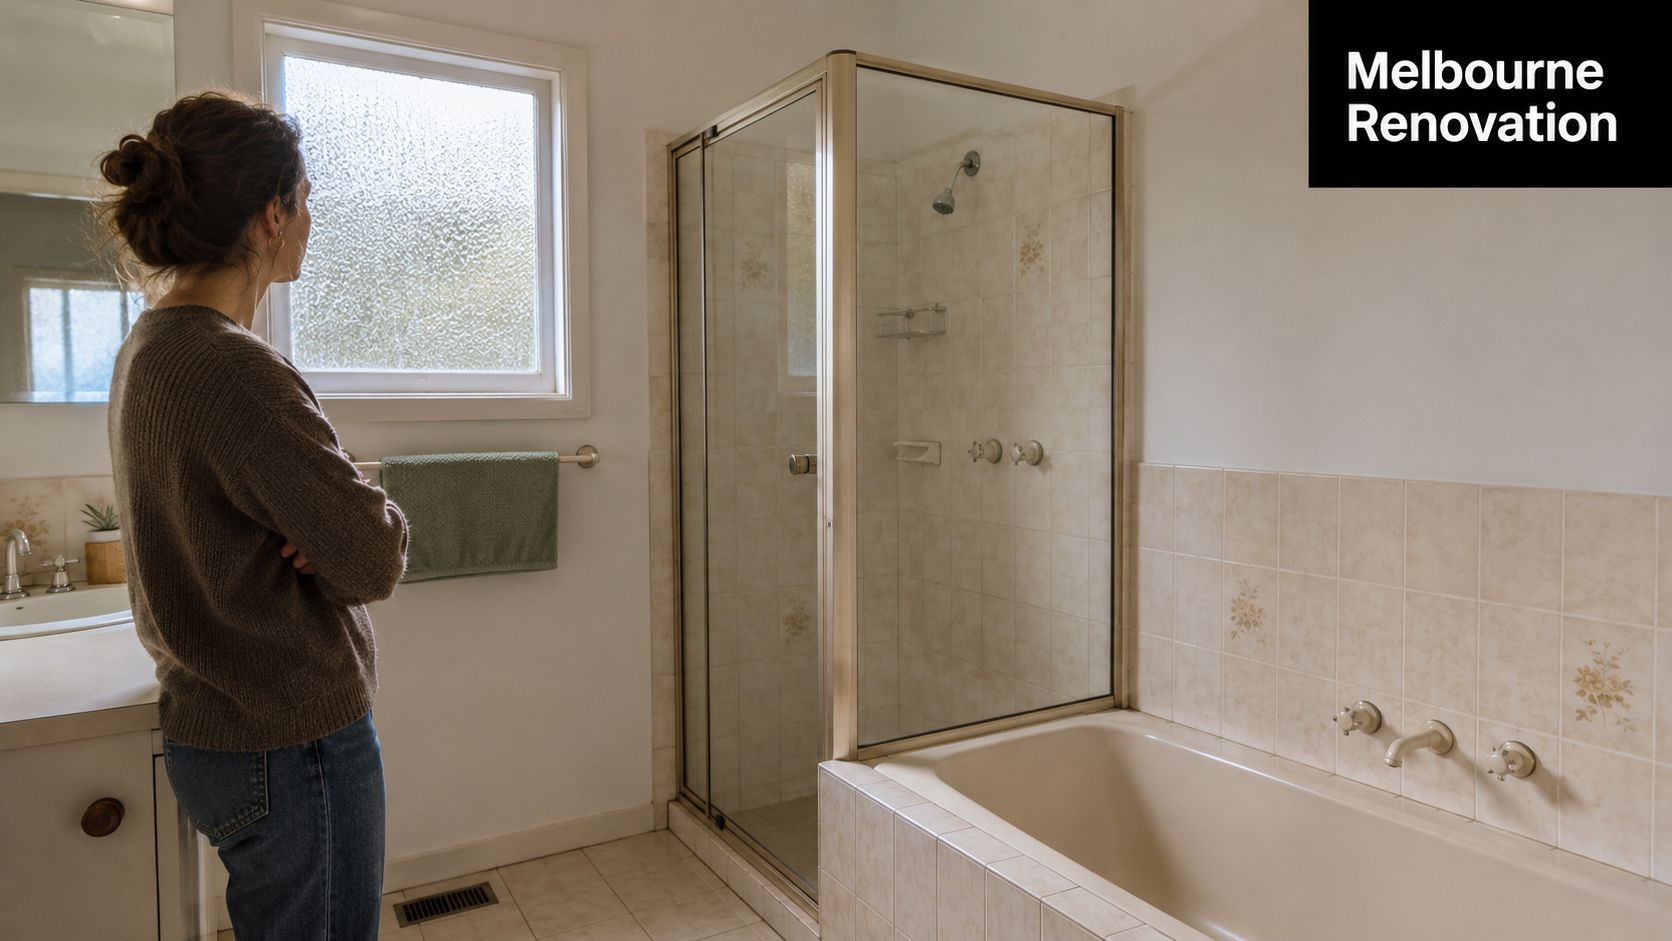
A woman looks at her dated bathroom that needs professional tiling services and a modern renovation.

The first fork in the road is simple. Are you doing a tiling job, or are you doing a bathroom renovation?

If you're replacing a kitchen splashback or retiling a laundry floor on a sound substrate, a tiler may be the right trade to call first. If you're renovating a bathroom, changing layout, replacing a shower, dealing with water damage, updating drainage, or coordinating multiple trades, you need to think more broadly. That kind of project often needs someone who can manage scope, sequence, compliance, and responsibility from demolition through to final fit-off.

A bathroom renovation is more than the tile selection

In Melbourne homes, bathroom problems often sit beneath the surface. The old screed may be wrong. The floor may not have the right falls. The wall substrate may move. The shower may have historic leak issues. A homeowner can't see those things from a showroom sample board, but the contractor should be looking for them immediately.

That's where the distinction matters. A tiler installs tiles. A registered builder coordinates a renovation and carries broader responsibility for how all the parts come together.

If the work involves waterproofing, multiple trades, demolition, reconstruction, or any uncertainty about what's behind the walls, hire for the whole renovation, not just the tile finish.

What the right hire protects

A bathroom is a wet area. That sounds obvious, but many hiring decisions ignore it. The right contractor doesn't just deliver straight grout lines. They protect the room from leaks, movement, poor drainage, and unfinished trade interfaces.

Look for someone who talks early about:

  • Substrate condition: Whether walls and floors are suitable before tiling starts
  • Waterproofing responsibility: Who does it, how it's documented, and how it connects to the tiling work
  • Trade coordination: Plumbing, electrical, carpentry, glazing, and final fit-off
  • Scope clarity: What's included, what's excluded, and who owns each stage

In a bathroom renovation, the closest contractor isn't automatically the right one. The right one understands the build-up behind the tile and can stand behind the finished room.

Where to Find Reputable Tiling Contractors in Melbourne

A search engine is a starting point, not a screening tool. If you rely only on ads and map listings, you'll mostly see who markets well, not necessarily who suits your bathroom renovation.

In Melbourne, better leads usually come from places where trades are already being filtered by real work. The goal is to build a shortlist of contractors who are used to renovation conditions, not just small patch jobs.

Start with trade-facing suppliers and showrooms

Tile and bathroom showrooms can be useful if you ask the right question. Don't ask, “Do you know a tiler?” Ask, “Who do your customers use for bathroom renovations where waterproofing, screeding, and full coordination matter?”

Trade counters and supplier showrooms often know which contractors buy consistently, return for the right products, and handle more demanding work. That doesn't make every referral perfect, but it's usually better than a cold click on a generic listing.

Useful places to ask include:

  • Tile showrooms: Especially when you've chosen porcelain, stone, mosaic, or large-format products that need careful handling
  • Bathroom fixture suppliers: They often hear which installers manage layouts and finishing well
  • Building material suppliers: These businesses tend to know who works regularly in renovation, not just on one-off jobs

Use industry directories and official lookups

A proper shortlist should include businesses you can cross-check. In Victoria, that means using official registration lookups and established industry directories rather than relying on star ratings alone.

A good process is to gather names from several channels, then narrow them down by verification. You're not trying to find dozens. You're trying to find a handful worth speaking to.

Reviews can tell you whether a client liked the interaction. They rarely tell you whether the falls were correct, the substrate was prepared properly, or the waterproofing responsibility was clear.

Use online platforms carefully

Online review platforms and local search pages can still help. They're useful for pattern spotting. If multiple clients mention delays, communication issues, or incomplete jobs, pay attention. If every review sounds vague and generic, treat that as marketing noise rather than proof.

It also helps to look at a contractor's own recent project work, then compare that with independent feedback. For example, a page of Melbourne tiling reviews from completed local projects is more useful when the examples match the kind of bathroom you're planning.

Build a shortlist with the right mix

For a Melbourne bathroom renovation, the strongest shortlist usually includes a mix like this:

  • One registered builder who handles full bathrooms: Best for renovations involving multiple trades and compliance risk
  • One tiling specialist with wet-area experience: Worth speaking to if your project is more limited in scope
  • One contractor recommended by a supplier or designer: Useful when they've already delivered similar finishes

Don't choose from the first three names you see. Choose from the first few names that survive basic scrutiny. That small change saves a lot of grief later.

Vetting Your Shortlist Licences Insurance and Key Questions

The shortlist can feel like real progress. It's also where costly mistakes begin. A polite contractor, a nice gallery, and a quick site visit don't tell you enough. Bathrooms need tighter screening because the damage from poor work usually shows up after the trades have left.

Start with the essentials before anyone measures up or talks style.

A checklist infographic outlining six essential steps for vetting and hiring a professional tiling contractor.

Know the difference between a tiler and a builder

This is the main hiring issue in Melbourne bathroom renovations. A tiler may be excellent at laying tile and still not be the right lead contractor for your project. If the bathroom renovation involves demolition, reconstruction, waterproofing coordination, plumbing, electrical, or layout changes, you need to know who is taking responsibility for the full scope.

Ask directly whether they are a registered builder, what class of work they manage, and who supervises the bathroom renovation as a whole. If the answer is fuzzy, you've learned something important.

Most important check: Verify the contractor's registration yourself and make sure it matches the type of project you're asking them to deliver.

That single step filters out a surprising number of unsuitable options.

The phone call that saves wasted site visits

A short phone call can eliminate the wrong contractor fast. Don't start with tile colour or finish trims. Start with accountability.

Ask questions like these:

  • Are you a registered builder for bathroom renovation work? If not, ask what part of the project they contract for.
  • Who performs the waterproofing and who provides the documentation? This should never be left vague.
  • Have you completed bathrooms similar to mine? Ask for projects with a similar size, layout complexity, and finish level.
  • Who coordinates the plumber, electrician, and shower screen installer? If nobody owns the sequence, the homeowner ends up owning the stress.
  • Do you inspect the substrate before final pricing? Good contractors know tile can't fix structural or preparation problems.
  • Can you provide recent references for similar work? Industry guidance recommends a structured due-diligence workflow that includes verifying a similar-project portfolio, confirming licensure and insurance, requesting 3–4 references, and requiring a written scope before pricing. The same guidance also recommends ordering 10–15% extra tiles for cutting loss, breakage, and future repairs, as outlined in this tile installer due-diligence guide.

The answers matter, but so does how they answer. Clear, direct replies usually signal organised work. Evasive replies usually signal messy scope.

Here's a useful visual summary before you move to site meetings.

What to ask for before pricing

A proper quote starts with a proper brief. If a contractor is prepared to throw out a number without seeing the room properly, without asking about waterproofing, tile type, substrate, or fixtures, that's not efficiency. It's guesswork.

Before pricing, ask for:

  • Insurance details: Public liability and any other relevant cover for the work arrangement
  • A written scope: Demolition, prep, waterproofing, screeding, tiling, grout, trims, silicone, rubbish, clean-up
  • Recent project photos: Not generic inspiration shots, actual completed bathrooms
  • References you can call: Current enough to reflect how they work now

If you want a practical reference point for common homeowner questions before those calls, this bathroom renovation and tiling Q&A page is a useful checklist.

Good vetting feels a bit strict. That's exactly the point. Bathrooms punish casual hiring.

Understanding Specialist Services Beyond Basic Tiling

A lot of local search results flatten everything into one category. Tiler. Bathroom tiler. Wall and floor tiler. That language misses the core issue. Not every contractor who can lay a tile can deliver a wet area renovation to a high standard.

The gap becomes obvious in bathrooms because the work is layered. Waterproofing, falls, movement, substrate flatness, trim detail, penetrations, and fixture interfaces all affect the final result.

A modern bathroom shower area featuring blue herringbone tiles and a recessed shelf with gold fixtures.

Waterproofing is not a casual extra

Homeowners often talk about waterproofing as if it's part of the adhesive stage. It isn't. It's a regulated compliance issue in Australian wet areas, and it needs clear responsibility. For bathrooms, showers, and balconies, verifying a contractor's waterproofing capability is critical. Australian guidance also stresses that homeowners should confirm who is responsible for waterproofing and what documentation they will receive, as discussed in this waterproofing and leak-remediation guide.

That matters because water damage can be expensive to rectify, and the tile finish can look perfect while the system underneath is wrong.

When assessing a contractor, look for someone who can explain:

  • Where the waterproofing starts and stops
  • How penetrations and junctions are handled
  • What documentation you receive at completion
  • Who owns rectification if a leak appears later

If you're comparing specialist services, this overview of bathroom waterproofing in Melbourne shows the kind of wet-area scope that should be discussed before tiling begins.

Large format tile changes the whole job

Large-format porcelain and slab-style products have changed bathroom expectations. Clients want quieter joints, cleaner walls, bigger visual lines, and that sleek hotel look. The problem is that larger tile doesn't forgive poor prep.

A contractor who is fine with standard ceramic wall tile may struggle when the specification shifts to large-format tile or premium stone. These materials need flatter substrates, more disciplined handling, and the right setting system. If the prep is off, the finish tells on everyone.

Bigger tile often means more preparation, not less. The reduced grout lines look simpler, but the installation is usually less forgiving.

Ask to see completed work similar to what you're planning. Not just one hero photo. Ask for corners, niches, transitions, floor-to-wall junctions, and drain detailing.

Integrated bathroom work that affects the tiling finish

A quality bathroom finish depends on more than the tile itself. Some of the most important trades are the ones homeowners barely think about until something goes wrong.

Watch for contractors who understand how these pieces connect:

  • Screeding and falls: Shower floors need proper drainage. Tile can't compensate for bad falls.
  • Self-levelling preparation: Flat floors matter before large-format or rectified tile goes down.
  • Shower screen coordination: Frameless glass only looks clean when walls are true and tile edges are resolved properly.
  • Leak diagnosis and remedial work: Existing wet-area failures need investigation before cosmetic replacement.

Melbourne Tiling Services P/L is one example of a contractor that works across these combined scopes, including bathroom renovations, waterproofing, self-levelling, screeding, leak rectification, frameless shower screens, and large-format Kerlite-style installations. That integrated model is often a better fit for bathroom renovations than hiring isolated trades one by one.

If a contractor talks only about tile selection and grout colour, they're probably discussing the easiest part of the room.

Decoding Quotes Timelines and Common Red Flags

A bathroom quote can look tidy and still be dangerous. The total price on page one doesn't tell you much unless the scope behind it is equally clear.

Many homeowners revert to the familiar search habit. They compare names from a “tiling contractors near me” search, line up prices, and assume the lower quote is more efficient. In practice, lower quotes are often missing tasks, responsibilities, or remedial allowances that surface later as variations.

Why the cheapest quote often isn't the cheapest project

Local pricing varies because local scope varies. Even outside Australia, marketplace data shows how wide the spread can be. A Tulsa tile installation report listed ceramic tile installation at $6.34 per square foot, with an observed range of $5.57 to $7.10 per square foot, and also showed other installation scenarios around $4.20 and $3.16 per square foot, illustrating how quotes shift with tile type and labour scope in ProMatcher's regional tile cost report.

The lesson isn't to convert overseas rates. The lesson is that one line-item price rarely describes the whole job. A bathroom renovation quote can differ dramatically depending on whether it includes demolition, substrate repair, waterproofing, drainage prep, tile trim systems, shower screen coordination, rubbish removal, and final clean.

A vague quote gives the contractor room to charge later and gives the homeowner very little to stand on.

Comparing Tiling Quotes What to Look For

Feature Basic Tiler Quote Registered Builder Quote
Scope detail Often brief, focused on tile supply and installation only Usually broader, covering demolition, prep, trade coordination, and finish details
Waterproofing May be unclear, assumed, or excluded Responsibility is identified and documentation is typically addressed
Substrate preparation Sometimes described loosely or left for variation More likely to be inspected, specified, and priced as part of the build-up
Other trades Homeowner may need to organise plumber, electrician, or glazier separately Builder usually coordinates the sequence and interfaces
Variations Higher risk when the original scope is thin Still possible, but clearer scope reduces avoidable disputes
Programme May focus only on the tiling window Usually considers the whole bathroom timeline from strip-out to completion
Accountability Split across separate contractors More centralised responsibility for the end result

A stronger quote usually identifies materials, tile areas, preparation steps, who supplies what, and how defects in existing surfaces are handled if discovered after demolition.

Red flags that should stop the conversation

Some warning signs are immediate. Others show up only when you read the quote carefully.

Walk away if you see this combination:

  • No clear written scope: If it only says “bathroom renovation” or “tile labour”, that's not enough.
  • Reluctance to confirm registration details: Legitimate contractors shouldn't dance around this.
  • Waterproofing responsibility is vague: If nobody clearly owns it, that's a serious risk.
  • Cash pressure before paperwork: Fast money requests before proper documentation are a bad sign.
  • No allowance for preparation issues: Old bathrooms often hide substrate problems. Pretending otherwise doesn't make them disappear.
  • Portfolio mismatch: A contractor showing mostly outdoor paving or splashbacks may not suit a full wet-area renovation.

Timelines matter too. Promises that sound too neat usually are. Good contractors will explain what can delay a job, especially once demolition exposes the existing condition. That honesty is worth more than a rushed promise that falls apart in week one.

Finalising the Hire and Ensuring a Smooth Project

By the time you're ready to choose, the main question should be settled. For a full bathroom renovation in Melbourne, you're usually not hiring just for tile laying. You're hiring for controlled delivery of a wet-area build. That's why the contract matters more than the pitch.

Tile installation is skilled work. In the United States benchmark data often used to describe the trade, tile and stone setters had a national median annual wage of $52,870 in May 2023, with employment concentrated in building finishing contractors at 26,010 workers, according to the Bureau of Labor Statistics occupational profile for tile and stone setters. The practical takeaway for homeowners is simple. Tiling is specialised labour, and the price reflects preparation, execution, and finishing quality, not just the tile itself.

The contract matters more than the sales pitch

A proper bathroom renovation contract should be plain, detailed, and specific. If something matters to you, it should be written down.

At minimum, make sure it covers:

  • Detailed scope of works: Demolition, preparation, waterproofing, tiling, glazing, fit-off, waste removal
  • Material specifications: Tile type, grout choice, trims, niches, screens, fixtures if supplied
  • Payment schedule: Staged and tied to progress, not vague verbal milestones
  • Total price and variation process: You need to know how changes are approved
  • Warranties and defect responsibility: Especially for workmanship and wet-area elements
  • Who is responsible for site supervision: One point of contact avoids confusion

If a contractor says, “Don't worry, we'll sort that out as we go,” that should worry you.

Simple habits that keep the renovation on track

Once the contract is signed, the homeowner still has a role. The smoothest projects usually have clear communication and fewer late changes.

A few habits help:

  • Lock tile selections early: Don't leave core finishes unresolved once the schedule starts.
  • Confirm supplied items in writing: Tapware, vanity, mirrors, rails, and accessories create delays when assumptions creep in.
  • Agree on site access and protection: Parking, keys, dust control, rubbish, and working hours should be settled early.
  • Keep decisions in writing: Text or email beats memory every time.
  • Inspect at practical milestones: After demolition, after prep, after waterproofing responsibility is confirmed, and before final handover

The safest hiring mindset is this. If the work is limited, hire a tiler. If the bathroom is being rebuilt, hire for the renovation. In Melbourne, that usually means engaging someone who can manage the full project with proper responsibility attached.


If you're planning a bathroom or ensuite renovation and want a contractor that handles tiling within a broader renovation scope, Melbourne Tiling Services P/L offers bathroom renovations, waterproofing, screeding, self-levelling, large-format tiling, leak rectification, frameless shower screens, free quotes, and 3D drawings across Melbourne.