
You've probably got one cracked tile staring at you every time you walk into the bathroom. It might be a fine hairline on a wall tile, a chip on the edge of a floor tile, or a crack across a shower tile that you're hoping can be fixed without tearing the room apart.
That's where tile crack repair epoxy can help, but only in the right situation. In Melbourne bathrooms, the repair itself is rarely the hard part. The primary issue is working out whether the crack is cosmetic or whether it points to movement, a hollow tile, or a waterproofing problem that turns a small repair into a bathroom renovation issue. In Victoria, that distinction matters because wet area work has to line up with building standards, and some repairs absolutely need registered builders involved.
Table of Contents
- First Things First Is Epoxy the Right Fix for Your Tile
- Gathering Your Materials and Tools for a Pro Finish
- Your Step-by-Step Guide to Applying Tile Epoxy
- The Art of Colour Matching and Creating a Seamless Finish
- When to Call a Registered Builder for Your Bathroom Renovation
- Frequently Asked Questions about Tile Repair
First Things First Is Epoxy the Right Fix for Your Tile
You notice a fine crack in one bathroom tile after a cold Melbourne morning. The tile still feels firm, the grout looks intact, and the damage seems minor. In that situation, epoxy can be a reasonable repair. In plenty of others, it just hides a bigger problem for a few months.
That distinction matters more in Victoria than a lot of overseas guides admit. A cosmetic repair on a dry wall tile is one thing. A repair on a shower floor, hob, niche, or wall junction can interfere with a wet area system that has to perform as a whole under AS 3740 waterproofing requirements. If the crack points to movement, water entry, or membrane failure, a tube of epoxy is not the answer.
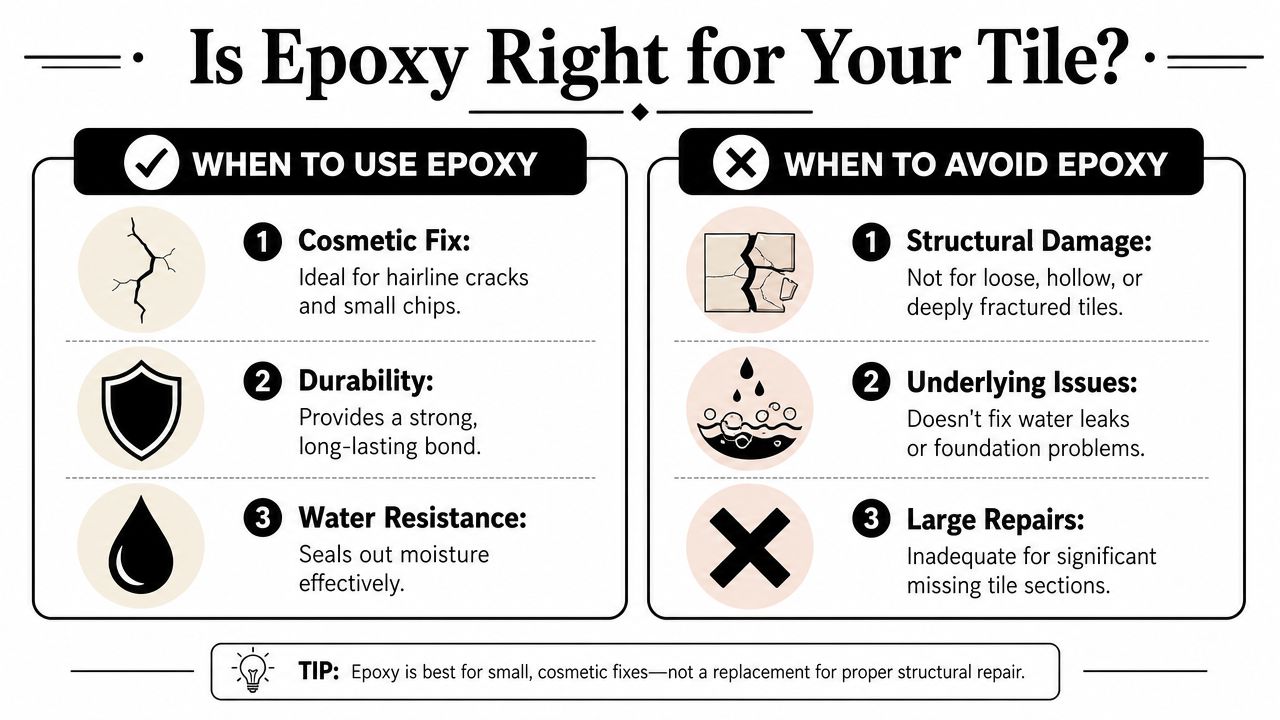
What epoxy is good at
Epoxy suits small, localised damage where the tile is still properly bonded and the repair is only there to improve the appearance.
Use it when the problem looks like this:
- Hairline crack only: The crack is on the surface and the tile does not move under hand pressure or foot traffic.
- Single isolated tile: Nearby tiles and grout joints are stable, with no pattern of cracking across the area.
- Low-risk location: Splashbacks, laundry walls, powder room walls, and other dry or low-exposure areas are better candidates.
- Minor chip or edge damage: Epoxy can rebuild a small corner or glaze chip if the tile body is otherwise sound.
I tell homeowners to keep the test simple. If the tile is solid, the crack is small, and nothing around it is shifting, epoxy may be worth the effort.
What makes epoxy the wrong fix
A visible crack is only the symptom. The important question is what caused it.
Tap the tile lightly with something hard. Press on the edges. Look at the grout lines around it. If the tile sounds hollow, rocks slightly, or the grout has opened up, the issue is usually below the surface. That could be poor coverage, substrate movement, moisture-related swelling, or a failed bond.
Here's the quick check I use on site:
| Check | Good sign | Bad sign |
|---|---|---|
| Sound test | Solid, hard tap | Hollow or drummy sound |
| Movement | No flex or rocking | Tile shifts or clicks |
| Crack depth | Surface line only | Full-depth break through tile body |
| Location | Dry wall or low-risk area | Shower floor, balcony, wet wall junction |
| Pattern | One tile only | Multiple cracked tiles nearby |
A hollow tile changes the decision straight away. In my experience across Melbourne homes, epoxy repairs rarely last when the crack runs through the full tile body or the tile has lost support underneath. The filler might hold its colour for a while, but the crack usually prints back through or the tile breaks further.
The Melbourne and Victorian standards angle homeowners need to know
This is the part generic repair articles usually miss.
In a Victorian bathroom, the tile is not the waterproof layer. The membrane below is. If a cracked tile in a wet area happened because the substrate moved, water got in, or the assembly was built poorly, patching the tile face does not restore the waterproofing system. It can also make the problem harder to diagnose later.
DIY epoxy repair is generally acceptable on a dry area tile, or on a wet area tile only where you are certain the damage is superficial and the waterproofing has not been affected. If you have cracking on a shower floor, at wall to floor junctions, around a puddling flange, or across several tiles, get a registered builder involved before doing cosmetic patching. That is where compliance, rectification scope, and water damage risk start to matter.
If you want a feel for the sort of gear and site checks professionals rely on before making that call, have a look at these tiling tools used by professional tilers.
A neat epoxy repair has its place. It is just not a substitute for replacing loose tiles, fixing substrate movement, or rectifying failed waterproofing.
Gathering Your Materials and Tools for a Pro Finish
Good epoxy repairs start before you open the tube. The right kit keeps the repair clean, keeps the colour tighter, and stops you making a small crack look worse.
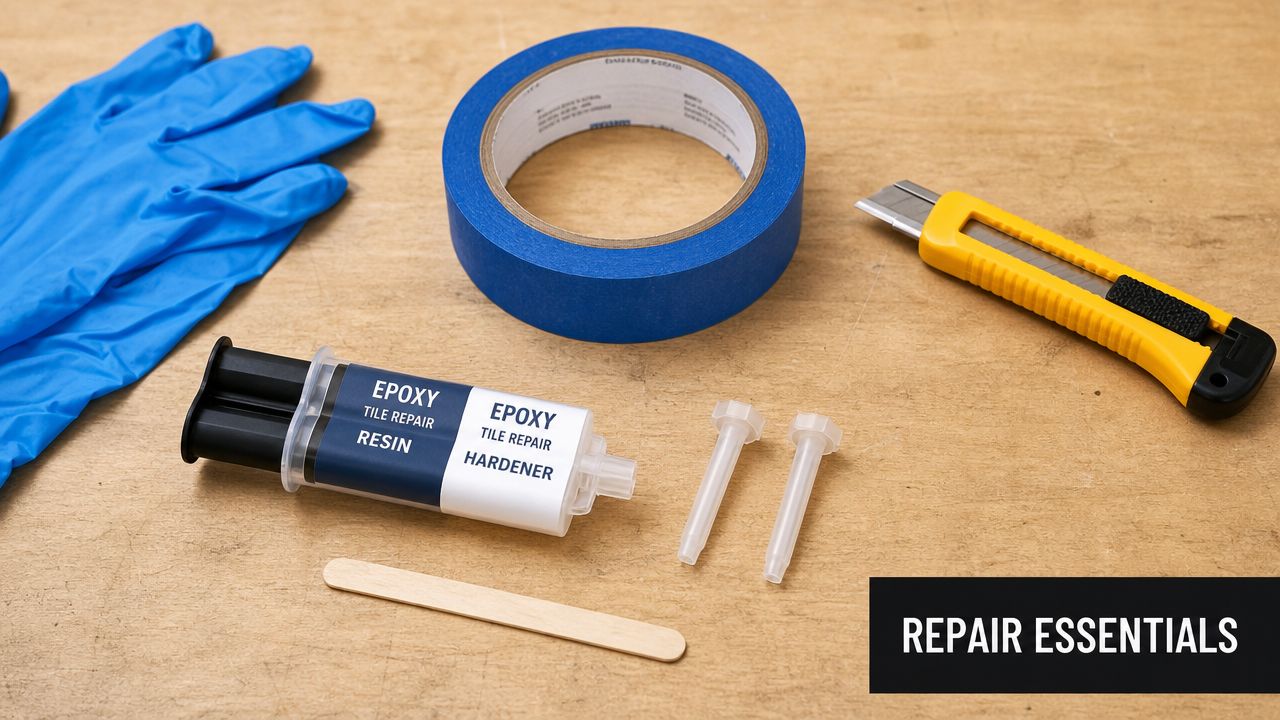
The Essential Repair Kit
Here's what I'd have beside me before starting:
- Two-part epoxy repair product: Use a tile repair epoxy or epoxy putty suited to ceramic or porcelain. Grout is for joints, not crack repair.
- Sharp utility blade or razor blade: For trimming loose edges, cleaning out the crack, and squaring chipped sections so the filler sits properly.
- Painter's tape: Helps keep the repair line neat and limits smearing on the tile face.
- Plastic spreader or flexible filling knife: Better control than a stiff, cheap scraper, especially on glazed tiles.
- Microfibre cloths: One for cleaning, one for final wipe-down. Dirty rags just move residue around.
- Fine sandpaper: Keep a couple of grades on hand so you can flatten the patch, then refine the finish.
- Gloves and ventilation: Epoxy on skin is avoidable. So is breathing it in inside a closed bathroom.
- Degreaser or suitable cleaner: Soap film, body oils, silicone haze, and cleaning residue all interfere with bond strength.
If you want to see the sort of gear tilers use day to day, this guide to professional tiling tools used on site gives you a practical reference.
Wet area materials need more care
A crack on a laundry splashback is one job. A crack inside a shower recess is another.
For bathroom repairs, use a water-resistant epoxy that the manufacturer says is suitable for wet areas. Generic decorative fillers are a poor choice anywhere that sees regular water, steam, or cleaning chemicals. In Melbourne bathrooms, that matters even more in older homes where movement, poor ventilation, and previous patch jobs are common.
The cleaning stage matters just as much as the product. In my experience, failed DIY epoxy repairs usually come back to one of three things. The tile was not properly degreased, there was still silicone contamination near the crack, or the repair was sanded before it had cured through. Any of those will weaken the bond and leave a repair that looks fine for a week, then starts telegraphing through.
Read the label for cure times and working times, then follow that product, not the guesswork. Some epoxy putties are ready for light sanding after a few hours in mild conditions. Others need longer, especially in a cool Melbourne bathroom in winter. If the patch is still a bit green underneath, sanding will drag it, mark the glaze around it, and spoil the finish.
One more practical point. If the cracked tile sits in a shower, around a bath, or near a wall-floor junction, keep the repair strictly cosmetic unless you are certain the waterproofing system below has not been affected. Once there is any doubt about membrane integrity or substrate movement, that stops being a tiling touch-up and starts falling into rectification work that should be assessed by a registered builder under Victorian requirements.
Your Step-by-Step Guide to Applying Tile Epoxy
A tile repair usually goes wrong in the first ten minutes, not the last ten. The crack is still damp, the surface still has soap residue on it, or the filler gets wiped over the top instead of worked into the break.
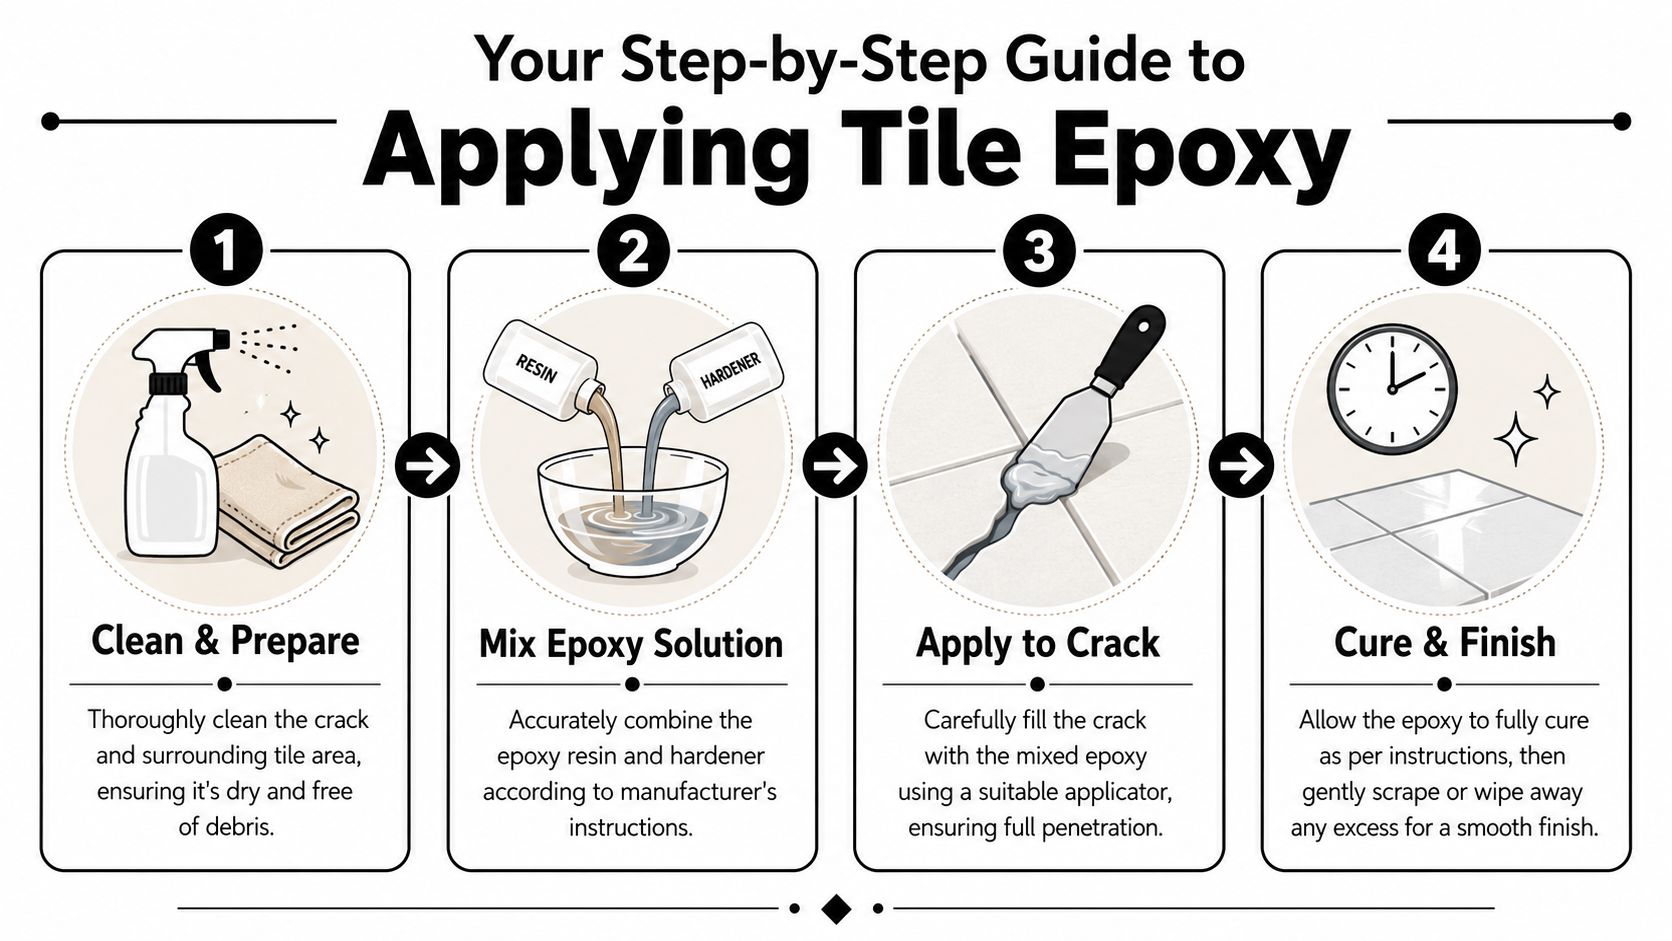
Phase one preparation
Start by checking whether the tile is a good candidate for epoxy at all. A fine crack in a dry wall tile is one thing. A cracked floor tile that sounds hollow, moves underfoot, or sits inside a shower recess can point to substrate movement or waterproofing trouble underneath. In Victoria, epoxy is only a cosmetic repair if the membrane and substrate are still sound.
Clean the tile face and the crack thoroughly. Remove dust, soap film, oils, old sealer, and any loose grit. If the crack is in a bathroom, let it dry properly before you do anything else. A hairdryer on low heat helps with narrow cracks where moisture sits below the surface.
For chipped edges, trim away any loose or feathered material with a sharp blade so the repair has a firm edge to bond to. That is straightforward trade practice, and it makes the patch easier to level and less obvious once sanded.
If you want a broader look at what can be repaired and what usually needs replacement, this guide on how to fix a tile without making the damage worse gives you the bigger picture.
Phase two filling the crack properly
Mix the epoxy exactly to the manufacturer's ratio and working time. Two-part products are unforgiving. If the mix is off, the repair can stay soft, cure patchy, or fail around the edges.
Push the epoxy into the crack with a small scraper, blade, or applicator. Fill the depth of the crack, not just the surface line. On anything more than a hairline mark, I slightly overfill the repair so it can be cut back flush once fully cured.
This video gives a useful visual reference for the process:
For a moderate crack, take your time here. Work the product in, scrape off the excess cleanly, then leave it alone. Constantly reworking epoxy as it starts to firm up usually makes the finish worse and can pull the filler back out of the crack.
Phase three curing sanding and sealing
Cure time is where plenty of DIY repairs get spoiled. The surface might feel hard enough to touch, but the body of the repair can still be green underneath, especially in a cool Melbourne bathroom in winter.
Follow the product instructions for cure time, then allow more time if the room is cold, damp, or poorly ventilated. If the tile is in a wet area, be even more cautious. Grouting, washing, or sanding too early can mark the repair, weaken the bond, and leave a dull patch on the glaze.
Once the epoxy has cured through:
- Level the repair: Sand the overfill back gently until it sits flush with the tile face.
- Refine the finish: Use finer abrasive to smooth the patch and reduce visible scratch marks.
- Clean the surface: Wipe away all sanding dust before any tinting or sealing.
- Seal if needed: In splash-prone areas, use a suitable finishing sealer if the product manufacturer recommends one.
One practical warning. If the cracked tile is inside a shower, at a wall-floor junction, around a bath, or anywhere the waterproofed system could be involved, stop and get the area assessed if there is any sign of movement, drummy tiles, loose grout, or recurring moisture. At that point the issue may be beyond a simple epoxy repair, and in Victoria that can move into work that should be inspected and managed by a registered builder.
The Art of Colour Matching and Creating a Seamless Finish
A tile repair can be solid and still stand out for all the wrong reasons. Homeowners usually notice the patch because the colour is slightly off, the gloss does not match, or the filled crack catches light differently from the rest of the tile.
That is the part DIY guides often understate.
In real bathrooms across Melbourne, white wall tile is usually the easiest repair to disguise. Once you get into older porcelain, printed tiles, terrazzo-look finishes, stone-look ceramics, or aged batches that have yellowed over time, colour matching gets harder fast. Heritage homes are a good example. The original tile may have surface wear, uneven glaze, and a tone you cannot match straight from a hardware store kit.
The best result comes from matching three things together, not one. Base colour, surface sheen, and edge definition all need to line up. Get two right and one wrong, and the repair still reads as a patch.
Why DIY colour matching often falls short
Ready-mixed epoxy repair kits are made for broad colour groups. White, almond, grey, black. That can be good enough for a laundry splashback or a low-visibility wall tile. It is often not good enough for a feature tile at eye level.
Some products can be tinted, but there is a trade-off. Add too much colourant and the epoxy can cure differently or lose clarity. Leave it untinted and the repair looks chalky. Patterned tiles are harder again because a crack rarely runs through one flat colour. It usually crosses shade variation, printed grain, or speckle.
I see another problem regularly. The patch colour is acceptable on day one, then the finish turns obvious once the room is cleaned, the tile is wet, or sunlight hits the wall from the window. Gloss level matters as much as colour.
For homeowners weighing up patching against replacement, our tile repair service in Melbourne is usually the right place to compare what can be disguised well and what will always remain visible.
How a good repair is blended properly
Tilers who do this well slow the process down at the finishing stage.
- Match the main field colour first. Do not start by chasing tiny flecks or veining before the body colour is close.
- Check the tile in the room, not just on the bench. Bathroom lighting changes how the repair reads.
- Test dry and slightly damp. Some tiles darken when cleaned, and a patch that looks right dry can look pale once moisture hits it.
- Build colour in light passes. That works better than trying to force one heavy coat to do everything.
- Adjust the sheen at the end. A matt tile, satin tile, and glazed wall tile all throw light differently.
On older or textured tiles, the honest answer is that epoxy can hide the crack, but it may not make it disappear. A repair can still be worthwhile if the tile is hard to replace or the crack is in a low-visibility spot. If the tile is a feature piece in the middle of a shower wall, replacement often gives the better visual result.
One more point from practical job experience. A lot of failed-looking repairs are not bond failures at all. The filler stays in place, but the top finish yellows, peels, or flashes under light because the wrong paint, glaze coat, or sealer was used over the epoxy. That is common on DIY jobs and also on rushed maintenance work.
If the crack sits in a wet area, appearance is only half the conversation. In Victoria, once a repair starts affecting waterproofed areas or raises questions about membrane integrity, the job needs to be assessed properly under the rules that apply to bathroom works. Colour matching is the easy part compared with fixing a bathroom that has a hidden compliance problem underneath.
When to Call a Registered Builder for Your Bathroom Renovation
You notice a crack on a shower wall, run a bit of epoxy into it, and the tile looks fine again. A month later the grout line nearby darkens, silicone starts lifting at the corner, and the skirting outside the bathroom feels damp. That is the point where a tile repair turns into a building problem.
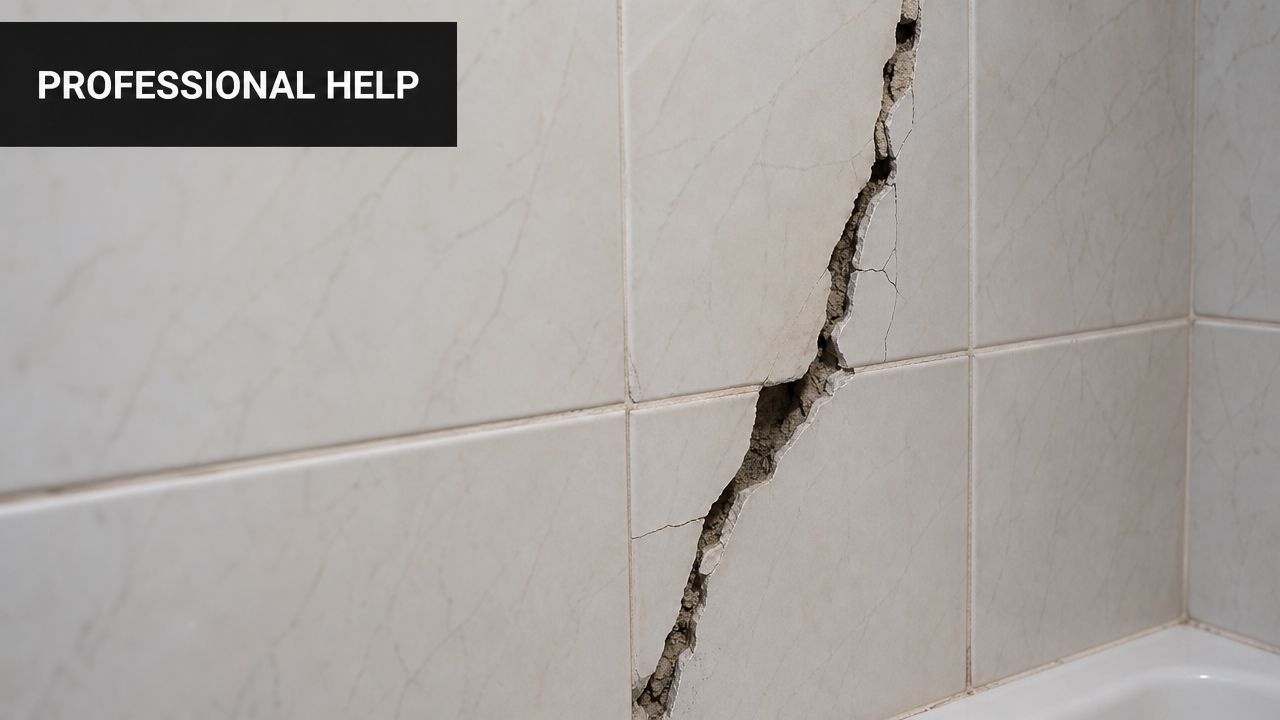
Wet areas change the rules
In Melbourne bathrooms, location matters more than crack size. A small crack on a dry wall tile can be a tidy DIY repair. A crack inside a shower, on the shower floor, near the waste, at a wall to floor junction, or around a hob needs a different level of caution because those areas sit over waterproofing that must comply with AS 3740.
That is where I tell homeowners to stop treating the tile as an isolated surface defect. The tile might be the visible part of the problem, but the underlying issue can be movement in the sheet, poor bedding, failed waterproofing, or moisture already getting into the substrate.
In Victoria, once bathroom work involves waterproofing, structural change, or a broader renovation scope, it needs to be handled under the right registration and compliance framework. If you cannot confirm the membrane is intact, an epoxy patch can hide damage instead of fixing it.
Signs the crack is part of a bigger failure
Some cracks are straightforward. Others are warning signs.
Get professional advice if you notice any of the following:
- The tile sounds hollow when tapped. That often means poor adhesive coverage or bond failure underneath.
- More than one tile is cracked. A repeated pattern usually points to movement in the substrate or installation stress.
- Grout is cracking as well. Tile and grout failing together rarely comes down to a simple surface blemish.
- There is moisture nearby. Damp skirtings, mould growth, swollen trims, or staining below the bathroom all need proper investigation.
- The crack is in a shower, balcony, or other wet zone. Those are the areas where cosmetic repairs can create the most expensive false confidence.
The National Construction Code references AS 3958.1 for ceramic tiling, and that standard requires high adhesive contact in wet areas and on floors. For a shower base or large-format tile, poor support under the tile is a common reason cracks come back after a patch. You can check the standard summary through the ABCB guidance on wet area and tiling compliance.
A practical rule on site is simple. If the tile is cracked because it is unsupported, filling the crack does nothing to fix the reason it cracked.
The cost trade-off is real
I understand why people try epoxy first. Replacing one tile can be hard if spares are gone, and a full bathroom rebuild is a very different budget decision. The Housing Industry Association has reported that bathroom renovation costs have risen sharply over time, which is one reason minor repair work is so common in Melbourne homes. You can review that broader cost trend in HIA's bathroom renovation cost commentary.
Small cosmetic repairs usually cost far less than renovation work, but price is not the only question. A cheap repair in a dry area can be sensible. A cheap repair over a wet-area failure often becomes the expensive option because the moisture keeps travelling behind the tile.
If you need a clearer idea of what a proper assessment or repair looks like, our tile repair services in Melbourne page explains the difference between a cosmetic tile fix and work that needs wider bathroom investigation.
My practical cutoff for DIY versus builder involvement
DIY epoxy repair is reasonable when the crack is minor, the tile is firm, the area is dry, and there is no sign of movement or water entry.
Call a Registered Builder when any of these apply:
- the crack is in a shower recess or shower floor
- the tile is loose or hollow
- the crack runs through multiple tiles or keeps reopening
- the grout, silicone, or adjacent finishes are also failing
- there is any doubt about the membrane, substrate, or compliance history of the bathroom
That is the honest dividing line. If the repair could affect waterproofing performance, or if the crack points to a failure below the tile, the job needs someone who can assess the whole assembly, not just fill the surface.
Frequently Asked Questions about Tile Repair
Can I epoxy a shower tile myself
You can repair a minor, stable crack on a shower wall tile, but you need to be cautious. If the tile is loose, hollow, full-depth cracked, or located on the shower base, epoxy may not satisfy the waterproofing expectations of AS 3740. In those cases, it's better to get a registered builder involved rather than rely on a cosmetic patch.
Is epoxy cheaper than replacement
Usually, yes for a small cosmetic issue. Verified Victorian data puts epoxy repair at $120 to $180 per tile, while the median full bathroom renovation cost in Melbourne is about $10,000. The catch is that a cheap patch becomes expensive if it delays proper waterproofing or hides substrate failure.
How long does the repair take
For small cosmetic work, the actual application is quick. The waiting is the important part. High-performance epoxy putties require 4 to 6 hours at 20°C before sanding, and deeper epoxy-grout repairs need a full 48-hour cure at 22°C before sealing. In bathrooms, patience is part of the repair.
Can renters use tile crack repair epoxy
For a minor chip or hairline crack in a dry area, sometimes yes. The smart move is to get landlord approval first, especially if the tile is in a bathroom. If the repair goes wrong, a mismatched patch can create more problems than the original mark.
Will the repair be invisible
Sometimes. Often it will be close, not perfect. On plain modern ceramic, you've got a fair chance of a discreet repair. On aged, textured, patterned, or heritage tile, the finish is much harder to hide. Colour, sheen and surface texture all need to line up.
Can epoxy fix large-format porcelain
It can handle some chips and fine cracks, but large-format tiles are less forgiving because voids, movement and poor adhesive coverage matter more. If the tile is big, drummy, or installed in a premium bathroom, replacement is often the cleaner solution.
What if the tile crack keeps coming back
That usually means the tile itself wasn't the problem. Movement in the substrate, impact stress, poor bond, or wet area failure can all reopen a repaired crack. Repeating the same epoxy patch won't solve a structural cause.
If you're dealing with a cracked tile in Melbourne and you want a straight answer on whether it's safe to repair, replace, or investigate as part of a bathroom renovation, Melbourne Tiling Services P/L can help. As Registered Unlimited Builders, the team handles tile repairs, waterproofing, shower rectification, and complete bathroom renovations across Melbourne and greater Victoria with the compliance side taken seriously.
Recent Comments