

You can stand in a newly finished Melbourne bathroom, turn on the shower, and see nothing wrong. The tiles look even, the grout lines are clean, and the screen sits neatly on the threshold. Yet the decision that determines whether that bathroom stays dry often sits underneath your feet, in the shaped mortar bed that directs water to the waste.
A screed shower base isn't just a filler layer beneath tiles. It establishes the drainage profile, works with the waterproofing system, and sets the finished height for the tile, grate, screen and adjoining floor. Get those relationships right and the bathroom performs smoothly. Get one wrong and ponding, cracked grout, loose tiles or concealed moisture can appear long before the surface looks obviously damaged.
Table of Contents
- Picture the Shower Floor Beneath Your Tiles
- What a Screed Shower Base Actually Is
- The Build-Up from Floor to Tile
- Getting the Falls Right
- Screed Base Versus Preformed Tray
- Waterproofing Around a Screed Base
- Cost, Time, and Builder Registration in Melbourne
- Maintenance, Repairs, and Long-Term Care
Picture the Shower Floor Beneath Your Tiles
A Melbourne bathroom can look finished while its drainage work remains hidden. The shower runs, the porcelain stays intact, and the screen, tapware and vanity attract attention. Underneath, the shaped base is directing water to the waste, and small errors in that profile can determine whether the room remains dry or develops moisture problems later.
Consider a hob-less entry with a channel drain and large-format tiles. The floor needs a continuous path to the outlet, the waterproofing must suit that plane, and the adhesive and tile thickness must finish at the correct level beside the bathroom floor. A few millimetres can affect the screen line, doorway transition and available fall.
The hidden decisions beneath a finished bathroom
A tiler or builder forms a screed base on site. Compared with a factory-made tray, it can be adjusted to the room, waste position, screen line and entry detail. That flexibility helps in older Melbourne homes, where walls may be out of square and plumbing may not align with a standard tray.
The floor build-up generally includes:
- Structural substrate: A concrete slab or suitable sheet floor supports the shower assembly.
- Bonding preparation: Primer or another specified bonding material helps the screed adhere to the substrate.
- Shaped screed: Cementitious mortar creates the drainage fall and fills the planned shower geometry.
- Waterproofing membrane: The membrane protects the wet-area construction when its location, joints and penetrations are detailed correctly.
- Tile bed and finish: Adhesive and tile form the visible surface, while their combined thickness controls the finished level.
The screed is therefore a shaped drainage component, not merely a layer that raises the floor.
Practical rule: A shower can have attractive tiles and still contain a poorly formed drainage base.
The National Construction Code permits a membrane above or below a tile bed or screed when the screed is used with the membrane, provided the selected system is designed and installed consistently. Shower floors must be fully waterproofed, and shower walls must be waterproofed to at least 1800 mm. Other bathroom wall and floor requirements apply in specified situations. The NCC wet-area waterproofing provisions provide the framework for the waterproofing arrangement.
Those requirements affect practical sequencing. The builder must allow for membrane placement, screed depth, tile thickness and waste detailing before the floor is formed. If the levels are guessed, the finished fall, screen clearance or adjoining floor transition may be wrong even when the tiling itself looks neat.
What a Screed Shower Base Actually Is
A screed shower base is a cementitious mortar bed laid over the structural floor and shaped towards a waste. The installer places and compacts a sand-and-cement mixture, then uses straight edges, levels and trowels to create a continuous gradient. Tiles are fixed over the completed waterproofing and prepared substrate.
The mixture is commonly made on site from sand and cement. Depending on the specified system, the installer may use an acrylic bonding agent, flexible additive or other compatible product to improve adhesion and accommodate the wet-area conditions. The material needs enough moisture to compact properly, but a mix that's too wet can slump and lose the carefully established fall.
Why the shape matters
A preformed acrylic, fibreglass or pressed-metal tray arrives as a moulded unit. Its footprint, outlet location and falls are already established, so it can provide a fast solution when the room matches the tray. That can work well in a straightforward standard-sized shower on a prepared, level floor.
A screed base takes longer to form, but it gives the installer control over irregular Melbourne bathrooms. The shower can be wider, longer, angled or integrated into a hob-less layout. A channel or linear drain can be positioned to suit the room instead of forcing the plumbing to match a stock product.
That customisation comes with responsibility. The installer must calculate the fall from the relevant perimeter points, allow for the drain and tile build-up, compact the screed without hollows, and coordinate the membrane detail. A factory tray reduces some of that site shaping, but it doesn't remove the need for correct waterproofing, support and connection to the waste.
For a plain-language explanation of mortar beds and their role in tile work, this guide to screed in tiling is useful background. Wet-area assemblies also use different liner and membrane approaches, so a homeowner comparing systems may benefit from Trademaster Construction's shower pan liner guide before approving a detail.
Where a screed base earns its place
Screed is particularly practical when the waste is off-centre, the shower has a non-standard shape, or a designer wants the shower floor to flow into a broader wet-area arrangement. It also allows the tiler to resolve small variations in an existing slab or sheet floor during preparation.
What doesn't work is treating the screed as an opportunity to hide poor planning. If the structural floor is moving, the drain is set too high, or the screen position hasn't been confirmed, the mortar bed can't magically correct every issue. The base needs a coordinated design before anyone mixes material.
The Build-Up from Floor to Tile
A shower base can look flat and simple once tiled, but beneath it sits a coordinated drainage assembly. The substrate, shaped screed, waterproofing, adhesive and tile must be set out together. A mistake in one layer can leave the waste too high, reduce the available fall or create a finished floor that does not meet the adjoining level.
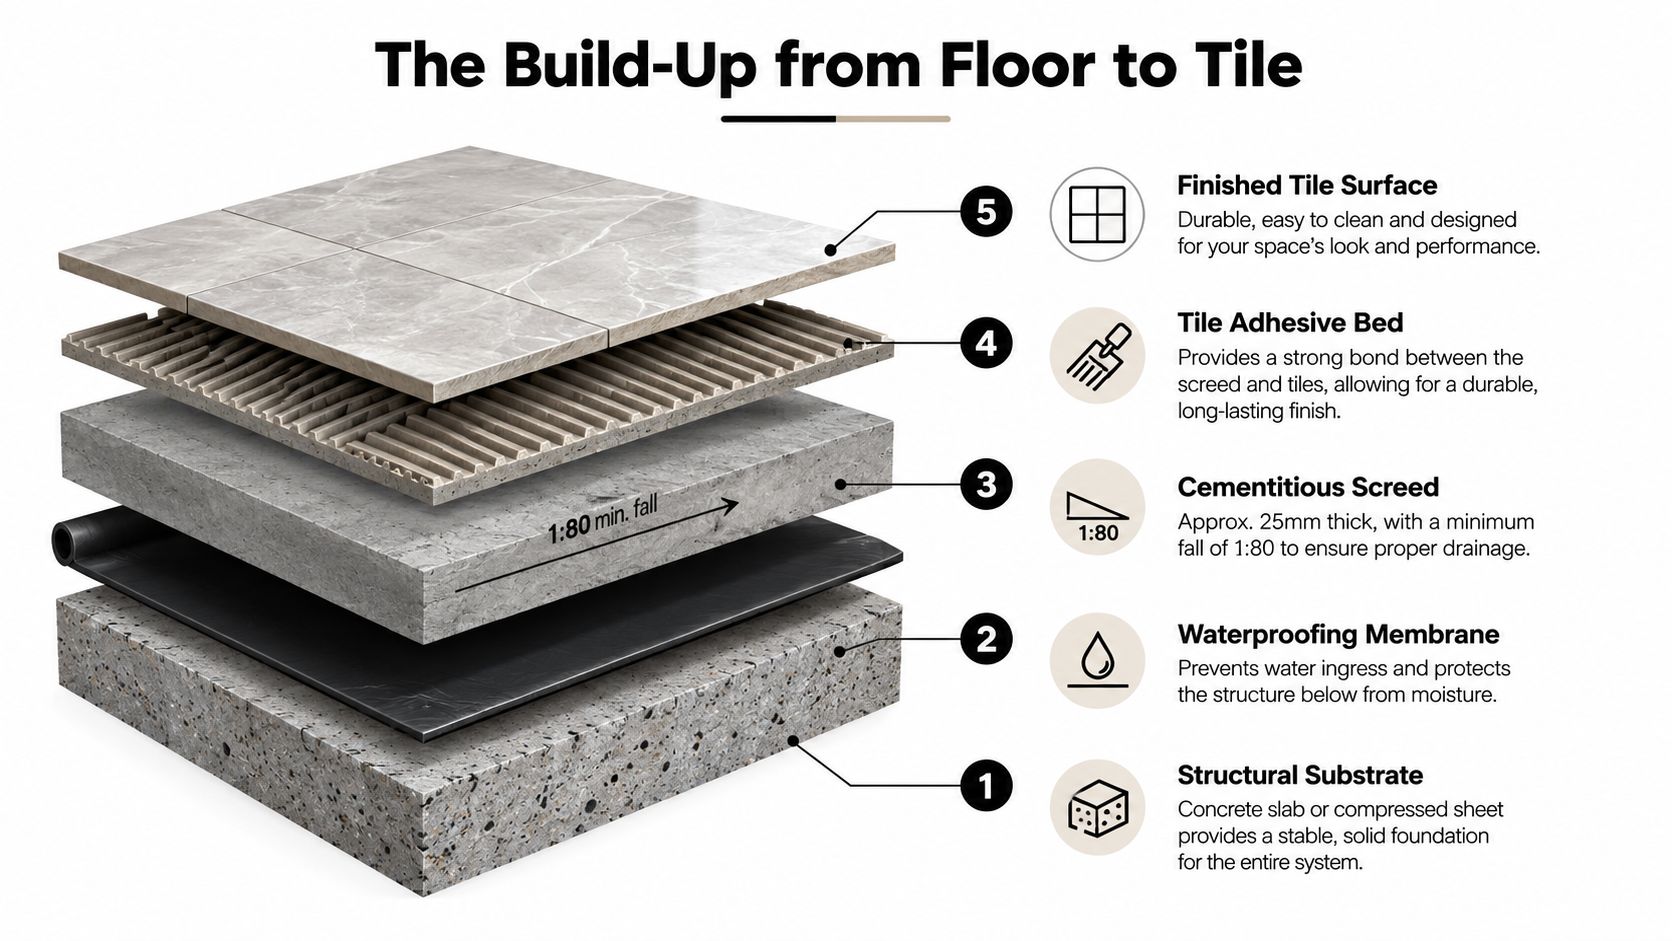
1. Structural substrate
Construction usually starts with a concrete slab or compressed sheet flooring. It must be sound, clean and suitable for the specified bonding method. Dust, contamination, movement and poorly detailed sheet joints can affect the build-up before the waterproofing is installed.
On concrete, the installer may need a primer or bonding slurry specified by the screed system. Sheet flooring requires its own substrate and movement details. Applying a concrete method to a sheet floor can lead to movement, cracking or loss of bond.
2. Screed and its formed fall
The screed is compacted and shaped to direct water towards the waste. Technical guidance on Australian bathroom floor screed thickness identifies minimum build-ups of 50 mm for cement-and-sand screed, 35 mm for fibre-reinforced screed and 65 mm for floating screed over insulation.
Those figures still need to be checked against the selected product, substrate and drainage detail. The thin edge is often the difficult point. It must retain enough strength while preserving the required fall, connecting to the waste and meeting the surrounding floor height. If the tile is thicker than allowed for, the screed profile and drain position may need to change before installation starts.
3. Membrane, drain and junction details
The membrane system must suit the screed, waste and tile assembly. At the outlet, a puddle flange or equivalent detail provides a controlled membrane connection. Corners and wall-to-floor junctions need the specified bond-breaker treatment, because changes in plane concentrate movement and membrane stress.
Membrane placement also affects the usable height of the build-up. The installer must confirm whether the system sits above or below the screed and follow its preparation, curing and reinforcement requirements.
4. Adhesive and tile
Adhesive and tile add the final height. Large-format porcelain, stone and mosaics can produce different levels over the same screed, so the waste, threshold and adjoining floor must be set out for the selected finish. Victorian compliance depends on the completed wet-area assembly, not the mortar bed alone.
The screed is correct only when the finished tiled surface still drains properly and meets the required levels.
Getting the Falls Right
A shower floor can look level after tiling and still hold water. The screed must create a continuous drainage path to the waste, with the finished surface meeting the required fall. For a tiled shower floor, the commonly specified minimum is 1:80, equal to about 11 mm over a 900 mm run or 19 mm over a 1500 mm run. The finished wet-area assembly, rather than the screed alone, determines whether the result performs correctly.
The installer sets a reference height around the perimeter, measures each run to the lowest drainage point, then shapes the screed between those levels. A centre waste creates several sloping planes. A channel drain creates one dominant plane, but the wall lines, screen position and drain length still require accurate set-out. AS 3740:2021 provides the relevant Australian Standard reference for these fall requirements.
A performance window, not a race to the steepest point
A shallow or inconsistent fall can leave birdbaths and back-falls. Excessive fall can feel awkward underfoot, make tile set-out harder and move outside the acceptable performance range. Victorian guidance identifies a maximum continuous fall of 1:50, so adding slope is not a substitute for correcting a poor drainage layout. The VBA waterproofing fact sheet addresses both the required fall and the upper limit.
The membrane substrate and finished tile surface are measured separately. Where a floor waste is provided, the membrane substrate requires a minimum 1:100 fall, while a Category 1 shower floor finish requires at least 1:80. Membrane thickness, adhesive variation, tile geometry and the drain detail can all reduce the effective fall visible at the finished surface.
ARDEX guidance reflects the practical choice to form shower recess screeds up to 1:60 and internal wet areas to at least 1:80, giving the installer room to manage local variation without creating an excessively steep floor. The selected product data and installation requirements still govern the work.
How the installer checks the shape
A competent tiler checks more than one line. The screed is compacted, ruled with straight edges or battens, checked across multiple directions and inspected for flat strips beside the screen line. A long level can reveal a gradual back-fall that a short tool misses.
Older timber subfloors add movement to the calculation. Deflection can crack a rigid build-up or loosen the tile bed, so the substrate, reinforcement and flexible products need to be selected as one system.
For practical guidance, review this guide to floor slope for drainage.
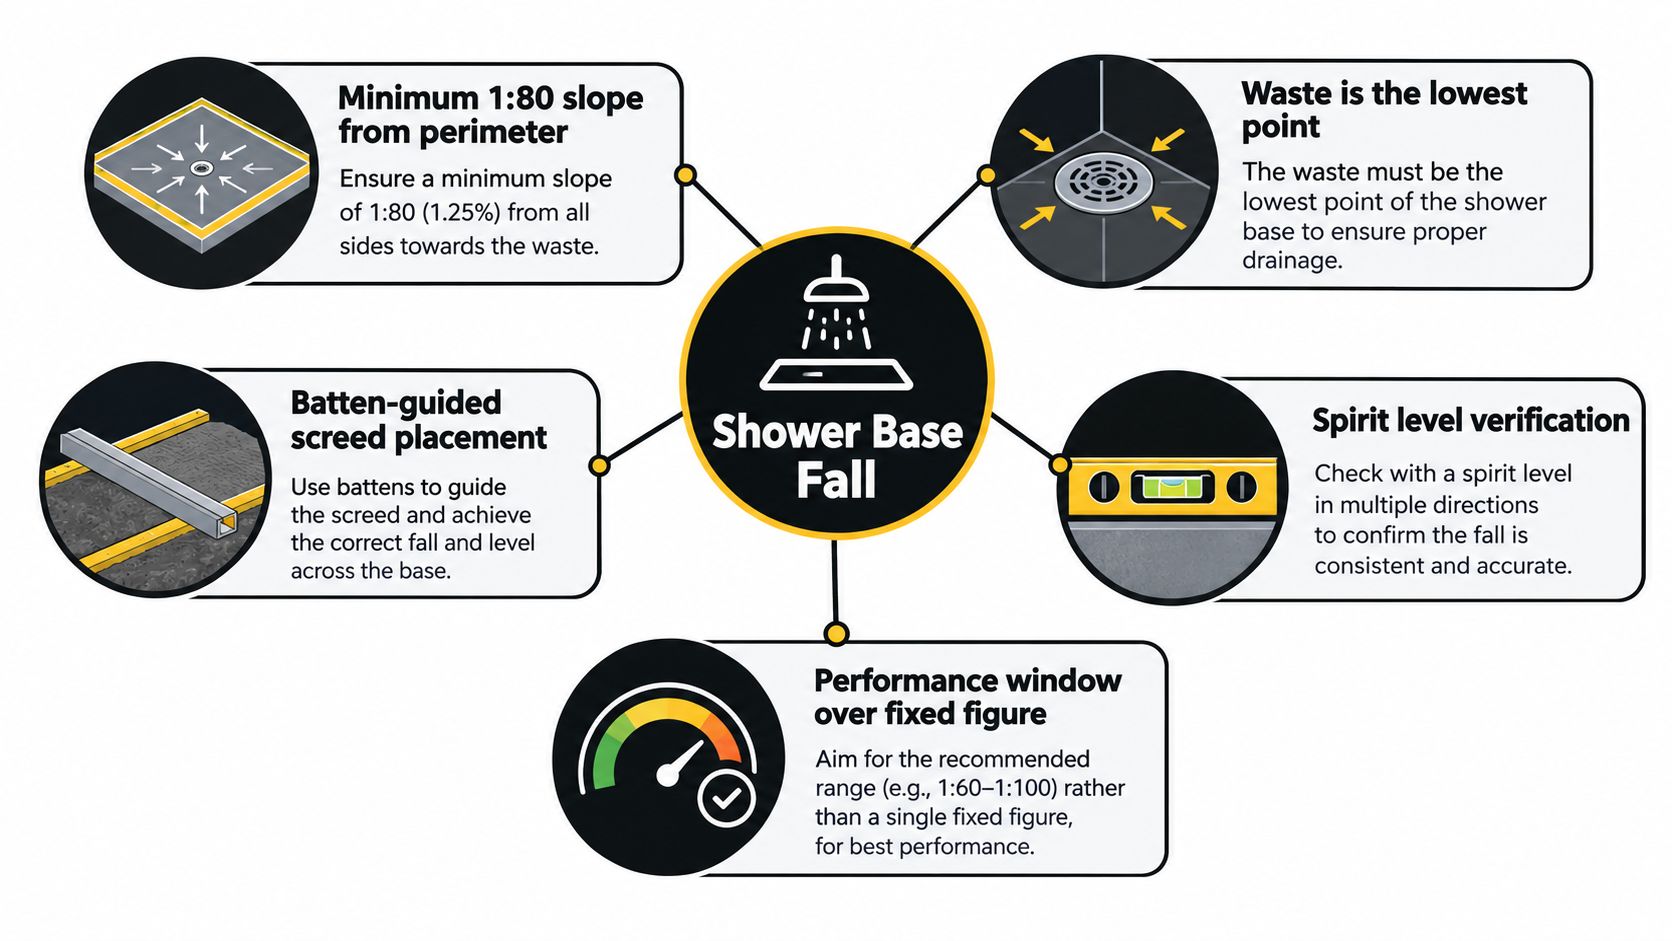
A visual demonstration shows how perimeter height, drain position and screed guides work together:
Screed Base Versus Preformed Tray
The right choice depends on the room, not on a blanket claim that one system is always superior. A preformed tray is efficient when its dimensions, waste position and edge details suit the project. Screed is more adaptable when the bathroom has an unusual footprint or the drainage layout can't follow a catalogue product.
| Factor | Screed Base | Preformed Tray |
|---|---|---|
| Shape | Can be formed around odd walls, nibs and custom screen lines | Limited to available moulded footprints |
| Drain position | Can accommodate centre, offset or channel layouts when designed correctly | Must match the tray's outlet and plumbing arrangement |
| Installation | Requires site mixing, shaping, checking and curing | Drops into a prepared area when the substrate is suitable |
| Falls | Created by the installer and must be verified across the whole surface | Factory-formed, but still depends on correct support and installation |
| Waterproofing | Membrane and waste detail are installed as part of the wet-area system | Tray connections and surrounding membrane details remain critical |
| Repairs | Can often be locally retiled or repaired when the underlying assembly remains sound | A cracked or failed tray may require replacement and disturbance to adjacent work |
The cost trade-off is broader than the product
A tray may appear cheaper because it arrives ready to place. The genuine comparison includes floor preparation, waste relocation, support, waterproofing transitions, screed labour, curing time, adhesive and tile work. A screed base may carry more site labour, but it can avoid expensive compromises where a stock tray doesn't fit.
Melbourne apartments can create a different decision again. A second-storey slab may already have set falls or fixed penetrations, and the installer must work with those conditions. In a narrow ensuite, a custom screed can make space for a nib wall or unusual screen position that a standard tray cannot accommodate.
Repairability matters
A sound screed assembly can often be retiled or locally repaired without replacing a moulded tray. That doesn't mean every leak is a small repair. If the membrane has failed broadly, the fall is wrong or the substrate has moved, rectification may involve removing the tile and screed before rebuilding the wet area.
A tray makes sense where speed and repeatability outweigh custom geometry. Screed earns its place where the room requires control. The mistake is choosing the product before confirming the waste, finished levels and waterproofing strategy.
Waterproofing Around a Screed Base
A screed shower base is a shaped drainage surface, so the membrane must follow the finished falls without interrupting drainage or leaving weak points at the edges. On many Melbourne projects, the specified arrangement is membrane above the cured screed. The screed forms the slope, the membrane follows it, and tiles go down only after the membrane has been detailed and cured.
This arrangement follows industry guidance for wet areas using a screed. The screed establishes the formed drainage surface, while the membrane protects the substrate from water. The VBA waterproofing webinar explains how substrate falls, finished falls and waterproofing work together.
Membrane placement and critical junctions
For a full walkthrough of membrane selection and detailing, see this guide to the shower waterproofing membrane. The installation sequence is simple to describe, but each part affects the finished drainage system:
- Cure and prepare the screed. Remove dust and weak material, then apply the specified primer.
- Apply the membrane. Use the approved liquid or sheet system over the shower base and the required wall areas.
- Detail the waste. Connect the membrane to the puddle flange or compatible waste flange using the manufacturer's method.
- Treat changes of plane. Bond-breaker tape or reinforcing fabric may be required at wall-floor junctions and other movement points.
- Protect penetrations. Niches, pipe outlets and future screen fixings need compatible detailing, not casual sealant.
Tile thickness also affects the drain connection and final falls. Confirm the finished levels before waterproofing, because a membrane cannot correct a screed that drains poorly or a waste set too high.
Waterproofing can extend beyond the visible shower area. In an unenclosed shower, waterproof flooring and water-resistant walling must extend 1500 mm from the shower rose. The James Hardie wet-area construction guide sets out this geometry for unenclosed showers and shower-over-bath arrangements.
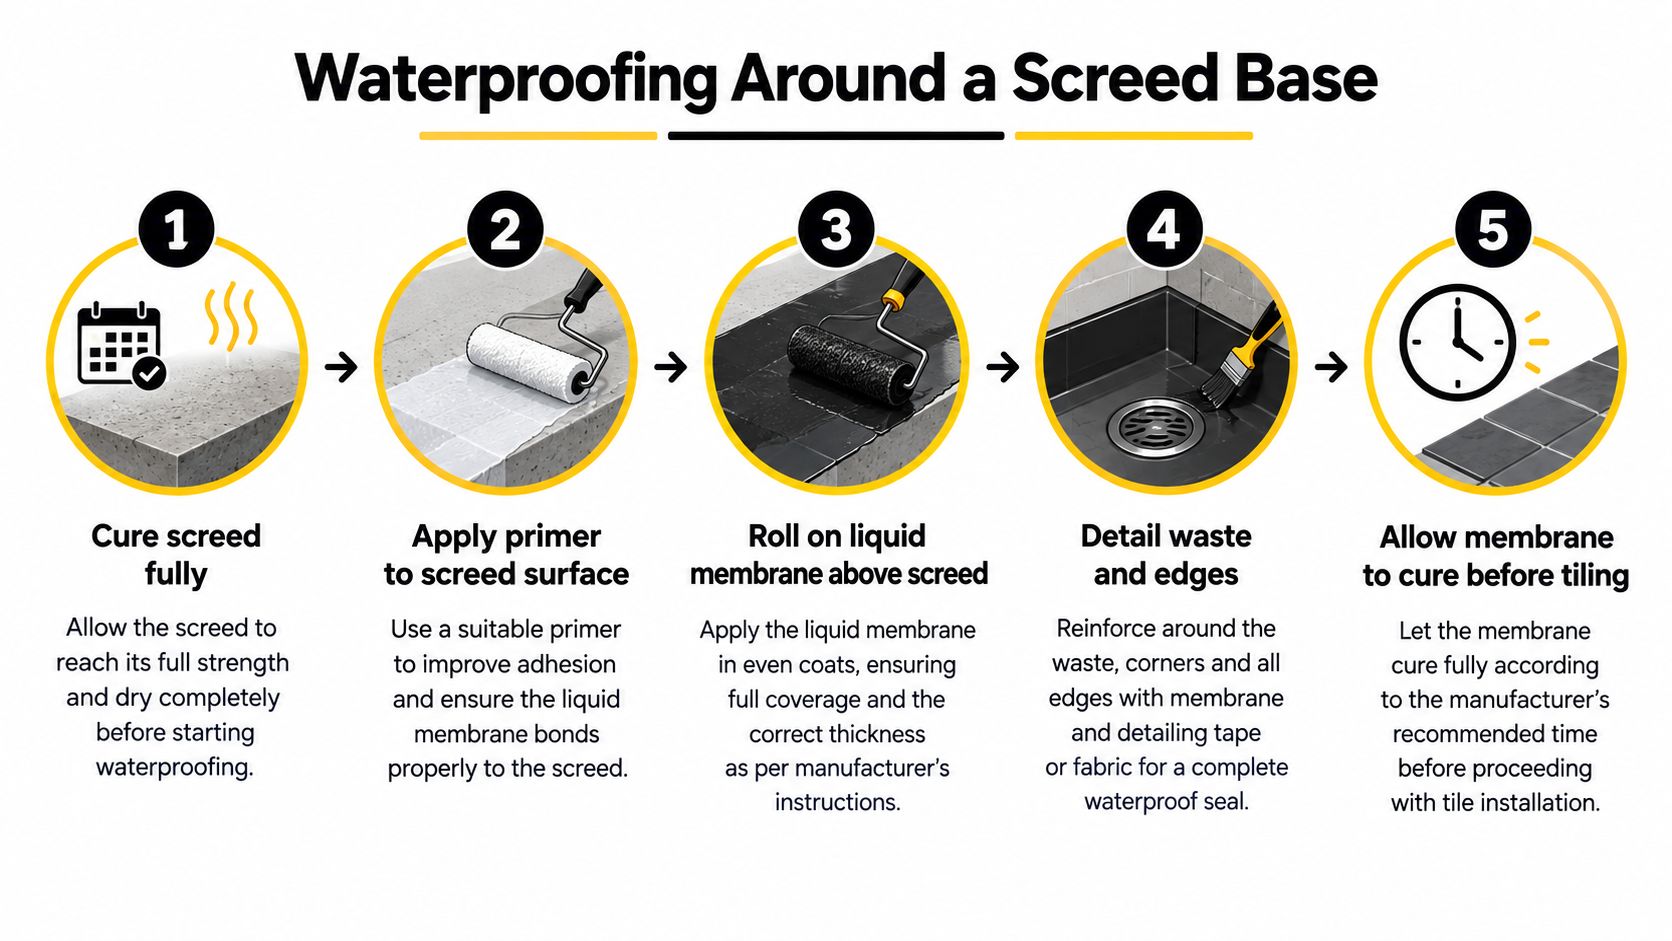
Why tiling must wait
Tiles and adhesive conceal membrane defects. Tiling before the membrane has cured, or before the details have been checked, creates avoidable leak risk. A registered waterproofer should complete the wet-area work and provide the required sign-off before the tiler covers the system.
A membrane-below-screed arrangement may be permitted within a compatible system, but the screed and drainage design above it must then protect the waterproofing strategy. The selected products, drain, substrate and installation sequence must work together. Mixing details from unrelated systems is a common cause of failure.
Cost, Time, and Builder Registration in Melbourne
A shower floor can look like a simple line item until the quote separates the work properly. Allow for substrate preparation, waste and plumbing changes, screed forming, waterproofing, tiles, grout, trims, and repairs to nearby floors or walls. Comparing a bag of screed with a preformed tray gives an incomplete cost picture.
A screed shower base usually takes more on-site shaping because it is formed to the waste and the required falls. It also needs enough curing time for the specified waterproofing system. A preformed tray may shorten forming time when the existing floor is level and the tray suits the room, but it still needs preparation, accurate waste connection, membrane transitions, and coordination with the finished tile height.
Timing affects the programme
The screed must harden and dry sufficiently before waterproofing. Allow 24 to 48 hours as a minimum curing window before waterproofing, with longer drying in a cold or unheated room. Treat this as a planning allowance, not a guarantee. Product requirements, screed thickness, ventilation and site conditions can extend the wait.
Tile thickness also affects the programme because the finished floor level must be set before the membrane and adjoining surfaces are completed. A few millimetres can alter the waste connection, doorway transition or screen clearance. Confirm those levels during set-out, rather than trying to correct them with extra adhesive later.
After membrane application, the waterproofer must allow the product to cure before tiling. Rushing that stage for handover can trap moisture, damage the membrane or weaken the adhesive bond. A workable programme includes inspection, drying and corrections between trades.
Registration isn't an administrative detail
Victoria has a domestic builder pathway limited to bathroom, kitchen and laundry renovation work. The application requires industry qualifications, project-work evidence, a technical referee report, a criminal history check, photo identification and declarations. The VBA bathroom, kitchen and laundry renovation application sets out the formal requirements for that category.
Domestic building work over A$10,000 must generally be performed by a registered builder or building company, with an exception where the work involves only one trade. Use the Victorian domestic building guidance to check the applicable registration and Home Warranty insurance requirements, then confirm the position with the VBA or Consumer Affairs Victoria before work starts.
That exception does not remove the need to coordinate responsibility on a bathroom renovation. Waterproofing, plumbing, carpentry, electrical work, tiling and structural changes can affect one another, particularly in a hob-less shower or reconfigured room. Confirm who holds the relevant registration, who controls the wet-area sequence, and whether the work needs a building permit or VBA notification.
Registration does not guarantee a sound screed. The person forming the base still needs to set the waste, falls, membrane position, tile thickness and finished levels correctly.
Maintenance, Repairs, and Long-Term Care
A screed shower base is protected by the complete tiled and waterproofed system, not by grout alone. Routine inspection helps identify surface failures before moisture reaches vulnerable junctions or adjoining rooms.
Check grout and silicone joints periodically, especially around the wall-floor junction, screen threshold and corners. Look for hollow or loose tiles near the waste, persistent discolouration, efflorescence or a joint that has separated from the surface.
Signs that deserve prompt attention
- Damp at the screen base: This can indicate failed silicone, poor drainage at the threshold or water escaping the intended shower area.
- Musty smells nearby: Odours in an adjoining room can point to persistent moisture behind the wet-area lining or under the floor.
- Drummy tiles: A hollow sound or movement underfoot may indicate a weak bond, substrate movement or water affecting the tile bed.
- Recurring ponding: A low spot can reflect a surface defect, an obstructed waste or a poorly formed fall that cleaning won't correct.
Not every problem requires removing the whole base. Regrouting or replacing failed silicone may solve a surface-junction issue when the membrane and substrate remain sound. A localised tile removal with a compatible membrane patch can be suitable where the damage is limited and the underlying fall still performs.
If the membrane has failed broadly, the screed is cracked from movement or the drainage profile is wrong, the repair becomes much larger. Tiles, screed and waterproofing may all need removal before the base is rebuilt and retiled.
Use pH-neutral cleaning products and avoid aggressive acidic descalers on cement-based materials. Keep the waste clear, don't drill through waterproofed areas without a coordinated detail, and replace failed silicone rather than allowing water to sit at the joint.
Melbourne Tiling Services P/L provides bathroom renovations, screed shower bases, waterproofing, puddle flange installation, tiling and leak rectification across Melbourne and greater Victoria. For a coordinated assessment of your shower floor levels, falls and waterproofing build-up, visit Melbourne Tiling Services P/L and request a quote for the renovation work.
Write a Comment