

The bathroom is gutted, the old tiles are stacked outside, and the shower wall is finally open to the studs. That's usually when someone decides they want a recessed niche, only to discover that the position affects framing, plumbing, tile layout and waterproofing all at once. A niche cut into the wrong section of wall can leave pipes in the way, create awkward tile cuts or introduce a leak behind a finish that looks perfect.
Good shower niche installation starts before the saw. In Australia, AS 3740:2021 and NCC 2022 treat the niche as part of the wet-area waterproofing system, not as a decorative box. The niche needs a stable substrate, continuous membrane coverage and a base that drains towards the shower. The following process reflects how the work should be planned on a Melbourne bathroom renovation site, with the legal role of registered builders considered alongside the practical work.
Table of Contents
- Before You Cut Into the Wall
- Planning Size, Height, and Framing Layout
- Tools, Materials, and Substrate Choices
- Step-by-Step Shower Niche Installation
- Troubleshooting Waterproofing and Tile Failures
- Time, Cost, and When to Hire a Registered Builder
- Quick Decision Framework and FAQs
Before You Cut Into the Wall
A homeowner once showed me a shower wall with the cavity already cut. The opening looked square, but a mixer pipe ran straight through the lower corner, the proposed shelf had no fall, and the remaining studs no longer gave the wall the support it needed. The tiles hadn't been selected yet, so the niche would also have forced narrow slivers into the surrounding layout. The expensive part wasn't cutting the opening. It was undoing the decisions made before anyone checked the wall.
Treat the recess as part of the wet area
Under NCC 2022 wet-area provisions, the shower floor must be waterproof, shower walls must be waterproof to not less than 1800 mm above the floor substrate, and shower-area junctions and joints must be waterproof for not less than 40 mm either side of the junction. The NCC wet-area waterproofing provisions make the practical point clear. A recessed opening interrupts the normal wall surface, so the membrane detail must be planned around it.
AS 3740:2021 adds niche-specific requirements. Every niche surface needs a water-resistant substrate, the niche must be separated from the lining on the opposite side of the wall, all surfaces must be fully waterproofed, and the base must fall at least 1:100 towards the shower. Those requirements are why a niche can't be cut into plasterboard and tiled over.
Confirm the site conditions first
Before the cut-out is marked, confirm:
- Wall construction: Identify whether the wall is masonry, timber frame or steel frame. Each material changes how the opening is supported and how the lining is fixed.
- Services: Use a stud finder and inspect the exposed cavity for water, waste and electrical routes. Body sprays, mixers and hand-showers need space around the niche, not through it.
- Framing strength: Check that removing or modifying studs won't compromise the wall. Add proper side supports, a head and a bottom support before installing the lining.
- Fall direction: Mark the shelf so water runs back into the shower. A level shelf is a defect waiting to become a maintenance problem.
- Waterproofing plan: Record the niche dimensions, internal corners, penetrations and shelf junctions for the waterproofer.
- Contract scope: In Victoria, domestic building work costing more than $10,000 in labour and materials, or any building work requiring a permit, must be performed by a person registered with the Building and Plumbing Commission, with registration approved before work starts. The Victorian waterproofing and tiling guidance explains why this matters during bathroom renovations.
Decide early between a preformed foam insert and a custom tile-in niche. A preformed unit can simplify the shape and membrane detailing. A custom recess gives better control over tile modules, width and shelf design, but leaves more responsibility with the framing and waterproofing trades.
Planning Size, Height, and Framing Layout
The right niche is sized around the bottles, the wall structure and the tile grid, not just the visual proportion of the shower. I normally place the selected tile on the floor or draw its module on the wall before finalising the opening. That exposes problems early, such as a niche edge landing halfway through a feature tile or a shelf that can't carry the intended stone slab.
Choose a footprint that suits the wall
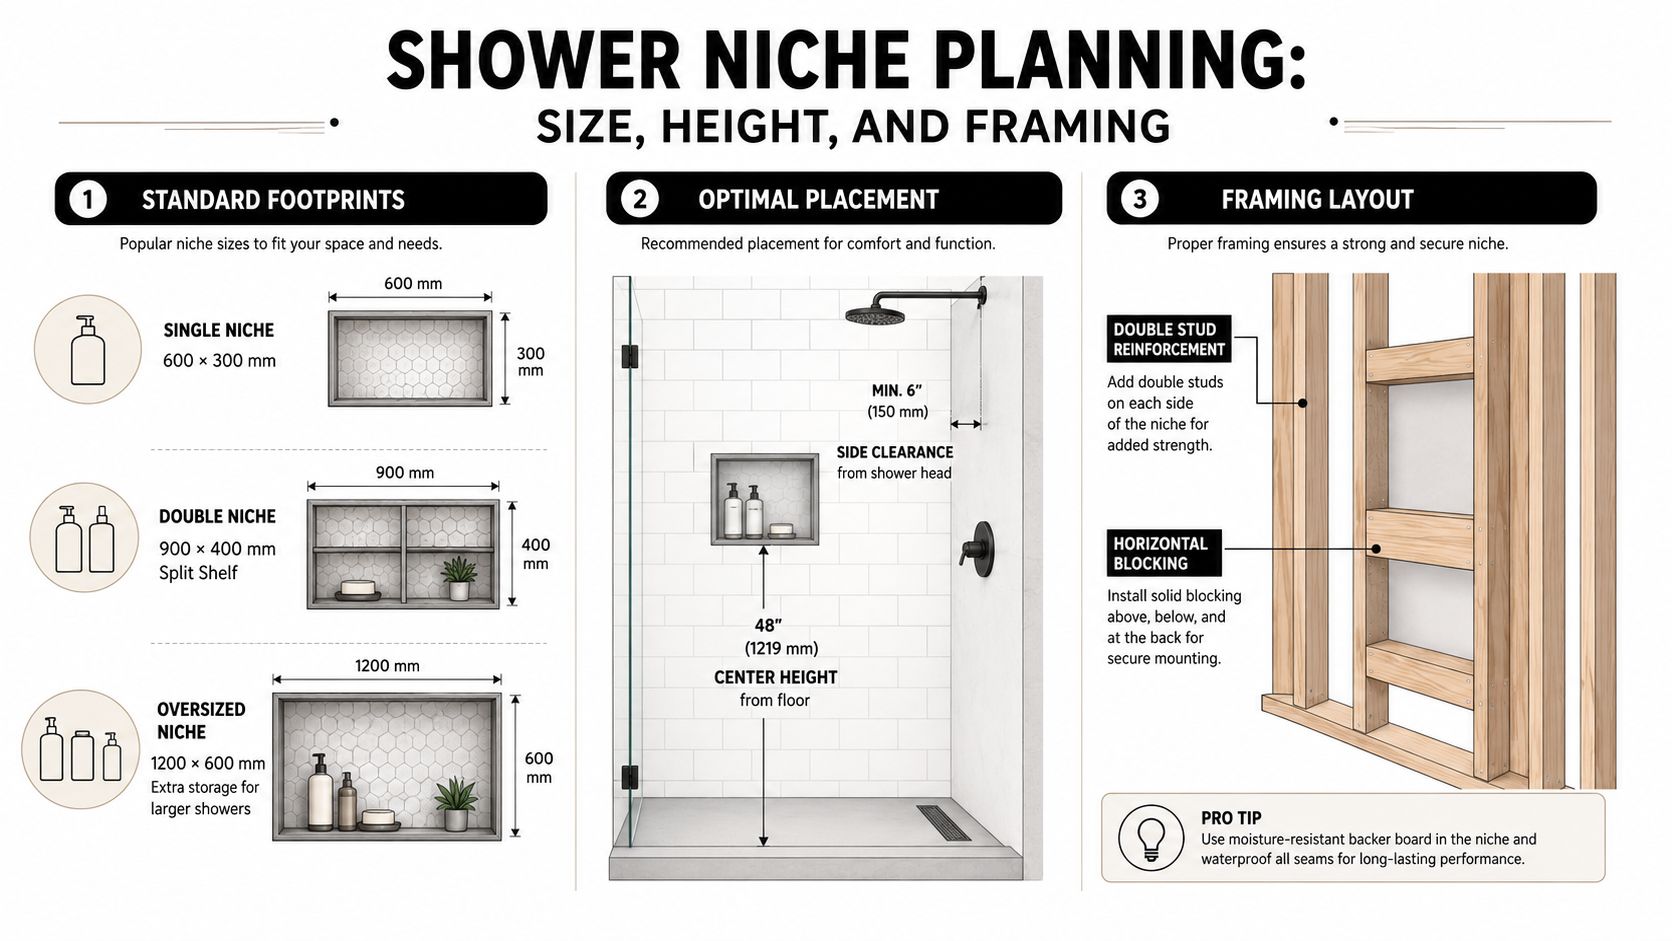
Common planning footprints include:
- Single 600 × 300 mm niche: A practical horizontal recess for everyday bottles where the wall has limited width.
- Double 900 × 400 mm niche with split shelf: Useful when products need to be separated, but the divider and extra junction add detailing work.
- Oversized 1200 × 500 mm niche: Appropriate only where the wall, framing and waterproofing plan can support the larger opening, particularly with multiple shower outlets.
Those dimensions are design examples, not compliance dimensions. The niche must still fit the available cavity and preserve the waterproofing envelope.
The main shelf commonly sits in a height band of 1200 mm to 1500 mm at centre, adjusted for the tallest user and the shower rose. A lower shelf may sit around 300 mm above the bath or floor for foot-level storage, but it mustn't become an obstacle or create a difficult-to-clean recess.
Frame for the cavity, then route services
A niche between two studs is the simplest arrangement. A partial-width niche may need a 90 mm noggin to form the lower or upper support, while a heavy stone shelf should be supported with double noggins and appropriate fixings. Don't rely on tile adhesive to carry a thick shelf.
Plumbing needs to be resolved before the wall is closed. Route body sprays, mixers and hand-showers around the proposed opening, leaving enough room for fittings and penetrations. Moving a tap after the membrane has been applied isn't a small adjustment. It creates a new penetration and requires the affected area to be re-waterproofed under AS 3740.
Document the final cavity width, height, depth and shelf positions on the waterproofing plan. The applicator needs that information to detail bond-breakers, internal corners and shelf-to-wall transitions without guessing on the day.
Tools, Materials, and Substrate Choices
A clean niche depends on having the right materials on site before the wall is closed. Substrate compatibility matters as much as the brand of membrane. A primer designed for fibre cement won't automatically be correct for a foam insert, and an untreated timber support can create problems behind an otherwise sound membrane.
Build the job checklist by stage
Framing and inspection
- Cutting tools: Use a multi-tool or reciprocating saw for controlled openings.
- Fixings: Keep a drill-driver and suitable 90 mm screws available for framing work.
- Supports: Use treated pine noggins, a stud finder, spirit level and laser to set the opening accurately.
- Service checks: Inspect the cavity before cutting, particularly around plumbing and electrical routes.
Plumbing rough-in
- Testing equipment: A pressure gauge helps the plumber verify the rough-in before the lining is installed.
- Penetration preparation: Use thread tape where specified and lagging around services where required to protect pipes and reduce movement.
- Valve planning: The JMJ Plumbing shower valves resource is useful when confirming valve positions and the relationship between plumbing hardware and the niche opening.
Waterproofing
- Primer: Match the primer to the substrate and membrane system.
- Membrane: Use the specified Class III acrylic or polyurethane membrane system.
- Reinforcement: Allow for 100 mm reinforcing bandage at internal corners and shelf-to-wall junctions.
- Sealing tools: Have silicone sealant, a brush, hawk and wet film gauge ready.
- Application control: Follow the membrane manufacturer's coverage and curing instructions rather than judging thickness by colour.
Tiling and finishing
- Cutting and bedding: Select a notched trowel appropriate to the tile, with spacers, spirit level and a tile cutter or wet saw.
- Edge protection: Use a lipped tile profile where the niche edge needs a crisp, durable finish.
- Penetrations: Keep a diamond hole saw available for outlets close to the niche.
- Junction seal: Use compatible silicone at changes of plane instead of forcing grout into corners.
Fibre-cement sheet, including 6 mm or 9 mm compressed sheet for masonry and 6 mm sheet for stud walls, is a common lining option where the system allows it. Foam preformed inserts can reduce framing complexity, while tiled HardieBacker or another approved fibre-cement lining supports a custom tile-in build. Plasterboard isn't suitable as the wet-area niche substrate for this application, MDF swells when exposed to moisture, and untreated pine can rot behind the membrane.
| Stage | Item | Quantity |
|---|---|---|
| Framing | Treated noggins and approved screws | As required for the opening and shelf supports |
| Lining | Water-resistant substrate or preformed foam insert | Enough to line every niche surface |
| Waterproofing | Primer and compatible membrane | Enough for complete coverage of all niche surfaces and adjoining details |
| Reinforcement | 100 mm bandage | Enough for internal corners and shelf junctions, with additional length for overlaps |
| Finishing | Tile adhesive, trims, grout and silicone | Based on the selected tile and niche perimeter |
For estimating, measure the full niche perimeter and allow membrane and bandage for every internal corner and shelf junction. A one-metre perimeter isn't one metre of bandage in practice if several corners and overlaps need reinforcement, so measure the actual detail rather than buying only the visible edge length. For substrate preparation before lining, use this guide to substrate preparation.
Step-by-Step Shower Niche Installation
The sequence should read like one continuous build. Framing, lining, plumbing, waterproofing and tiling are separate trades, but the niche only works when each stage leaves the next one a sound, documented surface.
Frame and line the opening
Start by scanning the wall and confirming that no pipe or cable intersects the proposed cut. Mark the opening with a laser or long spirit level, then install double studs at each side where the design requires additional support. Fit a bottom plate or noggin that can carry the shelf and establish the fall towards the shower.
Add a head support and any intermediate noggins needed for a divider, shelf or stone slab. Fix the lining cleanly, keeping approximately 6 mm gaps at corners where the waterproofing system requires room for a membrane turn-up and flexible detailing. Don't pack the cavity with weak offcuts or leave a shelf supported only by the wall sheet.
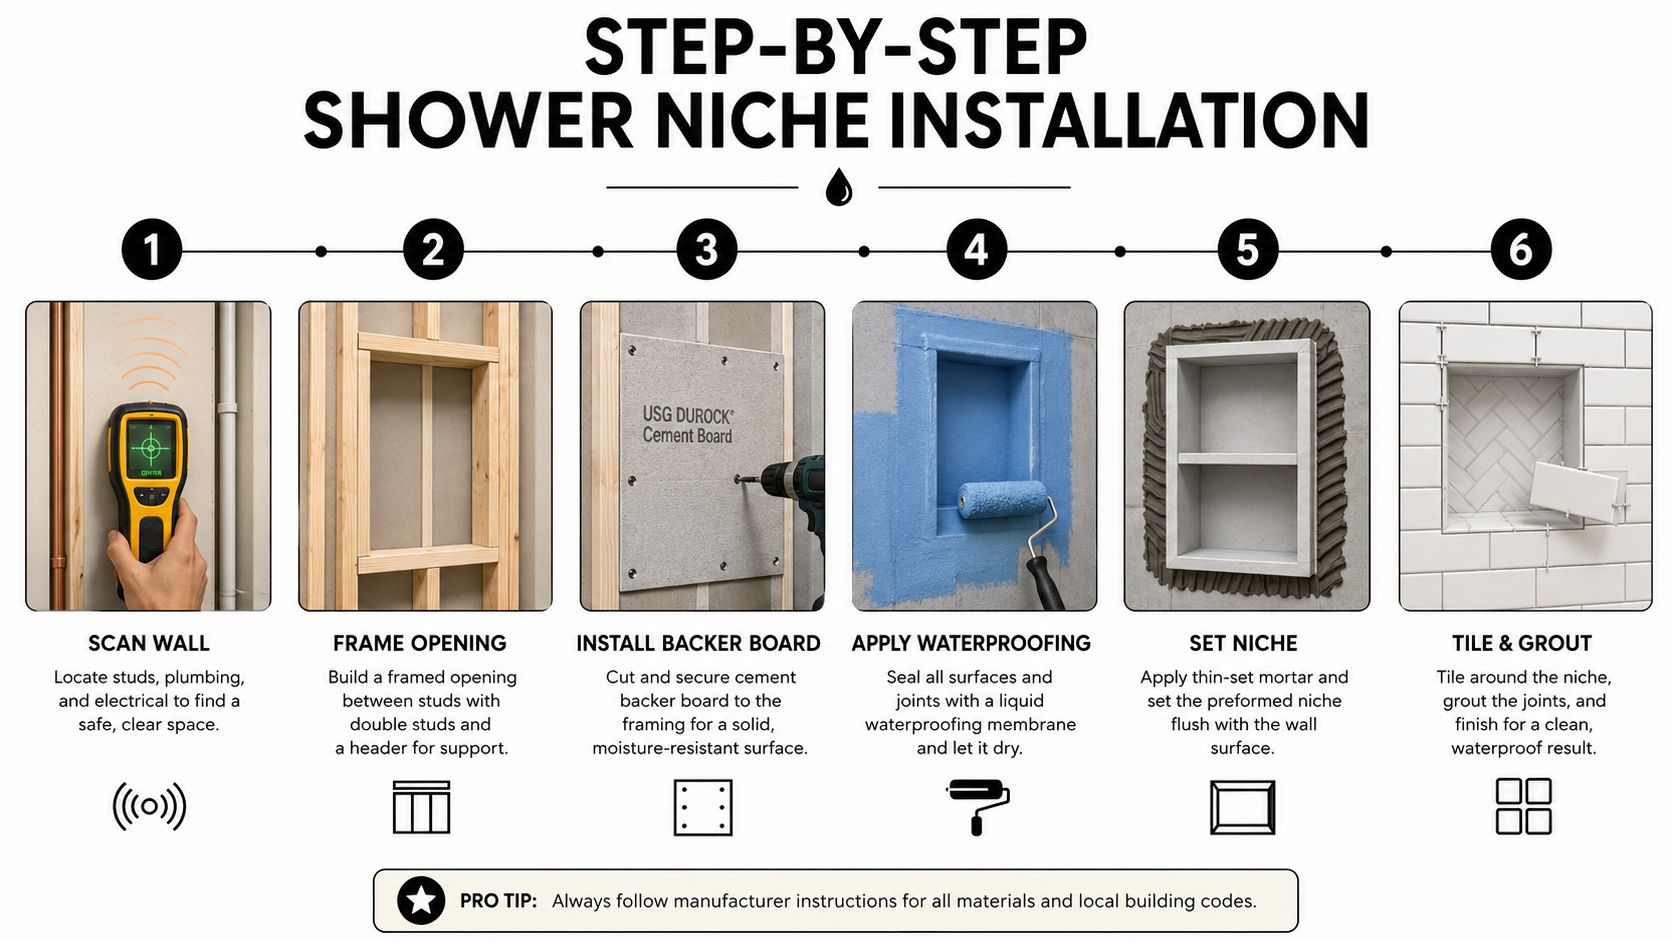
The substrate controls the rest of the system. Villaboard, another approved fibre-cement sheet or a foam preformed niche each needs the primer and membrane specified for that surface. A preformed insert still needs to be installed exactly as the manufacturer's system requires. It doesn't excuse gaps, unsealed flanges or missing membrane continuity at the surrounding wall.
Waterproof every surface
Before applying membrane, remove dust and prime the substrate. Install bond-breaker tape at all internal corners, including the base, sides, back and shelf-to-wall junctions. Apply the membrane in the specified coats and use a wet film gauge where the system requires measured thickness. The AS 3740:2021 guidance reinforces the central rule. The niche must be lined on all surfaces, isolated from the opposite wall lining, fully waterproofed and built with a minimum 1:100 fall towards the shower.
Allow the membrane to cure fully before any required flood test or tiling. Rushing because the surface feels dry can trap moisture under adhesive and compromise the bond. Under NCC 2022, the niche detail must connect with the waterproofed shower floor, walls, junctions and penetrations rather than ending at the visible tile edge.
Tile for drainage and movement
Dry-fit the niche tiles before spreading adhesive. Keep the layout aligned with the surrounding courses where possible, and avoid placing mitred joints directly on the niche base where standing water and movement make the detail vulnerable. Set the shelf with its fall intact, then tile the back, sides, top and base in a sequence that leaves clean, supported edges.
Use mould-resistant grout on the tile joints, but don't grout changes of plane. The niche corners and niche-to-wall junction should receive compatible silicone so movement doesn't turn into a hairline crack. A carefully selected designer shower enclosures for UK homes reference can also help when coordinating the niche position with the eventual screen line, door swing and visible hardware.
Troubleshooting Waterproofing and Tile Failures
A niche that looks dry during handover can still be poorly built. The common mistake is treating a visible symptom, such as discoloured grout or a damp corner, instead of correcting the waterproofing detail beneath it.
Ponding at the shelf
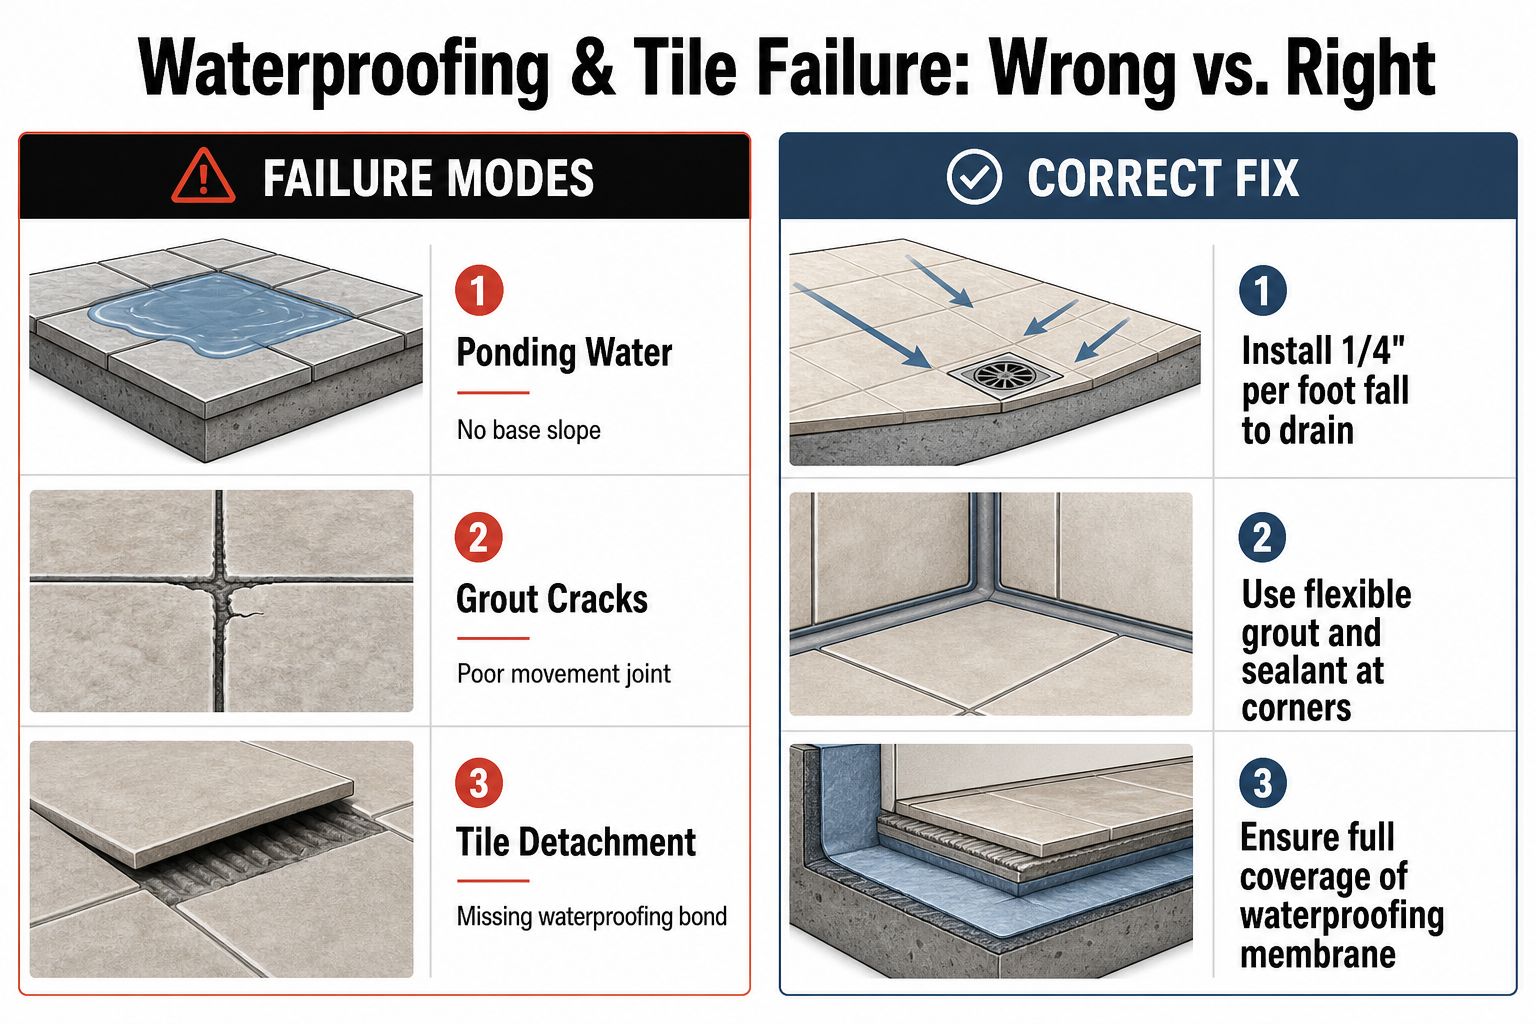
Water sitting on the base usually means the shelf was installed too flat, or the fall was directed towards the back of the niche. Adding silicone to the front edge won't correct the geometry and may trap moisture. Remove the affected finish, rebuild the shelf with a compliant fall, then re-prime and re-membrane the repaired area.
The applicable AS 3740 niche rule requires a minimum 1:100 fall towards the shower. Some site discussions use steeper falls for practical drainage, but the installed system still needs to meet the relevant standard and product instructions.
Junction leaks and cracked corners
A leak at the niche-to-wall junction often starts with a missing bond-breaker, an unreinforced corner or a membrane that stops short of the adjoining wall. Surface caulk is the wrong repair when the membrane detail is incomplete. The sound approach is to expose the failed junction, install the specified bond-breaker and lap the membrane at least 100 mm onto the substrate where the system requires that reinforcement.
Efflorescence and grout haze can appear when tiling or grouting starts before the membrane has cured. Let the waterproofing system reach its specified cure before covering it. Moisture trapped under the finish has nowhere useful to go.
Movement, mould and inspection
Hairline cracks along the niche base are usually a movement-joint issue, not a request for harder grout. Use silicone at changes of plane and replace failed grout where appropriate. Mould behind a shelf can point to blocked drainage, poor ventilation or detailing that has trapped moisture behind the finish.
Tile selection also affects maintenance. An architect specification guide by Varun Marbles can help compare marble and vitrified surfaces before the niche is tiled. For a Melbourne-specific waterproofing detail, refer to shower niche waterproofing guidance.
After the shower has been used, inspect the niche base with a torch and moisture meter once the shower has run for 10 minutes. This isn't a substitute for proper testing or inspection, but it can reveal early ponding or dampness before the damage spreads.
Time, Cost, and When to Hire a Registered Builder
A single niche can be a compact job or a coordination problem disguised as a compact job. A preformed insert usually reduces shaping and internal detailing. A custom tile-in niche gives more control over the tile layout, shelf material and proportions, but it demands stronger framing and more careful waterproofing.
The following planning ranges apply to a Melbourne bathroom renovation in 2024 to 2025, as specified for this installation comparison:
| Install Type | Time | Cost (AUD) | Skill Required | Builder Required? |
|---|---|---|---|---|
| Preformed niche, fully installed | 6 to 10 hours across a tiler-and-waterproofer team over two days | $650 to $1,400 | Experienced tiling and waterproofing knowledge | Depends on total domestic building scope and permits |
| Custom tile-in niche, excluding surrounding wall tiling | 6 to 10 hours across a tiler-and-waterproofer team over two days | $1,200 to $2,200 | Framing, membrane application, tile layout and finishing | Depends on total domestic building scope and permits |
| Owner-builder custom installation | Two full weekends | Costs depend on materials and hired trades | Must understand membrane testing and AS 3740 data sheets | Owner-builder requirements may apply |
These figures cover the niche scope described, not the entire bathroom. Extra plumbing, structural alterations, demolition, screeding, wall tiling and screen installation can change the project total.
The Victorian threshold changes the responsible party
In Victoria, domestic building work where the total cost of labour and materials exceeds $10,000, or work that requires a permit regardless of cost, must be carried out by a registered builder approved before work starts. A homeowner may instead act as an owner-builder where the legal requirements and certificate of consent apply. That means a bathroom renovation can move beyond a simple tiler-and-waterproofer arrangement once the total contract includes other trades.
Waterproofing should be performed by a suitably certified applicator, with records and product data retained. If you can't read the AS 3740 data sheet or have never tested a membrane, the apparent saving from doing the detail yourself may not justify the repair risk.
For a coordinated bathroom renovation, Melbourne bathroom renovation specialists can be considered alongside independent tilers, plumbers, waterproofer teams and registered builders. Call a tiler for tile layout and finish, a waterproofer for membrane work and certification, and a registered builder when the overall scope or permit rules require one. An independent waterproofing inspector is useful when the substrate, membrane or sequencing is disputed before tiles conceal the work.
Quick Decision Framework and FAQs
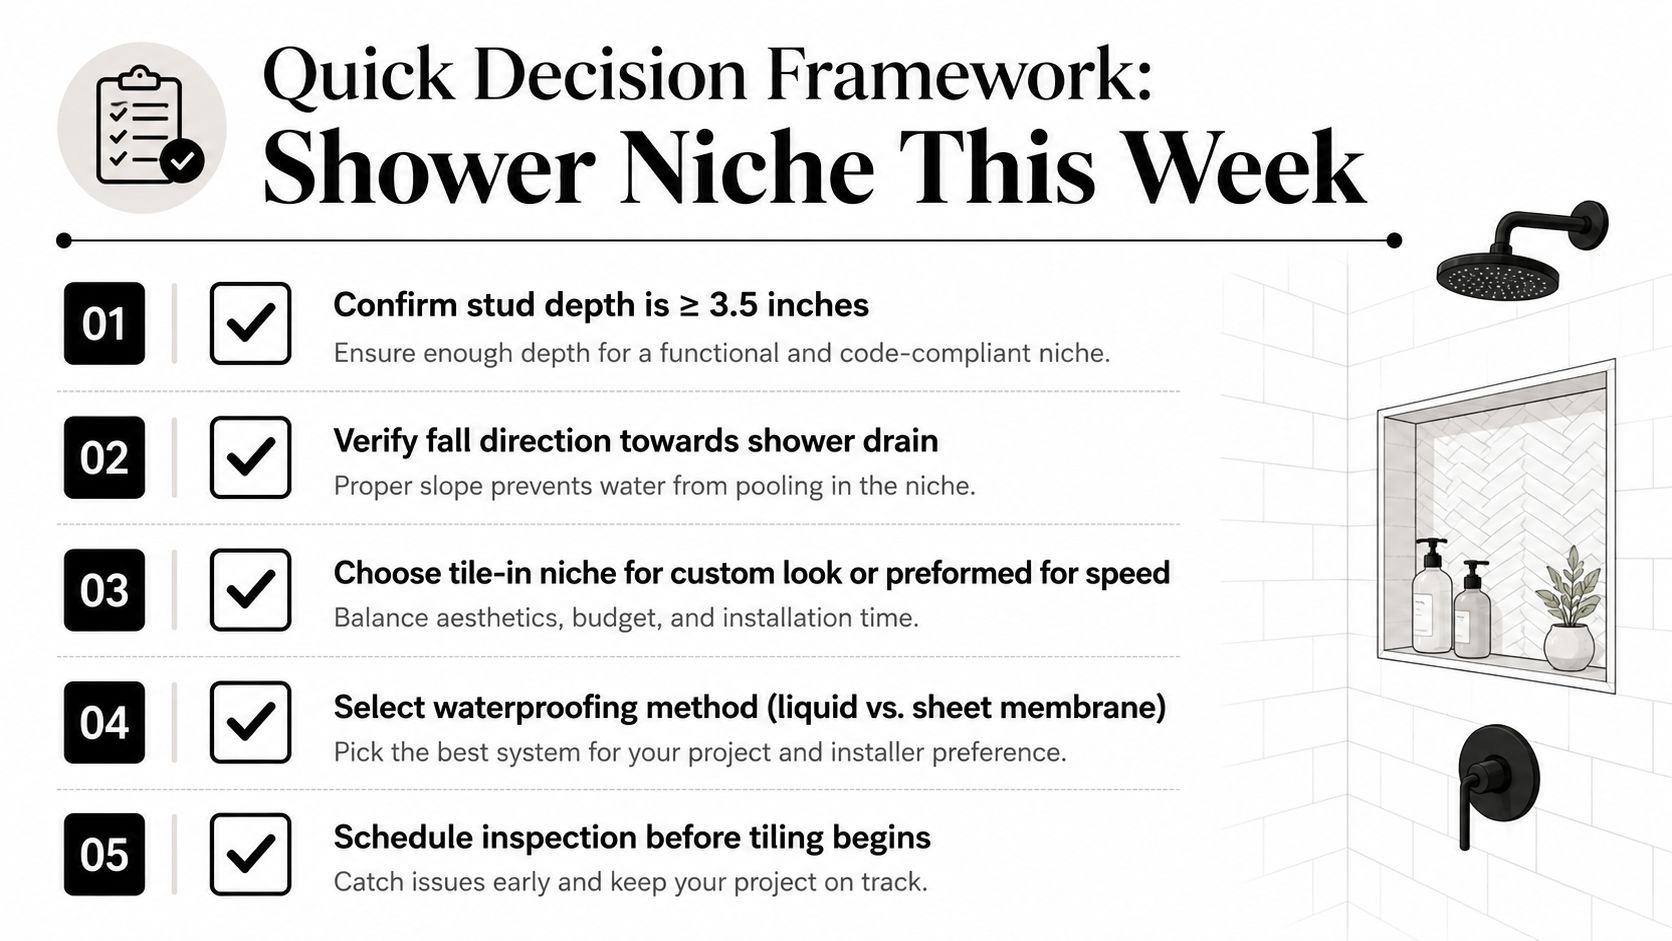
A reliable decision can be made before ordering the niche. Confirm the wall depth, service routes and fall direction first. Then choose the system that gives the waterproofer a clear, continuous detail, rather than choosing a product only because its front edge looks neat.
Make the decision in this order
- Confirm the cavity: Check stud depth, framing strength and service routes before buying a preformed insert or cutting the wall.
- Set the drainage direction: Mark the shelf fall towards the shower and verify it with a spirit level.
- Choose the construction: Select a tile-in niche for custom proportions and tile control, or a preformed unit when a controlled, system-based installation is more suitable.
- Book the trades in sequence: Plumbing and framing come first, waterproofing follows the completed substrate, and tiling starts only after the membrane is ready.
- Check the legal scope: Use a registered builder when the domestic building work exceeds $10,000, or whenever a permit is required, as set out in the NCC wet-area provisions.
Common questions
What minimum cavity depth suits a 90 mm tile-in niche?
Allow the full wall cavity and lining build-up, not just the nominal stud dimension. Confirm the finished internal depth with the niche system and tile thickness before framing.
Does a preformed insert still need a full membrane behind it?
It still needs compliant integration with the wet-area waterproofing system. Seal flanges, junctions and penetrations as specified, and don't leave the surrounding wall membrane discontinuous.
What fall is acceptable inside the niche?
The niche base must fall at least 1:100 towards the shower under AS 3740:2021. The finished surface should drain without ponding.
Can an existing tiled wall be retrofitted?
Yes, but it means opening the wall, checking services and rebuilding the waterproofing detail. Removing only the tiles and inserting a box over the existing surface isn't a compliant shortcut.
Can waterproofing be inspected in Melbourne?
Arrange inspection through an appropriately qualified waterproofing practitioner or building professional, and confirm the individual's current Victorian registration or certification before work starts.
Melbourne Tiling Services P/L coordinates bathroom renovations, shower niche framing, waterproofing, screeding and detailed tiling across Melbourne and greater Victoria. Visit Melbourne Tiling Services P/L to discuss your niche layout, obtain a quote and organise the right sequence of registered builders and wet-area trades for the job.
Recent Comments