

You're probably looking at a bathroom that still works, but doesn't feel good to use. The shower may be boxed in by heavy framing, the room feels tighter than it is, and every edge seems to collect soap scum. In many Melbourne homes, that's the point where people start thinking about a frameless screen.
A frameless shower screen can absolutely change the feel of a bathroom. It opens sightlines, lets tilework do the visual heavy lifting, and gives the room a cleaner, more modern finish. But in a real renovation, the screen isn't a standalone upgrade. It sits at the end of a chain of decisions about layout, waterproofing, falls, wall straightness, hardware, and compliance.
That's where many projects go wrong. Clients often compare screens by appearance alone, then find out too late that the chosen layout doesn't contain water well, the door swing clashes with the vanity, or the glass can't be safely detailed the way they imagined. A good result comes from treating the shower screen as part of the full bathroom build, not as an afterthought.
Table of Contents
- Elevating Your Bathroom with a Frameless Shower Screen
- Frameless vs Framed Screens Understanding Your Options
- Choosing the Right Glass and Hardware
- Designing the Perfect Shower Screen Layout
- The Installation and Renovation Workflow
- Budgeting for Frameless Screens in Melbourne
- Waterproofing, Compliance, and Long-Term Care
- Why a Registered Builder Is Essential for Your Project
Elevating Your Bathroom with a Frameless Shower Screen
A dated bathroom usually has the same problems. The screen chops the room into smaller visual zones, aluminium edges catch grime, and the shower feels like a separate box rather than part of the room. Even when the floor area is reasonable, the bathroom can still feel cramped.
A frameless screen changes that because it removes visual bulk. You see tile, light, stone, and fittings first. The glass becomes part of the architecture rather than the feature itself. In an ensuite, that often makes the room feel calmer. In a family bathroom, it can make the whole space read as newer even when the footprint hasn't changed.
What matters is using the right frameless solution for the room you have. A wide, open panel can look excellent in a large bathroom with generous circulation space. In a tight room, the best result may be a smaller fixed panel, a door with inline glass, or a more contained corner layout.
A good shower screen should make the bathroom easier to live with, not just nicer in a photo.
In full bathroom renovations, the most successful frameless shower screens are the ones designed around how the room will be used day after day. That means thinking about cleaning, splash control, who uses the bathroom, where towels sit, where the showerhead points, and how the waterproofing and tile set-out support the final glass.
Frameless vs Framed Screens Understanding Your Options
The first decision isn't hardware finish or handle style. It's which screen type suits the renovation brief. Most bathrooms come down to three categories: framed, semi-frameless, and frameless.
What changes visually and practically
A framed screen uses metal framing around the glass. It's usually the most forgiving option when budget is tight or the room needs stronger water containment. It does, however, create more edges, more visual interruption, and more places for residue to build up.
A semi-frameless screen sits in the middle. You still get some visible framing, but less than a fully framed system. For many households, it's a practical compromise. It can deliver a cleaner look than a traditional framed screen while keeping more structure around the enclosure.
A frameless screen strips the enclosure back to glass and hardware. That's what gives it its premium and sought-after aesthetic. The room feels more open, and the tilework stays visible. The trade-off is that detailing has to be much sharper. Measurements, wall condition, hardware selection, and shower layout all matter more.
Quick comparison for renovation planning
| Feature | Framed | Semi-Frameless | Frameless |
|---|---|---|---|
| Visual style | More traditional and defined | Cleaner than framed, still has visible structure | Minimal, open, contemporary |
| Cleaning | More edges and channels to clean | Moderate cleaning around partial frame | Easier to wipe down due to fewer interruptions |
| Water containment | Generally stronger containment | Often a good balance of style and sealing | Can be less forgiving if the layout is too open |
| Flexibility in design | Practical for standard layouts | Good for many common bathroom plans | Best when custom measured and designed carefully |
| Renovation feel | Functional | Updated | Premium |
| Budget position | Usually lowest | Mid-range | Usually highest |
If your priority is keeping costs down and controlling splash in a busy household bathroom, framed or semi-frameless can make sense. If your priority is a clean architectural finish and uninterrupted sightlines, frameless usually wins.
There's also a maintenance question. Clients often assume frameless means no compromises. In reality, each system has a place.
- Choose framed when the room is heavily used, the budget is tighter, or containment matters more than appearance.
- Choose semi-frameless when you want a more current look without going fully into premium detailing.
- Choose frameless when the bathroom design, tile finish, and overall renovation quality justify a more exacting system.
Practical rule: Pick the screen type after the layout is resolved, not before. The wrong enclosure in the wrong room creates more problems than the right enclosure ever solves.
Choosing the Right Glass and Hardware
The look of a frameless shower screen is simple. The build behind it isn't. Glass thickness, panel width, hardware type, wall support, and finish selection all need to work together.
Glass thickness and panel limits
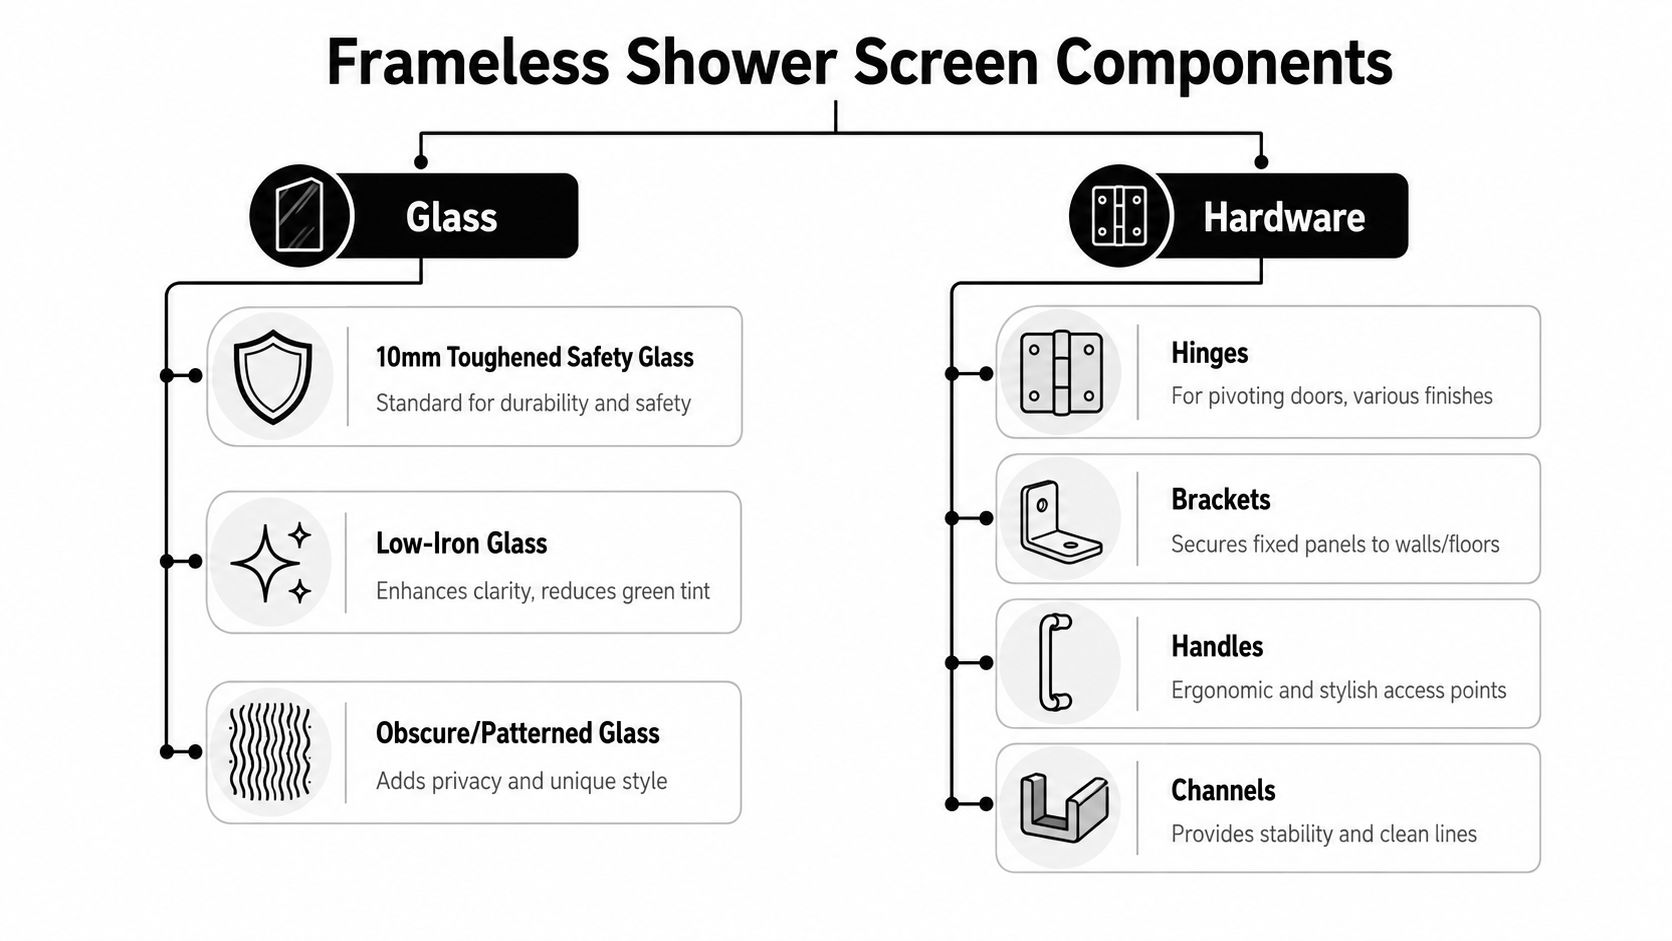
In Australian practice, frameless shower screens should use safety glass compliant with AS/NZS 2208 and be installed in accordance with AS 1288, with common guidance pointing to 10 mm toughened glass as the standard frameless option and 8 mm generally kept for smaller panels or situations with extra bracing, as outlined in guidance on shower screen glass thickness and installation.
For fixed unframed panels, width matters more than height when you're thinking about deflection. Guidance for Australia and New Zealand recommends a maximum width of 750 mm for 8 mm toughened glass and 1,500 mm for both 10 mm and 12 mm toughened glass, which effectively sets 1,500 mm as a practical upper limit for unframed shower panels according to the Window & Glass Association technical bulletin.
That's why asking for “thicker glass” isn't enough. Once the panel gets too wide, layout and bracing become more important than adding weight. If a client wants a broad, open walk-in look, the design may need a stabiliser bar, a header, or a different panel arrangement to keep movement under control.
Glass style and hardware finishes
After thickness and sizing are sorted, the visual choices become easier.
- Clear glass suits most bathrooms because it keeps the room open and shows off feature tiles.
- Low-iron glass reduces the green tint you see on some glass edges. It's often worth considering when the palette is light, especially with white or pale stone finishes.
- Obscure or patterned glass gives more privacy and can soften the visual impact of water spots.
Hardware deserves more attention than it usually gets. Hinges, brackets, handles, channels, and stabiliser bars carry the visual style, but they also carry load. The finish has to suit the bathroom, and the hardware has to suit the actual glass weight and configuration.
In practice, these are the decisions that hold up best:
- Stainless steel fittings are a reliable choice for a clean, modern bathroom.
- Solid brass hardware is often selected where a heavier, more decorative finish is wanted.
- Chrome stays popular because it pairs easily with many tapware ranges.
- Matte black, brushed nickel, and brushed brass can look sharp, but the full room needs to be coordinated so the finish feels intentional.
A well-built frameless screen should feel quiet in use. No obvious flex, no awkward handle placement, and no hardware that looks undersized for the panel.
Designing the Perfect Shower Screen Layout
Most problems with shower screens start at layout stage, not installation day. A screen can be beautifully made and still be wrong for the room. The right layout depends on space, movement, and how water behaves once the shower is running.
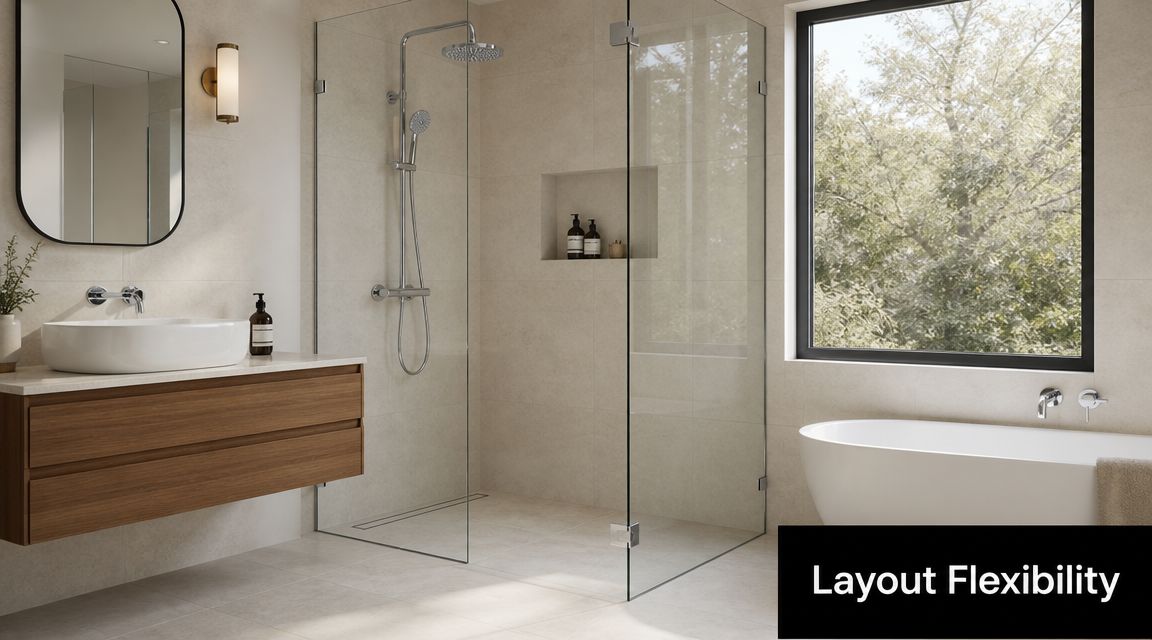
Layouts that work in real bathrooms
In a small ensuite, a single fixed panel can be the cleanest answer. It keeps the room visually open and avoids the clutter of a swinging door. This works best when the showerhead is positioned to throw water away from the opening and the floor falls are set correctly.
In a standard alcove shower, a door with an inline fixed panel often gives a more controlled result. You still get the frameless look, but entry is more defined and the enclosure usually contains water better than a very open walk-in arrangement.
A corner unit can solve awkward planning in family bathrooms, especially where the vanity, toilet, and doorway are all competing for space. The glass can be arranged to preserve circulation without making the shower recess feel cramped.
For tight rooms where door swing becomes a problem, a sliding configuration can be the practical choice. It won't suit every design style, but it can prevent the door from clashing with a vanity, towel rail, or toilet pan.
The details that decide whether it works
The layout only works if the surrounding details support it. These are the checks that matter most on site:
- Showerhead placement decides where splash goes. A beautiful open panel can still flood the bathroom if the outlet is aimed toward the opening.
- Door swing clearance has to be tested against actual room use, not just the plan drawing.
- Screen height and return positioning affect privacy, cleaning access, and water control.
- Nib walls, benches, and recessed shelves can either improve the enclosure or make the glass detailing harder if they're not planned early.
In small bathrooms, the smartest frameless design is often the one that looks slightly more contained on paper and performs far better in daily use.
The best layout is rarely the most extreme one. It's the one that respects the room, the users, and the renovation as a whole.
The Installation and Renovation Workflow
A frameless shower screen should be one of the final fitted elements in the bathroom. If it's measured or installed at the wrong time, everything downstream gets harder. This part of the job only runs well when the renovation sequence is controlled properly.
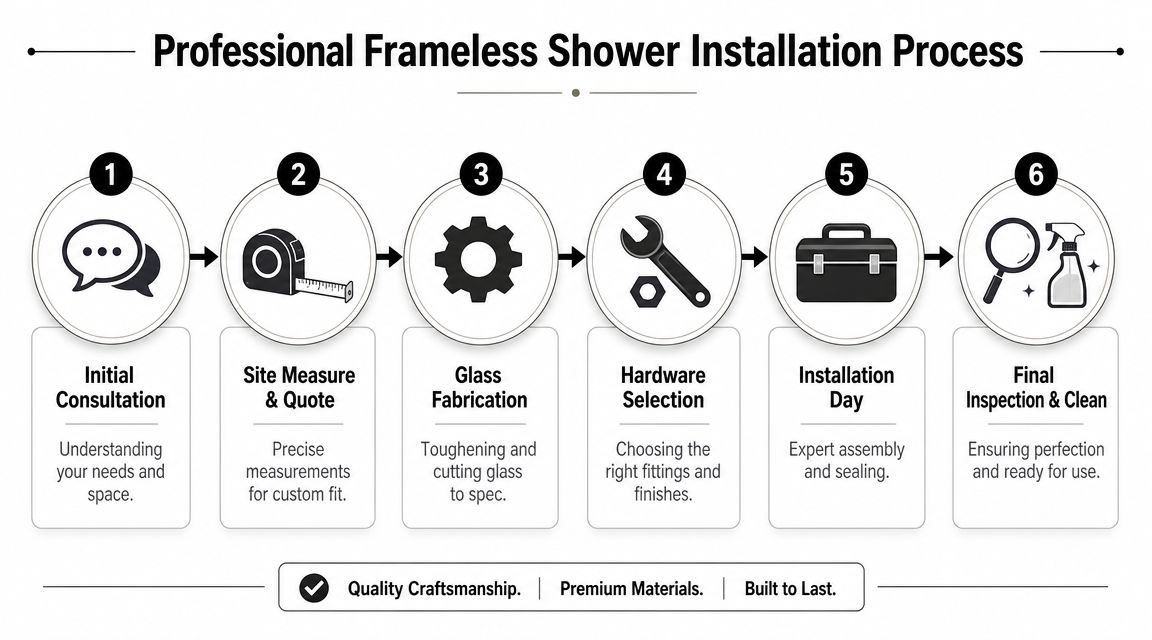
Here's the overall process in visual form.
How the sequence should run
The job starts with site assessment. The room is checked for dimensions, wall condition, floor levels, plumbing locations, and the practical constraints that affect the final screen layout. A registered builder earns their keep during this process, because the screen decision can't be separated from the rest of the bathroom renovation.
Then the wet area build has to be completed in the right order.
Structural and set-out work first
If walls need straightening, carpentry adjustment, plumbing relocation, or substrate correction, that happens before finishes. Frameless glass is unforgiving. Crooked walls and poor set-out don't disappear under minimal hardware.Waterproofing before tiling
The membrane is what protects the structure. Penetrations, junctions, and floor-to-wall transitions need to be resolved before tile goes down. The shower screen sits on top of a waterproofed, finished system. It doesn't fix a weak one.Tiling and final finished surfaces
Only after the tiles are laid, cured, and finished should the final measure be taken. A few millimetres matter. If you measure too early, the fabricated glass may not suit the actual finished opening.
A practical demonstration helps clients understand how accurate the process needs to be.
Why timing matters
Custom glass isn't a flexible product once it's made. Holes for hinges, handle positions, notch details, and edge sizes are all locked in. That's why the final site measure should happen after the room is fully ready, not when it is “close enough”.
A coordinated bathroom renovation also means the glass installer isn't working in isolation. Plumbers, waterproofers, tilers, and the screen supplier all affect the final result. On larger or more detailed jobs, Melbourne Tiling Services P/L handles that sequence as part of the bathroom renovation scope, including the integration of tiling, waterproofing, and shower screen installation.
Measure from finished reality, not from intentions. That one habit prevents a lot of expensive rework.
The cleanest installs usually come from disciplined timing. The screen becomes the final precision element in a bathroom that has already been built properly.
Budgeting for Frameless Screens in Melbourne
Frameless shower screens sit in the premium end of the bathroom market. That doesn't mean they're automatically overpriced. It means the cost is tied to heavier toughened glass, custom fabrication, more exact measuring, and a more careful fitting process.
What drives the final quote
Australian cost benchmarks show why frameless sits above simpler options. A standard shower door installation is commonly priced around AU$530 to AU$1,380, while frameless options sit at the higher end of that range. Angi also notes that glass shower door installation and materials typically cost about US$500 to US$1,500, with custom frameless doors reaching about US$3,300, and that with proper maintenance a frameless door can last 20 to 30 years, according to this shower door cost and lifespan guide.
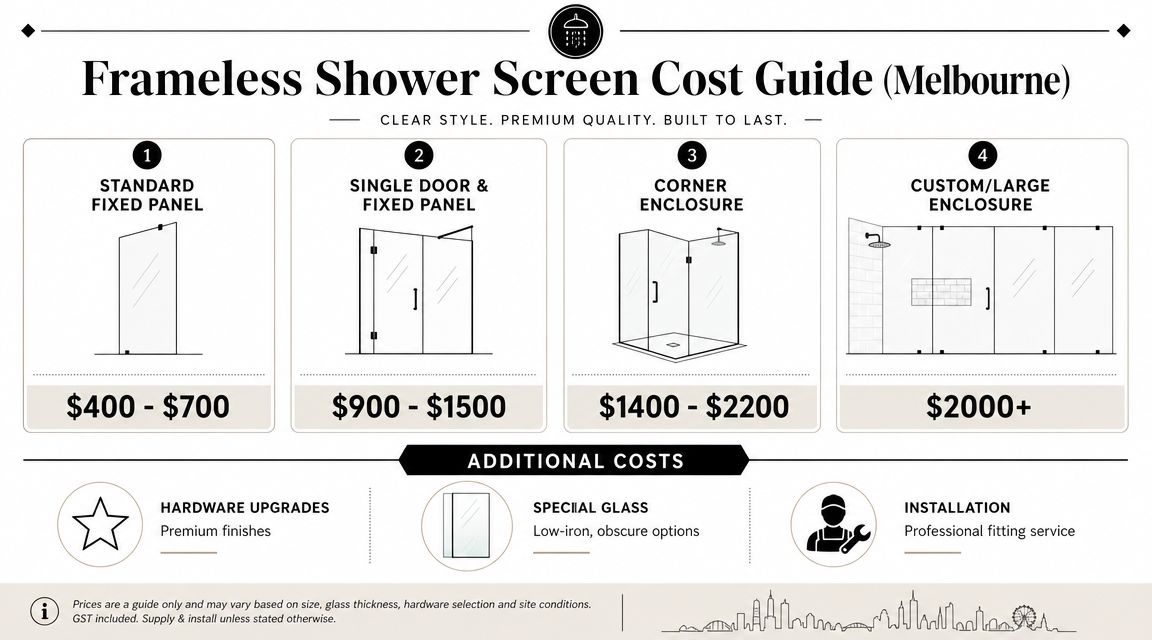
On actual renovation jobs, the final price usually moves for practical reasons rather than marketing reasons:
- Bigger panels cost more because the glass is heavier and harder to handle.
- More complex layouts need more fabrication detail, more hardware, or both.
- Special finishes on hinges, handles, and brackets can push the figure up.
- Custom conditions on site such as angles, nib walls, benches, and uneven existing structures often increase labour.
If you want a more project-specific breakdown, this shower screen installation cost guide for Melbourne is a useful starting point.
Thinking beyond the ticket price
A cheaper screen can still become the more expensive choice if it ages badly, contains water poorly, or needs early replacement. The better way to budget is to ask what you're paying for:
| Cost driver | Why it matters |
|---|---|
| Glass specification | Heavier toughened glass affects both material and installation complexity |
| Hardware quality | Better fittings usually give smoother operation and longer service life |
| Site conditions | Straight walls, good tile set-out, and prepared openings reduce headaches |
| Design complexity | Simpler layouts are usually easier to fabricate and fit |
For most homeowners, the right question isn't “What's the cheapest frameless screen?” It's “What screen suits the room, performs well, and still feels worth the spend years from now?”
Waterproofing, Compliance, and Long-Term Care
The best-looking shower screen in the world won't save a bathroom that leaks. In a proper renovation, compliance and waterproofing come ahead of appearance every time.
Compliance isn't optional
In Australia, all glass shower screens are a safety glazing application and must comply with AS/NZS 2208, which means they use toughened safety glass and certified hardware as part of a compliant installation, as explained in this overview of frameless shower door safety requirements in Australia.
That matters because a shower screen lives in one of the highest-risk interior glass locations in the home. It's in a wet area, it's used constantly, and it needs the right clearances, fixings, and edge protection. Compliant products should also carry the required safety glazing identification or marking.
The other half of compliance is the substrate beneath it. Waterproofing isn't a box to tick. It's the layer that stops water migrating into walls, framing, and surrounding finishes. If the membrane, junctions, and penetrations are wrong, leaks often show up long after the bathroom looks “finished”.
For Victorian projects, homeowners should also understand the paperwork side. Where waterproofing forms part of the work, clear records and certification matter. This guide to a waterproofing compliance certificate in Victoria gives a useful overview of what to expect.
Care and leak prevention
Frameless screens need sensible maintenance, but not fussy maintenance. The simplest routine is usually the best.
- Squeegee after use to reduce water spotting and soap residue.
- Clean hardware gently so finishes aren't damaged by harsh products.
- Check silicone and seals as part of normal bathroom upkeep.
- Act early on movement or leakage instead of waiting for minor issues to become substrate damage.
Most shower leaks blamed on the screen are really layout, waterproofing, or detailing problems.
Long-term performance comes from the whole assembly. Glass, fixings, tile falls, shower position, and membrane work together. When that system is built correctly, frameless shower screens can be both refined and dependable.
Why a Registered Builder Is Essential for Your Project
A frameless shower screen looks simple because the visible parts are simple. The renovation work behind it is not. You're combining design, plumbing, substrate preparation, waterproofing, tiling, glazing, and final fit-off in a wet area where errors are expensive.
One system, one scope of responsibility
This is why a registered builder matters. Instead of treating the screen as a separate purchase bolted onto the end of the job, a builder looks at the bathroom as one connected system. The shower area is planned around use, not just appearance. Door swing, set-out, floor falls, waterproofing terminations, recesses, and glazing details are coordinated together.
That approach is especially important with frameless designs because they can have more limited water containment than framed options. In smaller Australian bathrooms, splash control becomes a real planning issue. The answer isn't to talk clients out of frameless. It's to design the enclosure geometry, showerhead placement, and waterproofing detail properly, as highlighted in this discussion of frameless shower screen trade-offs and splash control.
Where builder oversight changes the outcome
A registered builder reduces common renovation risks in a few very practical ways:
- One point of accountability means the tiler, waterproofer, plumber, and screen installer aren't passing problems around.
- Sequencing is controlled so final measurements happen when the bathroom is ready.
- Compliance is built in rather than checked after the fact.
- Layout decisions are tested against real use including family traffic, cleaning access, and leak risk.
For homeowners planning a broader upgrade, it helps to look at the shower screen inside the full renovation brief. This bathroom renovations project overview in Altona shows the kind of integrated planning that produces better wet area outcomes.
The end result is usually less stress and fewer surprises. You're not buying a piece of glass. You're building a shower that has to perform every day, in a room where water management, compliance, and workmanship all matter just as much as the final look.
If you're planning a bathroom upgrade and want clear advice on frameless shower screens, waterproofing, layout, and renovation sequencing, Melbourne Tiling Services P/L can help you assess the full scope before any glass is ordered.
Write a Comment