

You're standing in a newly tiled shower, grout still bright, screen still clear. Downstairs, a brown stain is already spreading across the ceiling. The tiles look perfect, so the leak feels impossible. That's the trap with waterproofing. The layer that stops water sits under the tiles, and once tiling starts, you can't see it again.
That's why this guide treats a bathroom waterproofing sheet as one part of a complete system. You'll learn where it goes, how the layers fit together, and what records to request before anyone covers the work. The product matters, but the joints, corners, substrate and paperwork decide whether it lasts.
Table of Contents
- What a Bathroom Waterproofing Sheet Is and How It Differs
- Where Sheet Membranes Go in a Bathroom
- Why Installation Quality Decides Whether the Sheet Works
- When a Sheet Suits Your Bathroom Better Than Liquid
- How the Sheet System Works and How to Install It
- Records, Compliance and Builders Before Tiling
What a Bathroom Waterproofing Sheet Is and How It Differs
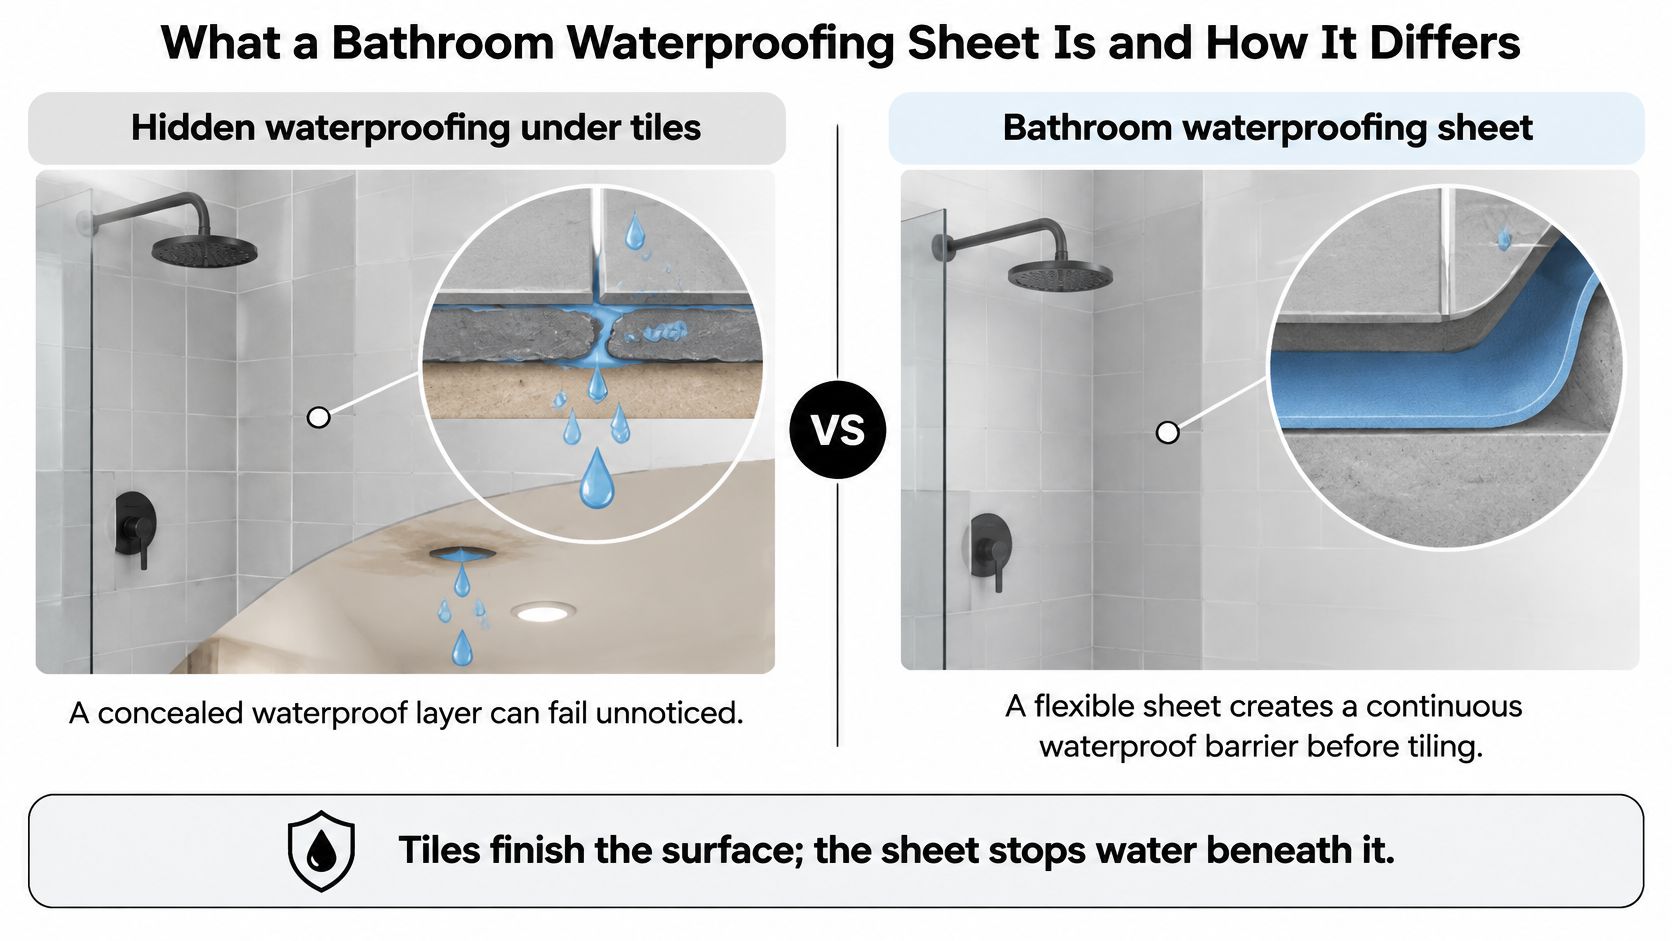
A shower can look beautifully finished and still leak into the room below. Water passes through grout, which is porous, and through tiny gaps at corners and penetrations. If there's no continuous barrier behind the finish, that water reaches framing, cabinetry and ceilings long before you notice anything wrong.
A bathroom waterproofing sheet is a flexible membrane bonded to the substrate under tiles, with joints and corners sealed using matching tape, corner pieces and adhesive. A liquid membrane does the same job differently. The installer brushes or rolls it on in coats, often embedding reinforcing fabric at corners while the coat is wet.
The visual below shows why the hidden layer matters more than the visible finish.
Bathroom waterproofing sheet versus liquid membrane at a glance
| Factor | Waterproofing sheet | Liquid membrane |
|---|---|---|
| Form | Rolled sheet bonded to the substrate | Liquid applied by brush or roller in coats |
| Joints and corners | Joint tape and pre-formed corner pieces bonded with system adhesive | Reinforcing fabric or tape embedded in the wet coat |
| Thickness control | Set by the sheet and its bond | Depends on number and rate of coats; verify against the product data |
| Curing before tiling | Follow adhesive and sealant cure times | Each coat must dry and the full system must cure per product data |
| Main installation risk | Poorly bonded laps, corners and penetrations | Uneven coverage and thin spots at corners and wastes |
| Typical choice | Flat, sound substrates and large floor areas | Complex shapes, niches and many small penetrations |
Read the table as a starting point, not a verdict. Homeowners often ask which category is waterproof, and the honest answer is that either can be, and either can fail. A sheet that's well made in the factory still depends on site work at every lap and pipe.
Practical rule: Tiles and grout finish the surface. The membrane underneath stops the water.
Both systems fail for the same core reasons. The substrate moves or holds moisture, a corner isn't reinforced, a waste isn't sealed, or incompatible products are mixed. Judging a job by the roll or tin alone misses those risks. The useful question is whether the whole build-up, from substrate to tile adhesive, works as one tested system.
Where Sheet Membranes Go in a Bathroom
Start with the shower, because it's the highest-stakes zone. Water hits the floor and walls daily, under pressure and with heat, so the rules are strictest there. The NCC waterproofing guidance for houses states that the entire shower floor, including a hob or step-down, must be waterproof, and shower walls must be waterproof to at least 1,800 mm above the floor substrate. Wall junctions, wall-to-floor junctions and relevant joints inside the shower must also be waterproof.
That means the sheet can't stop neatly at the shower screen line if the floor and junctions continue beyond it. It runs across the full shower floor, turns up at the walls, and carries up the walls to the required height. Every change of direction gets tape or a corner piece, because corners move slightly and a flat sheet folded sharply can bridge or split.
Bathroom zones, NCC requirements and what the sheet must do
| Bathroom area | What the NCC requires | What the sheet must do |
|---|---|---|
| Shower floor, including hob or step-down | Must be waterproof | Run the sheet across the full floor and up to the walls at the junction |
| Shower walls | Waterproof to at least 1,800 mm above the floor substrate | Carry the sheet to at least 1,800 mm with sealed joints |
| Wall-to-floor and wall junctions in the shower | Must be waterproof | Use joint tape and corner pieces at every junction |
| Timber-based bathroom floor | Must be waterproof | Give full sheet coverage with sealed joints |
| Tap and spout penetrations in horizontal surfaces | Must be waterproofed around the penetration | Seal the sheet tightly around each penetration |
Outside the shower, the floor material changes the answer. A timber-based floor such as particleboard or plywood needs full waterproof coverage, so the sheet runs wall to wall with sealed joints. Concrete and compressed fibre-cement have been treated as water-resistant in parts of a bathroom under earlier provisions, which is why two similar bathrooms can legitimately have different sheet extents.
Penetrations deserve the same care as large areas. Where a tap or spout passes through a horizontal surface, the sheet must seal tightly around it rather than stop short and rely on surface silicone. A niche adds internal corners and a shelf that holds water, so follow the detailing in our guide to waterproofing a shower niche correctly before you finalise the layout.
If you're comparing approaches for the shower base itself, Trademaster Construction's shower liner guide is a useful plain-language resource on how a liner sits under a shower floor. Use it for concepts, not Australian compliance.
In a renovation, changing the shower layout, replacing the floor or adding new wall linings can bring these requirements into play even if the old bathroom had less coverage. Check the existing substrate and fixture positions first. Then decide where the sheet goes, rather than copying whatever the previous tiles hid.
Why Installation Quality Decides Whether the Sheet Works
Waterproofing failures aren't rare, and they're rarely caused by a sheet wearing out in the middle of a floor. Independent defect research cited in Australian reporting on waterproofing standards covering Queensland, New South Wales and Victoria ranked waterproofing as the third most common defect category, at 11.46 percent of all recorded problems. The reported issues were membrane failures, defective membrane installation, and inadequate falls to shower areas.
Separate NSW strata research cited in that reporting found serious waterproofing defects in 42 percent of surveyed Class 2 apartment buildings. Read that figure carefully. It describes surveyed apartment buildings, not every Australian house or bathroom, so it doesn't predict your renovation. It does show how often concealed work goes wrong when detailing and inspection are weak.
The three failures that stay hidden
- Membrane failure: The material breaks down, debonds or was never compatible with the primer and adhesive under it.
- Defective installation: Laps lift, corners aren't reinforced, or a penetration is cut too loosely and sealed with hope.
- Inadequate falls: Water ponds instead of draining, so it sits against grout and junctions for hours after each shower.
All three can stay concealed beneath tiles until damage appears elsewhere. You might see a ceiling stain below, mould that keeps returning, swollen vanity panels, or paint bubbling on the other side of a shower wall. By then, the original membrane is buried and the argument about what was installed becomes hard to settle.
Good substrate preparation before waterproofing prevents many of these outcomes, because a sound, clean, correctly sloped base gives the sheet a chance to bond and drain. A premium sheet doesn't rescue a damp screed, a dusty wall or a floor that falls away from the waste.
The material category predicts less than verified system compatibility and workmanship.
For a homeowner, the practical consequence is timing. The evidence exists for a short window between membrane installation and tiling. After that, proving quality depends on photographs, product records and signed documentation captured while the work was visible.
When a Sheet Suits Your Bathroom Better Than Liquid
Don't start with a brand ranking. Start with the substrate in front of you. Ask whether it's flat, sound, dry and stable, and how many corners and pipes interrupt it. Those answers usually point to the easier system to install well.
A sheet tends to suit large, flat floor areas where the installer can lay full widths with few cuts. Its thickness is set during manufacture, so you don't rely on coat build to reach the right film thickness. It also suits projects where the installer regularly uses that specific sheet system and knows its tape, corners and adhesive.
A liquid membrane may be easier where the room fights a roll. Tight ensuites, curved or irregular niches, clusters of small penetrations and awkward steps can be brushed around more readily than they're cut and folded. The trade-off is discipline. The installer must achieve even coverage, reinforce corners and let each coat cure.
Five questions that decide the choice
- Substrate condition: Is it flat, sound and dry, or patched, moving and moisture-affected?
- Shape complexity: Are there niches, benches, steps or tight corners that need many cuts?
- Number of penetrations: How many pipes, wastes and fixings pass through the membrane?
- Installer experience: Has the installer completed this exact system before, not just a similar one?
- Documentation available: Can you get product evidence, method details and installation photos?
Old substrates make generic advice unreliable. A renovated bathroom might combine original framing, new sheeting, a patched screed and moved plumbing. Movement at those junctions matters more than whether the membrane arrived as a roll or a liquid.
Either choice must meet the same compliance pathway for the wet area. If two quotes propose different systems, compare their detailing, preparation and records line by line. The installer who can explain corners, wastes and curing clearly is usually a safer bet than the one who only names a product.
How the Sheet System Works and How to Install It
Think of a raincoat. The fabric can be waterproof, yet water still enters through seams, zips and hems if they're not sealed. A sheet membrane works the same way. The flat field of the sheet is the easy part, and the laps, corners and penetrations decide whether the system holds.
The diagram below builds the system from the bottom up, in the order water would try to pass through it.
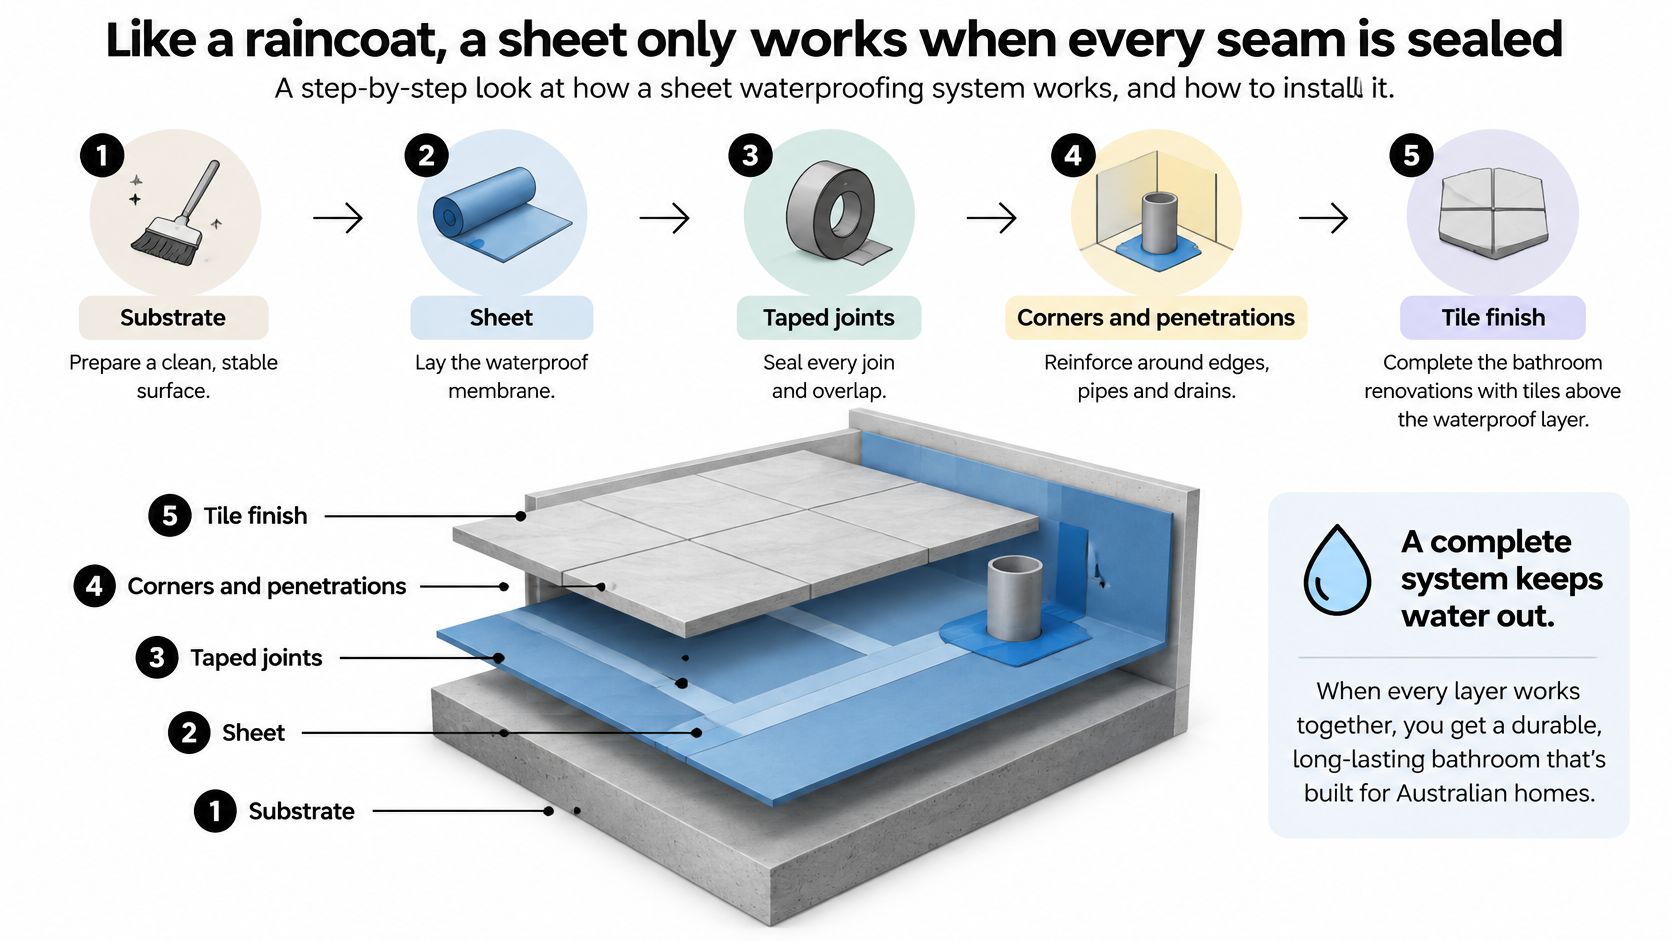
From the bottom, you need a sound, flat, dry substrate, then the specified primer and adhesive, the sheet, joint tape and corner pieces, and sealants at wastes and perimeters. Tile and grout sit on top as the finish, not the waterproofing. The NCC Housing Provisions Part 10.2 recognises flexible waterproof sheet flooring material only when it has waterproof joints, and Victorian guidance requires wet-area membranes to demonstrate compliance with AS/NZS 4858:2004. Follow one consistent pathway, AS 3740 or the Housing Provisions, rather than mixing details.
Moisture control comes before any bonding. The Victorian Building and Plumbing Commission waterproofing guidance warns that excessive residual moisture can prevent a membrane from fully curing or cause premature failure. That warning applies in spirit to the whole build-up, because trapped moisture weakens bonds and can blister coatings and adhesives.
Watch the installation sequence in the video, then use the steps below to check what your installer is doing and why.
Installation in eight steps
- Confirm the substrate is sound, flat and dry. Take moisture readings on screeds and patched walls before primer goes on, because trapped moisture undermines curing and bond. The common slip is trusting a surface that feels dry.
- Repair and prime. Fill cracks, remove loose material, vacuum dust, then apply the primer specified for that sheet and substrate. A generic primer can look fine and still be incompatible.
- Check falls and drainage. Run water or use a level to confirm the floor falls to the waste without ponding. Sealing a floor that holds water locks in a defect.
- Set corners and junction tape first. Fit pre-formed internal corner pieces and joint tape at wall-to-floor junctions before the main sheet, so movement points are reinforced, not bridged.
- Seal wastes and penetrations. Dress the sheet into the puddle flange, seal around grates and pipes, and use the specified sealant and bond breakers. The wrong sealant at a waste can attack the membrane or lose adhesion.
- Lay and bond the sheet. Set out full sheets to minimise joints, use the specified overlaps, spread compatible adhesive evenly and roll out air pockets from the centre outward.
- Inspect before tiling. Check every lap, corner and penetration by hand and eye, and test where the system and project require it. Fix lifted edges now, not after tiles are on.
- Record the work. Photograph coverage, corners and penetrations, and note the system name, batch and installer before linings or tiles hide everything.
The same sequence needs extra care below ground, where external moisture adds pressure from the other side. Northpoint Construction's overview of waterproofing a basement bathroom shows why drainage and detailing matter even more in those settings, although Australian projects still need the local pathway.
Installer check: If you can't see sealed corners and penetrations in the photos, you don't have evidence they were sealed.
Rushing usually shows up as skipped moisture checks, mixed primers, unrolled laps and tiling before adhesives cure. None of those shortcuts saves much time. Each one removes a layer of protection you'll never be able to inspect again.
Records, Compliance and Builders Before Tiling
Ask one question before tiling starts. If this shower leaks in three years, what evidence will show the work was compliant? If the answer is only a verbal assurance, you're relying on memory after the proof has been covered.
In Victoria, the framework is specific. Victorian building standards guidance explains that NCC requirements operate through the Building Act 1993, Building Regulations 2018 and Plumbing Regulations 2018, with the appointed building surveyor responsible for assessing building-permit compliance. Waterproofing must follow the applicable NCC Deemed-to-Satisfy provisions, AS 3740 or an approved Performance Solution, and shower floors, adjacent wet areas and related penetrations are compliance-sensitive work.
That framework has a history worth knowing when old advice conflicts with current practice. The NCC structure changed over time, with details moving between the code and AS 3740, so your documentation should name the applicable NCC edition and the exact pathway used. Don't accept a note that just says waterproofed to Australian Standards. Ask which standard, which edition and which system.
Recent Victorian regulatory-impact proposals for stronger notification at waterproofing and pre-lining stages reflect the same concern you should have as an owner. Once linings and tiles go in, defects are hidden. Your record set is the practical way to keep the work visible on paper.
Our summary of bathroom waterproofing standards in Australia helps you match those records to the relevant requirements before you sign a contract.
Records to request before tiling
| Record | What it proves |
|---|---|
| Product name and AS/NZS 4858 evidence | Sheet is a wet-area membrane that meets the standard |
| Substrate moisture check results | Substrate was dry enough for the membrane to cure |
| Installation photographs | Joints, corners and penetrations were built as specified |
| Membrane coverage details | Full sheet coverage was achieved across the wet area |
| Signed installer records | Named installer accepts responsibility for the work |
| Building permit or inspection status | Whether a permit or inspection applies and was booked |
Use the table as a pre-tiling gate. Tiling shouldn't proceed until the system evidence is on file, moisture was checked, joints and penetrations were inspected, photographs exist, and any required permit or inspection is booked. If one item is missing, pause while the membrane is still exposed. A one-day delay is cheaper than removing tiles to investigate a leak.
Who does what on a compliant project
Registered builders coordinate the trades and sequence, but coordination isn't the same as certification. The Australian Building Codes Board guidance on building practitioners identifies registered building certifiers as the appropriate source for advice about individual buildings or sites, while the NCC provides the technical wet-area rules. A registered builder coordinating plumbers, electricians, carpenters and waterproofers can help manage bathroom renovations, but registration doesn't remove the need for compliant design, installation and certification where required.
Check three things in writing before work starts. Confirm the builder's registration status, clarify whether a building permit or inspection applies to your scope, and ask who signs the waterproofing records. Those answers should be in the quote and contract, not discovered after demolition.
With us, all of our workers are qualified and certified waterproofers or tilers, so the person installing the membrane and the person tiling over it work to the same system and record set. That continuity matters because tile adhesive, grout and movement joints must suit the membrane underneath.
Ask for a written quote that scopes the complete waterproofing system, not just a line for waterproofing. It should name preparation, primer, sheet or membrane system, junction detailing, the records you'll receive and the warranty terms. Our waterproofing work comes with extended warranties, and you should confirm any provider's warranty in writing, including what it covers and what maintenance it assumes, before work starts.
For bathroom renovations, we offer free quotes and 3D drawings, which lets you agree the layout, shower position, niche and waste locations before waterproofing is detailed around them. Moving a waste after the sheet is laid creates penetrations and patching you'd rather design out at the drawing stage.
Property managers and landlords should keep the same file for each property. When a tenant reports a stain or a leaking shower, product evidence, dated photographs and signed records help a rectification team locate the likely failure point quickly. Without them, diagnosis often means opening finished surfaces just to learn what was installed.
If you're planning bathroom renovations in Melbourne and want the waterproofing sheet system, tiling and records handled in one coordinated scope, talk to Melbourne Tiling Services P/L for a free quote and 3D drawings before you commit to a layout. We'll help you confirm the system, detailing and pre-tiling evidence for your bathroom, and our waterproofing work comes with extended warranties.
Write a Comment