
Bathroom Waterproofing Sheet: Installation Tips for 2026

You're standing in a newly tiled shower, grout still bright, screen still clear. Downstairs, a brown stain is already spreading across the ceiling. The tiles look perfect, so the leak feels impossible. That's the trap with waterproofing. The layer that stops water sits under the tiles, and once tiling starts, you can't see it again.

That's why this guide treats a bathroom waterproofing sheet as one part of a complete system. You'll learn where it goes, how the layers fit together, and what records to request before anyone covers the work. The product matters, but the joints, corners, substrate and paperwork decide whether it lasts.

Table of Contents

What a Bathroom Waterproofing Sheet Is and How It Differs

A shower can look beautifully finished and still leak into the room below. Water passes through grout, which is porous, and through tiny gaps at corners and penetrations. If there's no continuous barrier behind the finish, that water reaches framing, cabinetry and ceilings long before you notice anything wrong.

A bathroom waterproofing sheet is a flexible membrane bonded to the substrate under tiles, with joints and corners sealed using matching tape, corner pieces and adhesive. A liquid membrane does the same job differently. The installer brushes or rolls it on in coats, often embedding reinforcing fabric at corners while the coat is wet.

The visual below shows why the hidden layer matters more than the visible finish.
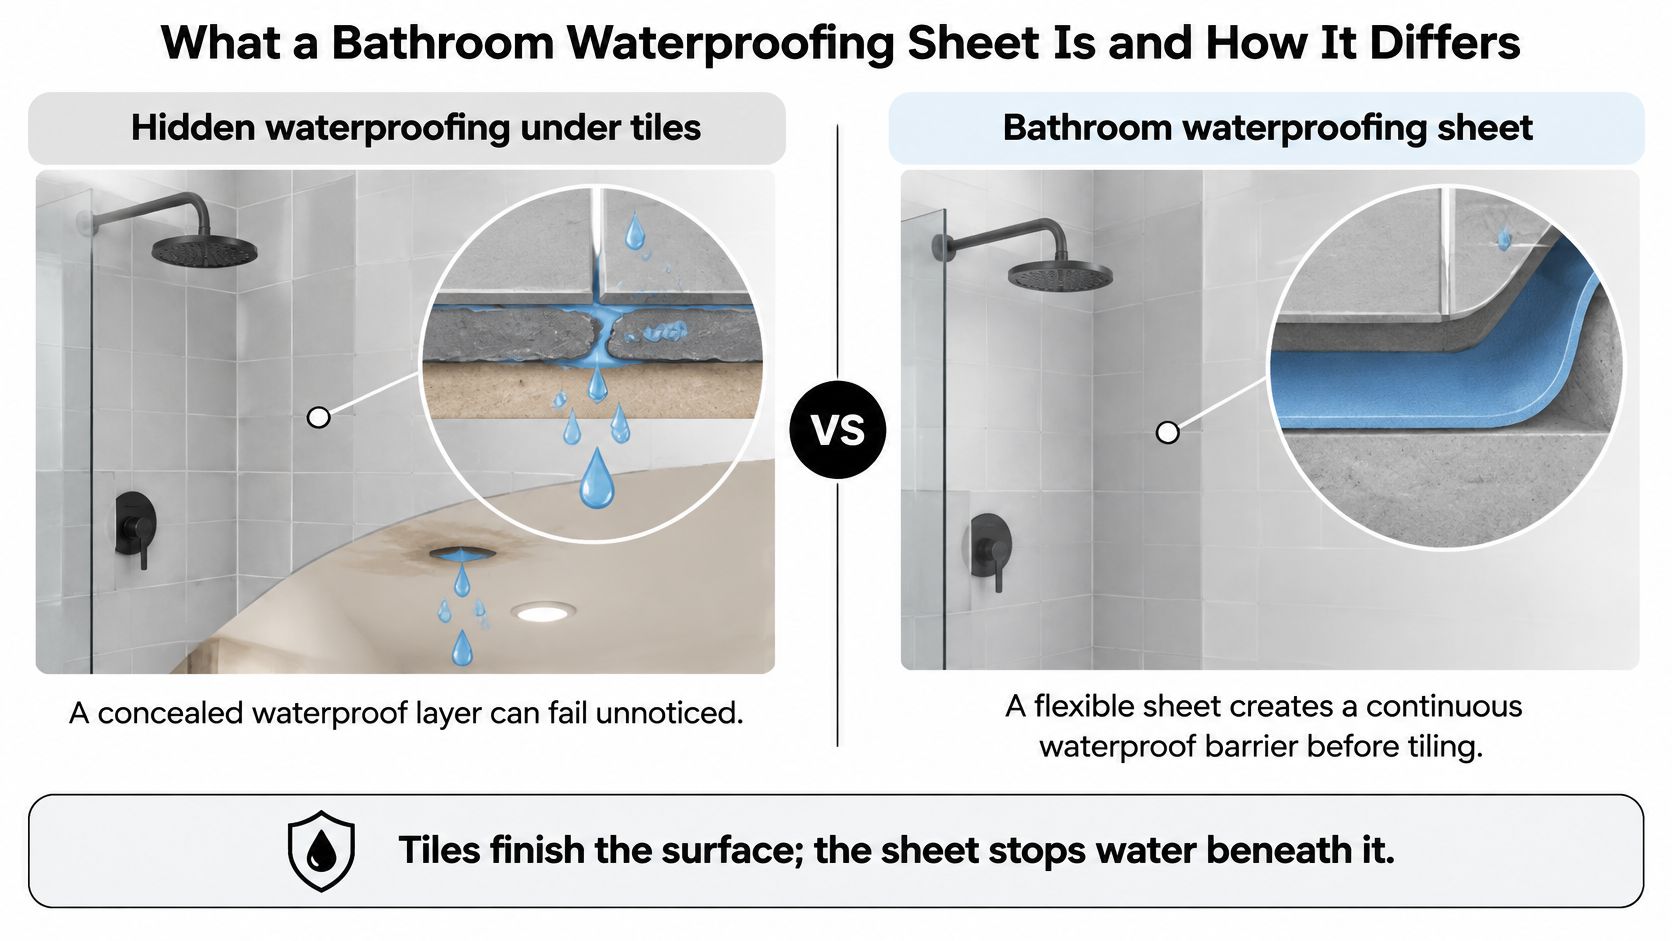
A comparison infographic showing how a bathroom waterproofing sheet provides a continuous barrier compared to failing tile layers.

Bathroom waterproofing sheet versus liquid membrane at a glance

Factor Waterproofing sheet Liquid membrane
Form Rolled sheet bonded to the substrate Liquid applied by brush or roller in coats
Joints and corners Joint tape and pre-formed corner pieces bonded with system adhesive Reinforcing fabric or tape embedded in the wet coat
Thickness control Set by the sheet and its bond Depends on number and rate of coats; verify against the product data
Curing before tiling Follow adhesive and sealant cure times Each coat must dry and the full system must cure per product data
Main installation risk Poorly bonded laps, corners and penetrations Uneven coverage and thin spots at corners and wastes
Typical choice Flat, sound substrates and large floor areas Complex shapes, niches and many small penetrations

Read the table as a starting point, not a verdict. Homeowners often ask which category is waterproof, and the honest answer is that either can be, and either can fail. A sheet that's well made in the factory still depends on site work at every lap and pipe.

Practical rule: Tiles and grout finish the surface. The membrane underneath stops the water.

Both systems fail for the same core reasons. The substrate moves or holds moisture, a corner isn't reinforced, a waste isn't sealed, or incompatible products are mixed. Judging a job by the roll or tin alone misses those risks. The useful question is whether the whole build-up, from substrate to tile adhesive, works as one tested system.

Where Sheet Membranes Go in a Bathroom

Start with the shower, because it's the highest-stakes zone. Water hits the floor and walls daily, under pressure and with heat, so the rules are strictest there. The NCC waterproofing guidance for houses states that the entire shower floor, including a hob or step-down, must be waterproof, and shower walls must be waterproof to at least 1,800 mm above the floor substrate. Wall junctions, wall-to-floor junctions and relevant joints inside the shower must also be waterproof.

That means the sheet can't stop neatly at the shower screen line if the floor and junctions continue beyond it. It runs across the full shower floor, turns up at the walls, and carries up the walls to the required height. Every change of direction gets tape or a corner piece, because corners move slightly and a flat sheet folded sharply can bridge or split.

Bathroom zones, NCC requirements and what the sheet must do

Bathroom area What the NCC requires What the sheet must do
Shower floor, including hob or step-down Must be waterproof Run the sheet across the full floor and up to the walls at the junction
Shower walls Waterproof to at least 1,800 mm above the floor substrate Carry the sheet to at least 1,800 mm with sealed joints
Wall-to-floor and wall junctions in the shower Must be waterproof Use joint tape and corner pieces at every junction
Timber-based bathroom floor Must be waterproof Give full sheet coverage with sealed joints
Tap and spout penetrations in horizontal surfaces Must be waterproofed around the penetration Seal the sheet tightly around each penetration

Outside the shower, the floor material changes the answer. A timber-based floor such as particleboard or plywood needs full waterproof coverage, so the sheet runs wall to wall with sealed joints. Concrete and compressed fibre-cement have been treated as water-resistant in parts of a bathroom under earlier provisions, which is why two similar bathrooms can legitimately have different sheet extents.

Penetrations deserve the same care as large areas. Where a tap or spout passes through a horizontal surface, the sheet must seal tightly around it rather than stop short and rely on surface silicone. A niche adds internal corners and a shelf that holds water, so follow the detailing in our guide to waterproofing a shower niche correctly before you finalise the layout.

If you're comparing approaches for the shower base itself, Trademaster Construction's shower liner guide is a useful plain-language resource on how a liner sits under a shower floor. Use it for concepts, not Australian compliance.

In a renovation, changing the shower layout, replacing the floor or adding new wall linings can bring these requirements into play even if the old bathroom had less coverage. Check the existing substrate and fixture positions first. Then decide where the sheet goes, rather than copying whatever the previous tiles hid.

Why Installation Quality Decides Whether the Sheet Works

Waterproofing failures aren't rare, and they're rarely caused by a sheet wearing out in the middle of a floor. Independent defect research cited in Australian reporting on waterproofing standards covering Queensland, New South Wales and Victoria ranked waterproofing as the third most common defect category, at 11.46 percent of all recorded problems. The reported issues were membrane failures, defective membrane installation, and inadequate falls to shower areas.

Separate NSW strata research cited in that reporting found serious waterproofing defects in 42 percent of surveyed Class 2 apartment buildings. Read that figure carefully. It describes surveyed apartment buildings, not every Australian house or bathroom, so it doesn't predict your renovation. It does show how often concealed work goes wrong when detailing and inspection are weak.

The three failures that stay hidden

  • Membrane failure: The material breaks down, debonds or was never compatible with the primer and adhesive under it.
  • Defective installation: Laps lift, corners aren't reinforced, or a penetration is cut too loosely and sealed with hope.
  • Inadequate falls: Water ponds instead of draining, so it sits against grout and junctions for hours after each shower.

All three can stay concealed beneath tiles until damage appears elsewhere. You might see a ceiling stain below, mould that keeps returning, swollen vanity panels, or paint bubbling on the other side of a shower wall. By then, the original membrane is buried and the argument about what was installed becomes hard to settle.

Good substrate preparation before waterproofing prevents many of these outcomes, because a sound, clean, correctly sloped base gives the sheet a chance to bond and drain. A premium sheet doesn't rescue a damp screed, a dusty wall or a floor that falls away from the waste.

The material category predicts less than verified system compatibility and workmanship.

For a homeowner, the practical consequence is timing. The evidence exists for a short window between membrane installation and tiling. After that, proving quality depends on photographs, product records and signed documentation captured while the work was visible.

When a Sheet Suits Your Bathroom Better Than Liquid

Don't start with a brand ranking. Start with the substrate in front of you. Ask whether it's flat, sound, dry and stable, and how many corners and pipes interrupt it. Those answers usually point to the easier system to install well.

A sheet tends to suit large, flat floor areas where the installer can lay full widths with few cuts. Its thickness is set during manufacture, so you don't rely on coat build to reach the right film thickness. It also suits projects where the installer regularly uses that specific sheet system and knows its tape, corners and adhesive.

A liquid membrane may be easier where the room fights a roll. Tight ensuites, curved or irregular niches, clusters of small penetrations and awkward steps can be brushed around more readily than they're cut and folded. The trade-off is discipline. The installer must achieve even coverage, reinforce corners and let each coat cure.

Five questions that decide the choice

  • Substrate condition: Is it flat, sound and dry, or patched, moving and moisture-affected?
  • Shape complexity: Are there niches, benches, steps or tight corners that need many cuts?
  • Number of penetrations: How many pipes, wastes and fixings pass through the membrane?
  • Installer experience: Has the installer completed this exact system before, not just a similar one?
  • Documentation available: Can you get product evidence, method details and installation photos?

Old substrates make generic advice unreliable. A renovated bathroom might combine original framing, new sheeting, a patched screed and moved plumbing. Movement at those junctions matters more than whether the membrane arrived as a roll or a liquid.

Either choice must meet the same compliance pathway for the wet area. If two quotes propose different systems, compare their detailing, preparation and records line by line. The installer who can explain corners, wastes and curing clearly is usually a safer bet than the one who only names a product.

How the Sheet System Works and How to Install It

Think of a raincoat. The fabric can be waterproof, yet water still enters through seams, zips and hems if they're not sealed. A sheet membrane works the same way. The flat field of the sheet is the easy part, and the laps, corners and penetrations decide whether the system holds.

The diagram below builds the system from the bottom up, in the order water would try to pass through it.
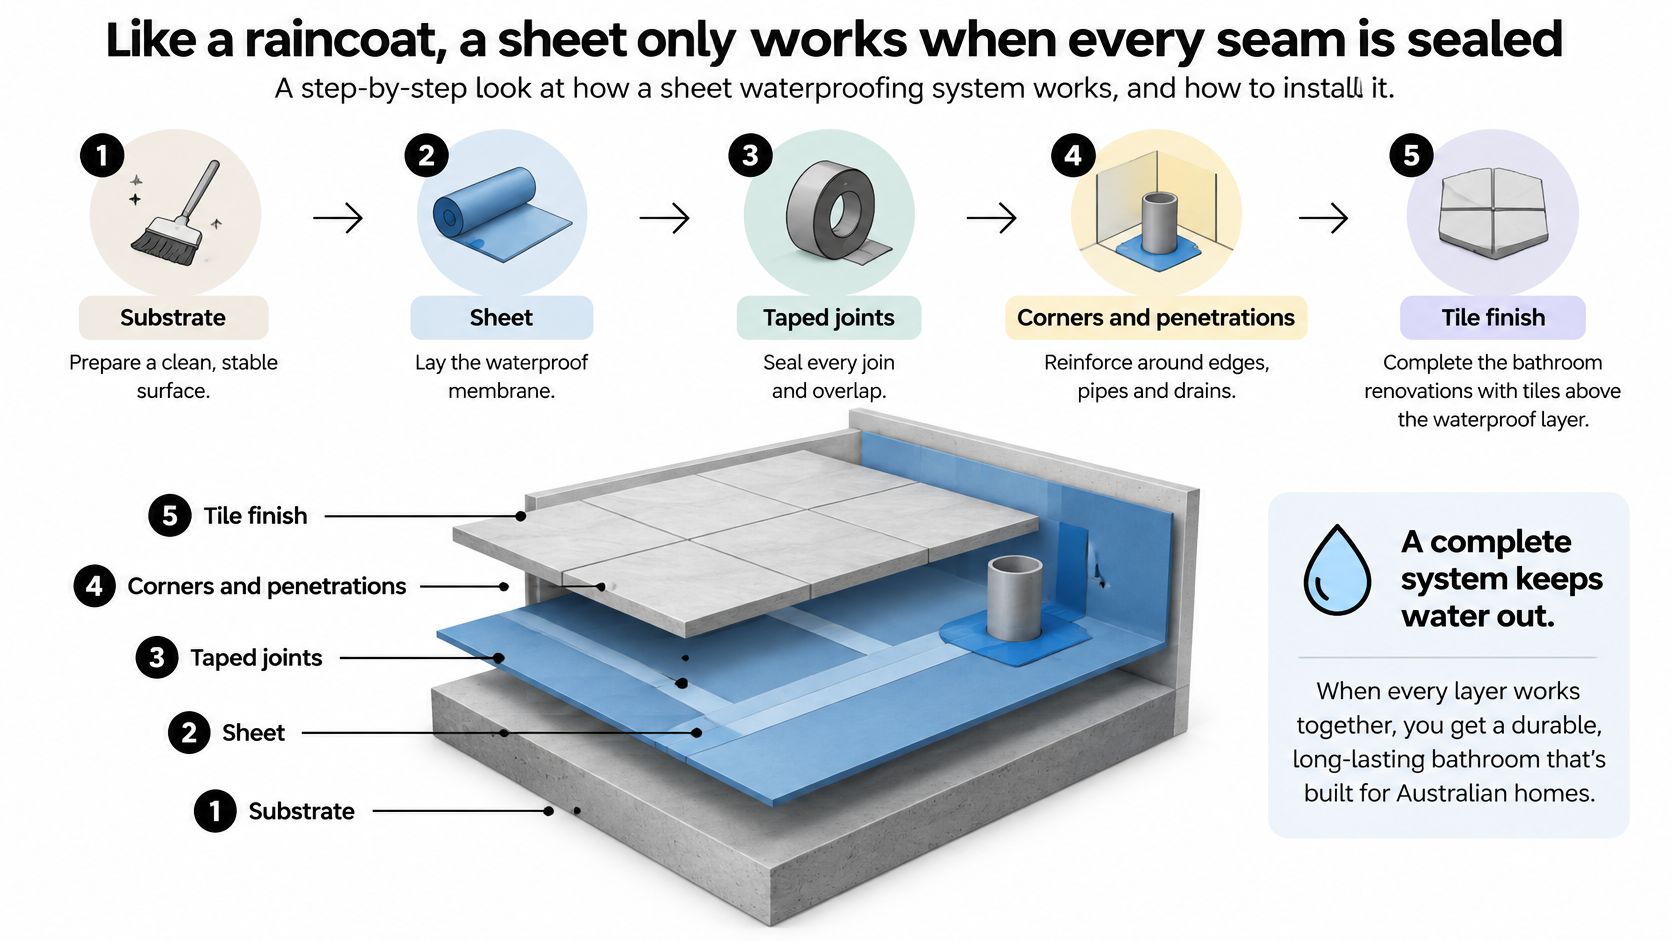
A diagram illustrating the step-by-step installation process of a bathroom sheet waterproofing system on a floor.

From the bottom, you need a sound, flat, dry substrate, then the specified primer and adhesive, the sheet, joint tape and corner pieces, and sealants at wastes and perimeters. Tile and grout sit on top as the finish, not the waterproofing. The NCC Housing Provisions Part 10.2 recognises flexible waterproof sheet flooring material only when it has waterproof joints, and Victorian guidance requires wet-area membranes to demonstrate compliance with AS/NZS 4858:2004. Follow one consistent pathway, AS 3740 or the Housing Provisions, rather than mixing details.

Moisture control comes before any bonding. The Victorian Building and Plumbing Commission waterproofing guidance warns that excessive residual moisture can prevent a membrane from fully curing or cause premature failure. That warning applies in spirit to the whole build-up, because trapped moisture weakens bonds and can blister coatings and adhesives.

Watch the installation sequence in the video, then use the steps below to check what your installer is doing and why.

Installation in eight steps

  1. Confirm the substrate is sound, flat and dry. Take moisture readings on screeds and patched walls before primer goes on, because trapped moisture undermines curing and bond. The common slip is trusting a surface that feels dry.
  2. Repair and prime. Fill cracks, remove loose material, vacuum dust, then apply the primer specified for that sheet and substrate. A generic primer can look fine and still be incompatible.
  3. Check falls and drainage. Run water or use a level to confirm the floor falls to the waste without ponding. Sealing a floor that holds water locks in a defect.
  4. Set corners and junction tape first. Fit pre-formed internal corner pieces and joint tape at wall-to-floor junctions before the main sheet, so movement points are reinforced, not bridged.
  5. Seal wastes and penetrations. Dress the sheet into the puddle flange, seal around grates and pipes, and use the specified sealant and bond breakers. The wrong sealant at a waste can attack the membrane or lose adhesion.
  6. Lay and bond the sheet. Set out full sheets to minimise joints, use the specified overlaps, spread compatible adhesive evenly and roll out air pockets from the centre outward.
  7. Inspect before tiling. Check every lap, corner and penetration by hand and eye, and test where the system and project require it. Fix lifted edges now, not after tiles are on.
  8. Record the work. Photograph coverage, corners and penetrations, and note the system name, batch and installer before linings or tiles hide everything.

The same sequence needs extra care below ground, where external moisture adds pressure from the other side. Northpoint Construction's overview of waterproofing a basement bathroom shows why drainage and detailing matter even more in those settings, although Australian projects still need the local pathway.

Installer check: If you can't see sealed corners and penetrations in the photos, you don't have evidence they were sealed.

Rushing usually shows up as skipped moisture checks, mixed primers, unrolled laps and tiling before adhesives cure. None of those shortcuts saves much time. Each one removes a layer of protection you'll never be able to inspect again.

Records, Compliance and Builders Before Tiling

Ask one question before tiling starts. If this shower leaks in three years, what evidence will show the work was compliant? If the answer is only a verbal assurance, you're relying on memory after the proof has been covered.

In Victoria, the framework is specific. Victorian building standards guidance explains that NCC requirements operate through the Building Act 1993, Building Regulations 2018 and Plumbing Regulations 2018, with the appointed building surveyor responsible for assessing building-permit compliance. Waterproofing must follow the applicable NCC Deemed-to-Satisfy provisions, AS 3740 or an approved Performance Solution, and shower floors, adjacent wet areas and related penetrations are compliance-sensitive work.

That framework has a history worth knowing when old advice conflicts with current practice. The NCC structure changed over time, with details moving between the code and AS 3740, so your documentation should name the applicable NCC edition and the exact pathway used. Don't accept a note that just says waterproofed to Australian Standards. Ask which standard, which edition and which system.

Recent Victorian regulatory-impact proposals for stronger notification at waterproofing and pre-lining stages reflect the same concern you should have as an owner. Once linings and tiles go in, defects are hidden. Your record set is the practical way to keep the work visible on paper.

Our summary of bathroom waterproofing standards in Australia helps you match those records to the relevant requirements before you sign a contract.

Records to request before tiling

Record What it proves
Product name and AS/NZS 4858 evidence Sheet is a wet-area membrane that meets the standard
Substrate moisture check results Substrate was dry enough for the membrane to cure
Installation photographs Joints, corners and penetrations were built as specified
Membrane coverage details Full sheet coverage was achieved across the wet area
Signed installer records Named installer accepts responsibility for the work
Building permit or inspection status Whether a permit or inspection applies and was booked

Use the table as a pre-tiling gate. Tiling shouldn't proceed until the system evidence is on file, moisture was checked, joints and penetrations were inspected, photographs exist, and any required permit or inspection is booked. If one item is missing, pause while the membrane is still exposed. A one-day delay is cheaper than removing tiles to investigate a leak.

Who does what on a compliant project

Registered builders coordinate the trades and sequence, but coordination isn't the same as certification. The Australian Building Codes Board guidance on building practitioners identifies registered building certifiers as the appropriate source for advice about individual buildings or sites, while the NCC provides the technical wet-area rules. A registered builder coordinating plumbers, electricians, carpenters and waterproofers can help manage bathroom renovations, but registration doesn't remove the need for compliant design, installation and certification where required.

Check three things in writing before work starts. Confirm the builder's registration status, clarify whether a building permit or inspection applies to your scope, and ask who signs the waterproofing records. Those answers should be in the quote and contract, not discovered after demolition.

With us, all of our workers are qualified and certified waterproofers or tilers, so the person installing the membrane and the person tiling over it work to the same system and record set. That continuity matters because tile adhesive, grout and movement joints must suit the membrane underneath.

Ask for a written quote that scopes the complete waterproofing system, not just a line for waterproofing. It should name preparation, primer, sheet or membrane system, junction detailing, the records you'll receive and the warranty terms. Our waterproofing work comes with extended warranties, and you should confirm any provider's warranty in writing, including what it covers and what maintenance it assumes, before work starts.

For bathroom renovations, we offer free quotes and 3D drawings, which lets you agree the layout, shower position, niche and waste locations before waterproofing is detailed around them. Moving a waste after the sheet is laid creates penetrations and patching you'd rather design out at the drawing stage.

Property managers and landlords should keep the same file for each property. When a tenant reports a stain or a leaking shower, product evidence, dated photographs and signed records help a rectification team locate the likely failure point quickly. Without them, diagnosis often means opening finished surfaces just to learn what was installed.


If you're planning bathroom renovations in Melbourne and want the waterproofing sheet system, tiling and records handled in one coordinated scope, talk to Melbourne Tiling Services P/L for a free quote and 3D drawings before you commit to a layout. We'll help you confirm the system, detailing and pre-tiling evidence for your bathroom, and our waterproofing work comes with extended warranties.
Bathroom Installation and Tiling: Costs and Timelines

Bathrooms outnumbered kitchens in Australian renovation work in 2024–2025: approximately 244,000 jobs against 163,000 kitchen renovations, based on Housing Industry Association estimates reported by news.com.au. A mid-range refresh that keeps the existing layout, replacing the tiles, shower screen, vanity and fixtures, usually lands between AUD 15,000 and AUD 30,000 and runs for 2 to 4 weeks.

The finished surface tells you almost nothing.

Money and lost days sit underneath it, in demolition, substrate repair, falls, membrane and the cure time each layer demands. A fall that misses the waste or a membrane that skipped a flood test stays invisible until the leak appears. I would verify both before a single tile goes on, and judge any quote on how the contractor proves that hidden work rather than on the tile range being proposed.

Table of Contents

What a Bathroom Renovation Costs and How Long It Takes

A bathroom quote is mostly a wager on what sits behind the old tiles. Two rooms with the same floor area can land weeks and thousands apart once demolition exposes swollen sheeting, a floor out of level, a waste in the wrong place, or a shower base that never had enough fall. Costs vary widely by scope because the visible finish is only the last layer; demolition, substrate, falls and membrane decide whether the job stays simple.

Scope Indicative cost (AUD) Typical duration
Wall and floor re-tile on existing layout 4,000 to 9,000 5 to 8 working days
Mid-range refresh with new tiles, screen and fixtures on existing layout 15,000 to 30,000 2 to 4 weeks
Full redesign with relocated waste, niche or hobless shower 30,000 to 50,000 and above 4 to 8 weeks
Shower leak repair with re-membrane and re-tile 2,000 to 6,000 3 to 7 days

Treat these bands as typical ranges by scope rather than fixed quotes. A re-tile on the existing layout stays shorter because plumbing points do not move. A redesign that relocates the waste, cuts a niche or builds a hobless shower pays for carpentry, new falls and a wider membrane, which is why it stretches toward 4 to 8 weeks.

What pushes the price inside a band

Tile price and format. A standard ceramic wall tile carries a different material cost, and a different cutting day, from large porcelain or stone. More cuts mean more labour even when the square metres match.

Hidden substrate and waterproofing. Stripping sheeting, rebuilding a shower base and laying a new membrane often cost more than the vanity you can see. An out-of-level floor adds screed before a single tile is set, and every extra layer needs time before the next one covers it.

Services and walls that move. Shifting a waste, a tap or a power point brings a plumber or electrician back while the walls are open. Leaving those positions where they are is the fastest way to stay in the lower half of a band.

How to read the quote

Each trade should be its own line: demolition, substrate, waterproofing, tiling, fixtures, electrical and make-good. Exclusions belong in writing, not in a verbal “we'll see on site”. A lump sum with no breakdown is how a cheap quote grows once the wall comes off. Before tiles hide the work, ask for photos of the substrate, the membrane and the shower base fall, and have the fall checked with a level rather than judged by eye. You can test a scope against a bathroom renovation calculator before you compare two written prices.

Practical rule: If the waterproofing line is smaller than the tile-supply line, ask which membrane, how many coats, and whether waterstops are included.

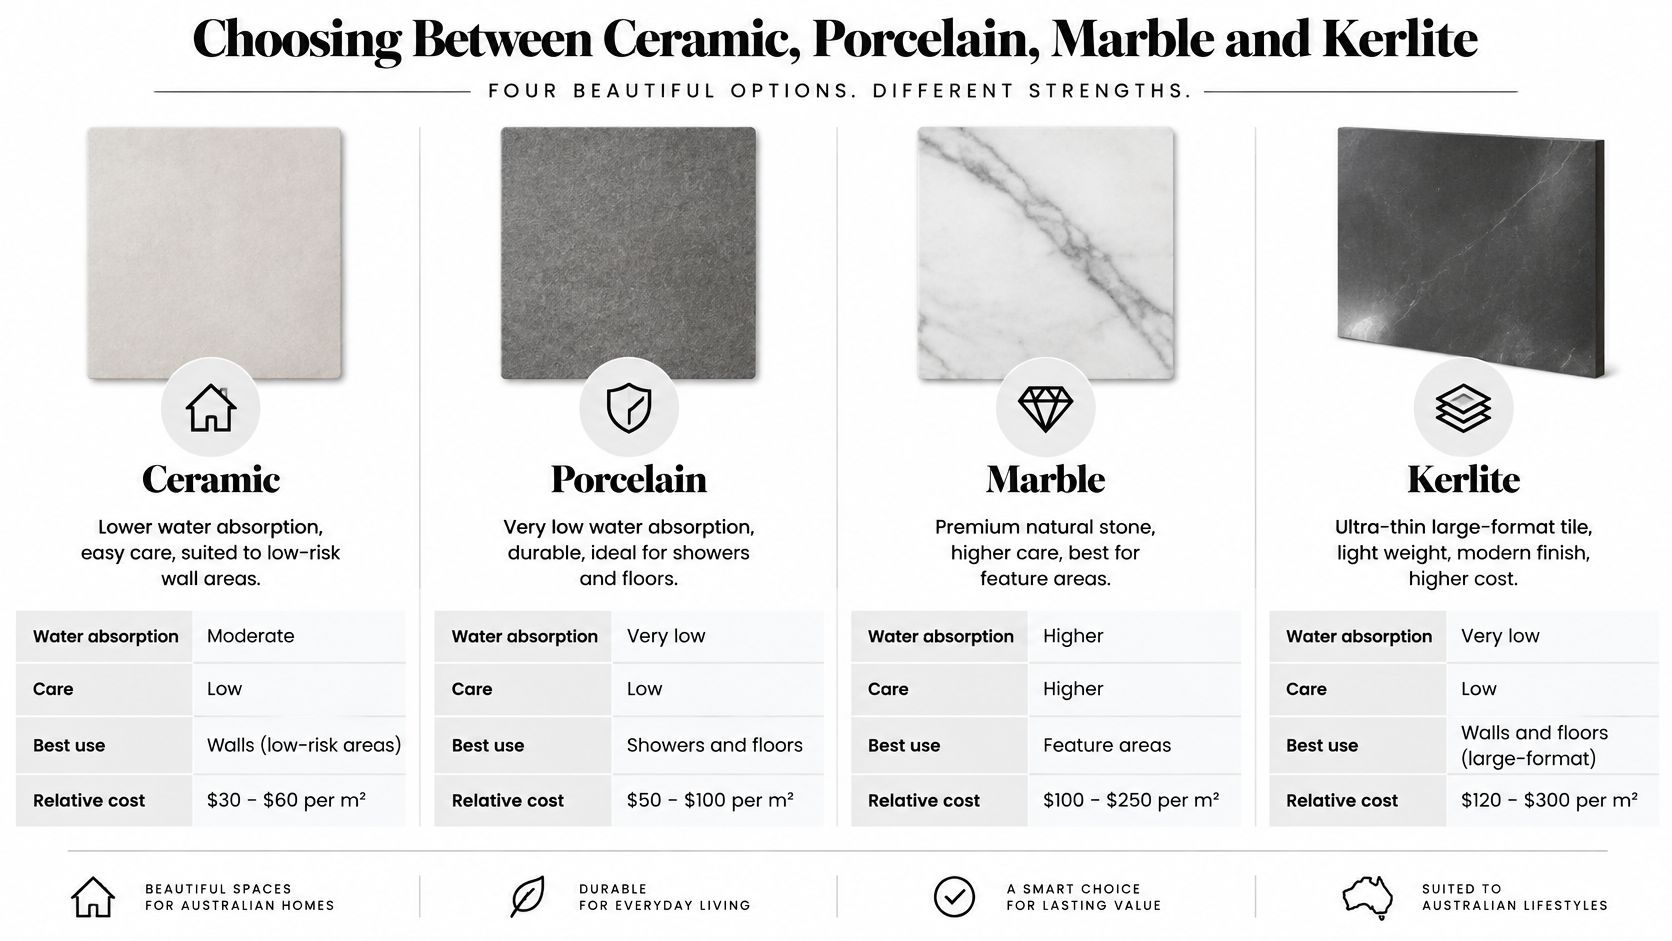
Choosing Between Ceramic, Porcelain, Marble and Kerlite

Water absorption decides whether a tile belongs in a shower. Ceramic is like a biscuit with a glazed coat: the body can still drink water if that coat chips. Porcelain is fired so dense it barely drinks, which is why it suits showers and floors that take constant wet feet.

A comparison chart outlining the characteristics, uses, and costs of ceramic, porcelain, marble, and Kerlite tiles.

Material Best use Water absorption Care needs Relative cost
Ceramic Walls and light-traffic floors Higher, often 3% or more Glaze can chip; wipe clean Low
Porcelain Showers, floors and walls Very low, under 0.5% Low maintenance; harder to cut Low to mid
Marble Feature walls, niches and vanity tops Porous, needs sealing Seal regularly; etches with acidic cleaners High
Kerlite (brand of thin sintered porcelain) Large-format walls and floors, inside and out Low; thin sintered porcelain Few grout lines; needs flat substrate and specialist cutting High

Where each material earns its place

Ceramic is still a sound wall tile where weight and cost matter. I wouldn't put a higher-absorption ceramic on a shower floor that stays wet for hours. It wipes clean on a dry wall and fails the brief once the glaze is breached at the floor.

Porcelain is the default for shower floors and most wet walls. It cuts harder, so blade wear and a slower set-out belong in the tiling days, not only in the box price. Low maintenance is real. Easy cutting is not.

Marble brings natural veining that suits a feature wall, a niche or a vanity top. It is porous, so it needs sealing on a schedule, and lemon-based or other acidic cleaners etch the face. Treat it as a finish you maintain, not a set-and-forget surface. A remnant sill in a niche can look deliberate. An unsealed shower floor in the same stone will mark.

Kerlite is a brand of thin sintered porcelain, so compare it as a large-format porcelain option rather than a separate mineral. The thin slabs give few grout lines and a smooth look inside or out. They demand a flatter substrate, a compatible large-format adhesive and specialist cutting. Fewer joints don't replace falls or a membrane.

Slip, light and the order

Ask for an AS 4586 slip rating. R10 or higher is commonly specified for wet floors. A polished tile that looks right under showroom spots can be the wrong surface once it's soapy.

View samples under the bathroom's own lighting, write down the batch number, and confirm the format fits the walls without a run of skinny cuts. A 600 mm tile on a short return leaves awkward pieces. Change the format on paper, not after the pallet arrives. Large-format work also fails on lippage when the wall waves more than the adhesive can fill. Check flatness with a straightedge, and match the trowel notch to the tile, before you lock the order.

Waterproofing and Falls Before Any Tile Goes On

A shower screen limits splash. It does not seal the floor or the wall. Water still tracks under tiles, through movement joints and around pipes if the membrane stops too low. Adhesive and grout are finishes. They are not the waterproofing system.

In Victoria, the NCC 2022 Housing Provisions require a bathroom shower floor to be waterproof, and shower-area walls waterproofed to at least 1,800 mm above the floor substrate, as set out by the Australian Building Codes Board. For a hobless shower the membrane continues across the floor and up the vertical wall substrate to that height, rather than stopping at the screen line. AS 3740 is the domestic wet-area pathway the Board identifies, with the NCC as the compliance framework. Substrate prep, a compatible primer, bond breakers at internal corners, sealed penetrations and photos of coverage all sit before any tile.

Requirement Rule Why it matters
Shower wall waterproofing height At least 1,800 mm above floor substrate Covers the splash zone above the screen line
Floor fall to waste Between 1:80 and 1:50 Drains water without ponding, around 18.75 to 30 mm over 1.5 m
Unenclosed shower radius 1,500 mm from the shower rose Sets a wider exposed zone for membrane and waterstops
Doorway waterstop Fitted at floor-level openings Stops water crossing the threshold into the room
Membrane coats and coverage As the product data sheet and AS 3740 require Confirms the membrane is continuous and thick enough
Penetrations Sealed at pipes, valves and waste Common entry points for leaks behind tiles

Corners, pipes and the waste

Internal corners need bond breakers or reinforcing so the membrane can flex when the framing moves. A coat painted tight into a sharp corner cracks along the junction. The leak then shows up in the next room, not on the tile face.

Pipe penetrations, mixer bodies and the waste flange are the usual entry points. Each one should be sealed with a collar or sealant the membrane maker accepts, then lapped into the field coat. Primer has to suit the sheet or screed. A second coat only counts if the first has skinned as the data sheet says. The screed that sets the fall has to be in place before that membrane goes down, so drainage doesn't depend on a thick, compressible bed of adhesive.

What to hold before tiles go on

Ask for three records while the membrane is still visible.

  • Product and batch: the membrane name, the batch number and the primer used.
  • Dated photographs: the full floor, the wall height, every penetration and each doorway waterstop.
  • A written check: a flood test, or the equivalent inspection your waterproofer records, before tiling starts.

Those photos are the only proof once the tiles cover the work. The practical sequence is set out in these bathroom waterproofing standards.

A neat tile layout cannot repair a membrane that stopped at the glass.

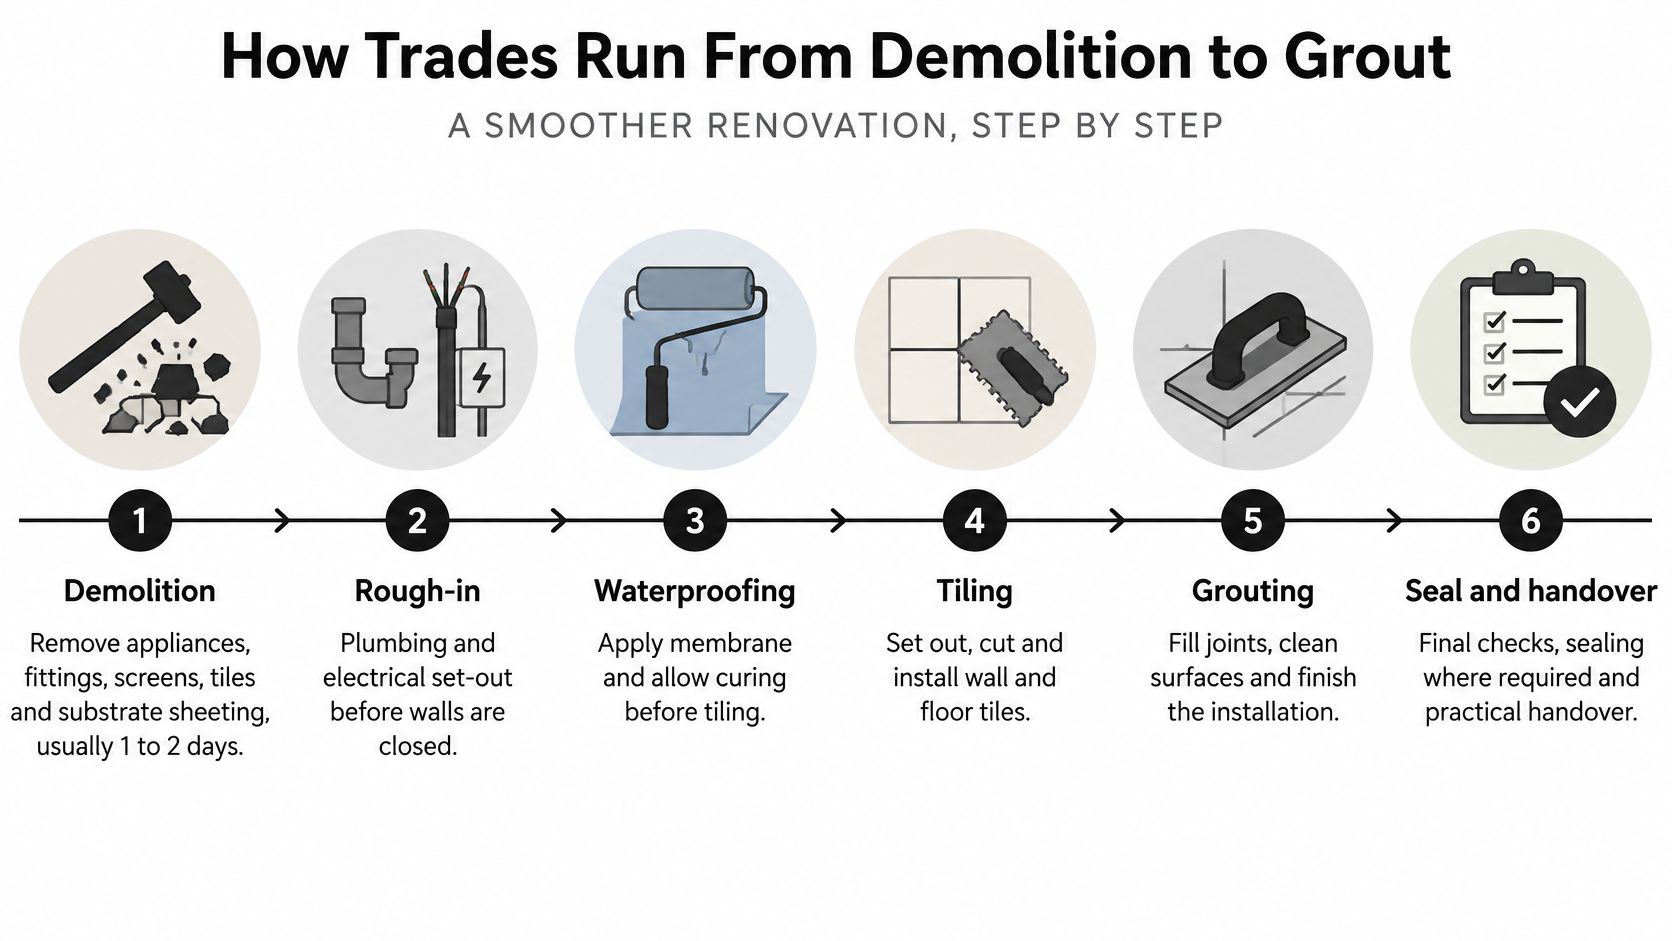
How Trades Run From Demolition to Grout

A step-by-step infographic illustrating the six stages of a bathroom renovation from demolition to final handover.

A renovation programme is a chain of handovers. The costly mistakes are usually buried by the next trade: an unstable substrate, uninspected rough-in, incorrect fall or membrane covered before it has cured. Check each layer before it disappears.

  1. Demolition, usually 1 to 2 days. Appliances, fittings, shower screens, tiles and substrate sheeting come out. Soft sheet and old adhesive beds get binned rather than tiled over. This is the first chance to assess what the new work will sit on.

  2. Rough-in plumbing and electrical, usually 1 to 3 days. Drains, supply lines, outlet positions and rewiring are completed while the walls remain open, then inspected before anything is closed. Book the return visit before the carpentry slot. A contractor who can handle plumbing calls while on jobs is less likely to leave a required adjustment sitting in voicemail.

  3. Carpentry and substrate, usually 1 to 3 days. Stud walls, a dropped shower base, niches, and new wall and subfloor sheeting are completed. Walls are commonly plaster or fibre-cement sheet. Subfloors may be timber, particle board, compressed sheet or fibre-cement. Swollen or loose sheeting has to be replaced before tiling.

  4. Screeding, then cure. Victorian guidance from the Building and Plumbing Commission sets a minimum fall of 1:80 and a maximum of 1:50 toward a floor waste (about 18.75 mm to 30 mm over a 1.5 m run), and waterproofing across a 1,500 mm horizontal radius from the shower rose connection for an unenclosed shower. Too little fall leaves ponded water, slower drying, mould risk and efflorescence. Too much makes large-format porcelain uncomfortable underfoot and prone to lippage.

  5. Waterproofing, usually 2 to 4 days. Prime the substrate, apply the membrane to the data sheet and AS 3740, fit waterstops, seal penetrations and leave the system to cure. The membrane has to cover the full regulated zone rather than stopping at the screen line.

  6. Tiling walls and floors, usually 3 to 7 days. Floor tiles are cut to suit the shower base fall. Walls are set from a ledger so cut tiles land away from eye level. Check the layout and tile quantities before adhesive is mixed.

  7. Grouting and sealing, usually 1 to 2 days. Colour-matched grout goes across walls and floors, corner joints are sealed, then a penetrating sealer is applied over tiles and grout where the product requires it.

  8. Fixtures and screens, usually 1 to 2 days. The vanity, tapware, bath, cabinets, shower screen and mirror go on after the grout has set. Confirm the finished dimensions before the screen is made.

  9. Final inspection and clean. Run water across the floor, check the waste, silicone lines and fittings, then file the pre-tile photographs and waterproofing records with the handover.

Where the calendar slips

Cure times cannot be shortened with a heater and a hope. A late tile delivery stalls the tiler even when the membrane is ready, and glass measured too early can arrive for a niche or wall line that moved during tiling. Confirm material availability before demolition, keep the hold points in place and move the later bookings when an earlier trade slips.

Spotting Leaks Before Tiles Hide Them

Mould, a brown stain or a loose tile is a late symptom. Waiting for those signs is a poor test of the membrane. By the time the ceiling below blotches, water has already travelled through a cavity.

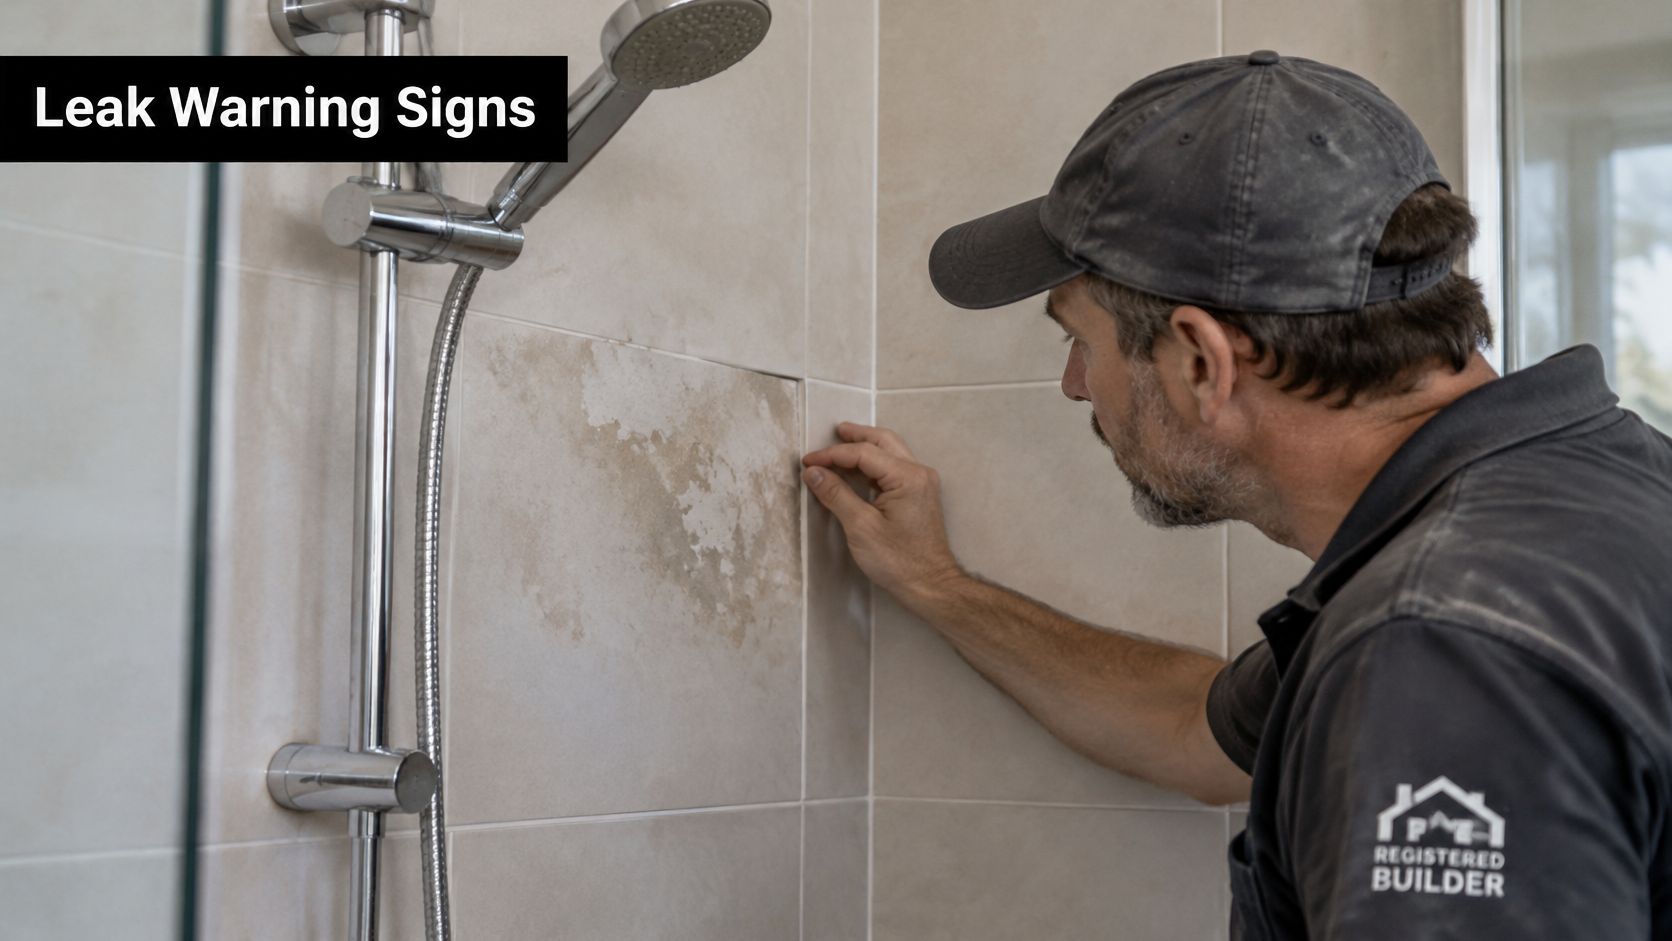
A registered builder inspects damaged shower tiles for potential water leaks in a modern bathroom shower stall.

Look for earlier signs that don't need a saw.

  • Musty air in the room beside the bathroom, even when the bathroom itself looks clean.
  • Soft or swollen skirting and door frames on the wet-area side.
  • Ceiling stains underneath, often offset from the shower rather than directly below the waste.
  • A hollow tap on floor tiles near the junction, which can mean the bed has let go after repeated wetting.
  • Dark or cracked grout along the floor-to-wall junction.
  • Water sitting on the shower floor after the waste has had time to drain.

A Western Australian inspection of 86 shower areas, covering 1,360 points, found only 60% satisfactory. The WA industry bulletin tied 111 of 539 unsatisfactory findings, about 21%, to waterstops that were missing or installed incorrectly. That defect sits under the tile. Grout colour won't show it.

Membrane, grout or silicone

If the leak shows only at a joint, test the sealant and grout first. Failed silicone in a screen channel is a different repair from a failed membrane. If water tracks through the wall cavity, or appears away from joints, suspect the membrane, a missing waterstop or a badly sealed penetration.

Settle that argument with the handover set: dated photos, the membrane batch and the flood-test note. Re-grouting before that check covers the evidence you need.

For a landlord or property manager, write down the symptom, notify the party named in the contract or tenancy, and book a licensed inspection before anyone skins the wall. In Melbourne, leak detection should chase the path of the water, not just the stain on the paint.

The clip below shows what a wet area looks like once it is opened. That is the stage worth photographing, not guessing after the tiles are back on.

Hiring a Registered Builder and Signing the Contract

In Victoria, a written major domestic building contract is required when bathroom renovations and other home improvements are worth more than AUD 10,000, including alterations and repairs. Consumer Affairs Victoria applies that threshold to the total project value even when the work is split into several smaller contracts. Separate invoices for demolition, waterproofing and tiling don't reset it.

The contract should describe the work in detail, name both parties, state the price, deposits and progress payments, attach plans and specifications, and explain the five-day cooling-off period. That pack is what you argue from if a variation appears in week three.

Registration covers the whole bathroom

A full bathroom combines carpentry, plumbing and tiling, so registered builders matter more than a tiler working alone. Consumer Affairs Victoria states that registration is generally required above that value, while single-trade work such as tiling alone is among the listed exceptions. Someone using a mix of skills, or doing work that needs a building permit, must be registered with the Building and Plumbing Commission. Check the job as a whole, not as "just tiling".

Outside Victoria, state and territory rules set different thresholds and registration tests. Use the equivalent test where the property sits.

Before any deposit

  • Registration: confirm the builder on the Commission's register, and check the licence class covers the plumbing.
  • Insurance: ask for a current certificate of currency for public liability.
  • Waterproofing warranty: get, in writing, who carries it and for how long.
  • Scope: lock every line before money moves.

A low quote with a vague scope usually costs more through variations. If "make good paint" or "relocate the waste" isn't listed, it isn't included.

Pay the deposit against a signed scope, not against a text that says the job will be around that figure.

Confirm Your Scope Before You Book

A quote can look tidy and still leave the expensive parts vague: what happens under the tiles, which walls move, and who makes good after the last fixture is set. Lock the scope first, or the first variation arrives with the skip.

  1. Write the job down. List rooms, tile format and the budget band that matches the work, then mark every change to plumbing, wall position, shower base fall or substrate. A hobless shower is a different job from a re-tile on the same waste.

  2. Put the concealed work on paper. The scope should name demolition down to appliances, fittings, screens, tiles and substrate sheeting; the wall and floor build-up; waterproofing extent; outlet changes; and the checks due before tiling covers them. Ask for the fall to the waste and the inspection point to be stated before dates are booked.

  3. Demand separate lines. Split demolition, carpentry and alterations, plumbing, electrical, waterproofing, tiling, fixtures, caulking and make-good, with exclusions written beside them. Compare that page with the drawings, sketches and agreed modifications, not the mood board.

  4. Match the paperwork before you pay. Melbourne Tiling Services P/L has specialised in bathroom renovations since 2003, runs them with in-house carpenters, plumbers, waterproofers and tilers, and offers free quotes and 3D drawings, so a site visit can price the full scope.

Book the visit, compare the written scope with those checks, and confirm the signed contract covers every item before the first deposit is paid.

Melbourne Tiling Services P/L plans and builds bathroom installation and tiling from demolition through waterproofing and falls to the finished surface. If you're ready to price a Melbourne or Victorian bathroom against a written scope, visit Melbourne Tiling Services P/L and ask for a site visit, a free quote and 3D drawings before you commit a deposit.

Bathroom Waterproofing Services: Melbourne Compliance Guide

You're comparing bathroom renovation quotes when you notice one contractor has allowed for waterproofing and another has included it under tiling. Or perhaps your tenant has sent a photo of damp carpet outside the shower, even though the tiles still look sound. In either situation, the important question isn't which membrane brand someone plans to use. It's where the waterproofing starts, where it stops, and how the installer will seal every interruption along the way.

Good bathroom waterproofing services address the whole assembly beneath the finishes. For Melbourne homeowners and landlords, a written scope and dated photographs before tiling provide something a product label can't: evidence of what was installed.

Table of Contents

What Waterproofing Must Cover in a Bathroom

Required waterproofing coverage in a bathroom

Area Required performance Reference
Shower floor with hob, step-down or level threshold Waterproof NCC 2022 Housing Provisions
Shower walls Waterproof to at least 1,800 mm above floor substrate NCC 2022 Housing Provisions
Unenclosed shower floor zone Waterproof within 1,500 mm radius of shower-rose connection Victorian wet-area guidance
Wall and floor junctions and penetrations in shower Waterproof NCC Specification 26
Timber or particleboard bathroom floor Waterproof NCC Specification 26
Concrete or fibre-cement floor outside shower Water resistant NCC wet-area requirements
Tap and spout penetrations in horizontal surfaces Waterproof NCC waterproofing and water-resistance requirements

The shower-floor requirement includes the hob or step-down, not just the flat surface where you stand. Likewise, shower-wall coverage is measured from the floor substrate, rather than from an arbitrary grout line or the top of a finished shower base. A quote that says only “waterproof shower” doesn't show whether either requirement has been allowed for.

An unenclosed shower needs particular attention because the regulated shower area extends beyond what many homeowners regard as the shower's footprint. Removing a screen or changing the shower-rose location can therefore change the membrane boundary, even when the room itself stays the same size.

Waterproof isn't the same as water resistant

Water-resistant construction tolerates wetting under the relevant requirements. Waterproof construction requires a barrier that prevents water passing into protected building elements. Tiles and grout alone shouldn't be treated as that barrier.

The substrate matters. Timber and particleboard need waterproof protection because moisture entering the floor assembly can cause swelling and damage, while suitable concrete or fibre-cement floors outside the shower can have water-resistance requirements instead. Penetrations through horizontal surfaces still need waterproof treatment.

A level-access layout also needs a deliberate transition between the shower and the rest of the room. For design context, SouthRay Kitchen & Bath's explanation of fully waterproofed bathroom layouts helps distinguish a wet-room concept from a conventional enclosed shower. The local compliance assessment must still determine the actual membrane extent.

Our waterproofing services cover interior and exterior walls and floors, including shower walls and floors, balconies and retaining walls. Those locations don't all use the same detailing, so the bathroom scope should identify its own surfaces rather than borrow a generic description.

Before comparing quotes:

  1. Measure the shower. Record the enclosure, shower-rose position and proposed threshold.
  2. Identify the substrate. Note whether the floor is concrete, fibre-cement, timber or particleboard, and flag anything still concealed.
  3. Request a marked sketch. Have the membrane boundary, wall coverage, waste and penetrations shown clearly.

Membranes, Tanking and Liquid Systems Compared

Waterproofing methods by use and trade-off

Method Typical use Main strength Main limitation
Sheet membrane Flat floors and areas needing uniform thickness Consistent thickness across flat areas Seams and corners need careful jointing
Liquid-applied membrane Showers, niches and irregular shapes Seamless and follows corners Thickness depends on coats and curing
Cementitious tanking Floors and shower bases beneath tile Compatible with suitable screeds and tile bonding Needs adequate falls and curing time

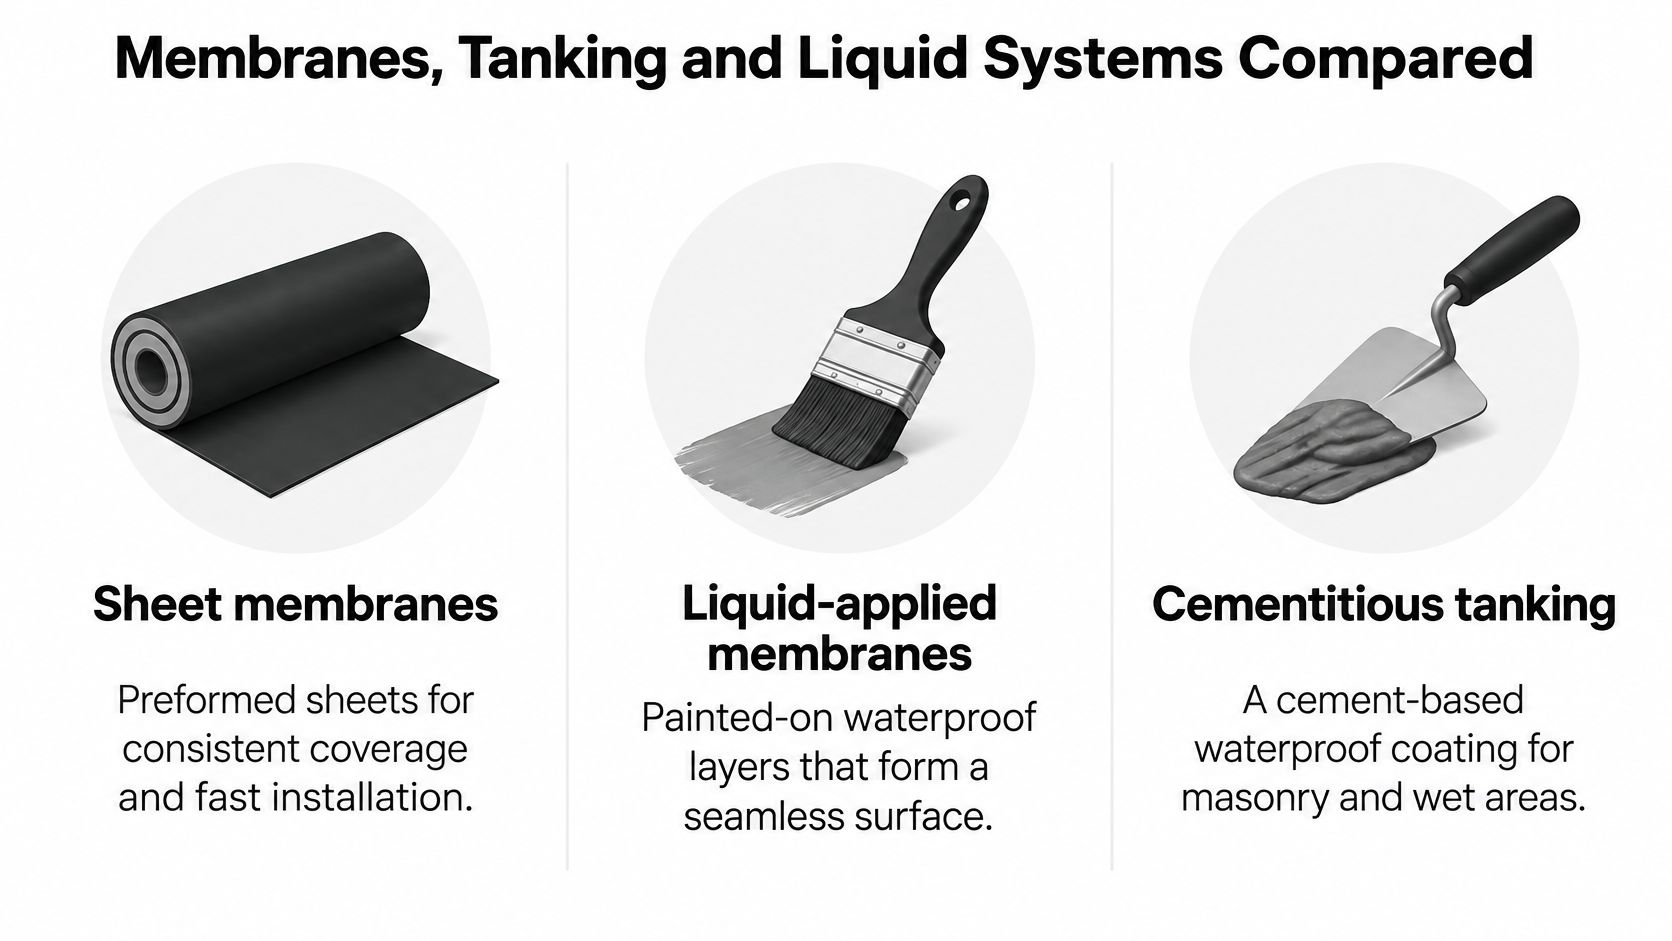
These approaches create a waterproof barrier differently. The comparison below illustrates the material types, but the installer still needs to specify a complete compatible system.

A comparison chart showing three common waterproofing materials: sheet membranes, liquid-applied membranes, and cementitious tanking systems.

Choose for the shape and substrate

Sheet membranes suit broad, relatively flat areas where a preformed layer provides consistent material thickness. Their vulnerable details are seams, corners and connections to wastes. A neatly covered floor isn't enough if the installer hasn't bonded overlaps correctly or integrated the sheet with the drain fitting.

Liquid-applied membranes suit niches, returns and irregular shower layouts because the coating follows their shape without sheet seams across the field. Their common weakness is insufficient applied thickness, particularly where a roller spreads material too thinly. Installers should check coverage and wet-film thickness against the product specification, rather than judge performance by colour alone.

Cementitious tanking uses a cement-based waterproof coating suited to compatible mineral substrates, floors and shower bases beneath tiles. Compatibility with the screed, substrate and tile adhesive is essential. Don't assume every cement-based coating can accommodate the same movement or be applied over the same background.

Think of the membrane as a raincoat. Its broad panels matter, but the seams, corners and zips decide whether you stay dry.

Compare complete systems, not buckets

A system includes more than the visible membrane. Primer, reinforcing tape, bond breakers, collars, sealants and waste connections must work together. Mixing a convenient primer with an unrelated coating can introduce uncertainty that a familiar brand name won't resolve.

For our bathroom waterproofing, we use class 4 waterproofing systems on walls and cementitious-compatible systems on floors. That describes our service approach, not a universal instruction to select a product by class name alone. The written specification must still identify suitability for the particular substrate and application.

For a tiled shower with niches, a suitable liquid-applied system is often practical because it can follow the recesses. For a flat floor over a compatible substrate, sheet or cementitious systems are common options. None is automatically the best choice in every bathroom.

Ask for the product's technical data sheet and the proposed installation sequence. The compliance pathway and manufacturer's system requirements should govern the selection, including preparation, application thickness, curing and protection before tiling.

Victorian Rules, Registered Builders and Warranties

Victorian bathroom work must meet the Building Act 1993, Building Regulations 2018 and Plumbing Regulations 2018, and the Victorian Building and Plumbing Commission's guidance on concerns about building work identifies inadequate bathroom waterproofing as non-compliance that can cause moisture problems. Waterproofing is regulated building work, not an optional improvement beneath attractive tiles.

The applicable code edition and compliance route need to be established for the project. Don't assume a standard quoted in an old renovation proposal remains the correct basis for new work.

Establish the compliance pathway

The Australian Building Codes Board's waterproofing history explains that detailed wet-area construction provisions moved out of NCC Volume Two for 2012 to 2019, then returned to the Housing Provisions in 2022, with AS 3740:2021 retained as an available Deemed-to-Satisfy pathway. This helps explain why bathroom quotes can contain different references without making their actual installation method clear.

Under the pathways described for that framework, the choices are the Housing Provisions' wet-area requirements or the Australian Standard route with the specified accompanying Housing Provisions clauses satisfied. Installers mustn't cherry-pick provisions between pathways. Wet-area membranes must also demonstrate compliance with the applicable membrane product standard.

Our guide to bathroom waterproofing standards provides additional context for discussing the specification. Before work starts, get clear answers to these questions:

  • Which pathway applies? Record the applicable code edition and compliance route.
  • Which system will be installed? Identify the membrane and associated products.
  • How will compliance be documented? Specify the records to be supplied before concealment and at handover.

Inspection should assess the assembly, not just the finished surface.

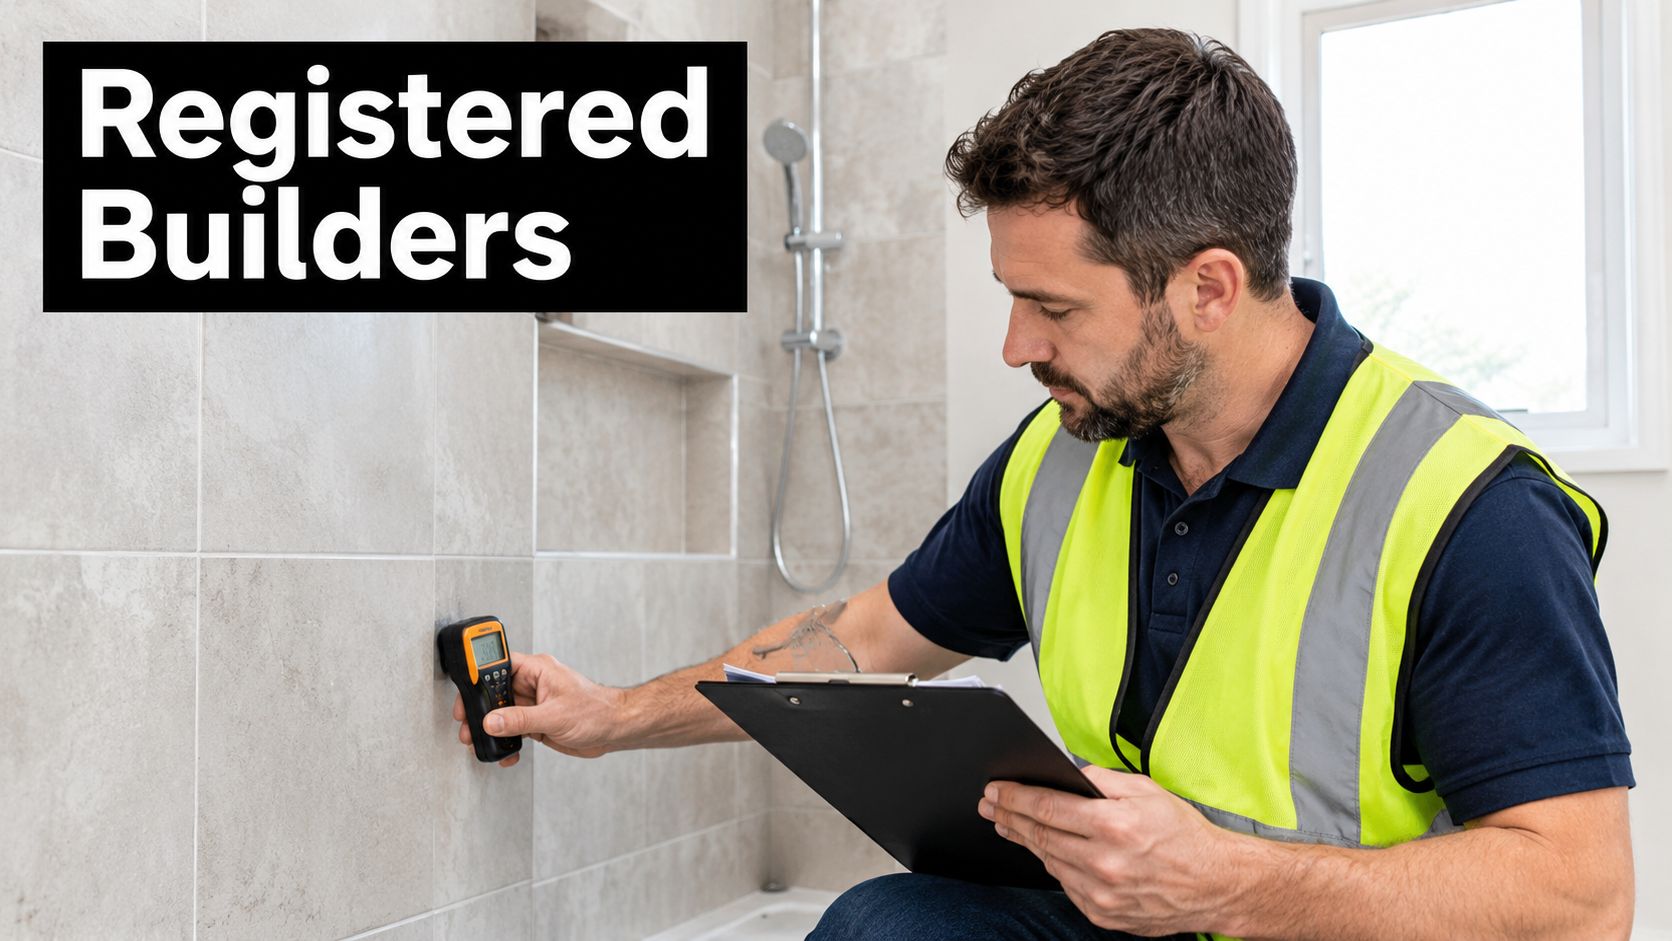
A professional building inspector wearing a safety vest checks moisture levels in a tiled bathroom wall.

Put coordination and warranty terms in writing

Registered builders coordinating bathroom renovations can manage the handovers between substrate installation, plumbing, waterproofing and tiling. The contract should identify who is responsible for checking those interfaces, rather than leave each trade assuming someone else has inspected them.

At Melbourne Tiling Services P/L, we operate as Registered Unlimited Builders, and our bathroom renovations are delivered with in-house carpenters, plumbers, waterproofers and tilers. All our workers are qualified and certified waterproofers or tilers. That coordination matters when a plumbing change affects a wall lining or a shower-screen fixing intersects waterproofing.

Our waterproofing work comes with extended warranties. Confirm the written term, covered work, exclusions, claim procedure and whether coverage transfers to a subsequent owner or applies when the property is tenanted; don't infer those conditions from the word “extended”.
Keep the written scope, compliance pathway, dated photographs, product details and warranty certificate together. If a leak appears, distinguish maintenance issues from possible installation defects before accepting responsibility. Notify the builder promptly about suspected defective work, and have the cause assessed rather than assuming every leak is either automatically a warranty claim or automatically the owner's expense.

Pre-Tile Checks That Prevent Hidden Leaks

The most useful inspection happens before the tiles conceal the work. A finished bathroom can look carefully built while hiding an incomplete drain connection, an untreated penetration or a membrane applied over a weak base.

Arrange a hold point in the programme so the waterproofing can be checked before tiling proceeds. The owner, landlord or builder should retain the resulting photographs and written log, rather than rely on images remaining on a tradesperson's phone.

Follow the installation sequence

  1. Confirm a sound substrate. Check that sheets are securely fixed, joints are prepared, surfaces are clean and the background suits the selected membrane, because movement or loose material can undermine the barrier. Our explanation of substrate preparation helps identify what needs resolving before coating begins.

  2. Check falls towards the waste. Use a straightedge and level to identify backfall or low spots, because a waterproof surface can still retain water when the drainage geometry is wrong. Include the niche shelf and any other horizontal ledges in this assessment.

  3. Verify primer, membrane build-up and curing. Record the products used and confirm that all specified layers have been applied under suitable conditions, because a thin or incompletely cured coating isn't equivalent to the tested system. Photograph product labels and retain application records alongside the site images.

  4. Inspect continuous junction treatment. Check corners, wall-floor junctions and bond-breaker details before they disappear beneath subsequent work, because the system must accommodate these changes of plane without an unprotected gap.

  5. Examine penetrations and the threshold. Confirm treatment around pipes, tap fixtures, wastes and the doorway waterstop, because these interruptions need integration with the surrounding barrier. Photograph the threshold separately so its position and termination remain identifiable.

  6. Measure the installed extent. The ABCB's waterproofing guidance specifies shower-wall waterproofing to at least 1,800 mm above the floor substrate for the stated shower configurations; photograph a tape measure against the installation and check the unenclosed shower boundary against the approved scope.

Make the photographs useful

Take an overall room photograph, then closer views showing each critical detail in context. Label the images by location and stage, and record the date, installer, product and any corrective work. A close-up without a recognisable location can be difficult to interpret later.

Practical rule: Photograph the detail while someone can still fix it without removing tiles.

Where stone flooring and underfloor heating are planned, coordinate the heating build-up before waterproofing starts. Varun Marbles' underfloor heating tips for stone bathrooms offer useful design context, but the membrane and heating manufacturers must determine the compatible layer sequence.

A later leak may originate at one of these concealed stages rather than at the visible tile surface. These records won't diagnose every defect, but they give an investigating specialist a much stronger starting point than a photograph of finished grout.

Leak Symptoms, Repair Scope and When to Call a Specialist

A leak rarely announces where it started. Water travels along joists, pipe runs and screed falls, so a stain can appear well away from the defect that caused it.

Leak symptoms and the right next action

Situation Likely scope Specialist needed
Damp grout lines with no staining behind tiles Regrout and reseal joints, then monitor Optional, if damp returns
Water seeping through the shower threshold Check threshold detail and membrane height Yes
Damp patch on ceiling below the bathroom Trace the source through the floor and plumbing Yes, before any patching
Hollow or lifting tiles across the shower floor Tile removal and membrane reinstatement if failure is confirmed Yes
Soft or swollen timber subfloor Membrane assessment and subfloor repair Yes

Treat this table as a starting point for investigation. Identical-looking stains can come from a plumbing joint, a threshold defect or water that has tracked across from another part of the room.

Notice where the higher-stakes rows sit. Failures cluster at junctions, thresholds and penetrations, where the membrane meets a drain, a doorway or a pipe, rather than across the open field of a wall or floor. A symptom's location tells an investigator more than its size.

Surface grout deterioration may justify local maintenance when there's no evidence of concealed damage. The absence of visible staining, though, doesn't prove that everything behind the tiles is dry. If damp returns after maintenance, stop repeating the same treatment and investigate.

When a patch isn't enough

Water at a threshold deserves attention because the fault may sit below the visible sealant joint. A fresh silicone bead over a leaking threshold works like repainting a damp wall: the surface looks better while the moisture keeps travelling underneath. Hollow tiles also need interpretation. They can signal a bonding problem while the membrane remains intact, so the removal scope should follow assessment rather than precede it.

For a ceiling stain, a plumber may need to rule out supply or waste leakage before a waterproofer opens the tiled assembly. The leak advice from Jays Plumbing and Sewer provides useful homeowner context for that situation. If the ceiling is sagging or water is near electrical fittings, keep clear and arrange urgent professional assistance.

Our bathroom waterproofing repair services cover shower-leak rectification and related tiling, carried out by qualified and certified waterproofers and tilers. Some concealed defects can't be confirmed until tiles and damaged materials are removed, so an initial assessment may need a staged investigation allowance. Ask what each stage will establish before work begins.

Compare repair costs on equal terms

In 2025, Sparky's Australian bathroom waterproofing pricing reported typical amounts of AUD 1,100 for a professional owner-managed renovation and AUD 1,400 as an itemised tiling-quote amount. These figures describe broader bathroom work, so treat them as references rather than leak-repair prices. Check whether demolition, substrate replacement, plumbing, screeding and retiling are included before comparing quotes.

A repair quoted cheaply because it skips demolition and substrate inspection can cost more in the end than a thorough job priced correctly the first time. Paying for a clear diagnosis helps avoid an ineffective patch and poorly planned destructive work.

Confirm a Written Waterproofing Scope Before You Book

Before accepting a quote, require a written waterproofing scope that identifies the shower dimensions, membrane boundary, waterproofing method, compliance pathway, warranty term and pre-tile photographic records. Compare its coverage with the bathroom's actual surfaces, substrate and shower configuration, not merely the total price.

Bring a clear shower photograph, the bathroom's approximate age, details of any leaks and their locations, and whatever you know about the floor construction. If you don't know whether the concealed subfloor is timber or particleboard, mark it as unconfirmed rather than guess.

Resolve the unknowns before signing

  • Coverage: Have every shower surface, junction, penetration and threshold identified on a sketch.
  • Concealed conditions: Record what requires inspection after demolition and how additional work will be agreed.
  • Handover: Specify the product records, photographs and warranty documents you'll receive.

Melbourne Tiling Services P/L provides bathroom renovations, tiling and waterproofing, with free renovation quotes and 3D drawings. Our design process includes sketches, plans and discussions, with modifications agreed before work commences.

Use that planning stage to settle the membrane boundary and responsibilities before comparing prices. Don't accept a verbal assurance in place of a defined installation scope.

No written scope, no booking.


Melbourne Tiling Services P/L offers bathroom renovations, waterproofing, tiling and shower-leak repairs, with coordinated trades for the work beneath and above the tiles. Visit Melbourne Tiling Services P/L to arrange a free quote, and bring your shower photos, floor details and leak locations so you can discuss a written scope before booking.

Wet Area Waterproofing Guide for Melbourne Renovations

The most popular waterproofing advice is also the most misleading: choose a good membrane and your bathroom will be safe. A membrane matters, but it can't rescue a weak substrate, a badly positioned waste, an incorrect fall, or an unsealed pipe penetration. Wet area waterproofing is a water-management system, and every part of that system has to work before the first tile is fixed.

For Melbourne homeowners, that distinction matters during bathroom renovations because the work hidden beneath the tiles determines whether the finished room remains dry or becomes a source of mould, damaged materials and disruptive rectification. The current compliance framework also means a builder must account for the room layout, building class, shower arrangement and substrate, rather than applying one generic method to every renovation.

Table of Contents

Why Your Bathroom Leak Probably Isn't the Tile

A bathroom can appear finished and fault-free while water is already moving beneath it. Straight grout lines, clean tile faces and a well-fitted shower screen do not prevent moisture escaping through a waste, corner or wall junction. Staining outside the bathroom often appears only after the hidden path has been active for some time.

Tile defects are visible, but they do not explain every wet-area leak. A cracked tile can admit water, yet the consequences depend on the conditions below it. Movement in the substrate, poor drainage falls or waterproofing that ends short of a penetration can direct water into materials never intended to stay wet.

Practical rule: Assess the waterproofing before judging the tile finish. Once tiles cover the membrane, inspection becomes much harder.

I've seen renovation disputes centre on a loose tile while the actual defect sat at the floor waste or wall-to-floor junction. A sound investigation follows the complete water path, including adjoining construction and drainage, rather than treating the first visible symptom as the cause. Victorian regulator guidance recognises that water ingress can also involve balconies, roofs, drainage and other building areas beyond the bathroom. The diagnosis must therefore match the route water is taking. Victorian waterproofing and water-ingress guidance provides useful context for that broader assessment.

The four parts of a reliable system

A leak-resistant bathroom renovation depends on four connected decisions:

  • Substrate preparation: The surface must be stable, clean and suitable for the specified membrane.
  • Geometry: The floor must direct water to the waste instead of allowing ongoing pooling.
  • Membrane continuity: The barrier must remain unbroken at corners, wastes, penetrations and transitions.
  • Fixture detailing: Drains, shower screens, niches, thresholds and pipework must connect correctly to the waterproofed zone.

Homeowners mainly see the fixtures and tile finish. The builder and waterproofer must control the full system. If one responsibility is passed between trades, a visually impressive renovation can still hide a leak risk. For an existing problem, professional leak detection services in Melbourne can help identify the water path before tiles are removed or a repair method is chosen.

What Wet Area Waterproofing Is

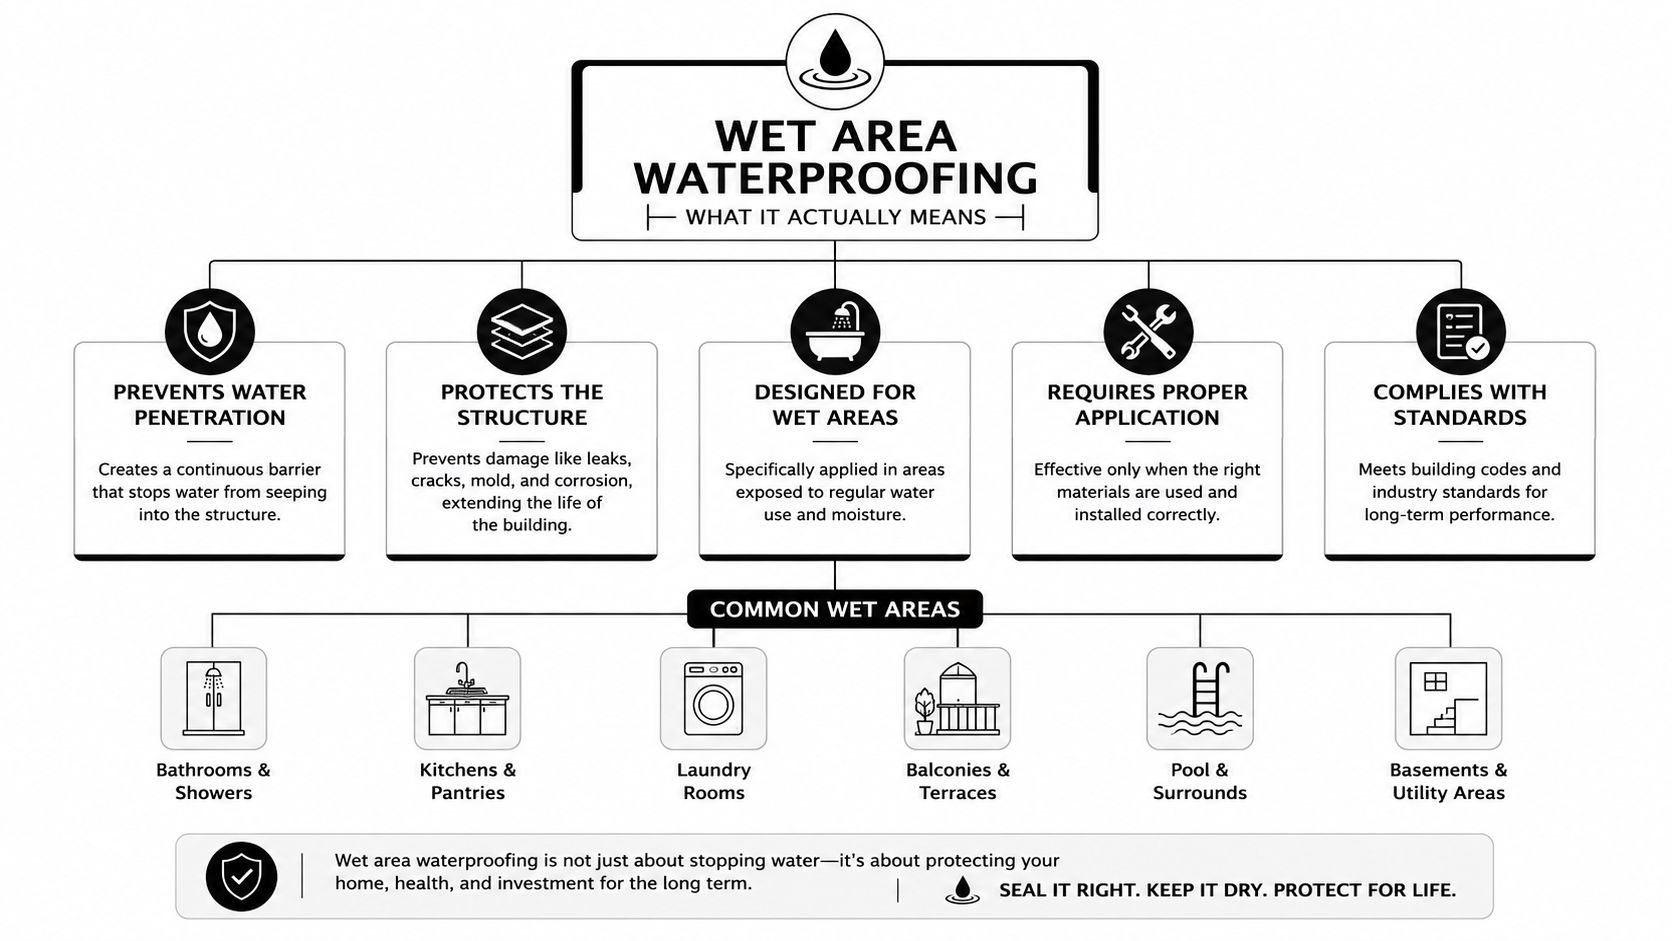
Wet area waterproofing is a water-management system beneath the finished surface. It limits moisture movement into substrates, wall cavities and structural elements. Tiles and grout provide the finish, not the primary waterproofing barrier. The substrate, floor geometry, membrane and fixture details must work together before water reaches vulnerable building materials.

A membrane choice alone does not make a bathroom waterproof. The installer must control three connected areas, each with a separate role.

A professional infographic titled Wet Area Waterproofing explaining its key benefits and common areas requiring protection.

Start with the substrate

The substrate receives the waterproofing system. Concrete, fibre-cement sheet and other approved surfaces behave differently, so the installer must confirm that the surface is stable, clean, suitably prepared and compatible with the selected membrane.

Dust, movement, contamination and unsuitable sheet products can compromise the work before the membrane is applied. The Victorian Building Authority states that particleboard is no longer allowed to form part of the waterproofing system, making substrate selection a compliance and durability decision, not just a material preference. The VBA fact sheet on wet-area waterproofing explains why the treatment must suit the particular wet-area design.

Geometry controls where water goes

A membrane can resist water, but it cannot correct a flat or poorly formed floor. The screed, slab or sheet floor needs a controlled path to the waste, with fixture positions and finished levels resolved before tiling begins.

Hobless showers expose poor set-out quickly. Their larger uninterrupted floor area must drain without a raised step containing overspray. Accurate falls reduce standing water and the load placed on joints, corners and other details.

The membrane must stay continuous

Liquid, sheet and cementitious systems use different installation methods, yet every system must remain connected across changes in plane and interruptions. Floor wastes, pipe penetrations, wall corners, thresholds and niches require deliberate detailing.

A suitable product with poor joins is still a failed waterproofing system. Ask the builder how each penetration and transition will be treated, where the membrane will terminate, and how continuity will be checked before the finish conceals the work.

Australian Standards and Victorian Requirements

The national reference point for domestic wet-area waterproofing is AS 3740:2021. Standards Australia approved the standard on 7 July 2021, published it on 23 July 2021, and the NCC 2022 adopted it for housing provisions on 1 May 2023. The Housing Industry Association's explanation of wet-area waterproofing describes its role in setting minimum requirements for waterproofing materials, design and installation.

The standard applies across Class 1, Class 2 and Class 4 buildings. It also applies to wet areas in Class 3 to 9 buildings as though those wet areas were parts of a Class 2 or Class 4 building. For Melbourne renovations, that distinction matters because a detached house, townhouse, apartment and mixed-use project don't automatically carry the same practical compliance pathway.

The fall requirements are not cosmetic

For shower floor wastes, Victorian guidance identifies a minimum fall of 1:80, equivalent to 12.5 mm over 1 metre, and a maximum continuous fall of 1:50, equivalent to 20 mm over 1 metre. These requirements are set out in the NCC 2022 housing provisions for wet-area waterproofing.

The change is significant for renovations because earlier guidance under AS 3740-2010 had allowed 1:100 in some shower configurations with vertical separation. A builder who measures only the finished tile surface, rather than coordinating the substrate, screed, waste and tile thickness, can create a floor that looks acceptable but doesn't meet the required drainage geometry.

Shower walls must be waterproofed to 1800 mm above the floor substrate. Bathrooms are also classified into Category 1 high risk, Category 2 moderate risk and Category 3 low risk, with the room design determining the appropriate treatment.

Building class changes the conversation

Apartment and higher-risk projects need more than a generic residential bathroom specification. The ABCB notes that NCC 2025 waterproofing provisions were revised in connection with the DBP Act, which adds compliance complexity relevant to apartments, townhouses and mixed-use work in Victoria. The ABCB waterproofing compliance document is particularly relevant when the project extends beyond a straightforward Class 1 renovation.

For homeowners, the practical question is simple: ask the builder which compliance pathway applies to the building and why. Keep the waterproofing specification, product details, inspection records and certification together. If you need evidence for a project, discuss a Victorian waterproofing compliance certificate before tiling begins, not after the membrane has disappeared behind the finished surface.

Liquid, Sheet, and Cementitious Membranes Compared

Membrane selection should follow the conditions of the job, not the installer's habit or the lowest product price. Liquid-applied, sheet and cementitious membranes can all be appropriate, but they behave differently under movement, around penetrations and across complex layouts.

Liquid-applied systems

Liquid membranes are rolled, brushed or sprayed onto the prepared surface and cure into a continuous barrier. They suit irregular shapes, curved transitions and detailed areas because the installer isn't joining a series of factory sheets around every obstruction.

That flexibility brings a responsibility. Coverage and cured thickness need close control, and a thin area or missed section may be difficult to identify once tiling starts. The installer also needs to follow the specified preparation and curing conditions rather than rushing the next trade onto the surface.

Sheet systems

Sheet membranes provide controlled manufactured thickness and can offer a clean, consistent installation across suitable areas. They're useful where the layout is relatively straightforward and the team has a reliable method for bonding or fixing the sheet to the substrate.

Joints, corners and terminations are the trade-off. Each overlap and edge must be sealed correctly, and substrate movement can place stress on the sheet or its bonded interfaces. A sheet system isn't automatically safer than a liquid system. It moves the critical workmanship from coating thickness to joint and termination quality.

Cementitious systems

Cementitious membranes are brushed or trowelled over prepared substrates. They're familiar in many traditional bathroom applications and can work effectively where the substrate and design suit a more rigid coating.

Their limitation is flexibility. If the substrate shifts, a rigid coating can crack or lose continuity. That makes substrate stability and movement control central to the decision, particularly in complex renovations or areas exposed to changing conditions.

Membrane Type Best Suited For Key Advantage Primary Risk
Liquid-applied Irregular layouts, penetrations and complex shower details Continuous coating with fewer sheet joints Inconsistent thickness, missed areas or poor curing
Sheet Suitable, stable substrates and defined layouts Manufactured thickness and consistent material Failed laps, joints or terminations
Cementitious Simpler applications with compatible traditional substrates Familiar installation and substrate compatibility Cracking when the substrate moves

For a Melbourne bathroom renovation, the correct choice depends on the substrate, geometry, fixture arrangement and risk category. A hobless shower may favour a system that handles detailed transitions well, while a simpler layout may suit another product. The specification should name the system and detail its preparation, not merely state “waterproofing included”.

The following video can help visualise the practical principles behind membrane installation.

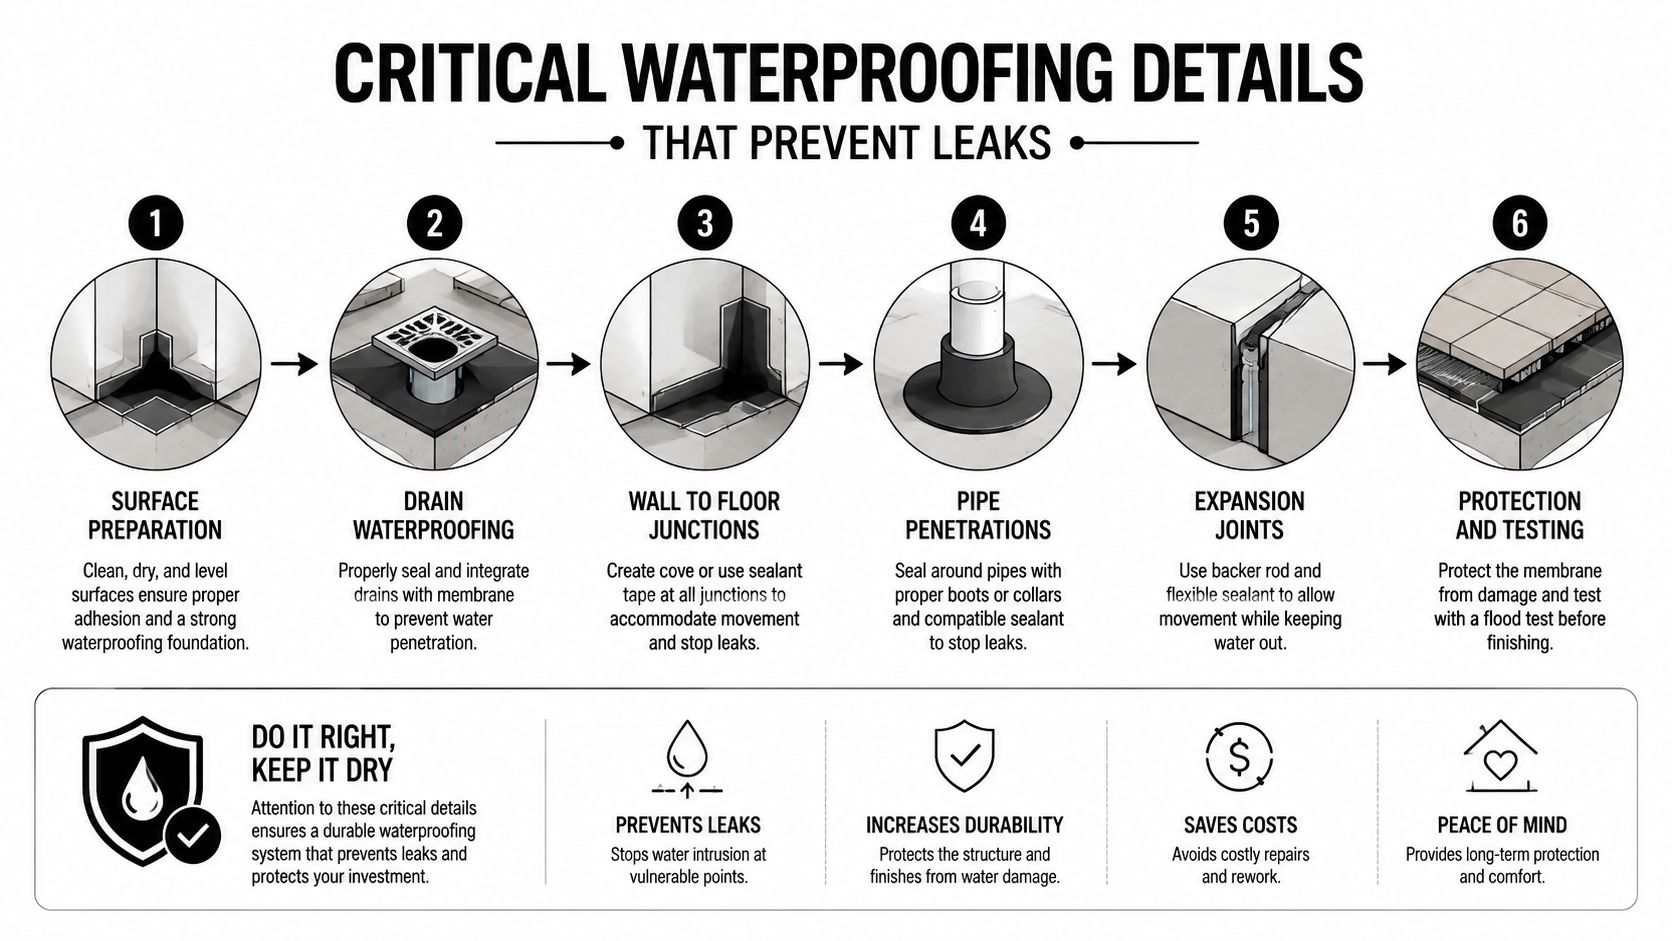
Critical Waterproofing Details That Prevent Leaks

A leak-free bathroom depends on how the whole water-management system is built. The substrate, floor geometry, membrane, waste connection and fixture penetrations must work together. Product selection matters, but poor detailing at a change of plane or opening through the membrane can defeat a suitable system.

Control the shower waste and floor shape

The shower waste must sit within a properly formed drainage plane. Water should run continuously towards it without persistent pooling, and the membrane must connect securely to the waste flange so moisture cannot pass around the drain.

Before waterproofing begins, coordinate the waste position, floor levels, screed thickness and tile build-up. Hobless showers require particular care because the finished floor must contain water while still directing it to the waste. A layout that appears simple can become difficult once tolerances and drainage are accounted for.

Treat transitions and penetrations as system details

At the bathroom threshold, the containment detail must direct water back towards the wet zone. The membrane needs a secure termination at that transition, rather than stopping near the doorway where the edge remains exposed.

Pipes, drains, fixings and shower fittings interrupt the waterproofed surface. Proprietary boots, collars or compatible sealants may form part of the detail, provided they are correctly bonded and installed without gaps. A neat escutcheon only conceals a pipe opening. It does not make the penetration waterproof.

Site observation: Membranes usually fail at details treated as an afterthought, not across the broad, uninterrupted field.

The wall-to-floor junction requires the same discipline. Horizontal and vertical waterproofing must form one continuous connection through corners and shower niches. If you are planning a recessed shelf, discuss shower niche waterproofing before finalising the wall lining and membrane specification.

An infographic showing six critical steps for professional wet area waterproofing to prevent leaks and water damage.

Respect the required protection zones

Victorian guidance requires shower wall waterproofing to reach 1800 mm above the floor substrate. Walls surrounding baths and laundry tubs in wet areas must be waterproofed to at least 150 mm above the fixture, as explained in this practical guide to waterproofing and tiling.

Mark and inspect these heights before tiling. Check floor edges, skirtings and thresholds as well. If the barrier stops short of a vulnerable junction, moisture can enter behind the finished surface even when the main shower field has been installed correctly. A builder should show these transitions clearly before they are covered.

Common Defects and How to Avoid Them

Waterproofing failures are often blamed on tiles because tiles are the first visible element to crack, sound hollow or stain. That diagnosis can send a homeowner towards regrouting when the actual defect sits in the substrate, drainage geometry or concealed membrane.

The VBA identifies several issues that deserve direct attention. The newer standard no longer permits particleboard to form part of the waterproofing system, and the regulator highlights falls to waste, shower wall coverage and correct treatment of hobless or unenclosed showers. The VBA's practitioner education material also supports looking beyond the membrane alone when investigating water ingress.

Defects that deserve a pre-tiling check

  • Membrane discontinuity: Gaps, tears and thin areas commonly occur at corners, edges and penetrations.
  • Poor drainage geometry: Inadequate fall leaves water sitting where the design expects it to move towards the waste.
  • Unsuitable substrate: Particleboard and unstable or incompatible surfaces can undermine the waterproofing system.
  • Incomplete wall coverage: Treating only a narrow splash zone won't satisfy the current shower wall requirement.
  • Unprotected transitions: Door thresholds, skirtings and wall-to-floor junctions can expose edges to moisture.
  • Incorrect hobless detailing: An unenclosed shower demands careful coordination because the floor has to manage a broader water path.

A good inspection isn't limited to asking whether the membrane has been applied. Check the substrate before application, confirm the waste and falls, inspect the corners and penetrations, and photograph the completed waterproofing before the tiler starts. If the tiler arrives while the membrane is still uncured or the details haven't been checked, the programme is moving too quickly.

What doesn't work: Choosing a cheap membrane, applying it over an unsuitable sheet and asking the tiles to hide the problem. The tile finish can disguise a defect, but it can't repair one.

Balconies need the same systems thinking at a larger exposure level. Drainage paths, junctions and membrane continuity remain central, while water may also enter through adjoining roof, façade or drainage details. A bathroom renovation and balcony rectification aren't identical jobs, but neither should be reduced to selecting a coating from a product shelf.

Hiring the Right Builder for Wet Area Waterproofing

A sound specification still depends on the people coordinating it. Bathroom renovations involve demolition, carpentry, plumbing, electrical work, screeding, waterproofing and tiling, and each trade can affect the next trade's work. If the builder doesn't control that sequence, one installer can damage a detail that another installer completed correctly.

Verify the builder first

For Victorian domestic building work, builder registration is required for larger renovation jobs. Homeowners should verify the builder's status with the Victorian Building Authority before signing a contract, rather than relying on a business card or verbal assurance. This Victorian waterproofing guidance for homeowners explains why registration checks matter when waterproofing and coordinated renovation work are involved.

Ask who is responsible for the waterproofing specification and who will inspect it. A registered builder should be able to identify the membrane system, substrate requirements, floor-fall method, penetration details and inspection point before the tiler covers the work.

Put the deliverables in writing

Use a written checklist that names the evidence you expect:

  • Registration verification: Confirm the builder's current Victorian registration before work starts.
  • System specification: Record the membrane type, compatible primer, substrate and detail products.
  • Geometry confirmation: Ask how the required fall, waste position and finished levels will be checked.
  • Trade coordination: Confirm that plumbers, carpenters, waterproofers and tilers work from the same set-out.
  • Pre-tiling inspection: Require photographs and inspection records while the membrane remains visible.
  • Certification records: Obtain the relevant waterproofing certification before tiles conceal the system.

Melbourne Tiling Services P/L operates as a Registered Unlimited Builder from Highett and coordinates licensed carpenters, plumbers, electricians, tilers and waterproofers across residential and commercial projects in Melbourne and greater Victoria. Its services include bathroom renovation management, waterproofing, screeding, self-levelling, tiling and leak rectification, with design support that can help coordinate the finished layout before construction begins.

Screenshot from https://melbournetilingservices.com.au

Don't accept “waterproofing included” as a complete scope. Demand the system details, ask who checks the work and make sure certification and inspection records are available before tiling starts.


For Melbourne bathroom renovations, Melbourne Tiling Services P/L can coordinate substrate preparation, wet area waterproofing, screeding, tiling and related licensed trades as one managed project. Visit Melbourne Tiling Services P/L to discuss your renovation, leak rectification or waterproofing requirements and request a detailed quote.