

You've just finished a Melbourne bathroom renovation, balcony upgrade or open-plan flooring project. The tiles are clean, the grout lines are straight and the handover photographs look perfect. Then, months later, a grout line splits near the doorway, a balcony tile sounds hollow, or a large porcelain floor begins lifting at the edges. The finish looked complete, but the installation may not have had enough room to move.
Movement joints in tiling provide that controlled room. They separate a rigid tiled surface into panels, allowing tile, adhesive, screed, concrete, timber and waterproofing systems to respond to movement without forcing stress into the tile field. For Melbourne homes, that planning matters across large-format interior floors, sun-exposed balconies, alfresco areas and wet-area bathroom work.
Table of Contents
- Why Tiled Surfaces Need Room to Move
- Understanding Movement Joints in Tiling
- Australian Spacing and Width Guidance
- Choosing the Right Joint Locations
- Installing Movement Joints Correctly
- Adapting Joints to Substrates and Tiles
- Bathroom Renovations and Registered Builders
- A Practical Movement Joint Planning Checklist
Why Tiled Surfaces Need Room to Move
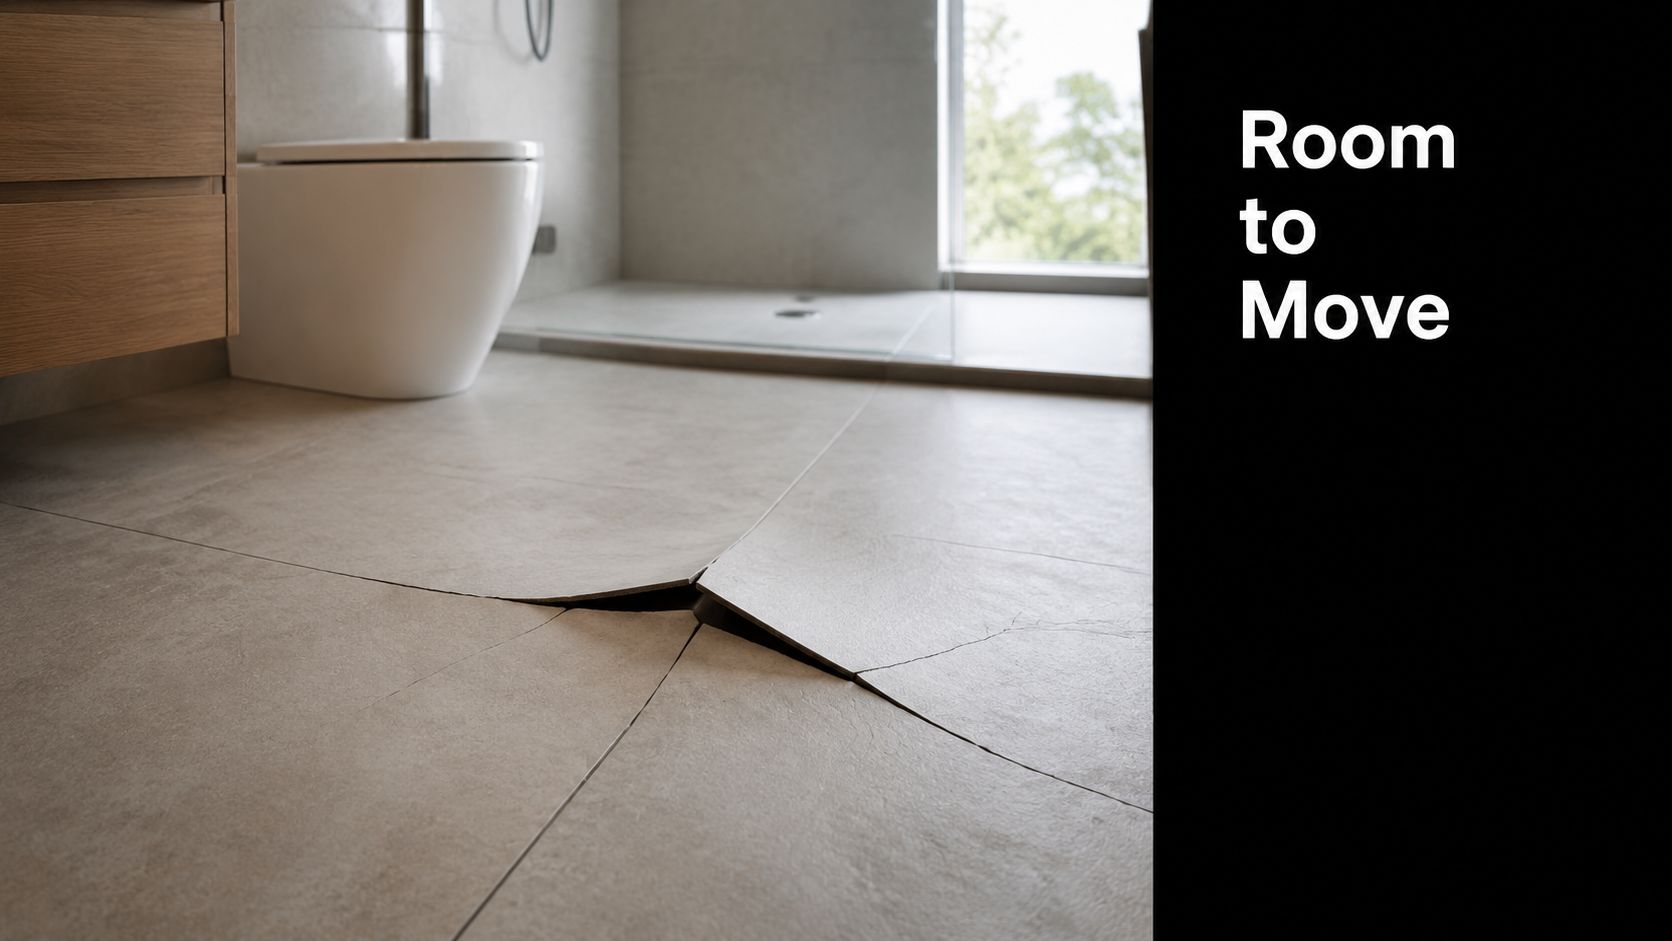
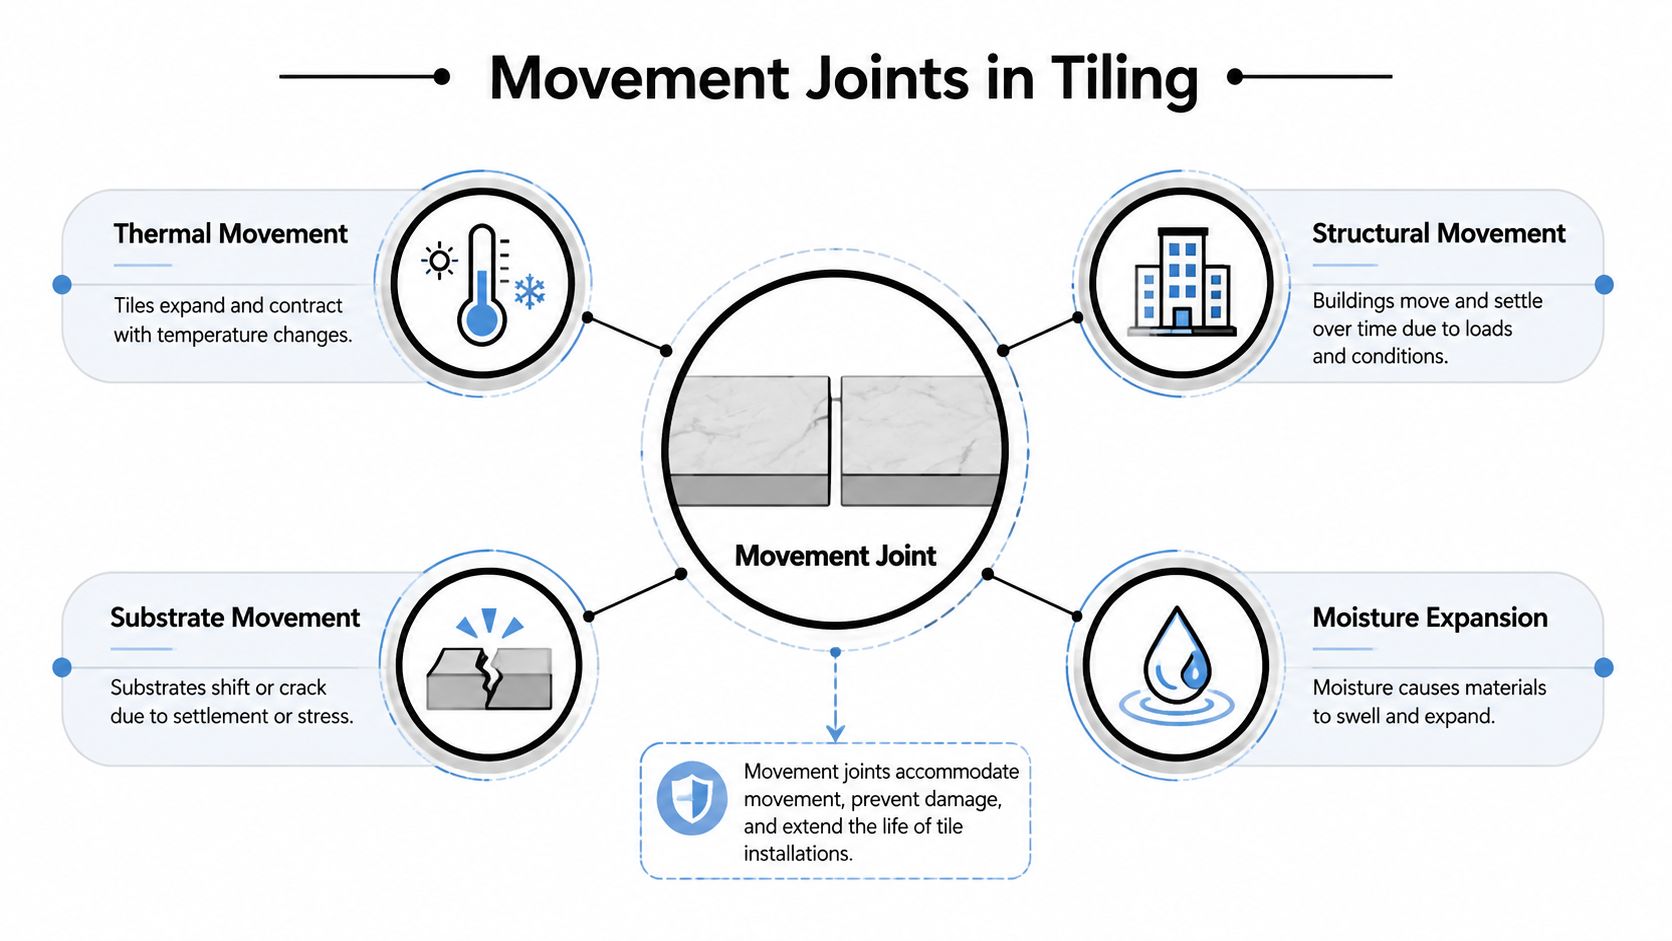
A large-format porcelain floor can fail even when the tiler has produced an impressive visual finish. Melbourne homes experience daily temperature changes, seasonal humidity shifts and structural deflection. Those forces push, pull and shear the different layers beneath the tiles.
Tile, adhesive, screed, concrete, timber and waterproofing membranes don't expand and contract in exactly the same way. If the whole assembly is bonded tightly against walls, columns, cabinets or adjoining surfaces, movement has nowhere to dissipate. The stress then concentrates at weak points, such as corners, doorways, grout lines and areas where the substrate changes.
What homeowners usually see
The first signs often look minor. A grout line opens beside a skirting board, a corner tile debonds, or sanitary ware junctions develop cracks. On an exposed balcony, tiles may sound hollow when tapped, while a living-area screed can develop a drummy or loose-sounding section.
Those symptoms don't always identify the original cause. A cracked grout line may reflect movement below, not poor grouting alone. A tented tile may have been pushed against a wall as the tiled panel expanded. A hollow balcony tile may also point to incomplete support, water entry or movement that the installation couldn't accommodate.
Practical rule: A neat grout finish can conceal a poorly planned movement system. Inspect the joints beneath the finish, not just the visible surface.
Movement joints are part of the design
A movement joint isn't an aesthetic flaw or an admission that the tiling is unfinished. It's an engineered separation that manages predictable movement before the tile field cracks or lifts.
Large interior floors need a different approach from exposed balconies. A bathroom floor must also work with waterproofing, shower transitions, floor-to-wall junctions and changes in plane. Treating every tiled surface as one uninterrupted sheet is the mistake. Treating each area according to its substrate, exposure and restraints produces a more durable result.
Understanding Movement Joints in Tiling
A movement joint is a deliberately formed, full-depth gap that divides a tiled surface into smaller panels. Each panel can respond more independently to thermal and structural movement instead of transferring every force through the tiles and grout.
The simplest comparison is a concrete driveway. Separate sections are divided by joints so the concrete can move without pushing the entire drive against a fixed edge. Timber decking uses a similar principle through planned gaps between boards. In tiling, the separation is usually narrower, more carefully positioned and finished with a flexible sealant or a purpose-made movement profile.
The joint has several layers
A functional joint isn't a line scraped into grout. It needs to continue through the tile, adhesive and underlying bedding material so the complete assembly can move at the planned location.
A typical sealant joint may include:
- A clean joint face: Tile edges must be free from grout, adhesive, dust and curing residue.
- Compressible backing rod: In a deep joint, backing rod controls sealant depth and helps create the correct sealant geometry.
- Primer where required: The sealant manufacturer may require primer on particular tile, screed or substrate surfaces.
- Flexible sealant: The elastomeric sealant should bond to the joint faces, not to the backing rod below.
- Bond-breaker treatment: At some wall junctions, bond-breaker tape helps prevent the sealant from adhering to the back of the joint.
ARDEX Australia's technical guidance requires movement joints to run through the full tile and adhesive build-up, remain free from grout and adhesive, and use compressible backing rod in deep joints where needed. Its guidance also identifies perimeters, internal corners, changes in substrate plane and doorways as locations requiring careful movement detailing. ARDEX Australia's technical bulletin on differential movement in tiles.pdf) explains why the detail matters, concentrated shear transfer can otherwise pass into the tile field.
Structural joints and tiling joints differ
A structural joint belongs to the building or substrate and may be formed by the engineer or builder. If a concrete slab has a structural or control separation, the tiled finish must honour it at the same location.
A tiling movement joint is planned within the tile layout to manage movement across the tiled surface. The two systems aren't interchangeable. A tiler can add field, perimeter or isolation joints, but shouldn't cover or relocate a structural joint without appropriate design coordination.
Australian Spacing and Width Guidance
Australian guidance gives Melbourne designers and installers measurable starting points, but spacing still needs to reflect exposure, substrate and construction details. The current Housing Industry Association summary of AS 3958:2023 states that internal floors larger than 9 m in any dimension need movement joints at spacings no greater than 4.5 m, while external floors require 4.5 m spacing in any dimension. The same guidance states that wall movement joints should be at least 6 mm wide and extend through both the tiles and bedding material. The HIA guidance on joints in floor and wall tiles also places horizontal wall movement joints at storey heights and about 3 m to 4.5 m apart vertically.
These figures are particularly relevant to Melbourne homes with broad interior layouts, balconies and alfresco areas. Sun exposure can create stronger thermal movement than a shaded internal room, so a balcony layout shouldn't copy the spacing used in a hallway.
Current guidance and older summaries
Older Australian industry material summarising AS 3958.1-2007 states that perimeter movement joints are required in installations over 10 m², and that joints should be used wherever movement is likely, not only at standard spacings. That source also reports a minimum floor joint size of 3 mm for dust-pressed floor tiles under clause 5.4.6(c). The Australian tiling industry summary is useful historical context, but a summary table shouldn't replace reviewing the current standard and project-specific requirements.
A practical reference looks like this:
| Location | Typical maximum spacing | Minimum joint width | Notes |
|---|---|---|---|
| Internal floors larger than 9 m in any dimension | 4.5 m | Project-specific, with wall joints at least 6 mm | Follow current HIA guidance and coordinate with substrate joints |
| External floors | 4.5 m in any dimension | Project-specific, with wall joints at least 6 mm | Exposed balconies and alfresco areas need careful thermal and water detailing |
| Wall tiling | About 3 m to 4.5 m vertically | At least 6 mm for wall movement joints | Place at storey heights and coordinate with corners and substrate changes |
For large interior layouts, review the tile format and proposed layout alongside large-format tile installation considerations. A straight joint may need to move to align with a control joint, doorway or change in construction. The numbers are not permission to ignore site conditions. They're a measurable framework for a design that still needs professional judgement.
Choosing the Right Joint Locations
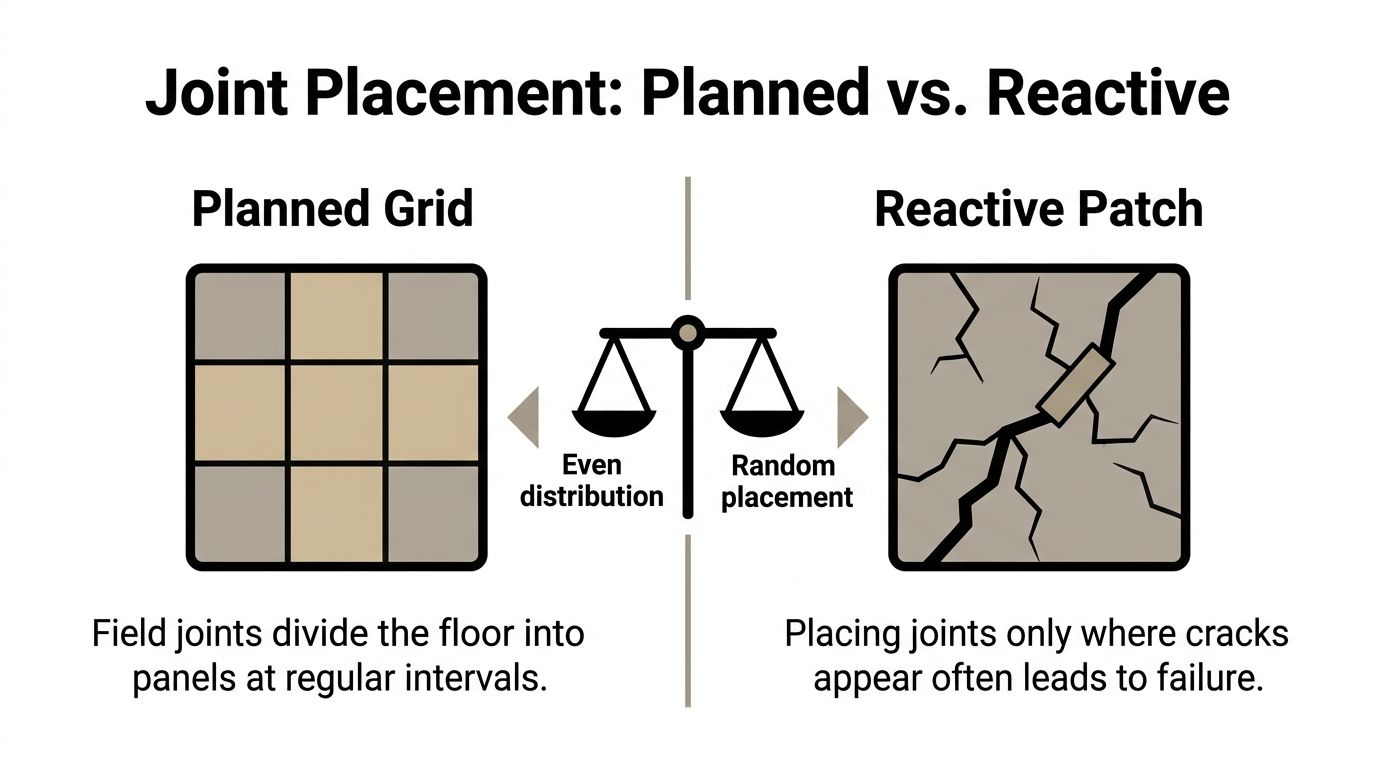
Joint placement works best as a planned grid, not as a repair strategy after cracking appears. Field joints divide the interior of a tiled area into panels. Perimeter joints separate the tile field from walls, columns, fixed cabinets and other boundaries that can restrain expansion.
Compare the main joint types
| Joint type | Where it belongs | Why it matters |
|---|---|---|
| Field joint | Across the interior tile field | Divides a large surface into manageable panels |
| Perimeter joint | Against walls, columns, cabinets and fixed fixtures | Stops the tile field pressing against fixed boundaries |
| Structural joint | Directly above a joint in the substrate | Carries the building separation through the tile assembly |
| Isolation joint | Between different materials, construction methods or movement zones | Separates areas that may move differently |
| Change-of-plane joint | At floor-to-wall junctions, shower corners and similar transitions | Allows movement where surfaces meet at an angle |
Plan around the room, not just the grout lines
Doorways often make useful panel boundaries, particularly where rooms have different substrates, tile directions or construction methods. A doorway can also separate a bathroom floor from an adjoining hallway, but the joint still needs to work with the threshold, waterproofing detail and finished floor levels.
Internal corners deserve special attention. A flexible joint at a floor-to-wall junction may isolate the two planes, but it doesn't replace field-joint spacing across a large floor. Likewise, a perimeter joint beside a column doesn't remove the need for a planned field grid.
Good layout practice: Mark joints on the drawing before tile selection, screeding and waterproofing. A joint that's designed late may collide with a shower waste, cabinet, step or high-traffic route.
Large-format tiles change the visual problem
Large-format tiles can make a room look calm because they reduce visible grout lines. They don't reduce the movement of the substrate beneath them. In fact, a wide tile can make a poorly located joint harder to integrate into the layout, especially where the joint falls near a corner or cuts across a prominent visual axis.
Check thresholds, shower transitions, steps, columns and changes in bay size before adhesive reaches the floor. If a joint must cross a visible area, the designer and installer can coordinate it with tile edges, a doorway or a suitable movement profile. The aim isn't to hide every joint. The aim is to place each one where it can perform and still look intentional.
Installing Movement Joints Correctly
A movement joint only works when the installer builds it through the complete tiled assembly and fills it with a material designed to absorb movement. Cutting a line into the finished grout won't create the required separation.
Prepare the joint from the substrate up
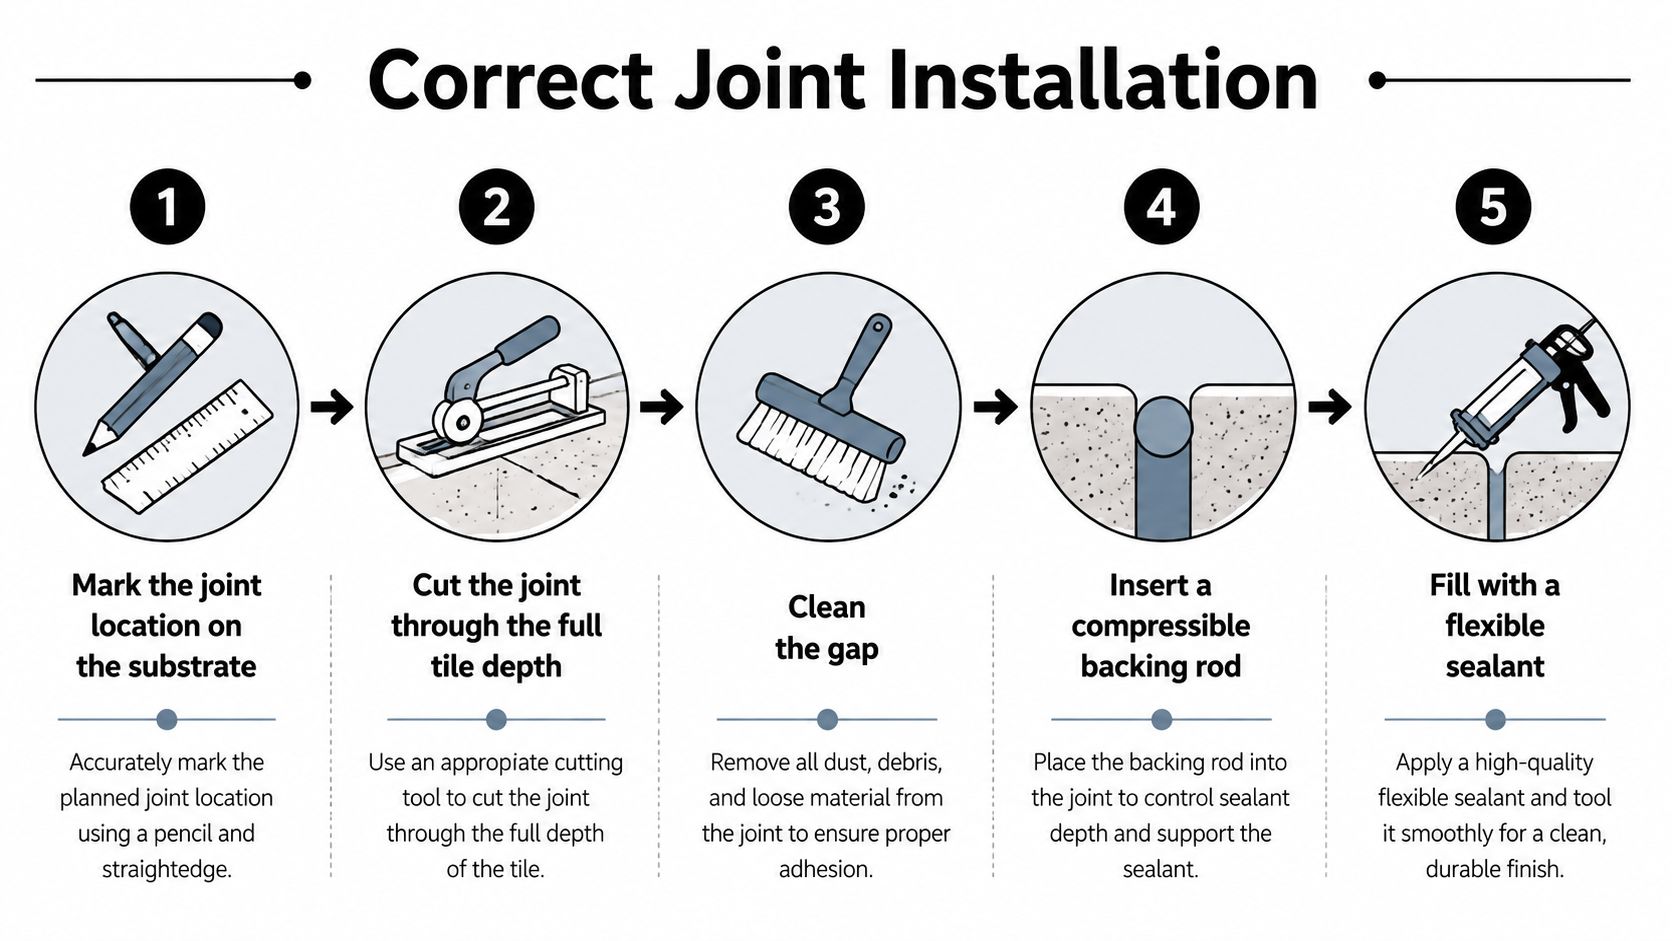
Start by marking the joint location on the substrate. Carry that line consistently through any levelling compound, screed, adhesive bed and tile installation. If the substrate already contains a structural or control joint, the tile joint must align with it rather than bridging across the separation.
The finished gap needs straight, clean faces. Remove dust, adhesive, grout, loose particles and curing residues before applying sealant. Any rigid material left in the gap can restrict movement or stop the sealant bonding correctly.
Control the sealant geometry
Where the joint is deep, insert a compressible backing rod at the specified depth. The rod controls how much sealant is used and prevents the sealant from bonding to the bottom of the joint. That allows the sealant to stretch and compress between the joint faces instead of tearing under movement.
Primer isn't universal. Follow the sealant manufacturer's requirements for tile, screed, concrete, waterproofing interfaces and other surfaces. The same instructions should establish the required width-to-depth relationship, product compatibility and curing conditions.
- Clean the faces: Brush and vacuum the gap before masking and sealing.
- Use compatible materials: Confirm that the sealant suits the tile, waterproofing system and exposure.
- Keep rigid products out: Grout and adhesive must not bridge the movement gap.
- Finish below traffic: On external floors, detail the sealant so it remains protected from impact while still shedding water and debris.
- Protect the joint: Keep fixtures, floor finishes and excess sealant from obstructing the designed separation.
A rigid grout plug defeats the joint. Leaving adhesive across the gap creates the same problem by transferring stress into the tile edges. On balconies, debris and water can also shorten the life of an otherwise suitable sealant if the joint isn't properly formed and protected.
Adapting Joints to Substrates and Tiles
The joint layout must respond to what supports the tiles, what covers them and what the room experiences. A concrete slab, suspended timber floor, bathroom screed and exposed balcony aren't interchangeable bases.
Timber floors and suspended construction may deflect differently from concrete. Before selecting a tile grid, confirm that the framing, sheeting and fixings provide a suitable foundation. Concrete and cementitious screeds may shrink or crack while curing, so existing cracks, construction joints and curing conditions need assessment before the tiled finish is installed.
Waterproofing adds another layer of coordination. Bathroom floor-to-wall transitions, shower corners, thresholds and balcony perimeters need movement detailing that works with the membrane rather than cutting or puncturing it. A sealant joint that looks correct at the tile face can still fail if the underlying waterproofing detail is discontinuous.
For guidance on the supporting layer, review what screed does in a tiling system. The screed's condition, thickness, curing and relationship with the substrate all affect the decision.
| Substrate or tile | Planning consideration | Typical action |
|---|---|---|
| Timber floor | Deflection and sheeting movement can differ from concrete | Confirm structural support and fixing before layout |
| Concrete slab | Existing control and structural joints may govern the tile grid | Reflect substrate joints through the tile finish |
| Cementitious screed | Shrinkage and curing can affect the finished surface | Assess curing, cracks and movement before tiling |
| Waterproofing system | Joints must preserve membrane continuity | Coordinate floor, wall, shower and balcony details |
| Ceramic tile | Format and substrate still determine movement needs | Use the planned joint system, not grout alone |
| Porcelain tile | Dense, rigid tiles still follow substrate movement | Provide full support and planned movement accommodation |
| Stone | Natural variation and sealant compatibility require checking | Confirm product suitability and movement detailing |
| Large-format Kerlite | Broad sheets demand careful alignment and support | Use product-specific technical data and a coordinated grid |
Large-format porcelain, stone and thin porcelain formats such as Kerlite don't justify fewer or narrower joints. Rectified edges improve visual consistency, but they can't stop substrate movement. Interior floors, heated floors, balconies and sun-exposed areas should be treated as distinct design situations, with the tile dimensions, adhesive, membrane, joint width and sealant recorded before work begins.
Bathroom Renovations and Registered Builders
Grout isn't a movement joint. Cement-based grout cures into a rigid filler, so it can crack where two planes meet, around perimeters or wherever a tile assembly moves. Flexible silicone or another compatible elastomeric sealant belongs at movement points, internal corners and junctions where rigid grout is likely to transfer stress.
That technical distinction matters in a Melbourne bathroom renovation because a failed junction can affect more than appearance. A cracked sealant line may expose the waterproofing detail, while a grout-filled corner can concentrate movement at the tile edges. The tiler, waterproofer, plumber and builder need to agree on floor levels, screed curing, fixture locations, membrane transitions and movement joints before the finish is installed.
Victorian registration boundaries
In Victoria, domestic building work worth more than $10,000 must be carried out by a person registered with the Building and Plumbing Commission. Registration also applies regardless of value where the work requires a building permit, and Consumer Affairs Victoria states that registration must be approved before work starts. Consumer Affairs Victoria's guidance on builders and tradespeople sets out that boundary.
Victoria also recognises a limited domestic builder class for bathroom, kitchen and laundry renovations that remain within the home's existing external walls, floor and ceiling. The prescribed pathway includes a cabinet-making certificate, additional competency units and at least 2 years of practical experience, while the VBA application requires documentary evidence including qualifications, project work, a technical referee report, a criminal history check, photo identification, declarations and payment authorisation. The prescribed Victorian qualification schedule shows why registration represents documented competence and formal vetting, not a business description.
| Renovation task | Typically tiler scope | Requires registered builder |
|---|---|---|
| Replacing tiles on a sound existing surface | Often | Not necessarily |
| Installing compatible sealant at tile junctions | Often | Not necessarily |
| Altering waterproofing as part of broader renovation | Coordinated trade work | Often, depending on scope and permit requirements |
| Moving fixtures and changing services | Trade coordination | May require registered-builder oversight |
| Altering load-bearing walls or structural elements | No | Yes |
| Multi-trade bathroom renovation | Participates as tiler | Confirm registered-builder requirement before work starts |
For wet-area scope and membrane coordination, review bathroom tiling and waterproofing services. Written scope, product records, photographs and sign-offs help clarify responsibility if a warranty dispute later involves the tile, membrane, screed or structure.
A Practical Movement Joint Planning Checklist
Before any tile is laid, record the installation rather than relying on memory or a last-minute site conversation.
Substrate and movement
- Identify the base: Note whether it's concrete, screed, timber, suspended construction or another system.
- Record existing joints: Mark structural, control, construction and isolation joints.
- List movement sources: Include sun exposure, balconies, alfresco areas, heated floors, moisture and substrate changes.
- Check the surface: Document cracks, deflection, curing condition, levels and support.
Layout and materials
- Sketch the joint grid: Show field, perimeter, structural, isolation and change-of-plane joints.
- Confirm spacing and width: Compare the plan with AS 3958 and current HIA guidance, then adjust for site conditions.
- Specify the joint system: Record sealant type, backing rod, primer requirements and movement profile details.
- Note the tile: Include format, thickness, ceramic, porcelain, stone or Kerlite classification.
- Coordinate wet areas: Align joints with waterproofing, screed, shower transitions, thresholds and fixtures.
Documentation and responsibility
Keep the standards referenced, technical data sheets, product batch information, drawings and trade responsibilities together. This checklist supports qualified trades, but it isn't a substitute for competent design or installation. Where structural, permit-related or broader wet-area changes are involved, confirm the scope with a registered builder before work begins.
Melbourne Tiling Services P/L coordinates bathroom renovations, waterproofing, screeding and large-format porcelain, stone and Kerlite installations with movement details in mind. Visit Melbourne Tiling Services P/L to discuss your Melbourne project, request a free quote and plan the joint layout before tiles are ordered.
Write a Comment