

A bathroom renovation in Melbourne can look flawless on handover day. The grout lines are straight, the porcelain reflects the light, and the shower feels ready for use. Months later, a hollow sound under the tiles, a cracked grout joint or a loose floor tile can reveal that the problem started beneath the surface, often with an adhesive chosen for convenience rather than compatibility.
Bathroom tile adhesive isn't a stronger version of household glue. It forms part of an installation system that has to work with the substrate, waterproofing membrane, tile type, moisture exposure and movement. A product that performs well on a dry wall splashback may be unsuitable for a shower floor, porcelain feature wall or large-format Kerlite installation.
Australian guidance gives renovators a useful technical framework. Adhesives are classified under AS ISO 13007, while the broader tile-installation framework was consolidated through AS 3958:2023. Wet-area waterproofing also has its own requirements under AS 3740:2021. These standards help shift the buying question from “Which brand is strongest?” to “Which performance class suits this complete system?”
The practical path is straightforward. First, understand what the adhesive does. Then compare cementitious, pre-mixed and epoxy products. After that, match the adhesive to porcelain, stone, large-format tiles, heated floors and substrate movement. Finally, check preparation, membrane compatibility, curing and the level of professional coordination your bathroom renovations require.
Table of Contents
- Introduction Why Bathroom Tile Adhesive Matters More Than You Think
- Understanding Bathroom Tile Adhesive and How It Works
- Main Types of Bathroom Tile Adhesive Compared
- Matching Adhesive to Bathroom Conditions and Tile Choices
- Substrate Preparation Waterproofing and Curing Essentials
- How to Choose and Buy the Right Bathroom Tile Adhesive
- When to Call Registered Builders and Tiling Professionals
Introduction Why Bathroom Tile Adhesive Matters More Than You Think
A typical Melbourne renovation starts with a decision about finishes. The homeowner chooses a warm stone-look porcelain, a terrazzo wall tile or a dramatic marble slab. The tiler measures the room, the plumber roughs in the fittings, and someone buys adhesive from a trade counter. Because the powder is hidden once the work is complete, it can receive less attention than the tile itself.
That approach creates risk. A bathroom exposes the bond line to moisture, changes in temperature and movement between materials. Porcelain has a dense, low-absorption surface. A large tile creates a broad area where small variations in the wall or floor can place stress on the bond. A waterproofing membrane may also move differently from the substrate and tile above it.
Site rule: The tile is the visible finish, but the adhesive and preparation determine how that finish behaves over time.
Australian classification makes this easier to assess. Under AS ISO 13007, C1 identifies a standard cementitious adhesive, while C2 identifies an improved cementitious adhesive. S1 and S2 describe increasing deformability, which matters where the installation must tolerate movement. Australian tiling guidance commonly treats C2 as the minimum benchmark for residential wet areas, rather than relying on a basic C1 product. Australian tile installation guidance on adhesive classes explains this distinction in practical terms.
The choice also has to fit the waterproofing sequence. A membrane isn't a substitute for adhesive, and adhesive isn't a waterproofing membrane. The membrane protects the wet-area structure, while the adhesive bonds the tile to the prepared, compatible surface above it.
By the end of this guide, you'll be able to read adhesive classifications, recognise the limits of mastics and compare flexible systems for demanding tiles. You'll also know when a product label is missing the information that matters most.
Understanding Bathroom Tile Adhesive and How It Works
At the bond line, adhesive has three jobs. It must grip the substrate, hold the tile in position while it cures and continue transferring loads after the bathroom is in use. Water, heat, cleaning, foot traffic and material movement all test that connection.
A cementitious adhesive starts as a powder and is mixed with water or an approved liquid additive. The cement hydrates as it cures, while polymers can improve adhesion, workability and tolerance of movement. The final performance depends not only on the powder, but also on the substrate, mixing method, trowelling, coverage and curing conditions.
Think of the classification like a building foundation. A C1 adhesive is the standard foundation for suitable, lower-stress applications. A C2 adhesive is the reinforced option, designed to provide improved bond performance. The letters don't replace the technical data sheet, but they give you a measurable starting point instead of a vague phrase such as “bathroom safe”.
Reading the performance classes
The “S” classification describes deformability. S1 indicates a slightly deformable adhesive, while S2 indicates a highly deformable adhesive. These classes become relevant where the substrate, membrane, tile or temperature conditions create greater movement across the bond.
A bathroom in an older Melbourne home may contain a patched floor, a fibre-cement sheet wall, a concrete slab or a timber-based structure. Those backgrounds don't all move in the same way. A rigid adhesive may struggle when the materials expand, contract or flex, while a suitably flexible system can accommodate more movement.
Australia's installation framework places this decision in context. The 2023 update through AS 3958:2023 tile installation guidance consolidated earlier ceramic and stone tile guidance into one national standard. Adhesive selection therefore sits alongside background preparation, tile placement and grouting, rather than operating as an isolated product choice.
What the label should tell you
Look for the classification, recommended substrates, tile limitations, primer requirements, open time, curing conditions and compatibility with waterproofing products. A label that only promises flexibility or superior grip doesn't tell you enough.
Australia has regulated tile adhesive performance for decades. The historical AS 2358-1990 preview shows that earlier guidance covered organic adhesives, cement-based adhesives and mortars containing organic additives. The modern approach is more useful for today's renovations because it describes performance classes and system requirements.
Main Types of Bathroom Tile Adhesive Compared
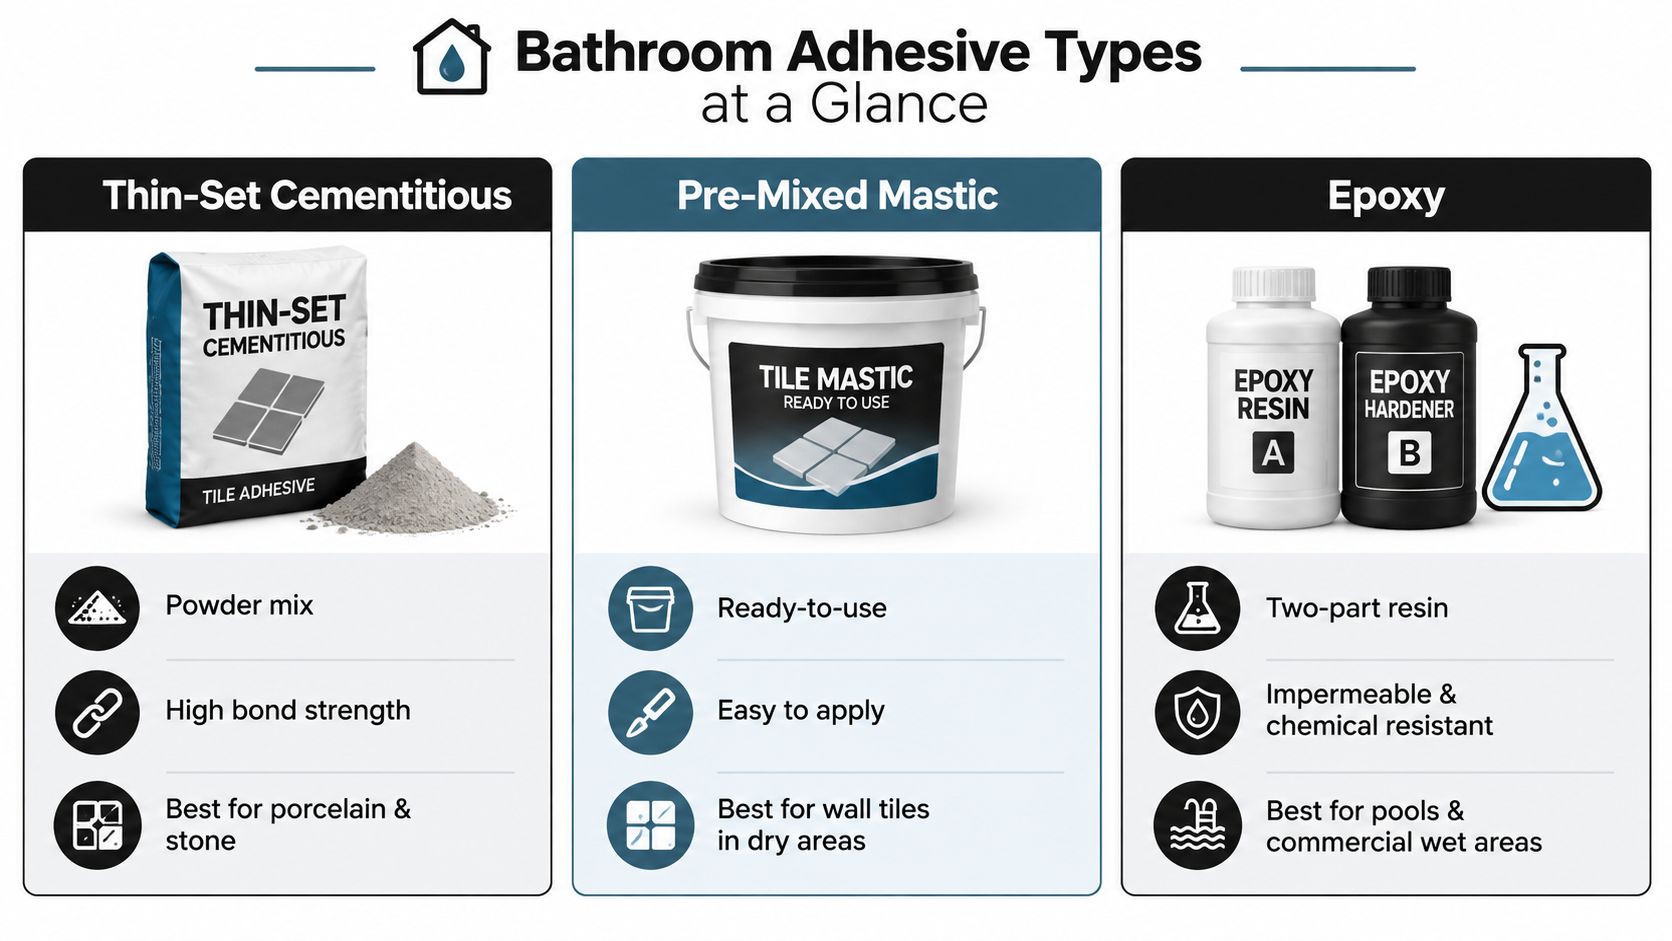
The three adhesive families most likely to appear in a bathroom discussion are thin-set cementitious adhesive, pre-mixed mastic and epoxy. They aren't interchangeable. Each has a different chemistry, application method and tolerance of wet conditions.
Thin-set cementitious adhesive is the usual starting point for bathroom floors, shower walls and porcelain. The installer mixes the powder to the manufacturer's specified consistency, spreads it with a notched trowel and beds the tile into the ridges. Polymer-modified C2 products are widely used where wet-area bond performance matters.
Pre-mixed mastic arrives ready to use, which makes it attractive for small wall jobs. It can be convenient on a dry internal splashback or a light ceramic wall tile, but prolonged moisture exposure changes the decision. A product that's easy to spread isn't automatically suitable for a shower floor, a continuously wet wall or a location where water can remain behind a dense tile.
Epoxy is a two-part resin system. It can provide strong adhesion and resistance to chemicals and water, but it requires careful proportioning, application and cleaning. It tends to suit specialised situations, such as demanding commercial wet areas or locations exposed to aggressive substances, rather than every domestic bathroom.
Bathroom adhesive types at a glance
| Adhesive Type | Best For | Wet Area Suitability | Key Limitation |
|---|---|---|---|
| Thin-set cementitious | Porcelain, ceramic, stone and floor tiling | Common choice for wet-area systems when the class and membrane are compatible | Requires accurate mixing, coverage and curing |
| Pre-mixed mastic | Selected internal wall tiles and dry splashbacks | Limited, check the specific product and location | May be unsuitable for prolonged or submerged moisture |
| Epoxy | Specialist commercial wet areas, pools and chemical-exposed locations | High resistance where the complete system allows it | More demanding application and clean-up |
Choosing by situation
For a standard Melbourne ensuite with porcelain wall and floor tiles, start by checking a suitable C2 cementitious product and then confirm the tile and membrane requirements. For a dry kitchen splashback, a ready-to-use product may be appropriate if the technical sheet allows it. For a commercial washroom or chemical-exposed area, epoxy may justify its extra handling requirements.
The mistake is treating “ready to use” as a performance class. Convenience describes how the product arrives. It doesn't confirm how it will behave behind a large porcelain tile in a wet shower.
Matching Adhesive to Bathroom Conditions and Tile Choices
The tile and the room set the workload for the adhesive. A small ceramic wall tile on a stable, prepared background places different demands on the bond than a large porcelain panel over a membrane or a heavy marble tile beside a heated floor.
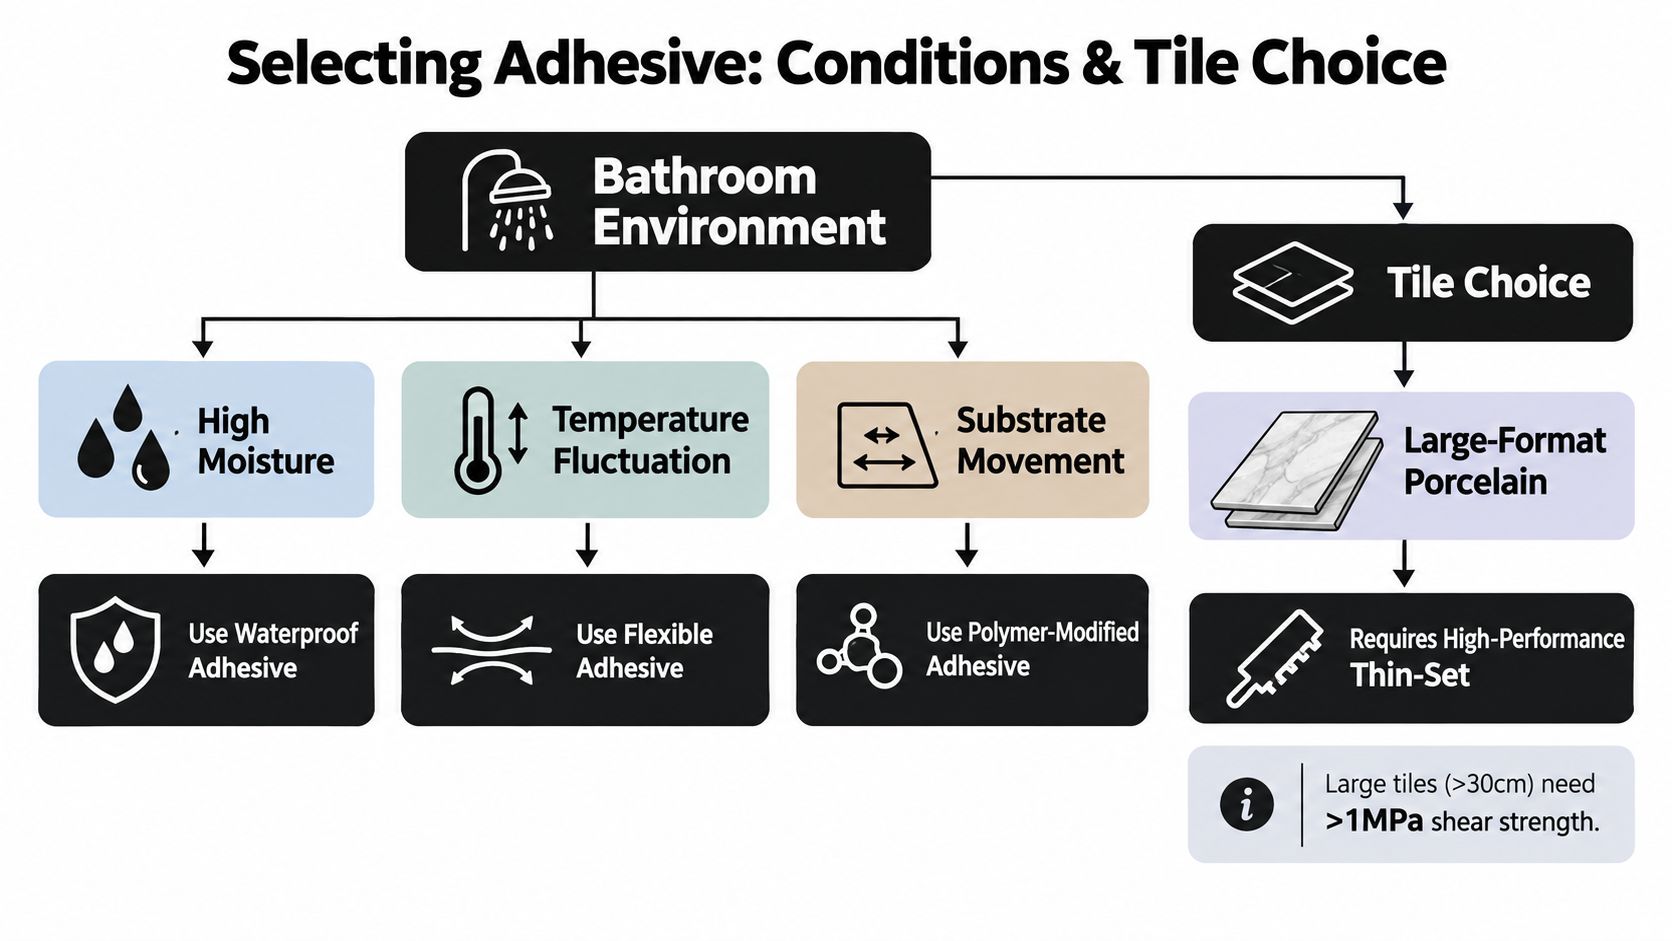
Porcelain is dense and absorbs little water, so the adhesive must develop an appropriate bond to its back. Large-format tiles also expose more of the substrate's imperfections. If the wall has hollows, the installer may struggle to achieve a consistent bed, and voids can become weak points under impact or movement.
For that reason, C2 is a safer benchmark for many high-stress bathroom applications. Australian guidance links improved cementitious performance with porcelain, large-format tiles, exterior-adjacent areas and installations where moisture or movement increases shear stress. Where the system needs deformation tolerance, the S1 or S2 classification becomes part of the specification rather than a decorative label.
Match the class to the installation
Underfloor heating introduces repeated temperature changes through the floor build-up. An exterior-adjacent bathroom can also experience more pronounced environmental changes than a room fully enclosed within the building. Older substrates, timber backgrounds and membranes may move in their own way.
Natural stone requires extra care because the tile can vary in weight, absorption and sensitivity to staining. Marble also deserves a technical check before installation, including whether the adhesive colour and chemical behaviour are suitable for the stone. The product data sheet, tile supplier and installer should agree on the system.
For large-format porcelain or Kerlite, large-format tile installation guidance is more useful than a generic adhesive recommendation because handling, substrate flatness, trowel selection and coverage all influence the result.
Coverage is part of the bond
Wet-area guidance points to at least 90% adhesive coverage beneath wall and floor tiles. Australian waterproofing and tiling guidance discusses this benchmark and the risks of spot-fixing, where adhesive dabs leave too much of the underside unsupported.
A notched trowel creates ridges, but the installer must still bed the tile correctly. Back-buttering may be needed for large or heavily profiled tiles, and the installer should lift an occasional tile during the work to check that the adhesive is contacting the back as intended.
A product can carry the right classification and still fail if the background is dusty, the ridges collapse, the tile is pressed unevenly or the installer grouts before the adhesive has cured.
Substrate Preparation Waterproofing and Curing Essentials
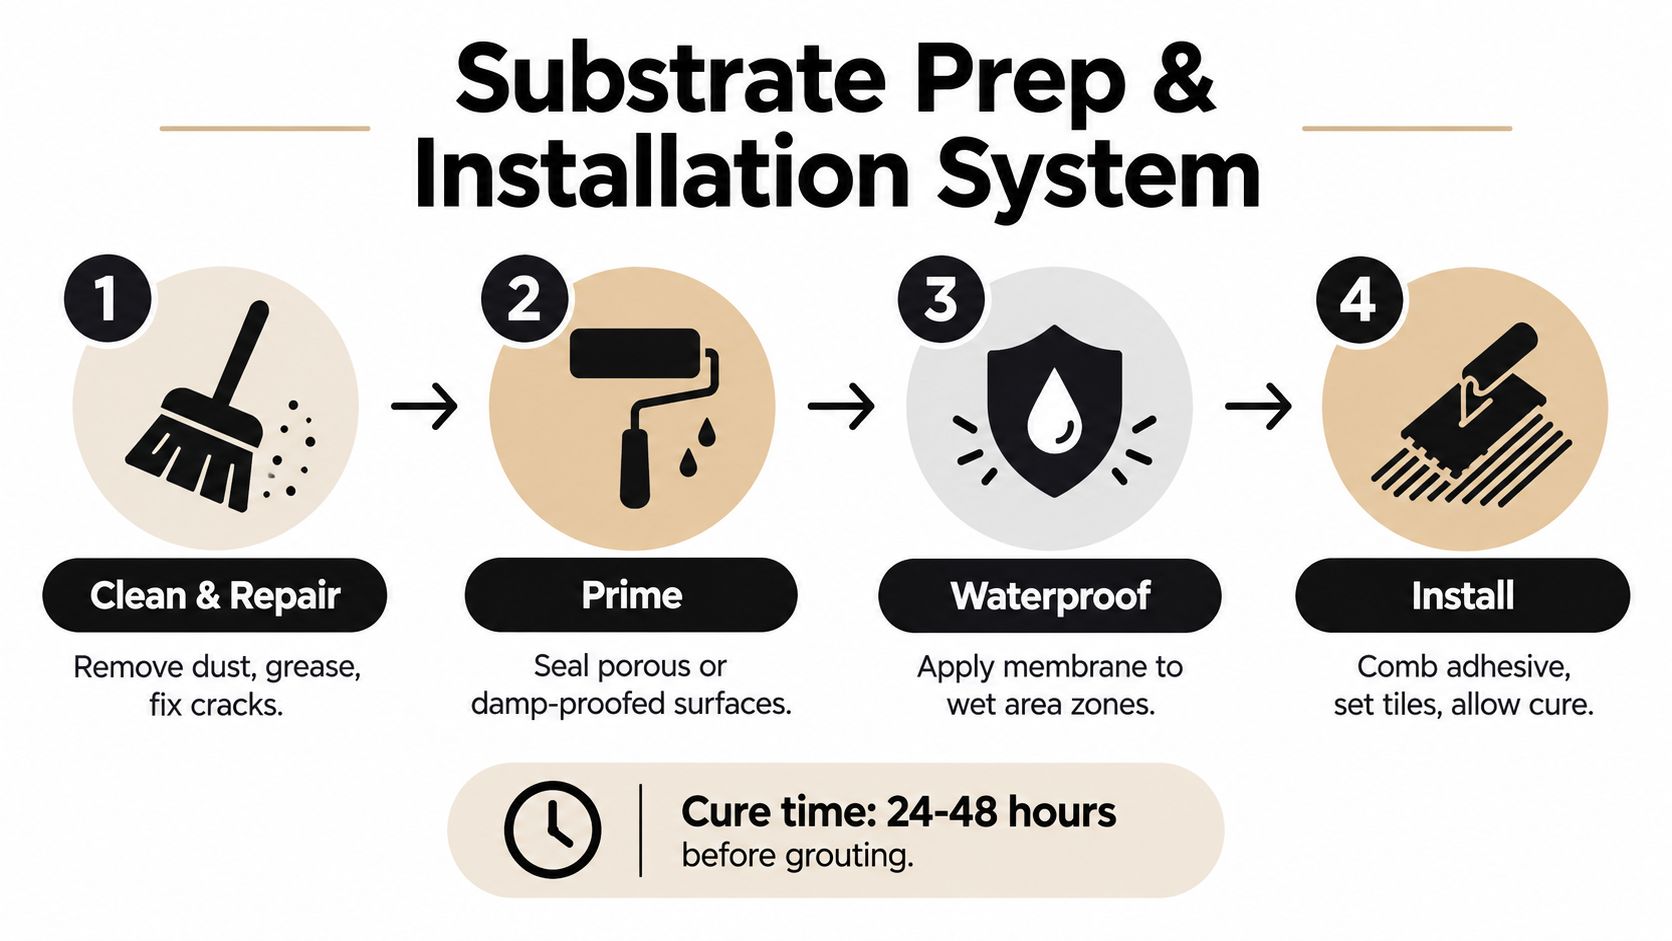
Adhesive can't flatten a dirty wall, repair a moving sheet or replace a waterproofing membrane. The installer needs to build the bathroom from the background outward, with each layer ready to receive the next.
AS 3958.1 covers background preparation, fixing and grouting for wall and floor tiles, including wet-area applications. The AS 3958.1 reference document reinforces the practical point: the adhesive must be selected for the background, moisture conditions and fixing method.
Prepare the background first
Remove dust, grease, loose material and old adhesive that isn't sound. Repair cracks and damaged areas, check levels and confirm that the surface is suitable for the selected system. A porous background may need a primer, while a non-porous or damp-proofed surface may require a specific primer stated by the adhesive or membrane manufacturer.
A primer isn't a universal cure. It changes the surface so the next material can bond consistently, but the installer still has to respect drying and recoat requirements. For a deeper explanation of this stage, see what substrate preparation involves.
Waterproof before tiling
The membrane comes before the tile adhesive. It protects the wet-area structure, while the adhesive bonds the tile to the membrane or prepared surface above it. The adhesive must be compatible with that membrane, and it shouldn't be expected to block water on its own.
AS 3740:2021 requires waterproofing adhesives in the system to be waterproof where waterproof materials meet and compatible with the materials they bond to. It also states that ceramic and stone tile adhesives must be water-resistant when bonding tiles to waterproof or water-resistant surfaces. The AS 3740:2021 document provides that technical context.
The required waterproofing zones also affect the work sequence. Under AS 3740:2021, shower floors must be fully waterproofed, shower walls must be waterproofed to at least 1800 mm, and bathroom walls must be waterproofed to at least 150 mm. Where a bathroom floor contains timber or sits on a second storey or higher, the whole floor must be waterproofed to at least 100 mm. This AS 3740 waterproofing overview summarises those extents.
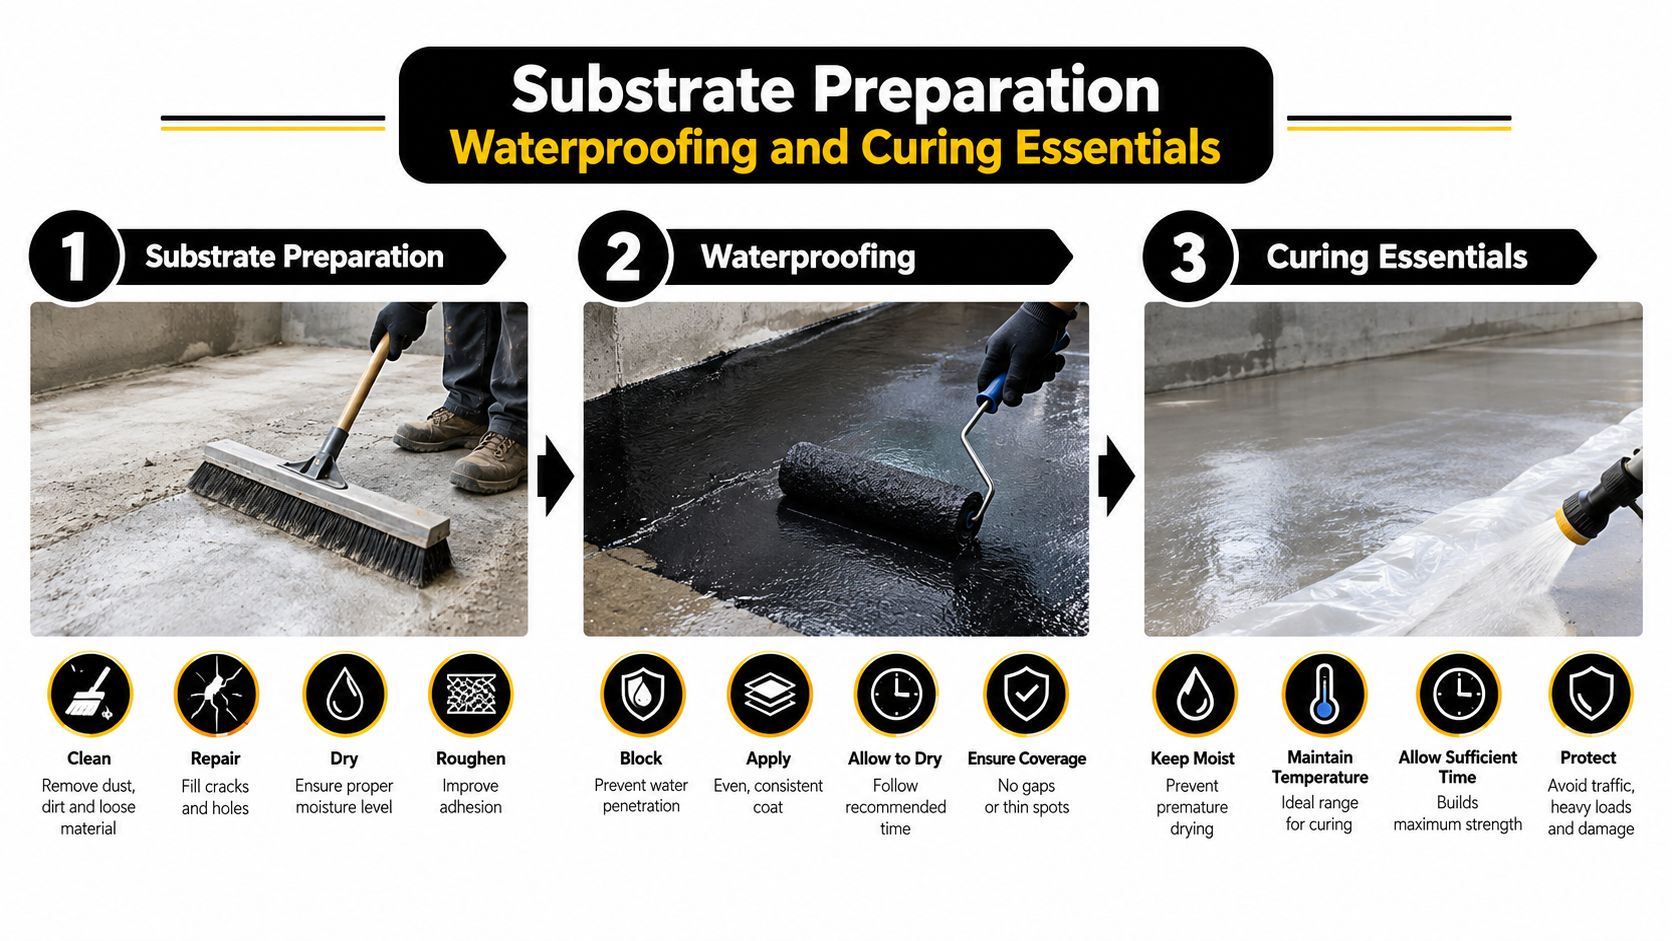
Allow the system to cure
Fast-track membrane products can state that some areas are ready for tiling as little as 4 hours after application, as shown in this wet-area membrane product literature. That doesn't mean every bathroom is ready on the same schedule. Temperature, humidity, film thickness, substrate condition and the manufacturer's written instructions still control the decision.
Don't tile over a membrane that feels soft, transfers material to a finger or hasn't reached its stated cure. Confirm the product, batch instructions and compatible adhesive before proceeding. A rushed sequence can trap moisture, weaken the bond or compromise the membrane.
Bathrooms can also develop mould when moisture management fails. If a property has a persistent damp smell, staining or suspected concealed moisture, a resource such as mold assessment for Georgetown properties explains why assessment should precede cosmetic repairs, even though the location differs from Melbourne.
How to Choose and Buy the Right Bathroom Tile Adhesive
Start with the installation, not the shopping aisle. Write down the substrate, membrane, tile material, tile size, room location and whether the floor has heating. That short description gives a supplier or tiler enough context to recommend a performance class rather than a generic product.
A practical buying matrix looks like this:
- Prepared internal wall with standard ceramic: Check whether a C1 product is permitted, but confirm the wet-area location and manufacturer's instructions.
- Bathroom floor or shower wall: Use a product meeting the wet-area benchmark, commonly C2, with compatibility confirmed for the substrate and membrane.
- Porcelain, marble or large-format tile: Ask about C2 performance, deformability, tile weight, coverage and any primer requirements.
- Heated or movement-prone floor: Discuss S1 or S2 suitability and confirm that the complete system allows the expected movement.
- Non-porous or damp-proofed background: Ask which primer is required and whether the adhesive has been tested or approved for that surface.
Questions for the supplier
Ask for the technical data sheet, not just the front label. Confirm the classification, recommended tile formats, substrate restrictions, mixing instructions, open time, curing guidance and grout timing. If the adhesive is going over a membrane, provide the membrane name and ask for written compatibility.
Budget matters, but the cheapest bag can become expensive if tiles need to be removed, the membrane is damaged or a leaking shower requires rectification. Buying a premium product also isn't a substitute for correct preparation and coverage.
For a full bathroom renovation, Melbourne Tiling Services P/L can prepare free quotes and 3D drawings while coordinating waterproofing, screeding, self-levelling and tile installation. That planning process helps align the tile format, adhesive system and renovation scope before materials arrive on site.
When to Call Registered Builders and Tiling Professionals
DIY tiling can suit a small, dry wall project where the background is sound and the materials are straightforward. A shower renovation is different because waterproofing, plumbing, falls, substrate preparation and tile fixing interact. If one layer is wrong, the finished tile surface may hide the problem until water damage appears.
Victoria has specific registration rules. A person must be registered with the Building and Plumbing Commission for domestic building work worth more than $10,000, and registration is also required for building work that needs a permit regardless of cost. Consumer Affairs Victoria states that tiling alone, involving only wall and floor tiling, doesn't require registration unless multiple building trades are combined in one contract. Consumer Affairs Victoria's registered practitioner checklist sets out these conditions.
A registered builder adds value when the project includes demolition, carpentry, plumbing, electrical work, waterproofing and tiling under one coordinated contract. That matters for leak rectification, screeding, large-format porcelain, marble and complex shower layouts, where sequencing and documentation affect the final result.
If you're comparing tiling contractors near Melbourne, ask who handles the membrane, what adhesive class they specify, how they check coverage and how they document curing and substrate preparation. Those answers reveal more than a brand name or a low material allowance.
Melbourne Tiling Services P/L delivers bathroom and ensuite renovations, waterproofing, screeding, self-levelling and porcelain, marble, ceramic and large-format Kerlite tiling across Melbourne and greater Victoria. Visit Melbourne Tiling Services P/L to discuss your tile format, substrate and wet-area adhesive requirements, then request a free quote and 3D renovation plan.
Recent Comments