
You've pulled the old shower out. Studs are exposed, the tray area is bare, and you're standing there wondering whether waterproofing is just a coat-on product you can knock over in an afternoon.
That's where a lot of bathroom renovations in Melbourne start drifting off course.
A shower doesn't fail dramatically on day one. It fails subtly. Water gets into a corner, behind a niche, around a mixer penetration, or through a missed seam. Months later, the damage shows up somewhere else. Swollen skirting outside the bathroom. Damp plaster in the room behind. Musty smells that don't go away. By then, the tiles you paid for are often the least expensive part of the repair.
If you want to know how to waterproof a shower properly in Victoria, start with this: compliance is not optional. The National Construction Code and AS 3740 set the benchmark. If the job isn't built and waterproofed to standard, it isn't a shortcut. It's a defect waiting to surface.
Table of Contents
- Why Shower Waterproofing Is a Non-Negotiable First Step
- Preparing Your Shower for a Watertight Future
- Choosing Your Armour Liquid vs Sheet Membranes
- The Art of Application Corners Niches and Junctions
- Curing Testing and Proving Your Work Is Watertight
- The Final Stage Tiling and When to Call the Professionals
Why Shower Waterproofing Is a Non-Negotiable First Step
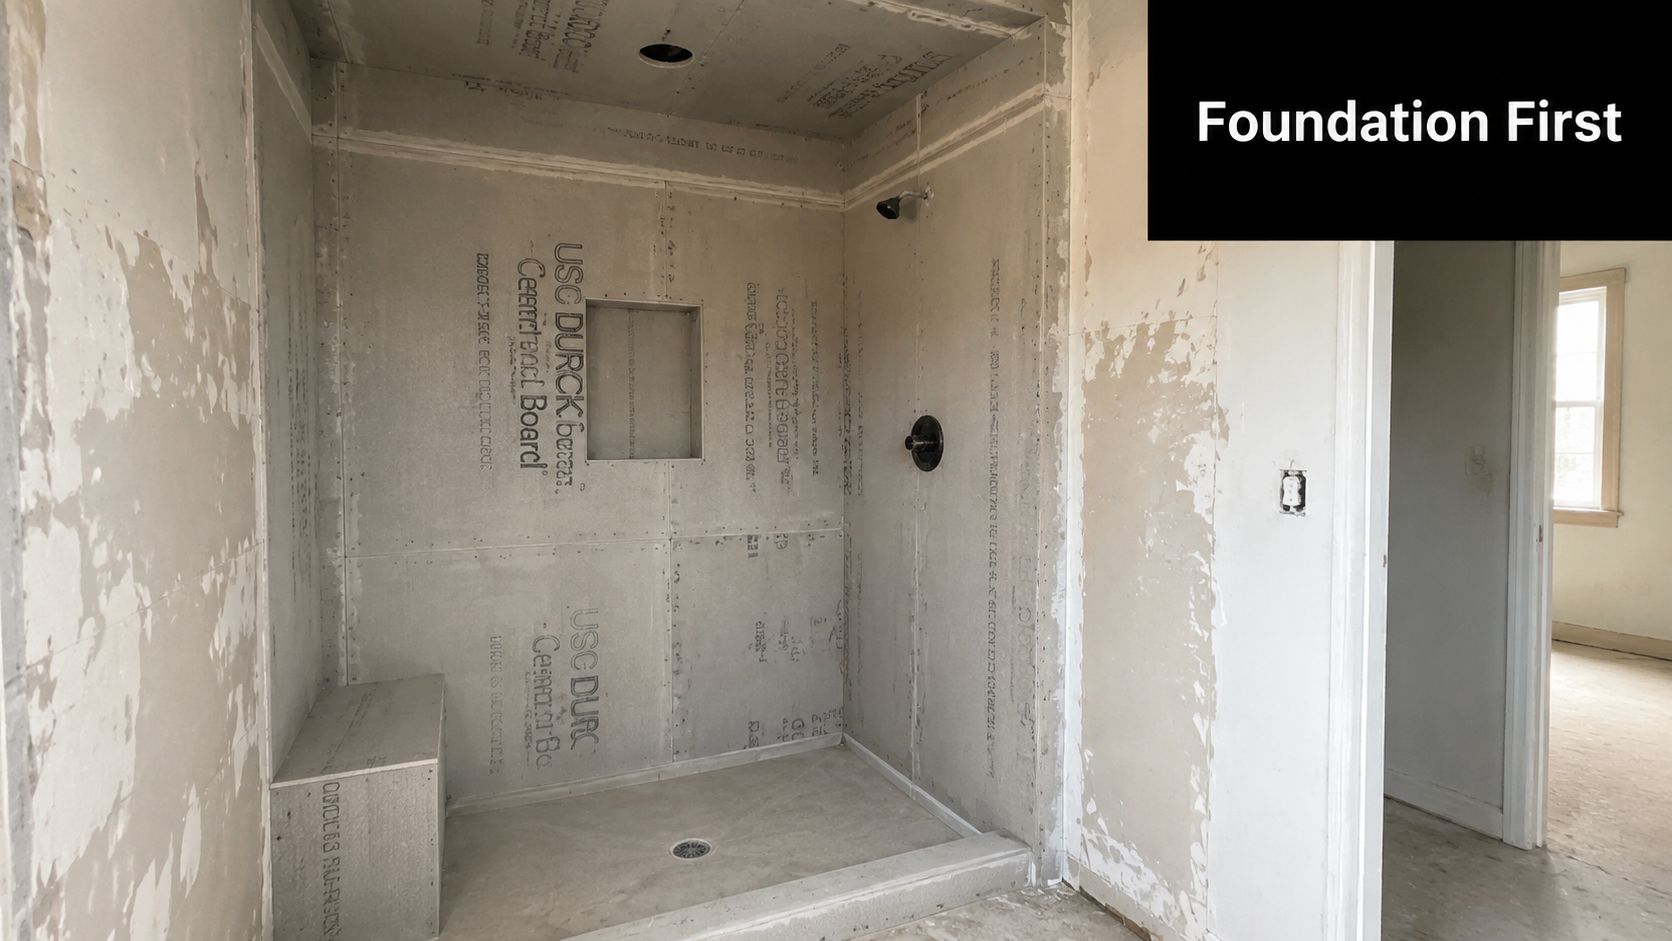
A lot of owners treat waterproofing like a middle step. Strip-out first, tile selection next, and waterproofing somewhere in between. In practice, it's the foundation of the whole shower. If that layer fails, the finish above it doesn't matter.
I've seen bathrooms in older Melbourne homes where the visible issue was just cracked grout near the base of the shower wall. Once opened up, the actual problem was behind the surface. Wet framing, degraded sheet material, mould around penetrations, and movement where the wall and floor junction had been taking moisture for too long. The repair then stops being a simple shower refresh. It turns into rectification.
The law matters here
In Australia, shower waterproofing sits under the National Construction Code and AS 3740. That means the work isn't just about what seems sensible on site. It has to meet the required system and detailing standard for internal wet areas.
That matters for bathroom renovations because a shower can look neat and still be wrong. Tiles don't waterproof a shower. Grout doesn't waterproof a shower. Silicone by itself definitely doesn't waterproof a shower. The membrane system and the junction treatment do the heavy lifting.
Practical rule: If the waterproofing isn't compliant before tiling starts, tiling only hides the problem.
Why skipping steps gets expensive fast
The common mistake is believing the shower base is the only area that matters. It isn't. Water hits walls, corners, recesses, and plumbing penetrations every day. A shower is a system, not a tray with tiles around it.
For homeowners in Victoria, there's another issue. Once wall linings are off, you may uncover framing repairs, poor plumbing set-out, or out-of-square surfaces that affect the waterproofing build-up. If you ignore those and coat over them, the membrane ends up bridging defects instead of bonding to a stable substrate.
That's why waterproofing comes first in the decision-making, even before final tile layout. The right question isn't, “What product should I buy?” It's, “Is the shower build-up ready for a compliant waterproofing system?”
Preparing Your Shower for a Watertight Future
Waterproofing starts long before the first coat. The membrane only performs as well as the surface under it. If the substrate is loose, dusty, damp, cracked, or moving, you're building failure into the job.
Start with the substrate, not the membrane bucket
In Australia, shower waterproofing is governed by the National Construction Code and AS 3740, which requires internal wet-area walls in showers to be waterproofed to at least shower rose height. One Australian-system guide also specifies that the membrane should be allowed to dry for at least three days before tiling begins, which is a useful planning milestone for renovation sequencing, as noted in this Australian-system waterproofing guide.
That single point changes how you plan the job. If you're trying to waterproof on Friday and tile on Saturday, your schedule is already wrong.
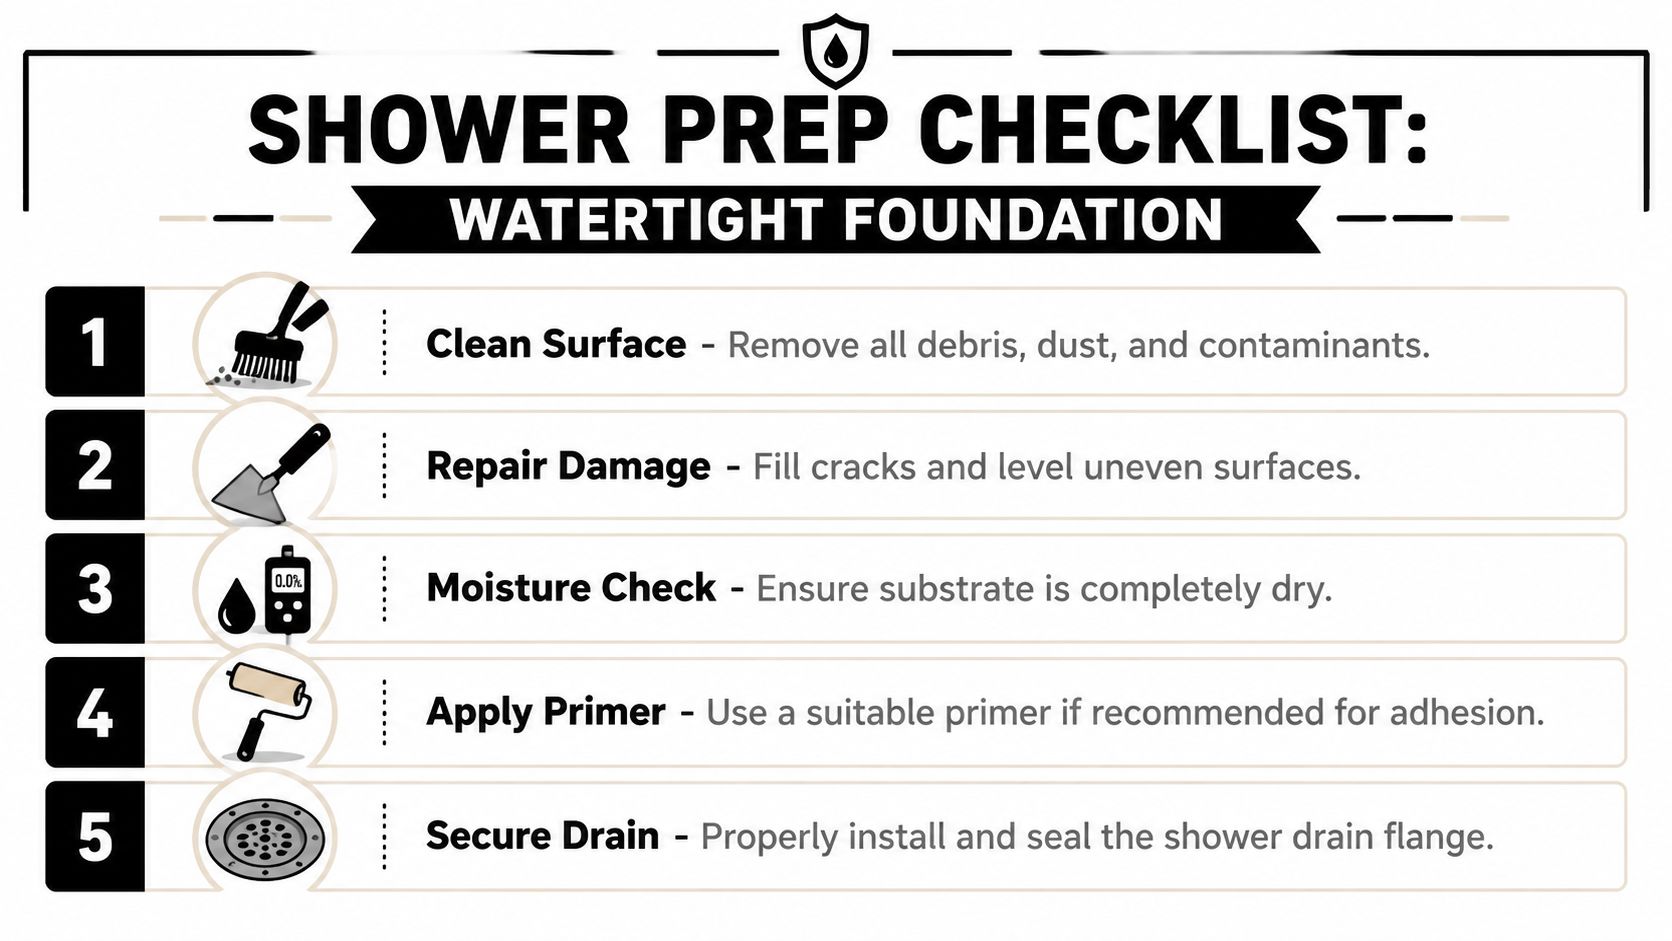
Before any membrane goes on, check these basics:
- Substrate type: Cement sheet, suitable backing board, masonry and concrete are common shower substrates. If a wall lining isn't suitable for a wet area system, coating it won't fix that.
- Fixing quality: Loose sheets, proud fasteners, and movement at joints must be addressed first.
- Flatness and damage: Hollows, chips, and rough patches need repair. Membranes don't level surfaces well, and they don't like sharp ridges.
- Cleanliness: Dust kills adhesion. So do soap residue, release agents, and old sealants.
- Dryness: A surface that looks dry isn't always dry enough. If moisture is trapped under the system, cure and bond can suffer.
What to check before waterproofing starts
The prep on a Melbourne renovation often depends on what the old bathroom leaves behind. In brick veneer homes, you may find patched masonry or mixed substrates in one shower. In apartments, you may be working around tight falls, service penetrations, and limited floor build-up. Those conditions need sorting before the membrane stage.
A practical prep sequence looks like this:
- Strip back to sound material. Any soft, swollen, mould-affected or delaminating material needs removal.
- Set the shower geometry. Walls should be plumb enough for board and tile. The floor area needs proper falls to the waste.
- Repair and fill. Cracks, voids and damaged spots get repaired so the membrane sits on a continuous surface.
- Prime if the system requires it. Follow the membrane manufacturer's instructions for substrate compatibility and adhesion.
- Check the drain set-out. The drain flange and surrounding area need to work with the chosen waterproofing system.
The clean-up stage is where many DIY jobs lose the room. If the prep is rushed, the membrane becomes a patch over defects instead of a sealed layer bonded to a stable base.
A lot of capable homeowners can handle demolition, cleaning, and even some substrate preparation if they understand what they're looking at. Where people get into trouble is mistaking “paintable” for “ready.”
If framing is out, the floor needs correction, or there's any doubt about the wet-area build-up, bring in a registered builder. That's not about gatekeeping. It's about responsibility. On a proper bathroom renovation, the builder coordinates the plumbing, carpentry, sheeting, and waterproofing so each trade hands over a substrate the next trade can trust.
Choosing Your Armour Liquid vs Sheet Membranes
If you're learning how to waterproof a shower, the first product decision is usually liquid-applied membrane versus sheet membrane. Both can work. Both can fail. The difference is in how they suit the shower shape, the substrate, and the installer's skill.
When liquid membranes make more sense
Liquid membrane is common in residential bathroom renovations because it adapts well to site conditions. It's useful where the shower has a niche, a bench, returns, odd framing, or small geometry changes that would make sheet detailing fiddly.
It also gives you flexibility when the room isn't perfectly square, which is common in older Melbourne housing stock. You can brush and roll into corners, around penetrations, and over transitions without trying to force a factory-made sheet into a shape it doesn't naturally want to hold.
That said, liquid systems punish sloppy application. If the coating is thin in one area, pinholed at a corner, or missed at a junction, you may not know until the shower is in service.
When sheet membranes are the better call
Sheet membranes offer consistency. Thickness is controlled by the product itself rather than by how heavy-handed or light-handed the installer is with a roller or brush.
That makes them attractive for straightforward shower layouts with clean lines and good access. On a standard rectangular shower with simple wall runs, a sheet system can produce a very predictable result. The risk shifts to seam work, corner folds, overlap control, and drain integration.
If the joins are poor, the advantage disappears quickly.
| Feature | Liquid-Applied Membrane | Sheet Membrane |
|---|---|---|
| Best fit | Complex shapes, niches, irregular surfaces | Straightforward layouts with cleaner geometry |
| Thickness control | Depends on correct application | Built into the product |
| Detailing difficulty | Easier around penetrations and awkward shapes | More demanding at seams and folded corners |
| DIY risk | Missed spots, thin coats, pinholes | Poor overlaps, fishmouths, bad seam treatment |
| Renovation use | Flexible for site variability | Good when substrate and layout are well controlled |
The real trade-off
The wrong way to choose is by asking which system is “better” in general. The right way is to ask which one is harder to get wrong in your shower.
For example:
- Rectangular alcove shower: A sheet system may be efficient if the installer is confident with seam and corner work.
- Niche-heavy ensuite: Liquid membrane often handles the geometry more practically.
- Custom design shower: The detail load increases fast, so the installer's experience matters more than the product category.
- Repair or remedial work: Compatibility with the existing substrate and drain arrangement becomes a deciding factor.
For a broader look at membrane options and assemblies used in wet areas, it helps to compare different waterproofing systems used in bathroom construction.
A membrane doesn't save a poor detail. Good waterproofing comes from the whole assembly working together, especially at changes of plane and around the drain.
If you're a capable homeowner tackling a basic shower rebuild, liquid membrane is often the more forgiving path on shape alone. If you're building a custom shower with angled returns, curved walls or multiple recesses, product choice matters less than whether the person installing it knows how to manage corners and overlaps without creating weak points.
The Art of Application Corners Niches and Junctions
Most shower leaks don't start in the middle of a wall. They start where one material changes to another, where the wall meets the floor, where a pipe comes through, where a niche interrupts a flat surface, or where someone assumed a bit of sealant would do the job.
The leak points are nearly always the details
For Australian showers using liquid-applied membranes, the practical benchmark is two coats with a 24-hour wait before the second coat and another 24 hours before the shower is used, because liquid membranes only work properly when the first coat cures and the second coat closes up pinholes. A common failure mode is incomplete coverage at corners and seams, so installers typically reinforce board joints with 2-inch alkali-resistant mesh tape before coating, as described in this guide to shower waterproofing methods.
That's why professional installers slow down at the details. The broad wall areas are the easy part. The risk sits in the transitions.
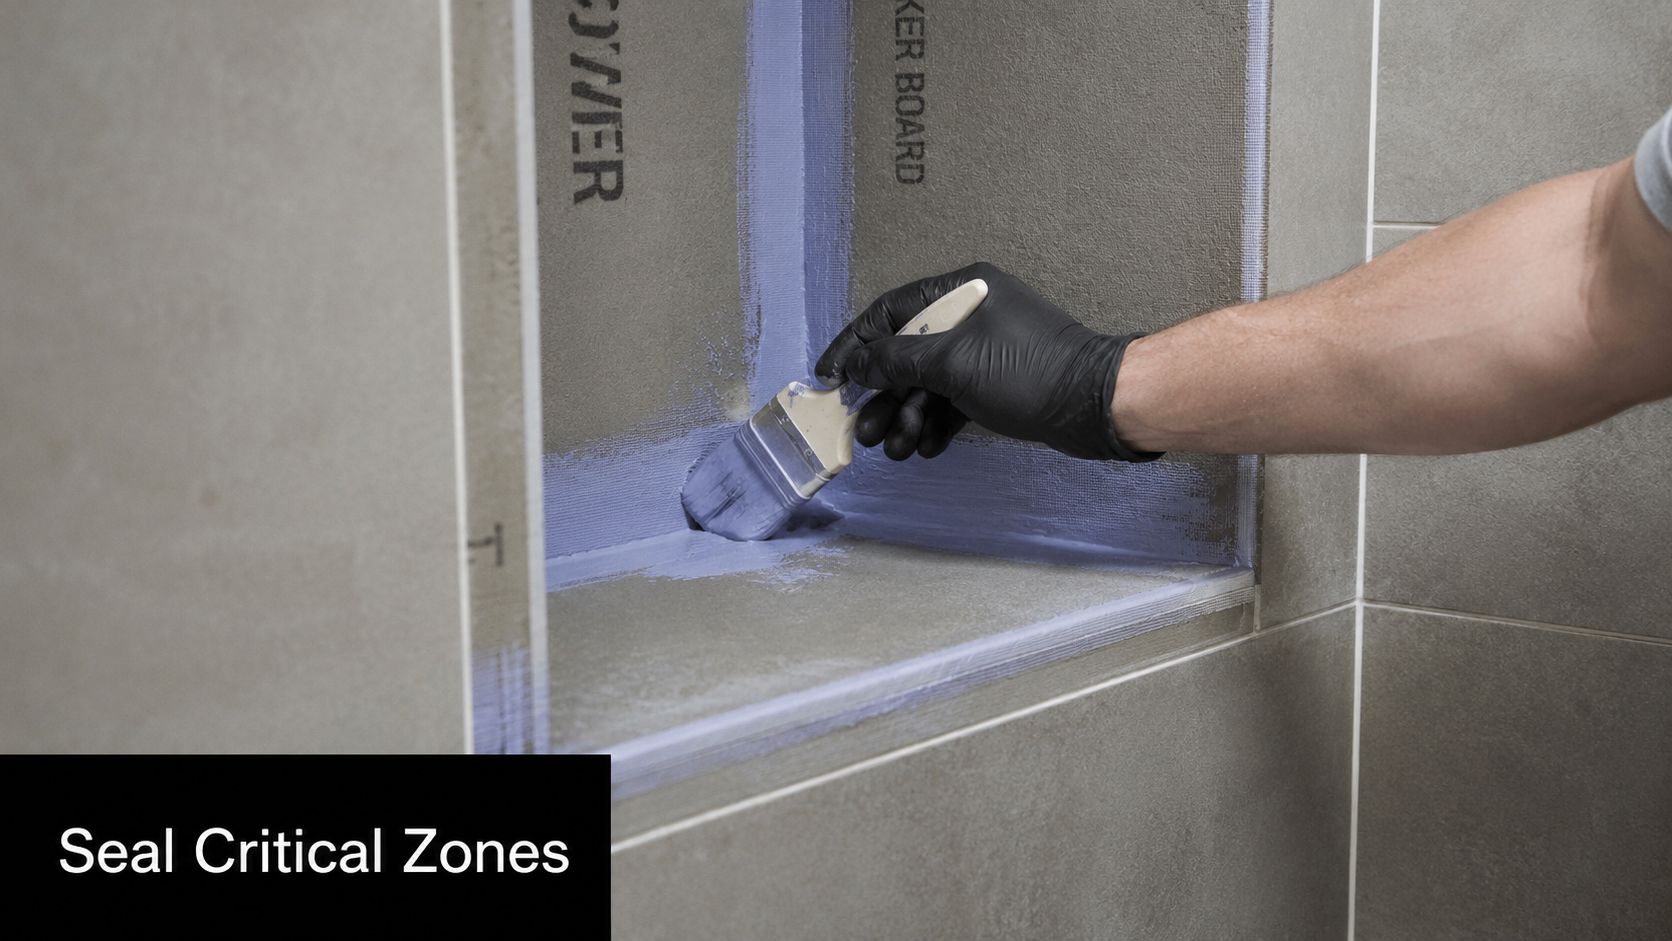
How to handle corners, board joints and penetrations
A practical liquid-membrane process usually looks like this:
- Treat board joints first. Reinforce them properly so movement and shrinkage don't print through the membrane.
- Detail changes of plane. Wall-to-wall and wall-to-floor junctions need proper system treatment, not just extra paint-on product.
- Seal penetrations carefully. Mixer bodies, outlets and pipe penetrations are classic leak paths if the membrane is broken or thin around them.
- Build the coats methodically. Bunnings' Australian guidance specifies applying the first coat with vertical brush strokes and the second with horizontal strokes to improve film continuity and help catch missed spots before tiling.
- Inspect after drying. Look for pinprick holes, exposed mesh, skipped seams, and thin edges around fittings.
This is also where the wrong fastener placement causes grief. If somebody fixes a screen channel, accessory, or board too low in a vulnerable zone, they can compromise the system long after the membrane looked finished. That's one reason caulking and sealing details in wet areas need to be treated as part of the overall assembly, not as cosmetic finishing.
Here's a useful visual on sequencing and detail work in wet areas:
Complex showers need a different mindset
Standard rectangular showers are one thing. Custom showers are another.
Niches multiply internal corners. Benches create horizontal surfaces and front-edge transitions. Neo-angle and curved layouts introduce geometry that can't be waterproofed properly by guessing where a fold should land. Those shapes require planning before the membrane is opened. You need to know where laps will fall, how corners will be built, and whether a sheet wants a pre-cut mitered piece instead of a forced fold.
“If a corner looks awkward before waterproofing, it will usually become a leak point after tiling unless the detail is reworked.”
For a homeowner, this is often the line between DIY and professional work. A straight shower recess with clean board joints and no niche is one thing. A custom ensuite with a bench seat, niche stack, angled entry, linear drain and mixed substrates is a builder-managed waterproofing job.
The lesson is simple. Don't judge the difficulty by square metres. Judge it by junction count. The more corners, penetrations, returns and interfaces the shower has, the less forgiving the waterproofing becomes.
Curing Testing and Proving Your Work Is Watertight
A shower isn't finished when the membrane changes colour or feels dry to the touch. It's finished when the system has cured properly, been inspected properly, and been tested in a way that would catch a failure before tiles hide it.
Dry enough is not cured enough
One of the biggest DIY mistakes is impatience. People waterproof late in the week, the membrane looks set by the next day, and they start tiling over it. That can undermine the bond, trap defects, or leave weak areas at precisely the points most exposed to water.
A key technical benchmark used in shower waterproofing systems is a minimum 50 mm overlap at membrane joints and intersections, together with multiple coats and cure time before the area is put back into service. Regional product instructions also specify a 24-hour cure after the first coat, then a second coat, and then another 6 to 8 hours before tiling in one system, while another recommends at least 24 hours between coats and 24 more hours before shower use. Those staged timeframes are set out in this shower waterproofing installation guide.
That's why waterproofing should be scheduled, not squeezed in.
What a proper flood test actually checks
Professional guidance emphasises flood testing, protecting weep holes, and avoiding fasteners low on the wall or curb. It also points out that many shower leaks are caused by transitions such as drains, corners, screw penetrations, and curb interfaces, not just the membrane field itself, as outlined in this guide to proving a shower is watertight.
A sensible verification routine includes:
- Visual inspection first: Check for pinholes, missed seams, weak coating around penetrations, and irregular edges.
- Drain setup: Plug the drain correctly without blocking or damaging the drainage function the assembly relies on.
- Controlled water hold: Keep water in the shower base long enough to reveal a problem if one exists.
- External checks: Inspect adjoining rooms, below-floor areas if accessible, and perimeter zones for signs of loss or seepage.
- No fast fixes: If the test reveals a failure, don't tile and hope adhesive or grout will save it. Repair the waterproofing detail and re-test.
For Victorian projects where documentation matters, especially on managed renovations and rectification work, a waterproofing compliance certificate in Victoria can be part of proving the job was completed to the required standard.
Site check: If you can't explain how the shower was tested, you can't be confident it's ready to tile.
The Final Stage Tiling and When to Call the Professionals
Once the shower is cured and proven watertight, tiling can begin. Many homeowners relax too early once tiling begins. But the tile stage still matters because poor tile installation can damage finished waterproofing, especially at drains, wall bases, and penetrations.
What capable DIYers can usually handle
A careful DIY renovator can often manage demolition, cleaning, product research, and some straightforward preparation work. Some can even tile competently in a simple shower if the substrate, set-out and waterproofing have already been handled correctly.
Where DIY usually falls apart is coordination. Bathrooms aren't one trade. They're carpentry, plumbing, sheeting, waterproofing, tiling, sealing and compliance all crossing over each other. If one stage is off, the next trade inherits the defect.
What should go to a registered builder
Most guides focus on standard rectangular showers and don't explain the geometry, overlaps and corner detailing needed in custom builds like neo-angle or curved showers. Those shapes require specific techniques where failure risk concentrates, which is why they create problems in design-led bathroom renovations, as shown in this installation example covering custom shower geometry.
That's where a registered builder matters. If the job involves structural correction, custom shower design, altered plumbing locations, unusual substrate conditions, or remedial leak work, you want someone who can manage the entire build and remain accountable for compliance. That's especially true in Melbourne renovations where old housing stock often reveals surprises once the bathroom is opened up.
A registered builder doesn't just organise trades. They control the sequence, ensure the waterproofing system suits the shower design, and stop the project from becoming a chain of assumptions between separate contractors.
If you're planning a shower rebuild, ensuite upgrade, or leak rectification job in Victoria, Melbourne Tiling Services P/L is one option for builder-managed bathroom renovations, waterproofing, tiling, and compliance-focused wet-area work.
Recent Comments