

You're probably standing in your kitchen right now looking at tired splashback tiles, chipped grout, dated colours, or a floor that never quite feels clean. The cabinets might still be serviceable, or you may be planning a full renovation and trying to work out where tiling fits into the bigger job.
That's where most Melbourne homeowners hit the same problem. They start by choosing a tile they like, then realise the important considerations are about movement, moisture, substrate condition, trade coordination, and who's responsible if something fails.
Good kitchen tiling in Melbourne isn't just about the surface. It's a system made up of the substrate, adhesive, grout, sealant, movement joints, tile selection, and the way the work is sequenced with plumbing, cabinetry, electrical, and sometimes bathroom renovations happening elsewhere in the home at the same time. From a registered builder's point of view, the result is only as good as what sits underneath.
Table of Contents
- Your Dream Kitchen Starts with a Solid Plan
- Decoding Tile Types for Melbourne Kitchens
- The Unseen Foundation Substrate and Waterproofing
- Budgeting for Your Melbourne Kitchen Tiling Project
- Choosing Your Tiler Why a Registered Builder Is Key
- The Kitchen Tiling Process Step by Step
- Maintaining Your New Tiles and Getting Started
Your Dream Kitchen Starts with a Solid Plan
You pick a tile you love, get a quote, and expect the job to be straightforward. Then the old splashback comes off, the wall is out, the floor falls away near the pantry, and the neat price on page one no longer matches the work required on site. This is a common problem for Melbourne homeowners, especially in older homes where the visible finish hides the true condition underneath.
Good kitchen tiling starts with scope. Before anyone talks about grout colour or tile pattern, the job needs clear boundaries. Is the work limited to a splashback, or does it include the floor as well? Are the cabinets staying. Will plumbing or power points move. Is the kitchen being renovated on its own, or as part of a wider project where trade sequencing affects access, timing, and cost?
Those decisions change the method, the program, and the risk.
In Melbourne, planning matters because kitchens sit at the intersection of finishes and construction. A tiler may be the trade on site, but the result depends on what sits behind the tile, who prepares it, and whether the layout has been resolved before materials are ordered. I regularly see avoidable problems caused by late decisions on appliance sizes, cabinet set-out, and tile module. Large tiles are a good example. They can look clean and modern, but they also demand flatter surfaces, tighter setting-out, and sharper cutting around windows, rangehoods, and power points. That is why many owners benefit from reviewing the practical implications of large format kitchen tiles in Melbourne before locking in a product.
Start with function, not colour
A kitchen tile has to suit the way the room is used, cleaned, and maintained over time.
- Cooking-heavy households: Usually need finishes that release grease easily and do not leave every splash visible.
- Families with kids or pets: Often get a better result from hard-wearing tiles and grout colours that cope with traffic and daily mess.
- Rental properties: Tend to suit practical materials that are easy to clean and easy to repair.
- Higher-spec renovations: Can support more specialised products, but only when the owner is clear about sealing, cleaning, and long-term upkeep.
Practical rule: If the discussion is only about tile colour and price, key parts of the job are still missing. Substrate condition, movement, moisture exposure, edge treatment, and set-out all need to be addressed before work starts.
A solid plan also identifies who is responsible for each part of the build. Demolition, substrate repairs, waterproofing where required, tiling, caulking, and final fit-off need to line up properly. If responsibility is vague, defects and delays usually follow. The kitchen may still look good on handover day, but appearance alone is a poor measure of quality.
The better outcome comes from clear documentation, realistic allowances, and a build sequence that reflects the actual site conditions. That is how a tiled kitchen holds its line, stays serviceable, and remains compliant long after the renovation is finished.
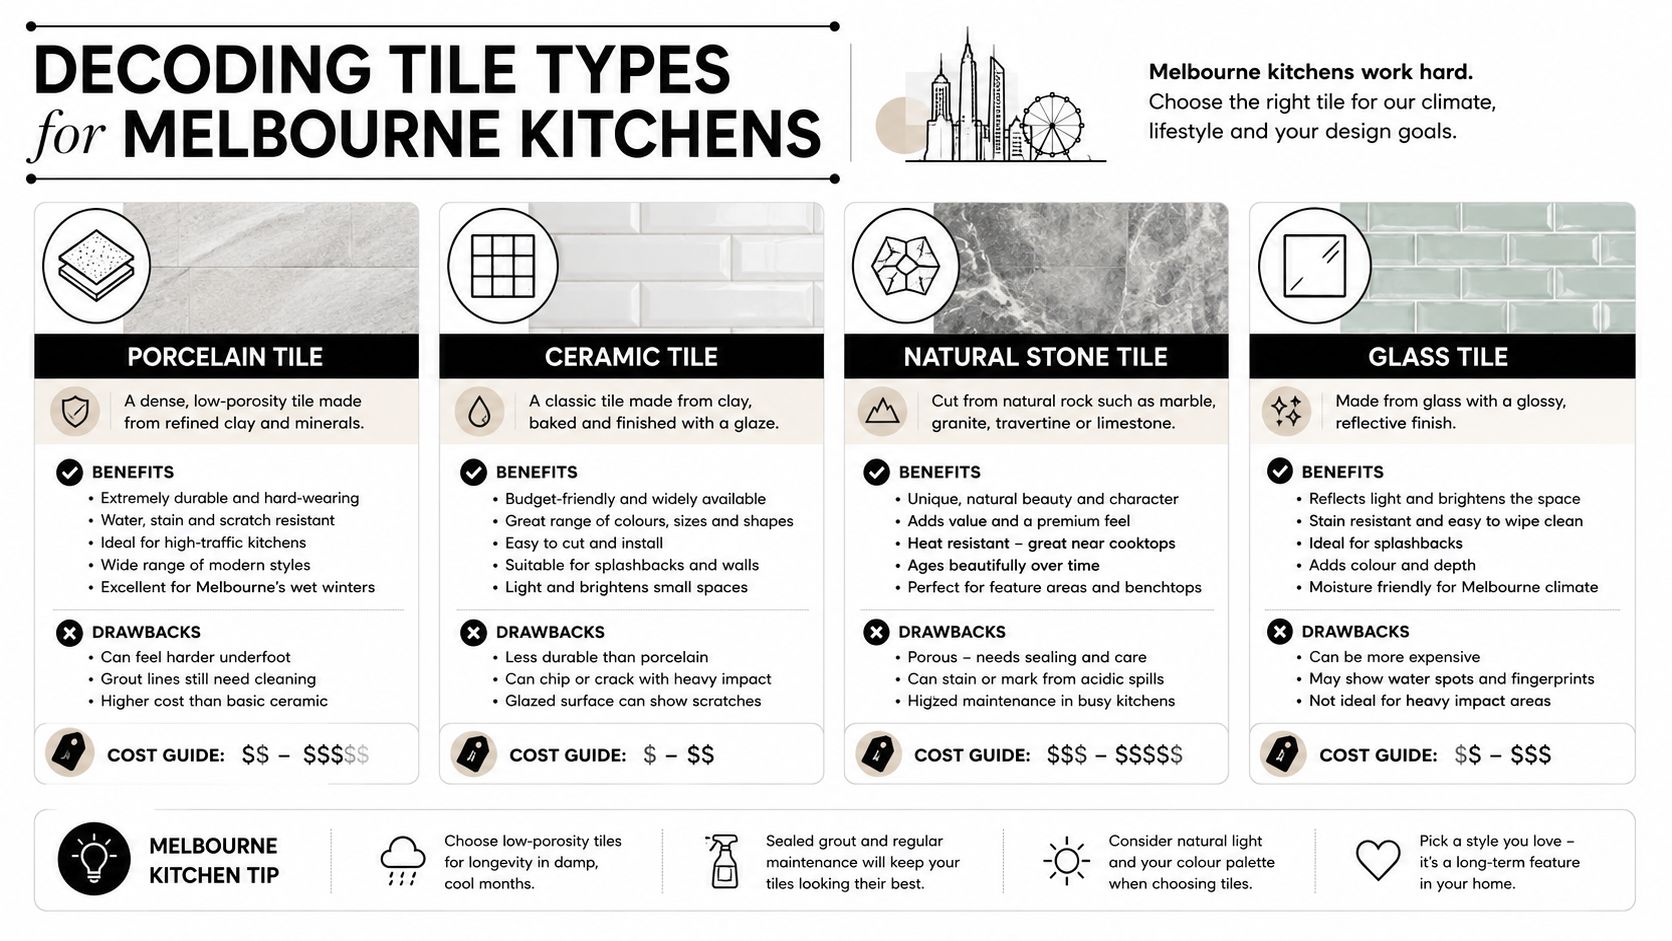
Decoding Tile Types for Melbourne Kitchens
Most kitchen tile mistakes happen before the first tile is laid. The wrong material gets picked for the wrong reason. A polished surface is chosen for ease of cleaning without considering grip. A porous natural stone goes in behind a cooktop with no real thought about maintenance. A very large tile is selected for a wall that isn't flat enough to carry it cleanly.
Expert guidance puts the decision in the right order. Porcelain's strength and natural stone's need for sealing are useful starting points, but the better question is how finish, slip resistance, and grout strategy match the way your household uses the kitchen in Victoria (tile performance guidance for Australian conditions).
What works well in a busy kitchen
Porcelain is the safe performer for many Melbourne kitchens. It's a strong choice for floors and splashbacks where the owner wants durability and lower day-to-day fuss. It also works well in homes where people want a stone look without the same maintenance burden.
Ceramic often suits splashbacks and lower-cost wall applications. It can be a sensible option where the wall is the visual feature and the wear demands are lower than the floor. It's less forgiving if someone expects premium impact resistance or wants a very hard-wearing floor finish.
Natural stone can look exceptional, but it's for owners who understand what they're buying. Stone can stain, can need sealing, and can develop visible wear that some people love and others regret. In a kitchen, that's not a styling issue. It's a maintenance decision.
Glass and decorative feature tiles are usually best kept to controlled applications such as splashback bands or feature walls. They can be effective, but they need a careful setting-out plan and the substrate has to be right because reflective finishes show every irregularity.
A practical comparison
| Tile type | Where it usually suits | Main advantage | Main trade-off |
|---|---|---|---|
| Porcelain | Floors, splashbacks, family kitchens | Strong performer with good durability | Can cost more upfront and needs proper cutting tools |
| Ceramic | Splashbacks, lower-wear wall areas | Flexible design choice and often easier on budget | Not always the first choice for heavy-duty floor use |
| Natural stone | Premium renovations, feature areas | Unique natural appearance | Needs more maintenance and sealing awareness |
| Large-format tiles | Contemporary kitchens, minimal-joint look | Fewer grout lines and a cleaner visual finish | Requires flatter substrates and more precise installation |
Large-format products deserve a separate mention. They look sharp, reduce grout lines, and can make a smaller kitchen feel calmer. They also expose poor prep instantly. If the wall bows or the floor has variation, large-format installation becomes more technical and less forgiving. If you're considering that route, it helps to understand the handling and setting demands involved with large-format tiles in Melbourne.
A tile that looks impressive in a sample board can be the wrong tile for a household that wants low maintenance, quick cleaning, and minimal visible wear.
For most kitchen tiling Melbourne projects, the right choice is the one that matches how the room will be lived in. That's usually a more useful filter than trend, resale talk, or what looked good on social media.
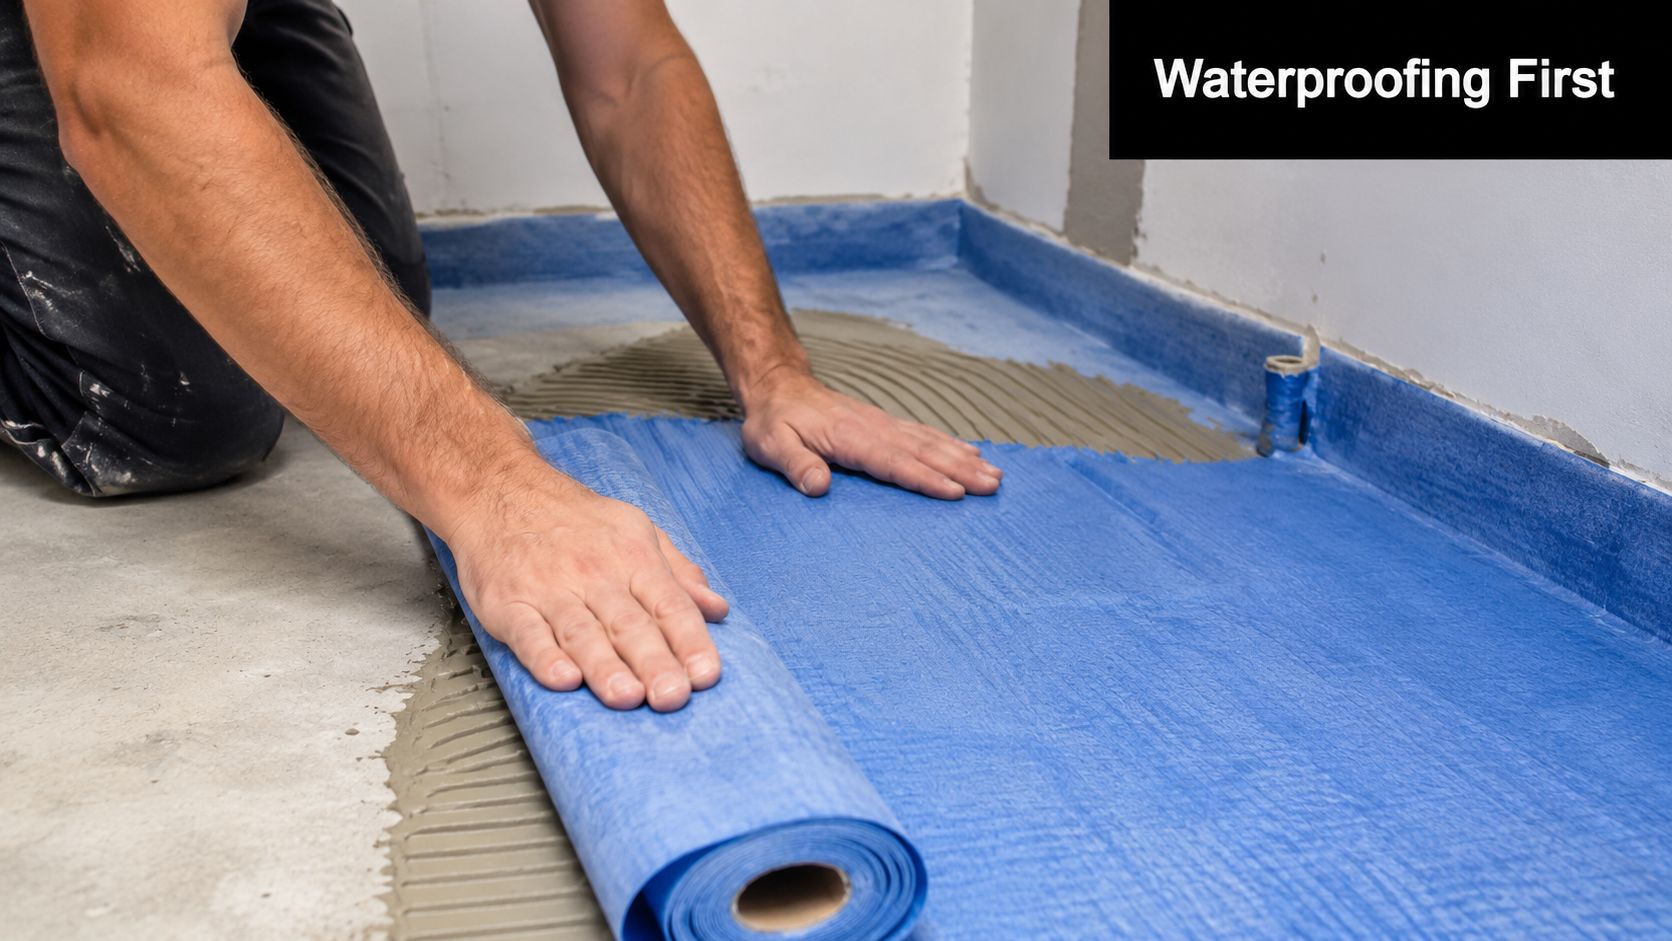
The Unseen Foundation Substrate and Waterproofing
A car with a beautiful paint job and a twisted chassis is still a bad car. Kitchen tiling works the same way. Homeowners see the finish, but the durability sits in the base.
The critical issue in kitchen tiling is often moisture exposure near sinks and splashbacks, not because the whole kitchen is treated like a shower, but because intermittent water, steam, cleaning products, and movement can break down a poor system over time. Guidance on Australian tile systems for wet-area-adjacent surfaces stresses using a compatible package of substrate, adhesive, grout, and sealant, along with a properly prepared level base, polymer-modified adhesive, and movement joints at perimeters and changes of plane to reduce cracking and debonding risk in Melbourne's climate (wet-area-adjacent tile system guidance).
Why the base matters more than the tile
Substrate preparation covers a lot of ground:
- Levelling: Correcting uneven floors or walls so the finished tile sits properly.
- Repairs: Replacing damaged sheeting, patching weak areas, or dealing with drummy old finishes.
- Screeding or self-levelling: Bringing a floor into plane before tiling starts.
- Moisture management: Detailing around sinks, junctions, and penetrations so water doesn't get where it shouldn't.
If any of those steps are skipped, the tile installer ends up trying to correct structural or substrate problems with adhesive. That doesn't work well. Adhesive is there to bond the tile, not to compensate for a bad base.
Where kitchens commonly fail
In kitchen tiling Melbourne work, failures often start in predictable locations:
- Behind sinks: Water tracks into junctions, silicone fails, or the wall system was never detailed properly.
- At corners and changes of plane: Rigid installations crack because movement wasn't allowed for.
- Across uneven floors: Lippage appears, tiles sound hollow, or the finish looks untidy.
- At interfaces with cabinetry and appliances: Poor planning leaves awkward cuts, weak edges, or trapped movement.
A lot of owners only discover these issues when they renovate an older home or apartment. That's why clear documentation matters. If the scope includes membrane work, levelling, or other moisture-control tasks, the quote should say so clearly. For a more project-specific view of that work, it's worth reviewing waterproofing in Melbourne.
When the foundation is done properly, the finished tiling looks cleaner, lasts longer, and gives you a much better chance of avoiding call-backs and repair work later.
Budgeting for Your Melbourne Kitchen Tiling Project
The cheapest tile quote is often the most incomplete one. A homeowner sees a price and assumes it covers the full job, but kitchen tiling costs are built from several moving parts. Some are visible, such as tile supply and labour. Others only become clear once demolition starts.
That matters in a market affected by broader construction and renovation conditions. IBISWorld estimates the Australian Tiling & Carpeting Services market at A$8.0 billion in 2026, down 4.8% from A$8.4 billion in 2025, which is a reminder that labour and material pricing don't move in isolation from housing conditions and the wider economy (IBISWorld tiling and carpeting services market size).
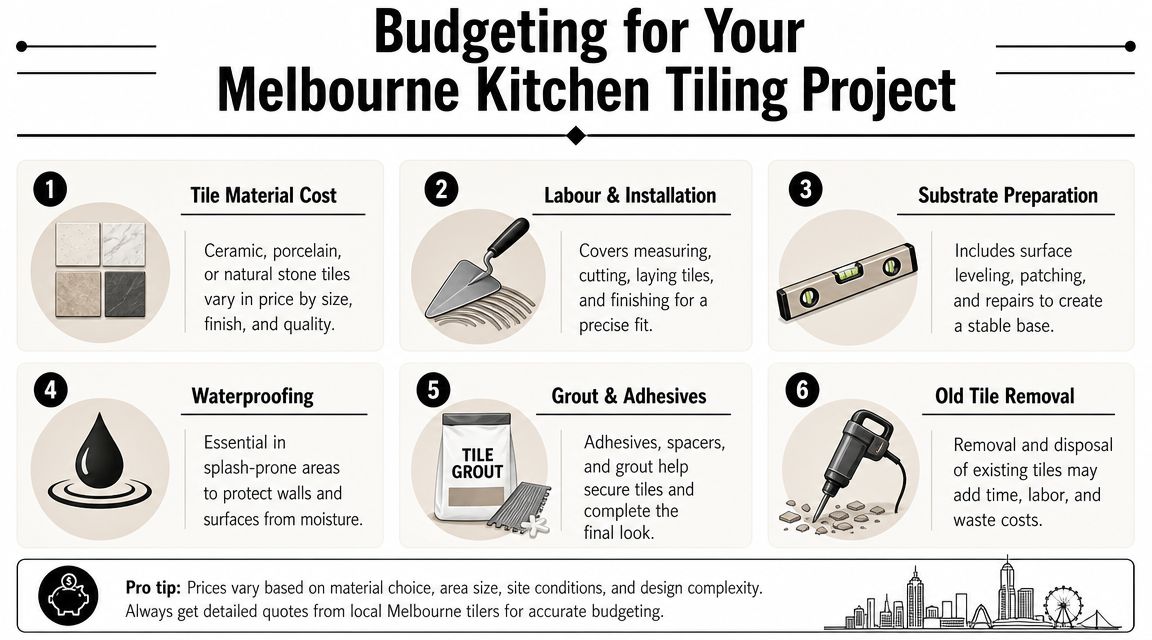
What you are actually paying for
A proper kitchen tiling budget usually includes these components:
- Tile supply: The material itself, plus trims, feature pieces, and any wastage allowance.
- Installation labour: Setting out, cutting, laying, grouting, detailing, and clean-up.
- Demolition and removal: Taking up old tiles, disposing of rubble, and protecting adjacent finishes.
- Substrate preparation: Levelling, patching, screeding, sheet replacement, or repairs.
- Moisture-related detailing: Sealants, membranes where required, and junction treatment.
- Consumables: Adhesives, grout, primers, trims, and sealants.
The hidden cost is usually substrate correction. A kitchen wall that looks straight when painted can be far from straight once a large-format tile goes on it. An older floor can need more rectification than the owner expected.
How to think about budget levels
Rather than chasing a single price point, it's smarter to think in tiers.
| Budget level | What it often includes | What can change the cost |
|---|---|---|
| Entry-level | Standard ceramic or basic porcelain, simpler layout, limited prep | Existing surfaces may still need more correction than expected |
| Mid-range | Better-quality porcelain, cleaner trim details, more layout control | Feature walls, niche cuts, and older substrates add labour |
| Premium | Large-format tile, specialty finishes, more involved prep and detailing | Precision installation, product handling, and edge detailing take longer |
Budget warning: A quote that doesn't spell out demolition, preparation, tile type, trims, grout, and moisture-related work leaves too much open to dispute.
For homeowners planning both a kitchen and bathroom renovation, budgeting should be done across the whole trade sequence, not room by room in isolation. The tiling component often depends on plumbing rough-in, carpentry timing, and whether surfaces are being rebuilt before the finish trades arrive.
Choosing Your Tiler Why a Registered Builder Is Key
Kitchen tiling can look like a standalone trade, but many jobs aren't standalone at all. Once you move plumbing, alter cabinetry, remove bulkheads, touch electrical, rebuild walls, or combine the project with bathroom renovations, you're no longer just hiring someone to stick tiles on a surface. You're managing a construction process.
That's where registered builder oversight changes the job. A lone tiler may be excellent at installation, but if the project also needs demolition coordination, substrate repair, waterproofing interfaces, plumber and electrician sequencing, or compliance decisions, someone has to own the bigger picture.
Why builder oversight changes the outcome
Independent Australian consumer guidance urges homeowners to ask for a detailed written quote, check that the tiler has experience with the same tile type, and get clarity around practical issues such as subfloor levelling and waterproofing. That advice is particularly relevant in older Melbourne homes, where renovation risk is often hidden behind existing finishes (questions to ask when choosing a tiler).
A registered builder brings value in a few specific ways:
- Scope control: The quote can identify what is included, what is excluded, and what happens if hidden defects are uncovered.
- Trade coordination: Plumbers, electricians, carpenters, waterproofers, and tilers can be sequenced so one trade doesn't undo another.
- Compliance focus: Wet-area-adjacent details, structural interfaces, and product compatibility are less likely to be treated as afterthoughts.
- Accountability: One party manages the process instead of multiple contractors shifting responsibility.
For homeowners comparing options, a registered builder also makes sense when the tiling is only one part of the renovation. Melbourne Tiling Services P/L is one example of a contractor that handles tiling alongside broader renovation coordination as Registered Unlimited Builders, which is relevant if the kitchen works connect to waterproofing, structural preparation, or bathroom renovation staging.
Questions worth asking before you sign
Don't ask only for a price. Ask how the contractor thinks.
- What condition do you expect the substrate to be in, and how will you deal with it if it isn't suitable?
- Have you installed this exact tile type before, especially if it's large-format, natural stone, or a thin panel product?
- Who is responsible for demolition, waste, and protection of adjacent areas?
- How are movement joints, trims, and changes of plane being detailed?
- What does the written scope say about exclusions and latent conditions?
- If this is part of a kitchen and bathroom renovation, who is coordinating the trades?
A practical starting point is to compare contractors who specialise in this category of work, such as those offering tiling contractors near me in Melbourne, then narrow the list by documentation quality, project understanding, and how clearly they explain the substrate and compliance side of the job.
Good tilers talk about layout. Good builders talk about layout, substrate, sequencing, responsibility, and what happens when the walls aren't as straight as everyone hoped.
That difference usually shows up in the final result.
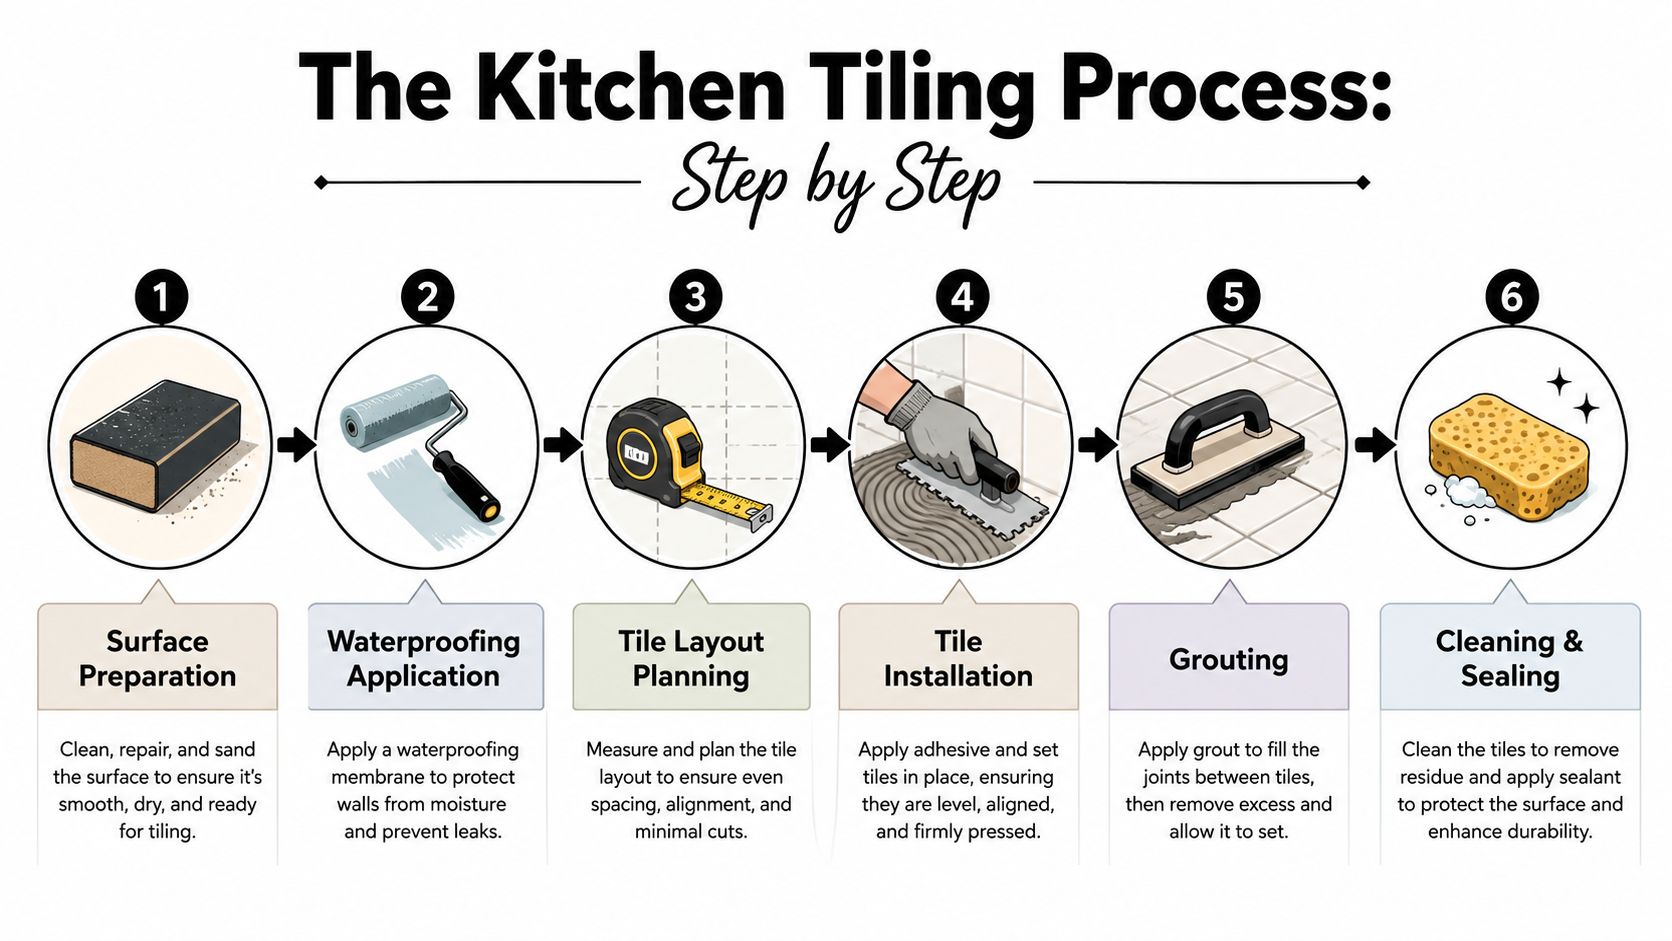
The Kitchen Tiling Process Step by Step
A kitchen tiling job usually looks simple on day one. Then the old finishes come off, the walls show their true condition, and the job either stays under control or starts drifting on cost, time, and quality. In Melbourne homes, the difference is rarely the tile itself. It comes from preparation, sequencing, and whether the installer treats the work as part of a building process rather than a cosmetic upgrade.
The visual flow is straightforward.
From strip-out to setting out
Site protection and set-up
Protection goes in before demolition starts. That includes floors, joinery, benchtops, access paths, and adjoining rooms. In occupied homes and apartments, this step matters because dust, debris, and repeated foot traffic can damage finishes that are staying.Demolition and removal
Existing tiles, splashbacks, adhesive build-up, or damaged sheet linings are removed. This is the point where hidden issues show up, such as loose plaster, uneven walls, moisture damage, or movement cracks.Substrate assessment and correction
The exposed surface is checked for flatness, strength, cleanliness, and suitability for the tile selected. If the substrate is out of tolerance, the fix might be patching, levelling, screeding, or replacing the sheet material altogether. Skipping this step usually leads to lippage, poor bond, and visible layout problems later.Water-related detailing where required
Kitchens are not bathrooms, but certain junctions and service areas still need careful treatment. Around sinks, benchtop returns, and vulnerable wall-floor transitions, the detailing must suit the risk and the construction. Any product that needs curing gets that time before adhesive is applied.
A small splashback can be completed quickly if the background is straight and stable. A kitchen floor, or a tiled kitchen that forms part of a wider renovation, takes longer because the prep stage sets the standard for everything that follows.
Here's a useful visual reference for how the workflow looks on site:
Laying grouting and handover
Tile layout and setting out
Set-out happens before adhesive hits the wall or floor. The layout should be checked against cabinets, appliances, power points, windows, and the main sightlines into the room. Good set-out reduces awkward cuts and keeps the finished work looking intentional rather than improvised.Tile installation
Tiles are fixed using the adhesive, notch size, coverage method, and joint spacing suited to the material and substrate. Large-format porcelain, handmade products, mosaics, and stone all behave differently on site. That is where trade judgment matters.Grouting and cleaning
Grouting starts only after the tiles are properly set. The surface then needs careful cleaning so grout haze, staining, and residue are not left behind. Rushed clean-up is one of the most common reasons a new tiled surface looks disappointing at handover.Sealing and final detailing if required
Some materials need sealing, and some do not. Silicone joints, perimeter movement treatment, trims, edge finishes, and final defect checks are completed before the job is signed off. In a well-run project, this stage is tidy and predictable because the earlier steps were handled properly.
Many tiling businesses are small operators, and there is nothing wrong with that. The practical issue is consistency. On site, quality differences usually show up in preparation, cleanliness, communication, and how well the sequence is controlled. From a Registered Builder's perspective, that sequence matters because a kitchen tile finish has to look right, perform well, and sit properly within the wider renovation scope.
Maintaining Your New Tiles and Getting Started
A good installation still needs sensible care. The biggest maintenance mistake is using harsh products that do more harm than the everyday dirt ever would.
Simple maintenance that actually helps
For most kitchens, routine care is straightforward:
- Use pH-appropriate cleaners: Especially if you have natural stone or specialty finishes.
- Wipe spills early: Oils, sauces, and strongly coloured food are easier to remove before they sit.
- Keep grout lines clean: A soft brush and the right cleaner usually beats aggressive scrubbing.
- Avoid random chemicals: If a product isn't suitable for tile, grout, stone, or sealant, don't test it on your new renovation.
Natural stone needs more attention than porcelain or ceramic. If you chose stone for its character, accept that maintenance is part of ownership. If you wanted a simpler cleaning routine, that choice should have been made during selection.
What to do before work begins
Before signing off on a kitchen tiling Melbourne project, make sure you have:
- A written scope that states what is being removed, prepared, tiled, sealed, and protected.
- Tile details including size, finish, and any special handling requirements.
- Clarification on substrate works so levelling and repairs aren't left vague.
- A clear sequence if the kitchen job connects to bathroom renovations or other building works.
- A workmanship discussion so you know what to inspect at handover.
A durable kitchen comes from good decisions made before the first tile arrives. Choose materials based on performance, insist on preparation being documented, and use a contractor who understands that compliance and craftsmanship go together.
If you're planning a splashback, floor tiling, or a larger kitchen and bathroom renovation, Melbourne Tiling Services P/L can help you scope the work properly from the start. The team provides free quotes, 3D drawings, and a transparent renovation calculator so you can understand layout, finishes, and budget before construction begins.
Recent Comments