
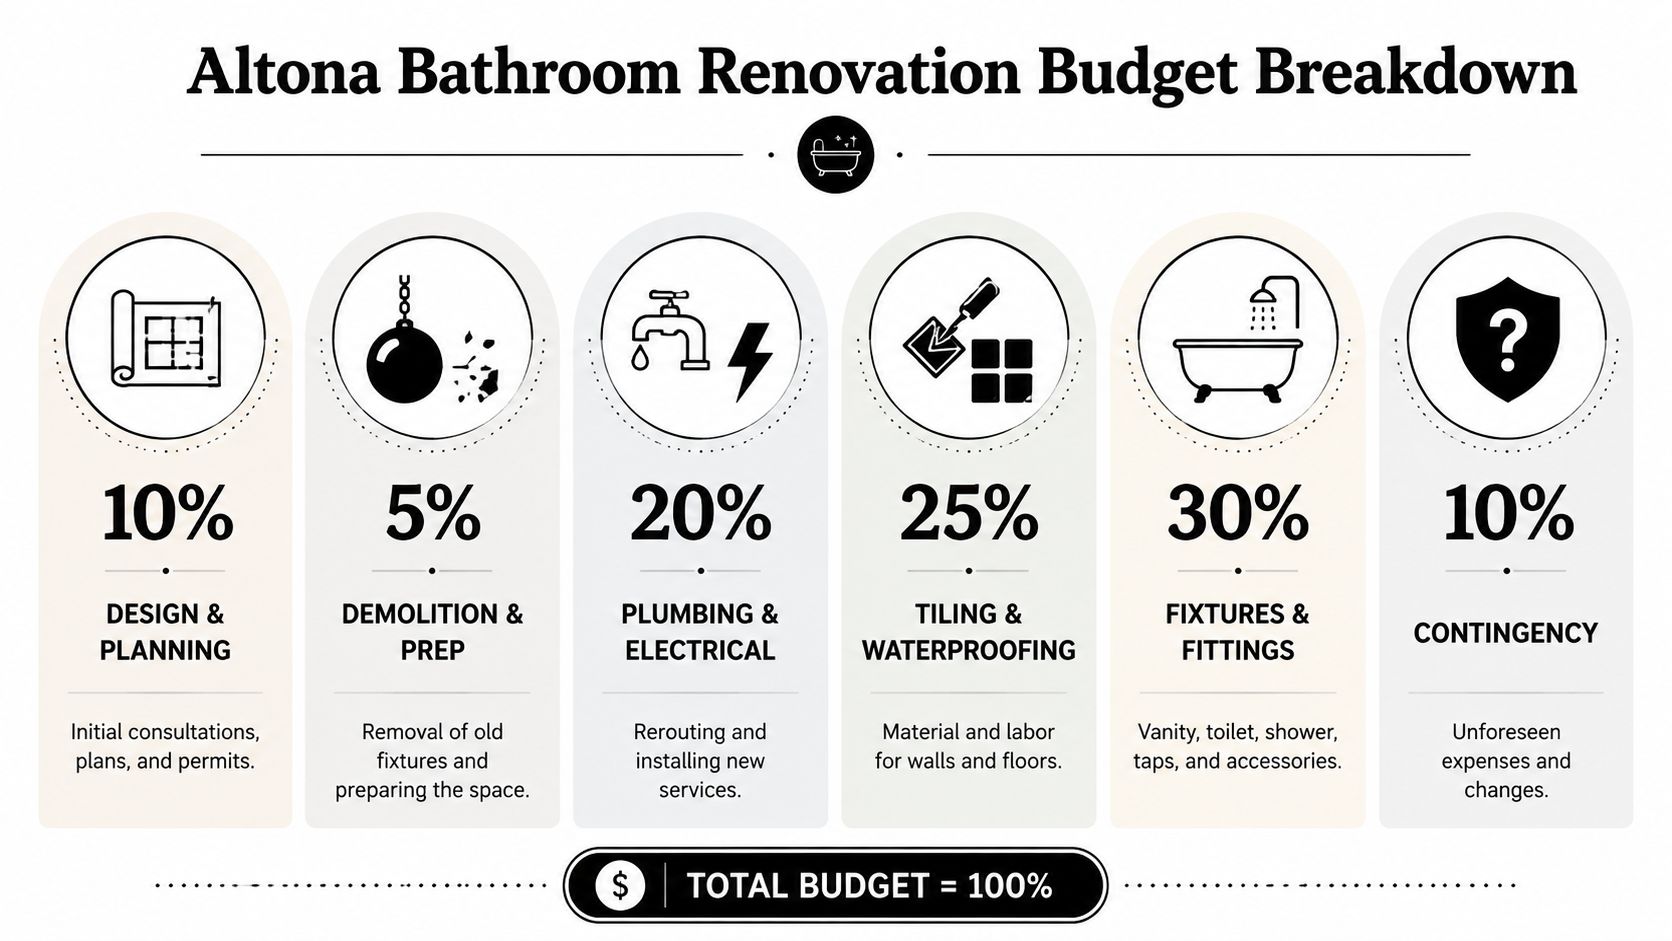
In Melbourne, a full bathroom renovation usually lands between $15,000 and $35,000, while a smaller cosmetic refresh can start from around $8,000. If your plan includes layout changes, premium finishes, or structural work, costs often move beyond that range.
That's the part most homeowners want answered first. The harder part is working out what those numbers include, and whether the quote in front of you covers a real end-to-end renovation or just a collection of partial trade costs.
A lot of the stress around bathroom renovation cost in Melbourne comes from comparing apples with oranges. One price might include demolition, waterproofing, tiling, plumbing, electrical, and project coordination. Another might leave out fixture installation, waste removal, compliance, or the cost of fixing what turns up once the room is stripped back. On paper, both can look similar until the work starts.
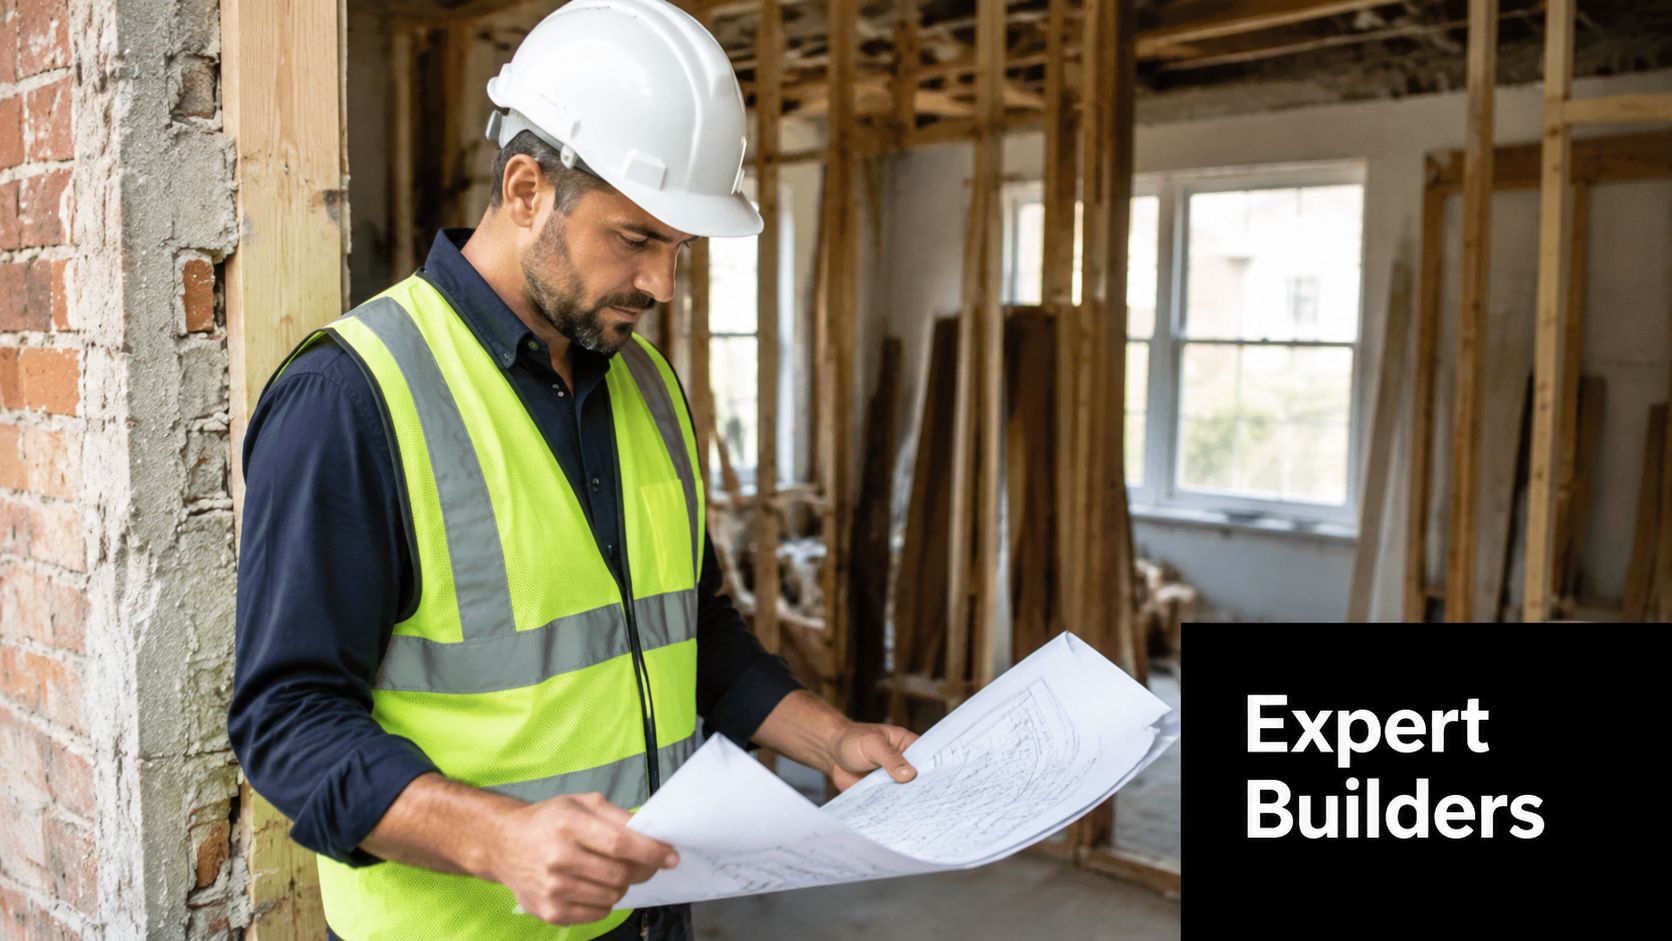
That's why the builder model matters. When a Registered Builder manages the renovation, you're not just paying for labour on site. You're paying for scope control, trade sequencing, responsibility for licensed work, cleaner handovers, and fewer gaps between what was quoted and what gets built.
Table of Contents
- Understanding Your Melbourne Bathroom Renovation Budget
- Bathroom Renovation Scopes and Typical Price Ranges
- An Itemised Breakdown of Renovation Costs
- Key Factors That Influence Your Final Cost
- Sample Budgets and A Typical Project Timeline
- How to Get an Accurate Quote from Registered Builders
- Plan Your Melbourne Bathroom Renovation with Confidence
Understanding Your Melbourne Bathroom Renovation Budget
The first budget mistake is treating a bathroom like a simple fixture swap. It isn't. Once you involve demolition, waterproofing, tiling, plumbing, electrical, and finishing trades, the price moves into full construction territory.
The clearest benchmark for homeowners is this: the Housing Industry Association-backed guide puts the average bathroom renovation in Australia at about A$26,000, with a practical spread of roughly A$8,000 to A$35,000+, depending on scope, materials, and whether it's a basic or high-end rebuild, as outlined in Canstar's bathroom renovation cost guide.
What that means in a Melbourne home
A cosmetic refresh sits at the lower end. That usually means keeping the layout largely intact and avoiding major changes to plumbing or electrical positions. It can improve the look of the room, but it won't solve every underlying issue.
A full renovation is different. It typically includes strip-out, preparation, waterproofing, tiling, licensed trade work, and new fixtures installed properly. In Melbourne, where labour and finish expectations are generally higher, that's where many standard bathrooms sit.
Practical rule: If the quote sounds cheap for a full bathroom rebuild, check what's missing before you compare it with anything else.
Why a Registered Builder changes the cost conversation
Homeowners often ask whether it's cheaper to organise a plumber, electrician, tiler, waterproofer, and shower screen installer themselves. On paper, it can look that way. In practice, self-managing trades often creates scope gaps, scheduling clashes, and disputes over who's responsible when one stage affects the next.
A Registered Builder gives you a single point of accountability. That matters in bathrooms because every stage depends on the one before it being done correctly. If framing is off, tiling suffers. If waterproofing is delayed or incomplete, the whole job is exposed. If fixtures arrive late, trades stand around or get rescheduled.
Budgeting for the whole job, not the cheapest line item
Those looking into bathroom renovation cost Melbourne usually want to answer one practical question: what will I really spend to get the room finished properly? The useful number is the all-in cost, not the cheapest trade-by-trade estimate.
That all-in figure should account for:
- Site preparation and demolition
- Licensed plumbing and electrical work
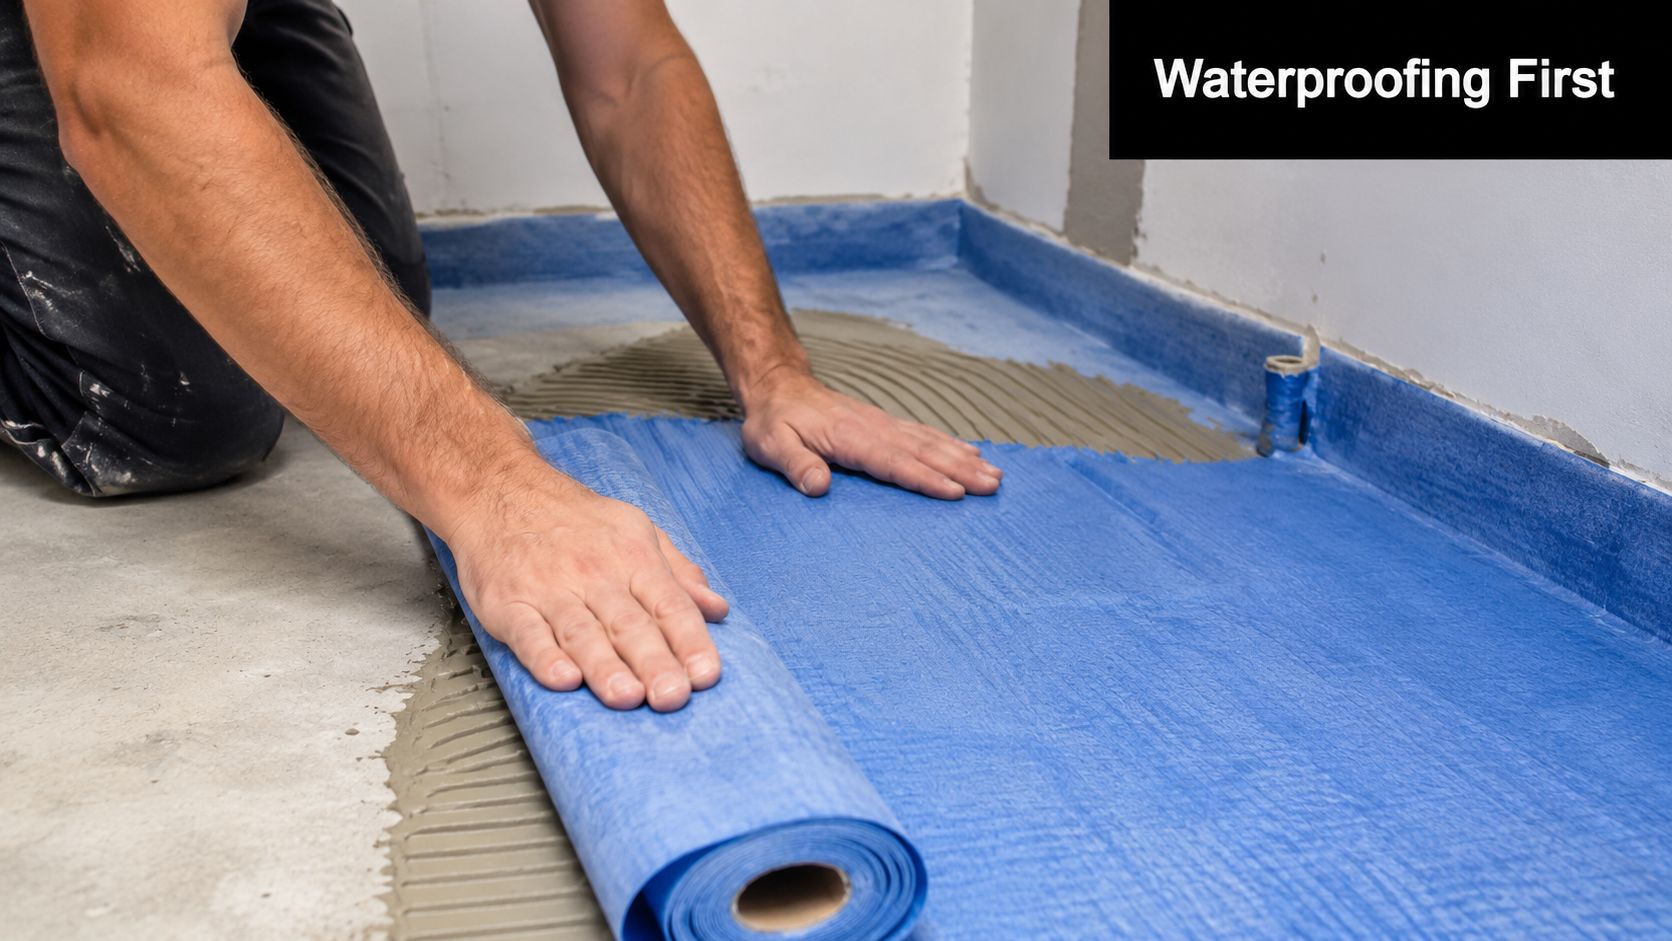
- Waterproofing and compliance
- Wall and floor tiling
- Fixture installation and finishing
- Project management by one responsible party
That's the difference between a room that looks done and a renovation that is complete.
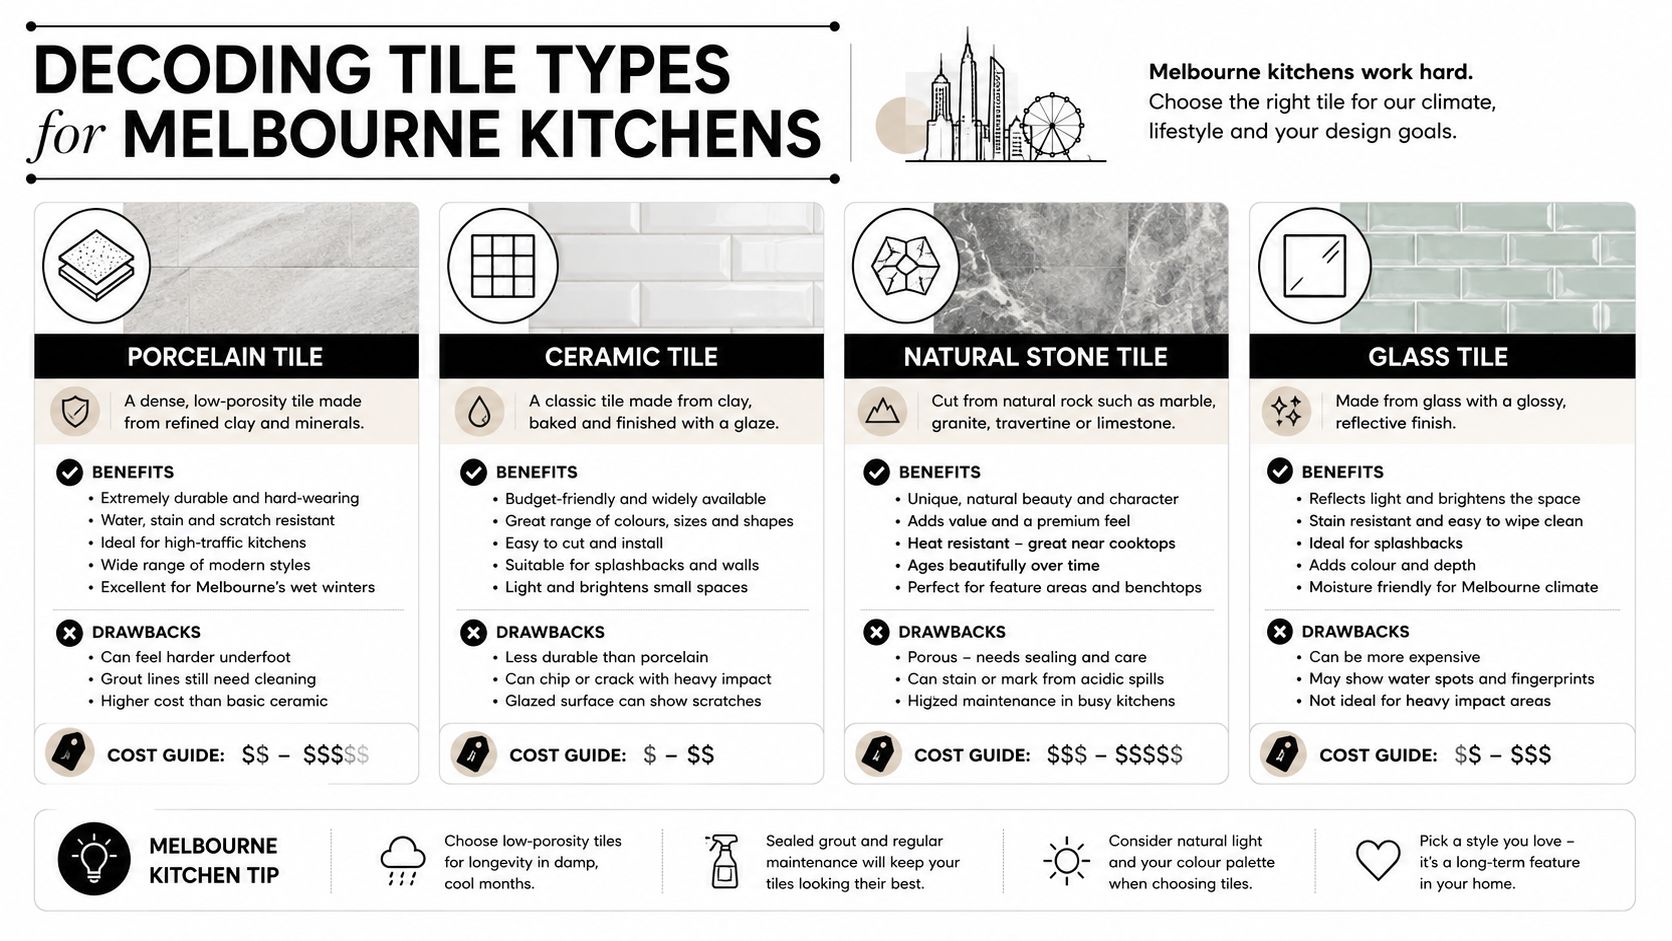
Bathroom Renovation Scopes and Typical Price Ranges
“Bathroom renovation” can describe three very different jobs. That's where homeowners get caught. They ask for a quote on a renovation, but one contractor prices a refresh while another prices a full rebuild.
Cosmetic refresh
At the lower end, projects can start from around $8,000, which aligns with the lower bracket noted in the verified cost guides. This scope usually suits a small bathroom or ensuite where the layout stays put and the work focuses on presentation rather than major reconfiguration.
A cosmetic refresh often includes selected updates such as:
- Replacing dated fixtures while keeping plumbing points where they are
- Refreshing surfaces without changing the room structure
- Upgrading the look with simpler tile choices and standard fittings
- Avoiding major trade complexity by not moving the toilet, shower, or vanity positions
This scope can work well for landlords, resale preparation, or homeowners who want the room improved without opening up every hidden issue in the walls and floor.
What it doesn't usually allow for is significant redesign. If you want a walk-in shower where a bath used to be, a floating vanity with altered services, or a more custom finish, you're usually past refresh territory.
Standard full renovation
This is the range most Melbourne homeowners shop in. A standard full renovation typically sits between $15,000 and $35,000, which matches the national benchmark and practical spread in the verified data.
This scope usually means the bathroom is stripped back and rebuilt properly. It may include new waterproofing, new tiling, updated plumbing and electrical, new fixtures, and a more cohesive finish throughout. It's the right category for bathrooms that are tired, leaking, poorly laid out, or due for a proper reset.
A standard full renovation tends to suit:
| Scope type | Typical range | Usually includes |
|---|---|---|
| Cosmetic refresh | $8,000 to $15,000 | Surface-level improvements, minor fixture changes, limited disruption |
| Standard full renovation | $15,000 to $35,000 | Demolition, licensed trades, waterproofing, tiling, new fixtures |
| High-end custom renovation | $35,000+ | Layout changes, premium materials, bespoke detailing, structural complexity |
The trade-off is straightforward. You spend more upfront, but you're paying to rebuild the wet area correctly rather than just cover over ageing materials.
A cheap refresh can make an old bathroom look newer. It won't necessarily make it perform like a new one.
High-end custom renovation
Once the job includes structural changes, high-end stone or porcelain, custom joinery, frameless screens, or specialist tile installation, costs frequently move beyond $35,000. That aligns with the upper end of the verified benchmarks for premium bathrooms.
Design decisions begin to drive labour just as much as materials. Large-format tiling, feature niches, flush finishes, and layout changes all require more precision. Premium bathrooms also tend to involve more planning because tolerances are tighter and the visual standard is higher.
Common triggers that push a bathroom into this category include:
- Moving plumbing locations to create a different layout
- Using premium tiling materials such as marble or specialist porcelain
- Installing custom frameless shower screens
- Reworking structure or openings as part of the new design
- Adding bespoke joinery and detail work instead of off-the-shelf pieces
Why scope clarity matters before you request pricing
Homeowners often think they need “a bathroom quote” when what they need is a scope decision. If you don't decide whether you want a refresh, a full rebuild, or a custom redesign, every quote will be based on different assumptions.
That's one reason managed bathroom renovations tend to produce clearer pricing. A builder-led quote is more likely to define what's included, what's excluded, and what level of finish the price is based on. That saves a lot of confusion later.
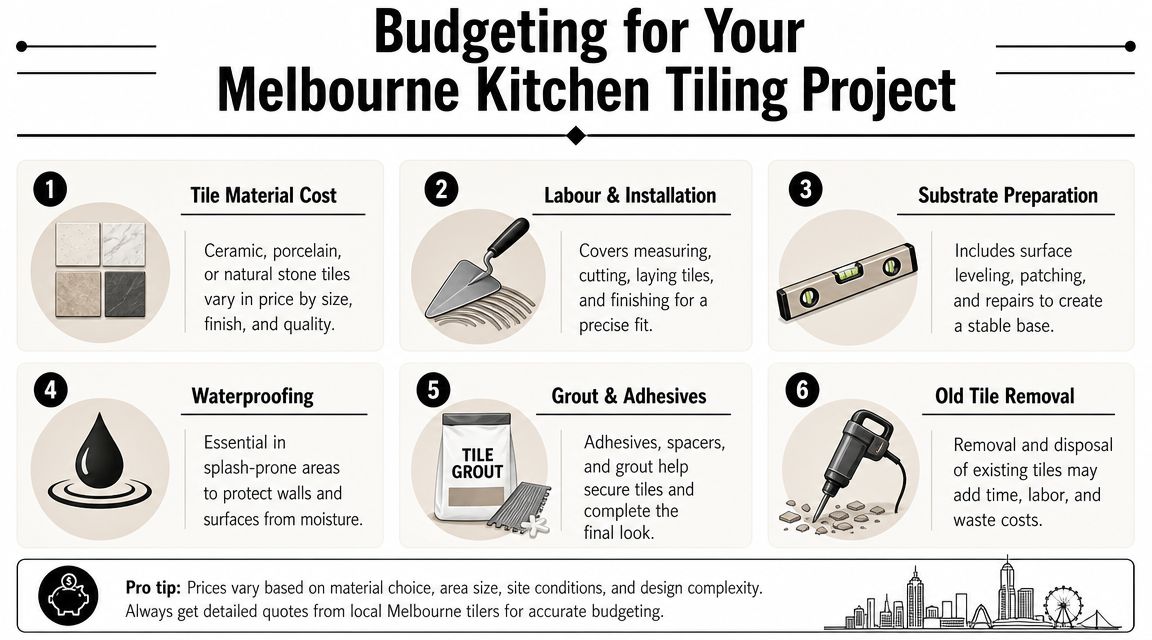
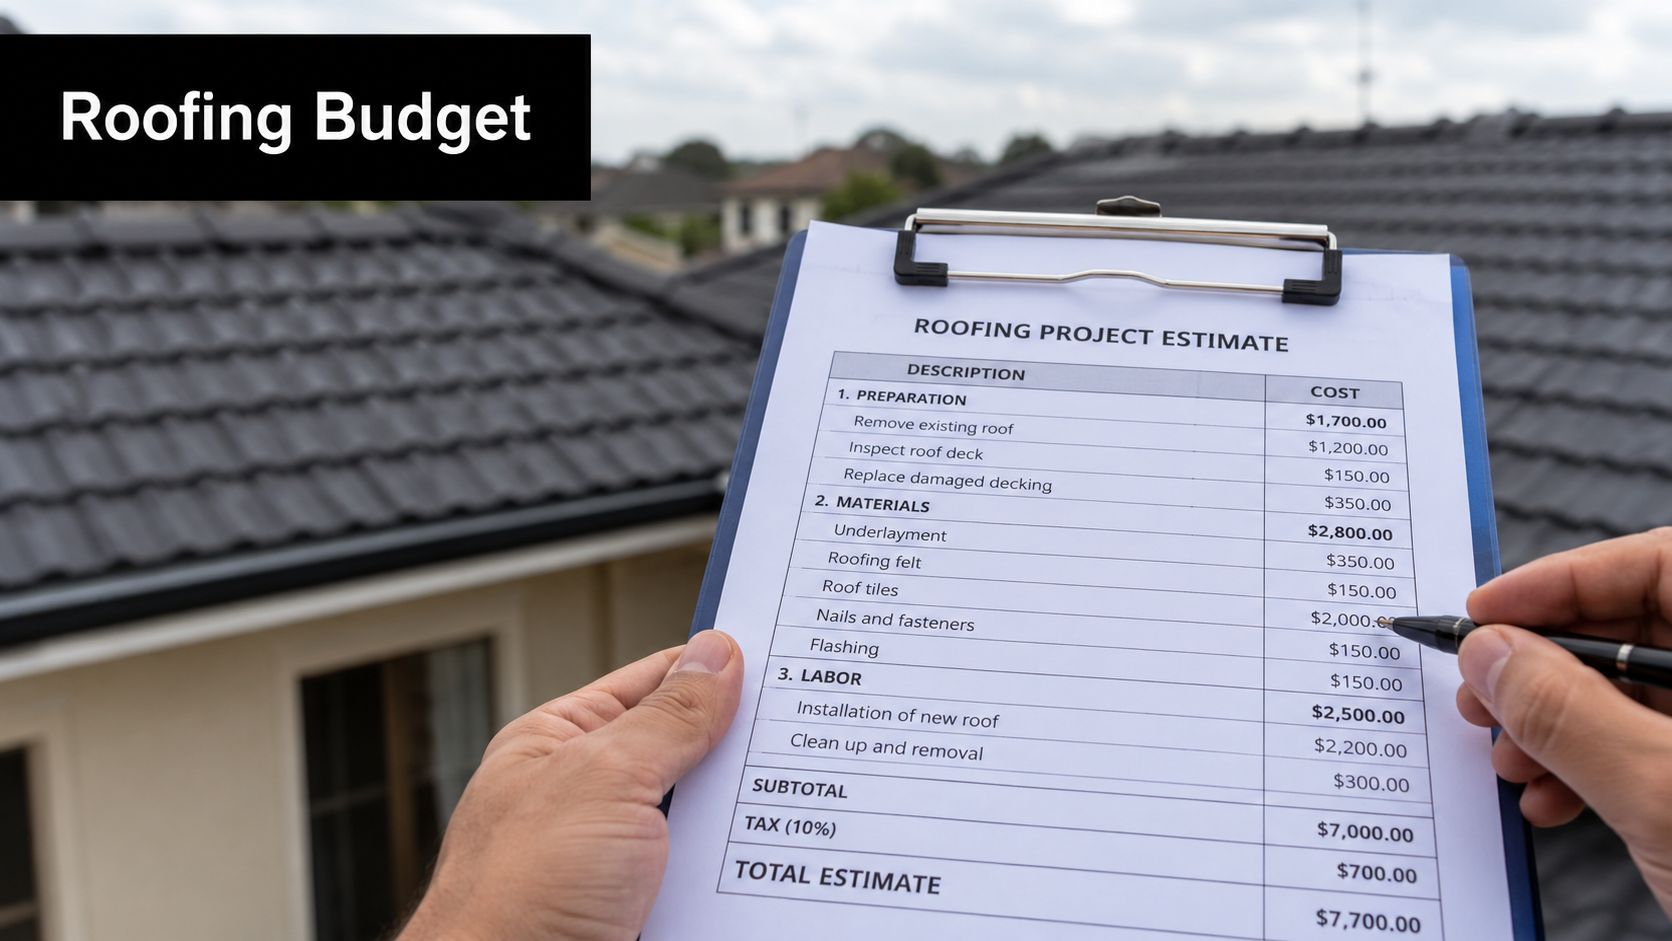
An Itemised Breakdown of Renovation Costs
A bathroom can be one of the smallest rooms in the house and still be one of the most labour-heavy. Every stage depends on the one before it being done properly. Strip-out affects set-out. Set-out affects waterproofing. Waterproofing affects tiling. That flow is a big reason an all-in builder quote often gives a clearer picture of the actual cost than a stack of separate trade prices.
Typical Bathroom Renovation Cost Breakdown in Melbourne
For a mid-range Melbourne bathroom around the $25,000 mark, the budget usually spreads across the job like this. The exact split changes with the room, the finish level, and whether services stay put.
| Cost Component | Typical Cost Range (for a ~$25k reno) | Percentage of Budget |
|---|---|---|
| Demolition and strip-out | Often A$1,000 to A$2,500 depending on access, waste removal, and how much is being removed | Lower share |
| Carpentry and preparation | Often A$1,500 to A$4,000 depending on framing repairs, floor correction, and wall straightening | Lower to mid share |
| Plumbing | Often A$2,500 to A$6,000 depending on fixture count and whether services move | Mid share |
| Electrical | Often A$1,000 to A$2,500 depending on lighting, power points, heated rails, and exhaust upgrades | Mid share |
| Waterproofing | Usually a modest line item compared with the full budget, but a failure here is expensive to rectify | Smaller but critical share |
| Tiling labour | Often one of the bigger labour costs, especially with large-format tiles, niches, mitres, or difficult set-outs | Mid to high share |
| Shower screen | Usually A$800 to A$2,000+ depending on framed, semi-frameless, or custom frameless glass | Mid share in premium jobs |
| Fixtures and fittings | Can range from budget retail selections to several thousand dollars in tapware, vanity, toilet, and accessories | Mid share |
| Labour and project management | A major share of the budget once trade coordination, supervision, scheduling, and defect responsibility are included | Major share |
The line items that catch homeowners out are usually the ones that are hard to compare online. Preparation is one. If walls are out, floors need packing, or the old substrate is not fit to tile over, the room needs extra work before finishes can start. That work is not glamorous, but it decides how the finished bathroom performs.
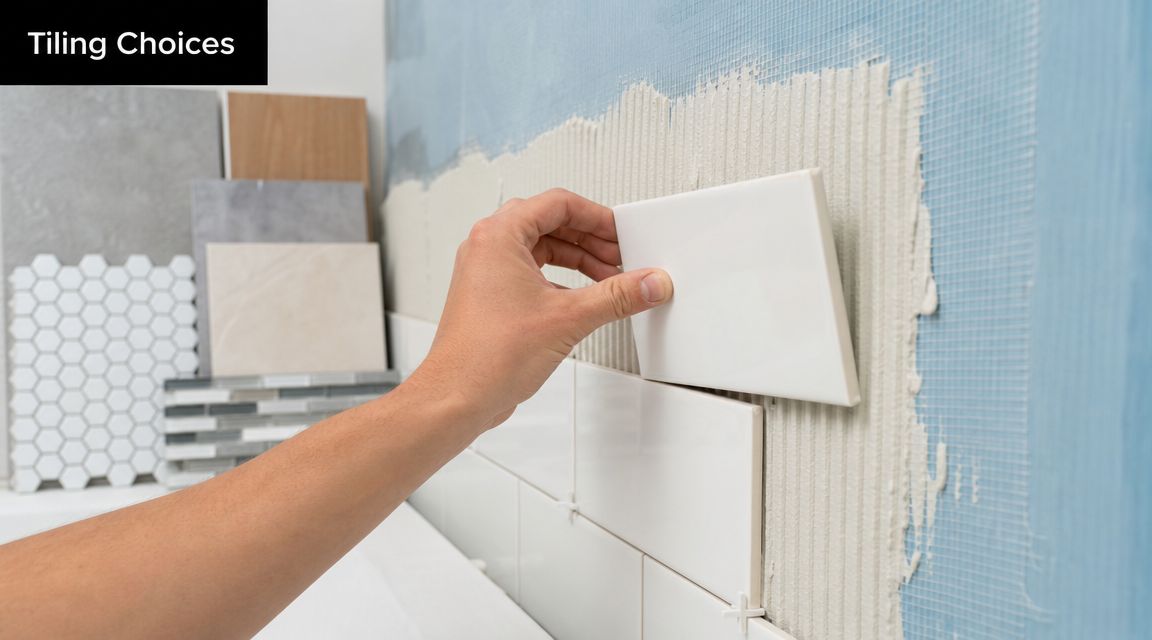
Tiling is another area where quotes can vary sharply. The tile itself is only part of the cost. Labour changes with tile size, pattern, substrate condition, waste allowance, trims, and the number of cuts around wastes, niches, windows, and tap penetrations. If you are comparing floor tiling services in Melbourne, check whether the price covers floor preparation, tile pattern, edge details, and final set-out, not just square metres.
The costs homeowners often miss when managing trades themselves
The biggest gap in owner-managed budgets is usually not a single trade rate. It is the coordination sitting between the trades.
If you hire the demo crew, plumber, waterproofer, tiler, electrician, glazier, and painter separately, someone still has to book them in the right order, make sure each stage is ready, answer questions on site, and carry the cost if one trade delays the next. In practice, that someone is usually the homeowner. The price may look lower at the start, but the risk sits with you.
A builder-managed renovation wraps those costs into one all-in number and puts responsibility in one place. That matters when:
- the plumber opens a wall and finds damaged framing
- the tiler needs falls adjusted before waterproofing can proceed
- the shower screen cannot be measured until final tile lines are confirmed
- one trade blames another for a defect or delay
That is where many "cheaper" bathrooms get expensive. Extra site visits, rebooking fees, repeated labour, and small scope gaps add up fast.
Where the budget is best spent
Money is usually best spent on the parts buried behind the finishes. Straight walls, correct falls, sound waterproofing, reliable plumbing rough-in, and careful tile installation have a bigger effect on the end result than upgrading a mixer from one retail range to another.
A vanity, basin, or tap can be changed later. Replacing failed waterproofing or redoing poor tile falls means pulling the bathroom apart.
The practical way to assess bathroom renovation cost in Melbourne is to look at the complete, managed build cost for a finished wet area that is compliant, functional, and properly handed over. That number tells you far more than a collection of low trade quotes that leave gaps between them.
Key Factors That Influence Your Final Cost
A bathroom budget isn't fixed just because you've set one. The final cost moves with design choices, site conditions, and how clearly the work is scoped before demolition starts.
One of the more important facts homeowners should know is that approximately 40% of renovation projects in Australia go over budget due to poor planning or unexpected structural issues, according to Hipages' summary of 2023 HIA bathroom renovation data. In Melbourne, older homes and higher trade costs make those surprises more painful.
Layout changes cost more than most people expect
The biggest jump in price often comes from changing the wet-area layout. Moving a toilet, relocating the shower waste, or shifting the vanity wall seems simple on a plan, but each change can trigger extra plumbing, extra labour, and more coordination between trades.
If the current layout works reasonably well, keeping services in place usually protects the budget better than almost any other decision.
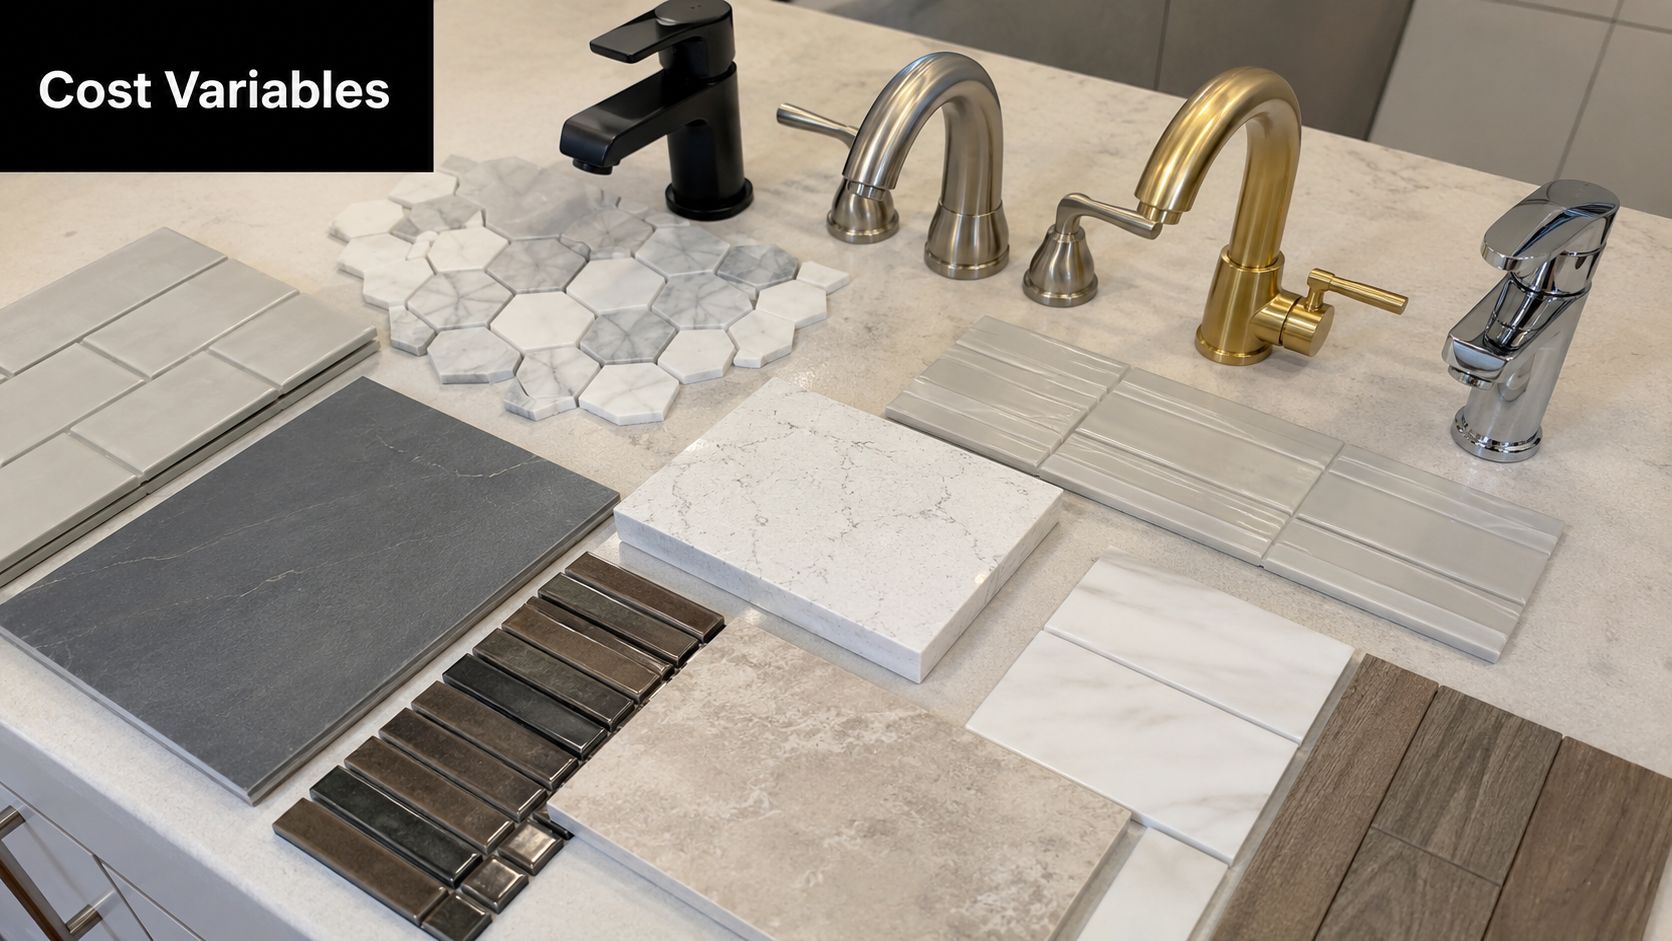
Material selection changes labour as well as supply cost
Premium materials don't just cost more to buy. They can also cost more to install. Large-format tiles, mitred edges, natural stone, and tighter visual detailing slow the job down and demand more care.
That's especially true in bathrooms where wall straightness, floor falls, and trim detail are obvious at close range. The room may be small, but there's nowhere to hide poor workmanship.
For wet areas, the practical side matters just as much as the look. That's why proper waterproofing in Melbourne should be treated as an essential part of the scope, not an afterthought.
Existing conditions can change everything
The unknowns are usually behind the tiles. Once demolition starts, builders sometimes find water damage, unstable substrates, out-of-square framing, or signs that previous work wasn't done well. Those aren't luxury upgrades. They're issues that need to be corrected before the new bathroom goes in.
A renovation usually blows out when the quote was based on hope instead of inspection.
Homeowners who coordinate trades themselves often come unstuck. One contractor strips the room, another discovers a problem, and then everyone starts debating who owns the extra work and how the schedule shifts.
The type of finish affects the amount of site time
A clean, straightforward bathroom with standard porcelain, a simple niche, and an off-the-shelf vanity is faster to deliver than a room with feature walls, custom cuts, stone, recessed storage, and a frameless screen that needs exact tolerances.
That difference matters because bathrooms are labour-heavy jobs. More detail means more hours on site, more checking, and tighter sequencing.
A short visual walk-through helps explain where those details add time and cost:
What homeowners can control
You can't eliminate every surprise, but you can reduce the expensive ones. The best cost control usually comes from a few disciplined decisions:
- Lock the layout early unless there's a strong reason to change it
- Choose materials before quoting so labour assumptions are realistic
- Inspect the site properly instead of pricing from photos alone
- Use one responsible party to manage sequencing, quality, and trade accountability
That's how budgets stay closer to plan. Not through unrealistically low allowances, but through clearer decisions before work begins.
Sample Budgets and A Typical Project Timeline
A budget feels more real when you attach it to an actual type of project. Melbourne bathrooms vary a lot, but most jobs fall into one of three common patterns.
Three sample budget scenarios
A smaller ensuite refresh in Highett might land around the lower end of the market if the layout stays the same and the selections are straightforward. That kind of job usually focuses on lifting presentation, replacing tired fixtures, and keeping disruption under control.
A family bathroom in Hawthorn often sits in the mid-range. That's the category where many homeowners want a proper rebuild, better waterproofing, improved storage, and a cleaner tile finish throughout.
A master bathroom in Toorak can move into premium territory quickly when the brief includes large-format tile, custom detailing, frameless glazing, and more design-led finishing. The room may still be a bathroom, but the labour profile is different.
The suburb doesn't set the price. The scope does. But in practice, premium expectations often mean more site time and tighter tolerances.
Why labour makes such a difference in Melbourne
For Victoria, the average spend on a bathroom renovation is approximately $19,000, but Melbourne's demand for higher-end finishes lifts median project costs to $22,000 to $29,000, with labour accounting for 40% to 65% of the total, according to OpenAgent's renovation cost guide. The same source notes plumbers commonly charge $100 to $150 per hour and electricians $80 to $100 per hour.
That's why two bathrooms of similar size can price very differently. If one needs more electrical work, more plumbing alteration, or more detailed tile installation, the labour share climbs fast.
A practical timeline homeowners can expect
The pricing discussion is only half the story. Time on site affects access, family routine, and how quickly trades need to be sequenced.
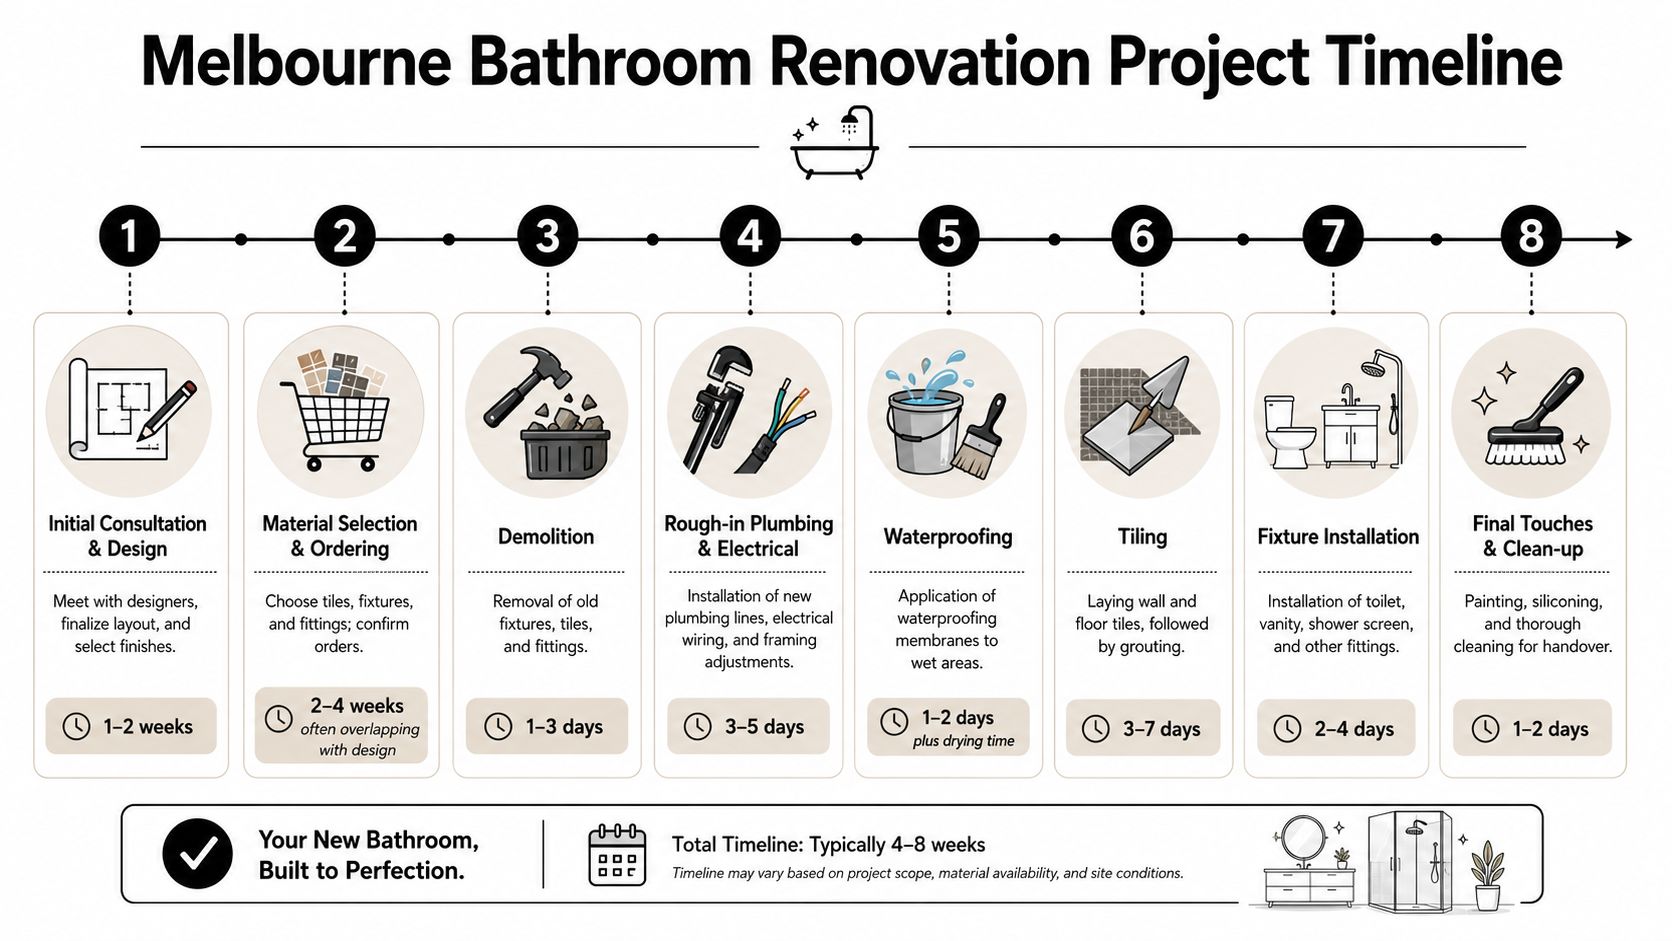
The broad pattern is consistent even when exact timing varies:
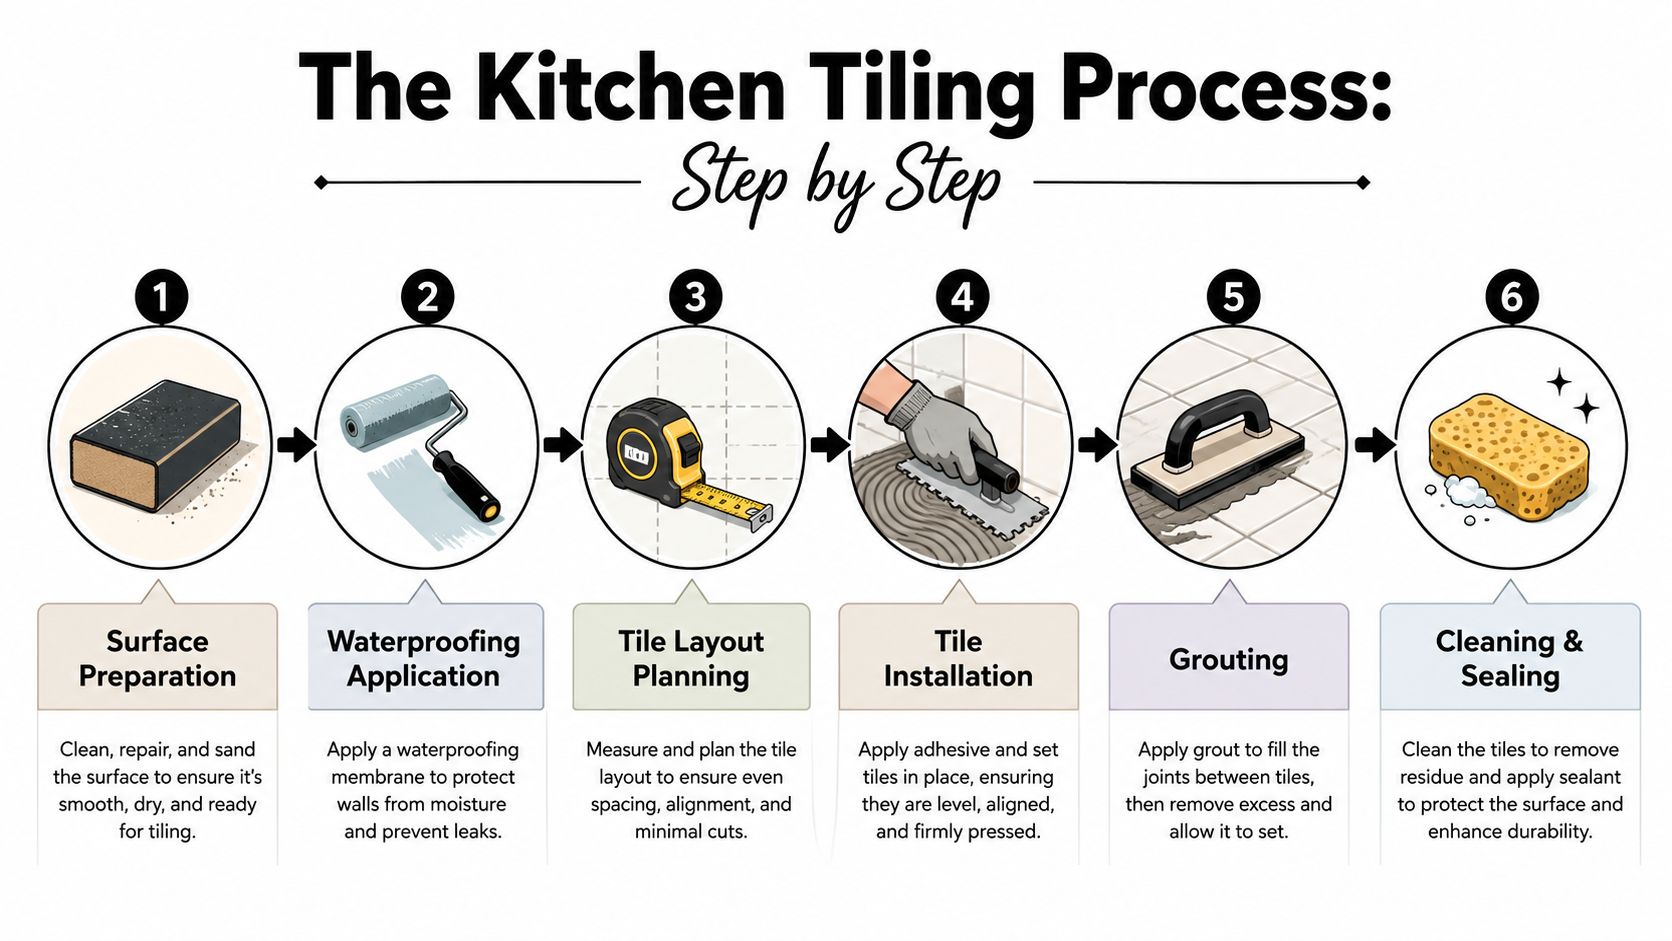
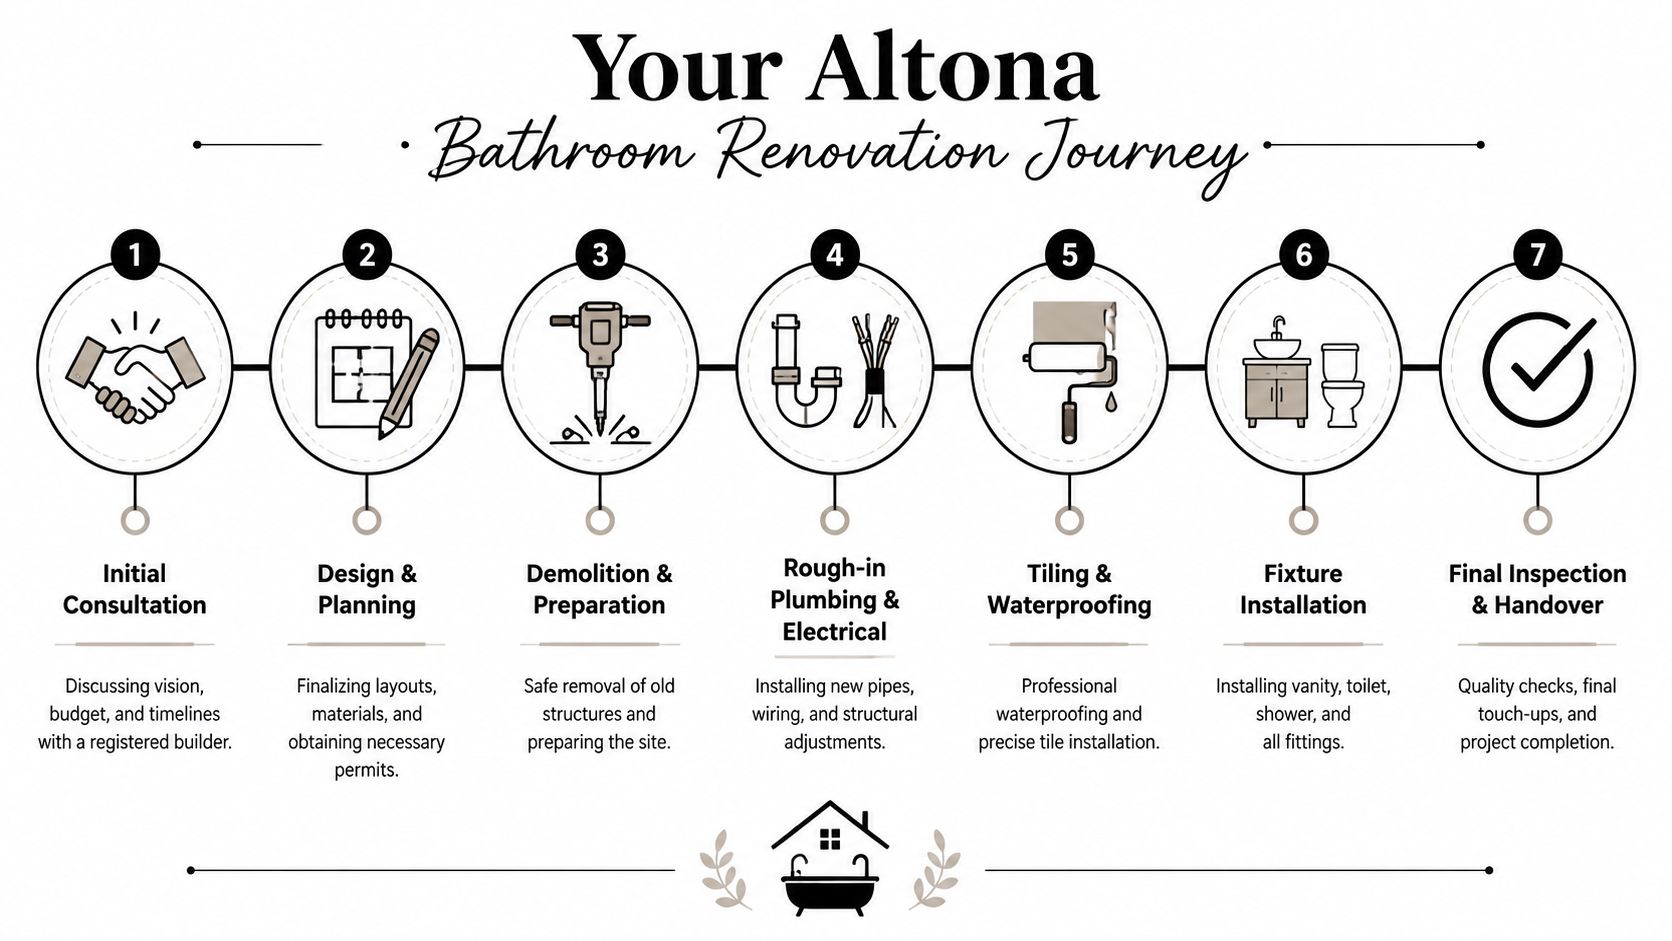
Initial consultation and design
Layout decisions, finish selections, and scope clarification.Material selection and ordering
Tiles, tapware, vanity, screen, and fittings need to be locked in.Demolition
Existing fixtures, tiles, and finishes are removed.Rough-in plumbing and electrical
Services are adjusted before walls and floors are closed up.Waterproofing
Wet areas are prepared and treated before tiling.Tiling
Walls and floors are laid, detailed, and grouted.Fixture installation
Vanity, toilet, taps, screen, and fittings are installed.Final touches and clean-up
Silicone, painting touch-ups, testing, and handover.
What delays a bathroom renovation
Delays usually come from late selections, missing materials, hidden damage, or poor trade coordination. This is another reason a builder-led process often runs smoother. Someone is tracking dependencies before the job stalls.
If you're trying to compare timelines between quotes, ask one question: who is coordinating every trade from demolition to handover? The answer matters as much as the quoted duration.
How to Get an Accurate Quote from Registered Builders
A homeowner gets three bathroom quotes. One looks cheap, one looks high, and one sits in the middle. Then the true comparison starts. Does the low quote include waterproofing, waste removal, fixture installation, compliance paperwork, and trade coordination, or are those costs about to land on you later?
That is why an accurate quote depends on more than price. It depends on scope, responsibility, and whether one Registered Builder is pricing the whole job from demolition to handover.
What to decide before requesting quotes
You do not need every finish selected before asking for pricing. You do need enough detail for the builder to price the same job each time.
The key decisions are practical:
Keep or change the layout
Keeping plumbing and drainage in place usually keeps the price tighter. Moving a shower, toilet, or vanity adds plumbing work, patching, and often extra electrical work.Set the finish standard
Basic tiles and standard fittings produce a very different quote from large-format tiles, custom joinery, recessed niches, underfloor heating, or frameless glass.Be clear about retained items
If the mirror cabinet, window, or door stays, say so upfront. If you are unsure, the quote may carry allowances or exclusions that make comparison harder.Disclose known problems
Water damage, mould, rotten subfloors, out-of-plumb walls, and previous patch repairs affect labour and risk. Hiding them does not save money. It only shifts the cost to a variation later.
A simple written brief and a few site photos can improve quote quality fast.
What a good builder quote should make clear
A proper builder quote should read like a build plan, not a one-line price.
Look for detail in the following areas:
| Quote item | What you want to see |
|---|---|
| Scope | Clear inclusions and exclusions |
| Trade coverage | Demolition, plumbing, electrical, waterproofing, tiling, carpentry, installation |
| Site assumptions | Access, parking, apartment rules, waste removal, protection of adjacent areas |
| Layout assumptions | Whether services remain in place or move |
| Material assumptions | Tile range, tapware level, vanity type, shower screen type |
| Compliance items | Waterproofing, testing, certificates, and any permit-related work if required |
The best quotes also explain who is supplying what. That matters. If you plan to supply your own tiles, tapware, vanity, or toilet suite, the builder should state whether delivery timing, breakage, missing parts, and warranty responsibility sit with you or with them.
That is one of the biggest differences between an all-in price from a Registered Builder and a pile of separate trade quotes. With separate trades, gaps open up fast. The plumber blames the tiler, the tiler waits on the waterproofer, the screen installer says the walls are out, and you end up coordinating the dispute while the bathroom sits unfinished.
Why Registered Builders are easier to compare
A Registered Builder is usually pricing the whole sequence of work, not just their own part of it. That gives you a clearer picture of the actual all-in cost.
It also makes risk easier to see.
If one quote covers demolition, waterproofing, tiling, plumbing fit-off, electrical fit-off, carpentry, screen install, rubbish removal, supervision, and defect rectification, you are comparing a finished bathroom. If another quote only covers tiles and labour, you are comparing a partial job with missing costs still to come.
Documentation matters too. Ask how the builder handles waterproofing records and handover documents, including any waterproofing compliance certificates in Victoria. A quote that ignores compliance is not cheaper. It is incomplete.
One practical way to compare quotes properly
Put the quotes side by side and mark up three things.
First, check what is excluded.
Second, check who is coordinating every trade.
Third, check who carries responsibility if something goes wrong.
That last point gets overlooked. Homeowners who hire individual trades themselves can save money on paper, but they also take on scheduling, supplier follow-up, site access, defect disputes, and missed handovers between trades. In practice, that often costs more than expected.
A reliable quote gives you a realistic total, a defined scope, and one party responsible for the result. That is the quote worth taking seriously.
Plan Your Melbourne Bathroom Renovation with Confidence
A lot of budget blowouts start the same way. A homeowner lines up separate quotes for plumbing, tiling, waterproofing, electrical, and shower screen installation, then finds out each trade is pricing only its own piece. The total looks cheaper at first. The true cost shows up later in return visits, delays between trades, missing scope, and arguments over who is responsible when one stage affects the next.
A bathroom renovation is easier to budget properly when one Registered Builder prices and manages the full job. That gives you an all-in figure tied to a defined scope, a build sequence that works, and one point of responsibility from demolition through to handover. It also cuts down the hidden costs that come with coordinating trades yourself.
Start with the room you have, not a square metre estimate pulled out of context. Site access, wall condition, floor levels, fixture locations, and product choices can shift the final price quickly.
A simple way to assess your next step
Test the likely budget range
Use a calculator or early estimate to work out whether your project sits closer to a cosmetic update, a standard renovation, or a full rebuild with layout changes.Get the room inspected on site
A site quote picks up the items that often get missed early, including difficult access, damaged framing or flooring, older plumbing, and electrical work that needs upgrading.Ask for one fully scoped price
The quote should cover demolition, waste removal, waterproofing, tiling, plumbing, electrical, carpentry, fittings, supervision, and defect rectification. If those items are split across multiple quotes, the total cost is still incomplete.
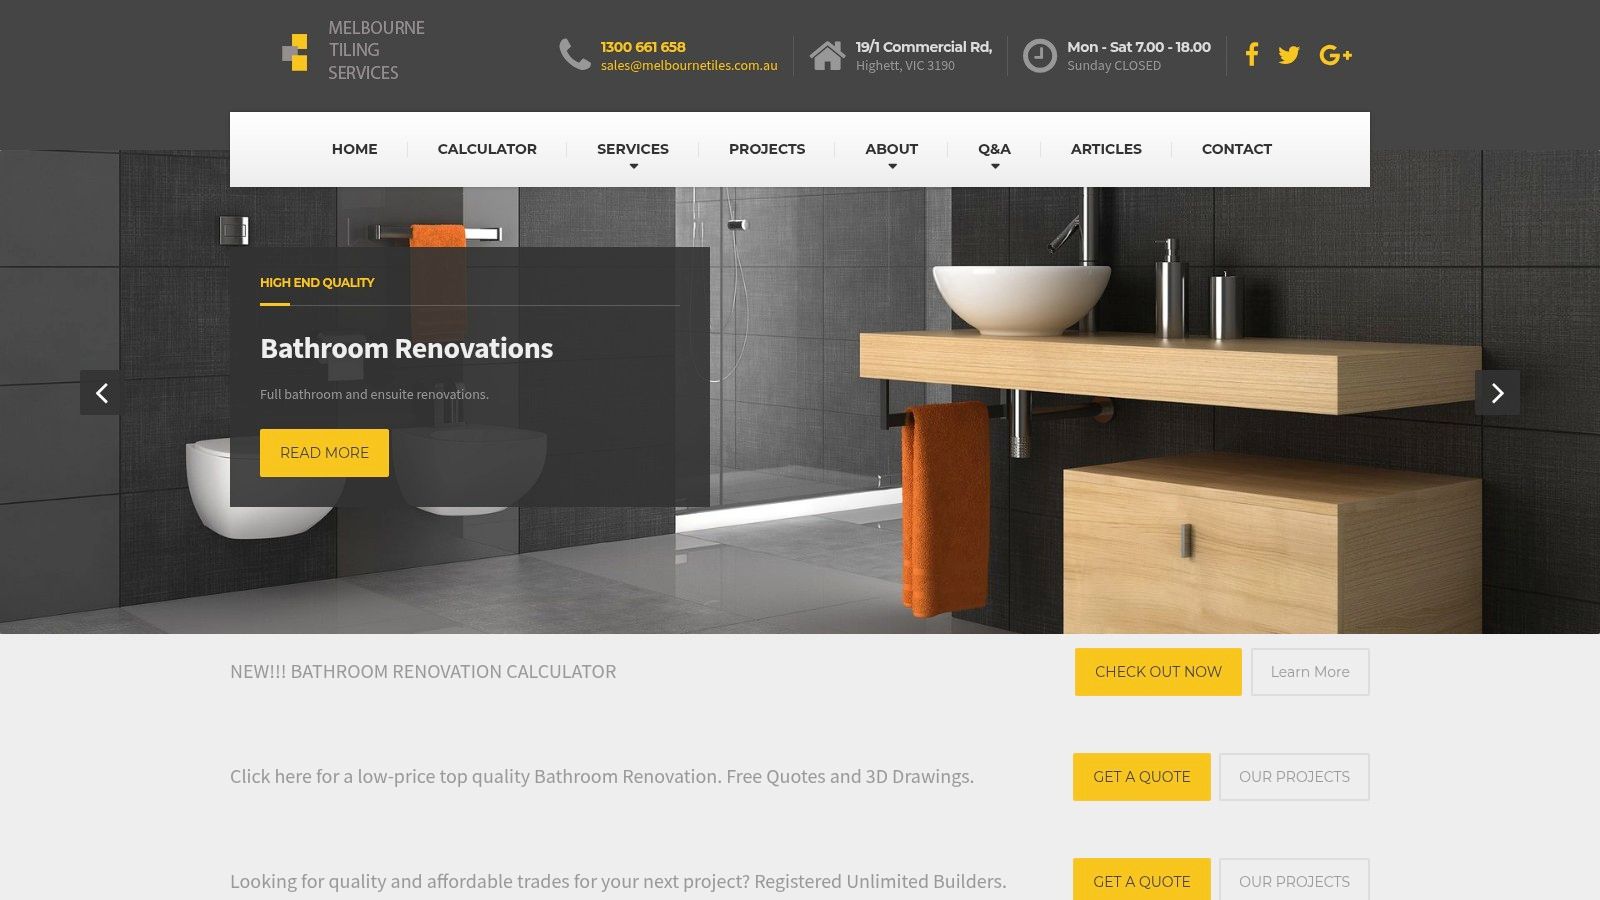
For homeowners weighing up builder-led renovations against self-managed trade packages, Melbourne Tiling Services P/L is one local example offering bathroom renovations through Registered Builders, along with free quotes, 3D drawings, and a renovation calculator. That approach gives homeowners a clearer price for the finished bathroom, not a collection of partial trade costs that still need to be coordinated.
The safest budget is the one that reflects the whole build. That is usually what saves money in the end.


Recent Comments