

The dark line at the shower base is back, even though you've cleaned the grout and replaced the silicone. Now there's a musty smell in the adjoining room, or a stain on the ceiling below. You're trying to work out whether this needs a small repair or tiles pulled off the walls.
Bathroom waterproofing repair starts with finding the water's path, not choosing a sealant. The membrane, junctions, falls, waste and screen work together. Repairing the wrong part can leave you paying for fresh finishes while timber and plaster keep getting wet.
Table of Contents
- Repair Options, Costs and Timelines at a Glance
- Reading the Signs and Tracing a Leak to Its Source
- How Each Repair Option Is Carried Out
- Victorian Rules That Shape Wet-Area Repairs
- Choosing a Pro and Booking a Diagnosis
- Preventive Maintenance That Stops Leaks Returning
Repair Options, Costs and Timelines at a Glance
Most repairs fall into four paths. The cost follows the extent of concealed failure and the work needed to reach it, not how shabby the tiles look.
Bathroom waterproofing repair options, costs and timelines
| Repair option | Typical scope | Indicative cost (AUD) | Typical timeline |
|---|---|---|---|
| Localised patch | Cut back to sound membrane at one junction, penetration or crack and lap new membrane | Quote after confirming access, compatibility and a sound membrane lap | 1 to 3 days |
| Shower floor or wall membrane replacement | Strip tiles to the failure zone, reinstate membrane and reinforcement, retile | Quote for demolition, substrate repairs, membrane, testing and matching tiles | 1 to 3 weeks including curing and flood test |
| Full wet-room waterproofing rebuild | Remove wet-area tiles and affected substrate, rebuild falls, membrane across the required floor and wall areas, retile | $8,000 to $20,000 and up | 3 to 6 weeks |
| Balcony remediation | Remove finishes, repair falls and drains, membrane and upstands, reinstate tiles or pavers | $5,000 to $30,000 and up, depending on area | 2 to 6 weeks |
Treat the dollar bands as indicative Melbourne budgeting ranges, not fixed offers. Access, tile type, plumbing relocation and concealed damage change the quote; the programmes include curing, but material lead times can extend the calendar.
A patch suits a leak traced to a particular junction where the surrounding membrane is sound and compatible with the repair system. Replacement becomes more appropriate when moisture mapping and exposed substrate show failure across the wet zone.
What no-tile-removal repairs actually buy
Regrouting, silicone replacement and surface coatings can reduce water entering a defective area. They can't verify a concealed membrane, failed hob, defective waste connection or water-damaged substrate.
The NCC wet-area waterproofing provisions permit membrane placement above or below the tile bed or screed, but protection extends to junctions, joints and penetrations, not just the visible surface.
Price the risk: A surface treatment isn't cheaper if you later pay to remove it, demolish the shower and repair the room below.
Ask what the proposed treatment fixes, what remains unverified and what happens if leakage returns. Compare the surface-treatment price with the cost of proper exposure and reinstatement, including the potential damage left hidden.
Trace the source before choosing a table row. Then ask contractors to price that exact scope, rather than a generic bathroom refresh.
Reading the Signs and Tracing a Leak to Its Source
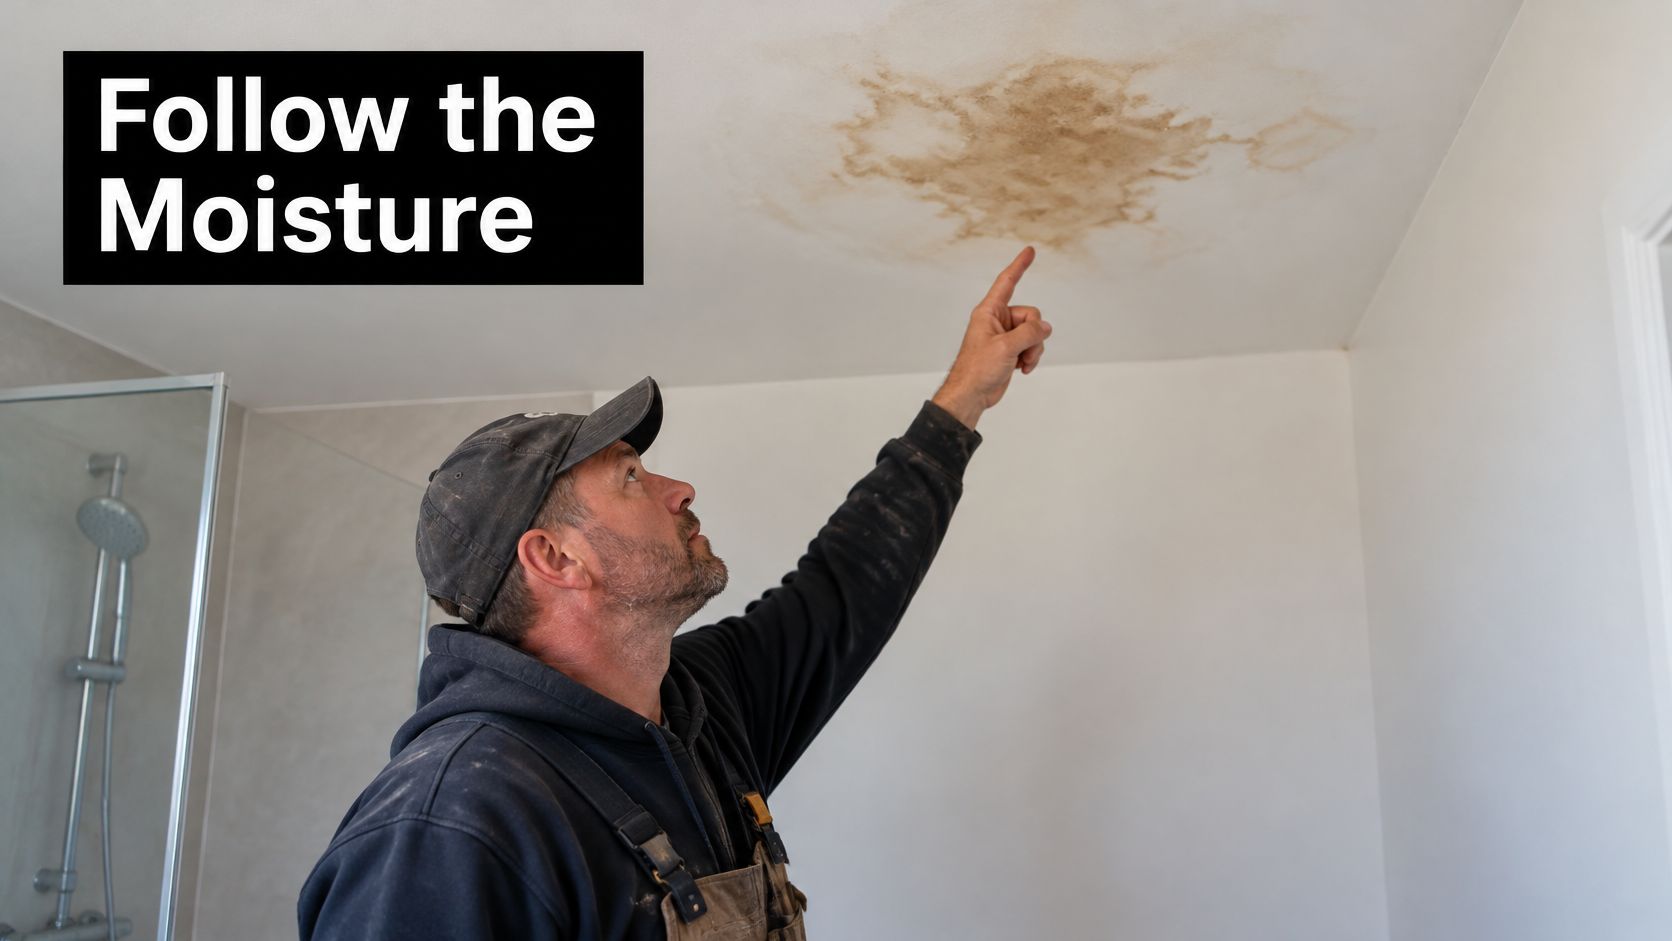
Say a ceiling stain appears beneath the bathroom after a dry month. The shower grout looks cracked, so you assume that's where the repair belongs. But a leaking waste, supply pipe or junction can leave the same stain.
The visible mark shows where water emerged, not necessarily where it entered. A tradesperson needs to follow the moisture path through the floor, wall or service penetration.
A ceiling stain is a useful starting point for investigation, not a diagnosis.
Read the symptoms together
Stains below the bathroom may be the first obvious warning. A damp adjoining wall or persistent musty smell suggests concealed wetting, while hollow or lifting tiles warrant checking adhesion and substrate movement.
Dark grout at a wall-floor join deserves attention, but colour alone doesn't prove membrane failure. Pooling outside the shower points towards containment or drainage problems; soft or swollen subfloor timber calls for prompt professional assessment.
Bathroom leak symptoms, likely causes and first checks
| Symptom | Likely cause | Check first | Fix direction |
|---|---|---|---|
| Stain on ceiling below the bathroom | Shower floor, penetration or waste leakage into the room below | Moisture readings at floor edges and ceiling | Trace the source and repair the failed zone |
| Damp wall behind tiles or musty smell | Wall membrane defect or wall-floor junction gap | Junction moisture readings and tile tap test | Expose the affected zone and reinstate waterproofing |
| Hollow or lifting tiles | Poor adhesion, water beneath the tile bed or substrate movement | Tap test and crack pattern | Remove affected tiles and assess the substrate |
| Water pooling outside the shower | Screen seal, threshold detail or inadequate fall | Controlled running-water test | Correct containment or drainage |
| Cracked or darkened grout at wall-floor join | Failed sealant, movement or concealed junction leakage | Inspect the joint and measure adjacent moisture | Expose a leaking junction rather than simply resealing |
| Soft or swollen subfloor timber | Prolonged leakage reaching timber | Professional timber assessment and adjoining-room inspection | Stop leakage and arrange structural repairs |
Separate the tests
A moisture meter maps relative wetness. It doesn't identify the source by itself, and metal, salts and different substrates can affect readings.
A controlled shower-running test checks splash, screen seals and drainage. A separate ponding test holds water over an isolated area to investigate waterproofing integrity, but it should only proceed when the installer considers the structure and risk of further damage.
The NCC Housing Provisions wet-area requirements address floors, junctions and penetrations together. That's why a membrane-only diagnosis can miss a threshold or drainage defect.
For leak detection in Melbourne, request staged testing rather than indiscriminate flooding. Record where water first appears, whether it follows shower use and whether dampness persists while the bathroom is unused.
How Each Repair Option Is Carried Out
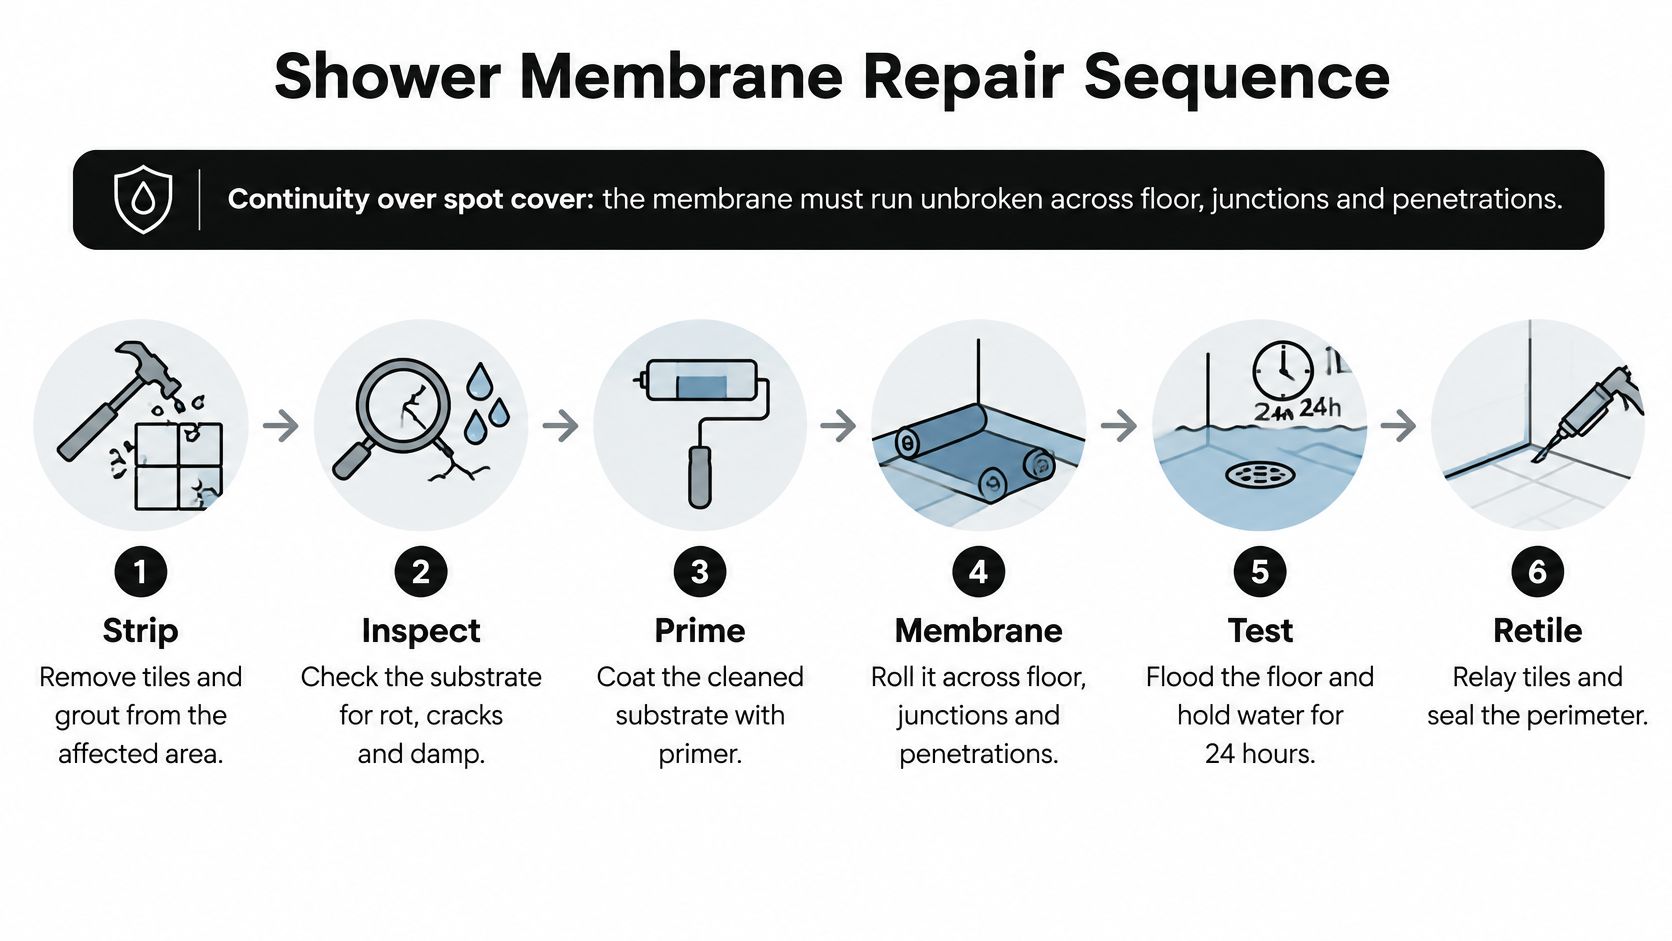
The membrane needs continuity across the protected floor, junctions and penetrations. A durable repair restores that continuity rather than covering a visible spot.
The sequence below shows the main stages, but the installer must adapt it to the substrate and membrane system.
Replacing a shower membrane
Record the existing construction. Photograph and measure the wet zone, waste, threshold and accessible substrate before covering anything. Mark the moisture pattern so the demolition scope follows evidence.
Strip back beyond the visible damage. Remove tiles, adhesive and compromised material until the installer reaches a suitable repair boundary. Protect plumbing and check for hazardous materials before disturbing suspect older linings.
Correct the substrate and falls. Replace unsound material, secure loose sheeting and investigate movement before applying membrane. Check drainage with a straightedge and level, including around the waste and threshold.
Prepare junctions and penetrations. Clean and prime the substrate using compatible products, then install the specified bond breakers, reinforcement or proprietary collars. The waste connection needs a deliberate membrane termination, not a bead of silicone around the grate.
Apply and cure the membrane. Follow the system's coat requirements and check wet-film thickness with a suitable gauge. Coats that look generous can still leave thin spots at corners, and extra material doesn't compensate for a poorly prepared base.
Test before tiling. Where appropriate, undertake a controlled flood or ponding test after full cure and record the water level and result. Set the test duration from the product requirements and project specification, not a generic promise of overnight testing.
Retile and finish the joints. Use an adhesive compatible with the membrane and maintain movement joints through the finish. Allow adhesive, grout and sealant to cure before returning the shower to service.
Where a patch differs
A localised patch needs an exposed, sound membrane boundary that the new product can bond to. The installer must identify compatibility and the required lap rather than apply an unfamiliar coating over an old surface.
Removing tiles without tearing the existing membrane can be difficult. If the membrane peels away, is brittle or can't be identified, a patch may no longer be a defensible repair.
Preserving tiles is useful only when it doesn't prevent a reliable waterproof connection.
A full wet-room rebuild gives access to broader defects, including damaged substrate and poorly arranged thresholds. It costs more and disrupts the household, but it avoids forcing a small patch onto a system that can't support one.
Why balconies need a different approach
Balcony remediation also involves weather exposure, door thresholds, upstands, outlets and overflow arrangements. The installer needs to check where water goes if the primary drain blocks, not merely whether the new membrane holds water.
Falls may need rebuilding before waterproofing starts. Reusing the existing tile level without checking door clearance and membrane terminations can recreate the original defect.
Victorian Rules That Shape Wet-Area Repairs
Bathroom repairs aren't automatically ordinary tiling work. Once you alter concealed waterproofing, drainage or damaged building fabric, the scope needs assessment against the applicable Victorian requirements.
The ABCB waterproofing guidance explains that NCC Volume Two included wet-area construction details in 1996, relied on AS 3740 for those details from 2012 to 2019, and reinstated them through NCC 2022, with AS 3740:2021 available as an alternative compliance pathway.
Choose a complete compliance pathway
The relevant provisions sit within the housing code and its wet-area provisions, but the correct application turns on the project date, building class and proposed work. An apartment bathroom and a detached-house bathroom shouldn't be assessed as though their approval circumstances are identical.
The designer or builder should identify the chosen compliance pathway before specifying the repair. They shouldn't select convenient fragments from different pathways while leaving incompatible detailing unresolved.
Straight tiling is only part of the job; concealed construction needs equal scrutiny.

Check responsibility and keep evidence
For bathroom renovations, ask which activities require a registered builder, licensed plumber or other appropriately authorised practitioner. Registration categories and contract obligations need checking against the actual work, rather than assuming every waterproofing or tiling task has identical requirements.
Verify registered builders through the Victorian building regulator's current register and obtain a written scope and contract appropriate to the project. Confirm the applicable code edition and Victorian adoption arrangements before work starts.
Use a bathroom waterproofing standards checklist to organise the handover evidence:
- Before-covering photos showing junctions, waste connections, thresholds and penetrations.
- Substrate records identifying repairs, preparation and condition before coating.
- Product details covering primer, membrane, reinforcement and compatible finishing materials.
- Installer information naming who completed and supervised the work.
- Testing records documenting any ponding test, observations and remedial work.
- Compliance documentation identifying the pathway and project-specific requirements.
These records don't replace sound workmanship. They make it possible to check what was installed after the tiles hide it.
Choosing a Pro and Booking a Diagnosis
DIY is reasonable for visible maintenance where the surrounding material is dry and sound. Concealed leaks, membrane repairs, junction detailing, falls and balconies need an appropriately qualified professional, with licensed trades engaged for regulated work.
A hidden leak needs diagnosis before demolition. Otherwise, you can pay to expose the wrong wall while the actual plumbing or drainage defect remains untouched.
Draw the DIY boundary
DIY or professional for common waterproofing tasks
| Task | DIY reasonable | Hire a licensed pro when |
|---|---|---|
| Cleaning and resealing visible silicone at bath edge | Yes, where surfaces are sound and dry | Sealant lifts repeatedly or moisture shows beneath it |
| Regrouting cracked grout in a dry area | Yes, after checking why it cracked | Cracking occurs at a wall-floor join or moisture is present |
| Replacing a single undamaged tile | Yes, only where removal won't disturb waterproofing | The tile sits over a wet or hollow substrate |
| Membrane repair at shower floor, wall junction or penetration | No | The membrane is concealed or continuity needs reinstatement |
| Hidden leak or moisture investigation | No | Stains, damp walls or unexplained moisture readings appear |
| Balcony membrane, falls or drainage | No | Work involves waterproofing, drainage or the structure below |
A regrout over a wet junction can disguise the warning signs without stopping the leak. Removing it later adds work, and continued shower use can extend damage into adjoining finishes.
Don't probe a suspected membrane with a screwdriver or lift tiles just to have a look. Destructive inspection should have a planned location, a reason and an agreed reinstatement scope.
Before accepting a quote: Ask the contractor to name the suspected failure, explain how they'll confirm it and identify what would change the price.
Book the work in the right order
Stop using the affected shower or balcony. Photograph the visible damage and record when it appears. If water is near electrical fittings or the structure feels unstable, arrange urgent assessment and keep people clear.
Request a written diagnosis. Ask for mapped moisture readings, plumbing checks where indicated and controlled testing where safe. Agree on any exploratory openings before the contractor removes finishes.
Compare the same scope. Each quote should identify demolition boundaries, substrate allowances, membrane work, testing, tile reinstatement and waste removal. A surface reseal and a membrane replacement aren't competing prices for the same repair.
Verify who is responsible. Check the builder's registration, the relevant trade licences and insurance. Get the price, exclusions, variation process and contract terms in writing before authorising work.
Arrange inspection hold points. Request evidence before the membrane is covered and confirm how test results and completion records will be handed over. Don't leave documentation until everyone has packed up.
Diagnosis can sometimes reduce a proposed full rebuild to a targeted repair. It can also show that a small advertised repair won't reach sound material, which is equally useful before you commit.
Choose coordination, not just a coating
Registered builders can coordinate waterproofers, plumbers, tilers and other trades so responsibility doesn't fall between separate contractors. For larger bathroom renovations, that coordination also helps manage substrate repairs, screen installation and the order of work.
One option is Melbourne Tiling Services P/L, a Highett-based registered unlimited builder offering shower and balcony leak rectification and free quotes. When comparing licensed waterproofing contractors, ask who will investigate the leak, who will complete each regulated task and who will stand behind the finished scope.
I'd book a diagnosis before committing to either a no-tile-removal treatment or demolition. The cheapest quote is useful only when it addresses the actual failure.
Preventive Maintenance That Stops Leaks Returning
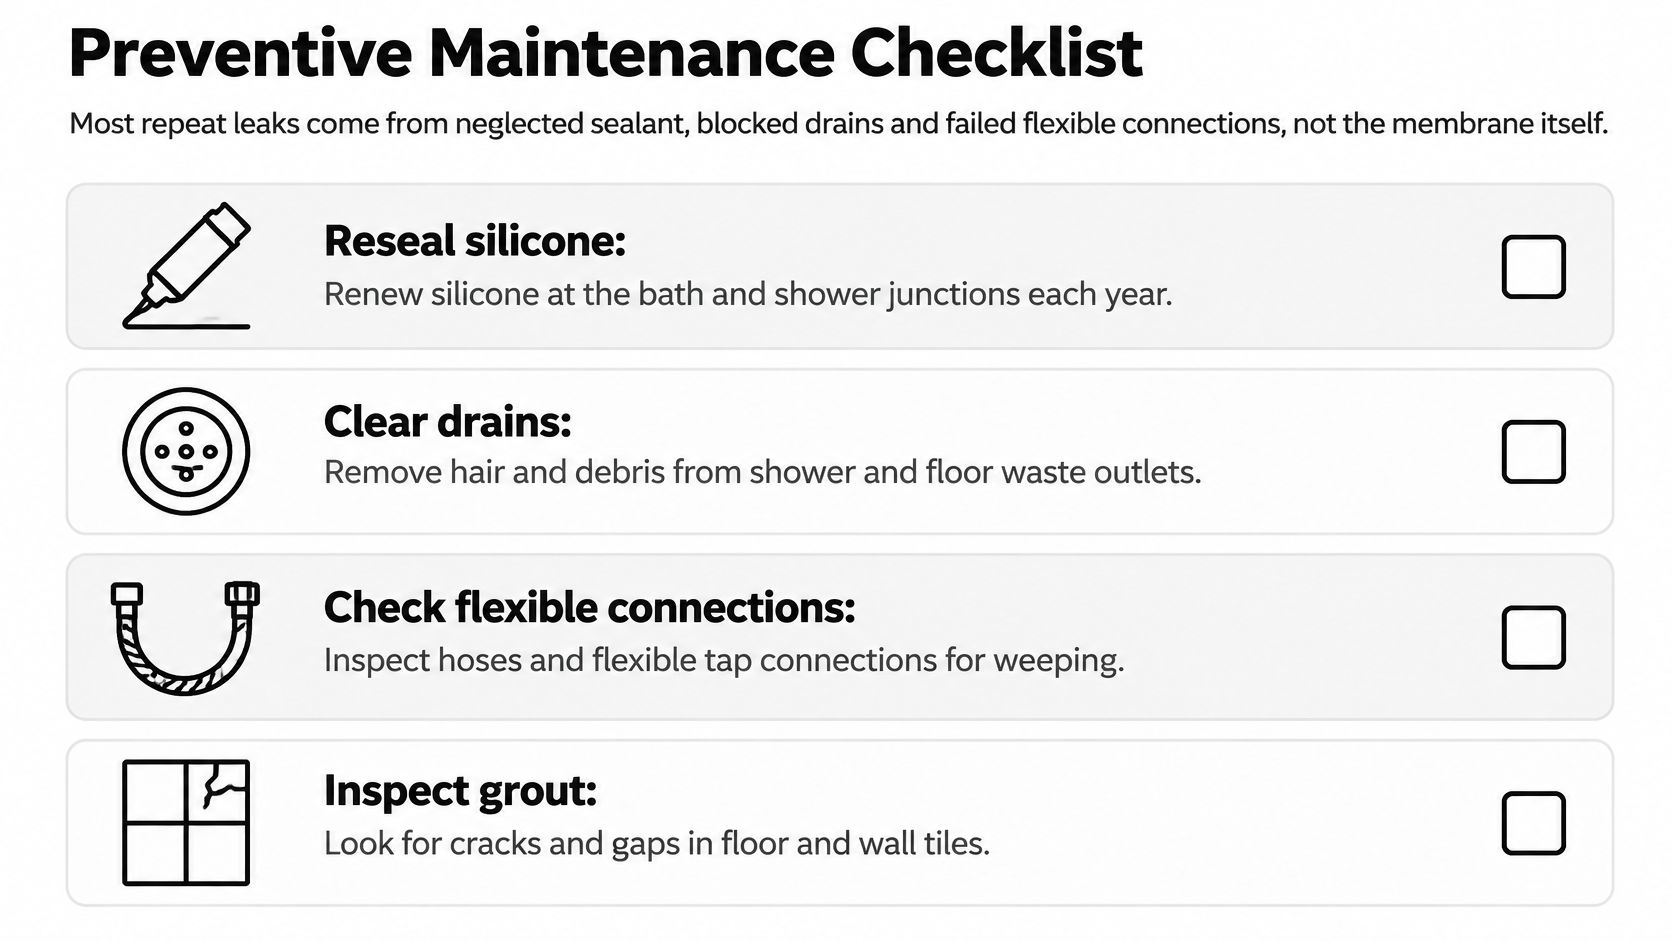
After a repair, pay attention to sealant, drains and flexible connections as well as the tiled finish. These are accessible places where you can spot deterioration before water reaches concealed materials.
Use the checklist as a reminder, but don't replace sound silicone merely because a calendar date has arrived.
Make checks part of normal cleaning
- After showers ventilate the room and notice water that remains outside the enclosure.
- During cleaning remove hair from accessible waste baskets and inspect grout and silicone for separation.
- At balcony outlets clear leaves and debris, especially after windy weather, without damaging grates or membrane edges.
- Around screens check seals and threshold behaviour after adjustments or replacement.
- Following alterations arrange an inspection if drilling, plumbing or new fittings could have disturbed waterproofing.
A blocked drain can overwhelm otherwise sound containment. Don't remove designed screen drainage paths or seal every opening indiscriminately, because some profiles need those openings to discharge water.
Don't overlook hoses and connections
According to CHOICE's reporting on Suncorp water-damage claims, burst flexi-hoses caused 10% of Suncorp's Australian home-insurance water-damage claims in 2024, with average claims of approximately AUD 30,000.
Inspect accessible connections for weeping, corrosion, frayed braid and sharp bends. Braided hoses can fail too, so ask a plumber about suitable replacement products or hard-piped connections where practical, and follow the manufacturer's replacement guidance.
This video provides another visual reference for bathroom waterproofing.
Keep a maintenance log with dated photos, repairs and product details. If dampness returns, that record helps the next tradesperson distinguish a new defect from an unresolved one and reduces time spent guessing.
Melbourne Tiling Services P/L offers bathroom waterproofing, shower and balcony leak rectification, and coordinated bathroom renovations. Visit Melbourne Tiling Services P/L to request a free quote and discuss an investigation-led repair scope before committing to new finishes.
Recent Comments