
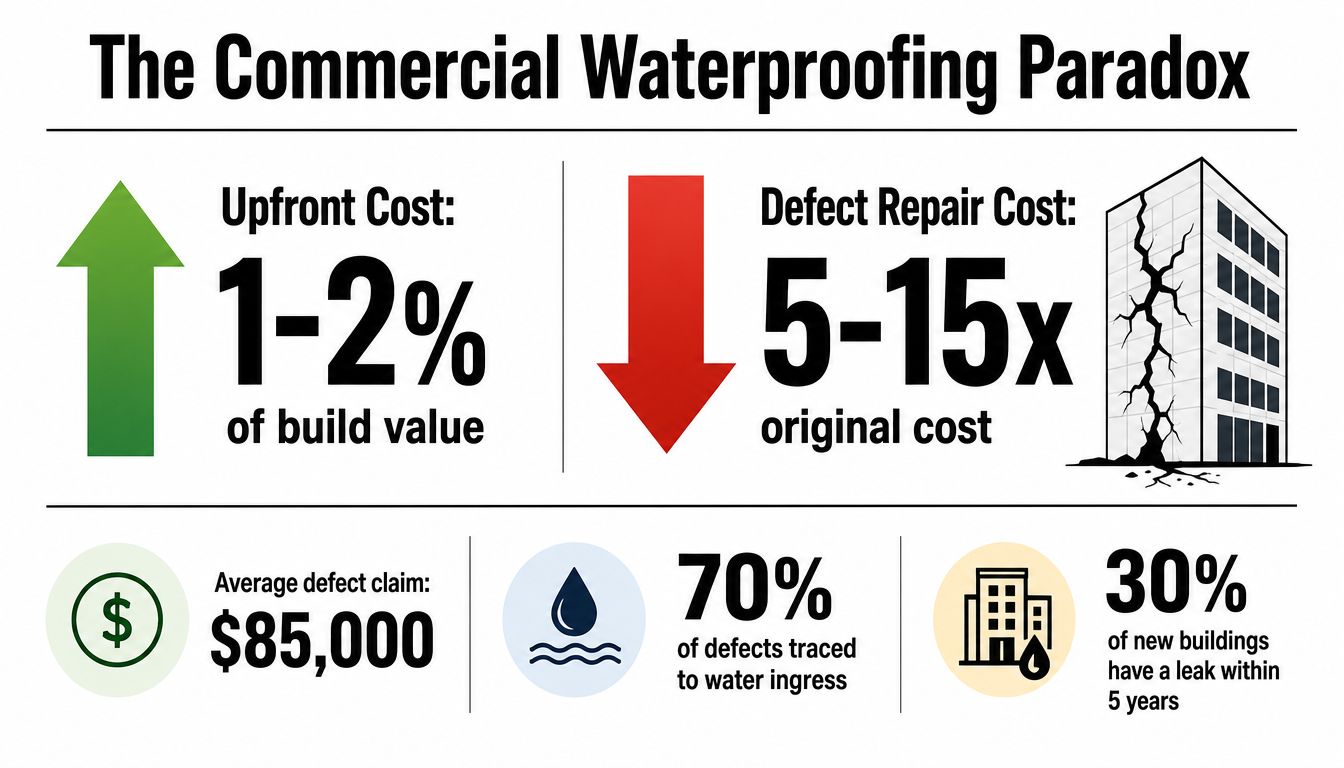
102 buildings in Victoria had defective balconies, and 79 of those buildings had water ingress as the primary cause. A proper fix is therefore a waterproofing system job, not a quick layer of grout over the tiles.
You notice it after a Melbourne downpour. A yellow-brown stain spreads across the lounge ceiling below the upstairs balcony, or a soft patch appears beside the sliding door threshold. The grout looks tired, one tile has cracked, and the first quote suggests resealing the surface.
That quote may be treating the symptom, not the leak.
A balcony works as a connected system. The structural slab, screed falls, drainage outlet, waterproof membrane, wall upstands, door thresholds, balustrade penetrations and tiled finish all have to work together. If one link fails, water takes the easiest path, often into the room below.
The right leaking balcony repairs begin with finding that path. Then the builder chooses the smallest repair that fully restores the system.
Table of Contents
- Why a Leaking Balcony Is Never Just a Tile Problem
- The Four Real Causes of Balcony Leaks in Melbourne Homes
- How a Tradesperson Diagnoses the Leak Before Touching a Tile
- Repair Options That Fix the Source of the Leak
- What a Proper Balcony Repair Looks Like Step by Step
- Why the Builder You Choose Changes Everything
- A Real Melbourne Balcony Repair From Inspection to Sign-Off
- Your Next Steps and Questions to Ask Before Work Starts
Why a Leaking Balcony Is Never Just a Tile Problem
After a Melbourne downpour, a brown ceiling stain appears below the balcony. The grout looks worn, one tile is cracked, and a quick quote recommends resealing the surface. That approach often treats the evidence, not the source.
The tile finish is only the top layer. A balcony depends on the concrete slab, screed falls, waterproof membrane, drainage outlet, movement joints, wall upstands, balustrade penetrations and door threshold working as one system. Water follows the easiest route through a failed junction, poor fall or damaged membrane, then shows up somewhere below.
Victorian defect analysis links balcony failures strongly with water ingress, particularly where waterproofing or workmanship is inadequate (Victorian balcony waterproofing defect analysis). VBA research into apartment balconies also found water ingress was the dominant defect cause, mainly through insufficient waterproofing or poor workmanship. A cracked tile can be part of the problem, but replacing it does not restore the waterproofing system.
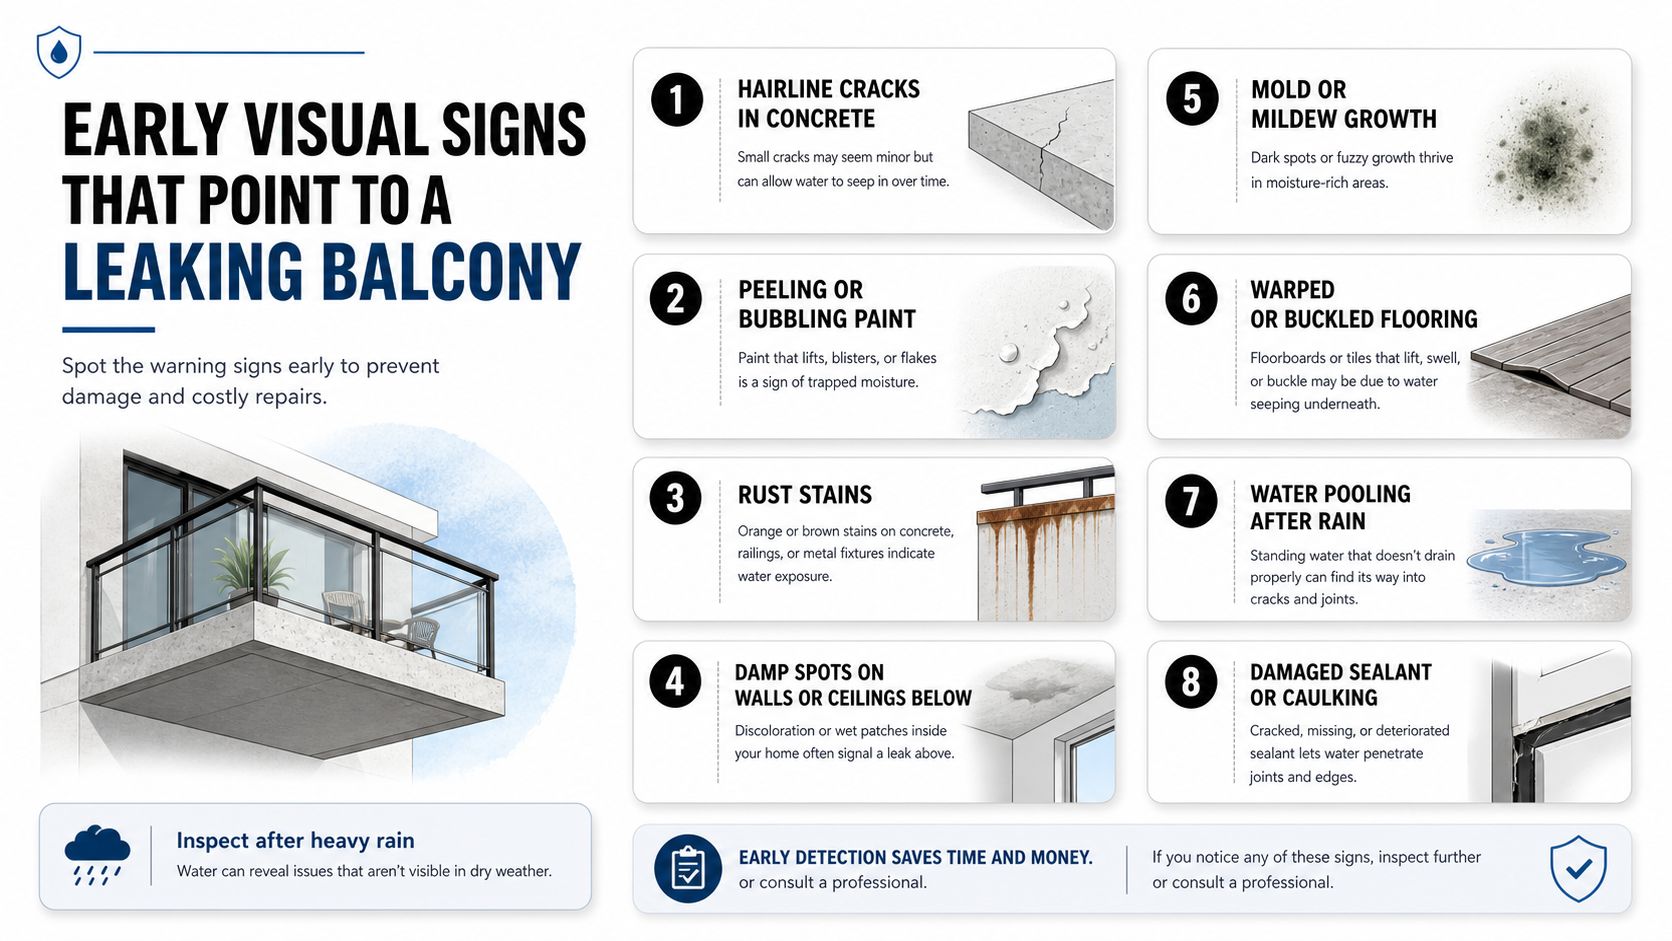
What the surface is telling you
Read the pattern across the balcony and the room below, rather than chasing one mark.
- Bubbling paint or plaster below: Moisture has reached the ceiling lining or wall finish.
- Efflorescence: White salts around grout or masonry show moisture moving through the build-up.
- Mould at the threshold: Water may be crossing the junction between the balcony and internal floor.
- Rust staining: Balustrade fixings or embedded steel may be exposed to ongoing moisture.
- Cracked or drummy tiles: The tile bed may have lost adhesion or be moving over a compromised substrate.
- Ponding: The fall, drain or outlet arrangement is not removing water properly.
The repair must match the evidence. If testing confirms a localised seal failure and the membrane and substrate remain sound, a targeted repair can be appropriate. If the membrane has failed or moisture is reaching structural elements, regrouting is a patch job that delays the proper work.
Victoria also has a regulatory boundary. Before accepting a repair scope, confirm whether the work requires a registered builder under VBA requirements, including the applicable building work value threshold. The contractor should explain who is responsible for the waterproofing, structural assessment, permits and sign-off.
For a broader first response to water entering a property, owners can review Total Plumbing leak solutions, particularly where plumbing may be contributing to the leak.
Practical rule: If the quote names tiles and grout but ignores the membrane, falls, drainage and junctions, it is not a proper balcony waterproofing scope.
The Four Real Causes of Balcony Leaks in Melbourne Homes
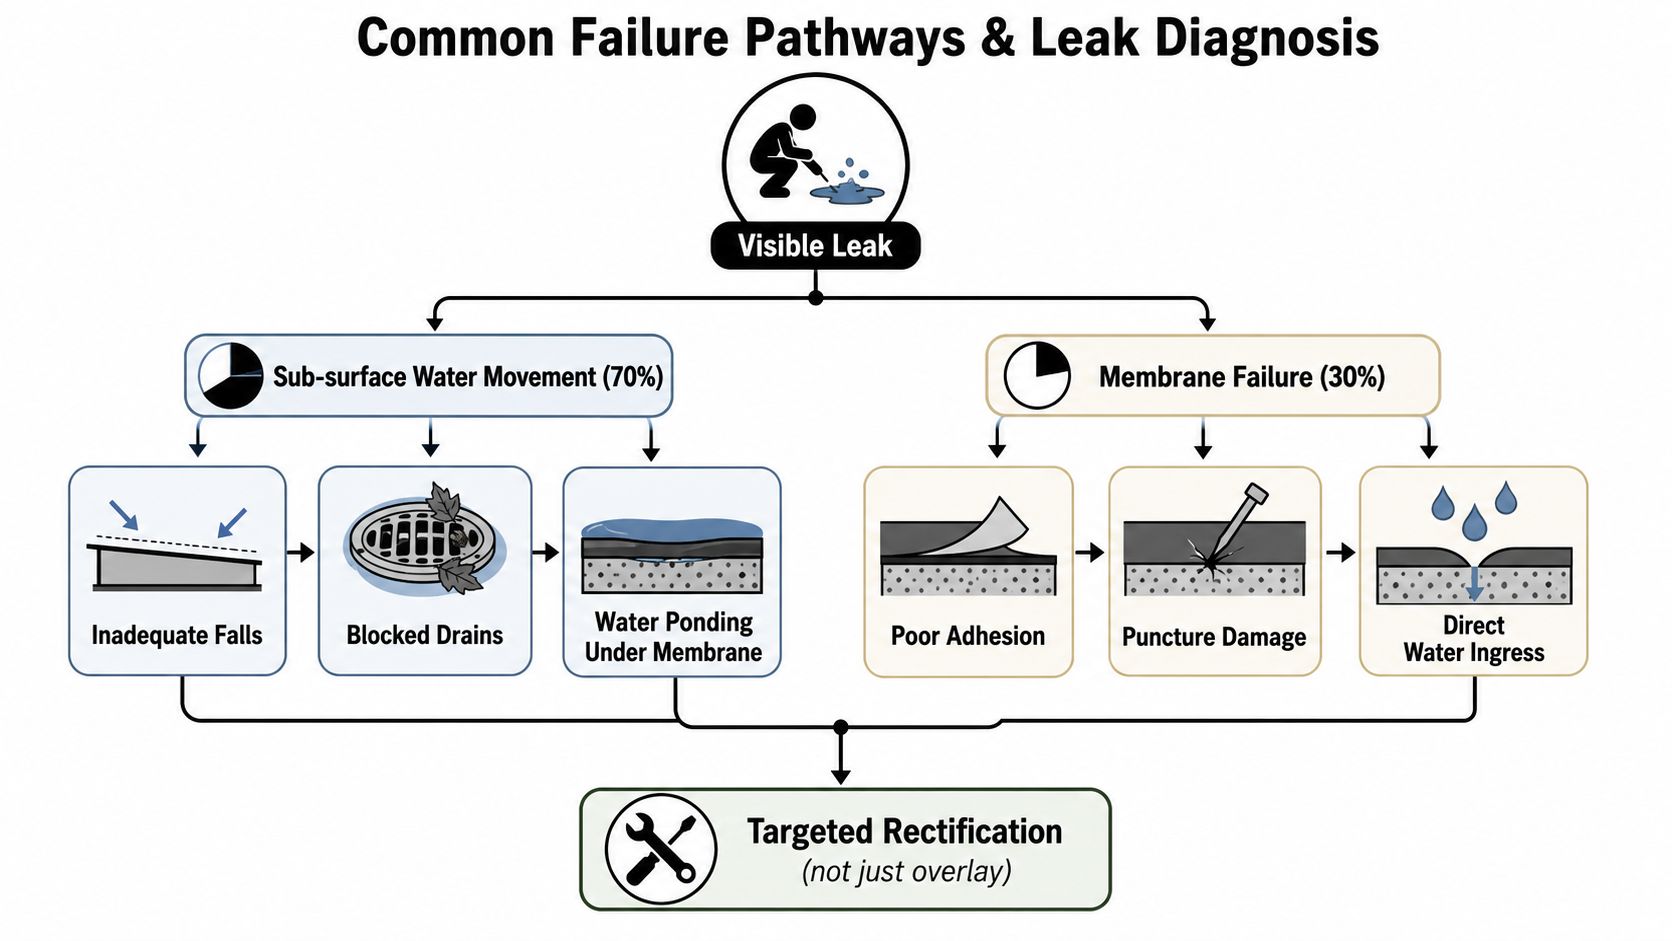
Victorian defect findings point to waterproofing failures, rather than tiles alone, as a dominant cause of balcony leaks (Victorian defect findings). Four failure patterns appear repeatedly across Melbourne homes and apartment buildings.
1. Failed waterproof membrane
The membrane may be cracked, detached, poorly joined or incompatible with movement in the substrate. Weather exposure and building movement can contribute, but poor installation is a common reason for early failure. Once the membrane stops bridging joints or sealing penetrations, clear sealer over the tiles will not restore the system.
A membrane failure often sits below an otherwise tidy tiled surface. That is why a balcony repair must assess the full waterproofing build-up, not just the finish visible from above.
2. Incorrect fall and ponding
A balcony needs a reliable path to its drain. If the screed is flat, dips around the outlet or falls back towards the building, water stays at weak points and places continuing pressure on joints and junctions. Older tiled balconies, resurfaced decks and areas beside planter boxes commonly develop this problem.
Correcting the fall may require removing the surface and rebuilding the screed. Regrouting does not change the direction of water.
3. Defective junction detailing
Wall upstands, door thresholds, parapets, balustrade posts and pipe penetrations are frequent breakdown points. The membrane may remain sound across the open floor while the edge transition leaks because it was poorly formed, inadequately sealed or punctured by a fixing.
These details connect the balcony to the rest of the building envelope. A repair that ignores them can leave water travelling into the slab, wall or internal floor.
4. Blocked or badly arranged drainage
Leaves, dirt and construction debris can block an outlet. Drainage also fails when the outlet sits too high, the puddle flange is missing or no suitable overflow path exists. Water then seeks another route through the slab, wall or threshold.
Clearing debris may solve a maintenance problem. It will not correct a drain that was installed at the wrong level or lacks the detailing needed to control overflow.
Victorian balcony leakage research identifies common leak locations including pipe penetrations and floor traps, construction joints, cracks, and porous internal walls and slabs (Victorian balcony leakage research). General guidance on how to waterproof your house can explain the principles, but balcony repairs still require a site-specific scope.
| Cause | Typical signs | Common in | Patch fix possible? |
|---|---|---|---|
| Failed membrane | Damp ceiling, peeling finishes, recurring leaks after rain | Ageing tiled balconies and apartment terraces | Only if testing proves the failure is localised |
| Poor fall | Persistent puddles, staining near the building edge or door | Older balconies and poorly resurfaced decks | Usually requires screed correction |
| Junction failure | Leaks near thresholds, walls, parapets or balustrade fixings | Apartments, planter-box edges and exposed thresholds | Sometimes, if the membrane remains sound |
| Drainage failure | Slow drainage, blocked outlet, water collecting around the drain | Balconies with debris, high outlets or inadequate overflows | Drain clearing may help, but defective drainage needs rebuilding |
How a Tradesperson Diagnoses the Leak Before Touching a Tile
A proper assessment doesn't start with a price for retiling. It starts with evidence.
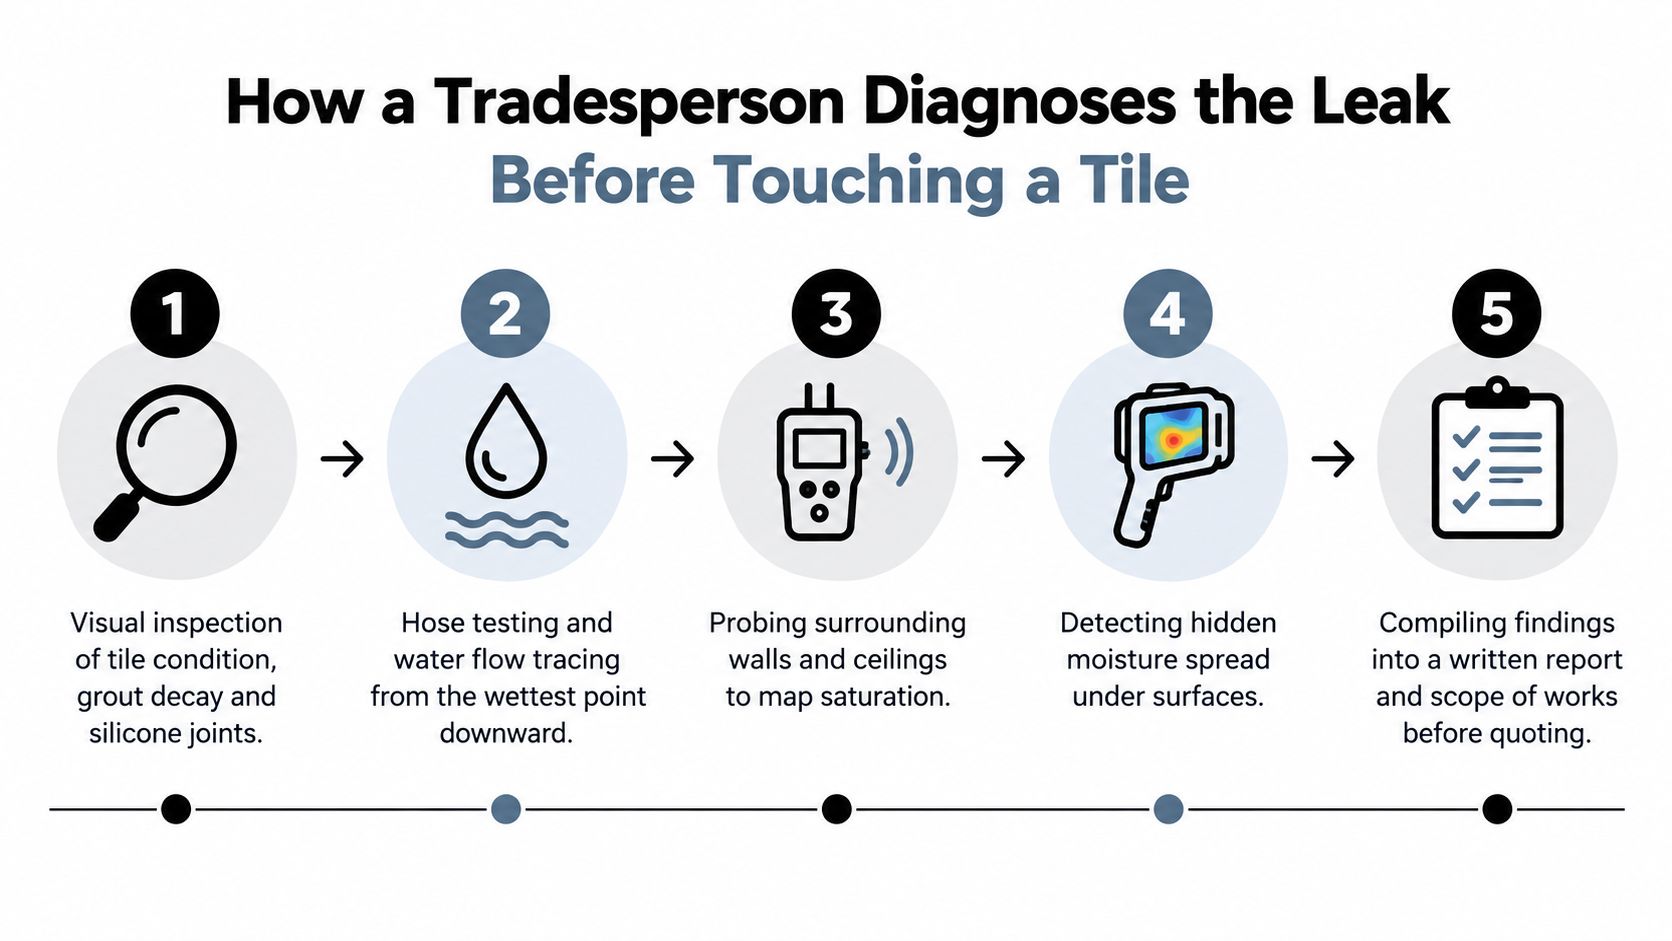
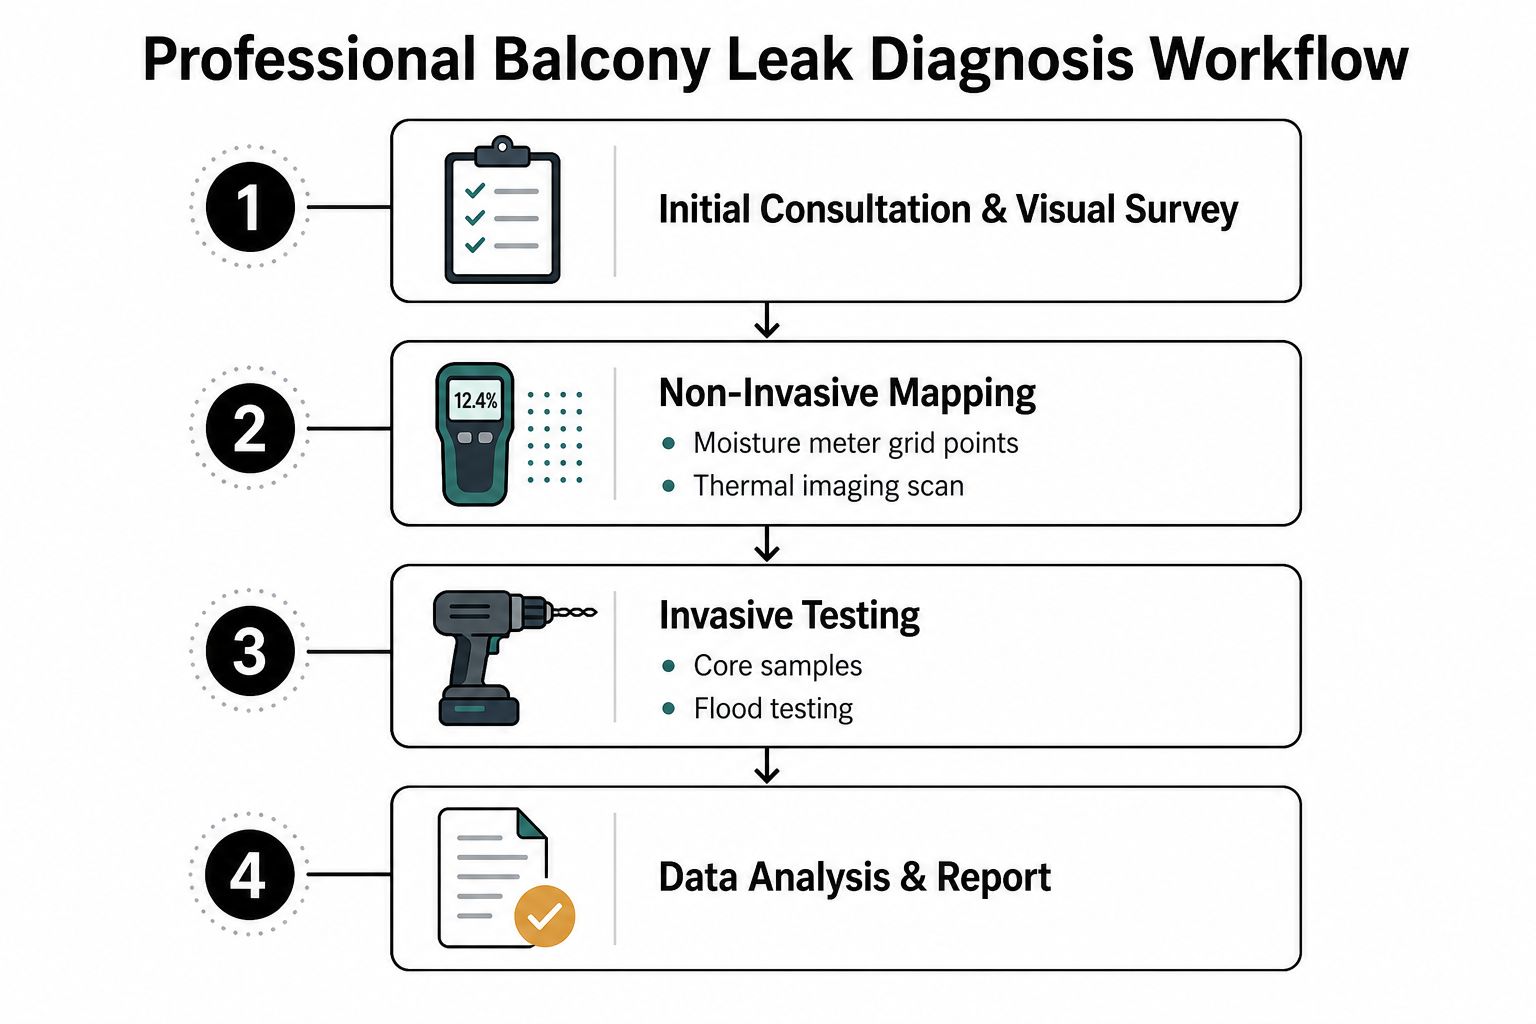
The first visit should include a visual inspection of the balcony and the area beneath it. The tradesperson checks cracked tiles, deteriorated grout, failed silicone at the wall, ponding marks, rust around balustrade fixings and staining on the underside. They also inspect the door threshold, wall junctions, drains and any penetrations that pass through the surface.
Next comes moisture mapping. A non-invasive moisture meter helps identify where saturation is concentrated around the threshold, internal walls and ceiling below. It won't identify every leak by itself, but it helps separate a damp-looking finish from a wet building element.
Testing the suspected path
A hose test can isolate a threshold, drain, wall junction or balustrade penetration. The operator wets one zone at a time and watches the ceiling, wall or moisture readings below. This is more useful than hosing the entire balcony and then guessing.
Where the construction and access allow it, a controlled flood test checks whether the waterproofing layer holds water. The balcony is isolated, water is introduced in a controlled way, and the area below is monitored. The test must be planned carefully around the building structure, drainage and apartment rules.
For complex apartment work, building managers may need a specialist who can detect leaks in multifamily buildings, especially where water may be moving between several units or common-property elements. A specialist can also use thermal imaging or other non-invasive methods to map hidden spread, but those tools support diagnosis rather than replace sound building judgement.
Ask for photographs, written findings and a scope that identifies the suspected membrane condition, falls, outlet arrangement and junction defects. A ten-minute quote that lists “remove and replace tiles” isn't a diagnosis.
For a Melbourne-specific starting point, property owners can also review balcony leak detection services and compare what the inspection includes.
Repair Options That Fix the Source of the Leak
The correct repair follows the failure, not the finish. A balcony that leaks through cracked grout may need only local reinstatement, while a failed waterproofing system requires demolition and rebuilding. A surface sealer is not a universal fix. It can hide water entry while the slab, edges or room below continue to suffer.
Full membrane replacement
If testing shows membrane failure across the balcony, remove the tiles and screed, expose and prepare the substrate, install a compatible membrane system, then rebuild the finish. External balcony waterproofing repairs must align with AS 4654.2, with materials suited to the substrate and building movement. The Victorian Building Authority guidance on water ingress treats water management as a connected system, not a tile-surface problem.
Before accepting the quote, ask whether the scope crosses the Victorian threshold requiring a registered builder or building practitioner. The contractor should identify who holds responsibility for the work and approvals.
Screed correction
If the membrane remains sound but water ponds because the falls are wrong, reshape or replace the screed. The repair must maintain correct falls to the outlet and include sound detailing at thresholds, edges and junctions. Laying new tiles over a flat or uneven surface only creates a cleaner-looking leak.
Drain and flashing work
A leaking drain, missing puddle flange, failed flashing or poor threshold transition needs detail work, not grout. The repair may require correcting the outlet, restoring membrane continuity and sealing the junction so water has a controlled route away from the building. The drain and surrounding membrane must work together.
Partial tile and grout reinstatement
Use a partial repair only when testing confirms that the membrane and substrate are dry and sound, and the defect is localised. Epoxy grout can help because it is non-porous and water-resistant. The leaking balcony repair guidance also notes that tiles can sometimes remain when the underlying conditions support that approach.
Silicone, regrouting and clear sealers close visible gaps, but they do not correct ponding, a missing membrane upturn or a drain positioned above the waterproofing layer. If the system beneath is wet, a coating can conceal the evidence while damage continues.
| Repair option | Best for | What drives the cost | Expected lifespan |
|---|---|---|---|
| Membrane replacement | Broad membrane failure or recurring ingress | Demolition scope, access, substrate repairs and the specified system | Installation quality, system and maintenance |
| Screed correction | Ponding with a sound waterproofing layer | Removal, access, new falls, drainage and finish | Rebuilt system and ongoing maintenance |
| Drain and flashing correction | Outlet, threshold, penetration or junction leaks | Number, condition and complexity of details | Compliant detailing and workmanship |
| Partial tile and grout reinstatement | Localised failure over a dry, sound system | Area of removal, matching finish and access | Condition of the membrane below |
Review balcony waterproofing membrane installation when comparing membrane scopes, but use a site inspection to decide which repair applies.
What a Proper Balcony Repair Looks Like Step by Step
A sound repair has a visible sequence. If the contractor can't explain what happens beneath the tiles, you're not being given enough information to approve the work.
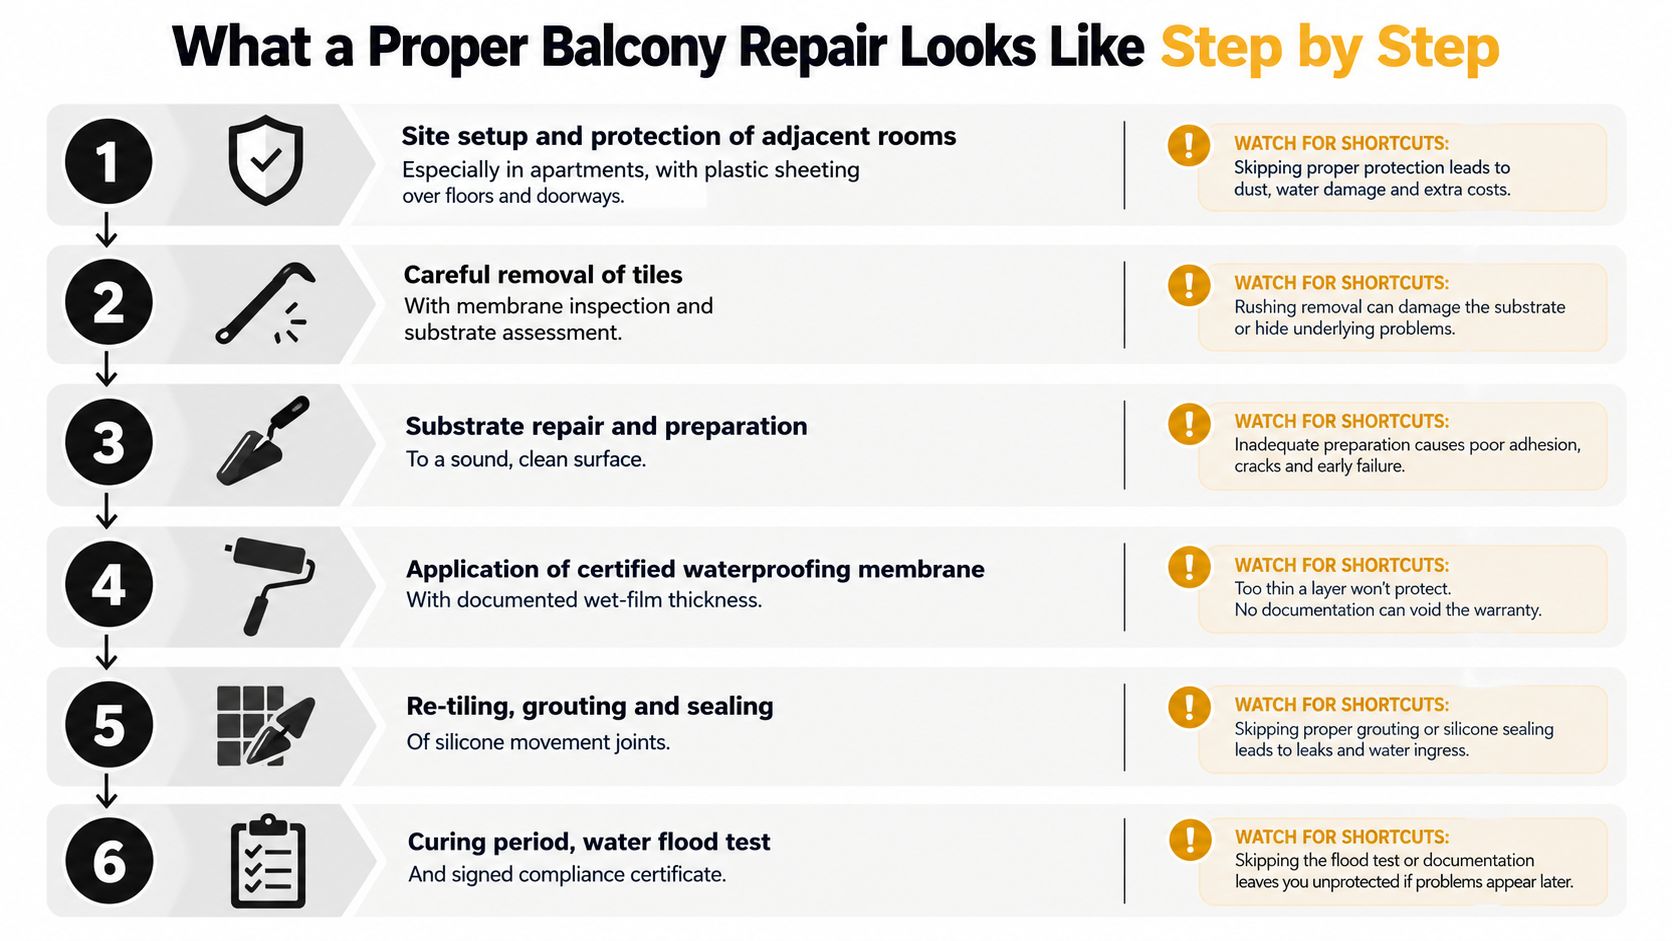
The job starts with protection. Internal floors, doorways and adjacent balconies need covering, and apartment projects require a plan for debris, access and communication with occupants. Demolition then removes tiles and screed carefully enough to expose the slab without damaging adjoining finishes or drainage components.
Preparing the structure
Once the substrate is open, the builder checks for cracking, spalling, contamination and areas that won't accept the new system. Concrete repairs happen before priming. A new outlet, puddle flange, flashing or edge detail must be installed while the membrane junctions are accessible.
The membrane system is selected for the substrate and movement conditions. Primer, reinforcement at joints and the specified membrane coats are applied in accordance with the system requirements, with each layer allowed to cure. The VBA describes balcony waterproofing as a system involving substrate, falls, drainage, membranes, toppings, finishes and junction detailing, rather than a product brushed onto a tile surface (VBA balcony leakage research).
The checkpoint that can't be skipped
A flood test is the essential checkpoint before the new finish covers the work. The test gives the builder an opportunity to identify membrane or detailing problems while the system is still accessible. After the test passes, the new screed is formed to drain correctly, tiles are installed, movement joints are finished and the perimeter is sealed.
A typical project can take several working days, and apartment work may take longer where body corporate access, shared balconies or lift bookings are involved. The calendar should allow for demolition, substrate repairs, membrane curing, testing and tile installation. Anyone promising a fast finish by skipping cure time is gambling with the repair.
The handover should include photographs of concealed work, product and system details, test records, compliance documentation where applicable and warranty terms. Those documents matter if the property is sold, managed by a body corporate or affected by a future leak.
Why the Builder You Choose Changes Everything
Waterproofing is one of those jobs where the cheapest quote can remove the very steps that make the repair last. A tiler may be excellent at laying porcelain, but a balcony leak can also require substrate repair, drainage work, membrane detailing, contract administration and coordination with licensed trades.
In Victoria, bathroom renovations over $10,000 require a Domestic Building Contract, and where the builder arranges the project, the contract must be written and signed before work starts, according to the Australian bathroom renovation guidance. Registered builders are categorised by class, including domestic builder and domestic builder limited, and a registered domestic builder can manage domestic building work such as bathroom renovations and coordinate the required trades (Victorian builder category information).
Read the scope before the price
A proper quote should identify demolition, substrate repairs, drainage, membrane system, junction detailing, screed, tiles, grout, sealants, testing, waste removal and documentation. Be cautious when the scope only says “repair balcony tiles” or “apply sealer”.
Check the practitioner on the VBA register. Ask for current insurance evidence, relevant waterproofing experience and a written warranty. If the balcony forms part of an apartment or townhouse development, confirm who owns the slab, membrane and drainage elements before approving work.

Red flags include a large upfront payment request, no membrane specification, no written test process, no allowance for substrate discovery and a price that is dramatically below competing quotes. A registered builder doesn't remove every risk, but an undocumented surface patch gives you very little protection when the leak returns.
For projects requiring formal waterproofing documentation, owners can review what a waterproofing compliance certificate in Victoria may form part of in the handover record.
A Real Melbourne Balcony Repair From Inspection to Sign-Off
A South Yarra apartment provides the kind of situation I see regularly. Water marks appeared on the living room ceiling below an upper balcony, and the tiled surface initially looked serviceable.
The inspection found a failed membrane and poor drainage beneath the finish. The tiles were removed so the substrate could be assessed properly, rather than sealed from above and left to hide the problem. The outlet and fall were corrected, the junctions were rebuilt, and the waterproofing system was reinstated before the balcony was finished again.
What the paperwork showed
The owner received photographs of the exposed substrate, records of the membrane installation, drainage details, testing results and the final scope. That information mattered as much as the new tiles because it showed what had been repaired and how the system had been checked.
The project took longer than a surface reseal would have taken. It also produced a repair that addressed the moisture path instead of covering the evidence. In balcony work, speed is useful only after the diagnosis is right.
A balcony isn't finished when the tiles look clean. It's finished when the water has a controlled path to the drain and the concealed system has been documented.
Your Next Steps and Questions to Ask Before Work Starts
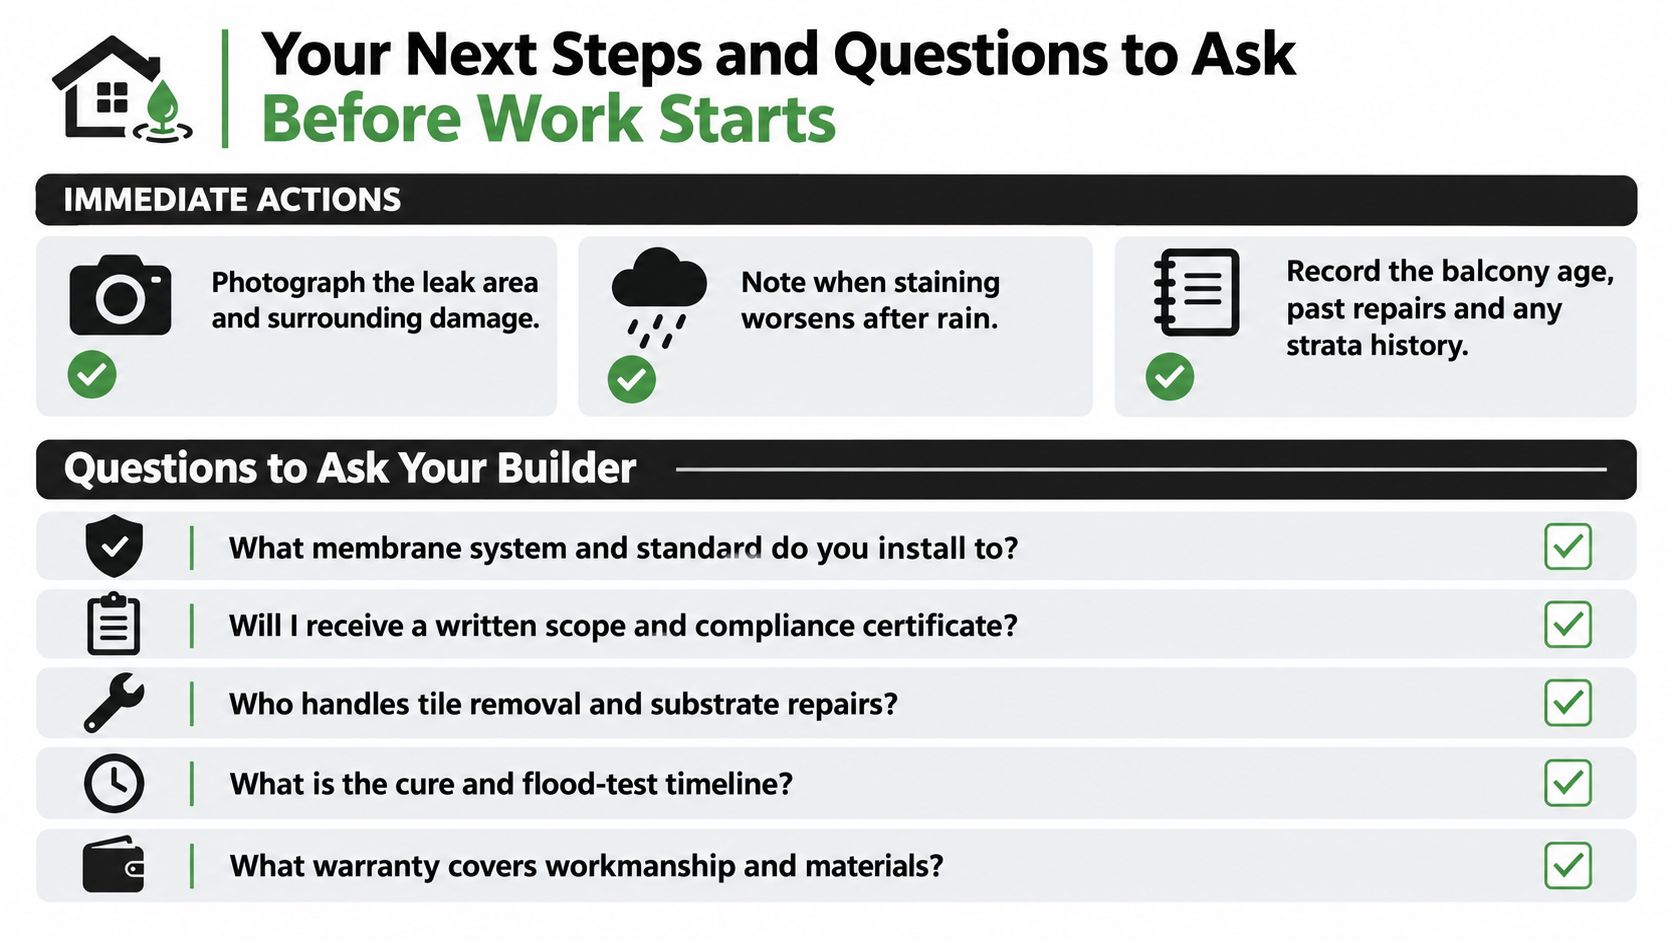
Start with evidence. Photograph the leak area, ceiling staining and balcony details. Note whether the staining worsens after rain, and check body corporate rules if the property is in a strata scheme.
Before signing, ask the prospective builder:
- What is your VBA registration number?
- Does the written scope separate membrane work from tiling?
- What membrane brand and system are you proposing?
- What warranty terms will I receive in writing?
- What are the start and finish dates, including curing allowances?
- Is the price fixed, or is it an estimate subject to discovery?
- Is flood testing included before the new finish is installed?
If the quote mentions only regrouting or surface sealing, treat it as a red flag and get a second opinion from a registered builder who specialises in balcony waterproofing across Melbourne and greater Victoria. Melbourne Tiling Services P/L handles balcony leak rectification, substrate repairs, screeding, waterproofing, flood testing and retiling, alongside complete bathroom renovations coordinated by registered builders. Visit Melbourne Tiling Services P/L to request a quote and discuss the actual failure before anyone starts lifting tiles.



Recent Comments