
A dripping shower handle is one of those problems Melbourne homeowners tend to ignore for too long. It starts as a faint tick, a wet stain on the vanity, or a shower floor that never quite dries out, then turns into a bathroom that smells musty and costs more to live with every month.
In older inner-suburb homes and renovated apartments across Melbourne, that drip is rarely just an annoyance. It can point to a worn cartridge, a tired washer, a showerhead issue, or something more serious behind the tiles. If the leak is allowed to keep going, the repair often gets bigger, because hidden moisture can move into wall cavities, finishes, and framing. That's why leaky shower valve repair is really about diagnosis first, not just parts replacement.
Table of Contents
- That Dripping Shower Handle Is Telling You Something
- Is It Really the Valve? Quick Checks Before You Touch Anything
- Tools, Parts and Safe Isolation in a Melbourne Bathroom
- Replacing the Cartridge or Washer Step by Step
- Repair Versus Full Replacement in Older Melbourne Homes
- When the Leak Is Really a Waterproofing and Building Compliance Job
- Your Decision Framework After the Drip Stops
That Dripping Shower Handle Is Telling You Something
A Bayside ensuite that never quite shuts off tells a familiar story. The tenants move out, the owner notices a slow drip from the spout, and suddenly the vanity edge has a water mark that wasn't there before. The handle feels a bit loose, the shower head hisses after use, and the bathroom has started asking for attention.
That symptom matters because shower efficiency and leak awareness aren't cosmetic issues in Australia. The Australian Government's WELS scheme has applied nationally since 1 July 2006, and it rates showerheads by star efficiency to reduce household water use. In practical terms, even a small drip matters in a country where household leaks can waste large volumes of water, and the U.S. EPA's WaterSense data shows a single showerhead leaking at 10 drips per minute wastes more than 500 gallons per year. Household leaks can waste more than 10,000 gallons annually as well, so the logic for fixing a shower leak is tied to water loss, bills, and moisture damage, not just comfort EPA WaterSense leak guidance.
A drip that seems minor at first can stay hidden for months, then show up as staining, swelling, or mould in the wrong place.
The visible leak isn't always the real fault
A handle leak often gets blamed on the valve because that's the part you can see and touch. Sometimes that's right. A worn cartridge or washer is common, and in many bathrooms the fix is straightforward if the rest of the installation is sound.
But Melbourne renovations tell a second story. Older bathrooms, especially ones updated before modern membrane standards, can leak because water is travelling behind the wall lining and out through the valve opening. When that happens, the drip is just the symptom, not the diagnosis. A sensible repair starts by asking whether the valve is failing, or whether the wall system around it has already failed.
Is It Really the Valve? Quick Checks Before You Touch Anything
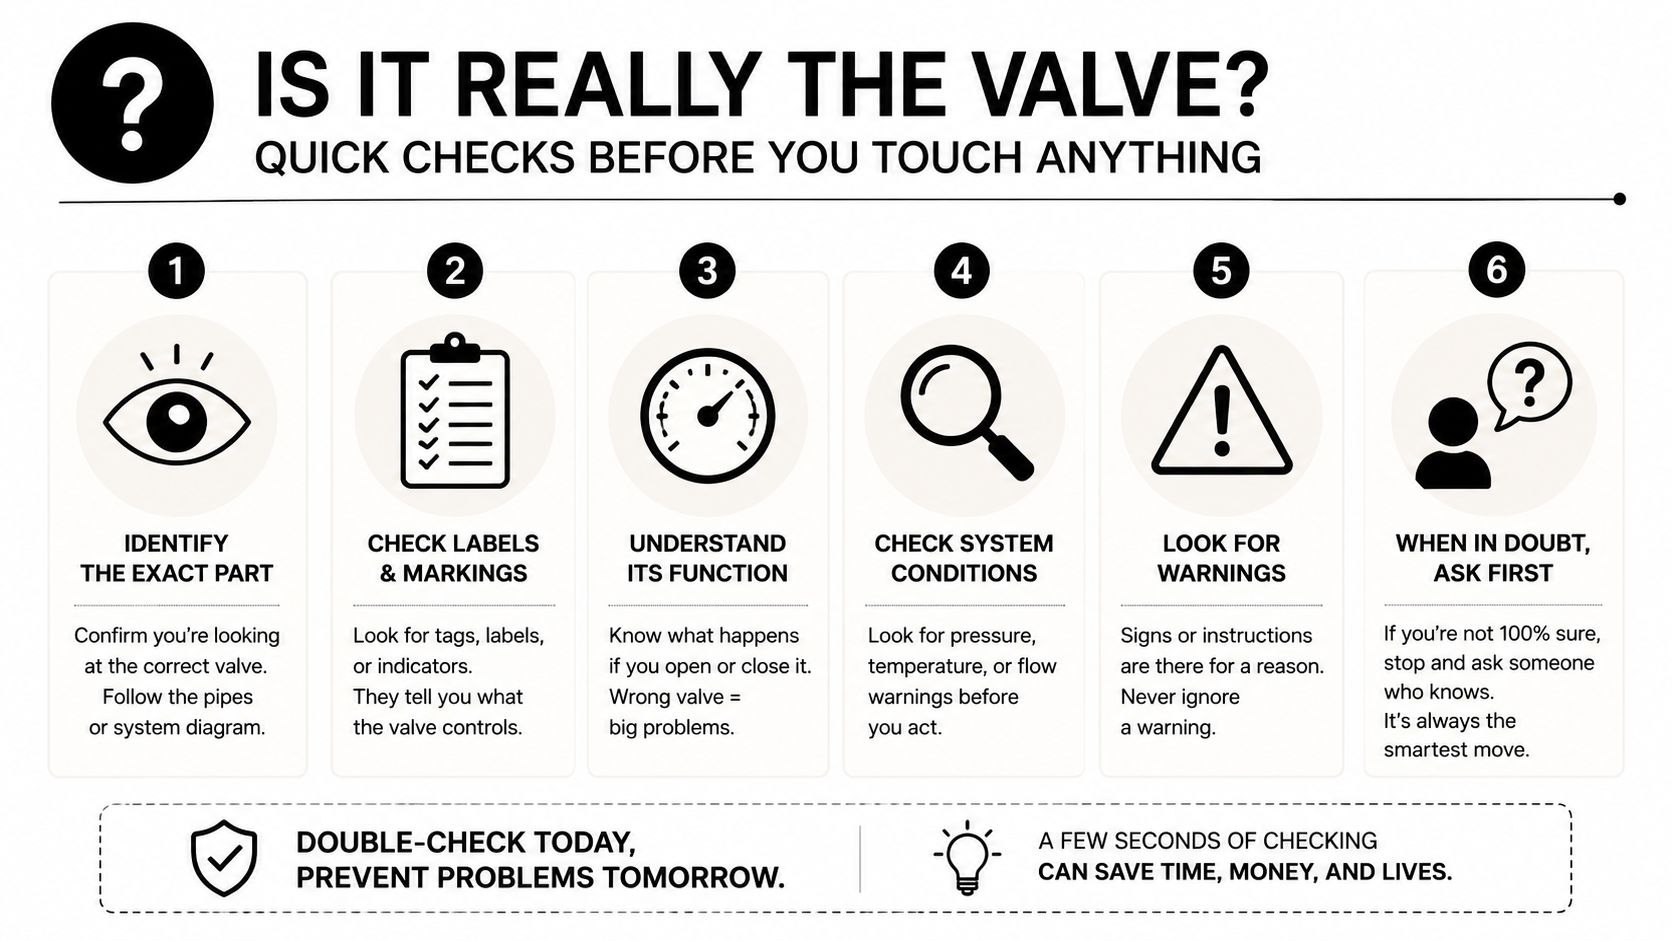
Before you pull the handle apart, run a few checks that separate a simple valve fault from a showerhead or concealed-wall problem. The point is to avoid opening up a working valve and chasing the wrong part. A ten-minute diagnosis can save an unnecessary tile repair later.
Start with the drip pattern
Watch what happens when the handle is fully off. If the drip slows down after the shower is left alone, that often points to an internal seal, cartridge, or washer issue. If it keeps going steadily, especially after a while, the problem may be pressure-related or coming from somewhere else in the assembly.
Next, isolate hot and cold if the setup allows it. Some valves behave differently depending on which side is under pressure, and that clue helps narrow the fault before anything is dismantled. If there are supply-stop valves behind the trim, they can help localise the issue without shutting off the whole property.
Check the showerhead and the wall around it
A showerhead can mimic a valve leak, especially if mineral buildup or a loose threaded connection is involved. Feel the shower arm joint, check the head, and look for water tracking along the fitting rather than from the valve body. A wrap of fresh PTFE thread tape or a tightened head may solve a joint leak, but don't assume that's the whole story if water is showing up elsewhere.
Then look outside the shower. Bubbling paint, swollen skirting, staining on adjacent walls, or a musty smell in the next room are red flags. Those signs usually mean the problem has moved beyond a trim-level repair and may involve a concealed wall failure. For homeowners wanting a local diagnostic starting point, this Melbourne shower leak detection resource is worth keeping handy.
Tools, Parts and Safe Isolation in a Melbourne Bathroom
A proper repair starts with the right tools on the bench, not half-way through the job. For most valve repairs, the practical kit is simple, but every item earns its place. You'll want an adjustable spanner, Phillips and flathead drivers, an allen key set, needle-nose pliers, plumber's grease, thread tape, a torch, and a phone or camera so you can photograph the assembly before you pull it apart.
The parts side matters just as much. Don't guess the cartridge by shape alone. Match it by brand and model where possible, especially in older Melbourne bathrooms where imported mixers and long-discontinued Australian valves still show up in renos and strata stock.
Isolate the water properly
Find the main bathroom stop tap first, then test it before touching the valve. Open the shower handle after shutting the supply to confirm pressure is off, because a trapped line can still surprise you. If mini isolation valves are hidden behind the trim plate, use them only if you can identify them clearly and they move freely.
If you can't confirm isolation, stop there. A dribbling valve is annoying, but a live line behind a wall opening turns a simple repair into a much bigger one.
Once the supply is off, photograph the trim, retaining clip, and cartridge orientation before removal. That single habit prevents a lot of reassembly mistakes. If you're dealing with a bathroom that's tied into a wider renovation, this Melbourne shower repair guide is a useful companion for the practical side of the work.
Replacing the Cartridge or Washer Step by Step
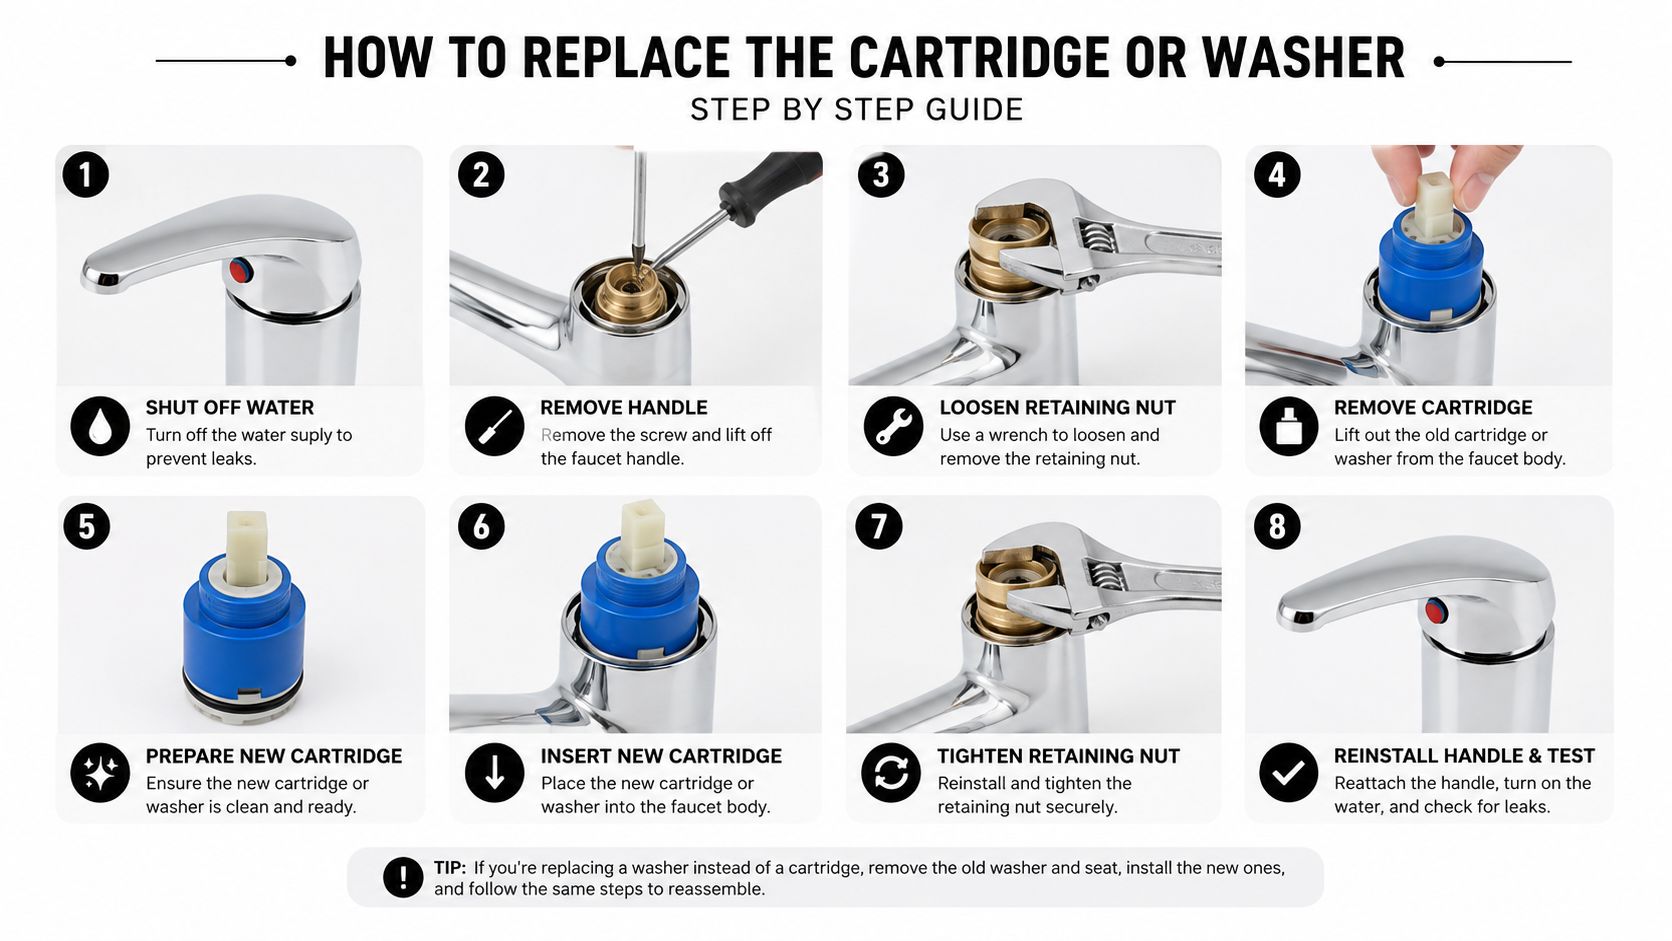
A good cartridge swap feels calm, not rushed. The handle comes off first, then the cap and trim plate, and only then do you get access to the valve body. The retaining clip is usually the part that turns a simple job into a frustrating one, so pull it carefully and keep it somewhere visible.
Remove straight, then match the part exactly
Pull the cartridge or stem straight out without twisting it if you can avoid it. If it's seized, that's where a stuck puller or a little patience comes in, especially in 1990s bathrooms where old cartridges can bind in place. Gentle heat can help, but forcing it usually damages the body or seats.
The replacement needs to go back with the orientation lugs matched to the valve body. Hot and cold sides matter, and so does the cartridge's seating depth. If you reuse a tired seal or clip it back in crooked, the shower can still drip after reassembly, which is why cartridge orientation and retaining-clip seating are the most common failure points in repair work.
Reassemble, grease, and test twice
Before reassembly, lightly grease the o-rings and any contact surfaces that need it. Then work in reverse order, trim plate first, handle last, and don't over-tighten cosmetic fittings. Once everything is back together, test under live flow, then shut it off and test again after residual pressure returns.
The real finish line isn't “it looked fine when I turned it on.” It's “it stayed dry after the line settled back down.”
That post-test check matters because some leaks only show once pressure returns to the line. If the valve still drips, the issue may be the seat, the cartridge, or the hot/cold side rather than the part you just changed. At that point, another round of guesswork usually costs more than getting the right diagnosis.
Repair Versus Full Replacement in Older Melbourne Homes
Older Melbourne homes often hide the decision in the wall. A cartridge or washer replacement is the right answer when the valve body is sound, the part is still available, and the seal surfaces haven't been chewed up by years of use. Full replacement makes more sense when the body is corroded, the threads are stripped, the valve has been over-tightened too many times, or the part is no longer easy to source.
The cost picture makes that choice worth thinking about early. National reference ranges commonly place shower valve repairs around $150 to $350 and full valve replacement around $225 to $575 Modernize cost reference. In Melbourne, that gap matters more in older housing stock, where labour, access, and part compatibility can shift a simple repair into a more involved rectification.
A practical comparison
| Factor | Cartridge or Washer Repair | Full Valve Replacement |
|---|---|---|
| Typical fit | Good when the body is sound and the part is available | Better when the valve is corroded, stuck, or obsolete |
| Access impact | Usually limited to the trim and internal parts | Often more disruptive, especially in older walls |
| Risk level | Lower if the right part is matched and seated correctly | Lower long term if the existing valve is worn out |
| Best use case | Early leak, clean body, known brand | Repeated leaks, corrosion, failed parts supply |
| Renovation value | Keeps costs down for a straightforward fix | Makes sense during a planned bathroom upgrade |
When replacement is the smarter call
If you're already planning bathroom renovations, replacement can be the cleaner path. That's especially true where the existing valve is incompatible with modern parts or where a newer pressure-balanced or thermostatic unit would improve reliability. WELS-rated fixture choices also make sense when a bathroom is being refreshed, because water efficiency is part of the long-term value equation in Australia.
Melbourne homeowners usually feel the trade-off in the labour bill, not just the parts box. A cheap repair that fails twice isn't cheap at all. A full replacement done at the right time can save a second callout and avoid chasing the same leak through an old valve body.
When the Leak Is Really a Waterproofing and Building Compliance Job
A shower that keeps leaking after a cartridge swap is telling you something different. The water may not be coming from the valve hardware at all. It can be tracking through failed waterproofing, moving through a degraded membrane, or collecting in the substrate and showing up where the trim meets the wall.
That's where the visible clues matter. Efflorescence on grout lines, soft or hollow-sounding tiles, mould at the shower base, or moisture readings on adjoining walls point to a concealed problem rather than a tidy valve fix. If those signs are present, a handle repair won't close the system back up.

Why compliance changes the job
Australia's National Construction Code and waterproofing requirements make shower waterproofing mandatory in compliant bathroom construction. That means leak repair can become a building compliance issue as soon as the wall lining, membrane, or tile substrate needs to be opened up. In Victoria, structural changes, plumbing changes, or waterproofing work generally pull the job beyond minor repair territory and into registered-practitioner work.
That's also where the role split matters. A licensed plumber handles the pipework and valve side. A registered waterproofing applicator addresses membrane failure. A Registered Unlimited Builder can coordinate the broader rectification across carpentry, plumbing, waterproofing, and tiling, which is often what a Melbourne bathroom needs once the leak has moved behind the tiles. Melbourne Tiling Services P/L also publishes guidance on waterproofing compliance in Victoria, which is a useful reference point when the repair starts looking like a renovation.
What not to ignore
If the wall feels soft, the skirting has swollen, or the shower base is holding damp longer than it should, the issue has likely moved past the valve. At that stage, the smartest move is to stop treating it like a small plumbing fix. A proper leak rectification may start with a handle, but it can end with a membrane repair, tile replacement, and compliant rebuild.
Your Decision Framework After the Drip Stops
Once the dripping stops, the key question is which path got you there. A clean DIY cartridge swap is the right result when the valve was easy to isolate, the part matched properly, and the shower stayed dry after the pressure test. That outcome usually suits a straightforward, recent installation with no hidden wall damage.
A licensed plumber call-out makes sense when the valve is stubborn, the isolation isn't clear, or the leak doesn't behave like a simple worn seal. That path is also the safer one when you're dealing with an older mixer, unknown parts, or repeat dripping after reassembly. The time signal is usually obvious, because a few minutes of DIY turns into a stalled bathroom and a pile of trim pieces.
The third path is the one Melbourne homeowners often miss. If the leak comes with tile movement, damp walls, or signs of waterproofing failure, the job has crossed into rectification and likely needs a registered builder to coordinate the repair properly. That's the point where bathroom renovations and leak repairs overlap, and it's better to treat the wall system correctly than keep swapping parts that aren't the core issue.

If your shower drip looks like a simple valve fault, Melbourne Tiling Services P/L can help assess whether it's a quick plumbing fix or a wider waterproofing problem. If the leak has started to affect tiles, membranes, or adjoining finishes, visit Melbourne Tiling Services P/L to organise a quote and talk through the repair or renovation scope with a Melbourne specialist.
Write a Comment