Bathroom Waterproofing Cost in Melbourne: 2026 Guide

A straightforward Melbourne bathroom usually costs about A$500 to A$750 to waterproof, while a more involved project can reach A$1,500 to A$4,000 once size, compliance, second-storey access, or substrate repairs are included. The quote isn't just for membrane, it covers preparation, detailing, labour, drying time, and the documentation needed before tiling.

You may be looking at three bathroom renovation quotes right now, each with a different waterproofing figure and no obvious explanation for the gap. A small ground-floor room on a concrete slab can be relatively predictable. An upstairs bathroom with timber flooring, a shower niche, awkward pipe penetrations, or an old failed membrane is a different trade package entirely.

Melbourne homeowners should treat waterproofing as a structural protection and compliance stage, not a cosmetic add-on. The Australian bathroom waterproofing cost guide places common jobs within a broad range, including an average around A$500 to A$750, while more complex work can rise to A$4,000. The price makes more sense once you separate the quote into labour, materials, substrate preparation, junction detailing, and certification.

Table of Contents

What Bathroom Waterproofing Costs in Melbourne

A 1990s Caulfield brick veneer home can show why quotes differ. The owners may have stripped the old bathroom and asked several tilers to price waterproofing. If the room is compact, sits on a sound concrete slab, has easy access, and needs a standard shower floor and wall system, A$500 to A$750 is a realistic starting band for the waterproofing component. The installer still needs to inspect the substrate before confirming that figure.

A mid-range bathroom commonly falls around A$800 to A$1,500, while a complex job can reach A$1,500 to A$4,000. Australian cost guidance reports a national average of A$800, with a minimum of A$500 and a maximum of A$4,000 in one 2023 guide. The range is outlined in the Australian waterproofing price guide.

Job Type Typical Melbourne Price What's Included
Straightforward ground-floor bathroom A$500 to A$750 Basic preparation, membrane application, standard shower and floor detailing
Mid-range bathroom A$800 to A$1,500 More wall area, additional junctions, repairs, or broader compliant coverage
Complex or second-storey bathroom A$1,500 to A$4,000 Second-storey access, timber substrate, extensive preparation, difficult falls, or replacement work

The line items matter more than the headline price. Labour covers site setup, preparation, membrane application, detailing, and the waiting time between coats. Membrane and reinforcement materials are usually a smaller part of the quote, while damaged substrate, difficult junctions, and removal of failed waterproofing can change the scope quickly.

For budget planning, waterproofing is a small but material part of the renovation allowance. Against a A$10,000 renovation benchmark, it can represent roughly 5% to 10%, depending on the work required. Demolition, plumbing, electrical work, screeding, tiling, fittings, and shower-screen installation sit outside that waterproofing figure. Virtual Tour Easy knows renovation planning checklists can help place this stage within the wider renovation sequence.

The main cost drivers are practical decisions:

  • Second-storey work: Decide whether the access, timber framing, and extra preparation justify the higher labour allowance.
  • Substrate condition: Particleboard, movement, rot, or uneven screed must be addressed before membrane application.
  • Room design: Niches, benches, curbless transitions, baths, and extra penetrations require more detailing.
  • Legacy waterproofing: Ask whether a failed or non-compliant membrane will be removed rather than covered.

Before accepting a quote, confirm whether it covers a basic membrane application or a complete compliant wet-area system, including preparation and documentation. That distinction often explains a cheaper figure.

How Waterproofing Works Behind the Tiles

A tiled shower can look finished while water is already reaching the substrate. Tiles and grout are the visible cladding, not the waterproof barrier. The membrane is the tank, so corners, penetrations, junctions, and waste connections must join into one continuous sealed system.

The installation sequence is practical:

  1. Clean, repair, and prime the substrate.
  2. Apply the first membrane coat to the specified areas.
  3. Reinforce wall-to-floor junctions and internal corners with bond-breaker tape or compatible bandage.
  4. Seal pipe penetrations, wastes, niches, and other openings.
  5. Apply the second coat over the reinforced areas, reaching the product's required thickness.
  6. Allow the membrane to cure before tiling, adding another coat if the system or site conditions call for it.

Drying time forms part of the work, not an optional delay. Applying another coat too soon can disturb the layer underneath, while tiling before the membrane has cured can weaken the bond or trap moisture. The installer should follow the selected product's technical data sheet rather than judge readiness by surface appearance.
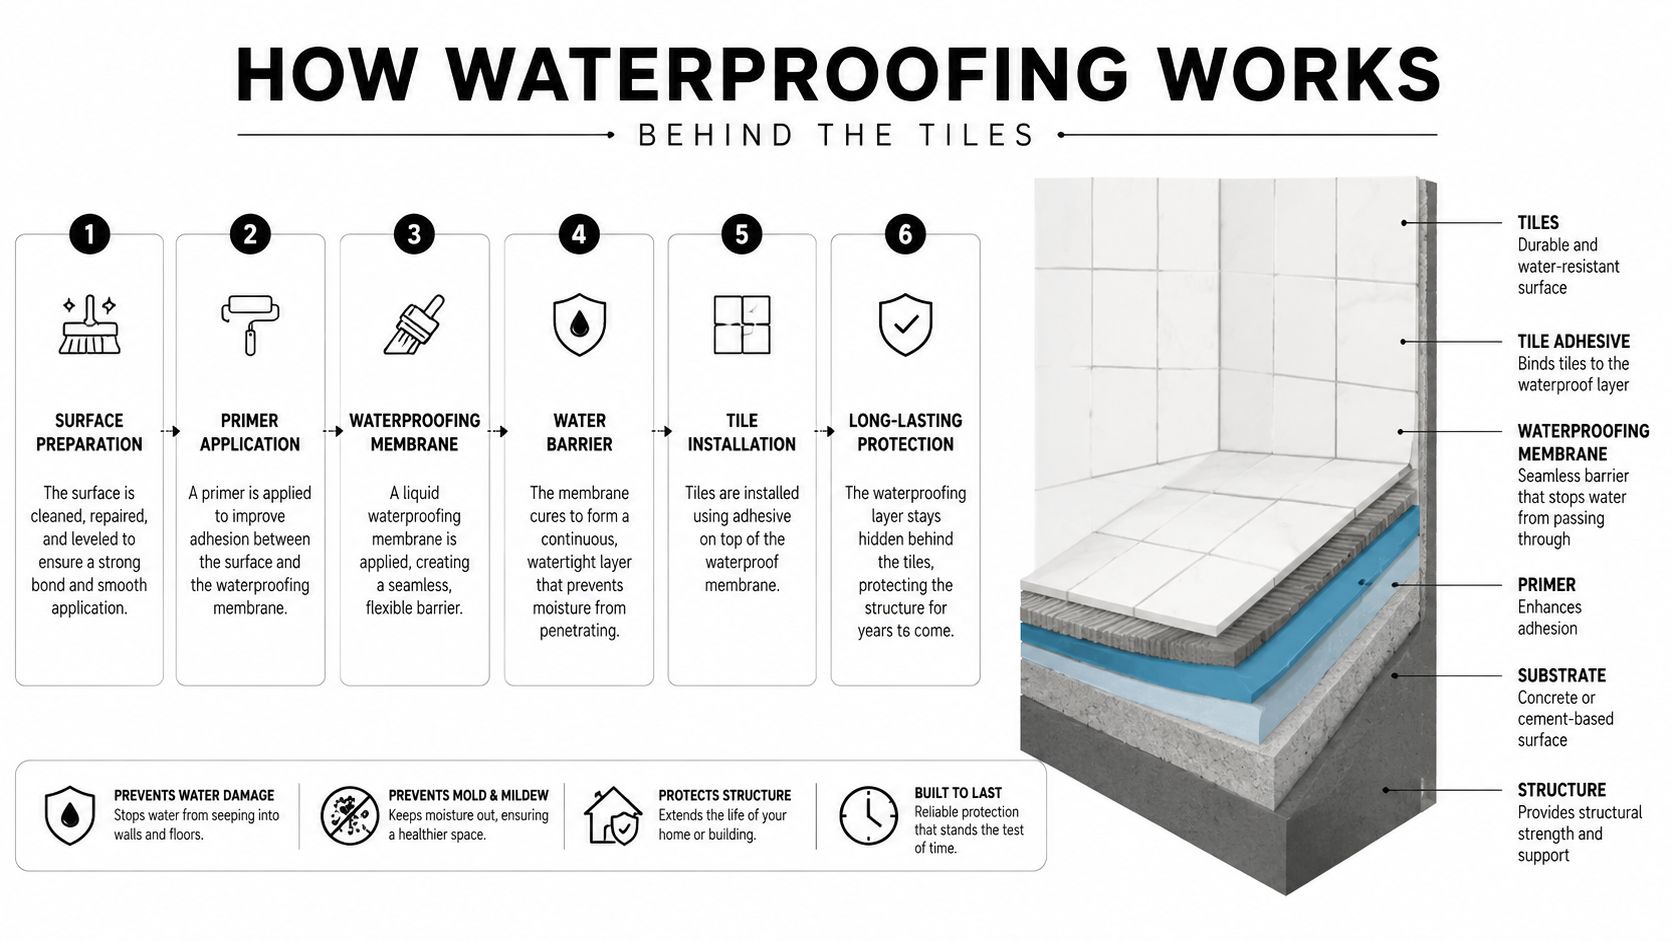
A step-by-step infographic illustrating the six-stage professional process for installing waterproofing behind bathroom shower tiles.

Falls and wall coverage

A shower recess needs a pre-formed shower tray or a correctly formed, flood-tested membrane fall that directs water to the waste. If the floor is flat, water can remain where the membrane and tile system face the most exposure.

Shower walls must also be waterproofed to the required height. Under the NCC wet-area provisions, shower floors require waterproofing, shower walls must reach at least 1,800 mm, and houses use that same 1,800 mm shower-area height requirement. The NCC wet-area waterproofing provisions provide the regulatory basis.

Australian guidance also covers waterproofing at least 150 mm above shower floors, 25 mm above finished floors, and fully waterproofing timber floors before tiling. The Australian waterproofing standards overview explains how preparation, layer thickness, and curing affect the finished system. Those steps are part of the quoted work, not just the visible paint-like membrane.

What Drives the Price on a Melbourne Quote

A useful quote should let you trace the price from the bare substrate to the signed compliance paperwork. If it only says “waterproof bathroom” with one lump sum, you can't tell whether the installer has allowed for corners, penetrations, drying days, or damaged flooring.

Preparation comes before membrane

Preparation may include removing old tiles, cleaning adhesive, repairing cracks, correcting screed levels, priming porous surfaces, or replacing unsuitable boards. This is often where a cheap quote becomes unstable. Membrane won't compensate for a loose, contaminated, moving, or poorly graded substrate.

The decision is practical. If the floor is sound and level, you may only need cleaning and primer. If the installer finds rotten particleboard or an uneven shower base, the right response is to repair it before waterproofing, not bury it under another coat.

Materials and junction details

The membrane price depends on the selected system, coverage area, and number of coats. The quote should identify whether it uses a liquid acrylic, polyurethane, cementitious-compatible system, or sheet membrane, along with compatible primers, sealants, tapes, corner pieces, and penetration seals.

Edges and junctions consume time because they carry concentrated movement and water exposure. Ask whether the price includes:

  • Wall-floor junctions: Bond-breaker tape or reinforcing fleece.
  • Internal corners: Reinforcement and compatible sealant.
  • Pipe penetrations: Proper collars or seals rather than a brush of excess membrane.
  • Waste connection: A compatible puddle flange detail.
  • Shower recess: A tray or formed fall, where applicable.

Labour and compliance

Labour is commonly the largest part of a waterproofing quote because the installer must prepare the area, detail weak points, apply coats, return after curing, and check the finished coverage. In Victoria, work valued over A$5,000 requires a Construction Waterproofing Licence from the Victorian Building Authority, which can affect labour pricing, scheduling, and documentation. The Victorian waterproofing licensing and compliance guidance provides the relevant cost and licensing context.

Compliance may include a VBA-recognised certificate, photographic records, and a flood test where appropriate. Victorian wet-area work is governed by AS 3740, and compliance paperwork is expected before tiling proceeds, as outlined in this Victoria waterproofing compliance guide.

Quote Line Item Approx. Share of Cost Homeowner Decision Involved
Substrate preparation Variable Pay for proper repair, or risk sealing an unstable surface
Membrane materials Variable Choose the specified system and required coat coverage
Edges and junctions Variable Confirm corners, penetrations, waste, and niches are included
Labour Usually the largest component Allow for return visits and cure time between coats
Compliance documentation Variable Confirm certificate, photographs, and testing requirements

Don't assume a waterproofing-only quote includes a shower-screen refit, tiling, demolition, plumbing alterations, or rotten-subfloor rectification. Those exclusions can change the final bill substantially. If someone offers to skip a second coat to save A$150, or proposes one coat over particleboard, the saving is attached to the part of the system that protects everything above it.

Comparing Waterproofing Methods and Materials

Melbourne quotes usually refer to a few broad system types. The right choice depends less on the product label than on the substrate, room layout, movement, junction count, and installer competence.

Liquid acrylic and polyurethane membranes are the familiar default for many standard bathrooms. The installer rolls or brushes the product over a prepared substrate, reinforces corners and junctions, then builds the system to the manufacturer's required thickness. They suit many concrete-slab bathrooms and compressed fibre-cement surfaces, but application quality matters. A thin or incomplete coat isn't equivalent to a correctly applied system.

Sheet membranes use PVC, CPE, or another bonded sheet with treated seams, corners, and penetrations. They can offer consistent coverage and make sense where the layout contains difficult junctions or where the installer is experienced with that particular system. The material cost may be higher, but a predictable sheet can reduce some application variability.

Pre-formed polyurethane shower trays provide the fall and waterproofing geometry in one component. They're useful where the waste position and shower layout suit the tray, but they don't remove the need to detail wall junctions and penetrations. A tray can simplify the shower base while adding product and fitting considerations elsewhere.

Method Typical $ per m² Best suited to Expected lifespan Key trade-off
Liquid acrylic membrane Not fixed Standard prepared bathrooms on sound substrates Depends heavily on preparation and application Accessible pricing, but thickness and curing must be controlled
Liquid polyurethane membrane Not fixed Areas needing a flexible liquid-applied system Depends on system specification and installation Flexible coverage, with careful substrate and cure requirements
Sheet PVC or CPE membrane Not fixed Complex junctions or installers trained in sheet systems Depends on seams, corners, and penetrations Consistent sheet coverage, but higher detailing and material requirements
Pre-formed polyurethane tray Not fixed Showers where tray dimensions and waste position suit Depends on compatible installation and surrounding detailing Provides a formed fall, but limits layout flexibility

There isn't a verified universal lifespan or Melbourne dollar-per-square-metre figure that applies to every system, so be wary of quotes promising a fixed service life without naming the product and installation conditions. The shower waterproofing membrane service information is useful when comparing membrane approaches, but your installer should still provide the exact product specification.

For a straightforward concrete-slab bathroom, liquid membrane is often the sensible choice when correctly applied. On an upstairs timber floor or a heavily articulated wet room, a sheet system or tray may justify its higher price because the layout demands more controlled detailing. Premium doesn't automatically mean better. Compatibility and installation quality decide whether the system performs.

Real Melbourne Bathroom Examples and Case Studies

Two bathrooms can have similar floor areas and completely different waterproofing quotes. The difference usually appears under the tiles, at the waste, and around the room's junctions.

Ground-floor ensuite in Glen Waverley

The first example is an anonymised ground-floor ensuite in a 1990s Glen Waverley brick veneer home. The room had a straightforward concrete slab, one shower, reasonable access, and no visible substrate surprise after the old finishes were removed.

The scope was easy to define. Preparation involved cleaning and priming the sound surface, the shower walls received the required coverage, and the installer detailed the floor, corners, penetrations, and waste before applying the membrane system. Because the substrate didn't need major correction, the quote stayed within the straightforward bathroom band.

The homeowner's key decision was whether to keep the existing layout. Keeping the waste and shower position avoided additional falls, complicated junctions, and broader screed work. The clear quote separated preparation, membrane application, detailing, and compliance rather than presenting a bare “waterproofing” allowance.

Second-storey bathroom in Brunswick

The second example is a second-storey bathroom in a 1920s Brunswick terrace. The room sat over timber joists, required levelling, needed an increased fall to the floor waste, and demanded careful treatment as a raised wet area under AS 3740.

The headline price per square metre would have been a poor guide. The waterproofer had to inspect the timber substrate, coordinate repairs and levelling, establish the fall, detail more movement-prone junctions, and document the compliant installation. Access also affected how materials and equipment reached the room.

Site inspection changes the quote: A phone estimate can price surface area, but it can't see rotten boards, movement, waste position, or the quality of the old screed.

These examples show why a free quote based only on room dimensions is unreliable. Send substrate photographs before the inspection, identify whether the room is upstairs, and explain whether the existing tiles are being removed. A site visit should also confirm shower-screen locations, niches, baths, floor wastes, and penetrations.

The difference isn't necessarily profiteering. It reflects scope. A slab-based ensuite can need a controlled membrane installation. A terrace bathroom over timber may need a coordinated substrate and compliance package before the waterproofing can even begin.

Ask the contractor to state which assumptions support the price. If the quote depends on “sound substrate” or “no levelling required”, those conditions should be written down so you know what happens if demolition reveals something else.

Repair or Replace How to Decide

A visible leak doesn't always tell you where the waterproofing failed. Water can travel beneath tiles and emerge away from the original gap, which makes a small surface patch an uncertain fix. Replacing grout or applying sealant may improve the finish, but it won't rebuild a continuous membrane behind the wall.

Use three checks before choosing a repair:

  1. Age: Older membranes deserve closer scrutiny, especially if the installation history and product are unknown.
  2. Leak location: A localised issue at a known penetration may be different from moisture appearing across several walls.
  3. Renovation timing: If tiles and wall linings are already being removed, rebuilding the system is usually more efficient than preserving questionable layers.

A spot repair can make sense when the installer can identify a discrete failure and the surrounding system is sound. Partial re-waterproofing may suit a confined shower zone where the rest of the wet area remains intact. Full replacement is more appropriate when the membrane is damaged broadly, the substrate has moved, or the room is being stripped back for a renovation.

The figures need to be read as scope bands, not promises. Simple work may sit in the common A$500 to A$750 range, while broader re-waterproofing can reach A$1,500 to A$4,000 when access, substrate, and compliance requirements expand. The cost of a failed system can also include tile removal, drying, damaged plasterboard, timber repairs, repainting, and work in the room below. Research cited in the Australian waterproofing defect cost discussion identifies waterproofing as a serious defect category and estimates annual economic costs from defects in new residential apartments at A$121 million to A$314 million, with the wider building estimate reaching as much as A$1.2 billion.

A man looks thoughtfully at a broken washing machine while comparing repair versus replacement options on paper.

Replacement usually wins when: More than one wall shows moisture signs, the membrane is over 15 years old, or tiles are already coming off.

Photograph bubbling paint, swollen skirting, mould, cracked grout, damp ceilings below, loose tiles, and any staining around the shower. Keep those images with the renovation records. They give the waterproofer a starting point and help distinguish a surface maintenance issue from a concealed wet-area failure.

Estimates Guarantees and Smart Budgeting in Melbourne

A useful Melbourne quote should read like a scope of work, not a product receipt. Whether you compare a specialist waterproofer, a tiler, or a bathroom renovation contractor, the estimate should state what happens before the membrane is opened and what evidence you'll receive before tiles cover it.

Read the quote line by line

Look for these items in writing:

  • Substrate preparation: Hours or tasks allowed for cleaning, removal, priming, screed correction, and board replacement.
  • Membrane specification: Product type, brand, system compatibility, coverage area, and coat count.
  • Detailing: Treatment of corners, wall-floor junctions, niches, wastes, pipe penetrations, and shower-screen interfaces.
  • Curing stages: Return visits and waiting periods between coats and before tiling.
  • Compliance certificate: The certificate, photographs, and any testing included in the price.
  • Warranty terms: Separate the product warranty from the installer's workmanship guarantee.

A quote that says “two coats membrane” but doesn't identify the product leaves too much unresolved. So does a price that excludes screed work while assuming the floor is already correctly graded. Ask what triggers a variation and require the contractor to show you the affected area before extra work begins.

For broader bathroom renovations, the legal contracting structure matters. Domestic building work above A$16,000 generally must be carried out by a registered builder in Victoria, and a renovation involving demolition, plumbing, waterproofing, tiling, and fittings commonly reaches that level. The Victorian domestic building guidance explains the registration threshold and its relevance to project supervision.

One industry source states that renovation jobs over A$10,000 require a Registered Builder, while plumbing must be performed by a registered or licensed plumber. Because guidance can differ by project category and source, confirm the current requirement with the relevant Victorian authority and make sure the contract identifies the responsible registered builders and licensed trades. You can also review the role of the Victorian waterproofing compliance certificate before signing.

Set the budget before demolition

For planning purposes, a small ground-floor bathroom may sit around A$500 to A$750, a standard main bathroom around A$1,200 to A$2,500, and a complex second-storey or substrate-replacement project around A$2,500 to A$4,000. These are practical planning brackets, not fixed tariffs, and the final amount depends on the inspected scope.

Against a A$10,000 renovation envelope, keep a contingency of 10% to 15% for surprises behind the tiles. That allowance can cover substrate repairs, levelling, waste alterations, or compliance-related rework, but it shouldn't be used to justify vague pricing. Ask for a written variation with the reason, affected trade, and revised total.

A checklist infographic titled Estimates, Guarantees and Smart Budgeting for renovation projects in Melbourne, Australia.

Before you commit, verify the contractor's registration, insurance details, certificate process, warranty wording, exclusions, and responsibility for coordinating plumbers, tilers, and shower-screen installers. A low initial quote only works if it includes the same scope as the quote beside it.


Melbourne Tiling Services P/L provides bathroom waterproofing, screeding, tiling, leak rectification, and complete bathroom renovation coordination, with written estimates and compliance documentation for Victorian projects. To compare your room's substrate, layout, and waterproofing scope against a clear renovation plan, visit Melbourne Tiling Services P/L and request a quote.
Shower Leak Repair Cost: A 2026 Melbourne Guide

In Melbourne, a minor shower reseal usually sits around $350 to $900, while major repairs involving waterproofing membrane replacement generally land between $2,000 and $4,000 or more. The final shower leak repair cost depends less on the drip you can see and more on the hidden damage you can't.

A leak is rarely reported the moment it starts. Calls typically occur when the ceiling below shows a stain, when the grout turns sandy, or when the bathroom starts smelling damp even after a clean. By then, the question isn't just “how much to stop the leak?” It's whether the leak is a surface maintenance issue, a failed waterproofing system, or the first sign that bathroom renovations are now part of the discussion.

That's reality with shower leaks in Melbourne homes. Some are straightforward. Some sit behind tiles for months or years and only show themselves when water has already worked into the substrate, skirting, ceiling, or framing. As registered builders, we look at these jobs through a wider lens. The repair has to stop the leak, meet compliance requirements, protect the structure, and make sense for the age and condition of the bathroom.

Table of Contents

That Small Drip Could Be a Big Problem

A typical call starts with something that seems minor. A homeowner notices blackening silicone in one corner, cracked grout on the shower floor, or a discoloured patch on the ceiling below an upstairs bathroom. They assume it's a plumbing issue, maybe a bead of silicone and a quick visit from a tradie.

Sometimes that assumption is right. Sometimes it isn't.

I've seen showers where the visible issue was a small split in sealant, but the underlying problem was a wet substrate and a failed membrane behind the tiles. I've also seen older bathrooms where years of small movement, poor falls, or tired grout had let water migrate slowly into places it should never reach. The leak looked local. The repair wasn't.

Why the visible symptom rarely tells the full story

A shower can leak in several ways. Water might escape through failed grout joints, cracked silicone, loose tap penetrations, a damaged shower base, or a waterproofing system that has reached the end of its life. The symptom is often the same. Dampness, staining, mould, or movement underfoot.

What matters is whether the leak is cosmetic, plumbing-related, or structural.

Practical rule: If the floor feels spongey, tiles sound hollow, or moisture is showing outside the shower itself, don't assume a reseal will solve it.

That's where a builder's view matters. A proper diagnosis looks at the whole wet area, not just the most obvious crack. If the bathroom is dated, poorly built, or already showing signs of widespread deterioration, a repair may only delay a larger problem. In those cases, full bathroom renovations can be the smarter financial decision because they deal with waterproofing, tiling, drainage, and compliance in one coordinated scope.

Why homeowners get caught out on cost

Leaks become expensive when people pay twice. First for a patch. Then for the actual repair.

Cheap surface fixes often look attractive because they're fast and relatively inexpensive upfront. But if water is already behind the tile bed or in the wall, fresh silicone only hides the issue. The leak continues. The damage spreads. The eventual job gets larger, messier, and harder to contain.

That's why shower leak repair cost varies so much. The labour, materials, and disruption all change once demolition, drying, rebuilding, and compliance come into play.

What Really Drives the Shower Leak Repair Cost

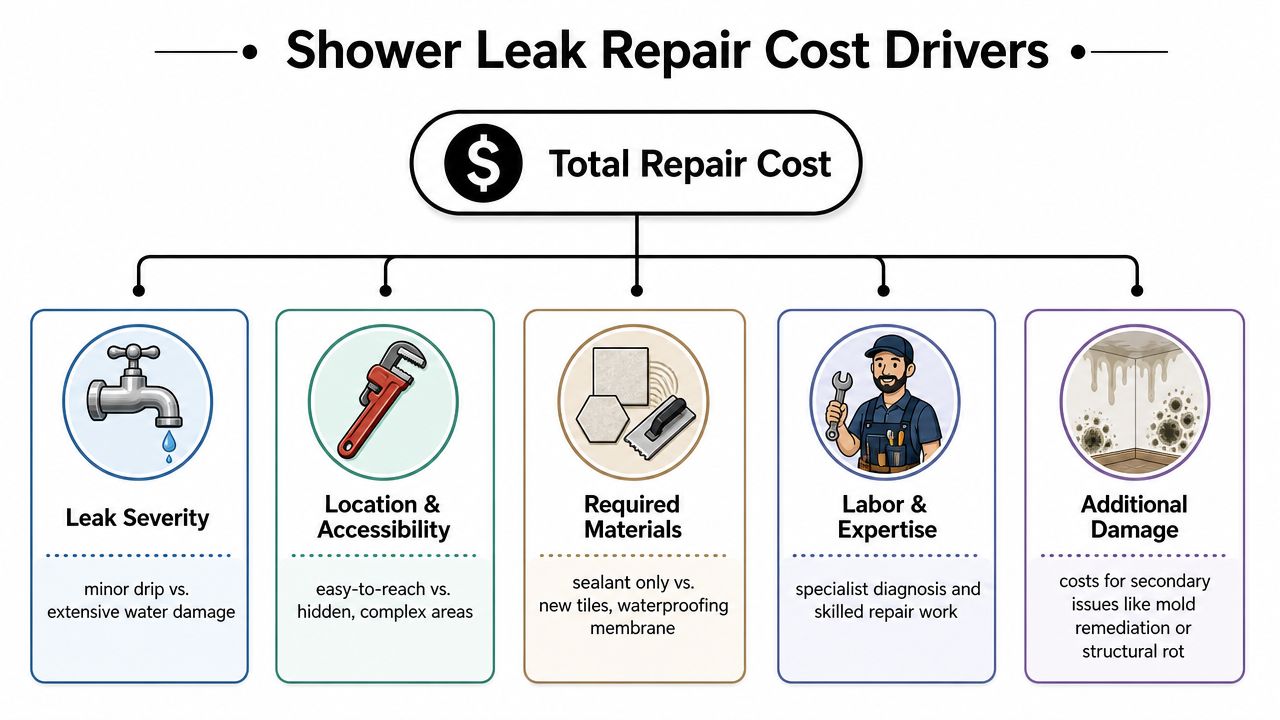
The biggest factor in pricing is scope, not optimism. You're not paying for a tradie to “have a look”. You're paying for diagnosis, access, repair method, materials, and the level of rebuilding needed to deliver a lasting result.

A flowchart infographic detailing the key factors that influence the total cost of repairing a shower leak.

Membrane failure changes everything

In practical terms, the cheapest jobs are usually localised maintenance. The expensive jobs are waterproofing failures. In the Australian market, minor resealing with grout and silicone typically ranges from $350 to $650, while full membrane replacement requiring tile removal sits around $2,000 to $4,000 because labour and material demands increase sharply, as outlined in this Australian shower leak cost breakdown.

That gap exists for a reason. Once tiles need to come off, the job can involve demolition, substrate assessment, preparation, membrane installation, curing time, retiling, sealing, and finishing. It stops being a maintenance visit and starts becoming a construction job.

Access, trades, and repair method

A clean quote usually reflects several moving parts:

  • Diagnosis first: A leak in the shower recess can come from the wall, floor, screen junction, waste, tap penetration, or a failed membrane. A proper inspection avoids pricing the wrong fix.
  • Trade coordination: Some jobs need only a tiler or leak repair specialist. Others need a plumber, waterproofer, carpenter, and tiler in sequence.
  • Site protection: In occupied homes, protecting adjacent floors, vanities, hallways, and fixtures matters. Good repair work includes containment and clean-up, not just tile removal.
  • Matching existing finishes: If replacement tiles are unavailable, a partial repair can become more complex because the visual finish has to be considered alongside the technical fix.

A “quick look” rarely tells you whether the water is staying inside the shower footprint or moving into the structure.

Materials matter, but labour usually drives the jump

Homeowners often focus on the price of silicone, grout, or tiles. That's understandable, but it's usually not where the cost blows out. Labour and process do that. Waterproofing needs correct preparation and curing. Tile removal takes care if the goal is to limit surrounding damage. Reinstatement has to restore falls, junctions, penetrations, and finish quality.

There's also the question of compliance. Wet area work isn't something to wing. If the bathroom is older, if previous repairs were done over the top of defects, or if the shower design has weak points, the new work needs to address those conditions properly.

Why registered builder oversight changes the outcome

When a registered builder assesses a leaking shower, the brief isn't just “stop the water today”. It's to identify the failure point, decide whether repair or replacement makes sense, and manage any larger implications for the room. That broader view often prevents false economies.

If the shower is one part of a tired wet area, the most cost-effective solution may not be another patch. It may be a targeted rebuild of the shower zone or a more extensive bathroom renovation that eliminates repeat failure points altogether.

Common Shower Leak Scenarios and Melbourne Price Ranges

Not every leak follows the same script. The easiest way to understand shower leak repair cost is to look at the kind of job you may be dealing with.

Localised grout and silicone failure

This is the scenario homeowners hope for. The shower still feels solid underfoot. Water staining is minor or only just beginning. Grout has cracked, silicone has pulled away at corners, and the shower is letting water escape at junctions rather than through a failed membrane.

In the Australian market, minor resealing tasks range from $350 to $900, while extensive repairs involving full waterproofing membrane replacement and retiling range from $2,000 to $4,000 or more, according to this national leaking shower cost guide.

A proper reseal can be a valid repair when the waterproofing beneath is still sound. A cosmetic reseal over an already failed substrate usually isn't.

Leaking tap hardware or shower fittings

Sometimes the leak isn't the shower recess itself. It's a worn washer, O-ring, tap set, or plumbing penetration. These jobs are often cheaper and less invasive, but they still need a proper diagnosis because plumbing leaks and waterproofing leaks can show similar symptoms from the outside.

If the issue is confined to hardware, the repair is often straightforward. If water has been escaping around penetrations for a long period, the surrounding wall lining or substrate may also need attention.

Failed waterproofing membrane

This is the job that catches people by surprise. The grout may look tired, but the bigger warning signs are a spongey floor, loose tiles, persistent damp smells, or moisture appearing outside the shower zone. At that point, the membrane has likely stopped doing its job.

Once that happens, there's no meaningful shortcut. Tiles usually need to come up, the substrate has to be inspected, waterproofing needs to be redone correctly, and the shower must be rebuilt to a compliant standard.

If water is already under the tiles, surface products won't reverse the damage. They only make the defect harder to diagnose later.

Cracked or leaking shower base

A shower base problem sits in the awkward middle ground. It may not require a full bathroom rebuild, but it can still involve substantial work depending on how the base ties into the wall finish, screen, and floor. If the surrounding structure has been wet for a while, the scope expands quickly.

In homes with open-plan or modern layouts, even a single failed element can create a broader rectification issue because the wet area design leaves little room for isolated repair.

Example shower leak repair costs in Melbourne 2026

Repair Scenario Common Cause Typical Cost Range (VIC)
Localised grout and silicone repair Cracked grout, failed silicone, minor junction leaks $350 to $900
Leaking tap hardware Worn washer or O-ring in compression faucet $50 to $200
General professional servicing to stop leaks Minor diagnostic and repair work $120 to $300
Shower base repair Shattered or leaking base $800 to $2,500+
Full membrane replacement and retiling Failed waterproofing behind tiles $2,000 to $4,000 or more

A cost guide only helps if it matches the actual failure. That's why inspections matter. Two showers can show the same cracked grout line and need completely different solutions.

DIY Fixes vs Hiring a Registered Builder

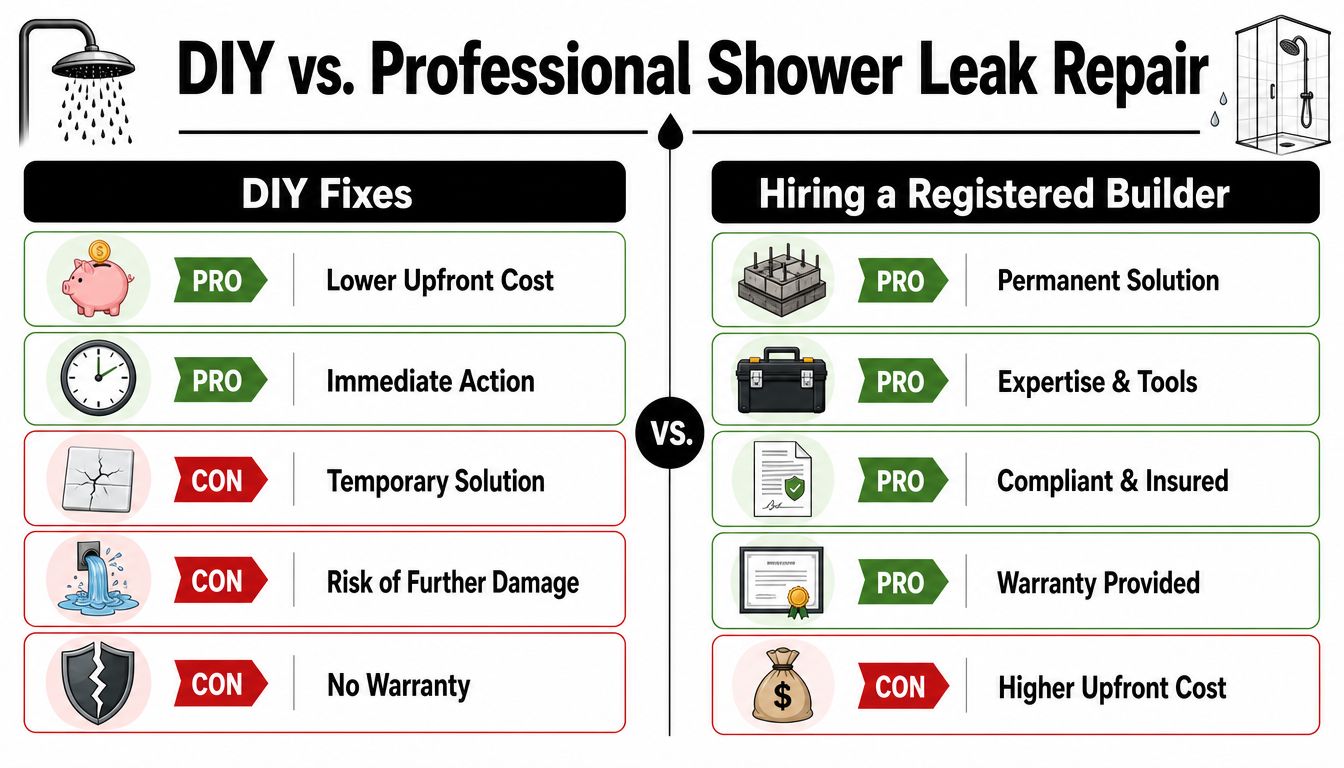
DIY shower leak repairs are tempting because the visible materials look simple. A tube of silicone, a grout touch-up product, a weekend of effort, and the problem appears solved. The risk is that many shower leaks aren't surface-level failures. They're building failures showing up on the surface.

A comparison chart showing the pros and cons of DIY versus professional shower leak repair services.

What DIY can do, and where it stops

DIY work can help with maintenance. Cleaning old sealant. Monitoring cracks. Replacing obviously deteriorated silicone in a low-risk area. Those jobs have a place if you already know the waterproofing system underneath is sound.

What DIY can't do is confirm whether the membrane has failed, whether the falls are wrong, whether movement is cracking the tile bed, or whether water has already reached framing or subfloor elements.

That's why quick-fix products often disappoint. High-quality shower waterproofing systems typically last 10 to 25+ years, while remedial or liquid-applied membranes used in quick-fix repairs generally last only 5 to 10+ years, as noted in this Australian waterproofing lifespan guide. A cheap patch can buy time, but it can also set up another failure cycle.

Why registered builder oversight matters

A registered builder doesn't just arrange a repair. They manage the whole wet-area problem. That includes diagnosis, scope, sequencing, trade coordination, compliance, and final responsibility for the result.

For homeowners, that matters in a few practical ways:

  • Compliance: Wet area work has to meet current standards and correct installation practice.
  • Trade management: Plumbing, waterproofing, screeding, tiling, and finishing often overlap.
  • Broader judgement: A builder can tell you when the shower is still repairable and when the bathroom has crossed into renovation territory.
  • Documentation and accountability: A proper scope of works is clearer than a verbal promise and a tube of sealant.

If you're comparing options, it helps to review a professional approach to fixing leaking showers before deciding whether a patch is worth doing.

DIY works best for maintenance. It works poorly as a substitute for diagnosis.

The long-term property value angle

Leaking showers aren't only inconvenient. They can affect saleability, tenant complaints, insurance discussions, and future renovation costs. Buyers and property managers notice bathrooms that feel soft underfoot, smell musty, or show evidence of repeated patching.

A compliant repair protects more than the shower recess. It protects the asset.

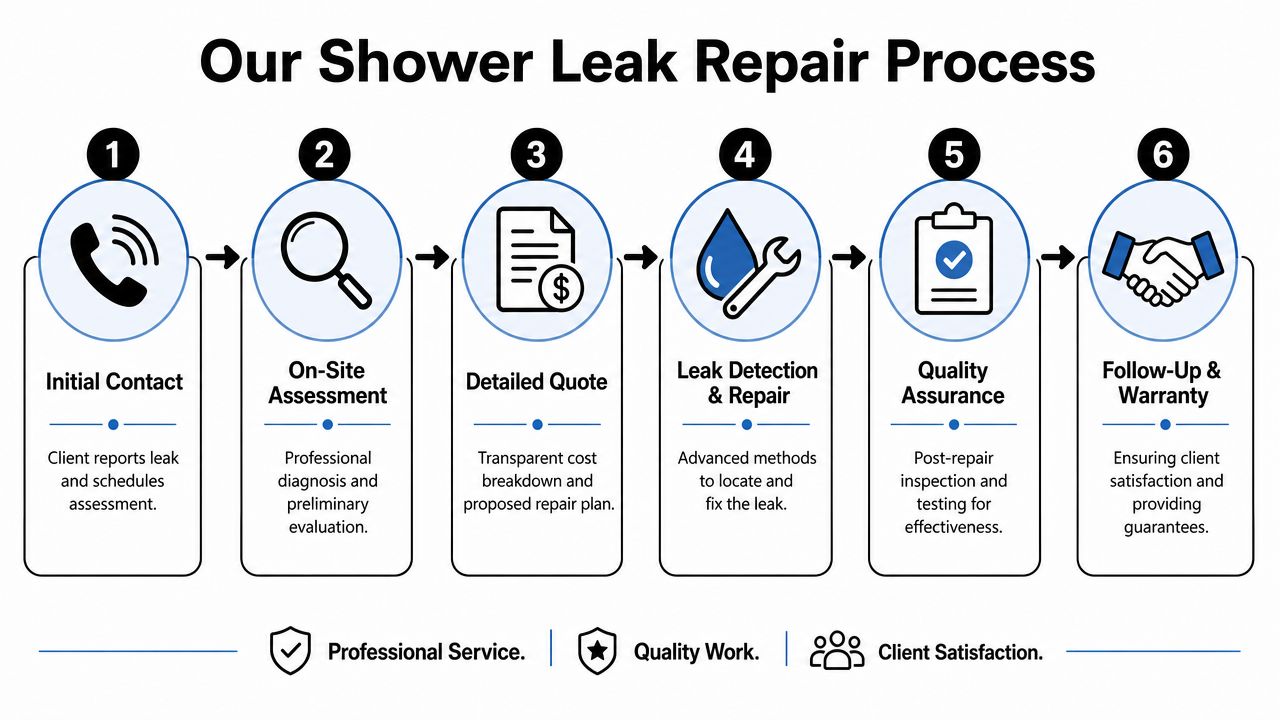
Our Leak Detection and Repair Process Explained

A proper leak job should feel organised from the first conversation. Homeowners don't need mystery, vague allowances, or a quote that changes shape every time another tile comes off. They need a clear process.

A six-step infographic detailing the professional shower leak repair process from initial contact to final warranty.

Step one to step three

The first part is about understanding what's happening, where it's happening, and how far it has spread.

  1. Initial contact
    The homeowner describes the symptoms. Ceiling stain, loose tiles, failed silicone, damp odour, shower screen leak, or water outside the recess.

  2. On-site assessment
    We inspect the shower, surrounding finishes, floor feel, tile condition, movement points, penetrations, and any signs of water migration beyond the wet area.

  3. Leak detection and scope
    When needed, we use more targeted assessment methods and then define the scope. If you're researching what this stage involves, this page on leak detection in Melbourne gives a good overview of how non-invasive diagnosis fits into a repair plan.

This short video gives a useful visual sense of how leak issues are identified and discussed on site.

Quote, repair, and quality control

Once the defect is identified, the next job is making the scope understandable. Good quotes don't hide the logic. They show whether the solution is a reseal, a base repair, a partial rebuild, or something larger.

At this stage, registered builder oversight becomes especially important in complex bathrooms. Melbourne-specific reporting notes that leak rectification for modern hobless showers can reach $6,800, and if the problem is diagnosed too late or incorrectly, some layouts can push owners into a $20,000 to $40,000 bathroom renovation, as discussed in this Melbourne-focused shower rectification article.

What the repair phase should include

A professional repair process usually includes:

  • Protection of the home: Dust control, floor protection, and careful demolition.
  • Licensed trade coordination: Plumbing, waterproofing, carpentry, and tiling where required.
  • Reinstatement with intent: Not just making it look finished, but restoring falls, junctions, and waterproof integrity.
  • Final inspection: Testing, finish review, and handover.

Melbourne Tiling Services P/L handles this type of builder-managed wet area work as part of its broader bathroom renovation and leak rectification service. That matters when a leaking shower turns out to be one piece of a larger bathroom failure rather than a stand-alone defect.

The repair should leave you with clarity. What failed, what was replaced, and why the chosen method fits the bathroom.

How to Reduce Costs and Prevent Future Leaks

The cheapest shower leak repair cost is usually the one tackled early. Once water gets into framing, ceilings, skirtings, or adjacent finishes, the leak stops being local.

In Victoria, ignoring a leaking shower can lead to secondary structural repairs costing $2,000 to $15,000+ and mould removal bills of $500 to $3,000+, according to this Victorian leak damage discussion. That's why speed matters.

How to keep the current job under control

A few practical steps can stop a repair from expanding unnecessarily:

  • Act early: Don't wait for visible ceiling damage downstairs or soft flooring around the shower entry.
  • Ask what's being diagnosed: A quote without a clear cause can be the first sign of a patch, not a solution.
  • Clarify the repair boundary: Make sure you understand what's included if hidden damage is found after tile removal.
  • Think beyond the recess: If the bathroom is old or poorly laid out, discuss whether a staged renovation makes more sense than repeated repairs.

A simple prevention checklist

Preventative maintenance isn't complicated, but it has to be consistent.

  • Inspect sealant lines: Check corners, wall-to-floor joints, and around screens for shrinkage, splitting, or mould.
  • Watch for movement: Loose tiles, drummy tiles, and cracking grout often point to something deeper than surface wear.
  • Pay attention to smell: A musty odour that returns quickly can indicate trapped moisture.
  • Keep the waterproofing system in mind: If the bathroom is ageing, preventive planning matters. This guide to how to waterproof a shower is useful if you want to understand what a proper system should include.

A homeowner doesn't need to become a builder. They do need to recognise that recurrent leaks are rarely solved by cosmetic maintenance alone.

Secure Your Home with a Professional Repair

A leaking shower can cost a few hundred dollars, a few thousand, or far more if the problem has spread into the structure. The wide range isn't random. It reflects the difference between a tired sealant joint and a failed wet-area system.

That's why the right first step is diagnosis, not guesswork. If the issue is minor, a targeted repair may be enough. If the membrane, base, or room layout has failed, the responsible answer may be a more substantial rebuild or one of the bathroom renovations that properly resets the space for the long term.

Registered builders approach these jobs differently because they have to. The work isn't just about stopping visible water. It's about compliance, coordinated trades, and protecting the home's value.

Screenshot from https://melbournetilingservices.com.au

Don't let a small leak become a renovation nightmare. Get the shower assessed properly, understand the full scope, and choose a repair path that fits the condition of the bathroom.


If you want clear advice on shower leak repair cost, compliant rectification, or whether the smarter move is a targeted repair or a full bathroom upgrade, contact Melbourne Tiling Services P/L for a free, no-obligation quote and a 3D estimate.

Shower Leak Repair Cost: A 2026 Melbourne Guide

In Melbourne, a minor shower reseal usually sits around $350 to $900, while major repairs involving waterproofing membrane replacement generally land between $2,000 and $4,000 or more. The final shower leak repair cost depends less on the drip you can see and more on the hidden damage you can't.

A leak is rarely reported the moment it starts. Calls typically occur when the ceiling below shows a stain, when the grout turns sandy, or when the bathroom starts smelling damp even after a clean. By then, the question isn't just “how much to stop the leak?” It's whether the leak is a surface maintenance issue, a failed waterproofing system, or the first sign that bathroom renovations are now part of the discussion.

That's reality with shower leaks in Melbourne homes. Some are straightforward. Some sit behind tiles for months or years and only show themselves when water has already worked into the substrate, skirting, ceiling, or framing. As registered builders, we look at these jobs through a wider lens. The repair has to stop the leak, meet compliance requirements, protect the structure, and make sense for the age and condition of the bathroom.

Table of Contents

That Small Drip Could Be a Big Problem

A typical call starts with something that seems minor. A homeowner notices blackening silicone in one corner, cracked grout on the shower floor, or a discoloured patch on the ceiling below an upstairs bathroom. They assume it's a plumbing issue, maybe a bead of silicone and a quick visit from a tradie.

Sometimes that assumption is right. Sometimes it isn't.

I've seen showers where the visible issue was a small split in sealant, but the underlying problem was a wet substrate and a failed membrane behind the tiles. I've also seen older bathrooms where years of small movement, poor falls, or tired grout had let water migrate slowly into places it should never reach. The leak looked local. The repair wasn't.

Why the visible symptom rarely tells the full story

A shower can leak in several ways. Water might escape through failed grout joints, cracked silicone, loose tap penetrations, a damaged shower base, or a waterproofing system that has reached the end of its life. The symptom is often the same. Dampness, staining, mould, or movement underfoot.

What matters is whether the leak is cosmetic, plumbing-related, or structural.

Practical rule: If the floor feels spongey, tiles sound hollow, or moisture is showing outside the shower itself, don't assume a reseal will solve it.

That's where a builder's view matters. A proper diagnosis looks at the whole wet area, not just the most obvious crack. If the bathroom is dated, poorly built, or already showing signs of widespread deterioration, a repair may only delay a larger problem. In those cases, full bathroom renovations can be the smarter financial decision because they deal with waterproofing, tiling, drainage, and compliance in one coordinated scope.

Why homeowners get caught out on cost

Leaks become expensive when people pay twice. First for a patch. Then for the actual repair.

Cheap surface fixes often look attractive because they're fast and relatively inexpensive upfront. But if water is already behind the tile bed or in the wall, fresh silicone only hides the issue. The leak continues. The damage spreads. The eventual job gets larger, messier, and harder to contain.

That's why shower leak repair cost varies so much. The labour, materials, and disruption all change once demolition, drying, rebuilding, and compliance come into play.

What Really Drives the Shower Leak Repair Cost

The biggest factor in pricing is scope, not optimism. You're not paying for a tradie to “have a look”. You're paying for diagnosis, access, repair method, materials, and the level of rebuilding needed to deliver a lasting result.

A flowchart infographic detailing the key factors that influence the total cost of repairing a shower leak.

Membrane failure changes everything

In practical terms, the cheapest jobs are usually localised maintenance. The expensive jobs are waterproofing failures. In the Australian market, minor resealing with grout and silicone typically ranges from $350 to $650, while full membrane replacement requiring tile removal sits around $2,000 to $4,000 because labour and material demands increase sharply, as outlined in this Australian shower leak cost breakdown.

That gap exists for a reason. Once tiles need to come off, the job can involve demolition, substrate assessment, preparation, membrane installation, curing time, retiling, sealing, and finishing. It stops being a maintenance visit and starts becoming a construction job.

Access, trades, and repair method

A clean quote usually reflects several moving parts:

  • Diagnosis first: A leak in the shower recess can come from the wall, floor, screen junction, waste, tap penetration, or a failed membrane. A proper inspection avoids pricing the wrong fix.
  • Trade coordination: Some jobs need only a tiler or leak repair specialist. Others need a plumber, waterproofer, carpenter, and tiler in sequence.
  • Site protection: In occupied homes, protecting adjacent floors, vanities, hallways, and fixtures matters. Good repair work includes containment and clean-up, not just tile removal.
  • Matching existing finishes: If replacement tiles are unavailable, a partial repair can become more complex because the visual finish has to be considered alongside the technical fix.

A “quick look” rarely tells you whether the water is staying inside the shower footprint or moving into the structure.

Materials matter, but labour usually drives the jump

Homeowners often focus on the price of silicone, grout, or tiles. That's understandable, but it's usually not where the cost blows out. Labour and process do that. Waterproofing needs correct preparation and curing. Tile removal takes care if the goal is to limit surrounding damage. Reinstatement has to restore falls, junctions, penetrations, and finish quality.

There's also the question of compliance. Wet area work isn't something to wing. If the bathroom is older, if previous repairs were done over the top of defects, or if the shower design has weak points, the new work needs to address those conditions properly.

Why registered builder oversight changes the outcome

When a registered builder assesses a leaking shower, the brief isn't just “stop the water today”. It's to identify the failure point, decide whether repair or replacement makes sense, and manage any larger implications for the room. That broader view often prevents false economies.

If the shower is one part of a tired wet area, the most cost-effective solution may not be another patch. It may be a targeted rebuild of the shower zone or a more extensive bathroom renovation that eliminates repeat failure points altogether.

Common Shower Leak Scenarios and Melbourne Price Ranges

Not every leak follows the same script. The easiest way to understand shower leak repair cost is to look at the kind of job you may be dealing with.

Localised grout and silicone failure

This is the scenario homeowners hope for. The shower still feels solid underfoot. Water staining is minor or only just beginning. Grout has cracked, silicone has pulled away at corners, and the shower is letting water escape at junctions rather than through a failed membrane.

In the Australian market, minor resealing tasks range from $350 to $900, while extensive repairs involving full waterproofing membrane replacement and retiling range from $2,000 to $4,000 or more, according to this national leaking shower cost guide.

A proper reseal can be a valid repair when the waterproofing beneath is still sound. A cosmetic reseal over an already failed substrate usually isn't.

Leaking tap hardware or shower fittings

Sometimes the leak isn't the shower recess itself. It's a worn washer, O-ring, tap set, or plumbing penetration. These jobs are often cheaper and less invasive, but they still need a proper diagnosis because plumbing leaks and waterproofing leaks can show similar symptoms from the outside.

If the issue is confined to hardware, the repair is often straightforward. If water has been escaping around penetrations for a long period, the surrounding wall lining or substrate may also need attention.

Failed waterproofing membrane

This is the job that catches people by surprise. The grout may look tired, but the bigger warning signs are a spongey floor, loose tiles, persistent damp smells, or moisture appearing outside the shower zone. At that point, the membrane has likely stopped doing its job.

Once that happens, there's no meaningful shortcut. Tiles usually need to come up, the substrate has to be inspected, waterproofing needs to be redone correctly, and the shower must be rebuilt to a compliant standard.

If water is already under the tiles, surface products won't reverse the damage. They only make the defect harder to diagnose later.

Cracked or leaking shower base

A shower base problem sits in the awkward middle ground. It may not require a full bathroom rebuild, but it can still involve substantial work depending on how the base ties into the wall finish, screen, and floor. If the surrounding structure has been wet for a while, the scope expands quickly.

In homes with open-plan or modern layouts, even a single failed element can create a broader rectification issue because the wet area design leaves little room for isolated repair.

Example shower leak repair costs in Melbourne 2026

Repair Scenario Common Cause Typical Cost Range (VIC)
Localised grout and silicone repair Cracked grout, failed silicone, minor junction leaks $350 to $900
Leaking tap hardware Worn washer or O-ring in compression faucet $50 to $200
General professional servicing to stop leaks Minor diagnostic and repair work $120 to $300
Shower base repair Shattered or leaking base $800 to $2,500+
Full membrane replacement and retiling Failed waterproofing behind tiles $2,000 to $4,000 or more

A cost guide only helps if it matches the actual failure. That's why inspections matter. Two showers can show the same cracked grout line and need completely different solutions.

DIY Fixes vs Hiring a Registered Builder

DIY shower leak repairs are tempting because the visible materials look simple. A tube of silicone, a grout touch-up product, a weekend of effort, and the problem appears solved. The risk is that many shower leaks aren't surface-level failures. They're building failures showing up on the surface.

A comparison chart showing the pros and cons of DIY versus professional shower leak repair services.

What DIY can do, and where it stops

DIY work can help with maintenance. Cleaning old sealant. Monitoring cracks. Replacing obviously deteriorated silicone in a low-risk area. Those jobs have a place if you already know the waterproofing system underneath is sound.

What DIY can't do is confirm whether the membrane has failed, whether the falls are wrong, whether movement is cracking the tile bed, or whether water has already reached framing or subfloor elements.

That's why quick-fix products often disappoint. High-quality shower waterproofing systems typically last 10 to 25+ years, while remedial or liquid-applied membranes used in quick-fix repairs generally last only 5 to 10+ years, as noted in this Australian waterproofing lifespan guide. A cheap patch can buy time, but it can also set up another failure cycle.

Why registered builder oversight matters

A registered builder doesn't just arrange a repair. They manage the whole wet-area problem. That includes diagnosis, scope, sequencing, trade coordination, compliance, and final responsibility for the result.

For homeowners, that matters in a few practical ways:

  • Compliance: Wet area work has to meet current standards and correct installation practice.
  • Trade management: Plumbing, waterproofing, screeding, tiling, and finishing often overlap.
  • Broader judgement: A builder can tell you when the shower is still repairable and when the bathroom has crossed into renovation territory.
  • Documentation and accountability: A proper scope of works is clearer than a verbal promise and a tube of sealant.

If you're comparing options, it helps to review a professional approach to fixing leaking showers before deciding whether a patch is worth doing.

DIY works best for maintenance. It works poorly as a substitute for diagnosis.

The long-term property value angle

Leaking showers aren't only inconvenient. They can affect saleability, tenant complaints, insurance discussions, and future renovation costs. Buyers and property managers notice bathrooms that feel soft underfoot, smell musty, or show evidence of repeated patching.

A compliant repair protects more than the shower recess. It protects the asset.

Our Leak Detection and Repair Process Explained

A proper leak job should feel organised from the first conversation. Homeowners don't need mystery, vague allowances, or a quote that changes shape every time another tile comes off. They need a clear process.

A six-step infographic detailing the professional shower leak repair process from initial contact to final warranty.

Step one to step three

The first part is about understanding what's happening, where it's happening, and how far it has spread.

  1. Initial contact
    The homeowner describes the symptoms. Ceiling stain, loose tiles, failed silicone, damp odour, shower screen leak, or water outside the recess.

  2. On-site assessment
    We inspect the shower, surrounding finishes, floor feel, tile condition, movement points, penetrations, and any signs of water migration beyond the wet area.

  3. Leak detection and scope
    When needed, we use more targeted assessment methods and then define the scope. If you're researching what this stage involves, this page on leak detection in Melbourne gives a good overview of how non-invasive diagnosis fits into a repair plan.

This short video gives a useful visual sense of how leak issues are identified and discussed on site.

Quote, repair, and quality control

Once the defect is identified, the next job is making the scope understandable. Good quotes don't hide the logic. They show whether the solution is a reseal, a base repair, a partial rebuild, or something larger.

At this stage, registered builder oversight becomes especially important in complex bathrooms. Melbourne-specific reporting notes that leak rectification for modern hobless showers can reach $6,800, and if the problem is diagnosed too late or incorrectly, some layouts can push owners into a $20,000 to $40,000 bathroom renovation, as discussed in this Melbourne-focused shower rectification article.

What the repair phase should include

A professional repair process usually includes:

  • Protection of the home: Dust control, floor protection, and careful demolition.
  • Licensed trade coordination: Plumbing, waterproofing, carpentry, and tiling where required.
  • Reinstatement with intent: Not just making it look finished, but restoring falls, junctions, and waterproof integrity.
  • Final inspection: Testing, finish review, and handover.

Melbourne Tiling Services P/L handles this type of builder-managed wet area work as part of its broader bathroom renovation and leak rectification service. That matters when a leaking shower turns out to be one piece of a larger bathroom failure rather than a stand-alone defect.

The repair should leave you with clarity. What failed, what was replaced, and why the chosen method fits the bathroom.

How to Reduce Costs and Prevent Future Leaks

The cheapest shower leak repair cost is usually the one tackled early. Once water gets into framing, ceilings, skirtings, or adjacent finishes, the leak stops being local.

In Victoria, ignoring a leaking shower can lead to secondary structural repairs costing $2,000 to $15,000+ and mould removal bills of $500 to $3,000+, according to this Victorian leak damage discussion. That's why speed matters.

How to keep the current job under control

A few practical steps can stop a repair from expanding unnecessarily:

  • Act early: Don't wait for visible ceiling damage downstairs or soft flooring around the shower entry.
  • Ask what's being diagnosed: A quote without a clear cause can be the first sign of a patch, not a solution.
  • Clarify the repair boundary: Make sure you understand what's included if hidden damage is found after tile removal.
  • Think beyond the recess: If the bathroom is old or poorly laid out, discuss whether a staged renovation makes more sense than repeated repairs.

A simple prevention checklist

Preventative maintenance isn't complicated, but it has to be consistent.

  • Inspect sealant lines: Check corners, wall-to-floor joints, and around screens for shrinkage, splitting, or mould.
  • Watch for movement: Loose tiles, drummy tiles, and cracking grout often point to something deeper than surface wear.
  • Pay attention to smell: A musty odour that returns quickly can indicate trapped moisture.
  • Keep the waterproofing system in mind: If the bathroom is ageing, preventive planning matters. This guide to how to waterproof a shower is useful if you want to understand what a proper system should include.

A homeowner doesn't need to become a builder. They do need to recognise that recurrent leaks are rarely solved by cosmetic maintenance alone.

Secure Your Home with a Professional Repair

A leaking shower can cost a few hundred dollars, a few thousand, or far more if the problem has spread into the structure. The wide range isn't random. It reflects the difference between a tired sealant joint and a failed wet-area system.

That's why the right first step is diagnosis, not guesswork. If the issue is minor, a targeted repair may be enough. If the membrane, base, or room layout has failed, the responsible answer may be a more substantial rebuild or one of the bathroom renovations that properly resets the space for the long term.

Registered builders approach these jobs differently because they have to. The work isn't just about stopping visible water. It's about compliance, coordinated trades, and protecting the home's value.

Screenshot from https://melbournetilingservices.com.au

Don't let a small leak become a renovation nightmare. Get the shower assessed properly, understand the full scope, and choose a repair path that fits the condition of the bathroom.


If you want clear advice on shower leak repair cost, compliant rectification, or whether the smarter move is a targeted repair or a full bathroom upgrade, contact Melbourne Tiling Services P/L for a free, no-obligation quote and a 3D estimate.