Marble Look Ceramic Subway Tile: A Melbourne Guide

You're standing in a Melbourne tile showroom with three samples in your hand. One is a glossy marble-look ceramic subway tile, one is a large Carrara-style porcelain slab, and the third is real marble with veining no printer can fully reproduce. You want the classic look without the sealing, weight and maintenance, but you also know a bathroom renovation can expose weaknesses that a showroom never will.

The right choice isn't decided by the prettiest sample. Water absorption, slip resistance, dimensional tolerance, grout design and compliant waterproofing determine whether marble look ceramic subway tile belongs on your shower wall, splashback, feature wall or floor. This guide gives you the practical Melbourne answer, including installation under AS 3958:2023, wet-area requirements under the NCC, grout maintenance, sourcing risks, Victorian permits and the role of registered builders.

Table of Contents

The Marble Look Trend in a Melbourne Bathroom

A Melbourne bathroom can look expensive in the showroom and disappoint once the shower is running. Marble look ceramic subway tile offers the familiar narrow format, printed Carrara or Calacatta-style veining and less routine maintenance than natural marble. It is a practical design choice, provided the product and installation suit the wet area.

The construction is straightforward: a fired ceramic body, a printed glazed surface carrying the marble pattern and a clear protective finish. The pattern creates the stone effect, while the ceramic body provides the tile's shape and base. A convincing print still cannot reproduce the variation of quarried marble.

The practical distinction: “Marble look” describes the finish, not the material.

A subway tile is usually rectangular, with a length roughly twice or three times its width. Running bond is the familiar layout, while stacked, vertical and restrained herringbone arrangements produce a different feel. The format creates more joints and alignment decisions than a large panel. On a Melbourne renovation, accurate setting-out and consistent joints matter as much as the printed design.
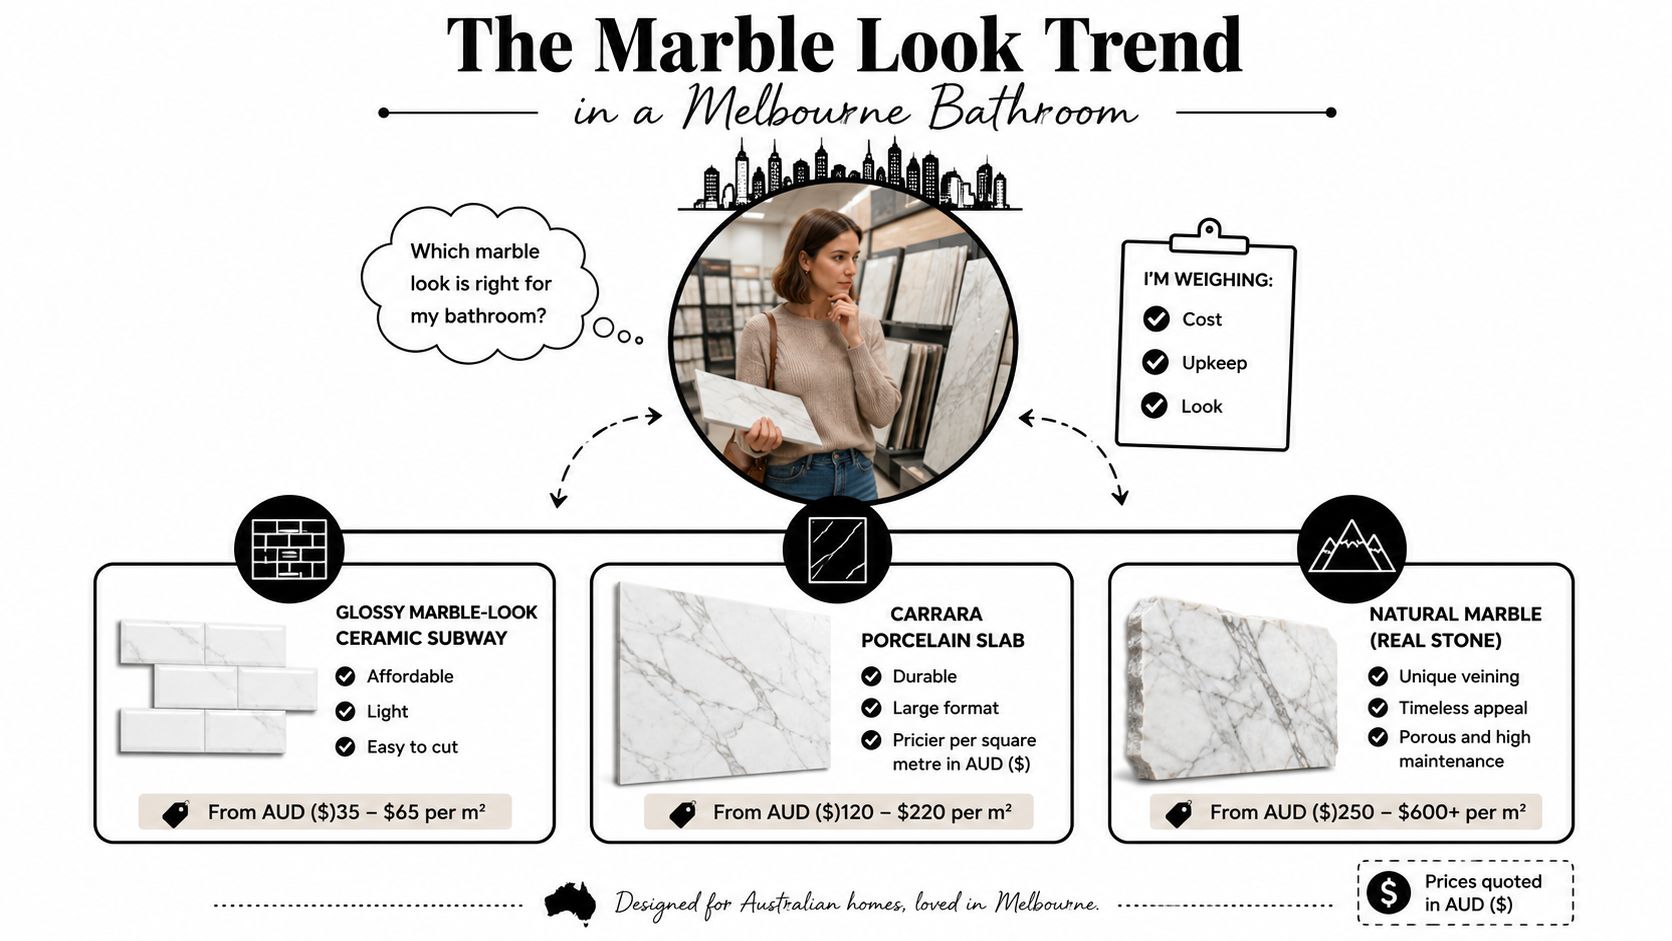
A comparison infographic showing prices and features of glossy ceramic subway, porcelain slab, and natural marble tiles.

Australia's supply chain affects availability, replacement matching and delivery times. Australia imported 40,120,185 square metres of ceramic tiles in 2019, down 12.1% from 45,577,062 square metres in 2018, with China supplying 70.6% of import volume, according to Australian ceramic-tile import analysis. Overseas manufacturing and freight can affect what remains available after installation.

Record the product code, calibre and shade before work begins. Confirm batch availability before demolition, then keep spare tiles for future repairs. A close replacement may still differ visibly in tone, size or veining.

What the showroom label doesn't tell you

Soft grey veining can look calm on a sample board and become busy across a full shower. High-contrast patterns may resemble luxury stone under bright showroom lighting but dominate a compact ensuite. Recent Australian bathroom design coverage favours softer, subtler marble veining over dramatic patterns, as discussed in current ceramic-tile design coverage.

The pattern also says nothing about floor suitability. Check the declared water absorption classification under AS 13006 and ISO 13006, the slip classification under AS 4586, and the manufacturer's dimensional-tolerance information. A marble-look tile can match the colour brief and still be unsuitable for a hobless shower floor.

Treat the glossy marketing as the starting point, not the specification. For walls, it can deliver the look efficiently. For floors, choose based on tested performance, compliant wet-area detailing and grout maintenance, not appearance alone.

Ceramic Subway Versus Natural Marble and Porcelain

Marble-look ceramic subway tile sits between natural marble and porcelain in both appearance and practical performance. Natural marble offers authentic variation and a surface that develops character, but it's porous, heavier and more demanding to maintain. Porcelain delivers density and large-format drama, yet it can be less forgiving to cut and doesn't give you the same narrow, hand-laid rhythm.

Australian ceramic demand provides useful context. Industry market data estimated 2024 ceramic-tile consumption and imports at approximately 43 million square metres, with import volume increasing 7% year on year and import value reaching about A$416 million, according to Australian bathroom-tile market data. Marble-look subway tile sits within this mainstream imported ceramic category, not a niche decorative market.

Material Typical Cost (per m² installed) Weight and Thickness Sealing Needed Best Fit in a Melbourne Bathroom
Marble-look ceramic subway Obtain a project-specific quote Generally lighter and easier to handle than slabs The tile face generally doesn't require stone sealing, but grout still needs care Shower walls, splashbacks and feature walls when the product is correctly specified
Marble-look porcelain slab Obtain a project-specific quote Larger, denser panels that require careful handling Usually no stone sealing, subject to the product system Large-format walls and high-impact contemporary bathrooms
Natural marble Obtain a project-specific quote Heavy stone with unique variation Ongoing sealing and maintenance are normally part of ownership Carefully detailed feature areas where authentic stone is the priority

The ceramic option is the sensible choice when you want the subway format, a lighter installation and a controlled visual pattern. It's also easier to replace if you've documented the batch and stored spares. Natural marble is the choice for people who value genuine stone more than convenience. Porcelain wins when uninterrupted surfaces and density matter more than individual small tiles.

For a more detailed material comparison before you select a product, review porcelain versus ceramic tiles. The important point is that material choice must follow the room zone, not the other way around.

Where Marble Look Subway Works and Where It Doesn't

Use marble-look ceramic subway tile on vertical surfaces first. Shower walls, vanity splashbacks, kitchen splashbacks and feature walls behind a freestanding bath are where the format performs best visually and practically. A full-height shower wall can carry the veining without exposing the tile to the direct wear and barefoot grip demands of a floor.

Laundry splashbacks are another strong application. They benefit from a wipeable glazed face and a classic pattern that works with cabinetry, troughs and utility fittings. A restrained running bond usually suits a busy laundry better than a complicated layout.
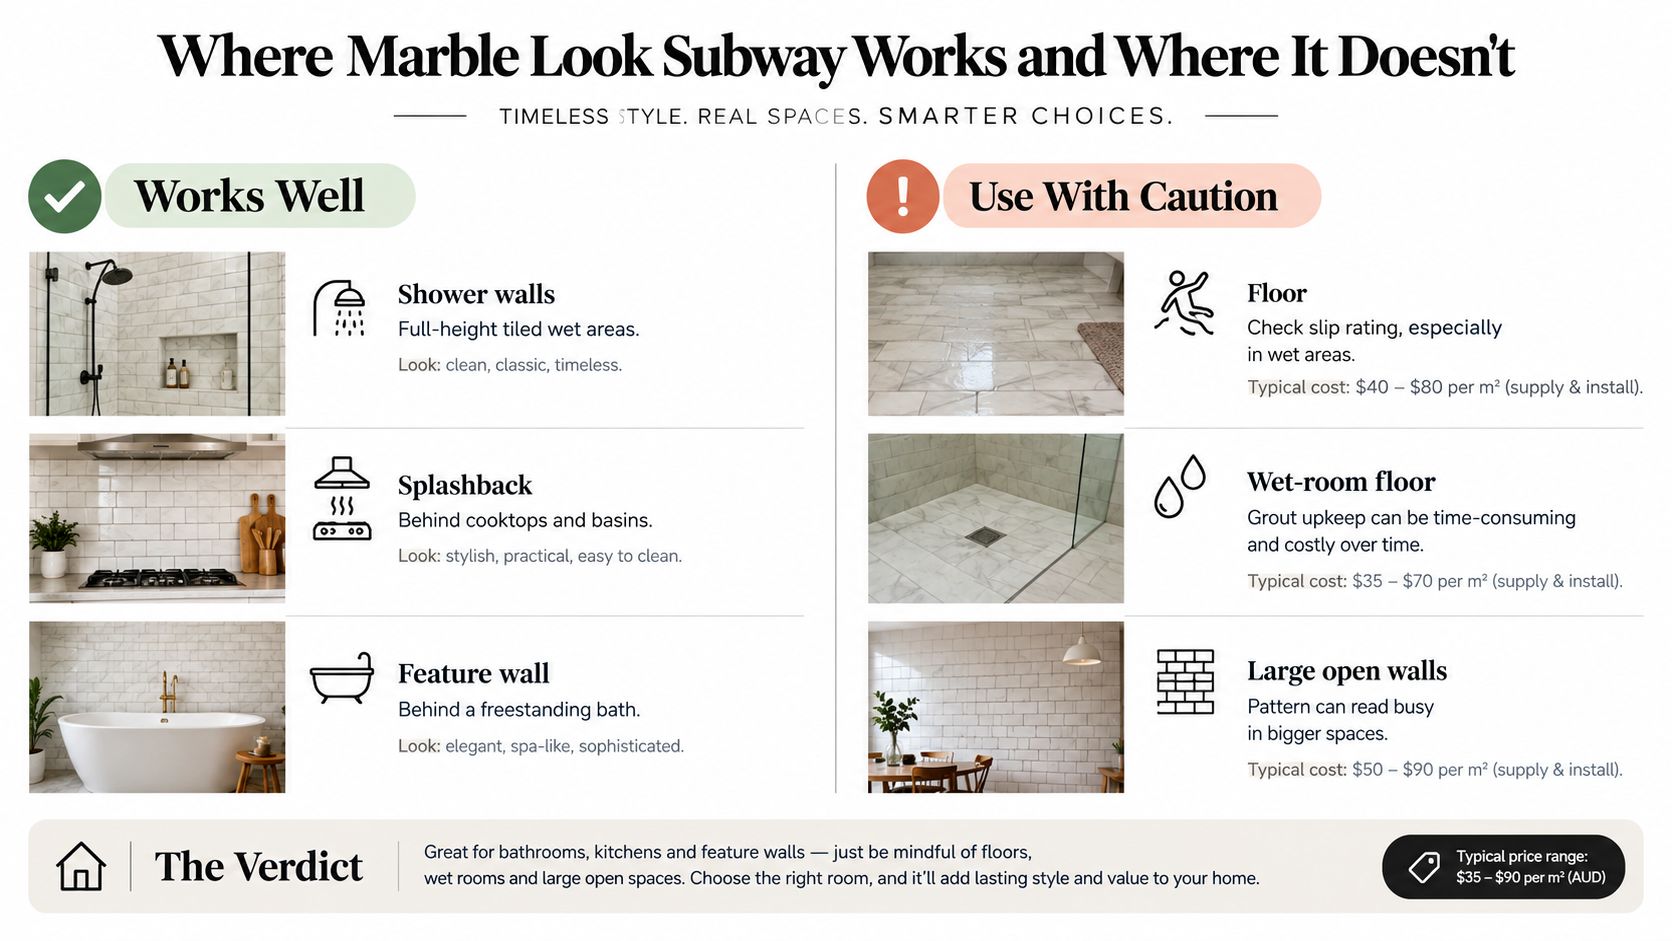
A comparison infographic showing where marble look subway tiles work well and where to use caution.

The shower-floor trap

A glossy marble-look subway tile may be marketed for bathrooms, but that doesn't make it suitable for a shower floor. Slip resistance must be verified under AS 4586, and wet barefoot areas may require P4 or P5 performance, according to Australian tile safety guidance. Glazed ceramic can become substantially more slippery when wet.

Grout joints don't automatically make a surface safe. Small tiles may create more joints, but joint quantity alone doesn't establish compliance. The exact tile, finish, grout, slope and cleaning regime need to work together.

Decision rule: If the supplier can't provide the product's documented AS 4586 classification for the intended zone, don't use it there.

For a hobless shower, choose a floor-rated product with documented wet barefoot performance. Keep the marble-look subway tile on the walls unless the manufacturer specifically supports the floor application and the classification suits the design.

Installation Standards That Protect Your Renovation

AS 3958:2023 sounds technical, but its homeowner implications are straightforward. The wall must be sound, clean, dry, sufficiently flat and dimensionally stable before the installer begins. A glossy, low-absorption tile won't hide a crooked substrate. It will highlight lippage, inconsistent joints and awkward cuts around niches and fittings.

The installer should prime compatible surfaces, use the correct notched trowel and achieve full adhesive coverage. Dabs and voids behind small-format tiles create weak spots and can leave areas vulnerable to impact or moisture-related problems. Ask for the adhesive product name and retain the installation paperwork.

For wall tiles with water absorption below 3%, the cited Australian guidance calls for at least a C2 cementitious adhesive or an R1 reaction-resin adhesive. Don't let anyone choose a basic adhesive by habit. Confirm the tile's declared absorption classification first, then match the adhesive to the product and substrate.
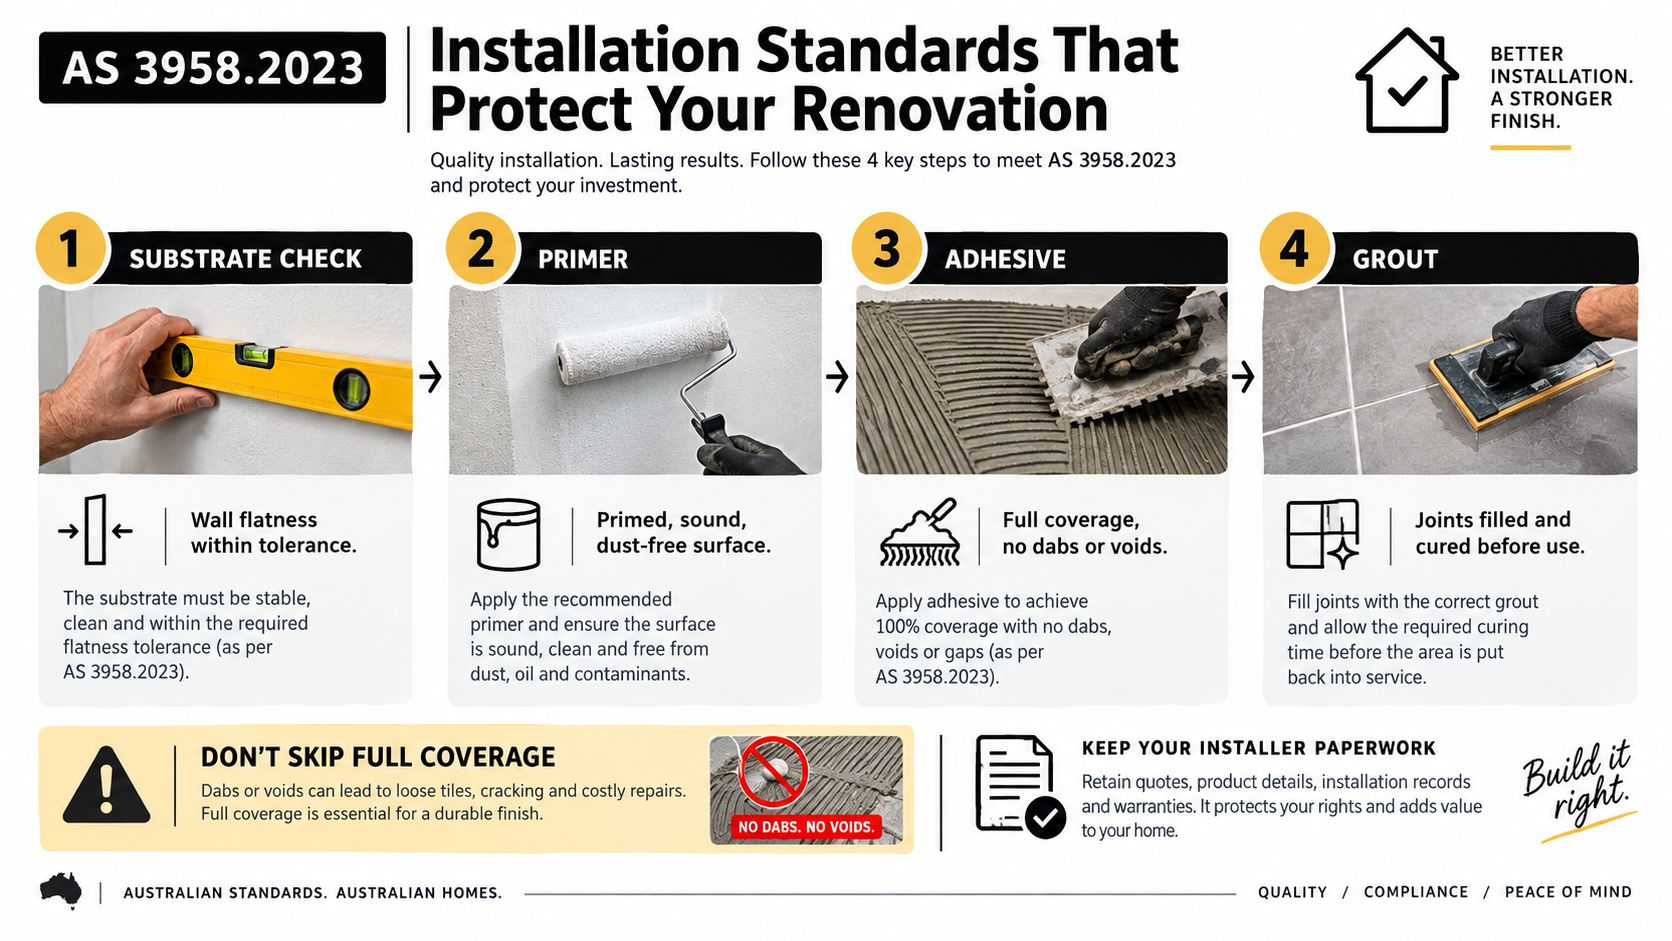
An infographic detailing the four key steps for professional tile installation according to Australian Standard AS 3958.2023.

Waterproofing sits behind the look

The tile isn't the waterproofing system. Under the NCC, shower walls must be waterproof to at least 1,800 mm above the floor substrate, while the shower floor, including any hob or step-down, must be waterproof. Wall junctions and joints inside the shower area also require waterproofing, as set out in the NCC waterproofing requirements for houses.

The membrane may sit above or below the tile bed or screed, depending on the compliant construction method. Corners, changes of plane, penetrations and junctions need proper detailing within that system. A flexible movement joint at a change of plane is a quality-control measure, not an optional decorative detail.

Before work starts, ask for a written specification covering the membrane system, substrate preparation, adhesive, grout, movement joints and curing requirements. The Australian bathroom waterproofing standards guide is a useful reference for the questions your installer should answer.

Grout Choices That Make or Break the Look

Grout sets the visual rhythm of a marble-look subway wall. A coordinated mid-tone grout keeps the printed veining calm and refined. Bright white joints create a sharper grid and can make the pattern look busier than intended.

For soft grey veining in a Melbourne ensuite, choose warm white, pale grey or a grout matched closely to the tile. Light grout supports the classic marble effect, but shows soap residue and discolouration sooner. Mid-tone grout hides everyday marks better in a busy household, particularly where ventilation is inconsistent.

Choose the joint before the tile is fixed

A narrow, even joint suits the clean lines of a pressed subway tile. Your installer should follow the manufacturer's tolerance and recommended joint width, rather than forcing tiles into an excessively tight grid. Confirm the layout dry, including corners, niches, windows and plumbing penetrations. These details reveal poor planning before adhesive is applied.

For wet zones, compare cementitious and epoxy grout by cleaning requirements, colour stability and installer experience. The practical differences are covered in this guide to epoxy grout versus cement grout. Epoxy can suit demanding areas, but application must be handled properly. Cementitious grout may be simpler to repair or replace, depending on the product and installation.

A useful test: View the tile and grout sample together under bathroom lighting, not only under showroom lights.

Quieter marble veining gives you more freedom with grout colour than a high-drama print, but the choice still needs to be deliberate. Set perimeter joints at corners and changes of plane with a flexible sealant compatible with the wet-area system. Do not pack those movement points rigidly with cementitious grout, because the joint must accommodate movement without cracking or breaking the finish.

Living With the Tile Day to Day

Marble-look ceramic is easier to live with than natural marble, but small-format subway tile creates more grout joints. The tile face may resist ordinary bathroom staining, while the joints collect soap residue, body oils and cleaning residue. Calling the wall “low maintenance” without discussing grout is incomplete.

Use a simple routine:

  • After showering: Squeegee excess water from the walls and rinse away residue.
  • Each week: Clean with warm water and a mild, pH-neutral cleaner.
  • During cleaning: Use a soft cloth or non-abrasive pad, then rinse and dry the surface.
  • For grout: Follow the grout manufacturer's maintenance instructions rather than applying stronger chemicals by default.

Australian product guidance recommends regular removal of grit and mild, pH-neutral cleaning, while warning that abrasive chemicals can damage tile surfaces. Acidic descalers can also attack grout and leave the installation looking patchy.

Keep a neutral cleaner, soft cloths, a soft brush for grout and a squeegee in the bathroom. Leave abrasive powders, harsh scouring pads and aggressive acidic products on the shelf. If the shower screen is contributing to the hard-water appearance, use this practical shower screen cleaning guide alongside your tile-care routine.

Ventilation matters as much as the product selection. Run the exhaust fan during and after showers, keep the room aired and deal with discolouration early. The goal isn't to make the wall maintenance-free. It's to make the maintenance predictable enough that the marble effect still looks deliberate years after installation.

Melbourne Sourcing, Permits and Registered Builders

A marble-look ceramic subway tile can be the smallest part of a Melbourne bathroom renovation. Demolition, carpentry, plumbing, electrical work, waterproofing, screeding, glazing and tiling all need to happen in the right order. Before choosing the tile, establish who controls sequencing, permits, inspections, documentation and defect rectification.

A building permit is written approval from a registered building surveyor confirming that the approved plans and specifications meet building regulations. Check permit requirements before work starts, especially if the renovation changes walls, plumbing layouts, structural elements or the building envelope. A registered private or municipal building surveyor can advise on the project.

Know the Victorian thresholds

Consumer Affairs Victoria states that renovation work worth more than $10,000 generally requires registration with the Building and Plumbing Commission, although some single-trade categories, including wall and floor tiling, are exceptions. Structural building work requires registration regardless of project value, and structural work also requires a building permit. Work above the general renovation threshold requires a major domestic building contract, according to Victorian guidance on builders and tradespeople.

Owner-builders have a separate requirement. A Certificate of Consent from the Building and Plumbing Commission is required before carrying out works over $16,000, as explained in the Victorian owner-builder checklist. This threshold is separate from the general $10,000 builder-registration and contract threshold.

For a multi-trade renovation, a Registered Unlimited Builder is usually the clearest choice. One accountable party can coordinate the programme, trade interfaces and compliance questions, rather than leaving each contractor responsible for only one part of the bathroom.

Source tiles before demolition

Ask the supplier for the product code, shade, calibre, absorption classification, slip data and current batch availability. Order enough tiles from one batch for the planned work, then retain spares for future repairs. Imported ceramic products can become difficult to match when a production run changes.

A tile specification should also sit beside the builder's paperwork. Record the selected product, intended location, grout requirements and installation responsibilities before demolition begins. If you are assessing how a trades business presents its capability online, Kultiva Marketing Agency services for trades offers relevant context. For your renovation, require the builder to provide the scope, responsibilities, product selections and completion records in writing.

Putting It All Together for Your Project

Give your builder a written specification, not a Pinterest photograph. Name the marble-look ceramic subway tile, product code, shade, calibre, absorption classification, dimensional tolerance and AS 4586 slip data. Assign it to walls, splashbacks or feature areas only when the product documentation supports that location.

Lock in the construction system before demolition:

  1. Confirm the wet-area design. Mark the shower floor, shower walls, junctions, penetrations and membrane position under the selected compliant method.
  2. Approve the substrate and adhesive. Require a sound, prepared wall and the correct C2 cementitious or R1 resin adhesive when tile absorption is below 3%.
  3. Set the visual controls. Approve the running bond or stacked layout, grout colour, joint width, trim and movement-joint details.
  4. Protect future repairs. Record batch information and store spare tiles in a dry, labelled location.
  5. Clarify the contract. Confirm which registered builder coordinates trades, permits, inspections, waterproofing records and completion documents.

Budgeting must be clear. Request a written scope, free quote, 3D drawings and a renovation calculator that separates demolition, plumbing, electrical work, waterproofing, tiling, glazing, fixtures and allowances. This exposes changes before they become costly variations.

If you act as an owner-builder, keep the $16,000 Certificate of Consent threshold separate from the $10,000 threshold that generally triggers builder registration and a major domestic building contract. These requirements are set out in Victorian owner-builder guidance published by Consumer Affairs Victoria. A tile selection does not determine the permit position. The building work and delivery model do.

Marble-look ceramic subway tile suits a Melbourne bathroom when it stays on the right surface, uses a compliant wet-area system and has a grout plan suited to daily cleaning. Choose it for the appearance, then approve it for performance.

Melbourne Tiling Services P/L offers start-to-finish bathroom and ensuite renovations, waterproofing, compliant tiling and coordinated trade management across Melbourne and greater Victoria. Visit Melbourne Tiling Services P/L to request a free quote, review 3D design options and plan your marble-look tile renovation with a Registered Unlimited Builder.
Porcelain Tiles Bathroom Guide for Melbourne Renovations

If you're planning a bathroom renovation in Melbourne, you're probably doing what most homeowners do at the start. Comparing tile samples, saving photos, and trying to work out why one porcelain tile costs more than another when they can look similar on a display board. The problem is that a bathroom isn't just a styling exercise. It's a wet area, a regulated build zone, and one of the easiest rooms in the house to get badly wrong if the product choice and the work underneath it don't match.

That's why porcelain keeps coming up in serious bathroom discussions. It has the look range people want, but it also offers the technical performance that suits showers, floors, walls, and busy family bathrooms. The global porcelain market was valued at USD 10.32 billion in 2025 and is projected to reach USD 18.13 billion by 2034 according to Fortune Business Insights' porcelain market outlook. For homeowners here, that scale matters because it supports broad product availability, better finish options, and ongoing investment in premium bathroom surfaces.

From a registered builder's perspective, tile choice is only one part of the job. The substrate, screed, waterproofing, set-out, drainage, and installation standards all matter just as much as the tile itself. A porcelain tiles bathroom should look sharp on day one, but it also needs to stay sound after years of steam, cleaning, movement, and daily use.

Table of Contents

Your Melbourne Bathroom Renovation Starts Here

A lot of bathroom projects begin with one simple question. “What tile should we use?” That sounds straightforward, but in practice it usually sits on top of bigger decisions about budget, layout, waterproofing, compliance, and who's coordinating the job.

In Melbourne homes, I often see two patterns. The first is a homeowner who has a clear visual style in mind but hasn't yet thought about falls, drainage, substrate movement, or slip safety. The second is a homeowner replacing a failed bathroom where the old tile might not have been the problem at all. The waterproofing, floor prep, or poor installation was.

That's why porcelain is usually where the serious conversation lands. It suits modern ensuites, compact family bathrooms, and higher-end renovations because it gives you a wide design range without asking you to compromise on wet-area performance. It can look restrained and architectural, or warm and textured, but the practical value is what keeps it in the specification.

A bathroom renovation works when the visible finish and the hidden build-up are treated as one system.

Registered builders look at the full chain. Not just tile colour and grout line. The order of trades, the condition of the substrate, the waterproofing method, penetrations, shower screen placement, and the final set-out all need to line up. If they don't, an expensive porcelain tile won't save the room.

For homeowners, that's the useful shift in mindset. Don't judge a porcelain tiles bathroom only by what's in the showroom. Judge it by how well it will perform once the room is used every day.

What Makes Porcelain the Ultimate Bathroom Tile

Porcelain is often described as a premium tile, but that's not really the key point. In bathrooms, what matters is performance.

Performance matters more than appearance

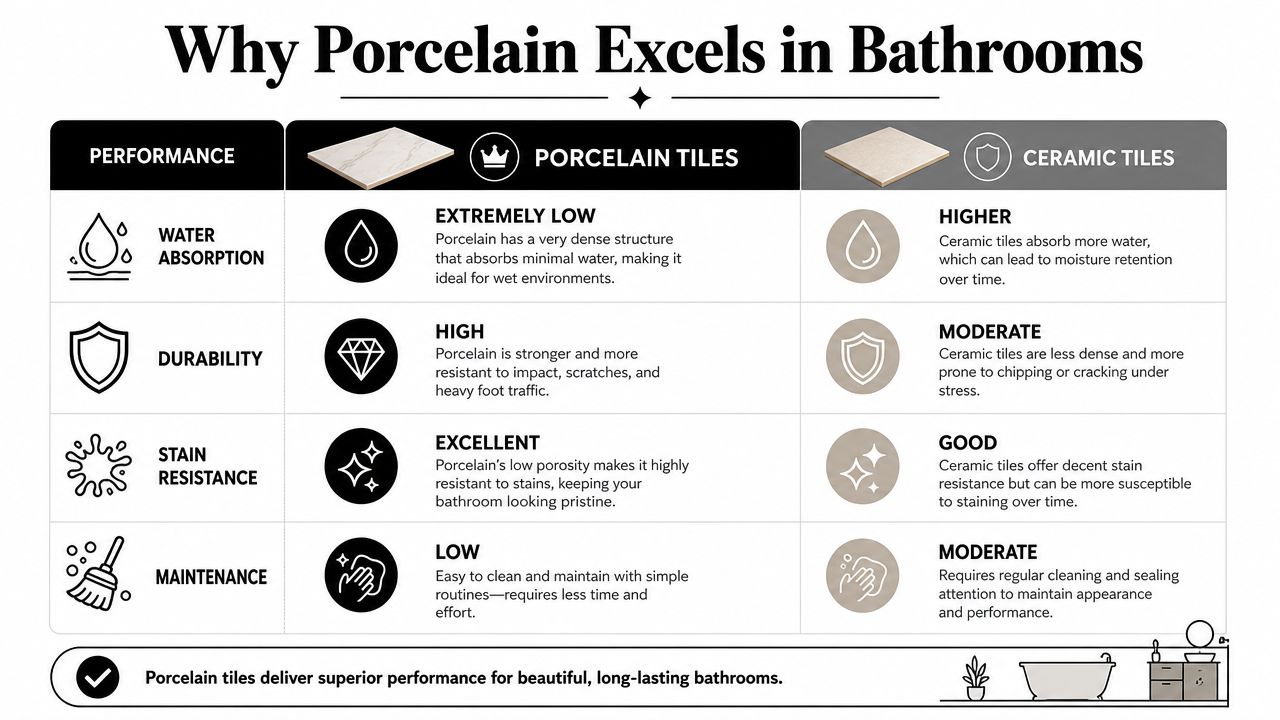
In Australia, a tile is classified as porcelain only if it has a water absorption rate of 0.5% or less, according to Australian industry guidance on porcelain tile performance. That threshold matters because bathrooms are exposed to constant moisture, steam, and cleaning. A dense, impervious tile body is far better suited to those conditions than a more absorbent alternative.

Many homeowners get misled. They look at a tile's surface finish and assume that's the whole story. It isn't. Two tiles can appear similar on the face, but the body of the tile can behave very differently once installed in a shower or on a bathroom floor.

A comparison chart showing why porcelain tiles are superior to ceramic tiles for bathroom flooring and walls.

Industry guidance for shower applications also describes porcelain as having water absorption of less than 0.5%, which places it in the impervious classification used under ASTM/ANSI-style standards in Robbins' guide to porcelain tile for showers. In practical terms, low porosity helps limit moisture migration into the tile body during repeated wetting and drying cycles.

Porcelain vs ceramic in a real bathroom

A porcelain tile and a standard ceramic tile don't behave the same way in a wet room. That difference shows up over time, not just on install day.

Feature Porcelain Tiles Ceramic Tiles
Water absorption Very low. Classified as porcelain at 0.5% or less Higher than porcelain
Density Dense and impervious Less dense
Bathroom suitability Strong choice for wet areas, showers, floors and walls Better suited to less demanding areas
Stain resistance Strong due to low porosity More dependent on product type and finish
Maintenance Generally low-maintenance Can require more caution in wet areas
Cutting and installation Harder to cut, needs proper tools and experience Usually easier to work with
Cost position Often a higher upfront material and labour choice Often lower upfront cost

The trade-off is simple. Porcelain usually costs more to buy and install, and it's less forgiving during cutting and laying. But in bathrooms, it earns that extra care.

Practical rule: If a tile is going into a shower base, bathroom floor, or any surface that gets wet often, performance should come before appearance.

That doesn't mean ceramic has no place. It can still work well on some bathroom walls or lower-demand areas. But if you want one material that covers most bathroom applications with fewer compromises, porcelain is usually the safer specification.

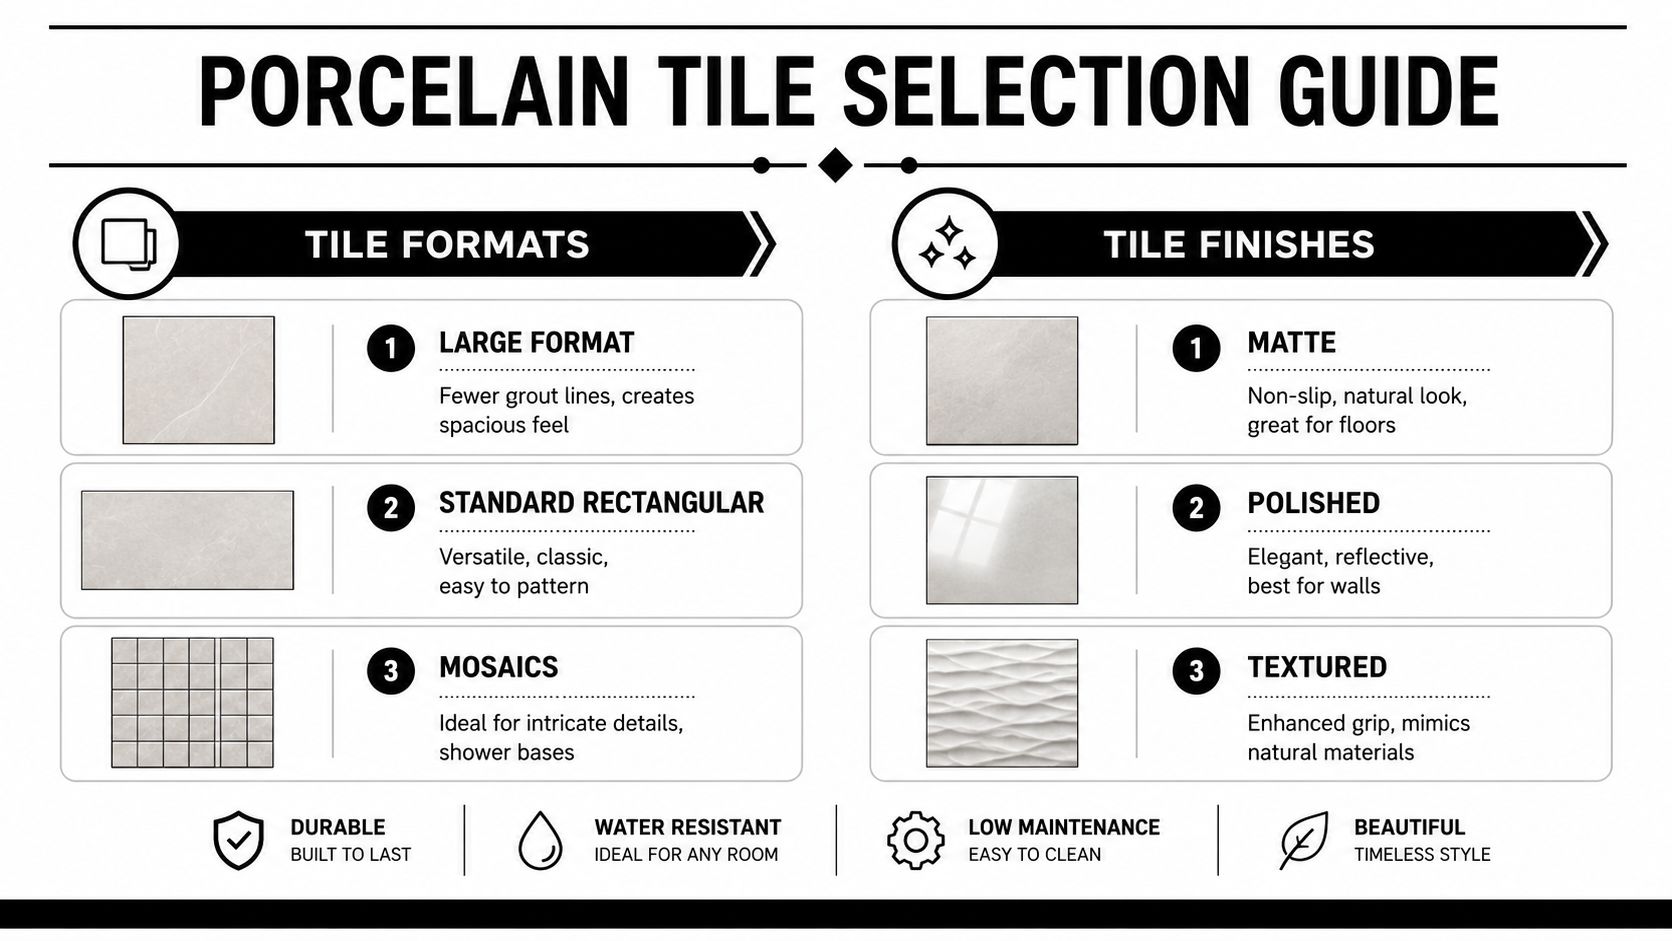
Choosing the Right Porcelain Format and Finish

Choosing porcelain isn't the end of the decision. The format and finish change how the room looks, how safe it feels underfoot, and how forgiving it'll be to live with.

A professional infographic titled porcelain tile selection guide showing different tile formats, finishes, and durability benefits.

Format changes the way the room works

Large-format porcelain has become a standard request in Melbourne bathrooms for good reason. Fewer grout lines usually create a cleaner look, and the room can feel calmer and more spacious. On walls, that can be a major visual improvement. On floors, it can work very well too, but only if the set-out and substrate are right.

For homeowners considering slabs and oversized pieces, it helps to look at examples of large-format tile installations for bathrooms and interiors. The visual effect is strong, but the installation tolerance tightens as the tile size increases. Small errors in floor prep that might be hidden by smaller tiles become obvious with larger ones.

Some practical format choices:

  • Large format tiles work well on main bathroom walls and open floor areas where you want fewer grout joints.
  • Standard rectangular tiles are easier to set out around niches, windows, and tighter spaces.
  • Mosaics still make sense on some shower floors because they adapt more easily to falls and drainage points.

Finish affects safety as much as style

Finish matters more than many showrooms explain. A glossy tile may look sharp on a wall, but that doesn't make it the right choice for the floor. In wet areas, slip resistance has to be part of the selection process, not an afterthought.

Independent tile guidance notes that unglazed or textured porcelain generally offers better slip resistance than highly polished glazed tile, especially for bathroom floors and shower bases, as outlined in clé's guidance on glazed vs unglazed porcelain. That lines up with what works on real jobs. High-shine finishes often belong on walls. Matte, textured, or unglazed finishes are usually the safer call underfoot.

A simple way to understand it:

  • Polished porcelain suits walls where reflection and a crisp finish are the goal.
  • Matte porcelain is a strong all-rounder. It looks controlled and is often easier to live with.
  • Textured or unglazed porcelain is often better for shower floors and bathroom floors where traction matters.
  • Lappato or semi-polished finishes sit somewhere in between and need careful placement.

The right finish depends on where the tile is going. Wall decisions and floor decisions shouldn't be made the same way.

Through-body porcelain and long-term wear

This is one of the most overlooked details in a porcelain tiles bathroom. Through-body porcelain has colour and pattern running through the full thickness of the tile, so chips are less visually obvious than they are on surface-only products.

That matters most on floors, step transitions, and busy bathrooms where hard objects get dropped. Product coverage from Architessa's through-body porcelain range also reflects the wider shift toward anti-slip, unglazed, and performance-led porcelain choices for bathrooms and high-traffic spaces.

If you want a clean summary, choose format for layout, choose finish for safety, and choose body type for durability. Most bathroom tile mistakes happen when homeowners pick only on colour.

The Foundation of a Flawless Tiled Bathroom

The tile is the visible finish. The foundation of the bathroom's success lies beneath it.

A registered builder looks at the room as a sequence of risk points. Floor deflection, wall condition, shower falls, waste placement, waterproofing continuity, movement joints, and penetrations all affect whether the bathroom stays sound. If any one of those is wrong, the porcelain on top won't fix it.

Waterproofing is not the place to improvise

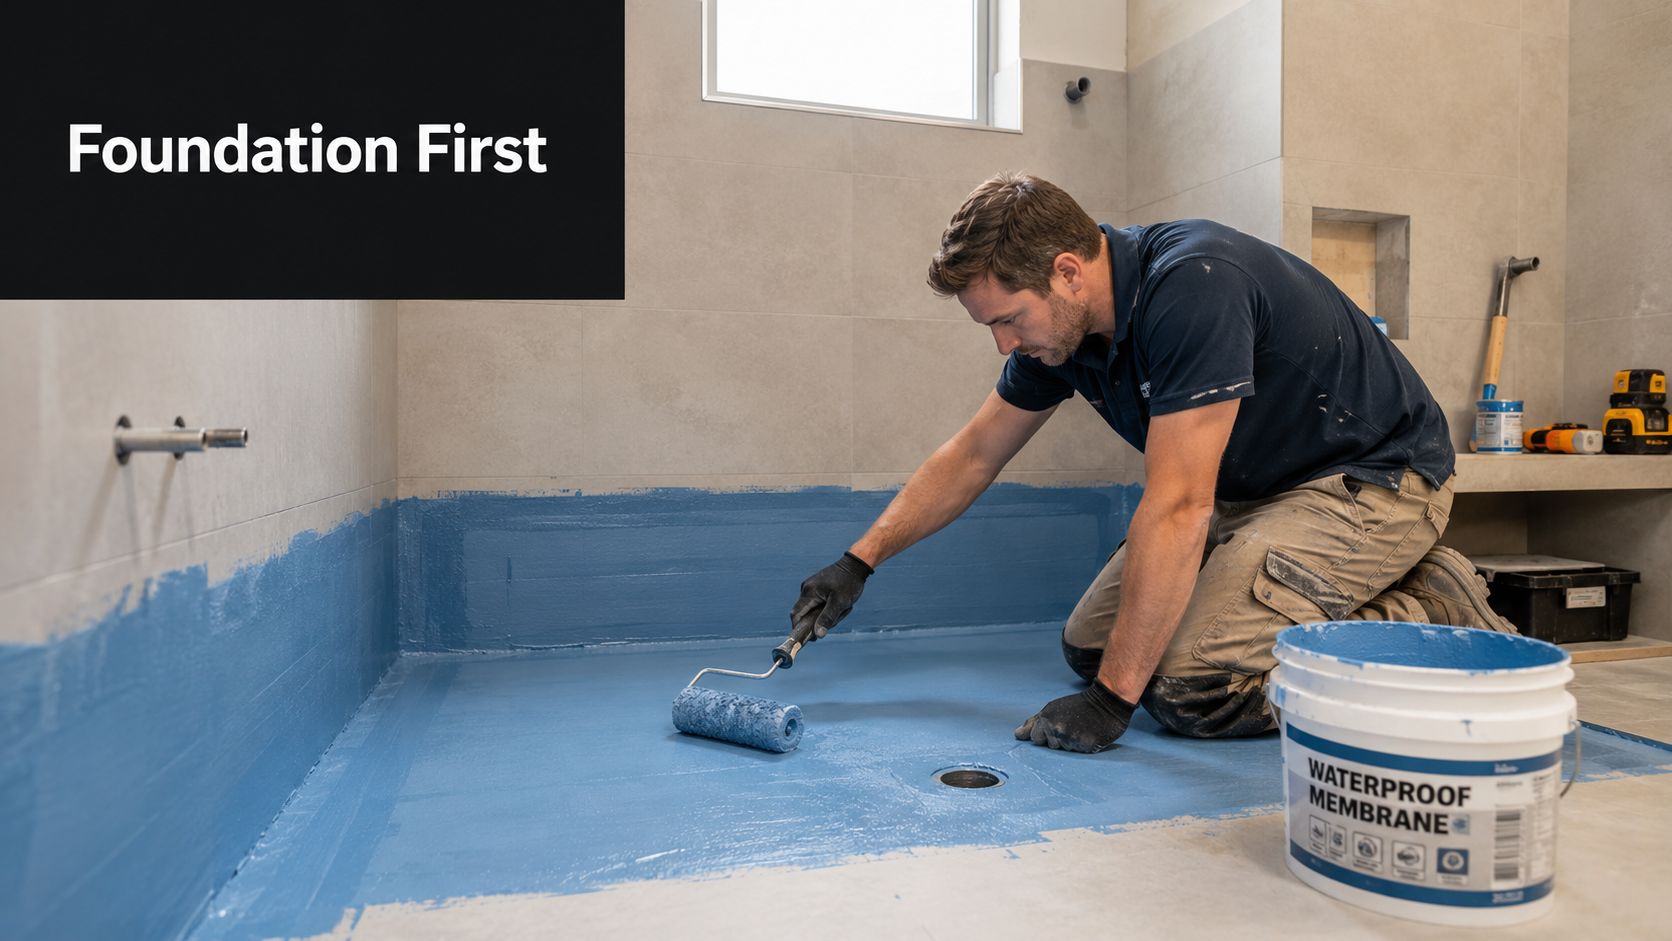
In a bathroom renovation, waterproofing has to be treated as core building work, not a side task squeezed in before tiling. The membrane has to suit the substrate, the detailing has to be correct, and the whole wet area assembly has to be executed with care.

A professional tradesman applying blue waterproof membrane to a shower floor with a paint roller.

Homeowners who want a practical overview of local wet-area requirements can read more about bathroom waterproofing work in Melbourne. The main point is simple. If waterproofing is rushed, patchy, or incompatible with the substrate, the failure may not show up immediately. When it does, the repair is rarely minor.

A leaking bathroom often starts as an unseen installation problem, not a tile problem.

Flat, level, and properly drained

Substrate preparation is where many bathrooms are won or lost. Large-format porcelain needs a flat surface. Shower floors need proper falls to waste. Walls need to be plumb enough that layout lines stay true and lippage is controlled.

This usually involves steps such as:

  • Screeding the floor correctly so water runs where it should.
  • Using self-levelling compounds where needed to create a suitable surface for tile installation.
  • Checking framing and sheeting alignment before any membrane or adhesive goes on.
  • Planning penetrations early so mixers, wastes, niches, and shower screens don't compromise the set-out.

A bathroom can look neat at handover and still have hidden defects if those basics were skipped. That's why experienced renovators focus so much on the unseen work. It's what protects the visible finish.

Porcelain Tile Installation and Renovation Costs

A bathroom budget can drift fast once the old room is stripped out and the hidden work shows itself. I see it often in Melbourne renovations. The porcelain tile selection is usually settled early, but the primary cost sits in everything required to install it properly and leave the room compliant, serviceable, and durable for years.

Why porcelain installation costs more than many homeowners expect

Porcelain is hard, dense, and exacting. That is part of its appeal, but it also means the installer has less margin for error. Cutting takes better equipment. Large-format tiles take more handling care, flatter surfaces, and tighter set-out control. If the room is out of square, the walls are out of plumb, or the floor has poor falls, porcelain tends to show every one of those problems.

The labour component often rises for practical reasons, not sales reasons. Good installers spend time dry-laying key areas, checking levels, planning trim positions, and making sure fixtures line up with grout joints and tile centres where possible. In a full renovation, that work only happens properly when tiling is coordinated with demolition, plumbing, electrical, waterproofing, and fit-off.

That coordination matters just as much as the tile itself.

Common cost drivers include:

  • Tile size and thickness. Larger porcelain usually needs flatter substrates, more careful handling, and more time on the saw.
  • Room condition after demolition. Damaged sheeting, uneven floors, and rotten or swollen substrate materials add repair work before tiling starts.
  • Detailing requirements. Niches, mitred corners, feature walls, linear drains, and recessed wastes all increase labour.
  • Access and site conditions. Tight inner-suburban properties, apartment access, and limited parking can affect delivery, waste removal, and setup time.
  • Add-ons integrated into the build. If you are considering under-tile heating for bathroom renovations, the wiring layout, thermostat position, floor build-up, and testing all need to be allowed for before tiling begins.

What a bathroom renovation budget actually covers

Homeowners often compare quotes by tile rate alone, then wonder why one figure is much higher than another. In a bathroom renovation, the tile installation cost is only one part of the total. The broader budget usually includes demolition, disposal, substrate repairs, waterproofing, plumbing rough-in and fit-off, electrical work, tiling, sealing, silicone, and fixture installation.

A builder-led scope usually breaks down more clearly because it reflects the full sequence of work, not just the visible finish:

Budget area What it generally relates to
Preliminaries Site protection, demolition, strip-out, waste removal
Wet-area preparation Substrate repairs, floor screeding, wall straightening, waterproofing
Services Plumbing and electrical rough-in, connections, fit-off
Tiling works Adhesive, tile installation, trims, grout, silicone
Fixtures and finishes Vanity, bath, shower screen, toilet, tapware, mirrors, accessories
Project management Trade coordination, inspections, scheduling, defect prevention

The trade-off is simple. A lower quote can look attractive at contract stage, but if it excludes preparation work or leaves grey areas around waterproofing, set-out, or fixture coordination, the final cost can climb once the job is underway. I would rather see a homeowner get a blunt, well-scoped price at the start than a cheap allowance that falls apart halfway through the build.

How to assess value, not just price

The best cost question is not “What do porcelain tiles cost per square metre?” It is “What is included to get this bathroom built properly?” Those are very different questions.

A sound quote should identify who is responsible for demolition, substrate rectification, waterproofing, tile supply or tile handling, trim details, grout type, silicone work, and final fit-off. It should also be clear about whether the person pricing the job is only tiling the room or managing the renovation sequence as a whole. Melbourne Tiling Services P/L can be considered on that basis alongside other registered renovation providers if you want one scope covering both the tiling work and the wider bathroom build.

That is usually where long-term value is decided. A porcelain bathroom that is installed on the right base, with the right falls and trade sequencing, costs more to do well. It also avoids the far more expensive exercise of repairing leaks, cracked tiles, drummy floors, or failed finishes after handover.

Design and Layout Tips for a Stunning Result

A bathroom can have excellent materials and still look unresolved if the layout isn't handled properly. Good design in tiled bathrooms is usually quiet. The lines are balanced, cuts are where they should be, and nothing feels accidental.

Near the start of the design process, sample boards help more than catalogues do.

A professional interior designer pointing at a material sample board during a bathroom renovation consultation.

Layout decisions that improve the room

In smaller Melbourne bathrooms, large-format wall tiles can help the room feel less busy. Fewer grout joints usually mean less visual interruption. On the floor, though, scale has to be balanced with drainage and room shape. A tile that looks perfect in a showroom can create awkward cuts if the room is narrow or loaded with obstacles.

Three layout decisions make a major difference:

  • Centre the important sightlines. The wall behind the vanity, the shower entry, or a feature niche usually deserves the cleanest set-out.
  • Use grout colour intentionally. Matching grout softens the grid. Contrast grout makes the pattern more visible.
  • Keep cuts consistent. Tiny slivers at one edge and full tiles at the other make even premium porcelain look second-rate.

A lot of homeowners also overlook comfort. If you're already opening the floor, it's worth considering under-tile heating for bathroom renovations, especially with porcelain, which performs well as a finished surface over heating systems.

Details that separate a clean job from a messy one

Feature walls work best when they're controlled. One textured porcelain wall inside a shower or behind a vanity can be enough. More than that, and the room can start competing with itself.

Design visualisation also helps before any tile is ordered. A 3D drawing or scaled elevation can show whether the niche lines up with grout joints, whether the feature tile should run full height, and whether the selected format will force poor cuts around fittings.

A short visual walkthrough can make those choices easier to judge:

Good bathroom layout isn't about adding more detail. It's about removing visual mistakes before they're built.

Maintaining Your Porcelain and Solving Common Issues

Porcelain is popular partly because it's easy to live with once the bathroom is finished. Day-to-day care is usually straightforward, and that's one of its strongest practical advantages.

Simple care that works

For regular cleaning, keep it simple. Use a suitable pH-neutral cleaner, soft mop or cloth, and don't let soap residue build up in corners, around wastes, or at the shower entry. On matte and textured finishes, routine cleaning matters more because surface texture can hold residue more easily than a polished wall tile.

A few habits make a difference:

  • Wipe water from shower floors and screens if you want less residue build-up.
  • Clean grout lines gently rather than attacking them with harsh products.
  • Check silicone joints occasionally around screens, corners, and fixtures.
  • Deal with stains early before they sit in grout or surface film.

Problems worth fixing early

If something looks wrong after installation, it's better to ask questions early. Grout haze, uneven tile edges, drummy-sounding tiles, poor drainage, or persistent damp smells can all point to different issues. Some are cosmetic and easy to resolve. Others suggest a deeper problem with falls, adhesion, or an older waterproofing failure behind the tiled surface.

The key is diagnosis. A leaking shower in an older bathroom isn't always fixed by regrouting. Likewise, a chipped tile doesn't always justify replacing a whole room. The remedy depends on what failed, and where.

When porcelain has been specified well and installed on a sound substrate, maintenance is generally low effort. Most of the serious problems seen in bathrooms come from shortcuts underneath the tile, not from porcelain itself.

Your Bathroom Renovation Questions Answered

Can you use porcelain on both bathroom walls and floors

Yes, and that's one reason it's so common in full renovations. The finish still needs to match the location, especially on floors and shower bases where slip resistance matters.

Is porcelain always better than ceramic in a bathroom

Not in every single location, but it's usually the stronger all-round choice for wet areas. Ceramic can still suit some wall applications. For floors, showers, and bathrooms that get hard daily use, porcelain is generally the safer specification.

Can you tile over existing tiles

Sometimes, but it depends on the condition of the existing surface, the substrate below it, room levels, and whether the assembly remains suitable for the renovation. In many bathrooms, removing the old build-up gives a more reliable result because it allows proper inspection and preparation.

Why hire a registered builder instead of only a tiler

Because a bathroom renovation involves more than tile laying. It includes demolition, waterproofing, plumbing, electrical work, substrate correction, compliance, and trade coordination. A registered builder manages the whole sequence and carries responsibility for the broader build outcome.

How long will a porcelain bathroom last

That depends far more on workmanship and the build-up beneath the tile than on the showroom sample. A well-built bathroom with proper preparation and waterproofing should give long service. A poorly built one can fail early even if the tile itself is premium.

What usually causes bathroom failures

Most failures come back to the hidden work. Inadequate waterproofing, poor falls, movement, weak substrate preparation, and rushed detailing around penetrations and junctions are the usual culprits.


If you're planning a bathroom or ensuite and want the tiling, waterproofing, layout, and renovation scope assessed together, Melbourne Tiling Services P/L provides quotes, renovation planning, and builder-managed bathroom works across Melbourne and greater Victoria.