

The popular advice is to choose the tiles first, compare a few labour prices, and worry about the rest once the design is settled. That approach works for a decorative splashback. It's a poor way to plan bathroom tiling in Melbourne, where the visible finish is only the outer layer of a wet-area system. The membrane, substrate, drainage, plumbing penetrations, movement joints and trade coordination determine whether the bathroom stays dry long after the grout has been cleaned for the first time.
A bathroom renovation also sits inside Victoria's building and plumbing framework. Older bathrooms can contain concealed defects, failed falls or undocumented waterproofing, and a tile surface can hide every one of them. The sensible question isn't just, "Which tile looks best?" It's, "What evidence shows that the whole water-management system has been prepared, waterproofed and installed correctly?"
Table of Contents
- Rethinking the Bathroom as a Water Management System
- Navigating Melbourne Waterproofing and Compliance Standards
- The Step by Step Bathroom Renovation Process
- Choosing the Right Renovation Scope for Your Budget
- Mastering Large Format Kerlite and Premium Stone Installations
- The Critical Role of Registered Builders in Complex Projects
- Securing Transparent Quotes and Planning Your Project
Rethinking the Bathroom as a Water Management System
Tiling is a finish, not a waterproofing strategy. A bathroom can have straight grout lines, expensive porcelain and an attractive feature wall while water migrates through an unsealed junction behind the shower. Once moisture reaches timber framing, plasterboard or an adjoining room, the cost and disruption of repair can be far greater than the original tiling work.
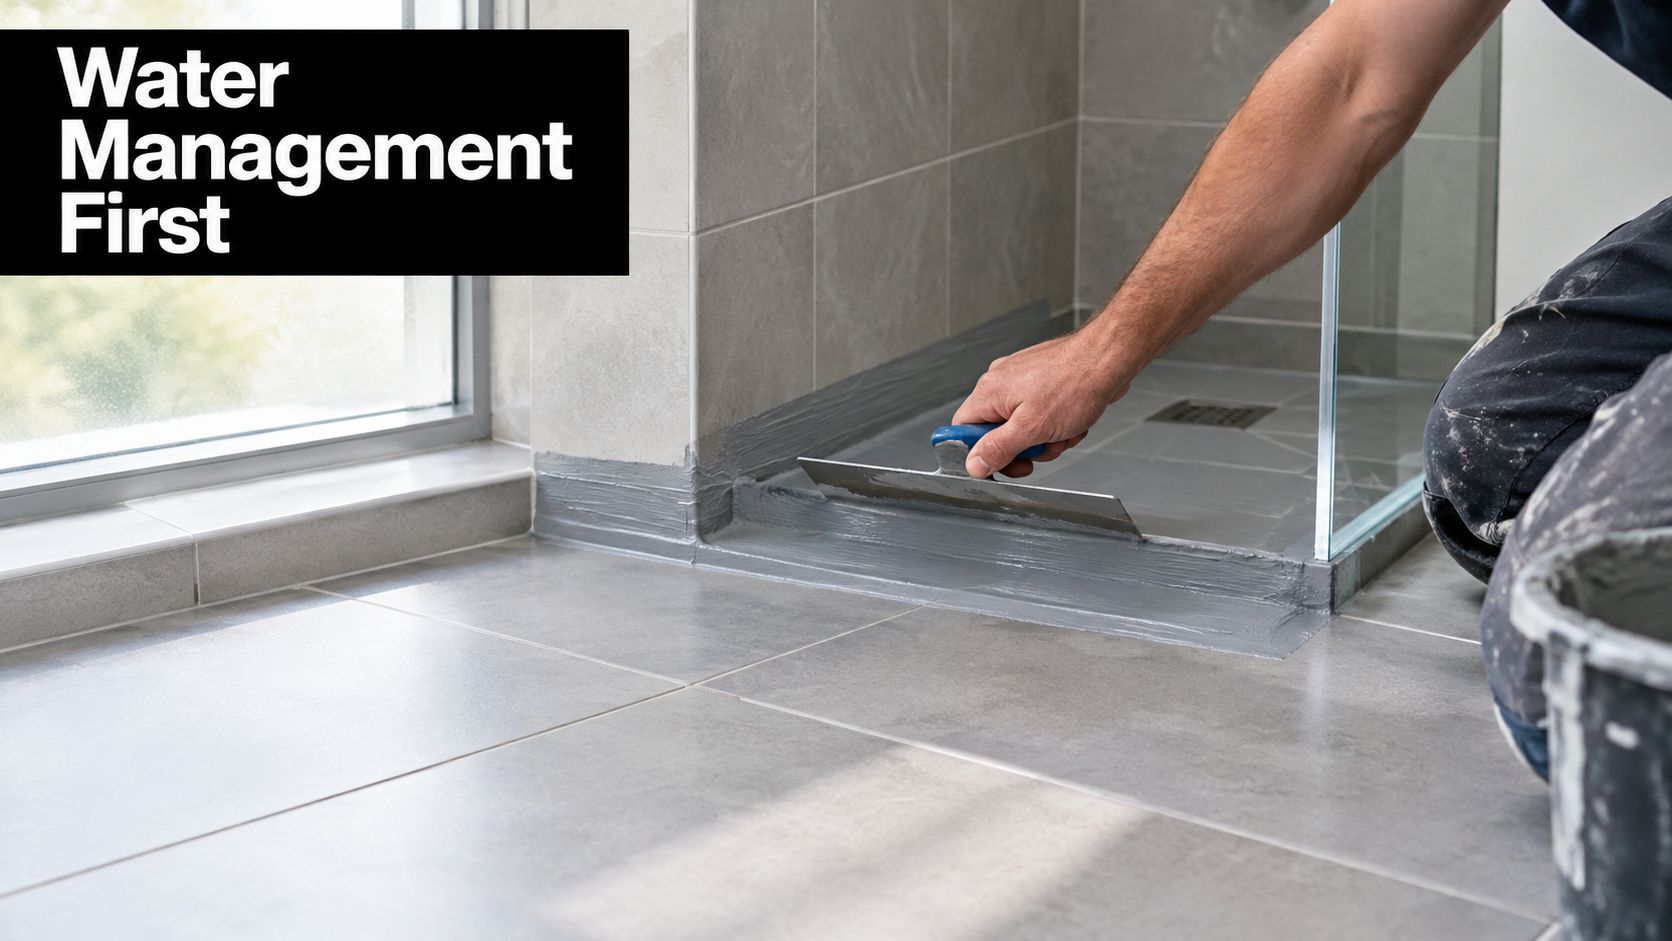
What sits beneath the finish
A durable bathroom relies on several connected layers:
- Plumbing: Waste positions, water points and shower penetrations must be set before walls and floors are closed.
- Substrate: Cement sheet, screed, existing masonry or another approved base must be stable, sound and prepared for the selected membrane and adhesive.
- Falls to waste: Water needs a continuous path to the waste. A flat-looking floor can still leave ponding around a drain.
- Waterproofing: The membrane must cover the required wet areas, with corners, junctions and penetrations treated as part of the system.
- Tiling: Adhesive coverage, tile movement, grout and flexible sealant must suit the substrate and tile type.
Melbourne's older housing stock makes this assessment particularly important. A recurring shower leak or damp patch doesn't prove that replacing the grout will solve the problem. It may point to movement, a failed membrane, poor falls, a deteriorated substrate or a leaking plumbing connection. The Victorian Building Authority's wet-area guidance treats waterproofing as a regulated construction requirement, assessed under the National Construction Code and relevant Australian Standards, including AS 3740 for internal wet areas such as bathrooms, showers and laundries. The Victorian waterproofing guidance also makes clear that the rules applying to work are those in force when the work is undertaken.
Practical rule: A quote that describes tile supply and laying but says little about substrate preparation, waterproofing records or inspection is not a complete bathroom renovation quote.
How to compare quotes properly
Ask each contractor to separate the visible finish from the concealed work. A low tile rate can look attractive until demolition reveals a damaged floor, an unstable wall lining or a shower base that can't achieve reliable drainage without rebuilding.
The better comparison is between scopes, not isolated square-metre prices. Look for a written sequence covering demolition, substrate assessment, screeding or self-levelling where required, waterproofing, curing, tiling, silicone joints, fixtures and handover records. That approach helps homeowners, landlords and property managers judge durability rather than just choosing the cheapest cosmetic fix.
Navigating Melbourne Waterproofing and Compliance Standards
Waterproofing should be designed around the National Construction Code and AS 3740:2021, not treated as a tile underlay. The NCC wet-area waterproofing provisions require the shower floor, including a hob or step-down, to be waterproof. Shower walls must be waterproof to at least 1,800 mm above the floor substrate, while wall junctions and joints inside the shower area also require waterproof treatment.
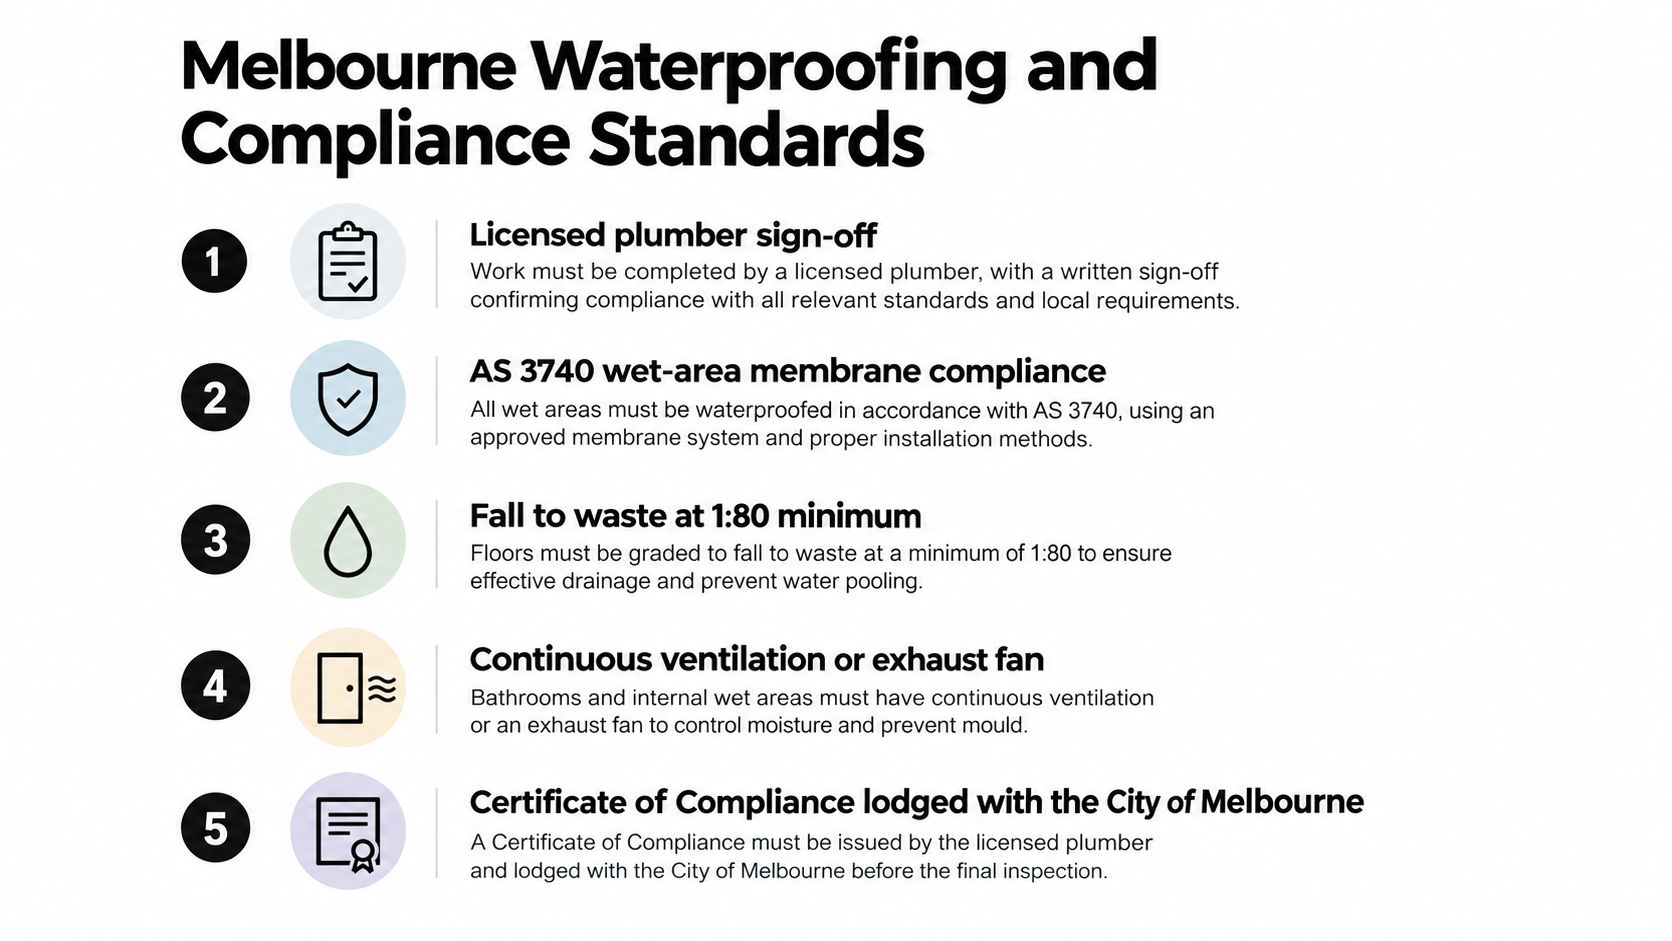
The membrane is only as reliable as its preparation
A membrane can't correct a moving wall, a contaminated surface or a floor that sends water away from the waste. Before application, the contractor should confirm that the substrate is stable, clean, sufficiently dry for the selected system and capable of accepting the specified primer and membrane.
The sequence matters:
- Confirm the substrate and drainage falls.
- Prepare surfaces according to the membrane manufacturer's system.
- Reinforce corners, wall junctions and changes in plane with compatible materials.
- Seal pipe penetrations and other openings.
- Apply the membrane to the required areas and thickness.
- Allow curing in accordance with the product system.
- Record the work before adhesive and tiles conceal it.
Pipe penetrations deserve particular attention. Taps, spouts and other fittings interrupt the membrane, and penetrations in horizontal surfaces require sealing. A neat escutcheon or bead of silicone on the finished wall isn't a substitute for a correctly integrated waterproofing detail behind the tiles.
What homeowners should retain
Keep the scope, product information, photographs and inspection or certification records. Documentation should identify the applicable compliance pathway, substrate preparation, membrane system, junction treatments and the person responsible for the work.
The Victorian framework also matters when renovating an existing bathroom. The Australian Building Codes Board explains through its guidance on waterproofing houses that the NCC primarily applies to new building work, while alterations and upgrades to existing buildings must also be considered under the relevant state or territory legislation. A Melbourne renovation therefore shouldn't be assessed by copying a new-home detail without checking Victorian requirements and permit obligations.
The NCC's Deemed-to-Satisfy pathways shouldn't be mixed indiscriminately with AS 3740 provisions. Establish the selected compliance route before construction begins, not after the membrane has disappeared behind the tiles. Homeowners can also ask who will inspect the work while the waterproofing remains accessible, because concealed defects become much harder to verify once finishes are installed.
For a practical overview of the points to raise with a contractor, use this guide to Melbourne bathroom waterproofing standards.
The Step by Step Bathroom Renovation Process
Good bathroom renovations run in a controlled order. The exact programme varies with the property and scope, but the logic stays consistent: design first, expose the existing conditions, complete concealed services, prepare the base, waterproof, tile, then fit off and inspect.
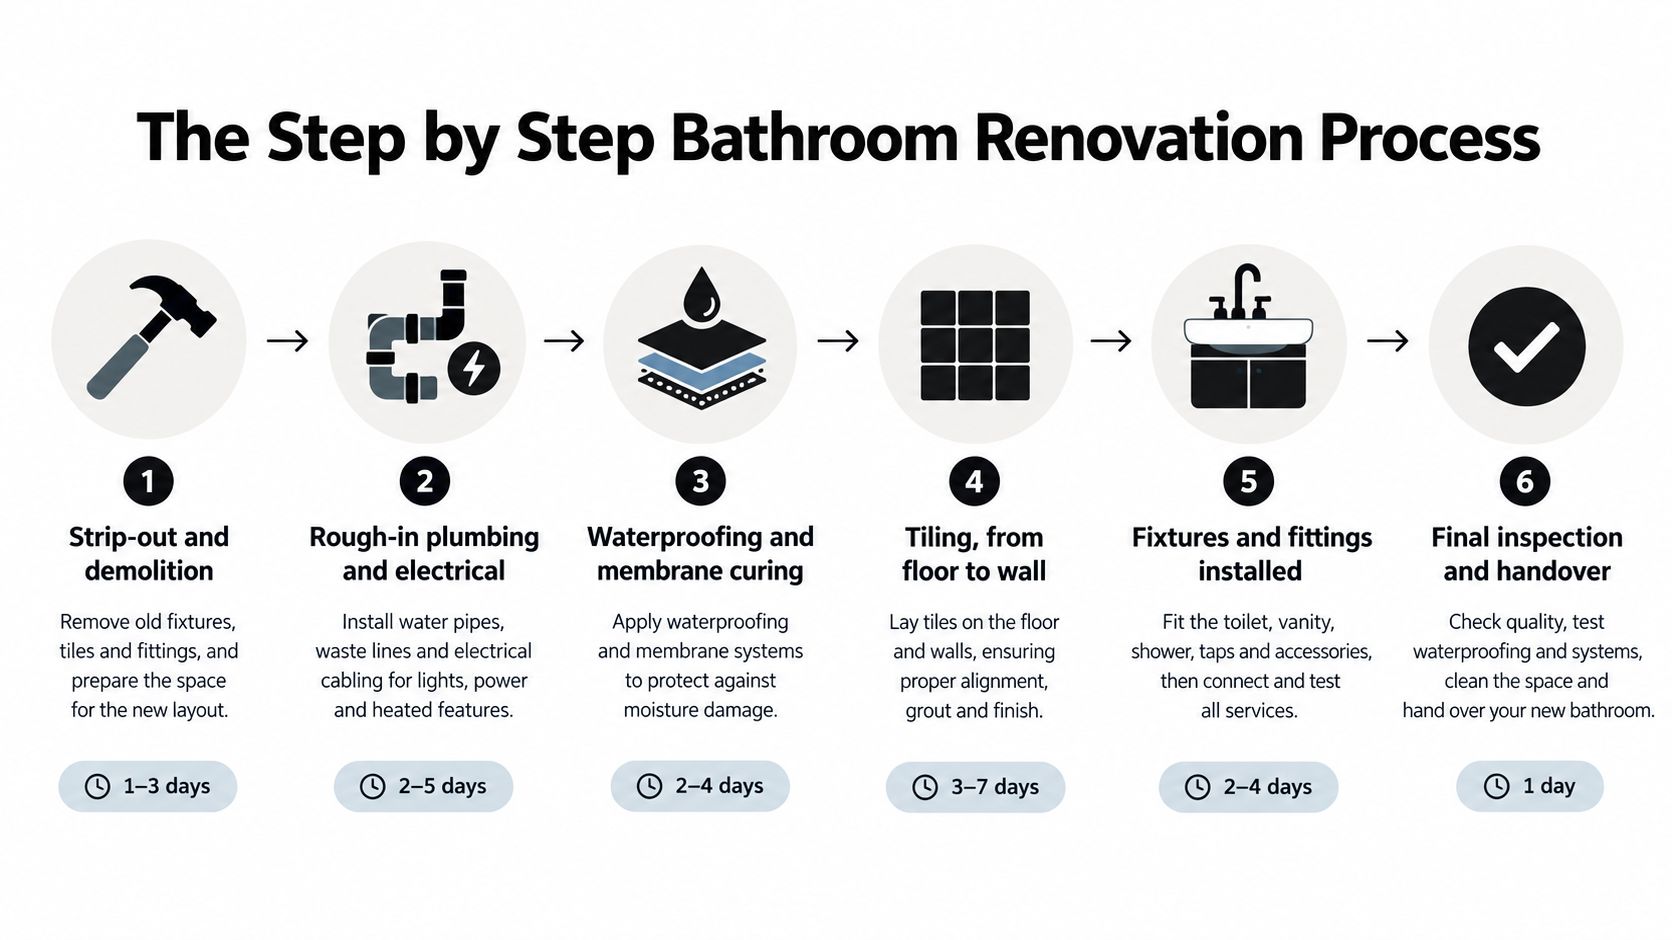
Start with design and controlled demolition
A useful design package can include measured drawings, tile layouts and 3D bathroom drawings. That work exposes conflicts early, such as a niche landing on a plumbing line, a basin that blocks a door swing or a large panel layout that leaves an impractical sliver at a corner.
Demolition should then remove finishes carefully enough to assess what lies beneath. Once the walls and floor are open, the team can identify damaged framing, unsuitable linings, old plumbing, unstable screeds and the actual location of wastes. Skipping this assessment creates false certainty in the quote.
Set the services before closing the room
The plumber establishes waste positions, water outlets, shower fittings and drainage connections. The electrician coordinates power, lighting, switches and ventilation, while the carpenter repairs or modifies framing and installs suitable backing for fixtures, screens and accessories.
The tiler needs these positions before laying begins. A floor waste that shifts after screeding can disrupt falls and tile cuts. A shower mixer set too close to a joint can force awkward cuts or compromise the finished detail.
Prepare, waterproof and cure
Screeding or self-levelling may be required to create a sound, consistent base and establish falls. High spots, loose areas and contaminated surfaces need correction before membrane application. The waterproofing contractor then treats junctions and penetrations as part of the membrane system, rather than relying on surface sealant after tiling.
Site standard: If a contractor can't explain what must cure before the next trade arrives, the programme is too vague.
Only after the membrane system has cured as specified should the tiler begin. The installation then proceeds according to the agreed layout, followed by grout, flexible sealant at movement or change-of-plane locations, fixture installation and final checks. A clear explanation of sequencing is also available in this guide to how to renovate a bathroom.
Choosing the Right Renovation Scope for Your Budget
A surface retile, a wet-area rebuild and a layout change are three different projects. Treating them as interchangeable is how homeowners end up with a polished bathroom and an unresolved drainage or waterproofing problem.
Consumer Affairs Victoria states that renovations over AUD 10,000 generally require a written major domestic building contract, and homeowners remain responsible for checking whether permits are needed and obtaining final inspection or occupancy documentation where applicable. Its renovation costing guidance should sit alongside the contractor's scope, not replace it.
Renovation Scope and Compliance Matrix
| Project Scope | Typical Work Included | Contract & Permit Thresholds | Primary Risk Factors |
|---|---|---|---|
| Surface-only retile | Remove or retain existing tiles, assess the base, prepare surfaces, install new wall or floor tiles and finish joints | Confirm whether the work is genuinely isolated tiling. Check permits and existing waterproofing condition before accepting the scope | Concealed membrane failure, added floor height, poor adhesion, damaged substrate and false savings |
| Wet-area rebuild | Demolition, substrate repairs, screeding or self-levelling, plumbing coordination, waterproofing, tiling and fixture fit-off | A broader renovation may require a written major domestic building contract when it exceeds AUD 10,000. Confirm permits and responsible practitioners | Incomplete documentation, incorrect falls, rushed membrane curing and disconnected trade sequencing |
| Full layout change | Relocate plumbing, alter walls or framing, renew electrical and ventilation services, rebuild the wet area and install finishes | Alterations must be checked against Victorian requirements and applicable permit pathways. Use appropriately registered and licensed practitioners | Structural surprises, waste relocation, coordination failures, approval gaps and budget pressure |
A surface-only retile can work when the existing substrate and wet-area system are demonstrably sound. It doesn't work as a blanket solution for a leaking shower, recurring dampness or tiles that have debonded because the base is moving.
A wet-area rebuild is usually the more defensible scope when the membrane can't be verified or the shower floor no longer drains properly. It costs more in demolition and coordination, but it exposes the work that controls durability.
A full layout change offers design freedom, yet it carries the greatest coordination burden. Moving a toilet, shower waste or basin affects plumbing, falls, wall linings, electrical locations and the tile set-out. A registered builder can help determine whether the proposed work requires a building permit and which licensed practitioners must be involved.
Mastering Large Format Kerlite and Premium Stone Installations
Large-format Kerlite, porcelain panels and premium stone can produce a quiet, continuous finish, but they're unforgiving of an uneven base. A small localised high spot can create a void beneath a panel, increase lippage or transfer stress into the tile. The visual simplicity of the finished surface demands more preparation, not less.
Flatness, movement and joint design
Before installation, the team should check flatness, moisture condition, soundness and falls to waste. Large panels need consistent adhesive contact and careful handling, while natural stone may also require material-specific preparation, sealing and adhesive selection.
The building still moves after the panels are installed. Framing, cement sheets, screeds, membranes and tile layers can respond differently to seasonal or structural movement. Without a planned release point, that stress may appear as cracked grout, debonding or a fractured panel.
The HIA guidance on movement joints in floor and wall tiles identifies structural, intermediate, perimeter and contraction movement joints, with a generally recommended minimum joint width of 6 mm where movement joints are required. These joints need compatible flexible sealant and backing material. Rigid adhesive or grout shouldn't bridge them.
Material choice doesn't override building movement. Premium stone can hide a preparation problem until the repair becomes expensive and disruptive.
Detail before the first panel
Layout planning should account for room boundaries, changes in plane, substrate breaks, niches, door reveals and penetrations. A panel layout that looks balanced on a drawing can become awkward when it meets a wall that isn't square or a floor that requires continuous drainage falls.
The installer must also coordinate movement joints with the waterproofing system. A joint that interrupts the tile layer still needs a compatible waterproof detail beneath it. This is why large-format work is best treated as a combined design, substrate and installation exercise, rather than a product upgrade.
For technical guidance on specifying and installing this finish, see large-format tile installation in Melbourne.
The handling and installation sequence matters as much as the panel itself. The following visual demonstrates the level of control expected during placement.
The Critical Role of Registered Builders in Complex Projects
A bathroom renovation becomes a coordination problem as soon as several trades work on the same waterproofed room. Demolition affects the carpenter, plumbing sets the tile layout, electrical work affects wall closures, and the tiler depends on every concealed service being in the correct position.
Victoria's registration threshold is clear. A builder or tradesperson must be registered when the work is worth more than AUD 10,000, unless the job involves only one exempt trade, and registration is also required where a practitioner combines skills for a renovation or building job. Consumer Affairs Victoria's guidance on builders and tradespeople explains why a multi-trade bathroom shouldn't be disguised as a series of unrelated minor tasks.
One accountable coordinator
Using separate low-bid subcontractors can appear cheaper, but it transfers coordination to the homeowner. Someone must confirm the order of work, resolve defects, protect completed surfaces, arrange inspections and establish who is responsible when one trade's work prevents another from proceeding.
A registered builder can provide a single contract pathway and coordinate registered or licensed specialists, including carpenters, plumbers, electricians, tilers and waterproofers. That doesn't remove the need to check registrations, permits or certificates, but it gives the project a defined point of responsibility.
The Building and Plumbing Commission began operating on 1 July 2025, combining functions previously handled across several bodies. Victoria's regulatory environment continues to develop, so homeowners should verify current requirements rather than rely on an old bathroom quote or a contractor's informal interpretation.
What responsibility should look like
A responsible coordinator should be able to explain:
- Who holds the contract: The homeowner should know which entity controls the renovation scope and variations.
- Who performs specialist work: Plumbing, electrical and other regulated activities must be assigned to the appropriate practitioners.
- How concealed work is recorded: Photographs, product details, waterproofing records and inspection information should be retained.
- How defects are handled: The contract should explain notification, rectification and handover responsibilities.
For a useful comparison of coordinated design and construction thinking outside residential bathrooms, the Cassins healthcare design construct case study provides relevant context. The same principle applies: complex work benefits from clear scope ownership, documented interfaces and coordination before finishes conceal the underlying construction.
Securing Transparent Quotes and Planning Your Project
A transparent quote should let you understand what happens before the first tile is laid. If it only lists tile quantities and a final labour figure, it doesn't tell you whether the contractor has allowed for demolition, substrate repairs, waterproofing, curing, waste disposal, flexible joints, fixtures or compliance records.
Ask questions that force the hidden scope into the open:
- Substrate preparation: Will the team inspect the existing base, and what happens if the screed or wall lining is unsound?
- Waterproofing: Which system is proposed, who installs it, and what photographs or records will you receive before tiling?
- Drainage: How will the floor falls be established, and who confirms that water reaches the waste?
- Trade coordination: Who books the plumber, electrician, carpenter and waterproofing installer?
- Materials: Are adhesive, grout, trims, sealants, membranes and wastage included?
- Programme: Which curing periods must be respected before tiling, grouting and shower use?
- Variations: How will concealed defects be priced and approved after demolition?
- Handover: Which inspection, certification, permit or occupancy documents apply to the completed work?
Use planning tools before signing
A measured site visit and 3D drawing can reveal conflicts that a mood board won't show. Check the location of niches, wastes, screens, wall penetrations and large-format panel joints before ordering materials. A transparent renovation calculator can then separate the design choices from the construction requirements, helping you test a surface retile against a complete wet-area rebuild.
The most useful quote isn't necessarily the shortest or cheapest. It's the one that identifies assumptions, assigns responsibility and gives you a way to verify concealed work before it disappears behind the finish. For bathroom renovations, that clarity protects the waterproofing system, the programme and the final result.
Melbourne Tiling Services P/L offers bathroom and ensuite renovations, waterproofing, screeding, self-levelling, ceramic, porcelain, marble and Kerlite tiling, with licensed trade coordination, free quotes and 3D drawings. Visit Melbourne Tiling Services P/L to discuss your scope, review the concealed work that matters, and arrange a renovation plan built around durability rather than a quick cosmetic fix.
Recent Comments