
You've found the stone, chosen the colour, and probably saved a dozen Melbourne bathroom images. Then the installer mentions waterproofing certificates, movement joints, substrate deflection and wet-slip ratings, and the project suddenly sounds less like a tile upgrade and more like building work. That reaction is understandable. Travertine tile installation is a compliance and detailing exercise first, and a visual craft exercise second.
The stone can look exceptional in a bathroom, ensuite, balcony transition or outdoor entertaining area, but it won't forgive a hollow screed, a back-fall, poor adhesive coverage or an unsuitable finish. The following guide focuses on the decisions that protect the finished surface, including the Victorian rules and practical controls that catch homeowners out.
Table of Contents
- Is Travertine the Right Tile for Your Project
- Preparing the Substrate and Getting the Fall Right
- Waterproofing Wet Areas to Australian Standard
- Choosing Adhesives, Grout and Movement Joints
- Cutting, Laying and Grouting Travertine
- Sealing, Slip Safety and Long-Term Maintenance
- When to Bring in a Registered Builder or Tiling Specialist
Is Travertine the Right Tile for Your Project
A Brunswick couple recently pulled up carpet in their 1990s bathroom after seeing travertine on a Houzz tour. They liked the warm variation and softened edges, but before any quote was prepared, three checks had to come first: substrate, environment and scope. Travertine should never be selected from a sample board alone.
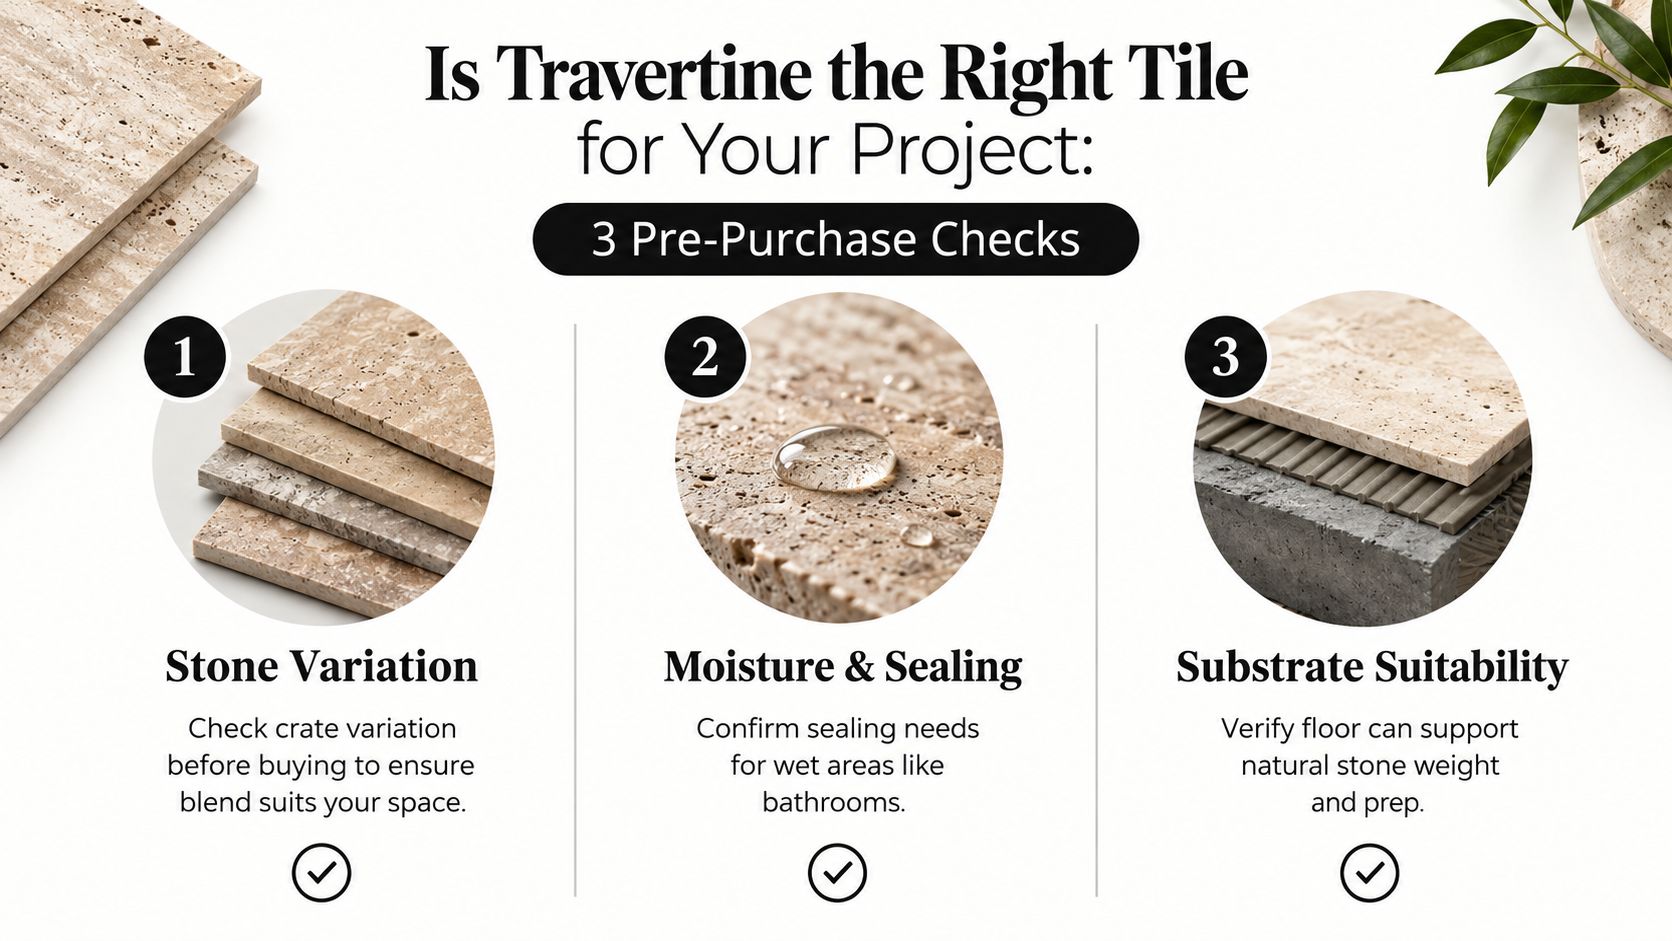
Check the substrate before buying stone
Concrete and timber floors behave differently. A concrete slab may provide a stable base, but it still needs assessment for cracks, hollows, contamination and movement. Timber floors need an approved fibre-cement underlay and added rigidity. Direct-sticking travertine over yellow tongue flooring is not a sound shortcut.
Natural stone also carries more dead load than a typical ceramic installation. Allow for approximately 40–60 kg/m² of stone load when checking the floor structure and have the floor assessed for a natural-stone installation where required. That figure is part of the pre-purchase decision, not something to discover after delivery.
Match the finish to the environment
A shower floor, balcony, heated slab, west-facing outdoor area and dry bathroom wall all present different risks. Moisture exposure demands compliant waterproofing and falls. Sunlight and temperature changes make movement detailing important. Bare feet and water make finish selection a safety decision.
Polished and some honed finishes can be a poor choice for wet floors. An Australian supplier lists honed travertine at 36X and tumbled travertine at 40X, with both described as presenting moderate wet-slip risk in the published product information at Bellstone's travertine Classico guide. That doesn't mean a finish is automatically suitable for every bathroom. The location, barefoot classification, slope and drainage still need to be assessed.
Define the renovation scope
A cosmetic wall upgrade is different from a wet-area reconfiguration. A bathroom renovation may involve plumbing, carpentry, waterproofing and building administration. A balcony job may involve structural movement, membrane replacement and body-corporate approval.
Travertine also has honest drawbacks. Filled pits can re-open, tumbled edges can chip, dark lots can change appearance under strong UV exposure, and honed stone can create a slip-rating problem in an ensuite shower. Those are manageable issues, but only when the specification acknowledges them.
A simple decision matrix helps:
- Choose travertine when the substrate is suitable, the finish matches the exposure, and the wet-area or external detailing can be built correctly.
- Choose with concessions when you're prepared to use a more textured finish, wider joints, additional preparation or a more involved maintenance plan.
- Choose another surface when the floor can't be adequately stiffened, falls can't be achieved, the required slip performance isn't available, or the project scope is being treated as purely cosmetic when it isn't.
For design ideas and suitable natural-stone bathroom applications, review natural stone bathroom tiles in Melbourne.
Preparing the Substrate and Getting the Fall Right
Travertine exposes poor preparation quickly. A hollow beneath one corner can leave a tile rocking, while a back-fall can hold water against grout and movement joints. Substrate preparation and fall-to-waste must be treated as one job, because a flat-looking surface isn't enough if water doesn't travel to the waste.
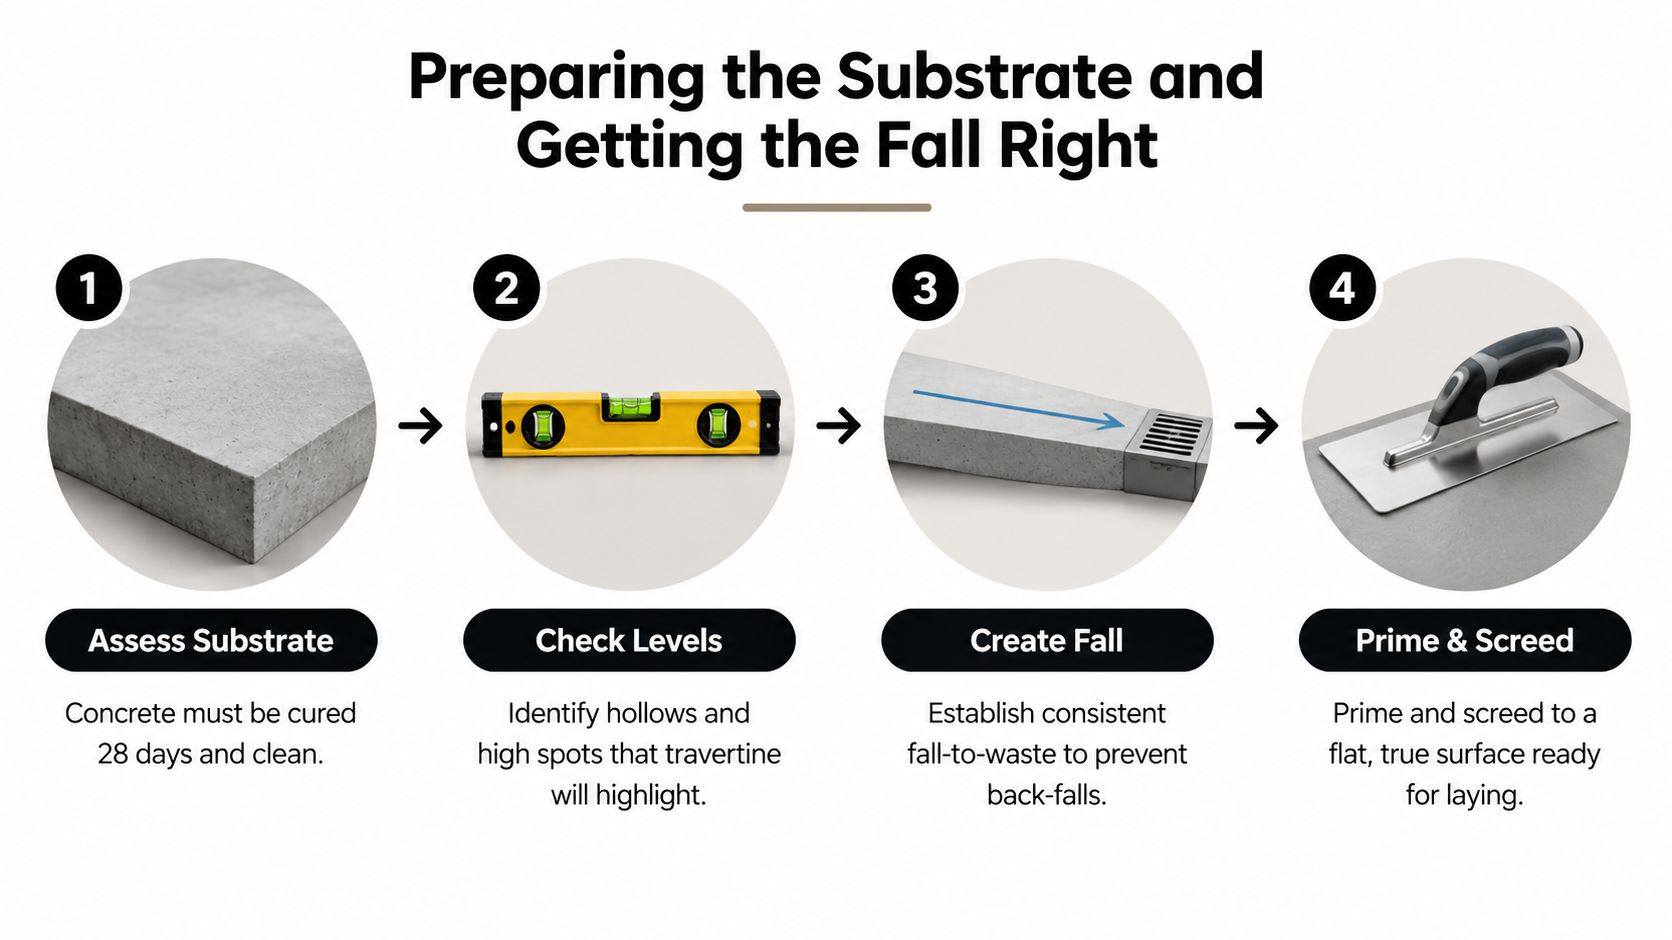
Assess cure, moisture and rigidity
Concrete should be properly cured before tiling. Allow 28 days for concrete and six weeks for screeded areas, with a moisture reading below 75% RH, following the applicable product and project requirements. Those milestones are especially important under porous stone, where trapped moisture can affect bonding, appearance and later sealing.
A bonded screed commonly uses a 3:1 sand-to-cement mix, while an unbonded screed uses 4:1, with a minimum thickness of 15 mm. These figures should be checked against the specified system, substrate and manufacturer's instructions rather than treated as a universal recipe.
Timber floors need an approved fibre-cement underlay and additional rigidity. Don't rely on adhesive to compensate for floor movement. If the structure flexes, the stone and grout will often show the consequences through cracking, debonding or chipped edges.
Build falls instead of hiding them
Bathroom floors need deliberate falls to the waste. The supplied project specification calls for a minimum 1:80 fall in showers and 1:100 across the bathroom floor, while the finished surface shouldn't pond wherever a 1 m straightedge is placed. These requirements should be checked before, during and after the screed is installed.
Use screed rods, a laser level or a water level to establish the high points and waste lines. Check the direction of fall at doorways, shower entries, wall junctions and around linear drains. Travertine's natural variation can disguise small visual inconsistencies, but it won't correct a structural back-fall.
Site rule: A self-levelling compound corrects a surface. It doesn't replace a properly designed screed or create falls by itself.
Self-levelling compounds are useful where the substrate is sound and only needs surface correction. They're not a solution for a poorly formed bathroom base, insufficient drainage or an unstable timber floor. In Melbourne apartments, a slab can also be subject to body-corporate restrictions, so re-fall-screeding shouldn't proceed without the required approval.
Finally, plan for the stone's bedding requirements. Australian travertine specifications call for 100% adhesive coverage, so the substrate needs to be flat and true enough for full contact under every tile, including textured backs and larger pavers. A few dabs of adhesive won't provide the support travertine needs.
Waterproofing Wet Areas to Australian Standard
On a Melbourne bathroom or balcony, waterproofing is a compliance and detailing job before it becomes a tiling job. Tiles and travertine do not form the waterproof layer. AS 3740:2021 governs domestic wet-area waterproofing, alongside relevant National Construction Code provisions, so the membrane system, junctions and inspection must be settled before stone is installed.
The typical sequence starts with a compatible primer. Bond-breaker tape is installed at wall-to-floor junctions, internal corners and pipe penetrations before the membrane coats are applied. The first coat must reach the specified wet-film thickness, followed by the second coat in the opposing direction. Respect the product's drying times and compatibility requirements. For a practical guide to membrane selection, priming and bond-breaker detailing, see our wet-area waterproofing service.
Showers must be waterproofed across the floor and up the walls to at least 1,800 mm, or 50 mm above the shower rose, whichever is higher, as set out in Build.com.au's waterproofing and tiling reference. Floors also need grading that sends water to the waste without ponding.
| Area | Min membrane height | Fall to waste | Inspection required |
|---|---|---|---|
| Shower floor and walls | 1,800 mm, or 50 mm above the shower rose, whichever is higher | Minimum 1:80 in the shower | Yes, before tiling |
| Bathroom floor | Wet-area coverage as specified for the room | Minimum 1:100 across the bathroom floor | Yes, before tiling |
| Shower hob or junction | Membrane detailing across junctions and up the hob | Falls must direct water to the waste | Yes, before tiling |
Treat the certificate as part of the installation
In Victoria, arrange the required inspection before tiling and obtain the formal Installation Certificate from the licensed waterproofer. Site Pro Bathrooms' explanation of Australian waterproofing standards describes this process, but the certificate and inspection record should be checked against the applicable Victorian requirements and the project documentation. Travertine should not cover the membrane until the work has been inspected and recorded.
The waterproofed surface must also be flat enough for the stone bedding system. Travertine's textured back and weight make spot-fixing risky, while a prepared membrane surface allows the adhesive to achieve the contact required by the installation system.
The certificate matters years later. If a leak appears after the stone is covered, documentation helps identify who completed the waterproofing and which system was used.
Most membrane manufacturers condition warranty coverage on compatible primers, correct application and documented inspection. Retain the product data sheets with the certificate. DIY work often fails when a membrane is tiled before inspection, or when primers and membranes from incompatible systems are combined. The finished stone may look sound while moisture travels into adjoining walls, cabinetry or ceilings.
Choosing Adhesives, Grout and Movement Joints
Adhesive selection should follow the stone finish, colour, location and substrate. A light honed travertine generally benefits from a white polymer-modified cement-based adhesive, because grey adhesive can affect the appearance of porous or lighter stone. Tumbled travertine needs a different emphasis, with edge variation and wider joints influencing the setting and grouting approach.
For a vertical feature wall, a suitable non-sag adhesive can help hold tiles in position while the bond develops. That doesn't make mastics appropriate everywhere. Wet areas, exterior locations, flexible membranes, timber floors and heated screeds require products specified for those conditions.
Compare the installation choices
| Travertine finish | Adhesive type | Grout joint width | Movement joint spacing | Bedding method |
|---|---|---|---|---|
| Smooth honed or polished | White polymer-modified cement-based adhesive suited to natural stone | 3–6 mm | Internal floors generally no greater than 4.5 m where a floor dimension exceeds 9 m | Full adhesive coverage, no spot-fixing |
| Textured or tumbled | Suitable stone adhesive with enough working time for edge adjustment | 6–10 mm | External floors require joints at 4.5 m spacing in any dimension | Full adhesive coverage, back-butter where needed |
| Vertical feature wall | Compatible non-sag stone adhesive where approved for the location | Joint selected for edge variation and movement | Wall movement joints a minimum 6 mm wide | Continuous supported bedding, not isolated dabs |
The Australian Tiling Standards reference AS 3958.1 for installation and AS 3958.2 for tile selection. Australian guidance also treats movement control as a core requirement, with perimeter joints required on installations and intermediate joints used to accommodate substrate deflection and sunlight exposure. Those joints need to be set out before adhesive is spread, not improvised after the grout has hardened.
Use flexible silicone or another specified soft joint where the floor meets walls, hobs, frames or other changes of plane. Keep perimeter gaps clear of mortar, spacers, dirt and debris. A rigid grout bridge at these interfaces creates a path for movement to transfer into the brittle stone finish.
For cleaning and grout-care considerations after installation, expert advice from That Cleaning Crew is a useful complementary resource. It's better to choose the grout and cleaning routine together than to install a porous stone and discover later that the chosen cleaner attacks the surface or leaves residue in the joints.
Cutting, Laying and Grouting Travertine
The first laying decision happens before adhesive. Open the crate and dry-lay enough of the stone to understand the variation in colour, veins, pits and edge character. For a visible floor, I'll normally blend tiles from different boxes rather than allowing one darker group or strongly veined group to dominate a single area.
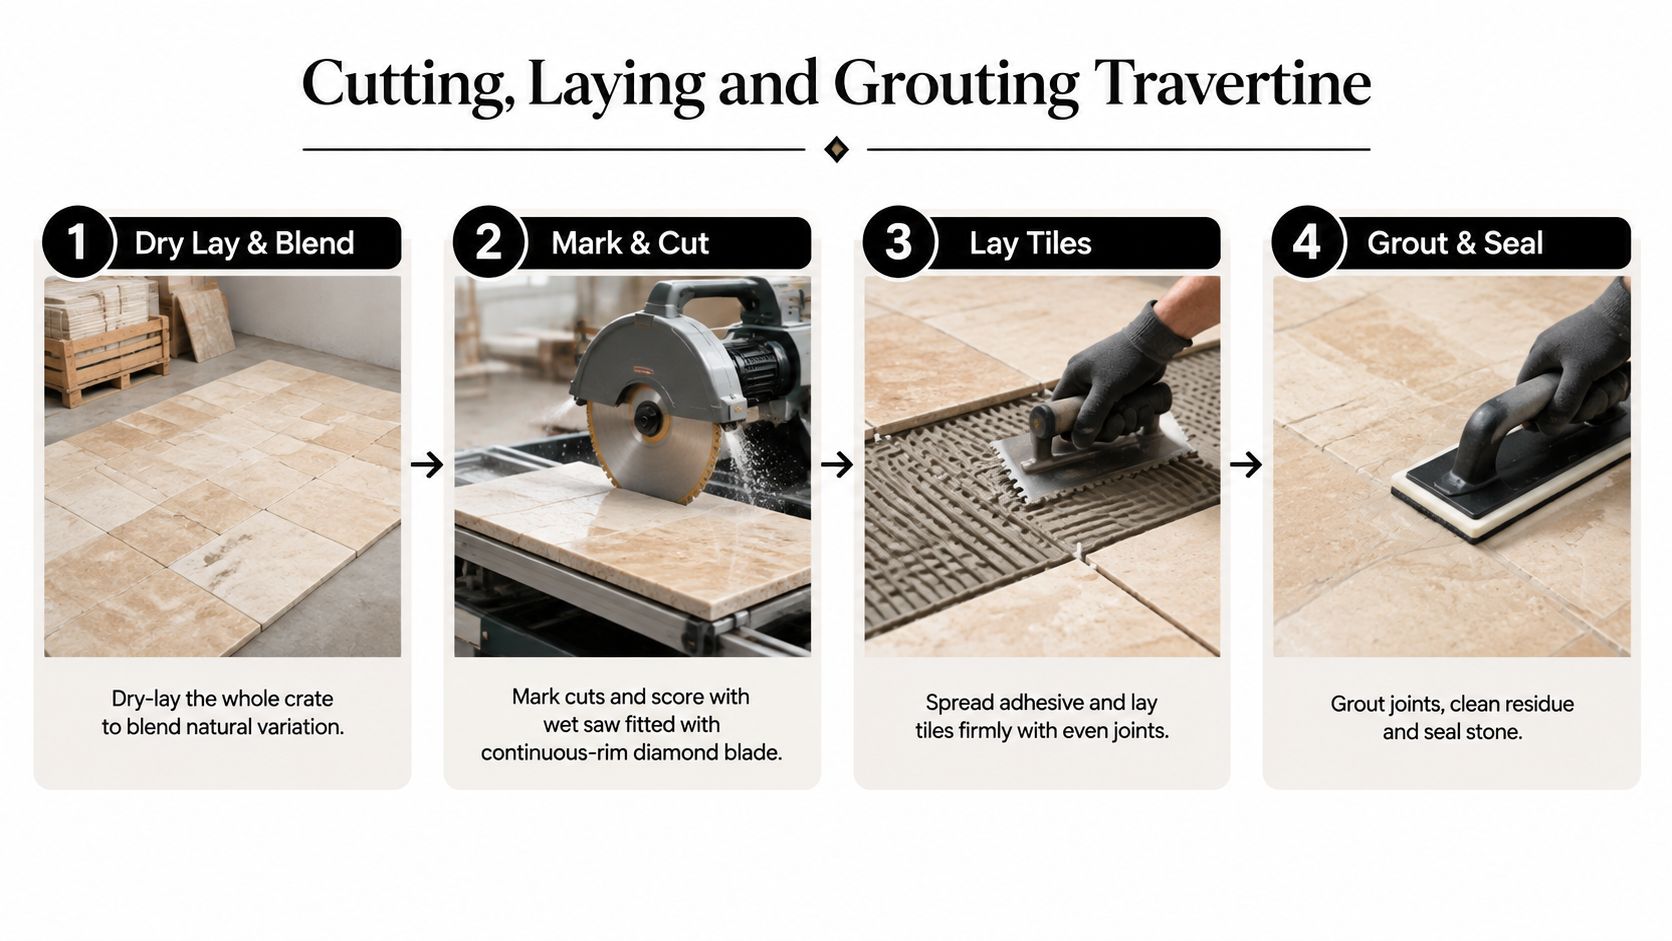
Mark cuts from the actual set-out, not from a nominal measurement. A wet saw fitted with a continuous-rim diamond blade gives cleaner results through travertine than forcing a dry cut. Support the tile properly, feed it steadily and handle the cut piece carefully, because tumbled arrises and filled areas can break away at the final part of the cut.
Set the stone with full contact
Back-butter each paver with the flat side of the trowel. This fills irregularities on the back and helps the adhesive contact the entire tile. Spread adhesive on the substrate, comb it consistently, then use a butter-and-float action to bed the stone.
Press and move the tile slightly to collapse the ridges. Lift an occasional tile during the installation to confirm coverage rather than assuming it. Australian travertine specifications call for 100% adhesive coverage, and that requirement is particularly important where pavers are large, heavy or installed over a moisture-sensitive substrate.
Avoid spot-fixing. Isolated adhesive dabs leave unsupported areas beneath the tile, which can create drummy sections and concentrated stress. The goal is a continuous bed that supports the stone across its whole underside.
Respect fills, veins and tumbled edges
Travertine is not a uniform manufactured sheet. A filled pit may be sound in one tile and fragile in another. Veins can change direction through a cut, and the softened edges of tumbled formats can chip while spacers are inserted or grout is compacted.
Where cutting exposes a filled edge, pre-seal or stabilise it with a compatible product if the specification calls for that treatment. Don't drag metal tools across the face, and don't use a rubber mallet with force that could fracture a thin section. Small adjustments with suction handles, a straightedge and controlled hand pressure are safer.
The grout joint reflects the finish. Smooth honed or polished stone generally uses 3–6 mm joints, while textured finishes commonly use 6–10 mm joints, as described in Australian stone installation guidance. Wider joints give tumbled edges room to vary without making the finished layout look forced.
Grouting shouldn't begin until at least 12 hours after laying, according to an Australian travertine installation guide. Press grout diagonally across the joints, especially where the joint is wider, then clean in controlled passes so you don't pull material back out of the porous edges.
Allow the surface to dry and cure for at least 7 days before sealing or walking on the floor where the applicable stone guide specifies that period. Sealing too early can trap moisture and produce uneven colour or a cloudy finish.
Sealing, Slip Safety and Long-Term Maintenance
Sealing protects travertine from staining, but it doesn't turn the stone into a waterproof surface and it doesn't materially improve slip resistance. The wet-area decision should begin with the finish and its tested rating, then move to waterproofing, falls, grout and maintenance.
A penetrating silane or siloxane sealer is often chosen where the stone needs stain resistance while retaining a natural appearance. An enhancing sealer can deepen colour and emphasise veins, but it may change the appearance more noticeably on tumbled stone. On a correctly waterproofed substrate, a breathable penetrating system is generally preferable to a coating that traps moisture, subject to the manufacturer's instructions.
Set a maintenance plan before handover
| Application | Sealer type | Reseal cycle | Target slip rating, AS 4586 | Maintenance note |
|---|---|---|---|---|
| Ensuite shower floor | Penetrating natural-look sealer | 1–2 years, depending on traffic and product | Higher bathroom rating, commonly P3, P4 or P5 guidance depending on location | Dry after use and inspect soft joints |
| Bathroom floor | Penetrating or suitable enhancing sealer | 2–4 years, depending on traffic and product | Select to the tested wet-area requirement | Use pH-neutral cleaner |
| Balcony or external transition | Exterior-suitable penetrating sealer | Product and exposure dependent | Assess the required external rating, commonly within P3–P4 guidance | Check joints, drainage and surface changes |
The ratings and application context need to come from the tested product and the location, not from a sales description. Australian guidance notes that bathrooms and shower floors need higher slip resistance, and factory finish assumptions can be unreliable. The Aqua Mix travertine cleaning and sealing guide also highlights that sealing doesn't change slip resistance and that existing surfaces may require on-site wet pendulum testing under Australian standards.
Inherited installations sometimes need remediation rather than another coat of sealer. Options can include an acid-wash-and-seal process where appropriate, a compatible clear anti-slip treatment or mechanical micro-roughening. The correct choice depends on the existing finish, contamination, drainage and test results. Product marketing shouldn't replace verification.
For practical care of porous tile surfaces, this guide from J.G. Carpet Cleaning provides useful maintenance context, although every cleaner still needs to be checked for compatibility with travertine.
Use pH-neutral cleaners only. Vinegar and bleach can damage stone or grout, and shower floors benefit from microfibre drying after use. Inspect movement joints at least every 12 months, looking for gaps, splitting, mould growth or rigid grout replacing a flexible seal. For planned stone sealing work, see stone tile sealing services in Melbourne.
When to Bring in a Registered Builder or Tiling Specialist
Travertine becomes a poor DIY project when the work involves more than sticking tiles to a sound, dry surface. Structural waterproofing, balcony membrane replacement, multi-residential work and larger renovation scopes can require registered building professionals and coordinated trades.
In Victoria, bathroom renovations valued at $5,000 or more must be carried out by a registered building practitioner, according to the Victorian bathroom renovation guidance summarised by hipages. The relevant registration types for bathroom work are Domestic Builder: Unlimited or Domestic Builder: Limited to bathroom, kitchen and laundry renovations.
That requirement matters because bathroom renovations often include plumbing, electrical work, carpentry, waterproofing and tiling. It's not enough to hire someone who can lay stone if the project contract and building scope require registered coordination.
Know when the surface has already failed
Stop and investigate if you find:
- Failed flood testing: Don't cover a membrane that hasn't passed the required checks.
- Drummy tiles: Hollow-sounding areas can indicate poor bedding or debonding.
- Efflorescence: Salt deposits can point to moisture movement through the system.
- Deflection: A floor that moves beyond the specified natural-stone tolerance needs structural or substrate attention before tiling continues.
A specialist tiler adds more than a wet saw. The useful work includes sorting calibrated batches, mapping veins, controlling wet-cut dust, protecting exposed fills and setting out movement joints to the relevant Australian installation guidance. That preparation prevents the finished floor from looking patchy or carrying avoidable stress.
Ask every Melbourne contractor to price the same line items: substrate survey, moisture assessment, screeding or self-levelling, waterproofing certificate, slip-rating requirement, waste allowance for tumbled edges, movement-joint detailing, sealing plan and warranty terms. Melbourne Tiling Services P/L can coordinate registered building work, waterproofing, screeding, natural-stone tiling and broader bathroom renovation trades, so those items can be discussed as one scope rather than vague rates for laying tiles alone.
For a travertine bathroom, ensuite, balcony transition or remedial project, Melbourne Tiling Services P/L offers substrate preparation, compliant waterproofing, screeding, stone installation and sealing coordination across Melbourne and greater Victoria. Request a detailed quote that records the finish, fall, slip-rating requirement, movement joints, certificate process and maintenance plan before you order the stone.
Write a Comment