Self Levelling Compound Over Tiles: A Practical Guide

You're standing in a Highett bathroom built when small ceramic tiles were the norm. The floor has a slight fall towards the shower, an old vinyl covering has already been pulled up, and you're planning large-format porcelain without turning the room into a demolition site. The obvious question is whether self levelling compound over tiles will solve the problem.

The better question comes first: are the existing tiles, adhesive bed and waterproofing stable enough to carry another floor build-up? Levelling compound can create a flat, tile-ready plane, but it can't repair loose tiles, failed waterproofing or a subfloor that moves. That distinction is where successful bathroom renovations separate from expensive rectification work.

Table of Contents

Why Tilers Reach for Levelling Compound Over Existing Tiles

Removing an old tiled floor is often the messiest decision in a Melbourne renovation. In an attached unit, demolition creates noise, dust, access problems and skip-bin costs. In older homes, particularly those built before 1990, the possibility of asbestos-containing materials elsewhere in the renovation also deserves proper assessment before disturbance. If the existing tile bed is sound, keeping it in place can simplify the programme and reduce the number of trades involved.

A typical Highett bathroom might have 1990s ceramic tiles, a gentle fall in the wrong direction and several patch repairs from earlier plumbing work. The owner wants larger porcelain tiles, which expose unevenness far more readily than small tiles. In that situation, levelling isn't a decorative touch. It becomes an early design and compliance decision.

Practical rule: Levelling compound can correct a flatness problem. It can't correct a bonding, moisture or structural problem.

The decision should follow a clear sequence:

  • Inspect the existing bed. Look for cracked tiles, loose edges, hollow sounds and grout joints that continue to open.
  • Confirm the finished height. Account for the leveller, adhesive, new tile, doorway and waste connection.
  • Choose a compatible system. The tile surface, primer and compound need to work together under the manufacturer's instructions.
  • Plan the waterproofing. A levelling layer doesn't automatically replace or repair a bathroom waterproofing system.
  • Measure the floor. Large-format porcelain requires a flatter base than small ceramic tile.

Overlay work is attractive because it can be faster and less disruptive than full demolition. It also preserves the existing floor height, which may already be useful around a shower waste or adjoining room. But the compromise is real. The new layer depends entirely on the old one, so a visually tidy surface can still be built over a failing foundation.

In practice, self levelling compound over tiles only makes sense when the existing substrate is stable, the required correction is within the product's rated thickness and the finished build-up won't create problems at doors, wastes or transitions.

Australian Flatness Standards and When Overlay Makes Sense

A bathroom floor can look tidy and still fail the tiling standard. Under AS 3958.1, the decision is not whether self levelling compound can cover existing tiles. The existing tile bed must be flat enough, stable enough and suitable to carry the added build-up. Standards Australia updated the current edition in 2023, which includes a dedicated section on levelling compounds. For general floor tiling in Victoria, the practical benchmark is no more than 3 mm deviation under a 1.8 m straightedge, as noted in Australian levelling compound guidance (Australian levelling compound guidance).

Check that deviation across the floor in several directions. Place the straightedge on the tiles and measure the gaps with a feeler gauge. A phone is useful for recording locations and photographs, but it cannot replace a straightedge, spirit level or proper substrate inspection.
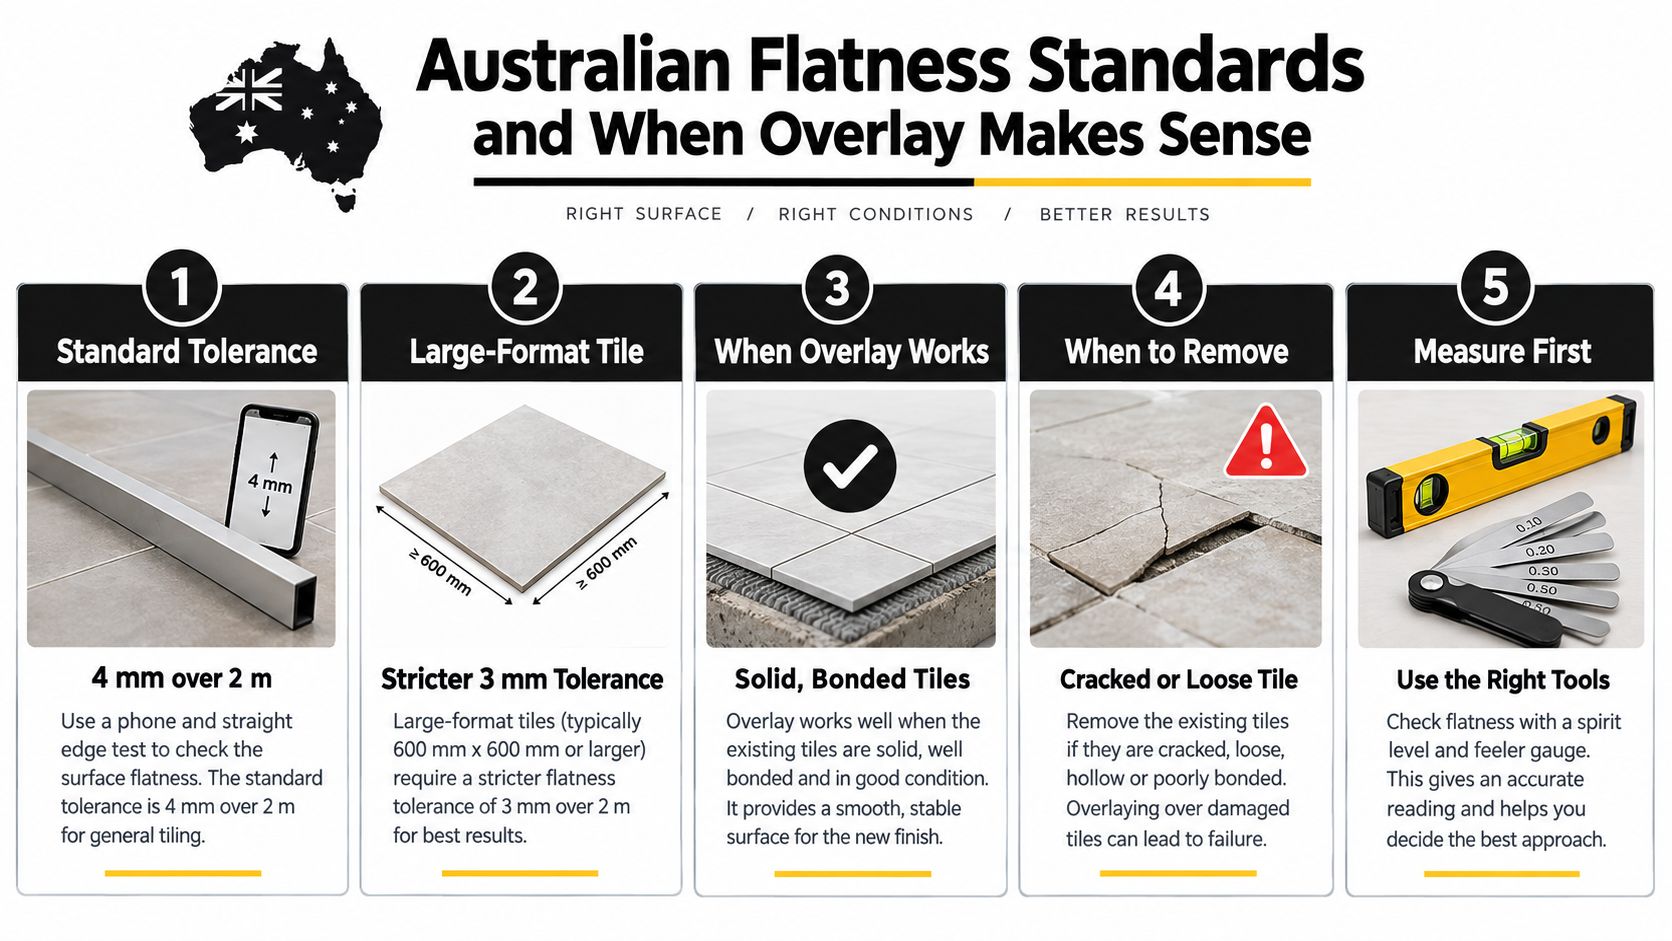
An infographic detailing Australian flatness standards for floor tiling, highlighting when it is appropriate to overlay tiles.

Large-format tiles over about 600 mm need tighter flatness control. Uneven contact can produce lippage, rocking tiles and weak bond performance. Leveller can bring a sound floor within the required flatness range, but it cannot make a defective tile bed suitable for an overlay.

Test before buying primer

Start with the existing floor, not the compound:

  • Tap every tile. Hollow or drummy sounds may indicate debonding.
  • Inspect grout lines. Cracks at thresholds, corners or across the room can point to movement.
  • Check corners and edges. Flexing, lifting or changed sounds require investigation.
  • Look for moisture evidence. Efflorescence, swollen skirtings, staining and soft areas are warning signs.
  • Check the waste and door. The finished build-up must meet the waste correctly and clear the door leaf.
  • Map the deviation. Record high and low points under the straightedge before choosing a product.

A bathroom floor also needs the correct fall toward its waste. Review this guide to floor slope requirements for drainage before levelling away a fall that the finished surface needs. For a broader comparison, this guide to concrete resurfacing methods for worn floors covers systems that are not interchangeable with a tiled overlay.

The rule is straightforward. Overlay when the tiles are firmly bonded, clean, dry and dimensionally stable, and the correction remains within the compound's specified range. Remove and investigate tiles that are hollow, cracked, moving, contaminated or damp, especially where water damage is visible. Leveller flattens a sound surface. It does not stop movement below it.

Preparing, Priming and Pouring Over Tiles

A bathroom overlay succeeds or fails before the compound reaches the floor. The tile surface must be stable, clean and suitable for the specified build-up, and the final level must still work with the waste, threshold and door. Mapei Australia lists Novoplan 21 for smoothing existing ceramic tile, terrazzo and natural stone where the surface is solid, dry and clean. Its stated thickness is 1 to 10 mm per coat, while a separate Australian work-method specification permits 3 to 40 mm with a 20 kg bag mixed with 3.4 to 3.6 L of water (Mapei Australia product information). These ranges are product-specific, so the instructions for the compound selected must control the work.

The substrate requires confirmation before mixing

Check suspicious areas by tapping the tiles and testing for movement. Inspect cracks, dampness and previous repairs, then resolve any uncertainty about the waterproofing or tile bed before committing to an overlay. Leveller can correct a surface deviation, but it cannot make an unstable floor suitable for a new finish.

The tile surface needs proper degreasing

Bathrooms leave soap film, body oils, cleaning chemicals and adhesive residue behind. Use a suitable alkaline tile cleaner, then rinse or remove residues as directed. A quick mop is inadequate, and sugar soap may leave a film that interferes with primer adhesion.

Glazed tiles need a mechanical key

Glazed ceramic and porcelain present a low-absorption surface to cementitious products. Light grinding or another approved abrasion method removes the sheen and surface contamination, giving the primer a clean key. Avoid gouging the floor or removing more tile than necessary.

The non-porous surface requires compatible primer

Use a tile bonding primer, such as Mapei Primer G or ARDEX Multiprime, according to the system instructions. Apply an even coat and allow it to tack off for the specified time. Primer forms the adhesion bridge between the prepared tile and leveller, so it is part of the system rather than a cosmetic extra. The practical requirements are also outlined in this guide to self levelling compound primer.

Edges and penetrations must contain the pour

Seal thresholds, gaps, penetrations and perimeter joints so liquid compound cannot escape beneath walls or into adjoining rooms. Foam strips or suitable edge-damming materials help contain the pour while preserving the perimeter detail.

Mixing and pouring depend on accurate timing

Use a clean 20 L bucket, a suitable drill and paddle, and measure the water precisely. Excess water weakens the matrix and increases the risk of cracking or segregation. Mix for 3 to 5 minutes until lump-free, allow the material to stand briefly if the product requires it, then remix before pouring.

Start at the far corner and work towards the door. Pour parallel ribbons, maintain a wet edge, and use a gauge rake or smoothing tool only as needed. Follow promptly with a spike roller to release trapped air and blend adjacent pours. Do not add water later to recover working time. Once the mix starts stiffening, discard it rather than force a weak finish.

Curing time controls the next trade

Protect the surface from foot traffic for the period stated by the manufacturer. A common practical allowance is 4 to 6 hours before light access, with tiling held for at least 24 hours unless the product documentation permits otherwise. Moisture, temperature, thickness and ventilation affect curing, so the bag data remains the controlling instruction.

A visual sequence is useful before starting the work:
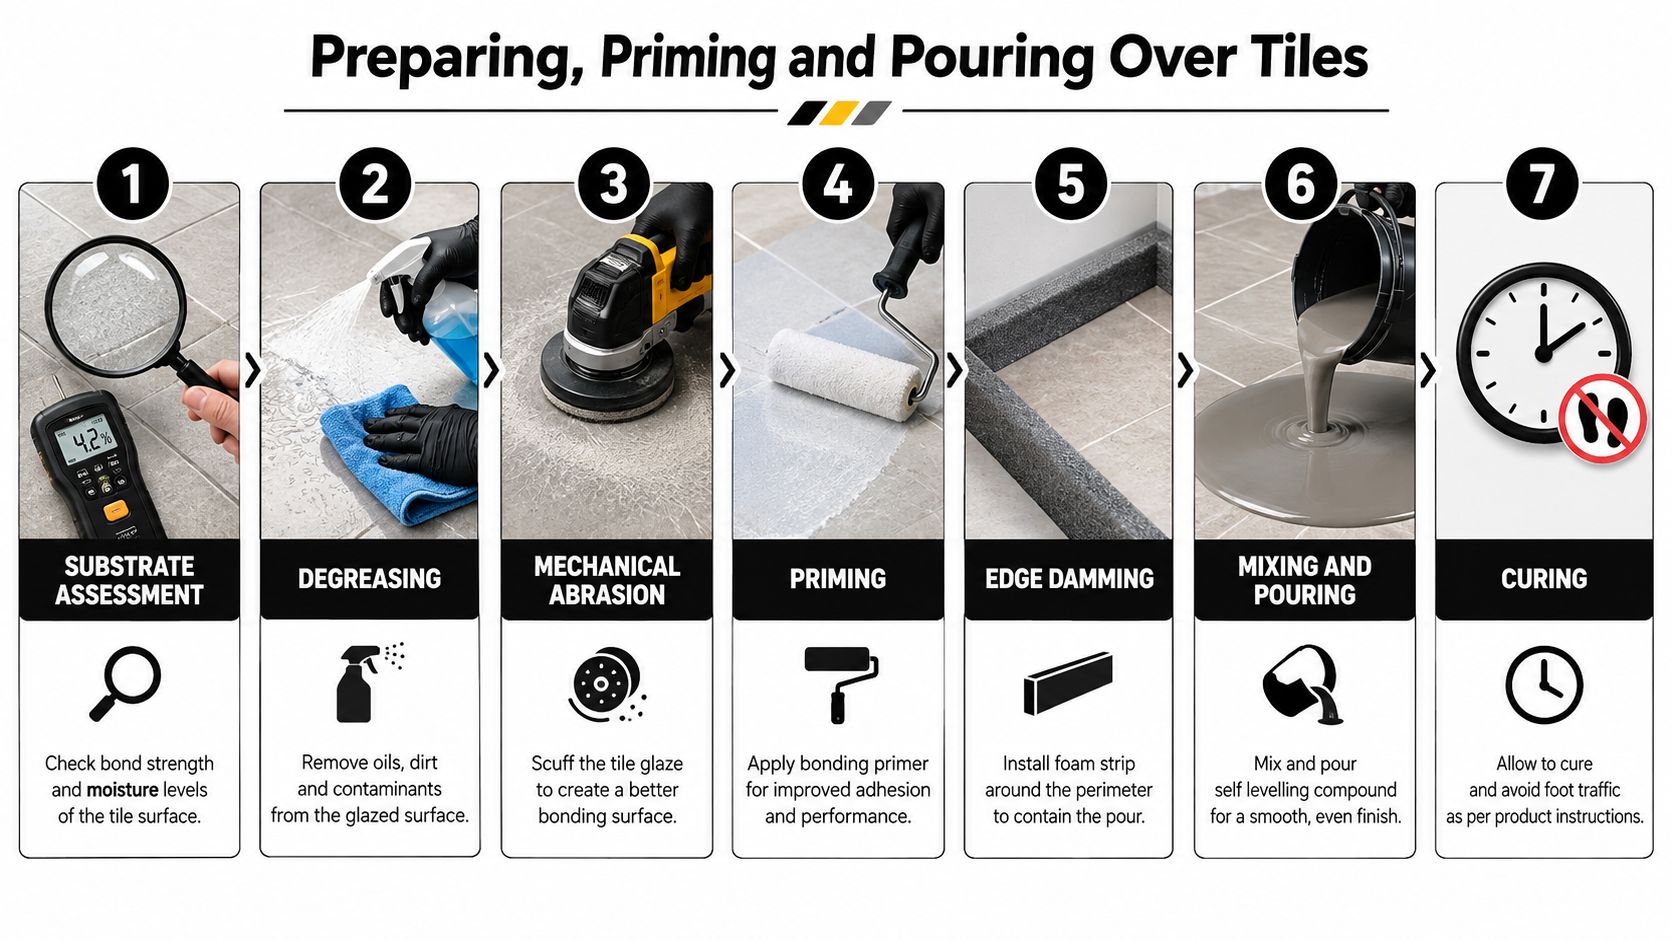
A seven-step instructional infographic showing the process of applying self-levelling compound over tile flooring.

The technique is demonstrated here:

The Hidden Failure Point Beneath the Leveller

The compound is rarely the first thing to fail. The weak point is usually the tile bed, waterproofing membrane or movement detail beneath it. If the old tiles are hollow, the overlay is bonded to a surface that can detach. If cracked grout has allowed moisture to travel, the leveller may conceal the evidence without removing the cause.

Movement is especially damaging. Thermal changes around shower perimeters, deflection in timber floors and missing movement joints can transfer stress into the new surface. Large-format layouts are less forgiving because a long, rigid tile bridges irregularities and concentrates load at high points.

AS 3958.1 places the emphasis on a suitable background before tiling. In practical terms, that means a surface must be rigid, clean and dimensionally stable. A levelling coat creates a plane, but it doesn't turn a moving floor into a stable one.

Three checks that expose a bad bed

Tap test: Use the handle of a screwdriver or another suitable tool to compare sounds across the floor. Hollow patches, drummy corners and isolated loose tiles need removal or repair rather than burial.

Moisture check: Use an appropriate moisture meter and inspect staining, efflorescence, swollen adjacent materials and persistent dampness. A bathroom floor may look dry while moisture remains within the build-up.

Waterproofing history: Find the original renovation records if they exist. If the membrane has failed, adding leveller and tiles over it doesn't restore the waterproofing system.

A flat failure is still a failure. The overlay must be supported by a floor that won't move, debond or transmit moisture.
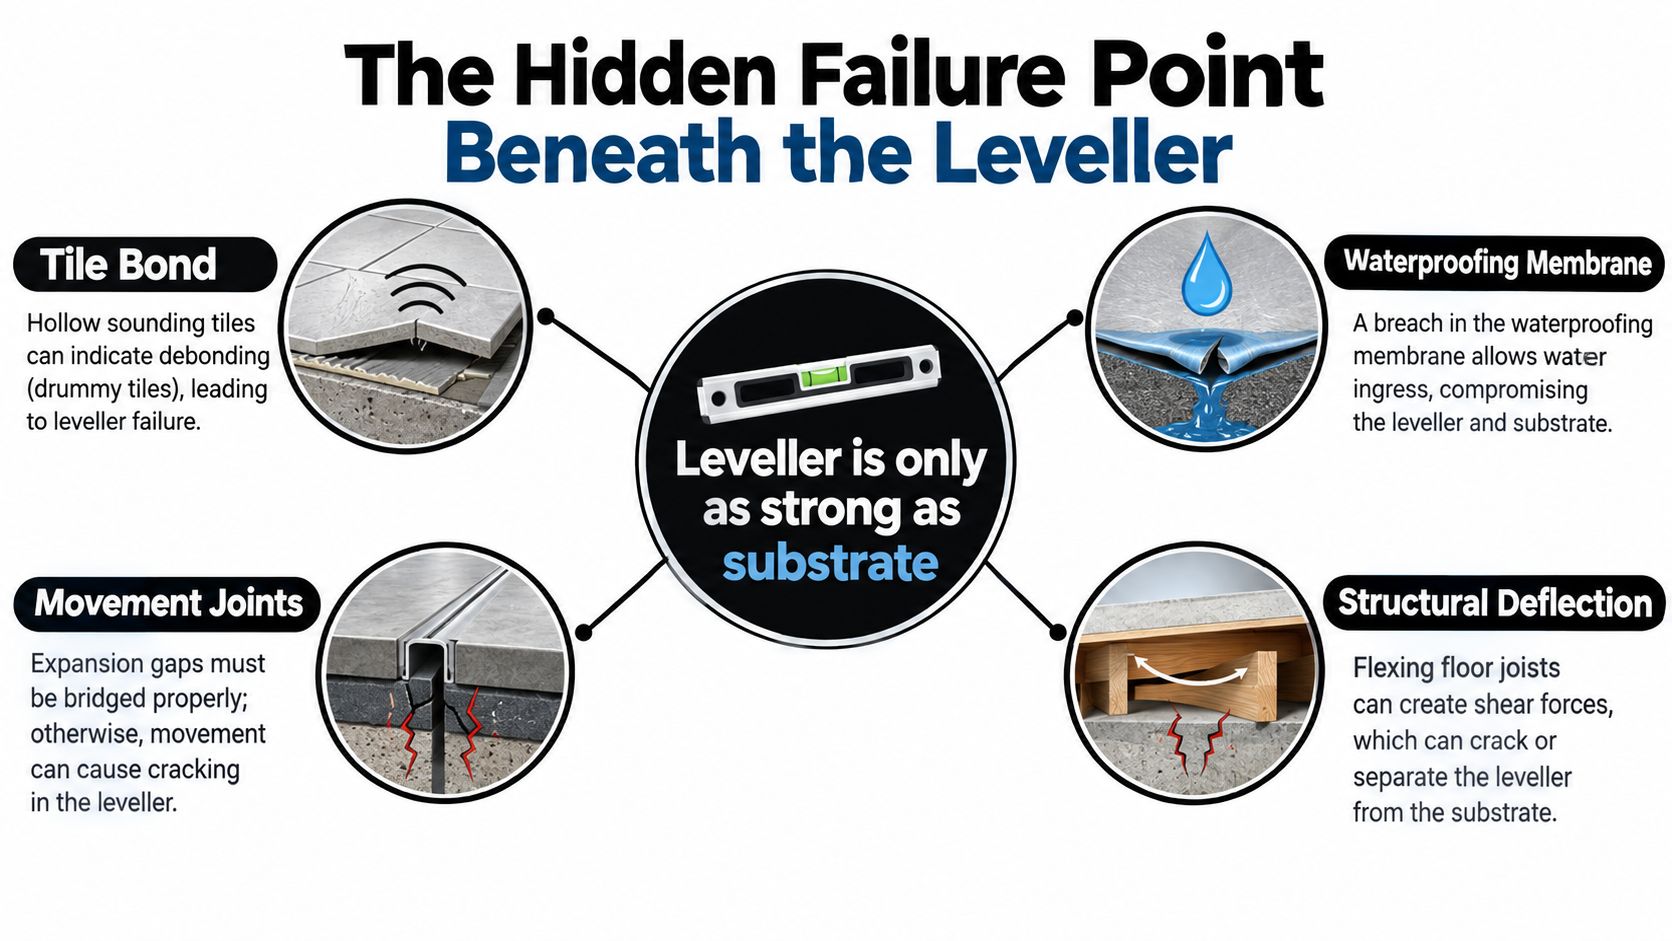
An infographic showing four common causes of self levelling compound failure, including substrate issues, movement, and deflection.

Older Melbourne bathrooms often contain several generations of adhesive, patching and waterproofing. That's why the question isn't whether compound can go over tiles. It's whether the existing assembly can safely carry the extra build-up and remain stable in a wet area.

Common Mistakes That Crack the Overlay

A bathroom overlay can look sound at handover and still fail soon after. On Melbourne rectification jobs, the recurring causes are an over-wet mix, an incompatible primer, excessive build-up or traffic before the compound has cured. The first signs are usually dust, pinholes, cracks or tiles that release from the surface.

Overwatering leaves a weak surface. Extra water may improve flow during mixing, but it can weaken the cured matrix and cause segregation. Measure the water accurately and remain within the bag's stated range. Do not use more water to compensate for a cold mix, poor batching or slow placement.

Primer selection controls adhesion. PVA is not a tile-bonding system. Use the primer nominated for the leveller and compatible with the prepared, non-porous tile surface. Grease, polish, dust or an omitted primer can leave the compound peeling even when the tile bed itself is stable.

Symptoms worth taking seriously

  • Dusty surface: Excess water, contamination or disturbance before curing may have weakened the top layer.
  • Delamination: The tile was glazed, greasy, unprimed or already loose.
  • Shrinkage cracks: The pour was too thick, or it dried in unsuitable conditions.
  • Low spots and dents: Someone walked across the wet compound, or the wet edge was not managed properly.
  • Bubbles and pinholes: Air remained trapped because the compound was not released with a spike roller, or the substrate and primer were poorly prepared.

Thickness needs the same discipline as water. One Australian compound specifies 1 to 10 mm per coat, so a deeper correction requires a compatible staged system, not an improvised thick pour. Respect the minimum thickness as well. A feather-edge product is not a substitute for a proper fill.

Do not tile because the surface feels hard. Follow the manufacturer's cure time, remove or repair powdery areas, and confirm that residual moisture suits the next adhesive system. If cracks return or the overlay debonds, the failure usually sits below the leveller, not in its appearance.
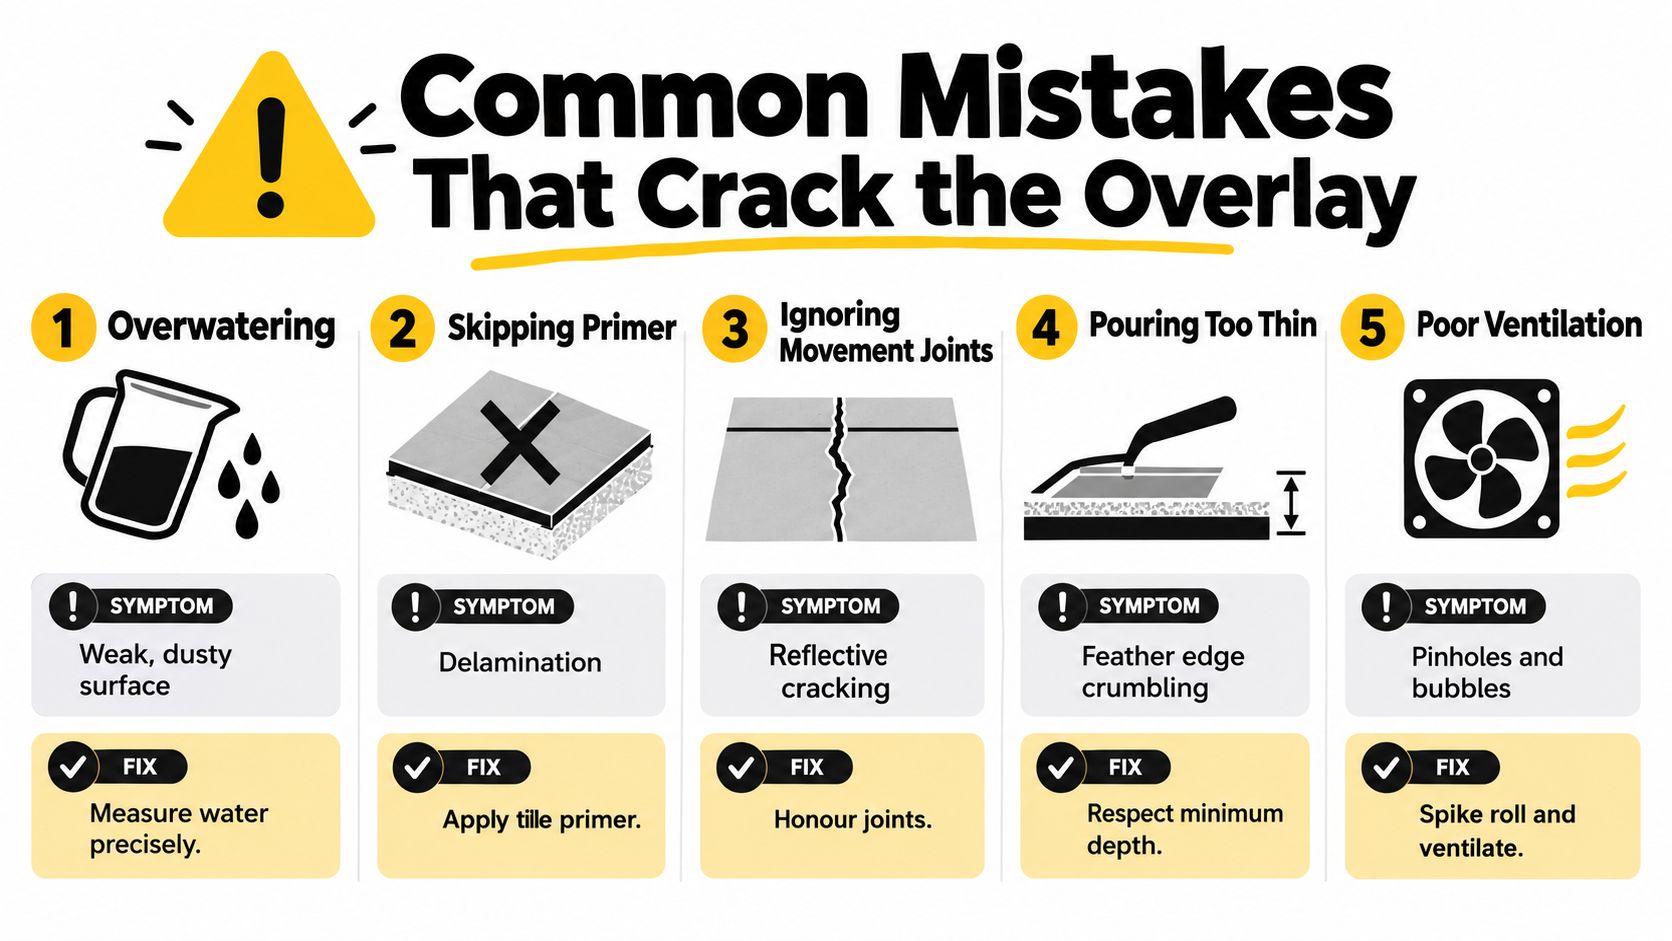
An infographic showing five common construction mistakes that cause cracks when applying floor overlay compounds.

Levelling Compound Compared With the Alternatives

For a Melbourne bathroom with sound but uneven tiles, levelling compound sits between a simple tile-on-tile installation and full demolition. It offers a clean, flat correction layer, but it also raises the finished floor and leaves the original substrate in place.

A cement screed can be more adaptable where falls need to be reshaped towards a new waste. It generally needs longer drying and a competent installer, but it can solve geometry that a free-flowing leveller isn't intended to create. Tile-on-tile adhesive avoids demolition and may suit a floor that is already reasonably flat, though it doesn't remove hidden substrate defects.

Full demolition provides the clearest reset. It exposes the structural floor, old adhesive and waterproofing so the installer can rebuild the system properly. The trade-off is disruption, waste and more coordination.

Method Typical Cost (per m²) Build-up Time to Tile Best Used When
Self levelling compound Site and product dependent Product dependent Manufacturer dependent Existing tiles are stable and the floor needs a controlled flatness correction
Cement screed Site and product dependent Designed to suit the required fall Longer drying period Falls need re-engineering or a drain position is changing
Tile-on-tile adhesive build-up Site and product dependent Limited by adhesive and tile system Often avoids a separate levelling cure Existing tiles are sound and already close to the required plane
Full demolition Site and product dependent Rebuilt from the structural floor Depends on waterproofing and preparation Tiles are loose, damaged or hiding substrate and waterproofing problems

For readers comparing polished or decorative concrete finishes with tiled surfaces, reviewing Atlanta Concrete Solutions finishes can clarify how different finish systems are built and maintained. It isn't a substitute for a wet-area tile specification, but it helps separate surface appearance from underlying construction.

Where a traditional mortar bed is more appropriate, this guide to screeding for tiles explains the role of screeding in creating the required plane and falls.

The honest call is straightforward. If the tiles are flat enough, firmly bonded and compatible with the primer and leveller, overlay can be the sensible middle path. If they're hollow, cracked or associated with failed waterproofing, demolition is usually the safer reset.

When the Job Calls for a Registered Builder

In Victoria, domestic building work costing more than $10,000 including labour and materials requires a registered domestic building practitioner, and registration must be in place before work begins, according to Consumer Affairs Victoria guidance on builders and tradespeople. A bathroom renovation involving tile removal, waterproofing, screeding and retiling can cross that threshold quickly.

A Domestic Builder Unlimited is registered to carry out, manage or arrange all components of domestic building work, including renovation, improvement and maintenance of a home, as described by the Master Builders Victoria registration guidance. That broader responsibility matters when the job involves several linked trades rather than a single cosmetic repair.

An owner-builder arrangement doesn't remove the technical and legal risks. The VBA's Owner-Builder Information and Study Guide states that an engaged domestic builder must be registered when the work costs more than $10,000 including labour and materials, and that only a registered domestic builder can enter into a major domestic building contract with an owner-builder.

Decide where the boundary sits

A small, dry-area tile repair may remain a straightforward maintenance task. Once the work affects a bathroom waterproofing membrane, shower construction, subfloor stability or coordinated plumbing, the consequences of getting the sequence wrong become much greater. A failed overlay can allow water into the structure or the ceiling below, while a handyman arrangement may leave no clear person responsible for the complete system.

Melbourne Tiling Services P/L operates from Highett and coordinates bathroom renovations, waterproofing, screeding, self-levelling and tiling as part of a broader registered building service. The compound is only one layer of the work. The important decision is whether the project needs a properly managed renovation scope rather than a cosmetic cover-up.


Melbourne Tiling Services P/L can assess whether your existing tiled bed is suitable for self levelling compound over tiles, then coordinate preparation, waterproofing, screeding and retiling where required. Visit Melbourne Tiling Services P/L to arrange a quote for your Melbourne bathroom or ensuite renovation.
Screeding for Tiles: Flawless Finish Guide

You're probably choosing tiles right now. Maybe you've shortlisted a soft stone-look porcelain, or you're weighing up a large-format Kerlite panel against a more forgiving standard tile. The exciting part of a bathroom renovation is always what you can see. The part that decides whether that finish still looks right years later is what sits underneath it.

That hidden layer is often where good renovations separate themselves from expensive call-backs. A bathroom floor can look close enough before tiling, but “close enough” is how you end up with poor falls, proud tile edges, drummy spots, and water that hangs around where it shouldn't. In Melbourne homes, especially in older properties with uneven slabs or awkward transitions, the floor usually needs correction before the first tile goes down.

That's where screeding for tiles matters. In practical terms, it gives the tiler a controlled base to work from and gives the homeowner a better chance of getting the finish they paid for. In renovation work, that base also has to work with waterproofing, existing floor heights, shower set-downs, and door clearances. Those aren't decorative details. They affect whether the bathroom performs properly.

A registered builder looks at screed differently from someone treating it as a quick prep step. It isn't just about making the floor look flatter. It's about coordinating levels, drainage, curing time, and sequencing so the finished room works as a whole. If you're planning floor tiling in a wet area, the standard of the base will often decide the standard of the result, including the quality of the floor tiling outcome in Melbourne homes.

Table of Contents

Your Foundation for a Flawless Renovation

A bathroom renovation often starts with a clean visual idea. Better tiles. Cleaner lines. A walk-in shower. Maybe a stone niche and a frameless screen. Then demolition starts, the old finishes come out, and the actual condition of the floor shows itself.

In Melbourne renovations, it's common to uncover a slab that's not flat, not true, or not suitable for direct tiling. Sometimes the issue is subtle. A dip near the doorway. A high edge where an old wall sat. A floor that seems acceptable until you start setting large-format tiles and every minor variation telegraphs straight through the finish. Other times the problem is obvious. Water has nowhere sensible to run, or the shower area can't be formed properly without rebuilding the substrate.

That's why screeding for tiles isn't a luxury step. It's the part that turns an uneven, unpredictable base into one that can support a premium finish.

Good tile work starts before tile work

Homeowners usually notice tile colour, grout lines, and feature walls. Trades notice the base first. A floor that's out of shape forces compromise into every stage after it.

A proper screed can help resolve practical renovation problems such as:

  • Floor build-up control: It helps manage the finished height where the new bathroom meets adjoining rooms.
  • Drainage formation: It gives the installer the ability to create the right falls in shower and wet zones.
  • Tile presentation: It reduces the chance of visible lippage, especially with long or large-format pieces.
  • Waterproofing compatibility: It allows the floor preparation to be coordinated with membrane work rather than treated as an afterthought.

A beautiful bathroom can still be a poor renovation if the water doesn't move properly and the tile bed isn't stable.

Why registered builder oversight matters

In a bathroom, the floor can't be assessed in isolation. Screed thickness affects transitions, waterproofing detail, fixtures, and scheduling. A registered builder is accountable for how those pieces interact, not just for whether one trade completed one task.

That matters most in renovation work, where every existing condition pushes against the plan. The difference between a tidy result and a recurring defect often comes down to whether someone looked at the whole system early enough.

What Is Floor Screed and Why Is It Essential for Tiling

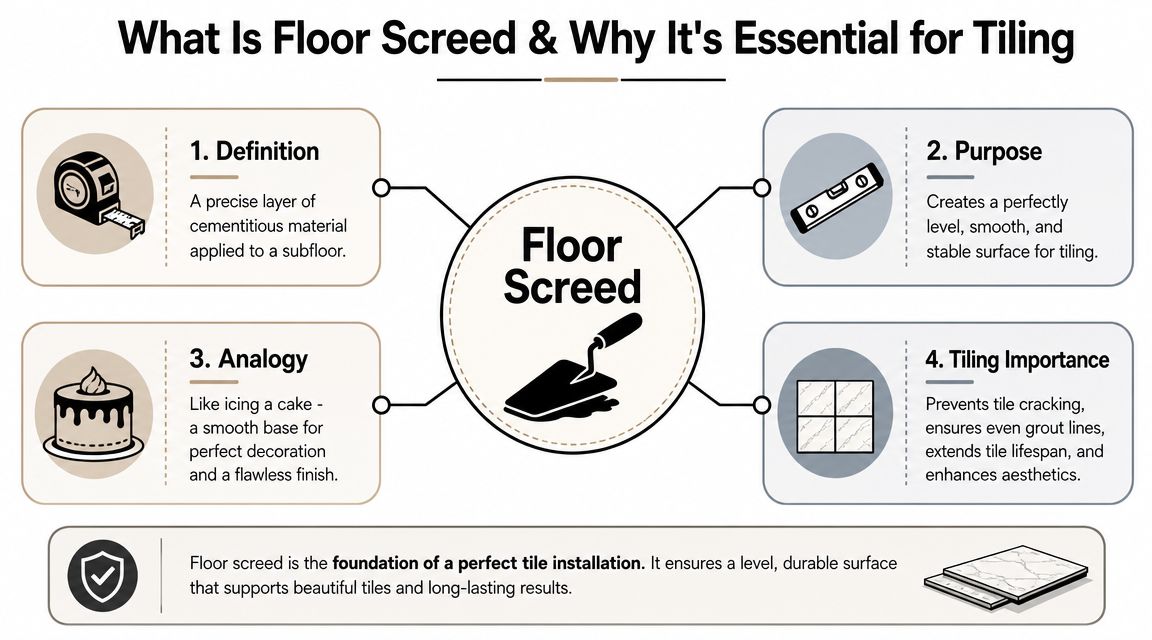
Floor screed is a cementitious layer applied over a subfloor to create a surface that's flatter, more stable, and more usable for tile installation. If the slab underneath is the structure, the screed is the correction layer that gives the tiler control.

The simple way to think about screed

The easiest analogy is cake icing. You can have a solid cake underneath, but if the top is uneven, the final decoration won't sit or present properly. Tiles behave the same way. They need a base that has been brought into line before the finish goes on.

An infographic explaining what floor screed is, its purpose, an analogy, and its importance for tile installation.

In Australian tiling practice, screed is used to create a smooth, level base before tiles are fixed, and the minimum thickness depends on whether the screed is bonded or unbonded. A bonded screed is typically laid at a minimum of 20 mm, while an unbonded screed must be at least 40 mm thick. The same guidance notes that a slurry coat is used before laying screed and that the floor should be allowed to cure properly before operational use, which affects renovation timing and floor build-up in bathrooms and wet areas (Mapei screed guidance for tiling works).

That thickness matters more than most homeowners expect. It influences the finished floor level, the threshold at the door, the relationship to the shower waste, and whether the renovation can tie neatly into the rest of the home.

Why flatness and falls both matter

Screeding for tiles has two jobs. The first is flatness. The second is falls.

Flatness matters because tiles don't hide substrate problems. They expose them. That becomes even more important with large-format porcelain and thin panel products where the eye picks up every irregularity. Guidance on tile substrate preparation notes that bumps bigger than 4 to 5 mm over a 2 m straight edge should be rectified before tiling, and that a liquid or traditional screed is often needed to make the surface tile-ready for a professional finish (UK Screeds guidance on common tiling mistakes).

Falls matter because wet areas must drain. A bathroom floor isn't meant to be flat everywhere. It needs intentional shape. Around showers, that shape has to send water where it belongs without creating birdbaths, awkward edge conditions, or tile cuts that look forced.

Here's what screed does well when it's planned properly:

  • Corrects uneven slabs: Minor highs and lows can be brought under control before tiling starts.
  • Forms drainage paths: Shower floors and wet area transitions can be built with purpose rather than guessed on the day.
  • Supports premium materials: Kerlite, natural stone, and rectified porcelain all benefit from a better substrate.
  • Reduces finish compromise: The tiler doesn't have to “fix” substrate problems with adhesive thickness and hope.

Practical rule: If the floor only looks flat by eye, it hasn't been assessed properly for tile.

Exploring the Main Types of Floor Screed

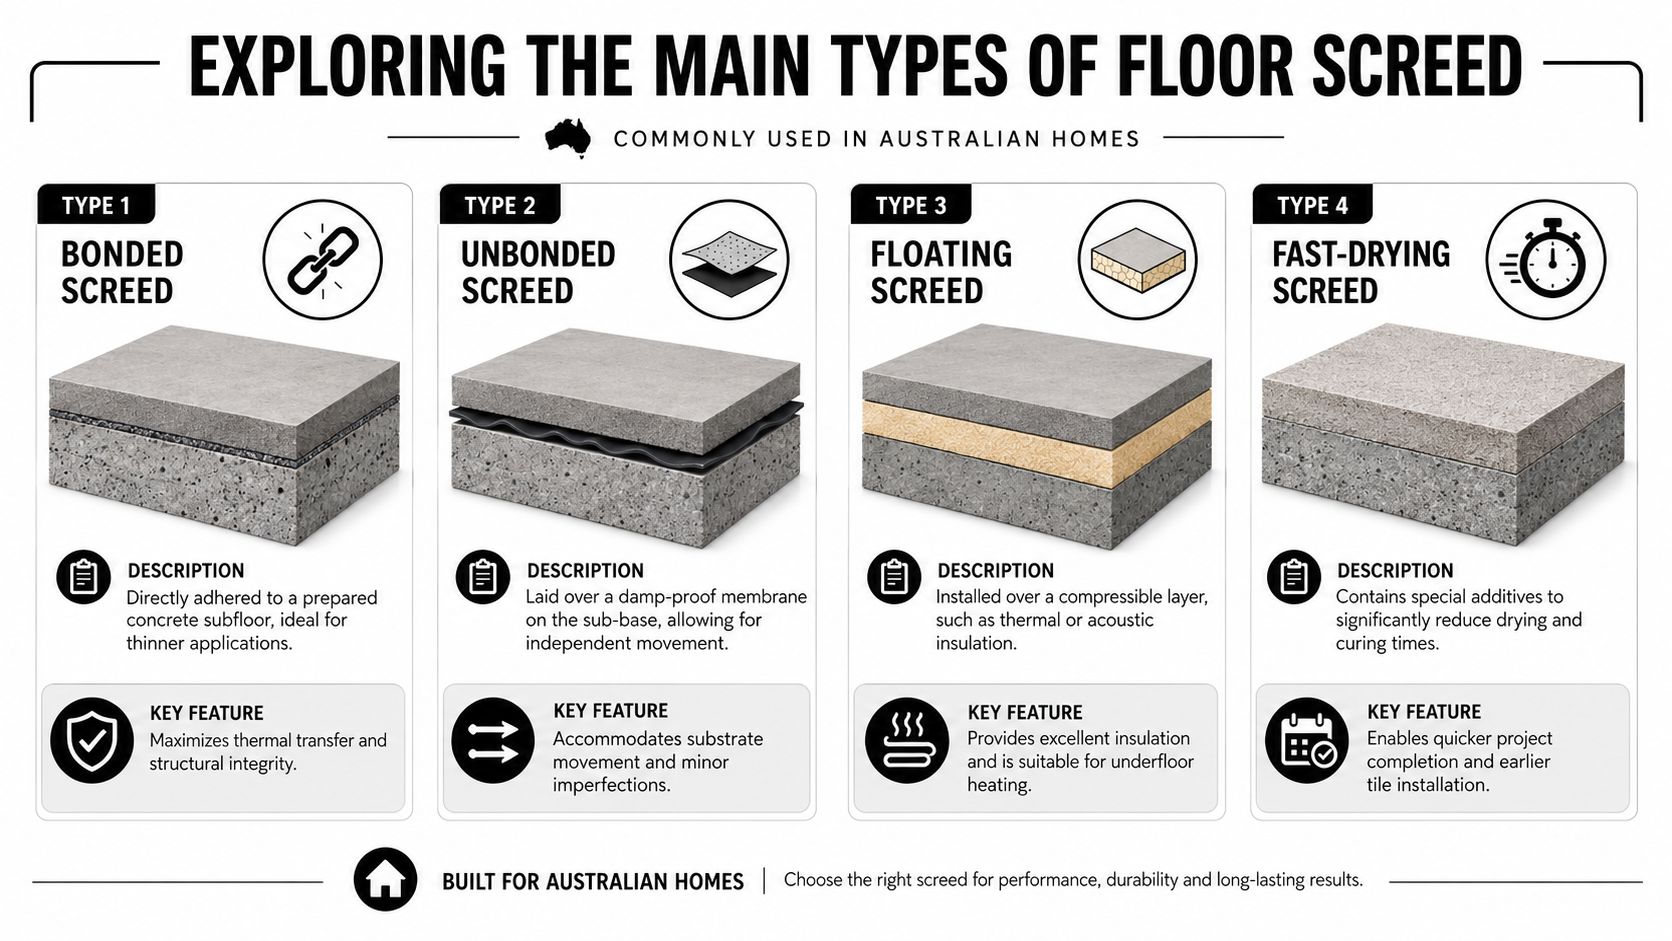
Not every screed does the same job. The right choice depends on the substrate, the room, the thickness available, and what sits under or over it. Homeowners often hear terms like bonded, unbonded, floating, and self-levelling as though they're interchangeable. They're not.

A diagram illustrating the four main types of floor screed commonly used in Australian residential construction.

How the main systems differ

A simple comparison helps.

Screed type What it sits on Typical use Key consideration
Bonded screed Directly bonded to prepared concrete Renovations where build-up needs to be kept tighter Substrate prep is critical because the screed relies on adhesion
Unbonded screed Separated from the base by a membrane or layer Floors needing movement separation or where direct bond isn't suitable Needs more thickness and movement control
Floating screed Over insulation or a compressible layer Areas with acoustic or thermal requirements, including some heated floors The whole build-up must be designed as a system
Self-levelling compound Over a prepared substrate as a correction layer Fine correction where the floor is close but not tile-ready It's not a substitute for every full screed application

In Australian practice, a bonded screed is typically laid at a minimum of 20 mm, while an unbonded screed requires at least 40 mm. For external areas, ARDEX technical guidance specifies bonded screeds at about 15 to 65 mm and unbonded screeds at about 40 to 80 mm, with welded wire mesh required for unbonded systems under AS 3958.1 to control movement (ARDEX Australia external floor screed detail).

That split is practical, not academic. Bonded systems transfer load through adhesion to the slab. Unbonded and floating arrangements need more depth because they behave more independently and have to deal with bending and shrinkage differently.

Which type suits which renovation

For a standard bathroom renovation, bonded screed is often the starting point if the slab can be prepared properly and the build-up needs to stay controlled. It's commonly the right answer when a registered builder is trying to maintain sensible transitions into the hall or adjacent bedroom.

An unbonded screed makes more sense where a membrane, substrate condition, or movement concern means direct adhesion isn't the best path. That extra separation can be helpful, but it comes with thickness implications. In a tight renovation, those extra millimetres can affect everything from threshold trims to vanity clearances.

A floating screed is usually part of a bigger build-up decision. If you're incorporating insulation or looking at under-tile heating in bathroom renovations, the floor assembly needs to be considered as one package rather than pieced together trade by trade.

Self-levelling compounds sit in a different category. They're useful when the substrate is close to acceptable but still outside what the tile finish needs. They don't replace every screed, and they're not a cure for major structural or drainage problems.

More material isn't automatically better. Too much build-up can create drying delays and compatibility issues with later waterproofing and adhesive stages.

A good contractor doesn't start by asking, “Should we screed?” The better question is, “What type of correction does this floor need?”

The Screeding Process in a Melbourne Bathroom Renovation

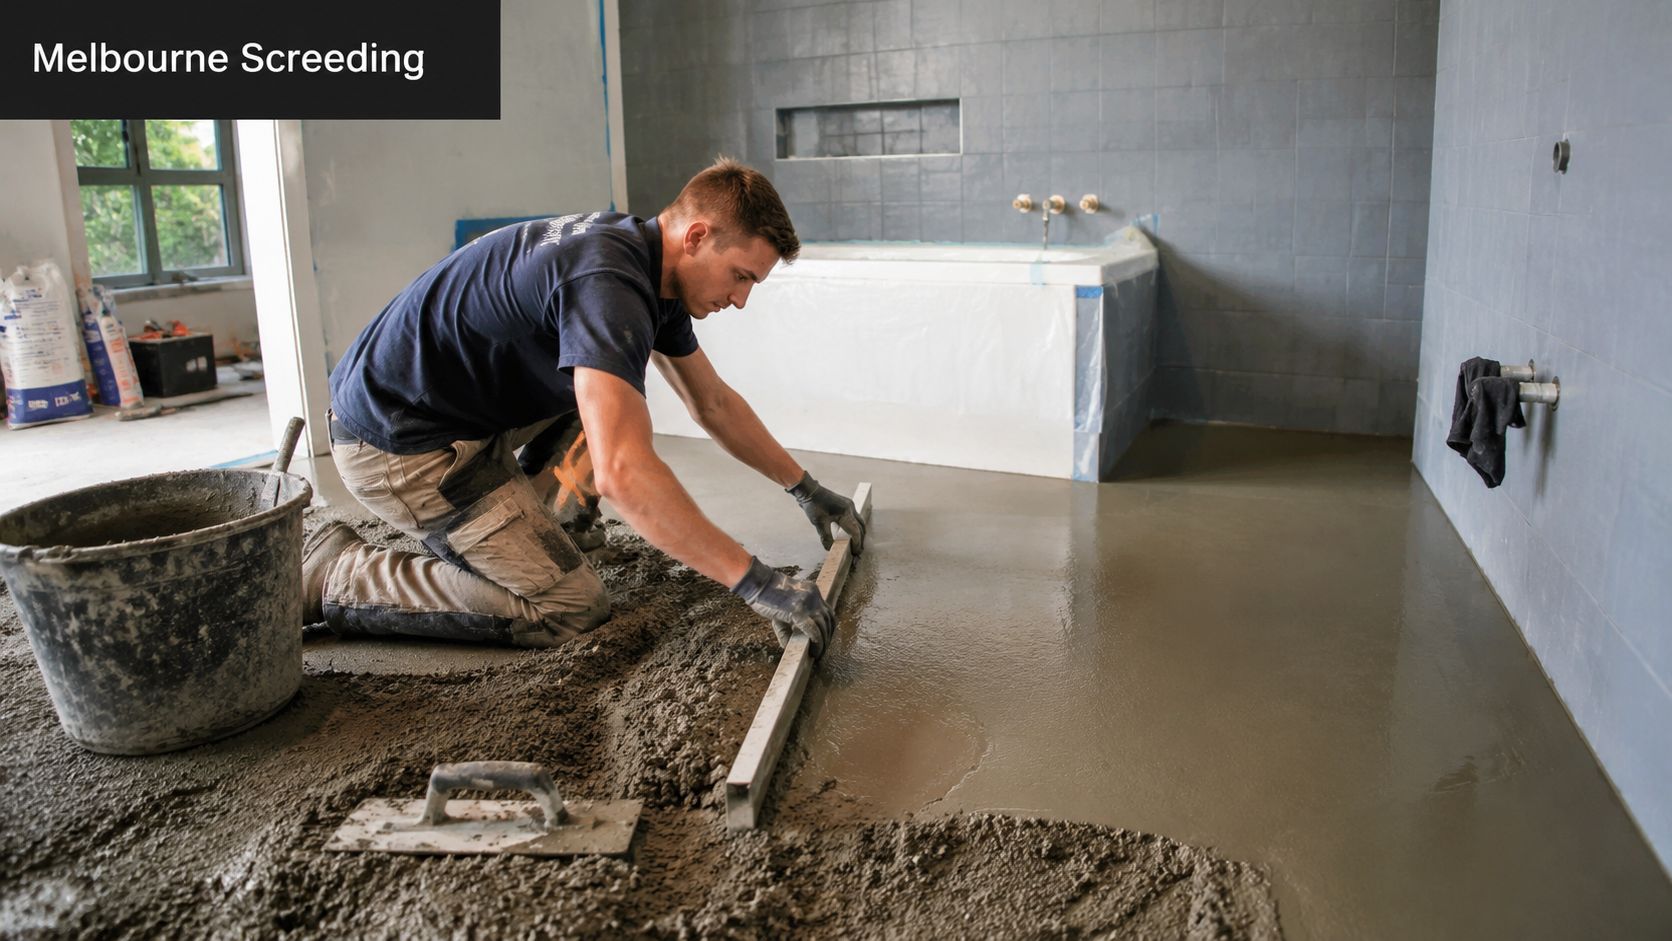
A proper screeding job on a bathroom floor is methodical. It isn't a bag of mix tipped on the slab and shaped by eye. The quality comes from assessment, preparation, sequencing, and patience.

Early in the renovation, the floor needs to be checked for height, condition, cleanliness, and how it relates to the rest of the room. That includes the shower area, doorway, waste positions, and any transition into adjoining finishes.

A professional construction worker kneeling on the floor, leveling wet cement screed in a modern bathroom renovation.

What happens before the screed goes down

The first serious step is substrate preparation. If the base is dusty, contaminated, weak, or poorly keyed, the screed won't perform the way it should. In Australian guidance for tiling works, a slurry coat is used before laying screed, which shows how important the bond interface is in practice.

On site, the process usually looks like this:

  1. Assess the substrate: Check flatness, soundness, levels, and whether the base is suitable for bonded correction or needs another system.
  2. Prepare the floor: Remove contamination, loose material, and anything that could interfere with adhesion or consistency.
  3. Set heights and falls: Establish where the finished tile level needs to land and how water will move in the wet area.
  4. Place and shape the screed: Work to the planned lines, not to visual guesswork.
  5. Protect the area: Keep traffic and follow-on work from damaging the fresh screed.

Australian product data also shows how controlled modern screeding materials have become. One local screed mix product specifies a pot life of about 1 hour at 20°C, an open time of about 20 minutes at 20°C, a final setting time of 24 hours at 20°C, a coverage rate of approximately 3.7 m² per 20 kg bag at 3 mm thickness, an application temperature range of 5°C to 30°C, and a shelf life of 6 months from production (Australian screed product data sheet).

Those figures are useful because they explain why experienced installers pay attention to batch size, room temperature, and staging. Screed has a working window. Once you miss it, finish quality suffers.

Why timing is part of the build quality

The part homeowners most want shortened is curing. It's also the part that shouldn't be rushed.

For ceramic floor finishes in Australia, AS 3958-based guidance cited in local construction commentary recommends continuous curing for at least 7 days followed by about 2 weeks of air-drying before tiling can commence. The same commentary notes movement joints at roughly 4.5 m intervals and that AS 4654.2 prefers a 50 mm minimum unbonded screed, above the 40 mm minimum referenced elsewhere for AS 3958.1. The reason is practical: proper curing and jointing help reduce curling, shrinkage cracking, debonding, and tile tenting (This is Construction on floor screed design).

That's why registered builders and disciplined tilers protect this stage in the programme. Drying time isn't wasted time. It's part of what makes the floor dependable.

A short visual on site practice helps most homeowners understand what that shaping stage involves:

Common Screed Failures and How to Prevent Them

When screeds fail, the symptom is often seen in the tiles. The underlying cause usually started underneath. That's why defects can be misread. Homeowners see cracked grout, hollow sounds, water sitting in the wrong place, or movement at tile edges. The earlier mistake may have been poor prep, wrong product choice, bad curing practice, or rushed sequencing.

Where failures usually begin

Some failures are material-related. A screed can end up weak or crumbly if the mix or application is wrong. Others come from movement and moisture. A floor that dries unevenly or is tiled over too soon can create problems that don't fully show until the bathroom is back in service.

Common failure patterns include:

  • Weak surface strength: The screed powders, breaks down, or doesn't provide a reliable bed for adhesive.
  • Cracking and curling: The floor moves as it dries, especially if curing and protection were poor.
  • Poor drainage: Falls weren't formed correctly, so water ponds instead of clearing.
  • Tile lippage and debonding: The substrate wasn't flat enough, or movement wasn't controlled properly.
  • Tenting or stress transfer: Expansion and contraction weren't managed across the floor build-up.

Poor subfloor preparation has a habit of showing up later as a “tile problem” even when the root cause sits below the adhesive.

Prevention starts before the screed is mixed. The floor has to be assessed thoroughly. If the base needs repair first, it should be repaired. If it only needs local correction, don't overspecify the build-up. If the wet area needs engineered falls, don't leave them to be improvised during tiling.

Why screeding is a risk decision not a line item

General tiling guidance links many failures, from cracking to leaks, to poor subfloor preparation and unsuitable substrate decisions. It also stresses that surfaces need to be properly prepared and free of contaminants before tile work starts. That's why investing in professional screeding is better viewed as a risk-management decision, especially in bathrooms and balconies where later rectification can become far more disruptive than the original prep work (Rubi guidance on common tile-laying mistakes).

For wet areas, this connects directly to the broader relationship between tile, substrate, and membrane. Homeowners comparing quotes should pay close attention to how the contractor handles tiling and waterproofing integration, because that interface is where a lot of avoidable problems begin.

The cheap version of screeding usually isn't cheaper. It just delays the bill until the bathroom is finished and occupied.

Hiring a Screeding and Tiling Expert in Melbourne

A lot of bathroom problems are locked in before the first tile is laid. I see it regularly in Melbourne renovations. The tiles look like the issue, but the underlying problem is an uneven floor, poor set-out, or a screed that was done without enough thought to levels, drainage, and the finish being installed.

That matters even more if the project includes large-format Kerlite or natural stone. Those materials don't hide errors. They show lipping, inconsistent falls, and movement quickly, which is why hiring the right screeding and tiling expert is less about finding someone to spread mud and more about choosing who takes responsibility for the floor build-up as a whole.

Questions worth asking before work starts

A good contractor should be able to explain the floor build-up in plain terms and tell you why they are choosing one method over another. If the answers are vague, or everything is treated as “standard,” treat that as a warning.

Ask questions like:

  • How will you assess whether the floor needs patching, self-levelling, or a full screed?
  • How will the finished height affect the doorway, shower recess, waste position, and adjoining floors?
  • How will falls be formed and checked in the wet area?
  • How will the screed work with the waterproofing system and the tile type selected?
  • What curing time is allowed before waterproofing or tiling starts?

In bathroom work, coordination matters as much as installation skill. A registered builder brings value here because the screed, waste location, membrane detail, and tile layout all have to line up. If those decisions are made in isolation, the risk usually shows up later in the finish.

Screenshot from https://melbournetilingservices.com.au

What to look for in the quote

A useful quote should show how the contractor is thinking, not just give you a price.

Look for detail around:

  • Scope clarity: whether substrate prep, screeding, and any floor correction are included
  • Wet area planning: whether falls, waste positioning, and membrane sequencing have been allowed for
  • Material suitability: whether the screed system suits the room conditions and the tile being installed
  • Programme realism: whether enough time has been allowed for curing, drying, and trade coordination

One local example is Melbourne Tiling Services P/L, which includes screeding within its broader bathroom renovation and floor preparation work. The more important point is who owns the result. For a high-end bathroom, especially one using thin porcelain panels or stone, the right contractor should be able to explain the build-up clearly, identify the risks early, and stand behind how the finished floor performs after handover.

If a contractor talks only about tile selection and not about levels, substrate condition, and falls, they are missing the part that usually causes the defect.

Frequently Asked Questions About Screeding for Tiles

Can I tile straight onto my concrete slab

Sometimes, yes. Often, no.

If the slab is sound, clean, appropriately flat, and already gives you the right levels and drainage, direct tiling may be possible. In many bathroom renovations, though, the existing slab isn't good enough for the finish being installed. Large-format porcelain, Kerlite, and natural stone are less forgiving than people expect. If the floor is out, the tiles will show it.

How much does screeding a bathroom floor cost in Melbourne

The price depends on the condition of the existing floor, the thickness required, access, the type of screed or levelling product, and how the work fits into the wider renovation. There isn't one honest number that suits every bathroom.

A better way to assess value is to compare the scope. Is the quote allowing for substrate preparation, proper falls, curing time, and coordination with waterproofing? A low figure can leave out exactly the work that prevents defects later.

Is screeding a DIY job

For a laundry or a simple utility area, some homeowners attempt minor floor correction themselves. In a bathroom, especially a shower area, DIY screeding is risky. The margin for error is small, and the consequences sit under every layer that follows.

The hard part isn't only spreading the mix. It's reading the substrate, setting the heights, forming reliable falls, and sequencing the work with waterproofing and tiling. That's why this step is usually better handled by an experienced tiler or a registered builder managing the renovation.

Is self-levelling the same as screeding

Not really. Self-levelling compounds are useful correction products, but they don't replace every screed application. If a bathroom floor needs shaped falls or a more substantial build-up, a traditional screed system is often the more appropriate solution.

Is screeding always worth it

No. If the floor is already suitable, unnecessary build-up can create new problems. The right approach depends on the substrate, tile format, wet area detail, and renovation constraints. The point isn't to add screed by default. The point is to correct the floor properly, and only as much as needed.


If you're planning a bathroom or ensuite and want clear advice on whether your floor needs patching, self-levelling, or full screeding for tiles, speak with Melbourne Tiling Services P/L. As registered builders handling bathroom renovations, waterproofing, screeding, and tiling, they can assess the full floor build-up and explain the practical options before work begins.