

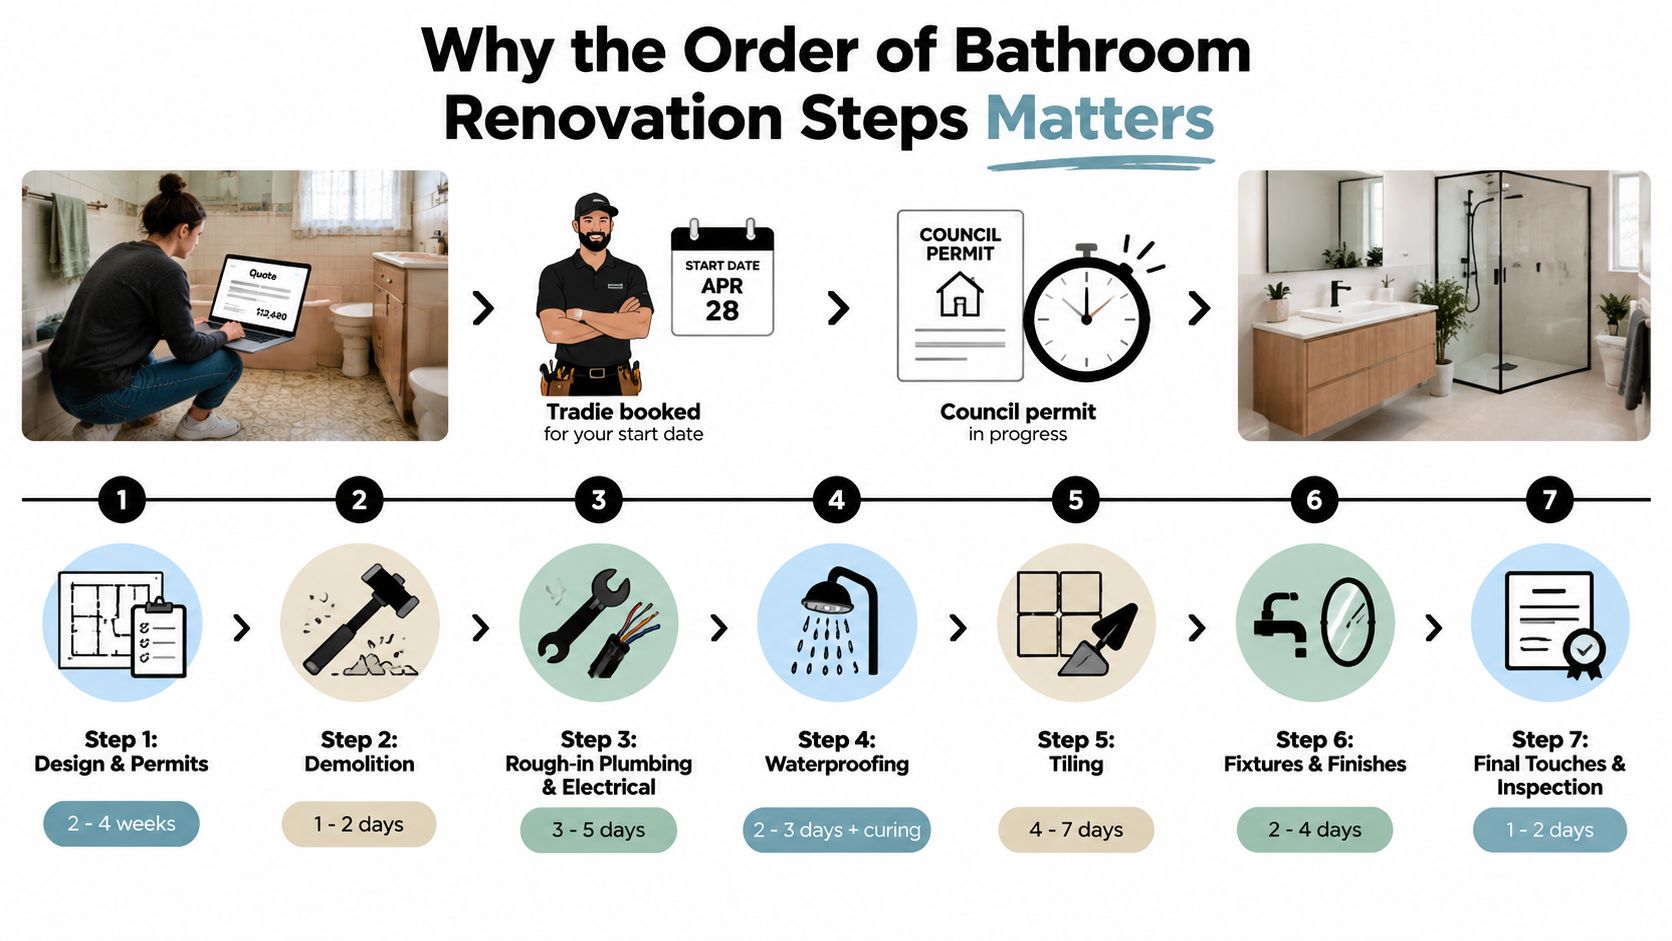
You're crouched in front of a tired 1990s bathroom in a Melbourne weatherboard, laptop open to a tradie quote, start date booked, and a council permit deadline approaching. The tiles look like the main problem, but the risk sits behind them. If demolition, plumbing, electrical work, waterproofing, inspections and tiling happen in the wrong order, a renovation that looked straightforward can turn into rework, delays and arguments about who pays.
The safest bathroom renovation steps in Victoria follow a compliance-driven sequence. Design decisions come first, registered builders and permits are checked before work starts, and waterproofing must be completed and certified before tiles cover the evidence. The finish matters, but the order protects the budget.
Table of Contents
- Why the Order of Bathroom Renovation Steps Matters
- Budgeting, Quotes and the Real Cost Bands
- When You Need a Registered Builder and a Permit
- Plumbing and Electrical Rough-In
- Waterproofing the Compliance Milestone
- Screeding, Levelling and Tiling the Space
- Shower Screens, Fit-Off and Final Trades
Why the Order of Bathroom Renovation Steps Matters
A bathroom renovation isn't a single leap from old tiles to a finished room. It's a chain of trade checkpoints, and each one depends on the work before it. The waterproofing inspection must happen before tile adhesive is mixed. Pipework and wiring rough-in need to be set to the finished wall positions before the substrate is closed. A registered builder may become the legal gatekeeper once the work involves structural changes or permit-triggering alterations.
That sequence is what separates a controlled project from an expensive strip-out followed by guesswork. An out-of-order renovation commonly creates rework, failed flood tests and warranty disputes. A clear plan turns the job into a series of passable stages, rather than asking the homeowner to trust that everything under the tiles will work forever.
Start with the room, not the finishes
The first useful document isn't a mood board. It's an accurate measure-up.
Record the room dimensions, ceiling height, window and door swings, floor joist direction and substrate type. Note where the existing toilet, basin, shower and bath sit, but don't assume those positions are suitable for the new design. Check access for materials, the location of the main switchboard, drainage constraints and whether adjoining walls or floors show signs of moisture damage.
The design can then move into a 3D concept that fixes the functional decisions early:
- Fixture locations: Set the toilet, vanity, bath and shower positions before rough-in pricing.
- Shower geometry: Confirm the screen size, entry direction, niche locations and whether a hob-less design affects drainage.
- Tile module: Choose the tile format and layout early, because large-format panels, mosaics and feature borders require different set-out and preparation.
- Services: Mark exhaust fans, heated towel rails, mirror demisters, lighting, shaver outlets and underfloor heating before walls are lined.
A 3D drawing is valuable because it gives the plumber and electrician real positions to price against. “Move the shower somewhere over there” isn't a scope. A dimensioned plan is.
Practical rule: Design the layout first, select the products second, and only then ask trades to price the work.
Fixture selection should be equally deliberate. Confirm the toilet suite, basin, tapware, shower mixer, shower head, screen, accessories, mirror and storage before demolition. A tap that looks right online may have a different spout projection, waste connection or wall-set requirement. A freestanding bath may require floor access and extra plumbing coordination. A frameless screen needs accurate finished dimensions, not an optimistic opening measured before tiling.
Put every trade into the written scope
The quote should identify who handles demolition, disposal, framing, plumbing, electrical work, waterproofing, screeding, tiling, painting, glazing and final cleaning. It should also state the waterproofing area in square metres, screed volume, tile supply and laying rates, fixture allowances and builder margin.
That level of detail makes competing quotes comparable. It also gives you a reference when demolition exposes an old pipe, damaged substrate or non-compliant previous repair. The written scope should be signed before demolition day, with changes documented as variations rather than discussed casually on site.
For a broader checklist covering the essential renovation steps for homeowners, use a planning resource that prompts decisions about layout, services, selections and construction preparation. The important point is not to collect more inspiration. It's to close decisions before the first wall is opened.
Budgeting, Quotes and the Real Cost Bands
A bathroom quote only becomes useful when every builder is pricing the same room, the same products and the same level of compliance. One contractor may include demolition, disposal, waterproofing and painting, while another may leave those items as allowances. The cheaper total can then be nothing more than a thinner scope.
The broader Australian renovation market helps explain why the bathroom sequence matters financially. A 2026 report estimated Australians spent more than AUD 50 billion on home renovations, with bathroom and kitchen projects together accounting for over 60% of that spending. The same report placed a full bathroom renovation nationally at about AUD 10,221 to AUD 20,443, with Melbourne at roughly AUD 10,500 to AUD 21,000. These figures are described in the 2026 Australian renovation-market report, and actual costs still depend heavily on access, selections and concealed conditions.
The following bands are practical comparison categories, not fixed prices. The verified Melbourne range above is a useful reference point, but a detailed custom scope can move above it when the layout, structure or finishes become more demanding.
| Cost Driver | Cosmetic Refresh | Mid-Range Full Reno | Premium Custom |
|---|---|---|---|
| Main scope | Surface and fixture updates | Full strip-out and replacement | Bespoke layout, premium finishes and complex detailing |
| Plumbing | Usually retained | Some alterations | Relocated or extensively altered |
| Tiling | Limited or selected areas | Walls and floor | Large-format, stone, intricate or feature work |
| Waterproofing | Confirmed where wet areas are opened | Full wet-area system | Detailed open-shower or custom system |
| Trade coordination | Limited | Builder-managed | High coordination across design and specialist trades |
Read the line items, not just the total
A proper quote should separate demolition and disposal, waterproofing per square metre, screed, wall and floor tile supply and laying, plumbing rough-in and fit-off, electrical rough-in and fit-off, shower screen, painting, builder margin and contingency.
A single scope change can affect several of those lines. Moving a shower may alter drainage, wall framing, waterproofing, screeding, tiling and electrical coordination. Large-format tiles can change adhesive, handling and laying requirements. A freestanding bath can affect plumbing, floor preparation and access.
Storage decisions deserve the same practical attention as tile colour, particularly in compact Melbourne apartments. Space-saving ideas such as the Endless Storage small apartment solutions can help you think about storage beyond a larger vanity.
Keep a homeowner-held contingency for concealed conditions and agreed changes. Don't treat an allowance buried in a builder's price as permission to change the scope without a written variation. A bathroom renovation calculator can help organise the early scope before you compare formal quotes.
When You Need a Registered Builder and a Permit
The first legal question isn't “Which tile do I like?” It's “What exactly am I changing, and who is authorised to coordinate it?”
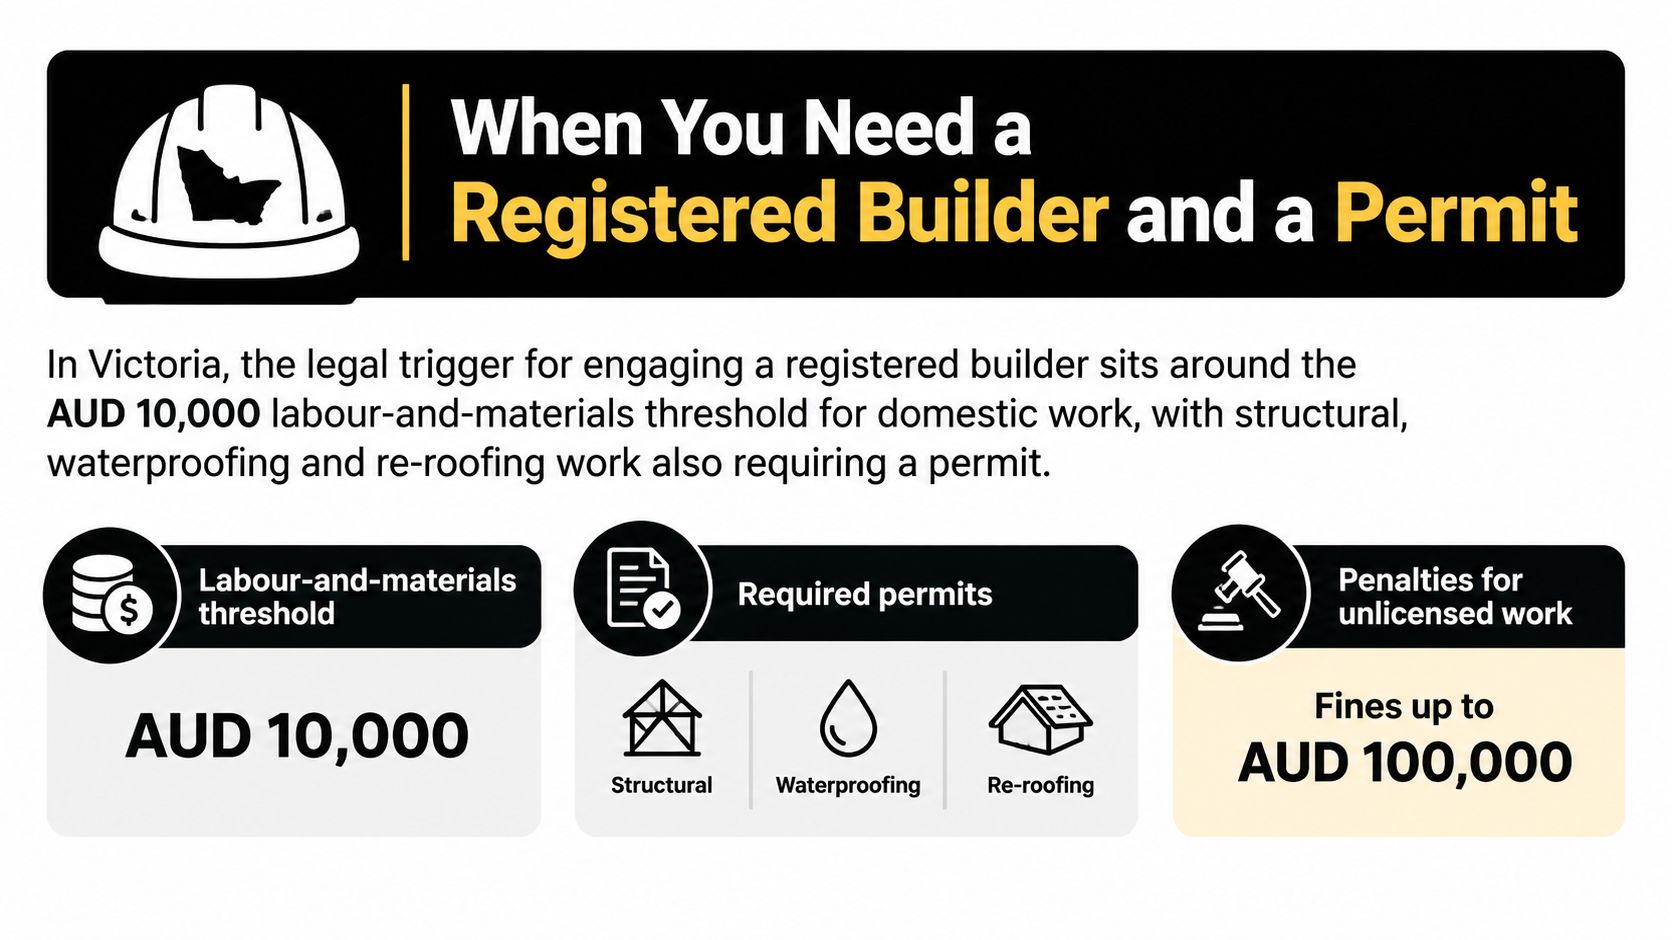
In Victoria, domestic bathroom work valued over AUD 10,000 generally requires a registered domestic builder, as outlined in Victorian bathroom renovation regulation guidance. If the project exceeds AUD 16,000, the builder must also provide domestic building insurance. Those thresholds should be considered alongside the actual scope, not used as a shortcut to split one substantial project into smaller informal jobs.
Structural changes, significant plumbing alterations and work involving the building fabric can move a project into the building permit stream. Relocating the bathroom footprint, moving a load-bearing wall or cutting into the subfloor requires more scrutiny than replacing a vanity in the existing position. Curbless showers and open wet areas also demand careful planning because the falls, drainage and waterproofing must be resolved before finishes conceal the work.
Check the practitioner before signing
A registered builder should help assemble the project documentation, which may include:
- Building permit material: Confirm the relevant application, plans and surveyor requirements.
- Structural information: Obtain engineering input when walls, joists or other structural elements are affected.
- Wet-area design: Specify a waterproofing system aligned with AS 3740-2021 and the actual shower configuration.
- Insurance documentation: Confirm the required domestic building insurance where the project value reaches the applicable threshold.
- Trade credentials: Verify the practitioners responsible for plumbing, electrical and waterproofing work.
The Victorian Building Authority and Building and Plumbing Commission process for bathroom, kitchen and laundry renovation registration asks applicants for industry qualifications, project work evidence, a technical referee report, police or criminal history checks, photo identification, declarations and payment, as shown in the domestic builder renovation application form. As a homeowner, you should check the builder's registration before signing and understand who is responsible for permits, inspections and certificates.
Owner-builders need to be particularly careful. If you're coordinating the work yourself, check whether an owner-builder certificate of consent applies before taking responsibility for the project. A cash price from an unlicensed renovator isn't equivalent to a registered building practitioner managing a compliant domestic building contract.
The permit and registration question also applies to the demolition phase. Demolition is a paid stage with its own risks, not a free favour added by the tiler.
Strip out methodically
Start with a written strip-out checklist:
- Remove existing tiles and screed.
- Disconnect and remove the vanity, shower screen, bath, cistern, towel rails and mirror.
- Remove tile backer board down to studs or brickwork where the scope requires it.
- Photograph the exposed substrate before sealing the room.
- Check for rot, movement, old leaks, damaged framing and asbestos-containing materials in older homes.
Protect the rest of the house with ram board on floors, plastic zip-wall sheeting across doorways and sealed returns along the hallway. Have the electrician isolate and lock off the bathroom circuit. Disconnect plumbing at the fixture valves where possible, rather than shutting down the whole house unnecessarily.
Don't wet dusty demolition waste. Cap exposed pipework, sweep and vacuum the room, and arrange a skip or bagged waste pickup so the next trade reaches a clean, safe slab ready for rough-in. The photographs matter because they record pre-existing conditions and can settle later questions about damage beneath the old bathroom.
Permit responsibility should be confirmed in writing, not assumed from a builder's casual comment. For specialist coordination, compare the documented scope with the services described by Melbourne bathroom renovation specialists before work begins.
Plumbing and Electrical Rough-In
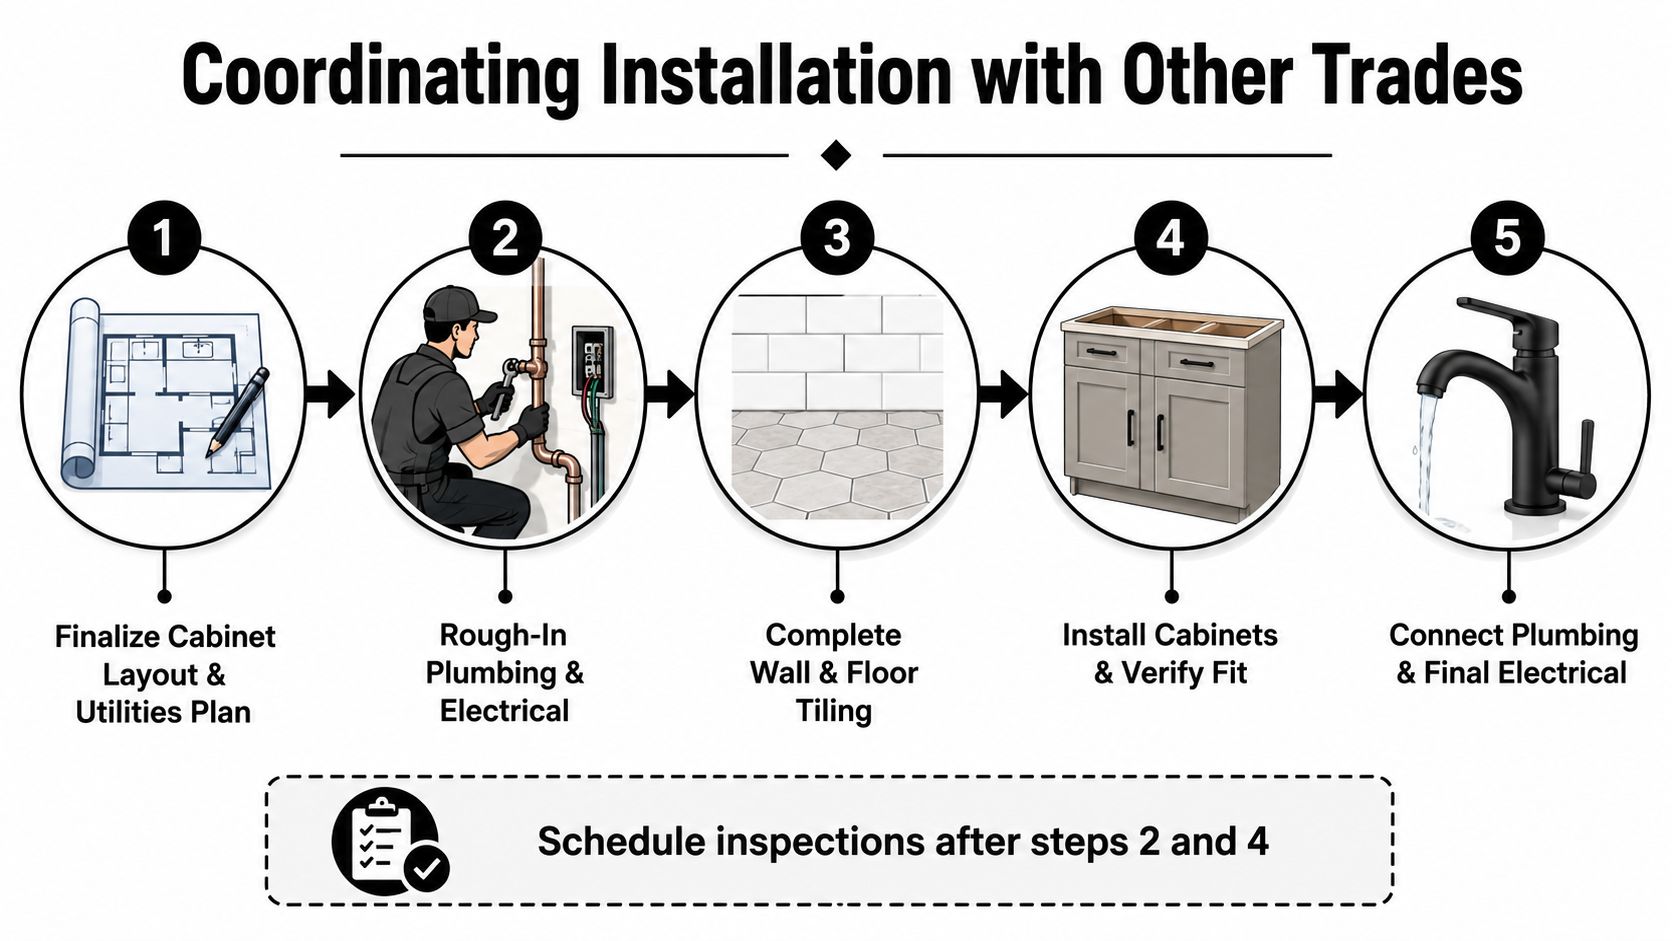
Once demolition is complete, the plumber and electrician work before the walls are closed. Their measurements must relate to the finished wall face, tile thickness and final fixture positions, not the old pipe and cable locations.
The plumber should establish drainage falls and in-wall water lines first. The electrician then runs the required circuits and protection, exhaust fan ducting and lighting cable. Both trades need to coordinate penetrations through studs and keep clear of niches, mixers, shower screens and tile edges.
Lock in these details now:
- Niches and shelves: Their height and depth affect framing, waterproofing and tile cuts.
- Large-format tiles: The set-out can determine where plumbing penetrations land.
- Heated towel rails and underfloor heating: Confirm power, controls and sensor positions before lining.
- Shaver outlets and mirror demisters: Allow for the cabinet or mirror dimensions rather than adding a socket as an afterthought.
- Ventilation: Confirm the exhaust path and ceiling access before the plasterboard or fibre-cement sheeting closes the cavity.
Book the building surveyor's rough-in inspection before wall sheeting goes up. In Melbourne, a missed inspection slot can hold up the next trade and interrupt the entire programme. Photograph every pipe and cable against the wall, mark the heights and store those records with the renovation documents.
Keep the site dry and don't let the tiler cover an unresolved inspection. A later repair may require cutting through a finished waterproofing system, which is exactly the kind of avoidable disruption that proper bathroom renovation steps are designed to prevent.
Waterproofing the Compliance Milestone
Waterproofing is the legal and practical gate before tiling. In Victoria, it must be completed and certified before tile adhesive is applied, and licensed practitioners are expected to provide an Installation Certificate. The relevant wet-area guidance references AS 3740-2021, including a minimum 1:80 fall for wet areas, as outlined in the Victorian waterproofing fact sheet.
Prepare the substrate first. Fibre-cement sheeting needs the correct primer, screeds must be cured, corners need bond-breaker treatment, and door thresholds require an appropriate water stop. Australian bathroom guidance calls for shower waterproofing across the floor and up the walls to at least 1,800 mm, or 50 mm above the shower rose, whichever is higher, with the floor graded so water drains without pooling. The waterproofing and tiling guidance provides that coverage reference.
For an unenclosed shower, Victorian guidance requires waterproofing to extend 1.5 metres from the shower rose connection. The shower floor must also maintain a continuous fall to the waste. These requirements become more demanding with open entries, linear drains, niches and minimal-threshold designs, because there's less tolerance for poor set-out.
The application method depends on the chosen system. A liquid membrane may require two coats with the manufacturer's curing interval, while sheet systems need correctly treated joints and overlaps. Don't assume “it looks covered” is a compliance test. The waterproofer should document the product, preparation, coverage and certificate requirements.
Before tiling, arrange the required verification, commonly a 24-hour flood test or a non-destructive dry film thickness test, as described in Victorian waterproofing compliance guidance. Keep the certificate, test result and photographs in the handover file. A waterproofing compliance certificate in Victoria should be treated as a project checkpoint, not a decorative extra.
Screeding, Levelling and Tiling the Space
Once the waterproofing checkpoint is closed, screeding and tiling create the visible room. The screed has to direct water to the waste without rocking, ponding or creating a lip beneath the tile. A common site mix uses sand and cement with bond aid, compacted into wall-floor corners and finished with a steel float, but the installer must follow the specified system and substrate requirements.
Underfloor heating may require a self-levelling compound. The installer primes the substrate, pours to the specified depth and de-gasses the compound with a spiked roller so the finished surface doesn't trap voids around the heating loops. The floor must be ready for the selected adhesive and tile system, not merely appear flat from across the room.
Set out the walls before fixing
Wall tiling usually starts from a laser line and a planned module. A stack-bond layout gives a clean grid, while a brick layout shifts joints and can disguise minor variations differently. Large-format panels need careful handling, suitable adhesive coverage, butter-and-float fixing and a clip system where appropriate. Mitred corners, niches and feature bands should be set out before the first adhesive bed is mixed.
Floor tiles require a full adhesive bed, a notch size matched to the tile and proper support beneath the finished surface. Don't use grout to correct an uneven substrate. It won't solve lippage, movement or a poor fall.
| Tile Type | Adhesive Standard | Grout Selection | Fixing Method |
|---|---|---|---|
| Porcelain wall tile | Flexible adhesive suited to the substrate and tile | Cement or epoxy according to exposure | Laser-line set-out with full coverage |
| Large-format porcelain | Manufacturer-approved flexible adhesive | Fine cement or epoxy where the wet-area specification requires it | Butter-and-float fixing with levelling clips |
| Kerlite or thin large panel | System-specific adhesive and substrate preparation | Manufacturer-compatible grout or sealant | Specialist handling, stable support and planned joints |
| Mosaic | Flexible adhesive with careful bed thickness | Epoxy or fine cement suited to joint width | Full-bed fixing with sheet alignment |
| Natural stone | Stone-compatible adhesive and substrate system | Product-compatible grout, with sealing where specified | Controlled coverage and protection from staining |
Use epoxy grout in demanding wet zones where the system calls for it. Cement grout may suit drier areas when correctly selected and sealed. At every change of plane, use a flexible silicone detail rather than forcing rigid grout into a joint that needs to accommodate movement.
Shower Screens, Fit-Off and Final Trades
The final stage is where a well-sequenced renovation can still be damaged by poor coordination. The shower screen should be measured after the tiles have cured, using the actual finished opening rather than the pre-tile dimensions. Frameless and semi-frameless panels need channel or wall-pin fixings set into the tile and substrate, not grout joints.
Install the screen square and plumb, then apply silicone after the alignment is correct. A thick bead used to hide a leaning panel isn't a proper fix.
Use a fixed fit-off order
Plumbing fit-off comes next. Install tapware, mixers, wastes and shower heads, then pressure-test the connections before applying final silicone. The licensed electrician follows with the exhaust fan, IXL or heat-light combination, shaver points, mirror demister and other electrical fittings. The electrician should provide the Prescribed Certificate of Electrical Safety.
Painting and decorative finishes belong after the dusty work, but before the final clean. Non-tiled walls can receive suitable bathroom paint, while feature wallpaper should stay clear of areas exposed to direct water. Silicone all wet-area junctions, clean excess material, then allow the room to settle before the practical completion inspection.
A typical programme is best treated as a coordination reference rather than a promise:
| Stage | Gantt-style reference |
|---|---|
| Design, selections and approvals | Weeks 1 to 2 |
| Demolition and substrate inspection | Early construction |
| Rough-in plumbing and electrical | After strip-out |
| Waterproofing and compliance checks | Before tiling |
| Screeding and tiling | After waterproofing approval |
| Screen, plumbing and electrical fit-off | Final construction stage |
| Cleaning and practical completion | Handover |
The exact programme changes with inspections, product availability, hidden damage and trade availability. Waterproofers rarely wait indefinitely for a tiler, and a late plumber can hold up sheeting, waterproofing and tile set-out. One missed trade can therefore affect several following bookings.
Verify the room before final payment
Run a short weekly site walk and keep updates in a shared WhatsApp thread or project folder. Ask who has booked the next inspection, which materials have arrived and whether a variation needs approval.
Before final payment, check:
- Waterproofing: Certificate, product details and inspection records are present.
- Drainage: Falls have been checked and water reaches the waste without pooling.
- Tiling: Tile lippage, chipped edges, grout consistency and silicone joints are acceptable.
- Ventilation: The exhaust fan operates correctly and discharges through its intended path.
- Plumbing: Taps, wastes, mixers and shower heads have been pressure-tested.
- Electrical work: The licensed sparkie has supplied the electrical safety documentation and test information.
- Glasswork: The screen is square, plumb, stable and sealed at the required junctions.
- Handover: You receive the compliance certificate, builder warranty, fixture warranties and tile batch numbers for future repairs.
Melbourne Tiling Services P/L coordinates bathroom renovations, waterproofing, screeding, self-levelling, tiling and frameless shower screens through registered builders and licensed trades. For a planned renovation with scope, sequencing and compliance checkpoints in place, visit Melbourne Tiling Services P/L to discuss the room, request a quote and organise design support.

Recent Comments