

You're probably standing in a bathroom that's overdue. The tiles look tired, the shower feels dated, and once you start browsing showrooms, every decision seems to multiply. White subway, terrazzo-look, matte grey, stone-look porcelain, mosaics, large format. It's easy to get lost in looks and miss the part that determines whether the room performs well for years.
That's where ceramic tiles for a bathroom still make sense. They've been around for a reason. The National Park Service preservation brief on ceramic tile floors notes that tilemaking can be traced back to the fourth millennium B.C., and modern ceramic tile is still valued because firing creates a hard, water-resistant surface that suits wet areas.
In Melbourne bathroom renovations, that history matters less as trivia and more as proof of a material that's lasted through changing building methods, design trends, and daily wear. Good tile selection isn't about chasing what looks current on social media. It's about matching the right tile to the right part of the room, then installing it as part of a compliant waterproofed system.
Table of Contents
- Your Melbourne Bathroom Renovation Starts with the Right Tile
- Ceramic vs Porcelain vs Natural Stone Tiles
- Understanding Tile Ratings for Safety and Performance
- Best Practices for Wall and Floor Tiles
- Making Smart Grout and Sizing Choices
- Budgeting for Durability and Long-Term Maintenance
- Why You Need a Registered Builder for Your Bathroom Renovation
Your Melbourne Bathroom Renovation Starts with the Right Tile
I usually see the same moment early in a Melbourne bathroom renovation. A client has a tile they like, then we put that sample against the actual room. Suddenly the real questions show up. Will it work on a shower floor with proper fall? Will it hide soap marks? Will it suit an older home where the walls are rarely dead straight? Will it support a bathroom build that stays sound years after handover?
That is why tile selection needs to start with function, not the showroom display. The tile affects cleaning, slip risk, set-out, grout joints, trim details, and how forgiving the installation will be once the waterproofing and substrate preparation are locked in. In Melbourne, I also look at the age of the home, likely movement in the structure, and whether the chosen format will help or fight the room.
Why ceramic still holds its place
Ceramic remains a practical choice because it performs well in the right areas and gives good value without creating unnecessary complexity. For bathroom walls, splash zones outside the shower, and feature areas, it often does the job well. It is lighter to handle than many dense tiles, usually easier to cut, and available in a wide range of finishes and sizes.
Its long history matters, but performance matters more. Ceramic still earns its place because it can be matched to the right part of the bathroom instead of being forced into every part of it. If you want a clearer breakdown of how different products behave on site, this guide to bathroom tiling materials and their practical uses is a useful starting point.
A good bathroom does not need one tile everywhere.
In many projects, the smarter build is a straightforward ceramic wall tile paired with a floor tile that is selected for grip, density, and wet-area suitability. That approach usually gives better long-term results than choosing one look and trying to make it solve every problem.
Practical rule: Choose tiles by zone first. Start with the shower floor, then the main floor, then wall areas, then any feature tile.
What homeowners usually get wrong
The common mistake is choosing from a display board without thinking through how the bathroom will be used. Showrooms are flat, bright, and dry. Real bathrooms deal with steam, residue, cleaning products, movement in the substrate, and wet feet on cold mornings.
From a builder's perspective, the better questions are practical:
- Where will water sit or drain slowly
- Which surfaces need more grip underfoot
- What finish will show less residue and be easier to clean
- Is the tile suitable for the specific wall or floor location
- Will the tile size and edge detail work with falls, trims, grout joints, and the waterproofing system
That last point gets missed too often. Tile is the visible finish, but it sits on top of a system that has to comply and perform. In a bathroom renovation, the best-looking tile is the wrong choice if it makes set-out difficult, creates problems at junctions, or pushes the job away from sound wet-area practice and Australian Standards.
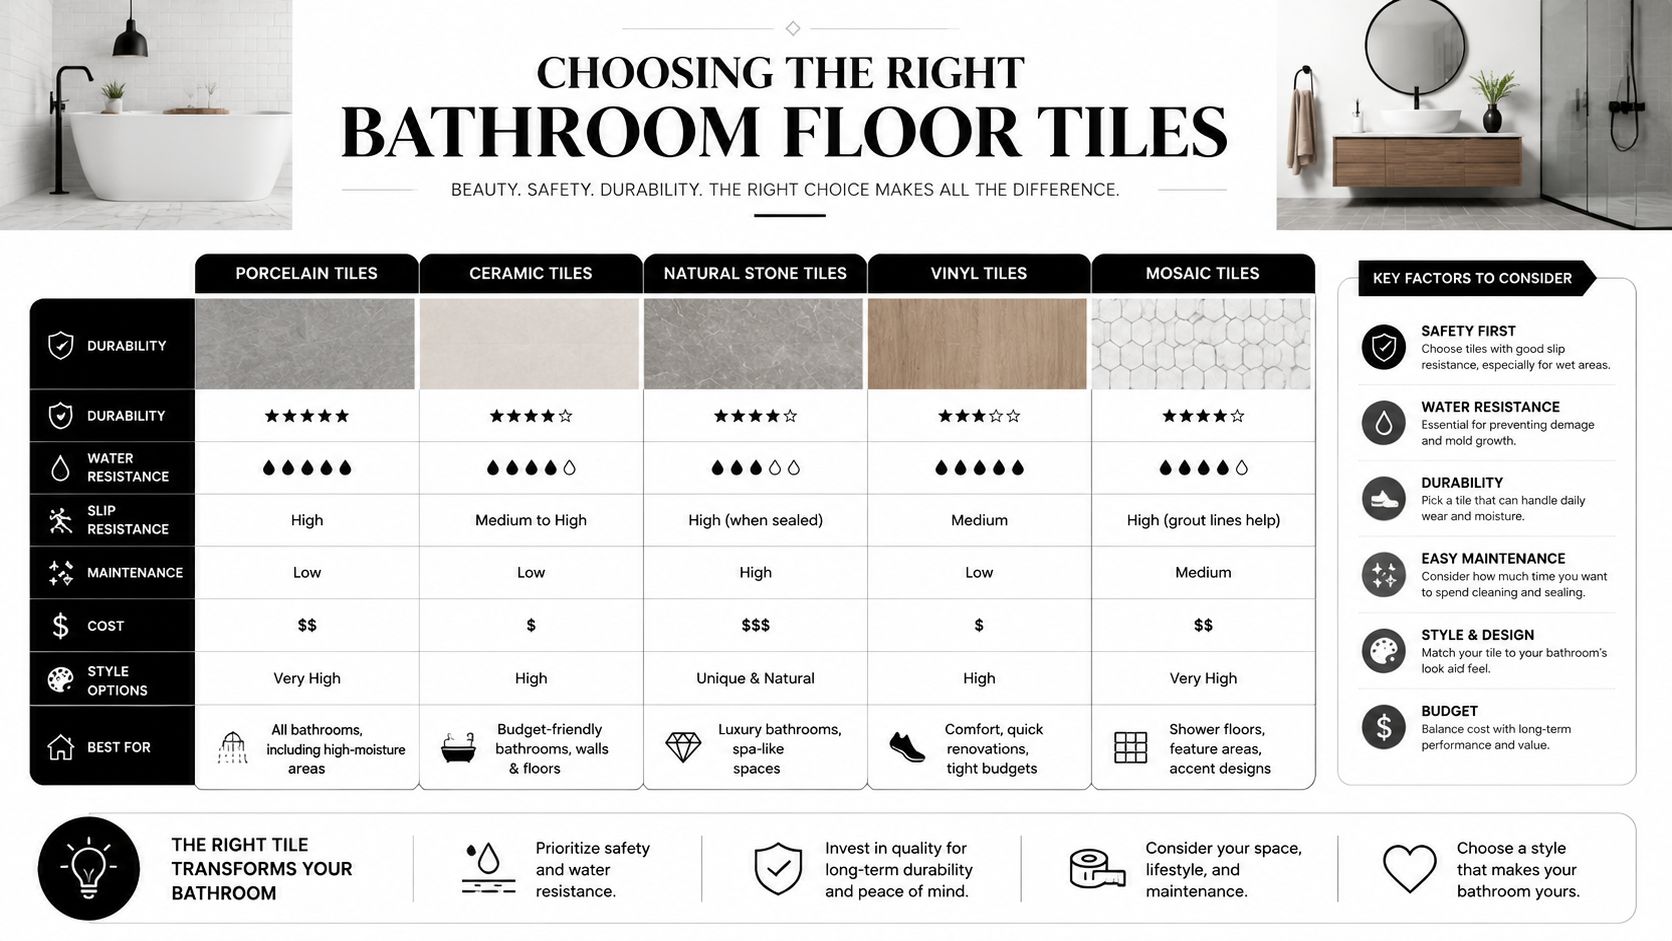
Ceramic vs Porcelain vs Natural Stone Tiles
A tile can look right on a sample board and still be the wrong product for a Melbourne bathroom. I see that regularly on renovation jobs. The problem usually is not colour or style. It is whether the tile suits a wet area, works with the waterproofing system underneath, and will still perform after years of steam, cleaning, and daily use.
The first technical difference is porosity. Denser tiles absorb less water, which generally makes them a better fit for shower floors and other hard-working wet zones. More porous materials can still be used, but only in the right locations and with the right expectations around maintenance and sealing.
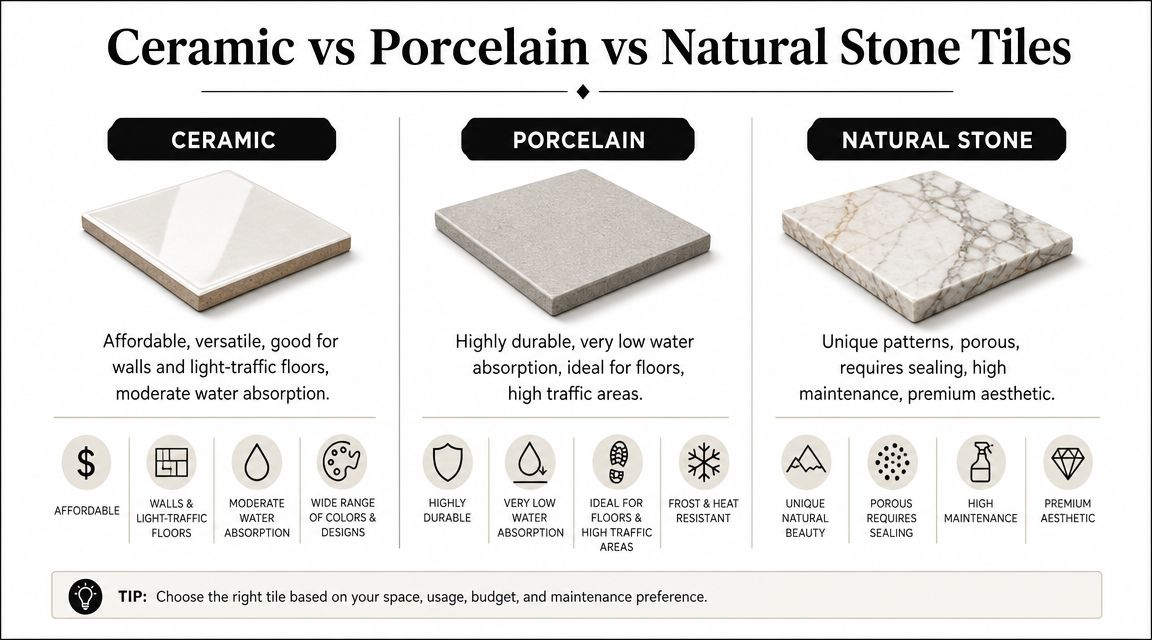
What changes in a bathroom
For bathroom work, water absorption is one of the clearest dividing lines between tile types. Porcelain sits in the impervious class, which is why builders and tilers often prefer it for shower bases, bathroom floors, and other areas that stay damp for long periods. A low-absorption tile does not replace proper waterproofing, but it does add a more stable and durable wearing surface over a compliant system.
Ceramic still earns its place. On bathroom walls, it is often the practical choice because it is lighter, easier to cut, and usually more cost-effective than porcelain. That can help with set-out, trims, and penetrations around mixers, niches, and fittings. For many projects, a good ceramic wall tile plus a properly rated porcelain floor tile is the sensible build.
Natural stone is different again. Stone can produce an excellent result, but it introduces more variables on site. Some stones stain easily, some need regular sealing, and some finishes are less forgiving under soap residue or aggressive bathroom cleaners. From a registered builder's perspective, stone only makes sense if the owner accepts the upkeep and the installer details the substrate, sealing, movement joints, and edge treatments properly. For a broader overview of tiling materials used in renovations, it helps to compare the material first, then choose the finish.
Tile Comparison for Bathroom Use
| Attribute | Ceramic Tile | Porcelain Tile | Natural Stone |
|---|---|---|---|
| Water absorption | Higher than porcelain | Very low absorption, suited to wetter locations | Varies by stone type and is often more porous |
| Best bathroom use | Walls, splash zones, and some lighter-duty floors if correctly specified | Shower floors, main floors, and heavily used wet areas | Feature walls, vanity splashbacks, and selected floors where maintenance is accepted |
| Durability | Good in the right location | Dense and hard-wearing | Depends heavily on stone type, finish, and care |
| Maintenance | Usually straightforward, especially glazed finishes | Generally low maintenance | Requires more cleaning care and often sealing |
| Slip options | Available in different finishes | Wide range of textured and wet-area finishes | Depends on finish, cut, and stone type |
| Typical trade-off | Lower cost and easier wall installation, but not ideal for every wet floor application | Strong long-term performer, but usually dearer and harder to cut | Premium look with higher upkeep and more installation risk |
In practice, I rarely recommend using one tile type everywhere just to keep the look uniform. Bathrooms are built in zones, and each zone places different demands on the tile, the adhesive, the falls, and the waterproofed substrate below.
Natural stone is not a bad choice. It is less forgiving. If low maintenance, predictable performance, and easier compliance are the priorities, porcelain usually gives the cleanest result on the floor, while ceramic remains a reliable option on the walls.
Understanding Tile Ratings for Safety and Performance
A bathroom tile only performs if it stays safe under wet feet, works with the falls in the floor, and holds up over years of cleaning. In Melbourne renovations, I treat tile ratings as a buildability and compliance issue as much as a finish selection issue.

Why slip resistance matters
Slip resistance is one of the first checks for any bathroom floor tile, particularly in shower areas and other regularly wet zones. A tile can look suitable in a showroom and still be the wrong product once soap, water, and cleaning residue hit the surface.
As noted earlier, wet-area tile selection should be backed by proper slip data rather than appearance alone. A common assumption I see is that homeowners can judge slip resistance by touch or by looking at a sample board. That is unreliable. Some lightly textured tiles become slippery in service, while some flatter-looking products perform well because they were designed and tested for wet-floor use.
The finish also affects how well the floor works with the rest of the bathroom build. The guidance on glazed and unglazed porcelain in wet areas explains why unglazed or purpose-textured surfaces usually give better grip, especially on shower floors.
Finish matters as much as colour
Finish choice always involves a trade-off. More grip can mean more effort to clean. A smoother surface is easier to wipe down, but it may be less forgiving under wet feet.
In practice, I look at finishes by zone, not by trend:
- Glossy glazed finishes usually work best on walls where easy cleaning matters more than underfoot grip.
- Matte finishes are often a sensible middle ground for general bathroom floors.
- Unglazed or textured finishes deserve close attention for shower floors and other wet zones where slip risk is higher.
- Highly polished finishes are usually a poor fit for bathroom floors, even if they suit the look of the room.
There is another practical issue here. Heavy texture can trap grime in the face of the tile and make regular cleaning harder, especially in family bathrooms. Good tile selection is about getting enough grip for the location without creating a surface that is frustrating to maintain.
From a builder's point of view, ratings are only useful if they match the way the bathroom is being constructed. The tile, adhesive, grout joints, floor falls, and waterproofed substrate all have to work together. If the supplier cannot clearly state where a tile is suitable, or cannot provide the relevant slip information, I would not specify it for a wet-area floor.
Best Practices for Wall and Floor Tiles
A bathroom can look right at handover and still fail in use if the tile selection ignores where each product is being installed. I see that problem regularly in Melbourne renovations. The wall tile is too delicate for floor traffic, or the floor tile is so awkward for the shower base that the tiler has to fight the falls and drain layout from day one.
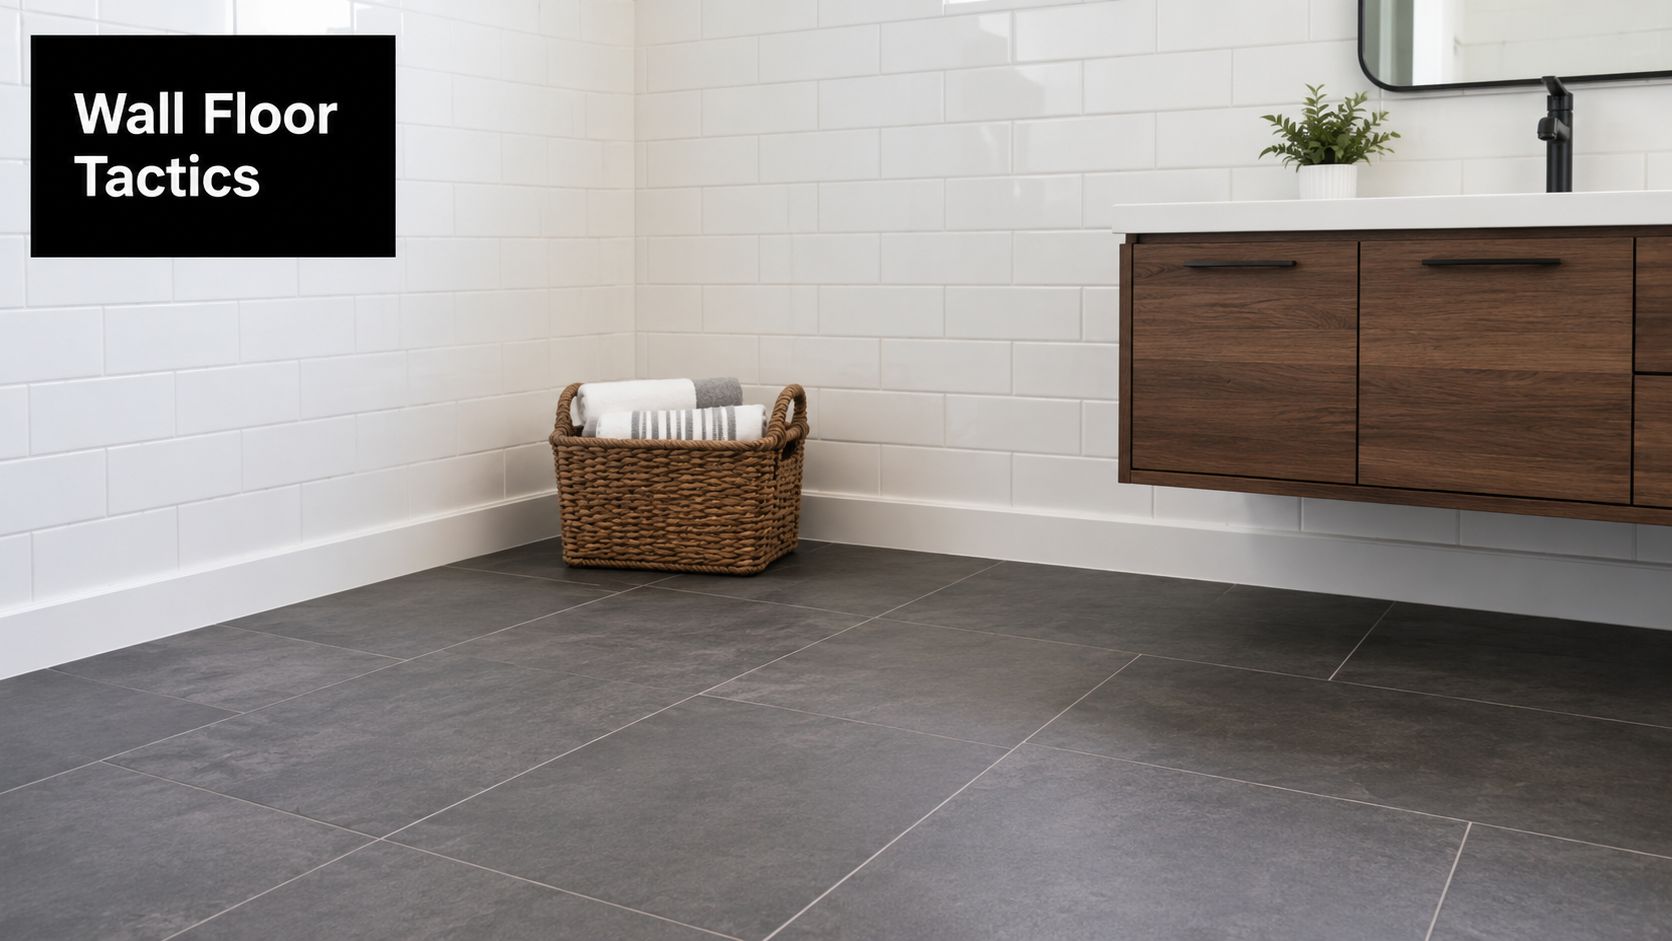
Wall tiles and floor tiles are not interchangeable
Wall tiles and floor tiles are designed for different loads and different risks. A glazed ceramic tile that performs well on a wall may chip or crack under foot traffic, point loading, or movement in the substrate. In a bathroom, that matters well beyond appearance. Once tiles or grout start failing on the floor, water management, cleanability, and service life usually suffer with them.
From a registered builder's point of view, tile choice also has to respect the broader wet-area system. The waterproofing membrane sits behind the finish, but the finished surface still needs to work with the intended falls, drainage, and daily use. Australian wet-area standards do not let you treat tile selection as a styling exercise separate from construction detail.
I assess bathroom tile zones like this:
- Walls need reliable adhesion, reasonable weight for the substrate, and a finish that is easy to keep clean.
- General bathroom floors need durability, slip resistance suited to wet barefoot traffic, and a surface that will not become a maintenance problem.
- Shower floors need tiles that can follow the required falls cleanly around the waste without creating lipping, ponding, or awkward cuts.
Tile size affects buildability, not just appearance
Size changes how easy the bathroom is to build properly. Large tiles can give walls and open floor areas a cleaner look, but they also demand flatter substrates, tighter set-out, and more planning around corners, niches, and fixtures. If the room is out of square, large pieces make that obvious fast.
On shower floors, smaller formats still earn their place for practical reasons. They conform to the fall more naturally, reduce the risk of unsupported corners, and usually give better footing because there are more joints across the surface. Large tiles can still work in some bathrooms, especially with the right waste location and a set-out planned early. The margin for error is smaller.
If you are weighing up sizes, this guide to large-format tiles for bathroom renovations explains where they perform well and where they create avoidable installation problems.
This video gives a good visual sense of how tile layout and installation detail affect the result:
Smaller tile is often the safer and more buildable choice in wet zones.
For ceramic tiles bathroom renovations, the strongest result usually comes from using different tile formats where they suit the room, the drainage layout, and the waterproofed substrate, rather than forcing one tile across every surface.
Making Smart Grout and Sizing Choices
Grout is where many bathrooms either stay looking sharp or start looking tired. People often treat it as filler. It isn't. It affects maintenance, appearance, and how forgiving the finished room is in daily use.
Grout is part of the system
On a wall, grout choice is mostly about appearance and cleanability. On a shower floor, it becomes more serious. The grout joints are exposed to regular water, soap, cleaning products, and movement around drains and corners.
In demanding wet areas, epoxy grout is often worth considering because it resists water and staining better than standard cementitious grout. Cementitious grout still has a place and is common, but it usually needs more care over time and is less forgiving when owners want a very low-maintenance bathroom.
A few practical rules help:
- Use epoxy where the exposure is harsh: Shower floors, niches, and splash-prone areas benefit most.
- Don't choose white grout by default: It can look crisp at handover and become a cleaning burden later.
- Match grout to tile edge quality: Rectified tiles allow tighter, cleaner lines. Irregular edges need more tolerance.
Choosing width and colour
Grout width changes the whole look of the bathroom. Tight joints feel cleaner and more contemporary. Wider joints can suit handmade-look or smaller-format tiles, but they also create more visible grid and more cleaning area.
Colour matters just as much:
- Blended grout colours make the surface feel calmer and hide minor variation.
- Contrasting grout highlights the layout and every alignment decision.
- Mid-tone grout is often the most forgiving on floors.
- Very light grout shows staining more readily in hard-working bathrooms.
If you're weighing scale as well as grout, this guide to large-format tiles and layout decisions helps clarify the trade-offs between fewer joints and more complex installation.
The best bathrooms usually don't have the most dramatic grout choice. They have the one that still looks good after months of steam, cleaning, and normal family use.
Budgeting for Durability and Long-Term Maintenance
Bathroom tile budgets usually blow out in one of two places. The first is at selection, where money goes into a feature tile that adds very little to day-to-day performance. The second shows up years later, when a surface is hard to keep clean, wears poorly, or contributes to avoidable slip risk.
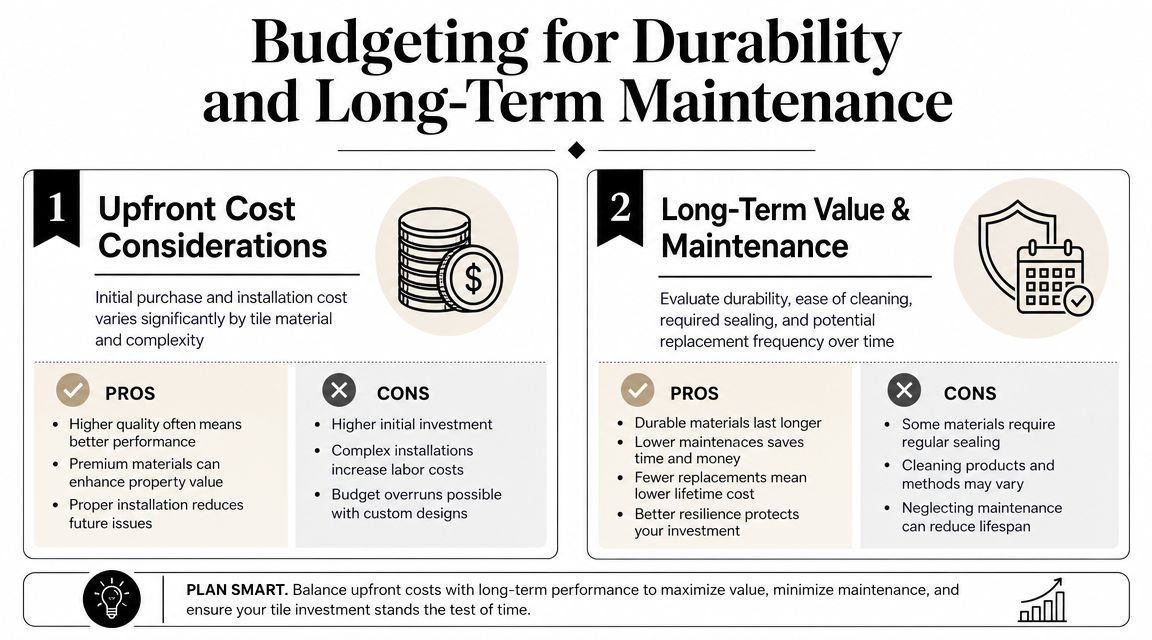
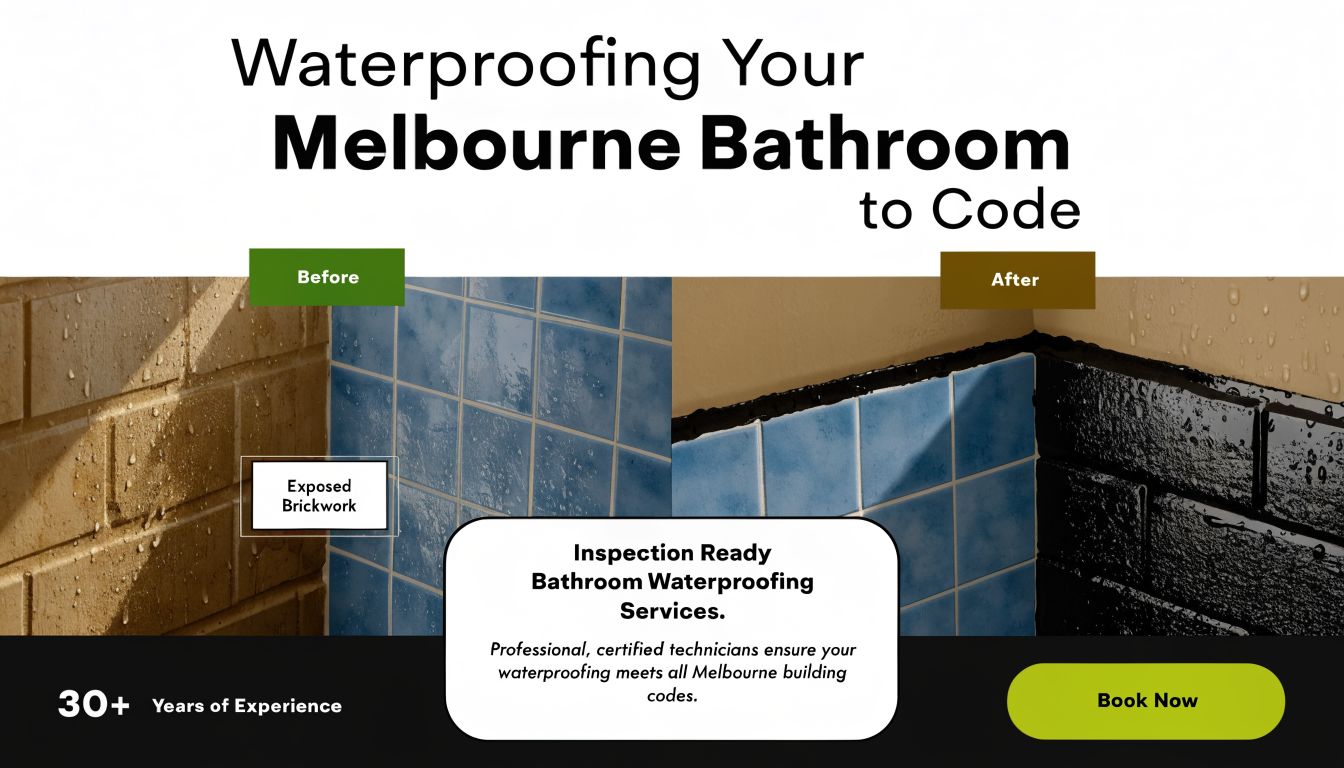
A bathroom in Melbourne has to handle regular moisture, cleaning chemicals, movement in the building, and wet-area construction requirements. That means the cheapest square-metre rate is rarely the true cost. Tile choice affects how well the room wears, how easily it cleans up, and how much pressure the whole assembly places on the substrate, set-out, and waterproofed areas. If you want context around that underlying system, this guide to bathroom waterproofing in Melbourne renovations explains why the visible finish is only one part of a durable bathroom.
Cheap to buy can be expensive to live with
The long-term trade-off usually sits between cleaning, safety, and durability.
A low-cost glossy tile might be easy to wipe down on a wall and a poor choice on a floor. A heavily textured tile can improve grip underfoot and still create more scrubbing in the shower than many owners expect. Natural stone can look excellent in the right project, but sealing, product selection, and ongoing care need to be budgeted properly from the start. Ceramic wall tiles remain one of the most economical options in many bathrooms because they give a consistent finish without adding much maintenance.
I usually tell clients to price the bathroom for ten years of use, not just for handover day.
Budget by zone, not by one tile for everything
Trying to force one tile across every surface often creates the wrong compromises. Bathrooms perform better when each area is costed for its actual job.
| Bathroom zone | What to prioritise | Typical budgeting mindset |
|---|---|---|
| Shower floor | Grip, wet performance, installability on falls | Spend for function first |
| Main bathroom floor | Safety, wear resistance, ease of cleaning | Choose for daily traffic, not just appearance |
| Walls | Cleanability, finish consistency, cost control | Ceramic often gives strong value here |
| Feature areas | Appearance and detail | Keep these selective so they do not distort the whole budget |
This approach also helps with compliance and buildability. Smaller tiles or mosaics on shower floors usually work better over falls. Large-format tiles can reduce grout lines elsewhere, but they may increase labour if the room is out of square or the set-out needs more cutting. Good budgeting accounts for both the material and the installation method.
For early planning, some owners use builder or contractor calculators to map scope before requesting quotes. Melbourne Tiling Services P/L has a renovation calculator intended to help homeowners frame likely project scope before selections are locked in.
The best tile choice is usually the one that still performs well after years of steam, cleaning, and wet feet.
Why You Need a Registered Builder for Your Bathroom Renovation
Tile is the visible finish. The actual risk sits underneath it. Most bathroom failures I'm called to inspect aren't caused by the tile itself. They come from poor substrate preparation, weak set-out decisions, bad falls, or failed waterproofing around penetrations, joints, and transitions.
Bathrooms fail at the joins between trades
A bathroom renovation usually involves demolition, carpentry, plumbing, electrical work, waterproofing, screeding, tiling, silicone finishing, and fixture installation. Problems start when no one is properly coordinating how those pieces connect.
That's why builder oversight matters. In Victoria, bathrooms aren't just decorating projects. They're controlled wet-area works that need the room to function as a system. The tile, grout, puddle flange, sheet or liquid membrane, waste location, movement joints, and shower screen all affect one another.
The tile doesn't keep the bathroom waterproof on its own. The waterproofing system does. The tile assembly has to support it, not undermine it. If you want context on how critical that layer is, this explanation of bathroom waterproofing in Melbourne renovations is worth reading before you approve any scope.
Questions worth asking before work starts
When you speak to a contractor, ask direct questions. If the answers sound slippery, that usually tells you enough.
- Who is coordinating the full scope if plumbing, electrical, waterproofing, and tiling all overlap?
- Who is responsible for substrate preparation before membrane and tile go down?
- How are shower falls being formed and checked before tiling starts?
- What tile is being specified for each zone and why?
- What documentation or certification applies to the waterproofing work?
- Who rectifies failures if leaks or cracked finishes appear after handover?
A registered builder doesn't just organise trades. They control sequencing, accountability, and compliance. That's what keeps a bathroom renovation from becoming a patchwork of separate jobs with no one taking ownership when something goes wrong.
If you're choosing ceramic tiles for a bathroom, don't separate tile selection from build responsibility. They belong together.
If you're planning a bathroom renovation in Melbourne and want clear advice on tile selection, waterproofing, and buildable layouts, Melbourne Tiling Services P/L can help you assess the scope before work starts and align your tile choices with long-term performance.

Recent Comments