Tiles Installation Services: Your 2026 Melbourne Guide

You're probably looking at a bathroom that no longer matches the rest of the house. The tiles look tired, the shower may be holding water where it shouldn't, and every quote seems to say something slightly different. One tiler talks about tile supply only. Another mentions waterproofing but not who's responsible for the carpentry, plumbing or final compliance. That's where many bathroom renovations start to go off track.

A tiled bathroom isn't just a tile job. It's a building job with tile as the visible finish. If the substrate is out, the falls are wrong, or the waterproofing sequence is poorly coordinated, the surface can look excellent on handover day and still fail years too early. Homeowners usually notice the symptoms first. Hollow tiles, cracked grout, water sitting near the waste, swollen skirtings outside the shower, or movement around large-format panels.

That's why a registered builder matters in bathroom renovations. A builder-led process looks at demolition, framing, sheet preparation, waterproofing, screeding, tile selection, slip resistance, drainage, shower screen set-out and trade sequencing as one system. In Melbourne homes, especially where older substrates meet modern large-format finishes, that joined-up approach is what separates a cosmetic refresh from a bathroom that stays sound.

Table of Contents

Your Melbourne Bathroom Renovation Starts Here

A smart bathroom renovation usually begins with one simple question. Are you buying tiles, or are you buying a complete result?

In Melbourne, plenty of bathrooms sit on concrete slabs, older screeds, patched walls and substrates that have seen multiple repairs over time. On the surface, the room might look straightforward. Strip it, waterproof it, tile it, finish it. In practice, the job turns on what's hidden. A registered builder sees the risk points before demolition starts, not after the expensive tiles arrive on site.

That matters because bathroom renovations involve more than a neat tile line. The builder needs to coordinate licensed trades, check the condition of the existing structure, make sure the falls can be formed correctly, confirm the screen and niche set-out, and prevent one trade from compromising the work of another. If the plumbing rough-in sits proud, the screed thickness changes. If the wall sheeting is wrong for the selected tile, the final plane shifts. If no one checks door clearances and waste positions together, the room starts absorbing compromises.

Practical rule: The visible finish only performs as well as the preparation underneath it.

A builder-led process keeps those details connected. It also gives you one accountable party for sequencing and compliance instead of a string of separate subcontractors pointing at each other when something goes wrong. That's especially important with large-format porcelain, marble, mitred edges, recessed shelves and frameless shower screens, where tolerances tighten and minor errors become obvious.

For homeowners comparing tiles installation services, this is the difference between a quote that prices laying only and a renovation that's built to last. The first can look cheaper. The second is usually what prevents leaks, lippage, cracked grout and rework.

From Porcelain to Marble The Best Tile Materials

Choosing tile by colour alone is how people end up with a bathroom that photographs well and performs poorly. The right material depends on the room, the substrate, the maintenance you'll tolerate and the finish you expect years from now.
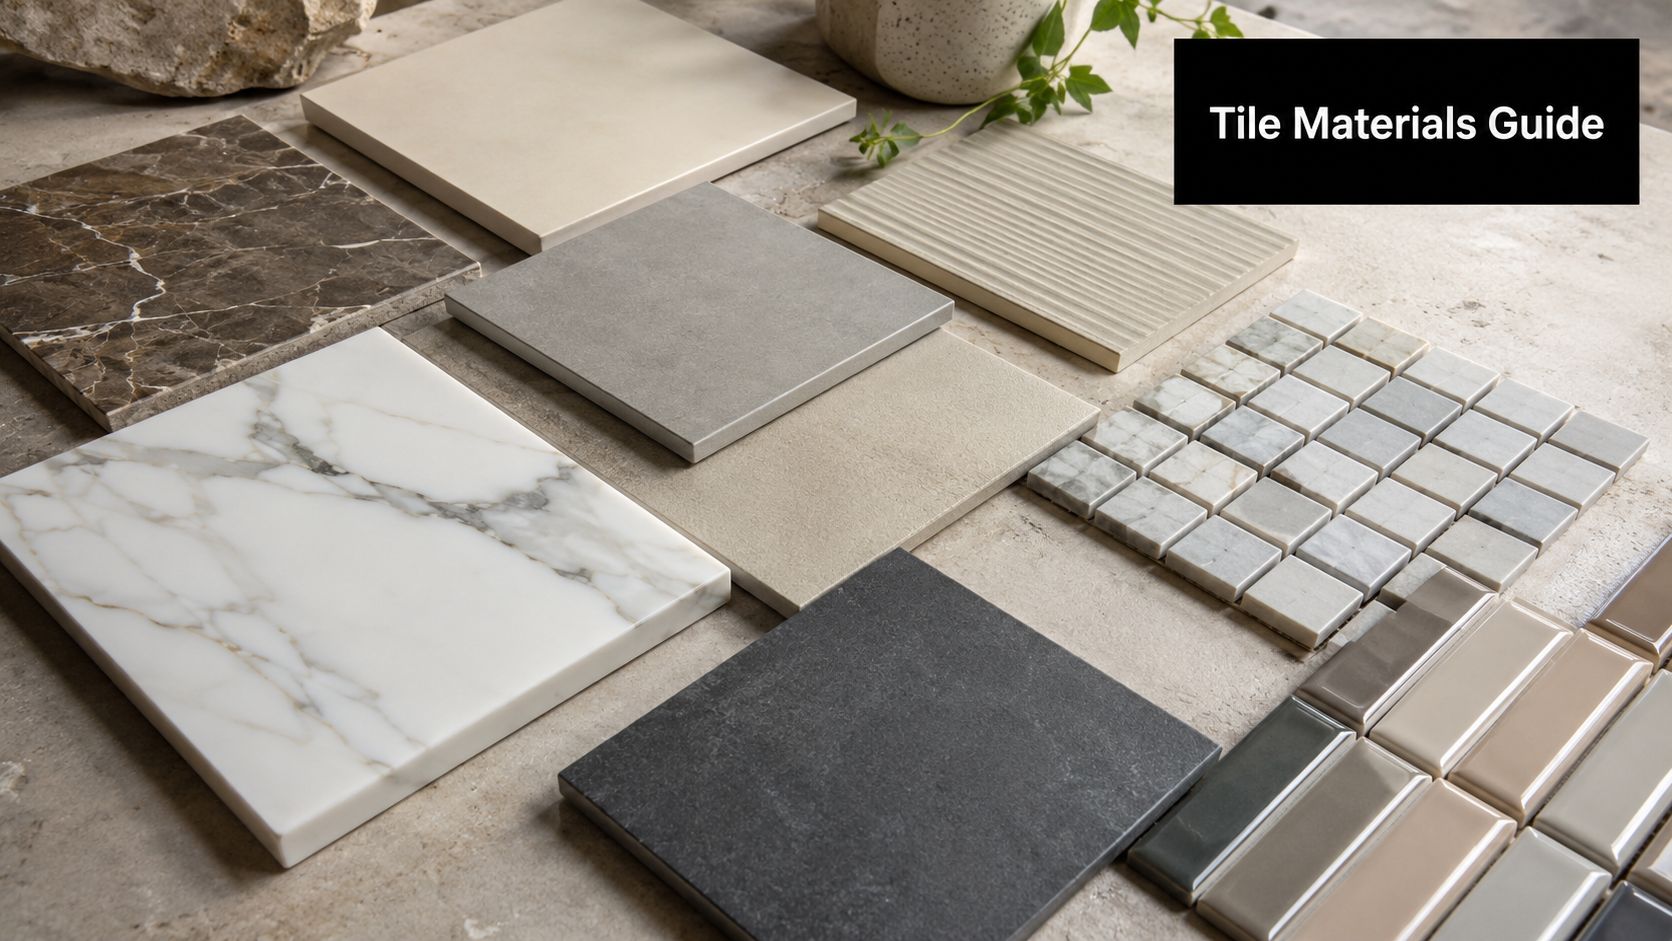
A collection of various tile samples including marble, ceramic, and textured stone squares displayed on a table.

Porcelain for hard-wearing wet areas

Porcelain is often the safest all-rounder for bathroom renovations. It's dense, durable, stable and available in finishes that mimic stone, concrete, terrazzo and timber without the same maintenance burden. For floors and shower areas, that mix of durability and design flexibility is hard to beat.

Slip performance matters as much as appearance. In Australia, AS 4586 slip resistance compliance is critical in wet areas. Residential shower tiles need a minimum P3 slip rating, while commercial wet areas require P4 to P5 according to this guide to Australian tile performance ratings. That same source notes that unsealed ceramic tiles with low water absorption of less than 0.5% maintained adhesion strength of more than 1.5 N/mm² after 720 hours of immersion, while more porous tiles with less than 3% absorption dropped below 0.8 N/mm², which increases the risk of delamination.

Ceramic when budget and wall use align

Ceramic still has a place, especially on bathroom walls where impact and foot traffic are lower. It's often easier to cut and can open up more cost-effective design options. But ceramic isn't a default answer for every zone. In wet areas, absorption, finish and intended use all need checking.

For many homeowners, ceramic works best when the wall tile does one job well. It delivers the look you want without pretending to be a heavy-duty floor tile. That's a sensible use of budget.

A useful starting point is to compare finishes, body types and maintenance requirements before buying. This overview of tiling materials gives a practical sense of where different products fit.

Marble and natural stone for premium spaces

Marble changes the feel of a room in a way printed tile doesn't. It has depth, variation and a natural surface character that gives a bathroom weight and permanence. In the right room, it can be exceptional.

It also demands more from the installation and the owner. Stone selection needs tighter batching control. Veining direction matters. Sealing matters. So does the suitability of the substrate and adhesive system. If you want a low-maintenance family bathroom, porcelain that reproduces marble may be the better long-term call. If you want natural stone, build the project around its needs instead of treating it like a standard ceramic wall tile.

Marble rewards discipline. If the set-out, sealing and edge work are average, the material won't hide it.

Kerlite and other large-format panels

Large-format products such as Kerlite create a cleaner visual field with fewer grout joints. They suit contemporary bathrooms, open-plan floors and feature walls where you want scale and continuity. Used properly, they can make a compact room feel broader and calmer.

They also expose poor preparation immediately. Big panels don't bend to forgive an uneven substrate. They bridge over high spots, rock on low spots and show lippage under natural light. That's why tiles installation services for large-format work should be judged less by the tile catalogue and more by the installer's preparation standard.

A good tile choice doesn't just suit the room on day one. It suits the way the room will be used, cleaned and maintained for years.

The Anatomy of a Flawless Tiling Installation

A bathroom gets stripped, new tiles go in, and six months later water sits in a corner of the shower, grout starts shading dark, and one large-format floor tile sounds hollow underfoot. The tile did not fail on its own. The build sequence failed underneath it.

A first-rate tiling job is a controlled system of demolition, substrate correction, waterproofing, set-out, fixing, movement treatment and curing. Registered builders approach tiles installation services differently from lay-only installers because they manage the whole assembly, not just the visible surface.
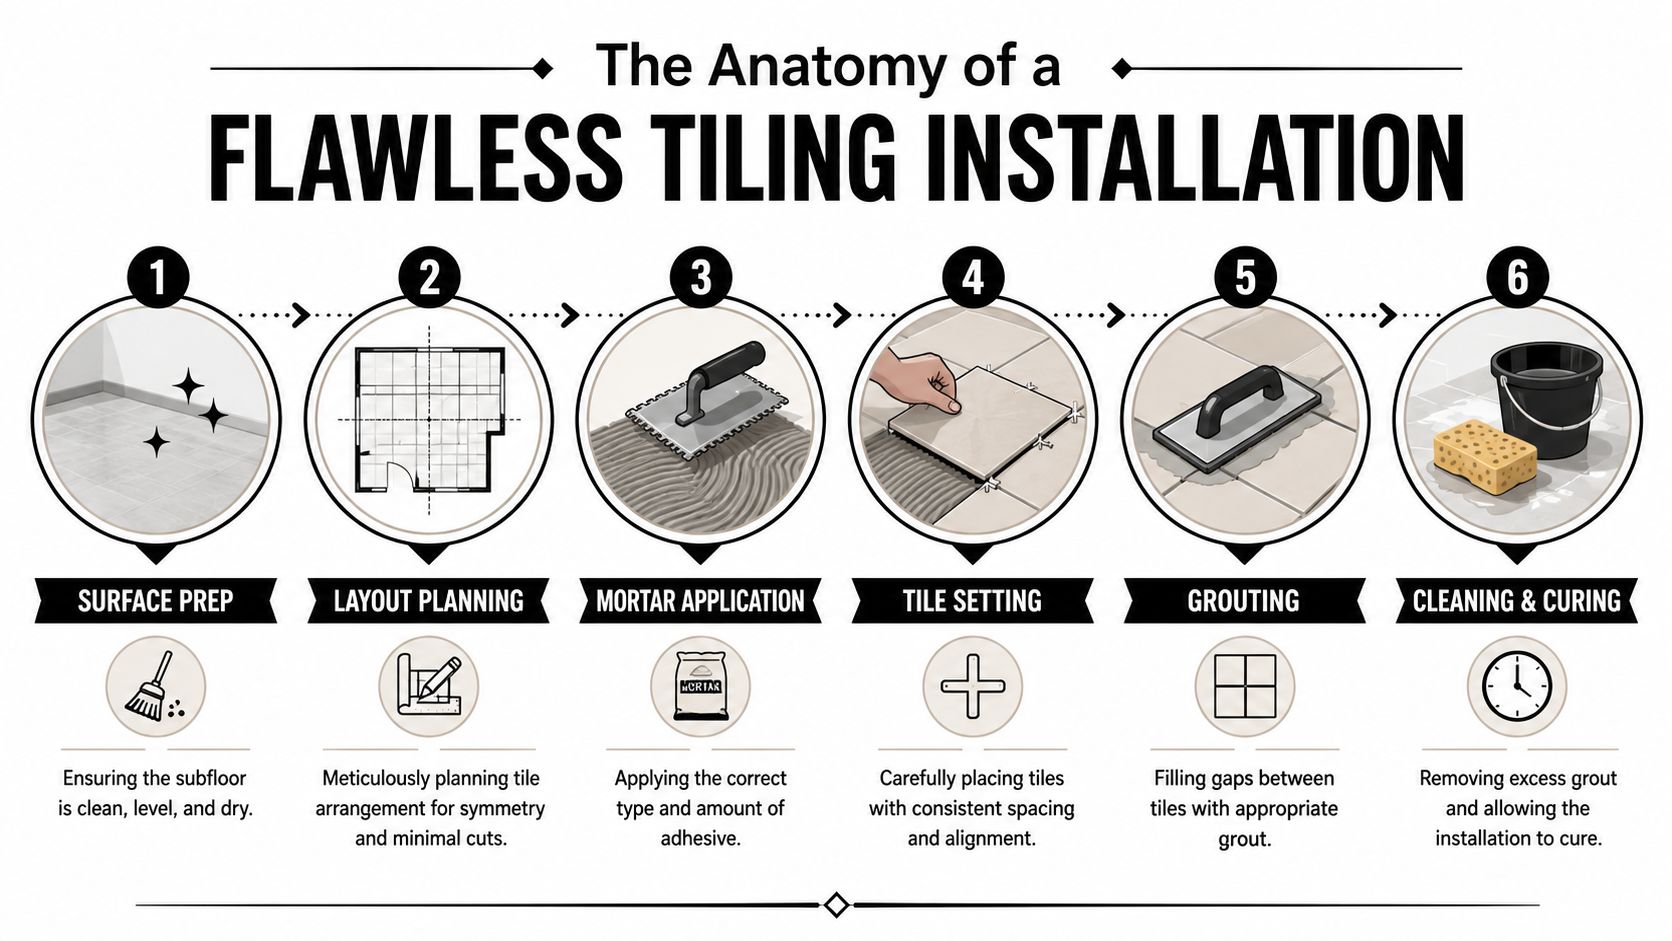
A six-step infographic illustrating the professional process of a flawless ceramic floor tile installation.

The work that happens before the first tile

Demolition tells the truth. Once the old finishes are out, the actual work appears. Slab levels, wall plumb, waste position, framing movement, sheeting quality, previous patch repairs and water damage all become visible. That is the point where a builder decides whether the planned tile size, joint width and waste detail still suit the room.

Large-format tiles are unforgiving. If the floor is out, the tile will show it. If the wall bows, rectified edges will telegraph it. Sunlight across a bathroom floor exposes lippage that a quick quote never allowed for.

That is why substrate preparation carries so much weight.

In practical terms, flatness usually means screeding, local patching, or self-levelling before a single tile is fixed. Proper screeding for tiles often makes the difference between a floor that looks crisp for decades and one that starts showing ponding, chipped edges and uneven joints as soon as the room is in regular use.

Setting out falls flatness and adhesion

Set-out is not just about centring a pattern. It decides where cuts finish, whether niches line through with grout joints, how the waste sits within the layout, and whether the room looks resolved instead of improvised. Good tilers mark this before mixing adhesive, because once fixing starts, small layout mistakes become permanent.

In wet areas, geometry matters as much as appearance. The shower base has to fall to the waste without low spots, reverse falls or awkward cut triangles that trap water. Wall junctions, hob heights, recesses and doorway transitions all need to be worked out with the finished tile thickness in mind. If those dimensions are guessed during installation, the room usually pays for it in poor drainage, misaligned trims or a shower screen that never sits quite right.

A useful visual reference sits below.

For large-format work, the background has to be flat enough to support the tile properly and the adhesive bed has to achieve strong, consistent coverage, especially in wet areas. Those are installation controls, not finishing touches. Get them wrong and the common failures are predictable. Cracked corners, drummy tiles, edge lipping, water sitting where it should drain, and movement that breaks grout long before the bathroom should need repair.

The finishing stage that decides longevity

After fixing comes the part many homeowners see as cleanup. In trade terms, it is still construction. Grout selection, movement joints, silicone at changes of plane, edge finishing, final wash and cure protection all affect service life.

A sound finish usually includes:

  • Joint widths that suit the tile calibre, rectification and expected movement of the room
  • Silicone joints at internal corners and other changes of plane, instead of hard grout where movement will cause cracking
  • Edge details such as trims, mitres or stone profiles planned before installation so corners finish cleanly
  • Protection during curing so fresh grout, silicone and tile edges are not damaged by early trade traffic

If a contractor talks only about tile choice and not about substrate, falls, waterproofing and movement joints, they are pricing the easiest part of the job.

Bathrooms last longer when one party coordinates the plumber, waterproofer, tiler, shower screen installer and electrician. That builder-led process is what prevents the small technical misses that turn into leaks, cracked large-format tiles and expensive rectification later.

Budgeting Your Tiling Project Costs and Timelines

A bathroom quote can look reasonable on paper and still miss the work that keeps water inside the shower and large-format tiles from cracking six months later. I see that gap often. One price allows for substrate correction, proper set-out, movement joints, drying time and compliant wet-area sequencing. Another price allows for tiles on a surface that was never ready.

What drives the quote up or down

In Australia, the average market cost to install floor tiles ranges from $30 to $150 per m², with labour typically adding another $30 to $120 per m² depending on location and tile type. Complex installations, including custom layouts or large-format tiles, can push labour to $100 to $150 per m², according to Hipages floor tile installation pricing.

The cost range is broad because the scope of tile installation varies significantly. A straight lay on a sound, level floor is one type of job. A bathroom with demolition, membrane repairs, floor levelling, recessed niches, mitred corners, stone sealing, difficult access or corrected shower falls is a different scope entirely.

For bathroom tiling labour specifically, the average hiring rate in Australia is about $60 per m², with a standard market range of $35 to $120 per m², excluding the tile cost itself, based on Hipages bathroom renovation cost guidance.

Bathroom renovation budgets also need the full project context. According to 2023 Housing Industry Association data, the average cost of a full bathroom renovation in Australia is $26,000, with a typical range of $8,000 to $35,000, as summarised by Canstar's bathroom renovation cost article.

Cheap quotes usually leave out the hard parts.

A proper builder-led allowance should make room for surface preparation, moisture management, inspection points between trades, and the slower handling required for rectified and large-format tiles. Those items do not make a quote look exciting, but they are usually the difference between a bathroom that performs for decades and one that needs rectification after the warranty period.

Sample Tiling Costs in Melbourne per square metre

Tile Type Material Cost (per m²) Labour Cost (per m²) Best For
Basic ceramic $30 to $50 $30 to $120 Budget-conscious wall and floor applications where the specification suits the room
Porcelain $40 to $100 $30 to $120 Bathrooms, ensuites and general wet areas needing durability and design flexibility
Natural stone $50 to $150 $30 to $120 Premium bathrooms and feature areas where natural variation is part of the design
Large-format or custom layout installation Depends on tile selected $100 to $150 Projects requiring precision set-out, levelling and advanced installation methods

That same Hipages pricing data also notes that a medium-sized bathroom of about 17 m² can range from $1,020 to $4,590 for installation depending on materials and complexity.

How to think about timing

Timeframes are driven by sequence, not just labour hours. Demolition can expose rotten sheet flooring, out-of-plumb walls or previous waterproofing failures. Once that shows up, the programme changes because the room has to be rebuilt properly before tile goes down.

Wet-area work also has curing windows that should not be compressed. Screeds, waterproofing systems, adhesives, grout and silicone all need the right conditions and enough time. Push those stages too hard and the bathroom may finish faster, but the risk shifts straight into bond failure, trapped moisture, cracked joints and leaks.

A realistic programme also allows for tile delivery, batch checking, set-out approval, and protection from follow-on trades. That is why registered builders tend to run bathroom projects more predictably. One party controls the sequence, signs off each stage, and makes sure the tiling work is built on compliant preparation instead of assumptions.

Why Tiles Fail Common Problems and Expert Solutions

Most tile failures aren't caused by the tile itself. They start below it or behind it.

Leaks usually start with geometry not appearance

Homeowners often assume a leaking shower means the membrane failed. Sometimes it did. But many shower failures begin with incorrect falls and badly formed wet-area junctions.

A key issue in Australia is the slope and angle at the shower base. Data referenced in this wet-area tiling discussion states that 40% of shower leak failures stem from improper corner angles and insufficient slope at the wet-area base rather than membrane failure alone. The same source points to a minimum 1:60 slope at the shower base and 45° mitre angles at wall junctions as critical details for drainage and water control.

That explains why some showers leak despite looking neatly tiled. Water doesn't care how square the grout joints are. It follows gravity. If the base geometry is wrong, water pools, tracks, sits against junctions and eventually finds a path.

A shower can look immaculate and still be built to fail if the falls were guessed instead of formed.

The professional answer is to correct the substrate and falls before tiling. Not after. Rectification usually involves removing enough of the assembly to rebuild the drainage geometry properly, then reinstating the waterproofing and finish in the correct sequence.

Cracks and hollow spots are often installation failures

Cracked tiles, drummy sounds and edge lippage usually point to support and bonding issues. Large-format tile makes these problems more obvious because the pieces are heavier, flatter and less forgiving of uneven backgrounds.

If the floor or wall wasn't brought within tolerance before tiling, the adhesive bed has to compensate. That's where stress builds. High spots force the tile proud. Low spots reduce support. Voids remain under corners or centres. Over time, movement and load expose the weakness.

Typical root causes include:

  • Out-of-tolerance substrates that should have been screeded or levelled first.
  • Poor adhesive coverage behind large-format tiles, especially in wet areas.
  • Incorrect movement treatment where internal corners or transitions were hard grouted.
  • Bad sequencing where another trade damages the waterproofing or substrate before tiling starts.

The solution isn't cosmetic patching. It's diagnosis. A proper tiler or registered builder traces the defect back to its cause, then decides whether the area can be locally repaired or needs full replacement. That's the difference between a short-term fix and a durable repair.

Your Checklist for Hiring a Tiling Contractor

The contractor you choose decides more than the finish. They decide the process, the risk level and who's accountable when details collide on site.
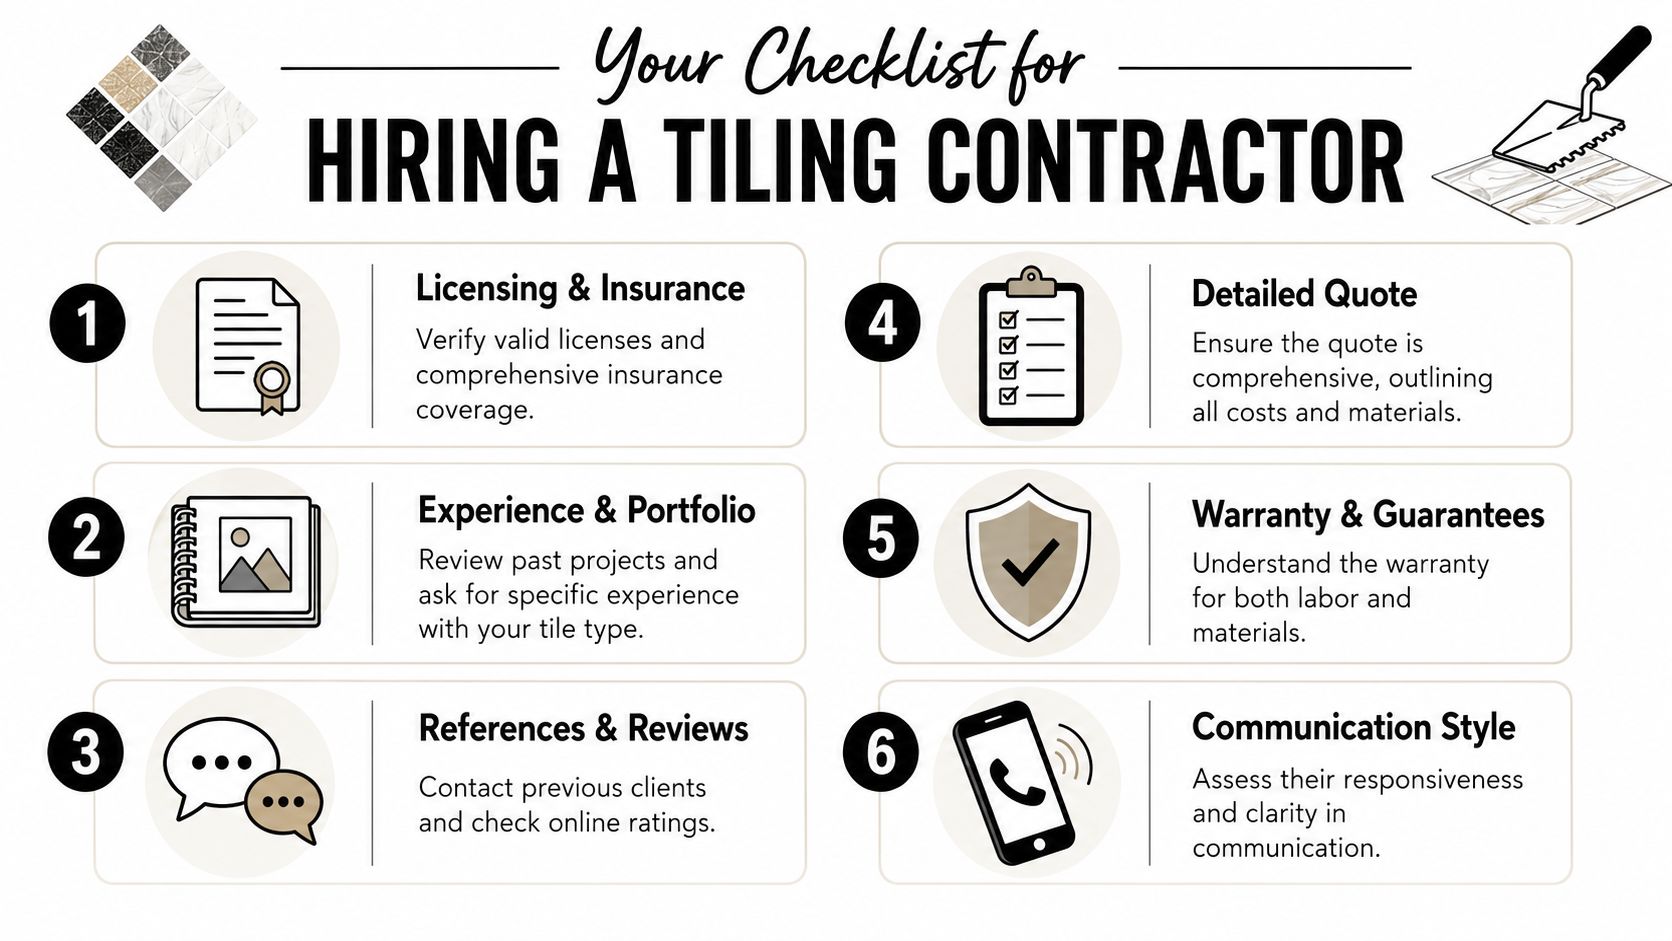
An infographic checklist for hiring a professional tiling contractor featuring six essential steps for homeowners.

Questions worth asking before you sign

Start with scope. Are you hiring someone to lay tile only, or someone who can manage the bathroom renovation as a registered builder? If your project includes demolition, waterproofing, plumbing changes, sheeting, screeding and shower screen set-out, that difference matters.

Then move to technical competence. For large-format tile installations of 400 mm x 400 mm or greater, AS 3958.1 requires background flatness of no more than 3 mm over 2 m, and failure to meet that standard can lead to cracked tiles or hollow spots, according to ARDEX's large-format tile bulletin. If the contractor can't discuss substrate tolerances clearly, they may not be the right fit for premium work.

Use this checklist when you compare tiles installation services:

  • Builder status and trade coordination: Ask whether they're a registered builder if your job is a full bathroom renovation, not just a tile replacement.
  • Insurance and compliance: Confirm public liability, workers compensation arrangements and who issues compliance documentation where applicable.
  • Waterproofing responsibility: Ask who performs it, who signs off on it and how it's protected before tiling begins.
  • Large-format experience: If you're using porcelain panels, Kerlite or stone, ask for examples of similar work and how they handle flatness correction.
  • Problem-solving method: Ask what they do if demolition exposes rotten framing, uneven slabs or failed previous waterproofing.
  • Local availability: If you're comparing options, this guide to tiling contractors near me is a useful reference point for what a full-scope service can include.

What a proper quote should show

A proper quote should separate supply, preparation and installation. It should tell you whether demolition is included, whether substrate correction is allowed for, whether waterproofing is in scope, and what happens if the room is out of tolerance once opened up.

It should also make the finish standard clear. Are mitres included? Are trims specified? Does the quote include sealing where relevant, silicone to changes of plane, tile waste allowance and clean-up?

Melbourne Tiling Services P/L is one example of a contractor model that combines tiling with registered builder oversight, which is relevant when the project needs demolition, wet-area rectification, screeding and trade coordination rather than tile laying alone.

Cheap quotes often stay cheap by excluding the exact work that stops the bathroom from failing.

That's why the best quote isn't always the lowest. It's the one that shows the contractor understands the room as a building system.

Bringing Your Vision to Life with Confidence

A bathroom renovation succeeds when every hidden layer supports the finish you can see. Tile selection matters. So do layout, slip resistance, edge details and grout choice. But the work that decides whether the room lasts is the work often unseen. Substrate correction, waterproofing, falls, adhesion and trade coordination.

That's why hiring a registered builder for bathroom renovations changes the result. You get one party looking at the whole assembly instead of one trade looking only at the final surface. For homeowners in Melbourne and greater Victoria, that's often the cleanest path to a bathroom that looks sharp, drains properly and avoids the common failure points that lead to leaks and rectification.

If you're comparing tiles installation services, judge them on more than the tile line. Ask how they prepare the floor. Ask how they control falls. Ask who carries responsibility for the wet area from demolition through to handover. The answers will tell you a lot.

A good bathroom should feel effortless to use. That only happens when the build behind it is disciplined.


If you're planning a bathroom renovation, ensuite upgrade, leak rectification or premium wall and floor tiling project, Melbourne Tiling Services P/L offers free quotes, 3D drawings and a renovation calculator to help you define scope, budget and the right builder-led process before work begins.


Tiles Installation Services: Your 2026 Melbourne Guide

You're probably looking at a bathroom that no longer matches the rest of the house. The tiles look tired, the shower may be holding water where it shouldn't, and every quote seems to say something slightly different. One tiler talks about tile supply only. Another mentions waterproofing but not who's responsible for the carpentry, plumbing or final compliance. That's where many bathroom renovations start to go off track.

A tiled bathroom isn't just a tile job. It's a building job with tile as the visible finish. If the substrate is out, the falls are wrong, or the waterproofing sequence is poorly coordinated, the surface can look excellent on handover day and still fail years too early. Homeowners usually notice the symptoms first. Hollow tiles, cracked grout, water sitting near the waste, swollen skirtings outside the shower, or movement around large-format panels.

That's why a registered builder matters in bathroom renovations. A builder-led process looks at demolition, framing, sheet preparation, waterproofing, screeding, tile selection, slip resistance, drainage, shower screen set-out and trade sequencing as one system. In Melbourne homes, especially where older substrates meet modern large-format finishes, that joined-up approach is what separates a cosmetic refresh from a bathroom that stays sound.

Table of Contents

Your Melbourne Bathroom Renovation Starts Here

A smart bathroom renovation usually begins with one simple question. Are you buying tiles, or are you buying a complete result?

In Melbourne, plenty of bathrooms sit on concrete slabs, older screeds, patched walls and substrates that have seen multiple repairs over time. On the surface, the room might look straightforward. Strip it, waterproof it, tile it, finish it. In practice, the job turns on what's hidden. A registered builder sees the risk points before demolition starts, not after the expensive tiles arrive on site.

That matters because bathroom renovations involve more than a neat tile line. The builder needs to coordinate licensed trades, check the condition of the existing structure, make sure the falls can be formed correctly, confirm the screen and niche set-out, and prevent one trade from compromising the work of another. If the plumbing rough-in sits proud, the screed thickness changes. If the wall sheeting is wrong for the selected tile, the final plane shifts. If no one checks door clearances and waste positions together, the room starts absorbing compromises.

Practical rule: The visible finish only performs as well as the preparation underneath it.

A builder-led process keeps those details connected. It also gives you one accountable party for sequencing and compliance instead of a string of separate subcontractors pointing at each other when something goes wrong. That's especially important with large-format porcelain, marble, mitred edges, recessed shelves and frameless shower screens, where tolerances tighten and minor errors become obvious.

For homeowners comparing tiles installation services, this is the difference between a quote that prices laying only and a renovation that's built to last. The first can look cheaper. The second is usually what prevents leaks, lippage, cracked grout and rework.

From Porcelain to Marble The Best Tile Materials

Choosing tile by colour alone is how people end up with a bathroom that photographs well and performs poorly. The right material depends on the room, the substrate, the maintenance you'll tolerate and the finish you expect years from now.

A collection of various tile samples including marble, ceramic, and textured stone squares displayed on a table.

Porcelain for hard-wearing wet areas

Porcelain is often the safest all-rounder for bathroom renovations. It's dense, durable, stable and available in finishes that mimic stone, concrete, terrazzo and timber without the same maintenance burden. For floors and shower areas, that mix of durability and design flexibility is hard to beat.

Slip performance matters as much as appearance. In Australia, AS 4586 slip resistance compliance is critical in wet areas. Residential shower tiles need a minimum P3 slip rating, while commercial wet areas require P4 to P5 according to this guide to Australian tile performance ratings. That same source notes that unsealed ceramic tiles with low water absorption of less than 0.5% maintained adhesion strength of more than 1.5 N/mm² after 720 hours of immersion, while more porous tiles with less than 3% absorption dropped below 0.8 N/mm², which increases the risk of delamination.

Ceramic when budget and wall use align

Ceramic still has a place, especially on bathroom walls where impact and foot traffic are lower. It's often easier to cut and can open up more cost-effective design options. But ceramic isn't a default answer for every zone. In wet areas, absorption, finish and intended use all need checking.

For many homeowners, ceramic works best when the wall tile does one job well. It delivers the look you want without pretending to be a heavy-duty floor tile. That's a sensible use of budget.

A useful starting point is to compare finishes, body types and maintenance requirements before buying. This overview of tiling materials gives a practical sense of where different products fit.

Marble and natural stone for premium spaces

Marble changes the feel of a room in a way printed tile doesn't. It has depth, variation and a natural surface character that gives a bathroom weight and permanence. In the right room, it can be exceptional.

It also demands more from the installation and the owner. Stone selection needs tighter batching control. Veining direction matters. Sealing matters. So does the suitability of the substrate and adhesive system. If you want a low-maintenance family bathroom, porcelain that reproduces marble may be the better long-term call. If you want natural stone, build the project around its needs instead of treating it like a standard ceramic wall tile.

Marble rewards discipline. If the set-out, sealing and edge work are average, the material won't hide it.

Kerlite and other large-format panels

Large-format products such as Kerlite create a cleaner visual field with fewer grout joints. They suit contemporary bathrooms, open-plan floors and feature walls where you want scale and continuity. Used properly, they can make a compact room feel broader and calmer.

They also expose poor preparation immediately. Big panels don't bend to forgive an uneven substrate. They bridge over high spots, rock on low spots and show lippage under natural light. That's why tiles installation services for large-format work should be judged less by the tile catalogue and more by the installer's preparation standard.

A good tile choice doesn't just suit the room on day one. It suits the way the room will be used, cleaned and maintained for years.

The Anatomy of a Flawless Tiling Installation

A bathroom gets stripped, new tiles go in, and six months later water sits in a corner of the shower, grout starts shading dark, and one large-format floor tile sounds hollow underfoot. The tile did not fail on its own. The build sequence failed underneath it.

A first-rate tiling job is a controlled system of demolition, substrate correction, waterproofing, set-out, fixing, movement treatment and curing. Registered builders approach tiles installation services differently from lay-only installers because they manage the whole assembly, not just the visible surface.

A six-step infographic illustrating the professional process of a flawless ceramic floor tile installation.

The work that happens before the first tile

Demolition tells the truth. Once the old finishes are out, the actual work appears. Slab levels, wall plumb, waste position, framing movement, sheeting quality, previous patch repairs and water damage all become visible. That is the point where a builder decides whether the planned tile size, joint width and waste detail still suit the room.

Large-format tiles are unforgiving. If the floor is out, the tile will show it. If the wall bows, rectified edges will telegraph it. Sunlight across a bathroom floor exposes lippage that a quick quote never allowed for.

That is why substrate preparation carries so much weight.

In practical terms, flatness usually means screeding, local patching, or self-levelling before a single tile is fixed. Proper screeding for tiles often makes the difference between a floor that looks crisp for decades and one that starts showing ponding, chipped edges and uneven joints as soon as the room is in regular use.

Setting out falls flatness and adhesion

Set-out is not just about centring a pattern. It decides where cuts finish, whether niches line through with grout joints, how the waste sits within the layout, and whether the room looks resolved instead of improvised. Good tilers mark this before mixing adhesive, because once fixing starts, small layout mistakes become permanent.

In wet areas, geometry matters as much as appearance. The shower base has to fall to the waste without low spots, reverse falls or awkward cut triangles that trap water. Wall junctions, hob heights, recesses and doorway transitions all need to be worked out with the finished tile thickness in mind. If those dimensions are guessed during installation, the room usually pays for it in poor drainage, misaligned trims or a shower screen that never sits quite right.

A useful visual reference sits below.

For large-format work, the background has to be flat enough to support the tile properly and the adhesive bed has to achieve strong, consistent coverage, especially in wet areas. Those are installation controls, not finishing touches. Get them wrong and the common failures are predictable. Cracked corners, drummy tiles, edge lipping, water sitting where it should drain, and movement that breaks grout long before the bathroom should need repair.

The finishing stage that decides longevity

After fixing comes the part many homeowners see as cleanup. In trade terms, it is still construction. Grout selection, movement joints, silicone at changes of plane, edge finishing, final wash and cure protection all affect service life.

A sound finish usually includes:

  • Joint widths that suit the tile calibre, rectification and expected movement of the room
  • Silicone joints at internal corners and other changes of plane, instead of hard grout where movement will cause cracking
  • Edge details such as trims, mitres or stone profiles planned before installation so corners finish cleanly
  • Protection during curing so fresh grout, silicone and tile edges are not damaged by early trade traffic

If a contractor talks only about tile choice and not about substrate, falls, waterproofing and movement joints, they are pricing the easiest part of the job.

Bathrooms last longer when one party coordinates the plumber, waterproofer, tiler, shower screen installer and electrician. That builder-led process is what prevents the small technical misses that turn into leaks, cracked large-format tiles and expensive rectification later.

Budgeting Your Tiling Project Costs and Timelines

A bathroom quote can look reasonable on paper and still miss the work that keeps water inside the shower and large-format tiles from cracking six months later. I see that gap often. One price allows for substrate correction, proper set-out, movement joints, drying time and compliant wet-area sequencing. Another price allows for tiles on a surface that was never ready.

What drives the quote up or down

In Australia, the average market cost to install floor tiles ranges from $30 to $150 per m², with labour typically adding another $30 to $120 per m² depending on location and tile type. Complex installations, including custom layouts or large-format tiles, can push labour to $100 to $150 per m², according to Hipages floor tile installation pricing.

The cost range is broad because the scope of tile installation varies significantly. A straight lay on a sound, level floor is one type of job. A bathroom with demolition, membrane repairs, floor levelling, recessed niches, mitred corners, stone sealing, difficult access or corrected shower falls is a different scope entirely.

For bathroom tiling labour specifically, the average hiring rate in Australia is about $60 per m², with a standard market range of $35 to $120 per m², excluding the tile cost itself, based on Hipages bathroom renovation cost guidance.

Bathroom renovation budgets also need the full project context. According to 2023 Housing Industry Association data, the average cost of a full bathroom renovation in Australia is $26,000, with a typical range of $8,000 to $35,000, as summarised by Canstar's bathroom renovation cost article.

Cheap quotes usually leave out the hard parts.

A proper builder-led allowance should make room for surface preparation, moisture management, inspection points between trades, and the slower handling required for rectified and large-format tiles. Those items do not make a quote look exciting, but they are usually the difference between a bathroom that performs for decades and one that needs rectification after the warranty period.

Sample Tiling Costs in Melbourne per square metre

Tile Type Material Cost (per m²) Labour Cost (per m²) Best For
Basic ceramic $30 to $50 $30 to $120 Budget-conscious wall and floor applications where the specification suits the room
Porcelain $40 to $100 $30 to $120 Bathrooms, ensuites and general wet areas needing durability and design flexibility
Natural stone $50 to $150 $30 to $120 Premium bathrooms and feature areas where natural variation is part of the design
Large-format or custom layout installation Depends on tile selected $100 to $150 Projects requiring precision set-out, levelling and advanced installation methods

That same Hipages pricing data also notes that a medium-sized bathroom of about 17 m² can range from $1,020 to $4,590 for installation depending on materials and complexity.

How to think about timing

Timeframes are driven by sequence, not just labour hours. Demolition can expose rotten sheet flooring, out-of-plumb walls or previous waterproofing failures. Once that shows up, the programme changes because the room has to be rebuilt properly before tile goes down.

Wet-area work also has curing windows that should not be compressed. Screeds, waterproofing systems, adhesives, grout and silicone all need the right conditions and enough time. Push those stages too hard and the bathroom may finish faster, but the risk shifts straight into bond failure, trapped moisture, cracked joints and leaks.

A realistic programme also allows for tile delivery, batch checking, set-out approval, and protection from follow-on trades. That is why registered builders tend to run bathroom projects more predictably. One party controls the sequence, signs off each stage, and makes sure the tiling work is built on compliant preparation instead of assumptions.

Why Tiles Fail Common Problems and Expert Solutions

Most tile failures aren't caused by the tile itself. They start below it or behind it.

Leaks usually start with geometry not appearance

Homeowners often assume a leaking shower means the membrane failed. Sometimes it did. But many shower failures begin with incorrect falls and badly formed wet-area junctions.

A key issue in Australia is the slope and angle at the shower base. Data referenced in this wet-area tiling discussion states that 40% of shower leak failures stem from improper corner angles and insufficient slope at the wet-area base rather than membrane failure alone. The same source points to a minimum 1:60 slope at the shower base and 45° mitre angles at wall junctions as critical details for drainage and water control.

That explains why some showers leak despite looking neatly tiled. Water doesn't care how square the grout joints are. It follows gravity. If the base geometry is wrong, water pools, tracks, sits against junctions and eventually finds a path.

A shower can look immaculate and still be built to fail if the falls were guessed instead of formed.

The professional answer is to correct the substrate and falls before tiling. Not after. Rectification usually involves removing enough of the assembly to rebuild the drainage geometry properly, then reinstating the waterproofing and finish in the correct sequence.

Cracks and hollow spots are often installation failures

Cracked tiles, drummy sounds and edge lippage usually point to support and bonding issues. Large-format tile makes these problems more obvious because the pieces are heavier, flatter and less forgiving of uneven backgrounds.

If the floor or wall wasn't brought within tolerance before tiling, the adhesive bed has to compensate. That's where stress builds. High spots force the tile proud. Low spots reduce support. Voids remain under corners or centres. Over time, movement and load expose the weakness.

Typical root causes include:

  • Out-of-tolerance substrates that should have been screeded or levelled first.
  • Poor adhesive coverage behind large-format tiles, especially in wet areas.
  • Incorrect movement treatment where internal corners or transitions were hard grouted.
  • Bad sequencing where another trade damages the waterproofing or substrate before tiling starts.

The solution isn't cosmetic patching. It's diagnosis. A proper tiler or registered builder traces the defect back to its cause, then decides whether the area can be locally repaired or needs full replacement. That's the difference between a short-term fix and a durable repair.

Your Checklist for Hiring a Tiling Contractor

The contractor you choose decides more than the finish. They decide the process, the risk level and who's accountable when details collide on site.

An infographic checklist for hiring a professional tiling contractor featuring six essential steps for homeowners.

Questions worth asking before you sign

Start with scope. Are you hiring someone to lay tile only, or someone who can manage the bathroom renovation as a registered builder? If your project includes demolition, waterproofing, plumbing changes, sheeting, screeding and shower screen set-out, that difference matters.

Then move to technical competence. For large-format tile installations of 400 mm x 400 mm or greater, AS 3958.1 requires background flatness of no more than 3 mm over 2 m, and failure to meet that standard can lead to cracked tiles or hollow spots, according to ARDEX's large-format tile bulletin. If the contractor can't discuss substrate tolerances clearly, they may not be the right fit for premium work.

Use this checklist when you compare tiles installation services:

  • Builder status and trade coordination: Ask whether they're a registered builder if your job is a full bathroom renovation, not just a tile replacement.
  • Insurance and compliance: Confirm public liability, workers compensation arrangements and who issues compliance documentation where applicable.
  • Waterproofing responsibility: Ask who performs it, who signs off on it and how it's protected before tiling begins.
  • Large-format experience: If you're using porcelain panels, Kerlite or stone, ask for examples of similar work and how they handle flatness correction.
  • Problem-solving method: Ask what they do if demolition exposes rotten framing, uneven slabs or failed previous waterproofing.
  • Local availability: If you're comparing options, this guide to tiling contractors near me is a useful reference point for what a full-scope service can include.

What a proper quote should show

A proper quote should separate supply, preparation and installation. It should tell you whether demolition is included, whether substrate correction is allowed for, whether waterproofing is in scope, and what happens if the room is out of tolerance once opened up.

It should also make the finish standard clear. Are mitres included? Are trims specified? Does the quote include sealing where relevant, silicone to changes of plane, tile waste allowance and clean-up?

Melbourne Tiling Services P/L is one example of a contractor model that combines tiling with registered builder oversight, which is relevant when the project needs demolition, wet-area rectification, screeding and trade coordination rather than tile laying alone.

Cheap quotes often stay cheap by excluding the exact work that stops the bathroom from failing.

That's why the best quote isn't always the lowest. It's the one that shows the contractor understands the room as a building system.

Bringing Your Vision to Life with Confidence

A bathroom renovation succeeds when every hidden layer supports the finish you can see. Tile selection matters. So do layout, slip resistance, edge details and grout choice. But the work that decides whether the room lasts is the work often unseen. Substrate correction, waterproofing, falls, adhesion and trade coordination.

That's why hiring a registered builder for bathroom renovations changes the result. You get one party looking at the whole assembly instead of one trade looking only at the final surface. For homeowners in Melbourne and greater Victoria, that's often the cleanest path to a bathroom that looks sharp, drains properly and avoids the common failure points that lead to leaks and rectification.

If you're comparing tiles installation services, judge them on more than the tile line. Ask how they prepare the floor. Ask how they control falls. Ask who carries responsibility for the wet area from demolition through to handover. The answers will tell you a lot.

A good bathroom should feel effortless to use. That only happens when the build behind it is disciplined.


If you're planning a bathroom renovation, ensuite upgrade, leak rectification or premium wall and floor tiling project, Melbourne Tiling Services P/L offers free quotes, 3D drawings and a renovation calculator to help you define scope, budget and the right builder-led process before work begins.
Floor Tiling Melbourne: Expert Guide to the Best Finish

You're probably looking at tile samples, Pinterest saves, and a bathroom that's overdue for work, while also wondering where the budget blows out and how to avoid a leak six months after handover. That's a normal place to start. Most Melbourne homeowners don't struggle with choosing a colour. They struggle with knowing what sits underneath the tile and whether the whole job is being built properly.

That matters more now because renovation costs have been moving the wrong way for homeowners. Australian Bureau of Statistics housing data for Victoria shows renovation spending rose 12% in 2025 due to inflation in materials like ceramic tiles, which is why clear planning and cost control matter from day one, as noted by Melbourne Tiling Services on renovation budgeting in Victoria.

Floor tiling melbourne projects go well when the finish is treated as the last step, not the first. In a proper bathroom renovation, the tile selection, subfloor preparation, waterproofing, drainage falls, and trade coordination all affect the final result. That's the difference between a floor that still looks right years later and one that starts sounding hollow, holding water, or cracking around movement points.

Table of Contents

Starting Your Melbourne Tiling Renovation

A bathroom floor rarely fails because the tile was unattractive. It fails because the planning was shallow. Homeowners often come in focused on pattern, size, and price per tile, then find out too late that the essential decisions were about substrate condition, shower falls, waterproofing details, and whether the person quoting the work can manage the whole renovation.

As a Registered Builder, the first thing I look at isn't the tile board. It's the room itself. Older Melbourne homes often have movement in the floor, previous water damage, patched plumbing penetrations, or walls that aren't square. If those issues aren't resolved before tiling starts, the finish will always be compromised no matter how expensive the tile is.

Start with the room, not the tile

A sound tiling plan should answer a few basic questions early:

  • What is the subfloor made of: Concrete behaves very differently from timber.
  • Is this a tile-only job or part of a bathroom renovation: The answer changes sequencing, access, and who carries responsibility.
  • Will the drainage work properly: Wet area performance matters more than visual symmetry.
  • Who is coordinating trades: Plumber, waterproofer, carpenter, electrician, screen installer, and tiler all affect the floor outcome.

Practical rule: If the quote talks a lot about finishes and very little about preparation, it's incomplete.

Builder thinking changes the result

A tiler can install a floor well. A builder has to think about compliance, sequencing, and risk across the entire room. That matters in bathroom renovations because one rushed trade can undo another. A plumbing change can alter falls. A poor patch can create movement. A missed waterproofing detail can send water behind finished surfaces.

That broader view is what keeps floor tiling melbourne projects from becoming repair jobs later. The best finish starts before a single tile is laid.

Choosing the Right Tile for Your Melbourne Home

Good tile selection is about where the tile is going and how the room will be used. A bathroom floor, laundry, hallway, and open-plan living area don't ask the same things from the material. Some homeowners choose based on showroom appearance alone, then end up with a product that needs more maintenance than expected or highlights every issue in the substrate.

A young couple reviewing various colored tile samples for home renovation on a bright kitchen table.

If you're comparing finishes, these tiling materials used in bathroom renovations give a useful starting point. The ultimate test is matching the material to the room.

Porcelain for hard-wearing bathrooms and living areas

Porcelain is usually the safest all-round choice for Melbourne homes. It's dense, durable, and works well in wet areas, especially when you want a clean modern look without the upkeep of natural stone. For bathroom floors, it gives you a reliable surface that handles moisture well and suits both small formats and large-format layouts.

It also gives builders and tilers more flexibility in design without creating maintenance issues for the owner. In family homes, rentals, and busy ensuites, porcelain tends to be the material that causes the fewest long-term complaints.

Ceramic where design matters more than punishment

Ceramic still has a place. It can work well on walls and in lower-stress areas, and many homeowners like it because there's a wide range of colours and finishes. On floors, though, I'm more selective.

If the room takes regular foot traffic, gets wet often, or needs to stand up to daily wear, ceramic usually isn't my first recommendation. It can still perform well in the right application, but it's less forgiving of poor product choice and poor installation.

Marble when you want character and accept maintenance

Marble looks excellent when the design calls for softness, variation, and a more natural finish. It suits high-end bathrooms, entry spaces, and homes where the owners understand what natural stone involves.

That trade-off matters. Marble needs more care than porcelain. It can mark, it can require sealing, and it shows installation errors quickly because the eye reads natural stone differently than it reads a uniform manufactured tile. If the substrate isn't flat and the layout isn't carefully controlled, marble won't hide it.

Marble can look refined for years, but only if the owner accepts that natural stone is not a low-maintenance product.

Kerlite for large-format minimalism

Kerlite and other large-format slim porcelain products create a very different visual effect. Fewer grout lines, broader visual flow, and a more architectural finish. They can work beautifully in bathrooms and open-plan areas, but they demand a flat substrate and careful handling.

What works with standard porcelain doesn't always work with a large-format slab. Minor irregularities underneath become visible quickly. Adhesive selection, handling, coverage, and cutting technique all matter more. Installer experience becomes particularly evident.

A practical way to choose

When clients are torn between options, I narrow it down like this:

Tile type Best suited to Main advantage Main trade-off
Porcelain Bathrooms, ensuites, living areas, hallways Durable and low maintenance Can feel plain if the selection is too safe
Ceramic Selected floors, many wall applications Broad style range Less ideal for harder-wearing floor areas
Marble Premium bathrooms and statement spaces Natural variation and character Higher maintenance and less forgiving
Kerlite Large-format designer spaces Minimal grout lines and sleek finish Installation demands are much higher

If you want one material that balances appearance, performance, and practicality, porcelain is often the steady choice. If you want a statement surface, marble or Kerlite can deliver it, but only when the preparation and installation standard match the material.

How to Budget for Floor Tiling Costs

A bathroom floor quote often looks reasonable until the old tiles come up. Then the actual costs appear. In Melbourne homes, especially older timber-frame houses, the floor can need straightening, stiffening, new sheeting, or a full rebuild of the wet area base before any tiling starts.

That is why I price bathroom floors as part of the renovation system, not as an isolated tiling job. Tile selection matters, but the bigger cost swings usually come from what is under the tile and how much coordination the room needs across demolition, plumbing, waterproofing, carpentry, and tiling.

Labour rates are only one part of the number

Recent Australian market guides published in late 2025 put tiler labour for standard floor tiling in a broad range, with natural stone and more complex layouts sitting above standard porcelain rates, as noted in this Australian tiler rates per square metre guide. Use that as a rough check only.

Small bathrooms rarely price neatly by square metre. A 10m² bathroom can involve dozens of cuts, set-outs around wastes and corners, waterproof detailing, trim work at doorways, and tighter tolerances than a much larger open floor. Builder-led pricing also has to allow for what happens before the tiler starts, because if the substrate is moving or the falls are wrong, the floor finish is already at risk.

What a proper quote should cover

A floor tiling allowance should break out the items that commonly get missed or underquoted:

  • Demolition and strip-out: Removal of tiles, screed, bedding, sheet underlay, and any failed substrate material.
  • Waste removal: Skip bin, tip fees, and labour to remove debris, especially where access is tight.
  • Subfloor correction: Levelling, patching, new underlay, cement sheet, screed, or structural rectification on timber floors.
  • Waterproofing: Membrane application, bond breakers, corners, penetrations, and curing time.
  • Setting materials: Adhesives, grout, primers, trims, movement joints, silicone, and stone sealers where needed.
  • Detailing: Floor waste cuts, threshold transitions, shower screen line-up, and final finish quality.

For wider project planning, this bathroom renovation cost guide for Melbourne homeowners helps place floor tiling inside the total bathroom budget.

Sample Budget Breakdown for a Standard Melbourne Bathroom (10m² Floor)

Expense Item Typical Cost Range (AUD)
Demolition and waste removal $600 to $1,500
Subfloor preparation and levelling $800 to $2,500
Waterproofing $700 to $1,500
Tiler labour for porcelain $800 to $1,600
Tiler labour for marble or other natural stone $1,200 to $2,400
Adhesives, grout, sealants, trims $350 to $900
Final detailing and clean $150 to $400

These figures are examples, not fixed rates. Access, floor condition, tile size, pattern, drainage setup, and whether the bathroom sits on concrete or timber all shift the final number.

The biggest budgeting mistake is comparing quotes that do not include the same scope. A cheap price can mean no substrate repair, minimal waterproofing allowance, weak material specs, or no provision for correcting falls. That saving disappears fast if the bathroom floor has to be redone after handover.

The expensive part is not always the tile. In many bathroom renovations, the expensive part is fixing what was hidden underneath.

The Renovation Process From a Builder's Perspective

A floor tiling job inside a bathroom renovation needs the right order. Good trades can still produce a poor result if the sequence is wrong. Builder-led projects usually feel more controlled for this reason, because someone is responsible for the room as a whole, not just one part of it.

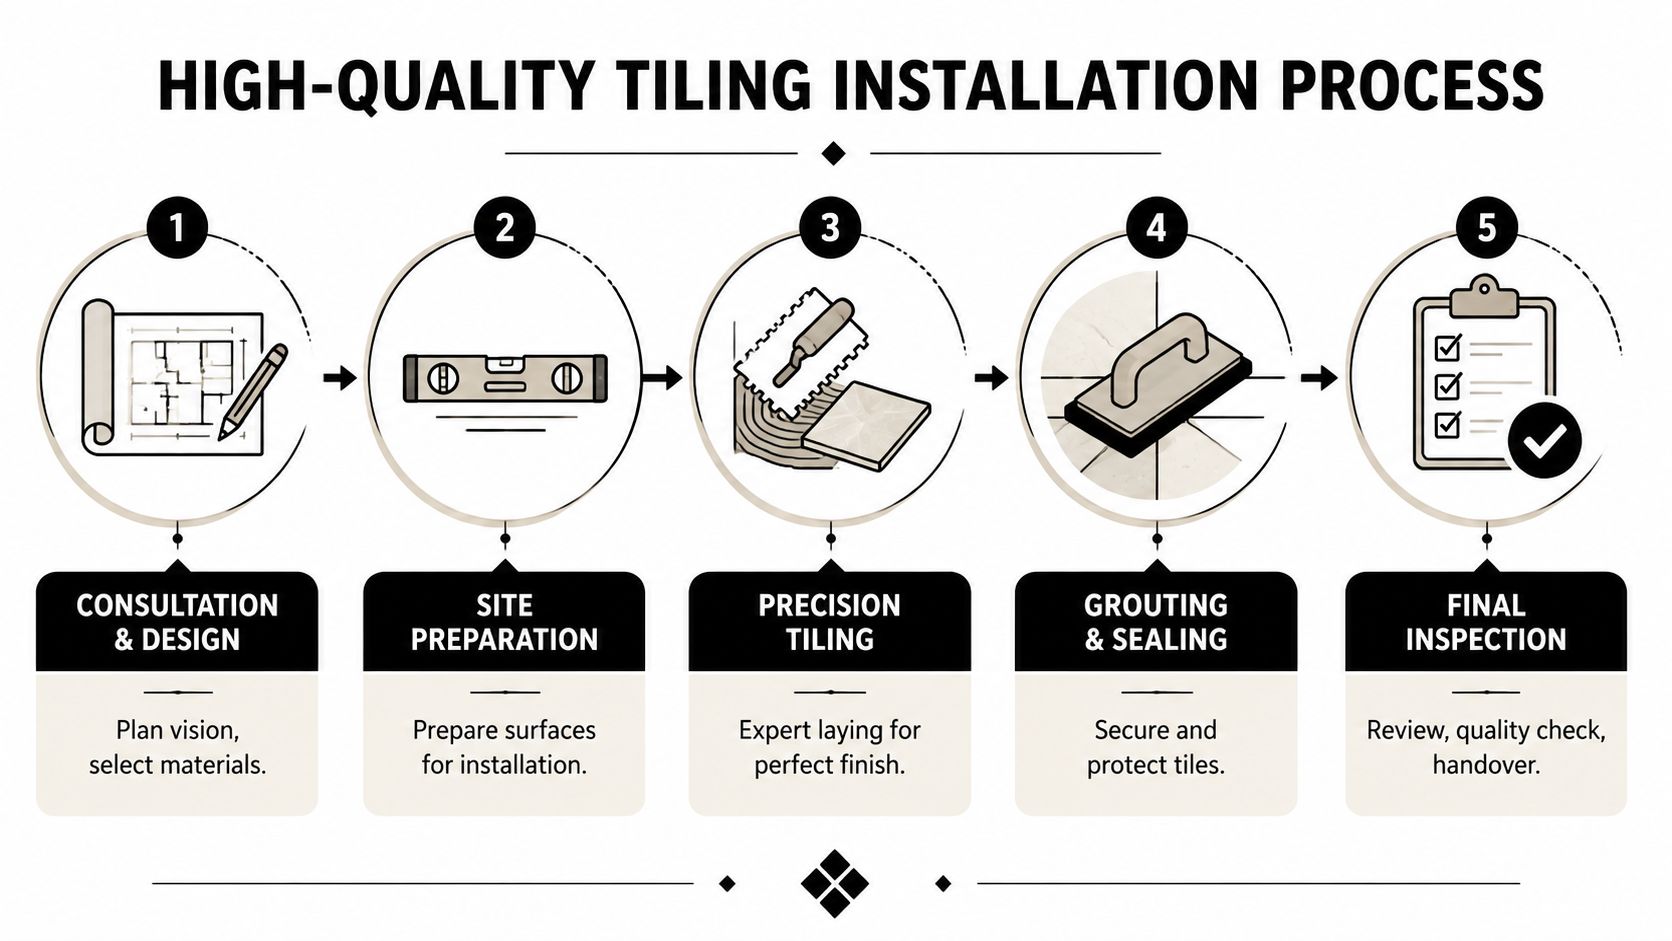
A five-step infographic showing the professional high-quality process for tiling installation from design to final inspection.

The sequence that prevents failure

The job usually starts with demolition and assessment. Once the existing floor is exposed, the substrate has to be checked for movement, damage, moisture issues, and level. On concrete, that often means grinding or patching. On timber, it may involve structural correction before any sheet underlay goes down.

Then comes forming the floor properly. In wet areas, this stage is essential because Australian Standard AS 3958.1 mandates a minimum floor fall of 1:80 in wet areas to ensure effective drainage, as outlined in this explanation of Australian tiling standards. If the floor doesn't drain, water sits. Once water sits, grout, tile bond, and adjacent finishes all start dealing with a problem they shouldn't have had.

After falls are established, waterproofing is applied in line with the room layout and penetrations. This stage needs clean surfaces, proper detailing, and curing time. Rushing straight from one step to the next is one of the most common reasons bathroom floors fail.

Why each layer matters

Each stage solves a different problem:

  1. Subfloor correction deals with movement and unevenness.
  2. Screeding or levelling establishes the geometry of the finished floor.
  3. Waterproofing protects the structure beneath the tile.
  4. Tiling and bedding create the wearing surface.
  5. Grouting, caulking, and final sealing where required finish the system.

When builders coordinate the room, they also coordinate the handover points between trades. The plumber can't leave penetrations messy. The carpenter can't leave a springy section under a premium tile. The waterproofer can't apply over a dirty or unstable base. Those details are where good bathroom renovations separate themselves from average ones.

The tile is the visible surface. The renovation quality sits underneath it.

Why trade coordination matters

This is also where a registered builder adds value over a tiling-only approach. In a bathroom renovation, the floor ties into shower screens, plumbing set-outs, cabinetry, door clearances, and sometimes underfloor heating or balcony thresholds. Those elements need to be coordinated before the tile goes down, not improvised after.

One example is Melbourne Tiling Services P/L, which handles bathroom renovations, waterproofing, screeding, self-levelling, and tile installation under a registered builder model. That type of setup can reduce confusion on site because one party is managing sequencing and accountability across the room.

Avoiding Common and Costly Tiling Disasters

Most floor failures don't look dramatic on day one. They start small. A tile sounds hollow. Water sits near the shower entry. A hairline crack appears at a doorway. Then the owner starts chasing repairs in a finished bathroom.

A close-up view of a cracked marble floor tile in a hallway with modern interior design.

Cracked and drummy tiles on timber floors

This is common in older Melbourne homes. The bathroom might look solid from above, but the timber subfloor underneath still moves. Tile and grout don't like movement. They want a stable base.

That's why Australian Standards require a fibre-cement underlay on timber floors and a maximum deflection of 1/360 of the span to prevent tile cracking from substrate movement, according to the Australian Tile Council tiling facts guide. If that requirement is ignored, the floor can flex under traffic and the finish starts to fail.

The fix is straightforward in principle, even if it isn't cheap. Stabilise the substrate, install the right underlay, fasten it correctly, and only then prepare for tiling. Skipping that process to save time is exactly how drummy floors and cracked grout lines show up.

Leaks that start below the tile

Homeowners often blame the tile when a shower leaks. Usually the tile isn't the main problem. The issue is below it. Failed waterproofing junctions, poor detailing at penetrations, and rushed floor preparation are much more common causes.

If you're reviewing methods before work starts, look at how bathroom waterproofing systems are applied in renovation work. The floor and wall junctions, waste locations, and transitions matter far more than the tile pattern.

A quick visual explanation can help if you're trying to spot the signs of poor practice on site.

Three red flags during installation

  • Tiles laid over an obviously uneven base: The installer is asking the adhesive to fix a substrate problem.
  • No clear discussion of movement and transitions: Floors need to cope with real building movement.
  • Wet area work pushed through too fast: Curing time matters. A rushed bathroom often becomes a repair job.

If the person doing the work can't explain what sits under the tile, they probably shouldn't be laying it.

How to Hire a Reputable Melbourne Tiler or Builder

Melbourne gives homeowners plenty of choice, but choice can make vetting harder. Australia's tiling services industry has over 20,000 businesses, which makes it a fragmented market where reputation, licensing, and reliable process matter, based on IBISWorld's analysis of Australia's tiling and carpeting services industry.

That size is one reason low quotes and polished sales talk don't tell you much. You need to know who is legally responsible for the work, who is coordinating the other trades, and whether the contractor understands bathroom renovations as a system rather than a tile-laying task.

A professional contractor in a green uniform shakes hands with a female client in a kitchen.

What to check before you sign

A reputable contractor should be comfortable being checked. If they get evasive about registration, insurance, or process, that's useful information.

Use a simple shortlist:

  • Verify registration and licensing: For bathroom renovations, check whether you're dealing with a properly registered builder where required.
  • Ask who manages the full scope: A solo tiler may do good work, but bathroom renovations involve more than tiling.
  • Review wet area experience: Bathrooms, balconies, and leak rectification require a stronger process than a dry internal floor.
  • Look at previous work carefully: Focus on drainage, detailing, finish consistency, and edge treatment, not just styling.
  • Read the quote line by line: If preparation is vague, ask for detail in writing.

Questions worth asking on site

Don't ask generic questions like “Do you do quality work?” Ask questions that force a technical answer.

  • How will you assess the existing subfloor before tiling starts
  • How are floor falls formed in the shower and main bathroom area
  • Who handles waterproofing and how is that coordinated with the tiling
  • Have you installed the exact material I've selected before
  • Who is responsible if another trade delays or affects the floor finish
  • What happens if you uncover substrate damage after demolition

The main difference between hiring a tiler and engaging a registered builder is accountability. A tiler is responsible for tiling work. A registered builder on a bathroom renovation is responsible for how the whole project is organised, sequenced, and delivered. If your project involves plumbing changes, waterproofing, structural correction, or multiple trades, that difference matters.

Project Timelines and Long-Term Floor Care

A realistic bathroom floor timeline

A standard bathroom floor tiling job usually moves through demolition, substrate preparation, waterproofing, tiling, grouting, and final curing. The exact timing depends on access, substrate condition, product choice, and whether the floor is part of a larger bathroom renovation. The mistake homeowners make is assuming tiling starts the moment the old floor comes up.

The slow parts are often the important parts. Preparation has to be done properly. Waterproofing needs time. Adhesives and grout need to set before the room is put back into service. If the schedule sounds too compressed, ask what has been shortened.

How to keep the floor looking right

Long-term care is simple when the installation is sound.

  • Use pH-neutral cleaners: Harsh products can damage grout, sealers, and some stone finishes.
  • Keep sealant lines in good condition: Perimeter and transition joints should be inspected, not ignored.
  • Don't drag heavy items across the floor: Chips usually come from impact, not normal foot traffic.
  • Clean standing water promptly: Especially near screens, doorways, and edges.

A well-built tiled floor shouldn't need constant attention. It should just perform.


If you're planning floor tiling melbourne work as part of a bathroom or ensuite renovation, Melbourne Tiling Services P/L can help with builder-led advice on tile selection, budgeting, waterproofing, and full project coordination across Melbourne and greater Victoria.