
If you're reading this after seeing a damp ceiling below your balcony, loose tiles at the doorway, or white chalky marks creeping across the grout, you're already past the cosmetic stage. Most leaking balconies in Melbourne don't fail because someone chose the wrong brand of membrane. They fail because the whole assembly wasn't assessed, detailed, drained, and finished as one system.
That's the part many owners only discover after paying for a balcony to be "waterproofed" once already. The tiles look new. The joints are fresh. Then winter arrives, water tracks into the room below, paint blisters, and everyone starts blaming the membrane. In practice, the actual fault often sits at the wall junction, the drain, the balustrade penetrations, the substrate, or the falls.
As a Melbourne Registered Builder, I've seen the same pattern in balcony repairs and in bathroom renovations. Water doesn't care which trade touched the job last. If the substrate moves, the flashing is wrong, the outlet isn't integrated, or the tiling team covers a membrane before it's ready, the leak returns. Waterproofing balcony areas properly is never a one-product decision. It's a building-envelope decision.
Table of Contents
- How to Properly Assess Your Balcony's Condition
- Choosing the Right Waterproofing System for Melbourne
- The Critical Steps of a Compliant Installation
- Why Properly Waterproofed Balconies Still Fail
- Tiling and Testing for a Bulletproof Finish
- Hiring a Licensed Expert vs a DIY Disaster in Melbourne
How to Properly Assess Your Balcony's Condition
A common Melbourne callout goes like this. The balcony was "waterproofed" a few years ago, the tiles still look serviceable, yet the ceiling below is stained and the door frame is starting to swell. In that situation, the membrane brand is rarely the first question. The primary question is where the assembly is failing. Movement, drainage, junctions, and termination details cause many of the leaks I see, and a surface-level inspection misses them.
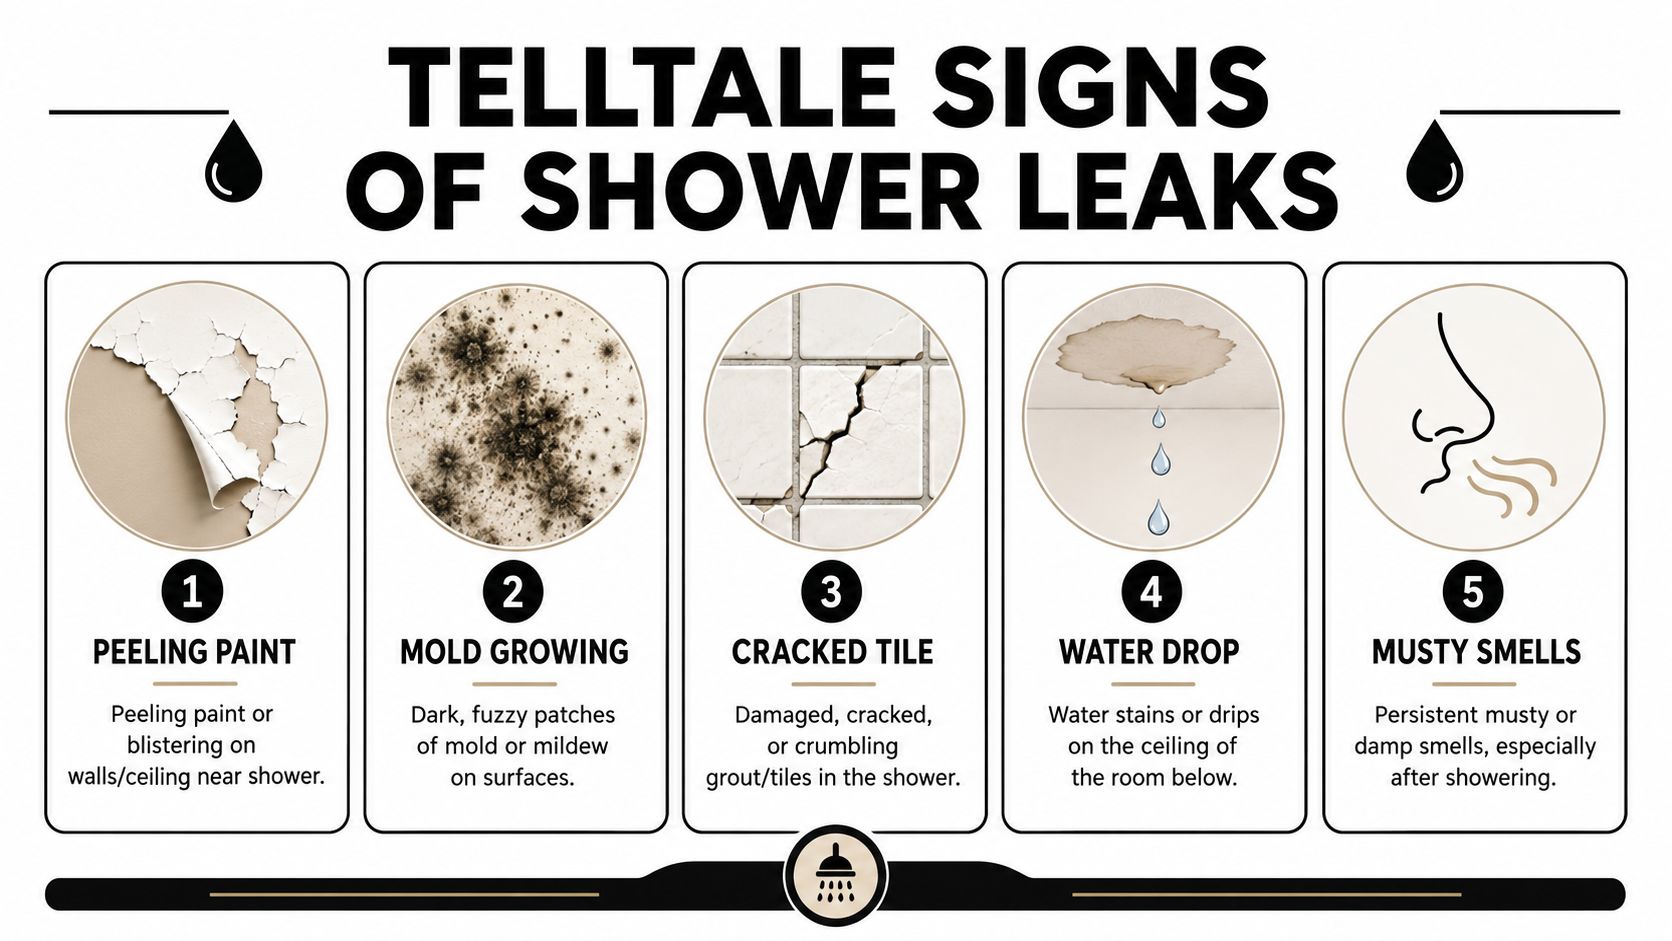
Start by reading the symptoms as a builder would, not as a painter or tiler would. Efflorescence on grout lines, tile edges, concrete soffits, or nearby walls means moisture is travelling through the build-up and evaporating at the surface. Drummy tiles matter too. A hollow sound often points to bond failure after water has sat beneath the finish or after the substrate has moved beyond what the tile system can tolerate.
Ponding is another giveaway. If water sits after rain, especially at corners, door thresholds, or around outlets, the balcony may have poor falls, blocked drainage, or a badly set outlet height. That is how a balcony can leak even after someone has applied a membrane. The water is still being trapped and pushed toward weak points.
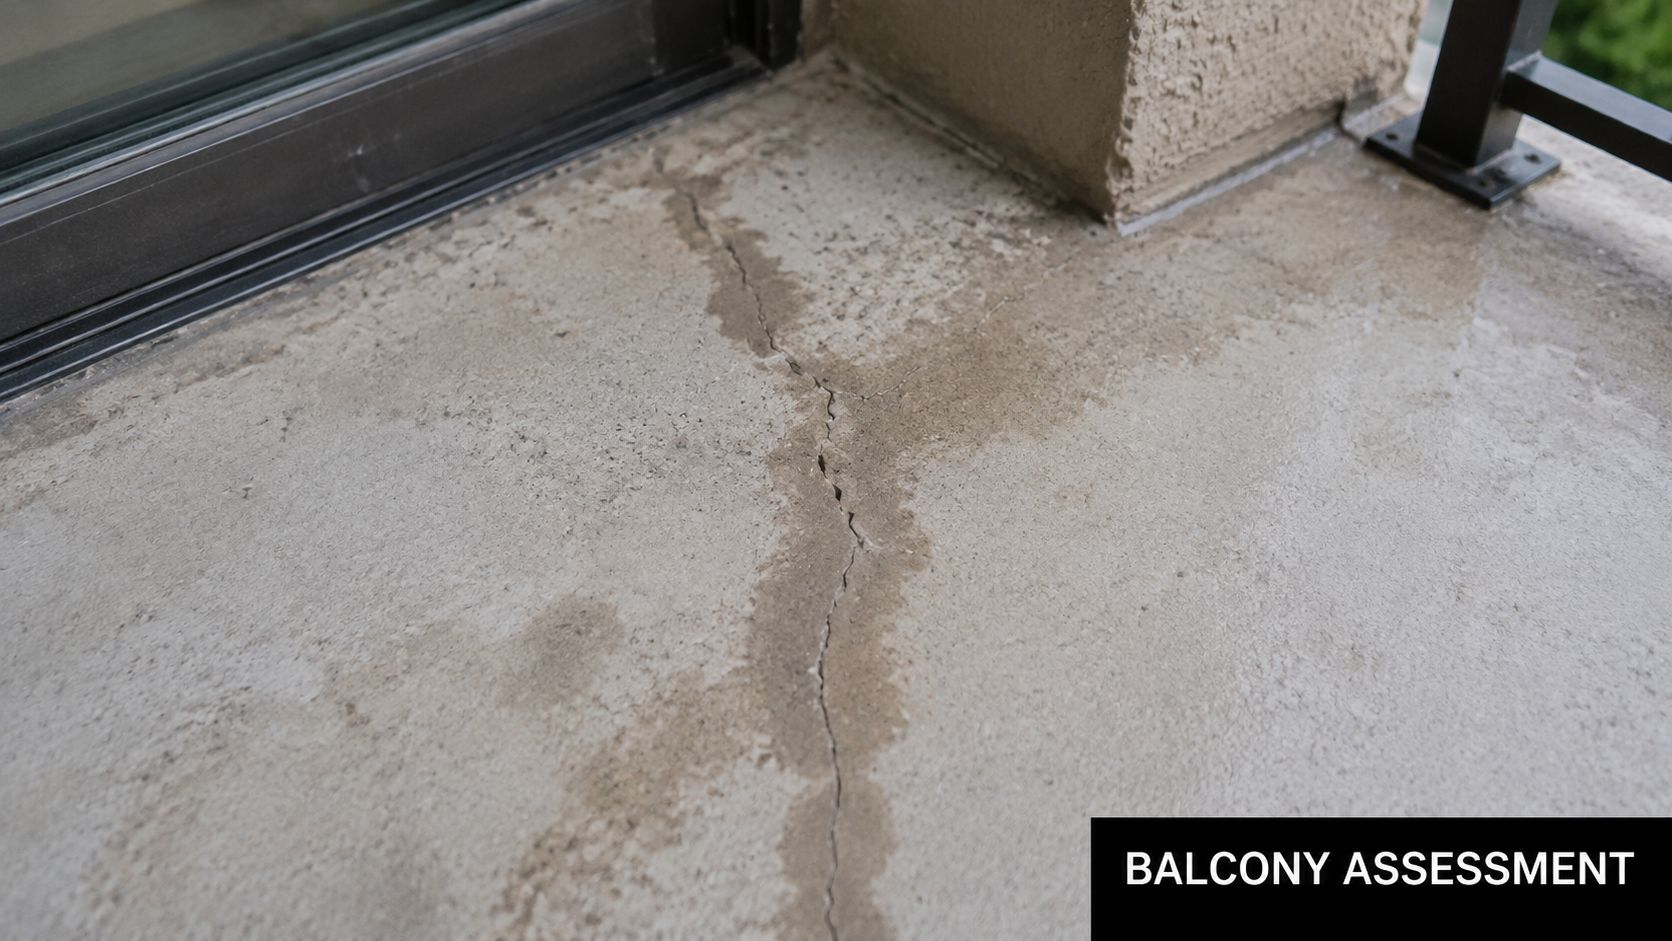
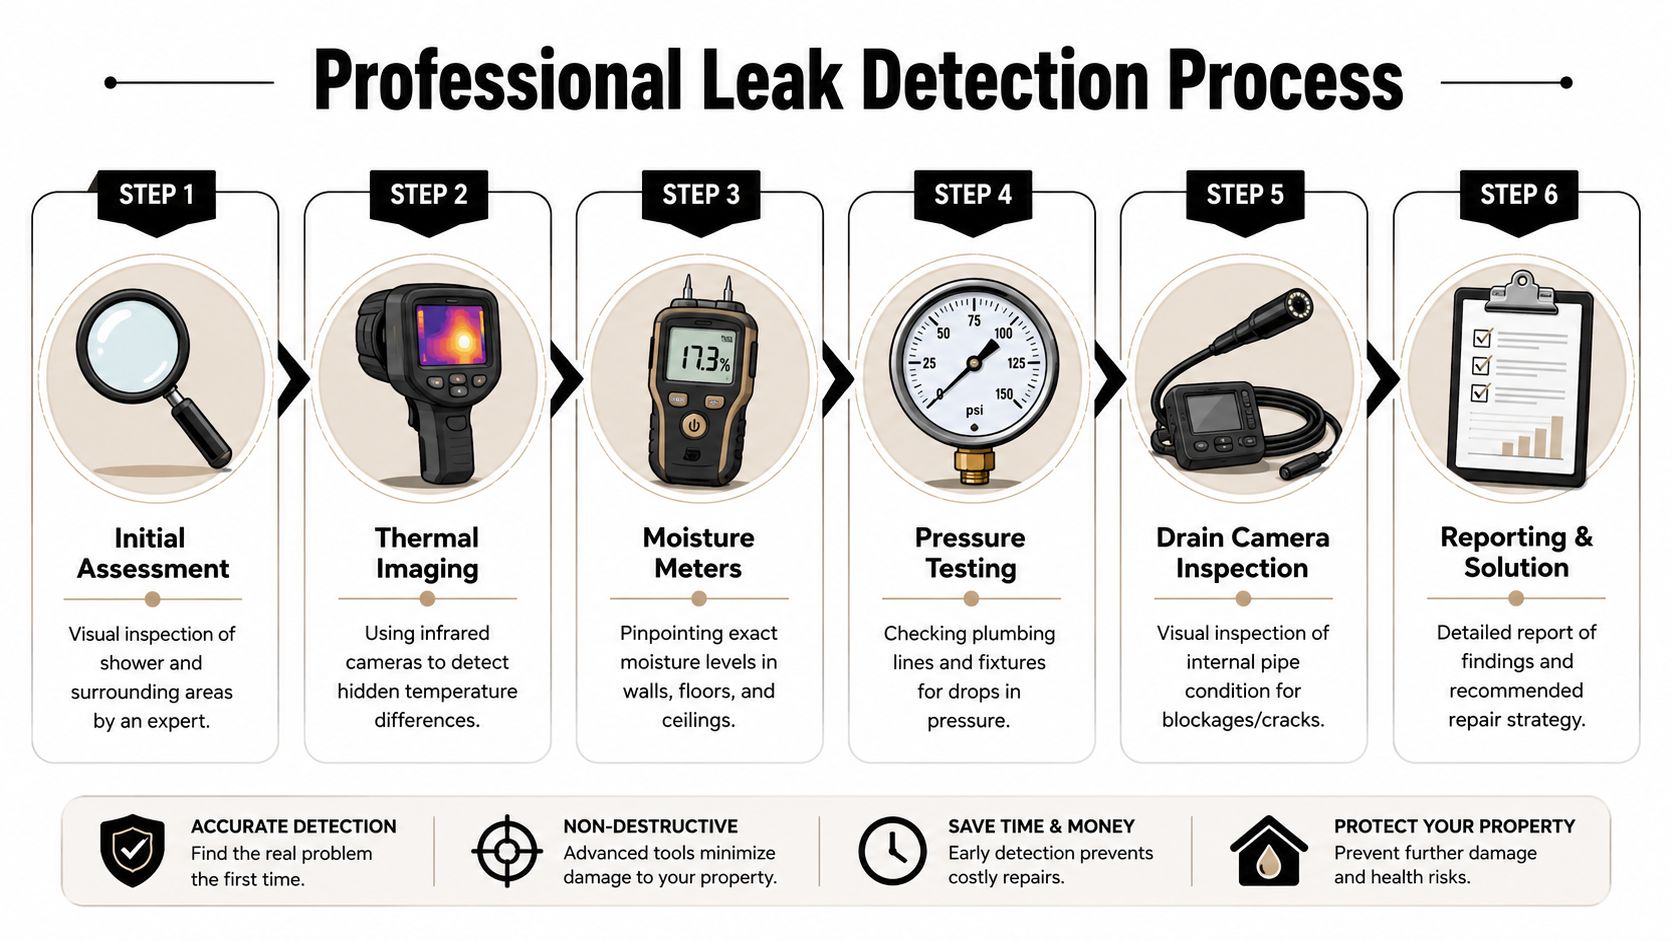
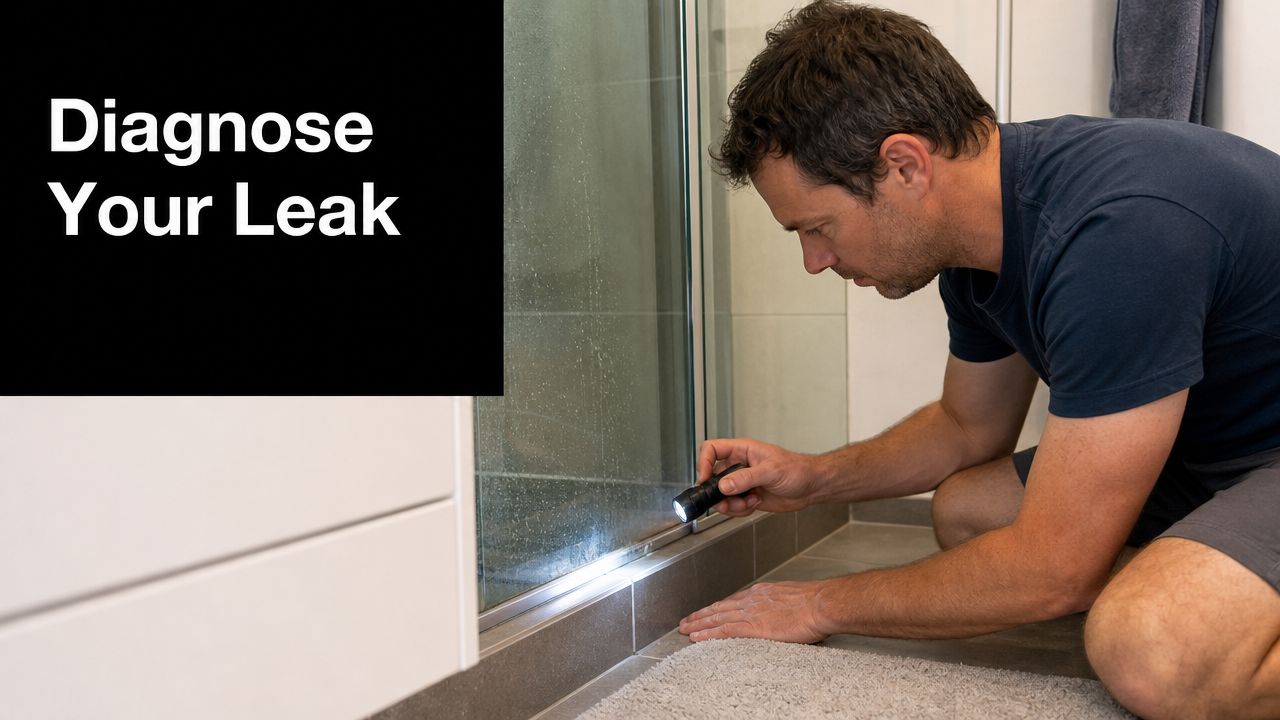
The inspection has to go beyond the walking surface. Check the soffit and the room below for staining, swollen plaster, mould, or peeling paint. Check the wall-to-floor junction, door threshold, balustrade posts or base plates, edges, and drip details. These are the spots where unqualified repairs usually fall short. A quick reseal over grout or a coating over old tiles does nothing if water is entering at a threshold, a cracked screed, or a poorly detailed penetration. If internal damage is already showing, arrange leak detection in Melbourne before approving any repair scope.
One rule saves a lot of money. Assess the whole system before touching the finish.
Separate surface wear from system failure
Some defects are maintenance issues. Others point to a failed assembly that needs demolition and rebuilding in line with Australian Standards, including AS 4654.1 and AS 4654.2. The skill is knowing the difference.
Warning signs that usually indicate more than cosmetic wear include:
- Recurring cracks in grout or tiles: Repeated cracking often points to structural movement, substrate deflection, or missing movement joints.
- Loose edge tiles, lifted trims, or failing balcony fronts: Perimeters cop a lot of water and movement. If the edge is failing, the detailing below it often is too.
- Persistent damp below the balcony: Water has usually passed the tile layer and is affecting the substrate, framing, soffit, or adjacent wall.
- Blocked, undersized, or badly integrated outlets: Drainage defects place constant pressure on the membrane and surrounding junctions.
- Sealant failure at doors and wall junctions: Once these interfaces open up, water tracks into the areas that are hardest to dry and hardest to repair.
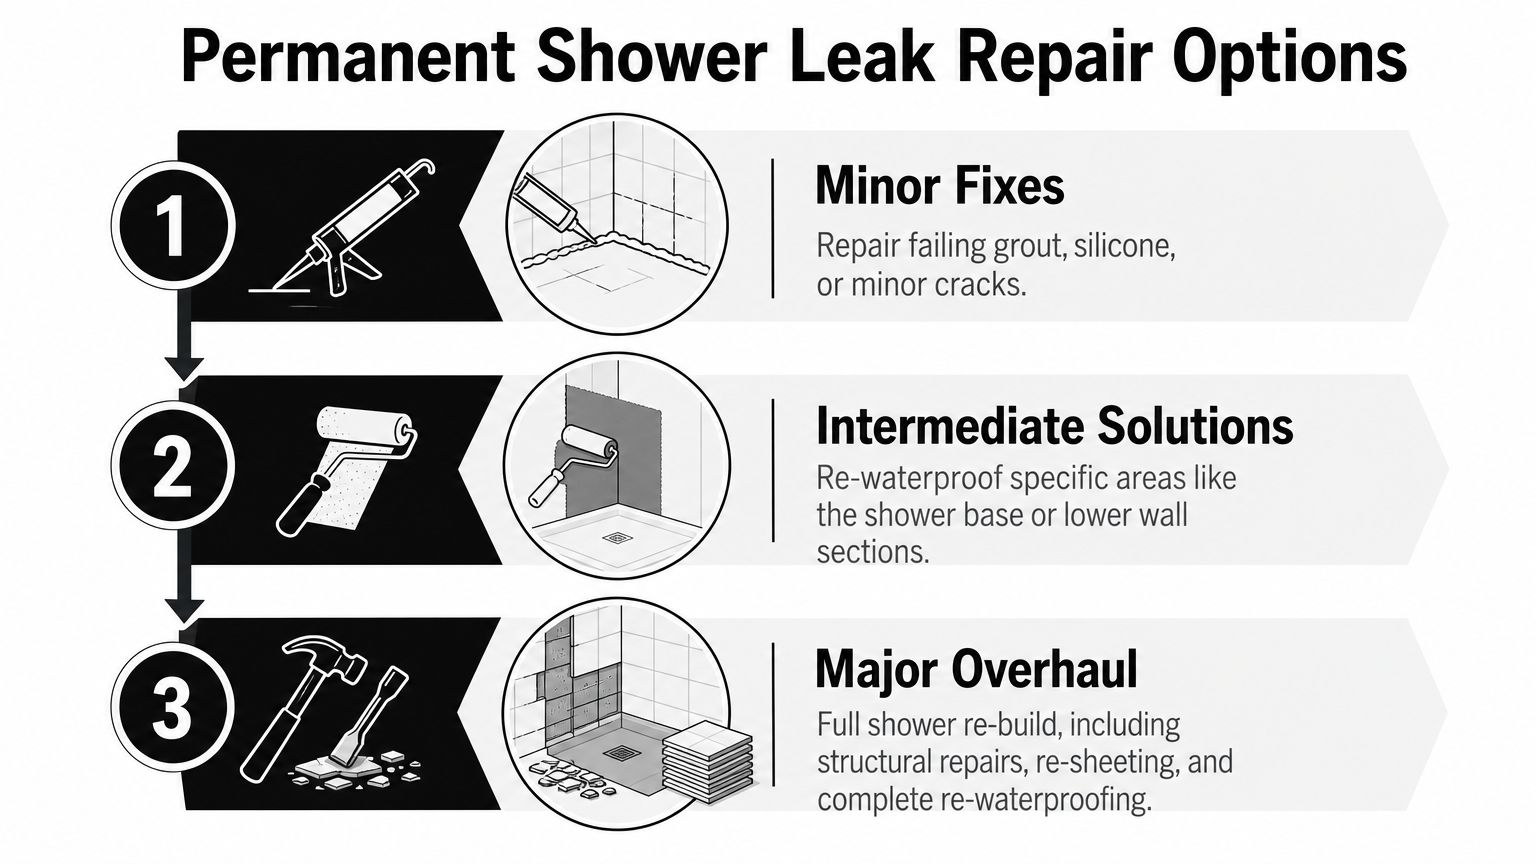
DIY repairs and cheap trade fixes often target the visible symptom. Regrout the tiles. Replace a bead of sealant. Roll on a coating. Those methods can tidy the surface, but they do not address falls, substrate cracking, membrane termination heights, outlet integration, or movement. As a Registered Builder, I treat a balcony with multiple symptoms as a building-envelope problem, not a tiling problem. The remedy may involve strip-out, substrate repair, re-screeding to correct falls, compliant waterproofing, flood testing, and only then re-tiling. That full sequence is what stops repeat leaks.
Choosing the Right Waterproofing System for Melbourne
The right system depends on the substrate, exposure, detailing complexity, traffic, finish requirement, and whether you're dealing with new work or remediation. Melbourne conditions make that choice more demanding because balconies cop wind-driven rain, temperature swings, and strong UV over time.
Compliance comes before product selection
In Australia, balcony waterproofing isn't just a product selection exercise. It must comply with AS 4654.1 and AS 4654.2, and cited Australian guidance notes that membranes used as part of external wall construction should terminate at least 150 mm above finished floor level, with balcony materials also needing to meet relevant fire-performance expectations in the cited guidance. The same guidance recommends inspecting balcony waterproofing and rainwater outlets twice yearly because these areas sit within the external envelope and are exposed to ongoing weather and UV stress, as outlined in this Australian best-practice waterproofing reference.
That requirement alone rules out a lot of casual repair methods. If someone suggests coating over the tile surface without dealing with upturns, terminations, outlets, thresholds, and interfaces, the job is already heading in the wrong direction.
For owners comparing systems, it helps to understand the trade-offs rather than chasing a miracle product. Melbourne projects often involve liquid-applied membranes, sheet membranes, or cementitious systems. The better question is whether the chosen system suits the substrate and detailing conditions. For a broader overview of waterproofing systems used in Melbourne projects, look at the whole build-up, not just the membrane label.
Balcony Waterproofing System Comparison
| System Type | Best For | Pros | Cons |
|---|---|---|---|
| Liquid membrane | Complex shapes, detailed junctions, renovations with multiple penetrations | Seamless application, good for irregular layouts, practical around corners and penetrations | Heavily dependent on substrate prep, coverage control, curing, and detailing discipline |
| Sheet membrane | Larger open areas, projects where consistent thickness is critical | Factory-made thickness, reliable for broad spans, useful where flat planes dominate | Junctions and laps need very careful execution, less forgiving on awkward geometry |
| Cementitious system | Specific concrete-based applications and selected remediation scopes | Compatible with some mineral substrates, useful in certain assemblies | Not a universal answer for every balcony, still depends on crack repair, detailing, and drainage |
What usually works and what usually doesn't
What works is a system matched to the actual balcony. Porous concrete and non-porous sheeted surfaces don't behave the same way, so primers and membranes need to be paired properly. Australian technical guidance also stresses that the substrate must be clean, dry, and sound before any membrane goes on. That applies just as much to balconies as it does to wet areas inside a home.
What doesn't work is selecting a membrane first and hoping the rest of the balcony adapts to it. That approach is common with DIY jobs and unqualified trades. They see a leak, buy a coating, and ignore the failed falls, the wall flashing, or the post penetrations. The balcony looks refreshed for a short period, then the same water path reappears.
A compliant balcony isn't defined by the bucket or the roll. It's defined by how the entire assembly sheds water.
The Critical Steps of a Compliant Installation
Most failed balcony jobs don't fail at the obvious stage. They fail earlier, when the substrate wasn't properly prepared, when details were left unresolved, or when the finish trade moved too quickly. A compliant installation has a sequence, and each part relies on the one before it.
Preparation decides the result
Surface preparation is where many DIY and low-cost jobs fall apart. Australian technical guidance is clear that adhesion failures often start with poor preparation. The surface must be confirmed as clean, dry, and sound, joints and penetrations must be treated before membrane application, and allowing a 48-hour weather buffer before starting is common field practice so moisture and rain don't compromise bond or curing, as described in this Australian substrate preparation guidance.
That means a proper installer doesn't just sweep the balcony and start rolling on product. The substrate gets inspected for contamination, laitance, cracks, hollows, weak patches, and movement. Unsound screed is removed. Cracks and gaps are repaired. Falls are checked. If the balcony needs grinding, patching, or corrective screeding, that happens first.
Details are where balconies are won or lost
Once the base is ready, the membrane system only succeeds if the details are resolved properly. Corners, wall-floor junctions, drain flanges, threshold transitions, movement joints, and balustrade penetrations all need deliberate treatment. That's where bond breakers, reinforcement bandage, compatible primers, puddle flanges, angle fillets, and flashing integration matter.
A professional sequence usually looks like this:
- Substrate correction first: Repair cracks, stabilise weak areas, and create proper falls if the balcony holds water.
- Primer matched to surface: The primer has to suit the substrate and membrane combination. Wrong pairing is a common cause of failure.
- Detail treatment before field coating: Corners, joints, and penetrations get reinforced ahead of the main membrane area.
- Drainage elements integrated early: Outlets, flashings, edge trims, and thresholds are set so the membrane can tie into them continuously.
- Membrane applied in controlled stages: Coverage is checked carefully instead of trying to rush the whole balcony in one pass.
- Protection before finishes: The membrane must be protected from damage by following trades during tiling or topping works.
For larger or more complex jobs, a Victorian waterproofing compliance certificate process can be part of the documentation trail owners should ask about.
If a penetration is added after the membrane goes down and nobody re-details it properly, the waterproofing system has already been compromised.
Curing, protection, and paperwork
A membrane that looks dry isn't always ready for the next trade. Installers need to respect manufacturer cure windows and site conditions. They also need to keep other trades off the surface or protect it properly. A dropped trowel, dragged tile stack, or rushed adhesive application can damage a sound membrane before the balcony is even finished.
Builder-led coordination matters. On balcony and bathroom renovations alike, sequencing avoids the classic handover dispute where every trade blames the one before. A compliant job leaves behind more than new tiles. It leaves behind evidence that the balcony was assessed, prepared, waterproofed, protected, and finished in the right order.
Why Properly Waterproofed Balconies Still Fail
The most frustrating balcony leaks are the ones that happen after the owner has already paid for waterproofing. In many of those cases, the membrane wasn't the actual weakness. The weak point was somewhere the eye doesn't go first.
The membrane isn't always the real problem
Australian technical commentary consistently points to junctions, penetrations, and drainage points as the main failure locations. It also makes a point many homeowners miss. Adding more membrane doesn't fix structural movement or incorrect slope. Those underlying issues have to be corrected first, as highlighted in this Australian commentary on balcony failure points.
That's why a balcony can leak even when the installed product itself is compliant. A few common examples:
- Wall interfaces fail: Water gets behind the system where the balcony meets the wall because the flashing or termination is wrong.
- Balustrade posts are the weak link: A post fixed through the waterproofing layer creates an obvious risk if the penetration wasn't detailed properly.
- Movement cracks open new paths: If the substrate or structure moves, the stress often shows up at corners, joints, or edges.
- Poor falls keep water in the wrong place: A membrane under constant ponding pressure is being asked to do more than it should.
- Drainage details are incomplete: The outlet might exist, but the membrane isn't properly tied into it.
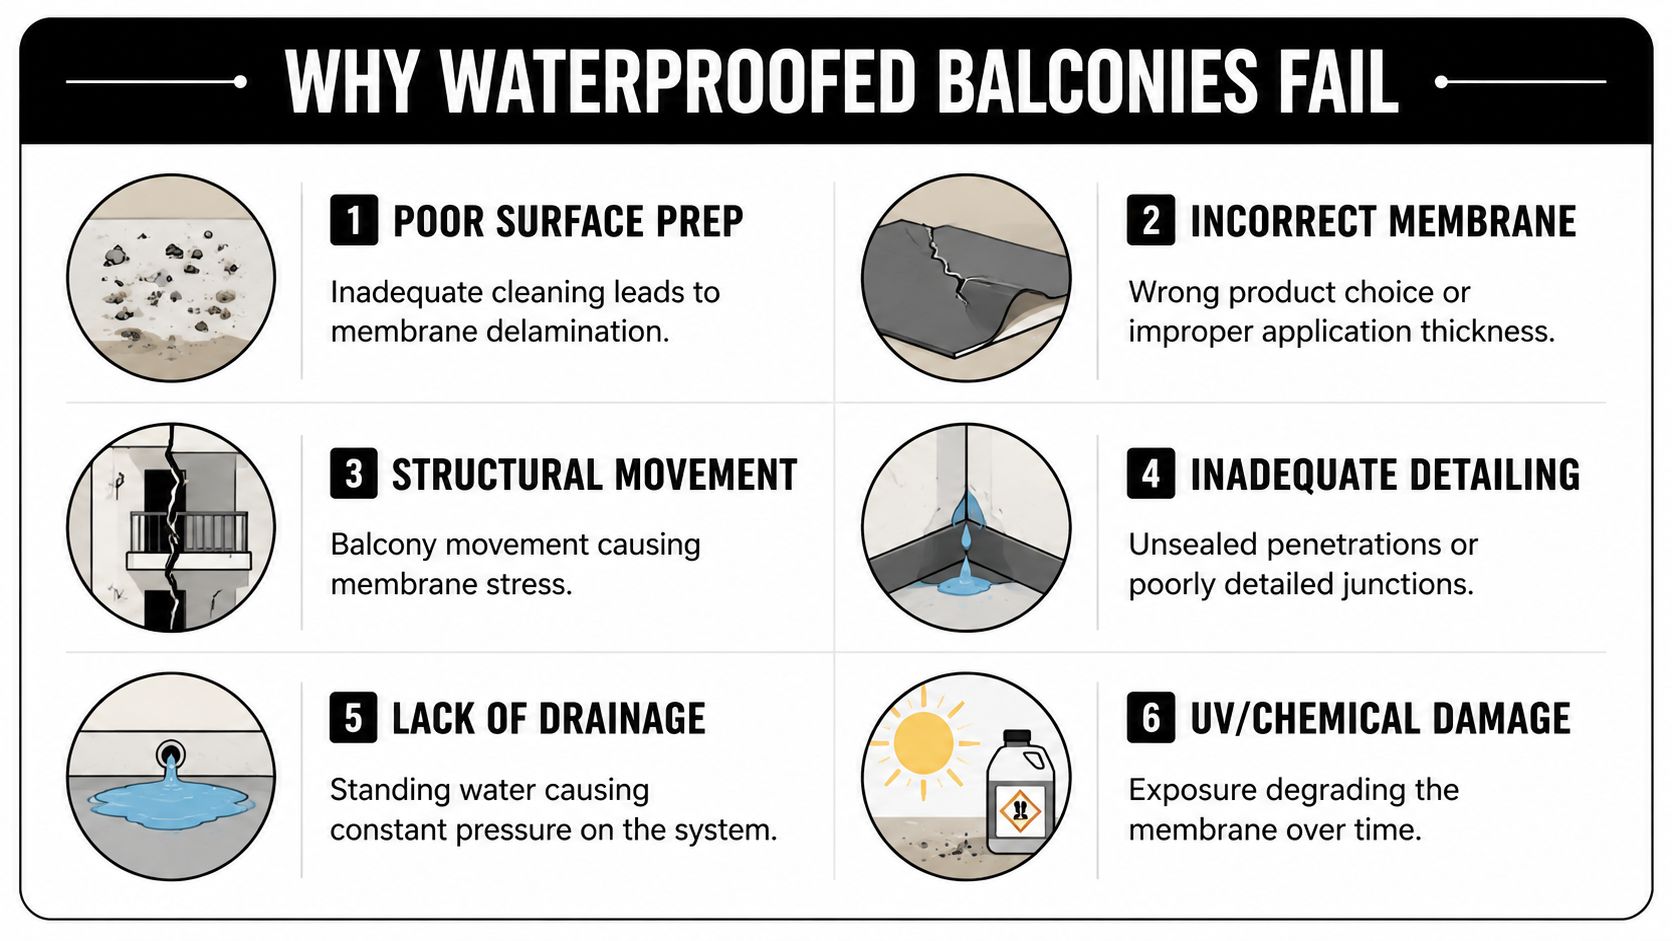
When a contractor looks only at the visible surface, these causes get missed. A Registered Builder looks at the assembly as a whole. That often changes the remedy from "apply another coat" to "remove the finish, correct the falls, repair the flashing, then rebuild the system properly."
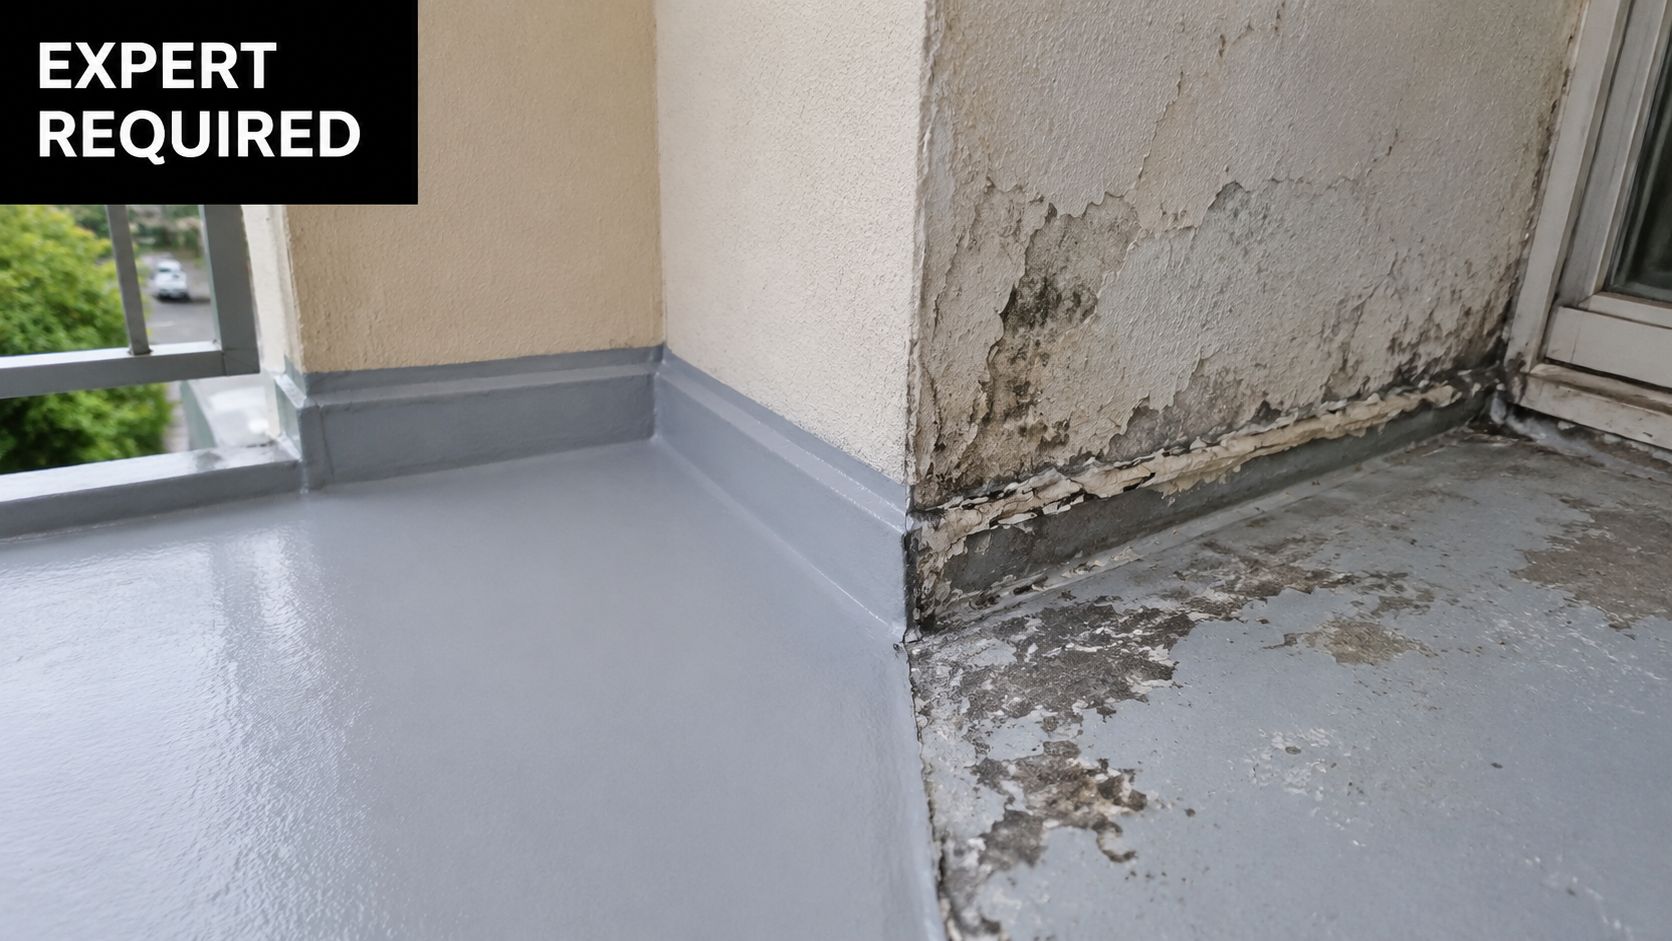
Why overlays over old tiles often disappoint
Waterproofing over existing tiles sounds attractive because it appears faster and less disruptive. Sometimes an overlay system can be viable. Often it isn't. The issue isn't whether an overlay product exists. The issue is whether the existing tiles, screed, bond, falls, and drainage can support a compliant new system.
If the old balcony has ponding, drummy tiles, trapped moisture, cracked screed, or failed edges, covering it can lock defects into the build-up. The leak path may shift rather than disappear. Owners then end up paying for demolition later, after already paying once for the shortcut.
A balcony can be freshly coated and still be fundamentally wrong underneath.
This is the point many unqualified trades miss. They treat waterproofing balcony work like painting. It isn't. It's remediation of an exposed structural surface over occupied space.
Tiling and Testing for a Bulletproof Finish
A balcony can look finished on Friday and leak by the first decent rain if the membrane was tiled over too early, damaged during installation, or locked under a tile bed that cannot cope with movement. I see that sequence often in Melbourne remedial work. The failure is then blamed on the membrane product, even though the underlying problem sits in the handover between waterproofing, testing, and tiling.
Testing before the tiles go down
Once the membrane has cured in line with the manufacturer's requirements, it needs to be inspected before any adhesive goes on. That means checking corners, upturns, puddle flanges, door thresholds, terminations, and any patched areas. Small defects at this stage are still easy to fix. After tiling, they are expensive to find and harder to prove.
Where the system and site conditions allow it, flood testing is a practical way to confirm the membrane is holding water and draining as intended. It can expose pinholes, weak junctions, and areas where detailing looked acceptable dry but fails under standing water. On a balcony over habitable space, that test is worth doing properly.
Patience matters here. A membrane that feels dry to the touch is not always ready for traffic, adhesive, or trapped moisture above it.
Tiling has to work with the waterproofing below
The tile finish is part of the weather-exposed assembly. If the tiler treats it as a cosmetic layer only, the waterproofing below is put at risk from day one. Exterior balconies in Melbourne move with temperature changes, moisture, and normal building settlement. The tiling system has to allow for that movement, not fight it.
Good practice includes:
- Using exterior-rated compatible materials: Adhesive, grout, primer, sealant, and tile type need to suit the substrate, the membrane, and external exposure.
- Protecting the membrane during tiling: Dropped tools, ladders, sharp tile edges, and stacked materials can puncture or bruise a cured membrane before the finish is even laid.
- Keeping movement joints clear and correctly located: If a tiler bridges control joints or fills movement joints with rigid materials, cracking usually returns through the tiled surface.
- Maintaining drainage through the finish: Adhesive build-up, poor tile selection, or bad set-out around outlets can reduce falls and create ponding that should have been avoided.
- Finishing perimeters and penetrations properly: Balconies often leak at edges, balustrade bases, and threshold interfaces where the tile work looks neat but the waterproofing continuity has been compromised.
In balcony waterproofing, a lot of DIY jobs and unqualified trade-led jobs frequently come undone. The membrane may be compliant on paper, but the balcony still fails because the tiling stage ignored movement, blocked drainage, or damaged a detail that was already doing a hard job. A bulletproof finish comes from treating assessment, membrane installation, testing, and tiling as one controlled build sequence, not four separate tasks.
Hiring a Licensed Expert vs a DIY Disaster in Melbourne
A leaking balcony often pulls in more than one trade. You may need demolition, substrate repair, screeding, waterproofing, carpentry, plumbing attention to outlets, and then external tiling. That's exactly why these jobs go wrong when owners hire individual trades without anyone taking responsibility for the full sequence.
Why builder oversight matters
A tiler can lay tiles. A waterproofer can apply a membrane. A plumber can deal with outlet components. But once the balcony needs diagnosis, demolition decisions, fall correction, flashing review, and coordination between trades, a Registered Builder is often the person who can hold the whole job together.
That matters even more when owners ask whether they can waterproof over existing tiles. Industry guidance on remediation notes that this is only viable when the existing tiles, screed, and slope are sound. Where ponding or extensive cracking is present, partial demolition and re-profiling are commonly required before a compliant new system can be installed, as discussed in this balcony remediation guidance for tiled substrates.
In practice, builder oversight reduces a common problem. One trade says the leak is in the grout. Another says it's in the flashing. Another says the membrane failed. A builder looks at all of it, works out the sequence, and makes sure the remedial scope matches the cause.
For owners comparing providers, Melbourne Tiling Services P/L is one example of a contractor that combines tiling, waterproofing, screeding, and registered builder oversight for renovation and leak-rectification work. That's relevant on balconies for the same reason it matters in bathroom renovations. The wet-area risk sits across multiple trades, not one.
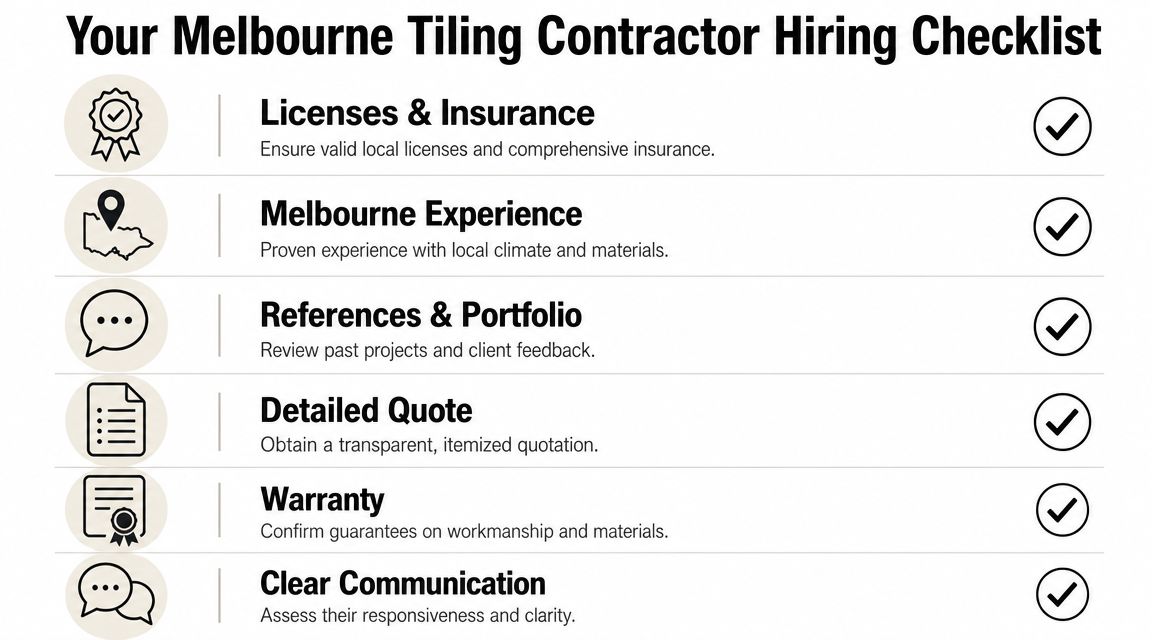
What to ask before you hire anyone
Use a short checklist before signing anything:
- Ask who is responsible for the full scope: If screeding, waterproofing, tiling, and rectification are split between unrelated subcontractors, ask who carries final accountability.
- Ask how they assess overlays versus demolition: Anyone who recommends coating over old tiles without discussing slope, substrate soundness, and trapped moisture is skipping the hard part.
- Ask about standards and documentation: They should be comfortable discussing Australian Standards, membrane compatibility, detail treatment, and completion records.
- Ask how they sequence trades: A good answer should include substrate prep, membrane curing, protection, and final finishes.
- Ask about similar leak rectification work: Balcony remediation is different from simple external tiling.
The video below gives useful context on what professional balcony work should look like when failures have already appeared.
DIY balcony waterproofing usually fails for the same reason cheap repair scopes fail. They focus on the surface symptom and ignore the build-up underneath. By the time water shows inside, the job has already moved beyond a weekend coating fix.
If you need practical advice on a leaking or ageing balcony, Melbourne Tiling Services P/L can help assess whether the issue is a surface repair, a drainage and detailing defect, or a larger remediation job involving screeding, waterproofing, and re-tiling under registered builder oversight.


Recent Comments