
You're probably at the point where the bathroom looks worse before it looks better. Old tiles are out, the floor feels uneven underfoot, and every showroom visit makes it easy to focus on colour, pattern and finish. That's normal. It's also where plenty of bathroom renovations go off track.
Bathroom floor tiling isn't just about what you see on the surface. In a Melbourne home, a tiled bathroom floor only performs properly when the subfloor, screed, falls, waterproofing, adhesive and movement detailing all work together. If one layer is wrong, the prettiest tile in the room won't save the job.
Homeowners usually start with tile choice. Registered builders start lower down. They ask whether the floor is stable, whether the falls can be formed properly, whether the waterproofing detail will comply, and whether the selected tile suits the room and substrate. That is the correct order of work if you want a bathroom that looks sharp on handover and still performs properly years later.
Table of Contents
- Choosing the Right Bathroom Floor Tiles
- The Critical Foundation Below Your Tiles
- Waterproofing Your Melbourne Bathroom to Code
- The Tiling Installation Process From Start to Finish
- Costs and Timelines for Melbourne Bathroom Renovations
- Long-Term Care and When to Call for Remediation
- Start Your Bathroom Renovation with Confidence
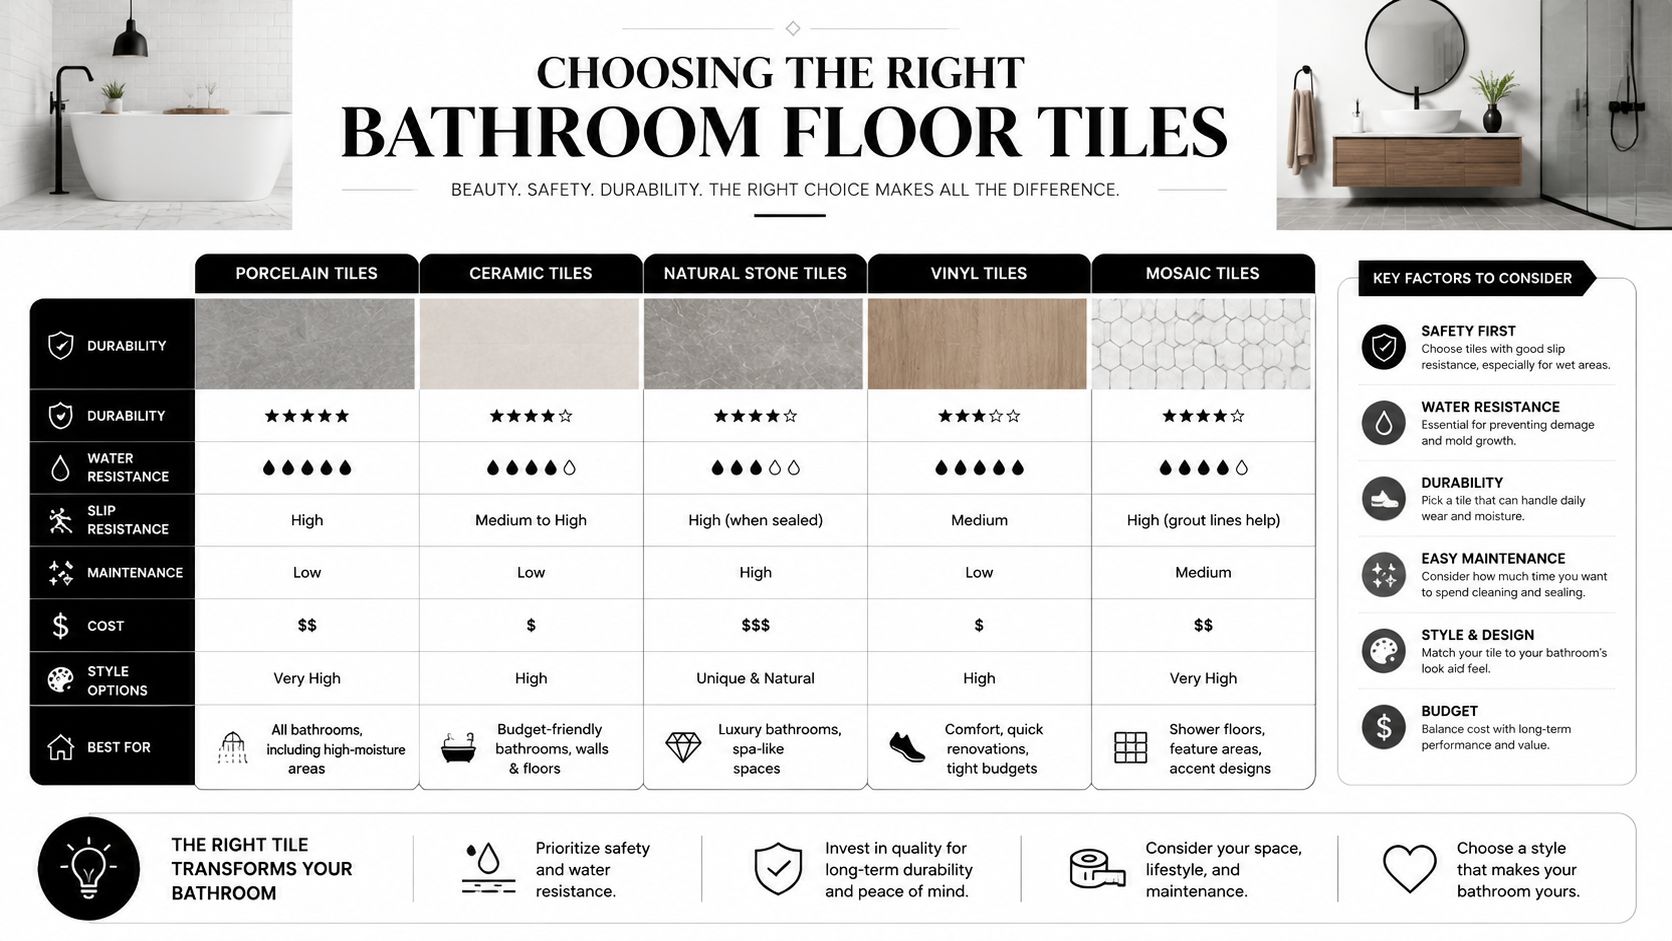
Choosing the Right Bathroom Floor Tiles
The tile is the part you'll notice every day, but the right choice starts with safety and suitability. In Australia, bathroom floor tiling should be specified around the wet-area slip-resistance benchmark in AS 4586, not just the tile's appearance. For internal wet areas such as bathroom floors, a common practical target is at least P3, as explained in this guide to choosing the right floor tile.
Start with grip, not colour
A bathroom floor gets wet. That sounds obvious, but plenty of selections are still made as if the room were a dry hallway. The safest bathroom floors usually combine a textured matt finish, sensible tile sizing, and good drainage. Smaller mosaics can help with traction because they create more grout joints underfoot. Large glossy tiles can look clean in a showroom and feel risky in a real shower area.
Practical rule: If a tile looks slippery when it's dry, don't expect it to behave better when soap and water hit it.
Slip resistance also works together with the rest of the floor build-up. A compliant waterproofed floor with poor falls is still a problem. A grippy tile over a badly prepared substrate is still a problem. Good bathroom floor tiling is always a system.
What different tile types do well
Homeowners in Melbourne usually compare a small group of materials.
| Bathroom Floor Tile Comparison | Best For | Durability | Maintenance |
|---|---|---|---|
| Porcelain | Family bathrooms, ensuites, heavy daily use | High | Low |
| Ceramic | Budget-conscious bathrooms with straightforward layouts | Good | Low to moderate |
| Natural stone | Premium bathrooms where appearance is the priority | Good, but depends on stone | Higher |
| Mosaic | Shower floors and smaller wet zones needing more grip | Good | Moderate |
| Large-format tiles | Contemporary bathrooms with minimal grout lines | Good, but installation-sensitive | Low to moderate |
Porcelain is usually the practical workhorse. It suits busy bathrooms, it's consistent, and it's available in finishes that can meet wet-area slip requirements.
Ceramic can work well in many domestic bathrooms, particularly where the budget is tighter and the room isn't asking the tile to do too much visually or structurally.
Natural stone such as marble gives a high-end finish, but it asks for more care. It's less forgiving on maintenance, and the selection has to be made carefully for a wet floor.
Large-format tiles look excellent in modern bathroom renovations, but they're less tolerant of imperfect floors. If you're considering slim-profile panels or oversized porcelain, it helps to understand the installation demands before you buy. This overview of large-format tiles gives a good sense of where they work and what they require.
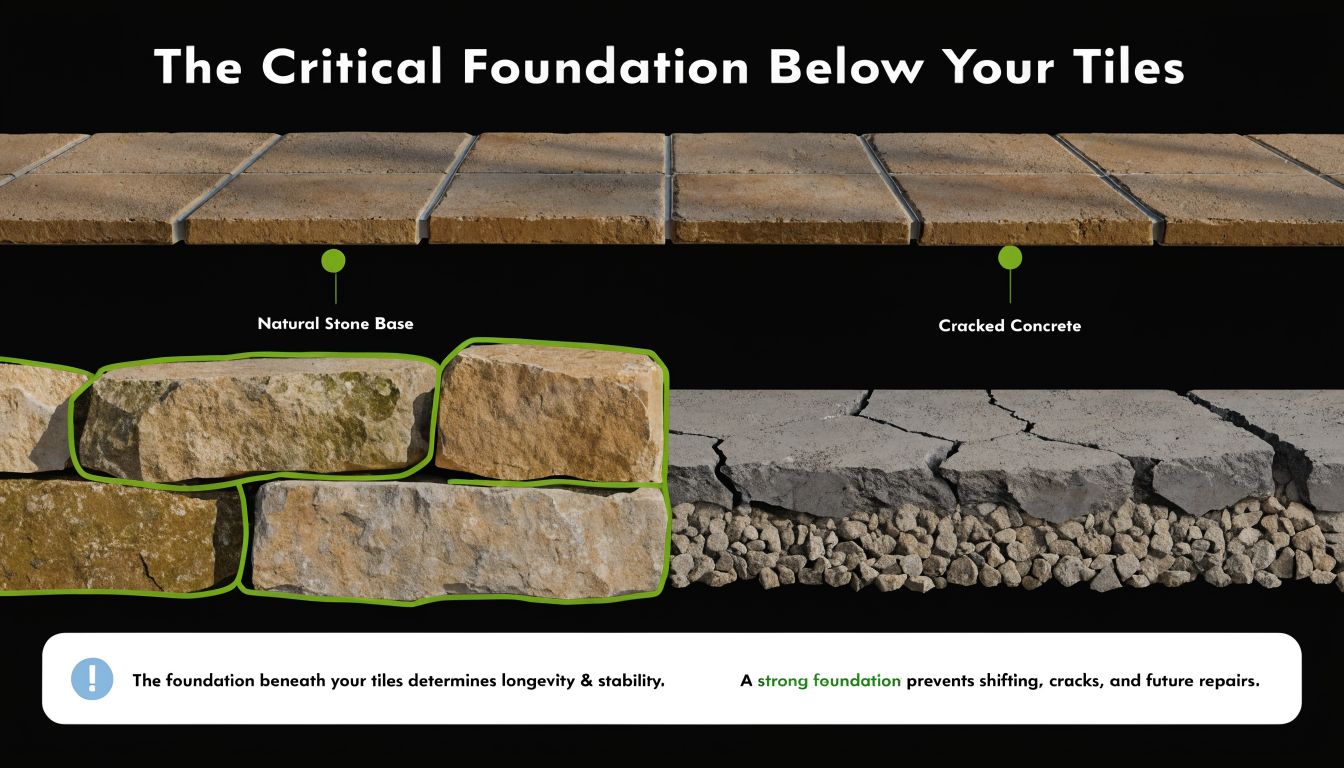
The Critical Foundation Below Your Tiles
Most failed tile jobs don't start with the tile. They start underneath it.
That's the part homeowners rarely see once the renovation is finished, but it's the part that decides whether the floor feels solid, drains properly and stays crack-free. If the substrate is uneven, weak, damp, moving, or out of level, the tile layer above it inherits every one of those problems.
Why the floor prep decides the result
Think of the substrate the same way you'd think about a house footing. You can spend money on finishes, but if the base is wrong, the finish won't stay right for long.
In bathroom renovations, the common trouble spots are familiar. An old timber floor has too much movement. A slab has dips and high points. Previous renovation work leaves patches, adhesive residue or weak areas. The room might also need falls corrected so water moves to the waste instead of sitting in corners.
Australian practice places real weight on this stage. A common but critical question for Victorian renovators is whether screeding or self-levelling is needed before tiling. The answer is often yes, because AS 3958.1 places heavy emphasis on substrate flatness and stability, especially for large-format tiles that show every imperfection, as noted in this article on uneven tile in bathroom renovations.
When screeding and self-levelling are needed
Screeding is used when the floor needs shape, especially falls to the waste. It creates a stable mortar bed and gives the tiler something consistent to work over.
Self-levelling compounds are used when the floor needs flatness more than slope correction. They're useful for smoothing out local irregularities before tile goes down.
A builder or tiler might recommend one, both, or neither depending on the room. What matters is the diagnosis. A lot of bad bathroom floor tiling comes from skipping that step and trying to fix a structural or substrate issue with adhesive thickness alone.
- Use screeding when the room needs corrected falls, a shower recess needs forming, or the floor plane is broadly wrong.
- Use self-levelling when the floor is structurally sound but locally uneven and needs flattening for tile installation.
- Pause the tiling altogether when the floor needs structural repair first. That might mean strengthening timber, replacing damaged sheet flooring, or resolving movement before any wet-area build-up starts.
A perfectly laid tile on a poor base is still a poor job. It just takes longer to reveal itself.
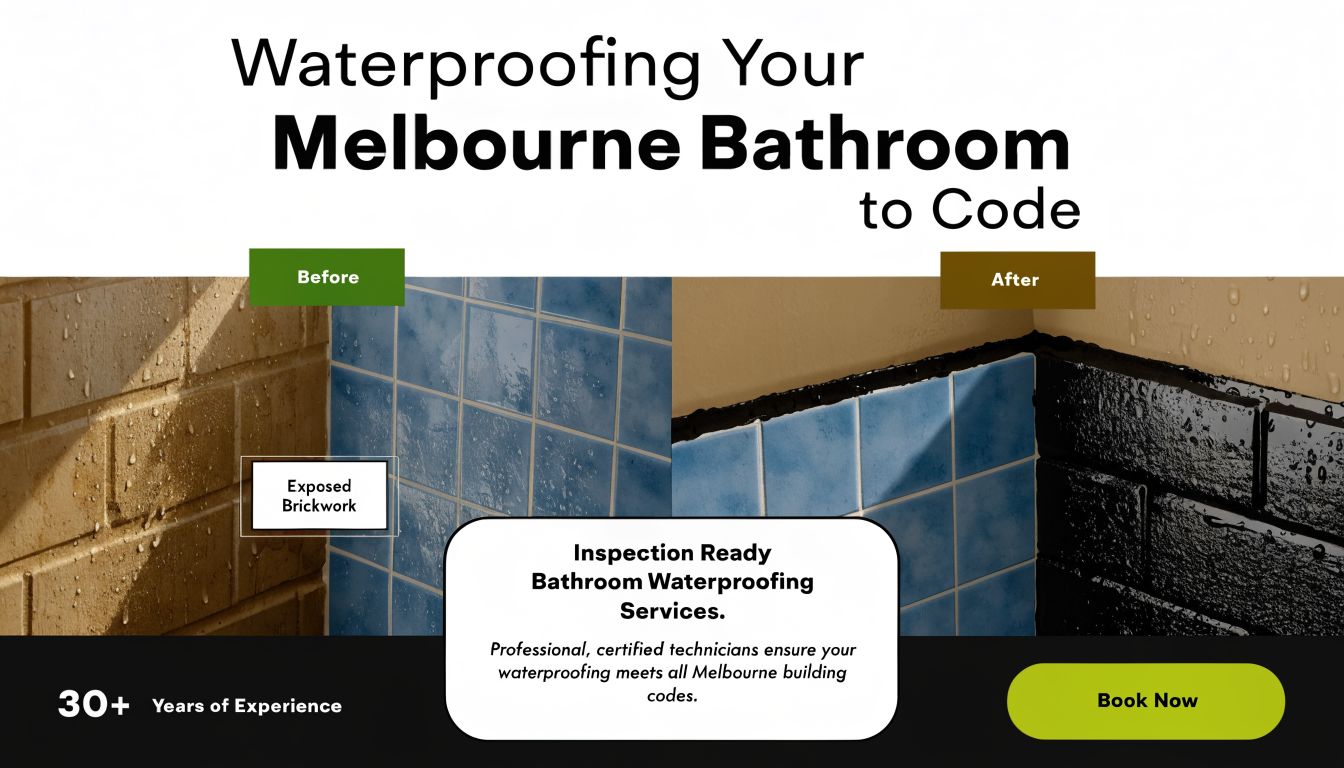
Waterproofing Your Melbourne Bathroom to Code
If there's one part of bathroom floor tiling that should never be treated as a shortcut, it's waterproofing. Homeowners often focus on visible finishes because that's what they live with day to day. The structure below the tile doesn't get the same attention until a leak shows up in the hallway, the ceiling below, or the skirting outside the bathroom.
What the membrane actually does
The modern benchmark in Australia changed significantly with AS 3740:2010, which standardised waterproofing requirements in domestic wet areas. It requires specific membrane coverage and detailing to prevent water ingress, which is treated as a leading cause of internal building damage in Australia in this discussion of the history of tile flooring and wet-area standards.
That matters because the tile and grout aren't the waterproof layer. The membrane is. The tiled finish above it takes wear, cleaning and foot traffic. The membrane below it protects the structure.
A compliant bathroom floor build-up usually includes prepared substrate, any required screed, the waterproofing membrane, and then the tile assembly above. Junctions, floor-to-wall transitions, penetrations and shower areas need the right detailing. This isn't decorative work. It's protective work.
Why registered builders matter
Registered builders add real value in bathroom renovations through this specialized expertise. The job isn't just to lay tiles. It's to manage the wet-area construction properly, coordinate the right licensed trades, and make sure the sequence is correct from demolition to certification.
If you're trying to understand what proper documentation and sign-off look like in Victoria, this overview of a waterproofing compliance certificate in Victoria is useful. It explains the compliance side that many homeowners only discover after asking for proof late in the project.
- Bad waterproofing hides well at first. The bathroom can look finished and still be vulnerable.
- Repairs are rarely local. Once water gets past the system, remediation often means removing tiles and rebuilding layers.
- Cheap shortcuts are expensive later. Saving money on membrane work usually shifts the cost into leak detection, demolition and reinstatement.
The Tiling Installation Process From Start to Finish
A professional installation rarely begins with opening adhesive bags. It starts with checking the room, confirming dimensions, reviewing the set-out and making sure the floor is ready to receive tile. That's especially important in a bathroom where one crooked line at the doorway can make the whole room feel off.
Layout comes before glue
Good layout work isn't about making every room perfectly centred. In many Melbourne bathrooms, especially older homes with alcoves, nib walls or off-square entries, the smarter decision is to protect the most visible sightline.
For odd-shaped bathrooms, the first decision isn't just visual layout but how to manage cuts at doorways and waterproofing upturns. The aim is to start from a focal point so the most visible lines, such as the threshold, stay clean, even if that means sacrificing a perfectly centred pattern elsewhere, as discussed in this guide to tiling floors in irregularly sized rooms.
That planning usually covers:
- Entry view: what you see first when the bathroom door opens
- Perimeter cuts: whether tiny slivers will appear at walls, nibs or the vanity line
- Drain location: whether the tile size and pattern work with the waste position
- Fixtures: how the floor lines relate to the toilet pan, vanity and shower screen
The cleanest bathrooms usually don't come from the most symmetrical plan. They come from the smartest compromise.
Setting, curing and finishing
Once the layout is locked in, the installer selects the adhesive to suit the tile type, format and substrate. Large-format porcelain doesn't get treated the same way as a small mosaic floor. Natural stone may need different handling again.
Tiles are then bedded carefully, aligned, checked for lippage and kept consistent across changes of plane. After that, the floor needs curing time. Rushing this stage causes trouble. Walking on fresh work too early, grouting too early, or loading the room with other trades before the bond is ready can undo good installation.
A registered builder coordinates all of this with plumbing, electrical, shower screen measuring and extras such as under tile heating for bathroom renovations. That coordination matters because the bathroom isn't a tiling job in isolation. It's a sequence of trades that need to hand over cleanly.
Costs and Timelines for Melbourne Bathroom Renovations
A bathroom can look like a simple tile update until the old floor comes up. Then the actual cost shows itself. Out-of-level sheeting, water-damaged framing, poor falls, and patchwork repairs are what push budgets and timelines off track in Melbourne bathrooms.
That is why the finish should never be priced in isolation. Floor tiling sits inside a renovation sequence that often includes demolition, plumbing, electrical, carpentry, substrate repairs, waterproofing, screeding, glazing, painting and final fit-off. The tile is visible. The work underneath determines whether the result lasts.
What changes the cost
Cost usually rises with preparation, detailing and coordination.
A straightforward bathroom with a stable substrate and standard porcelain tile is one price. A bathroom that needs floor correction, shower recess work, under-tile heating, stone, large-format tiles, or difficult drainage detailing is another. The labour is heavier, the set-out is tighter, and the margin for error is smaller.
These items commonly push the budget up:
| Cost factor | Why it matters |
|---|---|
| Substrate repair | Damaged or moving floors need correction before tiling |
| Screeding or levelling | The room may need falls or flattening before tile installation |
| Waterproofing detail | Complex shower areas and transitions require more labour |
| Tile format | Large-format and premium materials need tighter execution |
| Layout complexity | More cuts, awkward edges and drain work take more time |
| Trade coordination | Full bathroom renovations involve multiple licensed trades |
For a full bathroom renovation, Melbourne Tiling Services P/L notes a typical median project cost around $10,000 in its planning material. Use that as a rough reference only. Some bathrooms stay close to that range. Others climb quickly once remedial work, compliance upgrades, premium finishes, or structural corrections are included.
Small rooms can be deceptive. They often cost more per square metre because every junction matters, access is tighter, and there is less room to hide bad planning.
What affects the timeline
Timelines follow condition and sequencing more than room size. I have seen compact bathrooms take longer than larger ones because the base was out of tolerance and several trades had to return in the right order.
A realistic program usually allows for:
- Demolition and strip-out
- Subfloor assessment and repairs
- Screeding or levelling where required
- Waterproofing and curing
- Tiling and adhesive cure time
- Grouting, sealing and fit-off by other trades
Curing time is where schedules often go wrong. Adhesives, screeds, waterproofing membranes and sealants all need their proper window. If the job gets rushed to save a day or two, the risk of bond failure, cracked grout, trapped moisture or remedial work goes up.
If you want an early budget figure, a renovation calculator can help with planning. Site inspection is still what confirms scope. That is how you separate a cosmetic tile replacement from a bathroom that needs proper preparation, code-compliant waterproofing, and repairs before a single new tile goes down.
Long-Term Care and When to Call for Remediation
A newly tiled floor doesn't need fuss, but it does need sensible care. Most long-term problems come from neglected joints, harsh cleaning, movement underneath the floor, or a leak that went unnoticed for too long.

Simple maintenance that protects the floor
The day-to-day routine should be uncomplicated.
- Use pH-neutral cleaners: They're less likely to damage grout, sealers or stone finishes.
- Keep water moving: Wipe down standing water if the room stays damp for long periods.
- Check silicone joints: Junctions around the shower, wall base and fixtures should stay intact.
- Watch grout condition: Cracking, powdering or persistent discolouration usually means something needs attention.
If the floor is natural stone, the maintenance approach may be a bit stricter. If it's porcelain, the routine is usually simpler. Either way, cleaning should support the finish, not strip or etch it.
Signs the floor needs attention
Small symptoms often show up before major failure.
Large-format tiles are especially unforgiving here. Per AS 3958.1, deviations in the subfloor can telegraph through the tile, creating lippage and stress points that lead to cracks, which is one reason professional remediation is often required, as outlined in this article on ceramic tile installation standards and flatness.
Watch for these warning signs:
- Loose or drummy tiles: The bond may be failing.
- Cracked grout lines: Movement can be transferring into the tile field.
- Lippage that seems to worsen: The substrate may be shifting or the original prep may have been poor.
- Musty odours or staining outside the bathroom: Water may be escaping the wet area.
- Repeated silicone failure: There may be movement or moisture pressure behind the joint.
If one tile cracks, that might be local damage. If joints, tiles and seals start failing together, treat it as a system problem.
That's the point to bring in someone who can diagnose the cause, not just patch the symptom.
Start Your Bathroom Renovation with Confidence
The main lesson with bathroom floor tiling is simple. The finish only performs as well as the build-up below it. Homeowners see the grout lines, tile colour and pattern. Registered builders look at structure, flatness, falls, waterproofing, movement and sequencing because that's what keeps the floor sound.
A durable bathroom floor isn't produced by one good decision. It comes from a chain of good decisions made in the right order. Choose a tile that suits a wet floor. Prepare the substrate properly. Form the falls correctly. waterproof to code. Use the right adhesive and movement detailing. Then allow the installation to cure and finish properly before the room is handed over.
That's why bathroom renovations work better when one accountable party manages the process. Instead of having separate trades make isolated decisions, registered builders can coordinate the demolition, plumbing, electrical, waterproofing and tiling so the room is built as one system. That reduces guesswork and helps avoid the common situation where everyone blames the layer before them.
If you're planning a new ensuite, updating a tired family bathroom, or dealing with a floor that has already started to fail, start with the parts that matter most. Ask what condition the subfloor is in. Ask how the waterproofing will be handled. Ask who is responsible for compliance. Those questions will tell you more about the likely result than any tile sample board ever will.
If you're planning bathroom floor tiling and want the whole renovation considered properly, Melbourne Tiling Services P/L can help you organise the next step. You can book a free, no-obligation quote, request 3D drawings to visualise the layout, or use the online renovation calculator to map out budget and scope before work begins.
Write a Comment