Marble Floor Tiles Matt Guide for Melbourne Bathrooms

You might be standing in a half-finished Melbourne bathroom right now, trying to decide whether the floor should gleam like a showroom or feel calmer, safer, and easier to live with. That choice gets more complicated when the tiles are marble, because the finish changes how the room looks, how it feels under wet feet, and how the work needs to be handled by your builder.

Marble floor tiles matt sit in that sweet spot between luxury and practicality. In Australia, the domestic consumption of marble and travertine reached 810,000 tons in 2024, valued at $195 million AUD, with matte finishes increasingly favoured for their slip resistance in wet areas like bathrooms and ensuites (IndexBox market overview). For Melbourne homeowners, that means the finish isn't just a style choice, it's part of the safety and renovation conversation.

Table of Contents

Introduction to Matte Marble Floor Tiles

Sarah and Tom had just finished their ensuite, and the first thing they noticed wasn't the vanity or the tapware. It was the floor. Their builder had suggested a softer marble finish instead of a glossy one, and once the bathroom filled with daylight, the difference was obvious, less glare, calmer tone, and a more grounded feel underfoot.

That reaction is common. People often fall in love with marble for its natural movement, then realise the finish changes the whole room. Matt marble tiles don't shout for attention, they allow the stone's natural character to emerge, which is why they suit bathrooms where comfort, safety, and restraint matter just as much as appearance.

The market data backs up the wider shift in demand for marble materials, including floor tiles across residential and commercial spaces in Victoria and nationwide. When you're planning a bathroom renovation, that matters because your tile choice affects not only the visual outcome but also the materials your registered builder needs to specify, install, seal, and sign off correctly.

If you're weighing up finishes, start with the basics, then let the bathroom do the talking. A wet-zone floor needs to look good on day one and still make sense after daily use, cleaning, and winter mornings.

Understanding What Matt Marble Floor Tiles Are

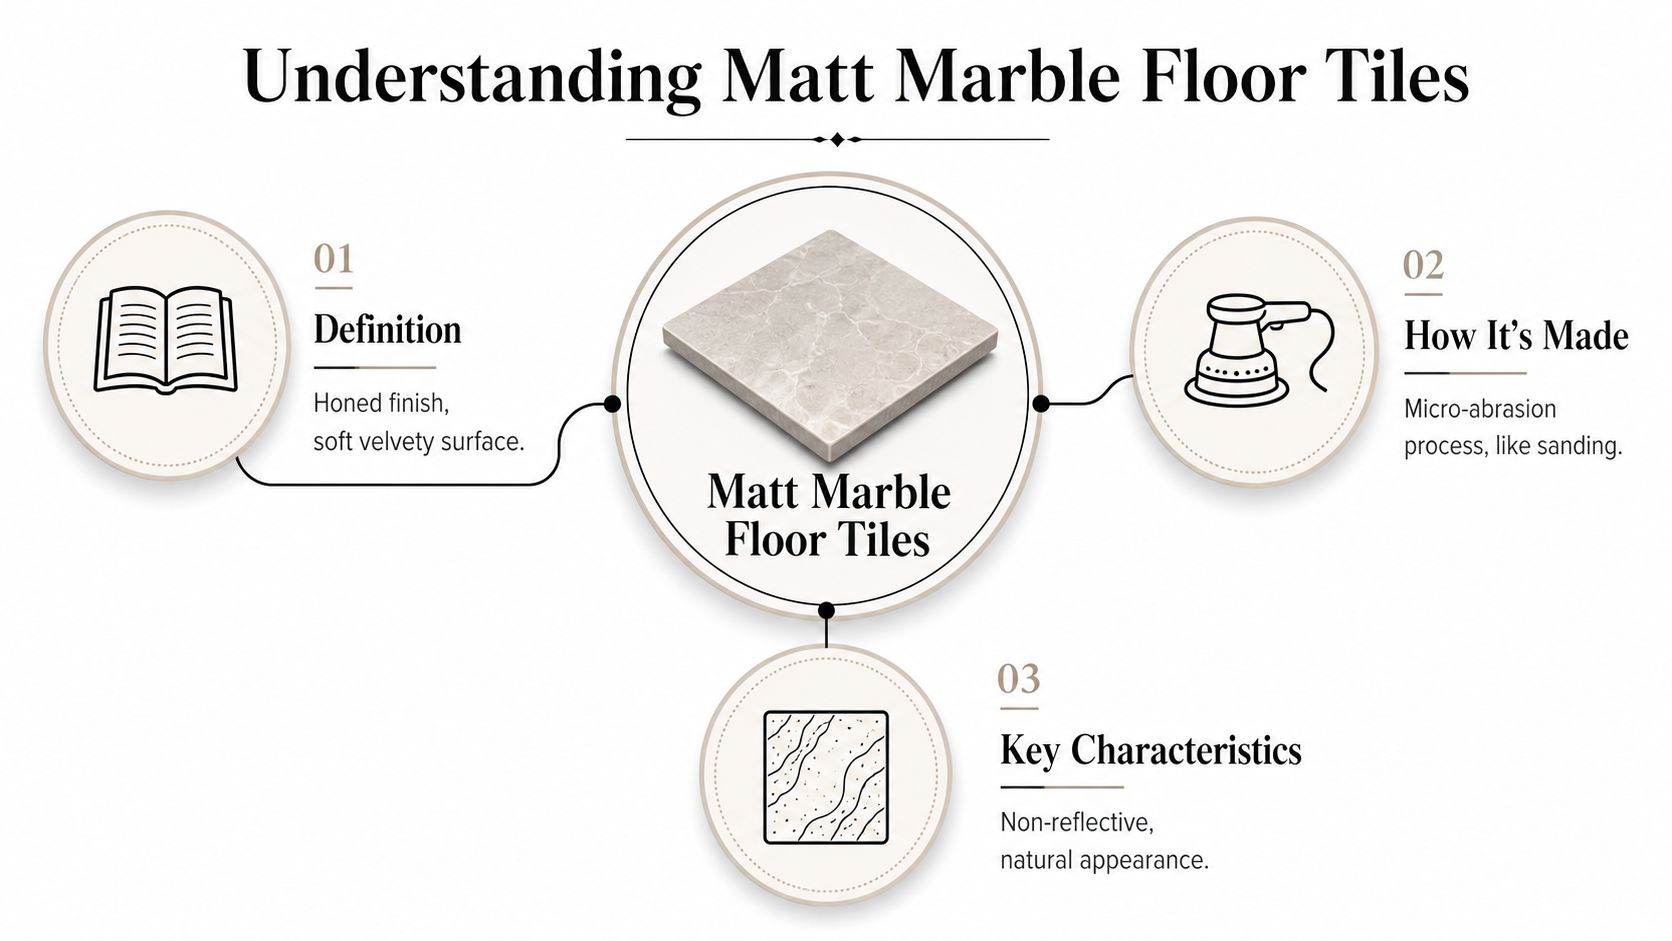
Matt and honed are often used for the same kind of finish, and in practical conversation they usually point to a surface that has lost the mirror-like shine of polished stone. Much like sanding raw timber, the wood doesn't become fake; it just becomes softer to the eye and easier to live with.

An infographic explaining the definition, manufacturing process, and key characteristics of matt marble floor tiles.

The finish comes from micro-abrasion, where the stone's surface is gently worked so it scatters light rather than reflecting it sharply. That creates the velvety look many Melbourne homeowners want in bathrooms, because it reads as natural rather than glossy, and it tends to hide the busy visual noise that polished stone can throw back at you under bright downlights.

How the surface changes the room

The main effect is visual comfort. A matt surface reduces glare from windows, mirrors, and ceiling lights, so the floor feels more settled. That's especially useful in en suites and compact bathrooms where every shiny surface can add to the sense of crowding.

The term also covers how the room feels emotionally. A polished floor can feel formal and dramatic, while a matt floor usually feels softer and more grounded. That's one reason people compare it to honed timber, it still has character, but it doesn't try to dominate the room.

What to ask before you buy

If you're shopping in Melbourne, ask whether the tile is a matt marble finish or a marble-look porcelain product. Both can work well, but they behave differently in installation and maintenance.

Practical rule: ask for the tile's finish description, its cleaning requirements, and whether it's meant for floor use in a wet area before you commit.

For local examples and product categories, this Melbourne marble tile resource can help you see how the finish sits within a broader bathroom design context. The key is to judge the tile by how it will function in your room, not just by how it looks under showroom lighting.

Comparing Matt and Polished Finishes

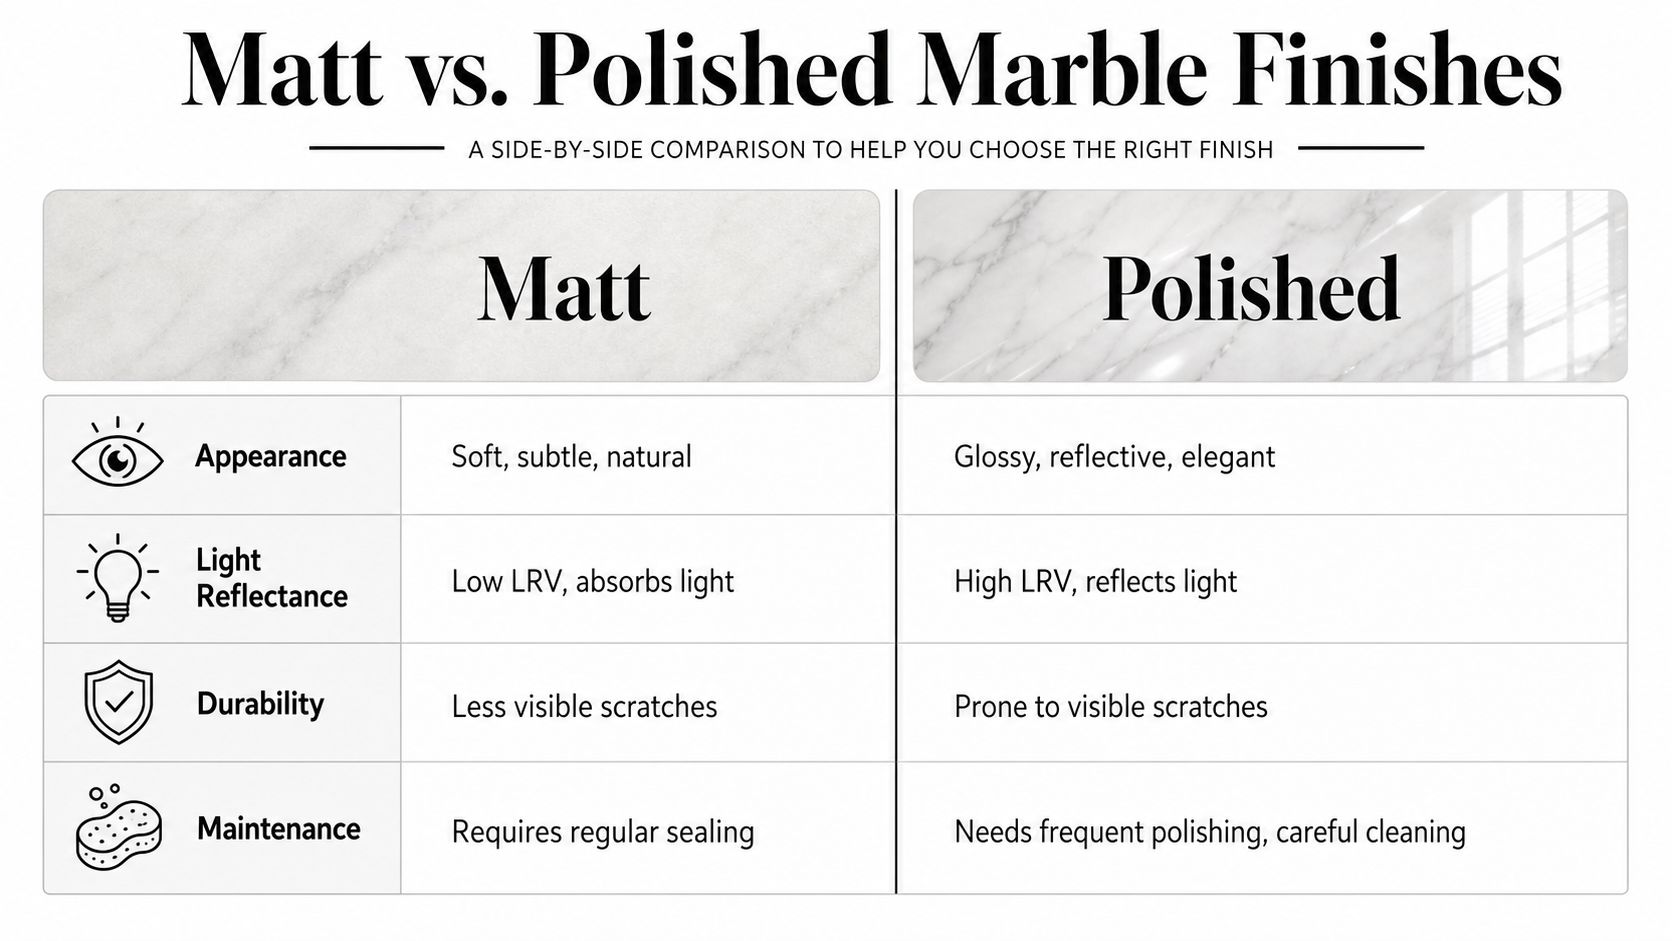
A glossy marble floor makes a strong first impression. It reflects light, highlights veining, and can make a bathroom feel formal or high-end. A matt floor does something different, it calms the room, softens contrast, and keeps attention on the texture of the stone rather than the shine.

A comparison chart outlining the differences between matt and polished marble finishes regarding appearance, light, and maintenance.

The biggest technical divide is reflectance. True matt-finish marble floor tiles in Australia typically exhibit an LRV between 5% and 15%, while polished marble can exceed 30% LRV, which means the polished surface bounces much more light back into the room (WD Tiles). That difference sounds abstract, but in a bathroom it changes how every towel, tap, and shadow reads against the floor.

Appearance and mood

Matt marble gives you a quieter palette. It suits bathrooms where you want the floor to frame the vanity, bath, or shower screen without competing for attention. Polished marble is more theatrical, and that can work beautifully in the right space, but it tends to announce itself first.

Wear, cleaning, and daily life

Matt surfaces usually hide small scuffs and incidental marks more easily because they don't catch every reflection. Polished stone can look spectacular when freshly cleaned, but once water spots, streaks, or surface wear appear, you notice them faster.

A recent Melbourne ensuite project I reviewed in design terms, not as a published case study, used matt marble on the floor and a brighter wall finish above. The result felt balanced, because the floor anchored the room while the walls kept it lively. That's the kind of split many architects prefer when the client wants softness underfoot without losing visual energy.

Choosing by user needs

If the bathroom is used by children, older adults, or anyone who values a more forgiving floor surface, matt usually makes more sense. If the space is a display bathroom with minimal wet traffic and a strong preference for gloss, polished may still fit.

A good tile choice should suit the person using the room every day, not just the photo you'll take after installation.

For a closer look at bathroom tile categories and layout ideas, the porcelain bathroom tile guide is a useful comparison point when you're deciding whether a marble-look or natural marble route is better for your budget and maintenance tolerance.

Safety and Slip Resistance in Wet Zones

Bathroom floors expose weak tile choices quickly. A tile that looks calm and elegant in a showroom can feel very different once water, soap, and steam are part of everyday use. That is why matt marble floor tiles are discussed as much for safety as for appearance.

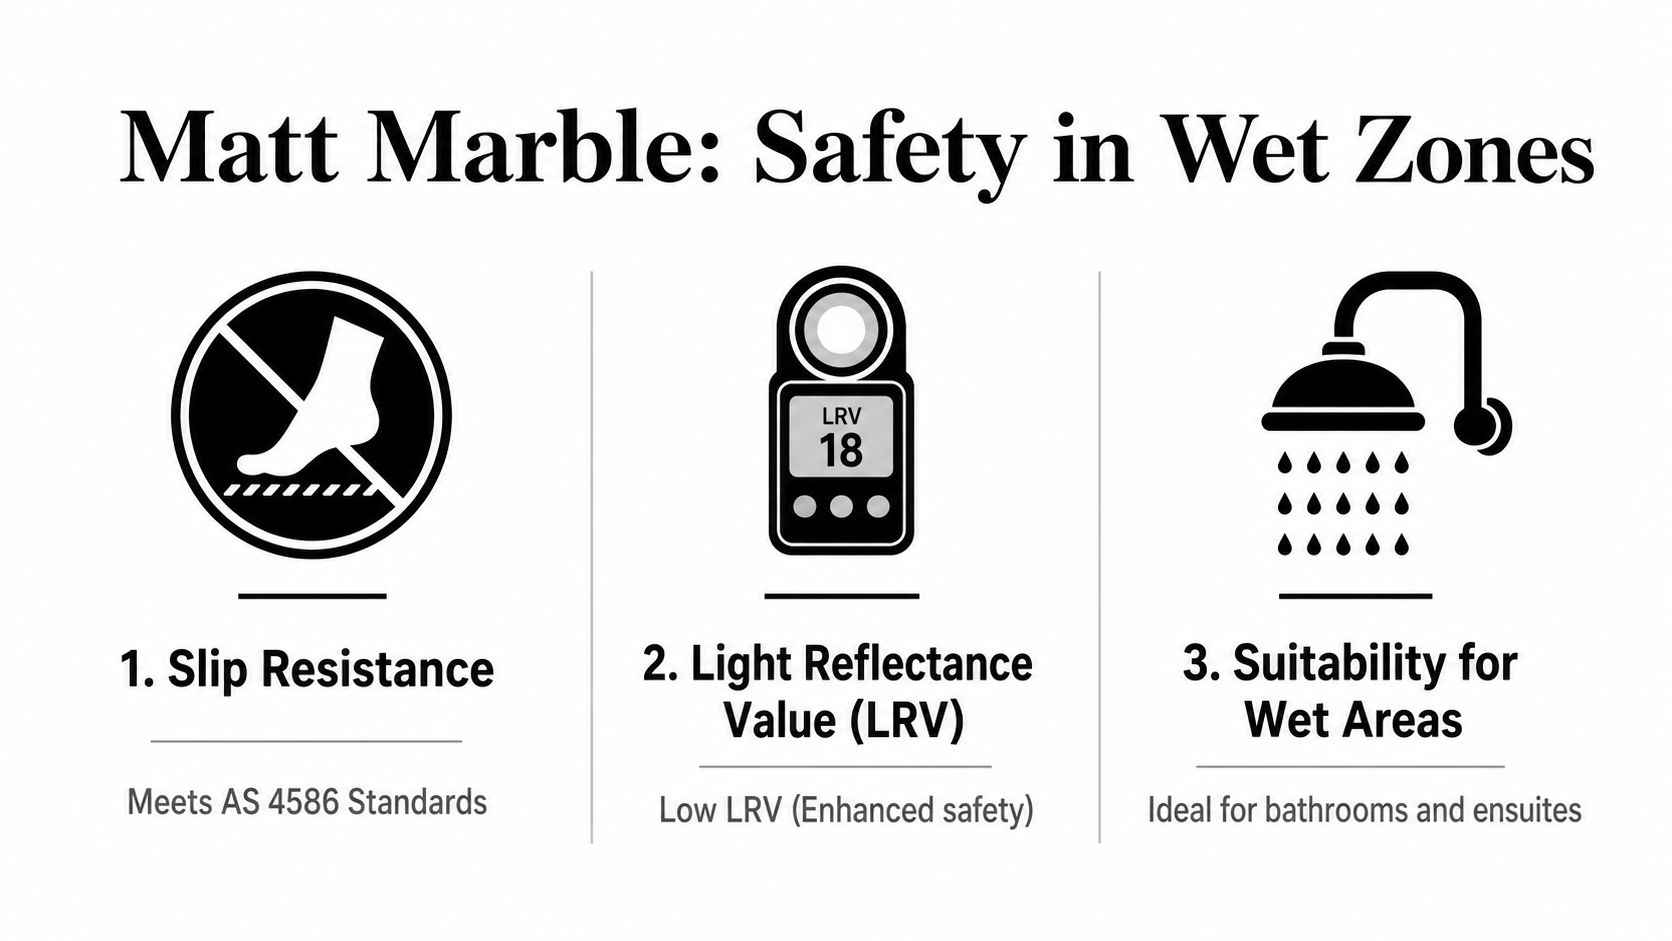
A graphic explaining the safety features of matt marble, highlighting slip resistance, light reflectance, and wet area suitability.

A matt surface reduces glare, so the floor reads as calmer and less shiny under bathroom lighting. That lower reflectance can help a wet room feel less visually slippery, which is one reason matt finishes are often preferred in practical wet zones. The point is not that the tile alone makes a bathroom safe. It is that the finish supports the overall safety of the room.

Why texture matters

A matt finish uses a fine surface texture that scatters light and gives the foot a little more purchase than a highly reflective surface. That matters when the floor is damp, your hands are full, or steam has softened visibility in the room. In Melbourne bathrooms, where family members often want a floor that feels forgiving without looking rough, that added surface control can make daily use easier.

The finish also needs to be considered alongside Australian slip-resistance expectations under AS 4586 and the wet-area requirements in the NCC waterproofing provisions. In a shower zone, or anywhere the floor is regularly exposed to water, the tile choice cannot be judged on appearance alone. It has to be checked as part of the full system, including substrate preparation, waterproofing, and drainage fall.

For a broader look at tile categories and bathroom layout ideas, the porcelain bathroom tile guide is useful when you are comparing a marble-look option with natural marble for maintenance and budgeting.

What to verify before you order

  • Ask for the slip data: The tile should come with technical information showing it suits wet-area use.
  • Read the surface description carefully: Matt, honed, textured, and anti-slip do not always mean the same thing, so check the specification sheet rather than relying on the brochure.
  • Confirm the installation plan: Even a better-performing tile still depends on proper substrate preparation, waterproofing, and drainage fall.

A secure-feeling surface is only one part of the decision. The installer still has to match the tile to the room conditions, and that is where careful planning matters just as much as the material itself.

Sealing Maintenance and Longevity

Marble asks for a bit more discipline than some other floor coverings, and matt marble asks for it in a slightly different way. The texture that gives it character also means dirt, soap residue, and cleaning products can sit differently on the surface, so maintenance needs to be intentional, not casual.

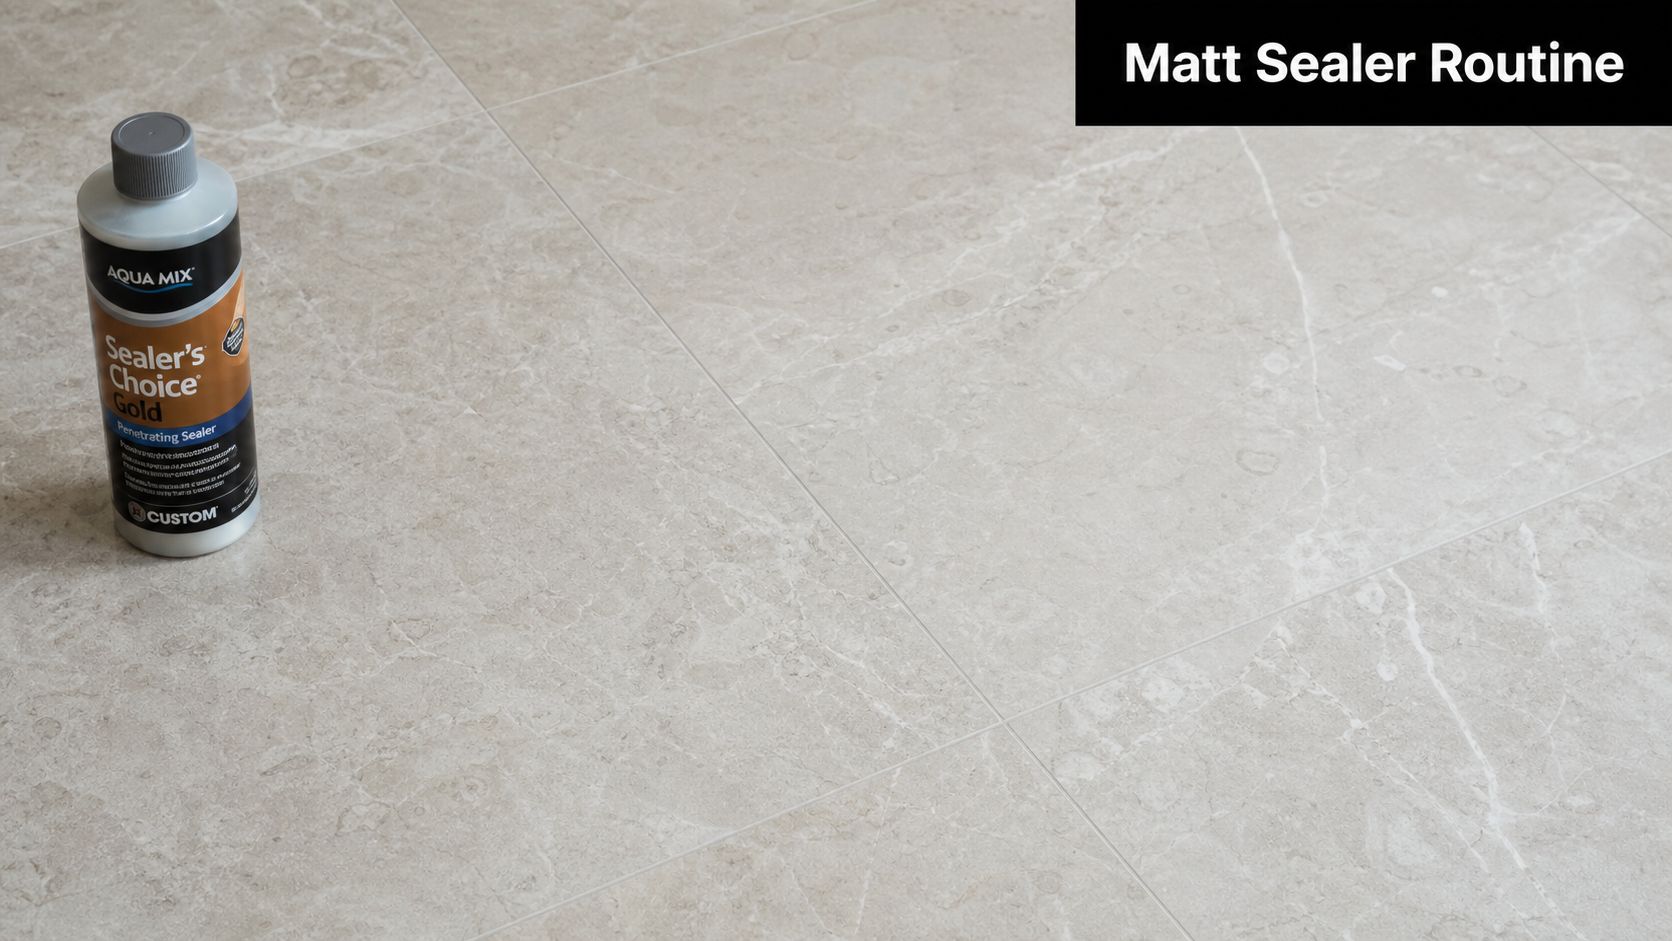
A bottle of Aqua Mix Sealer's Choice Gold sealer standing on light beige marble floor tiles.

For Melbourne homeowners, the main goal is to preserve the look without flattening the stone. A penetrating sealer is usually preferred over a topical coating because it works inside the surface rather than sitting as a film on top. That matters on a matt finish, where you want to protect the stone without creating a plastic sheen.

A simple maintenance rhythm

Start with the first clean after installation, then wait for the sealer and grout advice from your tiler or stone supplier. From there, use a gentle, pH-neutral cleaner and avoid anything acidic, because acids can attack marble and make the surface dull or patchy.

Practical rule: if a cleaner is strong enough to strip soap scum in seconds, it's probably too aggressive for marble.

The day-to-day routine should be boring, and that's a good thing. Wipe down standing water, use soft mops, and keep harsh scrub pads away from the stone. A matt surface can look beautifully understated for years, but only if the cleaning process respects the finish.

What Melbourne homeowners often get wrong

People sometimes assume matt means maintenance-free. It doesn't. It can be forgiving in appearance, but it still needs sealing and sensible cleaning. That said, many homeowners prefer the way matt marble ages because small marks don't jump out the way they do on polished stone.

There's also a comfort question that comes up often in Melbourne's cooler months. Insufficient coverage exists on the specific acoustic and thermal comfort advantages of matt-finish marble versus polished marble in Melbourne's cooler climate, despite anecdotal reports of a softer underfoot feel in winter months (Stonemasons installation guide). So if comfort is part of your buying decision, treat it as a lived experience point rather than a fully quantified claim.

If your renovation includes both tiling and waterproofing, the tiling and waterproofing overview is a useful reminder that the floor finish, membrane, falls, and cleaning plan all belong in the same conversation.

Choosing Tile Sizes Grout and Cost Framework

Tile size changes the room more than many homeowners expect. A large-format tile can make a bathroom feel calmer because there are fewer grout lines. A smaller tile can add texture and flexibility, but it also introduces more joints, which means more visual interruption and potentially more maintenance.

Matte marble tiles in Australia are often manufactured as rectified porcelain in 600×1200 mm format with ±0.5 mm edge precision, allowing 2 mm grout joints that reduce water ingress (TileMob). That precision matters in bathrooms because narrow, even joints support cleaner lines and a more disciplined finish.

Tile sizes and grout recommendations

Tile Size Grout Width Use Case
Large-format rectified 600×1200 mm 2 mm High-end en suites, minimal grout look, contemporary bathrooms
Traditional marble format Wider joints Older homes, more irregular rooms, classic layouts
Smaller modular sizes Wider joints Feature floors, tighter rooms, detailed patterns

The narrower joint on rectified tile also helps reduce the chance of water finding its way into vulnerable edges, provided the waterproofing and substrate are done properly. That's why many Melbourne builders favour rectified products in premium bathrooms, especially when the visual goal is a visually continuous floor.

Budget thinking without guesswork

Price can vary widely depending on the stone type, fabrication, rectification, sealing, and labour, so it's better to price the whole bathroom rather than the tile alone. If you're comparing quotes, make sure each one includes the same assumptions about substrate preparation, waterproofing, trim details, grout, and sealing.

Ask for a quote that separates supply, install, waterproofing, and finishing work. If those items are bundled vaguely, it becomes hard to compare one builder against another.

A practical buying mindset helps here. If you want a restrained, upscale look and easy-to-read grout lines, large-format rectified tile is often the cleanest option. If your room has awkward angles or heritage details, a different format may be easier to fit neatly without forcing cuts into visible areas.

Design Inspiration and Local Sourcing Tips

A good marble bathroom does not need much decoration. In Melbourne homes, the strongest examples usually rely on proportion, restraint, and one clear material choice. A matt floor can carry much of that visual weight on its own, like a calm backdrop that lets the rest of the room speak clearly.

A Fitzroy renovation might use matt marble floor tiles with simple wall tile and compact brass fittings, so the old-house character stays intact. In Southbank, the same finish might sit under slimline fixtures and a frameless screen, which makes the room feel cleaner and more architectural. In a suburban family bathroom, the floor may become the quietest part of the room, while storage and easy cleaning take priority.

What local sourcing should look like

Good sourcing starts with touch and light. Ask to see the tile in natural light and under artificial light, then check how the veining and surface finish read from standing height. A matt finish can look richer in one showroom and flatter in another, depending on the lighting and the size of the room.

Trade compliance matters at the same time. In Victoria, any domestic building work valued over $10,000 in labour and materials requires the contractor to hold appropriate VBA registration, so homeowners need a registered builder for many bathroom renovations (CertifyMe VBA guide). If the total contract value exceeds $16,000, domestic building insurance becomes legally required for the registered builder, which gives the homeowner protection for structural defects and non-completion (builders warranty discussion).

A builder checklist worth keeping

  • Confirm registration early: Do not wait until the quote is accepted.
  • Ask about project scope: Cosmetic retiling is one thing, but structural changes, plumbing moves, electrical updates, or major waterproofing can change permit requirements.
  • Check experience level: Domestic Builder (Unlimited) Registration in Victoria requires at least three years of practical experience within the seven years before application, while Domestic Builder (Limited) Registration requires two years (HIA Victoria licence guide).

A building permit in Melbourne is required when the renovation includes structural modifications, plumbing system changes, electrical updates, or major waterproofing work needed to meet Australian standards. Purely cosmetic updates like retiling or replacing taps in the same location generally do not require a permit (Melbourne permit guide). That distinction matters because the finish you choose can affect the scope of the job, which in turn affects who can legally do the work.

Conclusion and Next Steps

Matt marble works best when you want a bathroom that feels calm, safe, and timeless rather than bright and glossy. It suits wet areas because the finish lowers glare, supports better slip resistance, and gives the room a more grounded look, but the installation still has to be handled by the right registered builder.

If you're planning bathroom renovations in Melbourne, compare finish, grout, sealing, and builder credentials together, not separately. Then ask for a clear quote, confirm the registration details, and choose the tile that fits the way your household lives.


A CTA for Melbourne Tiling Services P/L.

Bathroom Floor Tiling: A Melbourne Renovation Guide

You're probably at the point where the bathroom looks worse before it looks better. Old tiles are out, the floor feels uneven underfoot, and every showroom visit makes it easy to focus on colour, pattern and finish. That's normal. It's also where plenty of bathroom renovations go off track.

Bathroom floor tiling isn't just about what you see on the surface. In a Melbourne home, a tiled bathroom floor only performs properly when the subfloor, screed, falls, waterproofing, adhesive and movement detailing all work together. If one layer is wrong, the prettiest tile in the room won't save the job.

Homeowners usually start with tile choice. Registered builders start lower down. They ask whether the floor is stable, whether the falls can be formed properly, whether the waterproofing detail will comply, and whether the selected tile suits the room and substrate. That is the correct order of work if you want a bathroom that looks sharp on handover and still performs properly years later.

Table of Contents

Choosing the Right Bathroom Floor Tiles

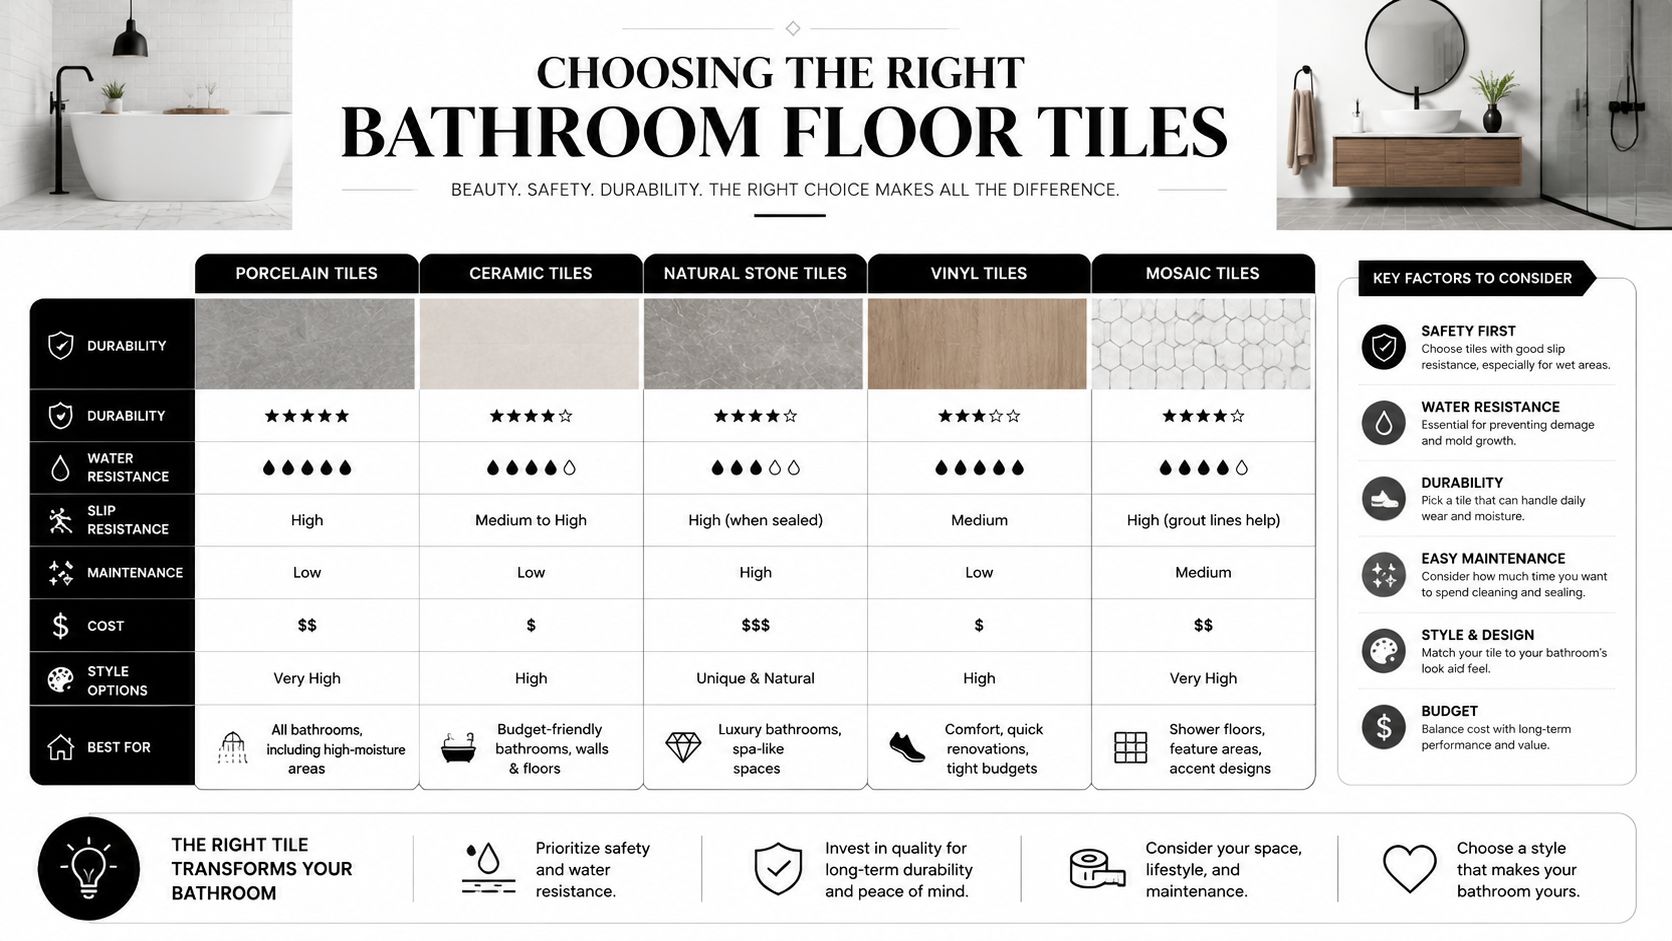
The tile is the part you'll notice every day, but the right choice starts with safety and suitability. In Australia, bathroom floor tiling should be specified around the wet-area slip-resistance benchmark in AS 4586, not just the tile's appearance. For internal wet areas such as bathroom floors, a common practical target is at least P3, as explained in this guide to choosing the right floor tile.

A comprehensive comparison chart of various bathroom floor tile materials including porcelain, ceramic, stone, vinyl, and mosaic.

Start with grip, not colour

A bathroom floor gets wet. That sounds obvious, but plenty of selections are still made as if the room were a dry hallway. The safest bathroom floors usually combine a textured matt finish, sensible tile sizing, and good drainage. Smaller mosaics can help with traction because they create more grout joints underfoot. Large glossy tiles can look clean in a showroom and feel risky in a real shower area.

Practical rule: If a tile looks slippery when it's dry, don't expect it to behave better when soap and water hit it.

Slip resistance also works together with the rest of the floor build-up. A compliant waterproofed floor with poor falls is still a problem. A grippy tile over a badly prepared substrate is still a problem. Good bathroom floor tiling is always a system.

What different tile types do well

Homeowners in Melbourne usually compare a small group of materials.

Bathroom Floor Tile Comparison Best For Durability Maintenance
Porcelain Family bathrooms, ensuites, heavy daily use High Low
Ceramic Budget-conscious bathrooms with straightforward layouts Good Low to moderate
Natural stone Premium bathrooms where appearance is the priority Good, but depends on stone Higher
Mosaic Shower floors and smaller wet zones needing more grip Good Moderate
Large-format tiles Contemporary bathrooms with minimal grout lines Good, but installation-sensitive Low to moderate

Porcelain is usually the practical workhorse. It suits busy bathrooms, it's consistent, and it's available in finishes that can meet wet-area slip requirements.

Ceramic can work well in many domestic bathrooms, particularly where the budget is tighter and the room isn't asking the tile to do too much visually or structurally.

Natural stone such as marble gives a high-end finish, but it asks for more care. It's less forgiving on maintenance, and the selection has to be made carefully for a wet floor.

Large-format tiles look excellent in modern bathroom renovations, but they're less tolerant of imperfect floors. If you're considering slim-profile panels or oversized porcelain, it helps to understand the installation demands before you buy. This overview of large-format tiles gives a good sense of where they work and what they require.

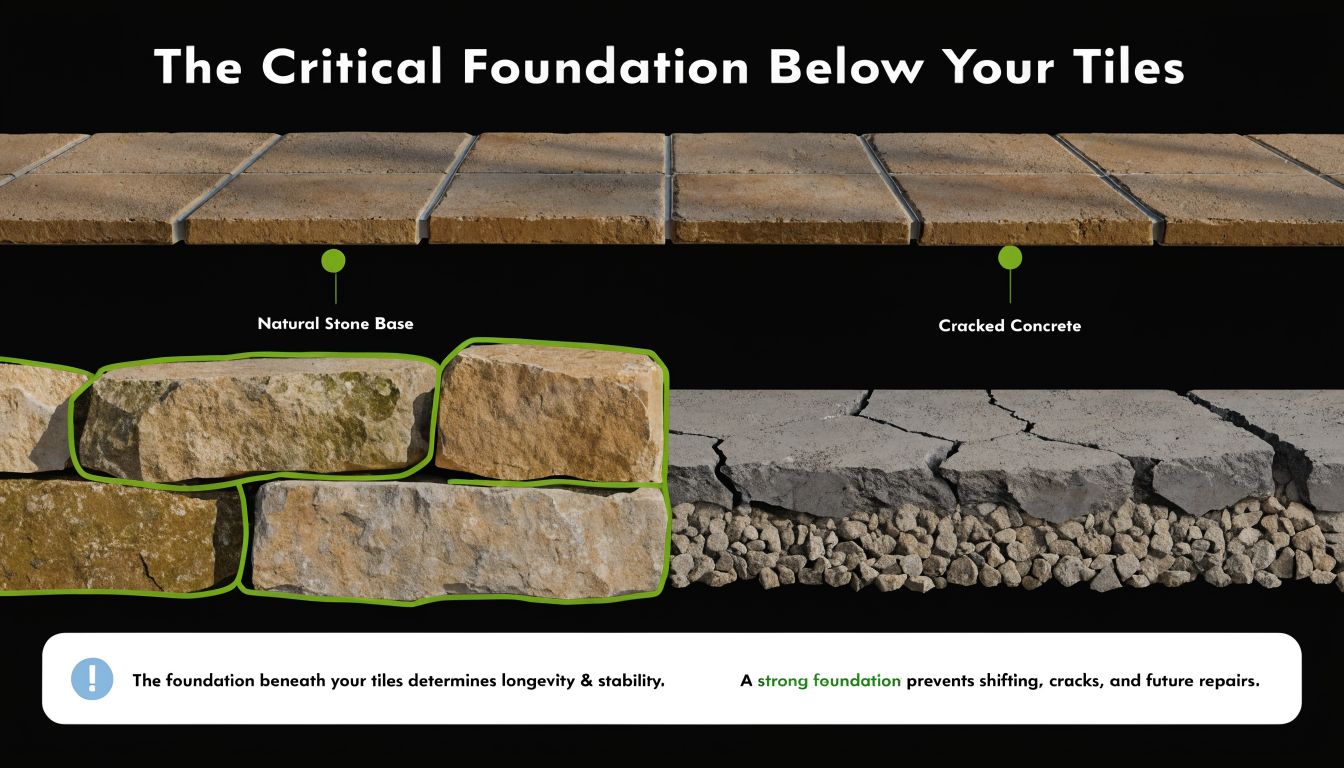
The Critical Foundation Below Your Tiles

Most failed tile jobs don't start with the tile. They start underneath it.

That's the part homeowners rarely see once the renovation is finished, but it's the part that decides whether the floor feels solid, drains properly and stays crack-free. If the substrate is uneven, weak, damp, moving, or out of level, the tile layer above it inherits every one of those problems.

A comparison illustration showing natural stone versus cracked concrete as foundations for tiled floor surfaces.

Why the floor prep decides the result

Think of the substrate the same way you'd think about a house footing. You can spend money on finishes, but if the base is wrong, the finish won't stay right for long.

In bathroom renovations, the common trouble spots are familiar. An old timber floor has too much movement. A slab has dips and high points. Previous renovation work leaves patches, adhesive residue or weak areas. The room might also need falls corrected so water moves to the waste instead of sitting in corners.

Australian practice places real weight on this stage. A common but critical question for Victorian renovators is whether screeding or self-levelling is needed before tiling. The answer is often yes, because AS 3958.1 places heavy emphasis on substrate flatness and stability, especially for large-format tiles that show every imperfection, as noted in this article on uneven tile in bathroom renovations.

When screeding and self-levelling are needed

Screeding is used when the floor needs shape, especially falls to the waste. It creates a stable mortar bed and gives the tiler something consistent to work over.

Self-levelling compounds are used when the floor needs flatness more than slope correction. They're useful for smoothing out local irregularities before tile goes down.

A builder or tiler might recommend one, both, or neither depending on the room. What matters is the diagnosis. A lot of bad bathroom floor tiling comes from skipping that step and trying to fix a structural or substrate issue with adhesive thickness alone.

  • Use screeding when the room needs corrected falls, a shower recess needs forming, or the floor plane is broadly wrong.
  • Use self-levelling when the floor is structurally sound but locally uneven and needs flattening for tile installation.
  • Pause the tiling altogether when the floor needs structural repair first. That might mean strengthening timber, replacing damaged sheet flooring, or resolving movement before any wet-area build-up starts.

A perfectly laid tile on a poor base is still a poor job. It just takes longer to reveal itself.

Waterproofing Your Melbourne Bathroom to Code

If there's one part of bathroom floor tiling that should never be treated as a shortcut, it's waterproofing. Homeowners often focus on visible finishes because that's what they live with day to day. The structure below the tile doesn't get the same attention until a leak shows up in the hallway, the ceiling below, or the skirting outside the bathroom.

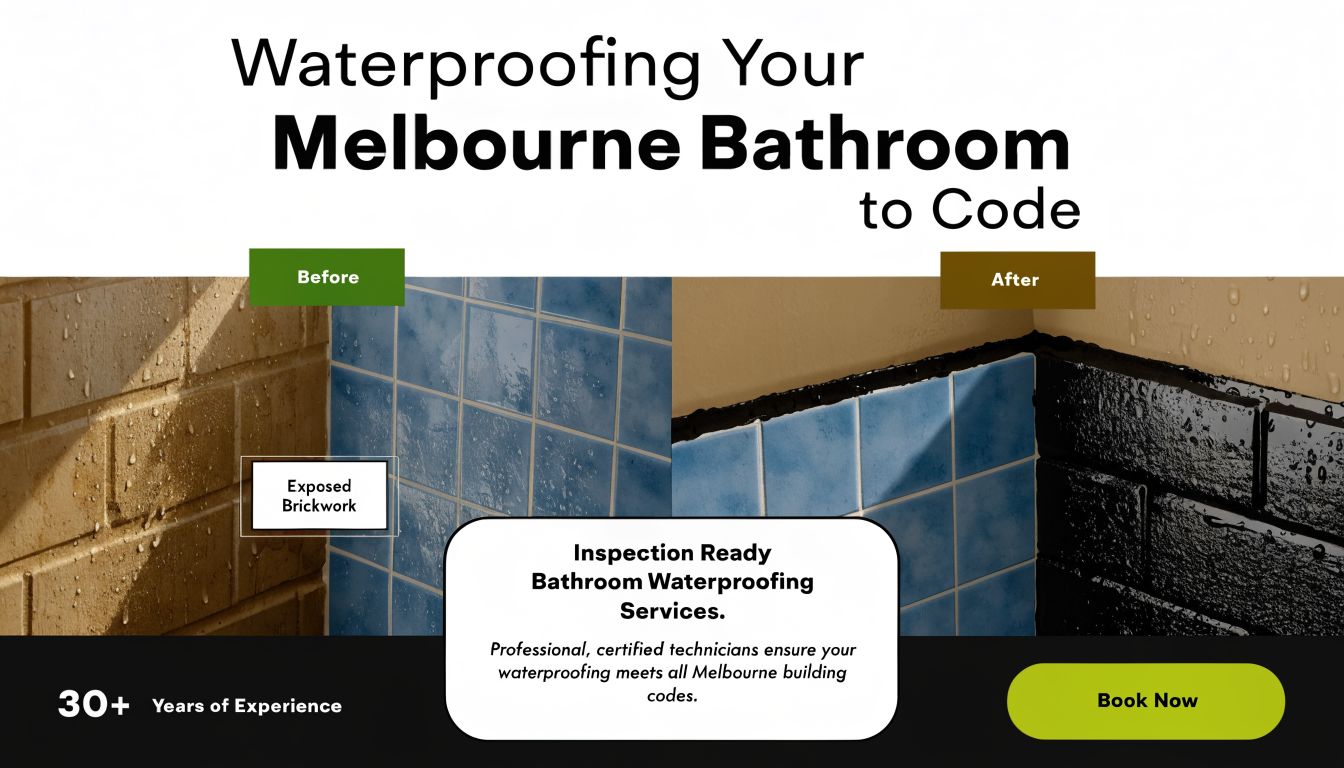
A professional bathroom waterproofing service in Melbourne demonstrating before and after results on brickwork.

What the membrane actually does

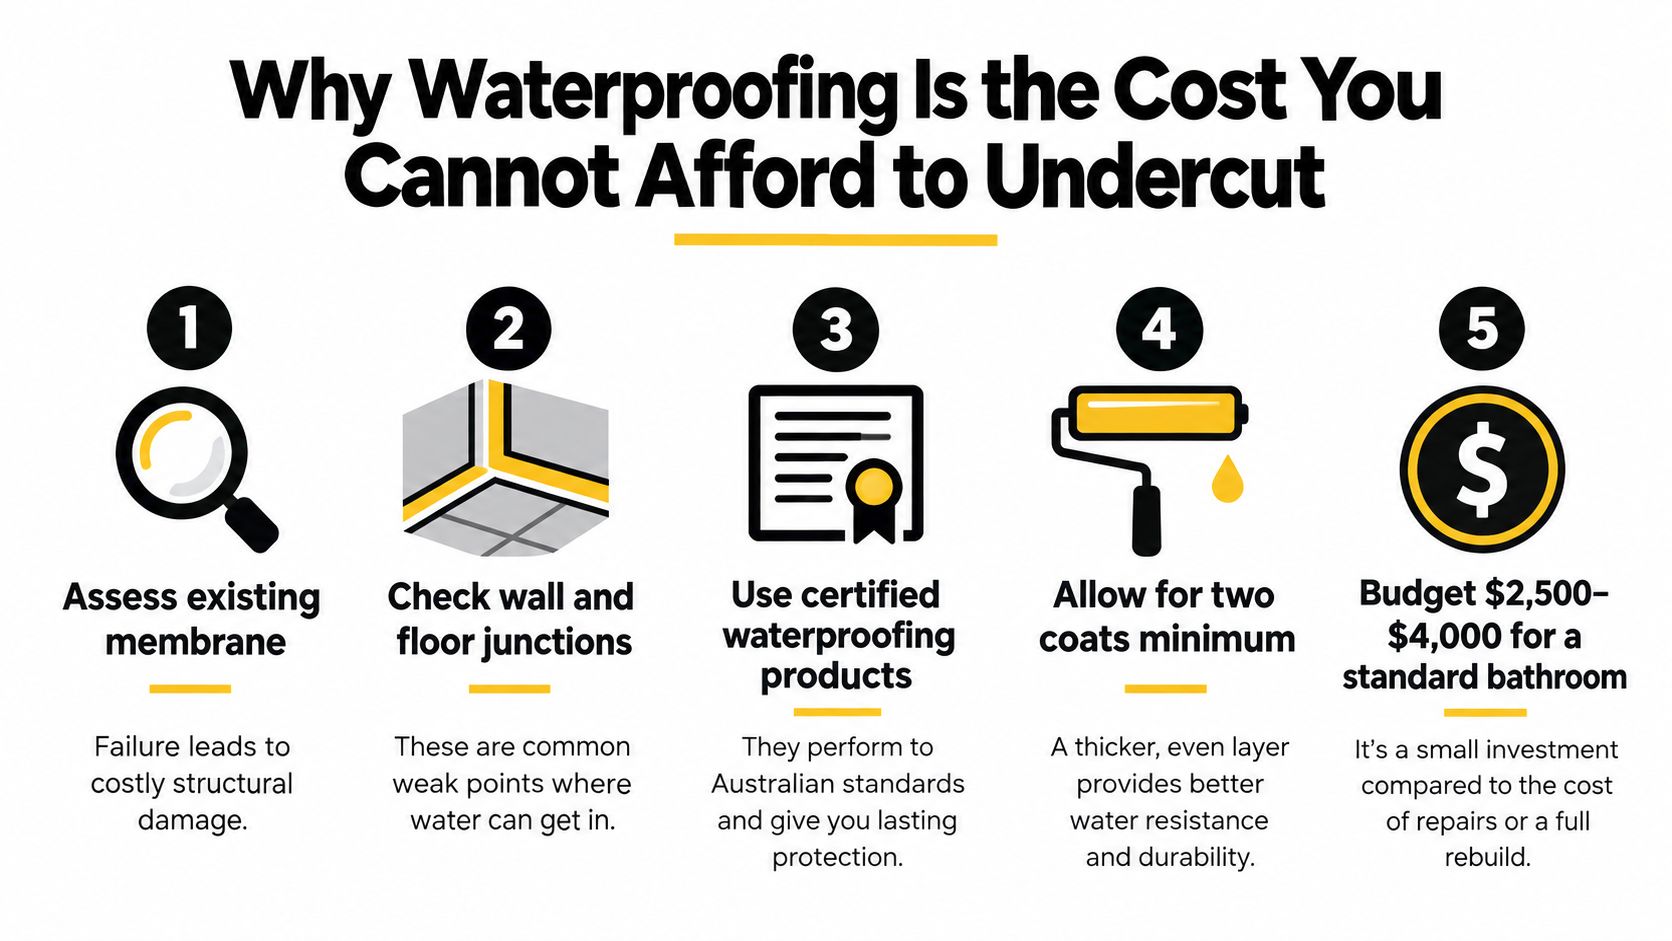
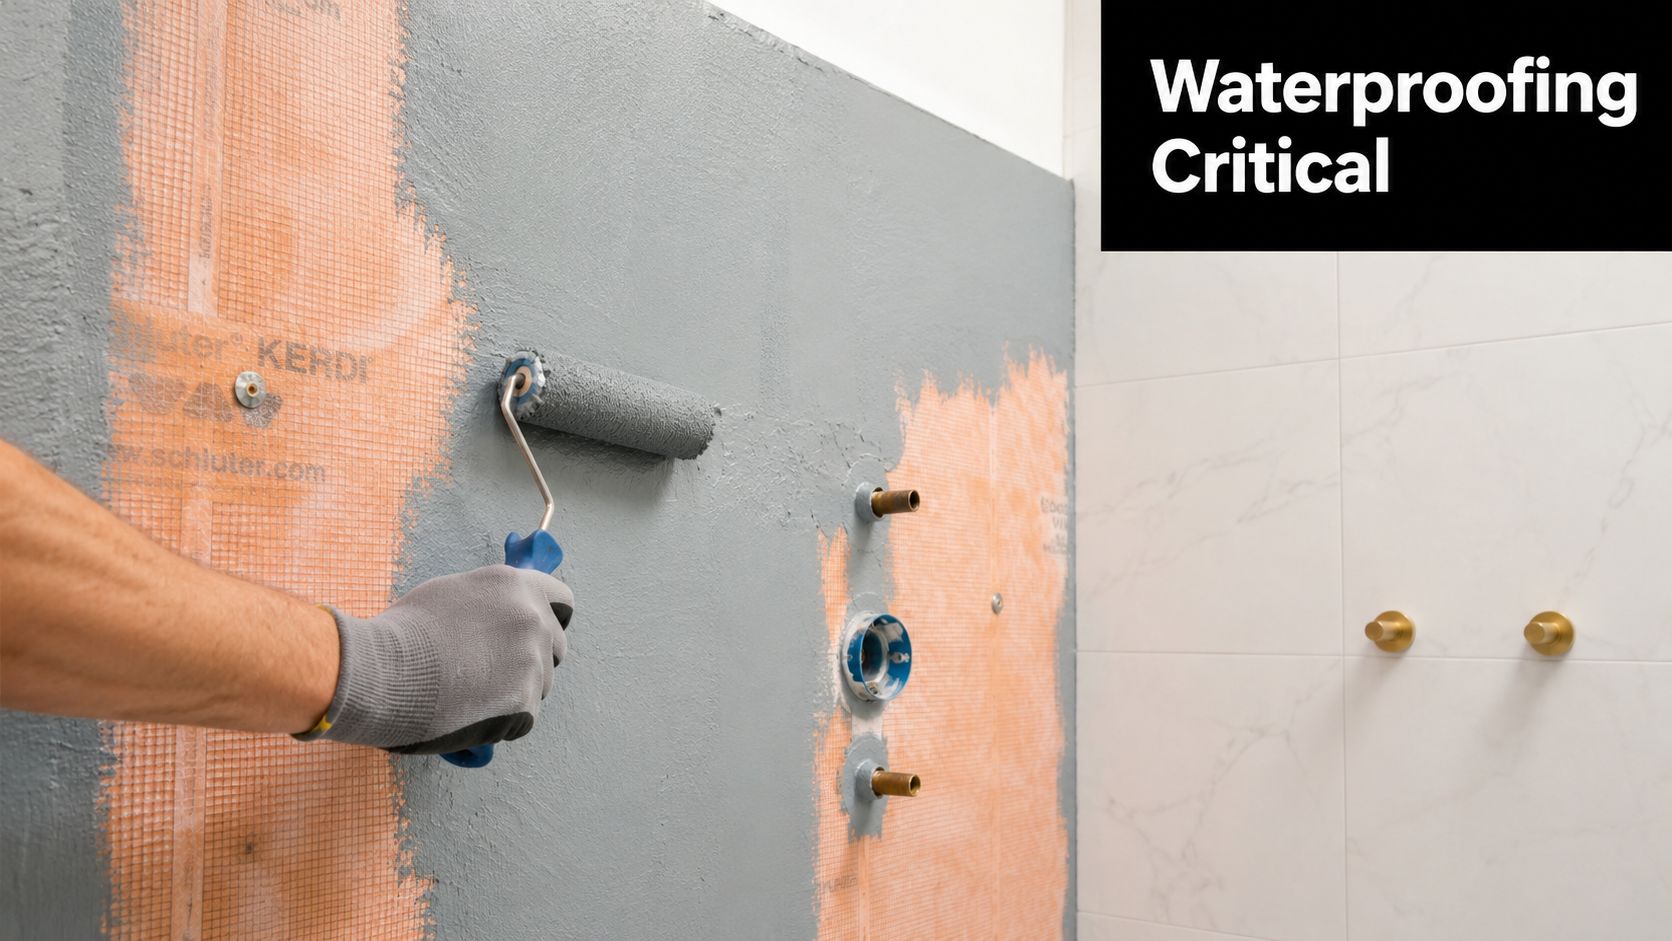
The modern benchmark in Australia changed significantly with AS 3740:2010, which standardised waterproofing requirements in domestic wet areas. It requires specific membrane coverage and detailing to prevent water ingress, which is treated as a leading cause of internal building damage in Australia in this discussion of the history of tile flooring and wet-area standards.

That matters because the tile and grout aren't the waterproof layer. The membrane is. The tiled finish above it takes wear, cleaning and foot traffic. The membrane below it protects the structure.

A compliant bathroom floor build-up usually includes prepared substrate, any required screed, the waterproofing membrane, and then the tile assembly above. Junctions, floor-to-wall transitions, penetrations and shower areas need the right detailing. This isn't decorative work. It's protective work.

Why registered builders matter

Registered builders add real value in bathroom renovations through this specialized expertise. The job isn't just to lay tiles. It's to manage the wet-area construction properly, coordinate the right licensed trades, and make sure the sequence is correct from demolition to certification.

If you're trying to understand what proper documentation and sign-off look like in Victoria, this overview of a waterproofing compliance certificate in Victoria is useful. It explains the compliance side that many homeowners only discover after asking for proof late in the project.

  • Bad waterproofing hides well at first. The bathroom can look finished and still be vulnerable.
  • Repairs are rarely local. Once water gets past the system, remediation often means removing tiles and rebuilding layers.
  • Cheap shortcuts are expensive later. Saving money on membrane work usually shifts the cost into leak detection, demolition and reinstatement.

The Tiling Installation Process From Start to Finish

A professional installation rarely begins with opening adhesive bags. It starts with checking the room, confirming dimensions, reviewing the set-out and making sure the floor is ready to receive tile. That's especially important in a bathroom where one crooked line at the doorway can make the whole room feel off.

Layout comes before glue

Good layout work isn't about making every room perfectly centred. In many Melbourne bathrooms, especially older homes with alcoves, nib walls or off-square entries, the smarter decision is to protect the most visible sightline.

For odd-shaped bathrooms, the first decision isn't just visual layout but how to manage cuts at doorways and waterproofing upturns. The aim is to start from a focal point so the most visible lines, such as the threshold, stay clean, even if that means sacrificing a perfectly centred pattern elsewhere, as discussed in this guide to tiling floors in irregularly sized rooms.

That planning usually covers:

  • Entry view: what you see first when the bathroom door opens
  • Perimeter cuts: whether tiny slivers will appear at walls, nibs or the vanity line
  • Drain location: whether the tile size and pattern work with the waste position
  • Fixtures: how the floor lines relate to the toilet pan, vanity and shower screen

The cleanest bathrooms usually don't come from the most symmetrical plan. They come from the smartest compromise.

Setting, curing and finishing

Once the layout is locked in, the installer selects the adhesive to suit the tile type, format and substrate. Large-format porcelain doesn't get treated the same way as a small mosaic floor. Natural stone may need different handling again.

Tiles are then bedded carefully, aligned, checked for lippage and kept consistent across changes of plane. After that, the floor needs curing time. Rushing this stage causes trouble. Walking on fresh work too early, grouting too early, or loading the room with other trades before the bond is ready can undo good installation.

A registered builder coordinates all of this with plumbing, electrical, shower screen measuring and extras such as under tile heating for bathroom renovations. That coordination matters because the bathroom isn't a tiling job in isolation. It's a sequence of trades that need to hand over cleanly.

Costs and Timelines for Melbourne Bathroom Renovations

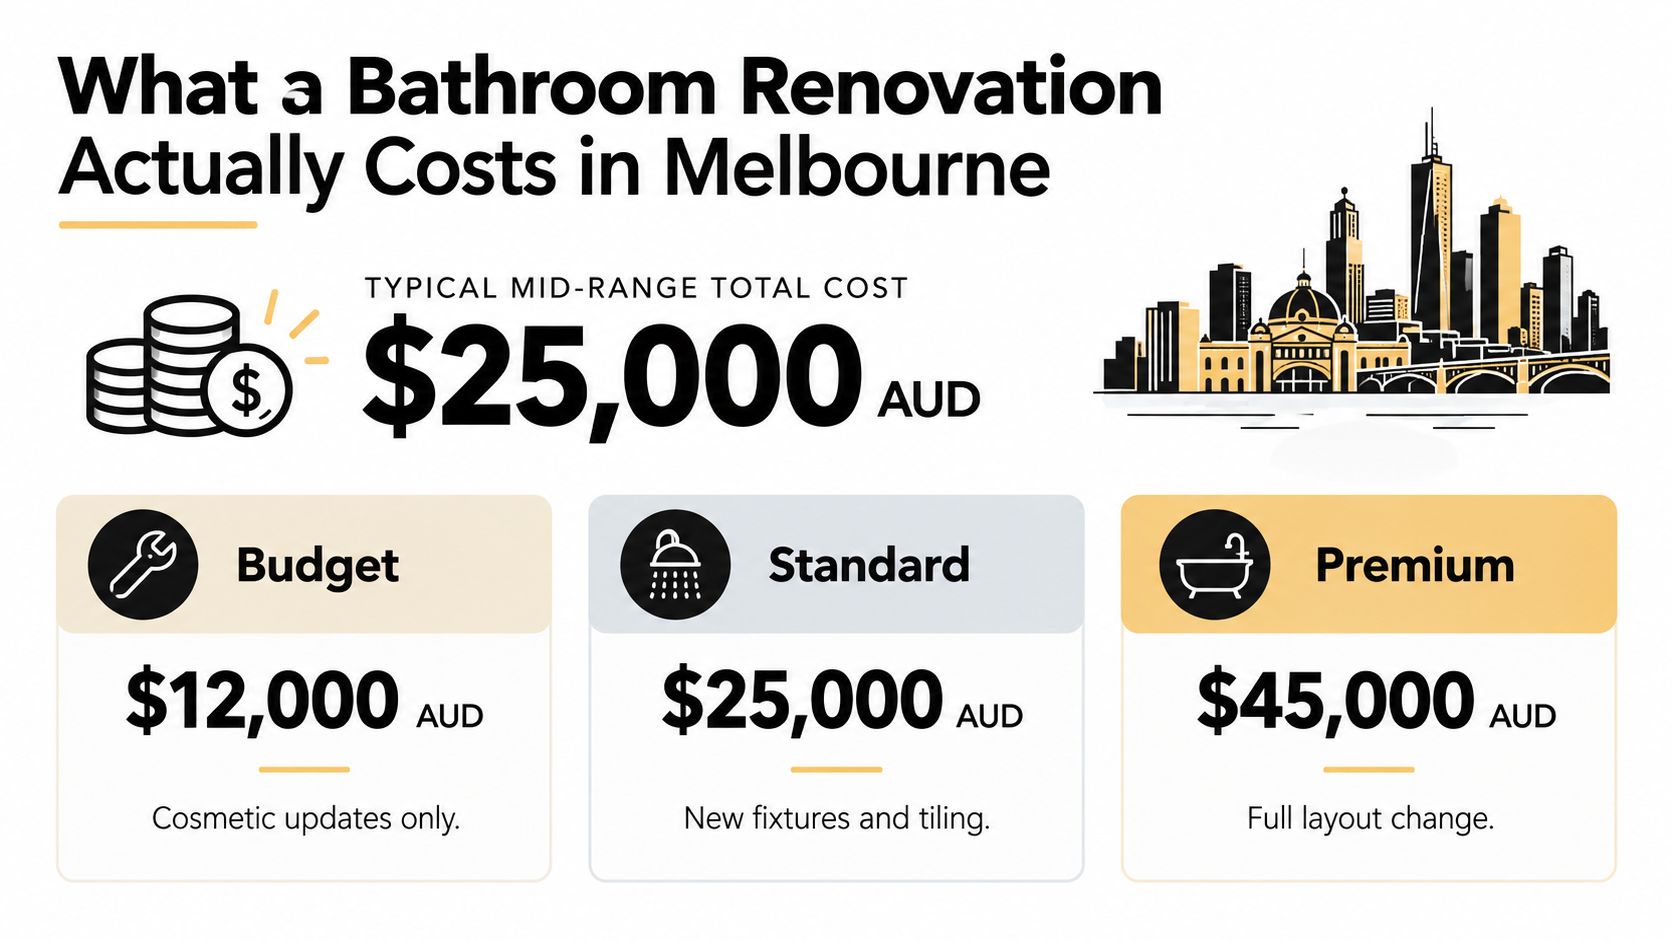
A bathroom can look like a simple tile update until the old floor comes up. Then the actual cost shows itself. Out-of-level sheeting, water-damaged framing, poor falls, and patchwork repairs are what push budgets and timelines off track in Melbourne bathrooms.

That is why the finish should never be priced in isolation. Floor tiling sits inside a renovation sequence that often includes demolition, plumbing, electrical, carpentry, substrate repairs, waterproofing, screeding, glazing, painting and final fit-off. The tile is visible. The work underneath determines whether the result lasts.

What changes the cost

Cost usually rises with preparation, detailing and coordination.

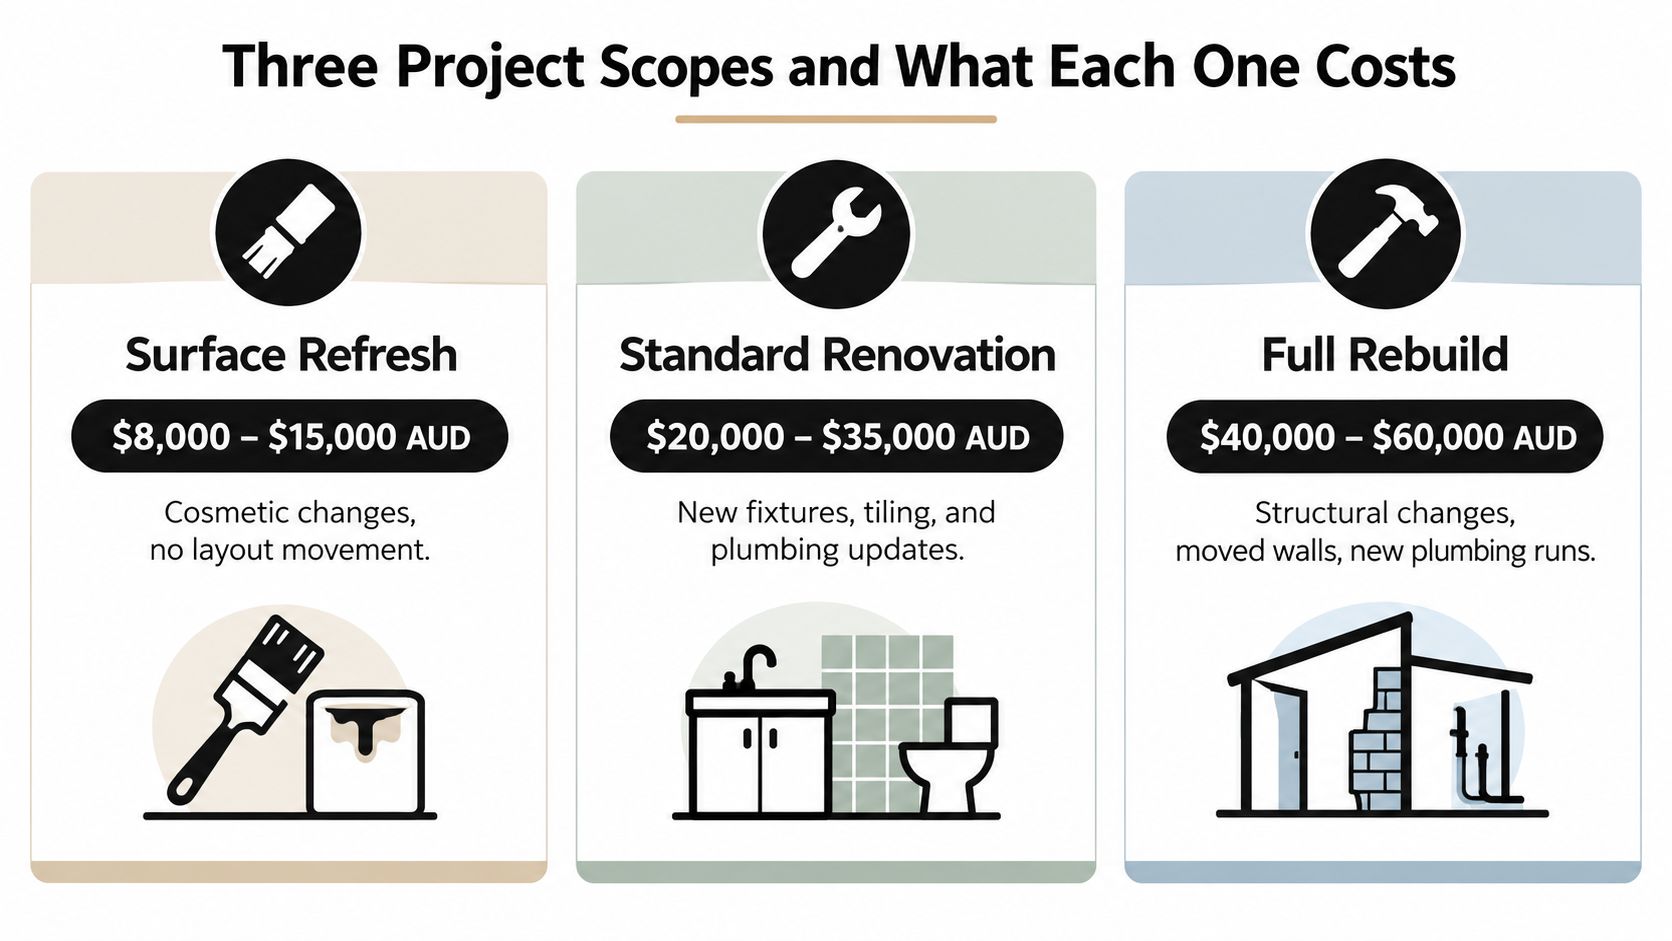
A straightforward bathroom with a stable substrate and standard porcelain tile is one price. A bathroom that needs floor correction, shower recess work, under-tile heating, stone, large-format tiles, or difficult drainage detailing is another. The labour is heavier, the set-out is tighter, and the margin for error is smaller.

These items commonly push the budget up:

Cost factor Why it matters
Substrate repair Damaged or moving floors need correction before tiling
Screeding or levelling The room may need falls or flattening before tile installation
Waterproofing detail Complex shower areas and transitions require more labour
Tile format Large-format and premium materials need tighter execution
Layout complexity More cuts, awkward edges and drain work take more time
Trade coordination Full bathroom renovations involve multiple licensed trades

For a full bathroom renovation, Melbourne Tiling Services P/L notes a typical median project cost around $10,000 in its planning material. Use that as a rough reference only. Some bathrooms stay close to that range. Others climb quickly once remedial work, compliance upgrades, premium finishes, or structural corrections are included.

Small rooms can be deceptive. They often cost more per square metre because every junction matters, access is tighter, and there is less room to hide bad planning.

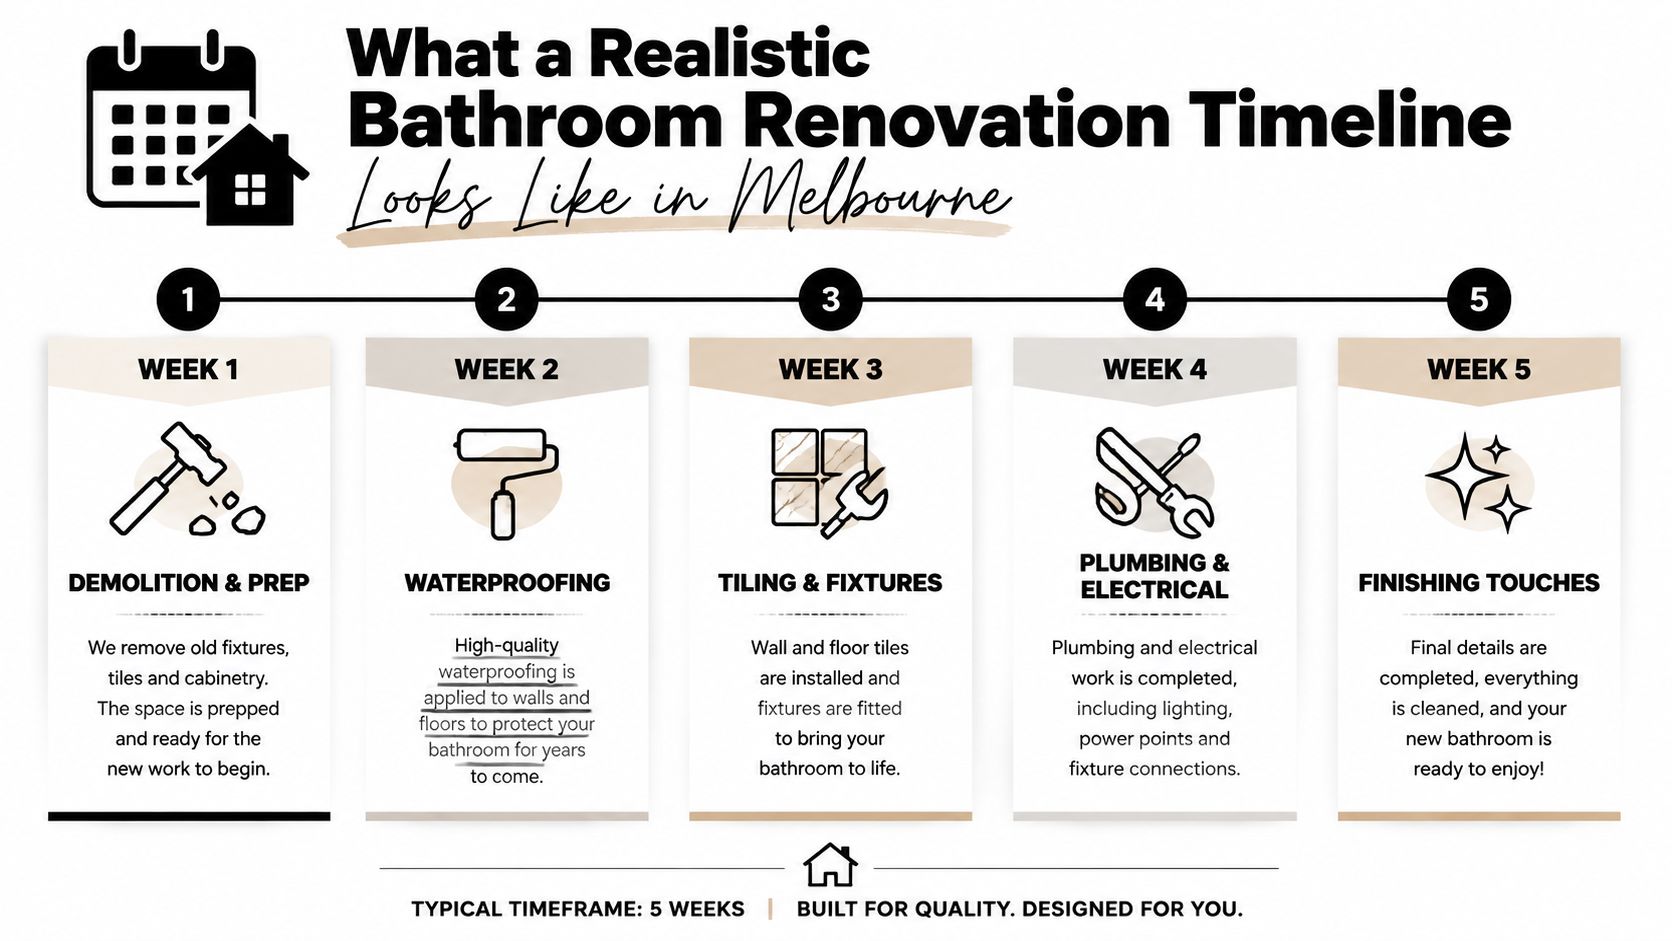
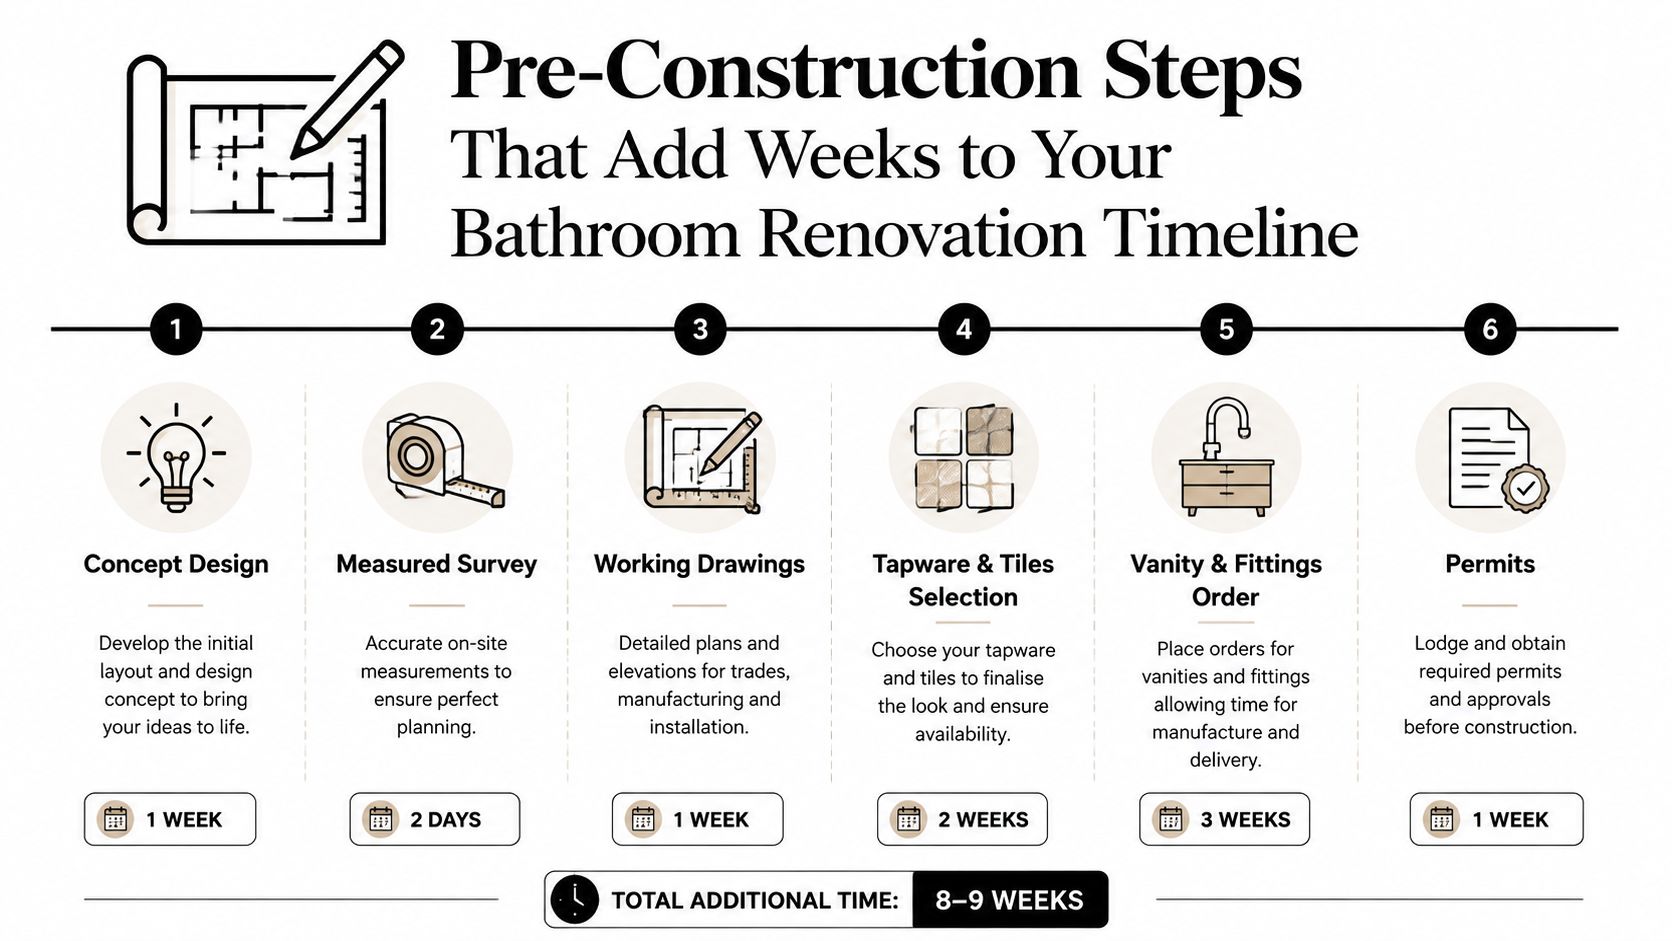
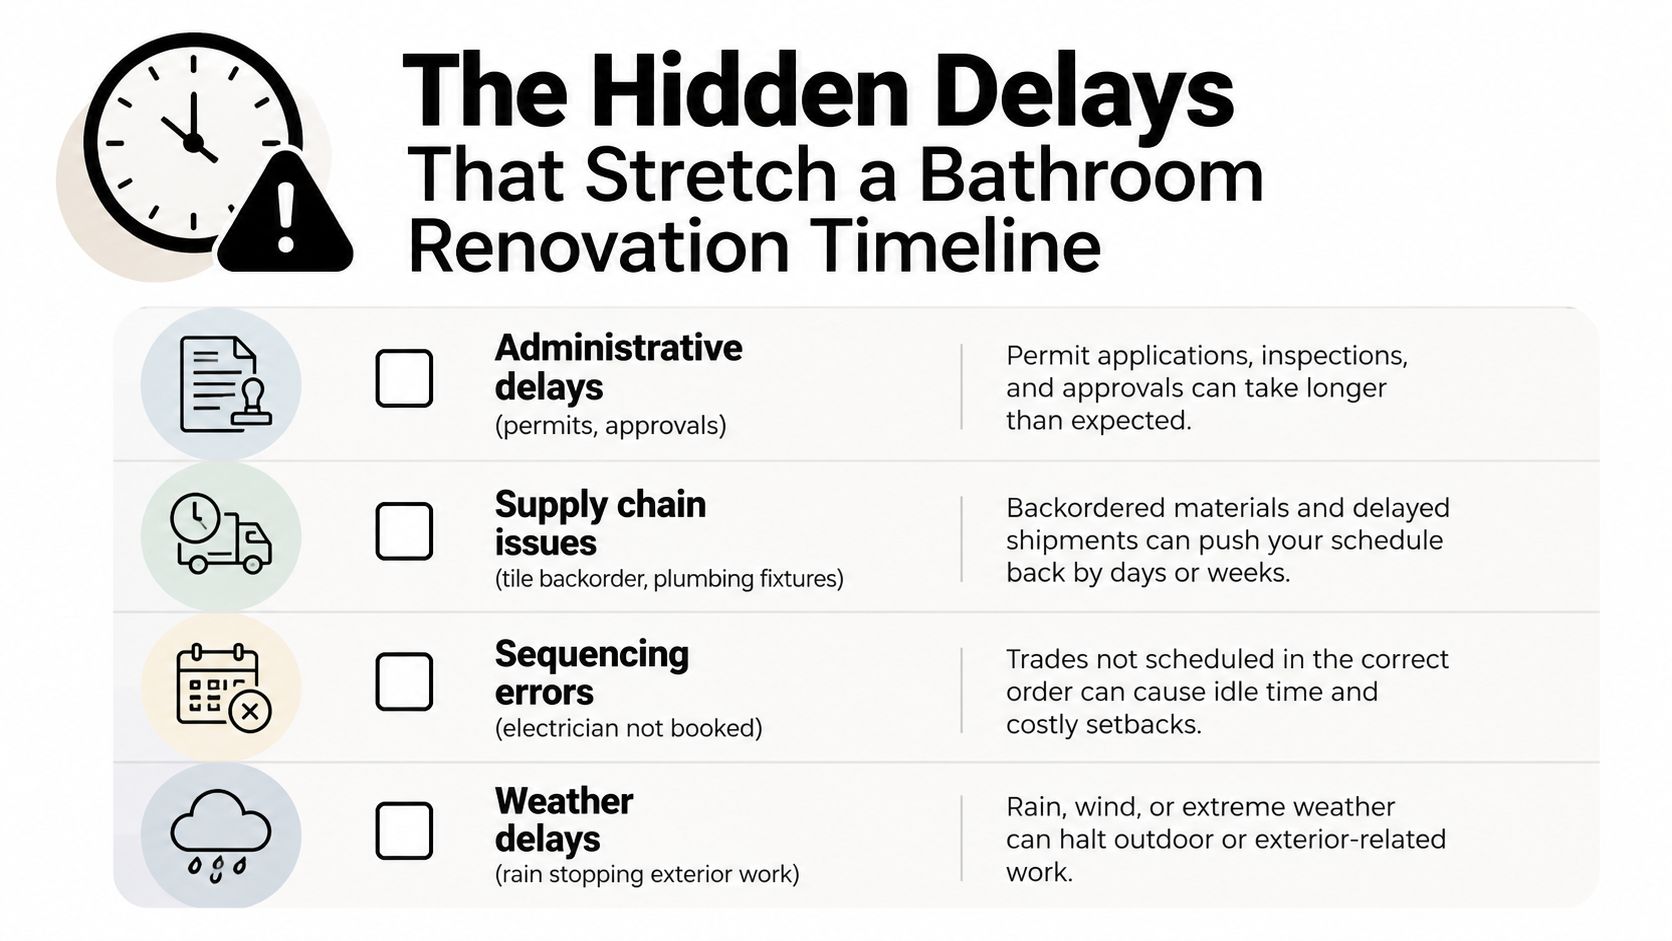
What affects the timeline

Timelines follow condition and sequencing more than room size. I have seen compact bathrooms take longer than larger ones because the base was out of tolerance and several trades had to return in the right order.

A realistic program usually allows for:

  1. Demolition and strip-out
  2. Subfloor assessment and repairs
  3. Screeding or levelling where required
  4. Waterproofing and curing
  5. Tiling and adhesive cure time
  6. Grouting, sealing and fit-off by other trades

Curing time is where schedules often go wrong. Adhesives, screeds, waterproofing membranes and sealants all need their proper window. If the job gets rushed to save a day or two, the risk of bond failure, cracked grout, trapped moisture or remedial work goes up.

If you want an early budget figure, a renovation calculator can help with planning. Site inspection is still what confirms scope. That is how you separate a cosmetic tile replacement from a bathroom that needs proper preparation, code-compliant waterproofing, and repairs before a single new tile goes down.

Long-Term Care and When to Call for Remediation

A newly tiled floor doesn't need fuss, but it does need sensible care. Most long-term problems come from neglected joints, harsh cleaning, movement underneath the floor, or a leak that went unnoticed for too long.

A split image showing healthy food ingredients for daily routines and a bench for assistive living.

Simple maintenance that protects the floor

The day-to-day routine should be uncomplicated.

  • Use pH-neutral cleaners: They're less likely to damage grout, sealers or stone finishes.
  • Keep water moving: Wipe down standing water if the room stays damp for long periods.
  • Check silicone joints: Junctions around the shower, wall base and fixtures should stay intact.
  • Watch grout condition: Cracking, powdering or persistent discolouration usually means something needs attention.

If the floor is natural stone, the maintenance approach may be a bit stricter. If it's porcelain, the routine is usually simpler. Either way, cleaning should support the finish, not strip or etch it.

Signs the floor needs attention

Small symptoms often show up before major failure.

Large-format tiles are especially unforgiving here. Per AS 3958.1, deviations in the subfloor can telegraph through the tile, creating lippage and stress points that lead to cracks, which is one reason professional remediation is often required, as outlined in this article on ceramic tile installation standards and flatness.

Watch for these warning signs:

  • Loose or drummy tiles: The bond may be failing.
  • Cracked grout lines: Movement can be transferring into the tile field.
  • Lippage that seems to worsen: The substrate may be shifting or the original prep may have been poor.
  • Musty odours or staining outside the bathroom: Water may be escaping the wet area.
  • Repeated silicone failure: There may be movement or moisture pressure behind the joint.

If one tile cracks, that might be local damage. If joints, tiles and seals start failing together, treat it as a system problem.

That's the point to bring in someone who can diagnose the cause, not just patch the symptom.

Start Your Bathroom Renovation with Confidence

The main lesson with bathroom floor tiling is simple. The finish only performs as well as the build-up below it. Homeowners see the grout lines, tile colour and pattern. Registered builders look at structure, flatness, falls, waterproofing, movement and sequencing because that's what keeps the floor sound.

A durable bathroom floor isn't produced by one good decision. It comes from a chain of good decisions made in the right order. Choose a tile that suits a wet floor. Prepare the substrate properly. Form the falls correctly. waterproof to code. Use the right adhesive and movement detailing. Then allow the installation to cure and finish properly before the room is handed over.

That's why bathroom renovations work better when one accountable party manages the process. Instead of having separate trades make isolated decisions, registered builders can coordinate the demolition, plumbing, electrical, waterproofing and tiling so the room is built as one system. That reduces guesswork and helps avoid the common situation where everyone blames the layer before them.

If you're planning a new ensuite, updating a tired family bathroom, or dealing with a floor that has already started to fail, start with the parts that matter most. Ask what condition the subfloor is in. Ask how the waterproofing will be handled. Ask who is responsible for compliance. Those questions will tell you more about the likely result than any tile sample board ever will.


If you're planning bathroom floor tiling and want the whole renovation considered properly, Melbourne Tiling Services P/L can help you organise the next step. You can book a free, no-obligation quote, request 3D drawings to visualise the layout, or use the online renovation calculator to map out budget and scope before work begins.