How Much Does Waterproofing Cost in Melbourne

Waterproofing in Melbourne typically costs around A$50–A$85 per square metre, or roughly A$800–A$1,800 for a standard 6–8 m² wet area. Larger ensuites, renovation work and failed-membrane repairs can push the price considerably higher.

You're probably asking because a bathroom renovation quote has arrived with a waterproofing line that feels either suspiciously cheap or difficult to justify. Perhaps the tiles have been removed, the shower recess is exposed, and you're trying to decide whether the contractor has allowed enough for preparation, membrane application and Victorian compliance.

Waterproofing is usually only 3–6% of a bathroom renovation budget, according to this Australian bathroom waterproofing cost guide. Yet it can become the most expensive defect in the room when a membrane fails beneath finished tiles. The right question isn't, “How much does waterproofing cost?” It's, “What exactly am I paying for, and will the completed work stand up to Melbourne conditions and AS 3740 requirements?”

Table of Contents

Why Two Waterproofing Quotes Can Look Nothing Alike

A Carlton homeowner once had two quotes beside the same stripped-out bathroom. Both contractors measured the shower, floor and wall areas, yet one came to A$850 and the other to A$2,400. The difference became clear only after checking what each price covered.

The cheaper quote allowed for membrane application alone. It assumed the substrate was ready, excluded repairs at cracked junctions, did not identify a primer, and left certification unclear. The higher quote allowed for more preparation, detailed penetrations, extra sealants and compliance paperwork. It also appeared to specify parts of a system that may not have been needed in that room.

Waterproofing is therefore not a reliable flat room rate. The price combines materials, labour, substrate preparation, detailing and compliance administration, while each contractor may make different assumptions about those items. Joyce Kitchens' Australian bathroom waterproofing cost guide places a standard 6–8 m² wet area at about A$800–A$1,800 including GST, and a large ensuite around A$1,500–A$3,000. Those figures provide a market benchmark, not a substitute for a defined scope. Access, repairs and the chosen system can change the final amount.

The waterproofing line is often only 3–6% of a bathroom renovation budget, yet a failed membrane can become the most expensive defect to repair after tiles, fixtures and finishes are installed. That small line item deserves more scrutiny than its size suggests.

The cheapest quote often leaves out the boring work

Grinding, patching, priming and substrate checks rarely stand out in a finished bathroom. They are also common sources of variations. Applying a membrane over dusty, porous or unstable material may produce a neat-looking result, but appearance does not prove adhesion or continuous coverage.

A high price is not automatically safer. One contractor may nominate a premium system where a suitable standard membrane would perform adequately. Another may include preparation already completed by a different trade. The useful comparison is the budget impact repair vs maintenance, as explained in this resource on budget impact for repair versus maintenance, rather than the lowest total alone.

Practical rule: Compare inclusions, not totals. A fair A$1,400 quote and a risky A$850 quote may describe completely different jobs.

Check whether every quote includes substrate repairs, primer, bond breakers, junction reinforcement, penetration sealing, curing time, inspection and the relevant certificate. Once those items are visible, the price difference is usually easier to assess.

How to Read a Waterproofing Quote Line by Line

A professional quote should let you identify what gets prepared, what gets coated, how it gets detailed and who signs off the work. If the document only says “waterproof bathroom, $1,400”, you're being asked to compare a complete scope with a blank space.

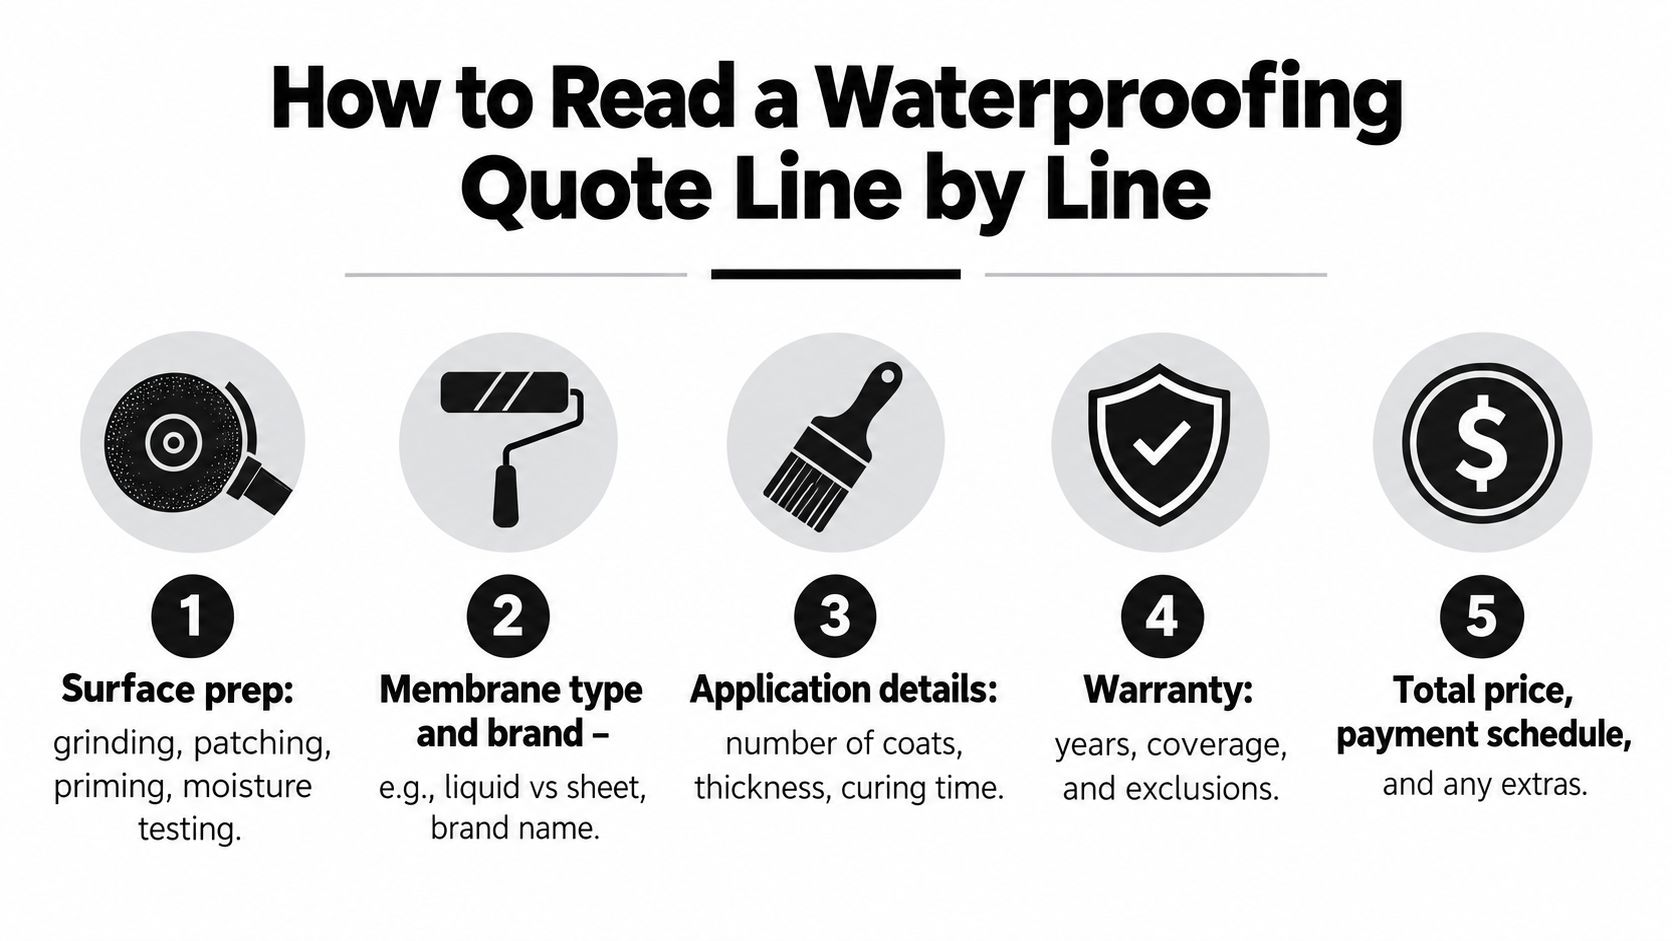
A guide illustrating five essential components to review in a professional waterproofing project cost quote.

Start with the surface

Look for grinding, dust removal, patching, screed repairs, priming and any moisture testing. A clean concrete surface may need limited preparation, while an older bathroom with adhesive residue, movement cracks or damaged sheeting needs more labour before the membrane can be applied.

The quote should then identify the membrane system and manufacturer. Common systems include liquid polyurethane, acrylic products and sheet membranes. Names such as Ardex, Davco, Mapei and Sika matter because each system has application requirements, compatible primers and curing instructions. “Waterproofing product” isn't enough information.

Check the application and detailing

The contractor should state the number of coats, coverage or thickness requirements, curing time and areas included. A transparent quote separates the shower recess, bathroom floor and wall areas, rather than hiding them inside one lump sum.

Ancillary items deserve their own attention:

  • Bond breakers: Confirm treatment at wall-floor junctions and movement-prone corners.
  • Reinforcement bandage: Check whether internal corners and changes of plane receive the specified reinforcement.
  • Penetrations: Ask how tap bodies, pipes and shower fittings will be sealed.
  • Puddle flange detailing: Confirm whether the floor waste connection is included.

Finally, ask who arranges the inspection and who issues the waterproofing installation certificate. Victorian guidance identifies AS 3740 compliance as relevant to bathroom waterproofing, and the certificate should be named in the scope rather than implied. This Victorian bathroom renovation regulations guide also explains why registered builders become relevant when building work reaches the applicable threshold.

What Drives Waterproofing Prices Up or Down

A small bathroom can produce a larger waterproofing bill than a spacious, open wet area. A niche, hob, several pipe penetrations or a damaged substrate adds labour even when the measured floor area is modest. Square metres set the starting point, while preparation and detailing often determine the final quote.

Membrane selection affects both material and application costs. Australian pricing guides place bathroom waterproofing broadly around A$40–A$100 per square metre, while another uses A$50–A$85 per square metre as a practical benchmark. A standard bathroom commonly falls around A$500–A$1,800, depending on scope and whether the work is new construction, renovation or rectification. This Australian waterproofing cost breakdown explains why higher pricing often reflects preparation, junctions and re-waterproofing rather than membrane material alone.

The main variables on a Melbourne site

A sound new screed supports a straightforward sequence. An older Victorian bathroom may need adhesive removal, grinding, patching and primer before the first coat. Apartment access, stair carries and restricted working hours raise labour costs because the waterproofer spends more time moving materials and protecting adjoining areas.

Height and detailing requirements also increase coverage. Under Australian bathroom guidance, shower walls need waterproofing to at least 1,800 mm above the finished floor substrate, or 50 mm above the shower rose, whichever is higher. Walls around baths and laundry tubs need waterproofing to at least 150 mm above the fixture. The Australian waterproofing and tiling guidance sets out these practical height requirements.

Price Driver Typical Impact Example
Membrane system Changes material and application requirements A standard liquid system may suit a simple room, while a specified polyurethane system can require more preparation and handling
Substrate condition Adds preparation labour and materials Cracked screed, old adhesive or porous sheeting needs repair and priming
Access Increases labour time A ground-floor room is simpler to service than an apartment with difficult access
Junctions and penetrations Adds detailing time Niches, hobs, floor wastes, pipe penetrations and door thresholds need careful treatment
Waterproofing height Increases coated area Shower walls extending to the required height use more material than shower-only floor work
Renovation versus new build Raises scope complexity Retiling requires removal and reinstatement work before the new membrane
Inspection and documentation Adds compliance overhead The quote may include inspection coordination and the installation certificate

A risk allowance should match visible site conditions. An unexplained premium deserves questions, especially when the quote does not separate preparation, access and rectification work. Comparing the same line-item logic with other property trades, roof estimate audit cost offers a useful reference for assessing whether scope analysis is transparent.

Real Price Ranges for Bathrooms, Balconies and Leak Repairs

The price changes sharply with the work category. Shower-only waterproofing, a complete bathroom membrane, balcony remediation and leak rectification are separate scopes, even when their measured areas appear similar. Waterproofing may account for only 3–6% of a bathroom renovation budget, yet a failed membrane can become the most expensive defect to repair. The quote needs to reflect the work required the first time.

For a medium bathroom, an Australian pricing guide reports A$900–A$1,800 for 6–10 m², based on roughly A$50–A$85 per square metre. Standard bathroom waterproofing is also commonly placed around A$500–A$1,500, while larger projects can reach A$4,500 or more as preparation, removal and reinstatement expand. This cost guide explains how area and project scope affect the estimate.

Scope Typical Size Price Range (A$) Notes
Shower-only waterproofing Varies by recess and floor area Around A$50–A$85 per m² Usually simpler where the screed and substrate are new and sound
Standard bathroom wet area 6–8 m² A$800–A$1,800 Benchmark includes GST in the cited Australian pricing guide
Large ensuite Larger than a standard bathroom A$1,500–A$3,000 More floor area, junctions and penetrations can increase labour
Medium bathroom 6–10 m² A$900–A$1,800 Area-based benchmark from an Australian cost guide
Balcony waterproofing Project-specific Varies with edges and penetrations Thresholds, door jambs, drip edges and balustrade penetrations make detailing significant
Failed waterproofing repair Project-specific A$3,000–A$8,000+ Strip-out and reinstatement can dominate the cost

Balcony work needs its own allowance. The membrane is only one part of the system. Falls, thresholds, drainage edges, balustrade penetrations and the junction with external finishes must be coordinated. Melbourne Tiling Services' balcony waterproofing cost guide for Melbourne projects provides a focused comparison for this type of work.

Leak rectification carries the widest uncertainty because the membrane is rarely the only item removed. Diagnosis may lead to tile and screed removal, inspection of sheeting and framing, membrane replacement, and reconstruction of the wet area. Failed waterproofing repairs can sit around A$3,000–A$8,000 or more once strip-out and reinstatement are included. A Melbourne waterproofing cost overview distinguishes standard new-build work from renovation and retile scopes.

A separate scope also matters where a renovation includes a roof opening or skylight near the wet area. Homeowners can compare flat roof skylight costs separately, rather than accepting one blended figure that hides waterproofing, access and reinstatement allowances.

DIY Versus a Licensed Waterproofer

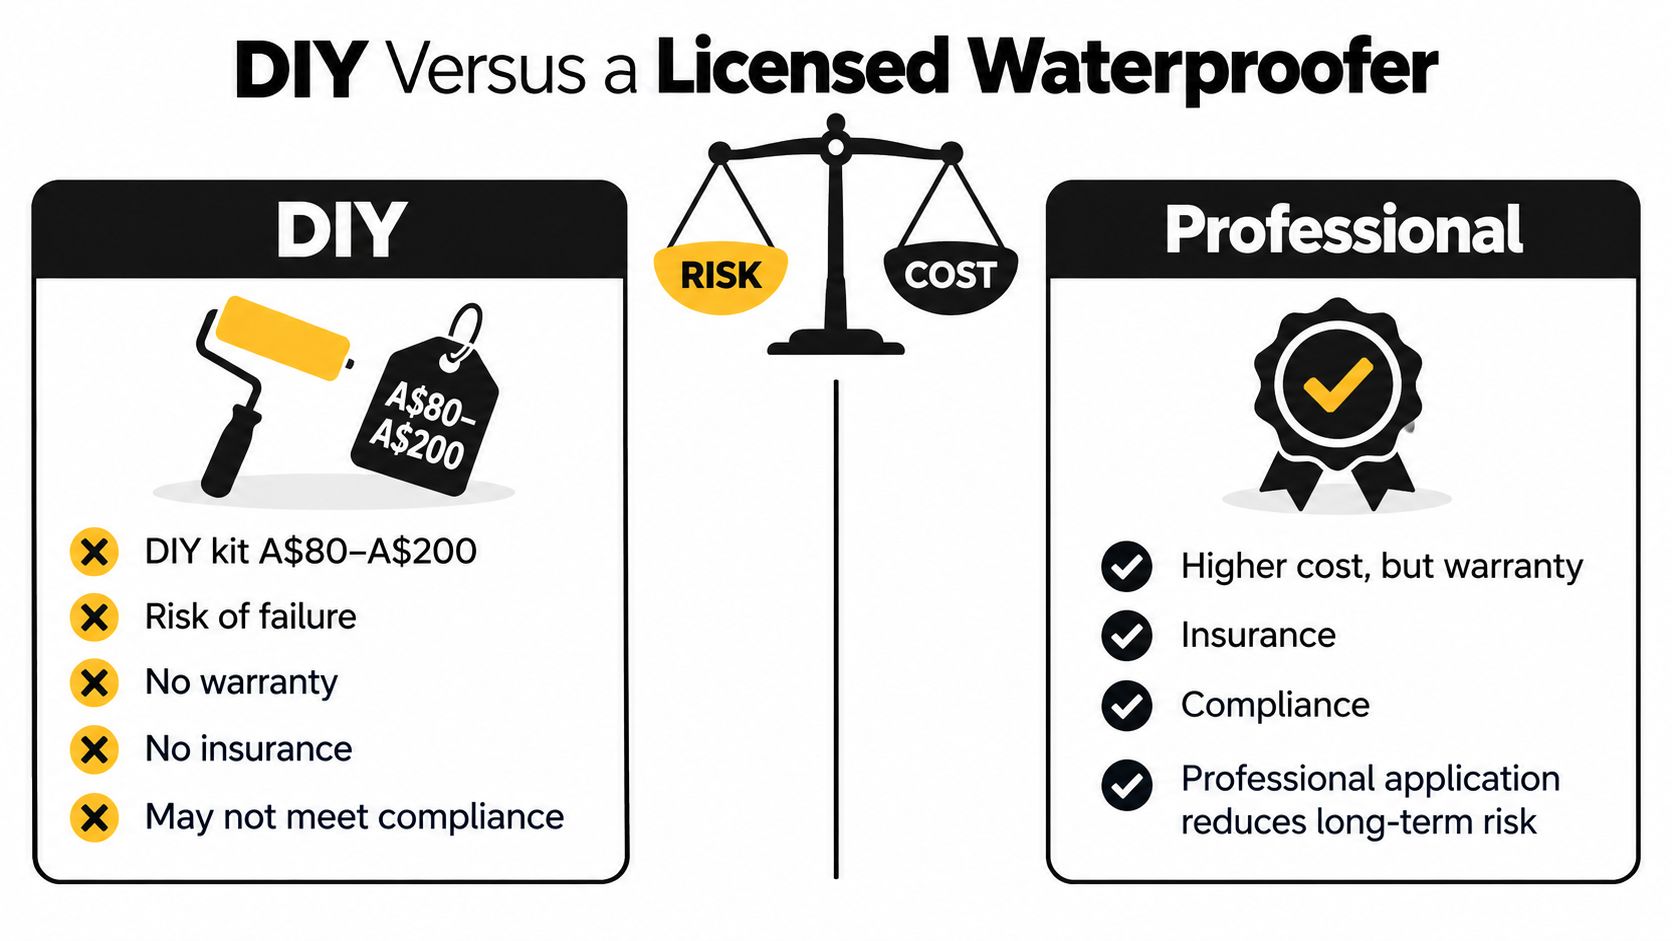
A bathroom membrane can represent only 3–6% of the renovation budget, yet a failed membrane may become the most expensive defect to repair. That is why the decision between DIY and a licensed waterproofer should be based on risk, compliance, warranty and insurance, not the price of a tub of product.

A homeowner may roll membrane across a prepared bathroom in a weekend. The difficult work is in forming reliable junctions, sealing penetrations, achieving the specified coverage and allowing the system to cure properly. Manufacturer warranty conditions may also depend on the approved application method, product system and installer competency.

Where the apparent saving disappears

In Victoria, building work valued at A$5,000 or more must be carried out by a registered building practitioner, according to Victoria's Building Act 1993 threshold guidance. That threshold applies to the broader building work, so confirm who accepts responsibility when waterproofing is part of a bathroom renovation. Compliance with AS 3740 must also be addressed. An even-looking membrane does not prove that the wet area has been detailed correctly.

A licensed contractor should provide a written scope, registration evidence, insurance details and the relevant installation certificate. DIY work can leave the owner without an independent inspection record. If water reaches the framing or adjoining room, that missing documentation can make warranty discussions and responsibility for repairs much harder.

Consideration DIY Licensed waterproofer
Upfront outlay Lower product cost Higher trade cost
Preparation Owner responsible Included when listed in the quote
Compliance record May be incomplete Certificate and inspection can be documented
Warranty position Depends on product conditions Linked to the specified system and installer
Failure consequences Owner carries rectification risk Contract and insurance arrangements may provide protection

The A$3,000–A$8,000+ repair range for failed waterproofing shows why membrane installation is not a casual finishing task. Strip-out, drying, substrate inspection, replacement and reinstatement can cost far more than the original waterproofing allowance. A licensed quote costs more at the start, but it should make the scope, responsibility and compliance record visible before tiles cover the work.

A comparison infographic showing the risks and costs of DIY waterproofing versus hiring a licensed professional.

This short video provides a visual introduction to the difference between a DIY approach and professional waterproofing work:

What to Ask Contractors and a Sample Quote Template

Send the same written questions to every contractor. Otherwise, one tradesperson may price a shower recess while another includes the complete bathroom floor, wall returns and certification.

A guide listing key questions to ask contractors and a template for a waterproofing service quote.

Questions that expose the real scope

Ask for the membrane manufacturer, product name and system type. Confirm how many coats are included, how the contractor will verify application thickness or coverage, and how long the system must cure before screeding or tiling.

Then ask about the substrate:

  • Preparation: Is grinding, patching, cleaning, priming and moisture testing included?
  • Junctions: How will internal and external corners, wall-floor changes and movement-prone areas be treated?
  • Heights: Will shower walls reach at least 1,800 mm, or the required level above the shower rose where applicable?
  • Penetrations: Are puddle flanges, wastes, taps, mixers, niches and pipe penetrations included?
  • Falls: Who is responsible for screed falls and directing water to the waste?
  • Curing: What is the required curing time before the next trade starts?
  • Documentation: Who arranges inspection and issues the waterproofing installation certificate?
  • Credentials: Can the contractor provide registration details, insurance evidence and comparable recent work?

For a second renovation quote, you can also compare how a bathroom renovation quote is structured and separate waterproofing from plumbing, carpentry, tiling and fixtures.

A copyable quote request

Project: Melbourne bathroom or ensuite waterproofing
Areas: Shower recess, floor, wall returns and other nominated walls
Preparation: Grinding, patching, cleaning, primer and moisture checks
System: Brand, product, liquid or sheet membrane, coats and curing requirements
Details: Corners, bond breakers, reinforcement, puddle flange and penetrations
Screed: Falls to waste, included or excluded
Certification: Inspection, installation certificate and responsible issuer
Price: Labour, materials, GST, variations and payment schedule
Programme: Start date, application dates and time before tiling
Contractor: Registration details, insurance and warranty terms

A quote that answers these points may not be the cheapest. It's far easier to assess, and clarity is one of the strongest protections against disputed variations.

Smart Ways to Cut Cost Without Risking Performance

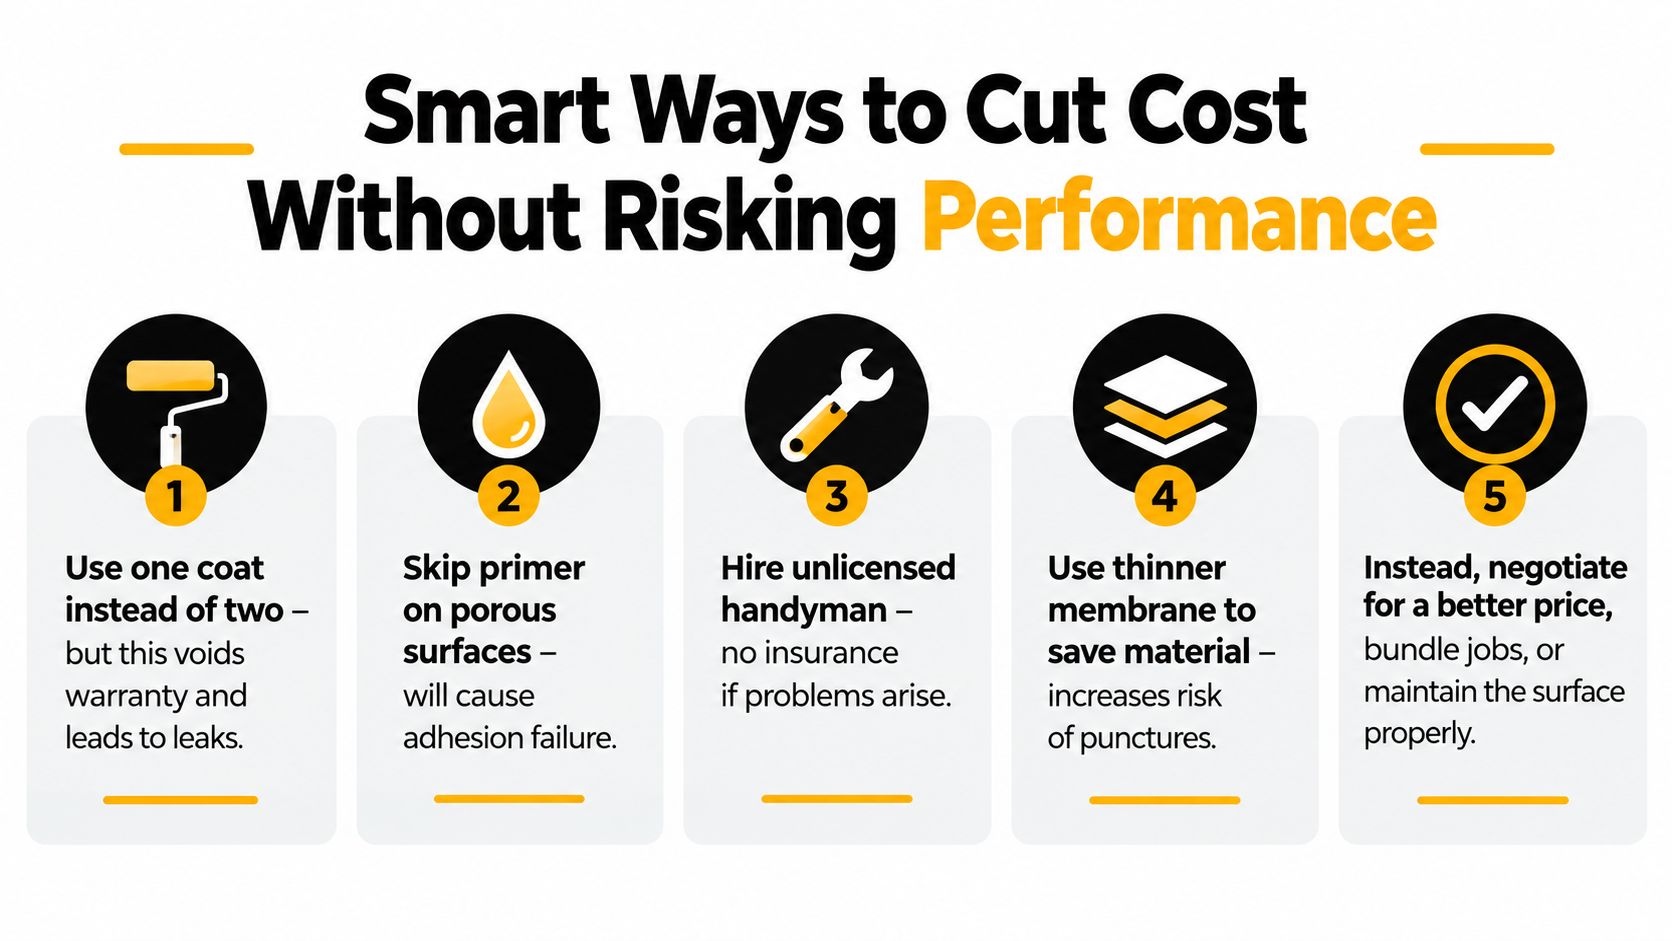
A membrane can look identical whether it was installed correctly or applied as a shortcut. You can't judge the number of coats, film thickness, adhesion or detailing from the finished tiled surface, so cutting the visible price often means cutting work that stays hidden.

The risky shortcuts are predictable. Skipping primer on a porous substrate can affect adhesion. Omitting bond breakers at movement-prone junctions can leave weak transitions. Reducing coats or membrane thickness may breach the product system, and skipping the final water test removes an important opportunity to identify problems before tiling.

An infographic showing five tips for cutting construction costs while avoiding performance risks during waterproofing projects.

Savings that preserve the system

The safest savings come from reducing duplicated mobilisation and preparation, not weakening the membrane:

  • Bundle wet areas: Arrange the bathroom, laundry and powder room together where the programme allows, so the contractor can organise one setup and visit.
  • Sequence trades properly: Book waterproofing after the screed has cured and the substrate is ready, rather than paying for a return visit.
  • Choose the right system: Use a suitable acrylic or polyurethane system where the substrate and manufacturer requirements allow it, instead of specifying the most expensive option automatically.
  • Keep finishes standard: Avoid unnecessary tinted topcoats or decorative product upgrades when they don't improve the waterproofing performance.
  • Complete safe preparation: Remove old tiles or loose finishes yourself only if you can do so without damaging sheeting, falls, plumbing or structural surfaces.

The waterproofing contractor still needs to inspect and accept any surface you prepare. A damaged substrate can cost more to correct than the labour you hoped to save.

Never negotiate away membrane thickness, required coats or the final water test. Those are performance controls, not decorative extras.

A fair contractor can often sharpen the price by coordinating the programme, clarifying the scope and avoiding duplicated visits. They shouldn't achieve the saving by substituting an unapproved product, reducing application requirements or leaving certification out of the contract.

Melbourne and Victorian Rules That Affect Your Final Price

Compliance is part of the price, even when it appears as a small line at the end of the quote. Victorian bathroom renovations may involve a registered builder, a licensed waterproofer, inspection arrangements and an installation certificate, depending on the nature and value of the work.

For Victorian building work valued at A$5,000 or more, the cited state guidance says a registered building practitioner must carry out the work. Waterproofing must also conform to AS 3740. That matters when an owner appoints separate trades for demolition, plumbing, carpentry, screeding, waterproofing and tiling, because someone needs to hold and coordinate responsibility for the building work.

Why compliance changes the quote

The contractor has to allow time to prepare junctions, complete the specified membrane system, organise inspection where required and retain documentation. Those tasks don't necessarily add much material, but they add skilled labour, coordination and accountability.

Australian bathroom guidance requires shower walls to reach at least 1,800 mm above the finished floor substrate, or 50 mm above the shower rose, whichever is higher, while walls around baths and laundry tubs require waterproofing to at least 150 mm above the fixture. The exact wall and floor scope should be written into the quote so the tiler and waterproofer aren't working from different assumptions. This Melbourne waterproofing service information provides a local reference point for discussing wet-area scope before finishes are installed.

One Victorian compliance guide states that proper bathroom waterproofing installation typically costs A$2,000–A$3,500, while rectifying failed waterproofing can reach A$15,000–A$30,000. It also identifies independent inspection before tiling and a formal installation certificate by a licensed waterproofer as part of the Victorian process. Read the Victorian waterproofing standards guidance when checking whether a quote has allowed for those requirements.

Request three like-for-like written quotes before tiling starts. Give each contractor the same plan, wet-area measurements, substrate information and certification requirements, then compare the scope rather than selecting the lowest headline figure.


Melbourne Tiling Services P/L can coordinate bathroom renovations, ensuite renovations, waterproofing, screeding, tiling and leak rectification through its registered building team and qualified trades. Visit Melbourne Tiling Services P/L to request a quote and discuss your wet-area scope before the membrane is covered by tiles.

Balcony Waterproofing Membrane Guide for Tiled Balconies

You've just had a tiled Melbourne balcony finished, and after the first proper rain you notice a shallow puddle near the door. A week later, there's a damp mark on the ceiling below, or the grout at the wall edge has started darkening. The tiles may look perfect, but the waterproofing layer beneath them is already telling you something.

A balcony waterproofing membrane isn't just a liquid product rolled across concrete. It's part of a coordinated system involving the substrate, falls, drains, movement joints, wall terminations, door thresholds, penetrations and the tile finish. This guide explains how that system works, why membranes fail at details more often than through the membrane material itself, how Australian compliance requirements apply, and when a homeowner, property manager or renovator should bring in a registered professional. The same principles matter in bathroom renovations, where waterproofing errors can also remain hidden until finishes are complete.

Table of Contents

Why Tiled Balconies Leak Without the Right Membrane

The first sign is often easy to dismiss. A few tiles stay wet after the rest of the balcony dries. Water gathers beside the sliding door. A downstairs ceiling develops a faint brown mark. By the time a leak becomes visible indoors, water may already have travelled through several concealed junctions.

Tiles and grout aren't the waterproofing system. They form the exposed walking surface, while the membrane underneath provides the continuous barrier that protects the structure below. If the installer leaves a gap around a drain, fails to seal a balustrade penetration, or carries the membrane to the wrong height at an adjacent wall, rain can move beneath the tiles even when the chosen product is technically suitable.

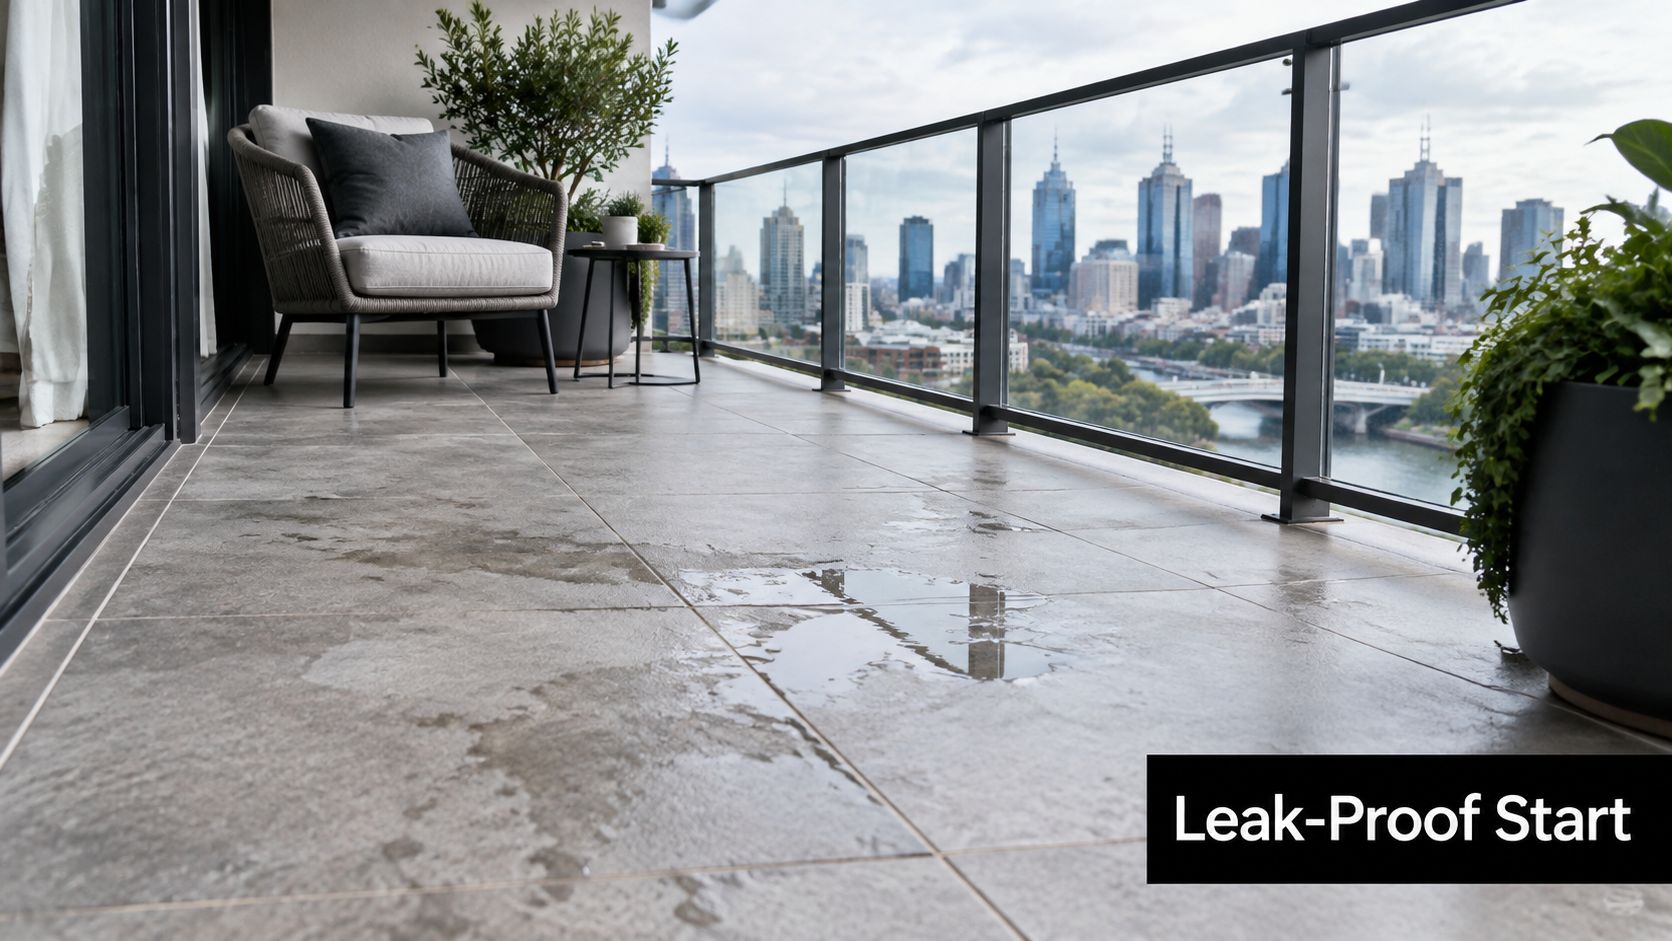
A modern apartment balcony featuring a puddle of water on stone tiles with a cityscape view.

The visible symptom is rarely the entry point

Suppose water appears on the ceiling below the outer corner of a balcony. That doesn't prove the membrane failed at that corner. Water may have entered around a door threshold, travelled along the slab, and emerged somewhere else. Concrete, screeds and tile bedding can conceal the path.

Common warning signs include:

  • Persistent ponding: Water remains around low points because the finished surface doesn't drain correctly.
  • Efflorescence: White mineral deposits appear where moisture carries salts through grout or masonry.
  • Drummy tiles: Tiles sound hollow or lose adhesion after moisture reaches the bedding layer.
  • Damp interiors: Paint, plaster or ceiling surfaces below the balcony show staining, mould or a musty smell.
  • Edge deterioration: Sealants split at wall junctions, corners, drains or door openings.

A Melbourne balcony also faces movement, wind-driven rain, temperature changes and strong exposure. Those forces concentrate at transitions, not in the middle of an uninterrupted membrane field. A product comparison that ignores those transitions gives homeowners false confidence.

Practical rule: Treat the balcony as a waterproofing system, not as a tile job with a waterproof coating added at the end.

That approach helps prevent expensive strip-outs. It also gives property managers and renovators a better question to ask: not just “Which membrane are you using?” but “How will the membrane connect to the drain, walls, threshold, joints and balustrade?”

What a Balcony Waterproofing Membrane Actually Does

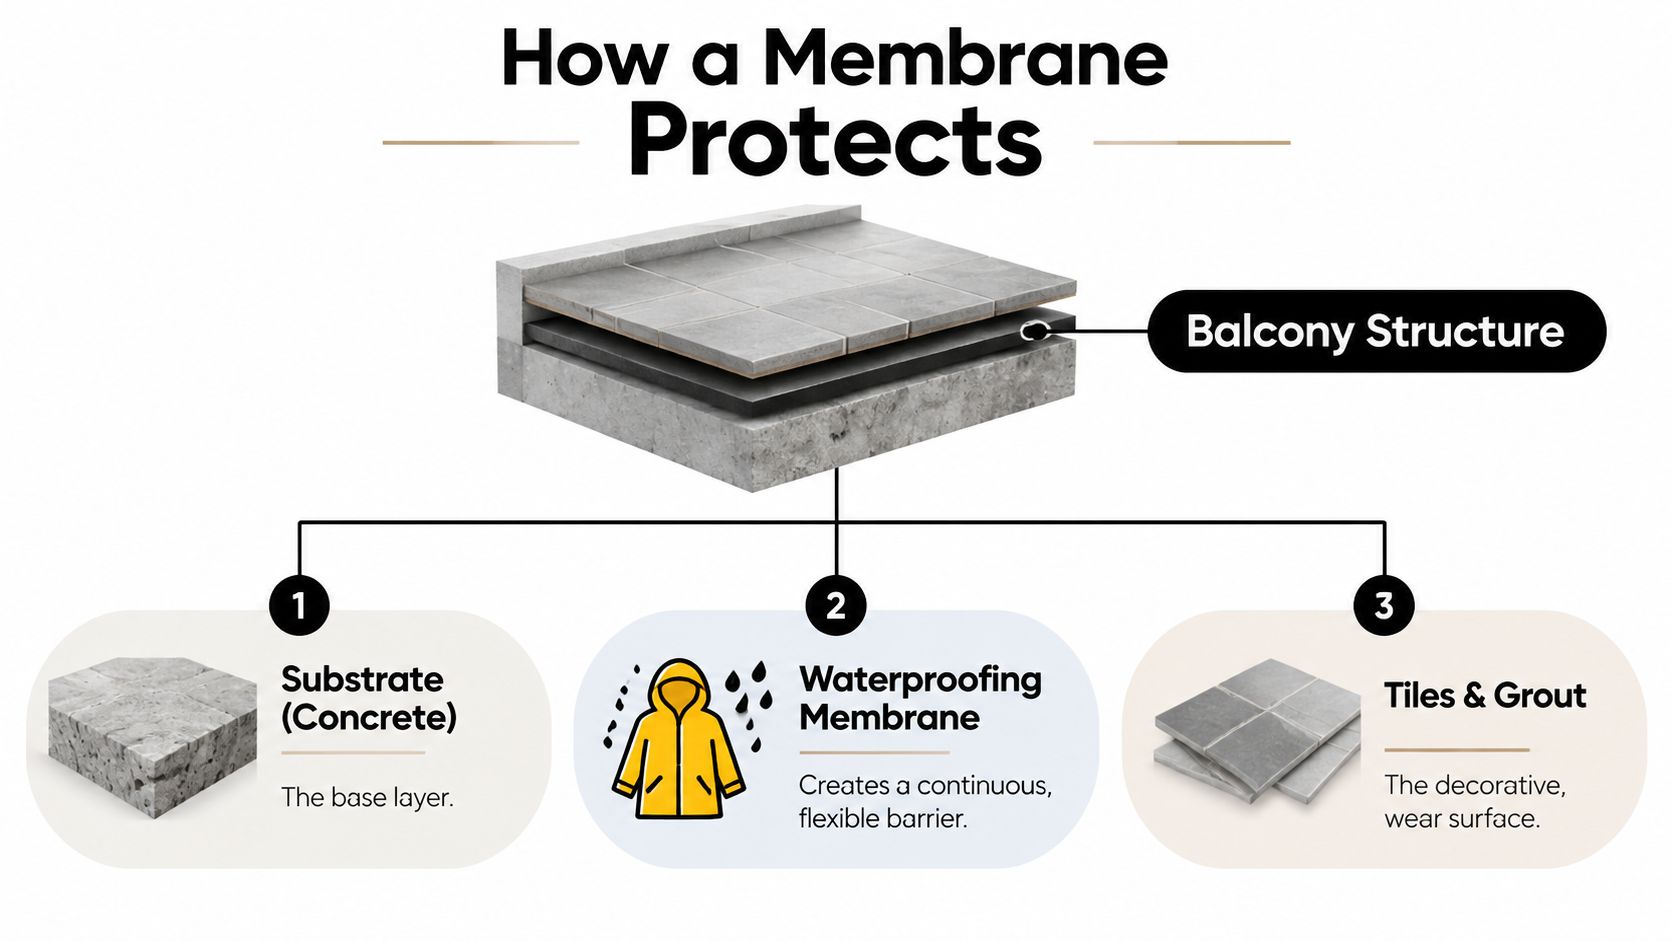
Think of the membrane as a raincoat beneath the tiles. The fabric keeps water out, but the coat only works if its seams, cuffs and zip are sealed. A balcony membrane follows the same principle. The broad surface matters, but the junctions decide whether the protective layer remains continuous.

The basic assembly contains three functional layers:

  1. Substrate: Usually the concrete or prepared base that supports the system.
  2. Waterproofing membrane: The flexible or bonded barrier that limits water movement into the structure.
  3. Tiles and grout: The decorative, wear-resistant surface that people walk on and that directs surface water towards drainage.

A diagram illustrating the three essential layers of balcony construction including concrete, waterproofing membrane, and tiled surface.

Material versus complete system

A membrane material may be waterproof on its own, but a balcony needs more than a waterproof sheet or cured coating. The system includes primers, reinforcing components, bond breakers, sealants, compatible adhesives, drain connections and termination details. Each part must work with the next part.

External balconies are also different from internal wet areas. AS 4654.2-2012 is Australia's key technical benchmark for above-ground external waterproofing membranes used in buildings and structures, including balconies and roofs. The standard addresses above-ground use, rather than below-ground or pool and spa applications, so a product suitable for one environment isn't automatically suitable for another. Australian balcony membrane guidance referencing AS 4654.2-2012 explains this distinction and the importance of design and installation.

How membrane assemblies differ

You may encounter several descriptions in specifications:

  • Fully bonded: The membrane adheres across the prepared substrate, limiting movement beneath it.
  • Partially bonded: Selected areas bond while other areas accommodate movement or help manage stresses.
  • Mechanically fixed: Fasteners secure the membrane, with penetrations and laps requiring careful sealing.
  • Ballasted: A covering layer holds the membrane in position rather than relying entirely on adhesive.
  • Inverted roof membrane assembly: The waterproofing sits beneath insulation or other protective layers in a roof-style build-up.

Those categories don't identify a universal “best” option. They describe how the membrane interacts with the structure and the layers above it. A tiled balcony needs a system compatible with the substrate, tile adhesive, screed and expected exposure.

Balustrades deserve particular care because posts, brackets and edge fixings can interrupt the waterproofing plane. Before selecting a railing arrangement, it can help to review a specialist resource on balcony railing safety and materials, then coordinate the railing design with the waterproofing detail rather than treating it as a separate trade decision.

Types of Balcony Waterproofing Membranes Compared

A tiled balcony can still leak after a high-quality membrane is installed. The usual weak points are the junctions, drainage details and compatibility between layers. Liquid-applied systems can follow irregular shapes and reduce laps, while sheet systems offer a controlled, factory-made thickness. Bituminous products may suit particular build-ups, and polyurethane, polyurea, PVC or other systems may offer different combinations of flexibility, UV resistance and traffic tolerance.

The right choice depends on the existing substrate, required falls, tile overlay, exposure, movement, access and the manufacturer's compatibility requirements. A roof product may not accept the same adhesive or tile bedding arrangement as a pedestrian balcony. Commercial work can place greater demands on the assembly where people use the area frequently or the membrane sits over occupied space. Guidance on durable waterproofing for commercial roofs shows why exposure, traffic and the complete build-up need to be considered together.

Membrane Type Application Method Pros for Tiled Balconies Limitations to Consider
Liquid-applied polyurethane or acrylic Rolled, brushed or squeegeed in coats Forms a continuous layer around corners, drains and irregular penetrations, making it practical for some remediation work Requires accurate coverage, curing and reinforcement; incompatible products or thin application can create weak areas
Sheet membrane Laid in sheets with bonded or welded laps Provides consistent manufactured thickness and can suit larger, regular areas when laps, upturns and thresholds are detailed correctly Laps, corners, drains and penetrations need precise detailing; the tile overlay must be compatible
Bituminous membrane Bonded, heat-applied or incorporated into a designed assembly Can provide heavy-duty protection in suitable roof and deck constructions, including assemblies with planned drainage and edge upturns May need protection from traffic and UV; heat application and tile compatibility require specialist assessment
Polyurea or other rapid-curing liquid system Sprayed or applied with specialist equipment Can create a joint-free finish around complex balcony details and may suit demanding commercial programmes Requires experienced installers, controlled conditions and documented compatibility with the finishing system
PVC or synthetic sheet Installed with bonded or welded seams Flexible sheet construction can suit selected external assemblies where drains, thresholds and edge seams are properly coordinated UV exposure, seam method, edge detailing and compatibility with tile finishes must be verified

Match the system to the balcony

A new balcony with a sound, accessible substrate allows the installer to design the build-up from the falls through to the tile adhesive. Retrofit work is less predictable. Existing tiles may need removal, old coatings may be poorly bonded, drains may be undersized or blocked, and movement joints may not align with the proposed tile layout.

The membrane is only one part of the water-control system. Falls must direct water to the drain, wall upturns must connect with the waterproofing plane, and thresholds must prevent water from reaching the interior. A product can perform well in testing yet fail when one of these details is interrupted during construction.

Traffic and UV exposure also affect the decision. A membrane that remains exposed needs a finish designed for exposure, while one beneath tiles needs protection from construction damage and compatibility with the tile assembly. The product data sheet should state the intended use, preparation requirements, curing conditions and compatible overlay products.

Ask for a written recommendation tied to the actual balcony rather than a generic promise. The shortlist should come from the substrate condition, junction details, drainage arrangement and planned finish, not brand popularity.

How Substrate Preparation and Installation Work

A reliable installation starts before anyone opens a membrane drum or rolls out a sheet. The installer first examines the substrate for cracks, contamination, loose material, moisture, unevenness and previous coatings. A balcony can't drain properly if the base contains depressions, and a membrane can't bond reliably to dust, laitance, grease or unstable material.

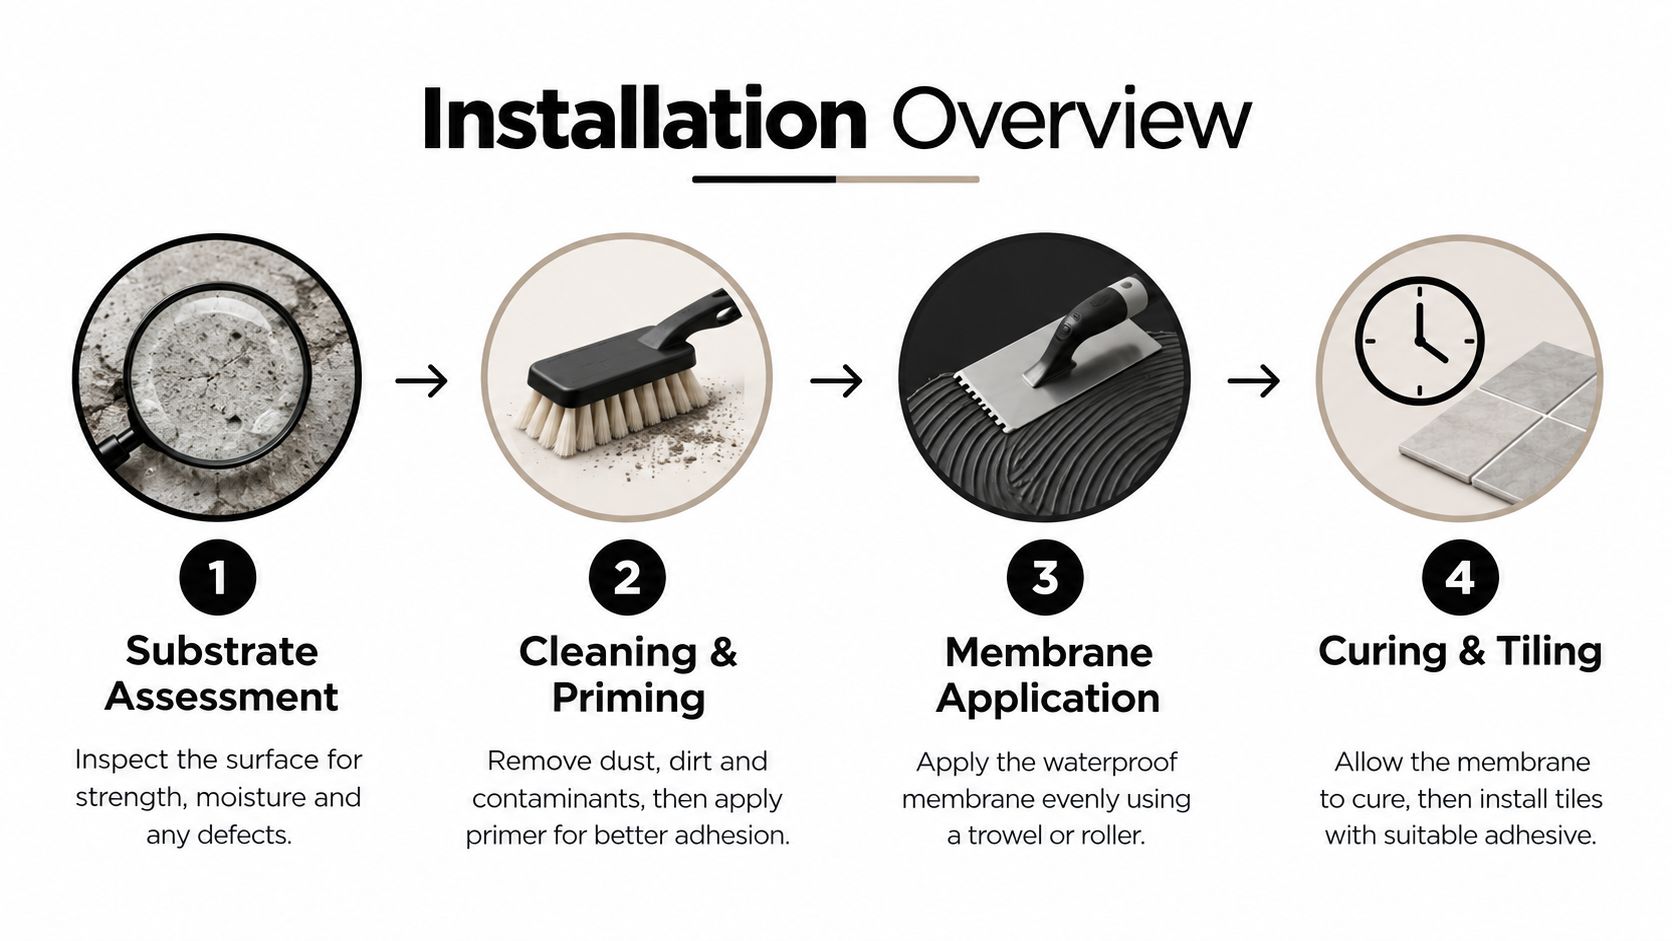
The sequence usually follows a clear logic:

  1. Assess the substrate. Identify structural cracks, hollow areas, weak screed, existing membrane remnants and locations of drains, joints and penetrations.
  2. Clean and prime. Remove contaminants and use the primer specified for the substrate and membrane. Primer choice isn't interchangeable across concrete, masonry, timber-based materials or old coatings.
  3. Correct levels and falls. Use a suitable screed or self-levelling approach where required, while preserving movement joints and ensuring the surface directs water to drainage.
  4. Detail the junctions. Treat corners, wall upturns, door thresholds, drains, balustrades, penetrations and movement joints before covering the broad field.
  5. Apply and protect the membrane. Install the specified coats, sheets, reinforcing or laps, allow the system to cure, then protect it from trades before tiling begins.

For a plain-language explanation of the first stage, see this guide to substrate preparation before tiling. Preparation determines whether later layers sit on a stable, clean and correctly shaped base.

A four-step infographic illustrating the installation process for balcony waterproofing membrane on a construction surface.

Falls and terminations are measurable

Australian balcony guidance built around AS 4654.2 identifies a continuous minimum finished surface fall of 1 in 80, equivalent to a 1.25% gradient towards drainage points. The same guidance identifies membrane termination heights of 100 mm to 150 mm above finished tile level on adjacent walls, depending on wind region and door-threshold design. AS 4654.2 guidance and construction requirements also highlights the need to treat penetrations, movement joints, drains and upturns correctly.

Those figures aren't decorative details. If the finished surface doesn't maintain the required fall, water can pond. If the termination is too low or interrupted at a threshold, wind-driven rain can reach the wall or internal floor edge.

A good installer photographs the substrate, details, membrane coats and completed work before tiles conceal the system. The project file should include product information, batch details where relevant, installation records and the waterproofing certificate. A short inspection before tiling can prevent a long investigation after the first leak.

For a visual explanation of how the process is carried out, watch the following installation overview:

Compliance Testing and Australian Standards Explained

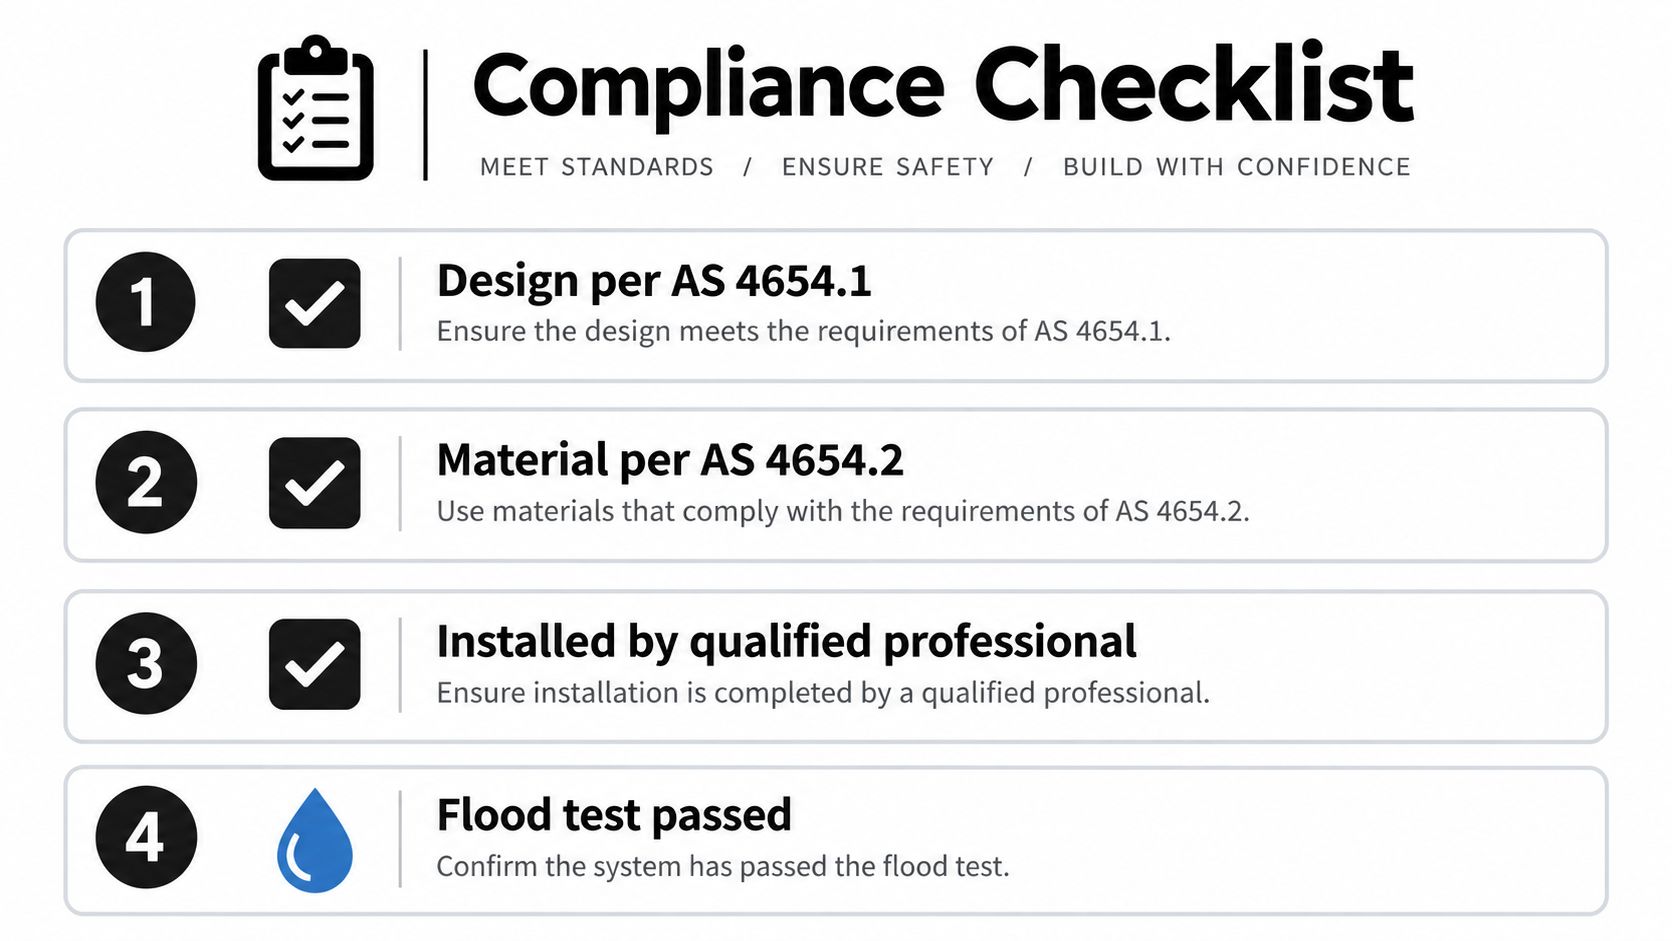
Victorian homeowners don't need to memorise an entire standard, but they should understand what compliance evidence looks like. AS 4654.1 and AS 4654.2 work together. Material performance and design-and-installation requirements are related, but they aren't the same document or the same responsibility.

The National Construction Code references the AS 4654 requirements as deemed-to-satisfy provisions for external above-ground waterproofing. Those provisions apply to elements including balconies, decks, roofs, external door openings, planter boxes and penetrations, and the NCC began referencing AS 4654 Parts 1 and 2 in its deemed-to-satisfy provisions from 1 May 2013. Australian guidance on waterproofing external above-ground building elements summarises that relationship.

What the paperwork should demonstrate

A membrane product needs evidence of material compliance, including relevant testing or certification to AS 4654.1. The design and installation must then align with AS 4654.2, the part that addresses how the system is configured and installed on the building.

The Victorian Building Authority identifies AS 4654.2 as the source of compliant balcony design details. Its guidance also addresses balcony and external wall junctions, including waterproofing incorporating balustrades under Clause 2.8.4. The VBA fact sheet on water ingress in balconies, roofs and drainage is especially useful because it focuses attention on the places where components meet.

Ask the installer for:

  • System identification: The exact membrane, primer, reinforcement and compatible tile or screed products.
  • Compliance evidence: Test reports or certification showing the membrane material meets the relevant requirements.
  • Installation records: Photos and notes showing preparation, details, coats and protection before tiling.
  • Drainage confirmation: Evidence that balcony drainage connects correctly to the stormwater system.
  • Completion documentation: A waterproofing certificate and any required inspection or handover records.

A four-step compliance checklist infographic detailing the necessary requirements for balcony waterproofing membrane installations and safety standards.

The central question is whether the documented system matches the constructed balcony. A premium product installed without the correct falls, termination or drain interface doesn't solve the compliance problem. Victoria waterproofing compliance certificate information can help homeowners understand the handover evidence they should expect.

Common Failure Modes Troubleshooting and Maintenance

A technically compliant membrane can still leak in service. Compliance confirms that a system has been designed and installed against the applicable requirements, but the balcony remains dependent on drainage, movement accommodation, protection and ongoing maintenance. A later railing installation, blocked overflow or damaged tile can create a new weak point.

Victorian water-ingress guidance places substantial emphasis on drainage and junction details. That supports a practical diagnosis: look at the interfaces before blaming the membrane field.

Where to look first

Start with the pattern rather than the product label:

  • Ponding near a door or wall: Check finished falls, tile build-up, threshold detailing and nearby drainage.
  • White deposits in grout: Investigate recurring moisture movement, cracked joints and water trapped beneath the tile finish.
  • Hollow or drummy tiles: Look for poor bedding, movement, substrate instability or moisture affecting the adhesive layer.
  • Dampness below the balcony: Inspect the full drainage path, wall junctions, penetrations and membrane edge, not just the stained ceiling location.
  • Leaks after railing work: Check whether posts, brackets or fixings pierced the waterproofing without a coordinated detail.
  • Water around an overflow: Confirm that the overflow is open and properly connected, rather than relying on a sealant bead alone.

The repair method depends on the cause. A failed surface sealant may need local replacement, while recurring ponding or concealed membrane damage may require tile removal and a broader investigation. Covering a stain with paint or applying another coating over unstable tiles usually hides the symptom without correcting the water path.

The membrane may be waterproof, but an unsealed penetration is still an opening in the waterproof envelope.

Protect the evidence and the finished work

Keep dated photographs of each membrane coat, corner treatment, drain connection and termination before tiling conceals them. This record helps future trades locate the system and gives the owner useful evidence if a defect appears later.

Maintenance should remain simple and regular:

  • Clear drainage points: Remove leaves, dirt and debris before they obstruct drains or overflows.
  • Inspect exposed sealants: Look for splitting at thresholds, wall junctions and balustrade interfaces.
  • Watch tile movement: Repair loose, cracked or drummy tiles before water reaches the bedding layer.
  • Record changes: Photograph new stains, ponding or efflorescence so a contractor can compare conditions over time.
  • Avoid unplanned penetrations: Coordinate shade structures, screens, railings and fixings with the waterproofing detail.

A professional investigation should trace the water path and inspect the concealed assembly where necessary. Don't accept a product swap as a diagnosis.

Costs Longevity and When to Hire Licensed Professionals

Balcony waterproofing costs depend on the work hidden beneath the visible finish. A new build with a sound substrate, planned falls and accessible edges is generally simpler to price than remediation involving tile removal, damaged screed, blocked drainage, failed terminations or water damage below. The membrane itself is only one line in the scope.

A useful budget separates the work into stages:

  • Investigation and access: Locate the entry point and protect adjoining areas.
  • Removal: Lift tiles, bedding or failed coatings where inspection requires it.
  • Substrate repair: Correct cracking, weak screed, uneven levels or damaged concrete.
  • Waterproofing: Install the selected system, including primers, reinforcement and junction details.
  • Finishing: Replace tiles, grout, movement joints and sealants, then complete the handover records.

Longevity depends on exposure, drainage, movement, installation quality and maintenance. A membrane that stays dry beneath a compatible tile assembly faces different conditions from an exposed system subject to traffic and ultraviolet light. The cheapest initial coating isn't automatically the lowest-cost decision if the balcony needs repeated disruption.

For a project-specific budgeting framework, review the cost factors involved in waterproofing a balcony. The same budgeting discipline helps with bathroom renovations, where waterproofing, screeding, tiling, plumbing and electrical coordination need to be priced as one connected scope.

In Victoria, domestic building work valued at $10,000 or more including labour and materials must be carried out by a registered building practitioner. Victorian guidance on DIY and professional waterproofing identifies registered domestic builder categories including Domestic Builder Unlimited and Domestic Builder Limited for relevant renovation work. Registration and trade licensing aren't a substitute for good detailing, but they help establish responsibility and coordination.

Contact a registered professional when the balcony sits above living space, the leak has returned, tiles need removal, the substrate is damaged, drainage is inadequate, or the work involves structural edges and balustrade fixings. Melbourne Tiling Services P/L in Highett coordinates balcony waterproofing, screeding, tiling and leak rectification, and also delivers bathroom and ensuite renovations with registered builder coordination, free quotes and 3D drawings.


If your Melbourne balcony is ponding, staining the room below or due for a tile replacement, ask Melbourne Tiling Services P/L to assess the substrate, drainage and membrane details before finishes are installed. Visit Melbourne Tiling Services P/L to discuss a quote for waterproofing, rectification, screeding and tiling.

Balcony Waterproofing Melbourne: A Builder’s Guide (2026)

A lot of Melbourne homeowners first notice a balcony problem from inside the house, not outside it. It's the water stain on the ceiling below, the bubbling paint near a door, the musty smell after a run of rain, or the grout line that never seems to dry out. By the time those signs appear, water has usually been getting in for a while.

That's why balcony waterproofing melbourne isn't a cosmetic job. It's a building-envelope job. If the cause is diagnosed properly and the system is rebuilt properly, the balcony stays dry and the rooms below stay protected. If the cause is guessed at, you end up paying twice.

Table of Contents

Your Guide to a Leak-Free Melbourne Balcony

If you're reading this because your balcony has started leaking, don't assume the fix is just “paint on a new membrane”. That's one of the most expensive mistakes owners make. A balcony is a full assembly made up of slab, falls, drainage, membrane, terminations, tile bed, tiles, grout, sealants and penetrations. If one part is wrong, the whole system is compromised.

This isn't a fringe problem either. A Victoria-focused balcony defects study found that 52% of assessed apartment buildings had defective balconies caused by water ingress, with a further 19% showing explicit waterproofing issues. For homeowners and apartment owners in Melbourne, that tells you two things. First, balcony leaks are common. Second, you need a methodical repair, not a rushed patch-up.

What a proper starting point looks like

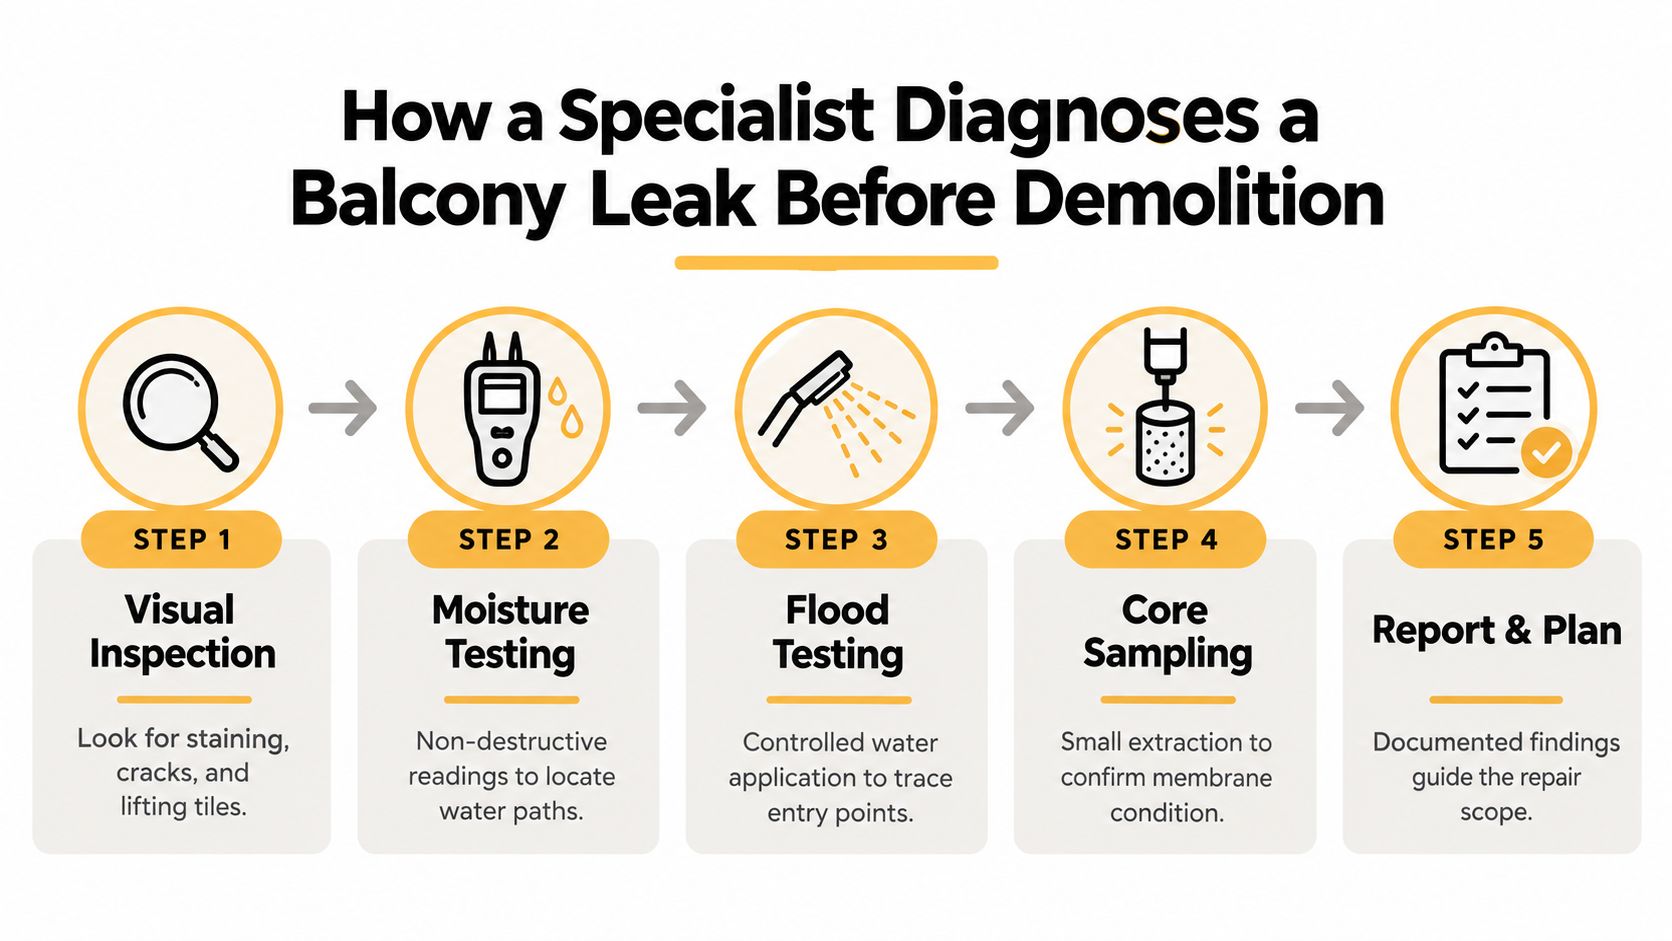
A seasoned builder won't begin by talking about brands and colours. The first job is diagnosis.

A proper site inspection should look at:

  • Where the water shows up: Ceiling below, internal wall, door threshold, slab edge, balustrade fixing or tile joints.
  • How the balcony sheds water: Whether water runs to drains cleanly or ponds on the surface.
  • What's been done before: Regrouting, silicone touch-ups, patch membranes or retiling over an old problem.
  • Whether movement is involved: Cracks at corners, wall junctions and around posts usually point to stress points, not just surface wear.

Practical rule: If someone quotes to re-waterproof your balcony before checking falls, drainage and penetrations, they're pricing a symptom, not the cause.

What homeowners need to demand

You don't need to know every clause in a standard to make a good decision. You do need to insist on a contractor who can explain the failure path in plain English.

Ask them to identify:

  1. where water enters,
  2. how it travels,
  3. why the existing system failed,
  4. what has to be removed,
  5. how the repaired system will be verified before finishes go back on.

That's the difference between a temporary improvement and a durable repair.

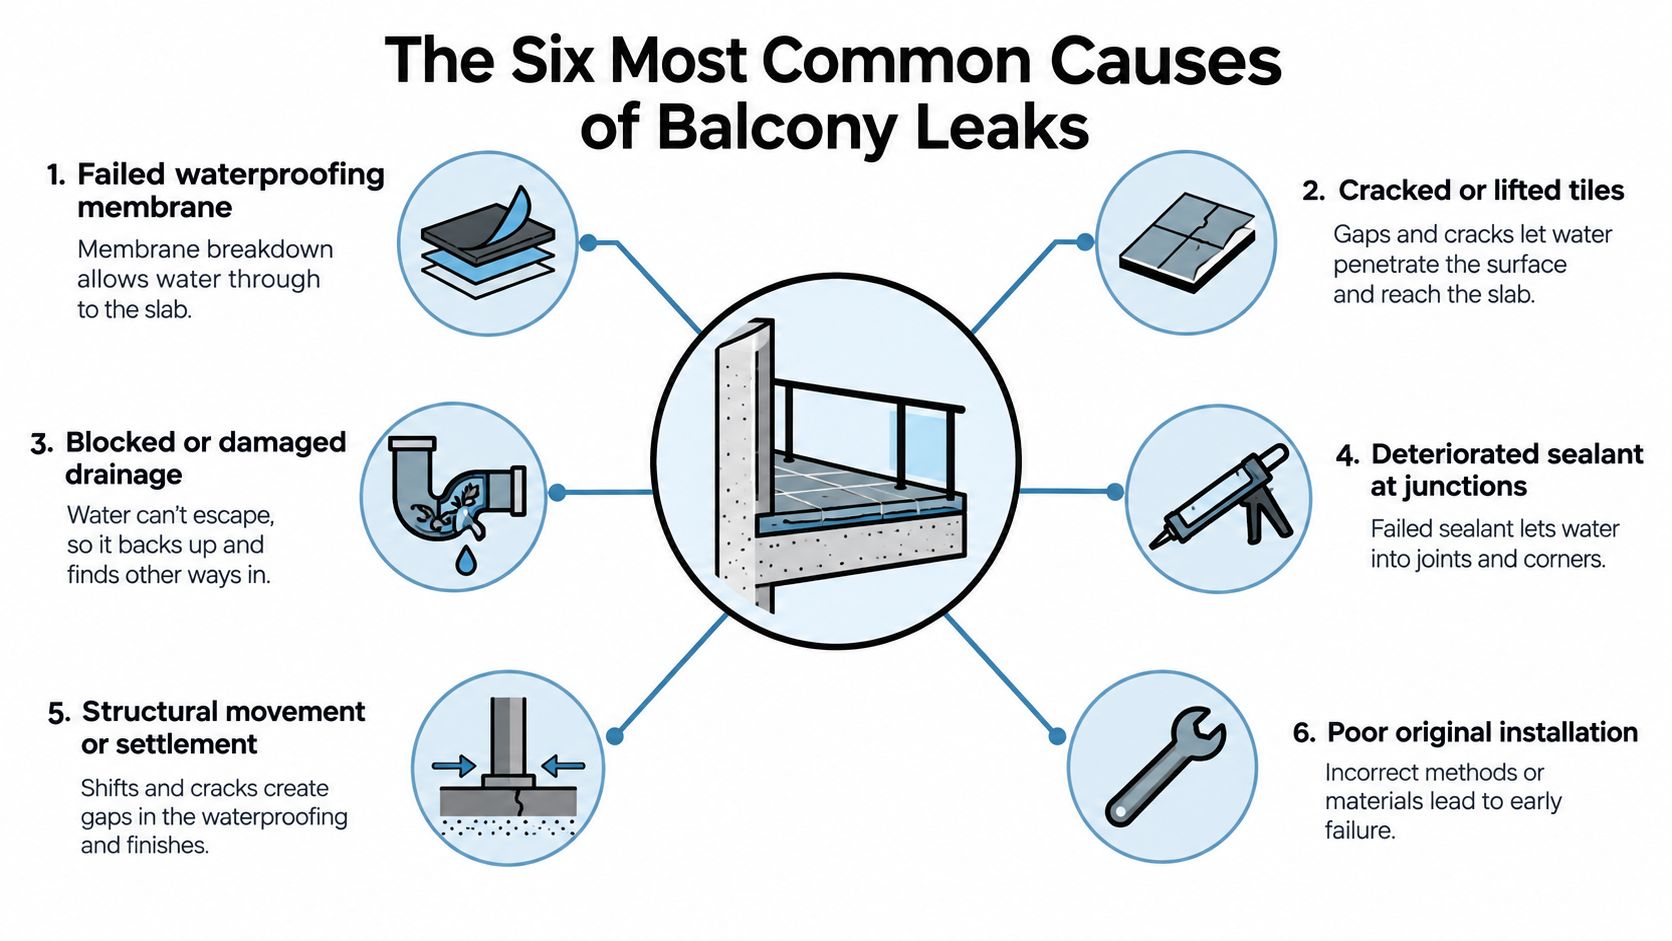
Why Balconies Really Leak The Culprits Beyond the Membrane

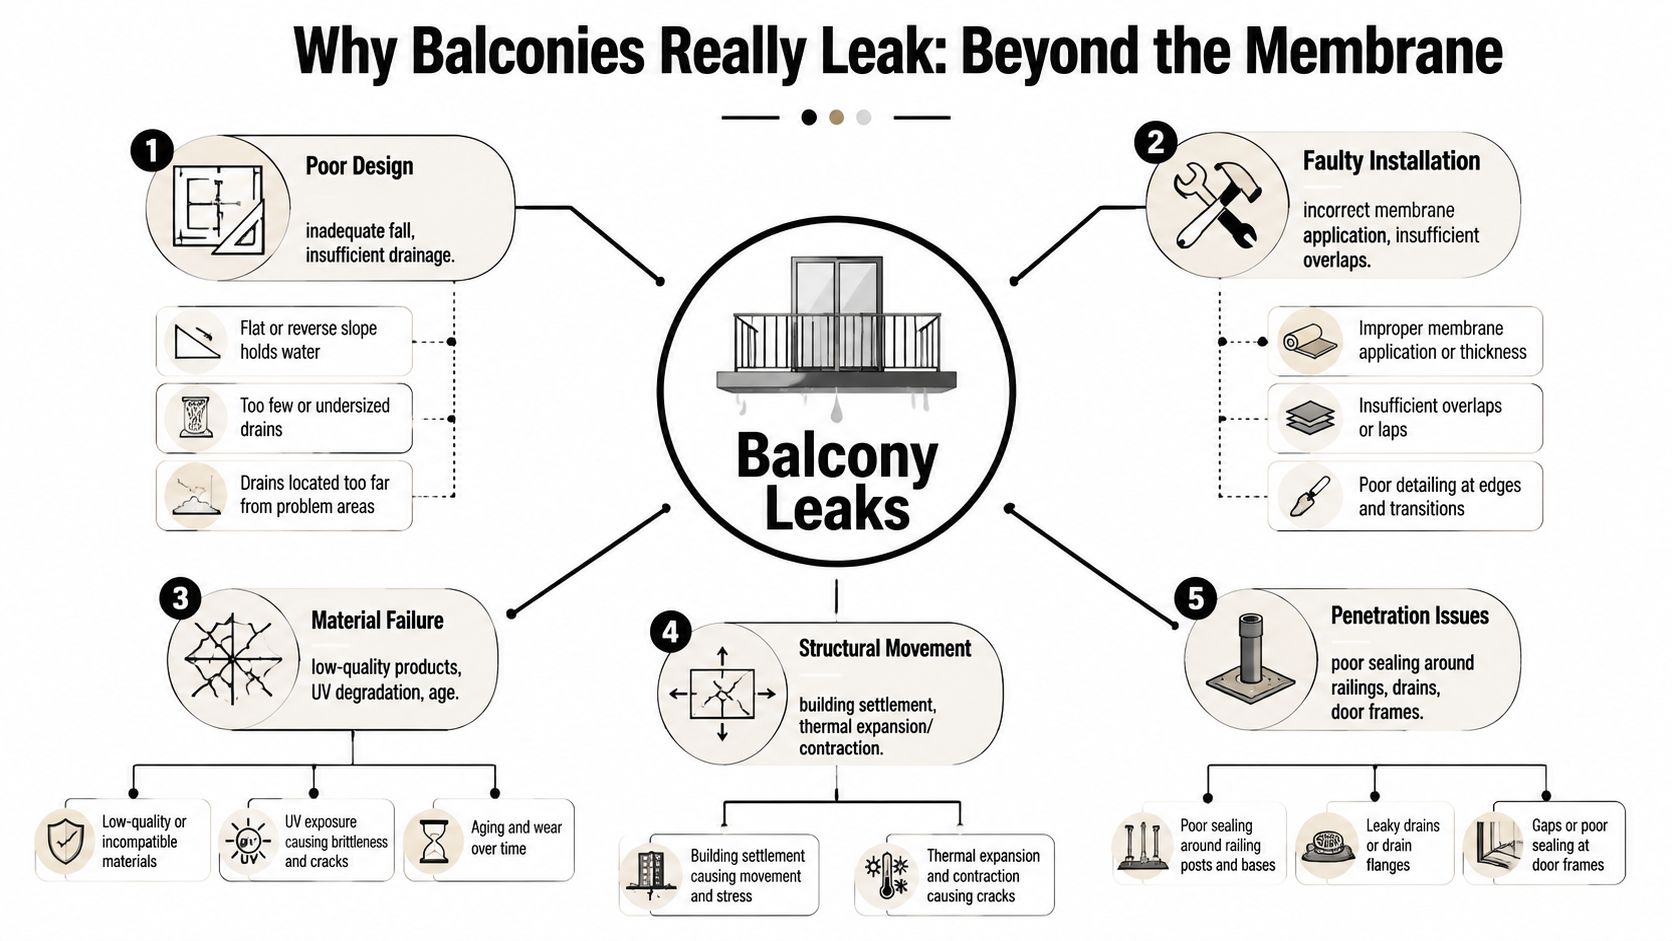
The membrane gets blamed for almost every balcony leak in Melbourne. Sometimes that's fair. Often it isn't. In practice, balconies usually leak because several small failures combine. Water ponds where it shouldn't, a sealant line cracks, a threshold is poorly detailed, or a drain can't cope because the geometry was wrong from the start.

The Victorian Building Authority guidance on water ingress in balconies, decks and terraces says balcony water ingress is often caused by poor design, inadequate water diversion, blocked drains, failed sealants, inappropriate external materials and other drainage-related defects, not just membrane failure. That's the most important mindset shift for owners. Replacing the membrane without fixing the water path often means the leak comes back.

An infographic detailing five primary causes of balcony leaks including poor design, installation, materials, movement, and penetrations.

The failure points that show up most often

Some causes are obvious once you know where to look.

  • Poor falls: Water sits on the surface instead of moving to the outlet. Standing water always finds weakness.
  • Blocked or badly located drains: Even a sound membrane struggles if the outlet arrangement is poor.
  • Failed sealants: Door frames, balustrade bases and threshold joints are frequent entry points.
  • Penetrations: Every post, flange and pipe passing through the surface creates a risk point.
  • Surface cracking and movement: Buildings move. Rigid details fail first at corners and junctions.

Many owners focus on cracked grout because that's what they can see. Grout matters, but it's usually not the primary waterproof layer. If the balcony underneath has poor falls or bad detailing at a threshold, regrouting won't solve the leak.

Why patch jobs usually disappoint

Silicone over joints. A waterproof paint from the hardware store. Replacing a few cracked tiles. These fixes can reduce symptoms for a while, but they rarely address the assembly underneath.

A proper diagnosis usually includes checking the balcony in wet conditions if possible, reviewing the edge details, examining drain setup, and tracing whether the leak appears after heavy rain, routine washing, or only wind-driven weather. Those patterns help identify whether the issue is surface ponding, overflow, a threshold problem or a penetration failure.

The best repair isn't the one with the biggest product list. It's the one that removes the actual entry point and controls where water goes.

If you want balcony waterproofing melbourne done properly, start with water management. The membrane matters. The drainage path matters just as much.

Choosing Your Waterproofing System A Melbourne Perspective

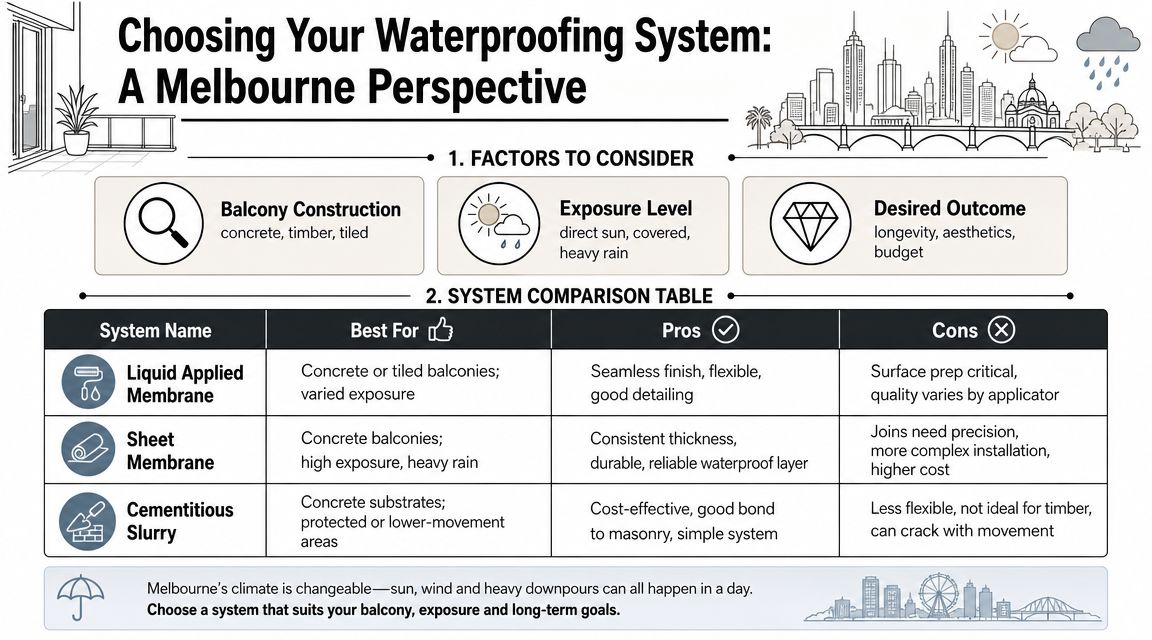
A leaking balcony often gets sold a membrane before anyone has chosen the right system for the build. That is how owners pay twice. The product matters, but the better question is whether the system suits the substrate, the finish, the movement in the structure, and the way the balcony sheds water in Melbourne weather.

For many projects here, a liquid-applied membrane with reinforced corners and junctions, installed in at least two coats to achieve the required dry-film thickness, is a practical choice, as described in this Melbourne balcony waterproofing guide. It works well on balconies with awkward edges, multiple penetrations, and detailed junctions. It also leaves less room for sloppy application. If the installer guesses coverage rates or rushes recoat times, the membrane can fail even though the surface looks finished.

An infographic comparing different balcony waterproofing systems suitable for the variable climate in Melbourne, Australia.

What builders usually compare first

Balcony Waterproofing Systems Compared Best For Pros Cons
Liquid-applied membrane Concrete balconies, complex shapes, detailed junctions A continuous, joint-free surface, good around corners and penetrations, widely used in remediation Thickness must be controlled properly, cure times matter, poor application creates weak spots
Sheet membrane Larger open areas where consistent sheet installation is practical Factory-controlled thickness, durable when seams and terminations are done properly Seams are critical, detailing around penetrations can be more demanding
Tile-over remediation systems Existing tiled balconies where demolition may be avoidable in limited cases Can reduce disruption when the substrate and existing finish are genuinely suitable Only works if the underlying structure is stable and the existing problem is not trapped below

The trade-off is straightforward. Liquid systems are more forgiving of complex shapes. Sheet systems are more controlled across big open runs. Tile-over systems can save time on the right balcony, but they are often oversold to owners who should be opening the assembly up and fixing the causes underneath.

That last point matters in Melbourne strata buildings. If the leak involves a balcony over another lot, a threshold tied into the building envelope, or balustrade fixings connected to common property, system choice is not just a product decision. It affects scope, access, approvals, and who should be carrying out the repair.

Where each system works and where it doesn't

Liquid systems suit many Melbourne balconies because they can be worked into drain flanges, floor-to-wall junctions, door upstands, and irregular slab edges without forcing extra joins into risky spots. I use them often in remedial work for that reason. The catch is quality control on site. Wet film thickness, reinforcement at change-of-plane areas, and curing conditions all need to be checked, not assumed.

Sheet membranes can be excellent on a new build or a stripped-back balcony with clean geometry. The material gives consistent thickness straight off the roll. The risk sits at the laps, terminations, and penetrations. One poor seam or badly finished outlet detail can undo an otherwise sound installation.

Tile-over remediation systems need the hardest scrutiny. They only make sense where the existing substrate is stable, the adhesion is reliable, moisture is not trapped below, and the balcony geometry already works. If the falls are wrong, if the threshold height is marginal, or if movement has already broken the surface assembly, going over the top usually hides the defect rather than fixing it.

A proper scope usually includes more than selecting the membrane:

  • Substrate preparation: remove contaminants, weak material, and anything that will interfere with adhesion
  • Crack and joint treatment: detail movement areas before the field membrane goes down
  • Drain and edge integration: make sure outlets, drips, terminations, and threshold details work with the chosen system
  • Compatibility checks: confirm primers, adhesives, screeds, tiles, and sealants are approved to work together
  • Verification: check dry-film thickness, inspect the finished work, and use flood testing where the detail allows it

Melbourne Tiling Services P/L handles balcony waterproofing together with tiling, screeding, and renovation work. That broader scope matters because balcony failures are often shared between trades. The membrane installer, tiler, screeder, and builder all affect whether the finished balcony stays dry.

The Rules of the Game Australian Standards and VBA Compliance

Balcony waterproofing isn't just a trade preference. It sits inside a compliance framework. If the work is external above-ground waterproofing, the technical benchmark in Melbourne is AS 4654.2, and the Victorian Building Authority notes that NCC compliance for balconies requires membranes to comply with AS 4654.1 and AS 4654.2 in a complete system, not just as a coating product. The VBA fact sheet on water ingress research insights also points directly to AS 4654.2 for the minimum details needed to comply.

That matters because many failed balconies weren't undone by the middle of the membrane field. They were undone at a transition, an edge, a drain, a post or a door.

What compliance means on site

Compliance in practical terms means the builder has to think in assemblies.

That includes checking:

  • Substrate suitability: The base must be sound and appropriate for the selected system.
  • Termination heights: Membrane returns and upturns have to be detailed so water can't overrun them.
  • Penetration detailing: Balustrade fixings, pipes and outlets need proper sealing and integration into the waterproofing system.
  • Evidence of installation quality: Inspection, thickness confirmation and testing matter more than a glossy finished look.

On-site reality: A balcony can look perfectly tiled and still be non-compliant underneath.

Many cheap quotes often fall apart. They price demolition, membrane, tile and grout as if the job is linear. Real waterproofing work isn't linear. It's detail-heavy. The slow parts are usually the parts that prevent leaks later.

Why registered builders matter

For homeowners, engaging registered builders matters because balcony leak repairs often touch more than one trade. You may need demolition, carpentry repairs, screeding, waterproofing, tiling, plumbing around drains, and joinery or threshold adjustments at door openings.

That's also why the overlap with bathroom renovations is so strong. The same discipline applies. Membranes have to suit the substrate. Falls have to be formed correctly. Penetrations have to be planned before finishes lock everything in. A contractor who understands only one layer of that process often misses the defect that sits in the next layer down.

More Than a Balcony Why Your Waterproofing Expert Should Be a Renovation Pro

A leaking balcony and a failed shower recess usually come from the same kind of mistake. Somebody treated waterproofing as a product instead of a system. In both settings, water is controlled by falls, junctions, penetrations, drainage, movement detailing and finish sequencing. That's why the best balcony repairers are often the same people who understand bathroom renovations at a high level.

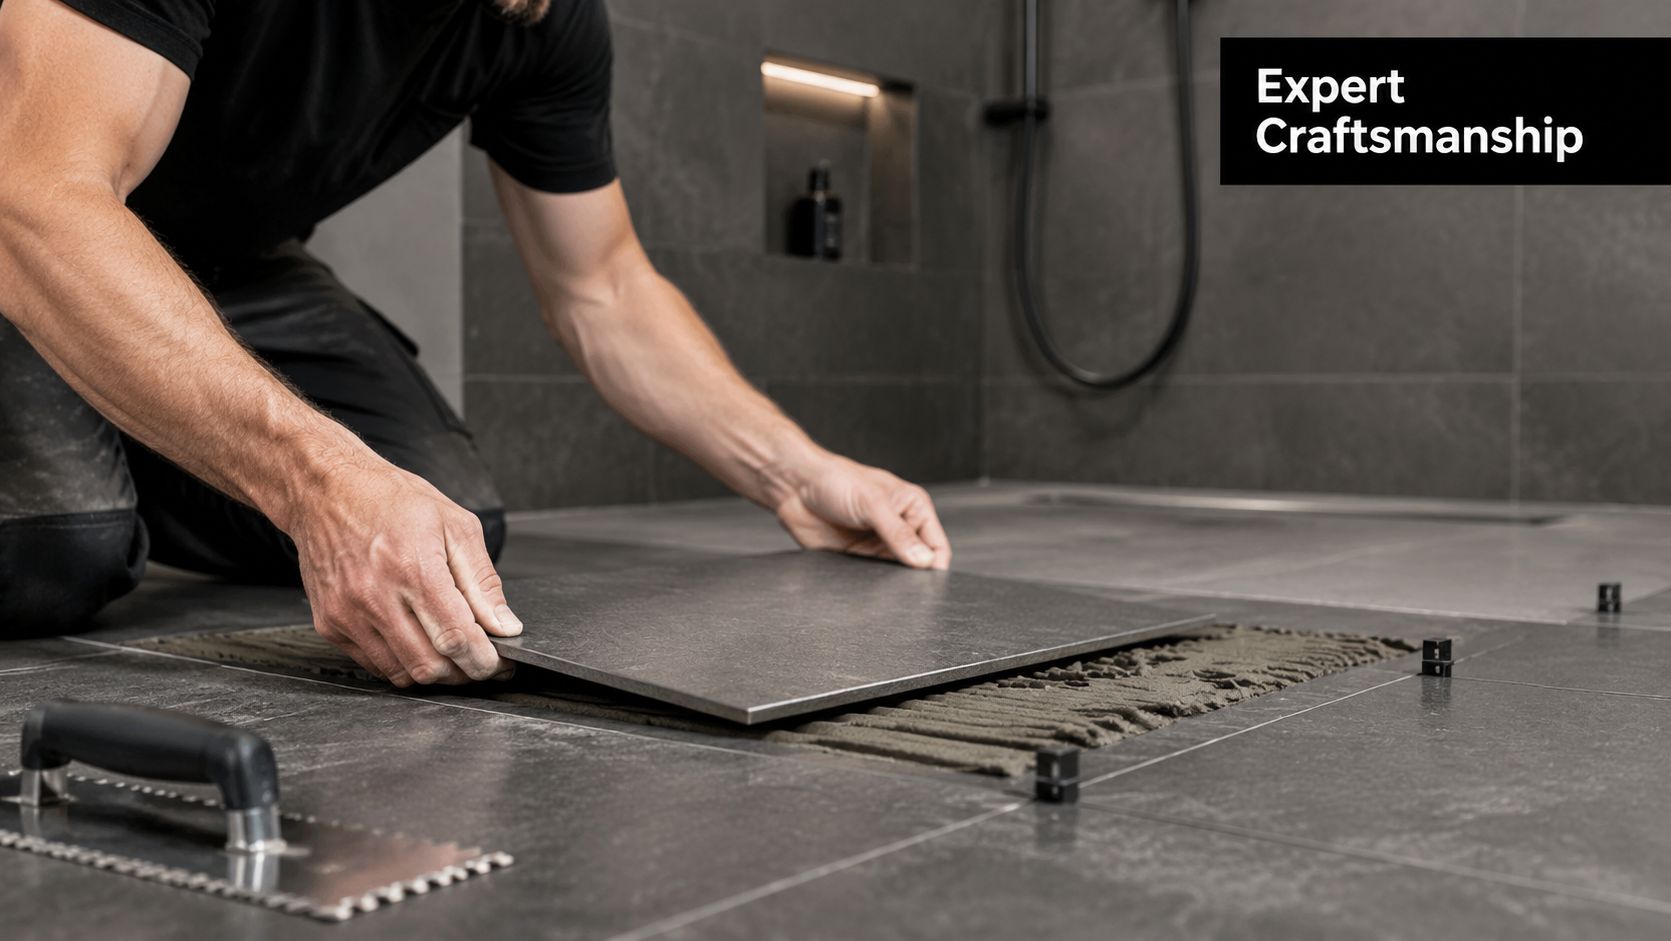
A professional tiler carefully installing a large dark ceramic floor tile onto adhesive in a bathroom.

Balconies and bathrooms fail in similar ways

The principle is identical. Water sits on or behind a finished surface, then moves through the weakest detail.

Common crossover issues include:

  • Bad falls: Water doesn't move to the waste or outlet.
  • Weak corners: Floor-to-wall junctions crack first if they aren't reinforced and detailed properly.
  • Poor penetration sealing: Shower fittings and balcony posts create similar risk points.
  • Finish-first thinking: People focus on the tile they can see, not the waterproofing they can't.

That's why a contractor who also handles bathroom renovations often has a stronger grip on sequencing. They know the screed can't be an afterthought. They know the drain detail can't be improvised once tiling starts. They know movement joints aren't optional just because the tile layout looks cleaner without them.

One trade alone usually isn't enough

Owners sometimes hire a tiler because tiles are cracking, or a waterproofer because there's a leak, or a handyman because the job “looks minor”. That can work for small surface maintenance. It usually doesn't work for recurring failures.

A durable balcony repair often needs coordinated work across:

  1. Assessment and strip-out
  2. Substrate repair and fall correction
  3. Drainage and threshold detailing
  4. Waterproofing installation
  5. Tiling, sealing and final verification

If the person quoting can only talk about membrane brand but not screed, drainage, door heights or tile build-up, they probably don't control the whole risk.

That's why homeowners are usually better served by a renovation-minded contractor who understands wet-area systems from slab to finish.

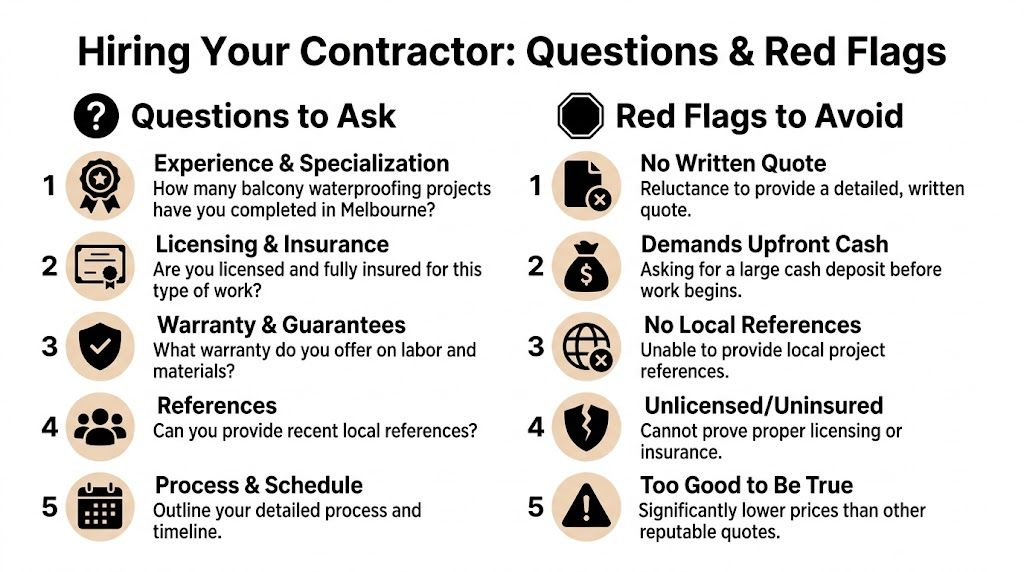
Hiring Your Contractor Questions to Ask and Red Flags to Avoid

Choosing the contractor is where most owners either protect themselves or create a bigger problem. Balcony waterproofing melbourne attracts everyone from capable registered builders to people who mainly sell “quick reseals”. The difference isn't always obvious from a photo gallery.

Use the checklist below before you accept a quote.

An infographic titled Hiring Your Contractor listing five essential questions and five red flags for waterproofing.

Questions that reveal real competence

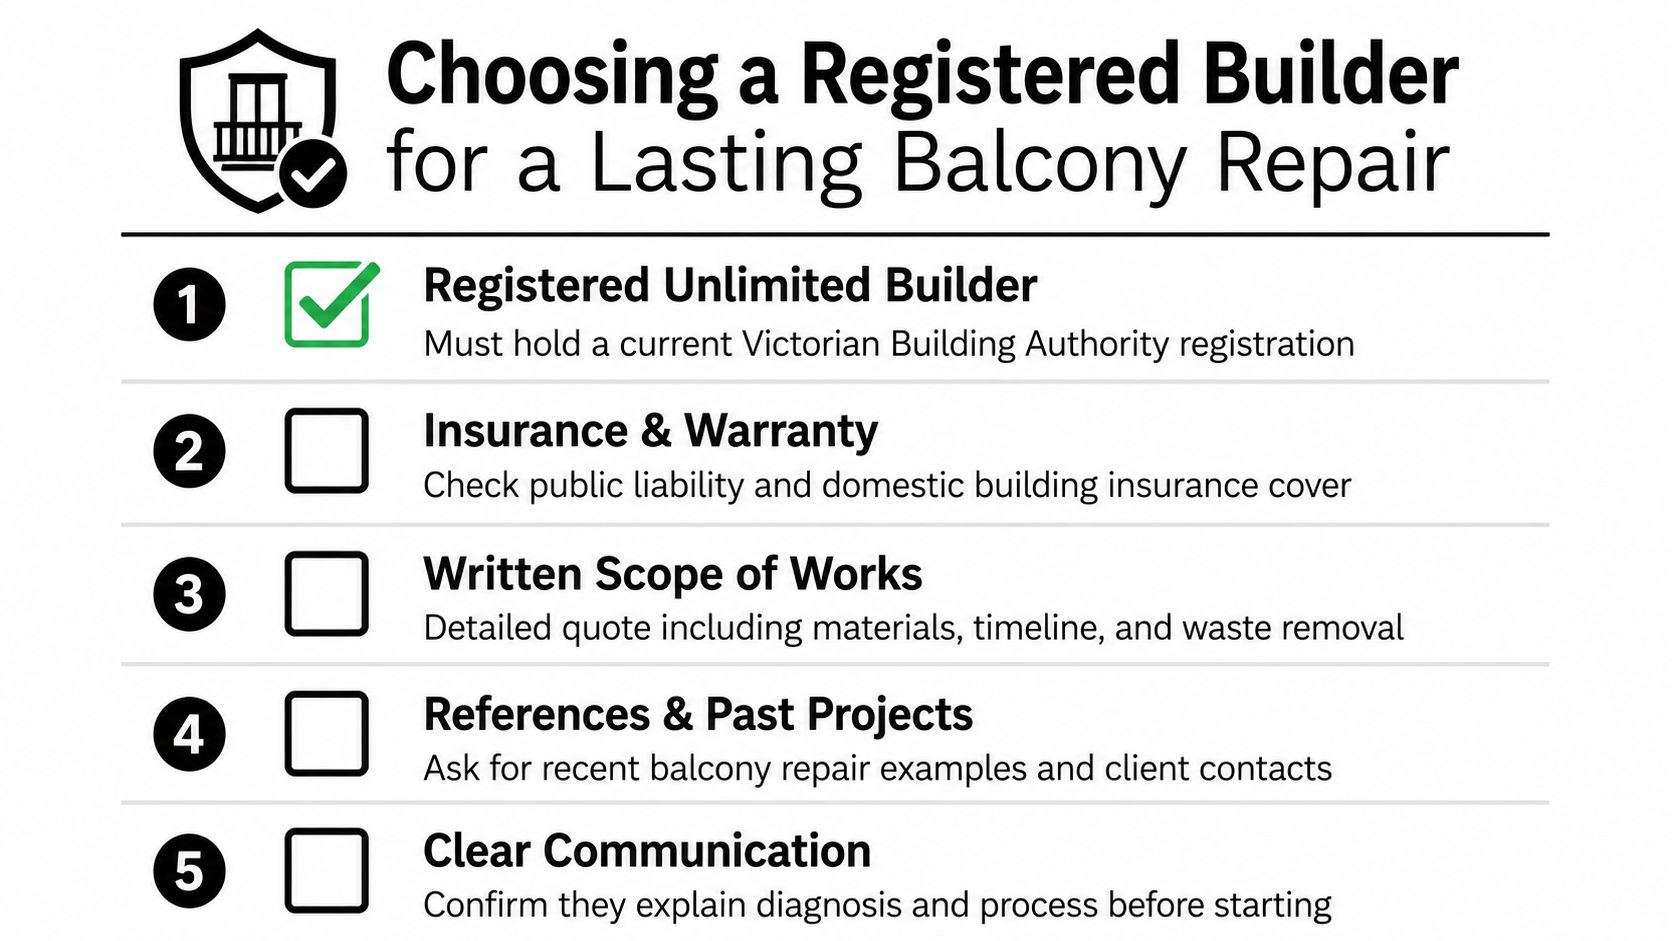
  • Registration and insurance: Ask for the builder registration details and proof of current insurance. A professional won't hesitate.
  • Failure diagnosis: Ask what they believe is causing the leak. If they can't explain the likely path of water entry, keep looking.
  • System build-up: Ask exactly what layers are included. Demolition, substrate prep, screed correction, membrane, flood or water testing, tiling, sealant and finishes should be clear.
  • Compliance evidence: Ask how they verify membrane thickness, terminations and penetrations before tiling over.
  • Occupied-apartment experience: If you're in strata, ask how they deal with access, approvals, neighbours below and Owners Corporation communication.

For apartment owners, responsibility is a major part of the conversation. The Melbourne balcony repair FAQ notes that the waterproofing membrane is often the lot owner's responsibility, while the structural slab underneath may be common property, depending on the title, plan and source of the defect. A competent contractor should be able to explain where their scope starts and where Owners Corporation involvement may be needed.

A short explainer can help if you're comparing quotes:

Red flags that usually lead to trouble

Some warning signs are consistent across bad waterproofing jobs.

Red flag Why it matters
Verbal quote only If the scope isn't written down, exclusions and shortcuts appear later
Focus on regrouting alone Regrouting may improve appearance, but it rarely solves a system failure by itself
No discussion of falls or drainage That usually means the contractor is treating the symptom
No mention of testing or inspection Good work is verified, not assumed
Pressure to choose the cheapest option Cheap waterproofing often becomes expensive rectification

Ask one simple question: “What are you doing to stop water getting in at the threshold, corners and penetrations?” The answer tells you a lot.

In strata buildings, also ask who they want copied into communication. Good contractors are usually comfortable dealing with owners, building managers, and Owners Corporations because responsibility can be split across finishes, membrane and structure.

Your Next Steps to a Dry and Durable Balcony

You usually find out a balcony has been leaking after the water has already travelled. A stained ceiling below, swollen skirting near the adjoining room, loose tiles at the doorway, rust marks on the slab edge. By then, the membrane may be only part of the problem.

The next step is to get the cause identified properly. On Melbourne balconies, leaks often start with poor drainage, blocked outlets, failed junctions at thresholds and balustrade penetrations, or movement that has opened up the system over time. If the balcony sits in a strata building, confirm who is responsible before work starts. The surface finishes may sit with the lot owner, while the slab, structure, or parts of the defect may involve the Owners Corporation.

Good repair work starts with a written scope. It should set out what will be removed, whether falls need correcting, how drainage will be dealt with, what waterproofing system will be installed, and how the work will be checked before tiles or finishes go back on.

Do not approve a patch job unless the contractor can show why it will work.

I tell owners the same thing on site. If the quote jumps straight to resealing grout lines or adding more silicone, the leak path probably has not been traced. Water rarely respects the visible crack. It follows the easiest route, then shows up somewhere else.

For homeowners, landlords, and apartment owners, the safest option is to use registered builders who understand waterproofing, screeding, tiling, and renovation sequencing together. Balcony failures are often assembly failures, not just membrane failures, so the repair needs to be coordinated that way.

If you need a practical assessment of a leaking balcony, Melbourne Tiling Services P/L can inspect the issue, identify the likely cause, and provide a written scope for compliant repair work, including related tiling, screeding, waterproofing, and renovation requirements.