Modern Bathroom Renovation: Your 2026 Melbourne Guide

You're probably here because the bathroom you use every day no longer works the way it should. The tiles might be dated, the shower screen could be awkward, the vanity may not hold enough, or worse, you've started noticing loose grout, musty smells, swelling skirtings, or signs that water is getting where it shouldn't.

That's the point where a modern bathroom renovation stops being a style exercise and becomes a building project. In Melbourne, that distinction matters. A bathroom has to look sharp, but it also has to survive daily moisture, meet wet-area requirements, and be built in the right sequence by the right licensed trades. Homeowners usually start with a moodboard. They finish with decisions about layout, waterproofing, ventilation, drainage, tile selection, and who's going to coordinate the entire job without mistakes.

Good bathroom renovations balance all of it. Clean lines, better storage, easier cleaning, stronger lighting, compliant waterproofing, and finishes that still look right years later. The most successful projects aren't the flashiest. They're the ones that make the room feel calm, practical, and durable from the day of handover onwards.

Table of Contents

Introduction Your Guide to a Flawless Modern Bathroom Renovation

A dated bathroom usually gives you plenty of warning before you decide to renovate. Storage stops working. Cleaning gets harder. The shower feels cramped. Old grout darkens, silicone peels away, and every small defect makes the room feel more tired than it really is.

In Melbourne homes, that often leads to the same question. Do you patch what's there, or do you rebuild it properly and turn it into a bathroom that suits how you live now? For many owners, the answer becomes obvious once layout problems and moisture risks start showing up together. Cosmetic fixes don't solve poor falls, failing substrates, or a room that was never detailed well to begin with.

A modern bathroom renovation should give you more than a cleaner look. It should improve movement through the room, simplify maintenance, and hold up to heavy daily use. That means thinking past the visible finishes and making decisions about ventilation, waterproofing, fixture placement, tile format, and how the trades will be coordinated.

A bathroom can look brand new and still be poorly built. The hidden work is what determines whether it stays sound.

That's also why homeowners increasingly look at bathroom work through a value lens rather than a trend lens. Australian renovation decisions sit inside a broader household spending reality, where housing costs and maintenance compete with other major expenses, so owners tend to prioritise durability, utility, accessibility, and cost control rather than short-term decoration, as noted in this Australian bathroom renovation spending context.

The smartest approach is to treat the project as one integrated build. Design matters. So do materials. But the lasting result comes from getting the technical work, sequencing, and supervision right from day one.

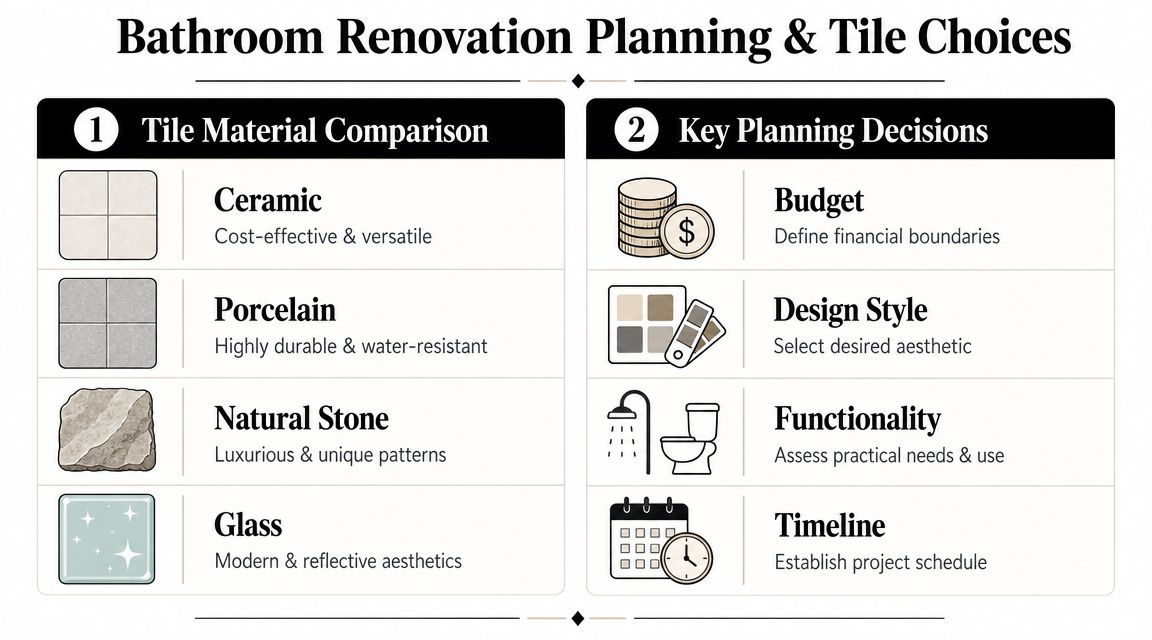
Defining Your Modern Design Vision and Materials

Modern bathrooms often get reduced to a look. White walls, black tapware, floating vanity, frameless shower. That's part of it, but in practice, a modern bathroom has to do more. It needs to feel open, clean, and easy to use without becoming fragile or hard to maintain.

What modern usually means in a real Melbourne bathroom

The most reliable modern layouts tend to share a few traits:

  • Cleaner lines: Wall-hung vanities, recessed niches, and frameless screens remove visual clutter.
  • Better movement: Hobless or low-profile shower entries can make the room feel larger and easier to access.
  • Controlled palette: Porcelain, stone-look surfaces, timber tones, brushed metal finishes, and matte or satin textures usually age better than highly decorative combinations.
  • Smarter storage: Drawer vanities, mirrored shaving cabinets, and in-wall recesses help reduce bench mess.

Minimalism works when the room is properly planned. It doesn't work when “minimal” becomes “there's nowhere to put anything” or when a flush shower is drawn beautifully but not resolved properly at the floor and waste.

A lot of online advice skips one of the biggest practical issues. Moisture resilience in low-maintenance finishes. Australian guidance makes clear that bathrooms are wet areas requiring compliant waterproofing and ventilation, yet many style-led articles don't explain how those requirements interact with large-format tiles, flush showers, and minimal grout lines. That gap matters in Melbourne bathrooms, where moisture control and durability need to sit alongside the aesthetic brief, as highlighted in this Australian discussion on wet-area detailing and ventilation.

Materials that look clean and work hard

Large-format porcelain is one of the strongest choices for a modern bathroom. It gives you fewer grout joints, a more continuous finish, and a less busy wall or floor. It also suits contemporary layouts with frameless glazing and long vanity runs. The trade-off is that substrate preparation has to be excellent. Large tiles don't hide uneven walls or floors.

Marble still has a place, especially where the aim is warmth and texture rather than a stark finish. It can look exceptional on feature walls, vanity tops, or selected floor areas. But natural stone needs a client who understands upkeep. If the brief is low maintenance first, porcelain that mimics stone is usually the safer option.

Kerlite and other thin porcelain sheet systems can be a strong solution where weight, finish continuity, or oversized panels matter. Installation is specialised. Handling, cutting, substrate flatness, adhesive choice, and edge detailing all need attention. It's not a product to hand to an inexperienced installer.

For homeowners comparing options, this practical guide to modern bathroom tiling in Melbourne is useful for understanding how tile style and installation method intersect.

A good material selection process usually comes down to this table:

Priority What usually works What often causes problems
Low maintenance Porcelain, fewer grout lines, satin finishes Heavily textured surfaces that trap residue
Visual calm Large-format walls, restrained palette, concealed storage Too many feature tiles and mixed finishes
Longevity Quality tile, solid waterproof-ready substrate, practical tapware Trend-led fixtures with poor serviceability
Easy cleaning Wall-hung vanity, framed or frameless glass with accessible edges Tight joins, awkward corners, excess ledges

Practical rule: Choose materials as a system, not as isolated samples. A tile that looks perfect on a showroom board may be the wrong choice if the substrate, drainage plan, or maintenance expectation doesn't suit it.

The best modern bathrooms don't rely on novelty. They rely on calm finishes, good detailing, and materials that still make sense after years of steam, cleaning, and daily use.

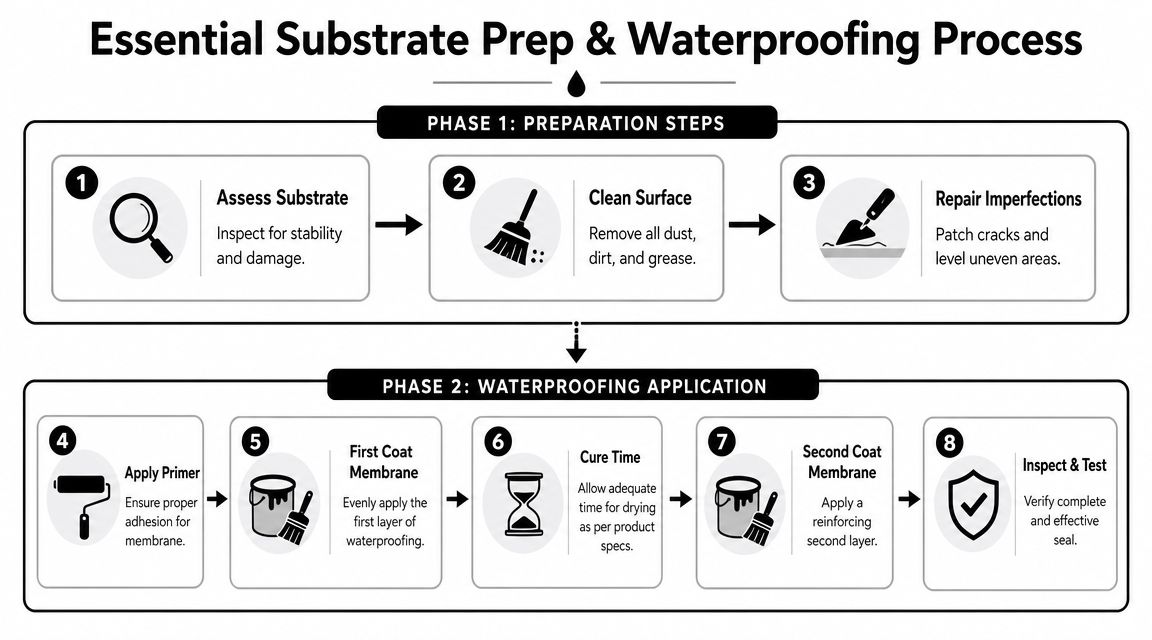
The Unseen Hero Waterproofing and Building Compliance

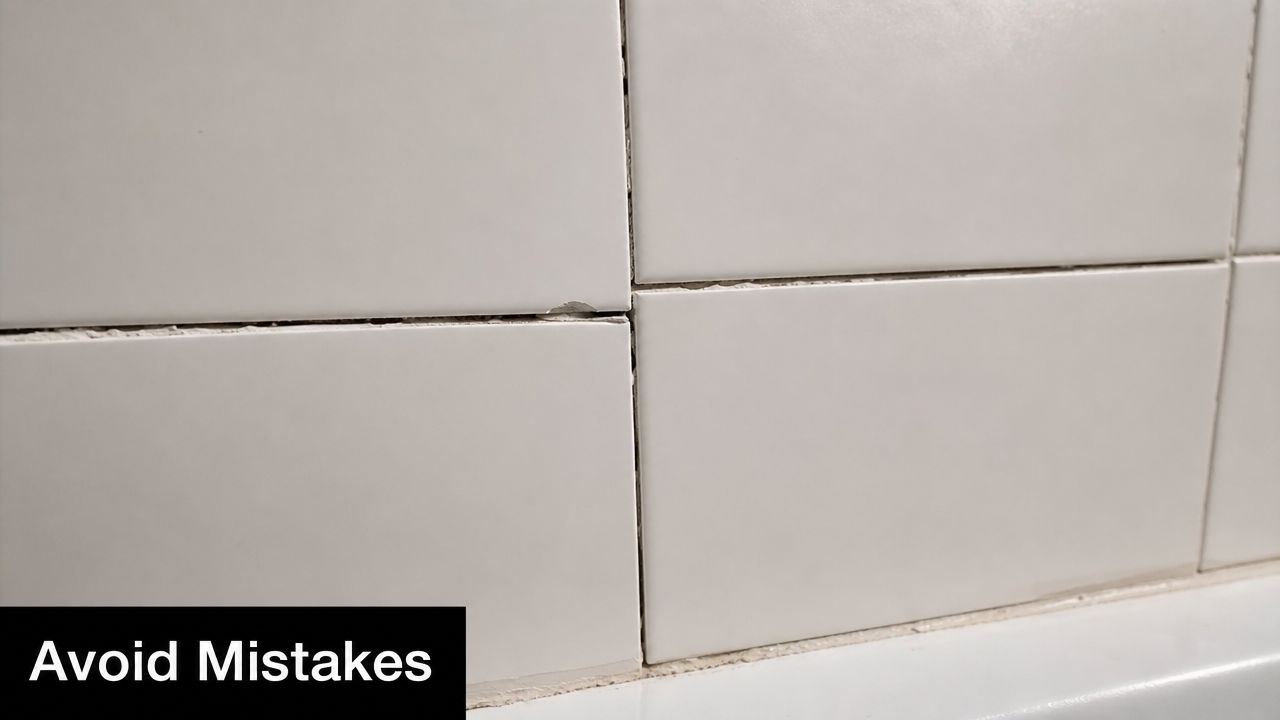
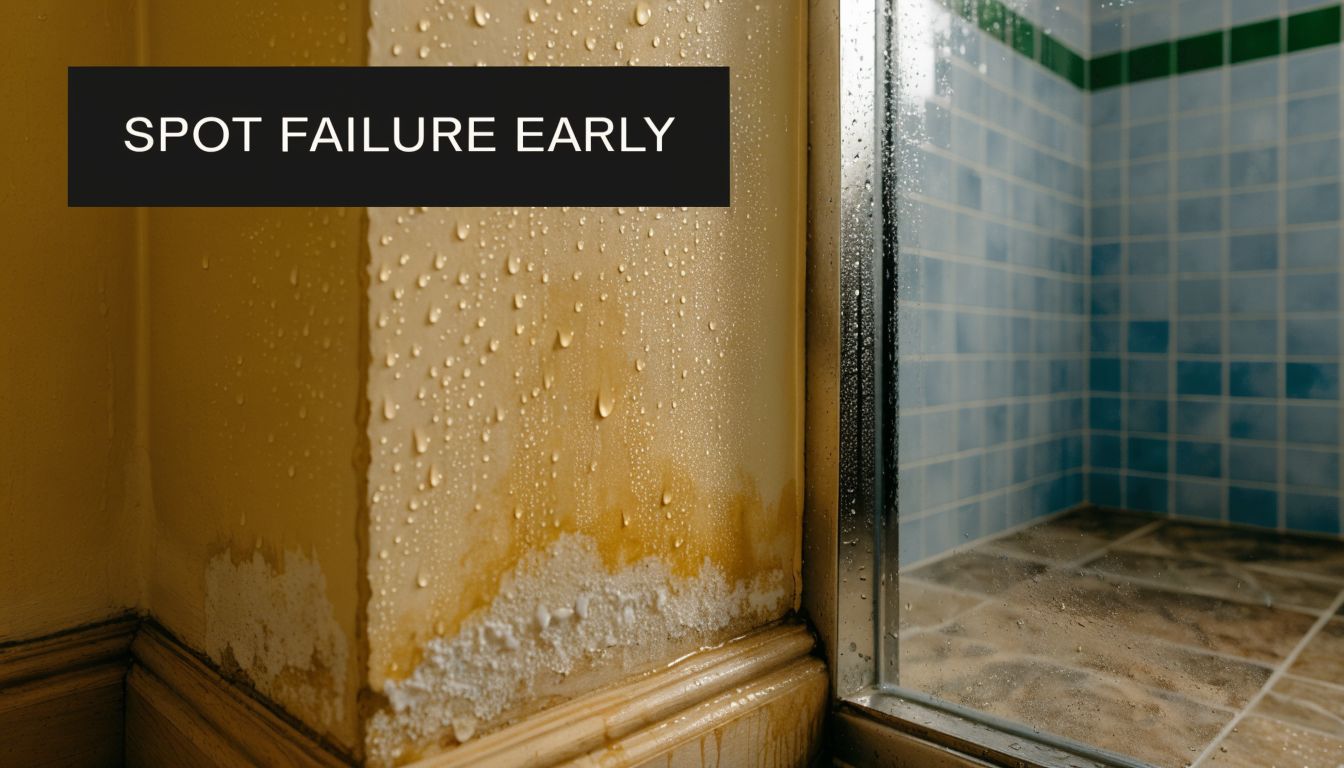
A bathroom can look finished on handover day and still be heading for failure. I have seen clean new tiling, frameless glass, and neat silicone lines hide poor falls, broken membrane continuity, and untreated penetrations that later sent water into adjoining rooms and subfloors.

Waterproofing sits behind the finishes, but it controls whether the renovation holds up. In a modern bathroom, that matters even more. Flush shower entries, large-format tiles, recessed niches, linear drains, and wall-hung fixtures leave less room for error. They can work well, but only if the builder resolves the technical side before the tiler starts.

Why waterproofing decides whether the renovation lasts

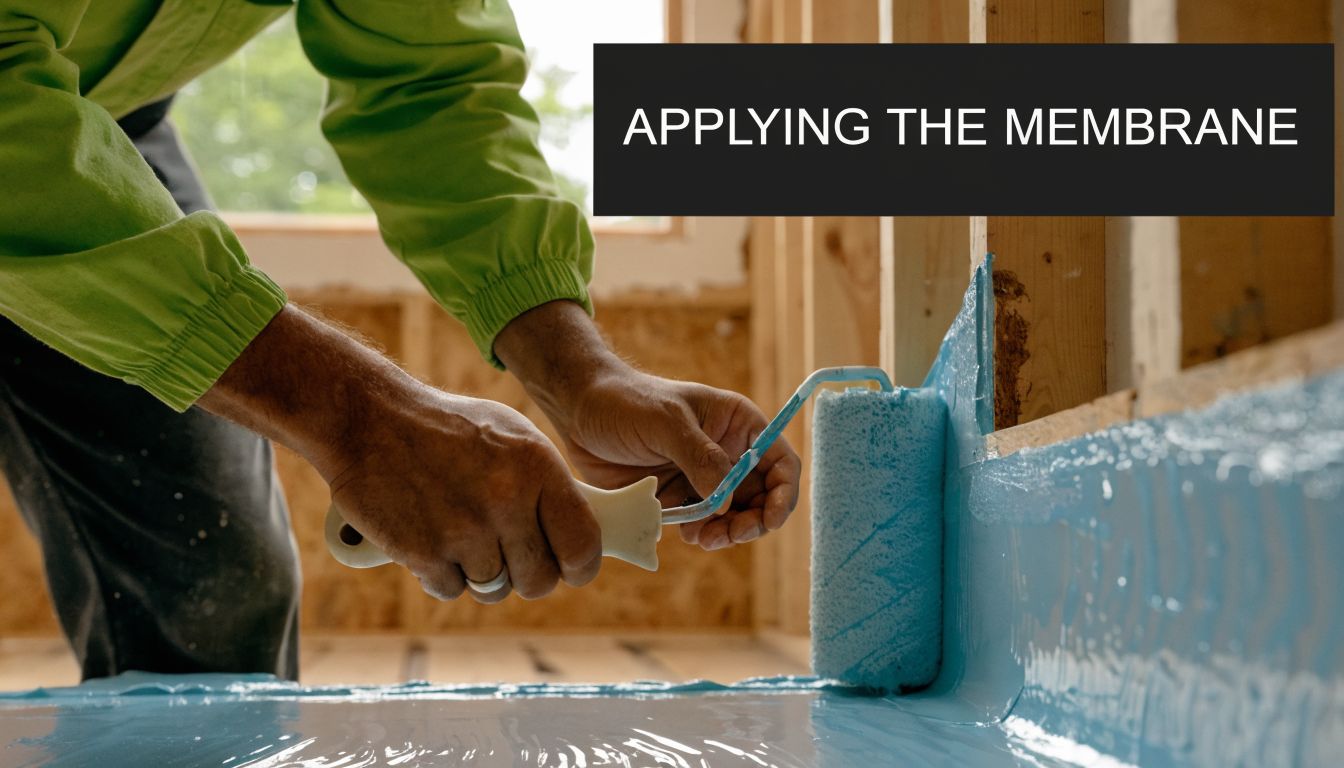
Tiles are the wear surface. They are not the waterproofing layer. Grout is porous. Silicone is a junction sealant that needs maintenance. The actual protection comes from the substrate preparation, the membrane system, and the way every junction is detailed from wall to floor to waste.

Continuity is the point that gets missed. If the membrane is interrupted at a hob, a shower waste, a pipe penetration, or the base of a niche, water gets a path. Once that happens, the repair is rarely local. The usual outcome is strip-out, drying time, retesting, and redoing finished work.

A split-view infographic comparing professional waterproofing benefits versus the risks of poor or DIY waterproofing methods.

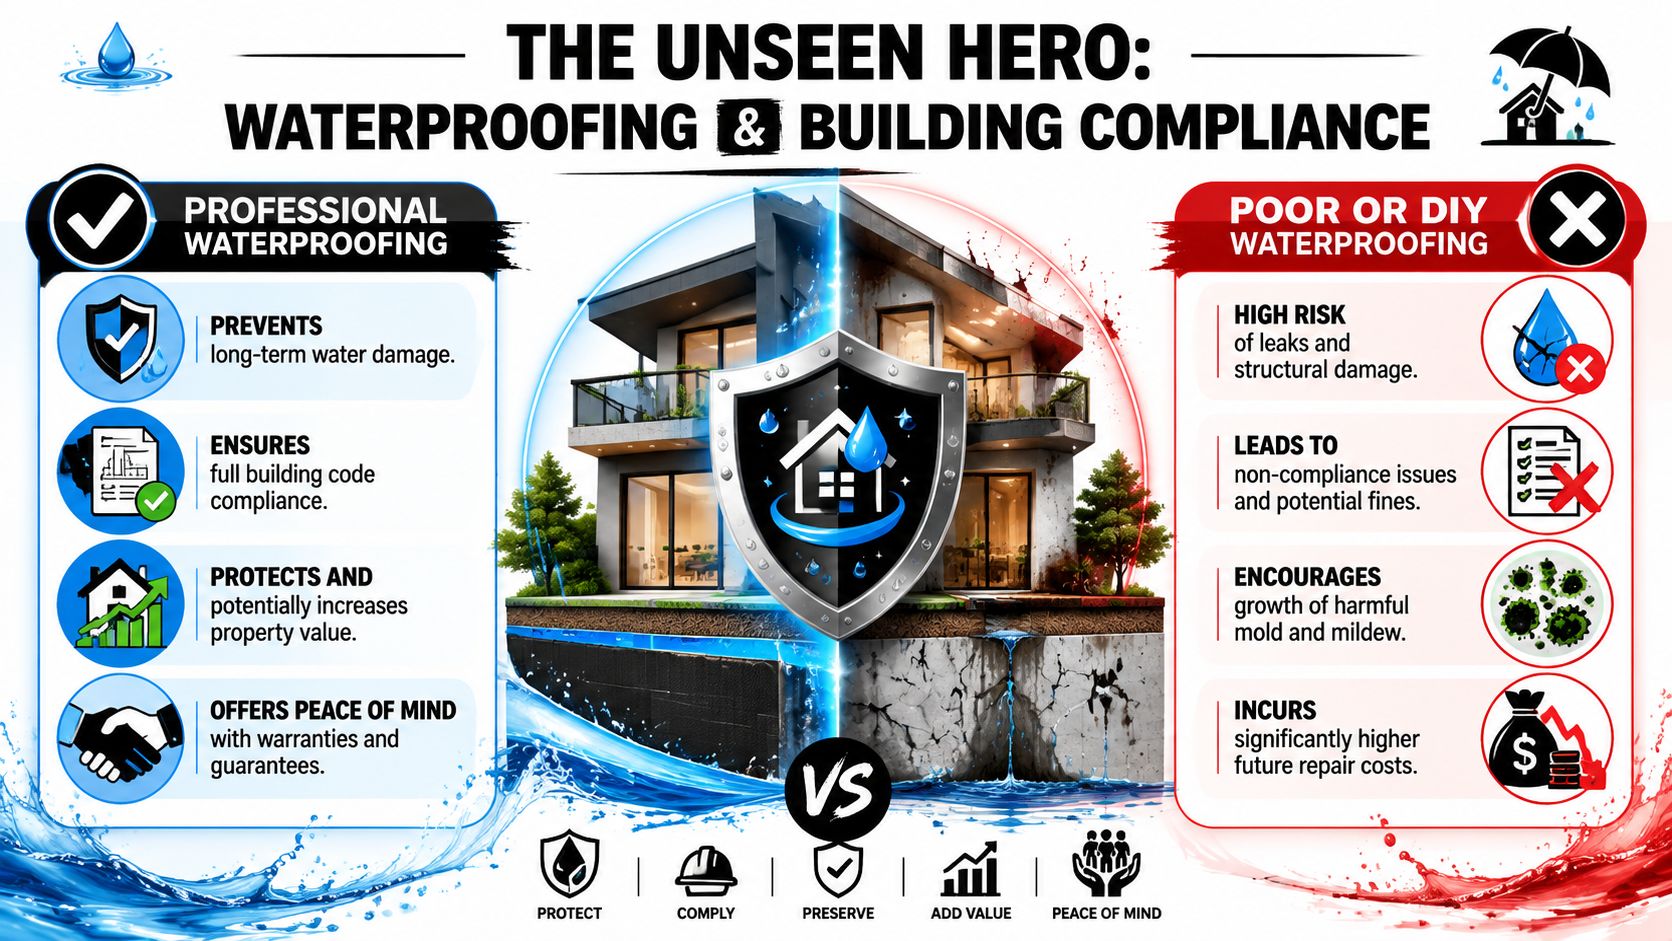
What compliant wet-area work actually involves

In Victoria, bathroom waterproofing is tied to standards, trade sequencing, and clear responsibility. AS 3740 sets the baseline for wet area waterproofing, but the standard alone does not deliver a good result. The room still needs correct set-out, suitable substrates, drainage falls that suit the tile format, and trades who do not damage completed work as the project moves forward.

This is one reason a single registered builder adds value. One party can control demolition, rectification of framing or sheeting, plumbing rough-in, screeding, waterproofing timing, protection of finished membranes, and final quality checks. When several contractors work independently, the common problem is not effort. It is gaps between scopes, and bathrooms fail in those gaps.

In practical terms, compliant wet-area work usually includes:

  • Substrate preparation: Wall and floor surfaces need to be stable, dry, clean, and appropriate for the nominated membrane system.
  • Correct falls to waste: The floor must shed water properly. If the shower holds water, the room is defective no matter how good the tile looks.
  • Membrane continuity at every junction: Corners, wall-floor junctions, hobs, niches, penetrations, and floor wastes all need proper treatment.
  • Curing and protection: Waterproofing needs its full cure time, and other trades must not walk over it or puncture it before tiling.
  • Compliance records: Owners should be able to identify the system used, the installer, and the paperwork that supports the work.

If you want to understand the documentation side, this guide to a waterproofing compliance certificate in Victoria explains what should be recorded and why it matters at handover or during a future sale.

The trade-off is straightforward:

Decision Short-term appeal Long-term outcome
DIY or loosely coordinated waterproofing Lower upfront cost and faster booking Higher risk of concealed leaks, rework, insurance disputes, and damaged finishes
Properly sequenced wet-area work under one builder More planning and tighter site control Better durability, clearer accountability, and a bathroom that complies and performs

The expensive part of waterproofing failure is not the membrane. It is the demolition required to reach it.

That is why experienced builders treat waterproofing as a construction stage with hold points, not as a quick task between trades. A modern bathroom should look sharp, but the long-term value comes from what is underneath, who is responsible for it, and whether the work meets the standards Victoria expects.

Your Step-by-Step Renovation Roadmap and Timeline

Bathroom work feels chaotic if you only see the room being ripped apart. It makes much more sense when you follow the order properly. The sequence isn't just about convenience. It protects quality.

Near the start of the process, this roadmap helps homeowners understand how each trade depends on the one before it.

An infographic detailing the eight essential steps of a modern bathroom renovation, from planning to final inspection.

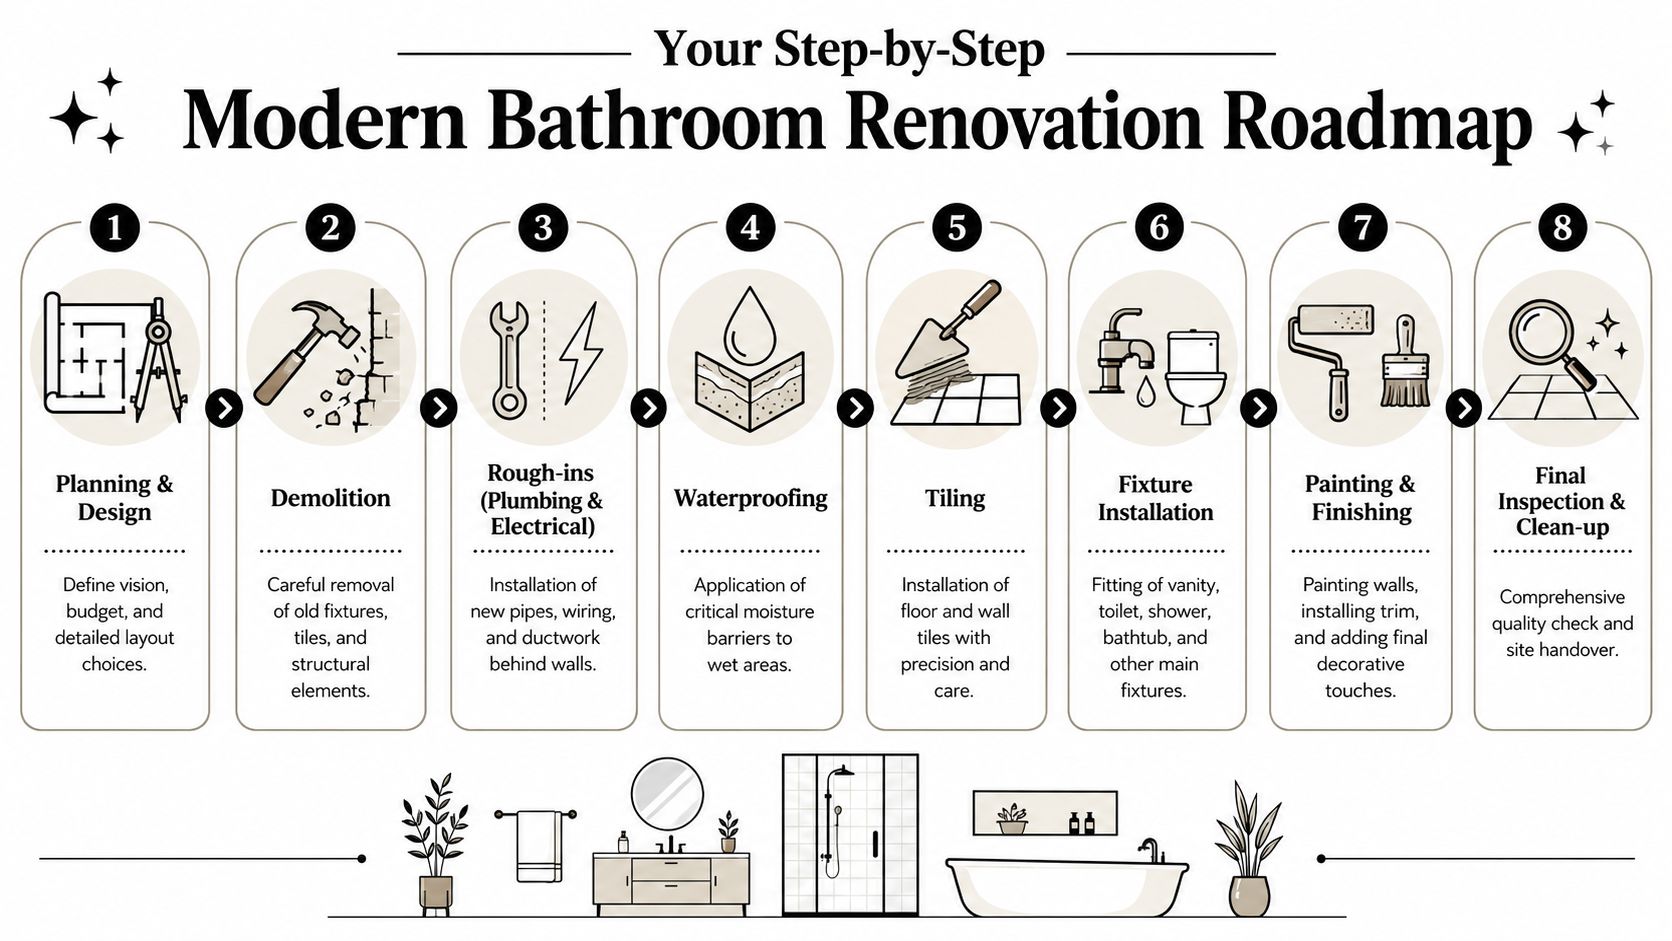
The order matters more than most people expect

A well-run renovation generally follows this path:

  1. Planning and selections
    Layout, fixture locations, tile format, drainage intent, electrical needs, and material selections should be resolved early. Last-minute changes are one of the fastest ways to create delay and rework.

  2. Demolition and strip-out
    Existing fixtures, wall linings, floor finishes, and damaged materials are removed. Good demolition is controlled, not reckless. The room is opened up so the condition of framing, substrate, and services can be assessed.

  3. Rough-in plumbing and electrical
    New pipework, wastes, cables, switches, lighting provisions, heated towel rail points, exhaust fan ducting, and any niche or mirror lighting requirements are set in place before surfaces are closed.

  4. Floor preparation and substrate correction
    This stage often includes screeding, levelling, patching, or rebuilding parts of the floor and wall surfaces so the room is ready for the membrane and tile system.

  5. Waterproofing and curing
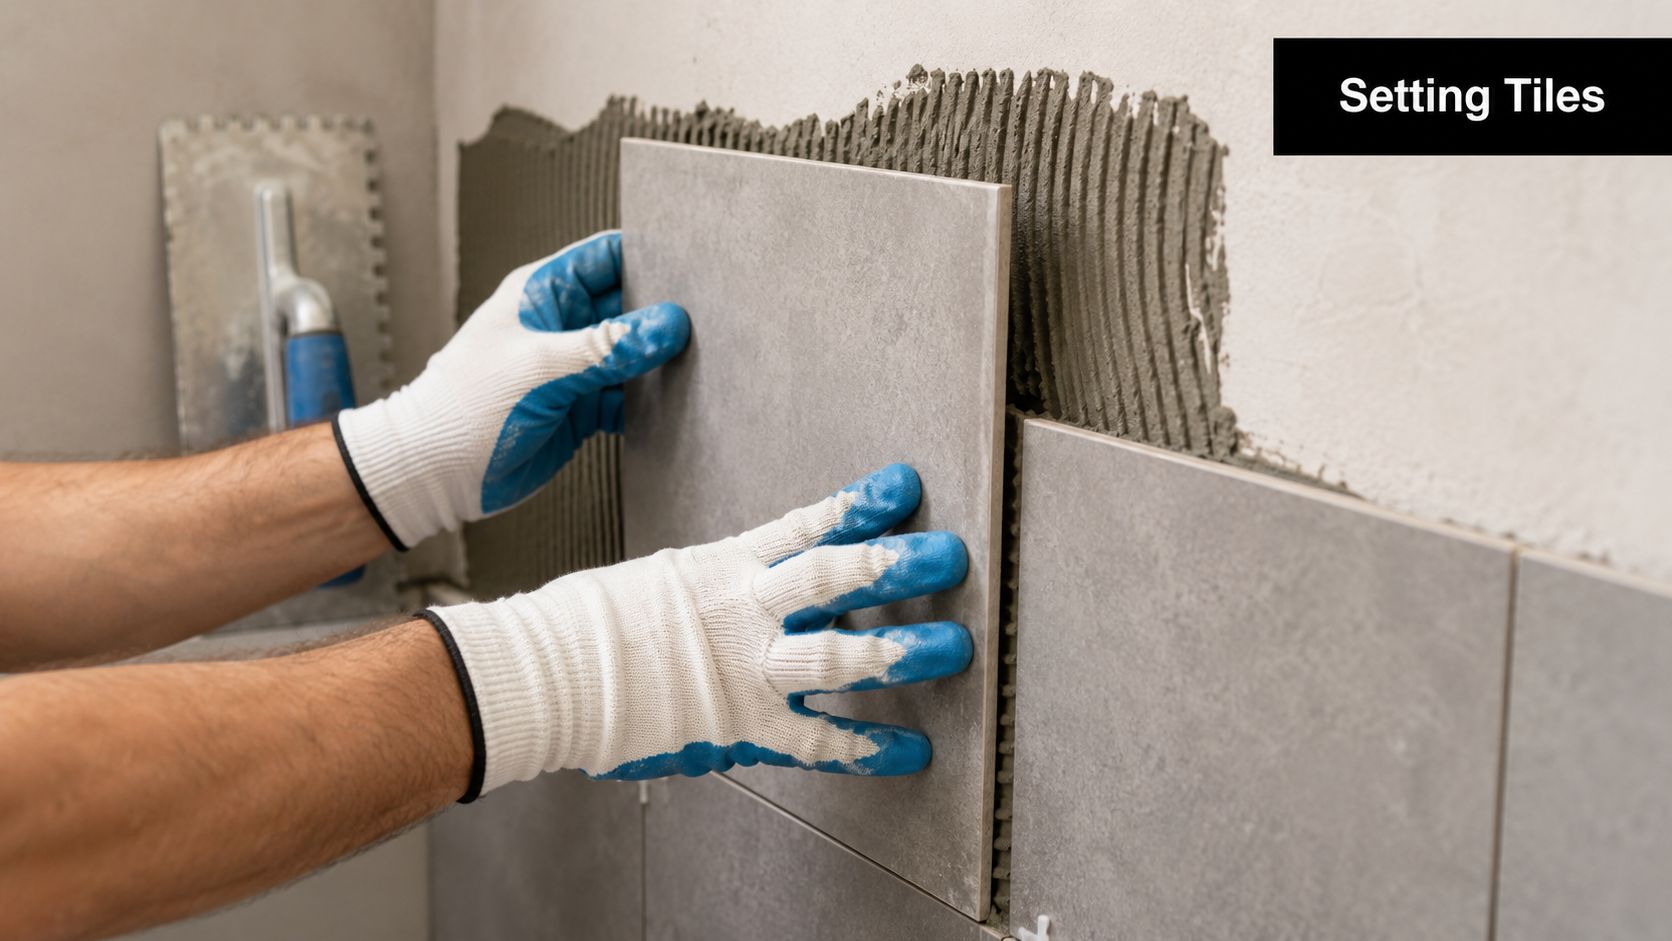
    Wet areas are treated in line with the specified system. Then the room has to be left alone long enough for the membrane to do its job.

  6. Tiling
    Wall tiling and floor tiling are set out carefully. The precision of tiling determines whether modern bathrooms look refined or slightly off. Centre lines, cuts, niche alignment, waste positioning, and edge profiles all show up here.

Later in the build, the visual progress speeds up.

  1. Fit-off and installation
    Vanity, basin, toilet, tapware, shower screen, mirror, accessories, and lighting are installed once the surfaces are ready.

  2. Painting, sealing, clean, and final check
    Final sealing, touch-ups, site cleaning, defect review, and handover complete the job.

Where delays usually happen

The biggest timeline issues usually come from coordination problems, not from the visible work itself.

  • Selections made too late: If tapware, vanity depth, or screen dimensions change late, the rough-in may no longer suit.
  • Uneven existing structure: Older homes often reveal walls and floors that need more correction than expected.
  • Curing and drying constraints: Some stages can't be compressed without affecting the result.
  • Trade overlap: Tilers, plumbers, electricians, waterproofers, glaziers, and cabinet suppliers all need the site at different times.

The fastest renovation isn't the one with the most people in the room. It's the one where each trade arrives to a site that's ready for them.

A bathroom is a compact space, but it's a dense project. The smaller the room, the more every millimetre and every handover between trades matters.

Budgeting Realistically for Your Renovation

Bathroom budgets go wrong when owners treat every line item as equal. They aren't. Some items protect the room. Some items shape everyday use. Others are mainly cosmetic and can be adjusted without damaging the outcome.

Where the money should go first

In Australia, bathroom renovation decisions are increasingly driven by value engineering. Homeowners still spend on improvement works, but the stronger preference is for durable finishes and choices that reduce long-term maintenance rather than paying only for a fashionable look. In Melbourne, that usually means asking which features are worth paying for and which ones are mostly visual upgrades, as reflected in this Australian view of modern bathroom value decisions.

That mindset is the right one.

For many projects, a realistic starting point is to separate the budget into four buckets:

Budget area What it covers Why it matters
Core construction Demolition, preparation, waterproofing, screeding, tiling labour Protects the room and determines finish quality
Services Plumbing and electrical rough-in plus fit-off Locks in how the room functions
Fixtures and fittings Vanity, toilet, tapware, shower fittings, mirrors, accessories Changes usability and daily experience
Contingency Hidden issues and necessary adjustments Prevents the project stalling when surprises appear

A lot of owners want a number immediately. That's fair. Melbourne Tiling Services P/L states that clients can plan scope and budget with a transparent calculator, with projects typically around a median $10,000, according to the company background provided for this article. That should be treated as a starting point for discussion, not a universal bathroom price, because layout change, tile selection, structural condition, and fixture quality all shift the actual cost.

A detailed infographic showing a realistic $20,000 budget breakdown for a modern bathroom renovation project.

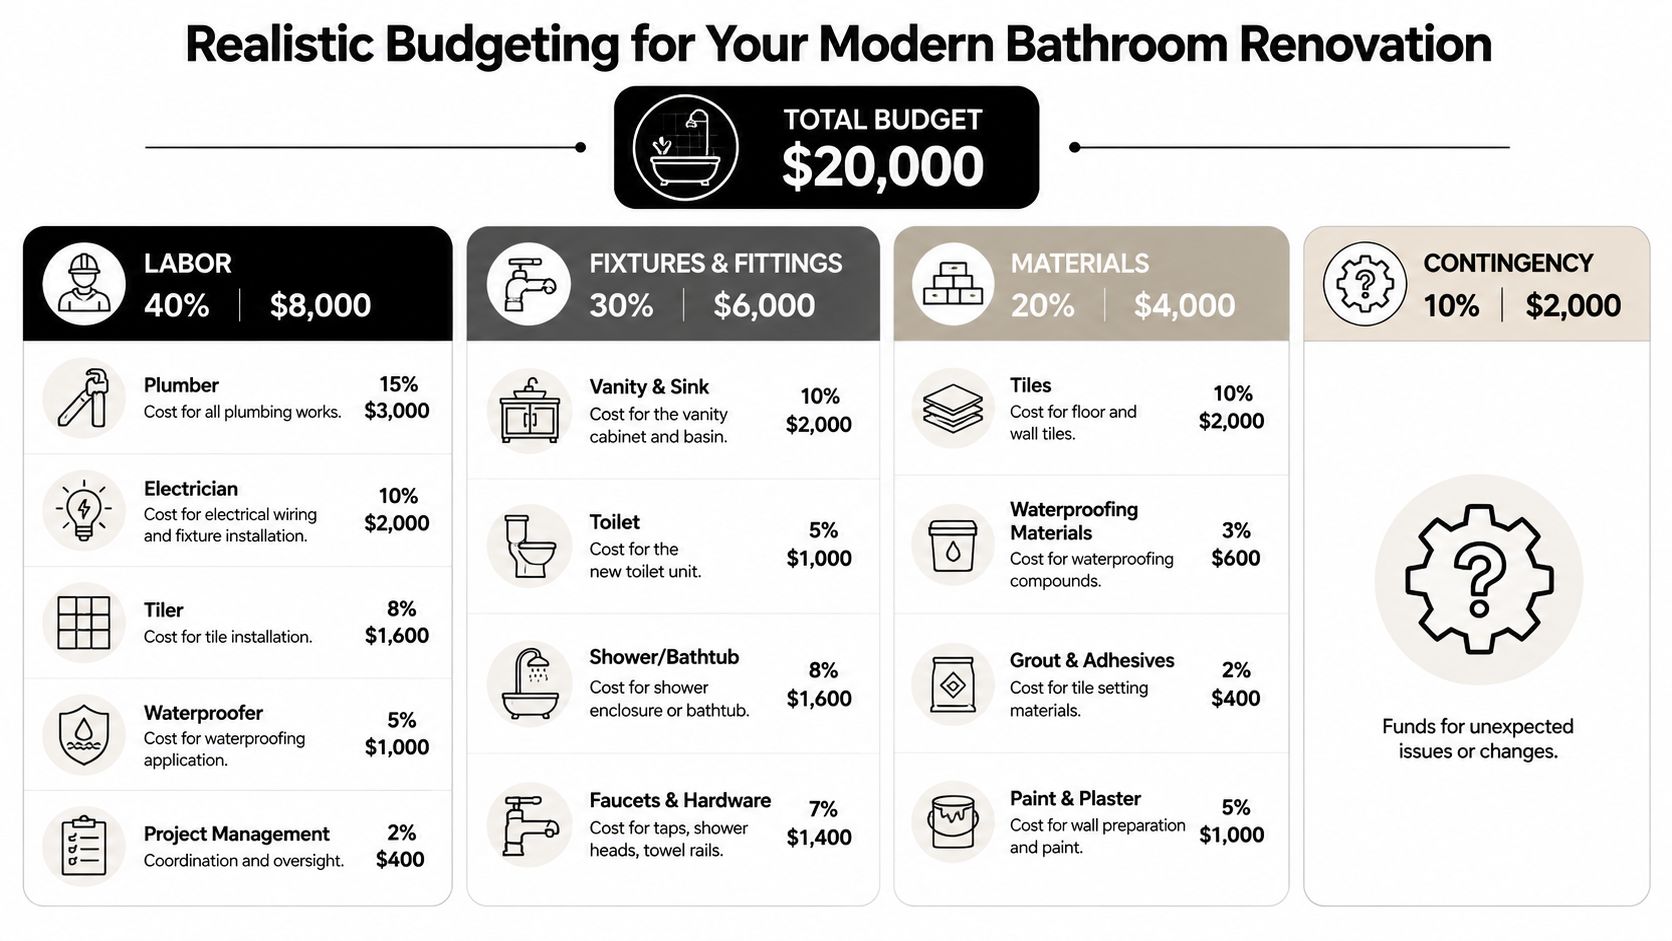
For a more local pricing reference, this guide to the cost of bathroom renovation in Melbourne helps frame how scope affects spend.

What to save on and what not to cheapen

There are sensible places to save. There are also false economies.

Usually worth prioritising

  • Waterproofing and preparation: Fail here and you can end up reopening the room.
  • Tiling workmanship: Large-format tile and tight modern detailing show every error.
  • Tapware and mixers with serviceable parts: Maintenance matters once the bathroom is in use.
  • Ventilation and lighting: These affect comfort every day, not just appearance.

Usually safer to moderate

  • Feature walls: One restrained feature can do the job of a much more expensive full-room treatment.
  • Custom cabinetry: Useful in some spaces, but off-the-shelf dimensions can work well if the layout suits.
  • Highly specialised finishes: They can be beautiful, but not every project benefits from them.

Spend where replacement would be disruptive. Save where replacement would be easy.

A well-budgeted bathroom doesn't feel cheap or extravagant. It feels deliberate. The money goes into the parts that keep the room dry, functional, and easy to live with, then the visual upgrades are layered on top.

Coordinating Contractors and Navigating Permits

The trouble usually starts after demolition.

A homeowner has booked a plumber, an electrician, a waterproofer, and a tiler separately. The wall-hung vanity arrives late. The mixer set-out does not match the selected basin. The shower screen is measured before final tile build-up is confirmed. Nobody owns the whole sequence, so every small miss rolls into the next trade. In a modern bathroom, where tolerances are tight and finishes are clean-lined, that is how a straightforward renovation turns into delay, rework, and arguments about responsibility.

Why a registered builder changes the job

A registered builder gives the renovation one accountable point of control from strip-out to handover. That matters because bathroom work is connected at every stage. Plumbing rough-in affects cabinetry and fixture placement. Floor preparation affects falls, grate position, and screen clearances. Waterproofing depends on the substrate being ready, dry, and correctly detailed before any membrane goes on.

The risk sits at the interfaces between trades. Corners, hob transitions, wall-floor junctions, and service penetrations are common failure points in wet areas if the work before and after waterproofing is not coordinated properly. The Victorian Building Authority guidance on bathrooms and waterproofing responsibilities is a useful reference for understanding how regulated work and trade responsibilities fit together.

A builder managing the full job helps by:

  • Sequencing trades in the right order: Demolition, rough-in, substrate preparation, waterproofing, tiling, fit-off, and glazing need proper spacing and inspection points.
  • Checking set-outs before work is locked in: Waste locations, mixer heights, niche positions, vanity clearances, and tile layouts need to be confirmed against the actual fixtures.
  • Protecting finished work: A small room gets damaged quickly when trades overlap or arrive before the previous stage has cured or been signed off.
  • Keeping responsibility clear: If the shower base ponds or the vanity does not fit, there is one party responsible for sorting it out.

A checklist infographic titled Coordinating Contractors and Navigating Permits, outlining seven essential steps for managing home renovation projects.

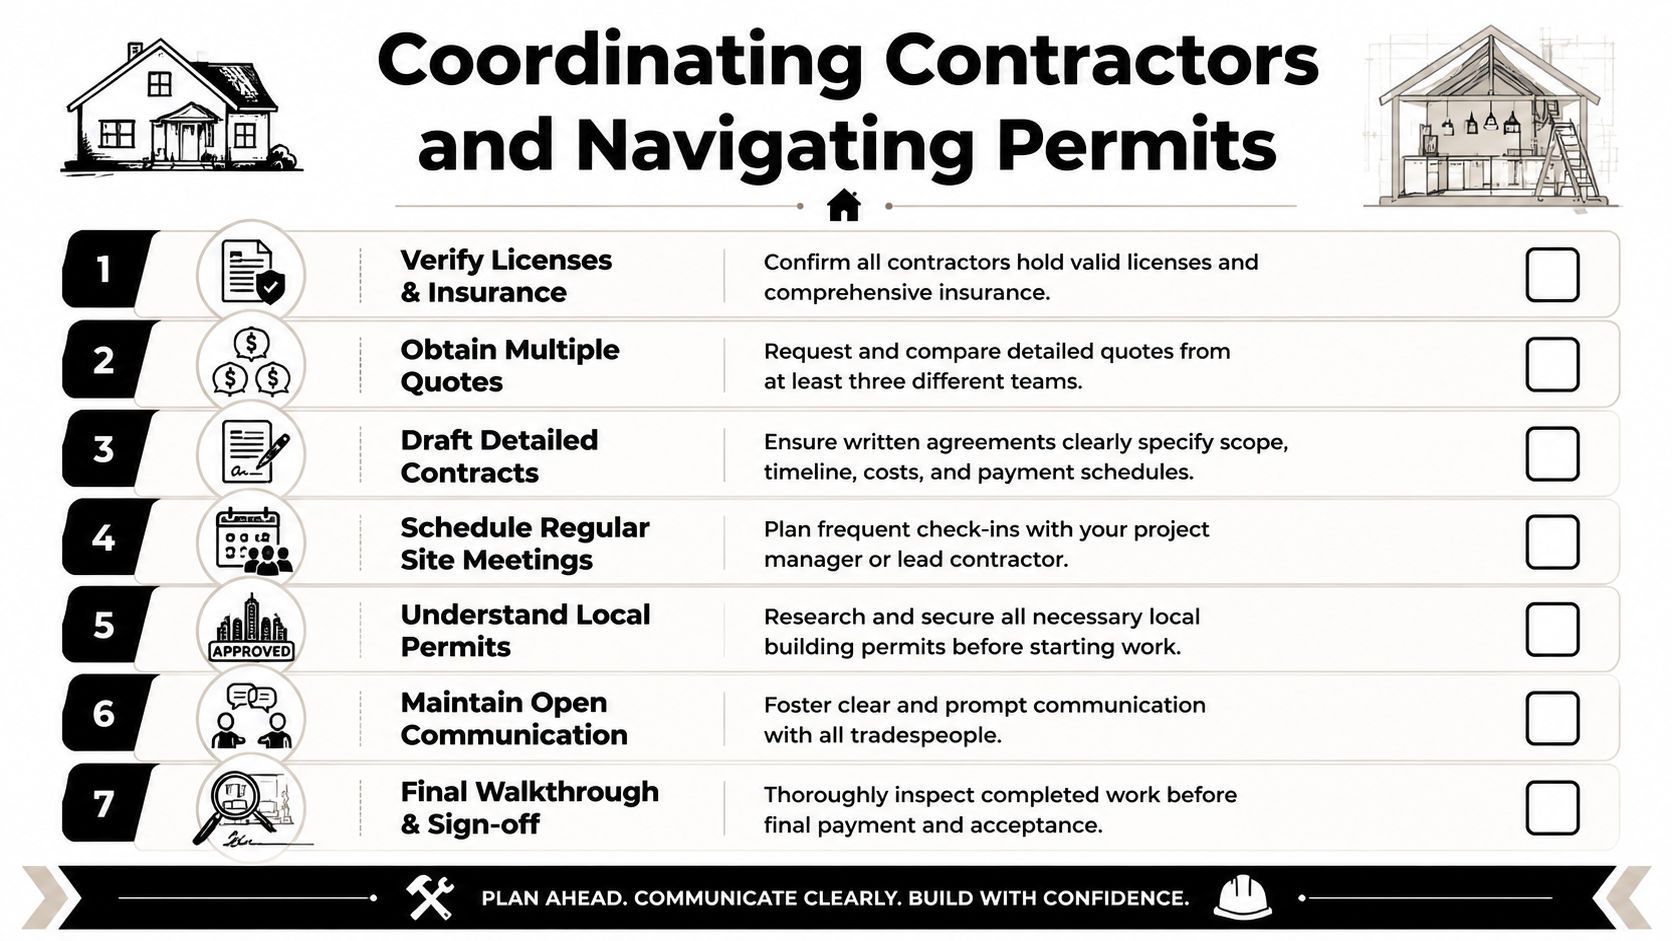
Permit and coordination issues that catch owners out

Not every bathroom renovation needs the same approval path, but existing rooms are not exempt from building rules. Scope decides the process. If the project includes structural work, changes to windows, major layout changes, or other regulated building work, permit requirements can change. Plumbing and electrical work also need to be carried out by properly licensed trades, with the right certificates where applicable.

The problems I see most often are practical, not theoretical.

Issue What goes wrong
Independent trade booking One delay shifts every following booking, and some trades are then pushed weeks out
Selections made after rough-in Taps, wastes, vanities, or shower fittings do not suit the installed set-outs
No recorded scope changes Variations are agreed on site, then disputed later on cost, timing, or responsibility
Missing compliance records Owners cannot confirm who completed regulated work or what system was installed
Assuming a like-for-like update is low risk Wet-area detailing, ventilation, and substrate condition still need proper checks

A bathroom usually goes wrong at the handover between trades, not in the visible finish.

That is why quote comparison needs to go beyond tile rates and fixture allowances. Ask who is programming the work, who signs off each stage before the next trade starts, who manages permits or advises when they are needed, and who carries responsibility if one trade's work affects another. In Melbourne, that clarity often adds more long-term value than an extra feature tile or a more expensive tap set.

Conclusion Creating Your Lasting Bathroom Sanctuary

A successful modern bathroom renovation isn't the result of one good product or one clever design idea. It comes from joining the visible and invisible parts of the job properly. The layout has to suit the room. The materials have to suit moisture, maintenance, and daily use. The waterproofing and compliance work has to be right before the finishes go on. The trades have to be coordinated in the right order.

That's why the best bathroom renovations feel simple once they're finished. The shower drains properly. The storage works. The tile lines are clean. The room is easier to clean, easier to use, and less likely to create expensive surprises later. None of that happens by accident.

For Melbourne homeowners, the long-term value usually sits in the same places every time. Durable finishes. Sound wet-area construction. Practical fixture choices. Clear budgeting. And one accountable, registered builder managing the process from demolition through to handover.

If your current bathroom is dated, leaking, hard to maintain, or doesn't suit the way you live, it's worth treating the renovation as a full building project rather than a cosmetic refresh. That approach costs less stress and usually delivers a much better result.


If you want a clear scope, practical advice, and end-to-end coordination under a registered builder, contact Melbourne Tiling Services P/L for a free, no-obligation quote and a complimentary 3D drawing to explore your bathroom renovation ideas.

Bath Tile Installation: Melbourne’s Expert Guide 2026

You're probably at the stage where the bathroom still looks simple on paper. Pick a tile, book a tiler, get it done. In practice, bath tile installation in Melbourne is rarely just about the tile. The finish you see on day one only lasts if the work underneath it was handled properly.

As a Melbourne-based Registered Builder and master tiler, I can tell you the same thing I tell homeowners at quoting stage. The expensive mistakes in bathroom renovations usually happen before the first tile is laid. Poor substrate prep, rushed waterproofing, bad falls, and sloppy junction detailing create the leaks and failures that cost the most to fix later.

Table of Contents

Planning Your Bathroom Renovation and Tile Selection

The best bathroom renovations start with decisions that most homeowners can't see. Before you compare colours, you need to know whether you're doing a cosmetic re-tile, a full wet-area rebuild, or a broader renovation involving plumbing, waterproofing, fixtures and layout changes. That scope determines cost, sequencing, who needs to be involved, and whether a Registered Builder should manage the job.

Start with scope, not samples

If the room has movement, an old screed, patched surfaces, or a history of leaks, tile selection is not the first conversation. The first conversation is whether the existing base is suitable to tile over at all. In many Melbourne bathrooms, it isn't.

Use these early planning checks:

  • Confirm the wet-area condition: Look for cracked grout lines, drummy tiles, swollen skirtings, stained ceilings below, or movement around shower bases and corners.
  • Define the renovation level: A simple surface refresh is very different from a strip-out that includes screeding, waterproofing, plumbing adjustments and fixture replacement.
  • Decide who coordinates trades: Bathroom renovations often need a builder to sequence tilers, plumbers, electricians, carpenters and waterproofers properly.

Practical rule: If you're changing waterproofed areas, drainage, wall linings, or the bathroom layout, treat it as construction work first and decorating second.

Choose tile by performance first

Homeowners often choose on appearance, then try to force the room to suit the tile. That's backwards. Tile size, material and edge profile all affect labour, substrate tolerance and installation difficulty.

Here's a practical comparison.

Tile Type Durability Water Resistance Average Cost (Supply) Best For
Ceramic Good Good Lower entry point Budget-conscious wall and floor updates
Porcelain High High Mid to higher range Family bathrooms, floors, showers
Natural Stone Varies by stone Varies, often needs sealing Higher Premium bathrooms and feature areas
Glass Good in the right application High Varies Feature strips, splashbacks, decorative walls

For style ideas, many homeowners start by browsing modern bathroom tiling options and then narrow choices based on cleaning, slip resistance, edge detail and how much movement the room is likely to see.

Large-format tiles can look sharp, but they're less forgiving. If the walls are out, the floor has poor falls, or the corners aren't true, a large porcelain tile will expose every flaw. Natural stone gives a premium look, but it asks more from the installer and from the owner after handover.

An infographic titled Bathroom Renovation Planning and Tile Choices listing material types and key planning decisions.

Budget for the hidden work

A realistic budget needs to separate visible finishes from technical preparation. Australian renovation guides commonly report bathroom tiling costs of about A$50 to A$150+ per m² for standard ceramic or porcelain, with higher-end stone, mosaics or complex layouts rising above that range, according to Angi's tile installation cost guide.

That spread tells you something important. Labour intensity changes dramatically when the room needs levelling, screeding, tighter set-out, shower detailing, niche work, or difficult cuts around fixtures.

DIY can work for a dry, simple, low-risk area. A bathroom is different. Wet-area work has compliance implications, and once waterproofing, falls and penetrations are involved, cutting corners stops being a styling issue and becomes a defect issue.

The Critical Foundation Substrate Prep and Waterproofing

The success or failure of bath tile installation depends heavily on the preparation. A bathroom can look perfect at handover and still be heading for failure if the base under the tiles wasn't sound. Tiles don't waterproof a bathroom. They protect and finish the surface. The actual defence sits below them.

Why the substrate decides the outcome

Australian wet-area work is governed by AS 3740:2021, and in domestic bathrooms the membrane must be installed before tiles are laid. That's part of why compliant bathroom work in Victoria is primarily about waterproofing and substrate preparation, not just appearance, as outlined in this explanation of AS 3740:2021 and bathroom tile installation.

Before any membrane goes down, the substrate has to be checked for stability, flatness, cleanliness and movement risk. On renovation projects I regularly see old bathrooms with patched screeds, mixed materials, previous repair work and surfaces that were never flat to begin with. If you tile over that without correcting it, the room may still leak, pond, crack or produce lippage.

The common weak points are predictable:

  • Wall and floor junctions
  • Pipe penetrations
  • Shower recess transitions
  • Drain detailing
  • Changes between old and new substrates

An infographic detailing the eight steps of the essential substrate preparation and waterproofing process for construction.

What compliant waterproofing actually involves

A proper system starts with substrate prep, then primer where required by the product system, then membrane application, reinforcement and detailing at critical junctions, followed by curing and project-specific verification before tile setting starts. If you're comparing contractors, ask them to explain the sequence in plain language. If they skip straight to tile choice, that's a warning sign.

For homeowners reviewing system options, one useful reference point is this page on bathroom waterproofing systems, because it reflects the fact that membranes, primers, detailing and tile adhesives need to work as a coordinated assembly rather than as isolated products.

Waterproofing failures rarely begin in the middle of the wall. They begin at edges, joins, penetrations and places where one trade assumed another trade had handled it.

What goes wrong when this stage is rushed

The hardest defects to fix are the ones hidden behind finished surfaces. If a tiler lays over a substrate that still moves, you can get cracking, drummy tiles and broken grout lines. If falls are wrong, water sits where it shouldn't. If the membrane is poorly detailed, moisture finds the path.

Consumer advice often reduces prep to “make sure the surface is clean.” In real bathroom renovations, that's nowhere near enough. The room needs a base that is true, stable and ready for a membrane that remains continuous through corners, edges and penetrations.

A premium tile doesn't rescue poor prep. In fact, high-end porcelain, stone and large-format panels tend to punish bad prep more severely because they reveal unevenness and demand better coverage and tighter movement control.

Tile Layout Adhesives and Setting Your Tiles

Once the room is properly prepared, the visible craft begins. This is the stage most homeowners think of when they hear bath tile installation, but the method matters more than speed. A neat finish comes from planning cuts, controlling lines and maintaining coverage, not from pushing tiles onto adhesive as fast as possible.

A tiler wearing blue and white gloves carefully setting a grey ceramic tile onto a mortar-covered wall.

A clean layout prevents a messy finish

Professional workflow starts with a dry layout. That means working out where full tiles land, where cuts fall, how the room centres visually, and whether niche edges, corners and floor wastes will look balanced. Industry installation guidance commonly recommends laying full tiles first and leaving perimeter cuts until last, with movement gaps maintained at walls. Mortars typically need about 24 hours before grouting, and ordering about 15% extra tile is a sensible allowance for cuts, breakage and future spares, based on Daltile's floor tile installation guidance.

The room should dictate the set-out, not the packet size. In a small ensuite, for example, a centred wall can still produce ugly slivers at an external edge if nobody thought through the sightlines from the doorway.

Adhesive choice and coverage matter

The right adhesive depends on the tile, the substrate and where the tile is going. Porcelain, natural stone, vertical applications and large-format pieces all ask more from the adhesive system than a basic ceramic wall tile in a low-stress area.

A few things matter on every job:

  • Coverage: Hollow spots come from poor transfer and bad technique.
  • Trowel selection: Notch size needs to suit tile size and substrate condition.
  • Working time: Spread only what can be tiled while the adhesive remains workable.
  • Movement allowance: Hard-setting every edge tight against walls invites later stress.

If you're comparing products for porcelain, stone or large-format work, this overview of tiling materials for bathroom and renovation projects is a practical starting point.

Here's a short visual demonstration of controlled tile setting technique in action:

Set in control zones, not in a rush

Good installers don't try to cover the whole room in one go. They work in smaller zones, check plane continuously, and keep adjusting as they go. On walls, that helps maintain clean lines around niches and tapware. On floors, it keeps falls readable and prevents drifting joints.

If the set-out is right, the room feels calm. If the set-out is off, even expensive tiles look second-rate.

Large-format work often benefits from levelling clips and wedges, but those are aids, not solutions. They don't replace a flat substrate, proper adhesive coverage or a well-planned layout.

Grouting Sealing and Installing Fixtures

A lot of bathrooms are spoiled at the finish line. The tiles are straight, the cuts are clean, then the grout is inconsistent, the haze isn't removed properly, or fixtures are installed with too much pressure on fresh tilework. Finishing trades need restraint.

Grout is part of the system

Grout choice should suit the location and maintenance expectations. Cement-based grout remains common and works well when correctly mixed, packed and cleaned. Epoxy grout can be a sensible option in areas where stain resistance and lower absorption matter more, but it needs more skill to install neatly.

What matters most is technique:

  • Pack the joints fully: Shallow joints don't protect edges well and often look patchy.
  • Clean in stages: Overwashing weakens colour consistency and can drag material from the joint.
  • Watch the timing: Cleaning too early smears grout. Too late, and haze becomes much harder to remove.

In showers and splash-prone areas, movement joints and junctions should be handled appropriately rather than being treated like ordinary field joints. That's one of the details that separates durable work from work that only photographs well.

Seal where the material calls for it

Not every tile needs sealing. Porcelain often doesn't. Many natural stones and other porous finishes do. The key is matching the sealer to the material and applying it at the correct stage.

Homeowners often assume sealing makes a bathroom waterproof. It doesn't. Sealing helps protect porous tile or grout from staining and moisture absorption at the surface. It does not replace the waterproofing system beneath.

Fixtures must be installed without compromising the tilework

The final stage includes shower screens, tapware trim-outs, wastes, mirrors, accessories and silicone finishing. This is where coordinated bathroom renovations matter. The tiler, plumber, glazier and builder all affect the final outcome.

A few details deserve close attention:

  • Frameless shower screens: Fixings need to respect waterproofed zones and finished tile lines.
  • Tap penetrations: Escutcheons should sit cleanly without forcing uneven cuts or leaving messy gaps.
  • Floor wastes: The grate position should align with the tile layout and still allow proper drainage.
  • Silicone joints: Neat flexible joints at changes of plane matter for movement and appearance.

Melbourne Tiling Services P/L is one example of a contractor that handles bathroom renovations with coordinated tiling, waterproofing and fixture integration under Registered Builder oversight, which is often the cleanest path when several trades need to work in sequence.

Common Tiling Mistakes and Melbourne Regulations

The most expensive assumption in bathroom work is that tiling is just a finish trade. It isn't. In a wet area, tiling sits on top of construction decisions that affect durability, leak risk and compliance.

The mistakes I see most often

The failures are rarely mysterious. Most can be traced back to basic shortcuts.

A close-up view of white bathroom wall tiles showing a cracked corner and poor grouting work.

Common examples include:

  • Tiling over uncured waterproofing: That traps risk into the room before the finish is even complete.
  • Ignoring substrate movement: Cracks, hollow spots and lippage often start here.
  • Bad junction detailing: Corners, penetrations and waste areas are frequent failure points.
  • Chasing appearance over drainage: Nice tile lines don't help if water doesn't fall correctly to waste.
  • Using premium tiles to hide poor prep: Expensive material usually makes defects more obvious, not less.

A recognised failure mode is tiling over uncured or discontinuous waterproofing, especially at junctions and penetrations. Guidance tied to Australian wet-area practice notes that AS 3740 requires these areas to be systematically sealed and cured before tiling starts, as explained in this article on how bathroom tile is laid over waterproofed areas.

A bathroom can survive a dated colour scheme. It won't survive failed waterproofing for long.

Why builder oversight matters in bathroom renovations

Melbourne homeowners sometimes split a bathroom job between separate trades without anyone taking full responsibility for sequencing. That's where defects get born. The plumber assumes the substrate issue has been fixed. The waterproofer assumes the carpentry is final. The tiler assumes penetrations are complete. Nobody owns the junction between trades.

That's why many bathroom renovations benefit from Registered Builder oversight. A builder doesn't just hire people. A competent builder coordinates the order of work, checks whether the room is ready for each trade, and prevents one shortcut from being buried by the next layer.

The homeowner benefit is practical. You get one scope, one sequence and one accountable party managing the room as a wet-area build, not as a patchwork of individual tasks.

Bringing It All Together Your Bathroom Renovation Checklist

A lasting bathroom isn't built by starting with the prettiest tile. It's built by getting the hidden work right and then finishing it with care. This is the difference between a bathroom that still performs years later and one that starts showing defects far too early.

Use this checklist before you commit:

  • Scope the job properly: Re-tile, rebuild, or full renovation.
  • Match the tile to the room: Don't choose large-format or stone without checking substrate suitability.
  • Verify the base: Flatness, movement, falls and junction condition all matter.
  • Treat waterproofing as essential: The membrane system has to be complete before tiling.
  • Plan the layout: Good set-out prevents poor cuts and awkward visual balance.
  • Use the right adhesive and curing sequence: Don't rush grouting or traffic.
  • Finish carefully: Grout, seal where required, and install fixtures without compromising the tilework.
  • Use qualified trades: Bathroom renovations work best when a Registered Builder coordinates the room as one system.

If you're spending money anywhere, spend it on the work you won't see once the room is complete. That's what protects everything you will see every day.


If you're planning a bathroom renovation and want practical guidance on tile selection, waterproofing, layout, or full project coordination, Melbourne Tiling Services P/L handles bathroom tiling and renovation work across Melbourne with Registered Builder oversight.

Waterproofing in Melbourne: Expert Guide to VIC Standards

A lot of homeowners still treat waterproofing like a line item under tiles. That's backwards. A 2023 New South Wales survey found 42% of new strata apartment buildings had serious waterproofing issues, and a federal 2021 report estimated that roughly 30% of all buildings had external leaks. The annual economic cost of these defects in new residential apartment construction has been estimated at between AUD 121 million and AUD 314 million across Australia according to this review of waterproofing failures in Australia.

In Melbourne, that matters long before you see a stained ceiling or swollen skirting board. By the time water shows up outside the bathroom, the failure usually started earlier, underneath the tiles, at a junction, around a penetration, or where one trade assumed another had handled the detail. In a major bathroom renovation, waterproofing isn't a separate task. It's part of a system that has to be designed, sequenced, installed, and documented properly.

That's why registered builder oversight matters. A good membrane product helps. Good detailing matters more. Good supervision matters most.

Table of Contents

The Hidden Risk in Melbourne Homes

Waterproofing failures rarely begin with a dramatic leak. Most start out of sight. A shower floor holds water a little longer than it should. A balcony edge lets moisture creep behind the finish. A wall-floor junction looks fine after handover, then movement opens a path water can follow.

That's why waterproofing in melbourne should be treated as risk management, not decoration support. The damage doesn't stop at grout or tiles. Water ingress can lead to mould, swollen framing, stained ceilings, damaged adjoining rooms, and disputes over who is responsible for fixing what.

For landlords, the stakes are broader again. If a tenant reports persistent moisture, mould, or a leaking wet area, the issue can affect habitability, maintenance obligations, and insurance discussions. It's worth understanding how comprehensive landlord coverage across Victoria fits around maintenance, leak events, and property protection, especially if you manage an older apartment or a recently renovated unit.

Why failures keep happening

In practice, most failures come from one of four places:

  • Bad sequencing: Plumbing, screeding, waterproofing, and tiling weren't coordinated properly.
  • Poor surface prep: The substrate moved, cracked, stayed contaminated, or wasn't ready to receive the membrane.
  • Weak detailing: Corners, penetrations, hob transitions, and door thresholds were rushed.
  • No real oversight: Each trade did its own piece, but no one checked whether the whole assembly worked together.

Poor waterproofing usually isn't one big mistake. It's a chain of small ones that line up in the same room.

Melbourne homes bring their own complications. Renovations often happen in older houses with movement in timber floors, or in apartments where access, strata constraints, and shared structures make rectification harder. By the time a defect becomes visible, repairs can involve demolition, drying, re-waterproofing, and re-tiling.

Why homeowners get caught out

Many owners assume that if a bathroom looks new, it must be sound. That assumption causes expensive trouble. A bathroom can have quality tapware, neat grout lines, and premium tiles, yet still be non-compliant underneath.

The same problem shows up on balconies and podium decks. Surface coatings can hide bad falls, failed upturns, and weak detailing around balustrades. The visible finish often distracts from the part that matters most, which is the concealed system underneath.

Victoria's Mandatory Waterproofing Standards

In Victoria, compliant waterproofing isn't a preference. It's a building requirement. The Victorian Building Authority states that waterproofing of wet areas is required to prevent mould growth and structural damage, and its guidance makes clear that bathrooms and other wet areas must meet prescriptive requirements under the applicable building framework, as outlined in the VBA's wet-area waterproofing requirements.

The practical point for a homeowner is simple. If you're renovating a bathroom, ensuite, laundry, or similar wet area, the job needs more than a membrane brushed on before tiling. It needs compliant detailing across the whole assembly.

Why compliance isn't optional

The industry has repeated the same lesson for years because it remains true. The Australian Institute of Waterproofing has been noted as saying waterproofing may account for just 1% of a building's cost, yet failures can drive a disproportionate amount of repair cost. That's why experienced registered builders don't treat waterproofing as a place to save money.

Here are some of the details that matter in real jobs:

  • Waterstops: The membrane has to terminate correctly. If you want a plain-English primer, this bathroom waterstops guide is useful for understanding why that small detail matters so much.
  • Junctions and transitions: Wall-to-floor corners, shower entries, and penetrations all need careful treatment.
  • Hobless and step-free design: These layouts can work well, but only when the falls, drainage, and threshold detailing are resolved properly.
  • Documentation: You should ask how compliance will be recorded, not just how the membrane will be applied.

A homeowner doesn't need to memorise every clause. You do need to understand that compliance lives in the details that are hidden once tiling starts.

What a registered builder should control

A registered builder's role is broader than hiring a waterproofer. On a full bathroom renovation, the builder should control the sequence and check that each trade leaves the next one a workable, compliant substrate.

That includes:

Stage What needs to be controlled
Demolition Removal back to a sound substrate without leaving hidden damage in place
Plumbing works Penetrations and set-outs that suit the waterproofing layout
Floor preparation Falls, levels, and screeds that allow water to drain properly
Waterproofing Correct product selection, detailing, curing, and extent
Pre-tiling review Visual confirmation before the membrane gets covered

If you want a record-focused explanation of what owners should request at handover, this page on a waterproofing compliance certificate in Victoria is a practical starting point.

Practical rule: If the contractor can explain the membrane brand but can't explain the waterstop, the falls, and the documentation, you're not hearing the full story.

Choosing the Right Waterproofing System

People often ask which membrane is best. That's not the right question. The right question is which system suits the substrate, the movement you expect, and the exposure the area will face.

Successful waterproofing in melbourne depends on matching the membrane system to the job. According to this guide to waterproofing systems and membrane methods, liquid membranes are versatile for complex shapes like showers and balconies, while sheet systems offer high dimensional stability. The same source also notes that poor detailing at joints and transitions is a primary cause of failure.

A guide illustrating four common types of waterproofing systems for construction and building maintenance projects.

Liquid membranes versus sheet membranes

Liquid-applied membranes are common in bathroom renovations for a reason. They suit awkward geometries. Niches, corners, mixer penetrations, shower bases, and small floor areas are easier to treat when the membrane can be rolled or brushed continuously around the detail.

Sheet membranes have a different strength. They offer consistent thickness and dimensional stability, which can be an advantage on larger or more uniform areas where movement, vapour management, or system design points in that direction.

A simple comparison helps:

System Tends to suit Watch-outs
Liquid-applied membrane Showers, bathrooms, irregular layouts, complex penetrations Thickness control, curing, and detailing must be disciplined
Sheet membrane Larger areas, some external assemblies, jobs needing stable sheet properties Seams, terminations, and substrate preparation must be exact

What actually decides the right system

The membrane type is only one decision. The better conversation is about the full build-up.

  • Substrate movement: Timber floors and mixed-material junctions behave differently from stable concrete.
  • Exposure: Internal wet areas don't face the same UV, temperature cycling, or weather load as an external balcony.
  • Traffic and finish: A trafficable surface needs a different approach from a tiled shower underlay.
  • Drainage design: If falls are wrong, a premium membrane won't rescue the job.
  • Detail complexity: Balustrade posts, channels, corners, and door thresholds all increase risk.

That's also why some contractors specify more than one system across a property. One product may suit the ensuite. Another may suit the balcony. Another may suit a retaining wall or podium edge.

For homeowners comparing options, a more useful discussion starts with the types of waterproofing systems used in Melbourne projects and then narrows down based on the room, substrate, and exposure.

A membrane doesn't fail because the brochure was wrong. It fails because the selected system didn't suit the build-up, or because the installer lost control of the detail work.

The Waterproofing Process in a Bathroom Renovation

In a proper bathroom renovation, waterproofing sits in the middle of the job, not at the start and not as an afterthought. By the time the membrane goes on, demolition should be complete, plumbing rough-in should be resolved, and the substrate should be sound, clean, and ready.

A professional construction worker using a paint roller to apply blue waterproof membrane to wooden wall frames.

On builder-managed jobs, coordination earns its keep. If the plumber leaves penetrations in the wrong place, if the floor isn't formed to drain properly, or if damaged sheeting stays in place, the waterproofer is being asked to bridge problems that should've been fixed earlier.

Where waterproofing sits in the renovation sequence

A sound sequence usually looks like this:

  1. Strip-out and inspection
    Old tiles, screeds, fittings, and damaged linings come out. Hidden moisture damage gets identified before new finishes go in.

  2. Structural and substrate correction
    Loose sheeting, movement, cracking, poor framing support, or unsuitable surfaces are dealt with first.

  3. Plumbing and set-out confirmation
    Waste locations, tap penetrations, shower positions, bath interfaces, and screen lines are checked against the layout.

  4. Floor preparation and falls The substrate must allow water to move where it should. Waterproofing over a badly prepared floor locks in the defect.

  5. Membrane detailing and application
    Corners, junctions, penetrations, and terminations are treated first. Then the field areas are coated or sheeted as required.

  6. Pre-tiling inspection
    This is the point where the hidden work is still visible. It matters more than most owners realise.

If you miss the pre-tile check, you lose your best chance to verify what's underneath the finish.

The inspection point that matters most

The most important inspection in a bathroom renovation is after waterproofing and before tiling. Once tile adhesive, tiles, grout, and fittings cover the membrane, you're relying on paperwork and trust.

That's why experienced builders photograph this stage, record products used, and confirm the detail work before the tiler starts. On larger or more technical jobs, that check becomes even more important because multiple trades intersect in a very small room.

A short visual overview of membrane application helps homeowners understand what they should be asking to see:

For bathroom renovations, one practical advantage of using a company with registered builder oversight is that the waterproofing stage isn't isolated from the rest of the project. For example, Melbourne Tiling Services P/L handles bathroom renovations, waterproofing, tiling, and related wet-area works under coordinated builder-led management rather than treating membrane application as a standalone trade event.

Beyond the Bathroom Waterproofing Balconies and Decks

A bathroom membrane lives in a controlled environment. A balcony doesn't. External waterproofing has to deal with rain, UV, temperature swings, surface traffic, wind-driven water, and movement at edges and penetrations. That's why a system that performs well in a shower may be the wrong choice outside.

For leaking balconies and external walls in Melbourne, the critical decision is choosing the right system based on substrate movement and use. Local specialists working in this space use liquid-applied, sheet, and trafficable systems, including products such as polyurea, polyurethane, and liquid rubber, especially around balustrades and penetrations where failures often occur, as discussed in this Melbourne guide to roofs and deck waterproofing.

Why external waterproofing fails differently

External areas fail for different reasons than bathrooms:

  • Weather exposure: Rainfall keeps testing the system from above, not just from intermittent use.
  • UV degradation: Some coatings and details deteriorate faster when exposed.
  • Thermal movement: Sun and shade cycles expand and contract the substrate and finish.
  • Access limitations: Repairing a podium deck or occupied apartment balcony is harder than fixing a bathroom under renovation.

That changes the design conversation. On a balcony, the builder has to think about the entire path water will take. Surface finish, falls, drainage outlets, door thresholds, upturns, and terminations all need to work together.

What to check before choosing a system

If you're dealing with a leaking balcony or deck, ask these questions first:

  • Is the surface trafficable: Some systems are designed to be exposed, others need protection or a tiled finish.
  • Where is the movement: Long spans, cracked screeds, mixed materials, and post penetrations all change the specification.
  • Can drainage be improved: A membrane won't fix a balcony that holds water because the fall is wrong.
  • What disruption is acceptable: Some rectification methods involve full removal. Others aim to target isolated failure points.

For apartment owners and managers, the practical issue often isn't product chemistry. It's whether the proposed method fits the access constraints, the occupied building, and the long-term maintenance plan. A detailed look at balcony waterproofing in Melbourne is useful when you're comparing remedial options rather than new-build assemblies.

External waterproofing punishes shortcuts more quickly than internal wet areas. The weather keeps testing the weak point until it opens up.

Hiring a Pro Costs, Licensing, and Your Warranty

The cheapest waterproofing quote often excludes the part that protects you. It may price membrane application as if the substrate is already perfect, the detailing is straightforward, and no one needs to document the result. Real projects aren't that tidy.

A compliant Melbourne waterproofing job isn't just about product selection. The VBA's guidance highlights details such as membrane termination to a waterstop, and the key homeowner question is: How will you document that the installation meets Victorian standards? That point comes directly through the VBA's practitioner guidance on waterproofing details for wet areas.

A professional business meeting with a firm handshake between two men in a bright modern office.

Why builder oversight changes the outcome

A sole waterproofer may do competent membrane work. The problem is that bathroom failures often begin outside the membrane application itself.

A registered builder overseeing the renovation is in a stronger position to manage:

Risk area Why oversight matters
Substrate condition Damaged or moving backgrounds need correction before waterproofing starts
Trade coordination Plumbing, carpentry, screeding, waterproofing, and tiling affect one another
Compliance detail Waterstops, thresholds, penetrations, and junctions must line up with the full design
Records Photos, scope notes, product information, and completion documentation should be collected systematically

That oversight matters even more in major bathroom renovations, where layout changes, enlarged showers, hobless entries, recessed niches, underfloor heating, or stone finishes can increase complexity.

Good waterproofing documentation protects you twice. It helps prevent disputes during the job, and it gives you a record after the tiles are on.

Questions worth asking before work starts

Don't ask only what membrane they use. Ask how the whole job will be controlled.

  • Who is supervising the full renovation: If several subcontractors are involved, who carries the responsibility for sequence and compliance?
  • How will falls and drainage be checked: A membrane laid over bad falls is still a bad system.
  • What details will be photographed: Ask for photos before tiling, especially at corners, penetrations, and threshold areas.
  • What documentation will I receive: You want a clear record of what was installed and how compliance was addressed.
  • Who do I call if there's a defect: One responsible party is better than three trades blaming each other.

If you're comparing quotes, treat unusually cheap pricing carefully. In waterproofing, missing scope often hides behind vague words like “standard prep” or “allowance for membrane”. A clear, builder-led scope usually reads more like a construction plan than a trade-only quote.

Signs of Failure and How to Maintain Your System

Waterproofing failure doesn't always announce itself with water running across the floor. Most owners notice secondary symptoms first. If you know what to look for, you can catch problems earlier and limit the spread.

A yellow wall with visible water damage, salt deposits, and condensation next to a glass shower door.

Early signs people miss

Keep an eye out for these:

  • Recurring mould: If mould keeps coming back after cleaning, moisture may be sitting behind the surface.
  • Loose or drummy tiles: Hollow sounds can point to debonding or moisture-related movement below.
  • Cracked grout at junctions: Repeated cracking at the same spot usually means movement or water-related failure underneath.
  • Peeling paint on the other side of a wall: Bathroom leaks often show up in the adjoining room first.
  • White salty residue: Efflorescence suggests moisture is moving through masonry or cement-based materials.
  • Musty odour: A room that smells damp even when it looks clean deserves investigation.

Some of these signs can also relate to plumbing leaks or ventilation issues. That's why diagnosis matters before anyone starts patch repairs.

Simple maintenance that helps

Maintenance won't fix a failed membrane, but it can reduce stress on a sound system.

  • Keep drains clear: Standing water gives every weak detail more time under load.
  • Check sealant joints: Silicone around screens, baths, and fixtures doesn't last forever.
  • Use gentle cleaners: Harsh products can shorten the life of sealants and some finishes.
  • Act early on movement: A cracked tile or recurring grout split shouldn't be ignored for months.
  • Watch external areas after rain: Balconies that pond water are telling you something useful.

Small maintenance habits don't replace proper construction. They do help preserve it.

Melbourne Waterproofing Frequently Asked Questions

Can I waterproof my own bathroom in Melbourne

You can physically apply a membrane yourself, but that doesn't mean the job will be compliant or easy to verify later. In a major renovation, the bigger risk is usually not the coating itself. It's the falls, the substrate, the terminations, and the lack of reliable documentation once the room is tiled.

Is waterproofing only important in the shower

No. In bathroom renovations, failures often occur at the edges of the obvious wet zone. Door thresholds, around baths, floor waste areas, wall-floor junctions, and penetrations all deserve attention. In some bathrooms, especially those with more movement or greater wet-area exposure, the surrounding floor area becomes just as important as the shower.

How do I know if the work is compliant

Ask for evidence before the tiles go on. You want to know what product system is being used, where the membrane starts and stops, how terminations are handled, and what photos or records will be provided. A compliant job should be explainable in plain English by the builder or installer.

What's more important, the membrane brand or the installer

The installer and the supervision. Good products are widely available. Failures still happen because the wrong system was chosen for the substrate, or because the detailing and sequencing were poor.

Are balconies waterproofed the same way as bathrooms

No. External areas face weather, UV, movement, and often foot traffic. That usually pushes the specification toward a different system and a different level of detail.

When should I involve a registered builder

At the start. If you're changing layout, removing walls or linings, updating plumbing locations, building a hobless shower, or doing a full ensuite or bathroom renovation, builder oversight should be part of the planning, not something added after demolition.

If you're planning a renovation or dealing with a leak, talk to a team that can assess the substrate, the detailing, and the compliance pathway before tiles go down.


If you need practical advice on waterproofing in melbourne, bathroom renovations, or leak rectification, Melbourne Tiling Services P/L can inspect the job, explain the trade-offs, and quote the work with registered builder oversight so the waterproofing is treated as part of the whole system, not a standalone afterthought.