What Is Substrate Preparation for Tiling and Waterproofing

Substrate preparation is the process of making a surface structurally sound, clean, dry, flat, and correctly profiled so waterproofing membranes and tile adhesives bond reliably and last for decades. In wet areas, new concrete should cure for at least 28 days, while cement-sand screeds may require 7 days before waterproofing.

The popular advice that tiling is mostly about choosing the right adhesive and laying tiles neatly misses the point. The tile is the visible finish, but the substrate is the working foundation. If that foundation moves, holds contamination, retains unsuitable moisture, or sends water in the wrong direction, a beautiful bathroom can still fail.

Table of Contents

Why Substrate Preparation Is the Most Overlooked Step in Tiling

Most tile failures start at the base layer, not at the face of the tile. A cracked grout joint, loose tile, hollow-sounding section, or leaking shower often points back to preparation that was rushed, misunderstood, or never properly checked.

In practical terms, substrate preparation means exposing the surface, assessing its condition, repairing defects, controlling moisture, removing contaminants, correcting levels and falls, and creating the right profile for waterproofing and adhesive. It isn't just sweeping dust from the floor before the tiler arrives.

Australian practice treats this as a technical stage. AS 3958:2023 formally covers preparation of backgrounds before bonded fixing and grouting of floor and wall tiles, including mosaic tiles and panels. It replaced earlier guidance such as AS 3958.1-2007, which also dealt with background preparation, tile fixing, and grouting. The AS 3958:2023 standard information reflects why experienced trades treat the background as part of the installation system, not as an afterthought.

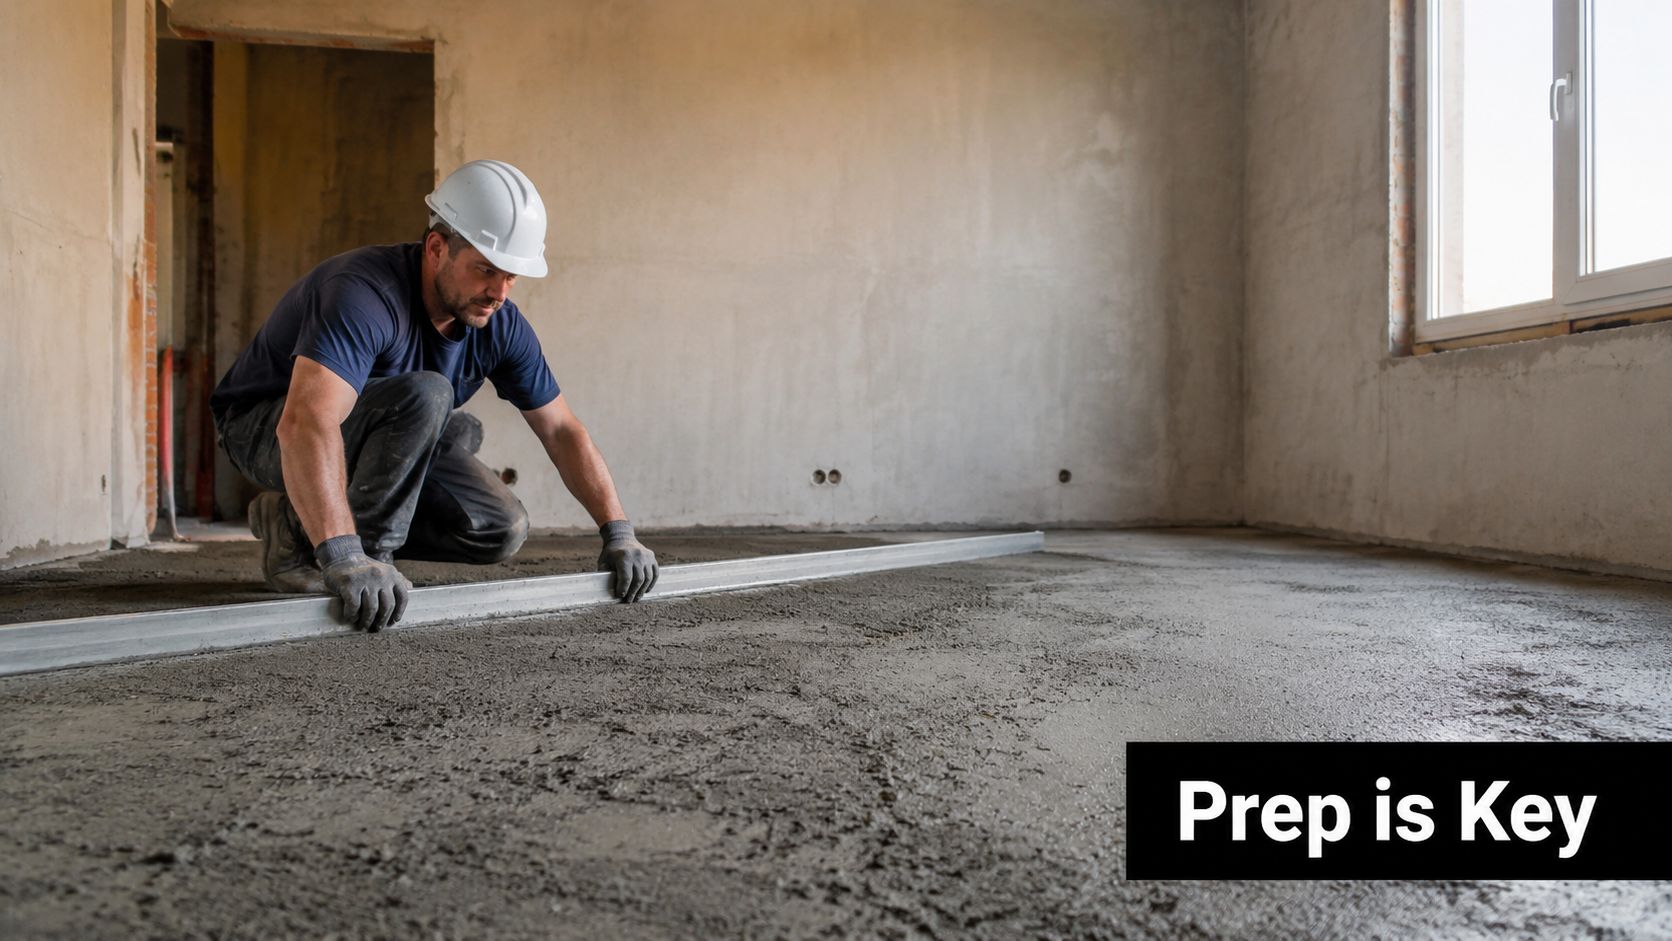
A construction worker in a hard hat smoothing wet concrete on a floor with a leveling tool.

The invisible work behind a finished bathroom

On a Melbourne bathroom renovation, preparation can involve stripping back old tiles, removing adhesive, grinding concrete laitance, filling cracks, repairing damaged framing, installing an appropriate underlay, forming falls, and priming before waterproofing. The exact sequence depends on the material and the condition discovered during demolition.

A registered builder treats preparation as a hold point. The next trade stage shouldn't begin until the base is suitable for it. Waterproofing over a contaminated or unstable surface doesn't turn that surface into a sound one. Likewise, spreading a premium adhesive over a poorly prepared floor can't compensate for movement, dust, or unsuitable moisture.

Practical rule: If the substrate isn't ready to receive the membrane or adhesive, the renovation isn't ready for waterproofing or tiling.

Australian trade training reflects this approach. CPCCWF3001 teaches preparation of surfaces for tiling application, including controlling suction with water and applying slurry and bonding agents when required. That history matters because it shows substrate preparation has long been treated as a codified trade skill in Australia, not a cosmetic cleaning exercise.

Core Technical Requirements for a Tiling-Ready Substrate

A tiling-ready surface needs more than a smooth appearance. The site supervisor is checking whether the base can support the finish, accept the next product, and direct water as designed.

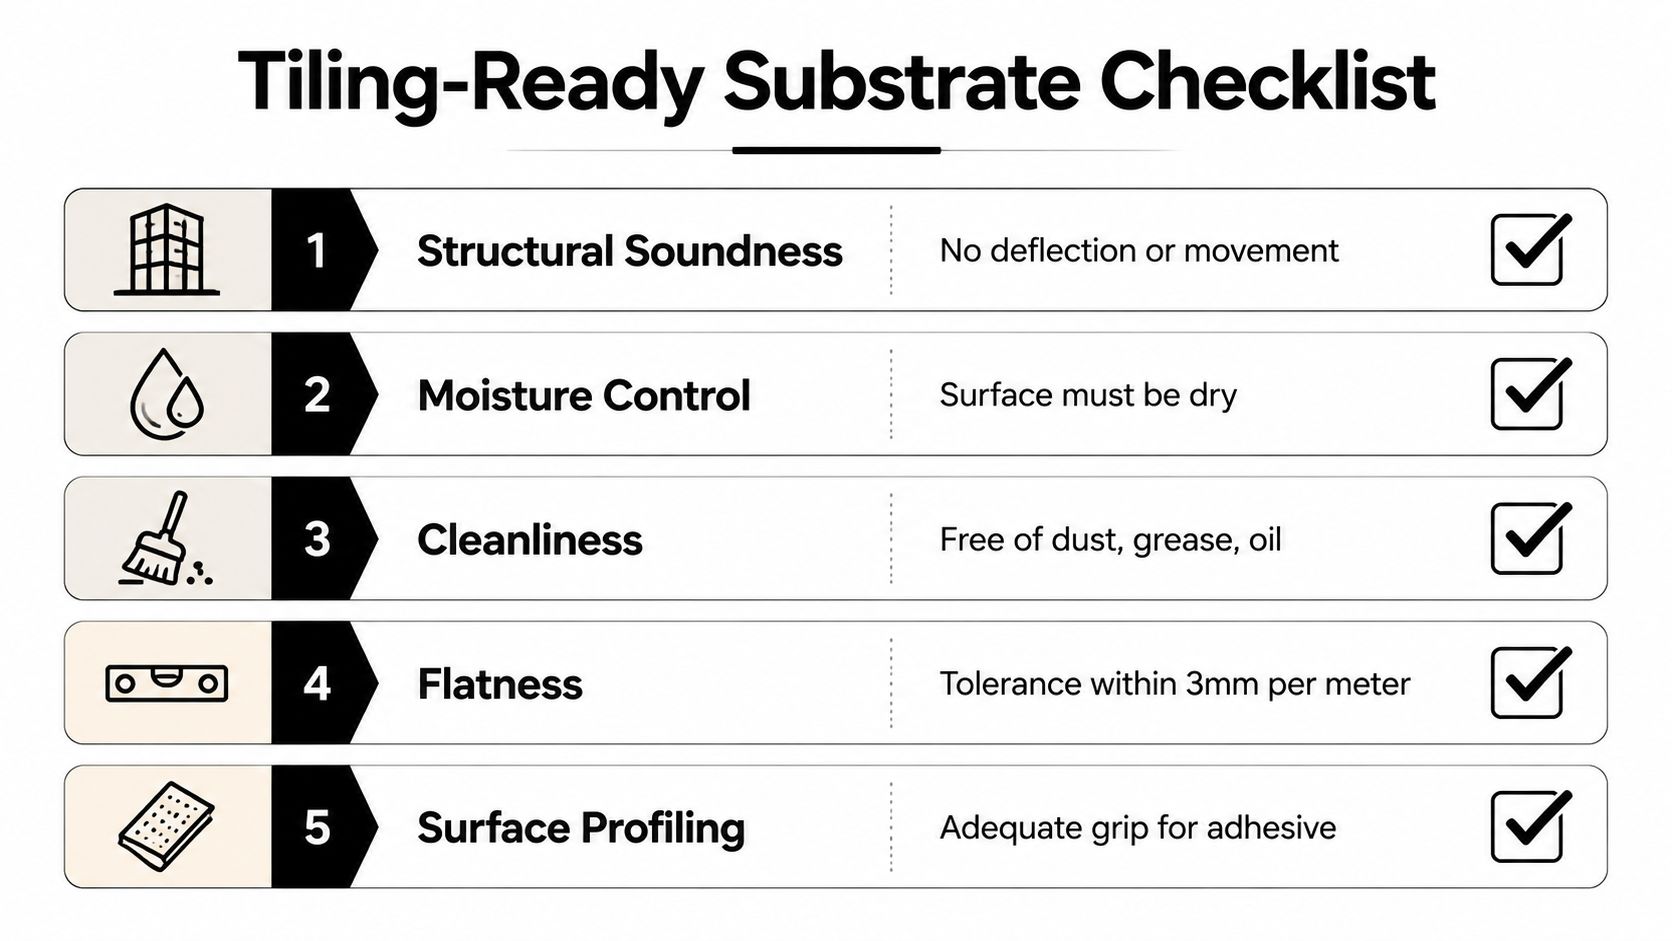
Five checks before the next trade starts

Structural soundness comes first. Concrete must not be loose, spalled, or breaking down at the surface. Timber floors need an assessment for movement and deflection before a tile underlay or tile system is installed. A surface that flexes underfoot may transfer stress into grout, adhesive, and tiles.

Moisture control requires more than touching the slab and deciding it feels dry. Australian technical guidance says finishes should be delayed until substrate moisture conforms to AS 1884 or AS 2455.1, while membrane manufacturers specify the acceptable condition for their own systems. Some systems permit application to damp surfaces, so the correct question is whether the moisture state matches the product specification, not whether every slab must be bone-dry.

Cleanliness means removing dust, laitance, oils, curing residues, old adhesive, paint, and other bond-breakers. A vacuum after grinding is useful, but it won't remove a contaminant that remains bonded to the surface. The surface must be suitable for adhesion.

Flatness matters because adhesive isn't a substitute for properly correcting a badly uneven base. High spots can be ground down, while hollows may need compatible repair mortar, screed, or levelling material. A straight-edge, level, and visual inspection reveal problems that disappear under general room lighting.

Surface profiling gives the primer, membrane, or adhesive a reliable key. Grinding, scarifying, or another approved mechanical method can open the surface and remove weak material. The final profile must suit the specified system, since overly aggressive preparation can create its own defects.

A checklist infographic detailing the five essential steps for preparing a substrate for professional tiling installation.

For wet-area work, the waterproofing system and tile adhesive must also be compatible. The practical relationship between the prepared base and the bonding layer is covered in this guide to tile adhesive for wet areas. Primers aren't interchangeable, and an installer should know whether the surface is porous, dense, dusty, damp, or previously coated before selecting one.

Inspection is more than a visual glance

A competent inspection checks for defects under a work light, tests questionable areas, confirms the intended falls, and records the substrate before it disappears beneath the membrane. A clean-looking slab can still have laitance, residual adhesive, or moisture outside the membrane manufacturer's limits.

How Preparation Differs Across Concrete Timber Plasterboard and Screed

“Substrate” is not one standard surface. Concrete, timber, plasterboard, and cement screed each respond differently to moisture, movement, primers, adhesives, and mechanical preparation. Treating them alike is a common cause of failures in Melbourne bathroom renovations.

Concrete requires more than a clean appearance. The surface may contain laitance, weak material, cracks, or voids, so the installer checks its condition, removes unsound material by suitable mechanical means, and repairs defects before waterproofing. New concrete should cure for at least 28 days before tiling or waterproofing under the Australian timing guidance in the National Tiles work method statement. Moisture must still be checked against the membrane manufacturer's limit. Cure time and moisture content are related, but they are not interchangeable.

Timber floors present a movement problem. Joists, sheet flooring, fixings, and transitions all need assessment before an appropriate tile underlay system is selected. Fibre-cement underlay may suit a specified system, provided movement joints and perimeter clearances follow the product instructions. Priming may be required to control absorption and prevent contaminants from weakening the bond. Excessive flexing can lead to cracked grout, loose tiles, or movement at transitions.

Standard plasterboard is not suitable as wet-area backing because it has been painted or covered with membrane. Wet-area wall linings must suit their location. Joints, junctions, penetrations, and fasteners form part of the waterproofing detail, not separate finishing tasks. The primer and joint treatment must be compatible with the membrane system before application begins.

Cement screed has its own cure and bonding requirements. A sand-cement screed may require 7 days before waterproofing, while moisture testing must confirm compliance with the membrane instructions. If the screed is bonded over an existing slab, the specified system may require a slurry or bonding coat. The screeding for tiles service information explains how screed selection and installation control the finished floor plane, not only its height.

NCC 2025 fall requirements add another practical check in wet areas. The prepared surface must support the required drainage direction without creating a hollow, reverse fall, or abrupt transition. Victorian registered builders treat this preparation as a codified trade skill because the substrate affects waterproofing, drainage, adhesion, and the durability of the finished work.

Substrate Type Key Prep Steps Moisture Threshold Common Failure Risk
Concrete Inspect, repair, mechanically profile, remove laitance, prime where specified Meet the membrane manufacturer's limit and applicable Australian requirements Poor adhesion, cracking, blistering, or delamination
Timber Check movement, verify framing, install suitable underlay, treat joints and transitions Confirm the system's moisture and environmental requirements Flexing, cracked grout, and tile movement
Plasterboard Use suitable wet-area lining, seal joints and penetrations, prime compatibly Follow the waterproofing system's substrate requirements Swelling, weak joints, and membrane failure
Cement screed Confirm cure, repair defects, check moisture, use bonding coat where specified Allow the required cure, including 7 days where applicable Shrinkage, debonding, and cracking through the finish

Recommended Surface Preparation Steps for Bathroom Renovations

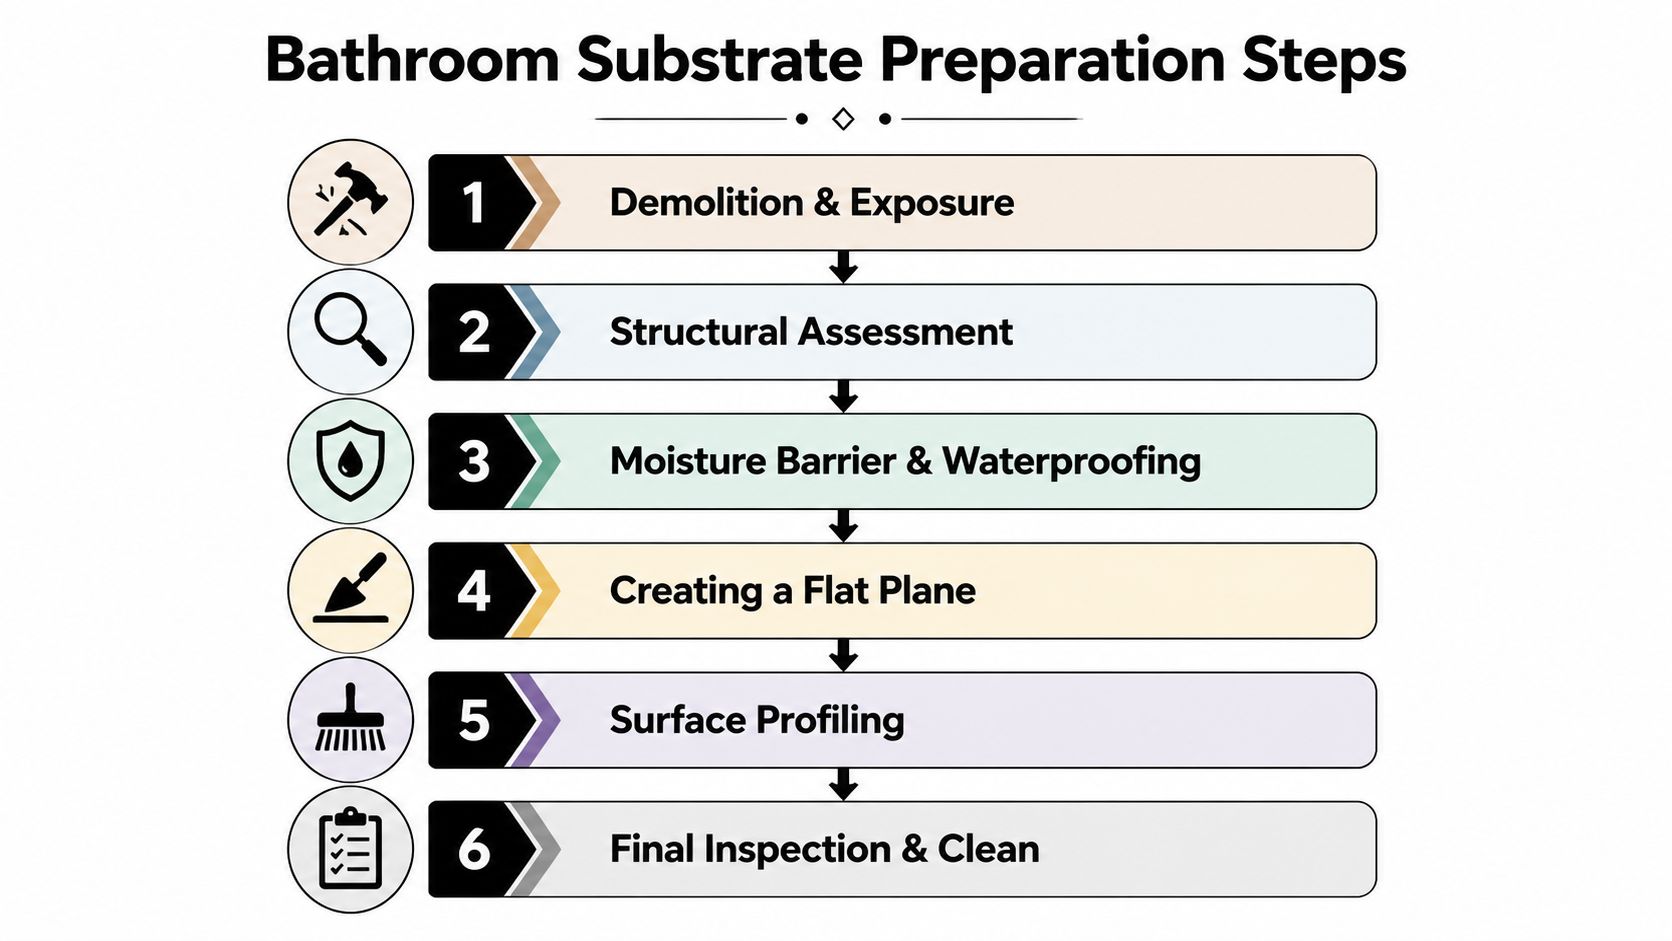
A Melbourne bathroom renovation should start with exposure, not assumptions. Demolition removes the tile and often reveals old adhesive, damaged sheet flooring, poorly formed falls, water-affected framing, or several layers that shouldn't remain under a new membrane.

A trade sequence that protects the next stage

  1. Expose the known base. Remove loose tiles, failing adhesive, soft material, and suspect patching. Keep removing material until the remaining surface is stable and identifiable.

  2. Assess structure and defects. Check concrete for cracks, spalling, hollow areas, and weak edges. On timber floors, inspect movement and support. Fill voids and repair defects with materials compatible with the intended waterproofing and tiling system.

  3. Clean mechanically. Depending on the base, grinding, scarifying, scraping, or controlled washing can remove laitance, dust, residues, and old bond-breakers. Vacuuming finishes the process, but it doesn't replace mechanical removal of bonded contamination.

  4. Check moisture and cure. New concrete generally needs at least 28 days, while cement-sand render screeds may need 7 days before waterproofing. Moisture meters or other approved testing methods help confirm whether the surface sits within the membrane manufacturer's limits. A membrane data sheet takes priority over a guess based on appearance.

A six-step infographic detailing the process for preparing a bathroom substrate before tiling or renovation work.

  1. Prime deliberately. Porous surfaces may need a primer to control suction, while dense or non-absorptive bases require a compatible product intended for that condition. The primer must suit the membrane, and the installer should respect its coverage and drying instructions.

  2. Form and verify falls. Internal wet areas need a structural substrate with a fall between 1:80 and 1:50 under the NCC 2025 guidance cited by Australian waterproofing update information. Other Australian waterproofing guidance tied to AS 3740 refers to 1:100 for floors and 1:80 for enclosed shower bases, so the design and applicable requirement must be checked rather than guessed. A laser level and straight-edge verify the result before waterproofing begins.

The NCC 2025 change is especially important outside. External waterproofed areas can no longer rely on a topping screed or tile bed to form falls, except in planter boxes. Finishes must be directly bonded to the membrane or loosely laid on pedestals. That rule doesn't mean a bathroom floor can be improvised. It means the substrate and fall strategy must be right before the membrane and finish are installed.

For a practical visual reference, review the following bathroom preparation video:

Before membrane application, the base should be smooth, clean, and free of imperfections. The bathroom floor waterproofing guidance also needs to be read alongside the actual membrane data sheet, because cure times, damp-surface permissions, primer requirements, and application thickness vary between certified systems.

Common Substrate Failures and Their Costly Consequences

The most expensive preparation mistake is usually the one that saves time at the start. Skipping a moisture check, accepting a weak screed, or leaving old adhesive in place can make the finished bathroom appear complete while the bond line remains vulnerable.

A membrane may blister or lose adhesion when applied over a substrate that hasn't reached the required cure or moisture condition. Poor falls create a separate problem. Water that sits against a wall or around a shower area can test every junction, penetration, and transition in the waterproofing system.

Where the failure begins

  • False moisture confidence: The installer relies on touch or appearance instead of an approved test and the product limits. Trapped moisture can interfere with adhesion and membrane performance.
  • Insufficient curing: Tiling or waterproofing proceeds over green concrete, screed, or levelling material. Shrinkage and movement can transmit cracking into the membrane or tile finish.
  • Uncorrected falls: The floor looks broadly level but doesn't direct water properly to the waste. Pooling increases the load on junctions and can leave the bathroom difficult to keep dry.
  • Bond-breakers left behind: Dust, oils, curing compounds, paint, and old adhesive remain under the new system. The membrane or adhesive bonds to contamination instead of the actual substrate.
  • Movement ignored: Timber or unstable repairs move after the tiles are installed. Grout cracks, tiles loosen, and water finds pathways into vulnerable edges.

Australian technical notes require voids, cracks, and defects to be filled, surfaces to be smooth and free of contaminants, and porous substrates to be primed before membrane application. The concrete substrate preparation guidance also links preparation with moisture control and cure state.

Failure Type Root Cause Typical Consequence Estimated Rectification Cost
Moisture-related membrane failure Substrate condition wasn't tested against the system requirements Blistering, poor adhesion, and possible leaks The cost varies with access, damage, and the extent of removal
Inadequate fall Floor profile wasn't designed or checked before waterproofing Persistent pooling and stressed junctions Rectification may require removing finishes and rebuilding the fall
Uncured screed or levelling material Waterproofing or tiling was rushed Shrinkage cracks and debonding Repairs can extend beyond the original wet-area work
Contaminated surface Dust, oil, laitance, or adhesive remained Delamination and loose tiles Full strip-out may be required where the bond has failed

No honest contractor can promise a fixed rectification figure without inspecting the bathroom. The important trade-off is clear, though. Preparation costs time and labour before the room looks different, while failed preparation can force demolition of work that appeared finished.

Why Registered Builders Matter for Wet-Area Substrate Work

In Victoria, a person must be registered with the Victorian Building Authority to perform domestic building work worth more than $10,000, including labour and materials, according to the Victorian domestic building registration guidance. The registration framework includes domestic builder unlimited and limited categories such as bathroom, kitchen, and laundry renovation.

That matters because wet-area substrate preparation sits inside a larger system. The builder must coordinate demolition, carpentry, plumbing, waterproofing, screeding, tiling, and inspections without allowing one trade to conceal a defect created by another.

Registration connects preparation with competence

The VBA's bathroom, kitchen, and laundry renovation materials require competence in installed wet-area wall and floor substrates and in selecting suitable waterproofing systems. The VBA registration application shows that substrate preparation is part of assessed technical capability, not an informal task handed to whoever arrives first.

A registered builder should be able to explain:

  • The substrate decision: Why a particular screed, underlay, repair mortar, or lining was selected.
  • The waterproofing interface: Which primer and membrane system are compatible with the prepared surface.
  • The inspection record: What was checked before the membrane and tiles covered the work.
  • The responsibility chain: Which licensed trade completed each connected part of the renovation.

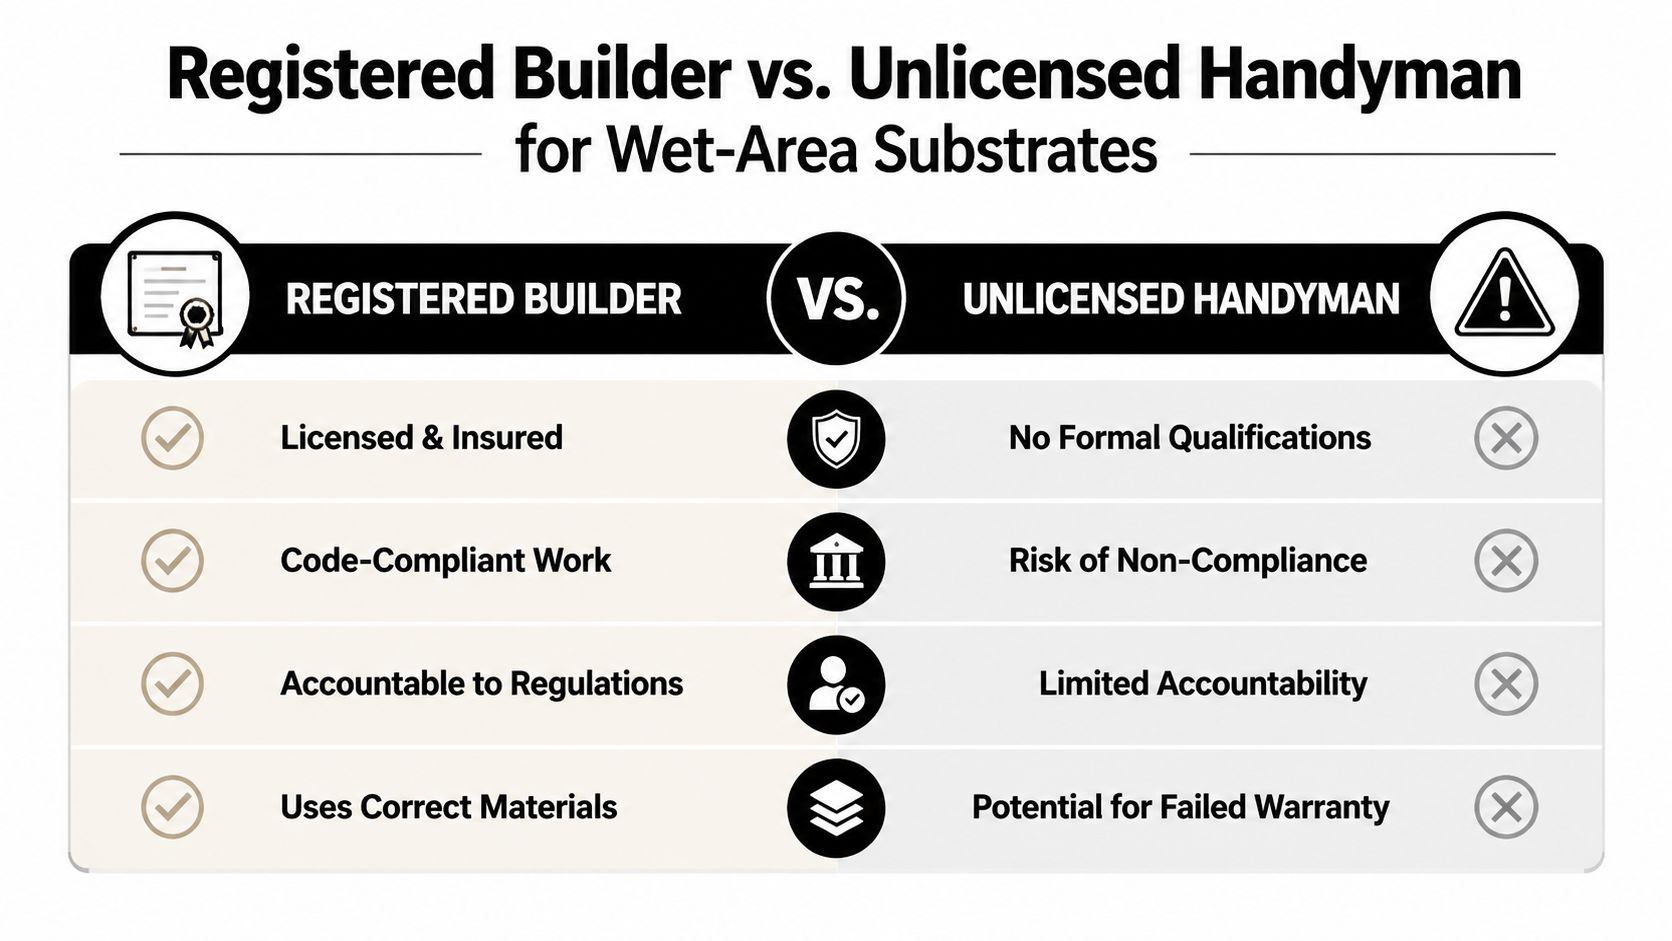
Registration doesn't make every installation automatically perfect, and it doesn't remove the need to inspect the work. It does give the homeowner a meaningful credential to verify before signing a contract. An unlicensed operator may offer a lower initial price by omitting testing, documentation, or proper preparation, but that saving can disappear when a concealed defect requires removal of finished work.

A comparison chart showing the advantages of hiring a registered builder over an unlicensed handyman for wet-area projects.

Your Substrate Preparation Checklist Before Tiling Begins

Before adhesive is mixed, ask the builder to confirm each point:

  • Structure: Has the concrete, timber, lining, or screed been checked for movement, cracks, spalling, and weak areas?
  • Moisture: Was moisture tested using a method and limit accepted by the membrane manufacturer?
  • Cure: Has new concrete cured for at least 28 days, and the relevant cement-sand screed for the required 7 days, where applicable, before waterproofing? Confirm the Australian installation guidance.
  • Cleanliness: Have dust, laitance, oil, curing compounds, old adhesive, and loose material been removed?
  • Profile: Was the surface mechanically prepared where needed, then vacuumed and primed with a compatible product?
  • Falls: Were wet-area falls checked against the design and NCC 2025 requirements, including 1:80 where required?
  • Waterproofing: Were the membrane system, primer, coverage, and junction details checked before tiling?

Request photographs before each layer conceals the work. The record should show the exposed substrate, repairs, moisture checks, primer, falls, and membrane. A Victorian registered builder should explain these checks and retain evidence of them.

Preparation determines whether tiles remain bonded and the wet area stays serviceable. It is a codified, inspectable trade stage, not surface tidying.

Melbourne Tiling Services P/L handles substrate preparation during bathroom and ensuite renovations, including grinding, patching, screeding, self-levelling, fall correction, priming, waterproofing, and tiling coordination. To discuss an existing bathroom before selecting tiles, visit Melbourne Tiling Services P/L for a quote.

Melbourne Waterproofing and Tiling: Your 2026 Guide

You've found the right tiles, chosen the vanity and probably saved a few inspiration photos. Then the builder mentions membrane thickness, floor falls, a flood test and a waterproofing certificate, and the bathroom suddenly feels less like a design project and more like a technical job. That reaction is normal. In Melbourne bathroom renovations, the tiles are the visible finish, but the waterproofing, drainage and substrate underneath decide whether the room performs.

Good Melbourne waterproofing and tiling treats the bathroom as one connected system. The membrane, screed, waste, wall linings, tile adhesive, grout, silicone and shower screen all need to work together. A neat-looking bathroom can still be poorly built if the falls are wrong, penetrations are unsealed or tiling starts before the membrane is ready.

Table of Contents

What Melbourne Waterproofing and Tiling Actually Covers

A bathroom renovation doesn't begin with a tile trowel. It begins with demolition, access planning and a close look at what sits behind the existing finishes. Once old tiles and fixtures are removed, the team can inspect framing, the structural floor, existing damage and the position of plumbing services. That information determines whether the project needs a straightforward refresh or a deeper rebuild.

A full scope commonly involves:

  • Strip-out and disposal: Remove tiles, fixtures, wall linings and failed waterproofing, then organise safe disposal and site protection.
  • Carpentry and substrate work: Repair framing, prepare cement sheet or other approved linings, and correct surfaces that aren't flat or stable.
  • Plumbing and electrical coordination: Complete rough-ins before waterproofing and tiling conceal access points behind the finished room.
  • Screeding and self-levelling: Form the drainage falls and create a suitable base for the membrane and tiles.
  • Waterproofing: Prime the substrate, treat corners and penetrations, and apply the membrane according to the system requirements.
  • Tiling and finishing: Set out wall and floor tiles, grout the joints, apply flexible silicone at movement points, and coordinate frameless shower screens.

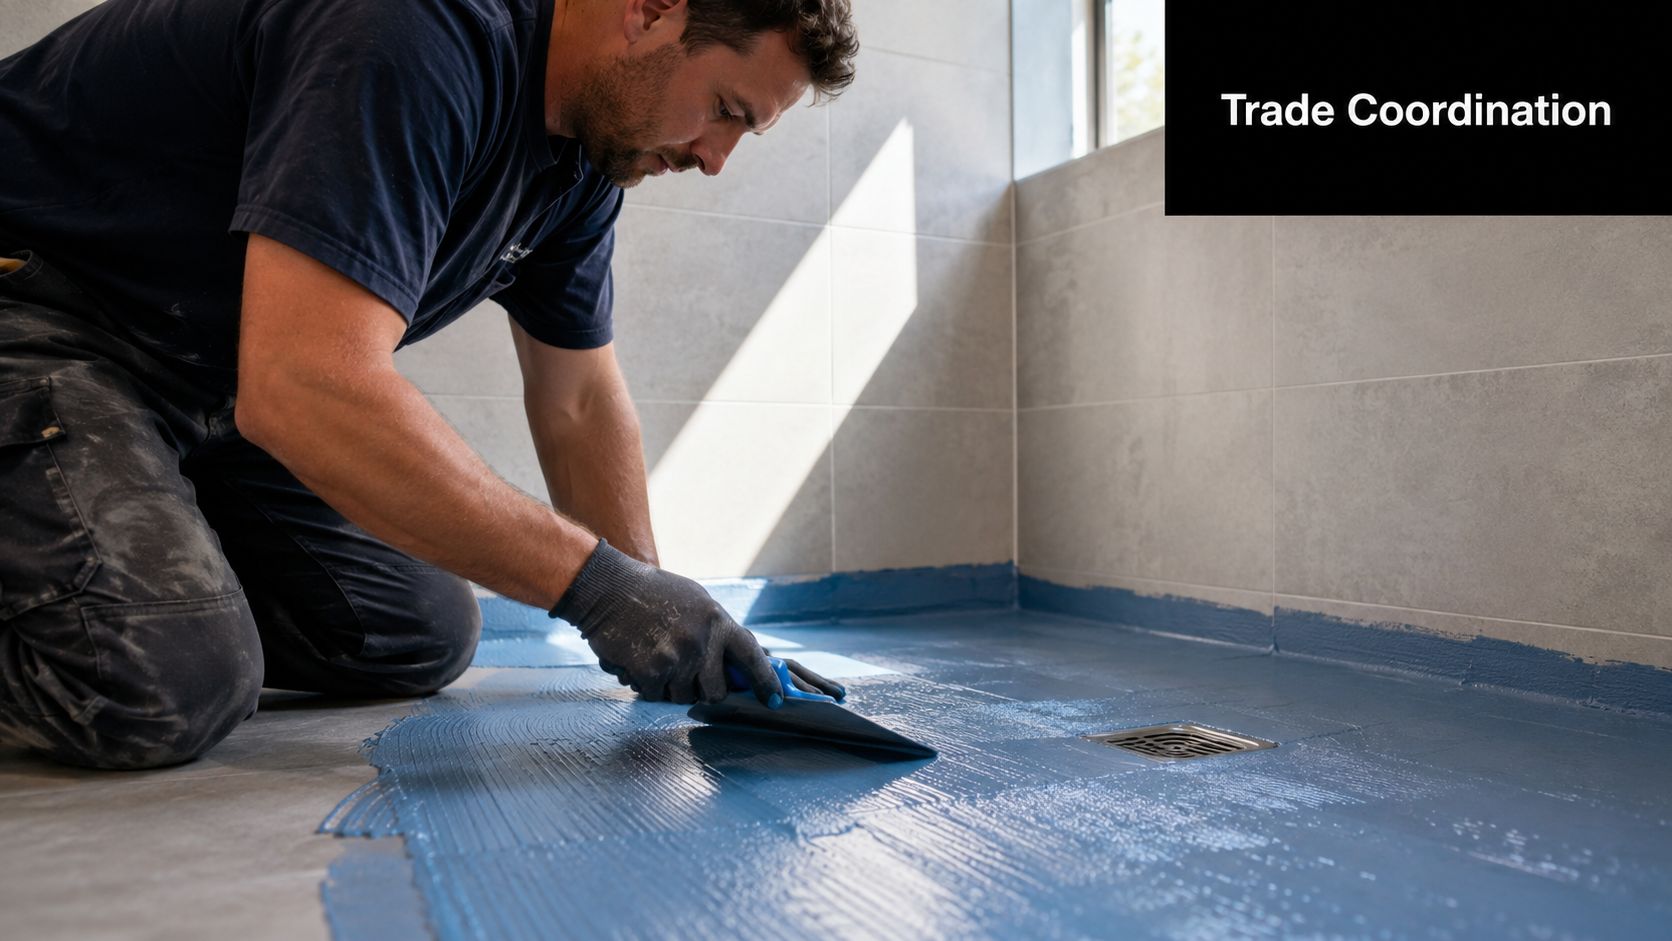
A professional construction worker applying blue waterproof membrane to a bathroom floor using a trowel

Why one person needs to own the sequence

Waterproofing and tiling are separate skills, but they shouldn't be separate accountability lines. A tiler who brings in an unknown waterproofing subcontractor may still produce a good result, but the homeowner needs to know who prepared the substrate, which membrane system was used, who inspected it and who will return if water appears later.

An integrated team can coordinate the practical handovers. Plumbing penetrations need to be finished before the membrane. Screed needs to be stable and ready before waterproofing. The membrane needs to pass its inspection or test before tiles cover it. The shower screen measure must account for the finished tile plane, not an early drawing.

Practical rule: Ask for the renovation sequence in writing. If a quote only lists “waterproof and tile bathroom” without identifying preparation, testing, curing and finishing, it doesn't describe the full risk.

A start-to-finish specialist may coordinate licensed carpenters, plumbers and electricians while keeping waterproofing, screeding, tiling, grouting and screen installation aligned. That matters for warranty discussions because a leak rarely respects trade boundaries. The person responsible for the finished bathroom should be able to explain the work from the first site visit through to handover, including what happens if the substrate isn't suitable.

The Building Code for Your Bathroom

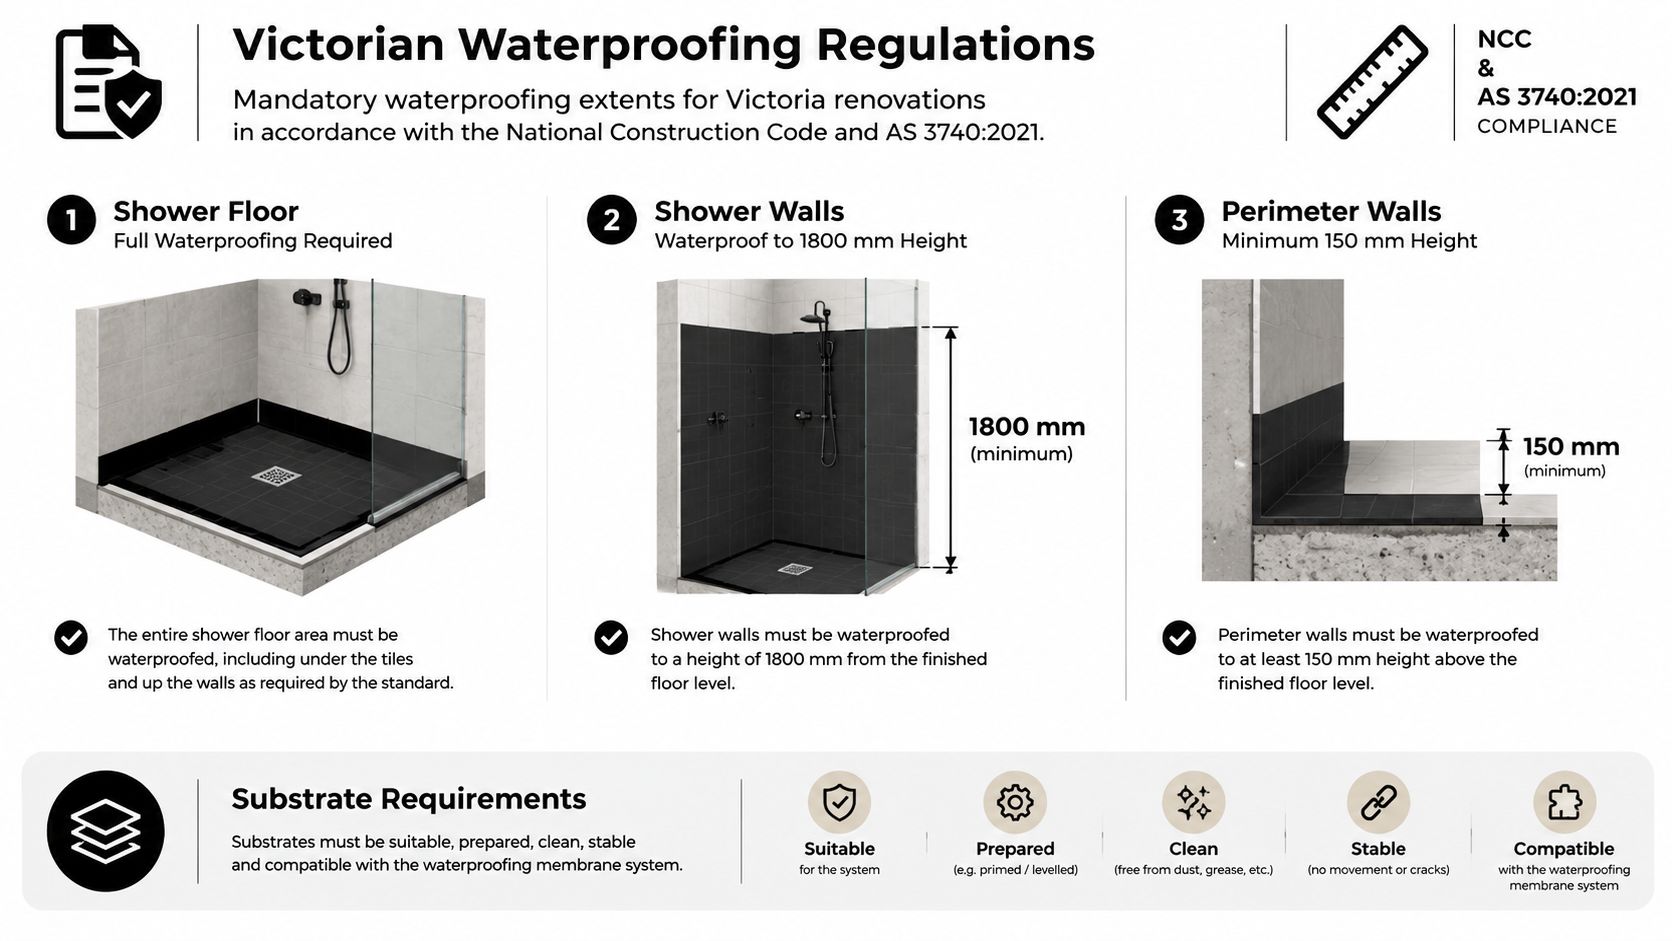
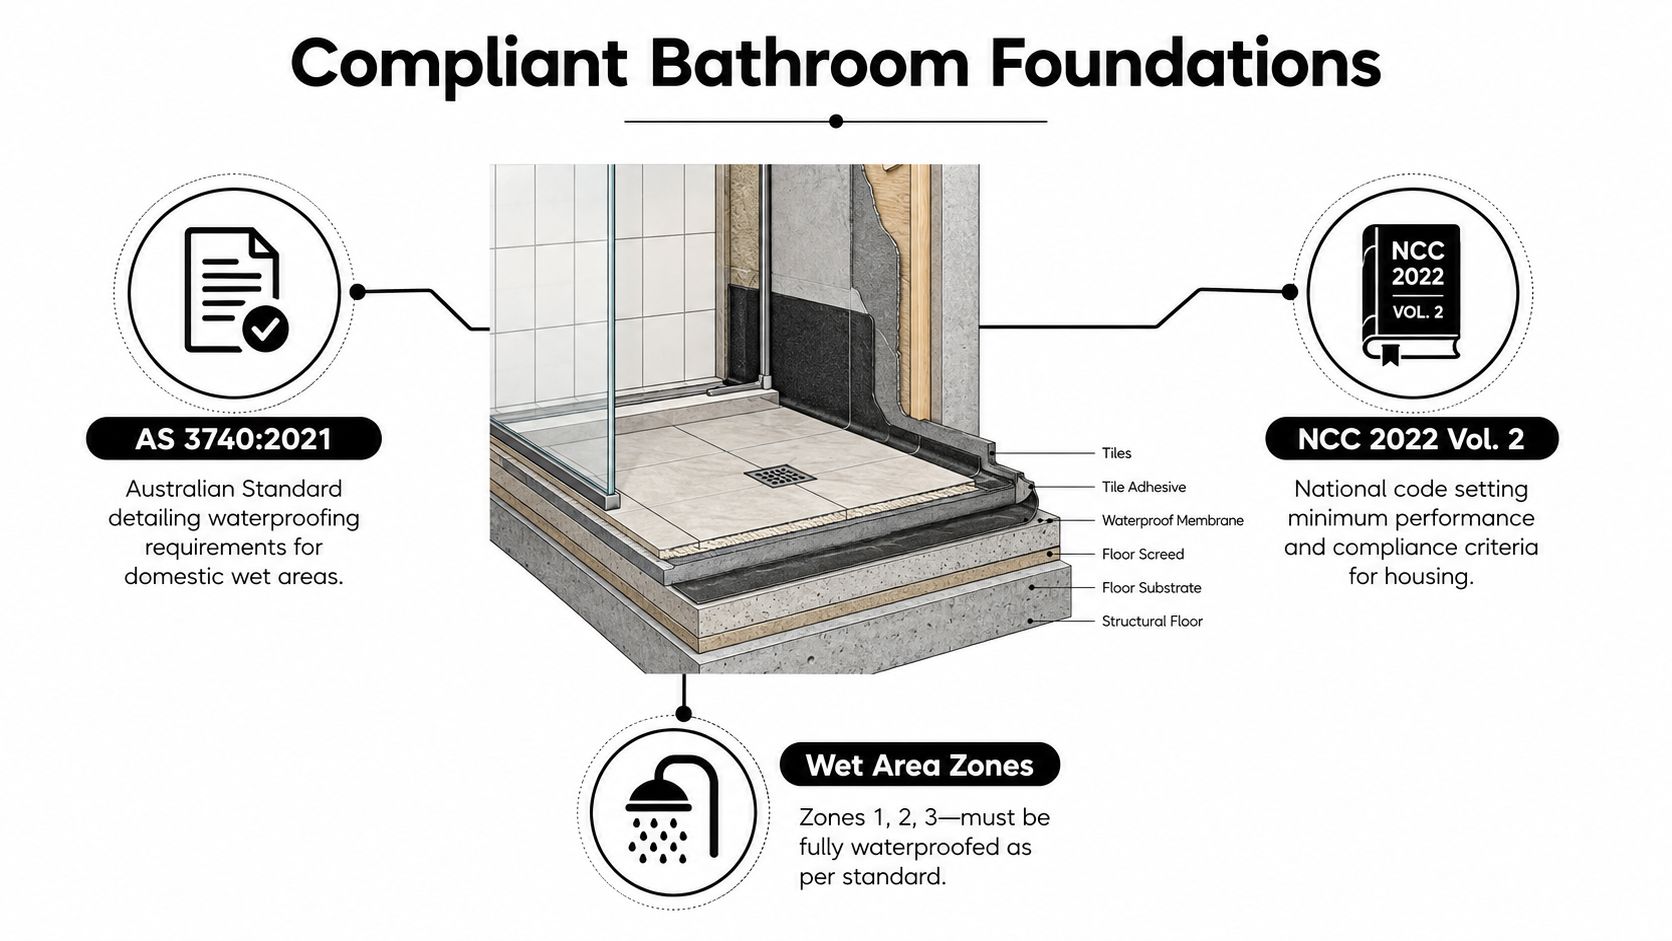
A compliant Melbourne bathroom starts with two documents: AS 3740:2021, the Australian Standard for waterproofing domestic wet areas, and NCC 2022, which adopted it on 1 May 2023. The Housing Industry Association's explanation of AS 3740 outlines minimum requirements for waterproofing materials, design and installation. On site, those requirements become measurable details rather than a checkbox.

The NCC 2022 wet-area provisions require shower floors to be fully waterproofed. Shower walls need protection to at least 1,800 mm above the finished floor level, while walls around baths or laundry tubs require protection to at least 150 mm above the fixture. The NCC also recognises membranes complying with AS/NZS 4858 as acceptable waterproofing materials.

A diagram illustrating compliant bathroom waterproofing layers, including tiles, membrane, screed, and structural floor components.

The measurements affect the build

In an unenclosed shower, Victorian guidance identifies waterproofing extending 1.5 metres from the shower rose connection, with a waterstop at a minimum horizontal distance of 1,500 mm from the shower rose. Where a floor waste is installed, the floor plane must fall continuously to the waste at a minimum of 1:80, as the Victorian Building Authority explains in its waterproofing guidance.

These measurements control the work. The shower radius determines how far the membrane and waterstop extend. The required fall affects screed depth, waste placement, tile set-out and the risk of ponding beside a large-format tile. Expensive tiles cannot correct a substrate that sends water away from the waste.

Before tiling, ask the contractor:

  1. Which parts of the room are classified as wet areas?
  2. Which membrane system is being used, and does it meet the applicable requirements?
  3. How will the floor fall be formed and checked?
  4. How will penetrations, corners, niches and wastes be detailed?
  5. What inspection or testing occurs before the membrane is covered?

Independent guidance on AS 3740 commonly describes a flood test that holds water within the membrane area for at least 24 hours without a drop in level. Treat that test as quality control before tile installation, not paperwork completed after the surface is hidden. A clear explanation of Melbourne waterproofing requirements should match the site method, drawings and product documentation.

How a Bathroom Renovation Actually Unfolds on Site

The order of work controls the result. Start tiling before the substrate, membrane or services are ready, and the project accumulates shortcuts that are difficult to see once the room is finished.

The work before waterproofing

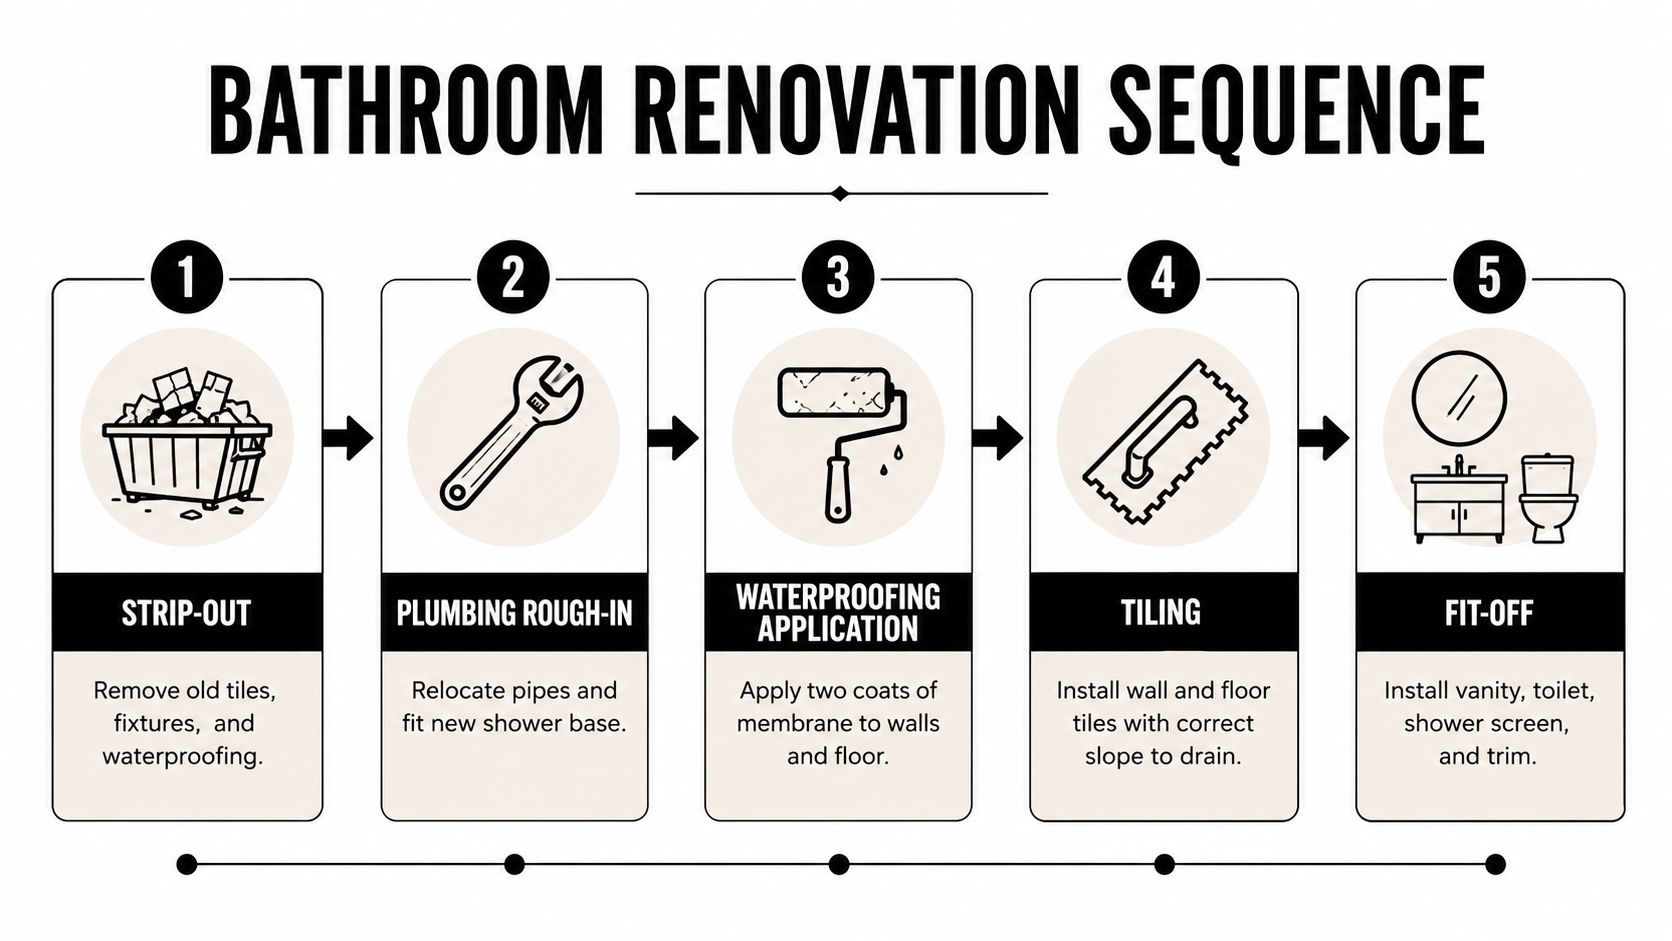
The first stage is strip-out. The team removes the existing tiles, fittings and wall linings, then checks for movement, water damage, damaged studs and unsuitable surfaces. A bathroom that's being altered around a new shower position may need more carpentry than a like-for-like replacement.

Plumbing rough-in follows. New wastes, mixers and outlets are positioned, then the plumber completes the relevant checks before the walls and floor are closed. Electrical first-fix work also needs to happen before waterproofing covers the substrate. The aim is simple, no one should cut into a finished membrane to install a service that was missed.

The screed then creates the drainage plane. It must direct water to the waste while leaving a stable, sufficiently prepared surface for the membrane. Self-levelling compounds can help in suitable areas, but they don't replace correct falls. The substrate needs time to cure and dry according to the materials used.

Membrane, inspection and tile set-out

Once preparation is complete, the applicator primes the surface, reinforces corners and changes of plane, seals penetrations and applies the membrane system in its required coats. The product data sheet matters here. A membrane isn't ready because it feels dry at the surface, and tiles shouldn't be used to hide incomplete detailing.

A second inspection or flood test provides a hold point before the finish goes over the work. If the level drops or water escapes, the cause needs to be addressed while the membrane remains accessible.

A five-step infographic showing the sequence of a bathroom renovation from strip-out to final fit-off.

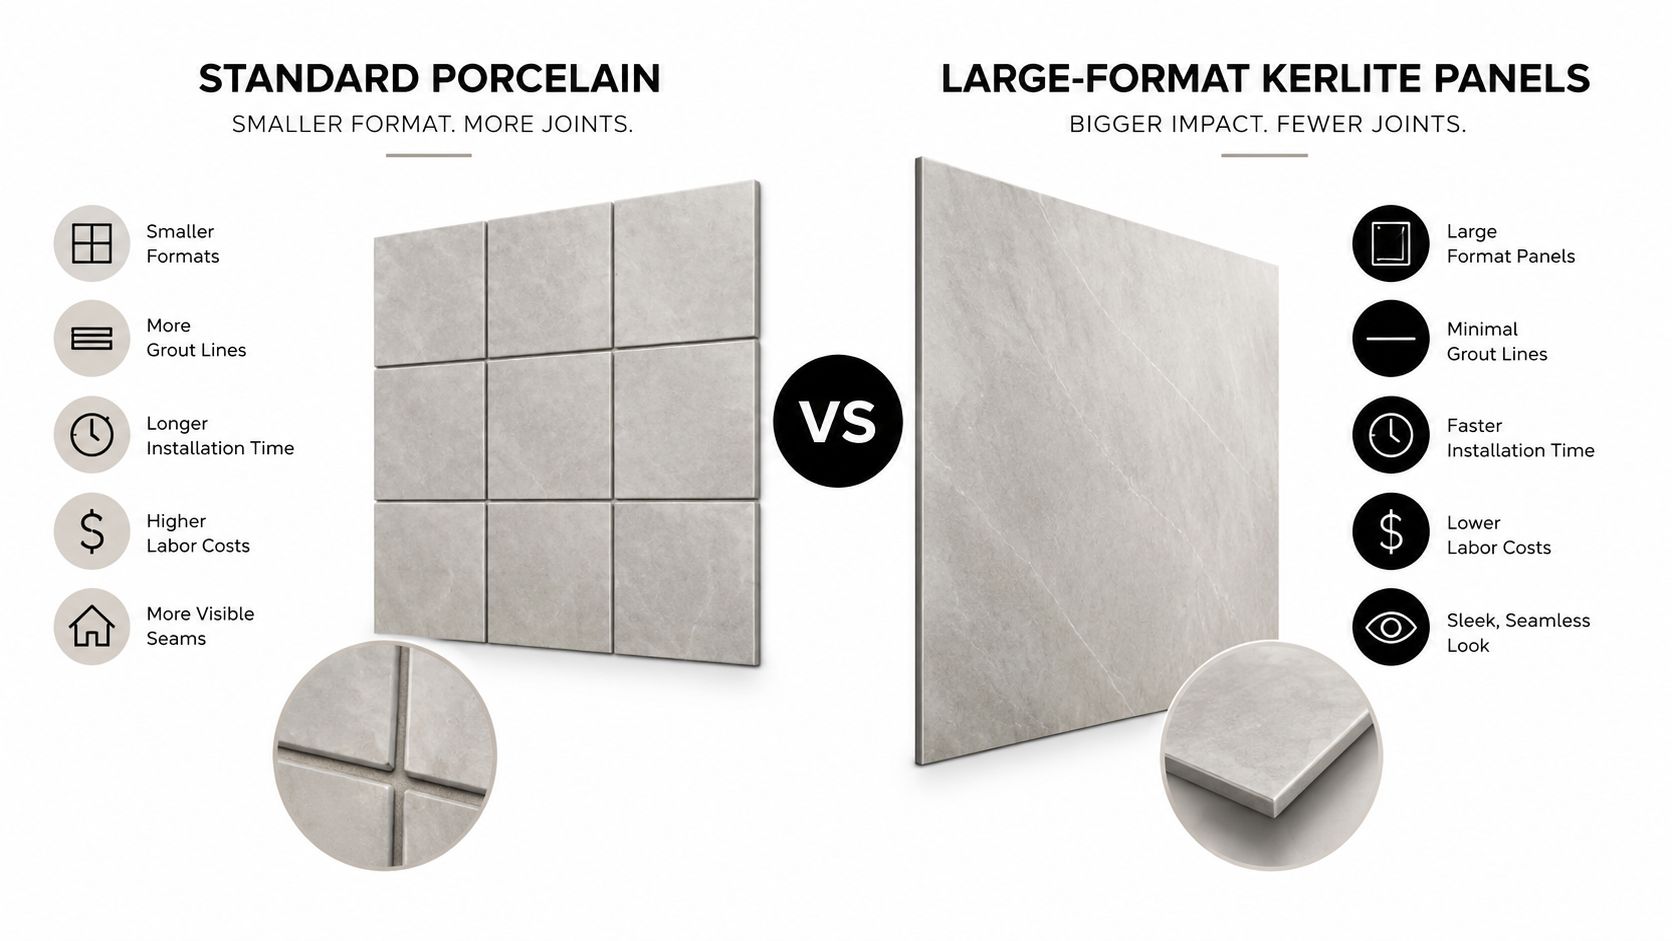
Large-format porcelain and Kerlite raise the preparation standard. Thin tiles reveal humps, hollows and inconsistent adhesive coverage, so the substrate and set-out need more control than a small-format tile can sometimes disguise.

Site reality: Most delays aren't caused by laying the tile. They happen when demolition reveals movement, services need relocation, screed or membrane needs curing time, or a failed inspection sends the work back a stage.

After approval, the tiler establishes reference lines, checks the drain relationship and fixes the tiles with the correct adhesive and coverage. Grouting comes after the adhesive has set. Flexible silicone belongs at movement joints, internal corners and junctions where rigid grout is likely to crack. The frameless shower screen is measured against the completed tile surfaces, then fitted after the finished levels are known.

What a Melbourne Bathroom Renovation Really Costs in 2026

A single renovation price hides the decisions that control the quote. A shower reseal and limited re-tiling are different from stripping a room to the stud frame, relocating plumbing, rebuilding the floor and installing new fixtures.

Melbourne Tiling Services P/L references a typical median spend around $10,000 for bathroom renovation planning, but that figure should be read as a scope reference rather than a promise. The final price depends on access, demolition, substrate condition, fixture selection, tile format, plumbing changes, electrical work, screen design and the amount of rectification discovered after strip-out.

Cost Driver Impact on Quote Typical Trade-Off
Existing substrate A sound base keeps preparation controlled. Damaged framing or slab work adds labour and materials. Save on demolition only when inspection confirms the base is suitable.
Plumbing layout Keeping fixtures near existing positions usually limits service relocation. Moving a waste or shower can improve the design but increases coordination and floor work.
Tile format Large-format Kerlite and porcelain demand flatter substrates, careful handling and accurate set-out. Fewer grout lines can create a cleaner finish, but preparation becomes less forgiving.
Waterproofing scope Niches, penetrations, unenclosed showers and complex junctions require more detailing. Simplifying the layout can reduce risk without compromising the room's function.
Shower screen Frameless glass, hardware and final measurement add to the finishing package. A simpler screen may reduce cost, while frameless glazing keeps the visual field open.
Design changes Late fixture or tile changes affect ordering, labour and sequencing. Confirming finishes early protects the programme and reduces rework.

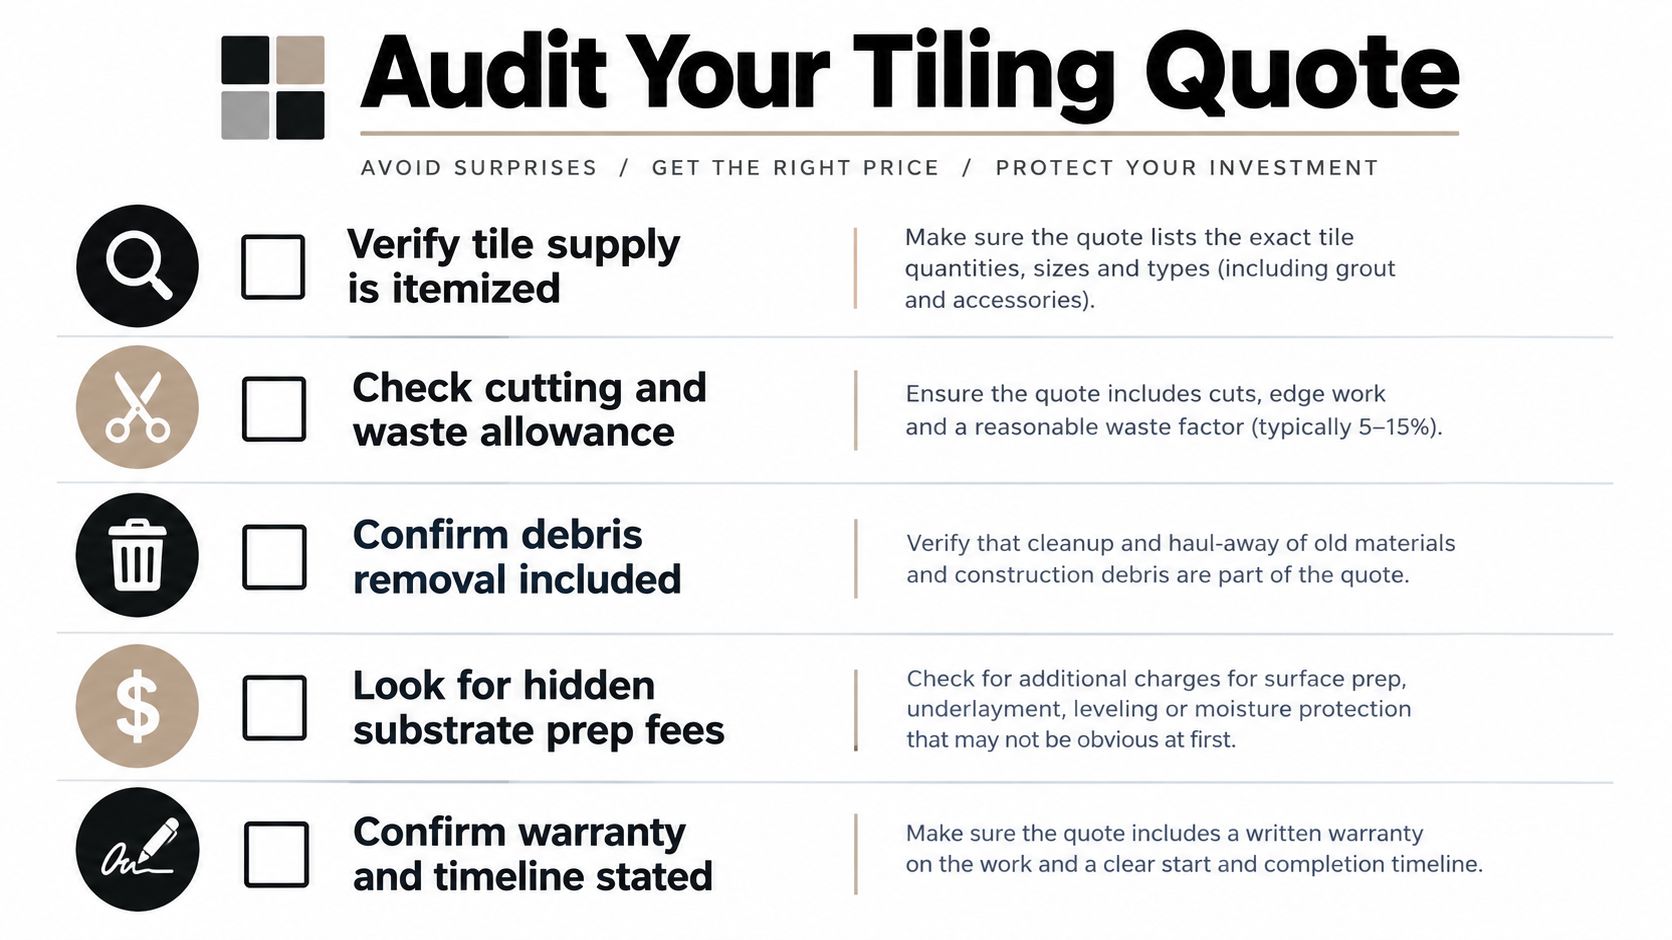
A useful quote should identify demolition and skip hire, substrate preparation, screeding, waterproofing, testing, tiling, grouting, silicone, fixtures and screen installation. It should also state exclusions. “Waterproofing included” isn't enough if the quote doesn't say who prepares the substrate or provides the certificate.

Free quotes, 3D drawings and a renovation calculator can help test the scope before signing. Compare line items, not just totals. The cheapest tender often leaves out preparation, testing or coordination, and those omissions tend to reappear as variations once the floor is open.

Choosing a Registered Builder Versus a Tiler-Only Quote

A tiler-only quote can suit a limited job where the substrate is already sound, plumbing and electrical work are complete, and the scope stops at preparation, waterproofing and tiles. It becomes a poor fit when the project involves structural changes, multiple licensed trades, new services, major demolition or a contract for the whole renovation.

The Victorian Building Authority states that only a registered domestic builder can enter into a major domestic building contract with an owner-builder, and that a builder must be registered where the work exceeds the prescribed cost threshold. The VBA owner-builder information guide sets out that registration requirement.

What registration does and doesn't prove

Registration doesn't guarantee perfect workmanship. It does provide a formal regulatory status for the type of work being contracted and gives the homeowner a clearer party to hold responsible for coordination. A registered builder can manage the relationship between the plumber, electrician, carpenter, waterproofing applicator, tiler and screen installer rather than leaving the owner to resolve gaps.

A tiler-only arrangement may cost less on paper because it excludes project management and other trades. That can work when the boundaries are real and documented. It becomes risky when the tiler informally organises plumbing or electrical work without a clear contract, licence checks or defined responsibility for defects.

Use a repeatable vetting process:

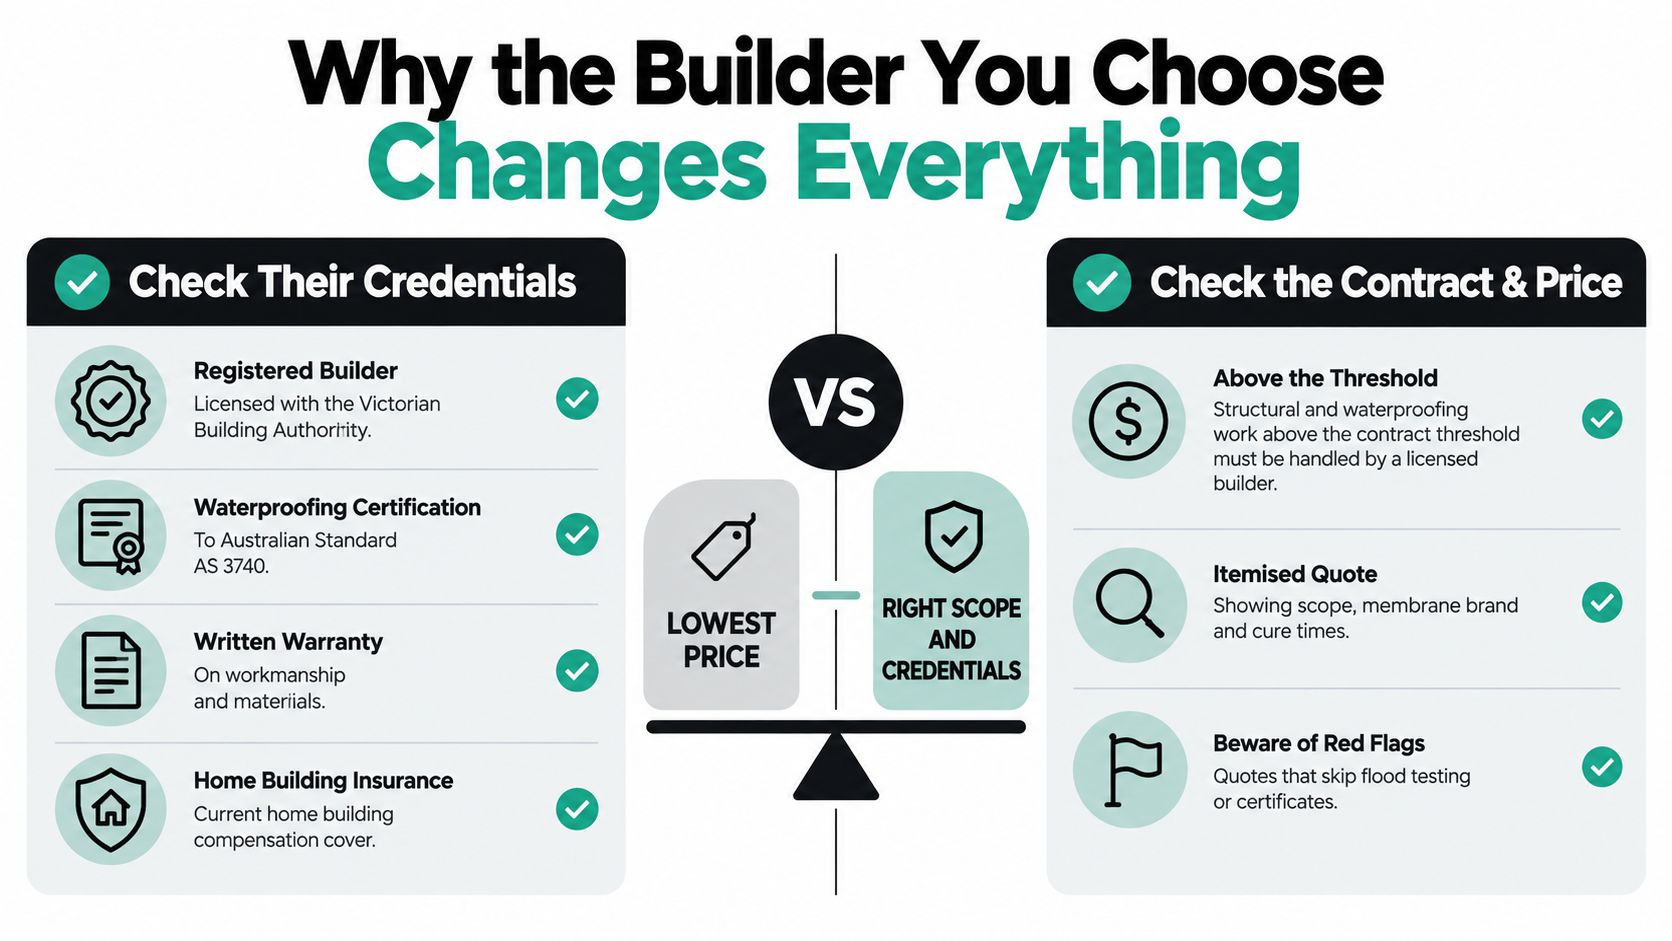
  • Check registration: Search the VBA register and confirm the registration matches the work being proposed.
  • Read the contract: The written scope should identify the registered builder, inclusions, exclusions, allowances and variation process.
  • Verify waterproofing records: Ask who applies the membrane, what system is specified and what inspection or certificate is supplied.
  • Confirm insurance: Request evidence of current public liability insurance and clarify any relevant domestic building insurance obligations.
  • Inspect comparable work: Look at finished bathrooms and ask how the contractor handled leaks, failed substrates or changes in scope.

Bathroom renovation specialists should be assessed on evidence, not polished images alone. Ask who owns the job after handover. If every trade points to somebody else when a leak appears, the low initial price wasn't a complete measure of risk.

Leaks, Balconies and Rectification Work

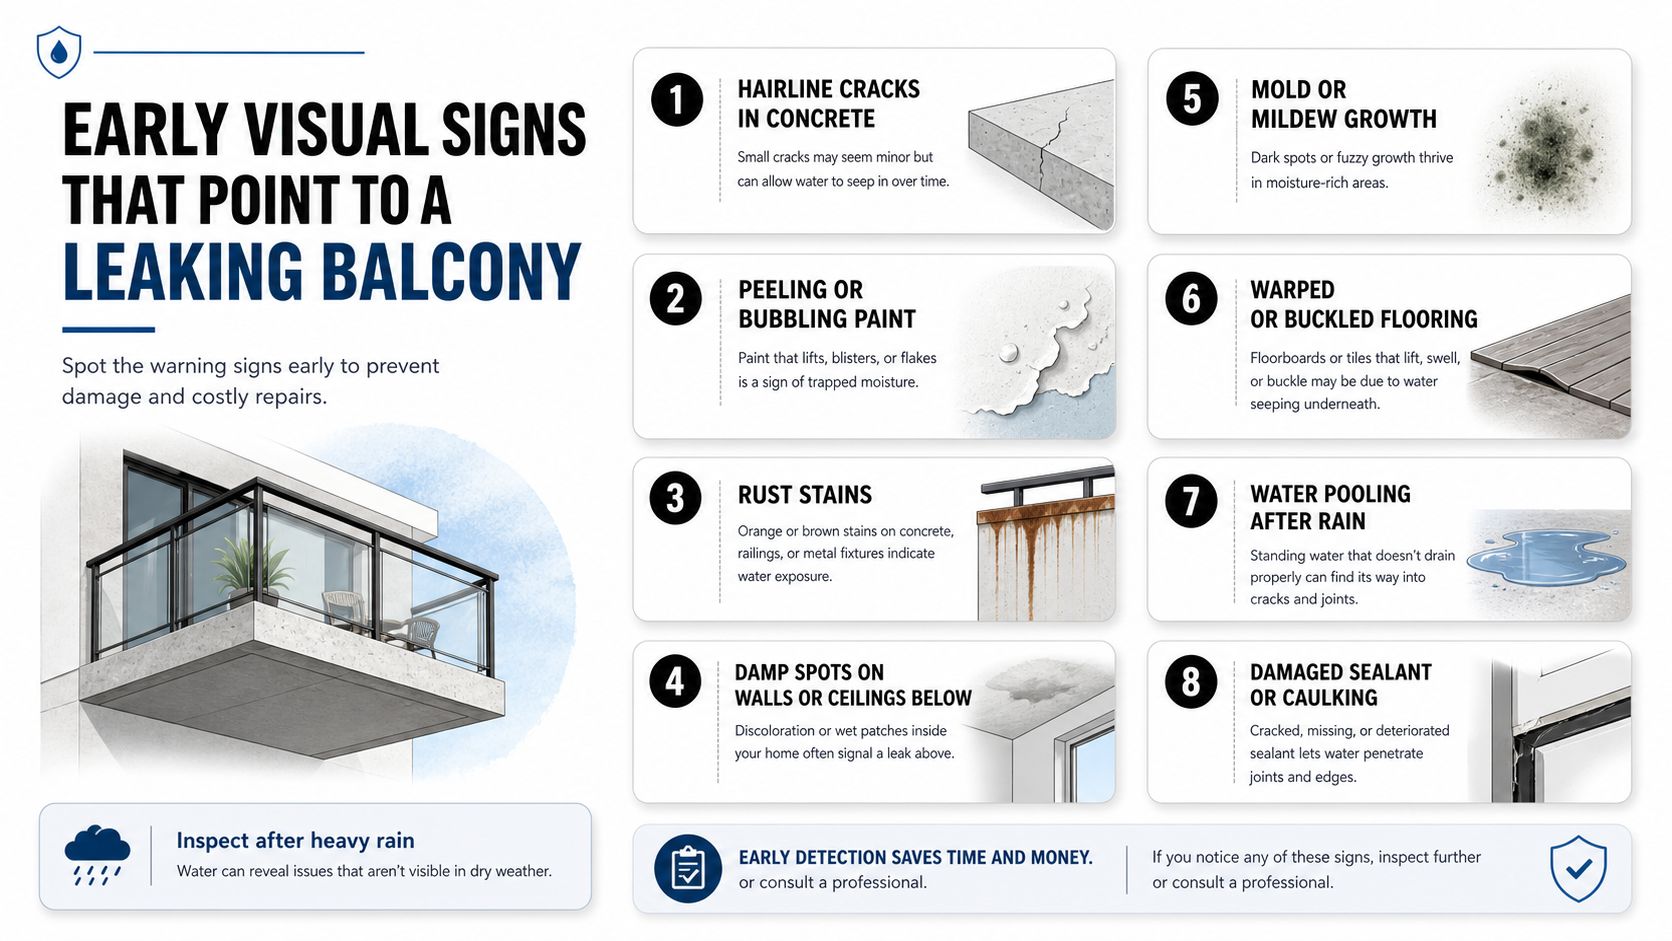
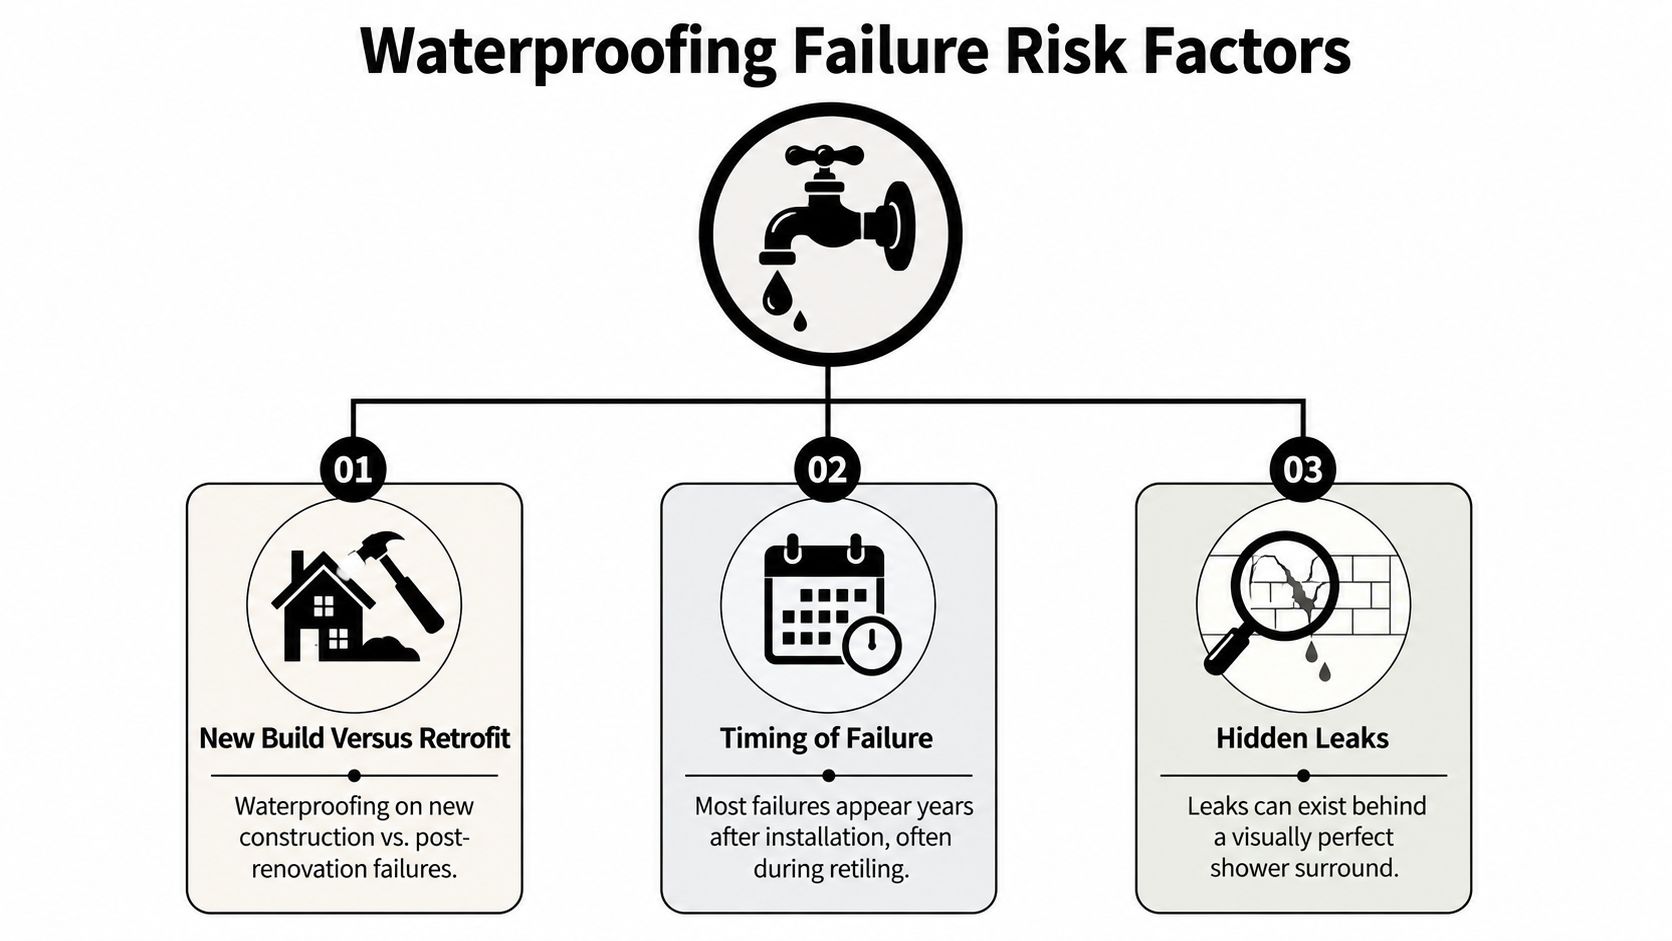
A shower can look clean while water is moving behind it. On a balcony, the first visible sign may appear on the ceiling below, around a balustrade fixing or at a door threshold rather than at the actual membrane breach.

Australian defect research used in NCC discussions reports that waterproofing accounts for 63% of incidences of waterproofing defects in Class 2 and Class 7 buildings, as documented in the ABCB waterproofing cost-benefit analysis. Separate NSW strata defect data identifies waterproofing as a material defect category at 22% of registered buildings in 2022–2024, also discussed in that source. The figures don't diagnose a particular Melbourne property, but they explain why leak rectification needs investigation rather than cosmetic patching.

A diagram outlining three major risk factors for waterproofing failures in home construction and renovations.

Surface repair or full remediation

Re-grouting or replacing silicone may be appropriate where the membrane is sound and the problem is limited to a failed joint. It won't repair a breached membrane, inadequate drainage fall, movement in the substrate or a badly detailed waste. Painting a coating over existing tiles can also trap water rather than solve the path that lets it in.

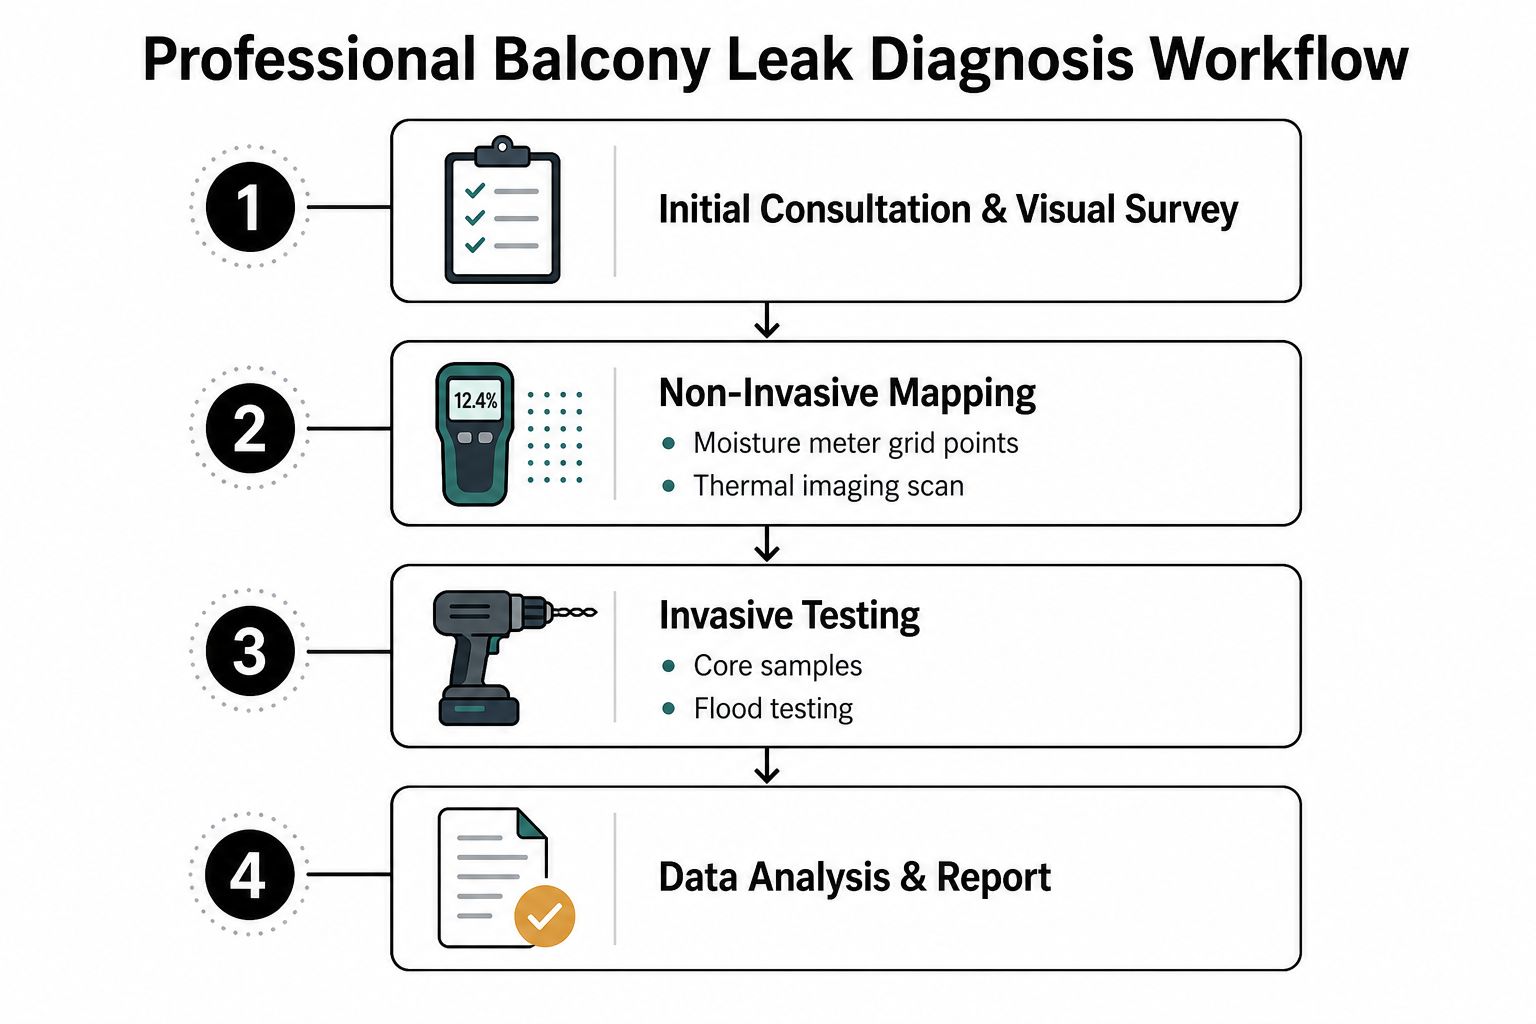
A proper assessment may include:

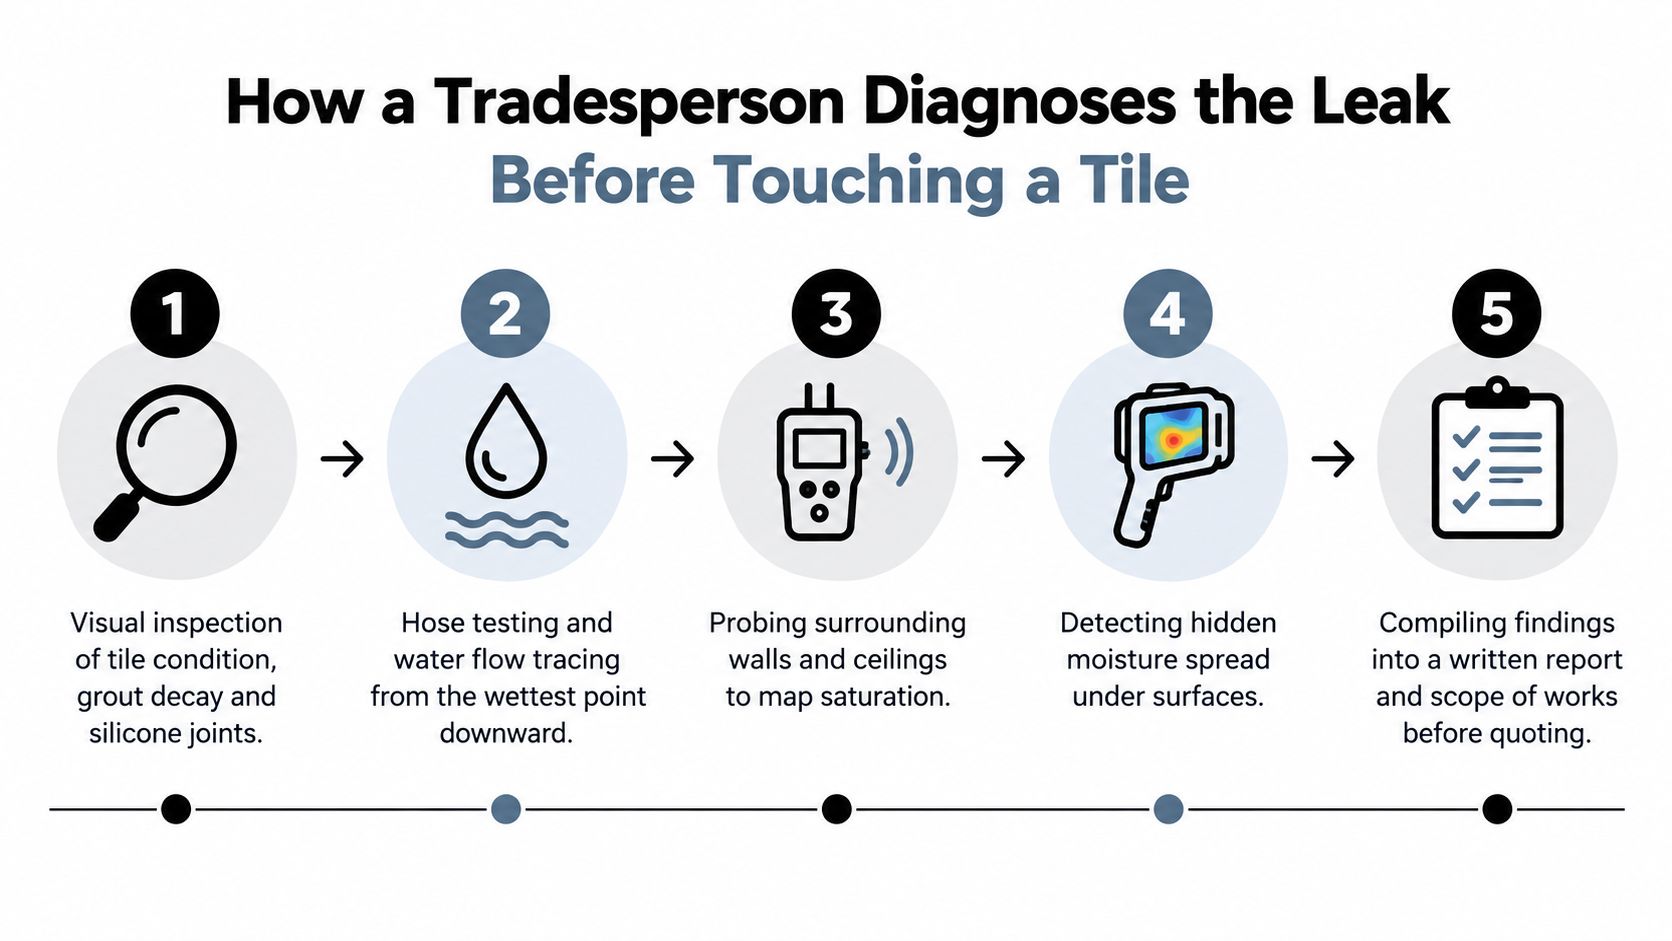
  1. Visual inspection of the shower, balcony, thresholds, corners and penetrations.
  2. Moisture readings and inspection of the room or ceiling below.
  3. Drainage and ponding checks.
  4. Localised tile removal where the membrane condition can't be established from the surface.
  5. Substrate and framing inspection after strip-out.
  6. A written scope that identifies the cause, not only the visible damage.

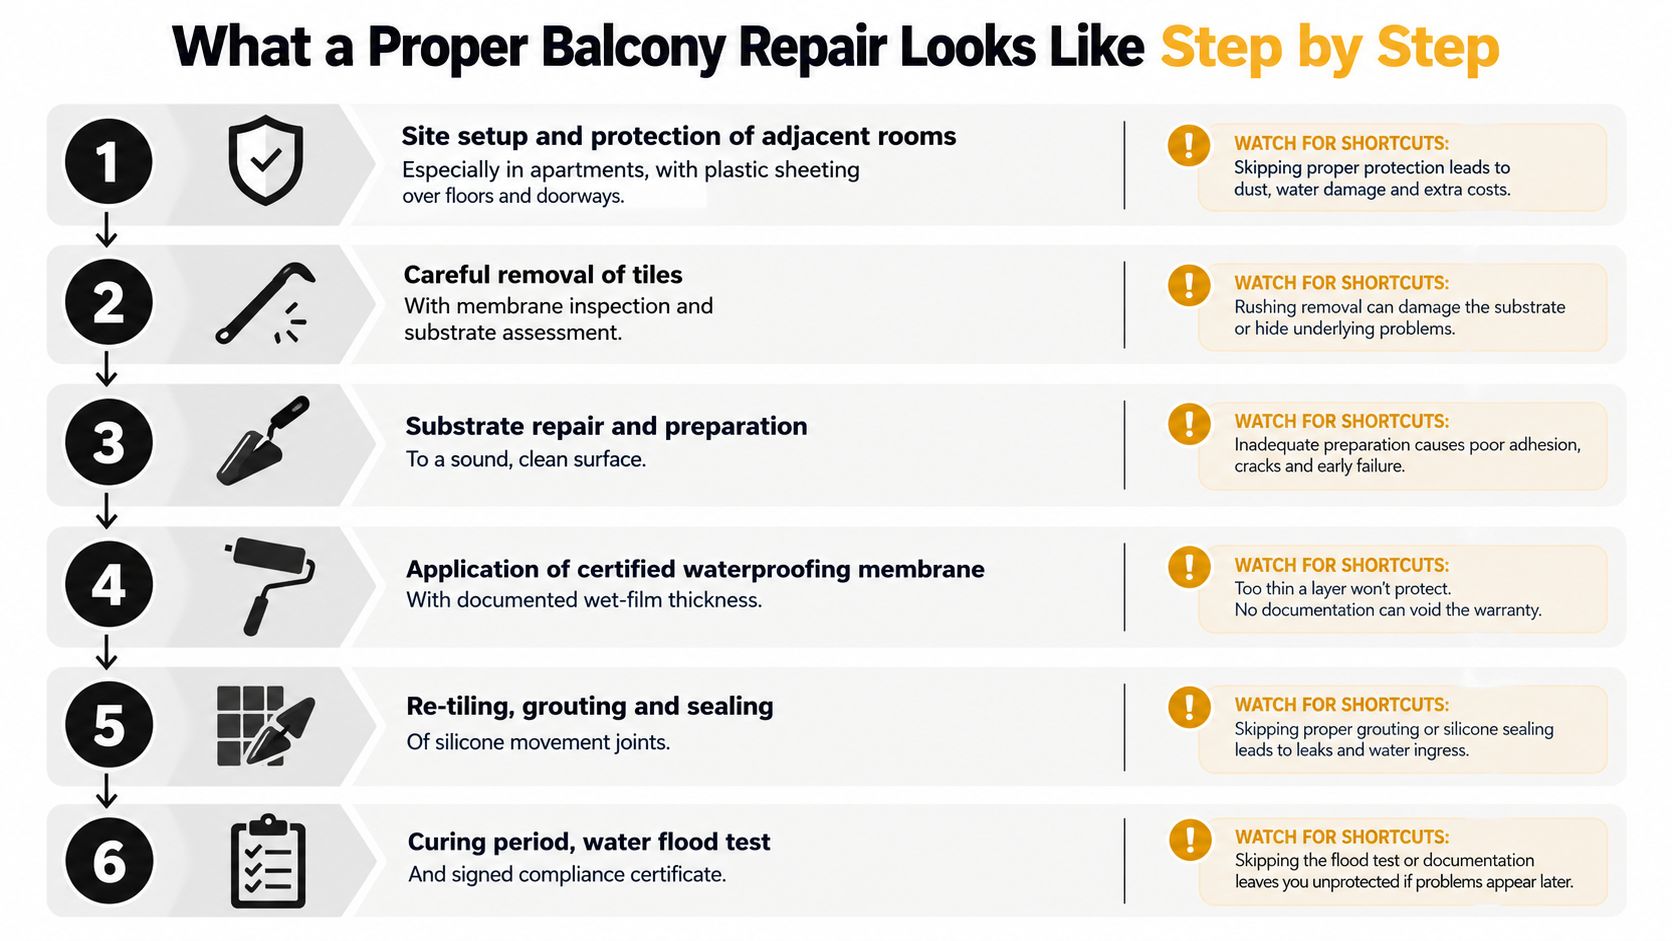
Full rectification commonly means removing tiles and failed layers, checking the substrate, repairing movement or damage, replacing the membrane and screed where necessary, then testing before re-tiling. The correct scope depends on evidence. A balcony with one isolated defective detail shouldn't automatically receive the same treatment as a slab with widespread moisture, but a growing stain shouldn't be covered with fresh paint.

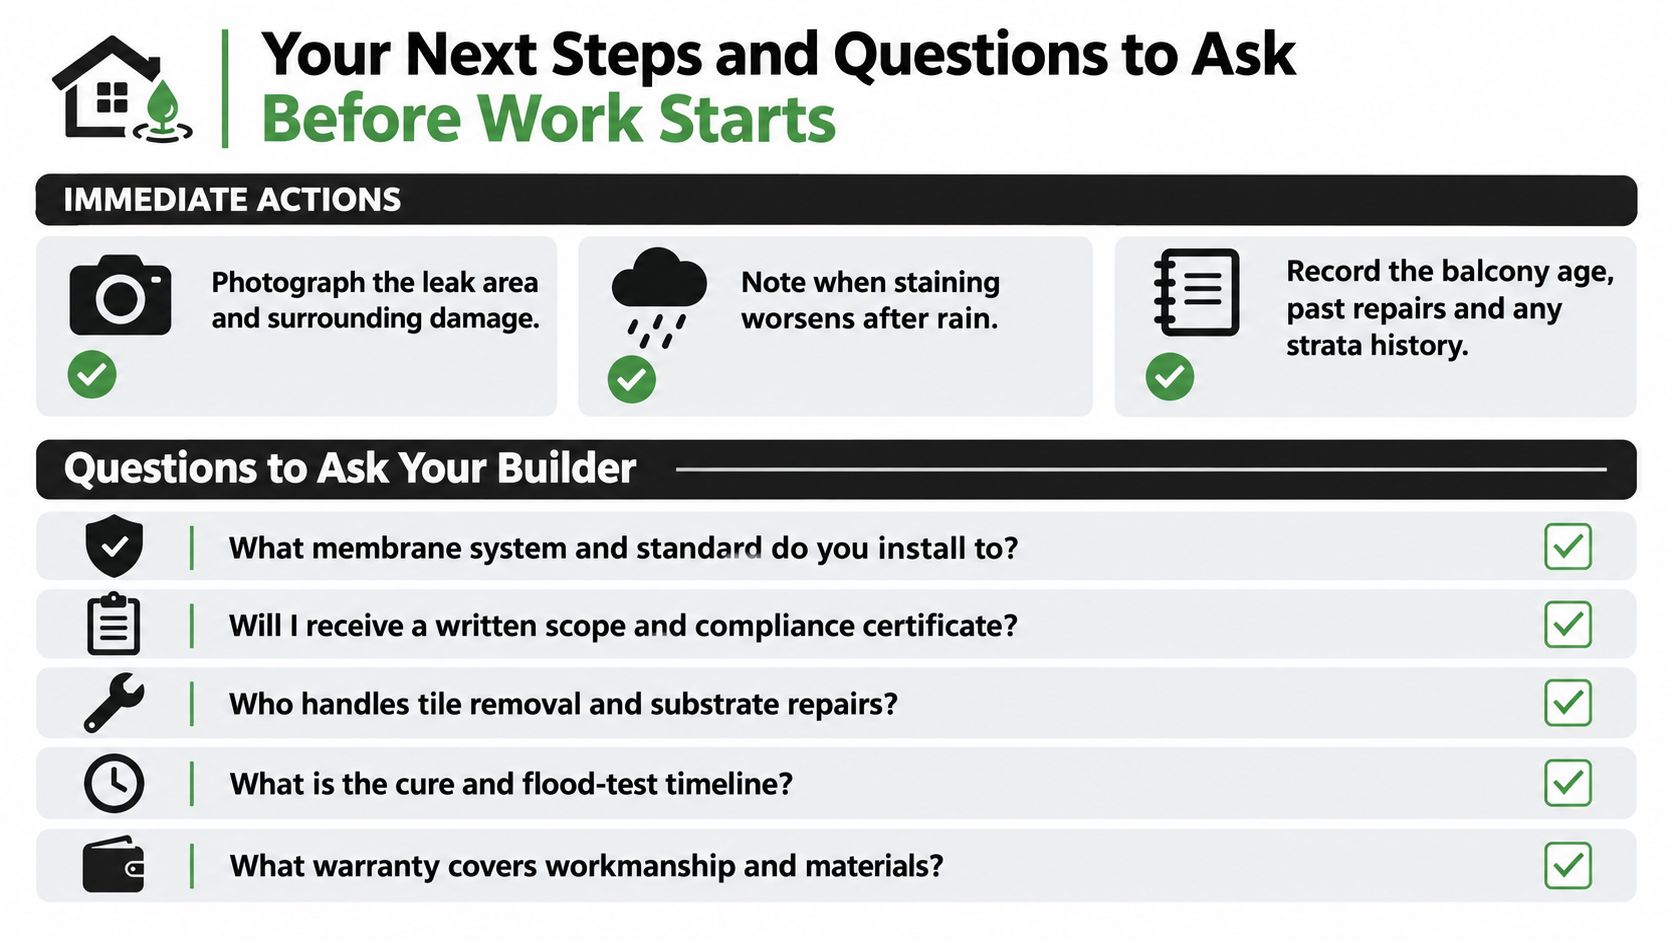
Property managers should record the location, timing and progression of staining, mould, loose tiles or odours, then arrange an assessment. Apartment owners should notify the owners corporation or strata manager before starting work because responsibility can depend on the building structure, plan of subdivision and location of the defect.

Balcony waterproofing services in Melbourne should begin with diagnosis. The useful question isn't “Can you reseal this?” It's “What evidence shows where the water is entering, and what layer needs to be repaired?”

Planning Your Next Steps with Confidence

Start by collecting the information a contractor needs. Measure the room, photograph every wall and floor, note the age of the existing bathroom, record any previous leaks and list the fixtures you want to keep or move. For a balcony, include photos of drainage points, balustrade bases, door thresholds and the ceiling or wall below.

Request a written quote that separates:

  • Demolition and preparation: Strip-out, disposal, framing and substrate repairs.
  • Services: Plumbing and electrical rough-in, testing and fit-off.
  • Waterproofing: Membrane system, wet-area extent, detailing and inspection records.
  • Finishes: Tile supply or installation, grout, silicone, trims and screen work.
  • Design support: 3D drawings, fixture selections and any renovation calculator assumptions.
  • Handover: Certificates, warranties, maintenance notes and the process for reporting defects.

Use 3D drawings to settle tile direction, niche positions, vanity dimensions and screen layout before materials arrive. Ask how long each stage needs to cure, what could trigger a variation and who approves changes. Maintenance still matters after handover. Keep drains clear, inspect grout and silicone, avoid harsh chemical cleaners, and respond quickly to damp patches, mould, bubbling paint or loose tiles.

A practical timeline should account for demolition, trade coordination, substrate preparation, curing, waterproofing, testing, tiling, grout, silicone and screen installation. The exact duration depends on the room and discoveries behind the old finishes, so a contractor who gives a confident completion date without discussing these hold points hasn't allowed for the work.


Melbourne Tiling Services P/L coordinates bathroom renovations, waterproofing, screeding, self-levelling, premium tiling, Kerlite installation, frameless shower screens and shower or balcony leak rectification across Melbourne and greater Victoria. For a measured scope, 3D design support and a quote that separates compliance work from finishes, visit Melbourne Tiling Services P/L and arrange the next site discussion.

Terrazzo Tiles Melbourne: Cost, Installation & Care

I've pulled up to jobs where the owner loved the look of terrazzo, then changed their mind the moment I explained the floor build-up under a bathroom door. The material can be beautiful in a Melbourne home, but only if the finish, sealer, and substrate are chosen like a wet-area system, not a showroom sample.

Table of Contents

Melbourne's Terrazzo Heritage and Modern Revival

Melbourne didn't just import terrazzo, it helped make it local. Museum Victoria records the De Marco Brothers' Melbourne work from approximately 1914 to 1955, and notes that they introduced terrazzo to Australia while helping popularise it as a bathroom finish in eastern-suburbs homes, which ties the material to real Victorian renovation culture rather than a vague overseas trend Museum Victoria. That matters because terrazzo has already proved it can sit comfortably in Melbourne houses, not just in glossy design magazines.

The older story is even more specific. A Melbourne heritage source documents imported terrazzo tiles in the city by 1884–1885, including examples at St Kilda's Bundalohn house and the Safe House basement, and it notes that imported terrazzo tiles in Australia predated in-situ terrazzo heritage paving record. In other words, terrazzo wasn't recently discovered by Melbourne designers. It was already appearing in built examples in one of the city's oldest residential precincts.

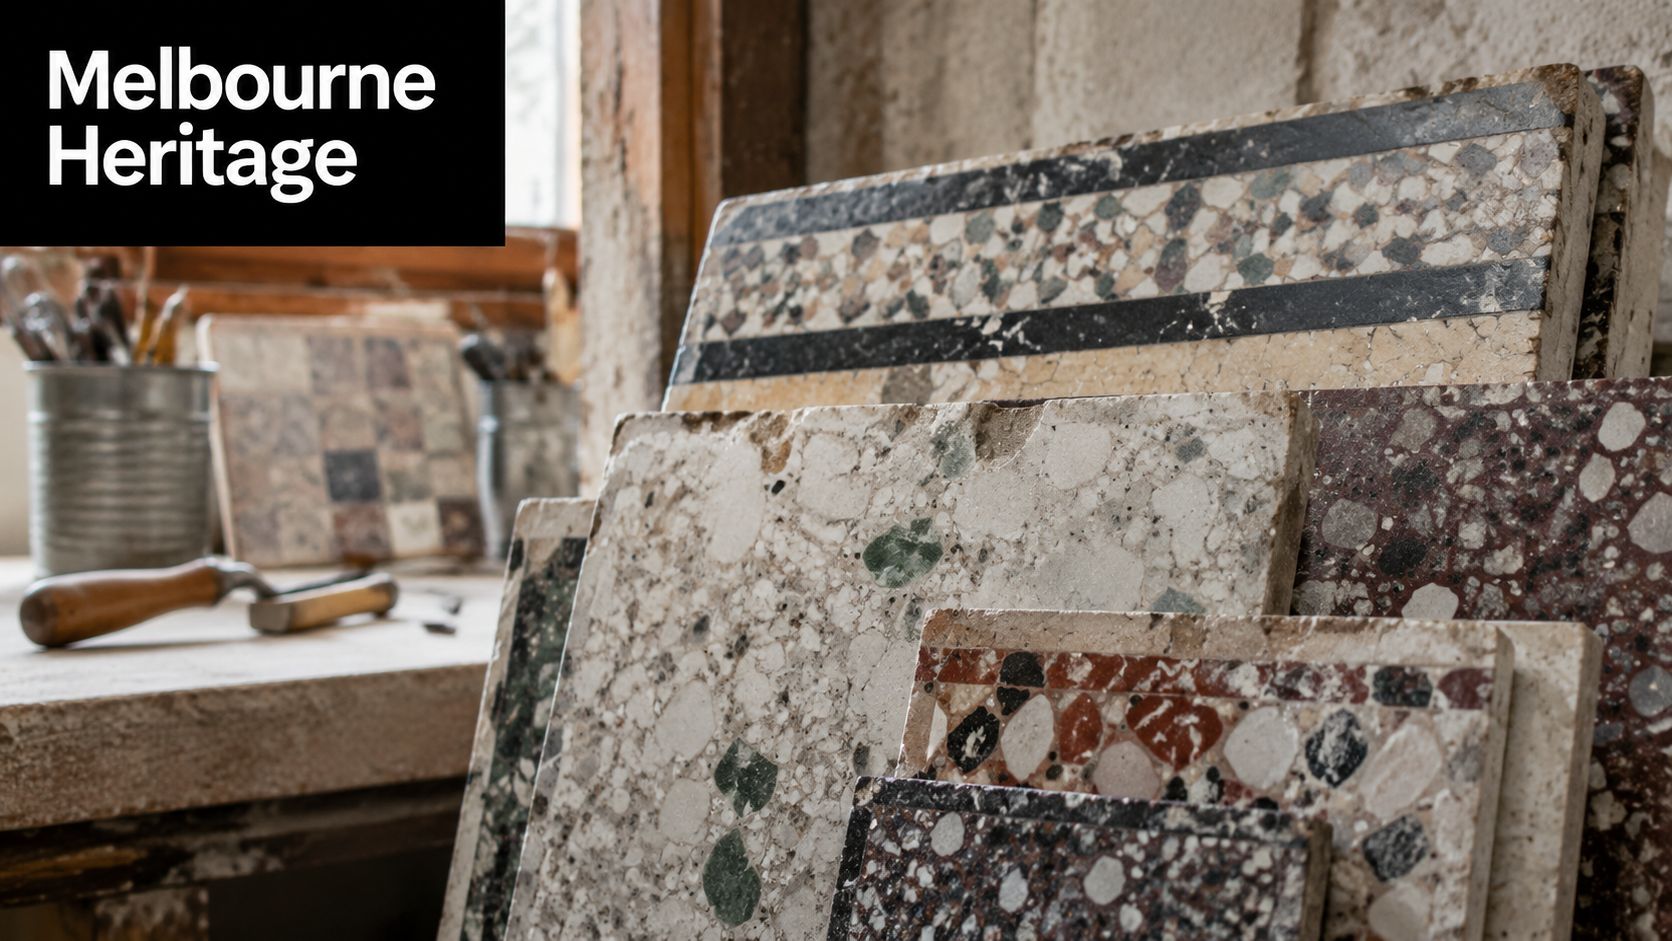
Various samples of decorative terrazzo stone tiles displayed in a workshop setting with tools nearby.

Why Melbourne keeps coming back to it

What drives the modern revival is simple. Homeowners want a bathroom surface that looks intentional, carries some history, and can still be detailed properly in a wet area. Terrazzo gives you that mix, but only if the rest of the system is built with equal care.

The strongest terrazzo jobs in Melbourne are the ones where the heritage look is matched by modern wet-area detailing.

In bathroom renovations, that usually means the surface is only one part of the decision. The work sits underneath, in waterproofing, fall planning, sealers, and the way the finish handles water on a daily basis. That's why terrazzo has stayed relevant here, it suits a city that values period character, but it still needs the practical discipline of a contemporary renovation.

Understanding Terrazzo Types and Finish Options

Terrazzo in Melbourne usually comes down to two system families, cement-based and resin-based. Cement-based tiles and slabs are commonly offered at 15 to 20 mm, while resin-based systems can be supplied as thin as 12 mm in tile form, and heavier-duty concrete terrazzo systems can be much thicker, around 32 to 80 mm Bernini specification PDF. That thickness difference isn't trivia, it affects floor height, door clearances, transition strips, and the amount of load your substrate needs to carry.

Finish choice changes performance

The finish matters just as much as the body of the tile. A polished surface has a different look and different underfoot behaviour to a honed or sandblasted finish, and in a wet area that difference is practical, not cosmetic. Australian terrazzo floors are commonly specified in R9 to R13 slip-resistance classes, with R10 explicitly mapped to wet-area uses such as kitchens, toilets, changing rooms, and laundries, while R11 to R13 suit progressively higher-risk external or traffic areas EUVAL technical specifications.

Here's the decision rule I use on site. If the floor is for a bathroom or ensuite, the finish has to be chosen with water on it, not just a dry sample in a showroom. A more polished surface can lower slip resistance relative to honed or sandblasted finishes, so the pretty option isn't always the best option.

Finish Type Slip Rating Best For Maintenance Level
Polished Lower practical grip in wet areas Feature floors, low-splash spaces Higher
Honed Often preferred where wet-area performance matters Bathrooms, ensuites, laundries Moderate
Sandblasted Stronger grip feel Higher-risk wet areas, external transitions Moderate to higher

A lot of people start by asking which terrazzo looks best. The better question is which finish works with the bathroom's exposure, cleaning routine, and safety requirement. That framing saves mistakes later, especially when the same floor has to look refined and still behave properly when it's wet.

See one example of a terrazzo bathroom tile range

Weighing the Advantages and Practical Limitations

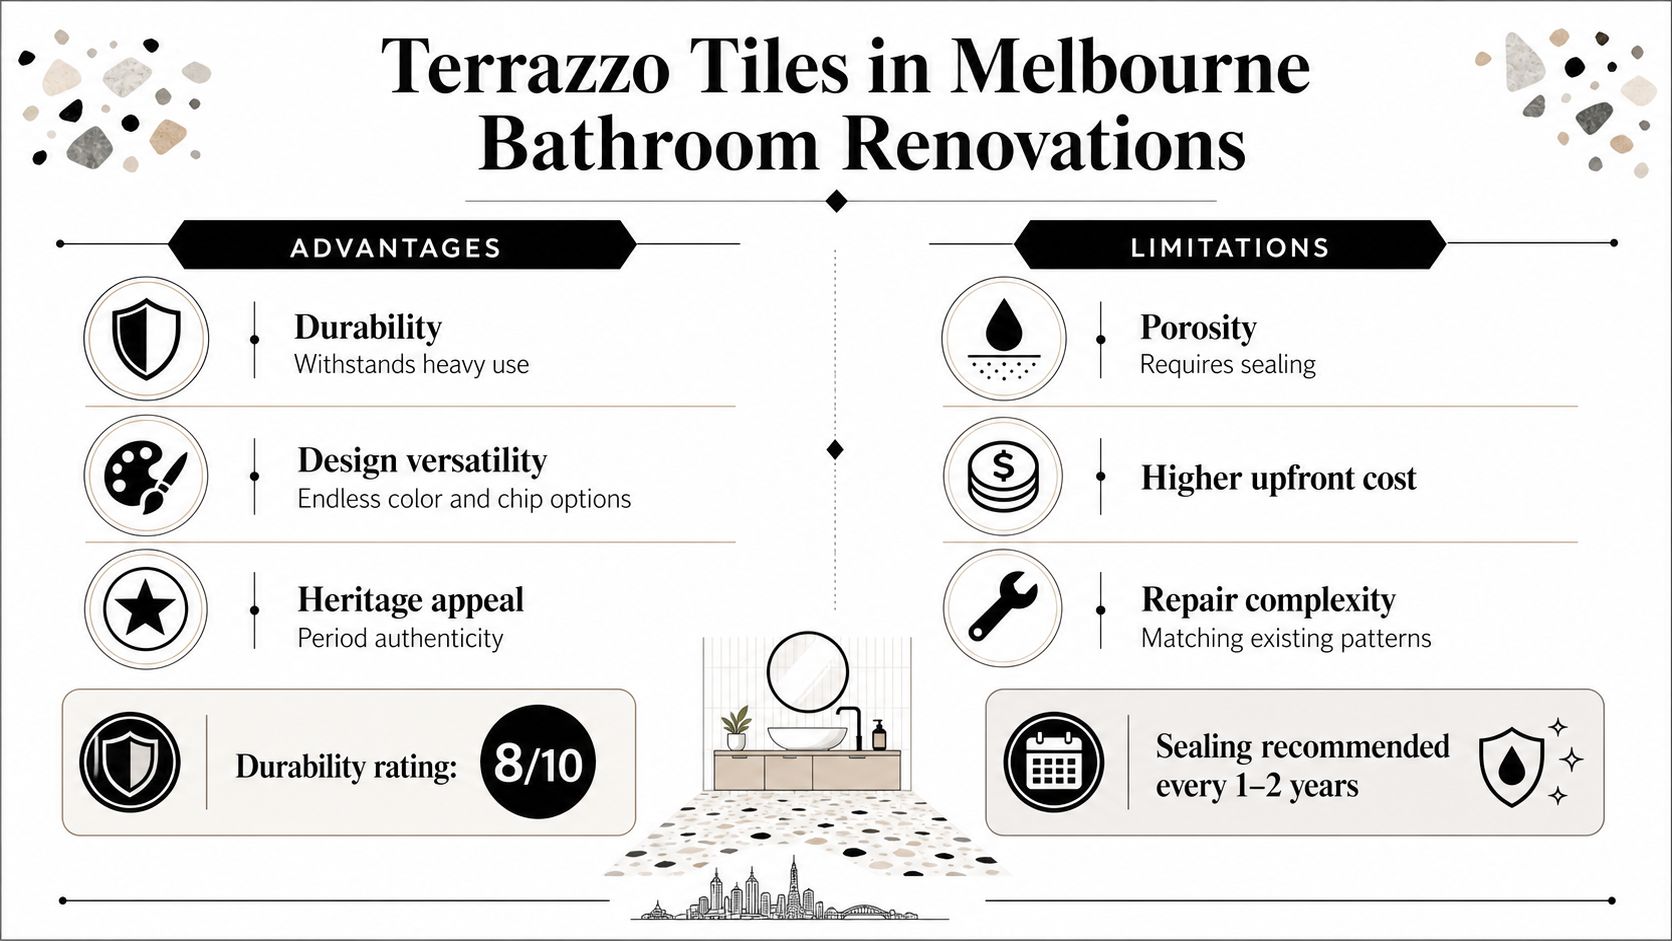
Terrazzo earns its place in Melbourne bathrooms because it does three things well. It brings durability, strong design versatility, and clear heritage appeal into one surface, which is why it keeps showing up in renovations where the owner wants something more distinctive than standard ceramic. In the right home, it can look period-correct in a Victorian terrace, cleaner and more architectural in a modern ensuite, or somewhere in between.

An infographic titled Terrazzo Tiles in Melbourne Bathroom Renovations detailing advantages like durability and limitations like porosity.

The part many guides leave out

The trade-off is maintenance and wet-area behaviour. Terrazzo is porous enough to need regular sealing, and polished finishes can be more slippery when wet, which is why the finish choice needs to be treated as part of safety planning. Weight also matters on upper floors, especially when the tile profile is thicker or the substrate already has limited capacity for build-up.

Practical rule: if the bathroom sees daily showers, choose the finish and sealer for traction and cleaning first, then worry about the gloss level.

Bathroom floors in Australia also need to satisfy wet-area waterproofing requirements under the National Construction Code and AS 3740, so the question isn't whether terrazzo is stylish. It's which finish, grout detail, and sealer system will be safest and easiest to maintain in a Melbourne bathroom. That's where terrazzo either becomes a smart renovation choice or a costly mistake.

The upside is that once the system is right, terrazzo can age gracefully. The downside is that it won't forgive lazy detailing, especially around showers, vanity edges, and changes in level. If you want the look without the upkeep, porcelain that mimics terrazzo will often suit better. If you want authentic terrazzo, accept the maintenance commitment and build it properly from day one.

Budgeting for Terrazzo Installation in Melbourne

A terrazzo quote usually looks tidy until the wet-area work is priced properly. The tile itself is only one part of the bill. Thickness, format, cutting, labour, substrate correction, waterproofing, adhesives, grout, sealing, and edge detailing all change the final number, and terrazzo tends to expose any shortcuts in those items faster than simpler finishes.

In Victoria, the contract side matters as much as the tile choice. A person must not carry out domestic building work valued over A$10,000 unless it is covered by a major domestic building contract, and the Victorian Building Authority says this applies to most renovation jobs above that amount, including bathroom renovations when they exceed the limit Victorian Building Authority information via renovation contract guidance. That affects how the job is set up, who coordinates it, and what consumer protections sit behind the work.

What that means in practice

If an ensuite passes that threshold once waterproofing and the full tiling scope are included, the contract needs to be treated as part of the renovation, not as an afterthought. The same applies to larger family bathrooms where tiling, plumbing coordination, and waterproofing are linked from the start.

Once the total work value crosses the contract threshold, do not treat the bathroom as a loose collection of trades. Treat it as a regulated domestic building project.

A registered builder matters because builder registration is the legal mechanism that lets the right person contract for and coordinate regulated domestic building work within the scope of that registration Victorian Building Authority builder registration guidance. Terrazzo jobs bring that issue into focus quickly, since the surface choice is usually tied to waterproofing, floor height, and plumbing coordination.

For homeowners, the cleanest way to budget is in layers. Price the tile and installation first. Then add substrate correction. Then waterproofing. Then sealing and finishing details. If the total creeps past the threshold, contract form and builder registration become part of the budget, not just the admin.

Installation Requirements and Substrate Preparation

Terrazzo fails fast when the base is wrong. The tile might look forgiving on a sample board, but once it's on a bathroom floor, every hump, dip, and awkward transition shows up under light and underfoot. That's why substrate prep matters more with terrazzo than with many cheaper finishes.

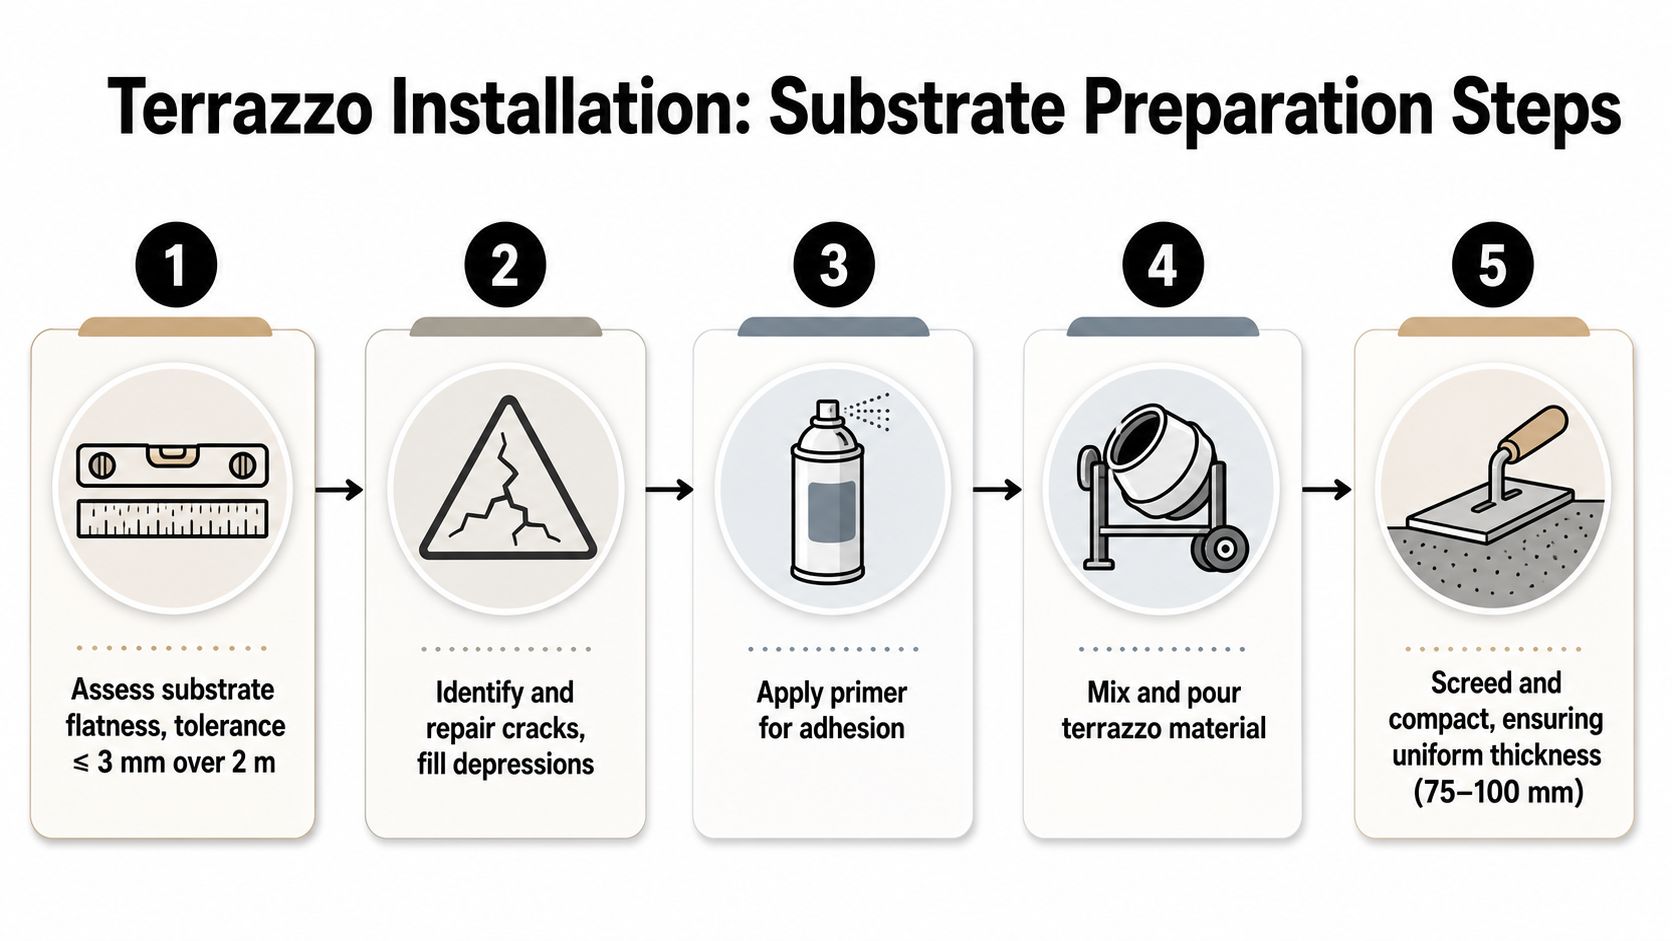
A step-by-step infographic illustrating the professional process for preparing a substrate before installing terrazzo flooring.

Start with flatness and load

The first check is simple. Assess the substrate, repair cracks, and decide whether the floor needs levelling before any tile goes down. Large-format terrazzo is less forgiving of poor tolerances, and the thickness of the tile system affects door clearances, drainage points, and junctions to hallways or adjacent bedrooms.

For wet areas, waterproofing has to be integrated into the build, not patched in later. In Melbourne bathroom renovations, that means the membrane system and its application need to suit the room layout, shower set-out, and substrate condition, with the finished floor still allowing correct falls and clean transitions. If the floor needs levelling, that work has to sit inside the overall system, not compete with it.

The thickness-to-load trade-off matters here too. Thin resin tiles are easier to manage on height, while thicker concrete terrazzo profiles create a heavier build-up. That can be a real issue in older homes where the floor levels already fight every extra millimetre.

The practical sequence is usually:

  1. Check the slab or timber substrate for movement and defects.
  2. Correct the base so the finished floor won't telegraph high spots.
  3. Coordinate waterproofing with the tile set-out.
  4. Confirm adhesives and setting materials suit the tile type.
  5. Allow for lippage control, especially with large-format pieces.

Read more about screed in tiling

Skimp on substrate work, and terrazzo will remind you of it every day.

That's why self-levelling compounds, screeding, and careful waterproofing coordination are not optional extras. They're the difference between a floor that looks crisp and one that shows every mistake at the first clean.

Long-Term Maintenance and Sealing Strategies

Terrazzo looks best when it's treated like a maintained surface, not a set-and-forget one. In bathroom conditions, the sealer is the line between a handsome floor and one that stains, dulls, or starts to hold moisture where it shouldn't. The finish chosen at installation also affects the cleaning burden later, especially if the surface is polished rather than honed.

Keep the routine simple

A pH-neutral cleaner is the safest daily or weekly option for normal care, because acidic products can attack both the sealer and the stone elements in the mix. If water stops beading on the surface, or the floor starts to look hungry and harder to clean, it's time to inspect the seal rather than push through with harsher products. High-moisture bathrooms tend to show wear sooner than dry circulation areas.

Sealing frequency depends on the system and finish. Polished terrazzo generally needs resealing more often than honed surfaces, and the infographic guidance used on this page places polished terrazzo at every 1 to 2 years and honed finish at every 2 to 3 years. That's a sensible maintenance rhythm for wet-area use, especially when showers are used daily.

If a stain does get through, don't scrub aggressively first. Identify the source, remove surface residue gently, and let the sealer be tested before assuming the floor has failed. In many cases, the problem is a worn patch or a neglected grout line, not the terrazzo itself.

See sealing guidance for stone tiles

The lesson is that long-term performance starts at the finish decision. A lower-grip, higher-gloss surface may look dramatic on day one, but it often asks for more care later. A more modest honed surface can be easier to live with in a Melbourne bathroom, and that usually matters more after the first month than the first photograph.

Choosing Qualified Suppliers and Registered Builders

I've seen strong terrazzo work start with a supplier who understands wet areas and finish differences, then fall apart because the wrong crew handled the bathroom. A good supplier should talk plainly about slip ratings, sealing, grout choice, finish options, and whether the tile belongs in a shower zone or only in a drier part of the room. If the conversation stays on colour and pattern, and skips the practical side, that's a warning sign.

What to check before you buy

Start with the sample itself, then ask for technical details that matter on site. You want clear answers on availability, the finish recommended for bathrooms, how the tile performs in wet areas, and whether the product suits the floor build-up your renovation can allow. In a Melbourne bathroom, thickness, surface finish, and substrate height all affect the final result, so the supplier should be able to discuss those limits without hesitation.

The contractor side matters just as much. In Victoria, a registered builder is the legal route for coordinating regulated domestic building work within the scope of that registration, which becomes important when bathroom renovations involve waterproofing, plumbing coordination, or structural changes Victorian Building Authority registration guidance. If the job value goes over A$10,000, the major domestic building contract requirement also comes into play VBA contract threshold guidance.

Ask these questions before you sign anything:

  • Registration status: Are you registered for the type of domestic building work this bathroom needs?
  • Wet-area experience: How many terrazzo bathrooms have you coordinated, not just tiled?
  • Subcontractor control: Who handles waterproofing, plumbing adjustments, and any floor levelling?
  • Previous work: Can you show similar Melbourne bathrooms with terrazzo finishes?
  • Maintenance advice: What sealer and care routine do you recommend after handover?

If the builder can't explain waterproofing, substrate prep, and finish selection in plain language, keep looking.

That point matters because terrazzo leaves little room for shortcuts. The right supplier helps you choose a suitable tile, but the right registered builder makes sure the whole wet-area system works together, from the slab or screed through to the final seal. For homeowners planning bathroom renovations, that combination is what turns terrazzo from a nice idea into a durable result.

If you're planning terrazzo tiles Melbourne wide, bring the wet-area details into the conversation early and don't leave them until the last site visit. Melbourne Tiling Services P/L handles bathroom renovations, waterproofing, screeding, and terrazzo-style tile installation with the practical coordination these jobs need, so visit Melbourne Tiling Services P/L to discuss your bathroom, ensuite, or renovation scope.

High End Bathroom Cabinets: A Melbourne Guide

Most advice on high end bathroom cabinets starts in the wrong place. It talks about door profiles, timber tones, and handle finishes, then treats moisture damage as an installation afterthought. In Melbourne bathrooms, that's backwards, because a cabinet only stays premium if its materials, set-out, and waterproofing interface survive steam, splash exposure, and constant movement around plumbing and walls.

The market is still being pulled by renovation activity rather than simple replacement demand. Grand View Research places the global bathroom furniture market at USD 136.20 billion in 2024, rising to USD 195.27 billion by 2030 at a 6.6% CAGR, and names home renovation and remodelling as a key driver, which matters in Australia because premium vanities are usually bought as part of a full bathroom upgrade rather than as a stand-alone item. Cabinet-style storage is also growing faster than the broader cabinet category, with Mordor Intelligence forecasting bathroom cabinets at 7.87% CAGR through 2031, ahead of the overall cabinet market at 5.04% CAGR for 2026 to 2031, driven by integrated power, drawer organisers, and textured finishes. Those trends line up with what's happening in Melbourne, where homeowners want cleaner, more concealed storage, but still need something that survives the wet zone.

Table of Contents

Why Expensive Cabinets Fail in Australian Bathrooms

Paying more doesn't automatically buy durability in a bathroom. I've seen beautifully finished cabinetry fail early because the carcass wasn't suited to humidity, the cut edges weren't sealed properly, or the cabinet was fitted before the waterproofing and plumbing details were resolved. The failure usually isn't dramatic at first, it starts with swelling at the base, softened edges around penetrations, or drawers that drag because the cabinet has moved slightly after exposure to moisture.

The visible finish hides the real weak point

A high-gloss door can look premium on day one and still be the wrong product for a wet-area renovation. The trouble is usually inside the box, at the back rail, around hinge cups, and wherever the cabinet meets wall, floor, and basin services. That's why wet-area compliance matters more than surface polish, because the National Construction Code requires waterproofing in wet spaces, and cabinetry has to work with that reality rather than ignore it.

Practical rule: if the cabinet details don't account for moisture, plumbing, and movement, the finish won't save it.

Melbourne bathrooms expose weak specification choices

Melbourne renovations often combine stone tops, timber-look faces, recessed storage, and compact layouts. Those combinations can look sharp, but they also create more chances for water ingress and fit issues if the cabinet isn't dimensioned and installed properly. In older homes, slight wall irregularities can leave gaps that get filled badly, then fail later when seals separate or substrate movement opens the joints again.

The true test of high end bathroom cabinets is simple. Can they stay straight, sealed, and serviceable after repeated steam exposure and daily splash contact? If the answer depends on perfect behaviour from the homeowner, the product isn't premium enough for an Australian bathroom.

Materials and Construction That Define Premium Quality

Premium bathroom joinery lives or dies in the substrate, edge treatment, and service access. A good showroom face can hide a weak carcass for a while, but Melbourne bathrooms punish poor board selection, sloppy sealing, and awkward rough-ins very quickly. In wet areas, I look first at whether the cabinet is built to cope with moisture, movement, and maintenance access, because those are the failures that show up after the installer has left.

A diagram illustrating the premium quality materials and construction techniques used to build bathroom cabinets.

Australian low-emitting composite timber products are commonly chosen because they align with national formaldehyde limits under the Australian Standard framework. That matters in moisture-prone internal joinery, where board stability and indoor air quality both affect long-term performance. If the substrate swells, telegraphs through the finish, or opens at the cut edge, the cabinet stops behaving like premium joinery.

The service void is not wasted space

A 45 mm service void at the back of base units gives plumbing and electrical services room to run without cutting into the carcass. That is especially useful when drawers need to stay full-extension and the back of the cabinet still has to clear waste traps, pipework, and service entries. If the site crew has to cut the unit heavily on installation day, the specification has already failed.

Practical rule: a cabinet that needs invasive site cutting is usually a cabinet that was measured too loosely or specified too rigidly.

Hardware and carcass geometry need to work together

Premium units commonly sit around 21 to 22 inches, about 533 to 559 mm deep, with tops projecting beyond the carcass, and larger formats can extend to around 1620 mm wide or 1538 mm high in taller storage pieces. Those dimensions only work if the wall set-out, waterproofing, and plumbing rough-ins are accurate. A deeper carcass gives better drawer capacity and hides services more cleanly, but it also makes poor alignment more obvious, especially with soft-close, full-extension undermount slides.

That is where coordination with a registered builder and the waterproofing trades matters. If the cabinet footprint clashes with membrane returns, pipe positions, or wall build-outs, the joinery may look fine on paper and still be awkward to install in a compliant wet area. For a practical guide to the sequencing issues, see Australian bathroom waterproofing requirements in Melbourne.

What to look for in the spec sheet

  • Moisture-resistant substrate: suitable for humidity, not just an attractive veneer.
  • Sealed cut edges: every cut end should be protected, especially near basins and plumbing exits.
  • Reinforced carcass construction: needed for deeper drawers and heavier tops.
  • Accessible service space: so plumbers and electricians are not forced to damage the cabinet later.
  • Low-emission board selection: sensible in enclosed internal joinery.

The biggest mistake is confusing a premium finish with premium construction. A cabinet earns the label only when the hidden details are as disciplined as the visible ones, and when the design respects the way moisture, plumbing, and wall movement behave in an Australian bathroom.

Waterproofing and Moisture Protection Essentials

Even a perfectly installed cabinet can fail if the moisture interface is sloppy. The weak point is the meeting point between the cabinet, wall, floor, waterproofing membrane, and pipe penetrations. In Melbourne bathroom renovations, that interface has to be planned before the cabinet arrives, not patched after the fact.

A checklist illustrating essential waterproofing and moisture protection tips for installing bathroom cabinets and kitchen fixtures.

Start with the cabinet-to-wall line

The back of a wall-hung or floor-standing vanity should meet a sealed, prepared surface. If there is movement, gaps, or an uneven substrate, the sealant line becomes vulnerable and the joinery starts working against the wall instead of with it. Measure around pipes, skirting, and door swing before ordering anything, because awkward clearances often force the install team to trim panels in places they should avoid.

Protect the hidden cavity

Any enclosed space behind or under the cabinet should not trap condensation. Humidity and poor airflow shorten the life of even well-made joinery, especially in tight ensuites where steam lingers and surfaces stay damp longer than people expect. The practical answer is to coordinate ventilation, membrane continuity, and cabinet placement before final fit-out.

The guidance in Melbourne waterproofing practice is useful because the cabinet does not sit outside the wet area, it sits inside the system that protects it. That is the mindset that keeps premium joinery from becoming expensive repair work.

Don't ignore pipe penetrations and cut ends

Every pipe entry, bolt hole, and sawn panel edge is a risk point. Use gaskets where services pass through, seal every exposed end, and make sure any plinth or support detail does not interrupt the waterproofing strategy. Stone tops and recessed storage look elegant, but they are only worth specifying if the substrate, membrane, and sealant line are all planned as one sequence.

Custom Joinery Versus Off-the-Shelf Solutions

Custom joinery gets blamed for being expensive, but in the right room it solves problems that stock units can't. Off-the-shelf cabinets can still work well when the layout is straightforward, the plumbing is already set, and the wall geometry is square enough to accept standard dimensions. The decision should come down to fit, not ego.

Where custom joinery earns its keep

Older Melbourne homes often have walls that are slightly out of square, which makes rigid cabinetry harder to install cleanly. In those rooms, templating matters more than catalogue browsing because the cabinet has to meet a real wall, not an ideal one. Custom joinery also gives you control over awkward rooms, integrated storage, and concealment of services without ugly filler panels.

Where stock units are the smarter buy

If the renovation is simple, the room is generous, and the plumbing rough-ins already suit standard widths, a quality off-the-shelf vanity can save time without looking cheap. That's especially true when the main job is to upgrade the room visually, not redesign its bones. A simpler cabinet can outperform a fancier one in a tight ensuite if circulation and door clearance are the primary constraints.

A more expensive cabinet isn't automatically the better cabinet. In small bathrooms, a precise flat-wall or recessed solution can beat a larger corner unit if movement space is the limiting factor.

The planning tools that prevent mistakes

3D planning, accurate templating, and checking the actual wall angle before ordering all reduce rework. The practical issue isn't only how the cabinet looks, it's whether it can be installed without clashing with skirting, doors, or service pipes. If the room has a tricky corner or a narrow return wall, measure first and decide later.

Hardware Finishes and Storage Configuration

Hardware is where premium cabinetry either feels refined every day or turns annoying very quickly. Soft-close hinges are expected, but in a deeper vanity they're not enough on their own. Full-extension undermount slides, properly reinforced drawer boxes, and a sensible internal layout matter more than decorative details once the cabinet starts getting used.

Storage has to match the drawer depth

Deep drawers can swallow a lot, but they also make things harder to reach if the internal layout is sloppy. That's why drawer organisers, divider trays, and concealed power points have become common in the premium segment, as noted in the broader cabinet market trend data from earlier. The point isn't just more storage, it's storage you can use without rummaging.

Handleless fronts can look cleaner in a modern bathroom, but they demand tighter tolerances and cleaner finger pulls. If the cabinet is near splash zones, corrosion-resistant hardware is worth specifying because bathroom air is harsher than most homeowners expect. Cheap fittings show their age quickly when steam, cleaners, and constant use all hit them at once.

Choose hardware for the way the room is used

  • Shared bathrooms: prioritise organised drawers and easy-open fronts.
  • Ensuites: focus on concealed storage and daily-access items.
  • Tall cabinets: use internal shelving that doesn't waste vertical space.
  • Deep vanities: use organisers so contents don't disappear into the back.

Melbourne Tiling Services P/L lists vanity installation as part of its bathroom renovation service offering, which makes sense because the cabinet, tiling, and waterproofing details are linked on site. That coordination matters more than the brand name stamped on the drawer runner.

Budget Ranges and Cost Drivers Explained

Cabinet pricing only makes sense when you separate the box, the finish, and the installation complexity. A premium-looking vanity can sit in a moderate budget if it uses standard dimensions and simple hardware, while a modest-looking cabinet can cost more once custom set-out, waterproofing coordination, and plumbing adjustments are added. The cabinet itself is only one line in the larger renovation scope.

High End Bathroom Cabinet Cost Ranges

Cabinet Tier Price Range (AUD) Key Features Best For
Entry premium Lower custom range, varies by size Moisture-resistant board, soft-close hardware, standard finishes Smaller ensuites and straightforward replacements
Mid premium Moderate custom range, varies by specification Tailored dimensions, full-extension drawers, better edge sealing Family bathrooms and most Melbourne renovations
High custom Higher custom range, varies by layout complexity Bespoke sizing, concealed services, integrated storage Awkward rooms, luxury fit-outs, design-led projects

If you want a practical budgeting reference tied to installation, the vanity installation cost guide is a useful starting point because it frames the cabinet as part of the wider bathroom scope, not an isolated purchase.

What drives the price up

  • Custom dimensions: every non-standard cut adds complexity.
  • Better hardware: full-extension slides and premium hinges cost more, and they should.
  • Moisture-ready materials: sealed, low-emission, and stable substrates are worth the spend.
  • Installation difficulty: out-of-square walls, service relocation, and tight access all increase labour.
  • Compliance coordination: when the renovation is part of domestic building work over AUD 10,000, the Victorian Building Authority says it must be covered by a major domestic building contract, which changes the formal project framework.

Where premium spending pays off

Spend on construction integrity, service access, and moisture resistance. Spend carefully on decorative extras that won't improve durability, because those often look good on a quote and disappear in daily use. The cabinet that stays straight, sealed, and serviceable is the one that keeps its value.

Coordinating Installation with Other Trades

A cabinet install can fail even when the product is right because the trades were sequenced badly. The cabinet arrives before plumbing is set, the tiler leaves an uneven substrate, or electrical outlets end up inside the opening that should've been reserved for drawers. Good builders prevent that by locking in the order before anyone turns up on site.

A five-step infographic showing the process of coordinating bathroom cabinet installation with other professional trade services.

The sequence that avoids rework

  1. Finalise the cabinet layout and utility plan.
  2. Complete plumbing and electrical rough-ins.
  3. Finish wall and floor tiling.
  4. Install cabinets and verify fit.
  5. Connect plumbing and final electrical.

Why the handoff points matter

The rough-ins must be complete before the cabinet is locked in place, because service clashes are one of the fastest ways to damage a new vanity. Tiling should be finished before final cabinet install unless the designer has deliberately planned the set-out around a floating detail. After the cabinet is fitted, the plumber and electrician can return to finish their connections without pulling the unit apart.

What to ask the project manager

  • Have the rough-ins been checked against the final cabinet drawing?
  • Has the waterproofing been inspected before the cabinet goes in?
  • Are the outlet and lighting positions clear of drawer paths?
  • Has the installer allowed for the service void and pipe movement?

The Victorian framework around registered builders matters here because bathroom renovations often involve structural, plumbing, or waterproofing work that can't be handled casually. Registered builders coordinate those trades so the vanity doesn't become the first thing blamed for a sequencing problem.

Sourcing Tips and Long-Term Maintenance

The easiest cabinets to maintain are the ones that were chosen with moisture in mind from the start. A supplier should be able to explain the substrate, edge sealing, hardware, and service clearances without hand-waving. If they can only talk about colour and door style, keep looking.

What to ask before you order

Ask for the cabinet specifications in writing, not just the showroom story. You want to know what the substrate is, how the cut edges are sealed, how the cabinet handles wet-area exposure, and what's covered under warranty if the bathroom gets damp in normal use. Warranty language often tells you more than the display sample does.

If a supplier won't talk plainly about moisture exposure, they probably don't want you reading the fine print too closely.

Maintenance that actually helps

Use mild cleaners, wipe standing water quickly, and check silicone lines where the cabinet meets the wall and top. Don't flood the cabinet with water, don't use abrasive pads on glossy coatings, and don't let a slow leak sit under the basin because that's where small problems become expensive ones. For homes with poor airflow, the bathroom ventilation requirements guide is worth reviewing, since good ventilation protects the cabinet as much as it protects the room.

A realistic routine

  • Weekly: wipe splash zones and inspect visible seals.
  • Monthly: check drawer action, hinge alignment, and under-basin dryness.
  • After any plumbing work: inspect the service void and the base edges.
  • Seasonally: look for swelling, soft spots, or finish lift around penetrations.

A cabinet that is kept dry, ventilated, and properly sealed can stay looking premium for years. The ones that fail are usually the ones nobody checks until the finish has already started to move.


If you're planning a Melbourne bathroom renovation and want the cabinet, waterproofing, tiling, and trade sequencing handled as one coordinated job, Melbourne Tiling Services P/L can assist with the technical side of the fit-out. Visit Melbourne Tiling Services P/L to discuss a bathroom or ensuite project that needs proper set-out, waterproofing, and cabinet installation done with care.

What Is Tile Adhesive: A Complete Guide

Tile adhesive is a factory-blended, polymer-modified bonding layer engineered to secure tiles mechanically and chemically, and C2 products are built for tougher jobs than basic C1 products. The wrong adhesive is one of the fastest ways to turn a bathroom renovation or balcony job into cracked grout, hollow spots, or debonding.

Many people still call it “glue”, but that framing is too simple for Melbourne conditions. In real tiling work, the adhesive has to suit the tile, the substrate, the moisture load, and the amount of movement the surface will see.

Table of Contents

Tile Adhesive Is Not Just Glue

The biggest mistake homeowners make is treating tile adhesive like a commodity. It's not just glue, it's a performance layer that has to bond, hold, and sometimes flex while the structure beneath it moves, dries, or heats up.

A construction worker spreading thin-set mortar on a floor using a notched trowel to prepare for tiling.

In Australian bathrooms, that distinction matters because the tiled surface sits inside a wet-area system, not a dry decorative finish. Adhesive choice has to work with waterproofing, substrate preparation, and the tile format, which is why the wrong product can fail even when the install looks neat on day one. Tile adhesive usage is tied closely to renovation and high-performance tiling applications, especially where moisture resistance and flexibility matter.

What the bond actually does

Tile adhesive creates two kinds of hold. It forms mechanical interlock with the substrate and tile back, and it also cures into a bonded layer that resists lifting, sliding, and separation. That's why surface condition, trowel coverage, and curing matter as much as the label on the bag.

Practical rule: If the substrate is moving, dusty, slick, or poorly prepared, a premium adhesive still won't save the job.

That's the reason professionals treat adhesive as one part of a system. Screeding, leveling, waterproofing, tile type, and adhesive classification all affect the final outcome. If you're planning bathroom renovations, the adhesive choice should sit alongside the surface prep work, not after it. Screeding is often the step that makes the adhesive perform properly.

Why this matters more in Melbourne renovations

Melbourne homes throw up real-world complications. Older slabs can be uneven, balconies can move, and renovated bathrooms often combine new board substrates with waterproofed wet zones. A generic product might hold a kitchen splashback, but that same product can struggle in a shower recess or on a balcony where temperature swings and moisture exposure are part of daily life.

That's why the better question isn't “what is tile adhesive?” in the simple sense. It's “what engineering job does this adhesive need to do on this specific surface?” Once you ask that, the product category starts to make sense fast.

The Main Types of Tile Adhesive Explained

Tile adhesive comes in a few practical families, and each one behaves differently once it hits the wall or floor. The type you choose affects how you mix it, how fast you can work, and how forgiving the job will be.

Cement-based powder adhesives

This is the professional default for most tiled floors and walls. It's mixed on site with water, which gives the tiler control over consistency and working time, and it's the most common choice for everyday installations because it balances cost and performance well. Market data also shows cementitious adhesives leading with 36.6% of the market in 2024 in one global market view, which lines up with their broad use in routine wall and floor work (Grand View Research).

Powder adhesives are also the right starting point when the job involves porcelain, larger formats, or wet-area work. For bathroom renovations, that flexibility matters because the adhesive often has to bridge different substrates and hold up under moisture.

Epoxy adhesives

Epoxy is the tougher, more specialised option. It's used when chemical resistance, stain resistance, or heavy-duty wet-area performance is required, and it's less about convenience than resilience. Most homeowners won't need epoxy everywhere, but in demanding commercial zones or very exposed conditions, it earns its place.

Acrylic-modified adhesives

Acrylic-modified products are chosen for added flexibility and improved bond behaviour. They can help where the surface isn't perfectly forgiving, but they still need to match the tile and substrate properly. A flexible product doesn't excuse poor prep.

Ready-mix tub products

Ready-mix products are the ones many homeowners recognise first because they're easy to open and apply. They can suit small, dry-area wall tiles, but they're not interchangeable with powder products in wet zones, large-format installs, or floors that need stronger performance. That's where a lot of DIY confusion starts.

The simplest way to sort them is this, powder products cover most serious renovation work, epoxy handles demanding environments, acrylic-modified products add flexibility, and premixed tubs are limited in scope.

For larger projects, especially those involving wall-to-floor continuity, the adhesive type has to line up with the tile weight and the substrate. That's why many tilers look at large-format tiles and the adhesive together, not separately.

Understanding Performance Classifications and Technical Criteria

The codes on a technical sheet only look abstract until you map them to the job in front of you. On site, they tell you whether an adhesive can handle a waterproof bathroom, a balcony with movement, or a feature wall carrying heavier tiles. That is the actual value, because tile adhesive works as an engineered performance system, not generic glue.

What the codes mean in practice

A C1 adhesive meets the standard bond-strength baseline. A C2 adhesive is the improved class, and it gives more confidence on porcelain, large-format tiles, and moisture-exposed surfaces. Technical guidance also ties these classes to minimum tensile adhesion values, which is one reason installers usually move to C2 for tougher residential work, especially where the substrate has been waterproofed or the tile is carrying more weight (Wacker).

Classification Meaning Typical Use Case
C1 Standard bond strength General interior tiling where conditions are stable
C2 Improved bond strength Porcelain, large-format tiles, wet areas, moisture-exposed substrates
T Reduced slip Vertical wall work where sag control matters
E Extended open time Jobs that need a wider window for placement and adjustment

For homeowners planning a renovation, those letters matter because they tell you where a product is built to perform and where it is likely to struggle. If the tile is dense, the room is wet, or the installation includes a substrate that has already been waterproofed, the extra margin from a C2 adhesive is usually worth having.

Why S1 and S2 matter

The S1 and S2 classes describe deformability, which is the adhesive's ability to cope with small movement without losing the bond. S1 is the flexible class most DIYers hear about, and it sits in the moderate deformability range in the technical standard. That matters when a substrate moves slightly, because a rigid adhesive can crack or let the tile lose contact. The same technical guidance also frames S2 as highly deformable, which pushes it into more specialist territory for jobs where movement is more likely.

Practical rule: Flexibility helps with movement, but it does not fix a bad floor, bad screed, or poor waterproofing.

In Melbourne bathrooms, I treat deformability as insurance against minor movement, not a shortcut around preparation. If the substrate is unstable, the adhesive is only one part of the system, and it cannot carry the whole problem.

Open time and adjustment time

Workability matters just as much as strength. One AU-relevant technical sheet for large-format tile adhesive specifies more than 30 minutes open time, about 45 minutes adjustment time, and 24-hour foot-traffic readiness. Those figures matter because large tiles are unforgiving once they are bedded in, and installers need enough time to correct alignment without the adhesive skinning over too early (Mapei technical data sheet_10c709f9b9a64d3bb0605fbf4612ba43.pdf?sfvrsn=f8939151_0)).

That is especially relevant on bathroom floors, where you are juggling falls, drains, and waterproofing details at the same time. A product with the wrong working time can turn a careful layout into a rushed fix, and rushing is where tile lines start drifting.

Slip resistance on walls

The T classification is there for vertical work. It reduces the risk of tiles sliding before the adhesive grabs, which is especially useful with heavier wall tiles and larger formats. In practice, that is a quiet detail that keeps a bathroom wall line straight and saves a lot of re-setting later.

If you are comparing products across tile types, it helps to cross-check the adhesive class with the tile material itself. A good place to start is a practical overview of tile materials for bathroom and renovation work, then match the adhesive to the demands of the tile, the substrate, and the room.

Matching Adhesive to Tile Material and Installation Environment

Tile adhesive has to be matched to the tile, the substrate, and the room conditions. A product that behaves well on a small ceramic splashback can be the wrong call for porcelain, natural stone, or a balcony that moves with Melbourne's weather.

Tile material changes the adhesive choice

Ceramic tiles are usually more forgiving than dense porcelain, so many standard wall jobs feel straightforward. Porcelain is denser and often needs higher bond performance, which is why C2 products are usually the safer choice. Natural stone adds another layer of care because staining, colour bleed, and movement sensitivity can affect the result, so the adhesive and grout system both need to suit the stone.

Large-format tiles, including thinner slab-style products such as Kerlite, call for a different approach. The adhesive needs enough working time to stay open, enough body to resist slumping, and enough coverage under more of the tile back. If the bed is uneven, the result can be lipping, hollow sounds, or bond failure later.

Wet areas, balconies, and heated floors

Bathrooms and ensuites are wet areas first and decorative spaces second. Adhesive selection has to work with waterproofed substrates and handle the regular moisture load around showers, vanities, and floor waste transitions. The same applies to balconies, where external exposure and movement put more pressure on flexibility and bond strength.

Situation What to prioritise What usually fails
Shower or ensuite Moisture resistance, coverage, compatibility with waterproofing Cheap premix products in wet zones
Balcony Flexibility, external durability, movement tolerance Rigid adhesive on a moving substrate
Large-format floor tile Extended open time, high bond strength, good bed support Fast skinning and poor coverage
Stone feature wall Material compatibility and careful product selection Generic adhesive chosen only for price

For a practical overview of tile materials for bathroom and renovation work, the key point is simple, the tile, the substrate, and the room need to be matched before the adhesive is chosen.

That trade-off is clearer on the jobs that fail first. Exterior areas and heavier internal installs place more demand on the bond, which is why adhesive specification matters more as the installation gets more exposed or more demanding.

Your Tile Adhesive Selection Checklist

A good quote should tell you more than a price and a tile brand. It should show that the installer has matched the adhesive to the material, substrate, and room conditions.

A checklist infographic titled Tile Adhesive Selection Checklist, featuring six numbered steps for choosing the right adhesive.

What to ask before you sign off

  • What tile size and material are being used? Dense porcelain, ceramic, natural stone, and large-format panels don't behave the same way.
  • Where is the tile going? Wall, floor, shower, balcony, and exterior areas each put different demands on the adhesive.
  • What is the substrate? Concrete, fibre-cement board, waterproofed wall systems, and old tile overlays all need different preparation.
  • Does the project need flexibility? Movement joints, underfloor heating, and balcony conditions can change the adhesive class you need.
  • What open time does the job require? Large-format tiling often needs a more forgiving product so the bed doesn't skin over too fast.
  • Is colour important? White adhesive is often chosen where light stone or translucent finishes are involved.

Red flags in a quote

If a quote says “tile adhesive included” with no further detail, ask for the actual product class. If a premixed product is being used in a wet area, that's another question mark unless the installer can justify it for a very specific application. If waterproofing compatibility isn't mentioned at all, the system hasn't been thought through properly.

Ask for the adhesive class, not just the brand name. The class tells you more about suitability than the marketing label does.

A clear quote should also show whether the installer has allowed for substrate work before the tiles go down. In bathroom renovations, the adhesive is only as good as the surface underneath it.

When Professional Installation and Registered Builders Matter

A good adhesive can still fail in the hands of a rushed installer. Wet-area tiling is a system job, and the system includes waterproofing, screeding, service coordination, tile setting, and cure time.

Why the installer matters as much as the product

Professional tilers don't just spread adhesive and walk away. They check substrate flatness, set trowel size, manage coverage, and choose a product that suits the tile and room. In showers and balconies, that judgement matters because moisture, movement, and transitions are where defects show up first.

Bathroom renovations also bring multiple trades into the same space. Plumbers, electricians, carpenters, waterproofers, and tilers all affect the final result, so the schedule and sequence have to line up. If one trade cuts corners, the adhesive often gets blamed for a problem that started elsewhere.

Registered builders and coordination

In Victoria, registered unlimited builders play a useful role in that coordination because they can manage the whole renovation sequence rather than treating each trade as an isolated task. That matters in bathrooms where waterproofing must be completed before tiling, and where screeding or self-levelling can determine whether the adhesive bed performs the way it should.

The technical side also matters on specialist jobs. Large-format Kerlite and similar systems need careful handling, even bed coverage, and the right adhesive class for the substrate and tile weight. A builder or tiler who has seen enough failure points will ask different questions before the first bag is mixed.

For some homeowners, a full-service tiling and renovation outfit such as Melbourne Tiling Services P/L is one practical option because it coordinates tiling, waterproofing, screeding, and bathroom renovation work under one roof. That kind of setup can reduce handover errors when the job involves wet areas or complex floor preparation.

Melbourne Considerations for Tile Adhesive and Tiling Projects

Melbourne jobs tend to expose weak products and weak prep quickly. Temperature swings affect exterior work, older homes can hide uneven substrates, and apartment balconies add movement and waterproofing pressure that basic products don't always handle well.

Bathroom renovations in older Melbourne homes often need more surface correction than new builds. That's where screeding, levelling, and the right adhesive class come together, because a poor base will show through as soon as the tiles go down. For balcony remediation, the product choice also has to account for external exposure and structural movement, not just appearance.

The local market is also shifting toward premium formats, especially large-format porcelain and Kerlite-style panels. That pushes adhesive selection away from the “cheap bag of glue” mindset and toward a more technical approach, because the tile format can dictate the open time, slip resistance, and deformability required.

Melbourne homeowners planning a renovation should expect a tiler to ask practical questions before quoting. What's the substrate, what's the waterproofing state, what tile size is being installed, and is the area wet or exposed? Those answers drive the adhesive choice, and the adhesive choice drives the durability of the result.


If you're planning bathroom renovations in Melbourne and want the adhesive, waterproofing, screeding, and tile selection handled as one system, visit Melbourne Tiling Services P/L to request a quote and discuss the right setup for your bathroom, balcony, or large-format tiling project.

Shower Waterproofing Membrane: The Ultimate 2026 Guide

You notice it in small ways first. A faint musty smell after a shower. Grout that never seems to dry properly. A paint bubble on the ceiling below. By the time water shows itself, it has usually been travelling for a while.

That's what catches people out in bathroom renovations. The tiles still look good. The tapware still shines. The room feels finished. But the part that decides whether the bathroom lasts is buried underneath all of that. It's the shower waterproofing membrane.

In Melbourne, that hidden layer matters even more than is commonly understood. Bathrooms deal with daily water exposure, cleaning chemicals, movement in the building, and stop-start drying conditions. Add variable humidity and cold spells, and rushed work gets exposed fast. A shower can look perfect on handover day and still be heading towards failure if the membrane was applied badly, cured poorly, or installed without proper falls to the drain.

If you're planning a bathroom renovation, fixing a leak, or comparing registered builders, this is the part worth understanding before a single tile goes on the wall.

Table of Contents

The Hidden Threat in Your Bathroom

A leaking shower rarely starts with a dramatic flood. More often, it starts with a pinhole weakness somewhere no one can see. Water gets past a junction, sits under tile, works into a wall cavity, and keeps going. Months later, the owner is staring at swollen skirting, lifting paint, or a dark patch in the room next door.

That's why I tell clients the shower membrane is the essential bathroom, and the tiles are just the finish. The membrane is the layer doing the hard work every day. If it fails, the rest of the bathroom becomes decoration over a defect.

Where the trouble usually starts

Most failures come from one of a few places:

  • Wall to floor junctions: Movement and water pressure converge.
  • Around the drain: If the system doesn't direct water properly, moisture hangs around where it shouldn't.
  • Penetrations: Shower roses, mixers, spouts, and pipes interrupt the surface and need proper sealing.
  • Hobs, niches, and corners: These details look simple on a plan, yet poor workmanship often becomes evident.

A bathroom can survive a chipped tile. It won't survive a failed waterproofing system.

A shower leak is rarely about one bad tile. It's usually about one broken chain in a waterproofing system.

Why cosmetic finishes fool people

Tiles, grout, silicone, and water-resistant linings all have a job, but none of them replaces membrane work. Grout absorbs moisture. Silicone ages. Tile assemblies move. If the waterproofing behind them isn't continuous, water finds the break.

That's what makes this part of bathroom renovations so often botched. Owners can compare tile colours and tapware brands easily. They can't see dry film thickness, curing discipline, or whether the membrane was detailed correctly around a puddle flange.

The result is simple. The most important layer in the room is also the easiest one for a rushed contractor to hide.

The Unseen Shield What Is a Waterproofing Membrane

A shower waterproofing membrane is the sealed barrier between everyday shower water and the structure of the building. The easiest way to think about it is a raincoat under the tiles. The tiles are the outer clothing. They look finished and tidy, but they are not the thing keeping the frame dry.

A shower wall under construction featuring cement backer board, waterproofing tape at seams, and partially installed marble tiles.

What the membrane actually does

Its job is blunt and uncompromising. It must stop water from passing through the tiled surface and reaching substrate, framing, and adjoining materials. That means it has to work across flat areas, corners, pipe penetrations, drains, and transitions.

If that barrier is broken anywhere, the shower stops being a controlled wet area and starts feeding moisture into places never meant to stay wet.

In Australia, faulty waterproofing is one of the top three building defects, with up to 90% of all bathroom complaints relating to waterproofing and leakages in shower areas, as noted in Siniat's summary of bathroom waterproofing requirements. That figure tells you something important. This isn't a minor trade detail. It's one of the biggest defect points in the whole renovation process.

Why tiles and grout aren't enough

A lot of people still assume tiled equals waterproof. It doesn't.

  • Tiles resist wear: They give you a cleanable finish.
  • Grout fills joints: It helps lock the surface together, but it is not a guaranteed water barrier.
  • Water-resistant boards help manage exposure: They are not a substitute for a compliant membrane.
  • Silicone handles movement at changes of plane: It can't carry the waterproofing system on its own.

That's the mistake. People trust the visible layer because it looks solid. In practice, the visible layer sheds some water and slows the rest. The membrane is what stops it.

Why continuity matters more than product marketing

The membrane only works when it forms one uninterrupted system. It can't stop at the easy parts and leave the critical details weak. Corners, drains, hobs, and penetrations are where good installs separate from bad ones.

If you want a practical walkthrough of the sequence, this guide on how to waterproof a shower properly shows the process in the order it needs to happen.

Practical rule: If someone tells you the tiles, grout, and silicone will “keep most of the water out”, they've already missed the point.

Choosing Your Armour Sheet vs Liquid-Applied Membranes

Not all membranes are installed the same way, and not all showers suit the same system. In practice, most bathroom renovations come down to sheet membranes or liquid-applied membranes. Both can work. Both can fail. The difference is usually in the detailing, substrate, and the person installing them.

A comparison infographic between sheet and liquid-applied shower waterproofing membranes, explaining their pros, cons, and use cases.

The core difference

A sheet membrane is a manufactured layer that gets cut, bonded, lapped, and sealed into place. A liquid membrane starts wet and is rolled, brushed, or trowelled on, then dries into a continuous barrier.

That sounds straightforward, but the trade-offs are real.

  • Sheet systems give you factory-made consistency in the membrane body itself.
  • Liquid systems adapt better to odd shapes, fiddly details, and irregular geometry.

The catch is that each system has its own failure points. Sheet systems rely heavily on seam treatment. Liquid systems rely heavily on application control.

Sheet vs Liquid-Applied Waterproofing Membranes

Feature Sheet Membrane (e.g., Fabric-Reinforced) Liquid-Applied Membrane (e.g., Polyurethane)
Thickness control Factory-made membrane thickness is consistent Installer must achieve correct thickness across the whole area
Corners and junctions Needs careful folding, bandaging, or preformed corner details Conforms easily to corners and complex shapes
Seams Seams are the critical weak point if badly lapped or bonded Fewer sheet joins, but continuity still depends on careful detailing
Speed on open areas Often efficient on simple, larger surfaces Can be slower because multiple coats and drying stages are needed
Complex penetrations Can be more fiddly around pipes and niches Usually easier to dress around penetrations
Substrate variation Good on flat, well-prepared surfaces More forgiving on shapes, less forgiving on poor prep
Quality risk Usually in overlaps, corners, and drain integration Usually in thin spots, pinholes, or rushed recoating
Best fit New builds or straight-forward layouts with clean geometry Renovations with awkward details, mixed surfaces, or custom shapes

What works well with sheet membranes

On clean, square substrates, sheet membranes can be an excellent choice. If the shower base, walls, and corners are well built, the installer can create a very controlled system. The membrane thickness isn't being guessed at on site because the material arrives as a manufactured sheet.

That's the upside. The downside is precision. One sloppy overlap, trapped air pocket, badly dressed corner, or poor drain connection can compromise the system. Sheet work rewards methodical installers.

What works well with liquid-applied membranes

Liquid membranes suit renovation work because bathrooms are rarely perfect once stripped out. Walls can be out slightly. Penetrations can be awkward. Niches, hobs, and transitions can be easier to detail with a brush and roller than with cut sheets.

The trade-off is consistency. The installer has to build the membrane to the required thickness everywhere, not just where it's easy. The verified Australian guidance around shower membrane application is very clear on the importance of thickness and cure. The ARDEX guide to liquid-applied waterproofing membranes states a minimum total dry film thickness of 1.0 mm for floor applications, notes full curing after 3 days at 23°C or 5 days at 10°C for an example system, and requires the membrane over the hob to extend at least 150 mm beyond the outside edge.

That's why liquid systems don't forgive rushed work. If someone lays it on too thin, skips reinforcement where required, or tiles before cure, the barrier looks finished before it is finished.

How I'd decide between them on a real job

I'd look at the job in this order:

  1. Substrate condition: Flat and simple can suit sheet. Irregular renovation work often suits liquid.
  2. Detail complexity: More penetrations, nib walls, niches, and custom geometry usually push the decision towards liquid.
  3. Installer skillset: A membrane is only as good as the team applying it. Product choice doesn't rescue poor workmanship.
  4. Programme pressure: If the timeline is compressed, that's a warning sign. The right answer isn't the “fastest” membrane. It's the system the team can install properly without forcing the next trade in too early.

Good waterproofing isn't about choosing the fanciest product. It's about choosing the system the site conditions and installer can support without shortcuts.

The Rulebook Meeting AS 3740 and Builder Compliance

Most owners hear “AS 3740” and switch off because it sounds like paperwork. That's a mistake. The standard matters because it tells you how a wet area must be built so water goes where it should, and nowhere else.

In plain terms, AS 3740 is not there to make bathroom renovations harder. It's there because bathrooms fail in predictable ways, and the standard is written around preventing those failures.

A checklist infographic outlining AS 3740:2021 standards for proper shower waterproofing preparation and installation steps.

The wall height requirement is about splash and saturation

One of the most important changes people need to understand is shower wall coverage. In Victoria, all bathroom renovations, including complete stripping back to substrate, must comply with AS 3740:2021, which mandates shower walls be waterproofed to a minimum height of 1800mm above the finished floor level, or 50mm above the shower rose if the rose is higher, according to this explanation of AS 3740 requirements for Victorian wet areas.

That requirement isn't arbitrary. Showers don't just wet the bottom of walls. They create repeated splash, misting, and runoff well above the old minimal treatment zones. Waterproofing only at the junction is like wearing gumboots in a storm and expecting your shirt to stay dry.

Falls and drainage are part of waterproofing

People often separate waterproofing from drainage. On site, they're tied together. A membrane can be intact and the shower can still fail if water sits where it should be moving.

The updated AS 3740:2021 guidance in Australia requires shower walls to be waterproofed to 1800 mm above the finished floor level or 50 mm above the shower rose, whichever is higher, and in commercial wet areas the membrane must be graded to the drain waste puddle flange, with no opting out, as outlined by ABCG's overview of the new waterproofing standard.

That grading requirement matters because standing water increases stress on every junction, every penetration, and every weakness in workmanship. If the shower floor doesn't fall properly, the membrane and the tile assembly stay wetter for longer.

Why registered builders matter

Compliance isn't just a membrane brand and a ticked box. It's coordination.

A registered builder looks at the whole chain:

  • Substrate preparation: Framing, sheeting, and set-out have to support the waterproofing system.
  • Drain location and puddle flange detailing: These are not accessories. They are part of the system.
  • Trade timing: Waterproofing can't be rushed because the tiler is due tomorrow.
  • Inspection and documentation: The work has to stand up later, not just look neat on the day.

If you're engaging a builder or waterproofer, ask how they handle compliance records and whether they issue the right documentation. This guide to a waterproofing compliance certificate in Victoria is useful because it shows what proper accountability looks like.

Rules only work when someone enforces them on site

Standards don't build bathrooms. People do.

The reason registered builders matter is simple. Someone has to control sequencing, reject bad substrate, hold back tiling until waterproofing is ready, and make sure each trade leaves the next one a compliant surface to work from. Without that oversight, the standard becomes a set of good intentions buried under tile adhesive.

Why Waterproofing Fails and How to Prevent It

Waterproofing failures usually aren't mysterious. They come from predictable mistakes, repeated on jobs where someone is rushing, guessing, or relying on cosmetic finishes to cover technical defects.

The pattern is familiar. The bathroom looks complete. The leak shows up later.

A close up view of shower floor tiles with a drain showing potential gaps needing waterproofing.

Failure starts before the membrane goes on

A membrane can't fix a dirty, damp, unstable, or badly formed surface. If the substrate is dusty, contaminated, or moving, adhesion suffers. If falls are wrong before waterproofing, the membrane follows bad geometry.

These are the common red flags:

  • Poor prep: Dust, residue, loose sheeting, or moisture left in the substrate.
  • Bad geometry: No proper fall to waste, uneven transitions, or awkward build-ups around the drain.
  • Untreated penetrations: Pipes and fittings interrupt the membrane plane and need proper detailing.
  • Damage between trades: A membrane can be compromised after application if later work isn't controlled.

Thin application means weak protection

This is one of the biggest issues with liquid systems. People see coverage and assume performance. They're not the same thing.

If the membrane goes on too thin, the cured layer may look continuous but still allow moisture transmission. Weak spots often show up at corners, around floor wastes, over hobs, and at changes of plane where the brush or roller work gets inconsistent.

If the waterproofing is only heavy where the installer can see it easily, it probably isn't right where it matters most.

Melbourne's climate punishes rushed curing

Local conditions really matter. Recent 2025–2026 data from Australian Waterproofing Company shows 25% of shower membrane failures in Melbourne are due to tiling before the membrane fully cured, and that Melbourne's variable climate can extend drying times beyond manufacturer claims, according to Dunlop Trade's discussion of shower waterproofing membrane selection and curing.

That aligns with what experienced site teams already know. A membrane doesn't cure by the calendar on the box if the room is cold, closed up, or carrying high humidity. In Melbourne, one day can be dry and mild, the next cool and damp. If a contractor treats every bathroom like a laboratory-controlled environment, they're taking a gamble with your walls and floor.

The mistake owners rarely see

Tiling too early is dangerous because it hides the problem immediately. Once adhesive and tile go over a membrane that hasn't fully cured, the system gets sealed in before it has reached proper performance. You can't inspect that later without demolition.

A useful visual explanation sits below. It helps homeowners understand where leaks often begin and why drain zones and transitions deserve extra attention.

How to prevent failure on a live renovation

Prevention isn't glamorous. It's disciplined.

  1. Start with the substrate: Clean, dry, stable, and formed correctly to falls.
  2. Use the membrane system as specified: Don't mix random components because they're “close enough”.
  3. Control thickness and detailing: Corners, penetrations, hobs, and drains need deliberate work, not quick touch-ups.
  4. Respect cure times: Programme pressure is not a technical justification.
  5. Protect the membrane before tiling: Damage from later trades is still membrane failure.

Most shower leaks are expensive because they stay hidden while the damage spreads. The fix isn't heroic workmanship later. It's patient workmanship at the exact moment people are tempted to rush.

The Full Picture Cost Compatibility and Maintenance

Owners often ask the wrong cost question. They ask what waterproofing adds to the renovation instead of what failure removes from it. Waterproofing is one of the least visible parts of the job and one of the most important to get right.

A proper membrane system has to work with the substrate, the adhesive, the tile format, the falls, and the sequencing of the trades. If one part is mismatched, the room might still finish neatly, but long-term performance starts to slip.

Cost is tied to complexity, not just area

A simple shower on straight walls is one thing. A shower with a niche, a hob, awkward penetrations, mixed substrates, and detailed stone work is another. The membrane itself is only part of the cost. The primary value is in proper preparation, detailing, cure management, and accountability if something goes wrong.

That's why cheap quotes can be misleading. The number on paper may exclude the patience required to do the work properly.

Compatibility matters more than people think

Large-format porcelain, mosaics, natural stone, sheet systems, liquid systems, adhesives, and substrates all interact differently. A good installer doesn't just ask what tile you like. They ask what the tile requires underneath.

  • Large-format tiles: These demand flatter surfaces and place a premium on accurate substrate preparation.
  • Mosaics on shower floors: They follow falls well but increase the number of grout joints and need careful drainage detailing.
  • Natural stone: This may need specific adhesive and sealing considerations depending on the stone and substrate.
  • Membrane-to-adhesive compatibility: The waterproofing product and tile adhesive have to be used as a system, not guessed at from separate brands and assumptions.

If that compatibility conversation never happens, that's a warning sign.

Maintenance protects the system you already paid for

Even the best shower waterproofing membrane doesn't mean the bathroom can be neglected. Surface maintenance won't replace the membrane, but it does reduce avoidable stress on the assembly.

A simple maintenance routine helps:

  • Check silicone joints: If movement joints are splitting or shrinking, deal with them early.
  • Watch drainage: If water lingers after a shower, don't ignore it.
  • Keep ventilation working: Bathrooms need moisture removed, not trapped.
  • Treat cracked grout as a signal: It may be minor movement, or it may be showing a bigger issue underneath.
  • Don't assume new means permanent: Wet areas age through use, cleaning, and movement.

According to Precision Business Insights' overview of the Australian waterproofing membranes market, high-quality waterproofing membranes typically last between 7 to 10 years under normal conditions, with industry guidelines recommending a refresh every 10 to 15 years to prevent water penetration.

That doesn't mean every bathroom suddenly fails at a set age. It means membranes are part of a working wet-area system, not a forever product you install once and stop thinking about.

Your Renovation Checklist Hiring the Right Professional

If you want a leak-free bathroom, don't start by asking what membrane brand someone uses. Start by asking how they run the whole job. Waterproofing succeeds when the builder, waterproofer, and tiler work in sequence and someone takes responsibility for the final outcome.

That's why bathroom renovations go better under registered builders who control the process instead of leaving each trade to protect itself.

Questions worth asking before work starts

Use this as a practical shortlist when you're interviewing contractors.

  • Are you a registered builder, or who is taking overall responsibility for the renovation? If no one owns the whole chain, defects get bounced between trades later.
  • How do you make sure the shower meets AS 3740 requirements on site? The answer should mention substrate, falls, wall extent, penetrations, and drainage details, not just “we waterproof everything”.
  • What membrane system are you using, and why does it suit this bathroom? A real answer connects the product to the substrate and layout.
  • How do you deal with niches, hobs, corners, and pipe penetrations? These are the places that reveal whether someone has a process or just confidence.
  • What is your curing process before tiling starts? If the answer sounds vague or too fast, keep digging.
  • How do you protect the membrane between application and tiling? Damage after waterproofing still counts as failed waterproofing.
  • What documentation do I receive at the end? This matters for compliance, future sale, and dispute protection.

What a good answer sounds like

A capable professional usually speaks in sequence. They talk about demolition, substrate condition, rectification if needed, falls, membrane application, cure management, inspection, then tiling. They don't jump straight to tile finish, grout colour, or how quickly they can start.

They also won't promise that waterproofing is easy. Good operators know wet areas are detail-heavy and don't like pretending otherwise.

The best contractor isn't the one who sounds the fastest. It's the one who can explain where showers fail and what they do to stop that happening.

One team is often safer than multiple disconnected trades

There's a reason many difficult bathrooms go wrong when owners split the job across separate people. One person strips the room, another sheets it, another waterproofs it, another tiles it. If a leak appears later, everyone says the defect started before they arrived.

A single accountable team reduces that problem. It doesn't eliminate the need for skill, but it does reduce the handover gaps where defects get buried.

If you're comparing local options, this list of tiling contractors near you in Melbourne is a useful place to begin your shortlist.

The final filter

Before you sign anything, ask yourself one plain question. Does this contractor talk about waterproofing like a hidden technical system, or like a quick prep step before the main work starts?

That answer tells you almost everything.


If you want a bathroom renovation team that understands shower waterproofing membrane systems from demolition through to final tiling, Melbourne Tiling Services P/L offers registered builder oversight, coordinated licensed trades, and practical wet-area experience across Melbourne and greater Victoria. For homeowners who want the job done once and done properly, they're worth speaking to early.

Marble Look Porcelain Tiles: A Melbourne Renovation Guide

You're probably in the same spot as a lot of Melbourne homeowners when they start bathroom renovations. You want the clean, high-end look of marble on the walls or floor, but you've also heard the stories about staining, etching, sealing, and the stress of keeping it looking good once the room is in use.

That's exactly where marble look porcelain tiles make sense. They give you the visual language of marble without forcing you into the maintenance routine that comes with natural stone. In Melbourne projects, that matters even more because bathrooms aren't showroom spaces. They're wet areas, used every day, and they need to perform properly under real conditions.

Table of Contents

The Marble Dream Without the Marble Drawbacks

A typical conversation starts the same way. The client has saved images of bright bathrooms with soft grey veining, full-height shower walls, and floors that feel more like stone slabs than tiles. Then the practical questions come in. Will it stain. Will it need sealing. Will it be hard to clean. What happens in a family bathroom that gets used hard every day.

That's where porcelain changed the market. Marble-look porcelain tiles have gained prominence in the Australian building sector since the early 2000s, aligning with the rise of high-end bathroom renovation specialists such as Melbourne Tiling Services P/L, which has operated since 2003 across residential and commercial projects, as noted in this Australian glazed porcelain tile market outlook.

The important point is that porcelain isn't a second-choice material anymore. In a good renovation, it's often the smarter specification from the start. You still get the marble aesthetic, but you're pairing it with a surface built for wet areas, heavy use, and straightforward cleaning.

A better fit for Melbourne homes

In older Melbourne homes, bathrooms often sit over timber floors, uneven substrates, or dated wet area construction. In newer homes and apartments, the challenge is different. Tighter tolerances, cleaner detailing, and larger tile formats mean there's less room for sloppy work.

Marble look porcelain tiles suit both situations because they can be specified to match the design intent without introducing unnecessary maintenance headaches.

Practical rule: If you love the look of marble but don't want to treat your bathroom like a museum piece, porcelain is usually the right call.

Why clients keep choosing it

A few reasons come up again and again:

  • Daily usability: You can clean it without the anxiety that comes with natural stone.
  • Design flexibility: You can use the same look across floors, walls, niches, and feature panels.
  • Consistent finish: Veining, tone, and sizing are more controlled than natural marble.
  • Better project balance: Budget can go into waterproofing, layout changes, joinery, or fittings instead of stone upkeep.

Porcelain vs Real Marble A Head to Head Comparison

Natural marble has presence. Nobody disputes that. But once you compare materials as a builder or tiler, the decision usually comes down to how the room will be used, how much maintenance the owner is willing to accept, and how much risk sits behind the finish.

A comparison chart outlining the key differences between marble look porcelain and natural marble tiles for home flooring.

What the material is actually doing

Porcelain wins on performance because of how it's made. Marble-look porcelain tiles are fired at 1200–1250°C, creating a density of more than 2.4 g/cm³ and a water absorption rate of less than 0.5%, according to this marble versus marble-look tile technical review. In practice, that means a denser, less porous surface that handles moisture and routine use far better in a bathroom.

Natural marble is different. It's stone, and stone varies. That variation is part of the appeal, but it also means the material can be softer, more reactive, and less forgiving when exposed to cleaners, cosmetics, water, and daily traffic.

Attribute Marble Look Porcelain Natural Marble
Durability Dense, hard-wearing manufactured tile for wet and high-traffic areas Softer stone that can scratch and etch more easily
Maintenance Low-maintenance surface with simple routine cleaning Needs more careful cleaning and ongoing sealing attention
Cost-effectiveness More predictable for bathroom renovations and day-to-day ownership Higher upkeep burden over time
Aesthetic versatility Consistent veining, wide format range, slab-look layouts Unique natural variation and stone character
Water behaviour Very low water absorption More porous and more dependent on sealing

A practical comparison usually comes down to these trade-offs:

  • Durability: Porcelain is built to take wear. That matters on floors, ensuite entries, and family bathrooms.
  • Maintenance: Marble needs more disciplined care. Porcelain is far less fussy in real households.
  • Appearance control: Porcelain lets you plan vein flow, tile size, and layout more precisely.
  • Wet-area suitability: Porcelain is the easier specification when the room has regular steam and splash exposure.

If you're still weighing materials, it helps to compare marble products and alternatives side by side with a supplier or installer who works across both. This marble tile range in Melbourne is one example of the type of reference point worth reviewing during selection.

Marble is beautiful. Porcelain is usually easier to live with.

Where marble still has a place

There are projects where real marble still makes sense. Powder rooms with lighter use. Feature walls away from direct water exposure. Homes where the client understands the maintenance and wants the stone for its natural variation above everything else.

But in bathrooms, especially the main bathroom or ensuite, I'd usually steer clients toward porcelain unless there's a very specific reason not to.

That's not because marble is inferior. It's because bathrooms punish materials. Steam, soaps, shampoo, body products, cleaning routines, and water left on surfaces all test the finish. Porcelain handles that environment with fewer compromises.

Choosing Your Perfect Tile Finishes Sizes and Formats

Specification matters more than commonly understood. Two marble look porcelain tiles can look similar in a showroom sample and perform very differently once they're installed on a floor, wrapped through a shower, or carried onto a feature wall.

A display of various marble look porcelain tile samples, including square tiles and a hexagonal mosaic pattern.

Start with finish before you look at colour

Most clients start with veining and colour. I'd start with finish.

A polished tile gives you a sharper, more reflective marble effect. It works well on walls and in bathrooms where you want light bounce and a dressier look. On floors, though, you need to think carefully about slip, maintenance of the surface appearance, and how the room is used.

A matt finish is usually the safer all-rounder. It feels more grounded, it hides water spotting better, and it suits floors very well. Lappato sits in the middle. It gives some movement and sheen without the full reflectivity of polished porcelain.

Here's the practical way to sort it:

  • For floors: Matt is usually the strongest choice.
  • For shower walls: Polished or lappato can work well if you want more visual lift.
  • For family bathrooms: Choose finishes that forgive water marks and daily wear.
  • For small ensuites: A lighter tile with a restrained vein pattern often keeps the space calmer.

Size changes the whole room

Tile size isn't only a design decision. It changes the feel of the room, the number of grout joints, the amount of pattern interruption, and the level of installation skill required.

Large-format tiles usually produce the cleanest marble effect because the veining reads across a bigger surface. The room feels less chopped up. On walls, that can make a bathroom feel more architectural and less busy. On floors, it can help a modest footprint feel broader.

For clients considering oversized panels or slab-style porcelain, this large-format tile installation guide is worth reviewing because the handling, preparation, and fixing methods are different from standard tiling.

Rectified edges make a visible difference

Rectified porcelain is one of the details that separates an average job from a refined one. Rectified marble-look porcelain tiles in Australia are manufactured to an edge precision of ±0.3mm under AS/NZS 4402, allowing minimal 2mm grout joints, which is what gives that cleaner slab-like look in Melbourne conditions, as described in this rectified porcelain tile specification.

That matters because wide, uneven grout joints can kill the marble effect. If you're paying for a premium-looking tile, you want the installation to support that look, not interrupt it.

A good selection process usually comes down to three questions:

  1. Where is the tile going
    Floors, walls, niches, vanity splashbacks, and shower interiors all have different demands.

  2. How quiet or bold should the room feel
    Some marble patterns are soft and cloudy. Others are high-contrast and dramatic.

  3. Do you want tile or slab visual language
    If the goal is a more monolithic finish, larger formats and rectified edges matter.

The sample board doesn't tell the whole story. Ask to see how the tile looks over a larger area and how the grout joint will actually present.

Designing Your Melbourne Bathroom with Marble Look Porcelain

The biggest strength of marble look porcelain tiles is that they can carry the whole room. You don't need layers of competing finishes if the tile itself has enough movement and scale.

A modern luxury bathroom featuring marble look porcelain tiles, a sleek double vanity, and a freestanding soaking tub.

Using the tile as the main design element

One approach I like in Melbourne bathroom renovations is to let the tile set the tone, then keep everything else disciplined. A soft white marble-look porcelain with controlled grey veining can run from floor to shower wall to niche, while the joinery, tapware, and screen stay understated.

That's especially effective in ensuites where space is limited. Fewer material changes usually mean a calmer room. If the tile has enough scale, you don't need extra tricks.

A few layouts consistently work well:

  • Full-height shower wall: This creates an obvious focal point without adding clutter.
  • Floor-to-wall continuation: Using the same series ties the room together and reduces visual breaks.
  • Feature vanity wall: A stronger vein pattern can sit behind the mirror and basin area.
  • Indoor-outdoor continuity: On some projects, porcelain can help connect an adjoining balcony or similar exterior threshold if the specification is right for both zones.

Layouts that work in real bathrooms

The best designs are usually the ones that offer subtle solutions to problems. In a narrow bathroom, running larger marble look porcelain tiles with a clean joint pattern can reduce visual chopping. In a darker room, a lighter base colour helps bounce light without relying on glossy everything.

Bookmatching is another option people ask about. It can look excellent when done properly, especially on larger wall installations where opposing vein patterns create a symmetrical statement. But it only works if the tile series supports it and the installer plans the set-out carefully before fixing starts.

This video gives a useful visual reference for the kind of finish many clients are aiming for in modern bathrooms.

What doesn't work is forcing a dramatic tile into every surface and then adding busy tapware, patterned joinery, and strong feature lighting on top. The room starts fighting itself.

In a good bathroom, the tile should lead. The other finishes should support it.

For period homes in Melbourne, marble look porcelain can also bridge old and new nicely. You keep a classic material language, but the finish and installation feel sharper and more current. That balance is often what makes a renovation feel expensive without becoming overdone.

Installation Essentials Waterproofing and Best Practices

A premium tile won't rescue a poor build-up. If the substrate is out, the falls are wrong, or the waterproofing is incomplete, the room will fail long before the tile wears out.

That's why the installation side matters as much as the tile selection. In bathroom renovations, the visible finish gets the attention, but the hidden work determines whether the bathroom stays sound.

The substrate decides the result

Every tiled bathroom starts with the base. Floors need to be level where they should be level, and graded where they need falls. Walls need to be straight enough to take the format you've chosen. If they aren't, large-format porcelain will expose every defect.

The critical layers usually include:

  • Demolition and inspection: Existing movement, moisture damage, and framing issues need to be identified early.
  • Preparation: That might mean screeding, patching, or self-levelling depending on the substrate.
  • Waterproofing: Wet areas must be treated as wet areas, not as a paint-on afterthought.
  • Tile setting: Adhesive choice, coverage, and lippage control all matter more with larger formats.

For anyone assessing the wet-area side of a project, this Melbourne waterproofing page is a useful reference point because compliant waterproofing is essential in bathrooms.

Large format tiles raise the standard

Large marble look porcelain tiles demand cleaner work than smaller formats. There's less forgiveness in the set-out, less room to hide an uneven wall, and more risk if the substrate prep is rushed.

That doesn't mean they're difficult for the sake of it. It means the installer has to control more variables:

  1. Set-out planning
    Vein direction, joint alignment, fixture locations, and cuts around niches or tapware need to be planned before the first tile is fixed.

  2. Handling and support
    Bigger porcelain pieces need proper handling to avoid edge damage and improper bedding.

  3. Adhesive coverage
    Voids behind large tiles are asking for trouble, especially in wet areas.

  4. Movement accommodation
    Bathrooms still move. Different materials expand and contract, and that has to be accounted for.

A lot of avoidable problems start when clients spend carefully on the tile and then treat installation like a commodity. That's the wrong order of priority.

Site advice: The more refined the finish you want, the less tolerance there is for average preparation.

The same applies to shower bases, niches, hobs, and junctions with frameless screens. These are not decorative details. They are failure points if they're badly built. In a proper bathroom renovation, waterproofing, falls, tile layout, and trim decisions all need to work together.

Budgeting Your Project Costs and Maintenance in Melbourne

Clients usually ask the wrong first question. They ask what the tile costs per square metre. That matters, but it's only one part of the budget.

In bathroom renovations, the bigger financial picture includes demolition, preparation, waterproofing, tiling labour, trims, fixtures, screens, plumbing, electrical, and whatever rectification work is needed once the old room is opened up.

What to allow for at the start

As a baseline, tile flooring installation in Australia averages $72 per square metre, and that benchmark applies directly to marble-look porcelain tiles used in residential renovations, according to this Australian tile flooring cost guide. That gives you a starting point for labour, but it doesn't represent the whole bathroom renovation cost on its own.

A bathroom budget usually shifts based on practical factors such as:

  • Tile format: Larger tiles often require more exact preparation and handling.
  • Existing condition: Rotten substrates, movement, and old water damage increase the scope.
  • Layout complexity: Niches, herringbone inserts, mitred edges, and feature walls all affect labour.
  • Access: Tight stair access, apartment rules, and parking can change site logistics.
  • Coordination of trades: Plumbing and electrical changes often drive cost more than tile supply.

For homeowners, the useful mindset is this. Don't compare a bathroom renovation to a simple floor tiling rate. They're different scopes.

Where porcelain saves money later

The strongest value case for marble look porcelain usually shows up after handover, not before. Natural marble often asks for ongoing care, cautious cleaning, and intervention if the finish starts reacting to moisture or products.

Porcelain is easier to own because routine maintenance is simpler and the material is less temperamental in wet areas. That gives you more confidence using the room normally, especially in a main bathroom or busy ensuite.

A smart budget doesn't only chase the lowest install number. It protects the build-up, allows for proper waterproofing, and chooses materials that won't become expensive to babysit.

If you're trying to make the budget work, I'd usually suggest preserving money for the things that are hard to change later. Waterproofing, substrate preparation, drainage, tile layout, and clean installation all matter more than squeezing every last dollar out of the tile selection.

Why Your Tiler Should Be a Registered Builder in Melbourne

You choose marble look porcelain because you want a premium finish without the upkeep. Fair enough. But in Melbourne bathrooms, the finish is only half the job. If the substrate moves, the falls are wrong, the waterproofing is patchy, or the trades are out of sequence, even excellent tiles end up on a failed build.

That is why I recommend a registered builder for full bathroom renovations, especially where wet-area construction, multiple trades, and high-end materials are involved. A registered builder is responsible for the entire project: demolition, repairs, waterproofing, trade sequencing, compliance, and final fit-off. That changes the outcome.

A bathroom renovation is a build, not a tile supply and install package

Premium porcelain performs well in wet areas and is easier to live with than real marble. As noted earlier, porcelain has very low water absorption, generally less than 0.5%, and it does not need the polishing and resealing that often come with natural stone. In Victoria's climate, that usually means lower maintenance spend over the life of the bathroom and fewer material-related headaches in busy family homes.

But material savings only hold if the room is built properly.

Screenshot from https://melbournetilingservices.com.au

The failures I see are rarely about the tile itself. They come from movement in the substrate, poor set-out, rushed waterproofing, bad drainage, and weak coordination between plumbing, electrical, carpentry, and tiling. Large-format marble look porcelain makes that even less forgiving because the layout has to be right, the surfaces have to be flat, and the edges and junctions need careful planning before the first tile goes down.

A registered builder handles those moving parts as one job instead of leaving the owner to manage separate trades and hope the details line up. That matters in Melbourne renovations, where older homes often hide out-of-level floors, damaged framing, legacy moisture issues, and wall surfaces that need correction before waterproofing starts.

One Melbourne option for that type of builder-led delivery is Melbourne Tiling Services P/L, which handles bathroom renovations, tiling, waterproofing, and trade coordination as a registered builder.

If your project includes wet-area construction, premium finishes, and more than one trade, treat it like a building job from day one.

Certificate III in Construction Waterproofing: A 2026 Guide

You're probably in one of two spots right now. Either you're planning a bathroom renovation and trying to work out who can waterproof it properly, or you're looking at the trade itself and wondering whether the Certificate III in Construction Waterproofing is enough to get you on site and working legally.

That confusion matters because waterproofing isn't decorative work. When it fails, the damage sits behind tiles, under screeds, around shower bases, inside timber frames, and beneath finishes that looked perfect on handover day. Registered builders see the same pattern over and over in failed bathroom renovations. The tiling might look straight, the tapware might be expensive, and the shower screen might be premium, but if the waterproofing was handled by someone without the right training or licensing, the whole job is vulnerable.

The important point is simple. The Certificate III in Construction Waterproofing is the trade foundation, not the whole legal pathway in Victoria. That distinction catches out new tradespeople and homeowners alike.

Table of Contents

Why Your Bathroom Renovation Depends on One Qualification

The bathroom looks finished on Friday. By winter, paint is bubbling on the hallway side of the wall, the skirting has swollen, and the owner is arguing with the tiler, plumber, and builder about who is responsible.

I see this pattern regularly. The failure usually starts long before the first cracked grout line or water stain appears. It starts behind the tiles, where poor preparation, bad detailing, or the wrong membrane application gets buried and signed off as if the job were sound.

That is why the Certificate III in Construction Waterproofing matters on bathroom renovations. It is the trade qualification that shows the installer has been trained to carry out waterproofing work as a building system, with sequence, substrate preparation, junction treatment, compatibility, curing, and compliance all handled properly. Homeowners often focus on the finish they can see. Builders focus on the work that can fail after handover.

The gap between a qualified waterproofer and a person who has only applied waterproofing products previously is wide. In a bathroom, small errors cause expensive failures. A poorly treated wall to floor junction, an untreated penetration, or a rushed flood-test sequence can leave water tracking into framing, sheeting, insulation, and adjoining rooms. By the time that damage is visible, the repair usually means demolition.

That same distinction is often misunderstood in Victoria. Holding the Certificate III is not the same as holding a contractor licence or registration to take on waterproofing work in your own right. The qualification shows trade competence. The legal right to contract, advertise, and carry responsibility for the work depends on the licensing and registration framework that applies to the job and the person performing it. For tradespeople, that affects the path into the industry. For homeowners, it affects who should be hired and who carries accountability if the work fails.

Wet areas do not forgive shortcuts.

For people entering the trade, this qualification marks the point where waterproofing stops being treated as a side task and starts being treated as specialist construction work. For clients, it is one of the clearest signs that the person doing the job understands what is at stake before the bathroom is closed up and the evidence disappears.

What the Certificate III in Construction Waterproofing Covers

A proper waterproofing qualification teaches a trade process, not a product demonstration. That distinction matters on site. The person applying the system has to understand the build-up under the tiles, the sequence of other trades, and the standards that govern how wet areas are prepared and treated.

A diagram outlining the key components of the Certificate III in Construction Waterproofing, including core units, electives, and safety.

What the qualification structure tells you

The Certificate III is built as a trade qualification with core units and electives. In practice, that means the training is meant to produce someone who can work across common waterproofing situations, not someone who has only seen one membrane brand or one bathroom detail in a classroom.

For tradespeople, that broad scope matters because waterproofing failures rarely come from one dramatic mistake. They usually come from several smaller ones. The falls were never checked. The substrate was still too wet. The bond breaker was skipped at a movement point. The membrane was applied before penetrations were properly detailed. Training needs to cover the full chain, because failures happen across the full chain.
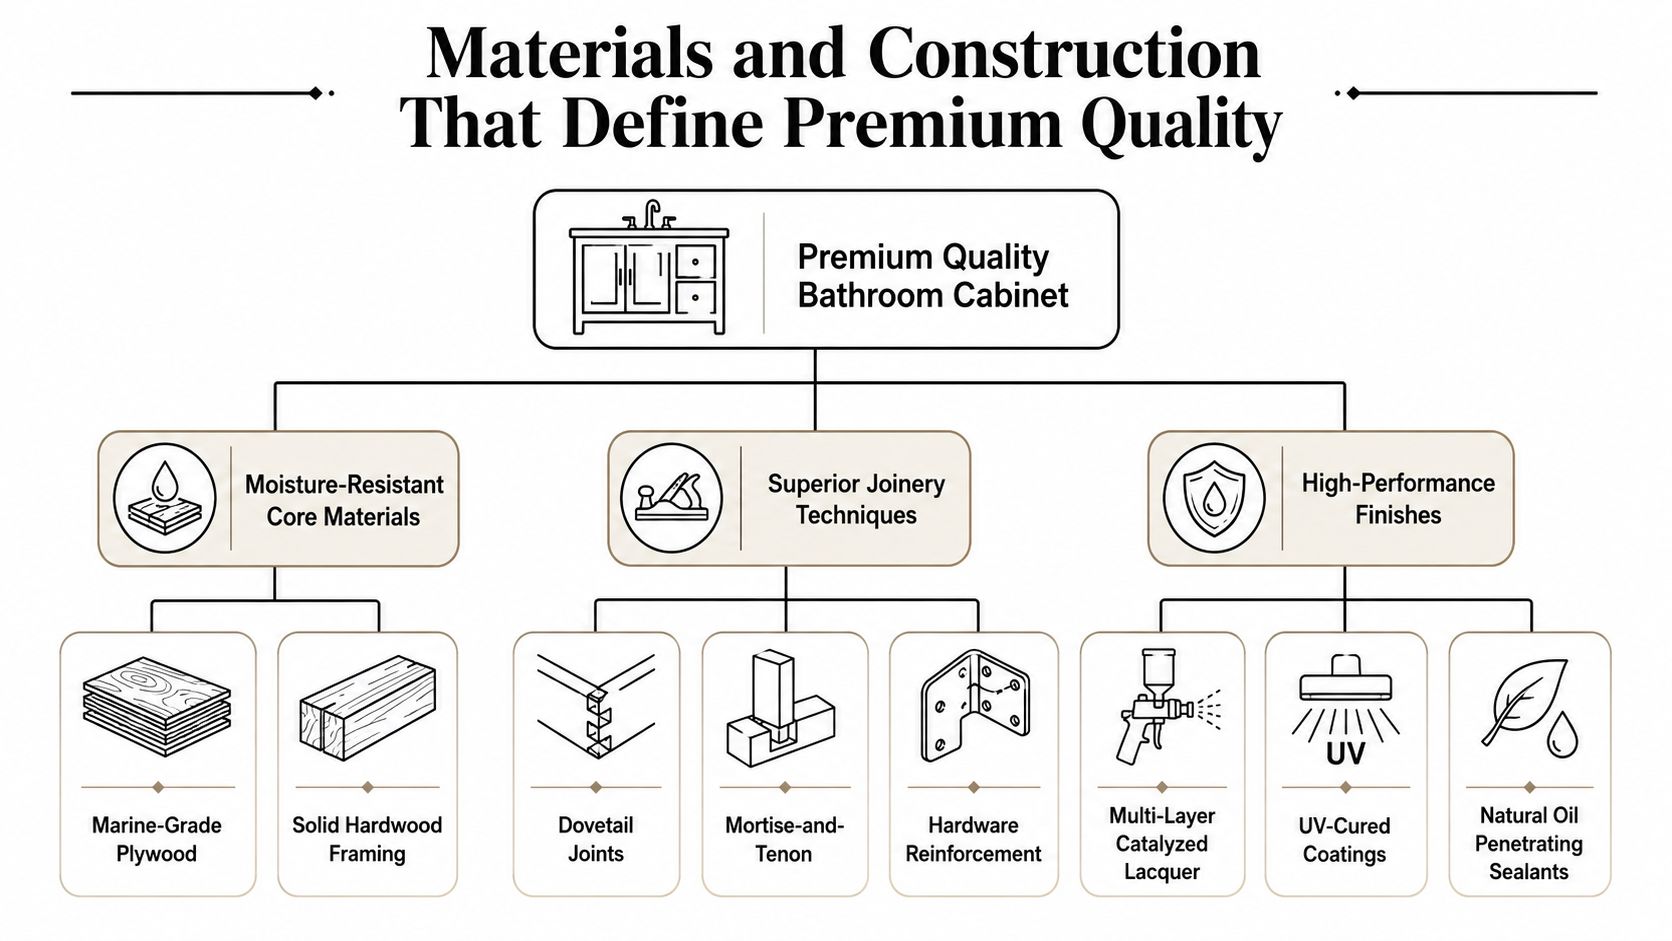
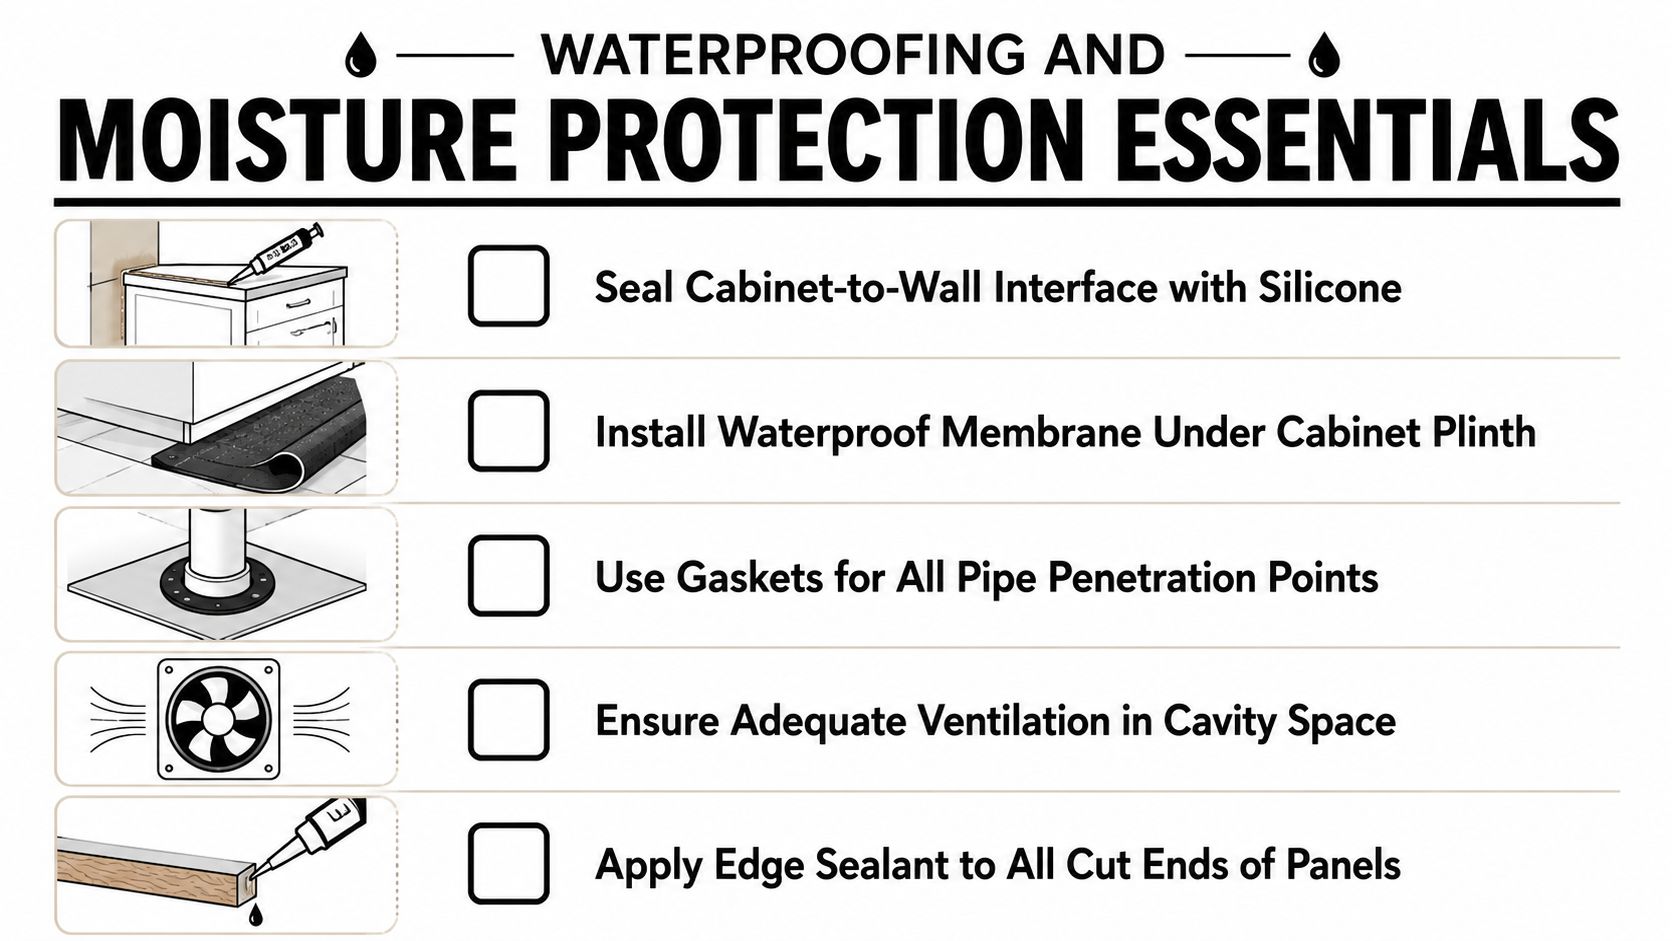
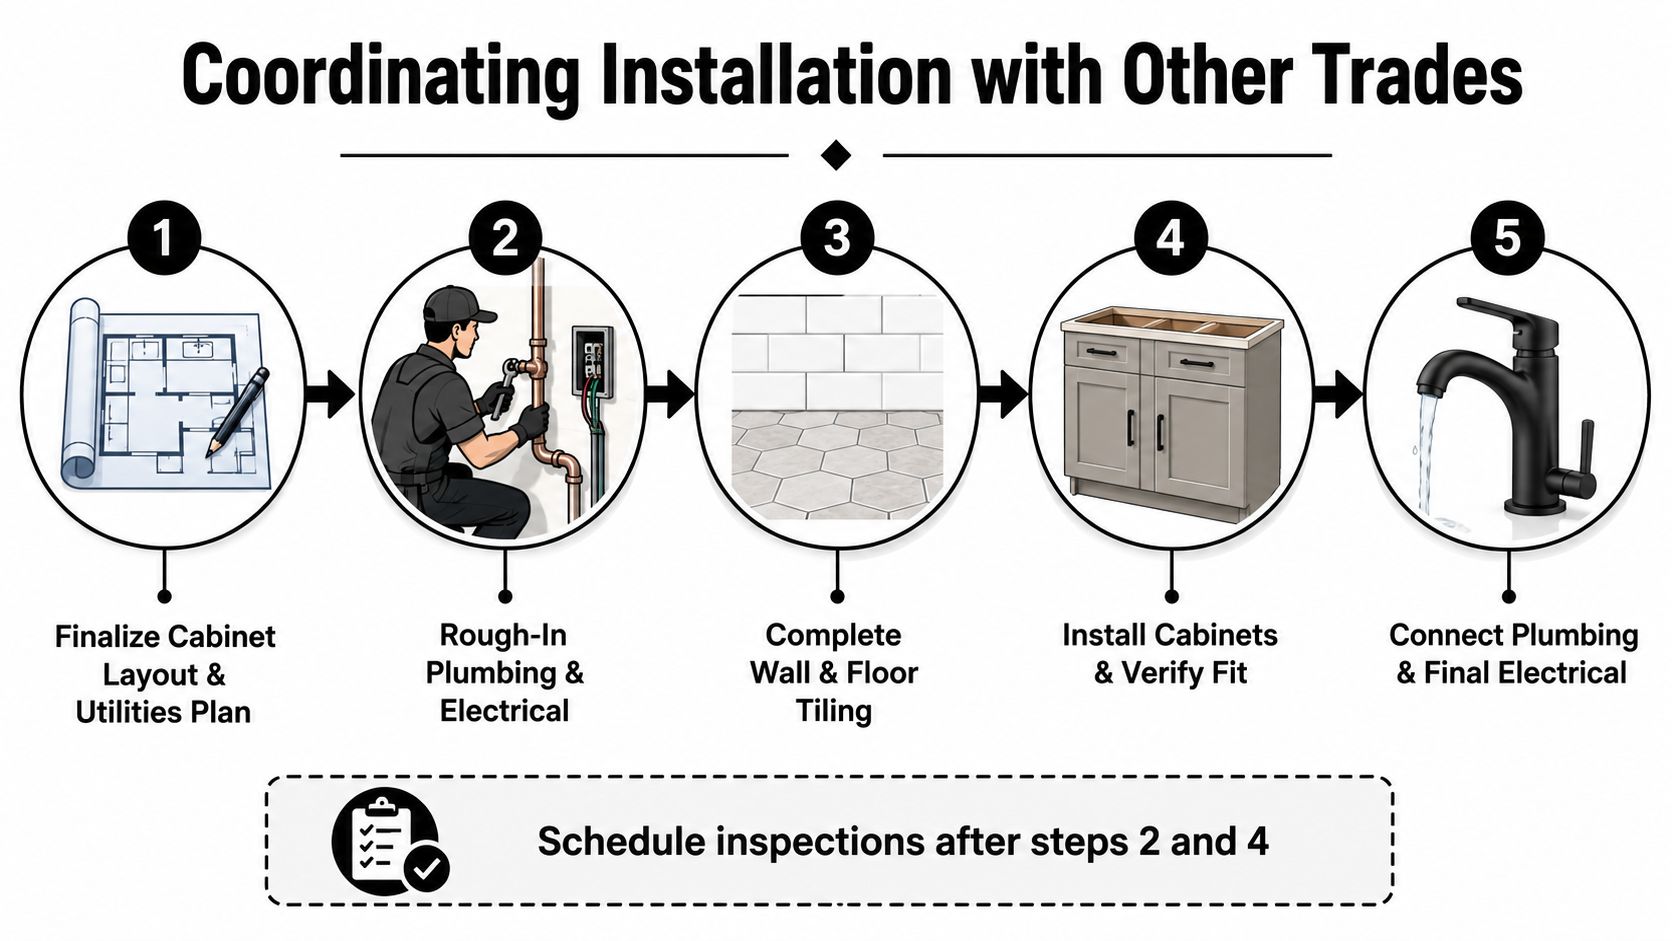
For homeowners and builders, the takeaway is straightforward. A person who has completed the qualification should be able to explain the whole waterproofing sequence from inspection to final application, including why each step affects compliance and durability.

What competent training should develop

Good training builds judgment as much as technique. It should develop capability in areas such as:

Area Why it matters in practice
Plan reading The installer needs to identify set-downs, wet-area extents, junction details, penetrations, and drainage intent before work starts.
Surface preparation Membranes fail early on dusty, unstable, contaminated, or damp substrates. Prep work decides whether the system bonds properly.
Material handling Primers, sheet systems, liquid membranes, bond breakers, and sealants all have different limits, curing times, and application methods.
Assessment skills The waterproofer has to judge whether the area is ready, whether previous trade work is acceptable, and whether the specified system suits the conditions.

The strongest operators are the ones who can stop a job before it goes wrong.

That might mean rejecting a substrate, sending a plumber back to fix penetrations, or delaying application because moisture levels and curing times are not right. Anyone can open a bucket. A trained waterproofer is expected to know when not to.

This is also where people often get confused in Victoria. The Certificate III shows that a worker has been trained in the trade. It does not automatically mean that person can contract directly with clients as a licensed waterproofing contractor. That licensing and registration question sits beyond the qualification itself, and it matters just as much as the training when work is being priced, signed off, and warranted.

For anyone comparing course content with real site work, a step-by-step guide to waterproofing a shower properly helps show how many separate decisions sit behind what looks like one simple trade task. That is the gap the Certificate III is supposed to address. It trains the work, not just the coating.

The Practical Skills of a Certified Waterproofer

A trained waterproofer protects the parts of the bathroom renovation that nobody wants to reopen later. That means the work has to be accurate before tiles, stone, screed, grout, and fixtures cover everything up.

A construction worker in a safety helmet applying waterproof membrane to a concrete surface on site.

The difference between a certified waterproofer and a general handyman usually comes down to detail. A tradesperson with proper training understands that a membrane system only works when the substrate, junction treatment, penetrations, curing sequence, and drainage intent are all handled properly. Miss one of those and the rest of the job can still fail.

Membrane thickness is not guesswork

One of the clearest examples is membrane coverage. The Certificate III in Construction Waterproofing mandates competence in applying liquid-applied membranes to achieve a minimum wet-out thickness of 1.5mm for shower bases and 1.0mm for vertical walls, as specified in AS 3740:2021, according to this training overview on Certificate III waterproofing requirements.

That matters because membrane thickness isn't cosmetic. Too thin, and the system can't perform as intended. Too inconsistent, and weak points appear where movement, ponding, or ongoing moisture exposure will test the installation.

On site, the better operators don't rush this stage. They inspect the substrate, check corners and junctions, allow for bond breakers where needed, and apply the system evenly instead of chasing speed.

If you want a practical look at the process in a shower area, this guide to how to waterproof a shower properly is useful because it shows the sequence matters as much as the product.

Falls, trays, and substrate preparation decide whether the job lasts

A compliant waterproofed bathroom also relies on drainage. Water must move to the waste, not sit in corners, puddle under tile finishes, or linger at doorway transitions. The same verified training source notes that trained practitioners must be competent in installing pre-formed shower trays with a minimum 1:100 slope to the waste.

That requirement goes straight to one of the most common practical failures in bathroom renovations. People focus on the membrane and ignore the fall. But waterproofing over a bad surface profile doesn't fix drainage. It just seals in a defect.

A certified waterproofer should be able to judge whether the area is ready to waterproof. That includes:

  • Substrate soundness: Cracked, unstable, contaminated, or damp surfaces need attention before any membrane goes down.
  • Correct falls: Water must move to the waste consistently, especially in shower bases and wet floors.
  • Trade coordination: Plumbing penetrations, carpentry details, and screed levels have to align before the membrane system is installed.

If the substrate is wrong, the membrane is being asked to rescue a problem it wasn't designed to solve.

That's the practical value of the qualification. It doesn't just certify that someone has seen waterproofing done. It certifies that they've been trained to recognise the conditions that make waterproofing succeed or fail.

From Certificate to Licensed Contractor in Victoria

This is the part that causes the most confusion in the trade. Many people finish the course and assume they're now a licensed waterproofer. In Victoria, that's not how it works.

A four-step infographic illustrating the pathway to becoming a licensed construction contractor in Victoria, Australia.

The qualification and the licence are not the same thing

The key distinction is legal, not academic. Completing the Certificate III does not grant a licence in Victoria. As explained in this Victorian guide to hiring a licensed waterproofer, an aspiring waterproofer must separately apply to the VBA and provide evidence of competency and insurance.

That same source also states that any bathroom waterproofing job valued over $5,000 in labour and materials, including GST, requires the waterproofer to hold a specific contractor licence in Victoria, and owner-builders are prohibited from performing their own wet area waterproofing work even if they hold an owner-builder permit.

This catches out two groups all the time:

  1. New tradespeople who think the certificate is the final box to tick.
  2. Homeowners who assume that a person saying they're “qualified” must also be legally licensed to contract for the work.

They're not the same thing. Qualification shows formal trade training. Licensing is the separate legal approval to contract for regulated work.

What this means on real projects

For homeowners, the risk is obvious. You can hire someone who has done some training, speaks confidently, and prices the job attractively, but still isn't properly licensed for the work they're taking on. If the job value crosses the legal threshold, that matters immediately.

For registered builders, the distinction matters for procurement and liability. A bathroom renovation doesn't run in isolation. Waterproofers work in sequence with plumbers, carpenters, screeders, tilers, and shower screen installers. If the waterproofer's status isn't verified properly, the risk doesn't stay with that trade alone. It spreads through the whole project.

A compliance document also becomes part of the discussion. Homeowners regularly ask what proof they should expect after completion, and that's where understanding the waterproofing compliance certificate requirements in Victoria helps frame the conversation.

A certificate from a training provider proves education. A contractor licence proves legal authority to take on regulated work.

A practical pathway for new tradespeople

If you're entering the trade in Victoria, the sensible way to think about the process is:

  • First, get the qualification. The Certificate III is the trade base and the prerequisite discussed in the verified material for contractor licensing pathways.
  • Then build evidence of real competence. You need to be able to demonstrate that you can perform the work properly, not just pass coursework.
  • Arrange the required insurance and complete the VBA application. This is the step many overlook, even though it's where legal contracting capacity is determined.
  • Only contract within the rules once licensed. Taking on work beyond what you're authorised to do is where minor confusion turns into major exposure.

There's also a broader interstate lesson here. The verified training details note that in NSW, applicants for a waterproofing licence must have at least two years of practical on-the-job experience under supervision, alongside the Certificate III qualification, as outlined in the training details for CPC31411. The details differ by state, but the pattern is the same. Training alone isn't always the whole legal pathway.

That's why smart operators don't stop at “I've done the course.” They ask the harder questions. Can I legally contract for the work? Can I prove competence? Do I have the insurance and paperwork to back up what I'm offering clients? Those are the questions that separate someone preparing for a long-term trade career from someone drifting into avoidable trouble.

Your Career Path and Earning Potential as a Waterproofer

For people considering the trade, waterproofing offers something many construction roles don't. It's specialised, regulated, and directly tied to project risk. That combination usually gives qualified operators a stronger position than general labour roles.

A professional construction worker wearing a white hard hat stands confidently on a flat residential roof.

Why the trade pays well

In Victoria, that value shows up clearly in pay. Licensed waterproofers holding the qualification command average annual salaries between $75,000 and $85,000, with experienced professionals earning up to $110,000 and licensed contractors potentially reaching $90,000–$120,000 per annum, according to this Australian waterproofer salary overview.

The same source ties that pay level to the mandatory licensing environment and notes a median bathroom renovation cost in Melbourne of approximately $10,000, which reflects the importance clients place on compliant and durable wet-area work. It also states that construction industry employment is projected to grow by 137,900 workers, or 13.0%, over a five-year period.

Those numbers make sense from a builder's point of view. Waterproofing defects are expensive, disruptive, and often discovered after multiple downstream trades have finished. When one trade can prevent that kind of exposure, builders and clients pay attention.

Where the career can lead

The career path usually develops in layers rather than leaps.

  • Newly qualified worker: You start by applying what you learned under supervision and building consistency on site.
  • Trusted specialist: With experience, you become the person builders want on wet areas that need reliable execution, not rework.
  • Licensed contractor: Once you've completed the legal pathway, you can contract for the work in your own right within the Victorian framework.
  • Broader site role: Some waterproofers move into supervision, coordination, or specialist subcontracting roles with registered builders on larger projects.

That progression rewards precision. Builders remember the waterproofers who arrive prepared, reject poor substrates, sequence work correctly, and leave clear records. They also remember the ones who say “she'll be right” and create defects that others have to uncover and repair.

The trade pays better when people trust your judgement, not just your labour.

For someone choosing between a general construction path and a specialist one, that's the primary appeal of Certificate III in Construction Waterproofing. It creates a route into a trade where proper training has visible market value.

How to Choose a Reputable Training Provider in Melbourne

Not all training experiences prepare people equally well for site work. The qualification code may be the same, but the standard of delivery can vary sharply. If you're choosing a provider in Melbourne, cost alone is a poor filter.

What to check before you enrol

A strong provider should give you more than classroom exposure. It should train you to recognise site conditions, work through wet-area details, and handle practical application with discipline.

Use this checklist when comparing options:

  • Hands-on training: Ask how much of the course involves practical application work, not just theory, slides, or product talk.
  • Wet-area realism: Find out whether students work through bathroom-style details such as junctions, penetrations, corners, shower bases, and wall-floor transitions.
  • Trainer background: You want instructors who understand site sequencing, defects, and remedial issues, not just course administration.
  • Assessment quality: Ask how practical competence is assessed. A trade like this needs observation of technique, not just written answers.
  • Industry relevance: Providers with stronger links to local construction work usually have a better feel for what builders and contractors expect in practice.

A decent provider should also answer direct questions plainly. If they can't explain the gap between qualification and licensing in Victoria, that's a warning sign.

What homeowners and builders should look for in a contractor

Even if you're not enrolling in the course yourself, this still matters. Homeowners and registered builders can use the same logic when checking a contractor's background.

Look for someone who can clearly explain:

  • How they prepare substrates before waterproofing
  • How they manage falls, drainage, and penetrations
  • What evidence supports their qualification and licence status
  • How their waterproofing work fits into the wider bathroom renovation sequence

The best contractors don't get defensive when you ask technical questions. They answer them clearly, because they understand the trade and they know those details protect the project.

The Foundation of Every Successful Building Project

The Certificate III in Construction Waterproofing matters because waterproofing is one of the few trades that can make an otherwise beautiful project fail from underneath. In bathroom renovations especially, the risk sits behind the finishes, which means errors stay hidden until the damage is already spreading.

For tradespeople, the qualification is the proper entry point into a specialised trade. For homeowners and registered builders, it's the first sign that the person doing the work has been trained to handle more than a bucket of membrane and a roller. In Victoria, the bigger lesson is even more important. A qualification is not the same as a contractor licence. Anyone hiring for regulated wet-area work needs to understand that difference before the job starts.

If you're checking standards, comparing contractors, or planning leak prevention in a renovation, it helps to understand how professional waterproofing in Melbourne should be approached from both a compliance and workmanship point of view.

Done properly, waterproofing protects the whole build. Done poorly, it drags the whole build backwards.


If you're planning a bathroom renovation, leak rectification, or compliant wet-area waterproofing in Victoria, Melbourne Tiling Services P/L can help with high-end bathroom and ensuite renovations, tiling, waterproofing, and coordinated trade delivery by experienced registered builders.

Melbourne Tile Crack Repair Epoxy: Your 2026 Guide

You've probably got one cracked tile staring at you every time you walk into the bathroom. It might be a fine hairline on a wall tile, a chip on the edge of a floor tile, or a crack across a shower tile that you're hoping can be fixed without tearing the room apart.

That's where tile crack repair epoxy can help, but only in the right situation. In Melbourne bathrooms, the repair itself is rarely the hard part. The primary issue is working out whether the crack is cosmetic or whether it points to movement, a hollow tile, or a waterproofing problem that turns a small repair into a bathroom renovation issue. In Victoria, that distinction matters because wet area work has to line up with building standards, and some repairs absolutely need registered builders involved.

Table of Contents

First Things First Is Epoxy the Right Fix for Your Tile

You notice a fine crack in one bathroom tile after a cold Melbourne morning. The tile still feels firm, the grout looks intact, and the damage seems minor. In that situation, epoxy can be a reasonable repair. In plenty of others, it just hides a bigger problem for a few months.

That distinction matters more in Victoria than a lot of overseas guides admit. A cosmetic repair on a dry wall tile is one thing. A repair on a shower floor, hob, niche, or wall junction can interfere with a wet area system that has to perform as a whole under AS 3740 waterproofing requirements. If the crack points to movement, water entry, or membrane failure, a tube of epoxy is not the answer.

An infographic titled Is Epoxy Right for Your Tile outlining when to use and avoid epoxy for repairs.

What epoxy is good at

Epoxy suits small, localised damage where the tile is still properly bonded and the repair is only there to improve the appearance.

Use it when the problem looks like this:

  • Hairline crack only: The crack is on the surface and the tile does not move under hand pressure or foot traffic.
  • Single isolated tile: Nearby tiles and grout joints are stable, with no pattern of cracking across the area.
  • Low-risk location: Splashbacks, laundry walls, powder room walls, and other dry or low-exposure areas are better candidates.
  • Minor chip or edge damage: Epoxy can rebuild a small corner or glaze chip if the tile body is otherwise sound.

I tell homeowners to keep the test simple. If the tile is solid, the crack is small, and nothing around it is shifting, epoxy may be worth the effort.

What makes epoxy the wrong fix

A visible crack is only the symptom. The important question is what caused it.

Tap the tile lightly with something hard. Press on the edges. Look at the grout lines around it. If the tile sounds hollow, rocks slightly, or the grout has opened up, the issue is usually below the surface. That could be poor coverage, substrate movement, moisture-related swelling, or a failed bond.

Here's the quick check I use on site:

Check Good sign Bad sign
Sound test Solid, hard tap Hollow or drummy sound
Movement No flex or rocking Tile shifts or clicks
Crack depth Surface line only Full-depth break through tile body
Location Dry wall or low-risk area Shower floor, balcony, wet wall junction
Pattern One tile only Multiple cracked tiles nearby

A hollow tile changes the decision straight away. In my experience across Melbourne homes, epoxy repairs rarely last when the crack runs through the full tile body or the tile has lost support underneath. The filler might hold its colour for a while, but the crack usually prints back through or the tile breaks further.

The Melbourne and Victorian standards angle homeowners need to know

This is the part generic repair articles usually miss.

In a Victorian bathroom, the tile is not the waterproof layer. The membrane below is. If a cracked tile in a wet area happened because the substrate moved, water got in, or the assembly was built poorly, patching the tile face does not restore the waterproofing system. It can also make the problem harder to diagnose later.

DIY epoxy repair is generally acceptable on a dry area tile, or on a wet area tile only where you are certain the damage is superficial and the waterproofing has not been affected. If you have cracking on a shower floor, at wall to floor junctions, around a puddling flange, or across several tiles, get a registered builder involved before doing cosmetic patching. That is where compliance, rectification scope, and water damage risk start to matter.

If you want a feel for the sort of gear and site checks professionals rely on before making that call, have a look at these tiling tools used by professional tilers.

A neat epoxy repair has its place. It is just not a substitute for replacing loose tiles, fixing substrate movement, or rectifying failed waterproofing.

Gathering Your Materials and Tools for a Pro Finish

Good epoxy repairs start before you open the tube. The right kit keeps the repair clean, keeps the colour tighter, and stops you making a small crack look worse.

An overhead view of a home improvement kit featuring tile repair epoxy, blue painter's tape, and tools.

The Essential Repair Kit

Here's what I'd have beside me before starting:

  • Two-part epoxy repair product: Use a tile repair epoxy or epoxy putty suited to ceramic or porcelain. Grout is for joints, not crack repair.
  • Sharp utility blade or razor blade: For trimming loose edges, cleaning out the crack, and squaring chipped sections so the filler sits properly.
  • Painter's tape: Helps keep the repair line neat and limits smearing on the tile face.
  • Plastic spreader or flexible filling knife: Better control than a stiff, cheap scraper, especially on glazed tiles.
  • Microfibre cloths: One for cleaning, one for final wipe-down. Dirty rags just move residue around.
  • Fine sandpaper: Keep a couple of grades on hand so you can flatten the patch, then refine the finish.
  • Gloves and ventilation: Epoxy on skin is avoidable. So is breathing it in inside a closed bathroom.
  • Degreaser or suitable cleaner: Soap film, body oils, silicone haze, and cleaning residue all interfere with bond strength.

If you want to see the sort of gear tilers use day to day, this guide to professional tiling tools used on site gives you a practical reference.

Wet area materials need more care

A crack on a laundry splashback is one job. A crack inside a shower recess is another.

For bathroom repairs, use a water-resistant epoxy that the manufacturer says is suitable for wet areas. Generic decorative fillers are a poor choice anywhere that sees regular water, steam, or cleaning chemicals. In Melbourne bathrooms, that matters even more in older homes where movement, poor ventilation, and previous patch jobs are common.

The cleaning stage matters just as much as the product. In my experience, failed DIY epoxy repairs usually come back to one of three things. The tile was not properly degreased, there was still silicone contamination near the crack, or the repair was sanded before it had cured through. Any of those will weaken the bond and leave a repair that looks fine for a week, then starts telegraphing through.

Read the label for cure times and working times, then follow that product, not the guesswork. Some epoxy putties are ready for light sanding after a few hours in mild conditions. Others need longer, especially in a cool Melbourne bathroom in winter. If the patch is still a bit green underneath, sanding will drag it, mark the glaze around it, and spoil the finish.

One more practical point. If the cracked tile sits in a shower, around a bath, or near a wall-floor junction, keep the repair strictly cosmetic unless you are certain the waterproofing system below has not been affected. Once there is any doubt about membrane integrity or substrate movement, that stops being a tiling touch-up and starts falling into rectification work that should be assessed by a registered builder under Victorian requirements.

Your Step-by-Step Guide to Applying Tile Epoxy

A tile repair usually goes wrong in the first ten minutes, not the last ten. The crack is still damp, the surface still has soap residue on it, or the filler gets wiped over the top instead of worked into the break.

A four-step instructional infographic guide showing how to repair cracked floor tiles using epoxy solution.

Phase one preparation

Start by checking whether the tile is a good candidate for epoxy at all. A fine crack in a dry wall tile is one thing. A cracked floor tile that sounds hollow, moves underfoot, or sits inside a shower recess can point to substrate movement or waterproofing trouble underneath. In Victoria, epoxy is only a cosmetic repair if the membrane and substrate are still sound.

Clean the tile face and the crack thoroughly. Remove dust, soap film, oils, old sealer, and any loose grit. If the crack is in a bathroom, let it dry properly before you do anything else. A hairdryer on low heat helps with narrow cracks where moisture sits below the surface.

For chipped edges, trim away any loose or feathered material with a sharp blade so the repair has a firm edge to bond to. That is straightforward trade practice, and it makes the patch easier to level and less obvious once sanded.

If you want a broader look at what can be repaired and what usually needs replacement, this guide on how to fix a tile without making the damage worse gives you the bigger picture.

Phase two filling the crack properly

Mix the epoxy exactly to the manufacturer's ratio and working time. Two-part products are unforgiving. If the mix is off, the repair can stay soft, cure patchy, or fail around the edges.

Push the epoxy into the crack with a small scraper, blade, or applicator. Fill the depth of the crack, not just the surface line. On anything more than a hairline mark, I slightly overfill the repair so it can be cut back flush once fully cured.

This video gives a useful visual reference for the process:

For a moderate crack, take your time here. Work the product in, scrape off the excess cleanly, then leave it alone. Constantly reworking epoxy as it starts to firm up usually makes the finish worse and can pull the filler back out of the crack.

Phase three curing sanding and sealing

Cure time is where plenty of DIY repairs get spoiled. The surface might feel hard enough to touch, but the body of the repair can still be green underneath, especially in a cool Melbourne bathroom in winter.

Follow the product instructions for cure time, then allow more time if the room is cold, damp, or poorly ventilated. If the tile is in a wet area, be even more cautious. Grouting, washing, or sanding too early can mark the repair, weaken the bond, and leave a dull patch on the glaze.

Once the epoxy has cured through:

  1. Level the repair: Sand the overfill back gently until it sits flush with the tile face.
  2. Refine the finish: Use finer abrasive to smooth the patch and reduce visible scratch marks.
  3. Clean the surface: Wipe away all sanding dust before any tinting or sealing.
  4. Seal if needed: In splash-prone areas, use a suitable finishing sealer if the product manufacturer recommends one.

One practical warning. If the cracked tile is inside a shower, at a wall-floor junction, around a bath, or anywhere the waterproofed system could be involved, stop and get the area assessed if there is any sign of movement, drummy tiles, loose grout, or recurring moisture. At that point the issue may be beyond a simple epoxy repair, and in Victoria that can move into work that should be inspected and managed by a registered builder.

The Art of Colour Matching and Creating a Seamless Finish

A tile repair can be solid and still stand out for all the wrong reasons. Homeowners usually notice the patch because the colour is slightly off, the gloss does not match, or the filled crack catches light differently from the rest of the tile.

That is the part DIY guides often understate.

In real bathrooms across Melbourne, white wall tile is usually the easiest repair to disguise. Once you get into older porcelain, printed tiles, terrazzo-look finishes, stone-look ceramics, or aged batches that have yellowed over time, colour matching gets harder fast. Heritage homes are a good example. The original tile may have surface wear, uneven glaze, and a tone you cannot match straight from a hardware store kit.

The best result comes from matching three things together, not one. Base colour, surface sheen, and edge definition all need to line up. Get two right and one wrong, and the repair still reads as a patch.

Why DIY colour matching often falls short

Ready-mixed epoxy repair kits are made for broad colour groups. White, almond, grey, black. That can be good enough for a laundry splashback or a low-visibility wall tile. It is often not good enough for a feature tile at eye level.

Some products can be tinted, but there is a trade-off. Add too much colourant and the epoxy can cure differently or lose clarity. Leave it untinted and the repair looks chalky. Patterned tiles are harder again because a crack rarely runs through one flat colour. It usually crosses shade variation, printed grain, or speckle.

I see another problem regularly. The patch colour is acceptable on day one, then the finish turns obvious once the room is cleaned, the tile is wet, or sunlight hits the wall from the window. Gloss level matters as much as colour.

For homeowners weighing up patching against replacement, our tile repair service in Melbourne is usually the right place to compare what can be disguised well and what will always remain visible.

How a good repair is blended properly

Tilers who do this well slow the process down at the finishing stage.

  • Match the main field colour first. Do not start by chasing tiny flecks or veining before the body colour is close.
  • Check the tile in the room, not just on the bench. Bathroom lighting changes how the repair reads.
  • Test dry and slightly damp. Some tiles darken when cleaned, and a patch that looks right dry can look pale once moisture hits it.
  • Build colour in light passes. That works better than trying to force one heavy coat to do everything.
  • Adjust the sheen at the end. A matt tile, satin tile, and glazed wall tile all throw light differently.

On older or textured tiles, the honest answer is that epoxy can hide the crack, but it may not make it disappear. A repair can still be worthwhile if the tile is hard to replace or the crack is in a low-visibility spot. If the tile is a feature piece in the middle of a shower wall, replacement often gives the better visual result.

One more point from practical job experience. A lot of failed-looking repairs are not bond failures at all. The filler stays in place, but the top finish yellows, peels, or flashes under light because the wrong paint, glaze coat, or sealer was used over the epoxy. That is common on DIY jobs and also on rushed maintenance work.

If the crack sits in a wet area, appearance is only half the conversation. In Victoria, once a repair starts affecting waterproofed areas or raises questions about membrane integrity, the job needs to be assessed properly under the rules that apply to bathroom works. Colour matching is the easy part compared with fixing a bathroom that has a hidden compliance problem underneath.

When to Call a Registered Builder for Your Bathroom Renovation

You notice a crack on a shower wall, run a bit of epoxy into it, and the tile looks fine again. A month later the grout line nearby darkens, silicone starts lifting at the corner, and the skirting outside the bathroom feels damp. That is the point where a tile repair turns into a building problem.

A close-up view of a large, jagged crack running through light-colored ceramic bathroom wall tiles.

Wet areas change the rules

In Melbourne bathrooms, location matters more than crack size. A small crack on a dry wall tile can be a tidy DIY repair. A crack inside a shower, on the shower floor, near the waste, at a wall to floor junction, or around a hob needs a different level of caution because those areas sit over waterproofing that must comply with AS 3740.

That is where I tell homeowners to stop treating the tile as an isolated surface defect. The tile might be the visible part of the problem, but the underlying issue can be movement in the sheet, poor bedding, failed waterproofing, or moisture already getting into the substrate.

In Victoria, once bathroom work involves waterproofing, structural change, or a broader renovation scope, it needs to be handled under the right registration and compliance framework. If you cannot confirm the membrane is intact, an epoxy patch can hide damage instead of fixing it.

Signs the crack is part of a bigger failure

Some cracks are straightforward. Others are warning signs.

Get professional advice if you notice any of the following:

  • The tile sounds hollow when tapped. That often means poor adhesive coverage or bond failure underneath.
  • More than one tile is cracked. A repeated pattern usually points to movement in the substrate or installation stress.
  • Grout is cracking as well. Tile and grout failing together rarely comes down to a simple surface blemish.
  • There is moisture nearby. Damp skirtings, mould growth, swollen trims, or staining below the bathroom all need proper investigation.
  • The crack is in a shower, balcony, or other wet zone. Those are the areas where cosmetic repairs can create the most expensive false confidence.

The National Construction Code references AS 3958.1 for ceramic tiling, and that standard requires high adhesive contact in wet areas and on floors. For a shower base or large-format tile, poor support under the tile is a common reason cracks come back after a patch. You can check the standard summary through the ABCB guidance on wet area and tiling compliance.

A practical rule on site is simple. If the tile is cracked because it is unsupported, filling the crack does nothing to fix the reason it cracked.

The cost trade-off is real

I understand why people try epoxy first. Replacing one tile can be hard if spares are gone, and a full bathroom rebuild is a very different budget decision. The Housing Industry Association has reported that bathroom renovation costs have risen sharply over time, which is one reason minor repair work is so common in Melbourne homes. You can review that broader cost trend in HIA's bathroom renovation cost commentary.

Small cosmetic repairs usually cost far less than renovation work, but price is not the only question. A cheap repair in a dry area can be sensible. A cheap repair over a wet-area failure often becomes the expensive option because the moisture keeps travelling behind the tile.

If you need a clearer idea of what a proper assessment or repair looks like, our tile repair services in Melbourne page explains the difference between a cosmetic tile fix and work that needs wider bathroom investigation.

My practical cutoff for DIY versus builder involvement

DIY epoxy repair is reasonable when the crack is minor, the tile is firm, the area is dry, and there is no sign of movement or water entry.

Call a Registered Builder when any of these apply:

  • the crack is in a shower recess or shower floor
  • the tile is loose or hollow
  • the crack runs through multiple tiles or keeps reopening
  • the grout, silicone, or adjacent finishes are also failing
  • there is any doubt about the membrane, substrate, or compliance history of the bathroom

That is the honest dividing line. If the repair could affect waterproofing performance, or if the crack points to a failure below the tile, the job needs someone who can assess the whole assembly, not just fill the surface.

Frequently Asked Questions about Tile Repair

Can I epoxy a shower tile myself

You can repair a minor, stable crack on a shower wall tile, but you need to be cautious. If the tile is loose, hollow, full-depth cracked, or located on the shower base, epoxy may not satisfy the waterproofing expectations of AS 3740. In those cases, it's better to get a registered builder involved rather than rely on a cosmetic patch.

Is epoxy cheaper than replacement

Usually, yes for a small cosmetic issue. Verified Victorian data puts epoxy repair at $120 to $180 per tile, while the median full bathroom renovation cost in Melbourne is about $10,000. The catch is that a cheap patch becomes expensive if it delays proper waterproofing or hides substrate failure.

How long does the repair take

For small cosmetic work, the actual application is quick. The waiting is the important part. High-performance epoxy putties require 4 to 6 hours at 20°C before sanding, and deeper epoxy-grout repairs need a full 48-hour cure at 22°C before sealing. In bathrooms, patience is part of the repair.

Can renters use tile crack repair epoxy

For a minor chip or hairline crack in a dry area, sometimes yes. The smart move is to get landlord approval first, especially if the tile is in a bathroom. If the repair goes wrong, a mismatched patch can create more problems than the original mark.

Will the repair be invisible

Sometimes. Often it will be close, not perfect. On plain modern ceramic, you've got a fair chance of a discreet repair. On aged, textured, patterned, or heritage tile, the finish is much harder to hide. Colour, sheen and surface texture all need to line up.

Can epoxy fix large-format porcelain

It can handle some chips and fine cracks, but large-format tiles are less forgiving because voids, movement and poor adhesive coverage matter more. If the tile is big, drummy, or installed in a premium bathroom, replacement is often the cleaner solution.

What if the tile crack keeps coming back

That usually means the tile itself wasn't the problem. Movement in the substrate, impact stress, poor bond, or wet area failure can all reopen a repaired crack. Repeating the same epoxy patch won't solve a structural cause.


If you're dealing with a cracked tile in Melbourne and you want a straight answer on whether it's safe to repair, replace, or investigate as part of a bathroom renovation, Melbourne Tiling Services P/L can help. As Registered Unlimited Builders, the team handles tile repairs, waterproofing, shower rectification, and complete bathroom renovations across Melbourne and greater Victoria with the compliance side taken seriously.

Shower Leak Detection Melbourne: Expert Guide 2026

You notice it in stages. First, a damp smell that lingers after the bathroom should've dried out. Then a paint blister on the wall outside the shower, or a yellowish mark on the ceiling below. In some homes, the clue is underfoot. A hollow tile, a grout joint that keeps darkening, or skirting that starts to swell.

That's usually the point where worry kicks in. Is it the grout. A pipe. The shower base. The whole bathroom.

In Melbourne homes, the answer isn't always obvious from what you can see. A shower can look fine on the surface while water is moving into framing, flooring, or adjacent walls behind the tiles. That's why the smart approach is calm and methodical. Confirm the symptoms. Isolate the likely source. Then decide whether you're dealing with a local repair, a waterproofing failure, or a bathroom that's reached the point where broader rectification makes more sense.

Table of Contents

The Unwelcome Discovery A Guide for Melbourne Homeowners

A lot of shower leak calls start the same way. Someone has cleaned the bathroom, regrouted a small section, maybe replaced a shower rose, and still the stain gets bigger or the smell comes back. They're not careless. They're trying to solve the problem before it spreads.

The trouble is that shower leaks don't behave neatly. Water follows gaps, gravity, framing, and old building materials. The wet patch you can see may be well away from the defect that caused it. In a tiled shower, moisture can travel behind finishes and show up in the hallway, in a robe on the other side of the wall, or on the ceiling below.

That's especially true across Melbourne's mixed housing stock. A newer ensuite can have a junction detail problem. A period home may have movement, ageing substrates, and an old membrane that no longer performs. An apartment can involve common property concerns and access limits that make diagnosis harder.

Practical rule: Don't assume the first visible symptom is the source. Treat it as a clue.

The right mindset is simple. Don't panic. Don't start ripping tiles off blindly. Don't keep applying surface products in the hope that one of them will magically stop water moving behind the scenes.

Use a structured process instead. Confirm whether the leak is active. Work out whether it points to supply plumbing, waste, or waterproofing. Then look at the bathroom as a whole. If the shower is leaking because the assembly itself is at the end of its serviceable life, the smartest fix may be broader than the original stain suggested.

Telltale Signs and Common Causes of Shower Leaks

Some signs are obvious. Others are easy to dismiss until the damage becomes harder to ignore. If you're searching for shower leak detection Melbourne, these are the symptoms worth taking seriously early.

An infographic detailing five common signs of shower leaks including peeling paint, mold growth, and cracked tiles.

What you can usually see and smell

The first category is visual damage outside the shower itself. That includes:

  • Peeling paint or blistering finishes on nearby walls or the ceiling below
  • Mould or mildew that keeps returning after cleaning
  • Darkened grout lines that stay wet long after use
  • Swollen skirtings or trim outside the bathroom
  • Water marks in adjoining rooms or downstairs areas

Then there are the structural clues inside the shower.

  • Loose tiles can mean moisture has affected the bond.
  • Cracked grout often signals movement or water entry points.
  • Failed silicone at junctions around wall-to-floor changes and screens can let water into vulnerable areas.
  • A soft or drummy feel underfoot may suggest substrate trouble beneath the tile layer.

The smell matters too. A persistent musty odour, especially after showering, usually means moisture is sitting where it shouldn't.

What's often causing it underneath

Not every leak is a burst pipe. In Melbourne bathrooms, many shower leaks come back to the shower assembly itself rather than a visible plumbing fixture.

A common culprit is failed waterproofing. In Victoria, the minimum plumbing work standard for shower waterproofing is governed by AS 3740-2021 and the National Construction Code, and practical leak detection guidance puts early focus on waterproofing failures, junctions, and membrane defects because water can track into walls or floors while the surface still looks relatively dry. That same guidance explains why staged testing is used to separate pressurised supply leaks from waste or waterproofing failures in a shower cubicle (Victorian shower waterproofing guidance and staged leak testing).

Other common causes include:

Likely cause What it tends to look like
Worn silicone joints Localised leakage near corners, screens, or penetrations
Cracked tiles or grout Water entry through repeated wetting and movement
Plumbing fixture issues Leaks linked to tapware, mixers, shower roses, or supply lines
Drainage defects Problems that show up during use rather than when the shower sits idle
Ageing bathroom build-up Multiple small failures happening at once

One practical reason to avoid guessing is the DIY trap. A Melbourne shower leak page notes that 68% of Australian shower leak complaints involve homeowners attempting DIY fixes first, leading to a 42% increase in secondary damage costs (DIY shower leak attempts and secondary damage costs). That doesn't mean you can't inspect carefully. It means cosmetic fixes often come before proper diagnosis, and that's when time and money get lost.

Simple DIY Checks to Isolate the Problem

A lot of Melbourne homeowners reach the same point. They notice a damp skirting outside the bathroom, a stain on the ceiling below, or silicone that never quite dries out, and they want to know whether this is a simple maintenance issue or the start of a bigger bathroom problem.

That is the right time for a few careful checks at home. Keep them non-destructive. The job here is to narrow the possibilities and decide whether the shower needs a registered builder or leak specialist to assess the full bathroom assembly, not just the obvious wet spot.

A man kneels on a bathroom floor inspecting a shower enclosure frame for leaks using a magnifying glass.

Safe checks worth doing first

Start by drying the shower and the floor outside it, then leave it unused for a day if you can. If fresh moisture appears while the shower has not been used, the problem may sit with a pressurised plumbing connection, tapware, or water tracking from another source. If the area stays dry until someone showers, that points more towards the enclosure, waste, or waterproofed areas.

Then inspect the obvious weak points closely. Check silicone in the internal corners, around the base, where the screen meets tile, and around penetrations such as taps and outlets. Look for splits, lifting edges, mould that returns quickly after cleaning, swollen trims, or grout that stays dark long after the rest of the shower dries.

A basic isolation check also helps. Run water straight into the waste with as little splash as possible for a few minutes. Later, use the shower normally. If the leak only shows up during normal showering, the drain itself may not be the main issue. The problem can sit higher up, where water hits walls, junctions, or screen connections under regular use.

Check the fixtures too. Dry around the mixer, shower rose, rail mounts, and any exposed joints. Come back later and look again. Moisture showing up around fittings without a full shower points to a different repair path than water escaping only when the enclosure is wet.

For homeowners trying to understand what a minor repair might involve, this guide on how to fix leaking showers gives a useful overview.

When DIY needs to stop

DIY checking has a limit. Once the next step involves removing tiles, cutting into walls, resealing over damp materials, or guessing which product might hold, the risk goes up fast.

If the pattern is unclear, damage is spreading outside the shower, or the leak keeps returning after small repairs, stop patching and get the bathroom assessed properly.

That matters because a shower leak is not always a shower-only problem. In older Melbourne bathrooms, I often find more than one failure at the same time. A leaking screen junction might be obvious, but there can also be movement in the substrate, degraded waterproofing, poor falls, or water damage in adjacent walls. Patching the visible point buys time at best and traps moisture at worst.

A short demonstration can help you understand what professionals are trying to isolate before they recommend repairs.

The decision point is simple. If your checks suggest a single maintenance issue, a targeted repair may be enough. If the signs overlap, or the bathroom is older and showing wear in several places, it is time to bring in a registered builder for a whole-of-bathroom assessment. That approach looks at the leak, the waterproofing, the condition of the substrate, and whether a proper renovation will cost less than repeated repairs over the next few years.

How Melbourne Professionals Find Hidden Shower Leaks

A proper leak investigation starts with one question. Are we dealing with a plumbing fault, a drainage issue, failed waterproofing, building movement, or a mix of them?

That matters because hidden shower leaks rarely announce themselves at the source. Water can travel under tiles, through screed, along framing, and into the room next door before a stain shows up. In older Melbourne bathrooms, I often see the visible damage sitting well away from the actual entry point.

Why staged testing matters in Victorian bathrooms

Good operators work in stages because each test rules something in or out. They start with the history of the leak, when it happens, how long it has been going on, whether it shows after showering or all the time, and what sits on the other side of the shower wall. Then they check the bathroom layout, likely water paths, and the condition of joints, penetrations, wastes, and adjoining finishes.

A six-step infographic detailing the professional leak detection process for plumbing, including inspection and reporting.

After that, non-invasive testing helps narrow the field before anything is opened up. The point is not to confirm that moisture exists. By the time a homeowner calls, that part is usually obvious. The point is to identify the likely source, trace the path, and work out whether a local repair makes sense or whether the bathroom needs broader rectification.

That distinction saves money.

If the issue is a loose outlet, failed seal at a screen junction, or a pressure-side plumbing defect, the repair scope can stay tight. If testing points to membrane failure, poor falls, damaged substrate, or moisture spread into adjacent materials, the conversation changes. At that stage, a builder needs to assess the bathroom as a whole, including the condition of the waterproofing system and whether proper bathroom waterproofing in Melbourne can be reinstated through a repair or only through renovation.

The tools that narrow the search

Different tools answer different questions, so professionals use them together instead of relying on a single reading.

  • Thermal imaging helps spot cooler areas that may show moisture movement or water tracking behind finishes.
  • Acoustic listening equipment is useful for active pressurised leaks where sound can help locate the defect.
  • Pressure testing checks whether supply lines hold pressure or lose it over time.
  • Drain cameras help inspect waste lines and traps where access is limited.
  • Moisture meters help map how far water has moved into plaster, timber, skirtings, or nearby wall linings.

Used properly, those tests give a clearer picture before demolition starts. They also reduce the chance of pulling up the wrong section of tile or opening a wall that was never the problem.

On site: The best result is a clear diagnosis with a repair scope. Homeowners need to know where the water is getting in, where it has travelled, and whether the fix belongs to a plumber, a waterproofer, or a registered builder managing a larger bathroom repair.

The final step is judgment. Tools help locate moisture and isolate defects, but someone still needs to read the pattern of failure in the context of the bathroom's age, construction, and overall condition. That is usually the point where DIY should stop. If the findings suggest more than one failing component, the smart call is a registered builder who can assess the leak and the long-term health of the bathroom before money goes into patchwork.

Beyond Detection Repair Waterproofing and Renovation

Finding the leak is only half the job. The bigger question is what the leak says about the overall state of the bathroom.

When a patch is enough and when it isn't

Some defects are local. A failed fitting, a minor penetration issue, or an isolated screen junction can sometimes be rectified without rebuilding the shower. But many leaking showers aren't failing at a single visible point. They're failing as a system.

That's why a practical detection workflow uses non-invasive methods first. When thermal imaging, acoustic testing, and pressure testing are used together, the value is in narrowing the source before demolition starts. This kind of triangulation improves the odds of removing only what's necessary and avoiding false assumptions about the leak path (non-invasive leak localisation and triangulation).

Once the issue points to waterproofing, repair usually moves beyond cosmetic work. The process may involve removing tiles, checking the screed or substrate, replacing damaged materials, reinstating a compliant membrane, and then retiling and resealing. If moisture has affected adjacent framing, flooring, architraves, or skirtings, those items need attention too.

A good decision test is whether the shower has one isolated fault or several signs of age at once:

  • Patch repair may suit a contained issue with otherwise sound bathroom construction.
  • Broader rectification is often smarter if tiles are loose, substrates are compromised, or the waterproofing assembly has plainly failed.
  • Full renovation deserves consideration when the bathroom is dated, access is poor, or you're facing repeat work on finishes that are already near the end of their life.

Why registered builders matter on bigger bathroom repairs

Homeowners often make an incorrect comparison. They compare the cost of a tube of sealant to the cost of a proper repair. That's not the actual trade-off. The actual trade-off is between a short-term patch and a bathroom that's sound again.

In Melbourne, larger shower leak repairs often cross trades. There may be plumbing, waterproofing, carpentry, tiling, shower screen reinstatement, and finish work. If the leak has spread, there can also be subfloor or wall rectification. That's where registered builders become valuable. They can assess the leak in the context of the whole bathroom, coordinate the right licensed trades, and decide whether the sensible path is a local repair or a proper renovation.

Screenshot from https://melbournetilingservices.com.au

If you're already weighing up whether to repair or rebuild, it's worth understanding what compliant waterproofing involves in a renovation context. This overview of waterproofing in Melbourne is a sensible place to start.

A leaking shower often isn't just a leak. It's the bathroom telling you the original build-up no longer has enough life left in it.

For many homeowners, that's the decision point. Keep patching and hope. Or treat the leak as the prompt to create a dry, durable bathroom that won't need revisiting every time another small failure appears.

Shower Leak Detection Costs and Timelines in Melbourne

The honest answer on cost is that it depends on where the leak is, how far water has travelled, and whether the fix is local or structural. Without testing, any firm number is guesswork. That's why good operators inspect first and scope second.

What affects the final cost

The cost of shower leak detection in Melbourne is usually shaped by a few practical factors:

Cost driver Why it changes the scope
Leak location A fixture issue is different from failed waterproofing
Access Apartments, tight bathrooms, and occupied homes can slow work
Extent of damage Adjacent rooms, ceilings, or framing add repair scope
Bathroom age and condition Older bathrooms often reveal more than one defect
Repair standard Temporary patching and full compliant rectification are not the same job

If you're budgeting, think in stages rather than one line item. There's the initial assessment and testing. Then there's the repair itself. In some homes, that repair is minor. In others, leak detection leads directly into partial rebuild work or a full bathroom renovation.

That's why the useful question isn't “what does a leak cost”. It's “what level of work does this leak require”.

For a closer look at service scope, this page on leak detection in Melbourne helps frame what inspection and rectification can involve.

How long the process usually takes

Detection is usually the shortest part of the job. A site visit, testing sequence, and findings can often be worked through in a relatively contained appointment, especially when access is straightforward and the symptoms are clear.

Repairs take longer because bathrooms need proper sequencing. If tiles have to come up, the area must be prepared correctly. Waterproofing needs to be applied to the right standard. Materials need curing and drying time before retiling, grouting, and sealing. If there's hidden substrate damage, the timeline stretches because the room has to be made sound before finishes go back on.

A practical way to plan is this:

  • Diagnosis first
  • Scope confirmed second
  • Drying, waterproofing, and reinstatement allowed the time they need

Rushing the repair phase is one of the easiest ways to end up paying for the same bathroom twice.

Frequently Asked Questions About Shower Leaks

Can I claim shower leak repairs on insurance

It depends on your policy and the cause of the damage. Insurers often distinguish between sudden damage and defects related to wear, deterioration, or maintenance issues. The safest approach is to document the symptoms, keep records of testing and findings, and ask your insurer what evidence they need before repair work begins.

Are shower leaks more common in older Melbourne homes

Older homes do tend to raise more leak questions because bathrooms may have ageing membranes, movement in the structure, older plumbing, and finishes that have been repaired multiple times. That doesn't mean newer bathrooms are immune. Newer showers can still fail at junctions, penetrations, screens, falls, or workmanship details.

What's different in apartments and townhouses

Apartments and townhouses add access, strata, and neighbour impact. A shower leak can present in another lot or in common areas, which complicates responsibility and timing. In those settings, it's important to confirm the source before authorising work, because the visible damage and the original defect may sit in different places.

Can regrouting fix a leaking shower

Sometimes regrouting improves appearance, but it often doesn't solve the underlying leak if water is already getting past the tile layer or through failed junctions and membrane defects. Grout is not a substitute for a sound waterproofing system.

Should I keep using the shower if I suspect a leak

If moisture is spreading, a ceiling below is staining, or finishes are deteriorating, continued use usually increases the damage. Limiting or stopping use until the issue is tested is often the safer choice.

When should I call a registered builder instead of a leak detector alone

Call a registered builder when the leak appears tied to the broader bathroom build-up, when there's visible movement or substrate damage, or when you're already considering bathroom renovations. At that point, you don't just need the source identified. You need someone to assess the repair pathway for the whole room.


If you need a clear answer on whether your shower needs local rectification or a broader rebuild, Melbourne Tiling Services P/L can help. As Registered Unlimited Builders, they handle bathroom renovations, waterproofing, leak rectification, tiling, and full trade coordination across Melbourne, with free quotes, 3D drawings, and a renovation calculator to help you plan the next step with confidence.