Caulking Services Melbourne: Expert Guide

You've got black silicone in the shower, a soft edge along the balcony, or a patch that keeps coming back after someone's “quick reseal”. That's usually when Melbourne owners start searching for caulking services Melbourne, but the right answer isn't always a tube of sealant and a good hand. On site, the question is whether you're dealing with maintenance, a defect, or a renovation scope that needs a registered builder and the right compliance path.

Table of Contents

What Caulking Actually Means on a Melbourne Job Site

A homeowner rings after noticing dark silicone around a shower base, or a strata manager spots a damp line on the underside of a balcony edge. The instinct is to ask for a reseal. The better first move is to find out whether the joint has aged, whether movement has opened it up, or whether the failure sits deeper in the substrate.

The bead is the last step, not the whole trade

On a real job, the visible bead is only the finish. Before that comes surface assessment, removal of failed material, cleaning, checking for hollow tiles or cracked grout, and deciding whether the joint is a routine maintenance line or part of a broader rectification scope. That's why caulking in Melbourne is a mature trade niche, with operators reporting 20+ years of experience in the local market, and why the work keeps showing up across bathrooms, balconies and external joints in Victoria, not just at renovation time. See the local market context in Melbourne caulking pricing and service examples.

Practical rule: if the joint is only dirty, the fix is usually different from a joint that has lost adhesion or is tied to water movement behind the tile.

Why the same line of silicone can mean different jobs

A shower edge might need a straightforward maintenance reseal if the substrate is sound. The same-looking line on a balcony can point to movement, weather exposure, or water tracking under a threshold, which is a different job entirely. That distinction matters because the bead is the visible outcome, but the risk sits in what's behind it.

Melbourne service pages often separate bathroom sealing from window frames, render joints and balcony work for a reason. The joint type decides the method, the removal approach, the cure time, and whether the work belongs to a caulker, a tiler, or a registered builder coordinating a larger wet-area scope. For a related sealing example, see sealing stone tiles in Melbourne.

Sealant Types and Where Each One Belongs

The wrong sealant usually fails in one of two ways. It either moves too little and splits, or it sticks in the wrong place and releases when the substrate flexes. In Melbourne wet areas, that's why the key decision is not colour, but movement, exposure and cleaning chemistry.
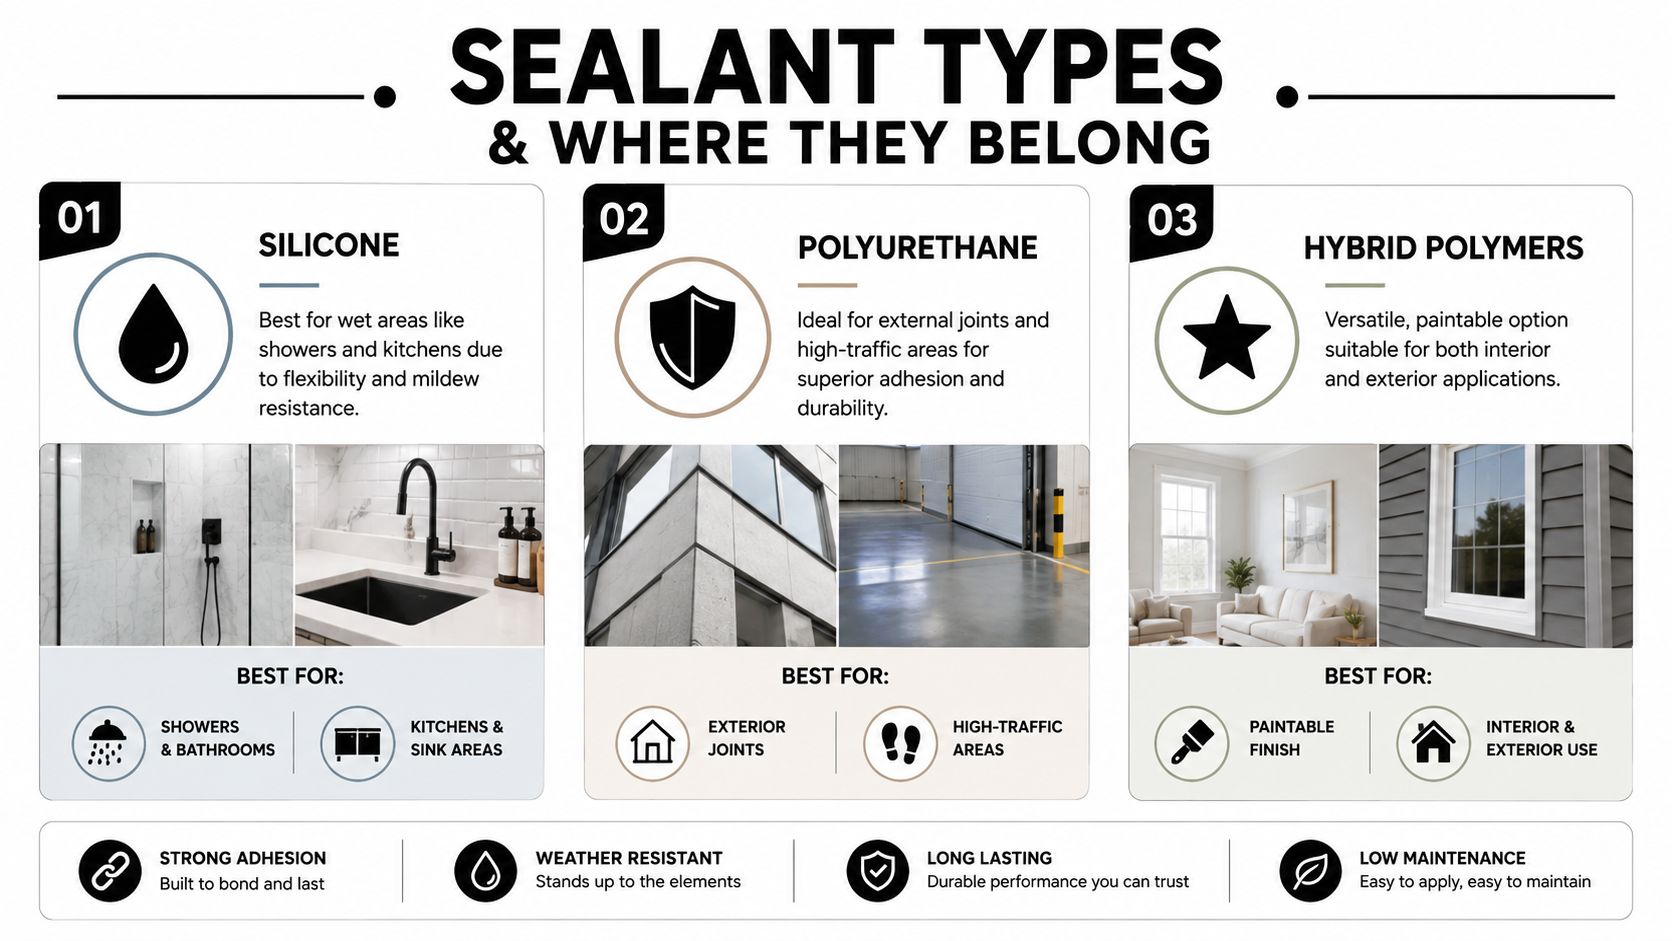
An infographic titled Sealant Types displaying information about silicone, polyurethane, and hybrid polymer sealants for various applications.

Start with the joint, not the tube

For showers, bathrooms and kitchens, silicone is the usual call because those areas see the most moisture and cleaning activity. Local wet-area pricing guidance places re-caulking at about $6–$8 per linear metre, with a medium home often totaling $900–$1,700, which shows how quickly the total is driven by joint length rather than room count MB Caulking Services pricing guidance. That's the right lens for wet-area work, because a small shower with lots of perimeter detail can take more effort than a plain room with fewer joints.

For external joints, high-traffic lines and exposed transitions, polyurethane is commonly chosen where adhesion and durability matter more than easy wipe-down maintenance. Hybrid polymers sit between those worlds, and local contractor service lists treat them as a separate option rather than a generic fix, especially for applications like windows, render joints and some exterior finishes Gapless service categories.

Match the sealant to the exposure class

Use a simple decision path.

  • Bathrooms and showers: silicone, because movement and moisture are constant.
  • Window frames and render joints: polyurethane or hybrid systems, depending on exposure and paintability.
  • Balconies and precast panels: a movement-capable sealant system, not a cosmetic filler.
  • Fire-rated seals and articulation joints: only a system that's specified for that use.

A generic sealant is rarely the right answer on a moving joint. If the substrate shifts, the product choice has to allow for that movement or the bead will fail again.

A contractor who understands the difference can explain why the same home may need more than one caulking system. That matters on Melbourne sites where bathroom, balcony and façade joints often sit side by side.

How to Tell When Re-Caulking Is the Wrong Fix

A fresh bead is not a cure for water that's already getting past the surface. If the room smells musty, the caulking keeps blackening, or the balcony edge shows signs of deeper damage, the issue may have moved beyond maintenance. That's where the diagnosis matters more than the reseal.

Signs that point deeper than a failed bead

The clearest warning signs are the ones that keep returning after cleaning. Blackened silicone usually means mould has taken hold in a line that's staying wet too long. Lifted edges suggest adhesion loss, which can come from movement or poor preparation. Soft grout around the joint often means the surrounding finish is breaking down too, not just the caulk itself.

Tide marks on plaster, recurring mould after cleaning, and balcony efflorescence point toward water moving where it shouldn't. That's the point where a re-caulk may only cover the symptom. If the shower pan, wall junction or balcony membrane has failed, the work shifts into rectification.

Read the pattern before you book the next reseal

A simple checklist helps separate surface failure from structural risk.

  • Persistent mould after cleaning: usually means moisture is still trapped or the joint keeps staying wet.
  • Peeling silicone: often points to failed adhesion, dirty substrate or movement.
  • Tide marks on nearby walls or ceilings: suggest water has already moved beyond the visible joint.
  • Efflorescence on balcony edges: often points to water migration through masonry or a hidden membrane issue.

For shower leak diagnosis, the clearest public service resource is how to fix leaking showers, because the correct fix depends on whether the failure is in the bead, grout, waterproofing or the substrate behind the tile.

If the same line keeps failing, stop treating it like a cosmetic issue. Repeating the sealant job without checking the cause usually costs more than doing the fault diagnosis once.

Typical Caulking Costs and Timelines in Melbourne

Price questions usually come up after the first inspection, because most owners want to know whether they're looking at a small maintenance visit or a broader repair. In Melbourne, local guides put general caulking at about $4–$7 per metre, while wet-area silicone re-caulking sits higher at about $6–$8 per linear metre Melbourne caulking pricing guidance MB Caulking Services pricing guidance. That spread reflects joint type, substrate prep and access, not just the product itself.

Typical job examples give a better estimate than room labels

A shower re-caulk often lands around $150–$300, a kitchen around $320, and a balcony around $450 Melbourne caulking pricing guidance. Larger sealing jobs can reach $500–$700 for concrete joints on a small to medium house and $900 for a larger house Melbourne caulking pricing guidance. Those are useful numbers because they show why asking for a quote by joint length is more accurate than asking by room name.

Job Type Typical Rate Indicative Total
Shower re-caulk job-based $150–$300
Kitchen caulk job-based $320
Balcony caulk job-based $450
Concrete joints, small to medium house job-based $500–$700
Concrete joints, larger house job-based $900

Time depends on scope, access and what's underneath

Routine maintenance is often a half-day to a single day job when the bead is the only issue. Leak rectification is different. Once tiles, membrane or screed need to come up, the scope turns into a multi-day job because the crew has to dry, repair, reset and then re-seal. The cost driver is not the number of rooms, it's the length of the joint, the condition of the substrate and whether the failed joint is just a finish line or part of the waterproofing system.

The Caulking Workflow From Inspection to Cure

Good caulking work follows a sequence. Skip one step and the joint can fail early, even if the bead looks neat on day one. The job has to start with what's under the joint, not the cartridge gun.
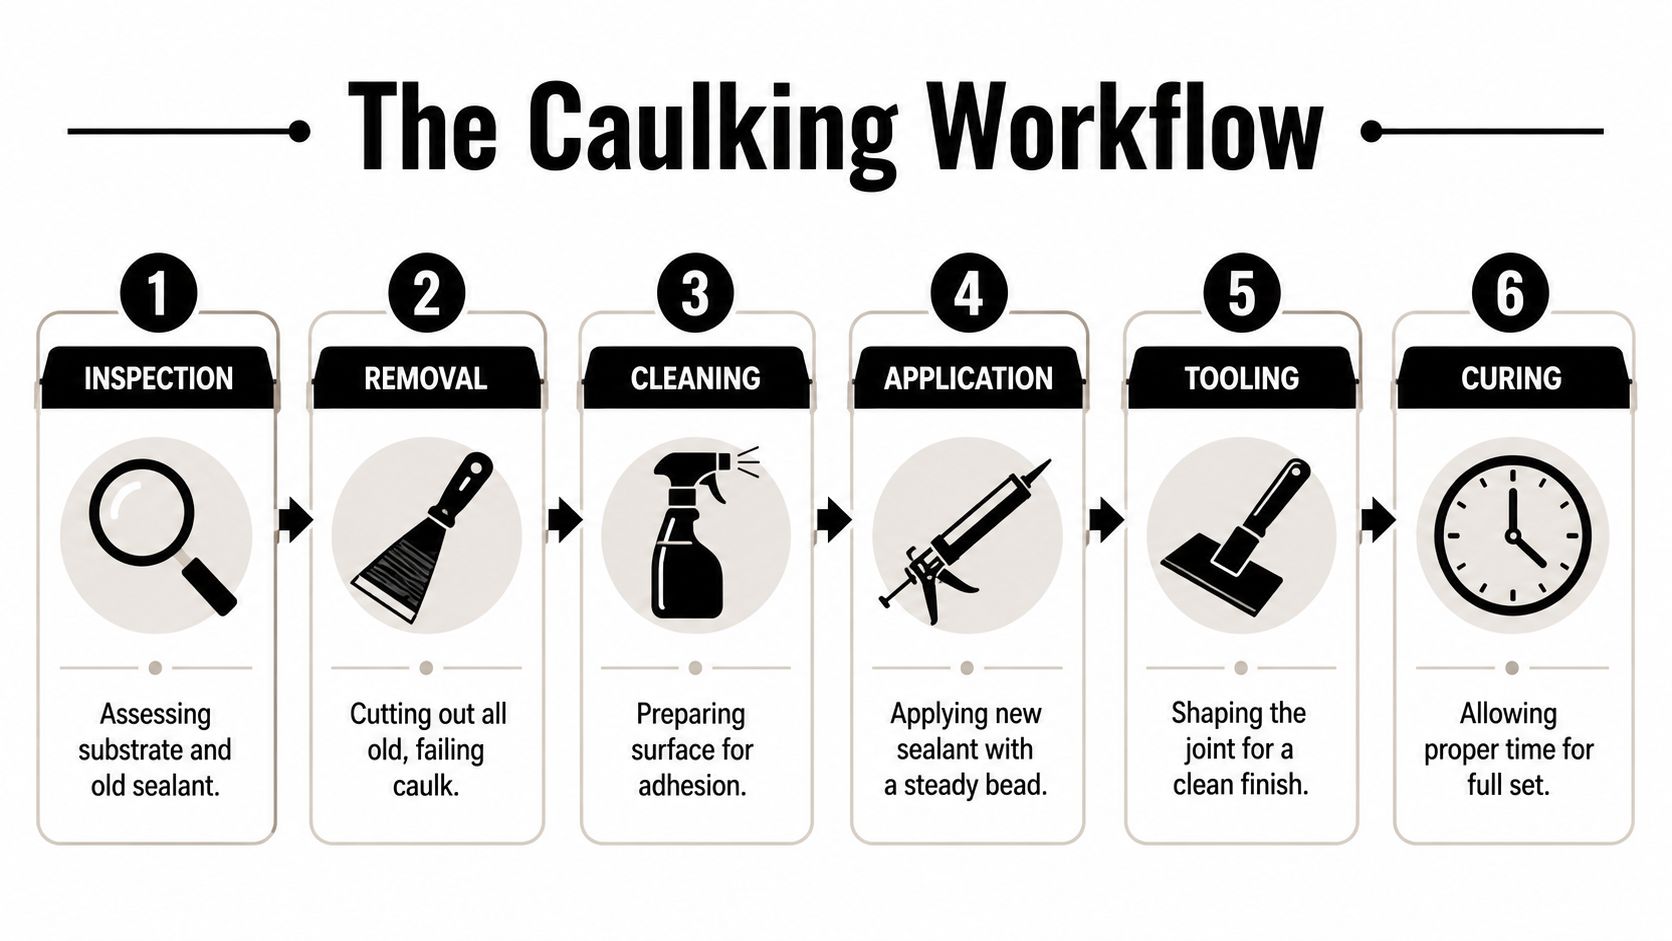
An infographic showing the six essential steps of the professional caulking workflow from inspection to final curing.

The site sequence that actually holds up

A proper crew usually works through inspection, removal, cleaning, application, tooling and curing. Inspection tells you whether the joint is a maintenance line or a rectification issue. Removal has to cut out all failed material without gouging the tile, stone or render. Cleaning matters because sealant bonds to the substrate, not to dust, soap residue or old silicone film.

The most important interface in wet-area work is the tie-in between the new sealant and the existing waterproofing line at the shower tray or balcony upturn. If that transition is treated casually, the same leak can return even when the bead itself looks fine. The earlier section on diagnosis matters here, because a bad bead on a sound membrane is a maintenance problem, while a failing membrane needs rectification first.

What gets done before the room goes back into service

A real workflow usually includes:

  1. Inspect the substrate and check for movement, loose tile edges or moisture signs.
  2. Remove old caulk completely so the new bead isn't bonding to failed material.
  3. Clean and dry the joint until the surface is ready for adhesion.
  4. Apply the right sealant for the joint type and exposure.
  5. Tool the bead to a consistent profile so water sheds cleanly.
  6. Allow a full cure window before water or traffic returns.

The cure period matters because an early shower or foot traffic can break the finish before it sets. That's why a balcony or bathroom can look finished long before it's ready to use.

Caulking, Bathrooms and the Registered Builder Question

A bathroom renovation often starts with one visible problem and ends up involving waterproofing, plumbing and tiling. That's why caulking can't always be treated as a standalone handyperson task. In Victoria, the compliance line matters once the work moves into proper renovation territory.

The $16,000 threshold changes the job category

If a domestic building contract for bathroom work is over $16,000, the statutory home warranty regime is triggered, and the builder must take out domestic building insurance before receiving any money above that threshold Victorian building insurance guidance. The Victorian Building Authority explains that domestic building insurance applies to most domestic building work over the threshold and protects owners if the builder dies, disappears or becomes insolvent Victorian building insurance guidance. That's not a minor admin step, it's a formal compliance point.

For a bathroom renovation, that distinction matters because caulking sits inside a bigger scope that may include demolition, waterproofing, carpentry, plumbing and tiling. In that setting, a Registered Builder is the right coordinator, because the job is no longer a single trade visit. The same logic is why a one-off shower reseal can be a simple maintenance call, while a recurring leak may require a registered rectification pathway.

Waterproofing and caulking are separate controls

Victorian practice treats waterproofing and surface sealing as different risk controls. That matters on showers and balconies, where a leak diagnosis has to answer whether water is bypassing the bead, the grout, the membrane or the movement joint. A contractor who only treats them as the same thing can miss the actual failure path.

For broader wet-area context, waterproofing in Melbourne is the reference point because the safest repair usually starts with the system, not the finish.

If the work crosses into renovation, ask who is carrying the compliance responsibility before you ask about colour. In a bathroom, the paperwork and the substrate both matter.

What Melbourne Tiling Services P/L Brings to a Caulking Scope

Some jobs only need a reseal. Others need a coordinated team that can handle leak rectification, waterproofing, tiling and the final caulk in one scope. Melbourne Tiling Services P/L sits in that second category, which matters when a failed bead is only one part of a larger bathroom or balcony problem.

The practical advantage is coordination

Melbourne Tiling Services P/L covers start-to-finish bathroom and ensuite renovations, waterproofing, screeding, self-levelling, marble, porcelain and ceramic wall and floor tiling, frameless shower screens and large-format Kerlite work for interior and exterior spaces. It also handles leak rectification for showers and balconies, which is where a caulking issue often stops being cosmetic. As Registered Unlimited Builders, the team can coordinate carpenters, plumbers, electricians, tilers and waterproofers inside one project path, which reduces the handover gap that often causes delays or missed details.

Planning tools change the way owners scope a job

The useful part for owners is that the scope can be priced and visualised before demolition. The business offers free quotes, 3D drawings, and a transparent renovation calculator that typically sits around a $10,000 median for planning scope and budget. That doesn't make every job a renovation, but it gives homeowners a better way to decide whether they're looking at maintenance, rectification or a full wet-area rebuild.

For a caulking issue alone, a stand-alone sealant service is usually enough. For a shower that keeps leaking, or a balcony edge that's tied to membrane failure, an integrated builder-led approach is a cleaner way to manage the repair path. If the job belongs to the bigger renovation category, the same team can carry the work through instead of handing it off between trades.
Screenshot from https://melbournetilingservices.com.au

Caulking Questions Melbourne Owners Ask Before Booking

Is shower re-caulking a maintenance job or a defect job? If the silicone has aged, discoloured or lifted but the substrate is sound, it's maintenance. If the same line keeps failing, or there are signs of water movement beyond the tile, it shifts into defect or rectification territory.

How long should a silicone re-caulk last in a Melbourne bathroom? There isn't one universal answer, because performance depends on movement, cleaning, ventilation and whether the underlying waterproofing is intact. A bead that's installed properly but placed over a failing substrate won't perform like a maintenance reseal on a stable wall.

What about balcony work? A balcony reseal can be a simple surface job if the joints are sound. If there's efflorescence, recurring dampness or staining below the edge, the job usually needs a deeper inspection and may involve membrane or substrate repair before any fresh sealant goes in.

How do I start? Ask for a free quote, request 3D drawings if the job is moving into renovation territory, and use the renovation calculator to get a realistic sense of scope before you commit.


If you're dealing with a shower joint that won't stay sealed, a balcony edge that keeps staining, or a bathroom renovation that needs the compliance side handled properly, speak with Melbourne Tiling Services P/L. They can assess whether your job is maintenance, rectification or a full renovation scope, then quote the work with the waterproofing and caulking tied into one practical plan.

Melbourne Apartment Bathroom Renovation Guide 2026

If you're staring at a tired apartment bathroom in Melbourne, you're probably weighing up two competing thoughts. One is practical: the room needs fixing, the shower may be dated, storage is poor, and every morning feels cramped. The other is caution: in an apartment, a bathroom renovation isn't just about tiles and tapware. It runs through strata rules, access restrictions, neighbour concerns, waterproofing certificates, and the question of who carries legal responsibility if something goes wrong.

That difference matters. A house renovation gives you more freedom. An apartment bathroom renovation sits inside a shared building, with common property, by-laws, booking systems, and a much tighter tolerance for mistakes. If a waterproofing failure happens in a detached house, it's bad. If it happens in an apartment, it can affect the lot below, trigger insurance disputes, and stop a project in its tracks.

In Melbourne, older apartment stock adds another layer. Existing plumbing can be awkward, walls aren't always straight, ventilation is often poor, and owners' corporations can be strict about noise, working hours, and waste removal. Done properly, though, bathroom renovations in apartments can transform how the space works and protect long-term property value.

Table of Contents

Navigating Strata Rules and Council Approvals

You can have tiles chosen, fixtures ordered, and a start date pencilled in, then lose two weeks because the owners' corporation has not signed off and the building manager will not allow trades into the lift. In Melbourne apartments, that is a common way bathroom jobs stall before demolition even starts.

Approval is often the part owners underestimate. A bathroom sits inside your lot, but the work rarely affects only your lot. Trades need access through common property. Noise carries. Waste has to leave the building without damaging lifts or hallways. In many apartment blocks, especially older ones across Melbourne's inner suburbs, the owners' corporation wants the scope of works, contractor details, insurance certificates, work hours, and a plan for protecting common areas before anyone sets foot on site.

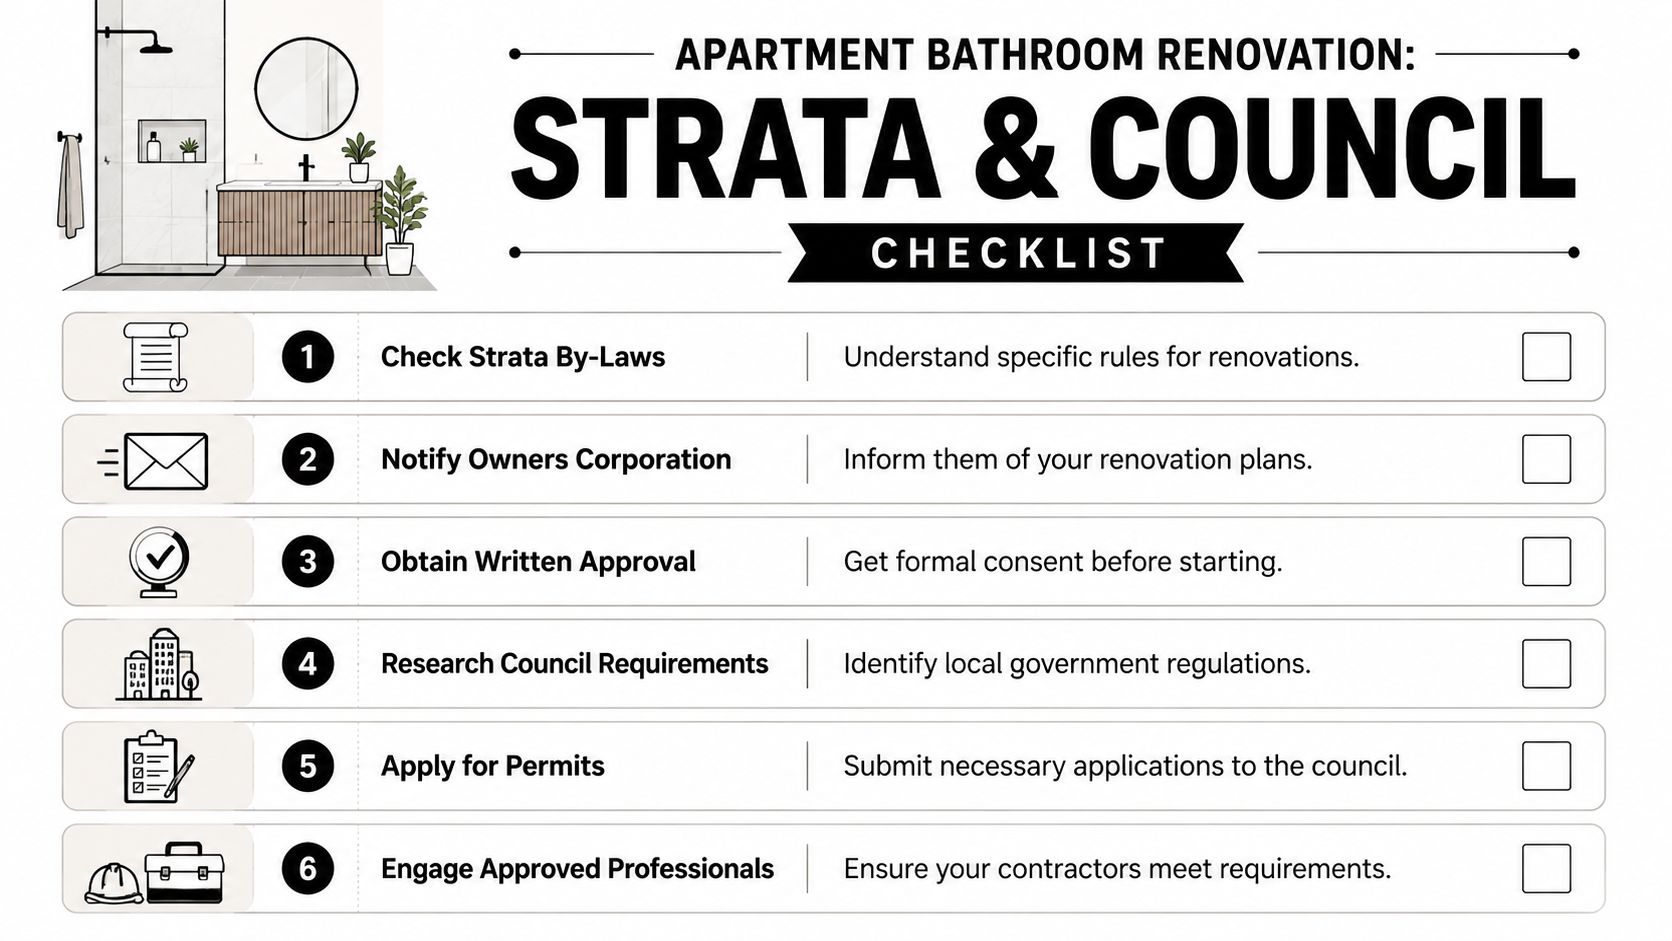
Wet-area compliance is the issue that catches people out most often. Generic renovation articles spend plenty of time on tapware and finishes, then gloss over the paperwork required for the job to proceed and remain insurable. In an apartment, that omission matters. If waterproofing is altered, the certification path needs to be clear from the start. The Victorian waterproofing compliance certificate process should be understood before work begins, not chased once the bathroom is closed up.

A checklist infographic guiding apartment owners through the essential strata and council steps for a bathroom renovation.

Council is not involved in every apartment bathroom renovation, but permits and formal approvals can come into play when the scope changes regulated building elements. Moving plumbing points, altering floor wastes, changing the waterproofed area, or reworking the layout can push the job beyond a like-for-like update. The trigger is the work itself, not whether the room is small or the budget is modest.

Practical rule: Get written approval before booking demolition. A verbal go-ahead from a building manager does not protect you if the owners' corporation later objects.

I see this in older Melbourne apartments all the time. An owner wants to shift the vanity, replace the shower base with a hobless shower, and retile the floor. It sounds straightforward. In practice, that can involve altered falls, plumbing changes, new waterproofing, and a formal submission to the owners' corporation because leaks in apartments do not stay contained to one bathroom.

A good strata submission makes the committee's job easier and reduces the back-and-forth. Include these items before lodging anything:

  1. A clear scope of works
    Set out what is being demolished, what stays, and whether plumbing, electrical, ventilation, waterproofing, tiling, or layout changes are proposed.

  2. Drawings or marked-up plans
    They do not need to be elaborate, but they do need to show the room clearly enough for review and approval.

  3. Contractor and licence details
    List the licensed plumber, electrician, waterproofer, and the registered builder or project manager responsible for coordinating the work.

  4. Insurance documents
    Many owners' corporations will not approve access until they have current public liability and other relevant cover on file.

  5. Site logistics
    Explain lift bookings, protection to hallways and lifts, delivery times, parking, rubbish removal, and permitted work hours.

  6. Compliance pathway
    Show how certificates, inspections, and required sign-offs will be handled at the end of the job.

The strongest applications answer the questions the strata manager is likely to ask before they have to ask them.

Older buildings usually need tighter planning. Services can be brittle, original waterproofing may have failed years ago, and committees are often more cautious because they have dealt with previous leaks. That does not mean the renovation is difficult. It means apartment work rewards proper documentation, realistic scope, and trades who understand how Melbourne strata buildings function.

Budgeting Your Apartment Bathroom Renovation

A Melbourne apartment bathroom can look like a small room on plan and still cost like a complex build once demolition starts. Limited access, older pipework, acoustic requirements, booked lift times, and strict weekday work windows all affect price before you choose a single tile.

The budget needs to match the type of renovation.

Cosmetic update or full rebuild

A cosmetic update suits bathrooms where the layout still works, the shower area is sound, and there is no reason to open up the substrate. National pricing guides put standard bathroom renovations across a wide range, from entry-level works through to high-end projects, but those averages are only a rough reference point for apartment owners because apartment constraints push labour and coordination higher than many house-based examples suggest. Canstar's bathroom renovation cost guide gives a useful broad market range, while CO-architecture's breakdown of bathroom renovation costs in Australia helps show how quickly costs rise once the work moves beyond surface upgrades.

A full rebuild is a different budget category. Once you remove tiles, bedding, screed, and wall linings, you may also be dealing with failed waterproofing, uneven floors, outdated drainage falls, or service locations that do not meet the new layout. In apartments, that rebuild scope also carries more site management because materials and waste have to move through common property without damaging it.

The practical question is simple. Are you refreshing finishes, or are you rebuilding the room properly?

Where the money usually goes

Small bathrooms are not cheap bathrooms. The fixed trade stack stays much the same whether the room is compact or generous. Demolition, plumbing, electrical, waterproofing, tiling, waste removal, and protection to common areas still need to be done properly, and each trade has to work within the building's access rules.

That is why budget blowouts usually come from hidden condition issues rather than from the vanity or mirror choice.

A useful way to price an apartment bathroom is to separate base construction cost from finish cost. Base construction covers the work that makes the room compliant and usable. Finish cost covers what you see and touch, such as tile selection, tapware, custom joinery, shower screens, and accessories. Owners often focus on finishes first, but the base construction cost is where apartment projects are won or lost.

Item Cost Percentage Estimated Cost
Demolition and waste removal 8% $2,400
Plumbing and drainage work 16% $4,800
Electrical and ventilation 8% $2,400
Waterproofing and screeding 8% $2,400
Tiling labour and setting out 18% $5,400
Tiles and finish materials 15% $4,500
Fixtures and fittings 14% $4,200
Design, approvals and site management 13% $3,900

Sample Mid-Range Apartment Bathroom Renovation Budget (Melbourne)

That sample uses a $30,000 mid-range allowance to show how costs are commonly distributed on an apartment job. It is a planning example, not a fixed schedule of rates.

Two allowances deserve protection in the budget. Tiling labour is highly sensitive to substrate condition, tile size, pattern, edge trims, and how much cutting is needed around tight apartment bathrooms. Hipages' guide to bathroom renovation costs and tiling rates is a reasonable benchmark for understanding how labour is priced separately from tile supply.

Waterproofing is the other area owners should never squeeze. In a house, poor waterproofing is bad enough. In an apartment, it can affect the lot below, trigger an owners corporation dispute, and leave you paying to rectify work twice.

The cheapest quote often assumes the walls are straight, the floor falls are workable, the waste is in the right spot, and no latent water damage appears. Older Melbourne apartments rarely give you all four.

Before signing a contract, compare your scope against a Melbourne apartment bathroom renovation cost guide and keep a contingency for what demolition may uncover. In older buildings, that reserve often covers the things no one can confirm until the room is stripped, such as rusted penetrations, damaged sheeting, unstable screeds, or plumbing that should be replaced while access is open.

Smart Design and Material Choices for Apartment Bathrooms

A small apartment bathroom doesn't need more decoration. It needs fewer visual interruptions and better function. The best rooms feel calm because the layout is disciplined, the materials are doing real work, and every fitting earns its place.

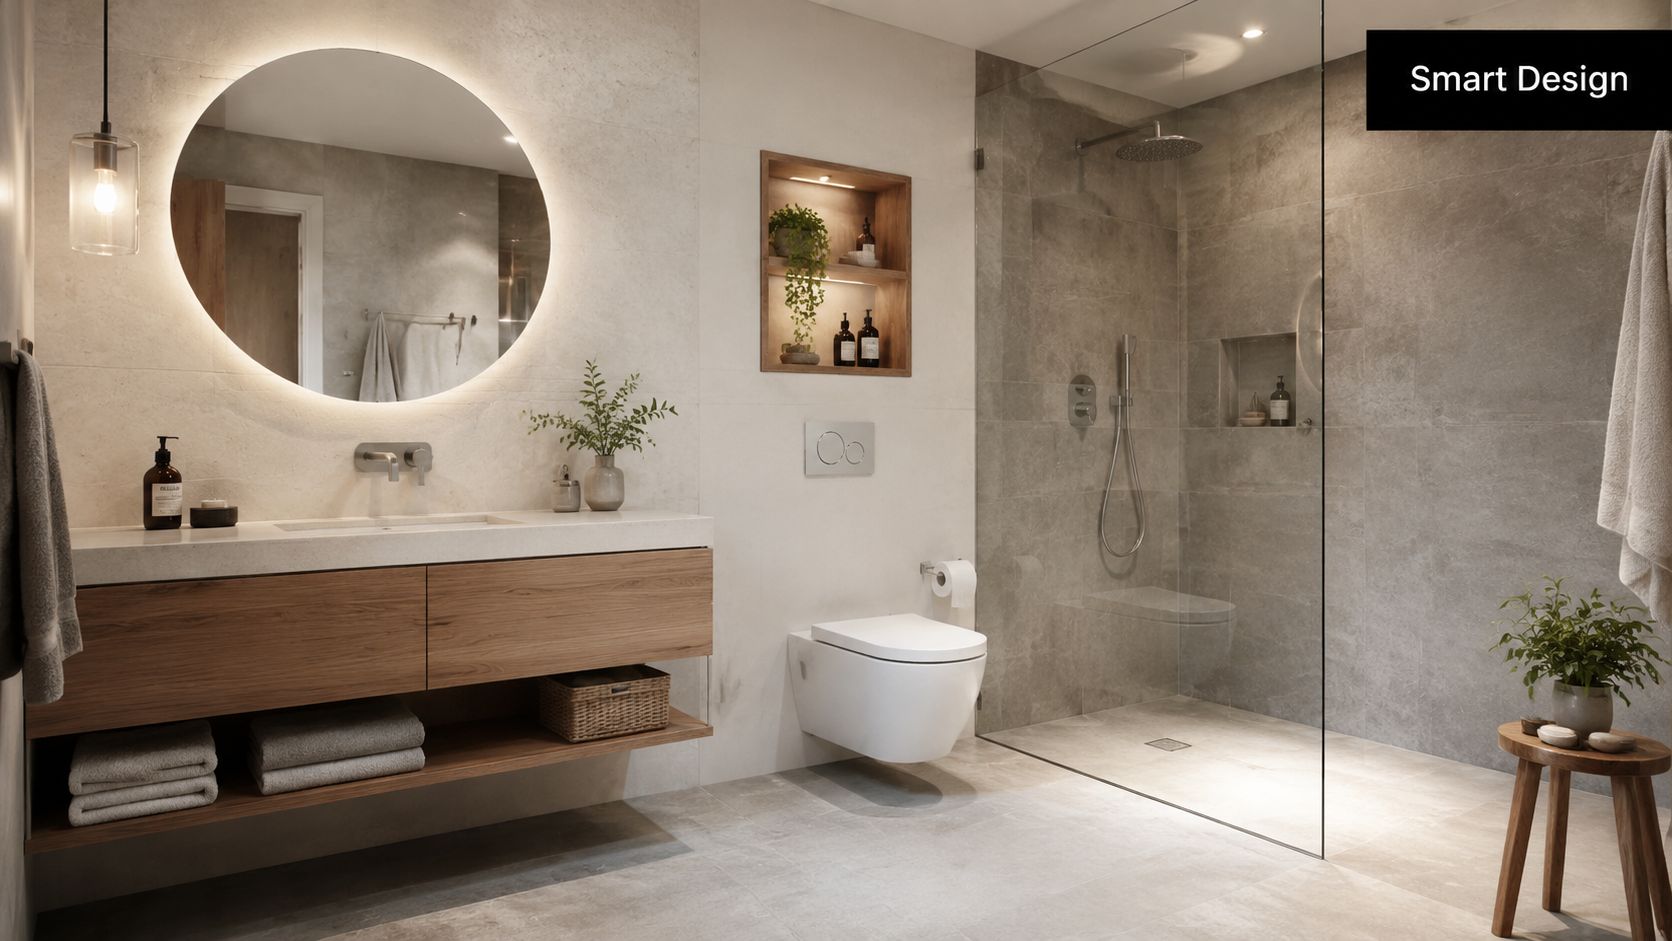
A modern, minimalist bathroom with a floating wood vanity, circular backlit mirror, and a spacious glass shower.

Materials that make small rooms work harder

Large-format tiles are one of the smartest choices in apartment bathrooms. They reduce grout lines, make the room feel less chopped up, and create a cleaner visual run across walls and floors. In practical terms, less grout also means less maintenance and fewer lines for soap residue to cling to.

Porcelain is usually the safest all-rounder. It handles moisture well, gives plenty of finish options, and suits both contemporary and more restrained apartment interiors. If you're weighing colours and finishes, these porcelain tile options for bathrooms are the kind of material decision worth making early because they affect grout selection, trim details, and the overall light in the room.

Frameless shower screens do more than look modern. They keep sightlines open, which matters in tight plans, and they let feature tile or stone read as part of one room instead of a boxed-off shower compartment.

In apartment bathrooms, visual width matters almost as much as actual width.

Design moves that improve function

Storage is where many apartment bathrooms fail. A vanity with workable drawer storage is usually more useful than a decorative basin cabinet with dead space. Recessed shaving cabinets help reclaim wall depth without making the room feel crowded. Shower niches stop the need for hanging caddies and keep the enclosure looking deliberate.

Lighting also changes how the bathroom reads. A single ceiling light flattens everything. Layered lighting, such as mirror lighting combined with general room light, makes grooming easier and softens shadows. If natural light is limited, reflective tile finishes and a careful mirror position can help bounce available light further into the room.

The layout should be solved before finishes are chosen. In most apartment bathrooms, these moves improve daily use:

  • Keep plumbing points close to existing locations: It reduces complexity and usually protects budget and approval risk.
  • Use a floating vanity: More visible floor area makes the room feel larger.
  • Choose wall-hung accessories carefully: Towel rails, hooks, and toilet roll holders should sit where they don't interrupt circulation.
  • Build in niche storage: It looks neater and avoids aftermarket clutter.

This walkthrough gives a useful visual sense of how modern detailing changes a compact bathroom without overfilling it.

Premium materials only work when the detailing is controlled. A beautiful tile with poor set-out, awkward cuts, or badly placed trims will still read as a compromised renovation. In apartment work, restraint usually beats over-design.

Waterproofing and Tiling The Foundation of a Lasting Renovation

A bathroom can look finished and still be built to fail. In an apartment, that failure does not stop at your door. Water tracks into corridors, ceilings below, timber framing, and service penetrations, and once an owners corporation is involved, a small defect becomes a much larger problem.

That is why waterproofing is one of the first places I slow a job down.

In Melbourne apartments, especially in older blocks, I often find uneven substrates, patched sheeting, loose screeds, and floor wastes that were never set up properly to begin with. None of that improves by covering it with membrane and tile. The base has to be sound, dry enough, and correctly formed before the waterproofing system goes on.

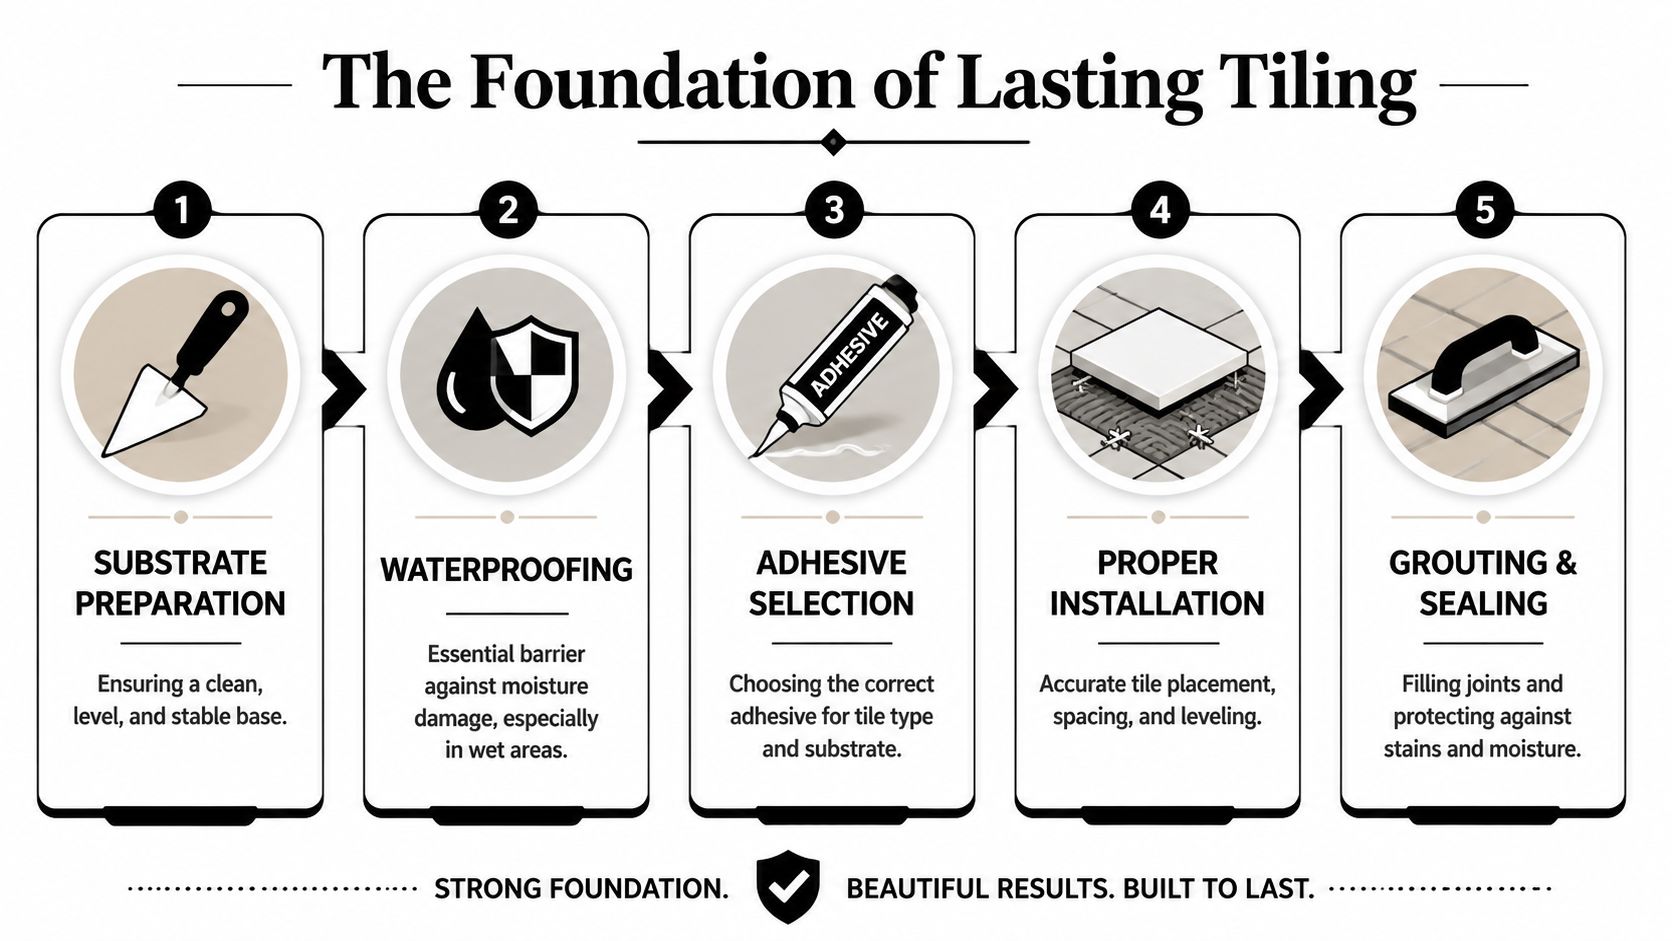
The sequence matters. Substrate preparation comes first. Junctions, corners, hobs, wastes, and pipe penetrations need the right treatment. The membrane then has to be applied to the required areas and left to cure properly before tiling starts. Drying time is not a suggestion, and pressure from booking windows, lift access, or a household trying to get the bathroom back does not change that.

Skip time in waterproofing and you do not save days. You create a defect.

Apartment owners also need to think beyond appearance when selecting fixtures. Plumbing product compliance is tightening, and lead-free plumbing products with no more than 0.25% weighted lead are scheduled to become mandatory from September 2026. If your renovation is being planned around that period or later, it makes sense to confirm tapware and mixers meet the current and upcoming requirements rather than treating it as a last-minute purchasing issue.

What proper tiling work involves

Tiling quality is decided well before adhesive is mixed. Good set-out, straight lines, correct falls, and controlled cuts are what make a bathroom feel resolved. Poor planning shows up fast in a compact apartment bathroom because every small error is more visible.

The core checks are simple:

  1. Establish the set-out early
    Start from the lines that matter visually. That usually means centring to the main wall, vanity, or shower screen, not just starting in the nearest corner.

  2. Get the falls right
    Shower floors need to drain cleanly to the waste without ponding. In apartment renovations, correcting falls can be harder because the slab and waste position usually stay where they are.

  3. Choose tiles that suit the room
    Porcelain is a reliable choice for most apartment bathrooms because it is durable and consistent. Natural stone can look excellent, but it needs sealing, ongoing care, and a client who understands the maintenance.

  4. Control trims, edges, and penetrations
    Mixers, outlets, niches, and floor wastes need clean cuts and tight detailing. These are the points people notice first, even if they cannot name why the room looks good or poor.

  5. Finish the joints properly
    Grout colour, joint width, movement joints, and silicone work all affect both performance and finish. Untidy silicone can make an otherwise solid job look second-rate.

Many tile problems are not tile problems. Hollow spots, cracked grout, lipping, and water sitting where it should not usually trace back to preparation, movement, poor sequencing, or a floor that was never set correctly. In an apartment bathroom, waterproofing and tiling need to be treated as one system, because that is how they fail and that is how they last.

Why You Need a Registered Builder for Your Renovation

A bathroom renovation in a Melbourne apartment can look straightforward until the building manager asks for trade licences, waterproofing details, access dates, lift protection, and confirmation that the proposed work matches the approved scope. That is usually the point where owner-managed projects start to come unstuck.

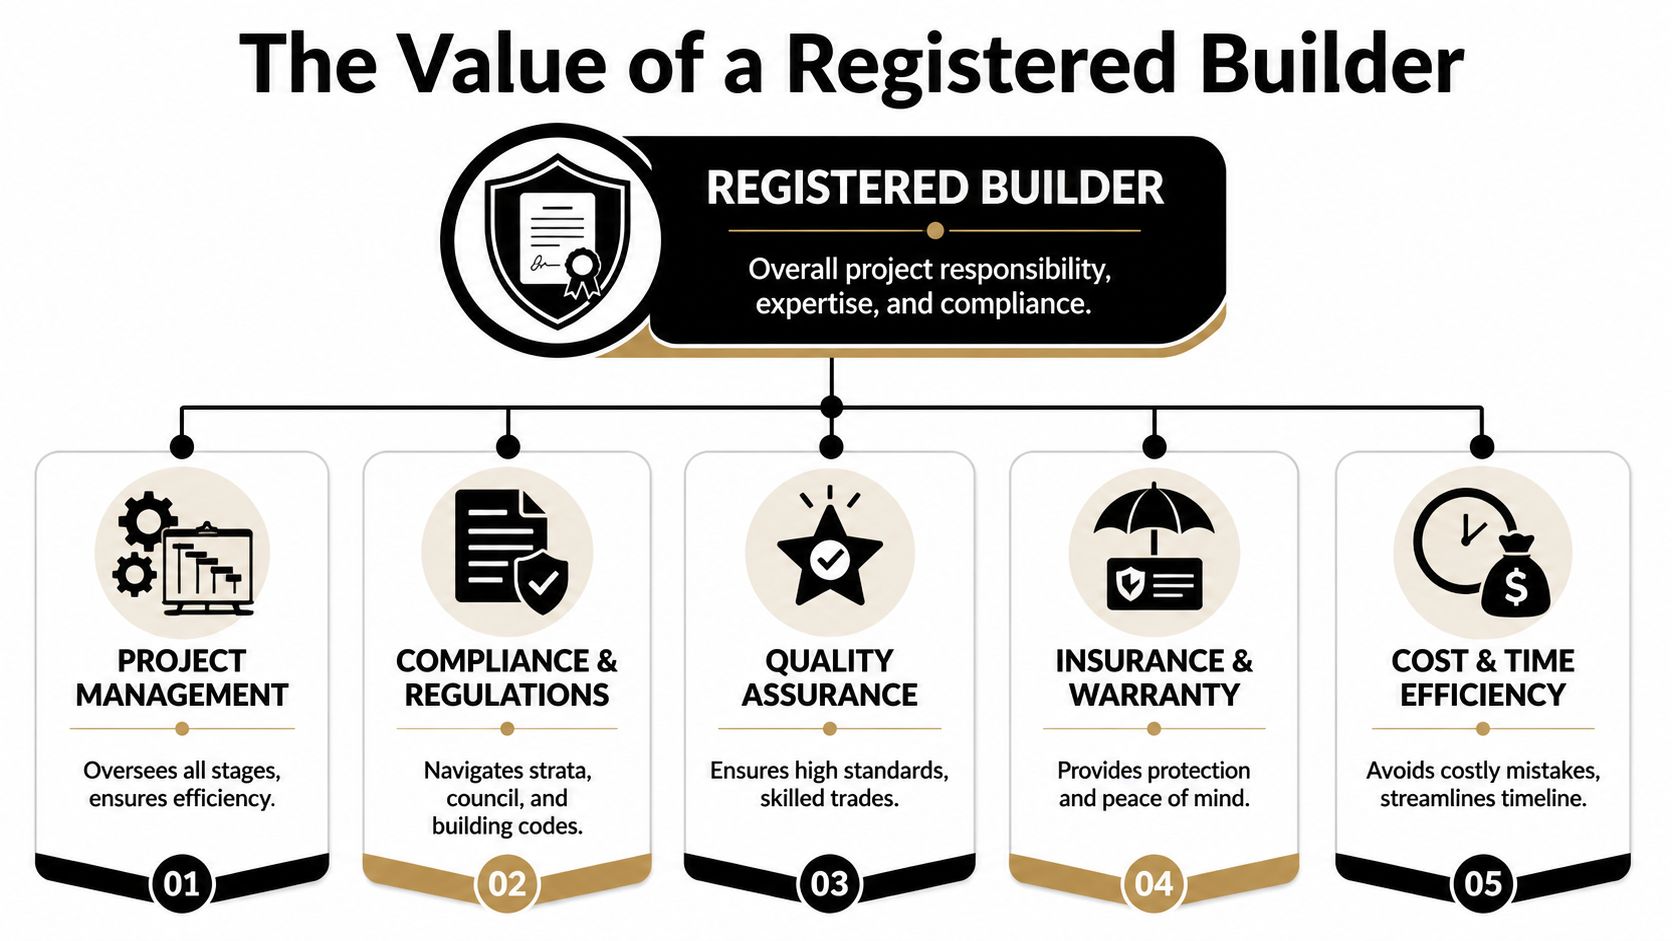
An infographic detailing five key benefits of hiring a registered builder for construction projects.

One point of responsibility matters in apartments

In a house, a delayed trade is frustrating. In an apartment, it can affect booked lifts, waste removal, parking, neighbour notices, and the hours your building allows noisy work. A registered builder manages that chain properly and keeps the job aligned with the approved scope, the building rules, and the sequence each trade needs.

That matters most in wet areas because the work is interconnected. Plumbing rough-in affects sheeting. Sheeting affects waterproofing. Waterproofing affects tiling. If one step is wrong or incomplete, the next trade either stops or covers a defect that becomes expensive later.

The other issue is compliance. Apartment bathrooms are not a place for informal trade coordination or DIY decision-making on the run. If the renovation involves changes to plumbing, drainage, electrical work, or structural elements, the work has to be carried out and documented by the right licensed people. In older Melbourne buildings, that also means dealing with uneven substrates, dated services, and details that are rarely obvious until demolition is complete.

A registered builder gives the owner one accountable party for:

  • Programming so demolition, rough-in, substrate preparation, waterproofing, tiling, fit-off, and final checks happen in the right order
  • Trade coordination so licensed plumbers, electricians, waterproofers, carpenters, and tilers are not working off different assumptions
  • Quality control so defects are picked up before they are buried behind tiles or fixtures
  • Documentation so certificates, insurances, and records are collected and matched to the actual work completed
  • Strata communication when access conditions change or hidden site issues require clarification before work continues

If a leak shows up after handover, a clear responsibility path matters.

That is one reason owner-builder style coordination often becomes false economy in apartments. I have seen jobs where the plumber blamed the waterproofer, the waterproofer blamed the substrate, and the tiler was left defending a finish over a base he did not control. The owner then has to sort out access for rectification, explain the issue to strata, and pay for parts of the room to be opened up again.

For owners comparing contractors, Melbourne Tiling Services P/L is one example of a firm that operates as Registered Unlimited Builders coordinating licensed carpenters, plumbers, electricians, tilers and waterproofers. That structure suits apartment bathrooms because design, compliance, sequencing, and defect responsibility sit under one roof.

What to check before signing anyone

Ask direct questions before you commit. Who is supervising the job day to day? Who is responsible for waterproofing certification? Who books inspections if they are required? Who protects common property, manages demolition waste, and deals with the building manager if site conditions change?

Ask how the builder handles variations as well. In apartments, variations often come from hidden conditions rather than owner indecision. A competent builder should be able to explain what happens if they uncover damaged framing, non-compliant past work, asbestos risk in an older building, or plumbing locations that limit the new layout.

The final test is clarity. A builder with real apartment experience should be able to explain what can be changed, what should stay put, where strata approval may be needed, and where a good design idea is not worth the compliance or cost risk. That advice saves owners money because it prevents the kind of mid-project changes that cause delays, disputes, and failed inspections.

The Renovation Timeline from Demolition to Handover

Owners usually want a simple answer to timing. The honest answer is that apartment bathrooms move in stages, and some stages are fixed while others depend on access, approvals, product lead times, and the condition of the existing room. The sequence is predictable. The pace isn't always identical from building to building.

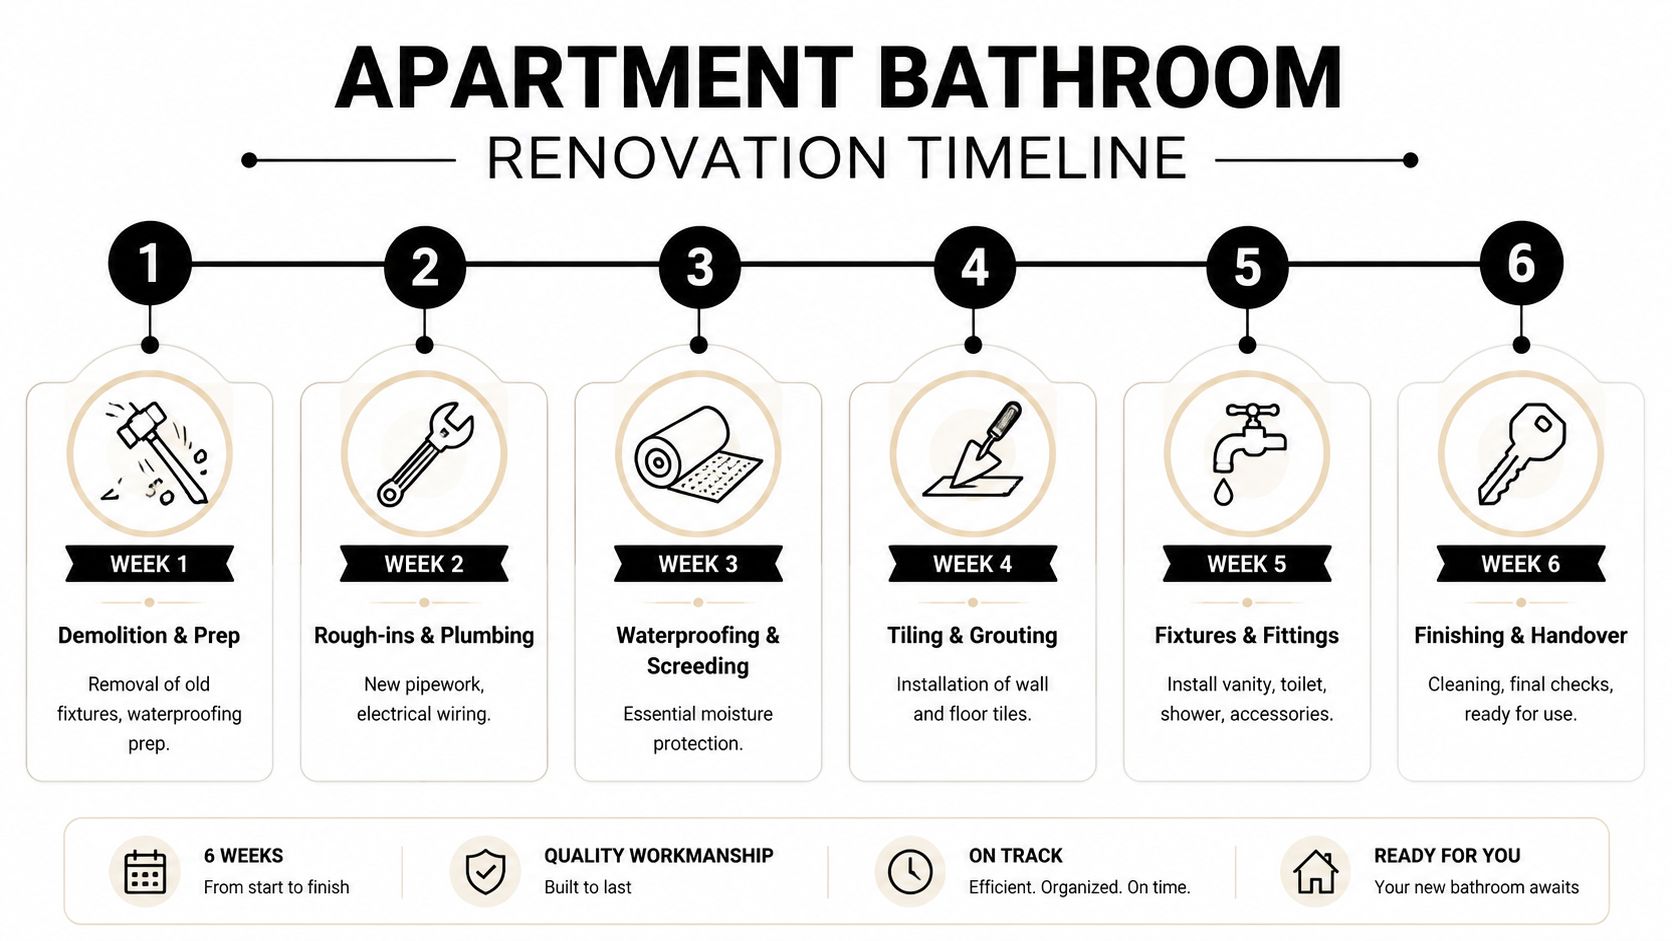
A six-week infographic timeline for an apartment bathroom renovation outlining step-by-step construction and remodeling phases.

What happens week by week

A typical apartment bathroom renovation often unfolds along lines like this:

Week 1 is site protection and demolition. Common areas are protected first, then fixtures, wall linings, floor finishes, and outdated waterproofing are removed. This is also when hidden issues tend to show themselves. Rotten framing, prior leak repairs, loose sheeting, and untidy old plumbing all become visible once the room is stripped.

Week 2 is rough-in work. The plumber and electrician come through to adjust services within the approved scope. If the layout is changing, this is the point where accuracy matters because every later trade depends on the position of drains, mixers, waste points, and power.

Week 3 is the technical backbone. Substrates are corrected, falls are formed where needed, and waterproofing is completed. This isn't the stage to pressure for speed. If curing time is cut short, later finishes may look fine at handover and still fail later in use.

Why apartment jobs can slow down

Apartment conditions create delays that don't show up on a simple builder's calendar. Lift bookings can restrict deliveries. Some buildings only allow noisy works within narrow windows. Rubbish removal may need staged collection rather than an open skip. Trades also lose time moving through protected common areas compared with walking straight onto a house site.

The final stages usually run like this:

  • Week 4 brings tiling and grouting, with close attention to set-out, cuts, trims, and falls.
  • Week 5 is fit-off. Vanity, toilet, shower screen, tapware, accessories, and lighting are installed.
  • Week 6 is finishing, defect checking, clean-up, and handover documentation.

A renovation that seems slow on paper often isn't being slow. It's being built in the right order. Apartment owners are better served by a controlled sequence than by a fast-looking program that starts stacking trades on top of one another before the room is ready.

A bathroom can be rebuilt quickly or carefully. In an apartment, only one of those is safe.

Avoiding Common Pitfalls and Maintaining Your New Bathroom

A lot of apartment bathroom problems start before the first tile is laid. In Melbourne, the usual pattern is simple. The owner gets excited, demolition starts, then the owners corporation asks for approval details, waterproofing records, acoustic notes, or proof that common property will be protected. At that point, the job is already harder and more expensive to control.

The biggest mistake is assuming an apartment bathroom renovation follows the same rules as a house. It does not. In many apartment buildings, walls, slab penetrations, membranes, and service locations affect common property or trigger owners corporation review. Older Melbourne buildings add another layer again. Floors can be out of level, pipe locations may not match current plans, and previous repairs often leave hidden problems behind linings or under screeds.

Price is another trap. A cheap quote can look fine until you compare what is included. Protection to lifts and hallways, rubbish removal through common areas, after-hours restrictions, make-good work, compliance certificates, and waterproofing documentation are often left vague. Owners usually find those gaps only after the contract is signed.

Design decisions cause trouble too. A nice layout on paper can become expensive fast if the new shower wastes need to move, if the vanity location conflicts with existing services, or if the building rules restrict penetrations. In apartments, good planning means checking what can stay, what can shift, and what approvals follow from each change.

Waterproofing failures remain one of the costliest problems because the damage rarely stays inside one lot. A failed membrane can affect the apartment below, trigger an insurance dispute, and turn a modest renovation into a building claim. For that reason, I always tell apartment owners to treat waterproofing records, product compatibility, and curing time as part of the finished job, not paperwork to sort out later.

A short warning list helps:

  • Get written strata or body corporate approval before demolition starts.
  • Confirm who is responsible for common property protection, waste removal, and lift bookings.
  • Check whether layout changes affect plumbing locations, penetrations, or acoustic requirements.
  • Use licensed trades for regulated work and keep the compliance documents.
  • Allow proper curing time for waterproofing, adhesives, grout, and silicone.
  • Do not overlook ventilation, especially in bathrooms with no operable window.

Once the bathroom is finished, maintenance is straightforward if it starts early. Clean surfaces regularly with non-abrasive products. Aggressive cleaners can shorten the life of sealants, mark fittings, and dull tile finishes.

Keep an eye on silicone around the shower base, wall junctions, bath edges, and vanity splashbacks. If it starts to shrink, split, or lift, arrange repairs before water gets behind the surface. That small maintenance item is far cheaper than replacing swollen skirtings, damaged cabinetry, or affected plaster in the room next door.

Ventilation matters every day. Run the exhaust fan long enough after showers to clear steam properly, and keep the grille clean so airflow does not drop off over time. In apartments with limited natural ventilation, that simple habit helps control mould, odour, and moisture build-up.

Check the bathroom as you use it. Loose tiles, hollow spots, hairline cracks, slow drainage, or a damp smell are all signs worth investigating early. They do not always mean a major failure, but they should not be ignored.

For owners who want one contractor to handle demolition, waterproofing, tiling, and fit-off in line with apartment requirements, Melbourne Tiling Services P/L provides start-to-finish bathroom renovation work across Melbourne.

Melbourne’s Guide: Expert Re Tiling Bathroom Tips 2026

If you're looking at cracked grout, drummy wall tiles, mouldy silicone, or a shower that never quite dries properly, you're probably already asking the right question. Is this a simple re tile, or is the bathroom telling you there's a bigger problem underneath?

In Melbourne homes, re tiling a bathroom often starts as a cosmetic update and ends up exposing loose plasterboard, failed waterproofing, poor falls, or old work that was never done to standard. That's why the smartest projects begin before the first tile comes off. You need to know what you're keeping, what you're replacing, what the rules are in Victoria, and when bathroom renovations move out of DIY territory and into registered builder territory.

Table of Contents

Planning Your Bathroom Retiling Project

A good bathroom job is won in the planning. Once demolition starts, changes get expensive fast.

Work out whether it is a re tile or a full renovation

Start with the room as it is now. If the layout stays the same, the plumbing points stay put, and the fixtures are still serviceable, you may be looking at a straight re tile. If the shower leaks, the floor feels uneven, the vanity is being replaced, or wall linings are damaged, you're closer to a full bathroom renovation.

Look for these signs before you commit:

  • Loose or hollow tiles: These often point to poor bonding or movement underneath.
  • Swollen skirtings or door jambs: Water may already be escaping the wet area.
  • Out of level floors: A new tile finish won't fix bad falls by itself.
  • Old shower recesses: Many older Melbourne bathrooms need more than fresh tiles.

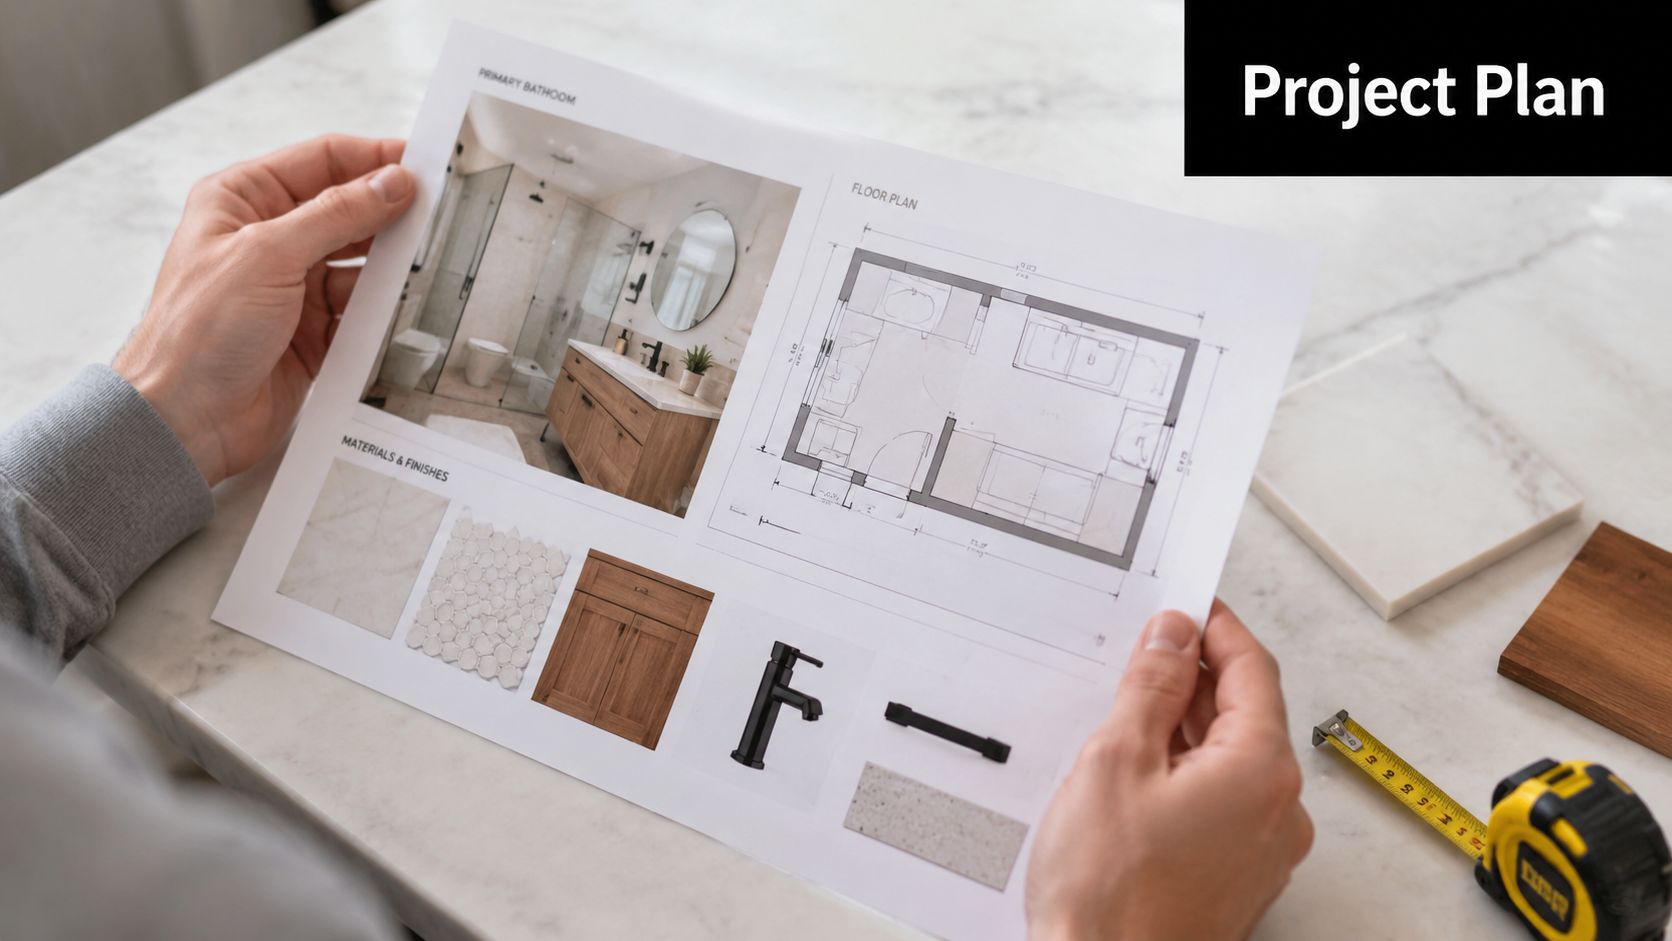
A person holds a printed bathroom renovation plan featuring floor layouts and various material and finish samples.

If you're comparing quotes, ask each contractor the same direct question. Are they pricing for tile replacement only, or have they allowed for substrate repair, screeding, waterproofing, and refitting the room properly? A cheap quote often assumes the old surface underneath is perfect. It rarely is.

Practical rule: If you don't know what condition the substrate is in, you don't know the real scope yet.

Decide early who is doing the work

Homeowners can handle very minor cosmetic jobs, but bathroom re tiling becomes specialised the moment waterproofing, floor correction, or compliance enters the picture. Wet areas don't forgive shortcuts.

Victoria also has builder rules that matter. In Victoria, a registered builder is required for domestic building contracts exceeding $10,000. If the value of the work organised by the builder exceeds $16,000, that registered builder must also provide domestic building insurance for the project to protect the homeowner, as noted in this Victorian registered builder and insurance threshold reference.

That isn't paperwork for its own sake. It affects who can legally manage the work, whether insurance applies, and whether the job stands up if something fails later.

A practical planning checklist looks like this:

  1. Lock the scope first. Re tile only, or complete bathroom renovation.
  2. Confirm who coordinates trades. Tiler alone, or registered builder managing plumbers, electricians and waterproofers.
  3. Check the contract value. Victoria's builder thresholds are important.
  4. Allow for hidden repairs. Older bathrooms often need more prep than owners expect.

If you want one contractor to manage demolition, substrate repair, waterproofing, tiling and fit-off, a registered builder setup is usually the cleaner path. It keeps responsibility clear, which matters when trades overlap.

Removing Old Tiles and Preparing Surfaces

The noisiest part of the job is demolition. The most important part is what you find after it.

Demolition tells you what the bathroom has been hiding

Old tiles come off with rotary hammers, floor scrapers, pry bars and patience. Wall tiles might release cleanly, or they might bring half the plasterboard with them. Floor tiles might reveal a solid bed, or cracked screed, patchwork levelling compounds, and old adhesive ridges that need grinding back.

What you want after demolition is simple. A clean, stable, dry surface.

That means checking:

  • Wall linings for softness, swelling, mould, and broken paper faces
  • Concrete or screed for cracks, drummy spots, and uneven levels
  • Corners and junctions for past leak staining
  • Shower bases for movement and poor falls to waste

A bathroom doesn't fail because one tile looked old. It fails because the layer under the tile couldn't support the system.

When tiling over tiles goes wrong

Tiling over existing tiles is the shortcut owners ask about most. Sometimes people want to save demolition costs. Sometimes they want to avoid dust. Sometimes they've been told it's easier.

It can be done in the right circumstances, but only with the right preparation and the right adhesive system. The failure point is usually bonding.

A common shortcut is tiling over existing tiles, but 40% of DIY tiling failures in Victoria result from improper adhesive bonding over non-porous tiles. A 2025 Master Builders Victoria survey found that the important step of priming the original tiles was skipped in 65% of failed renovations, according to this Victorian bathroom tiling guidance on existing tiles and priming.

That lines up with what turns up on site. If the original tiles are glossy, contaminated, loose, or sitting on a poor wall, tiling over them just traps the problem underneath.

If the old tile bed is unreliable, putting new tiles on top doesn't solve anything. It just delays the failure.

There's also a practical issue owners rarely think about. When someone eventually removes that second layer, they may tear the wall apart with it.

A quick decision guide

Existing condition Better move
Sound substrate, firm tiles, correct preparation possible Assess carefully before over-tiling
Loose tiles, drummy walls, water damage, poor falls Full removal
Unknown waterproofing history Full removal
DIY plan with ready-mixed adhesive Don't do it

For most bathroom renovations, especially showers, stripping back and rebuilding properly is the safer long-term decision.

Mastering Waterproofing and Floor Levelling

This is the stage that protects the structure, not just the finish. A bathroom can look immaculate and still be built to fail if the waterproofing and substrate work are poor.

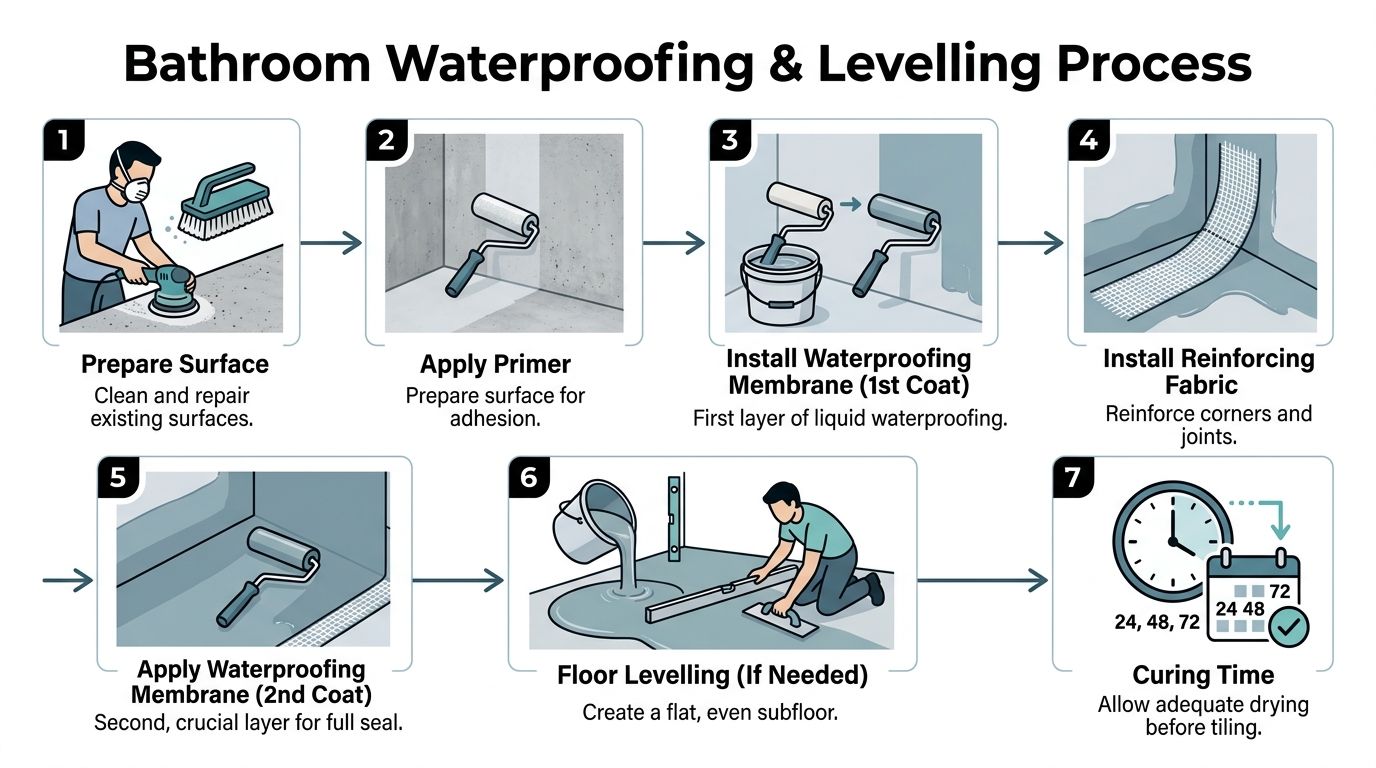
A seven-step instructional infographic explaining the professional process of bathroom waterproofing and floor levelling for renovation.

Waterproofing is the part that protects the house

A re tiling bathroom job in a wet area has to follow AS 3740. That standard isn't optional. It governs how wet areas are waterproofed so water doesn't migrate into framing, adjacent rooms, or lower levels.

Re-tiling a bathroom in Australia requires strict adherence to AS 3740 for waterproofing; failures to meet this standard result in a 30–40% recurrence rate of water leaks within 3 years, and 95% of long-term failures stem from inadequate substrate preparation, making pre-installation verification essential, based on this Australian bathroom waterproofing and substrate guidance.

That's why professional wet area prep matters more than the tile brand, grout colour, or feature niche. If the substrate isn't right, the waterproofing won't perform as intended. If the waterproofing fails, the tile finish won't save the room.

For a practical breakdown of compliant wet area prep, this guide on how to waterproof a shower is useful if you want to understand the sequence before work begins.

Falls levels and membrane details matter

The floor has to drain. That sounds obvious, but plenty of bathrooms hold water because the screed was rushed or the set-out didn't account for the waste location.

In practice, proper prep usually includes:

  • Surface repair and cleaning: Dust, soap residue and weak patches must be removed before primers or membranes go on.
  • Priming: The membrane system needs the correct base to bond to.
  • Bond breakers and reinforcing fabric: These are used at movement points and junctions.
  • Screeding or self-levelling where required: The floor has to support the tile and create the right falls.
  • Membrane application to the required areas: Done in the specified sequence and allowed to cure.

Later in the process, many professionals also carry out a flood test before final fit-off in shower areas. That's a sensible way to confirm the system is holding before screens, trims and fixtures lock everything in.

A visual walkthrough helps if you haven't seen the sequence before.

When owners try to save money here, they usually spend more later. Waterproofing is one of the few parts of bathroom renovations where there's no such thing as a harmless shortcut.

Selecting The Perfect Tiles and Materials

Tile selection affects how the bathroom wears, how easy it is to clean, and how well the finished room suits the way your household uses it. In Melbourne bathrooms, I start with slip resistance, tile porosity, maintenance, and the size of the room before I worry about colour.

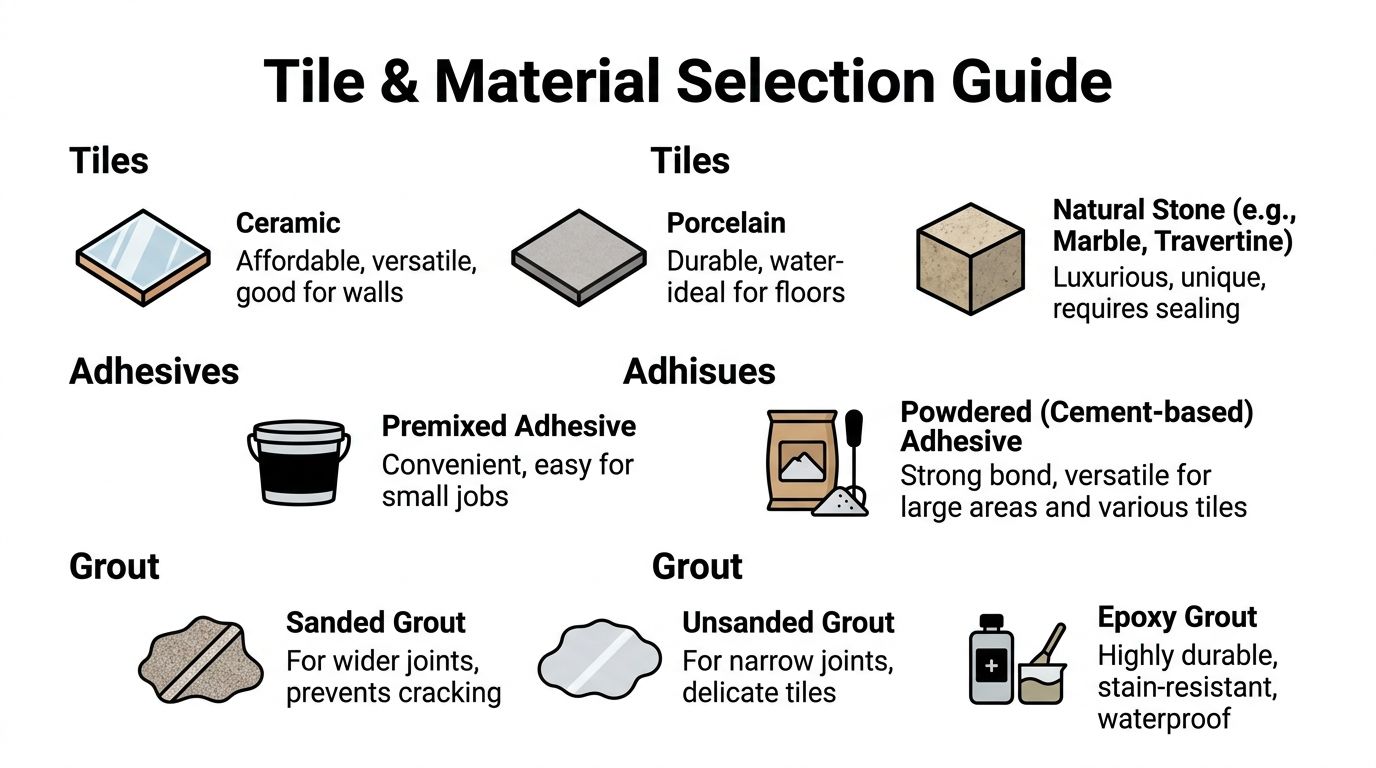
A guide illustrating various types of tiles, adhesives, and grout with descriptions for home renovation projects.

Choose tiles for the room not just the look

A tile that looks great in a showroom can be the wrong product for a wet floor or a heavily used family bathroom. Gloss wall tiles can work well on vertical surfaces. They are often a poor choice underfoot in a shower. Natural stone can look excellent, but owners need to accept sealing, product-specific cleaners, and more upkeep over time.

Here is the practical difference between the common options:

Material Where it works well Watch for
Ceramic Bathroom walls, lighter-duty areas Chips more easily than porcelain in harder-wearing spaces
Porcelain Floors, showers, family bathrooms Dense body. Harder cutting and drilling, especially around fittings
Natural stone Premium feature walls and selected floors Sealing, ongoing maintenance, and batch variation
Large-format panels such as Kerlite Contemporary walls and floors with fewer joints Handling, substrate flatness, and installer experience matter a lot

Porcelain is often the safe choice for Melbourne bathrooms because it is dense, hard-wearing, and available in finishes that suit wet areas. If you are comparing options for floors or shower walls, this guide to porcelain tiles for bathroom use gives a useful overview.

Large-format tiles reduce grout joints, which many owners prefer for cleaning and appearance. They also make any substrate issue more obvious. A bowed wall, an uneven floor, or a poor set-out will show up faster with a 600 x 1200 tile than with a smaller format tile. Smaller tiles still have a place, especially on shower floors where they help form falls to the waste.

Good tile selection balances appearance, slip resistance, maintenance, and the condition of the room you are tiling.

Adhesive and grout choices affect the result

The tile is only one part of the system. Adhesive, grout, trims, sealants, and movement treatment all need to suit the tile type and the bathroom conditions.

For dense porcelain and most wet-area work, ready-mixed adhesive is usually the wrong product. A cement-based adhesive rated for the tile and substrate is the standard approach. Large-format tiles may also need a higher-performance adhesive and careful trowelling to get proper coverage. If coverage is poor, tiles can sound hollow, crack under load, or fail around corners and fittings.

Grout choice matters as well. Light grout looks sharp on day one, but it shows staining faster in family bathrooms. Very narrow joints can look clean, but they leave less room to manage tile size variation. Stone may need a compatible grout and pre-sealing. In shower areas, changes in plane should be treated with the correct flexible sealant rather than hard grout.

A practical selection check looks like this:

  • For bathroom floors: Choose a tile finish with suitable grip for wet conditions.
  • For shower floors: Smaller formats often work better because they follow the falls more cleanly.
  • For porcelain: Use an adhesive rated for dense, low-porosity tiles.
  • For stone: Confirm sealing, cleaning, and maintenance before ordering.
  • For large-format tiles: Make sure the walls and floors are flat enough to carry them properly.

In Melbourne, product selection also needs to line up with the scope of the job. If the re-tiling forms part of broader bathroom building work, the registered builder and waterproofer should be selecting systems that work together and can be documented properly for compliance and warranty purposes. That part gets missed in generic advice, but it matters once a bathroom moves beyond a simple tile replacement.

Tiling Installation and Shower Screen Integration

This is the stage people notice. Straight lines, balanced cuts, neat mitres and crisp silicone all matter. What most owners don't see is how much of that finish depends on layout decisions made before the first tile is bedded.

Set the layout before the adhesive is mixed

Good tilers don't start in a random corner and hope the room works out. They measure the walls, check the floor, locate the centre lines, review the focal points, and work out where the cuts will land around the niche, waste, vanity and door.

A clean set-out usually aims for:

  1. Balanced cuts at edges, not a full tile one side and a sliver on the other.
  2. Level starting lines on walls, especially when floors aren't perfectly true.
  3. Controlled joint alignment through corners and around fixtures.
  4. Full adhesive coverage, not isolated blobs behind the tile.

Spot fixing is where many cracked tiles start. Tiles need support across the back, especially on floors and in showers where movement and moisture are constant factors. If a tile sounds hollow, there's often a reason.

Grouting and sealing are also part of the finish, not an afterthought. Joint widths need to suit the tile. Changes of plane should be treated correctly. Silicone work around trays, walls, screens and fixtures needs to be neat and properly bonded.

A bathroom can have expensive tiles and still look average if the set-out is poor.

Shower screen planning starts before final fit off

Frameless shower screens need more planning than people think. The tile lines, wall plumb, hob dimensions, falls, and fixing points all affect whether the final screen sits properly and seals well.

That means the screen installer shouldn't be the first person thinking about the screen. The tiler and builder should already have allowed for:

  • Straight and plumb walls
  • Enough fixing support where hardware lands
  • Clean falls back to waste
  • Correct clearances around doors and fittings

If you're comparing enclosure options, this guide to frameless shower screen installation gives a clear picture of what needs to be allowed for before measure and install.

Before handover, a careful check matters. Doors should swing properly, seals should sit cleanly, wastes should clear, and water should remain where it's meant to stay. That's the difference between a bathroom that photographs well and one that works every day.

Melbourne Costs Timelines and Builder Rules

A lot of Melbourne homeowners start with a simple plan. Keep the layout, swap the tiles, freshen the bathroom, done. Then the old tiles come off, the screed is out, the wall sheeting is tired, and the job stops being a basic re tile.
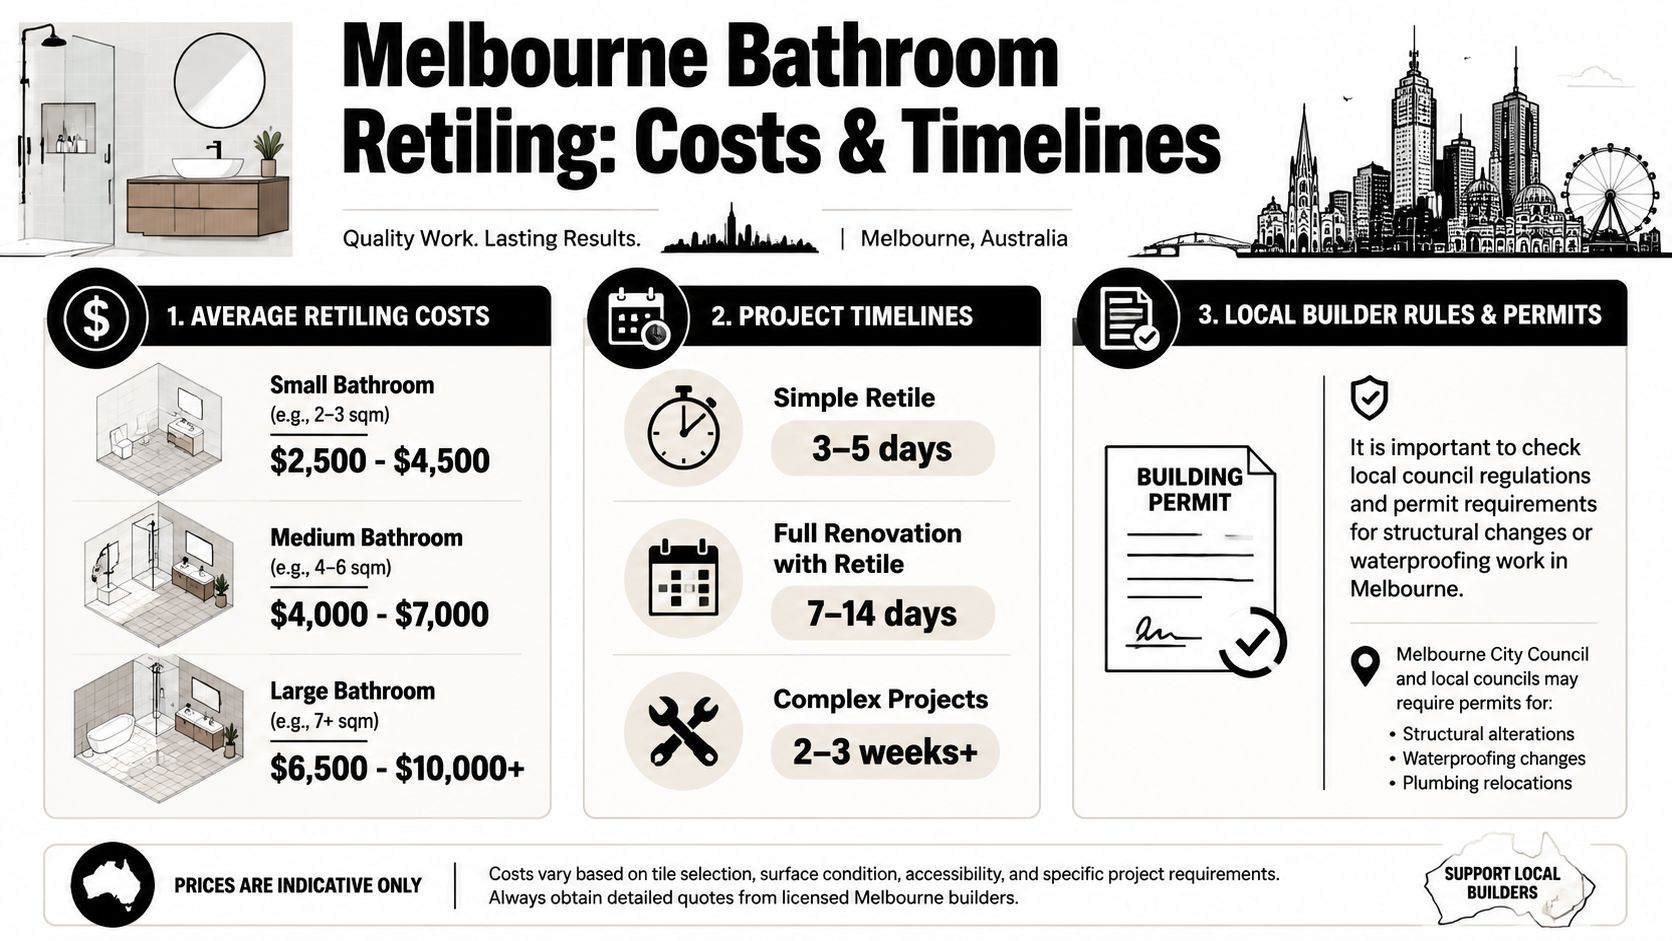
An infographic detailing average costs, project timelines, and permit requirements for bathroom retiling in Melbourne, Australia.

What re tiling and bathroom renovations typically cost

The first step is separating a tile replacement job from a bathroom renovation. They price very differently, and consequently, many quote comparisons are inaccurate.

The average cost to retile a bathroom in Melbourne ranges from $50 to $230 per square meter, with labour from $45-$85 per hour. A complete small bathroom renovation typically costs $5,000–$15,000, according to this Australian bathroom tiling and renovation cost guide.

Once the scope includes new waterproofing, plumbing changes, electrical work, new fixtures, or shower screen replacement, the budget shifts out of "retile only" territory. A full bathroom renovation budget also needs room for labour, fittings, materials, and a contingency. Analysts cited in this Australian bathroom renovation budget breakdown found that full bathroom renovation costs in Australia commonly sit well above a basic retile, with a large share of the spend going to trades and installation.

In practice, Melbourne jobs usually fall into three groups:

  • Retile only: Demolition, substrate prep, waterproofing, adhesives, grout, tiling labour, and waste removal.
  • Bathroom update: Includes tile work plus new tapware, vanity, screen, toilet, and trade fit-off.
  • Full renovation: Includes layout changes, plumbing relocation, electrical changes, new linings, and sometimes structural work.

Tile selection changes the budget fast. So does access. A ground-floor bathroom with standard porcelain tiles is a different job from a tight upstairs ensuite with large-format tiles, a frameless screen, and out-of-plumb walls that need correction before setting out starts.

Timelines permits and registered builder rules in Victoria

Timeframes depend on what sits behind the finished tile, not just the size of the room. A straightforward retile can move quickly if the structure is sound and the substrate is ready to go. If demolition exposes water damage, loose sheeting, failed screeds, or framing issues, the timeline extends because those items need to be fixed properly before waterproofing starts.

Industry guidance in this Australian bathroom renovation timeline guide aligns with what happens on site. Cosmetic work is quicker. Structural changes, custom finishes, and multi-trade coordination take longer.

Victoria also has rules that generic renovation articles often skim past. If the bathroom work includes structural changes, such as altering loadbearing walls, changing window openings, or extending the footprint, a building permit is required. That is not a paperwork detail. It affects who can do the work, how it is documented, and whether the project is compliant at handover.

Builder registration matters too. In Victoria, the Building Practitioner's Board mandates that all building work valued at $5,000 or more must be carried out by a registered building practitioner, explicitly covering domestic work including kitchen, bathroom, and laundry renovations, according to this state-by-state bathroom water and renovation regulation guide.

For a homeowner, the practical points are straightforward:

  • A like-for-like retile can turn into regulated building work once the room is opened up.
  • Permit requirements depend on scope, especially where structure is involved.
  • Registered builders and properly qualified waterproofing trades are part of risk control, not just administration.
  • Quotes should allow for rectification work, not just tile laying.
  • Busy periods can push labour rates higher and slow scheduling.

If you are comparing Melbourne quotes, check what is included. Ask whether demolition, substrate repairs, waterproofing, waste removal, silicone, grout, trims, and final fit-off allowances are in the price. Melbourne Tiling Services P/L can inspect the bathroom, confirm whether the work is a straightforward retile or part of a larger renovation, and price it under a registered builder framework where that is required.

Shower Waterproofing Membrane: The Ultimate 2026 Guide

You notice it in small ways first. A faint musty smell after a shower. Grout that never seems to dry properly. A paint bubble on the ceiling below. By the time water shows itself, it has usually been travelling for a while.

That's what catches people out in bathroom renovations. The tiles still look good. The tapware still shines. The room feels finished. But the part that decides whether the bathroom lasts is buried underneath all of that. It's the shower waterproofing membrane.

In Melbourne, that hidden layer matters even more than is commonly understood. Bathrooms deal with daily water exposure, cleaning chemicals, movement in the building, and stop-start drying conditions. Add variable humidity and cold spells, and rushed work gets exposed fast. A shower can look perfect on handover day and still be heading towards failure if the membrane was applied badly, cured poorly, or installed without proper falls to the drain.

If you're planning a bathroom renovation, fixing a leak, or comparing registered builders, this is the part worth understanding before a single tile goes on the wall.

Table of Contents

The Hidden Threat in Your Bathroom

A leaking shower rarely starts with a dramatic flood. More often, it starts with a pinhole weakness somewhere no one can see. Water gets past a junction, sits under tile, works into a wall cavity, and keeps going. Months later, the owner is staring at swollen skirting, lifting paint, or a dark patch in the room next door.

That's why I tell clients the shower membrane is the essential bathroom, and the tiles are just the finish. The membrane is the layer doing the hard work every day. If it fails, the rest of the bathroom becomes decoration over a defect.

Where the trouble usually starts

Most failures come from one of a few places:

  • Wall to floor junctions: Movement and water pressure converge.
  • Around the drain: If the system doesn't direct water properly, moisture hangs around where it shouldn't.
  • Penetrations: Shower roses, mixers, spouts, and pipes interrupt the surface and need proper sealing.
  • Hobs, niches, and corners: These details look simple on a plan, yet poor workmanship often becomes evident.

A bathroom can survive a chipped tile. It won't survive a failed waterproofing system.

A shower leak is rarely about one bad tile. It's usually about one broken chain in a waterproofing system.

Why cosmetic finishes fool people

Tiles, grout, silicone, and water-resistant linings all have a job, but none of them replaces membrane work. Grout absorbs moisture. Silicone ages. Tile assemblies move. If the waterproofing behind them isn't continuous, water finds the break.

That's what makes this part of bathroom renovations so often botched. Owners can compare tile colours and tapware brands easily. They can't see dry film thickness, curing discipline, or whether the membrane was detailed correctly around a puddle flange.

The result is simple. The most important layer in the room is also the easiest one for a rushed contractor to hide.

The Unseen Shield What Is a Waterproofing Membrane

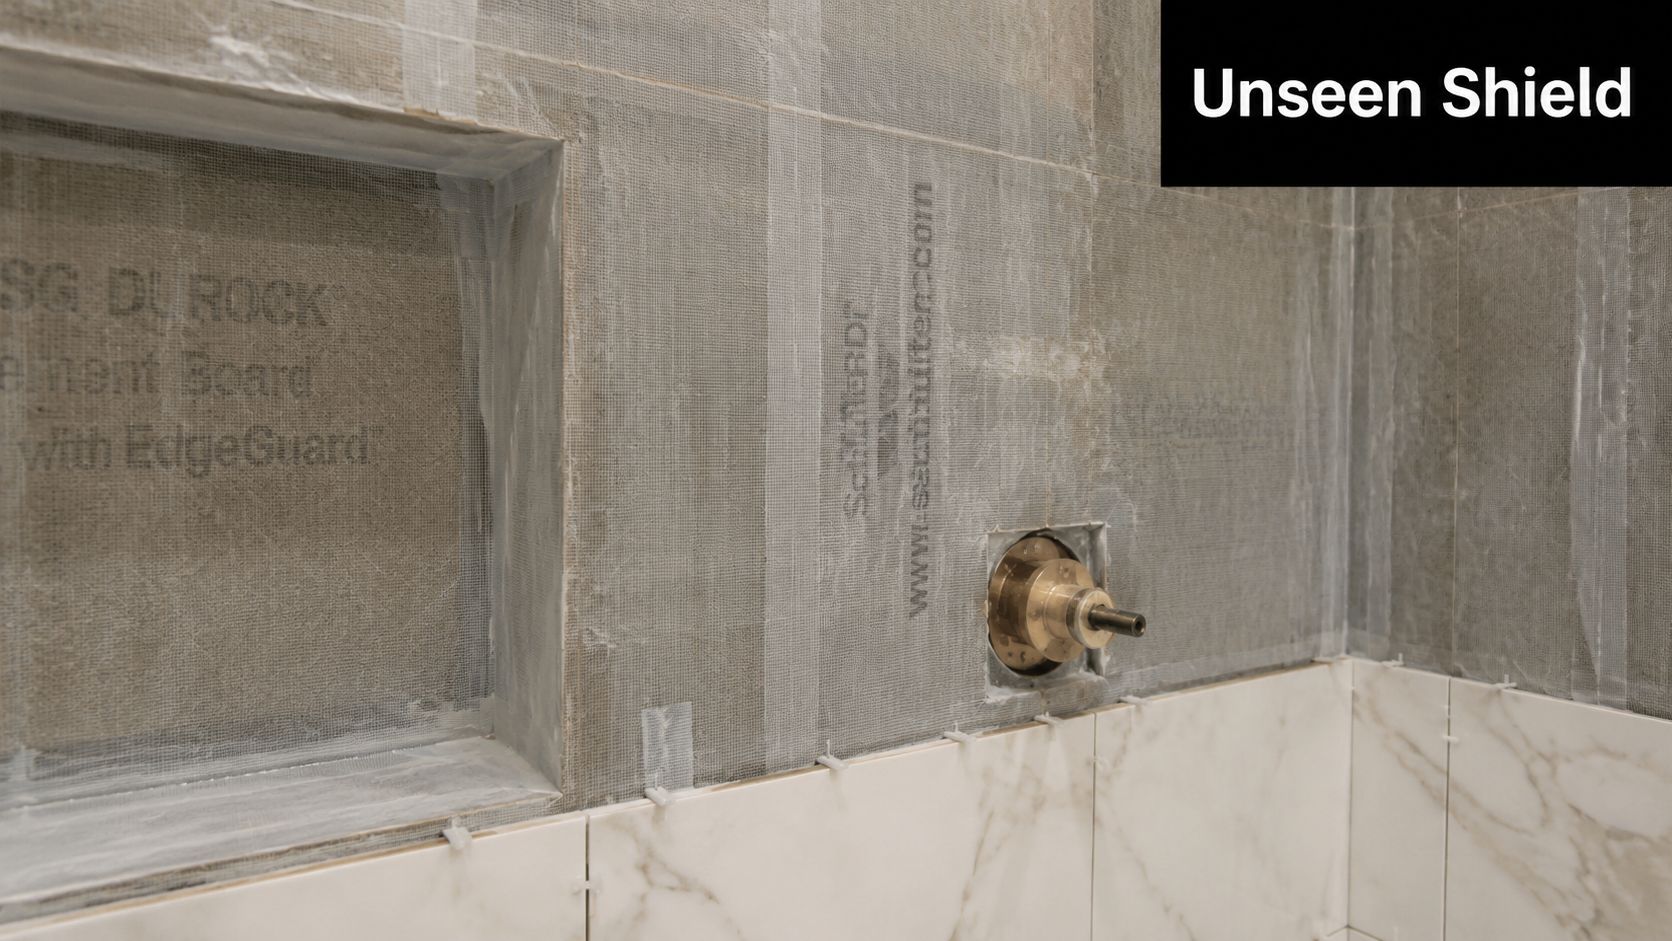
A shower waterproofing membrane is the sealed barrier between everyday shower water and the structure of the building. The easiest way to think about it is a raincoat under the tiles. The tiles are the outer clothing. They look finished and tidy, but they are not the thing keeping the frame dry.

A shower wall under construction featuring cement backer board, waterproofing tape at seams, and partially installed marble tiles.

What the membrane actually does

Its job is blunt and uncompromising. It must stop water from passing through the tiled surface and reaching substrate, framing, and adjoining materials. That means it has to work across flat areas, corners, pipe penetrations, drains, and transitions.

If that barrier is broken anywhere, the shower stops being a controlled wet area and starts feeding moisture into places never meant to stay wet.

In Australia, faulty waterproofing is one of the top three building defects, with up to 90% of all bathroom complaints relating to waterproofing and leakages in shower areas, as noted in Siniat's summary of bathroom waterproofing requirements. That figure tells you something important. This isn't a minor trade detail. It's one of the biggest defect points in the whole renovation process.

Why tiles and grout aren't enough

A lot of people still assume tiled equals waterproof. It doesn't.

  • Tiles resist wear: They give you a cleanable finish.
  • Grout fills joints: It helps lock the surface together, but it is not a guaranteed water barrier.
  • Water-resistant boards help manage exposure: They are not a substitute for a compliant membrane.
  • Silicone handles movement at changes of plane: It can't carry the waterproofing system on its own.

That's the mistake. People trust the visible layer because it looks solid. In practice, the visible layer sheds some water and slows the rest. The membrane is what stops it.

Why continuity matters more than product marketing

The membrane only works when it forms one uninterrupted system. It can't stop at the easy parts and leave the critical details weak. Corners, drains, hobs, and penetrations are where good installs separate from bad ones.

If you want a practical walkthrough of the sequence, this guide on how to waterproof a shower properly shows the process in the order it needs to happen.

Practical rule: If someone tells you the tiles, grout, and silicone will “keep most of the water out”, they've already missed the point.

Choosing Your Armour Sheet vs Liquid-Applied Membranes

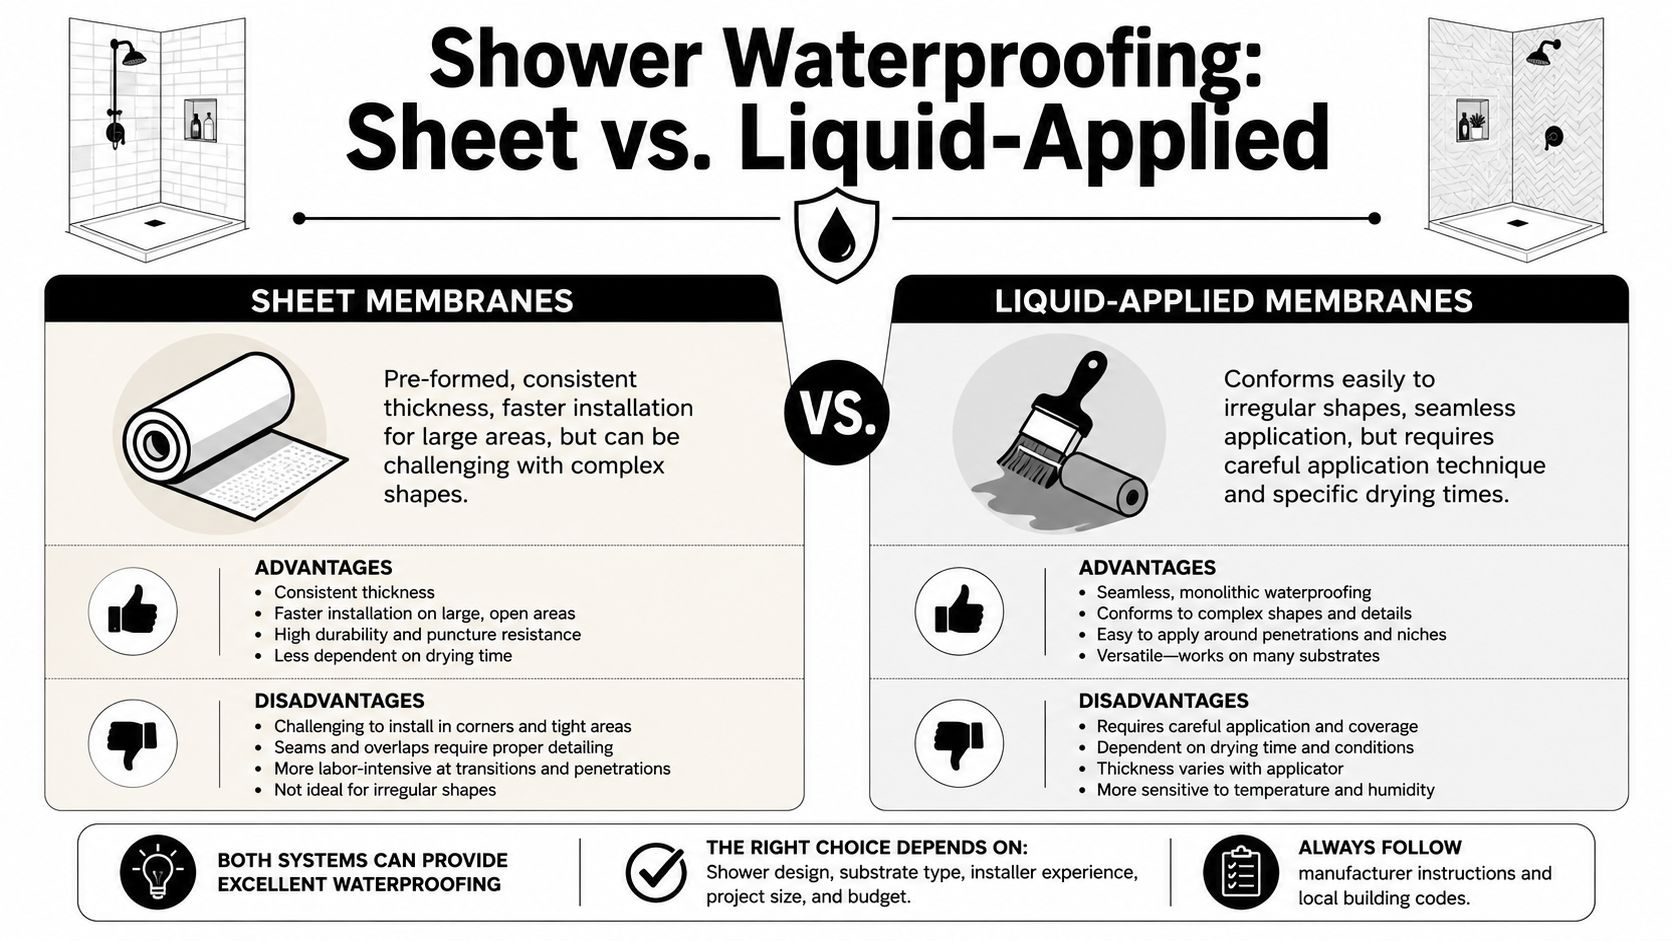
Not all membranes are installed the same way, and not all showers suit the same system. In practice, most bathroom renovations come down to sheet membranes or liquid-applied membranes. Both can work. Both can fail. The difference is usually in the detailing, substrate, and the person installing them.

A comparison infographic between sheet and liquid-applied shower waterproofing membranes, explaining their pros, cons, and use cases.

The core difference

A sheet membrane is a manufactured layer that gets cut, bonded, lapped, and sealed into place. A liquid membrane starts wet and is rolled, brushed, or trowelled on, then dries into a continuous barrier.

That sounds straightforward, but the trade-offs are real.

  • Sheet systems give you factory-made consistency in the membrane body itself.
  • Liquid systems adapt better to odd shapes, fiddly details, and irregular geometry.

The catch is that each system has its own failure points. Sheet systems rely heavily on seam treatment. Liquid systems rely heavily on application control.

Sheet vs Liquid-Applied Waterproofing Membranes

Feature Sheet Membrane (e.g., Fabric-Reinforced) Liquid-Applied Membrane (e.g., Polyurethane)
Thickness control Factory-made membrane thickness is consistent Installer must achieve correct thickness across the whole area
Corners and junctions Needs careful folding, bandaging, or preformed corner details Conforms easily to corners and complex shapes
Seams Seams are the critical weak point if badly lapped or bonded Fewer sheet joins, but continuity still depends on careful detailing
Speed on open areas Often efficient on simple, larger surfaces Can be slower because multiple coats and drying stages are needed
Complex penetrations Can be more fiddly around pipes and niches Usually easier to dress around penetrations
Substrate variation Good on flat, well-prepared surfaces More forgiving on shapes, less forgiving on poor prep
Quality risk Usually in overlaps, corners, and drain integration Usually in thin spots, pinholes, or rushed recoating
Best fit New builds or straight-forward layouts with clean geometry Renovations with awkward details, mixed surfaces, or custom shapes

What works well with sheet membranes

On clean, square substrates, sheet membranes can be an excellent choice. If the shower base, walls, and corners are well built, the installer can create a very controlled system. The membrane thickness isn't being guessed at on site because the material arrives as a manufactured sheet.

That's the upside. The downside is precision. One sloppy overlap, trapped air pocket, badly dressed corner, or poor drain connection can compromise the system. Sheet work rewards methodical installers.

What works well with liquid-applied membranes

Liquid membranes suit renovation work because bathrooms are rarely perfect once stripped out. Walls can be out slightly. Penetrations can be awkward. Niches, hobs, and transitions can be easier to detail with a brush and roller than with cut sheets.

The trade-off is consistency. The installer has to build the membrane to the required thickness everywhere, not just where it's easy. The verified Australian guidance around shower membrane application is very clear on the importance of thickness and cure. The ARDEX guide to liquid-applied waterproofing membranes states a minimum total dry film thickness of 1.0 mm for floor applications, notes full curing after 3 days at 23°C or 5 days at 10°C for an example system, and requires the membrane over the hob to extend at least 150 mm beyond the outside edge.

That's why liquid systems don't forgive rushed work. If someone lays it on too thin, skips reinforcement where required, or tiles before cure, the barrier looks finished before it is finished.

How I'd decide between them on a real job

I'd look at the job in this order:

  1. Substrate condition: Flat and simple can suit sheet. Irregular renovation work often suits liquid.
  2. Detail complexity: More penetrations, nib walls, niches, and custom geometry usually push the decision towards liquid.
  3. Installer skillset: A membrane is only as good as the team applying it. Product choice doesn't rescue poor workmanship.
  4. Programme pressure: If the timeline is compressed, that's a warning sign. The right answer isn't the “fastest” membrane. It's the system the team can install properly without forcing the next trade in too early.

Good waterproofing isn't about choosing the fanciest product. It's about choosing the system the site conditions and installer can support without shortcuts.

The Rulebook Meeting AS 3740 and Builder Compliance

Most owners hear “AS 3740” and switch off because it sounds like paperwork. That's a mistake. The standard matters because it tells you how a wet area must be built so water goes where it should, and nowhere else.

In plain terms, AS 3740 is not there to make bathroom renovations harder. It's there because bathrooms fail in predictable ways, and the standard is written around preventing those failures.

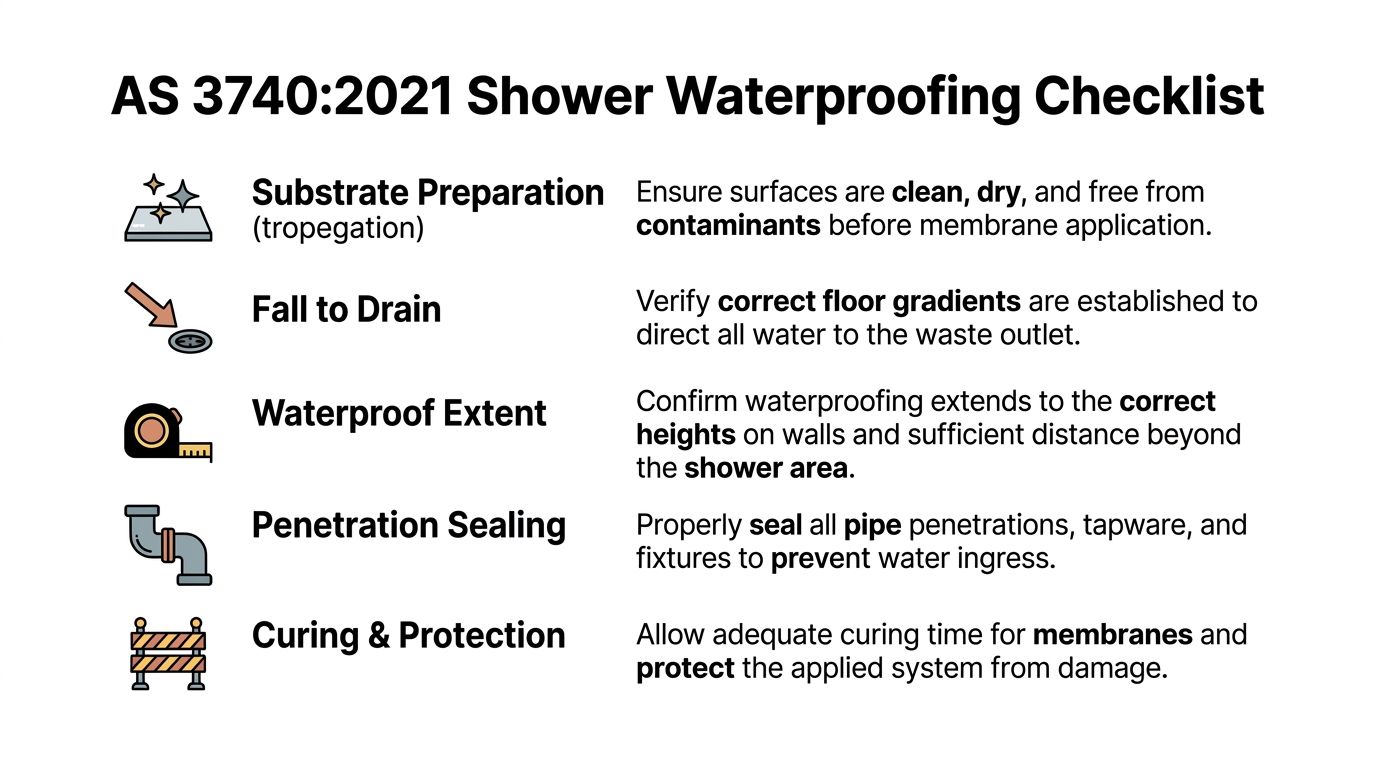
A checklist infographic outlining AS 3740:2021 standards for proper shower waterproofing preparation and installation steps.

The wall height requirement is about splash and saturation

One of the most important changes people need to understand is shower wall coverage. In Victoria, all bathroom renovations, including complete stripping back to substrate, must comply with AS 3740:2021, which mandates shower walls be waterproofed to a minimum height of 1800mm above the finished floor level, or 50mm above the shower rose if the rose is higher, according to this explanation of AS 3740 requirements for Victorian wet areas.

That requirement isn't arbitrary. Showers don't just wet the bottom of walls. They create repeated splash, misting, and runoff well above the old minimal treatment zones. Waterproofing only at the junction is like wearing gumboots in a storm and expecting your shirt to stay dry.

Falls and drainage are part of waterproofing

People often separate waterproofing from drainage. On site, they're tied together. A membrane can be intact and the shower can still fail if water sits where it should be moving.

The updated AS 3740:2021 guidance in Australia requires shower walls to be waterproofed to 1800 mm above the finished floor level or 50 mm above the shower rose, whichever is higher, and in commercial wet areas the membrane must be graded to the drain waste puddle flange, with no opting out, as outlined by ABCG's overview of the new waterproofing standard.

That grading requirement matters because standing water increases stress on every junction, every penetration, and every weakness in workmanship. If the shower floor doesn't fall properly, the membrane and the tile assembly stay wetter for longer.

Why registered builders matter

Compliance isn't just a membrane brand and a ticked box. It's coordination.

A registered builder looks at the whole chain:

  • Substrate preparation: Framing, sheeting, and set-out have to support the waterproofing system.
  • Drain location and puddle flange detailing: These are not accessories. They are part of the system.
  • Trade timing: Waterproofing can't be rushed because the tiler is due tomorrow.
  • Inspection and documentation: The work has to stand up later, not just look neat on the day.

If you're engaging a builder or waterproofer, ask how they handle compliance records and whether they issue the right documentation. This guide to a waterproofing compliance certificate in Victoria is useful because it shows what proper accountability looks like.

Rules only work when someone enforces them on site

Standards don't build bathrooms. People do.

The reason registered builders matter is simple. Someone has to control sequencing, reject bad substrate, hold back tiling until waterproofing is ready, and make sure each trade leaves the next one a compliant surface to work from. Without that oversight, the standard becomes a set of good intentions buried under tile adhesive.

Why Waterproofing Fails and How to Prevent It

Waterproofing failures usually aren't mysterious. They come from predictable mistakes, repeated on jobs where someone is rushing, guessing, or relying on cosmetic finishes to cover technical defects.

The pattern is familiar. The bathroom looks complete. The leak shows up later.

A close up view of shower floor tiles with a drain showing potential gaps needing waterproofing.

Failure starts before the membrane goes on

A membrane can't fix a dirty, damp, unstable, or badly formed surface. If the substrate is dusty, contaminated, or moving, adhesion suffers. If falls are wrong before waterproofing, the membrane follows bad geometry.

These are the common red flags:

  • Poor prep: Dust, residue, loose sheeting, or moisture left in the substrate.
  • Bad geometry: No proper fall to waste, uneven transitions, or awkward build-ups around the drain.
  • Untreated penetrations: Pipes and fittings interrupt the membrane plane and need proper detailing.
  • Damage between trades: A membrane can be compromised after application if later work isn't controlled.

Thin application means weak protection

This is one of the biggest issues with liquid systems. People see coverage and assume performance. They're not the same thing.

If the membrane goes on too thin, the cured layer may look continuous but still allow moisture transmission. Weak spots often show up at corners, around floor wastes, over hobs, and at changes of plane where the brush or roller work gets inconsistent.

If the waterproofing is only heavy where the installer can see it easily, it probably isn't right where it matters most.

Melbourne's climate punishes rushed curing

Local conditions really matter. Recent 2025–2026 data from Australian Waterproofing Company shows 25% of shower membrane failures in Melbourne are due to tiling before the membrane fully cured, and that Melbourne's variable climate can extend drying times beyond manufacturer claims, according to Dunlop Trade's discussion of shower waterproofing membrane selection and curing.

That aligns with what experienced site teams already know. A membrane doesn't cure by the calendar on the box if the room is cold, closed up, or carrying high humidity. In Melbourne, one day can be dry and mild, the next cool and damp. If a contractor treats every bathroom like a laboratory-controlled environment, they're taking a gamble with your walls and floor.

The mistake owners rarely see

Tiling too early is dangerous because it hides the problem immediately. Once adhesive and tile go over a membrane that hasn't fully cured, the system gets sealed in before it has reached proper performance. You can't inspect that later without demolition.

A useful visual explanation sits below. It helps homeowners understand where leaks often begin and why drain zones and transitions deserve extra attention.

How to prevent failure on a live renovation

Prevention isn't glamorous. It's disciplined.

  1. Start with the substrate: Clean, dry, stable, and formed correctly to falls.
  2. Use the membrane system as specified: Don't mix random components because they're “close enough”.
  3. Control thickness and detailing: Corners, penetrations, hobs, and drains need deliberate work, not quick touch-ups.
  4. Respect cure times: Programme pressure is not a technical justification.
  5. Protect the membrane before tiling: Damage from later trades is still membrane failure.

Most shower leaks are expensive because they stay hidden while the damage spreads. The fix isn't heroic workmanship later. It's patient workmanship at the exact moment people are tempted to rush.

The Full Picture Cost Compatibility and Maintenance

Owners often ask the wrong cost question. They ask what waterproofing adds to the renovation instead of what failure removes from it. Waterproofing is one of the least visible parts of the job and one of the most important to get right.

A proper membrane system has to work with the substrate, the adhesive, the tile format, the falls, and the sequencing of the trades. If one part is mismatched, the room might still finish neatly, but long-term performance starts to slip.

Cost is tied to complexity, not just area

A simple shower on straight walls is one thing. A shower with a niche, a hob, awkward penetrations, mixed substrates, and detailed stone work is another. The membrane itself is only part of the cost. The primary value is in proper preparation, detailing, cure management, and accountability if something goes wrong.

That's why cheap quotes can be misleading. The number on paper may exclude the patience required to do the work properly.

Compatibility matters more than people think

Large-format porcelain, mosaics, natural stone, sheet systems, liquid systems, adhesives, and substrates all interact differently. A good installer doesn't just ask what tile you like. They ask what the tile requires underneath.

  • Large-format tiles: These demand flatter surfaces and place a premium on accurate substrate preparation.
  • Mosaics on shower floors: They follow falls well but increase the number of grout joints and need careful drainage detailing.
  • Natural stone: This may need specific adhesive and sealing considerations depending on the stone and substrate.
  • Membrane-to-adhesive compatibility: The waterproofing product and tile adhesive have to be used as a system, not guessed at from separate brands and assumptions.

If that compatibility conversation never happens, that's a warning sign.

Maintenance protects the system you already paid for

Even the best shower waterproofing membrane doesn't mean the bathroom can be neglected. Surface maintenance won't replace the membrane, but it does reduce avoidable stress on the assembly.

A simple maintenance routine helps:

  • Check silicone joints: If movement joints are splitting or shrinking, deal with them early.
  • Watch drainage: If water lingers after a shower, don't ignore it.
  • Keep ventilation working: Bathrooms need moisture removed, not trapped.
  • Treat cracked grout as a signal: It may be minor movement, or it may be showing a bigger issue underneath.
  • Don't assume new means permanent: Wet areas age through use, cleaning, and movement.

According to Precision Business Insights' overview of the Australian waterproofing membranes market, high-quality waterproofing membranes typically last between 7 to 10 years under normal conditions, with industry guidelines recommending a refresh every 10 to 15 years to prevent water penetration.

That doesn't mean every bathroom suddenly fails at a set age. It means membranes are part of a working wet-area system, not a forever product you install once and stop thinking about.

Your Renovation Checklist Hiring the Right Professional

If you want a leak-free bathroom, don't start by asking what membrane brand someone uses. Start by asking how they run the whole job. Waterproofing succeeds when the builder, waterproofer, and tiler work in sequence and someone takes responsibility for the final outcome.

That's why bathroom renovations go better under registered builders who control the process instead of leaving each trade to protect itself.

Questions worth asking before work starts

Use this as a practical shortlist when you're interviewing contractors.

  • Are you a registered builder, or who is taking overall responsibility for the renovation? If no one owns the whole chain, defects get bounced between trades later.
  • How do you make sure the shower meets AS 3740 requirements on site? The answer should mention substrate, falls, wall extent, penetrations, and drainage details, not just “we waterproof everything”.
  • What membrane system are you using, and why does it suit this bathroom? A real answer connects the product to the substrate and layout.
  • How do you deal with niches, hobs, corners, and pipe penetrations? These are the places that reveal whether someone has a process or just confidence.
  • What is your curing process before tiling starts? If the answer sounds vague or too fast, keep digging.
  • How do you protect the membrane between application and tiling? Damage after waterproofing still counts as failed waterproofing.
  • What documentation do I receive at the end? This matters for compliance, future sale, and dispute protection.

What a good answer sounds like

A capable professional usually speaks in sequence. They talk about demolition, substrate condition, rectification if needed, falls, membrane application, cure management, inspection, then tiling. They don't jump straight to tile finish, grout colour, or how quickly they can start.

They also won't promise that waterproofing is easy. Good operators know wet areas are detail-heavy and don't like pretending otherwise.

The best contractor isn't the one who sounds the fastest. It's the one who can explain where showers fail and what they do to stop that happening.

One team is often safer than multiple disconnected trades

There's a reason many difficult bathrooms go wrong when owners split the job across separate people. One person strips the room, another sheets it, another waterproofs it, another tiles it. If a leak appears later, everyone says the defect started before they arrived.

A single accountable team reduces that problem. It doesn't eliminate the need for skill, but it does reduce the handover gaps where defects get buried.

If you're comparing local options, this list of tiling contractors near you in Melbourne is a useful place to begin your shortlist.

The final filter

Before you sign anything, ask yourself one plain question. Does this contractor talk about waterproofing like a hidden technical system, or like a quick prep step before the main work starts?

That answer tells you almost everything.


If you want a bathroom renovation team that understands shower waterproofing membrane systems from demolition through to final tiling, Melbourne Tiling Services P/L offers registered builder oversight, coordinated licensed trades, and practical wet-area experience across Melbourne and greater Victoria. For homeowners who want the job done once and done properly, they're worth speaking to early.

Porcelain Tile Durability: A Melbourne Renovator’s Guide

You're probably staring at tile samples that all look good under showroom lights. Large format stone-look porcelain on one board. A soft matt terrazzo look on another. Maybe a polished option that seems premium until you start wondering what it'll be like on a wet bathroom floor at 7 am when everyone's rushing.

That's where most bathroom renovations go off course. People choose with their eyes first, then deal with the consequences later. In Melbourne homes, the true measure isn't how a tile looks on display. It's how it performs after years of hot showers, cleaning products, foot traffic, movement in the substrate, and moisture sitting where it shouldn't.

As a tiler and registered builder, I can tell you this. Porcelain tile durability is rarely about one feature on a box. It's about whether the tile suits the room, whether the substrate is prepared properly, whether the waterproofing is done right, and whether the installation matches the format and conditions. Get those parts right and the finish can stay solid for decades. Get them wrong and even a premium tile can fail.

Table of Contents

Why Porcelain Tile Durability Matters in Your Renovation

A bathroom can look finished on handover day and still be heading for trouble. I see it in Melbourne renovations where the tile choice was driven by colour and price, while the floor levels, waterproofing details, and installation method were treated as secondary. A few months later, the problems show up. Slippery floors, chipped edges, stained grout, drummy spots, and water finding its way where it should not.

Porcelain is a strong material, but durability in a renovation is never just about the tile itself. In a bathroom, the tile has to work as part of a system that includes the substrate, falls, adhesive coverage, movement joints, grout, and waterproofing. If one part is wrong, the finished surface wears poorly even when the tile was a decent product.

That matters even more in Melbourne homes, where I often see timber subfloors in older properties, mixed substrates in extensions, and bathrooms updated over surfaces that needed more correction than the quote allowed for. Those conditions affect how a tile performs long after the showroom sample has been forgotten.

Showroom appeal versus site conditions

A tile can look perfect under display lighting and still be a poor choice for a family bathroom. Polished finishes can show wear and residue faster. Some large-format tiles suit walls better than wet floors because the layout leaves less room to manage falls cleanly. A tile with hard square edges can chip if the substrate moves or if the installer leaves poor support under corners.

Homeowners usually focus on the visible finish. Builders and tilers have to look at the load the room puts on the whole assembly.

I tell clients to assess bathroom tiles in this order:

  • Location: main floor, shower floor, wall, niche, or balcony edge all place different demands on the tile
  • Surface performance: grip, cleanability, and how the finish handles soap, water, and daily use
  • Tile size and edge type: whether the format suits the room dimensions, floor falls, and set-out
  • Installation conditions: whether the substrate is flat, stable, and properly prepared before waterproofing and tiling start

A durable bathroom comes from matching the tile to the room, then building the substrate and waterproofing to suit it.

Why durability affects the whole renovation budget

The tile itself is rarely the expensive part of a failure. The cost sits in the rework. Pulling out screens or vanities, removing surrounding tiles without damaging adjacent finishes, repairing the base, redoing waterproofing, and trying to match discontinued tiles is where a cheap decision turns into an expensive one.

This is why porcelain tile durability should be treated as a renovation risk issue, not just a product feature. A registered builder should be looking at the hidden work and the finished surface together. If that coordination is missing, even a good porcelain tile can end up in a bathroom that ages badly, needs repairs early, or fails where water management should have been sorted from the start.

Decoding the Technical Durability Ratings

The technical sheet matters, but only if you know what the terms mean. Most homeowners see a string of abbreviations and ratings and assume the highest number must be best. It doesn't work like that. The right tile for a shower floor isn't necessarily the same tile you'd use on a laundry wall or an alfresco balcony.
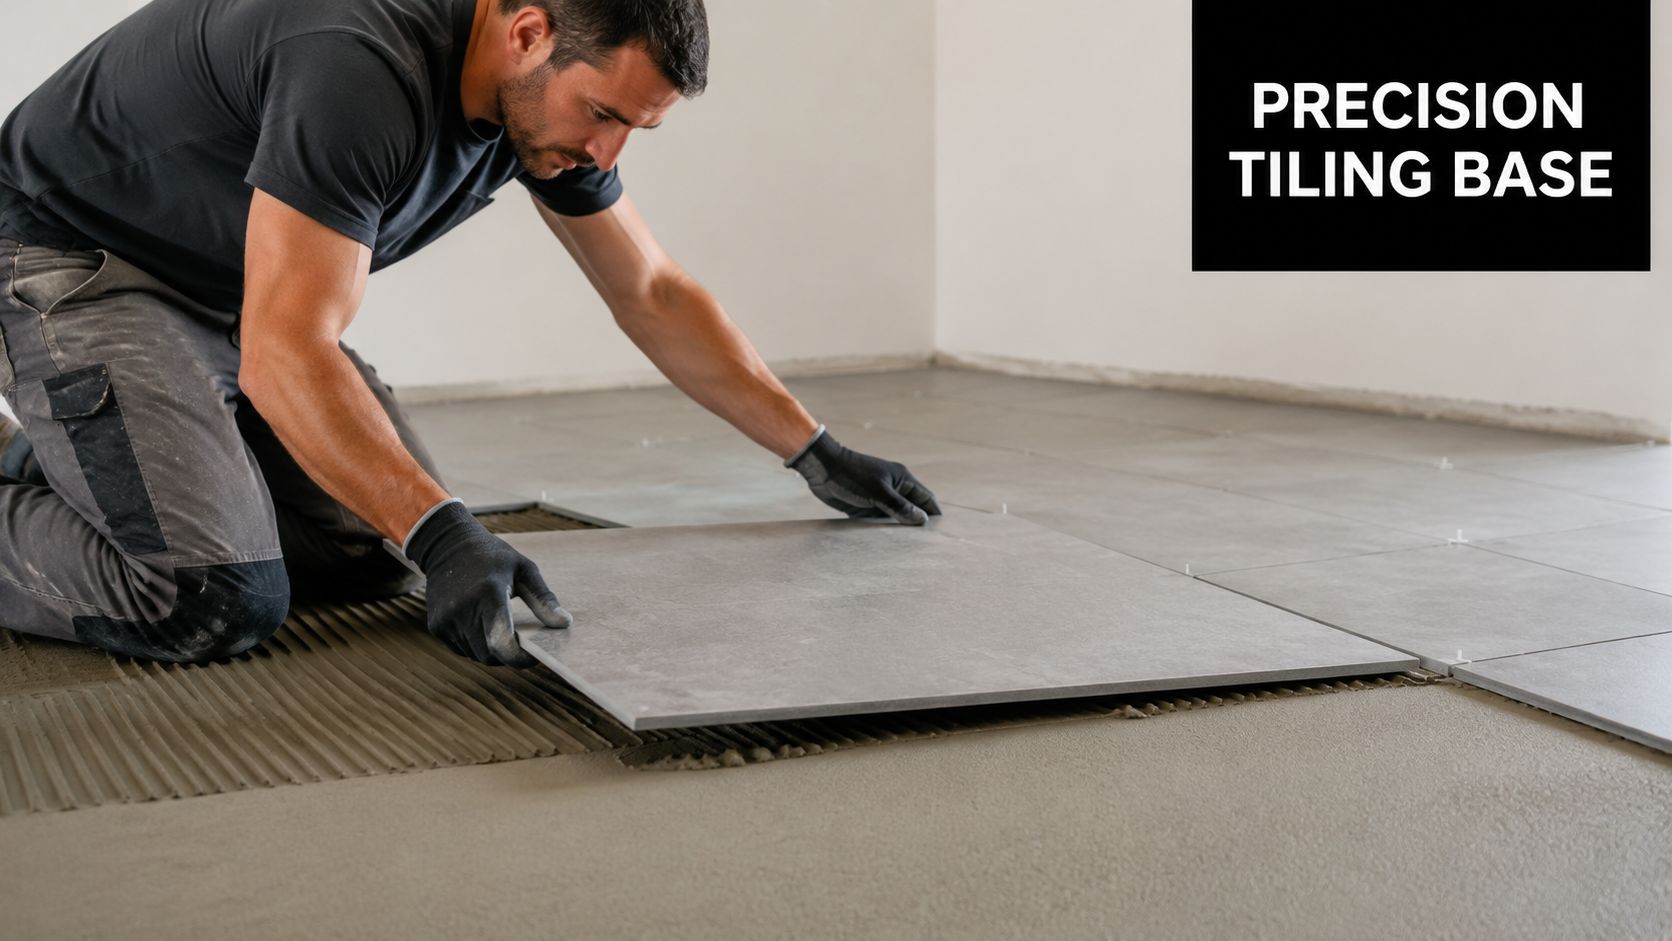
Here's the image I'd want any renovator to understand before picking a tile:

An infographic showing four key durability ratings for tiles including abrasion, slip, porosity, and scratch resistance.

What the ratings actually tell you

Start with water absorption. This is one of the clearest indicators of whether a tile belongs in a wet area. Porcelain used in these settings should have a water absorption rate of less than 0.5%, and Group B Ia porcelain tiles with water absorption ≤0.5% are mandatory for exterior and wet-area applications in Australia under AS ISO 13006, as explained in this discussion of PEI ratings and porcelain classification. If a bathroom or balcony tile doesn't meet that threshold, I wouldn't specify it for a moisture-heavy area.
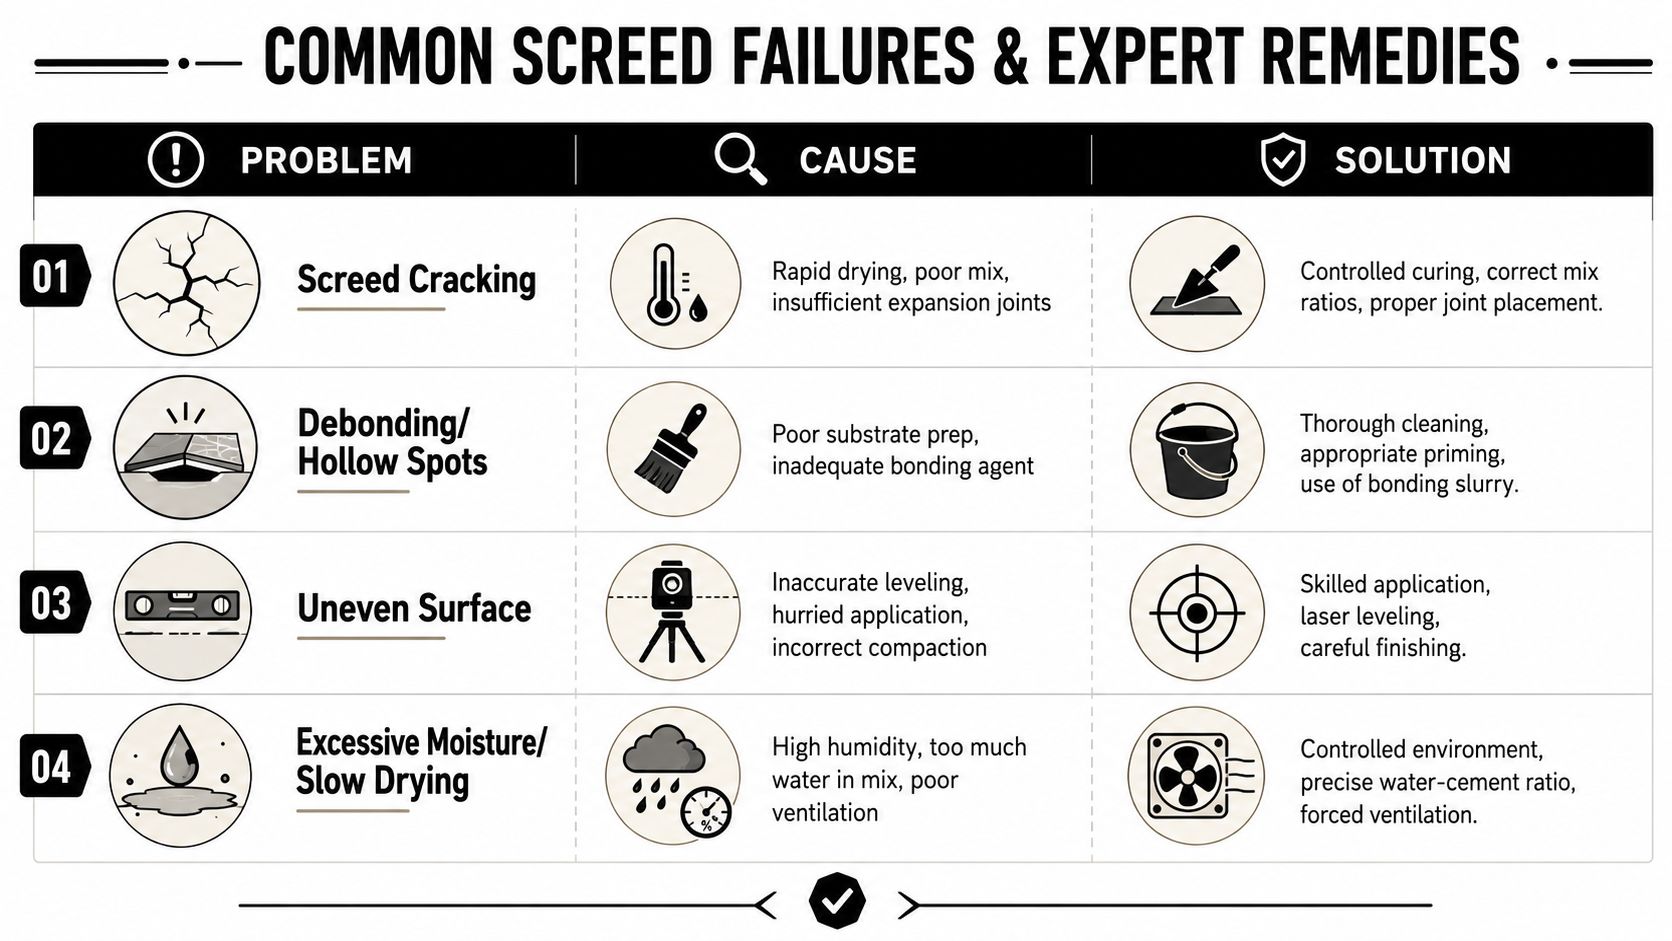

Then there's PEI. Think of PEI as a surface wear guide for glazed tiles, not a full measure of structural strength. That distinction matters. The same source notes that PEI ratings 1 to 5 only apply to glazed surfaces and don't reflect the structural durability of the unglazed porcelain body. A lot of homeowners mistake visible wear on the finish for the tile body failing, especially with natural-look and large-format products.

Mohs hardness tells you how resistant the surface is to scratching. Porcelain used for residential flooring typically sits around 5 to 6 on the Mohs scale, with premium options reaching 7 or higher, according to Jasmine McClelland Design's guide to selecting tiles. In plain terms, that means porcelain is hard-wearing enough for daily family use, but the finish still needs to suit the room. Hardness doesn't cancel out poor slip resistance or a weak installation.

Slip performance needs its own attention. The same source notes that a Pendulum BPN of 35 after 500 accelerated wear cycles is a suitable initial benchmark for level surfaces likely to be contaminated with water. That's useful because a tile needs to stay safe after wear, not just on day one.

PEI Wear Rating Guide for Residential Projects

PEI Rating Description Ideal Melbourne Application
PEI 1 Very light wear on glazed surfaces Ensuite wall tile or decorative low-contact area
PEI 2 Light residential wear Guest bathroom floor with light use
PEI 3 General residential wear Standard bathroom floor in a smaller household
PEI 4 Heavy residential wear Main bathroom floor, busy family home
PEI 5 Very heavy wear on glazed surfaces Entry-adjacent wet areas or demanding residential settings

The spec sheet traps that catch homeowners

The biggest trap is assuming one rating tells the whole story. It doesn't.

  • PEI isn't everything: It only covers wear on a glazed surface. It doesn't tell you how the tile body behaves under movement or impact.
  • Low absorption is essential in wet areas: For bathrooms, showers and external areas, the body of the tile must resist moisture uptake.
  • Hard tiles still chip if installed badly: A strong material laid over voids or on an uneven substrate can fail at edges and corners.
  • Slip rating must match the location: A wall tile finish and a shower floor finish are often two different products for a reason.

Practical rule: Read the spec sheet like you'd read a building report. No single line tells the whole story. You need the tile body, the finish and the intended location to line up.

Glazed vs Full-Body Porcelain Tiles

You finish a bathroom, everything looks sharp, and six months later a shampoo bottle clips the niche edge or a metal stool hits the floor near the vanity. The tile itself may still be sound, but the way that damage shows is very different between glazed and full-body porcelain. That difference matters more than many homeowners realise, especially in Melbourne bathroom renovations where edges, trims, and shower entries get hard daily use.

A comparison infographic detailing the differences between glazed porcelain tiles and full-body porcelain tiles in construction and durability.

How the tile is built matters

A glazed porcelain tile has a dense porcelain body with a finished surface applied over it. That surface is what gives you the detailed look of stone, concrete, terrazzo, timber, or travertine. In a residential bathroom, a good glazed porcelain tile usually performs well and gives you far more choice in colour, texture, and pattern.

A full-body porcelain tile has colour and material running through the body of the tile, or close enough in appearance that a chip is less obvious. It is often the better option where exposed edges can take knocks, or where long-term cosmetic wear matters more than decorative range.

The key point is simple. Both types can be durable. They just fail differently under impact and wear.

What that means on a real job

In most Melbourne bathrooms, glazed porcelain is the practical pick. The better products hold up well, the finish options are broader, and the visual result is usually stronger for residential design. If a client wants a natural stone look without the sealing and maintenance that comes with real stone, glazed porcelain is usually where I start. That includes finishes such as travertine-look porcelain tiles, which give you the look many homeowners want with a far more predictable maintenance profile.

Full-body porcelain earns its keep in tougher spots. Entry thresholds, laundry floors, outdoor links, stair treads, and commercial-style wet areas are the obvious examples. In those locations, a small chip on a glazed tile can expose a contrasting body and catch the eye straight away. On a full-body tile, the same damage is often much less noticeable.

That does not mean full-body is automatically the better buy. It often costs more, the design range is narrower, and it will not fix poor installation.

Where homeowners make the wrong call

The mistake I see is choosing by label instead of location.

A family bathroom with proper substrate prep, correct waterproofing, and a suitable glazed porcelain tile can last very well for years. On the other hand, an expensive full-body tile laid over movement, poor falls, or hollow spots will still chip, drum, or crack at stress points. The tile type matters, but in wet areas it has to be matched to the build-up underneath. That is where a registered builder and experienced tiler save you from the expensive failures that show up after handover.

A few practical rules help:

  • Choose glazed porcelain for most bathroom walls and floors where design realism and finish choice matter.
  • Choose full-body porcelain where exposed edges, hard use, or impact risk make visible chips a concern.
  • Look closely at niches, external corners, step edges, and trims. These areas show damage first.
  • Do not assume a harder-sounding spec solves everything. If the substrate moves or the waterproofing build-up is wrong, both tile types can fail.

Glazed porcelain usually wins on design. Full-body porcelain usually wins on hiding chips. For a bathroom renovation, the better choice depends on the room, the edge details, and whether the installation system is being built properly from the substrate up.

How Installation Quality Impacts Tile Longevity

A premium tile can still fail on a poor base. This is the part many homeowners don't see until the bathroom is already finished. The tile gets all the attention because it's visible. The substrate, waterproofing and adhesive bed decide whether the installation lasts.

A professional construction worker uses a spirit level to check the floor surface before laying tiles.

The tile is only one part of the system

In Melbourne bathroom renovations, slip safety and wear resistance need to line up with the location. Porcelain tiles used in these projects must meet a minimum slip rating of R10, or higher in wet zones, under AS/NZS 4586 and HB 198:2014, and PEI Class IV or V is recommended for areas with heavy foot traffic, as outlined in Surface Studio's guide to reading a tile data sheet. Those are useful benchmarks, but they only matter if the rest of the assembly is done properly.

A registered builder looks at the bathroom as a system:

  • Substrate condition: Is the floor level, stable and suitable for tile?
  • Falls to waste: Will water drain instead of sitting in corners?
  • Waterproofing sequence: Are junctions, penetrations and bond breakers handled properly?
  • Tile format: Does the room suit large-format porcelain or does it need more forgiving sizing?
  • Adhesive selection: Dense porcelain needs the right adhesive and coverage, especially on floors and wet walls.

If one of those steps is skipped or rushed, the symptoms show later as cracked grout, hollow-sounding tiles, poor drainage or water escaping the wet area.

Where cheap jobs usually fail

The common failures aren't mysterious. They're usually predictable.

One problem is lippage over an uneven base. Large porcelain tiles make a room look cleaner and more modern, but they also show every dip and hump in the substrate. If the floor hasn't been screeded or levelled properly, the installer ends up fighting the base the whole way through.

Another is poor adhesive coverage. Porcelain is dense. If the tile isn't bedded correctly, you can end up with voids under corners or edges. That's where impact damage and drummy sounds often start.

Then there's waterproofing that exists on paper more than in practice. A bathroom can look flawless at handover while the membrane detailing underneath is incomplete. Once moisture gets where it shouldn't, the visible tile layer won't save the room.

That's why proper coordination matters in tiling and waterproofing. The best outcomes happen when the builder, waterproofer and tiler are working to the same plan, rather than treating each trade as an isolated task.

The tile doesn't fail by itself. Usually the base moves, the water gets through, or the support under the tile was never right to begin with.

Choosing Tiles for Bathrooms Showers and Balconies

Different areas of the home punish tiles in different ways. A main bathroom floor deals with daily traffic and cleaning. A shower floor deals with constant wetting and soap residue. A balcony deals with weather exposure, drainage pressure and movement. If you choose one tile for all three without checking the technical side, you're asking one product to solve three separate problems.

This kind of outcome only happens when the specification and installation suit the space:

Screenshot from https://melbournetilingservices.com.au

Main bathroom floors

For the main bathroom floor, I look for a tile that balances wear resistance, slip performance and ease of cleaning. Often, a lot of homeowners make the wrong call with highly polished finishes that look impressive dry and clean, then become hard work once toothpaste, water marks and soap residue build up.

Porcelain is well suited here because it's vitrified at high temperatures and achieves a water absorption rate of less than 0.5%, making it nearly impervious to moisture and ideal for Australian bathroom renovations where waterproofing is critical, according to Plusco's comparison of bathroom tile materials. For a main bathroom, that low absorption is a major advantage because routine moisture exposure is unavoidable.

For most homes, I'd lean toward:

  • Matt or structured finishes: Better everyday practicality than polished surfaces.
  • Mid to large formats: Fewer grout joints, cleaner appearance, but only if the floor is prepared properly.
  • A layout that respects the room: Centre lines, door thresholds and waste locations should all be planned before tiling starts.

If you're weighing options, it helps to compare products specifically made for porcelain bathroom tiles, rather than choosing from a general tile display without reference to wet-area use.

Shower floors and wet zones

Shower floors need a different mindset. The safest and most durable tile in this area is often smaller and more textured than the wall tile beside it. That's not a design compromise. It's good planning.

Smaller formats conform to falls more easily and usually give better grip because there are more grout joints and more surface texture. What doesn't work well is forcing a large rectified tile onto a shower floor with tight falls and expecting it to drain neatly without awkward cuts or pooling.

A practical shortlist for shower areas looks like this:

  • Prioritise grip over gloss: Wet bare feet don't care how premium a polished tile looked in the showroom.
  • Match tile size to the waste and falls: The drainage layout should influence the format.
  • Keep maintenance in mind: Some heavily textured finishes hold grime more than others, so there's always a balance.

Balconies and exposed areas

Balconies are unforgiving. They deal with water, movement, temperature swings and edge exposure. A tile that behaves perfectly indoors can become a problem outside if the whole assembly isn't built for external conditions.

Large-format porcelain can work beautifully on balconies, but only when the substrate, falls, drainage points and movement joints are handled properly. That's doubly true with slim or panel-style products such as Kerlite. They can deliver a very clean finish with fewer joints, but they also demand accurate handling and support. On the wrong base, they won't forgive shortcuts.

The best balcony results usually come from restraint. Don't chase the biggest tile solely for its uninterrupted appearance. Choose the format your substrate is able to support, then install it to suit exposure, drainage and movement.

Long-Term Maintenance and Repair Tips

One reason homeowners choose porcelain is that it doesn't ask for much once it's installed properly. Due to its density and chip resistance, properly installed porcelain tiles can last over 50 years, offering stronger long-term durability than ceramic tiles, which are more prone to cracking in cold weather during outdoor balcony remediation, according to ABI Interiors' comparison of ceramic and porcelain tiles.

That doesn't mean no maintenance. It means sensible maintenance.

What to do routinely

Most of the ongoing care is straightforward:

  • Use pH-neutral cleaners: They clean the surface without being harsh on grout or finishes.
  • Wipe up residues early: Soap film and body oils are easier to remove before they build up.
  • Avoid abrasive pads: They can dull some glazed faces and roughen grout lines.
  • Check silicone and grout visually: The tile may still be perfect while surrounding joints are what need attention.

Keep the cleaning mild and consistent. Heavy-duty chemicals usually create more problems than they solve in a well-finished bathroom.

When a tile does get damaged

Porcelain is chip-resistant, not chip-proof. A dropped tool, metal ladder or hard edge impact can still damage a tile. When that happens, replacing a single tile often sounds easier than it is.

A proper repair usually involves cutting out grout cleanly, removing the broken tile without damaging the waterproofing or neighbouring edges, preparing the base again, then reinstalling and colour-matching the grout. That's why I always tell clients to keep spare tiles from the original batch. The repair is much cleaner when the replacement tile matches.

The key to avoiding repair work is getting the substrate, tile type, and installation right the first time.

Conclusion Making a Durable Choice for Your Project

The strongest takeaway is simple. Porcelain tile durability isn't just a property of the tile. It's the result of a complete system. The right tile body matters. The correct finish matters. The ratings matter. But substrate preparation, waterproofing, falls, adhesive coverage and installation quality matter just as much.

That's especially true in bathroom renovations, where moisture exposure is constant and small mistakes become expensive. A durable result comes from choosing the tile for the exact location, not for the showroom display. It also comes from working with registered builders and trades who understand how the waterproofed structure and tiled finish have to work together.

If you're planning a bathroom, ensuite, shower rebuild or balcony remediation in Melbourne, take the technical sheet seriously. Ask how the floor will be prepared. Ask what slip rating suits the wet zone. Ask how the builder is coordinating waterproofing and tiling. Those questions save money.


If you want project-specific advice from a team that handles bathroom renovations, waterproofing, screeding and porcelain installation under one roof, speak with Melbourne Tiling Services P/L. As registered builders working across Melbourne, they can assess the substrate, recommend suitable porcelain options, and help you build a bathroom or balcony finish that's designed to last.

Wall Tiling Melbourne: Your 2026 Renovation Guide

You're probably standing in a bathroom that no longer feels worth defending. The tiles look tired, the grout lines are stained, a wall may be slightly out, and every quote you get seems to describe a different job. One tiler talks about square metres. Another talks about waterproofing. A builder talks about the whole bathroom renovation, plumbing, electrical, timelines, and compliance.

That difference matters more than most homeowners realise.

A quality wall tiling job in Melbourne isn't just about sticking tiles to a wall and hoping the room looks sharp when the silicone goes in. It's a chain of decisions. Tile selection, wall preparation, waterproofing, adhesive coverage, cuts around fittings, and who is legally managing the work all affect how the bathroom performs after handover. If one part is weak, the finish may still look good at first, but problems usually show up later as cracked grout, drummy tiles, movement, moisture issues, or outright failure.

For bathroom renovations, the best results come from treating wall tiling as part of a complete building process. That's where registered builders, organised trades, and proper sequencing separate a lasting renovation from a cosmetic patch-up.

Table of Contents

Your Vision for a Perfect Tiled Wall

Often, the focus begins with the visible part. This typically involves a desire for cleaner lines, brighter walls, better proportions, and a bathroom that feels easier to live with. That's fair. Wall tiles do a lot of the visual heavy lifting in a bathroom. They set the tone of the room long before you notice the vanity, tapware, or shower screen.

In Melbourne homes, that vision often runs into site realities quickly. Older properties can have non-plumb walls, patched substrates, dated linings, or hidden moisture damage. Newer homes bring different issues, usually around rushed construction sequencing or tight tolerances around fixtures. Good wall tiling Melbourne work has to solve both appearance and performance at the same time.

Beauty follows process

A tiled wall that looks crisp usually comes from work you'll never see once the room is finished. The walls need to be clean, flat enough for the tile selected, and properly prepared for wet-area conditions. Set-out matters as much as adhesive. So do cuts around mixers, niches, windows, and trims.

Practical rule: If a contractor talks only about tile style and not about substrate, waterproofing, movement, and coverage, the conversation is incomplete.

That's also why bathroom renovations should never be treated as a single-trade job when the scope is larger. Tiling touches waterproofing, carpentry, plumbing set-outs, shower screen tolerances, and final fit-off. A registered builder looks at how those pieces work together instead of leaving each trade to solve its own corner.

What a lasting project usually gets right

A sound wall tiling project tends to share the same basics:

  • Clear tile selection: The tile suits the room, the substrate, and the level of maintenance you're comfortable with.
  • Accurate wall preparation: Irregular walls are corrected before tiling starts, not disguised during installation.
  • Wet-area compliance: Bathrooms need proper waterproofing and installation methods that respect Australian Standards.
  • Tidy sequencing: Plumbing rough-in, linings, waterproofing, tiling, grouting, and final trades happen in the right order.
  • Single-point accountability: On full bathroom renovations, someone qualified needs to own the whole process.

A perfect tiled wall isn't luck. It's what happens when design choices are matched by trade discipline.

Selecting the Right Wall Tile for Your Melbourne Home

A tile sample can look perfect under showroom lights and still be the wrong choice for the room. That shows up later, on the wall, when cuts get awkward, edges do not line up cleanly, maintenance becomes a chore, or the installation method has to be forced to suit the product.

Tile selection affects more than style. It changes setting-out, cutting time, trim choices, grout lines, substrate tolerance, and how much risk sits in the build. In a bathroom renovation, a registered builder should be weighing those knock-on effects with the tiler, plumber, waterproofer, and shower screen supplier, not leaving each trade to deal with the result after the tile has already been ordered.

What changes from one material to the next

Ceramic is the practical starting point for many Melbourne bathrooms. It is easier to cut than denser products, suits a wide range of wall sizes, and keeps labour under better control on straightforward layouts. If the walls are reasonably true and the design is simple, ceramic often gives good value without making the job harder than it needs to be.

Porcelain is denser, harder, and less forgiving to cut. It gives a sharper look and often suits newer homes and apartment bathrooms where clean lines matter, but it demands better blades, more time on cuts, and tighter planning around penetrations. The finish can be excellent. The labour is rarely the same as a basic ceramic job, even when the room size matches.

Natural stone, including marble, changes the whole brief. Stone needs careful selection, sealing, handling, and set-out because variation is part of the product. Veining, edge finish, sheet size, and the sequence of each cut all matter. The Australian Tile Council tiling facts guide notes that standard wall tiling labour in Melbourne often sits around $50 to $80 per m² for ceramic or porcelain, while natural stone can range from $100 to $160 per m² because the work is slower and more exacting.

Large-format products reduce grout joints and can make a bathroom feel calmer and larger. They also expose every defect in the wall. In older Melbourne homes, that matters. A substrate that might accept a smaller tile can become a problem with 600 x 1200 tiles, panels, or slab-style products, especially if someone tries to compensate with heavy adhesive dabs or old spot-bonding habits. Homeowners weighing oversized tiles should understand the handling and wall-preparation demands of large-format wall tiles before making a final call.

Wall Tile Material Comparison

Material Best For Durability Cost (Material & Labour)
Ceramic Standard bathroom renovations, simple wall layouts, practical budgets Durable for normal residential use Labour often falls in the $50 to $80 per m² range in Melbourne, according to the same guide
Porcelain Contemporary bathrooms, cleaner lines, refined finishes Strong and dependable in wet areas Labour often falls in the $50 to $80 per m² range in Melbourne, according to the same guide, though cutting complexity can push real project costs higher
Natural stone Premium bathrooms, marble features, period homes, custom work Performs well when installed and maintained correctly Labour often falls in the $100 to $160 per m² range in Melbourne, according to the same guide

Matching the tile to the house

The right tile depends on the room, the age of the home, and how the bathroom will be used.

  • For apartments: Porcelain and large-format tiles often suit the cleaner geometry and tighter visual style.
  • For period homes: Stone, textured ceramics, or smaller formats can sit more naturally with older proportions and detailing.
  • For family bathrooms: Easy-clean finishes, sensible grout choices, and readily replaceable products matter just as much as appearance.

One more point gets missed too often. The best-looking tile is not always the best renovation choice if the project also involves new plumbing positions, wall straightening, niches, recessed shaving cabinets, or custom shower screens. At that point, it is no longer just a tiling decision. It is part of a full bathroom build, and the tile should be chosen with the whole scope in mind.

A beautiful tile that is wrong for the wall, wrong for the room, or wrong for the budget is still the wrong tile.

The stronger choice balances appearance, installation tolerance, maintenance, and the practicalities of the build.

Beyond the Tiles The Foundation of a Lasting Finish

The visible tile layer gets the attention. The hidden work decides whether the bathroom lasts.

In wet areas, wall tiling only performs when the substrate is stable, the walls are properly prepared, and the installation method suits the room. That's why experienced tilers and registered builders spend so much time on surfaces before the first tile is laid.

A five-step infographic showing the essential foundation process for professional and long-lasting tile installation projects.

Preparation decides the result

Melbourne bathrooms often reveal problems once demolition starts. Walls may not be straight. Old plaster can be soft. Previous repairs may have left hollows, bumps, or loose sections. If those issues stay in place, the tile finish has to fight the wall the whole way.

That's where levelling, patching, screeding, and sheet preparation become essential. On older homes in particular, correcting non-plumb walls before tiling is often far more sensible than trying to hide defects with cuts and thicker adhesive. If you want a closer look at how professionals bring irregular walls back into line, this guide to screeding for tiles explains the groundwork.

A sharp tiled wall usually depends on three things before install day:

  1. The wall is sound. Loose, damp, or unstable linings need attention first.
  2. The surface is flat enough for the tile chosen. Larger tiles demand tighter tolerances.
  3. Waterproofing and tiling are sequenced properly. One rushed step can compromise the next.

Why spot fixing fails

One shortcut causes more trouble than many homeowners realise. Spot fixing, sometimes called spot bonding, uses blobs of adhesive instead of a continuous bed. It can help an installer move quickly over rough walls, but it's the wrong approach in wet areas.

According to the Qualicer paper referencing AS 3958.1 requirements, ceramic wall tiles in Victorian wet areas must be fixed with a continuous adhesive bed, not spot-fixed, to protect long-term waterproofing integrity. That matters in Melbourne bathrooms, where moisture and humidity shifts can expose weak installation methods over time.

Full coverage is not a luxury detail. It's basic trade discipline in a bathroom.

This is also why old, uneven walls shouldn't be “solved” by adding adhesive in random amounts behind the tile. Correct the wall first. Then tile it properly. That approach takes longer, but it gives the wall a fighting chance of staying bonded, square-looking, and serviceable for years.

What to Expect During Your Wall Tiling Project

Most bathroom clients feel better once they know the order of works. Tiling looks neat and controlled at the end, but the project itself moves through noisy, dusty, and highly technical stages before the room settles down.

A step-by-step infographic illustrating the professional wall tiling project process from consultation to final handover.

From first visit to finished wall

A typical wall tiling project in a bathroom renovation usually starts with a site assessment. The contractor checks wall condition, tile selection, fixture set-outs, access, and any signs of moisture or previous failure. That first visit should also flush out whether the job is simple tiling or a broader bathroom renovation needing builder-led coordination.

After that, the sequence usually looks like this:

  • Consultation and quoting: Scope is defined, tile types are discussed, and hidden risks are identified early.
  • Demolition and strip-out: Existing tiles, damaged linings, and any failed substrate are removed.
  • Wall correction: Non-plumb or uneven areas are repaired or levelled so the set-out works properly.
  • Waterproofing and prep: Wet-area surfaces are readied for tile installation.
  • Tile installation: Set-out lines, cuts, trims, and alignment are managed wall by wall.
  • Grouting and finishing: Joints are filled, surfaces are cleaned, and final details are checked at handover.

Clients often focus on the laying day, but the earlier stages are what make the tiling look calm and intentional instead of improvised.

Large format tiles need a tighter process

If you've selected large-format wall tiles, installation becomes more demanding. According to Ardex Australia technical bulletin TB001.010, tiles sized at or above 400mm x 400mm require a minimum of 95% adhesive coverage, achieved through back-buttering, and the total weight must not exceed 32 kg/m² to avoid substrate failure.

That changes what good practice looks like on site. Walls need to be flatter. Adhesive has to be applied without voids. The tile itself is buttered as part of the process. Installers also need to watch weight, handling, and bond quality much more closely than they would on a standard ceramic wall.

When large-format wall tiles fail, they usually expose a preparation or coverage problem, not a style problem.

For homeowners, the useful takeaway is simple. Ask how the wall will be prepared, how coverage will be achieved, and whether the tile selected is suitable for the substrate. A professional should answer that without hesitation.

Understanding the Costs of Professional Wall Tiling

A wall tiling quote can look sharp on paper and still leave you paying more later. I see this in Melbourne bathrooms all the time. One price covers tile fixing only. Another includes demolition, substrate repair, trims, waterproofing coordination, and builder supervision. If you compare totals without checking scope, you are not comparing the same job.

A professional tradesman reviews a tiling quote and calculates project costs while sitting at his desk.

What Your Quote Covers

For residential bathroom wall tiling, the price often includes far more than fixing tiles to a wall. According to the IBISWorld overview of Australia's tiling and carpeting services industry, residential bathroom wall tiling projects cost between $1,800 and $4,500 for labour and consumables, and vertical work adds $10 to $30 per m² compared with floor work because wall tiling involves slower setting and more cutting around fittings.

That matches real site conditions. Wall tiling is measured at eye level. Out-of-plumb corners, uneven sheets, poorly centred cuts, and sloppy trim lines stand out immediately. Add tap penetrations, shower mixers, niches, ledges, and mitred external corners, and labour hours climb fast.

A solid quote may include:

  • Installation labour: Set-out, cuts, fixing, alignment, grouting, and finishing
  • Consumables: Adhesive, grout, trims, sealants, and sundries
  • Substrate preparation: Wall straightening, patching, sheet replacement, or render correction
  • Removal work: Demolition and disposal of old tiles or damaged linings
  • Trade coordination: Programming with waterproofers, plumbers, carpenters, and shower screen installers
  • Builder oversight: Site responsibility, sequencing, defect prevention, and compliance management on renovation work

That last point matters more than many homeowners expect. In a bathroom renovation, the tiling line item can sit inside a larger job where mistakes in framing, sheeting, falls, plumbing set-out, or waterproofing show up at the tile face. That is why many clients start with local tiling contractors for bathroom renovations in Melbourne and then realise the project needs builder-level control, not just a layer of tiles.

Why one quote is low and another is not

Cheap quotes often rely on assumptions. The walls are assumed to be straight. Existing linings are assumed to be sound. Tile sizes are assumed to suit the room. Access is assumed to be easy. Once those assumptions fail, variations start.

Older Melbourne homes are where costs can shift quickly. I often find walls that are out of square, cement sheet that has softened, previous patching that should never have been tiled over, or old spot-bonded tiles hiding voids behind the finish. Spot bonding saves time on a rushed job, but it creates hollow sections, weak support, and a higher risk of cracking or failure in wet areas. Rectifying that before retiling costs money, but leaving it in place costs more.

Three factors drive price more than anything else:

  1. Tile and layout difficulty
    Mosaic sheets, stacked feature walls, stone, large-format tiles, recessed niches, and wraparound patterns all add labour.

  2. Condition of the wall behind the tile
    Good tiling starts with a surface that is flat, stable, and suitable for the system being used.

  3. Scope beyond tiling
    A simple splashback is one thing. A bathroom renovation with demolition, waterproofing, carpentry, plumbing set-out, and final tolerances is another level of responsibility.

For broader budget context, the Canstar summary of HIA 2023 bathroom renovation data notes that the average bathroom renovation cost in Australia is $26,000, with ranges from $8,000 for basic work to more than $35,000 for premium or complex projects. Wall tiling is only one portion of that total, but it is the part everyone sees every day. A low quote can still be expensive if the finish looks rushed or starts failing after handover.

Choosing Your Tiler Why a Registered Builder Matters

A bathroom renovation can start with a simple plan to retile the walls and end with plumbing changes, rotten framing, uneven substrates, waterproofing defects, and door or shower screen clearances that no longer work. Once that happens, the job is no longer just about laying tiles neatly. It needs someone who can take responsibility for the whole build.

Screenshot from https://melbournetilingservices.com.au

A builder coordinates the bathroom as a system

A good tiler focuses on set-out, adhesion, cuts, movement joints, finishes, and the visual result. A registered builder has a wider job. They coordinate demolition, carpentry, waterproofing, plumbing, electrical, glazing tolerances, sequencing, site issues, and defect responsibility so each trade works to the same outcome.

That matters legally as well as practically. In Victoria, the point where a bathroom renovation moves beyond a straightforward trade package can bring licensing, insurance, and clear project control into play. Homeowners often miss that line until the work is underway and trades start blaming each other for delays or defects.

If you're comparing local operators, look beyond the sales pitch and check whether they are tile installers or whether they can manage a renovation properly. This guide to tiling contractors near me is a useful starting point, but the key question is scope. Who is responsible when the substrate is wrong, the waterproofing needs to be redone, or the plumbing set-out throws off the tile layout?

In older Melbourne homes, that distinction is even more important. I regularly see bathrooms where the visible finish was only one part of the problem. The builder's role is to catch the issues behind the tile, adjust the sequence, bring in the right licensed trades, and keep the whole room compliant and buildable.

Questions worth asking before you sign

Ask these early, before deposits are paid and materials are ordered:

  • Who is taking responsibility for the full bathroom scope? If several trades are involved, one party should own the program and the result.
  • Who arranges and coordinates licensed plumbing and electrical work? Those decisions affect tile set-out, penetrations, and final fit-off.
  • How will wall preparation, waterproofing, and rectification be documented? Good operators can explain the process clearly.
  • What happens if demolition uncovers damaged framing, failed sheeting, or out-of-plumb walls? You want a method, not a shrug.
  • Who handles defects after handover? If trades are loosely stitched together, homeowners often end up chasing each one separately.

A short video can help you think about the difference between a basic installer and a renovation partner.

If the bathroom is being rebuilt, the person you hire should be able to explain demolition, substrate prep, waterproofing, trade sequencing, tile layout, and final tolerances, not just the tile pattern.

That is usually the difference between a quote that looks cheaper at the start and a bathroom that stays on track, meets the required standard, and holds up after handover.

Common Tiling Mistakes Melbourne Homeowners Should Avoid

A lot of Melbourne bathrooms look fine on handover day and start showing their true condition six or twelve months later. Hollow-sounding tiles, cracked grout lines, movement around fittings, and moisture issues usually trace back to decisions made before the first tile was fixed.

The shortcut worth watching most closely is spot bonding. According to this Houzz discussion of common bathroom tiling questions, many homeowners are never told why it matters. On older Melbourne walls that are out of plumb or poorly sheeted, some installers use blobs of adhesive to save time instead of correcting the surface. That leaves voids behind the tile, weakens support, and creates a higher risk of drummy tiles, cracked corners, and failure around penetrations.

Another common mistake is choosing the tile before checking the wall.

Large-format wall tiles can look sharp, but they demand a flatter substrate, tighter set-out, and better cuts around mixers, niches, and trims. If the wall prep is poor, the tile size works against you. Lippage becomes harder to control, and the finished job can look cheap even with expensive tiles.

Preparation gets cut more often than clients realise. Crooked framing, damaged sheeting, failed waterproofing, and walls that are out of square do not disappear under adhesive. They need rectification. In a full bathroom renovation, that is also where the difference shows between a tiler who is there to stick tiles on a wall and a Registered Builder who is responsible for the room as a buildable, compliant wet area.

Homeowners also get caught by low quotes that leave out the hard parts. Removal, substrate correction, waterproofing details, allowance for pattern matching, tile waste, trim selection, and coordination with plumbing and electrical work all affect the final result. If those items are vague, the price is not lower because the operator is more efficient. It is lower because scope has been pushed aside.

The avoidable mistakes are usually these:

  • Accepting spot bonding on wall tiles: Full adhesive coverage gives better support and a more durable bond.
  • Skipping substrate correction: Uneven or unstable walls telegraph through the finish.
  • Using large-format tiles on poorly prepared walls: The bigger the tile, the less room there is to hide bad prep.
  • Comparing quotes without comparing scope: Cheap prices often exclude rectification, proper prep, or finishing details.
  • Treating a bathroom renovation as a tiling-only job: Once waterproofing, demolition, plumbing, electrical, and structural issues are involved, someone needs to manage the whole build properly.

Good wall tiling Melbourne work comes from sound prep, proper coverage, clean set-out, and clear responsibility for the full scope. That is what separates a fast install from a bathroom that still looks right years after handover.


If you're planning wall tiling, leak rectification, or full bathroom renovations and want the job handled by experienced tilers and registered builders, Melbourne Tiling Services P/L offers start-to-finish support across Melbourne and greater Victoria. You can request a free quote, review design options, and get clear advice on preparation, waterproofing, tile selection, and full renovation scope before work begins.

Self Levelling Compound for Concrete: Your 2026 Guide

You've pulled up the old bathroom floor coverings, and now the slab is staring back at you. It's dusty, patchy, and nowhere near as flat as the tile sample you've got sitting on the vanity. One corner dips, another has a ridge where a previous repair was done, and suddenly the idea of laying clean, straight tiles feels a lot less simple than it did at the showroom.

That's where self levelling compound for concrete comes in. On a Melbourne bathroom renovation, it's often the step that decides whether the finished floor looks crisp and professional or slightly off forever. Large-format tiles, linear drains, tight shower falls, and neat transitions all depend on the substrate being right before a single tile goes down.

This isn't a niche product anymore. The Asia-Pacific region, including Australia, commanded 38% of the global self-leveling concrete market in 2023, with a projected market size of USD 9.10 billion by 2032, according to SNS Insider's self-leveling concrete market report. That matters because it shows how standard these systems have become in modern renovation and construction work.

In bathroom renovations, good levelling isn't about making a floor “good enough”. It's about creating the base that waterproofing, screeding, tile adhesive, and the finished tile surface all rely on. Registered builders and experienced tilers use these compounds because they solve a very specific problem fast, accurately, and with repeatable results when the prep is done properly.

Table of Contents

Introduction The Foundation of a Flawless Finish

Most bathroom floors don't fail at the tile. They fail underneath it. A slab can look solid and still be unsuitable for tiling because it has hollows, height changes, weak surface dust, or previous patch repairs that telegraph straight through the finished job.

That's why a levelling layer matters so much on concrete. It gives you a flat, predictable substrate instead of asking tile adhesive to do work it was never meant to do. Adhesive is for bonding tile. It isn't there to correct a badly out-of-plane floor across the whole room.

In Melbourne bathroom renovations, this problem shows up constantly. Old homes often have movement, previous plumbing changes, mixed substrates at doorways, and patchwork concrete where fittings have been relocated. Newer builds can still have enough variation to create issues once you start laying larger tiles or trying to achieve clean lines through a shower area.

What a proper base changes

A well-levelled concrete floor improves more than appearance. It helps with:

  • Tile adhesion because the bed thickness stays more consistent
  • Drainage control where falls need to be formed correctly in wet areas
  • Finish quality so lippage is easier to avoid
  • Workflow because the tiler spends less time fighting the substrate

Practical rule: If the floor is uneven before waterproofing and tiling start, the finished bathroom will usually show that problem somewhere. It might be at the doorway, around the waste, or across the tile edges.

A lot of homeowners see self levelling compound for concrete as a DIY shortcut. Sometimes it can be. But on a bathroom renovation, it's more accurate to think of it as a precision material. It rewards careful preparation and punishes shortcuts. That's exactly why registered builders and experienced tilers rely on it. Used properly, it creates the kind of base needed for premium finishes. Used carelessly, it can lock defects in place very quickly.

Why it's become standard practice

The growth in use across Australia isn't hard to understand. Renovations now demand flatter floors, cleaner transitions, and surfaces that can carry premium finishes without movement or visual distortion. Self-levelling underlayments answer that need better than rough patching or trying to build everything up with adhesive.

In practice, the best results come when the whole floor system is treated as one sequence. Concrete first. Surface prep next. Primer after that. Then the levelling pour. Then the rest of the bathroom build. Once you approach it that way, the finish becomes much more predictable.

What Is Self Levelling Compound

Self levelling compound is a cement-based underlayment designed to flow across a prepared surface and settle into low areas, leaving a flatter plane behind. On site, the simplest way to explain it is this: it behaves more like thick pancake batter than standard concrete.

Regular concrete is coarse and stiff. You push it, rake it, and work it into place. Self levelling compound for concrete is different. Once mixed correctly, it spreads under its own flow and helps remove minor undulations that would make tiling difficult.

An infographic explaining self-levelling compound, its consistency, and its benefits for creating flat, smooth floor surfaces.

What it does and what it doesn't do

Homeowners often confuse three different materials:

  1. Structural concrete, which forms the slab itself
  2. Traditional screed, which is used to shape or level areas manually
  3. Self-levelling underlayment, which smooths and flattens the substrate

That distinction matters. A levelling compound isn't there to replace a structural slab, and it isn't the right answer for every major defect. If the concrete is loose, contaminated, cracked badly, or moving, the leveller won't fix the underlying cause.

What it does do very well is create a smooth, flat surface for tile, timber, vinyl, or other floor finishes. In bathroom renovations, that flatter plane makes every next step easier. Waterproofing sits better, tile layout is more controlled, and the final floor doesn't show the unevenness of the old slab.

Self-levelling products are best thought of as finish preparation materials, not miracle repairs.

Why flow matters so much

The advantage of the material is in the flow. When mixed to the manufacturer's ratio, it moves into dips and helps blend transitions without endless hand-trowelling. That's why professionals use gauge rakes, smoothing tools, and spiked rollers to guide the product, not to force it into behaving like sand and cement.

A good self levelling compound for concrete should leave the floor flatter and cleaner than manual patching alone. A bad pour, though, can create ridges, trapped air, weak dusty surfaces, or edge build-up that has to be ground back later.

That's the trade-off. The product saves time and improves finish quality, but only if the slab is prepared properly and the installer respects the working time, mixing ratio, and substrate requirements.

Choosing the Right Compound for Concrete Substrates

A bathroom slab can look close enough until the first tile goes down and the lippage starts showing under the light. Product choice often decides whether the floor finishes cleanly or turns into extra grinding, patching, and delay.

For concrete substrates, the right self levelling compound is chosen by function, not marketing. In Melbourne bathroom renovations, I look at four things first. How much correction the floor needs, whether the area is internal or exposed, what finish is going over the top, and whether the job needs flattening only or shaped falls as well. Registered Builders work this way because the leveller has to suit the whole floor system, not just the pour itself.

Most bathroom jobs suit a polymer-modified cement leveller over sound concrete. It gives good flow, bonds well when matched with the correct primer, and leaves a surface suitable for tile installation. That said, one product will not cover every condition on site.

What actually matters when selecting a product

Thickness range comes first. Some compounds are designed for a skim correction, while others can handle deeper fill in a single application. If the slab has isolated hollows, doorway transitions, or an uneven set-down near the shower, the allowable build matters straight away. Use a product outside its stated range and the risks go up fast. Cracking, weak spots, delayed drying, and surface dusting are all common outcomes.

Compressive strength matters too, especially under large-format porcelain and stone. A soft underlayment under a heavy tile finish can become the failure point even when the tile adhesive is sound. For a bathroom floor, the levelling layer needs enough strength to support foot traffic, fixtures, and the tile assembly above it without breaking down.

Then check location and exposure. Internal bathroom floors are one category. Balconies, thresholds, laundries opening to external doors, and other exposed areas are another. Some products are made only for indoor use. Others are rated for broader exposure, but the rest of the system still has to match. Leveller selection does not override waterproofing requirements, movement joints, or moisture management in the slab.

There is also a point many DIY renovators miss. If the floor needs proper falls to a shower waste, a standard self leveller is often the wrong material to rely on by itself. In that case, a screeding system for tiled wet areas is usually the better approach, with leveller used only where it suits the floor outside the formed wet area.

The product data sheet should match the site condition, the tile finish, and the build sequence. If it does not, choose a different compound.

Self-Levelling Compound Selector

Compound Type Best For Typical Thickness Strength Notes
Polymer-modified cement underlayment Internal concrete floors before tiling, vinyl, or timber Thin to moderate correction, subject to product limits Check the manufacturer data sheet for compressive strength and substrate suitability
High-performance floor leveller Bathroom renovations, large-format tile support, concrete substrates needing a stronger underlayment Moderate build applications where the product is rated for that depth Suitable where higher compressive strength is specified by the manufacturer
Indoor and outdoor self-levelling compound Residential and commercial areas where exposure conditions affect product choice Depends on the exact product and environment Confirm suitability for exposure, bond, and strength before use

Professional selection is usually more conservative than DIY selection, and for good reason. Registered Builders and experienced tilers choose the compound that fits the substrate, the waterproofing method, the tile format, and the program. Homeowners can absolutely handle small, straightforward floor corrections, but if the slab is cracked, moisture-affected, out of level across multiple areas, or part of a full Melbourne bathroom renovation with tight tolerances, it is worth getting a builder or tile contractor involved before any product is mixed.

Surface Preparation and Priming The Most Critical Steps

A bathroom floor can look solid and still fail under tile if the slab is dusty, weak on the surface, or sealed in patches from old products. I see this regularly in Melbourne renovations. The leveller gets blamed, but the underlying issue started before the bag was opened.

Before any self levelling compound for concrete goes down, the concrete needs to be clean, sound, dry enough for the product system, and free of anything that will interfere with bond. That includes laitance, curing residues, paint, silicone, old adhesive, soap contamination near wet areas, and loose repair material. If any of that stays on the slab, the compound may flow nicely on the day and still release later.

A construction worker cleaning a dusty concrete floor with a heavy duty industrial vacuum cleaner.

What has to happen before the primer goes down

Inspection comes first. In a bathroom, that means checking for drummy areas, shrinkage cracks, old patch repairs, moisture-related damage, and height changes between the main floor, doorway, and shower zone. It also means deciding whether the floor needs flattening or whether it needs controlled falls. Those are different jobs. If the room needs shaped wet area falls, a proper screeding solution for tiled surfaces is often the right method, because self leveller is designed to find level, not create drainage.

Measure the slab with a straightedge. Mark the highs and lows. Check around penetrations and wall junctions where product can escape. On renovation work, I also look for the hidden problems that catch DIYers out, such as feathered adhesive residue, hairline cracking through old toppings, and surface hardeners that stop primer from soaking in properly.

Good preparation usually includes:

  • Vacuuming thoroughly until the slab is dust-free
  • Grinding or mechanically abrading weak or contaminated areas
  • Removing old adhesive, paint, and surface films
  • Sealing gaps, waste penetrations, and perimeter leakage points
  • Checking levels and setting target heights before any mixing starts

If your hand comes away dusty after rubbing the slab, it still needs work.

Priming is not the step to rush

Primer controls suction and helps the levelling compound bond to the concrete. On porous slabs, it stops the substrate from pulling water out of the mix too fast. On dense or treated surfaces, it improves adhesion and helps the leveller cure more evenly.

The trade-off is time. Primer adds another stage, but skipping it or pouring over primer that has not dried correctly can lead to pinholes, soft edges, inconsistent flow, and debonding. In a Melbourne bathroom renovation, that risk matters because the floor build-up has to work with waterproofing, set-downs, tile thickness, and finished heights at the doorway.

The drying window depends on the substrate and the primer system. As noted in this application guidance video on priming before self-levelling, non-porous surfaces generally need longer than porous ones. The safe approach is simple. Follow the product data sheet, allow full drying time, and do not assume touch-dry means ready to pour.

Registered Builders are usually stricter here than DIY renovators because this stage affects every layer above it. If the slab is cracked, moisture-affected, badly contaminated, or part of a bathroom where falls and waterproofing need to comply, get a builder or experienced tiler involved before priming starts. It is far cheaper to correct the substrate now than to pull up tilework later.

Mixing and Application Fundamentals

Good prep can still be undone in the bucket. In bathroom renovations, I see more failed levelling jobs caused by bad mixing and poor pour sequencing than by the product itself. The compound only gives you a short working window, so the job has to be set up before the first bag is opened.

A clean, organised mixing area keeps the pour controlled and the finish consistent.

A construction worker mixing self-leveling compound in a white plastic bucket using a drill with a mixer attachment.

Get the mix right before you chase speed

Set out the drill, paddle, buckets, measuring vessel, rake or finishing trowel, spiked roller, and clean water before you start. If you are still hunting for tools once the first batch is mixed, the floor will show it. For anyone putting together the basics, a proper set of tiling and floor preparation tools gives you much better control over the pour.

Water ratio matters. Registered Builders and experienced tilers follow the data sheet exactly because small changes in water content change how the product flows, how it settles, and how it cures. Add too little and the material drags and leaves ridges. Add too much and you can weaken the surface, increase laitance, and create a soft or dusty top that causes problems under tile adhesive later.

Mix each batch the same way, for the same time, with the same measured water. On a small Melbourne bathroom floor, inconsistency between batches is enough to leave visible humps, cold joints, or edge lines where one mix started tightening before the next one landed.

The application sequence should be simple and deliberate:

  1. Start at the furthest point from the doorway so you can work back toward your exit.
  2. Keep batches coming steadily so wet edges stay alive and each pour blends into the last.
  3. Move the compound into place with a gauge rake or trowel rather than pushing it around excessively.
  4. Use a spiked roller promptly to release trapped air and help the surface settle evenly.

For readers who want to watch the movement and timing of the material, this demonstration is useful:

How to estimate material without guessing

Running short halfway through a pour is one of the classic DIY mistakes. Once that happens, people start stretching the mix, reducing depth, or trying to patch in a second pour after the first has already begun to set. That is how a flat floor turns into a grinding job.

Work out the area, check the intended build thickness, then calculate bag numbers from the manufacturer's coverage guide. As noted earlier in the article, bag coverage drops quickly as depth increases, so even a small bathroom can use more material than expected if the slab has low spots or an uneven set-down.

On-site advice: Measure the deepest point, not the average point you hope for. Then allow extra material for the dips that only show up once the straightedge goes down.

This is also where professional judgement matters. Self levelling compound is designed to correct flatness. It does not replace proper bathroom falls to the waste, and it does not solve structural movement, loose concrete, or out-of-level framing beneath the substrate. In a Melbourne bathroom renovation, that distinction matters because the finished floor has to work with waterproofing heights, tile thickness, and drainage requirements. If the floor needs significant correction, if falls are unclear, or if the slab condition is questionable, that is the point to get a Registered Builder or experienced tiler involved instead of guessing and hoping the adhesive will make up the difference.

Drying Times Troubleshooting and Tiling

Monday morning in a Melbourne bathroom renovation, the leveller can look hard, pale, and ready to go. By lunchtime, a DIYer has stacked tile boxes on it and wants to start spreading adhesive. That is often the point where a tidy job starts drifting off standard.

A self levelling pour has to do more than feel firm underfoot. It needs enough cure for the next stage, and that judgement comes from the product sheet, site temperature, slab conditions, layer thickness, and what is being installed over the top. In bathrooms, that matters because any weakness below the tile usually shows up later as drummy spots, cracked grout, or loss of bond.

Walkable and tile-ready mean different things

Many compounds are designed to set quickly. A firm surface only means light traffic may be possible. It does not confirm the floor is ready for tile adhesive, waterproofing, or concentrated loads from ladders, stacked materials, and other trades.

On site, I treat early walkability as a handling milestone, not a green light to keep building over it.

The safe approach is simple. Read the manufacturer's timing for the exact product, then check the room itself. Cool weather, poor ventilation, higher build areas, and damp concrete all slow the process. In a Melbourne bathroom renovation, that delay is common in winter and in older homes with colder slabs. Rushing the tile stage to save half a day can cost far more in rectification.

If the substrate forms part of a tiled wet area, the floor also has to suit the full system above it. That is one reason clients often hand this stage and the next one to experienced floor tiling specialists in Melbourne, where substrate condition, tile finish, and bathroom tolerances are checked together instead of as separate tasks.

Common faults and what usually causes them

Most levelling failures are predictable once you know what to look for.

  • Pinholes or bubbling usually point to poor priming, residual dust, or air rising out of porous concrete.
  • Ridges, cold joints, or lap marks usually mean the pour stopped, batches were inconsistent, or the wet edge was lost.
  • A soft or chalky surface usually comes from excess water in the mix, weak surface prep, or fast moisture loss into the slab.
  • Cracking usually points to movement in the base, incorrect thickness for the product, or application over contamination.
  • Debonding or hollow patches usually mean the compound never properly keyed into the concrete.

The pattern matters. A few isolated surface defects may be repairable. Widespread bond failure usually means the floor has to come out and be redone properly.

What to do before tiling

Check the floor with a straightedge after cure, not just by eye. Bathrooms can fool people because small rooms make a floor look flatter than it is. Then inspect for soft spots, edge curl, dusting, and any area that sounds hollow under a tap test.

If the leveller is sound, flat, and cured for the next stage, tiling can proceed. If it is not, fix the substrate first. Tile adhesive is for bonding tile, not for correcting a failed levelling job or hiding poor flatness.

That is the practical difference between a DIY pour and a professional bathroom build. Registered Builders and experienced tilers use self levelling compounds because they save time and improve finish quality when the conditions are right. We also know when the floor is telling us to stop, reassess, and correct the base before waterproofing or tiling locks the problem in.

DIY or Call a Registered Builder for Your Renovation

A confident DIYer can use self levelling compound for concrete successfully in the right situation. A dry internal room, a straightforward slab, no waterproofing complexity, and enough time to prepare properly. That sort of project is manageable if you read the product sheet, measure carefully, and don't rush the primer or mixing stage.

Bathrooms are different. The floor build-up isn't isolated. It connects to falls, waterproofing, thresholds, waste positions, wall set-out, and the finished tile layout. If one part is off, the rest of the room usually has to work around it.

When DIY is realistic

DIY is more realistic when:

  • The area is simple and not part of a wet zone
  • The concrete is sound with only moderate variation
  • You can work continuously without stopping halfway through the pour
  • You understand the finish requirement before any tile goes down

That said, even small bathroom floors can punish inexperience because the room is compact. There's less space to manoeuvre, less time to react, and less tolerance for errors at doorways, shower entries, and around wastes.

When a professional should take over

In bathroom renovations, I'd strongly favour a professional when the floor needs accurate falls, waterproofing integration, or defect diagnosis before levelling begins. The tolerance is tight. Before tiling, the floor must not have more than 1/8 inch (3 mm) variation over a 6-foot (1.8 m) length, based on the tile preparation guidance cited earlier. Hitting that consistently is much easier when an experienced hand is checking the substrate.

A Registered Builder becomes especially important when the bathroom renovation involves multiple trades, compliance obligations, or coordination between demolition, plumbing, waterproofing, floor preparation, and tiling. The levelling step can't be treated as a stand-alone task in that context. It has to serve the whole bathroom assembly.

On balconies and other exposed areas, the consequences are more significant. Incorrect levelling can disrupt drainage, compromise waterproofing, and create leak issues that are much more expensive than the original floor prep would have been.

If you're unsure whether the floor needs a simple self-levelling pour or a more complete substrate correction, that uncertainty is often the sign to call someone in. In renovation work, uncertainty is rarely where the risk ends. It's where it starts.


If you're planning a bathroom renovation and want the floor prepared properly from the start, Melbourne Tiling Services P/L can help with complete bathroom renovations, floor preparation, screeding, waterproofing, and premium tiling across Melbourne. As Registered Unlimited Builders, the team coordinates the full process so the substrate, waterproofing, and tile finish all work together, not against each other.

Frameless Shower Screens Prices: Melbourne 2026 Cost Guide

A professionally installed frameless shower screen in Melbourne typically costs between $560 and $1,090, with a median around $800. That's the realistic starting point for a standard job, but the final number moves depending on the glass, hardware, layout, and how the screen fits into the rest of your bathroom renovation.

Many individuals start in the same place. They've picked the tiles, they know they want a clean modern shower, and then the quote for the screen lands with less detail than they expected. One supplier gives a supply-only figure. Another gives an installed price with no breakdown. Then someone else talks about custom glass, black fittings, wall prep, and suddenly it's hard to tell what you are paying for.

That confusion gets worse when you're planning a full bathroom renovation, not just replacing a screen. In Melbourne, the shower screen sits inside a bigger chain of work that usually includes waterproofing, floor falls, tiling, plumbing set-out, and compliance. If any of those pieces are off, the frameless screen becomes harder and more expensive to install properly.

Table of Contents

Introduction

A common Melbourne renovation scenario goes like this. The old shower has started leaking, the tiles are dated, and the homeowner wants the room to feel larger without moving walls. A frameless screen is usually one of the first items on the wish list because it changes the look of the room immediately.

The problem is that shower screen pricing often gets treated like it exists on its own. It doesn't. In real bathroom renovations, the screen only goes in properly after the waterproofing is right, the walls are straight enough, the floor falls have been formed correctly, and the tile layout has been planned to suit the glass and hardware.

Practical rule: If the bathroom hasn't been measured after tiling decisions are locked in, the shower screen number is still only a rough allowance.

That's why online calculators can be misleading. They might give you a number for a panel and a door, but they usually don't account for out-of-square walls, a hobless shower, reeded glass, matte black hardware, or the fact that a Registered Builder may be coordinating the full job.

For homeowners in Victoria, that matters. Bathroom renovations and registered builders belong in the same conversation because the screen is part of a regulated wet-area build, not just a decorative add-on. When the work is quoted properly, you can see where the money is going and where it makes sense to spend more.

Typical Frameless Shower Screen Prices in Melbourne

The clearest starting point comes from current Australian market pricing. A basic frameless shower screen starts at about $360 for a standard 2100mm x 900mm walk-in panel including aluminium channel, while a larger 1740mm x 1785mm x 2000mm three-panel sliding frameless screen can reach $690. Installation usually adds $200 to $400, which puts a standard all-in project at $560 to $1,090, with a commonly observed median total around $750 to $850 across Melbourne and greater Victoria according to hipages frameless glass shower screen cost data.

A visual guide illustrating estimated price ranges for four types of frameless shower screens in Melbourne.

Those numbers are useful because they show the difference between entry-level frameless and more complex layouts. A simple walk-in panel is one thing. A three-panel sliding setup needs more glass, more hardware, and more installation time. That's why frameless shower screens prices can look inconsistent if you compare quotes without checking the actual configuration.

What standard Melbourne quotes usually include

In a straightforward quote, you'll generally see:

  • Glass supply that reflects the panel count and size
  • Basic hardware suited to the selected design
  • Installation labour based on how long the job should take
  • A separate allowance for delivery or related site issues, because not every supplier handles that the same way

Two-panel systems sit near $410 plus $195 installation, while rectangular units sit near $550 with similar installation fees in the same pricing guide above. That places frameless firmly in the mid-to-high end of bathroom fit-out items.

The number that matters most to homeowners isn't the cheapest panel price. It's the installed number once the bathroom is ready for glass.

Why the screen cost can feel smaller or bigger inside a full reno

A frameless screen can look modest on paper until it's viewed alongside waterproofing, tiling, plumbing trim-off, and builder coordination. If you're pricing the whole room, it helps to compare the screen as one line item within the broader renovation budget rather than treating it as an isolated purchase. For a more job-specific local breakdown, this guide to shower screen installation cost in Melbourne is a practical next step.

What Drives the Cost of a Frameless Shower Screen

If two frameless screens look similar in photos but the prices are nowhere near each other, there's always a reason. The cost usually moves because of four things: the glass itself, the hardware finish, the layout, and the site conditions.

An array of glass panels and various metal shower door hardware components laid out on a table.

Glass and compliance

Frameless screens in Australia must use toughened safety glass certified to AS/NZS 2208:1996, and the requirement for fixed panels and sliding doors is a minimum thickness of 10mm under Victorian plumbing and building expectations, as outlined by Best n Buy's shower screen specification notes.

That requirement matters because thicker glass isn't just a style choice. It affects weight, hardware performance, transport, handling, and installation method. Once you move into premium selections such as 12mm tempered glass, reeded textures, or darker designer finishes, the price can rise sharply. The Australian market also shows a real premium material tax on luxury frameless products, with Bella Vista catalogue pricing including fully frameless reeded panels at $843 RRP and sliding systems at $1,628+, well above the common entry-level ranges shown elsewhere in the market, as seen in the Bella Vista shower screen catalogue.

Hardware and finish selection

Hardware changes the number faster than many homeowners expect. Hinges, handles, stabiliser bars, brackets, channels, and seals all sit in the quote somewhere. Chrome is usually the easiest place to stay sensible. Matte black, brushed finishes, and more decorative hardware push the screen into a more coordinated design package.

That's often the right move in a high-end ensuite. If the room has large-format tiles, premium tapware, and a minimal palette, basic hardware can make the shower look like the one item that was value-engineered too hard.

A frameless screen only looks expensive when the hardware and glass feel out of place. When they match the bathroom, the cost makes more sense.

Configuration and labour

Labour is one of the most misunderstood parts of frameless shower screens prices. In Australia, installation labour runs at $45 to $65 per hour. A two-panel frameless setup typically takes 3 to 4 hours, which totals $195 to $260, while a three-panel sliding door system can take 6 to 8 hours, resulting in installation fees of $400 or more, based on hipages shower screen installation pricing.

That same source notes that semi-frameless and fully frameless options broadly range from $200 to $700 excluding installation, while framed alternatives remain around $250. It also notes a clear price hierarchy, with frameless carrying a 44% to 180% premium over basic framed models because of glass thickness, hardware durability, and the cleaner minimalist finish.

Here's a short video that helps visualise what proper frameless installation involves:

Site conditions and custom work

Some bathrooms make installation easy. Others don't.

The expensive jobs usually have one or more of these issues:

  • Out-of-plumb walls that require tighter measuring and custom glass
  • Non-standard openings such as nib walls, angled ceilings, or recessed shelves
  • Bench seats or notches that force more fabrication detail
  • Hobless entries where water control and exact levels matter more
  • Tile variation that affects how neatly channels, clamps, or hinges can sit

If you want the most cost-effective outcome, standard sizes and straightforward geometry are your friends. Once a screen needs special cuts or has to solve poor preparation from earlier trades, the quote climbs quickly.

Frameless vs Framed and Semi-Frameless Screens

A lot of homeowners know they like the frameless look but still want to know if it's worth paying more for. That's a fair question. The answer depends on what matters more in your bathroom: upfront price, ease of cleaning, visual weight, or water containment.

The basic market hierarchy is already clear from the cost data cited earlier. Framed sits at the bottom end, semi-frameless occupies the middle, and frameless is the premium option. But price alone doesn't tell you what you're living with day to day.

Shower Screen Comparison

Feature Frameless Semi-Frameless Framed
Price Highest upfront cost in the three categories Mid-range Lowest entry cost
Aesthetics Cleanest sightlines and most open look Good balance of openness and structure Heavier visual presence
Cleaning and maintenance Fewer channels and edges to collect grime Some framed sections still need attention Most frame lines and channels to clean
Durability Strong glass and quality hardware, but relies on accurate install Good practical compromise Structurally familiar and budget-friendly

Where frameless earns its keep

Frameless tends to suit bathrooms where the tiles, niches, and fittings are part of the visual result. You see more of the wall finish, more of the floor, and less metal. In smaller bathrooms, that often makes the room feel more open.

It also tends to be easier to keep looking sharp because there are fewer framed edges to trap soap residue. That doesn't make it maintenance-free, but it does remove some of the spots where grime usually builds up.

Where the other options still make sense

Semi-frameless is often the practical middle ground. It keeps some of the lighter look while giving a bit more structure and often slightly easier water management around the opening.

Framed still has a place in budget-sensitive bathrooms, rentals, and straightforward replacements where cost matters more than the minimalist finish.

If the rest of the bathroom is being renovated to a premium standard, framed screens can look like a shortcut. If the room is basic and functional, framed can still be the sensible choice.

How to Get an Accurate Quote for Your Bathroom Renovation

The best quotes don't start with glass. They start with the room.

A proper shower screen quote depends on finished dimensions, wall condition, floor level, hinge position, and how the door will open around vanities, toilets, and towel rails. If you ask for a price too early, you'll get a broad estimate, not a dependable number.

Screenshot from https://melbournetilingservices.com.au

What to have ready before the site visit

You'll get a much clearer quote if you can show these decisions upfront:

  • Your preferred screen type such as fixed panel, hinged door, sliding system, or corner layout
  • Your tile selection because grout joints, tile thickness, and layout affect the final measure
  • Your hardware finish if you already know whether you want chrome, black, or another look
  • Any design constraints such as niches, shaving cabinets, wall taps, or underfloor heating transitions

A measured site visit after waterproofing and tiling planning is usually where vague estimates turn into real numbers.

Questions worth asking

Not every quote is built the same way. Ask whether the price includes supply, installation, hardware, measure, and delivery. Ask what happens if the walls are not square. Ask who is responsible for checking finished set-out before the glass is ordered.

A useful quote should also make it clear whether the screen is being considered as a standalone install or part of full bathroom renovations and registered builders coordination. That difference changes who carries responsibility if another trade leaves the opening out.

Why registered builders matter in Victoria

In Victoria, bathroom renovation projects involving frameless shower screens typically require Registered Builders to ensure compliance with the Building Act 1993. The same source notes that the median cost for a full bathroom renovation in Melbourne, including waterproofing and frameless screen installation, is approximately $10,000, according to Fresh Screens' Melbourne bathroom renovation guidance.

That's the bigger picture many screen-only quotes miss. In a full renovation, the screen is connected to waterproofing, substrate prep, drainage, tiling, plumbing trim-off, and final fit. A Registered Builder coordinates those moving parts and carries the compliance mindset across the whole room.

One practical option for that type of integrated job is frameless shower screen installation in Melbourne, where the screen is handled within the renovation process rather than treated as an isolated afterthought.

Project Timeline Warranties and Cost-Saving Tips

A frameless screen is usually one of the last visible items to go into the bathroom, but it depends on earlier work being finished properly. If the waterproofing, screed, tiling, and final set-out are still moving around, glass can't be ordered confidently.

How the job usually runs

The smooth jobs tend to follow a simple sequence:

  1. Layout is locked in and plumbing positions are confirmed.
  2. Waterproofing and tiling are completed so the finished opening can be measured accurately.
  3. Final measure happens on site after the critical surfaces are done.
  4. Glass is manufactured to suit the actual opening.
  5. Installation is booked once the bathroom is ready and protected.

That order matters because frameless glass doesn't forgive guesswork. Even small set-out changes affect how doors swing, how seals land, and whether the margins look even.

What to check on warranties

Ask separately about the glass, the hardware, and the installation workmanship. They're not always covered under one simple promise. You also want to know what maintenance is expected, especially around sealant, cleaning products, and moving hardware.

Because the product must use AS/NZS 2208:1996 toughened safety glass with a minimum 10mm thickness for fixed panels and sliding doors, compliance isn't optional. It's part of the baseline for a lawful and safe installation in Victoria, as outlined in the earlier cited specification guidance.

Cheap glass isn't the bargain in a wet area. Correct glass, correct set-out, and correct waterproofing are what prevent expensive callbacks.

Where you can save without regretting it

There are smart ways to reduce cost without gutting the result:

  • Choose standard sizes where possible because custom fabrication pushes the quote up fast.
  • Keep the layout simple. A fixed panel or straightforward door arrangement is easier to build and install than a heavily customised enclosure.
  • Use standard finishes if your budget is tight. Chrome usually keeps the number under better control than premium decorative hardware.
  • Coordinate the screen with the renovation program so the measuring and installation happen at the right time, not as a rushed add-on.
  • Make sure waterproofing paperwork is in order. For wet-area projects, understanding Victorian waterproofing compliance certificates helps avoid issues later.

Start Your Bathroom Transformation with a Free Quote and Design

Frameless shower screens are a premium item, and the price reflects that. You're paying for thicker compliant glass, better hardware, more precise measuring, and an installation that has to work with the finished waterproofed bathroom, not just sit inside it.

That's why the cheapest number isn't usually the most useful one. The right figure is the installed cost for your actual layout, with your tile choices, your fittings, and your renovation scope taken into account. For Melbourne homeowners, that often means looking at the screen as one part of the wider bathroom build rather than shopping it in isolation.

If you're planning a renovation in Melbourne or greater Victoria, it helps to get a quote encompassing the whole picture. A proper process should include a site assessment, realistic pricing, and clear advice on what will affect the number before anything is ordered.

A free, no-obligation quote and a professional 3D design make that process easier because you can see the room before committing. It also gives you a practical way to compare design choices, especially if you're weighing standard frameless glass against more premium finishes or a more customised layout.

Working with registered builders also gives you a cleaner line of responsibility across the project. The shower screen, waterproofing, tiling, plumbing, and final fit-out all need to line up. When they do, the result looks better and performs the way it should.

Frequently Asked Questions

Can I install a frameless shower screen myself

It's possible in theory, but it's not a good idea for most homeowners. Frameless glass is heavy, the margins are tight, and mistakes can damage tiles, hardware, or the waterproofed area. In a renovation, the bigger risk is not the fitting itself. It's getting the set-out wrong.

Do black or designer finishes cost more than chrome

Yes, they often do. The exact difference varies by supplier and hardware range, so it's better to ask for that item to be broken out in the quote rather than guessed as a blanket upgrade.

Are frameless screens durable enough for a family bathroom

Yes, provided the glass is compliant, the hardware is decent quality, and the screen is installed properly on a bathroom that has been set out correctly. In busy bathrooms, the quality of hinges, seals, and wall fixing matters just as much as the glass.

Can a frameless screen go on any floor surface

Not automatically. The floor needs the right falls, a stable substrate, and a finished surface that suits the fixing method and water control. This is one reason the screen should be planned together with the rest of the bathroom renovation.


If you want a practical quote for a frameless shower screen as part of a full bathroom renovation, Melbourne Tiling Services P/L can assess the space, provide a free quote, and help you line up the design, waterproofing, tiling, and installation under one renovation process.

What Is Screed in Tiling: A Comprehensive Guide

Screed is the cement and sand layer that creates the flat base and drainage falls under your tiles, and for an unbonded screed in tiling the minimum thickness is 40 mm, with 50 mm recommended to help prevent curling and lifting. In a bathroom, it acts like a precision-engineered foundation for the tile finish, because even beautiful tiles won't perform properly if the base underneath is uneven, weak, or shaped incorrectly.

If you're planning bathroom renovations and reviewing quotes from tilers or registered builders, screed is often one of the most misunderstood line items. Homeowners usually focus on tile selection, tapware, niches, stone tops, and shower screens. The trouble is that the part you don't see often decides whether the whole floor drains properly, sounds solid underfoot, and stays crack-free.

In Melbourne bathrooms, screed matters even more when you're using large-format porcelain, natural stone, or slim tile panels. Those finishes don't forgive poor preparation. A floor can look close enough before tiling and still be wrong once the tiles go down. That's why experienced trades treat screeding as part of the system, not an optional extra.

Table of Contents

An Introduction to Floor Screed for Home Renovators

If you've seen "floor screed" in a quote and wondered whether it's just another way of saying concrete, it isn't. In tiling, screed is a carefully placed layer that gives the tile installer the exact surface needed for a proper finish. In wet areas, that includes the right shape so water moves where it should.

Think of screed as the difference between hanging cabinetry on a straight wall and trying to fit it to a crooked one. Tiles are no different. If the base is off, the finished room will show it. You might see lippage at tile edges, water sitting in corners, or hollow sounds when you walk across the floor.

Registered builders and experienced tilers don't treat screed as filler. They treat it as a control layer. It lets the team correct what the slab or substrate gives them, then build the bathroom floor to suit the waterproofing, the waste position, the tile size, and the final floor heights.

For homeowners planning high-end work, that's where the value sits. You're not paying for mud on the floor. You're paying for accuracy, drainage, and a tiled surface that feels solid for years, not just on handover day.

If you're comparing finishes for a renovation, it's worth understanding how screed fits into the broader floor build-up used in floor tiling services in Melbourne.

Practical rule: Expensive tiles don't fix a bad base. They expose it.

The Critical Role of Screed in a Flawless Tiling Job

A lot of failures blamed on tiles begin underneath them. Screed has several jobs at once, and when one of those jobs is done poorly, the problem usually appears later as pooling water, cracked grout, drummy tiles, or a floor that never looks quite right.

Screed shapes the bathroom floor

In a bathroom, the floor shouldn't just be flat. It needs the right falls. That means the surface is shaped so water moves toward the waste instead of drifting to the doorway or sitting against a wall. This is one of the most important parts of waterproofing integrity.

When falls are wrong, the waterproofing membrane may still be intact, but the room won't perform properly. Water lingers. Grout stays wet longer than it should. Cleaning becomes harder. In shower areas, the room starts feeling poorly built even if the tiles themselves were laid neatly.

It corrects the substrate below

Concrete slabs and existing floors are rarely perfect. Some are out of level. Some have minor undulations. Some have old patching, service penetrations, or transitions between materials. Screed gives the tiler or builder a way to create a controlled surface over those irregularities.

An infographic detailing the four core functions of floor screed for achieving a flawless tile installation.

A good way to picture the floor build-up is this:

  • Subfloor or slab: The structural base
  • Preparation layer: Cleaning, priming, repairs, or slip sheet depending on the system
  • Screed: The shaping and flattening layer
  • Waterproofing and tile assembly: The protective and finished surface layers

That middle layer gives the installer control. Without it, you're trying to tile directly over whatever shape the substrate happens to be.

It creates a reliable bed for the tile system

Screed also helps where the floor build includes services such as underfloor heating or where exact finished heights matter at doorways and shower entries. In premium bathroom renovations, this becomes especially important because multiple trades need the floor to land at the correct level.

A straight tile finish starts well before the first tile comes out of the box.

The biggest misunderstanding is thinking screed exists only to make a floor look smooth. Its real role is broader. It supports drainage, flatness, adhesion, and the way the whole bathroom performs once people start using it every day.

Exploring the Different Types of Tiling Screed

Not all screeds are the same, and the right choice depends on the substrate, the room, the height available, and how the rest of the tiling system is being built. Homeowners often hear one word, "screed", as though it means a single product. On site, it doesn't.

Traditional sand and cement screed

This is the standard option typically referred to in residential tiling. It gives the installer a workable bed for shaping falls and flattening floors. In bathroom work, it's commonly used because it can be formed with precision around wastes, shower set-downs, and transitions.

Traditional screed suits jobs where the installer needs hands-on control. That's why it's still the backbone of many quality bathroom floors.

Polymer-modified screed

A polymer-modified mix is used when extra bond performance, reduced water demand, or tighter site conditions call for a more engineered product. It can be useful where the substrate is challenging or where the specification needs more than a basic sand and cement bed.

This doesn't mean every bathroom needs a modified screed. It means the builder or tiler should choose it for a reason, not because it sounds more advanced.

Liquid and self-levelling compounds

These products are often confused with traditional screed, but they serve a different purpose. A self-levelling compound is typically used to refine flatness, not to hand-shape shower falls in the way a dry-pack screed can. On some projects, it complements the system. On others, it's the wrong material for the task.

That distinction matters. A floor can be level and still be wrong for a wet area if it hasn't been shaped correctly for drainage.

Bonded and unbonded systems

This is one of the more important technical distinctions. A bonded screed adheres directly to the prepared substrate. An unbonded screed is separated from it by a slip layer. The choice affects thickness, reinforcement, and how the screed behaves.

According to Australian Standards guidance for unbonded screeds, AS 3958.1 and AS 4654.2 require a minimum thickness of 40 mm for an unbonded screed used in tiling, with AS 4654.2 specifically recommending 50 mm to help prevent curling and lifting. The same guidance states that unbonded screeds must be reinforced with either fibreglass mesh or small gauge steel mesh to control shrinkage-induced damage.

That isn't trivia. It's what separates a compliant assembly from one that looks acceptable on day one and starts moving later.

If you're comparing materials or trying to understand what your contractor has specified, it helps to know the basics of tiling materials used in floor and bathroom work.

Screed Type Typical Thickness Approx. Curing Time Before Tiling Best For
Traditional sand and cement screed Depends on the system and site conditions Requires full curing before tiling Shaping falls and building bathroom floors
Polymer-modified screed Product and application dependent Follow the product specification Jobs needing improved bond or tighter control
Liquid or self-levelling compound Usually thinner than traditional screed applications Product dependent Correcting flatness outside hand-shaped wet area falls
Unbonded screed Minimum 40 mm, with 50 mm recommended in AS 4654.2 Requires proper curing before tiling Floors where the screed is separated from the substrate

Screed Thickness Curing Times and Substrate Preparation

A bathroom floor can look fine on Friday, feel hard on Monday, and still be nowhere near ready for waterproofing or tiles. I see that mistake in Melbourne renovations more often than homeowners expect, especially where someone assumes a firm surface means the screed has finished moving.

Thickness, curing, and preparation control whether the tiled floor stays flat, drains properly, and holds the waterproofing system together. On high-end bathroom work with large-format tiles, there is very little tolerance for a screed that shrinks, powders, or debonds from the base.

What the mix and curing rules mean on site

For a traditional sand and cement screed, the mix needs to be consistent, the water needs to be controlled, and the curing period needs to be respected. A wet, sloppy mix is easier to spread, but it usually creates more shrinkage and a weaker result. A drier, well-compacted mix takes more skill to place, but it gives better control over shape, strength, and long-term stability.

Australian Standards and manufacturer specifications set the framework, but the on-site judgement matters just as much. The right curing time depends on the screed system, thickness, ventilation, temperature, and what layer is going over it next. In a bathroom, that sequencing matters because the screed does not work in isolation. It becomes the base for waterproofing, adhesive, and tile. If the screed is still shedding moisture or shrinking, the stress shows up higher in the assembly.

A step-by-step infographic showing the five stages of screed installation and curing process for tiling.

On site, the sequence usually runs like this:

  1. Prepare the substrate: Remove dust, laitance, paint, adhesive residue, oil, and loose material so the screed system has a sound base.
  2. Check levels and falls: Mark finished heights, waste locations, and door transitions before mixing starts.
  3. Place and compact the screed: Build the required thickness and shape with proper compaction, not just a quick spread-and-rub finish.
  4. Cure it to suit the system: Protect the screed from drying too fast and follow the specified cure and drying process before the next trade starts.
  5. Confirm readiness before tiling or waterproofing: Surface hardness alone is not the test. Moisture condition, bond, and stability matter.

That last point catches people out. A screed can be walkable long before it is ready to receive the next layer.

Why substrate preparation decides whether the screed lasts

Good screed over a poor base is like laying a luxury stone benchtop on a cabinet with a twisted frame. The finish might look straight for a while, but the support underneath is already setting up the failure.

In Melbourne bathroom renovations, the existing substrate often has old glue, paint overspray, cracked patches, saw cuts, plumbing penetrations, or soft surface laitance. If those defects are left in place, the screed can lose bond, dry unevenly, or crack at weak points. On a bonded screed, that bond line is everything. On an unbonded or floating system, the separation layer and edge treatment still need to be correct or the bed can move in ways it should not.

Preparation usually includes mechanical cleaning, checking for drummy or weak areas, repairing cracks where required, confirming the substrate is suitable for the selected screed system, and using the right primer or slip membrane. Trade discipline is evident. The result depends heavily on correct use of straightedges, lasers, grinders, mixers, and finishing tools, not guesswork or improvised gear. The right tiling tools for screed preparation and installation make it possible to hit levels accurately and keep falls honest.

For a Registered Builder, the bigger concern is compliance across the whole bathroom assembly. Screed has to suit the substrate, the waterproofing method, and the tile finish. Get that order wrong, or rush the drying stage, and the expensive part of the renovation ends up relying on the weakest layer in the room.

Why Modern Tiles Demand a Perfect Screed

A homeowner chooses 600 x 1200 rectified porcelain for a new Melbourne bathroom because the room needs to feel sharp, flat, and expensive. The tile looks flawless in the showroom. On site, that same tile will expose every low spot, every hump, and every lazy fall in the screed.

A professional construction worker laying a large grey tile onto a freshly applied screed flooring base.

Large-format tiles magnify every defect

Older bathrooms could hide a fair bit with smaller tiles and wider grout joints. Modern tile selections do the opposite. Large-format porcelain, rectified edges, natural stone, and slim panels leave very little tolerance for an uneven base.

A small mosaic can follow minor variation without drawing attention to it. A large tile spans across the highs and lows. That creates lippage, hollow support under parts of the tile, uneven reflections, and extra stress at edges and corners. In a high-end bathroom, those defects are easy to see and expensive to correct once the room is waterproofed and tiled.

I see this regularly in Melbourne renovations where clients want clean lines, narrow joints, and flush transitions. The finish only looks premium if the screed is set out with the same care as the tile.

Screed quality affects both tile performance and waterproofing integrity

Screed is not just there to give the tiler something to stick to. In many bathroom builds, it also controls the falls to the waste, supports the waterproofing strategy, and helps the whole floor system meet the standard expected under Australian practice.

If the falls are inconsistent, water sits where it should drain. If the surface is out of plane, the installer has to chase flatness with adhesive. That creates another problem. Adhesive works best as a bonding layer at the right bed thickness, not as a substitute for proper screeding.

The trade-off is straightforward. Spending more time getting the screed right saves trouble later with tile alignment, drainage, and finish quality. Rushing the screed usually shifts the problem to the waterproofing contractor or the tiler, and by then the room is already on the back foot.

Good coverage starts with a flat, accurate base

As noted earlier, tile installations over screed need proper adhesive contact between the tile and the substrate. That becomes harder to achieve when the base is wavy, powdery, or badly shaped around wastes and corners.

A short demonstration helps homeowners see what proper preparation is trying to achieve:

In practical terms, a well-finished screed gives the tiler control. Trowel lines collapse properly. Large tiles bed down evenly. Falls can be kept honest without creating birdbaths or proud edges at the doorway. That matters even more in bathrooms using large-format tiles, where the margin for error is small and the visual standard is high.

Premium tiles do not improve a bad base. They expose it.

Common Screed Problems and Professional Solutions

Most screed failures leave clues. Homeowners notice cracks in grout, tiles that sound hollow, or shower floors that never quite drain. The visible symptom isn't always the root cause, so it helps to look at the problem the way a builder or tiler would.

A chart illustrating four common screed problems, their underlying causes, and expert solutions for flooring installations.

Cracking and curling

Cracking often points to poor mix control, rushed curing, movement in the substrate, or weak compaction. In practice, it usually isn't one single mistake. It's a chain. Too much water in the mix, inconsistent placement, and drying too quickly can all contribute.

Curling and lifting at edges commonly shows up when moisture behaviour in the screed isn't controlled properly. In unbonded work, inadequate thickness or poor reinforcement can also make the problem worse.

Professional prevention usually includes:

  • Correct mix discipline: The sand and cement ratio can't be made up by eye on a rushed site.
  • Controlled curing: The screed has to be protected so it doesn't dry unevenly.
  • Proper reinforcement where required: Especially in systems that call for mesh.
  • Accurate thickness control: Thin spots become weak spots.

Drummy spots uneven falls and slow drying

A drummy or hollow sound under tiles often suggests debonding somewhere in the assembly. Sometimes the issue starts with contamination on the substrate. Dust, residue, weak surface material, or poor priming can stop the screed from anchoring the way it should.

Incorrect falls are a different failure, but one homeowners notice quickly. Water sits near the shower screen, tracks toward the door, or forms a puddle in a corner. That's a workmanship problem, not bad luck. It usually means the floor wasn't set out with enough care before screeding and tiling began.

Slow drying or persistent moisture can come from excess water in the mix, poor ventilation, or a rushed programme that pushes the next trade in too early.

A useful way to assess risk is to ask whether the contractor has a method, not just confidence.

Problem Likely Cause Professional Solution
Cracking Poor mix, rapid drying, weak compaction, movement Controlled mix, proper curing, sound substrate assessment
Hollow or drummy areas Dirty or weak substrate, poor bond preparation Thorough preparation, suitable primer or bond method
Water pooling Falls set incorrectly Careful set-out and shaping before tiles are laid
Curling or lifting Moisture imbalance, excess water, inadequate system design Correct system choice, proper thickness, disciplined curing

If a screed job is rushed, the floor usually tells on it later.

Hiring a Pro and Melbourne-Specific Screed FAQs

Bathroom screeding isn't a weekend DIY job. In a wet area, the screed affects drainage, tile performance, and how well the waterproofing system does its job over time. If the floor is wrong, fixing it usually means removing finished work. That's why this part of bathroom renovations is best handled by experienced tilers working with registered builders who understand the full assembly, not just the visible surface.

Questions worth asking before work starts

When you're speaking with contractors, ask direct questions:

  • Are you a Registered Builder or working under one? That matters when multiple trades and compliance issues need coordination.
  • How will you form the falls to the waste? A clear answer is better than vague reassurance.
  • What screed system are you proposing for this substrate? The answer should reflect the actual floor condition.
  • How do you manage curing and sequencing before tiling starts? If the reply sounds rushed, that's a warning sign.
  • Who is responsible for coordinating screed, waterproofing, and tiling? In failed bathrooms, this is often where accountability disappears.

Melbourne bathroom screed FAQs

How much does screeding a bathroom cost in Melbourne?
It depends on the bathroom size, access, substrate condition, waste location, floor height constraints, and whether the work is part of a full renovation. A simple rescreed and a custom floor build for large-format tiles are not the same scope, so fixed assumptions are risky.

Do I need council approval to re-screed a bathroom?
In many cases, screeding itself isn't the issue. The wider renovation scope is. Structural changes, plumbing relocation, and broader building work can affect approvals and compliance requirements. A Registered Builder can guide that process properly.

What about older Melbourne homes?
Older homes often come with uneven floors, previous patching, timber movement, and legacy waterproofing failures. They can produce excellent results, but they reward careful preparation and punish shortcuts.


If you're planning a bathroom or ensuite and want the floor built properly from the base up, Melbourne Tiling Services P/L handles complete bathroom renovations, screeding, waterproofing, and premium tile installation across Melbourne. Their team of Registered Builders coordinates the whole process so the screed, falls, waterproofing, and tile finish work together the way they should.

Patterned Bathroom Floor Tiles: Your 2026 Renovation Guide

You're probably standing in your current bathroom thinking the same thing many Melbourne homeowners think before they renovate. It's clean enough, functional enough, and completely forgettable. The white floor, plain wall tile, and standard chrome fittings don't look offensive, but they don't feel considered either.

That's usually the moment patterned bathroom floor tiles enter the conversation. They promise personality, movement, and a stronger design identity. They can absolutely deliver that, but only if the pattern suits the room, the finish performs in wet conditions, and the installation is handled properly by trades who understand bathroom renovations and registered builders' compliance obligations in Victoria.

Table of Contents

From Drab to Dramatic Why Patterned Tiles Are Reclaiming Melbourne Bathrooms

A lot of bathrooms built or updated in the last decade chased the same look. Flat white tiles, pale grey floors, minimal contrast, and nothing on the floor that asked for attention. The result was safe, but often cold.

That's changed. In 2025, Australian tile trends shifted away from stark minimalism, with a 35% increase in homeowners selecting patterned bathroom floor tiles to introduce warmth, texture, and character into their spaces, according to Australian tile trend reporting for 2025. That change makes sense on site. Clients still want a bathroom that feels clean, but they no longer want it to feel generic.

Patterned floors work because they do more than decorate. They create a focal point low in the room, which lets the walls, vanity and fittings stay restrained. In a compact ensuite, that's often the smartest way to add personality without turning every surface into a statement.

Practical rule: If the room is small, let the floor carry the character and keep the vertical surfaces calmer.

The strongest results usually come from restraint, not excess. A geometric floor with a simple wall tile can feel deliberate. A vintage-inspired motif paired with plain joinery can make a new bathroom feel as though it belongs in an older Melbourne home. In Victorian-era properties especially, patterned flooring often bridges old character and modern waterproof construction better than glossy feature walls ever do.

There's also a practical side to the renewed interest. Homeowners are spending serious money on bathroom renovations. Once you're already replacing waterproofing, screeding, plumbing fixtures and finishes, many people decide the floor shouldn't be the blandest surface in the room.

Choosing Your Canvas A Guide to Tile Materials and Finishes

A patterned floor can look first-rate in a showroom and still be the wrong product for a Melbourne bathroom. I see that most often in older inner-suburban homes, where a compact ensuite needs the floor to do three jobs at once: carry the design, meet slip requirements, and cope with daily moisture in a tight footprint. The tile material and surface finish decide whether that works.

Porcelain usually gives the best balance

For most bathroom floors, porcelain is the strongest starting point. It is dense, stable, and better suited to wet areas than many softer decorative products. It also gives you more choice in sharp printed patterns, encaustic-look designs, and stone-look finishes without taking on the sealing and stain sensitivity that come with some natural materials.

If you're weighing up options for a wet area, this guide to porcelain bathroom tiles for wet-area performance covers why they are commonly specified for bathroom floors. In practice, they hold up well under repeated use and are available in matte and textured finishes that are easier to specify safely.

Porcelain is rarely the cheapest tile on the shelf. It is often the better buying decision once you factor in lifespan, cleaning, and the fact that patterned floors are harder and more expensive to replace later if the product underperforms.

Ceramic, encaustic-look, and natural stone

Ceramic can still suit some projects, particularly a lower-traffic bathroom or a renovation with a tighter finish budget. The trade-off is durability. In family bathrooms, the wear usually shows first at the vanity, doorway, and shower entry.

Encaustic-look porcelain suits many Melbourne renovations because it gives the character of traditional patterned flooring in a product that is easier to live with. That matters in Victorian and Edwardian homes, where clients often want heritage flavour but still need a modern waterproofed system underneath.

Natural stone can look exceptional. It also asks more of the owner and the installer. Stone selection, sealing, cleaning products, variation between batches, and ongoing maintenance all need to be considered before it goes on a bathroom floor.

Here is the shortlist I use with clients.

Material Average Cost (per sqm) Durability Water Resistance Maintenance Level
Ceramic Lower entry cost than porcelain in many ranges Good for standard residential use Good when correctly installed Moderate
Porcelain Mid-range to premium, depending on pattern and finish High High Low to moderate
Encaustic-look porcelain Usually mid-range to premium High High Low to moderate
Natural stone Usually premium-priced compared with ceramic and porcelain High, but material-dependent Varies by stone and sealing Higher

Price matters, but it should not drive the whole decision. The install cost to prepare, waterproof, screed, set out, cut, and grout a patterned floor is substantial. Saving money on the tile itself can be false economy if the finish wears badly or the floor becomes harder to keep safe and clean.

Finish affects safety, maintenance, and how the pattern reads

Many homeowners choose the finish by eye. On a bathroom floor, that is the wrong order.

A good patterned tile has to read well under light, feel secure underfoot, and stay practical after years of soap residue, water spotting, and regular cleaning. In a small ensuite, the finish also changes how busy the pattern feels. A high-sheen surface can throw reflections around the room and make a detailed motif look sharper and more crowded than it did on the sample board.

  • Matte finish: Usually the safest all-round choice. It softens glare, suits both contemporary and period-style bathrooms, and is more forgiving with daily marks.
  • Textured or structured finish: Often a strong option in wet zones where extra grip is needed, but texture can hold more residue if the pattern is heavily inked or the grout joints are tight.
  • Gloss finish: Better on walls than floors in most bathrooms. It shows spotting, can feel slippery, and often cheapens a patterned floor once it is wet.
  • Lappato or semi-polished finish: Can work in the right product, but it needs proper checking against the manufacturer's wet-area rating before it is specified.

Choose in this order: wet-area suitability, slip resistance, finish underfoot, then pattern.

That sequence matters because a beautiful pattern does not rescue a floor that feels unsafe at the shower entry or becomes difficult to maintain around the toilet and vanity.

There is another layer that gets missed in design-led articles. Patterned tiles expose installation quality. If the tile has inconsistent sizing, poor print registration, edge warping, or too much variation between boxes, the floor will never look crisp no matter how good the waterproofing and screed are underneath. A proper selection process means checking multiple tiles together, confirming the slip rating and finish for floor use, and making sure the product can be laid accurately in the room you have, not the display board you saw in the showroom.

Mastering Pattern Scale and Layout in Your Space

A patterned floor can make a tight Carlton ensuite feel deliberate and expensive, or make it feel smaller and badly resolved. The difference usually comes down to scale, set-out, and how the pattern lands around real fixtures in a room that was never square to begin with.

Older Melbourne bathrooms are rarely clean rectangles. I see narrow door swings, chimney breasts, out-of-plumb walls, and shower entries pushed hard against existing structure. In those rooms, patterned tiles need more discipline than plain tiles because every cut, every grout line, and every shift in alignment is easier to see.

What works in small Melbourne bathrooms

Compact bathrooms generally suit patterns with a clear repeat and moderate contrast. The floor still gets visual interest, but it does not start fighting the room. Large decorative motifs often need more uninterrupted floor area than a Victorian-era ensuite can give them. Once the toilet pan, vanity, shower screen, and floor waste cut through the design, the pattern reads as fragments instead of a full composition.

Design guidance from Natural Tile's overview of patterned bathroom floor tile ideas points toward balanced geometric patterns for smaller bathrooms, and that lines up with what works on site. Repeating geometry, restrained colour shifts, and a lighter base usually hold the room together better than high-contrast motifs with a large visual repeat.

An infographic illustrating the pros and cons of using patterned tiles for interior home decor design.

Direction matters as much as pattern selection. A floor can visually widen a narrow room, stretch a short room, or pull the eye straight to a feature wall. Clients considering directional layouts should look closely at a herringbone tile pattern and how direction changes visual flow. The laying pattern often changes the feel of the room more than the print itself.

Layout decisions that change the room

Good results come from set-out, not guesswork.

Use these rules before the first tile goes down:

  1. Set the room from the main sightline
    Centre the layout to the view from the doorway or hall approach. That is the angle people read first. A pattern can be technically centred to a wall and still look wrong when you enter the room.

  2. Work with the room you have, not the one on the plan
    In older homes, walls can run out, corners can open, and shower nibs can throw the repeat off. Check the actual room after sheeting and waterproofing, then adjust the set-out to suit.

  3. Avoid skinny cuts at visible edges
    Small slivers at skirtings, shower screens, or the vanity front make even expensive tiles look cheap. A small shift in the starting line usually gives a better perimeter balance.

  4. Coordinate the pattern with fixtures early
    Toilet pans, floor wastes, frameless screens, and floating vanities interrupt the layout. Plan those locations before final set-out so the pattern still reads cleanly once everything is installed.

  5. Check where the full repeat will be seen
    The best part of the pattern should land in open floor area, not under the vanity kick or half-hidden behind the toilet.

Design and technical execution meet. A client may want a bold statement floor, but if the room only shows a partial repeat and every edge needs trimming, a quieter tile often gives the sharper result.

In larger bathrooms, stronger motifs have room to read properly. In compact ensuites, disciplined geometry usually wins. It looks intentional, handles awkward room shapes better, and gives the installer more control over symmetry and cuts.

Beyond Beauty Durability Safety and Long-Term Care

A patterned floor has to do more than look good on completion day. In a Melbourne bathroom, especially a compact ensuite in an older home, it needs to stay safe through wet winters, handle daily cleaning, and keep its finish without becoming a maintenance headache.

Close up view of patterned grey and white bathroom floor tiles with a spirit level tool.

Slip resistance is not a marketing label

Slip resistance needs to be checked against AS 4586. That is the starting point, not the whole answer.

On site, I look at where the tile is going, how much water will sit on it, how steep the falls are, and who will be using the room. A tile that feels acceptable in a dry display bay can be poor under bare feet once shampoo, soap film, and winter condensation get involved. That matters in Melbourne homes, where bathrooms often have limited natural ventilation and colder surfaces for much of the year.

The other point generic design articles miss is that decorative tiles often come with trade-offs. A heavily textured face can improve grip, but it can also trap grime and make cleaning harder. A smoother encaustic-look porcelain is easier to maintain, but it may need more careful product selection to avoid a slick feel in the shower approach or in front of the bath.

Small bathrooms make this more obvious. In a tight Victorian-era ensuite, there is less room to recover if someone steps from a wet shower area straight onto the main floor. That is why slip performance should be assessed around the layout, not just the sample board.

Durability starts below the tile

Long-term performance depends on what sits under the tile as much as the tile itself. Patterned floors are less forgiving than plain ones. If the substrate moves, if the screed is uneven, or if the waterproofing and falls are poorly executed, the finished floor will show it.

The failures I see are usually practical, not stylistic. Cracked grout at stress points. Hollow tiles from poor coverage. Ponding near the shower entry. Staining around joints that were never suited to the space. A beautiful pattern will not hide any of that. In fact, it often makes it easier to spot.

Porcelain patterned tiles are usually the safest choice for floor durability in family bathrooms because they are dense, hard-wearing, and easier to maintain than many natural stone products. Cement encaustic and natural stone can look excellent, but they ask more of the owner. They need the right sealing approach, gentler cleaning products, and realistic expectations about patina and wear.

Grout and sealing choices affect how the floor ages

Grout deserves more attention than it gets because it changes both the appearance of the pattern and the maintenance load.

  • Cementitious grout: A solid option for many bathrooms when the joints are prepared properly and the product is suited to the tile and movement conditions.
  • Epoxy grout: Better at resisting staining and moisture absorption, particularly in busy wet areas, but it is less forgiving to install and residue needs to be cleaned off patterned surfaces properly.
  • Grout colour: Matching grout gives a quieter look. Contrasting grout sharpens the geometry but also highlights lippage, joint variation, and any installation inconsistency.

Some tiles and most natural stones also need sealing. That should be determined by the tile body and finish, not by assumptions based on appearance. I always prefer to confirm maintenance requirements before selection, because a client chasing a high-end look may not want a floor that needs regular sealing to stay presentable.

Long-term care should be realistic

Good maintenance is simple and consistent. Sweep grit off the floor, clean with products the manufacturer allows, and avoid harsh acidic cleaners unless the surface is specifically rated for them. Keep soap residue under control, because buildup can reduce slip performance and dull the pattern over time.

Ventilation matters as well. Bathrooms that stay damp for hours after use will show residue faster and place more stress on grout joints and sealants. If the room has poor airflow, the cleaning routine needs to be tighter.

The best patterned bathroom floors age well because the specification was honest from the start. The tile suits wet use, the substrate is stable, the waterproofing is done properly, and the owner understands what the surface needs to stay safe and sharp.

Budgeting Your Melbourne Bathroom Renovation Real Costs

A patterned floor can look like the hero of the room in a showroom sample. In a real Melbourne renovation, especially in a tight Victorian ensuite, the floor budget is shaped just as much by waste location, floor falls, waterproofing build-up and labour time as it is by the tile itself.

What the whole renovation includes

According to 2023 Housing Industry Association data, the average cost of a full bathroom renovation in Australia is $26,000, with typical ranges from $8,000 for basic projects to over $35,000 for premium custom installations, as summarised in Australian bathroom renovation cost guidance.

For Melbourne projects, premium bathrooms commonly sit above that national average once you add local labour, apartment access constraints, older substrates, and higher-end finishes. Patterned floors can push the price further because the set-out is slower, offcuts are higher, and the installer has less room to hide small discrepancies.

A realistic budget usually includes all of the following, not just the visible finishes:

  • Demolition and disposal: Removing old tiles, screed, adhesives, fixtures and waste.
  • Subfloor correction: Levelling, repairing damaged sheeting or concrete, and forming proper falls where needed.
  • Waterproofing, permits and plumbing: These costs vary by scope, but they are standard parts of a compliant bathroom build and need to be allowed for early, especially where fixtures are being relocated. A single 2025 bathroom renovation cost breakdown for Australia and Victoria summarises typical allowances for waterproofing, permit fees and plumbing rates.
  • Electrical and ventilation: Lighting, exhaust upgrades, heated rails and any switchboard-related work.
  • Joinery, glazing and fit-off: Vanity installation, shower screen, tapware, mirrors and final fixture fit-off.

Budgets frequently drift. Clients compare a $70 per square metre tile with a $140 one, but the primary cost swing often comes from the room conditions underneath.

Where patterned tile choices change cost

Patterned tiles usually cost more to install than plain field tiles, even when the tile itself is reasonably priced. The reason is straightforward. Set-out takes longer, cuts around wastes and walls need to be cleaner, and the pattern repeat has to stay consistent across a floor that may be out of square.

On compact bathroom floors, that trade-off is sharper. A small room does not always mean a cheap floor. It can mean more cutting, more wastage, and more time spent balancing centrelines against practical details like the doorway, vanity line and shower screen.

Tile selection also changes the labour method. A porcelain encaustic-look tile is generally easier to price and maintain than a cement tile or some natural stone products, but it still needs the right slip rating for a wet floor and a layout that suits the room proportions. Chasing a high-end look on a tight budget usually works best when the pattern is doing the visual heavy lifting and the rest of the specification stays disciplined.

I tell clients to cost the bathroom as a system, not as a tile purchase.

That means allowing for substrate preparation, waterproofing, drainage correction, tile waste, trim details, grout choice, sealing where required, and skilled installation. If you are comparing quotes, compare scope line by line and check whether patterned tile set-out, feature cuts and floor preparation are included. A vague allowance nearly always turns into a variation later.

For homeowners pricing the labour side, it helps to speak with experienced tiling contractors in Melbourne who understand wet-area compliance as well as layout accuracy. The cheapest square metre rate can become the most expensive number in the job if the falls are wrong or the pattern is poorly centred.

The cleanest budgets are built from the floor up. Once the hidden work is priced properly, the tile selection becomes a design decision you can make with clear eyes, rather than a surprise waiting in the quote.

Why Pro Installation Is Non-Negotiable for Patterned Tiles

Plain tiles can hide minor inconsistencies. Patterned tiles don't. They expose them.

If the set-out is off, the motif won't line up. If the substrate is uneven, reflected light will catch lippage. If the screed is wrong, water sits where it shouldn't. This is why patterned floors belong in the hands of experienced installers and properly coordinated bathroom renovations led by registered builders when the project scope requires it.

A five-stage infographic illustrating the professional process for installing patterned floor tiles from preparation to sealing.

Pattern alignment exposes every mistake

The process starts well before the first tile is laid. The subfloor has to be stable, flat and ready to receive the system above it. In wet areas, the screed and falls need to work with the waste position and shower layout. Then comes waterproofing, which has to be compliant and protected during the rest of the installation.

The visible floor depends on several invisible steps being right:

  • Surface preparation: If the base isn't flat, no amount of adhesive work will make a patterned layout look disciplined.
  • Dry set-out: Installers need to map repeats, centrelines, border cuts and fixture interruptions before spreading adhesive.
  • Cut sequencing: Decorative motifs need cleaner cuts and more planning than plain square fields.
  • Joint consistency: A small variation across repeated pattern lines becomes obvious fast.

If you're weighing up trade options, it helps to review what experienced tiling contractors near you should actually manage on a bathroom project. The work isn't just laying tile. It's controlling sequence, accuracy and finish quality across the whole floor.

Here's a look at the professional installation flow in practice.

The builder's role behind the finished look

For larger bathroom renovations, especially where plumbing changes, structural rectification, waterproofing, and multiple licensed trades are involved, coordination matters as much as craftsmanship. That's where registered builders bring real value. They're not just booking people in. They're sequencing work so one trade doesn't compromise another.

A registered builder's lens is different from a retail showroom lens. They're looking at substrate condition, code compliance, waterproof transitions, penetrations, glazing interfaces, waste location, movement joints, and whether the specification makes sense for the room you have.

A premium bathroom doesn't come from buying the most expensive patterned tile. It comes from getting the set-out, falls, waterproofing and trade coordination right.

DIY or low-cost installation usually falls down in the same places. Inadequate preparation. Poor pattern centring. Weak perimeter cuts. Messy grout cleanup. Non-compliant waterproofing hidden under a floor that initially looks fine. Those problems are expensive because they often appear after the room is finished.

Conclusion Your Next Steps to a Flawless Finish

Patterned bathroom floor tiles can lift a bathroom from plain to memorable, but they only work when design decisions are tied to technical discipline. The best results come from choosing the right material, matching pattern scale to the room, prioritising slip resistance, and budgeting for the full renovation rather than just the tile selection.

In Melbourne homes, that balance matters even more. Compact Victorian-era ensuites need careful layout planning. Wet winter conditions make floor safety more important than showroom labels. Premium finishes need proper substrate preparation and compliant waterproofing underneath them. That's what separates a bathroom that photographs well from one that performs properly for years.

If you're planning a renovation, treat the patterned floor as part of a complete system. Check the finish underfoot, not just under lights. Review how the pattern will read from the doorway. Ask how the floor will be waterproofed, screeded and detailed around fixtures. Get the full scope priced before committing to a tile that sets the whole room's tone.


If you want a bathroom that looks sharp and performs properly, speak with Melbourne Tiling Services P/L. As Melbourne-based bathroom renovation specialists and Registered Unlimited Builders, they handle the full process from design support and waterproofing through to precision tiling, trade coordination and final fit-off for a durable, high-end finish.