Travertine Tile Installation: A Complete How-To Guide

You've found the stone, chosen the colour, and probably saved a dozen Melbourne bathroom images. Then the installer mentions waterproofing certificates, movement joints, substrate deflection and wet-slip ratings, and the project suddenly sounds less like a tile upgrade and more like building work. That reaction is understandable. Travertine tile installation is a compliance and detailing exercise first, and a visual craft exercise second.

The stone can look exceptional in a bathroom, ensuite, balcony transition or outdoor entertaining area, but it won't forgive a hollow screed, a back-fall, poor adhesive coverage or an unsuitable finish. The following guide focuses on the decisions that protect the finished surface, including the Victorian rules and practical controls that catch homeowners out.

Table of Contents

Is Travertine the Right Tile for Your Project

A Brunswick couple recently pulled up carpet in their 1990s bathroom after seeing travertine on a Houzz tour. They liked the warm variation and softened edges, but before any quote was prepared, three checks had to come first: substrate, environment and scope. Travertine should never be selected from a sample board alone.
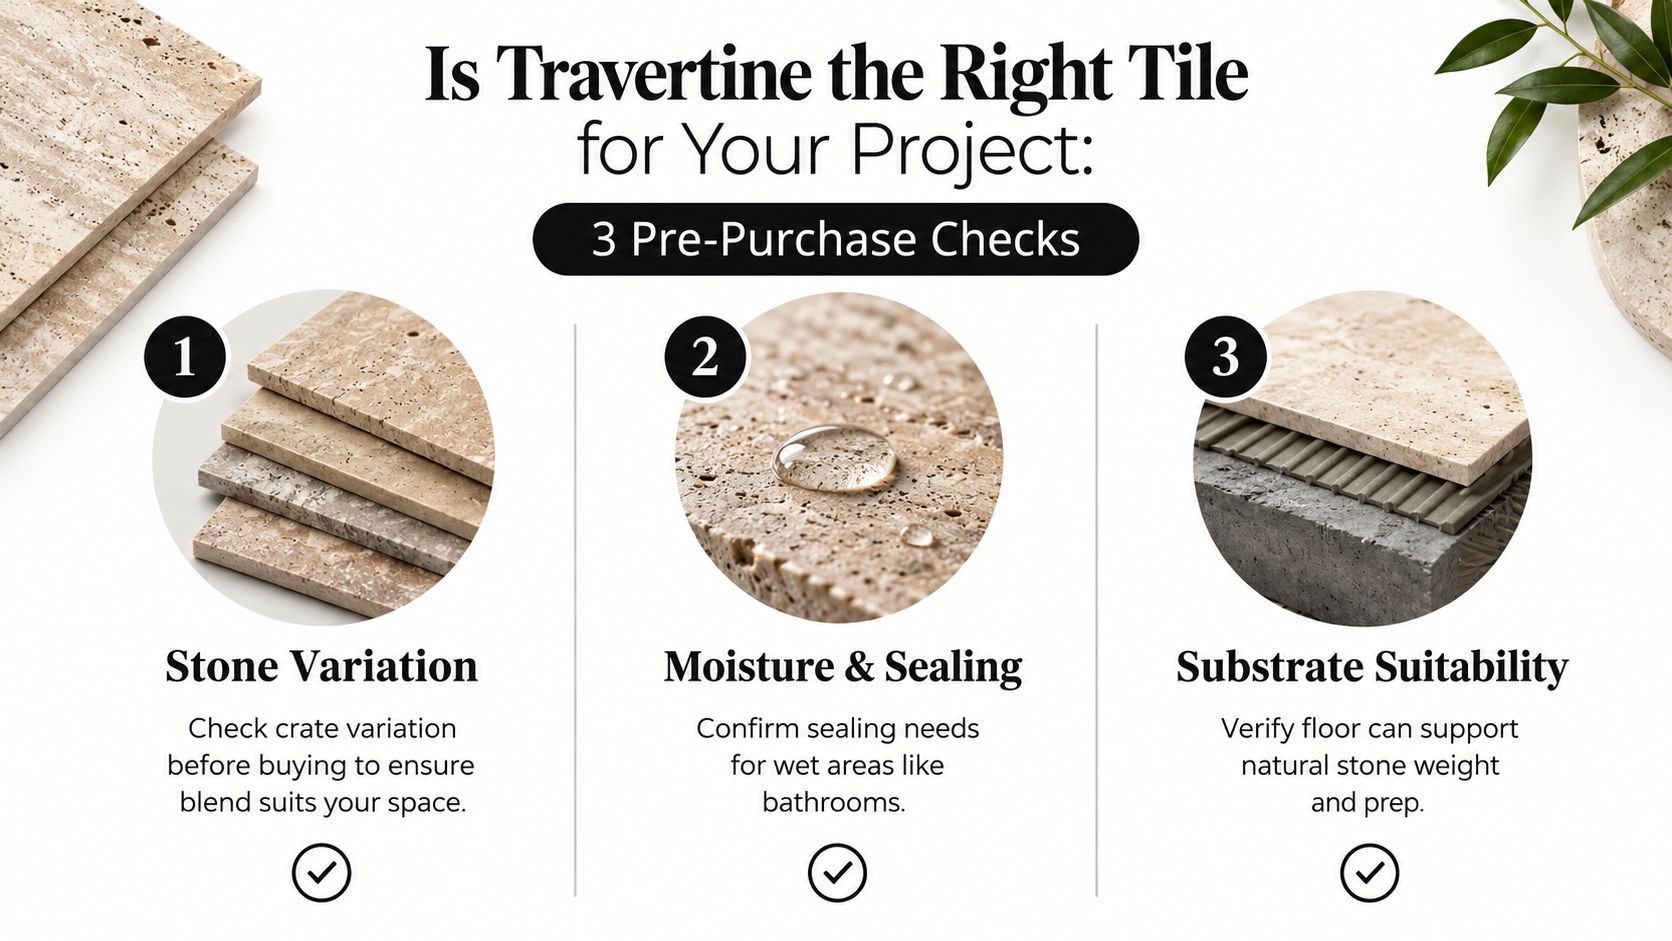
An infographic titled Is Travertine the Right Tile for Your Project featuring three essential pre-purchase checks.

Check the substrate before buying stone

Concrete and timber floors behave differently. A concrete slab may provide a stable base, but it still needs assessment for cracks, hollows, contamination and movement. Timber floors need an approved fibre-cement underlay and added rigidity. Direct-sticking travertine over yellow tongue flooring is not a sound shortcut.

Natural stone also carries more dead load than a typical ceramic installation. Allow for approximately 40–60 kg/m² of stone load when checking the floor structure and have the floor assessed for a natural-stone installation where required. That figure is part of the pre-purchase decision, not something to discover after delivery.

Match the finish to the environment

A shower floor, balcony, heated slab, west-facing outdoor area and dry bathroom wall all present different risks. Moisture exposure demands compliant waterproofing and falls. Sunlight and temperature changes make movement detailing important. Bare feet and water make finish selection a safety decision.

Polished and some honed finishes can be a poor choice for wet floors. An Australian supplier lists honed travertine at 36X and tumbled travertine at 40X, with both described as presenting moderate wet-slip risk in the published product information at Bellstone's travertine Classico guide. That doesn't mean a finish is automatically suitable for every bathroom. The location, barefoot classification, slope and drainage still need to be assessed.

Define the renovation scope

A cosmetic wall upgrade is different from a wet-area reconfiguration. A bathroom renovation may involve plumbing, carpentry, waterproofing and building administration. A balcony job may involve structural movement, membrane replacement and body-corporate approval.

Travertine also has honest drawbacks. Filled pits can re-open, tumbled edges can chip, dark lots can change appearance under strong UV exposure, and honed stone can create a slip-rating problem in an ensuite shower. Those are manageable issues, but only when the specification acknowledges them.

A simple decision matrix helps:

  • Choose travertine when the substrate is suitable, the finish matches the exposure, and the wet-area or external detailing can be built correctly.
  • Choose with concessions when you're prepared to use a more textured finish, wider joints, additional preparation or a more involved maintenance plan.
  • Choose another surface when the floor can't be adequately stiffened, falls can't be achieved, the required slip performance isn't available, or the project scope is being treated as purely cosmetic when it isn't.

For design ideas and suitable natural-stone bathroom applications, review natural stone bathroom tiles in Melbourne.

Preparing the Substrate and Getting the Fall Right

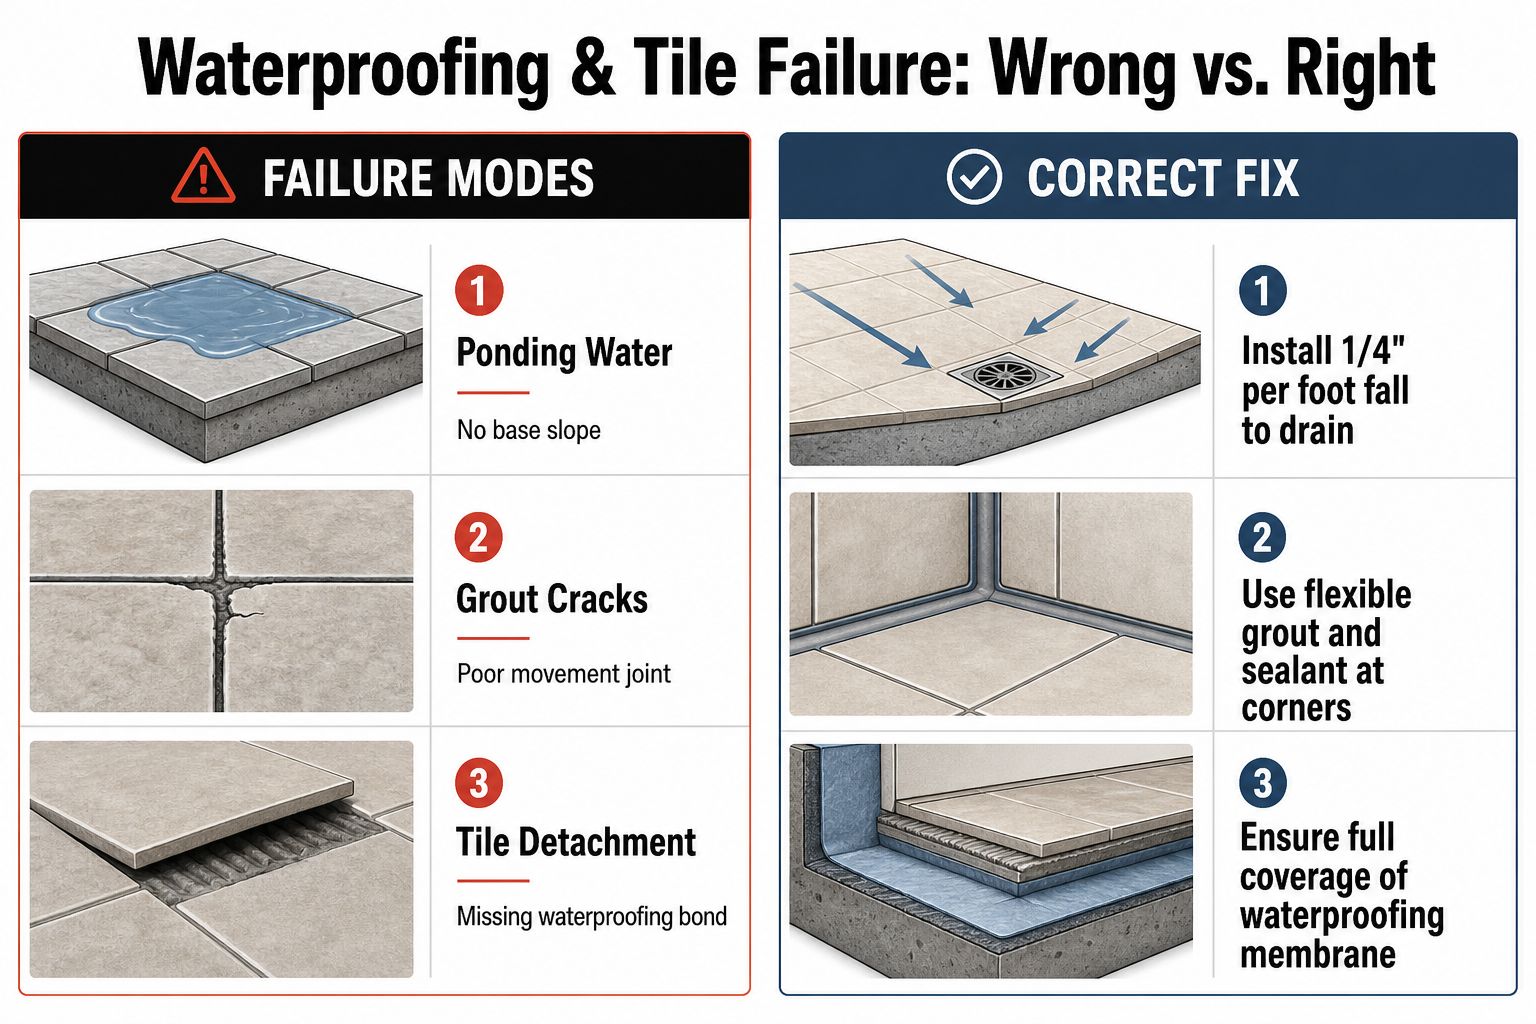
Travertine exposes poor preparation quickly. A hollow beneath one corner can leave a tile rocking, while a back-fall can hold water against grout and movement joints. Substrate preparation and fall-to-waste must be treated as one job, because a flat-looking surface isn't enough if water doesn't travel to the waste.
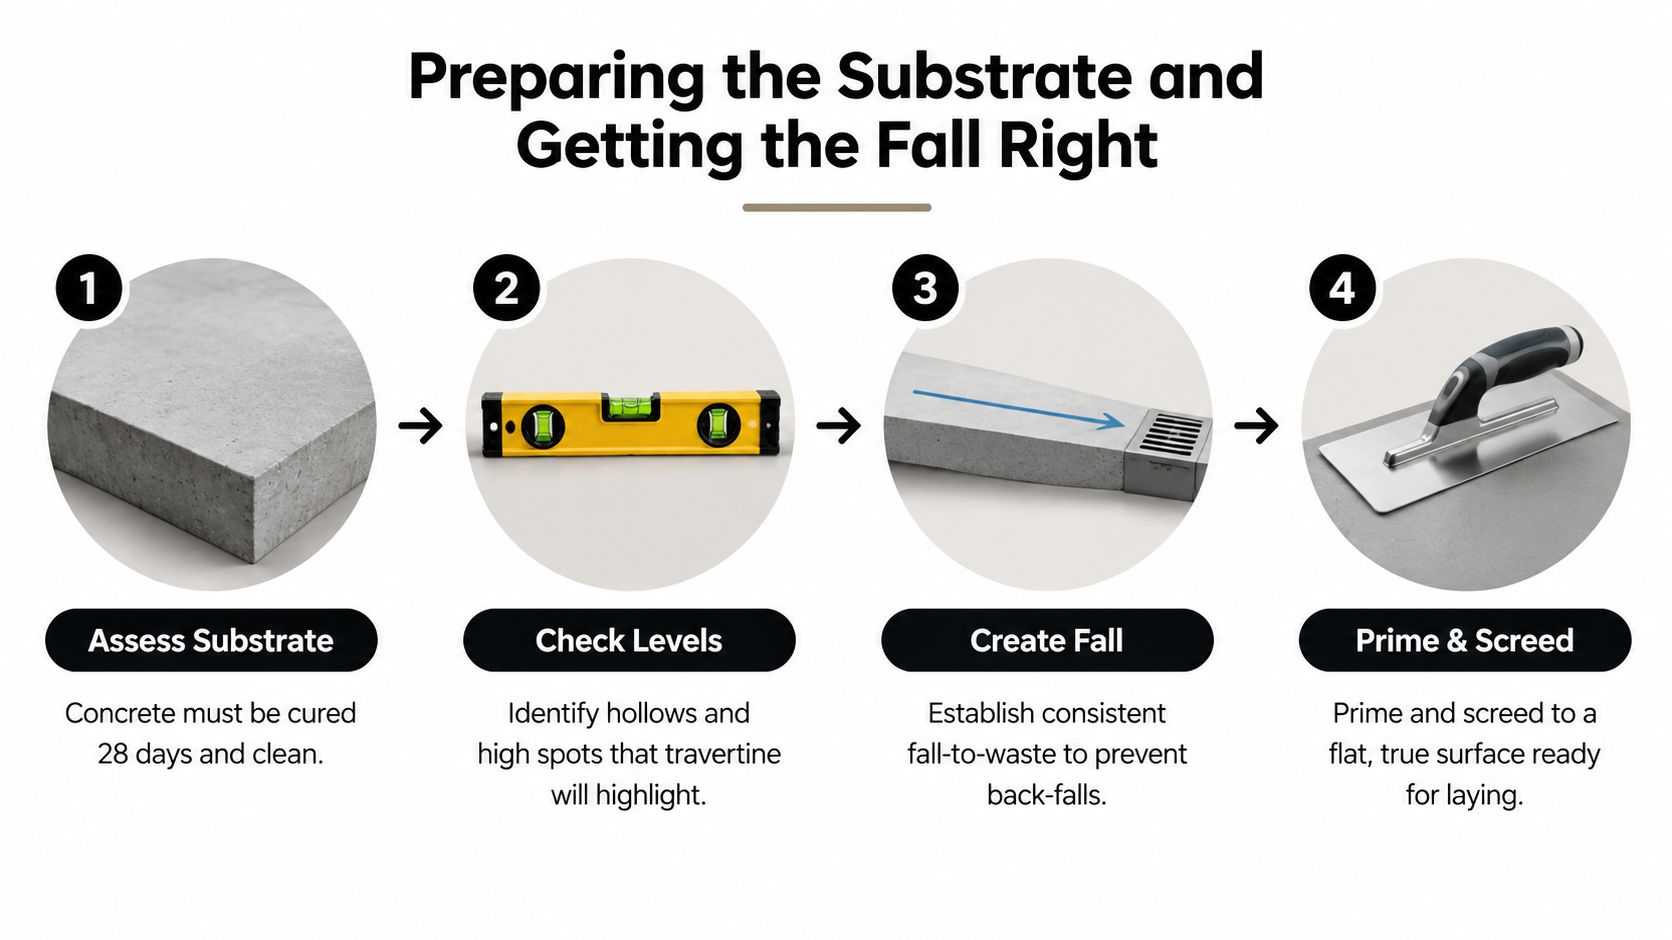
A four-step infographic illustrating the process of preparing a concrete substrate for travertine tile installation.

Assess cure, moisture and rigidity

Concrete should be properly cured before tiling. Allow 28 days for concrete and six weeks for screeded areas, with a moisture reading below 75% RH, following the applicable product and project requirements. Those milestones are especially important under porous stone, where trapped moisture can affect bonding, appearance and later sealing.

A bonded screed commonly uses a 3:1 sand-to-cement mix, while an unbonded screed uses 4:1, with a minimum thickness of 15 mm. These figures should be checked against the specified system, substrate and manufacturer's instructions rather than treated as a universal recipe.

Timber floors need an approved fibre-cement underlay and additional rigidity. Don't rely on adhesive to compensate for floor movement. If the structure flexes, the stone and grout will often show the consequences through cracking, debonding or chipped edges.

Build falls instead of hiding them

Bathroom floors need deliberate falls to the waste. The supplied project specification calls for a minimum 1:80 fall in showers and 1:100 across the bathroom floor, while the finished surface shouldn't pond wherever a 1 m straightedge is placed. These requirements should be checked before, during and after the screed is installed.

Use screed rods, a laser level or a water level to establish the high points and waste lines. Check the direction of fall at doorways, shower entries, wall junctions and around linear drains. Travertine's natural variation can disguise small visual inconsistencies, but it won't correct a structural back-fall.

Site rule: A self-levelling compound corrects a surface. It doesn't replace a properly designed screed or create falls by itself.

Self-levelling compounds are useful where the substrate is sound and only needs surface correction. They're not a solution for a poorly formed bathroom base, insufficient drainage or an unstable timber floor. In Melbourne apartments, a slab can also be subject to body-corporate restrictions, so re-fall-screeding shouldn't proceed without the required approval.

Finally, plan for the stone's bedding requirements. Australian travertine specifications call for 100% adhesive coverage, so the substrate needs to be flat and true enough for full contact under every tile, including textured backs and larger pavers. A few dabs of adhesive won't provide the support travertine needs.

Waterproofing Wet Areas to Australian Standard

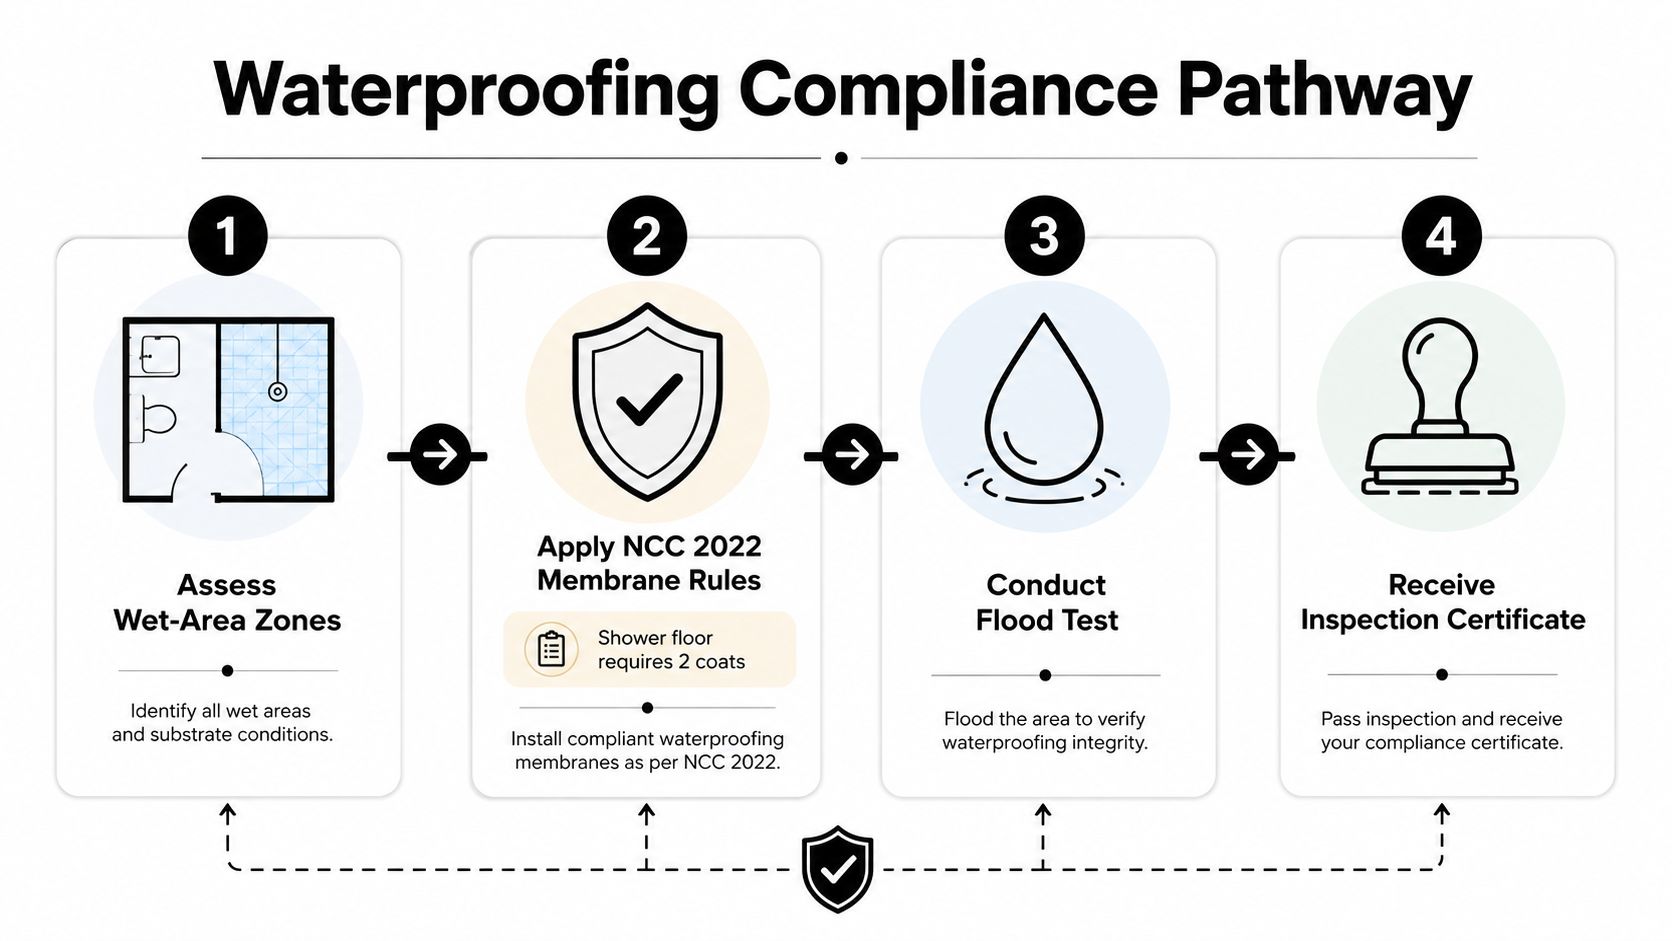
On a Melbourne bathroom or balcony, waterproofing is a compliance and detailing job before it becomes a tiling job. Tiles and travertine do not form the waterproof layer. AS 3740:2021 governs domestic wet-area waterproofing, alongside relevant National Construction Code provisions, so the membrane system, junctions and inspection must be settled before stone is installed.

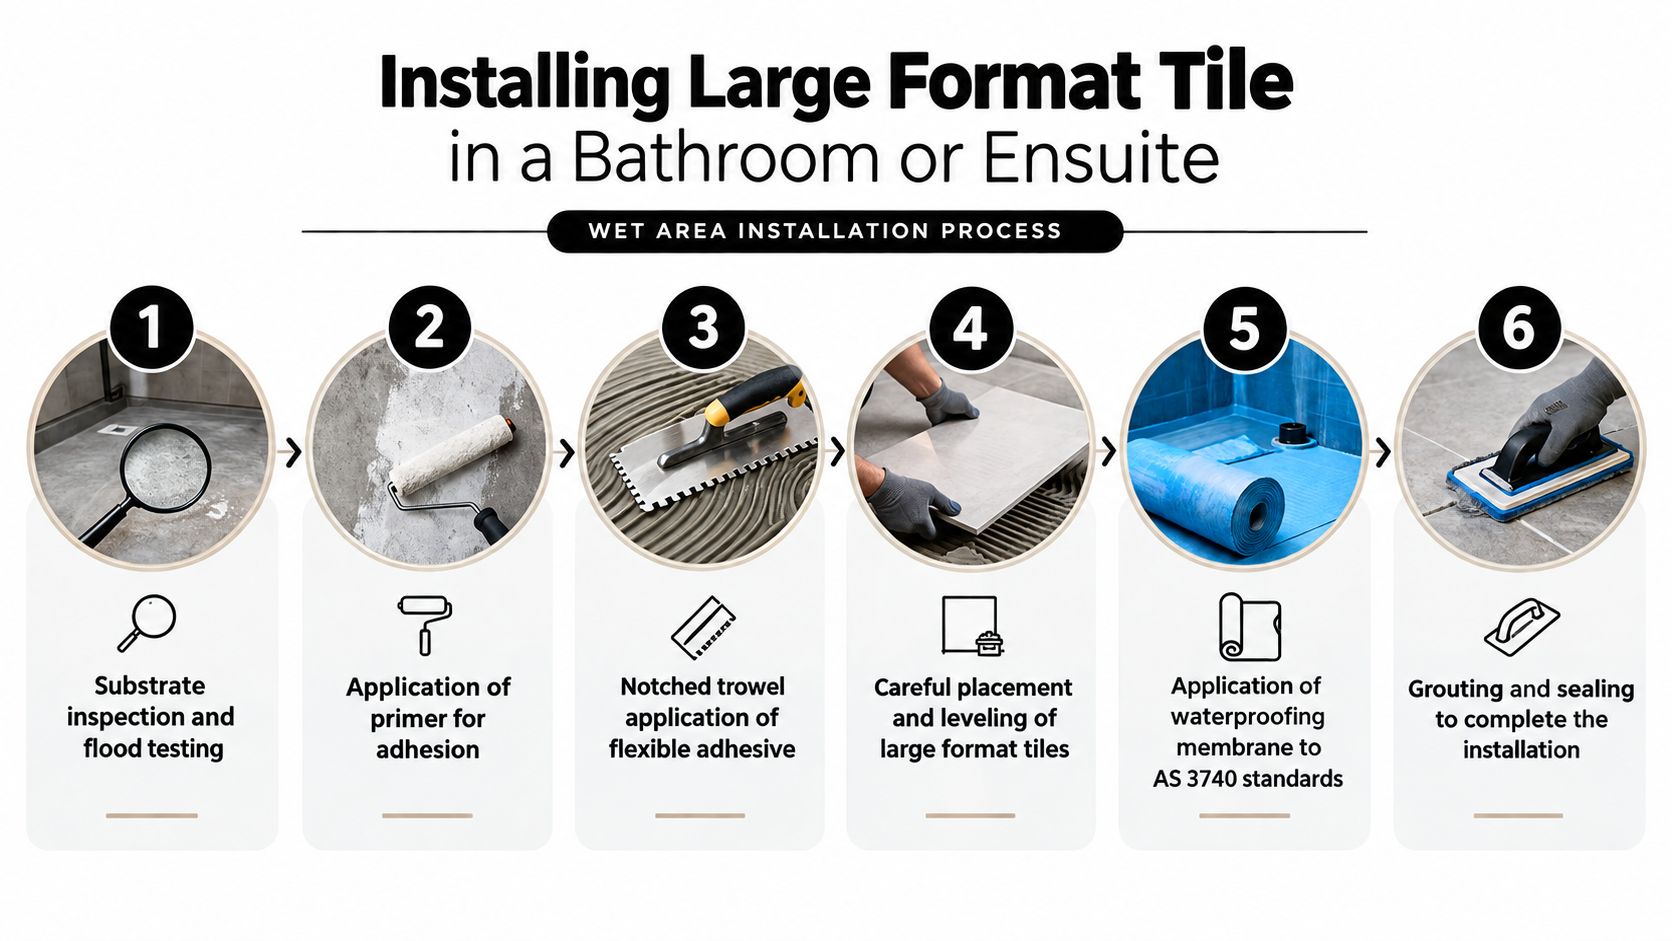
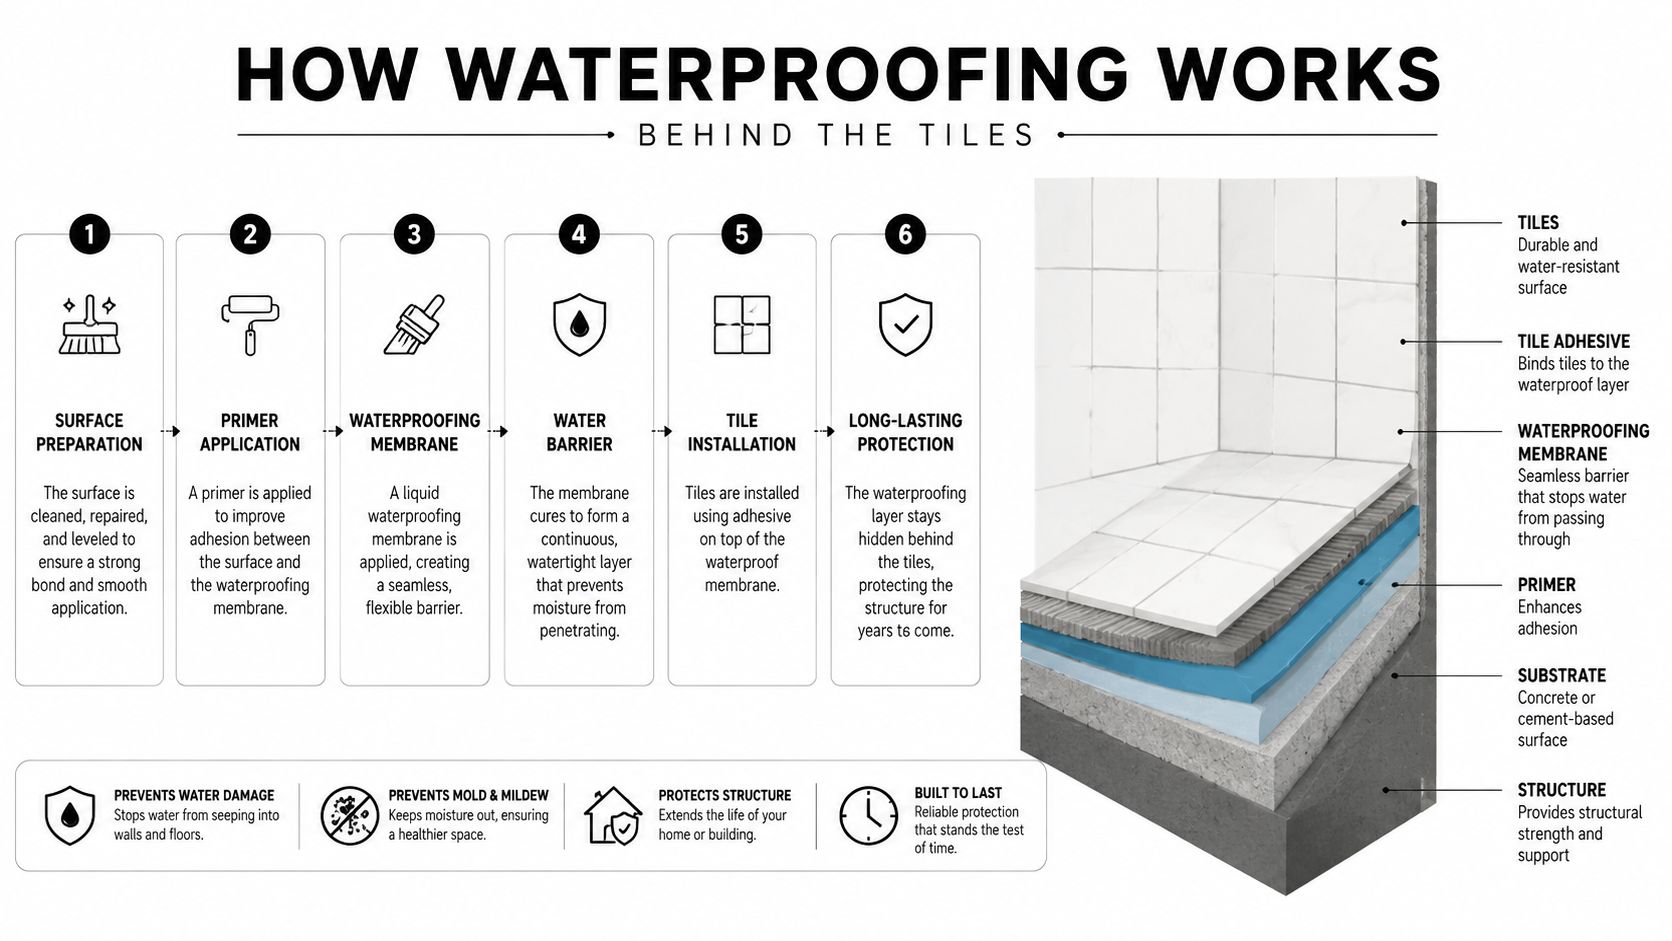
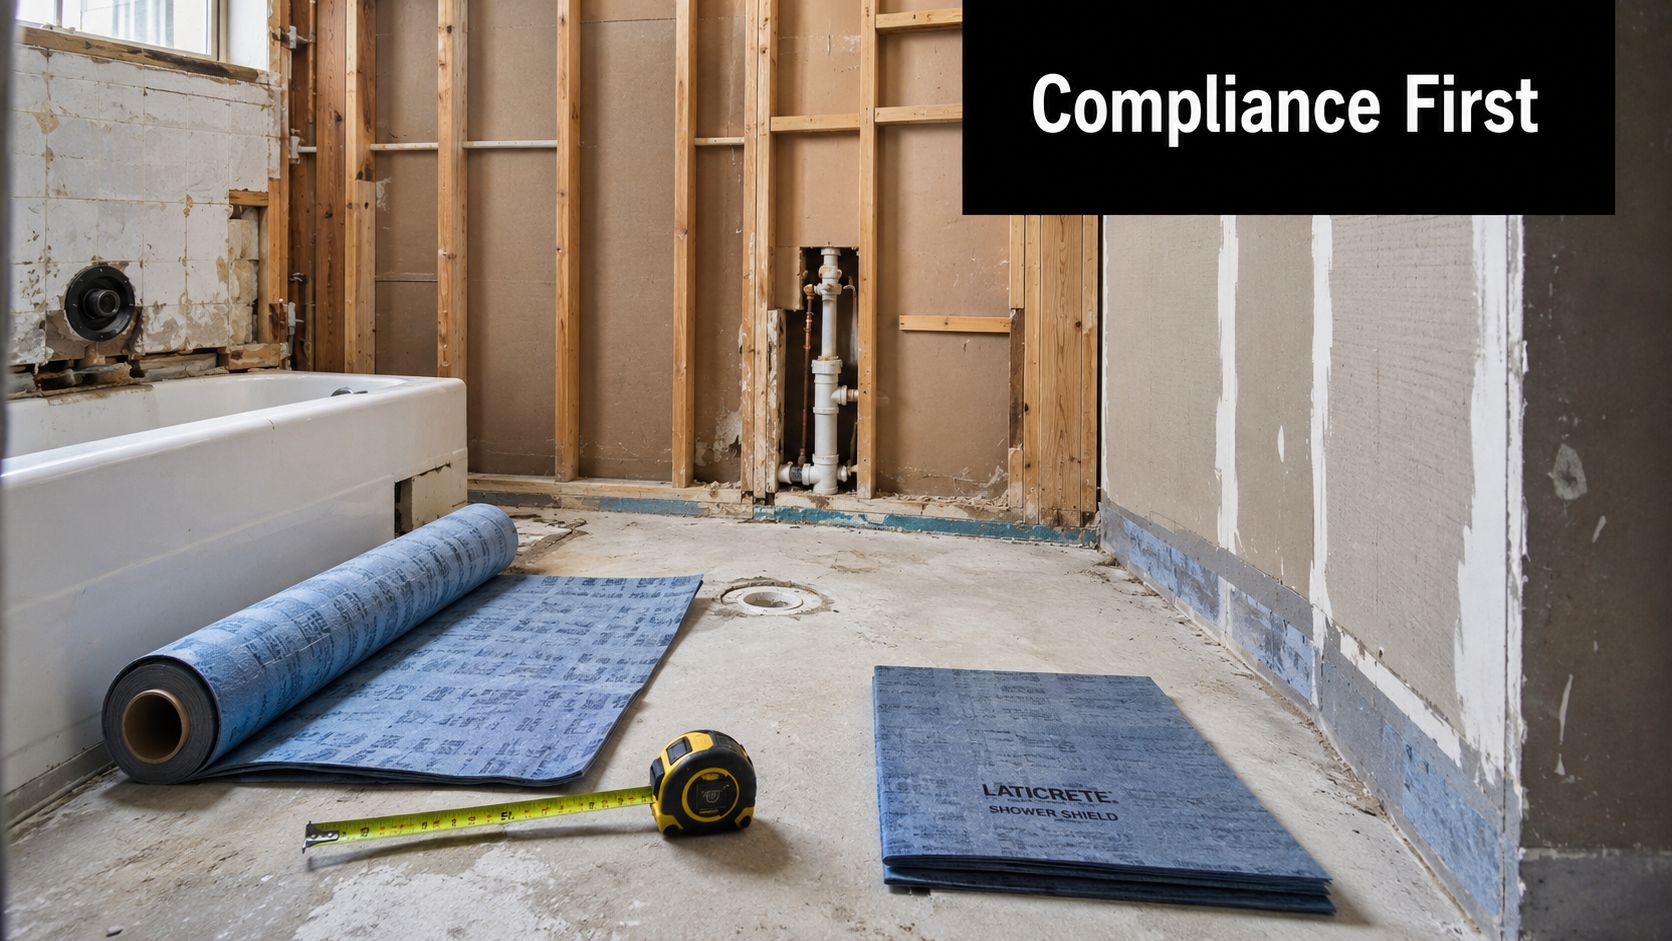
The typical sequence starts with a compatible primer. Bond-breaker tape is installed at wall-to-floor junctions, internal corners and pipe penetrations before the membrane coats are applied. The first coat must reach the specified wet-film thickness, followed by the second coat in the opposing direction. Respect the product's drying times and compatibility requirements. For a practical guide to membrane selection, priming and bond-breaker detailing, see our wet-area waterproofing service.

Showers must be waterproofed across the floor and up the walls to at least 1,800 mm, or 50 mm above the shower rose, whichever is higher, as set out in Build.com.au's waterproofing and tiling reference. Floors also need grading that sends water to the waste without ponding.

Area Min membrane height Fall to waste Inspection required
Shower floor and walls 1,800 mm, or 50 mm above the shower rose, whichever is higher Minimum 1:80 in the shower Yes, before tiling
Bathroom floor Wet-area coverage as specified for the room Minimum 1:100 across the bathroom floor Yes, before tiling
Shower hob or junction Membrane detailing across junctions and up the hob Falls must direct water to the waste Yes, before tiling

Treat the certificate as part of the installation

In Victoria, arrange the required inspection before tiling and obtain the formal Installation Certificate from the licensed waterproofer. Site Pro Bathrooms' explanation of Australian waterproofing standards describes this process, but the certificate and inspection record should be checked against the applicable Victorian requirements and the project documentation. Travertine should not cover the membrane until the work has been inspected and recorded.

The waterproofed surface must also be flat enough for the stone bedding system. Travertine's textured back and weight make spot-fixing risky, while a prepared membrane surface allows the adhesive to achieve the contact required by the installation system.

The certificate matters years later. If a leak appears after the stone is covered, documentation helps identify who completed the waterproofing and which system was used.

Most membrane manufacturers condition warranty coverage on compatible primers, correct application and documented inspection. Retain the product data sheets with the certificate. DIY work often fails when a membrane is tiled before inspection, or when primers and membranes from incompatible systems are combined. The finished stone may look sound while moisture travels into adjoining walls, cabinetry or ceilings.

Choosing Adhesives, Grout and Movement Joints

Adhesive selection should follow the stone finish, colour, location and substrate. A light honed travertine generally benefits from a white polymer-modified cement-based adhesive, because grey adhesive can affect the appearance of porous or lighter stone. Tumbled travertine needs a different emphasis, with edge variation and wider joints influencing the setting and grouting approach.

For a vertical feature wall, a suitable non-sag adhesive can help hold tiles in position while the bond develops. That doesn't make mastics appropriate everywhere. Wet areas, exterior locations, flexible membranes, timber floors and heated screeds require products specified for those conditions.

Compare the installation choices

Travertine finish Adhesive type Grout joint width Movement joint spacing Bedding method
Smooth honed or polished White polymer-modified cement-based adhesive suited to natural stone 3–6 mm Internal floors generally no greater than 4.5 m where a floor dimension exceeds 9 m Full adhesive coverage, no spot-fixing
Textured or tumbled Suitable stone adhesive with enough working time for edge adjustment 6–10 mm External floors require joints at 4.5 m spacing in any dimension Full adhesive coverage, back-butter where needed
Vertical feature wall Compatible non-sag stone adhesive where approved for the location Joint selected for edge variation and movement Wall movement joints a minimum 6 mm wide Continuous supported bedding, not isolated dabs

The Australian Tiling Standards reference AS 3958.1 for installation and AS 3958.2 for tile selection. Australian guidance also treats movement control as a core requirement, with perimeter joints required on installations and intermediate joints used to accommodate substrate deflection and sunlight exposure. Those joints need to be set out before adhesive is spread, not improvised after the grout has hardened.

Use flexible silicone or another specified soft joint where the floor meets walls, hobs, frames or other changes of plane. Keep perimeter gaps clear of mortar, spacers, dirt and debris. A rigid grout bridge at these interfaces creates a path for movement to transfer into the brittle stone finish.

For cleaning and grout-care considerations after installation, expert advice from That Cleaning Crew is a useful complementary resource. It's better to choose the grout and cleaning routine together than to install a porous stone and discover later that the chosen cleaner attacks the surface or leaves residue in the joints.

Cutting, Laying and Grouting Travertine

The first laying decision happens before adhesive. Open the crate and dry-lay enough of the stone to understand the variation in colour, veins, pits and edge character. For a visible floor, I'll normally blend tiles from different boxes rather than allowing one darker group or strongly veined group to dominate a single area.
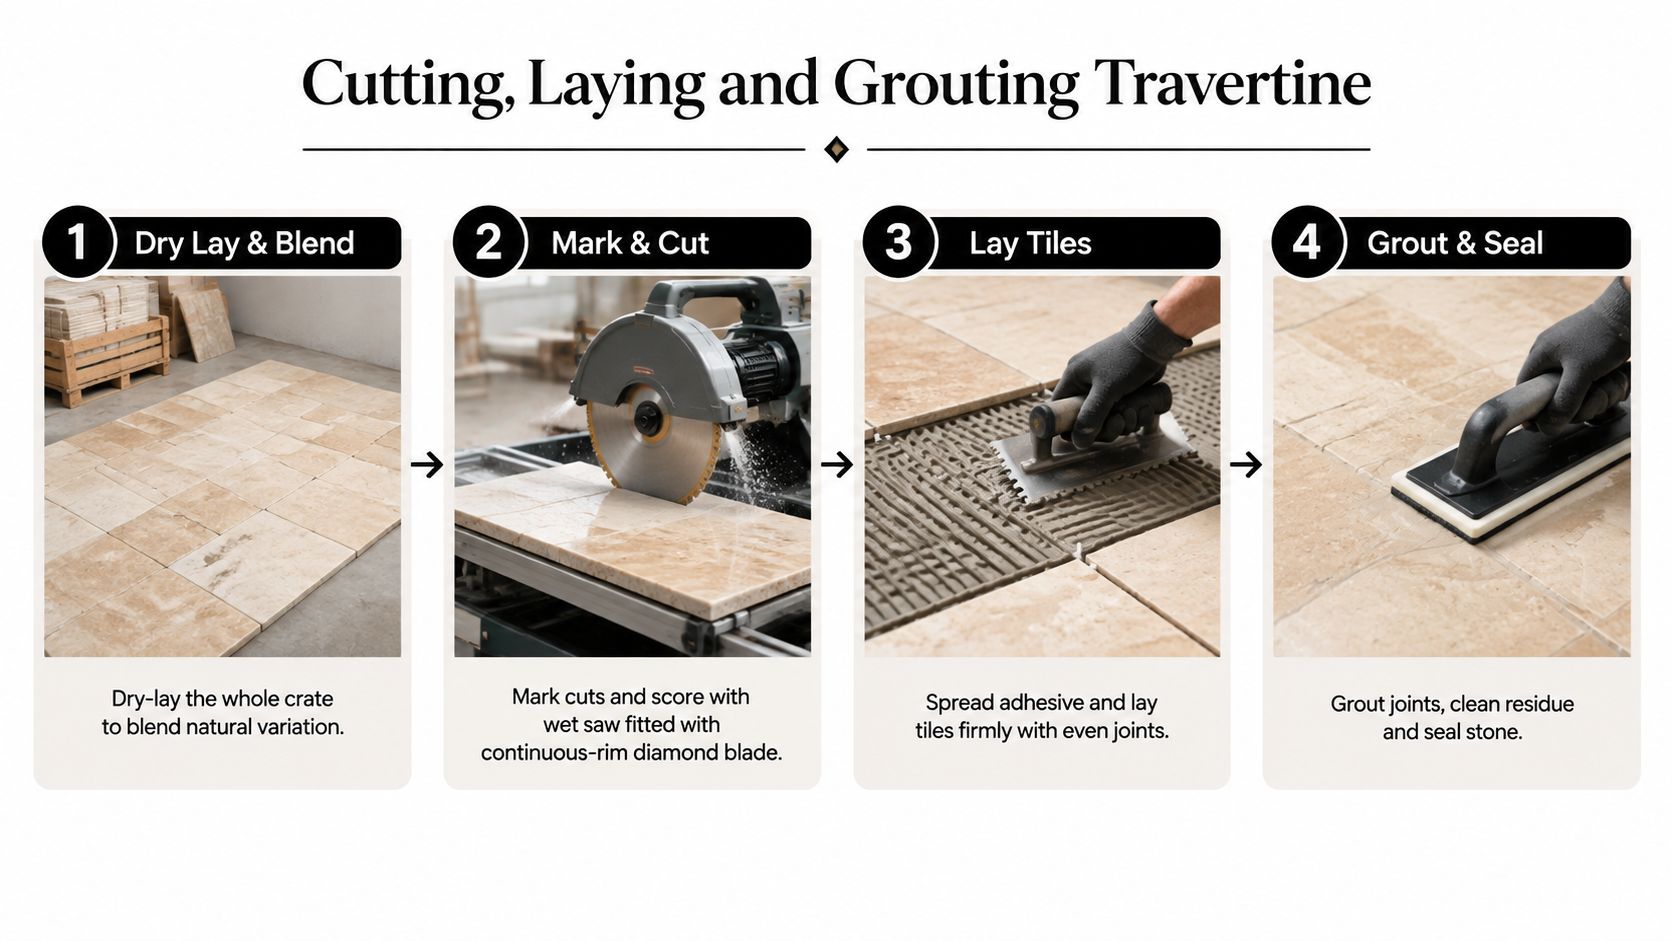
A four-step infographic illustrating the professional process of cutting, laying, and grouting natural travertine stone tiles.

Mark cuts from the actual set-out, not from a nominal measurement. A wet saw fitted with a continuous-rim diamond blade gives cleaner results through travertine than forcing a dry cut. Support the tile properly, feed it steadily and handle the cut piece carefully, because tumbled arrises and filled areas can break away at the final part of the cut.

Set the stone with full contact

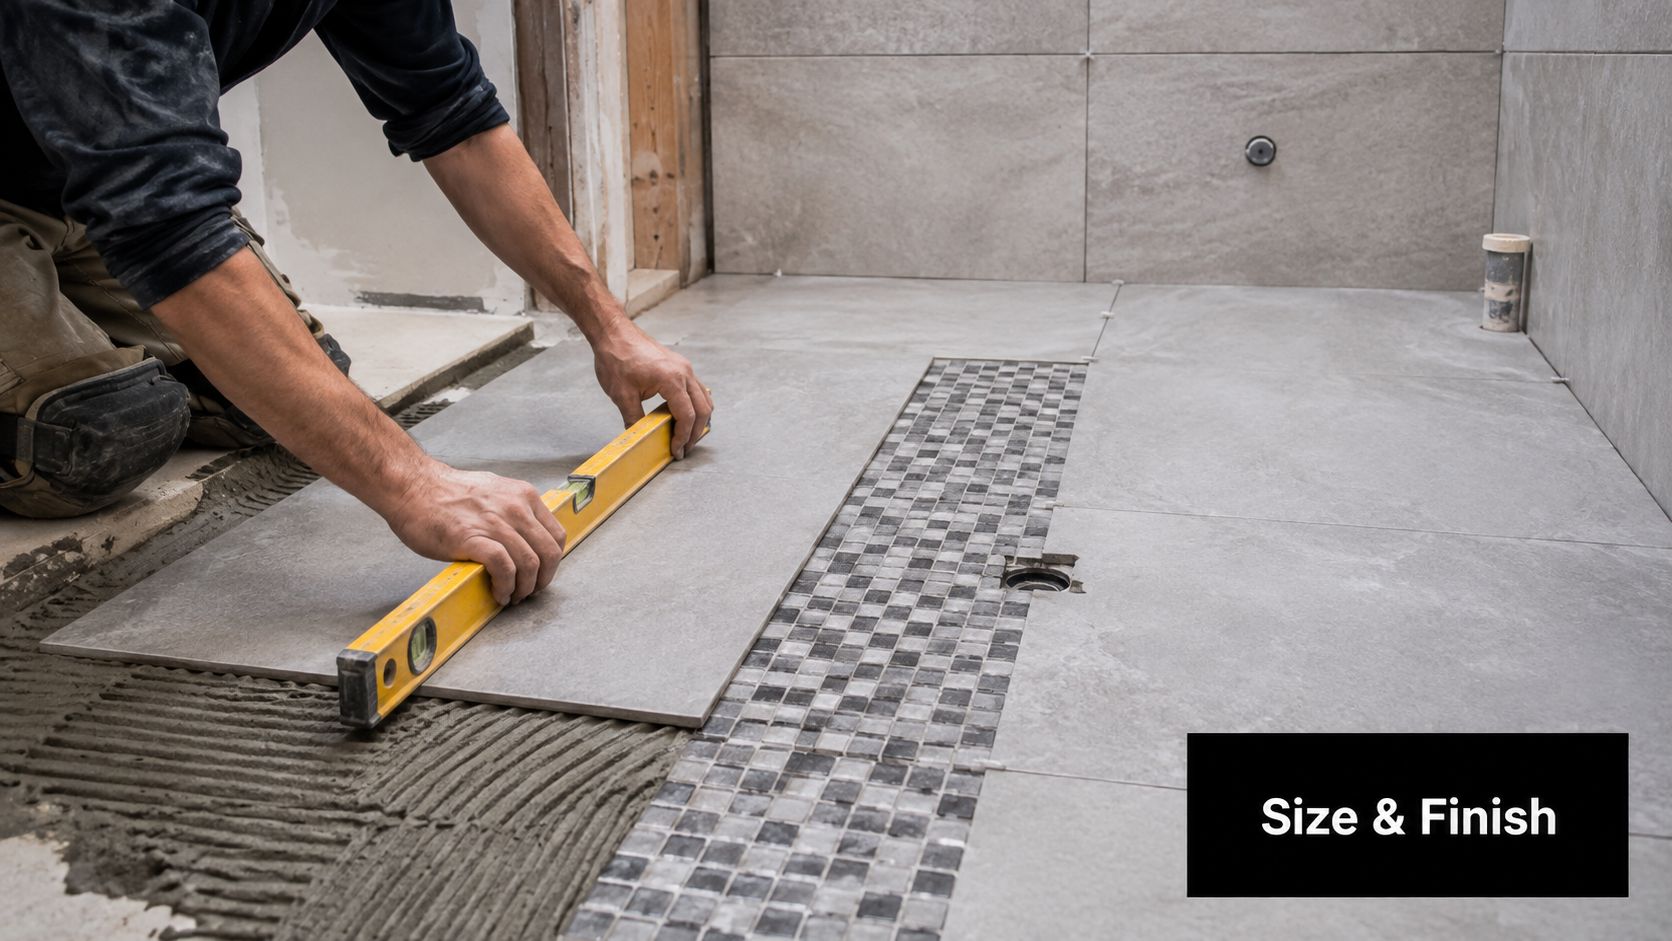
Back-butter each paver with the flat side of the trowel. This fills irregularities on the back and helps the adhesive contact the entire tile. Spread adhesive on the substrate, comb it consistently, then use a butter-and-float action to bed the stone.

Press and move the tile slightly to collapse the ridges. Lift an occasional tile during the installation to confirm coverage rather than assuming it. Australian travertine specifications call for 100% adhesive coverage, and that requirement is particularly important where pavers are large, heavy or installed over a moisture-sensitive substrate.

Avoid spot-fixing. Isolated adhesive dabs leave unsupported areas beneath the tile, which can create drummy sections and concentrated stress. The goal is a continuous bed that supports the stone across its whole underside.

Respect fills, veins and tumbled edges

Travertine is not a uniform manufactured sheet. A filled pit may be sound in one tile and fragile in another. Veins can change direction through a cut, and the softened edges of tumbled formats can chip while spacers are inserted or grout is compacted.

Where cutting exposes a filled edge, pre-seal or stabilise it with a compatible product if the specification calls for that treatment. Don't drag metal tools across the face, and don't use a rubber mallet with force that could fracture a thin section. Small adjustments with suction handles, a straightedge and controlled hand pressure are safer.

The grout joint reflects the finish. Smooth honed or polished stone generally uses 3–6 mm joints, while textured finishes commonly use 6–10 mm joints, as described in Australian stone installation guidance. Wider joints give tumbled edges room to vary without making the finished layout look forced.

Grouting shouldn't begin until at least 12 hours after laying, according to an Australian travertine installation guide. Press grout diagonally across the joints, especially where the joint is wider, then clean in controlled passes so you don't pull material back out of the porous edges.

Allow the surface to dry and cure for at least 7 days before sealing or walking on the floor where the applicable stone guide specifies that period. Sealing too early can trap moisture and produce uneven colour or a cloudy finish.

Sealing, Slip Safety and Long-Term Maintenance

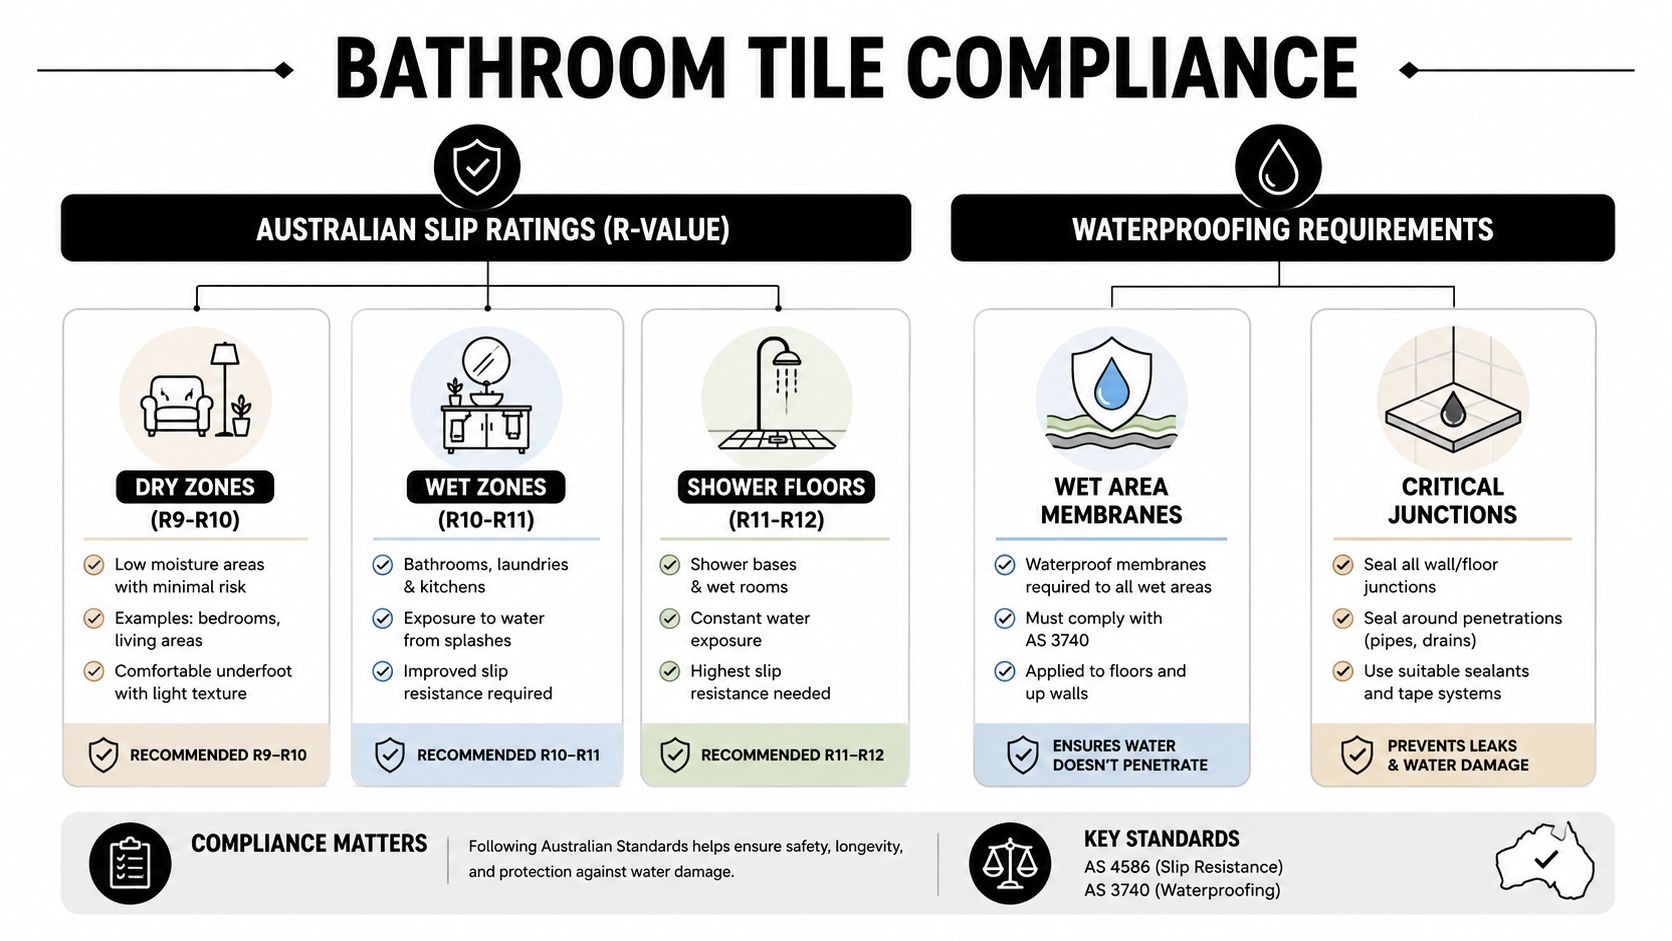
Sealing protects travertine from staining, but it doesn't turn the stone into a waterproof surface and it doesn't materially improve slip resistance. The wet-area decision should begin with the finish and its tested rating, then move to waterproofing, falls, grout and maintenance.

A penetrating silane or siloxane sealer is often chosen where the stone needs stain resistance while retaining a natural appearance. An enhancing sealer can deepen colour and emphasise veins, but it may change the appearance more noticeably on tumbled stone. On a correctly waterproofed substrate, a breathable penetrating system is generally preferable to a coating that traps moisture, subject to the manufacturer's instructions.

Set a maintenance plan before handover

Application Sealer type Reseal cycle Target slip rating, AS 4586 Maintenance note
Ensuite shower floor Penetrating natural-look sealer 1–2 years, depending on traffic and product Higher bathroom rating, commonly P3, P4 or P5 guidance depending on location Dry after use and inspect soft joints
Bathroom floor Penetrating or suitable enhancing sealer 2–4 years, depending on traffic and product Select to the tested wet-area requirement Use pH-neutral cleaner
Balcony or external transition Exterior-suitable penetrating sealer Product and exposure dependent Assess the required external rating, commonly within P3–P4 guidance Check joints, drainage and surface changes

The ratings and application context need to come from the tested product and the location, not from a sales description. Australian guidance notes that bathrooms and shower floors need higher slip resistance, and factory finish assumptions can be unreliable. The Aqua Mix travertine cleaning and sealing guide also highlights that sealing doesn't change slip resistance and that existing surfaces may require on-site wet pendulum testing under Australian standards.

Inherited installations sometimes need remediation rather than another coat of sealer. Options can include an acid-wash-and-seal process where appropriate, a compatible clear anti-slip treatment or mechanical micro-roughening. The correct choice depends on the existing finish, contamination, drainage and test results. Product marketing shouldn't replace verification.

For practical care of porous tile surfaces, this guide from J.G. Carpet Cleaning provides useful maintenance context, although every cleaner still needs to be checked for compatibility with travertine.

Use pH-neutral cleaners only. Vinegar and bleach can damage stone or grout, and shower floors benefit from microfibre drying after use. Inspect movement joints at least every 12 months, looking for gaps, splitting, mould growth or rigid grout replacing a flexible seal. For planned stone sealing work, see stone tile sealing services in Melbourne.

When to Bring in a Registered Builder or Tiling Specialist

Travertine becomes a poor DIY project when the work involves more than sticking tiles to a sound, dry surface. Structural waterproofing, balcony membrane replacement, multi-residential work and larger renovation scopes can require registered building professionals and coordinated trades.

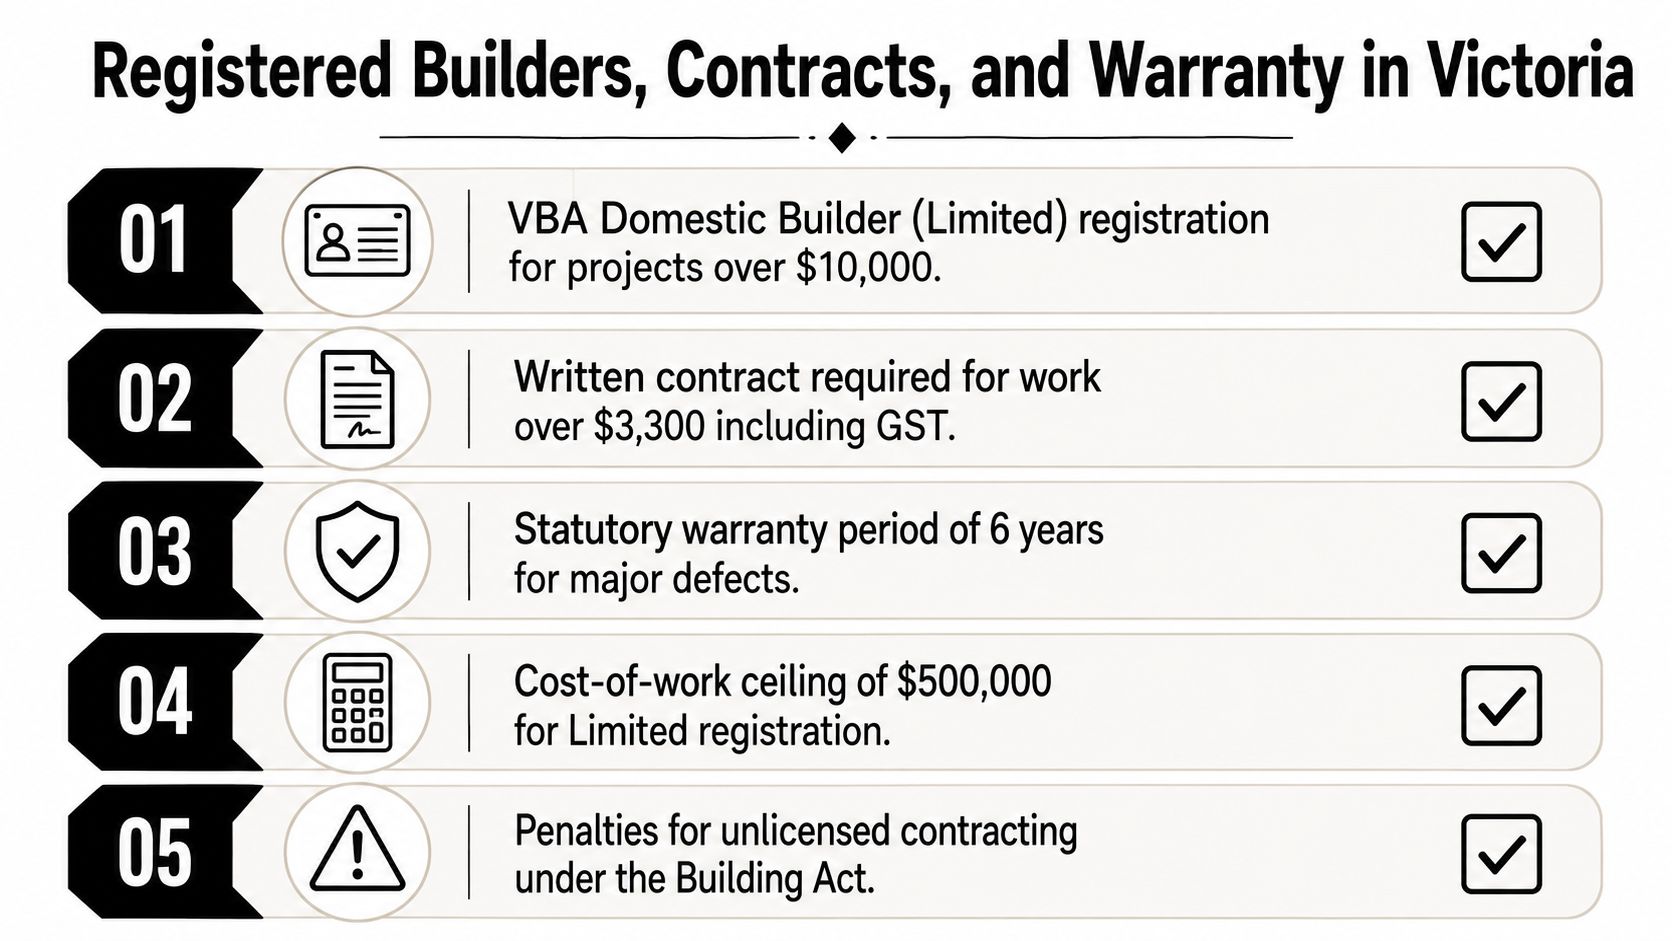
In Victoria, bathroom renovations valued at $5,000 or more must be carried out by a registered building practitioner, according to the Victorian bathroom renovation guidance summarised by hipages. The relevant registration types for bathroom work are Domestic Builder: Unlimited or Domestic Builder: Limited to bathroom, kitchen and laundry renovations.

That requirement matters because bathroom renovations often include plumbing, electrical work, carpentry, waterproofing and tiling. It's not enough to hire someone who can lay stone if the project contract and building scope require registered coordination.

Know when the surface has already failed

Stop and investigate if you find:

  • Failed flood testing: Don't cover a membrane that hasn't passed the required checks.
  • Drummy tiles: Hollow-sounding areas can indicate poor bedding or debonding.
  • Efflorescence: Salt deposits can point to moisture movement through the system.
  • Deflection: A floor that moves beyond the specified natural-stone tolerance needs structural or substrate attention before tiling continues.

A specialist tiler adds more than a wet saw. The useful work includes sorting calibrated batches, mapping veins, controlling wet-cut dust, protecting exposed fills and setting out movement joints to the relevant Australian installation guidance. That preparation prevents the finished floor from looking patchy or carrying avoidable stress.

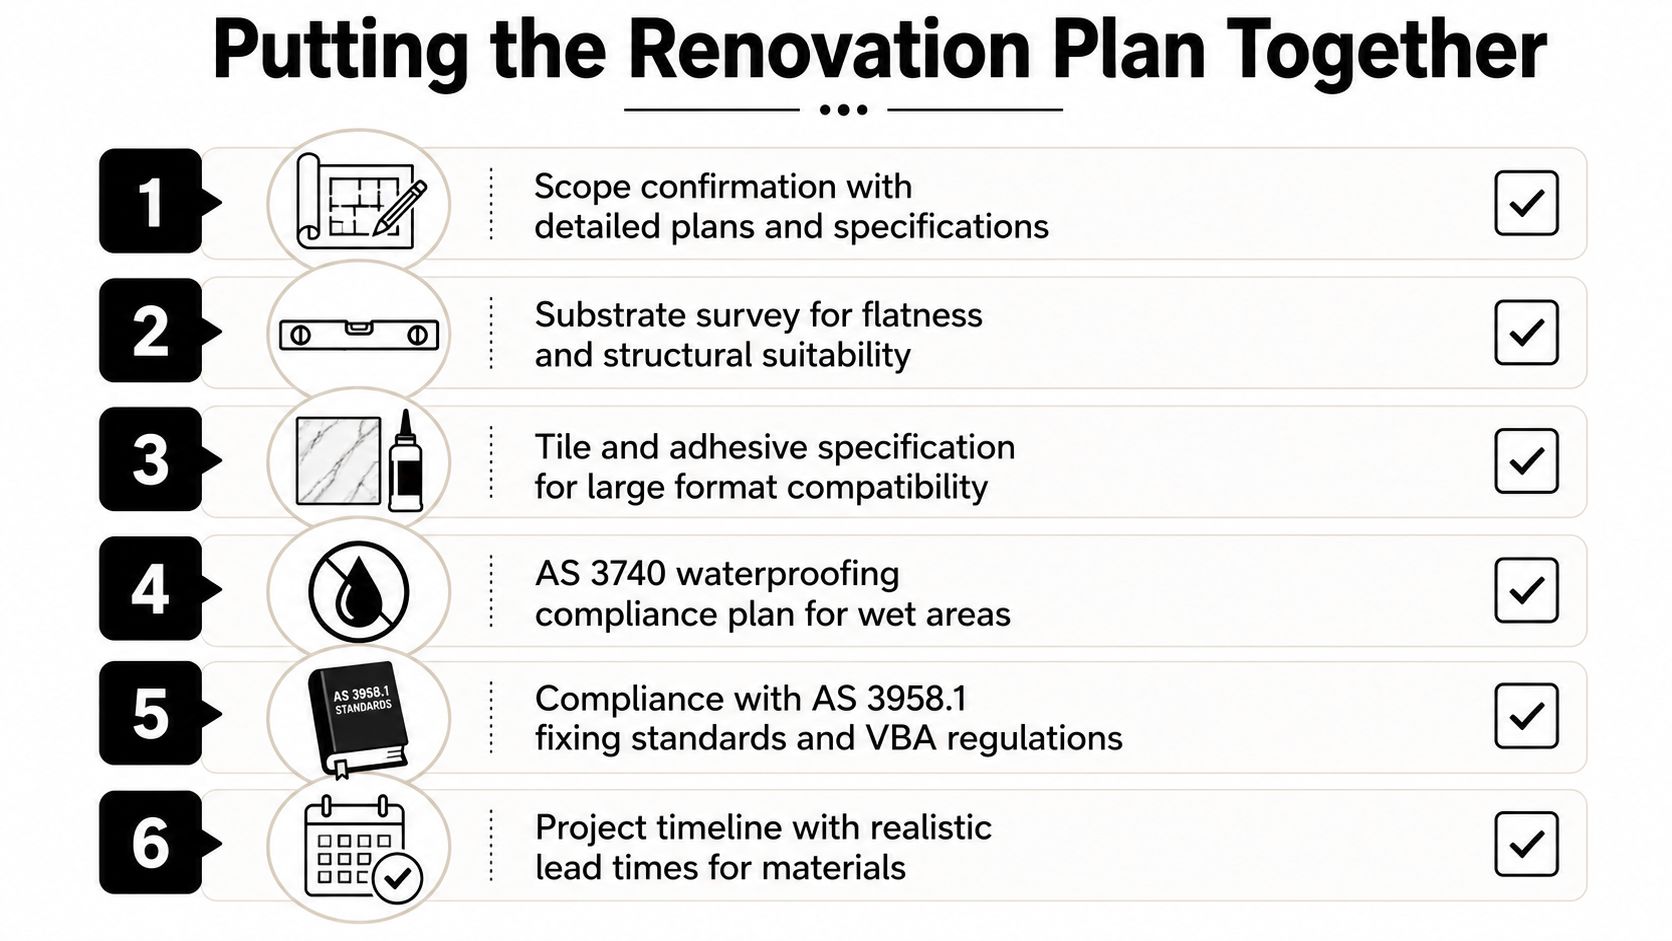
Ask every Melbourne contractor to price the same line items: substrate survey, moisture assessment, screeding or self-levelling, waterproofing certificate, slip-rating requirement, waste allowance for tumbled edges, movement-joint detailing, sealing plan and warranty terms. Melbourne Tiling Services P/L can coordinate registered building work, waterproofing, screeding, natural-stone tiling and broader bathroom renovation trades, so those items can be discussed as one scope rather than vague rates for laying tiles alone.


For a travertine bathroom, ensuite, balcony transition or remedial project, Melbourne Tiling Services P/L offers substrate preparation, compliant waterproofing, screeding, stone installation and sealing coordination across Melbourne and greater Victoria. Request a detailed quote that records the finish, fall, slip-rating requirement, movement joints, certificate process and maintenance plan before you order the stone.
Marble Tiles in Bathroom Style Durability and Care Guide

You've chosen the marble. The sample board is open on the vanity, the soft veining looks perfect beside your tapware, and the bathroom renovation suddenly feels real. Then the practical questions arrive: will polished marble be slippery in the shower, how often will it need sealing, and will Melbourne's cooler, slower-drying conditions make upkeep difficult?

Marble tiles in a bathroom can deliver exceptional depth, brightness and character, but they shouldn't automatically cover every surface. The strongest result usually comes from treating marble as a zoned luxury finish, then matching each zone to its water exposure, slip requirements and cleaning routine. This guide moves from marble's appearance and finishes through safety, maintenance, installation, alternatives and Victorian renovation requirements.

Table of Contents

Introduction to Marble Tiles in Bathroom Design

A Melbourne homeowner might begin with a white Carrara tile for the shower walls, add a marble mosaic to the niche and choose a matching vanity top. On paper, the room feels cohesive. In practice, each surface behaves differently. The shower floor faces standing water and soap residue, the wall receives regular splash, and the vanity area may stay comparatively dry.

That difference matters because marble isn't manufactured with the uniformity of porcelain or ceramic. Each tile has natural variation in colour, veining, density and absorption. Two pieces from the same batch can look related without looking identical. That variation creates the luxury effect, but it also means your installer needs to inspect, sort and set out the tiles carefully.

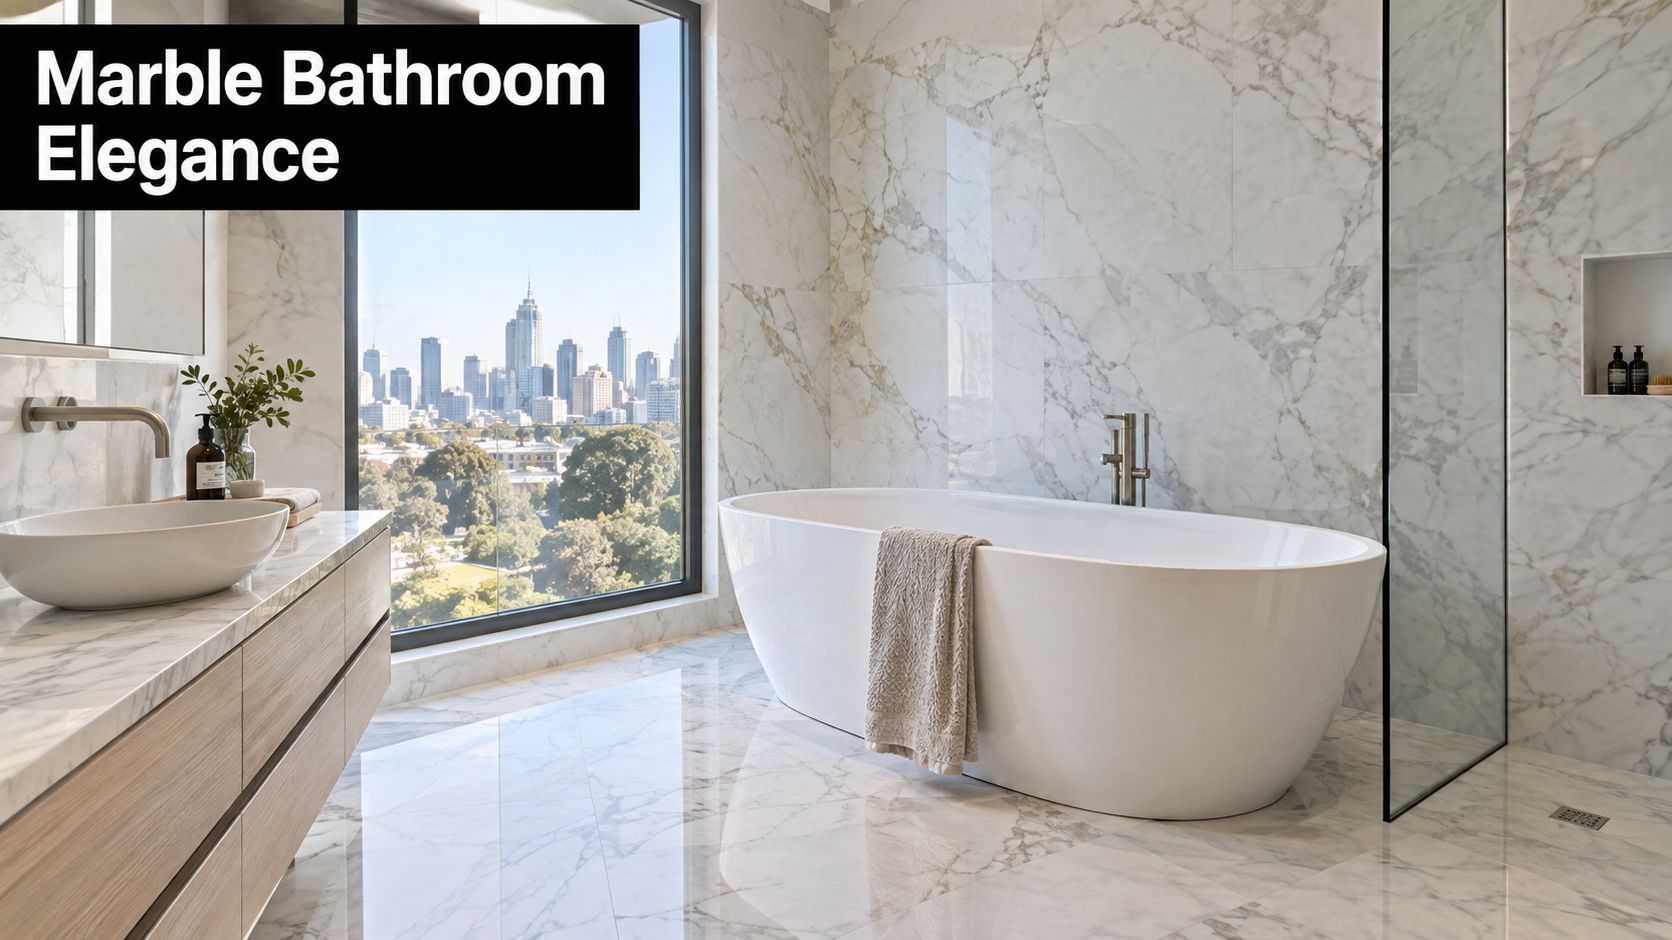
A luxurious bathroom featuring white marble tiles, a modern freestanding bathtub, and a scenic city view.

The right question isn't, “Is marble suitable for a bathroom?” A better question is, which marble, with which finish, in which zone, installed over which substrate, and maintained by whom?

Beauty and upkeep belong together

Marble reflects light differently from a printed tile. Its veining runs through the stone, so a wall can appear layered rather than flat. That makes it useful for a feature wall behind a freestanding bath, a vanity splashback, a niche lining or a carefully selected shower wall.

It also demands more thoughtful care. Acidic products can etch the surface, water and body oils can penetrate porous areas, and a polished finish can become a poor choice where a wet foot needs reliable friction. You're not buying a maintenance-free background. You're choosing a material whose appearance depends on sensible placement and routine care.

Use visual planning before ordering

A render can help you test whether marble belongs across the room or only in selected areas. For homeowners comparing calm, minimal layouts, a Japanese bathroom render can be useful for considering how natural stone, timber tones, open shower zones and restrained colour palettes work together before tiles are purchased.

Australia continues to import marble and related stone products for tile and building applications. The supply chain is active, but it's also influenced by overseas producers, so availability, batch matching and lead times deserve attention during bathroom planning.

Understanding Marble Types Finishes and How They Behave

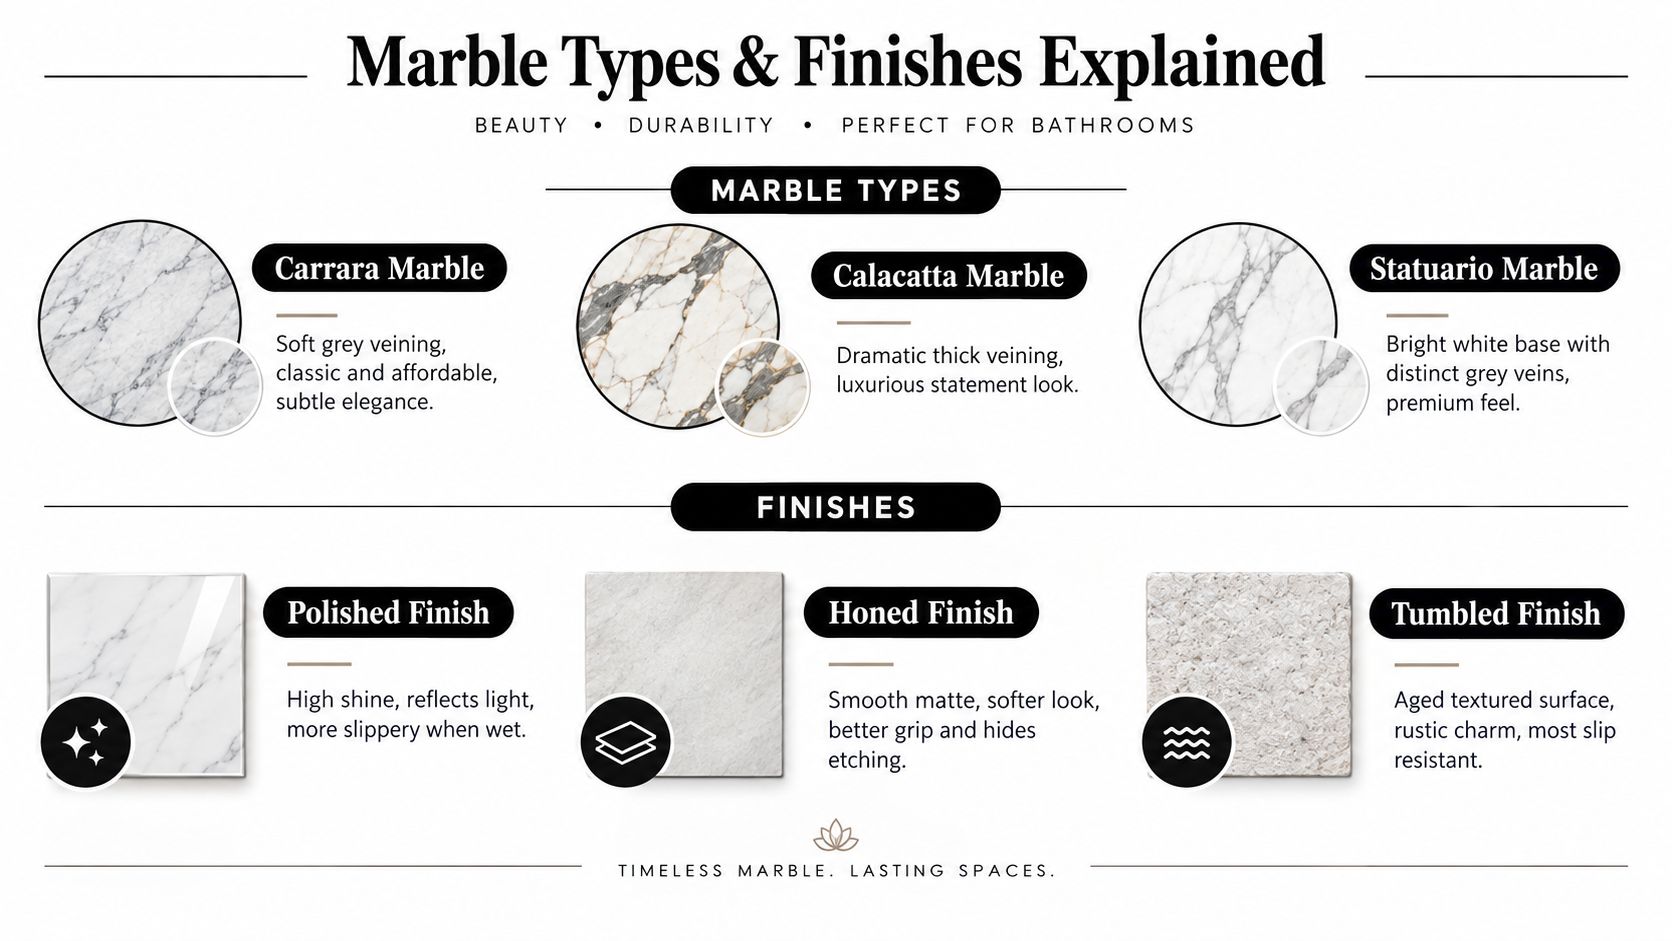
Start with the stone's appearance, then assess the finish. Marble type controls the visual language, while the finish changes how light, water and touch interact with the surface.

Match the marble to the room's character

Carrara marble generally offers a softer white or pale base with grey veining. It suits classic Melbourne terraces, Hamptons-inspired bathrooms and restrained contemporary schemes where you want movement without a dramatic focal point.

Calacatta marble is recognised for stronger, more expressive veining. It can make a vanity wall or bath backdrop feel like a deliberate piece of architecture, especially when the installer aligns adjoining pieces so the veins read as a continuous composition.

Statuario marble typically presents a bright white ground with distinct grey markings. It gives a sharper, more premium visual impression, but the exact appearance still varies between quarry selections and batches.

Think of each finish as a different type of skin texture. Polished marble has a glossy surface that reflects light and makes colours appear more vivid, much like a smooth, shiny surface under a window. Honed marble has a matte appearance with less glare, so it tends to feel quieter and can disguise minor etching more effectively. Tumbled marble has a deliberately aged, textured edge and surface that works well in rustic or heritage settings.

An infographic detailing different types of marble and finishes for bathroom design applications with descriptive labels.

Let the finish follow the zone

A glossy finish can brighten a dim wall, but it isn't automatically appropriate for a shower floor. A honed finish may provide a more practical feel underfoot, subject to its tested slip rating. Tumbled stone introduces texture, yet its irregular surface can require more attention around grout and residue.

Tile size changes the visual scale as well. Smaller mosaics introduce more grout and can help follow falls toward a drain. Larger tiles create fewer visual breaks, but they require a flatter substrate and more precise handling. Large-format slabs can look spectacular on a wall, although moving, cutting and setting them calls for specialist equipment and planning.

Australia's import data illustrates the breadth of the supply base. In 2024, Australia imported crude or roughly trimmed marble and travertine valued at A$86.89K, weighing 153,207 kg. Greece supplied A$83.77K and Turkey supplied A$3.12K of that category, according to Australia's marble and travertine import data.

A different category in 2023, marble and travertine merely cut into a square, reached A$103.20K and 247,778 kg. India led that category at A$49.29K, followed by Italy, Turkey, Egypt and Pakistan. For a Melbourne renovation, that overseas supply base makes batch selection and ordering discipline especially important.

Before committing, view several tiles together, mark the vein direction and ask how the installer will distribute variation. For practical guidance on a matte finish, see these marble floor tiles with a matt finish.

Is Marble Suitable for Bathrooms Durability and Safety Explained

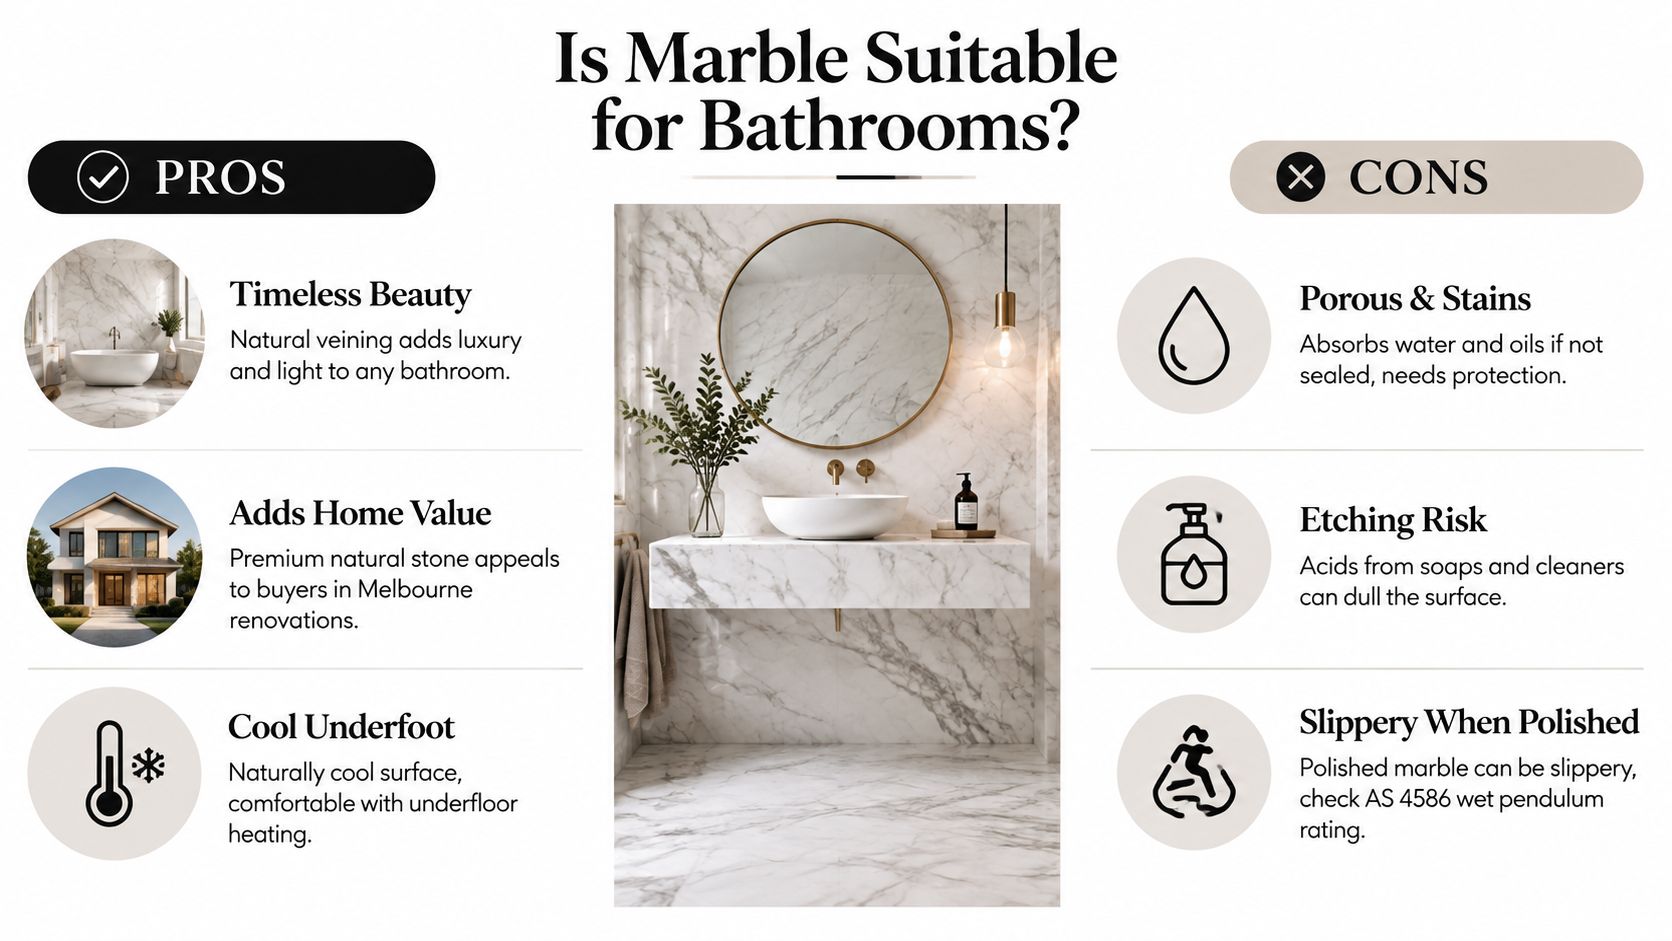
Marble can work in a bathroom, but it isn't equally suitable for every wet-area surface. Suitability depends on absorption, chemical exposure, surface texture, drainage and your willingness to maintain the room.

Natural stone absorbs liquids to different degrees. Lower absorption generally improves resistance to moisture ingress and staining, while higher absorption makes it easier for soap, oils and pigments to enter the stone. An Australian test publication records a mean water absorption value of 0.185% for one set of natural stone products, providing an example of the technical information specifiers compare when assessing materials. The result doesn't mean every marble has that performance, and it doesn't make any stone waterproof. Read the Australian natural stone test data for the importance of checking product-specific information.
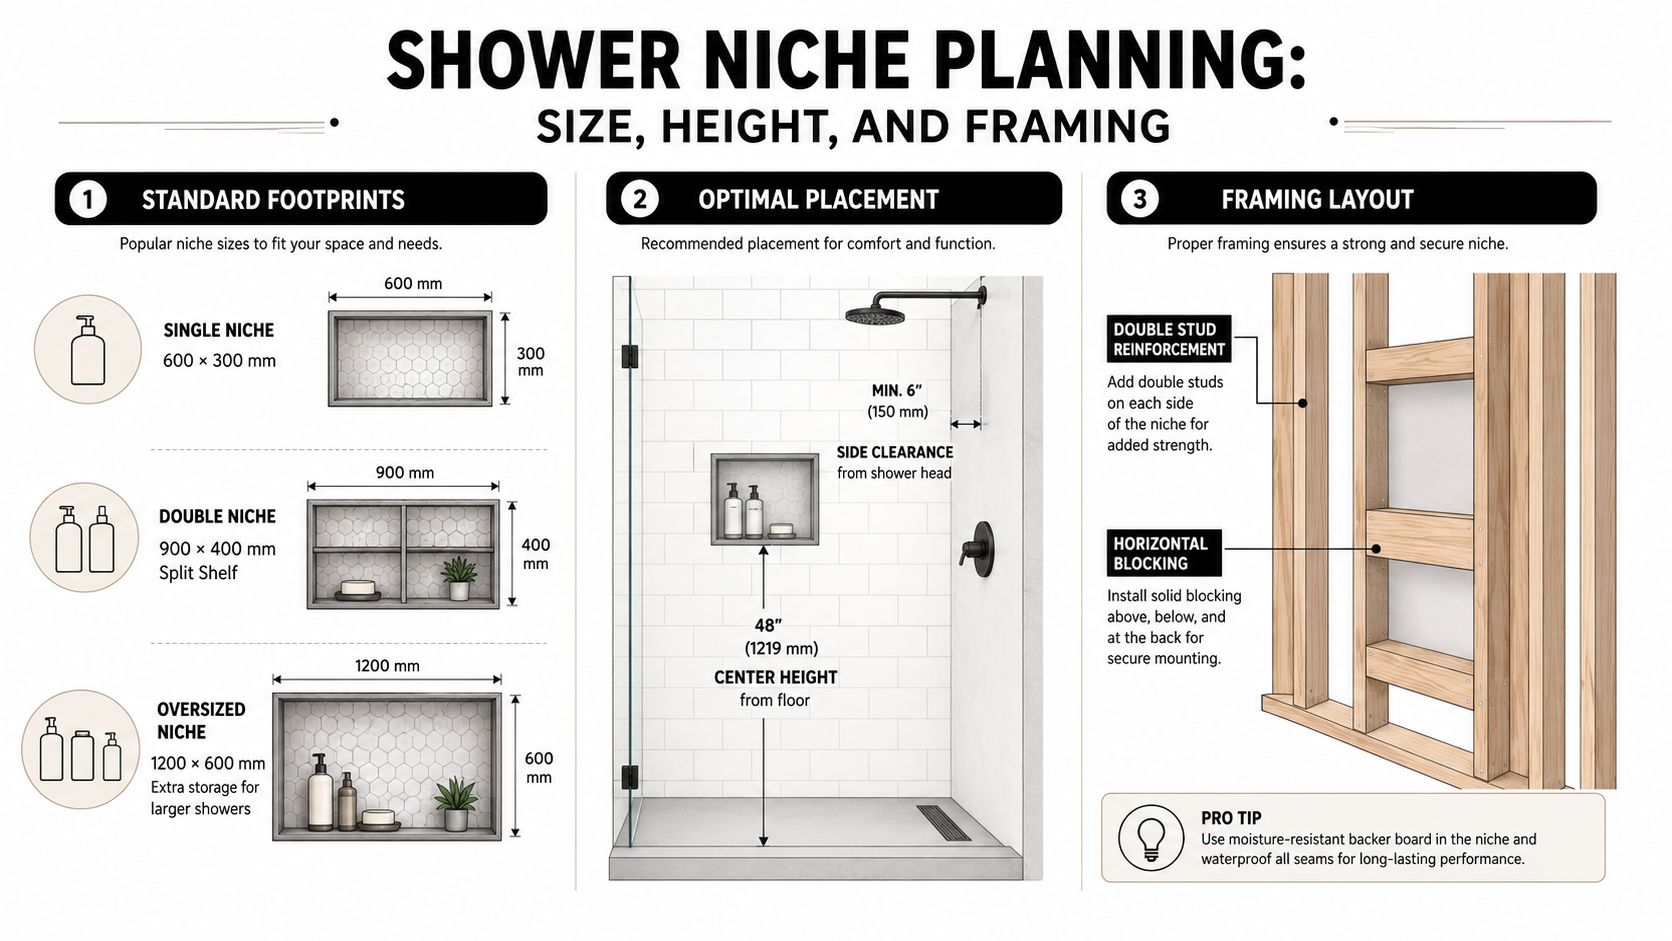
Understand the slip question

Slip resistance is assessed separately from appearance. Australian wet-area practice commonly uses the AS 4586 wet pendulum system, with ratings from P0 to P5. A higher P rating indicates lower slip risk, and domestic bathroom selection commonly targets at least P3 to P4, depending on exposure and use case, as explained in this Australian slip-rating guidance.

Polished marble often performs less favourably in wet conditions because its smooth surface provides less micro-texture for friction. A shower entry, floor or area immediately outside the shower should never be selected by colour alone. Ask for the tested rating of the actual product and finish, then confirm that the floor has correct falls to the drain.

Finish and Zone Slip and Moisture Consideration Recommended Use
Polished marble, dry vanity wall High reflectivity, but limited relevance to wet-foot traction Vanity splashbacks and decorative walls
Honed marble, shower wall Matte surface, still requires sealing and suitable grout detailing Shower walls and feature areas after product review
Honed marble, bathroom floor More practical than polished, but the tested rating remains decisive Floors where the documented rating suits the exposure
Textured or tumbled marble, selected wet zone Texture can improve grip, but irregularity may hold residue Feature sections and carefully specified floors

Melbourne conditions change the maintenance conversation

A bathroom that dries slowly gives water, soap residue and grout more time to cause trouble. Strong ventilation, effective extraction and a workable drying routine matter as much as the tile itself. A marble floor that feels acceptable in a dry vanity zone may be the wrong choice for a shower entry if the finish and rating don't suit regular wet feet.

Practical rule: Treat marble as a managed surface, not a waterproof surface.

The decision becomes straightforward when you're honest about daily habits. If you're happy to wipe down surfaces, control ventilation and maintain the sealer, marble can be considered in selected wet areas. If you want to leave the bathroom damp and perform occasional heavy cleaning, reserve marble for lower-splash zones or choose a less reactive alternative.

A comparison chart showing the pros and cons of using marble tiles for bathroom renovation projects.

Sealing and Maintenance That Keeps Marble Beautiful

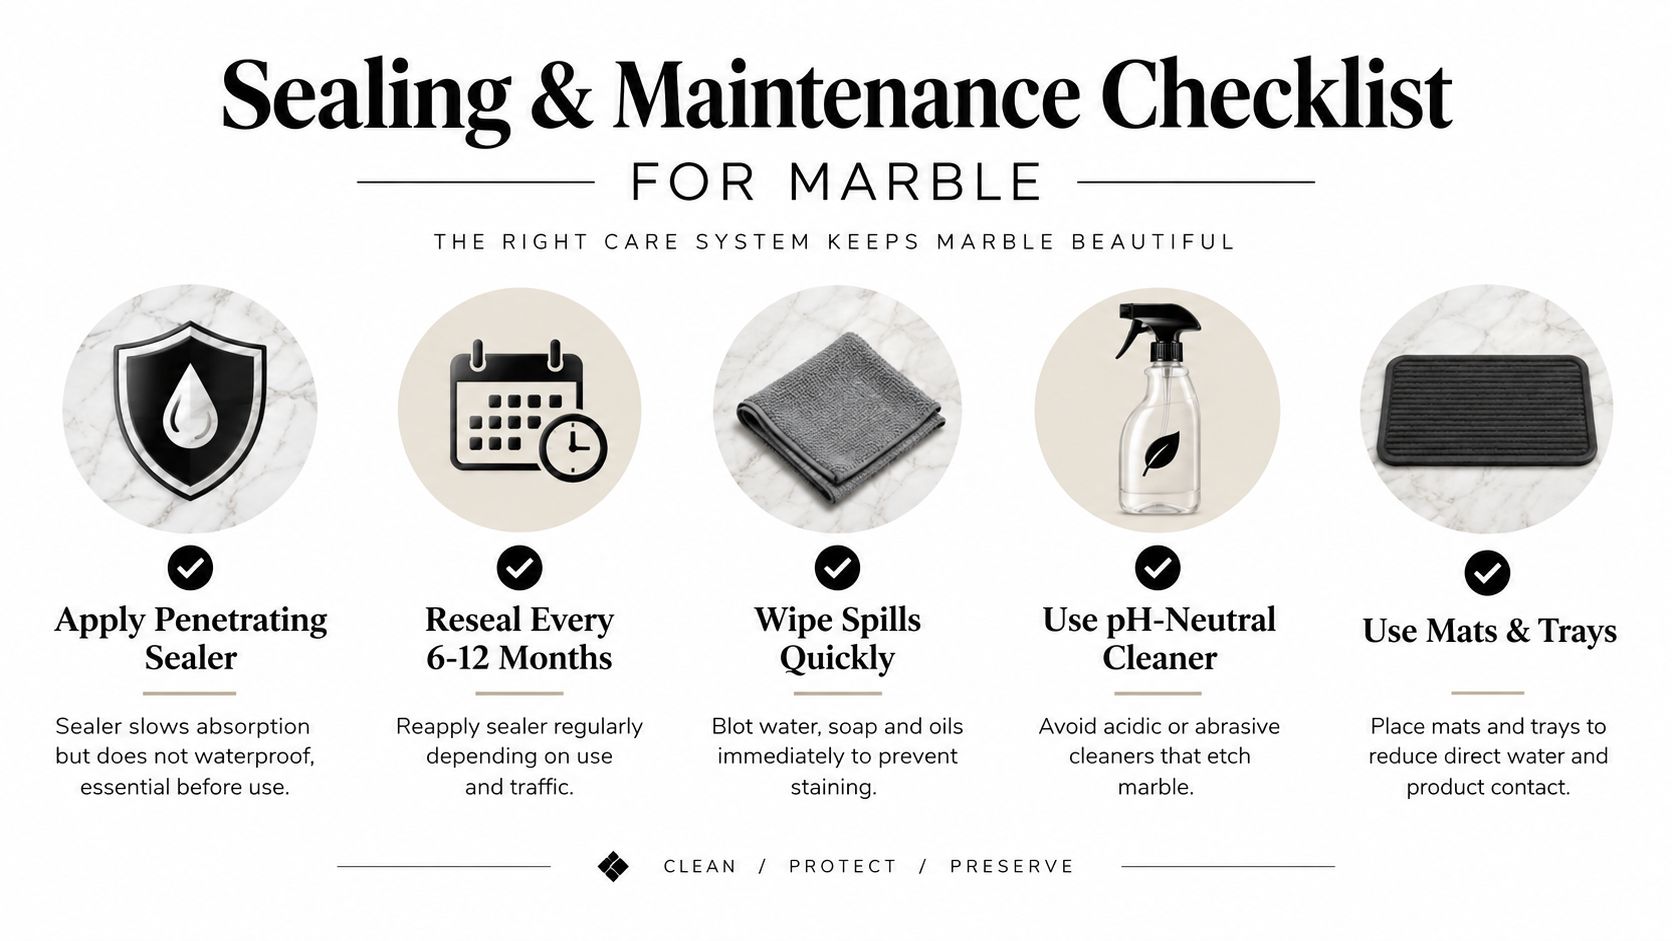
Sealing helps, but it doesn't change marble into porcelain. A penetrating sealer enters the stone and slows liquid uptake. It doesn't create a permanent waterproof coating, stop etching from acids or remove the need to dry the room.

Build a simple care routine

Before the bathroom is used, the installer should confirm that the marble and grout are suitable for the selected sealer, then test the product on an inconspicuous spare tile. The correct product and application method matter because residue left on the surface can affect the finish.

Wet zones require planned resealing. Independent Australian stone-care guidance treats showers and other wet areas as high-risk and recommends resealing porous natural stone every 12–18 months, with ventilation and pH-neutral cleaning forming part of the wider maintenance system, as set out in this Australian stone maintenance manual.

Use the following habits:

  • Blot promptly: Remove water, soap and body-oil spills rather than letting them sit.
  • Choose pH-neutral products: Use a cleaner labelled for marble or natural stone.
  • Avoid acids: Vinegar, lemon-based products and acidic bathroom cleaners can etch marble.
  • Use soft tools: Microfibre cloths, soft mops and non-abrasive sponges are safer than harsh pads.
  • Dry after use: A squeegee and towel reduce residue on shower walls, floors and glass.
  • Watch the grout: Grout lines can hold moisture even when the tile face looks clean.

A denser stone may absorb less, but even very low absorption doesn't eliminate staining or etching risk. Coastal humidity, heavy use and limited ventilation may mean the maintenance interval needs to be shorter than the general wet-area cycle.

Know the signs before damage spreads

Darkening can indicate moisture entering the stone. Dull patches can indicate etching rather than dirt. A sealer that no longer performs as expected may allow water to soak in quickly instead of remaining on the surface.
For a practical reference on protecting your marble tile, focus on gentle cleaning, quick drying and product testing rather than aggressive scrubbing. You can also review this guide to cleaning marble bathroom tiles before choosing products for the room.

A small daily action prevents a larger restoration problem. The aim isn't to keep marble untouched. Natural stone develops character, but sensible care helps you control staining, discolouration and avoidable surface wear.

An infographic titled Sealing and Maintenance Checklist for Marble detailing steps like sealing, cleaning, and protection.

This visual reminder covers the basic care system. Keep it near your product cupboard so everyone using the bathroom follows the same approach.

Installation Waterproofing and Underfloor Heating Considerations

A marble bathroom can fail even when the tile is beautiful. Water leaks usually originate in the system beneath and around the tile, not because marble itself was expected to act as the waterproofing layer.

Prepare the base before setting tiles

The substrate needs to be sound, clean, flat and suitable for the selected tile format. Large pieces show unevenness quickly, so installers may use screeding or self-levelling to correct the base before adhesive is applied. In a shower, the floor must fall consistently to the drain without creating a ponding area.

The waterproofing membrane belongs beneath the tile installation and needs careful detailing at corners, penetrations, niches, thresholds and waste outlets. Tiling over a visually neat but poorly prepared wet area won't correct a membrane problem.

Grout selection also matters. The grout must suit the joint size, exposure and cleaning demands. Movement joints allow parts of the installation to accommodate building or thermal movement instead of transferring stress into the marble or grout.

Coordinate heating and stone movement

Underfloor heating can work with tile and natural stone when the heating system, substrate, membrane, adhesive and grout are specified as one assembly. Marble responds to temperature changes, so the installer needs compatible flexible adhesives and appropriate movement detailing. The heating plan should also avoid creating an unsuitable buildup at wastes, thresholds or transitions.

Vein alignment adds another layer of precision. Before adhesive is spread, lay out the marble dry, inspect each tile and agree on the direction of prominent markings. A strong installer won't place the most visually different pieces beside one another without discussing the result.

The visible marble is only the final layer of a waterproofing, drainage, adhesive and movement-control system.

A shower renovation may also involve carpentry, plumbing, electrical work, waterproofing and glass installation. Each trade affects the next. A useful general reference on planning a one-piece shower stall installation reinforces why shower components, access and water management need to be considered together, even when your project uses individual marble tiles.

Keep records of the waterproofing work, product specifications and tile details. If a leak appears later, those documents help identify the relevant layer instead of relying on memory.

Cost Design Ideas and When to Choose Marble Over Alternatives

Marble earns its place when its visual impact justifies its care. Covering every wall and floor can create a striking room, but it also places the most maintenance-sensitive material across the highest-exposure areas.

A zoned marble bathroom often gives a better balance. Use marble behind a freestanding bath, across a vanity splashback, inside a niche or on a feature wall, then choose a practical floor tile and a moisture-resistant wall material for the shower. This approach keeps the natural veining where you notice it most without making every surface equally demanding.

Compare the main design paths

A full marble shower offers continuity and a strong luxury effect. It also requires careful finish selection, disciplined drying and ongoing attention to etching, stains and grout. It's most suitable for homeowners who accept that routine.

A mixed-material bathroom creates contrast. Marble can frame the vanity or bath while porcelain handles the floor and heavier splash zones. For a family bathroom, this arrangement may be easier to live with because the floor and shower surfaces can be selected for cleaning and slip performance rather than appearance alone.

Large-format alternatives reduce visual interruptions. Australian bathroom trend coverage describes growing use of 600×1200 mm tiles and panels, and formats reaching 2400×1200 mm, to reduce grout lines and simplify cleaning. The same coverage highlights large-format porcelain slabs as moisture-resistant options for spa-style bathrooms, as shown in this guide to marble-look porcelain tiles.

Apply the choice to Melbourne homes

For a Hamptons renovation, soft Carrara marble around the vanity can pair with a simple, durable floor. A modern spa bathroom may use a dramatic marble panel as the visual anchor while large-format porcelain manages the shower. In a heritage home, tumbled or honed marble can complement original details without forcing every surface into the same finish.

Your budget needs to account for more than the tile itself. Stone grade, format, cutting, wastage, substrate preparation, waterproofing, labour, sealing and future care all influence the outcome. Melbourne renovation planning often uses a median scope of $10,000, so confirm what that figure includes before comparing quotes, as the publisher's renovation information explains. Treat the number as a planning reference, not a promise for a particular marble project.

Planning Your Renovation With Registered Builders in Victoria

Design decisions become practical decisions once walls move, plumbing changes or permits enter the project. Victorian guidance states that building and demolition work generally requires a building permit unless an exemption applies. Cosmetic bathroom work may be exempt, but structural changes involving soundness, foundations, floor area, height or safety can trigger the permit pathway, according to this Victorian bathroom renovation permit guidance.

In Victoria, domestic building work valued above $10,000 generally requires registration with the Building and Plumbing Commission, formerly the VBA, unless the work falls within a trade-only exception. Consumer guidance lists wall and floor tiling among those exceptions, but anyone carrying out work that requires a building permit must be registered regardless of value, as outlined in this Victorian registration and permit guidance.

Registration isn't just a label. The Victorian domestic builder application for bathroom, kitchen and laundry renovation work calls for industry qualifications, project evidence, a technical referee report, a criminal history check, photo identification, declarations and payment authorisation, as shown in the VBA domestic builder application form.

Before you approve a marble renovation, check:

  • Builder status: Confirm the relevant registration and permit responsibilities.
  • Waterproofing records: Ask who will complete the work and what documentation you'll receive.
  • Slip evidence: Request the tested rating for the selected marble finish and zone.
  • Maintenance agreement: Clarify sealing, cleaning and ventilation expectations.
  • Setting-out plan: Approve vein direction, tile layout and feature-zone boundaries.

Melbourne Tiling Services P/L operates from Highett and coordinates bathroom renovations with carpenters, plumbers, electricians, tilers and waterproofers, offering free quotes and 3D drawings for homeowners planning marble, porcelain or ceramic finishes.


For a bathroom renovation that balances marble's natural character with safe wet-area detailing, contact Melbourne Tiling Services P/L to discuss zoning, waterproofing, slip ratings and a practical tile layout. Request a free quote and 3D design consultation before ordering materials, so your marble is placed where it will look exceptional and remain manageable to care for.

How Much Does It Cost to Waterproof a Balcony

In Melbourne, a straightforward balcony waterproofing job costs about A$85 to A$150 per square metre, while a remedial strip-and-rebuild commonly lands between A$8,000 and A$22,000+. The difference isn't the membrane alone, it's whether the existing tiles, screed, falls, drainage and substrate can stay in place.

That's why the answer to how much does it cost to waterproof a balcony can be misleading. A small balcony with a sound surface may need a controlled recoat. Another balcony of the same size may require demolition back to the slab, concrete repairs, new screed, compliant drainage detailing and complete reinstatement. In Melbourne, the scope decides the bill long before the applicator opens a membrane drum.

Table of Contents

What Balcony Waterproofing Actually Costs in 2026

For a straightforward Melbourne membrane job, allow roughly A$85 to A$150 per m², including preparation, the membrane system and drainage detailing. A 12 to 20 m² balcony commonly sits around A$1,100 to A$2,500 when the substrate is sound and access is uncomplicated, according to the Melbourne balcony waterproofing cost guide.

But that range only applies to the simpler end of the work. Remedial strip-out, re-waterproofing and retiling commonly move into A$8,000 to A$22,000+, because demolition, screed replacement, drainage correction and finish reinstatement dominate the labour. A separate Australian pricing guide also records small patch repairs from about A$800, while complex replacement work can approach A$10,000, with difficult apartment jobs reported from A$10,000 to A$17,000 depending on access and rectification requirements. See the Australian balcony waterproofing cost breakdown for the distinction between a surface repair and a full rebuild.

Find your scope before comparing rates

A homeowner should identify one of three scopes before comparing any quote.

  1. Maintenance recoat: The existing membrane and substrate are sound. The contractor cleans, prepares, primes and applies a compatible new coating. For a 12 m² balcony, the practical starting point is around A$1,100, subject to preparation and detailing.

  2. Localised repair: The membrane has failed in specific areas, or the substrate has minor defects. The contractor cuts out damaged sections, repairs cracks or weak patches, reinstates the membrane and seals the vulnerable junctions. A 12 m² balcony can sit around A$2,500 to A$5,000 in this middle category, depending on what the inspection uncovers.

  3. Full strip-and-rebuild: Tiles, adhesive and screed come out, exposing the structural slab. The scope then includes substrate repairs, new screed-to-falls, membrane installation, drainage details and a new finish. Budget from A$8,000 upward, with full Melbourne strip-out scopes commonly reaching A$8,000 to A$22,000+ according to Victorian balcony waterproofing pricing guidance.

Scope Typical $/m² 12 m² balcony estimate Best for
Maintenance recoat A$85–A$150 About A$1,100–A$1,800 Sound membrane and substrate
Localised repair Varies by defects About A$2,500–A$5,000 Isolated leaks and minor substrate damage
Strip-and-rebuild Not meaningfully comparable A$8,000–A$22,000+ Failed screed, drainage or widespread membrane failure

The balcony waterproofing service information is useful for understanding what preparation and reinstatement should appear in a written scope. Don't accept a square-metre rate until the contractor has stated which of these three jobs you're buying.

Key Factors That Drive Your Balcony Waterproofing Quote

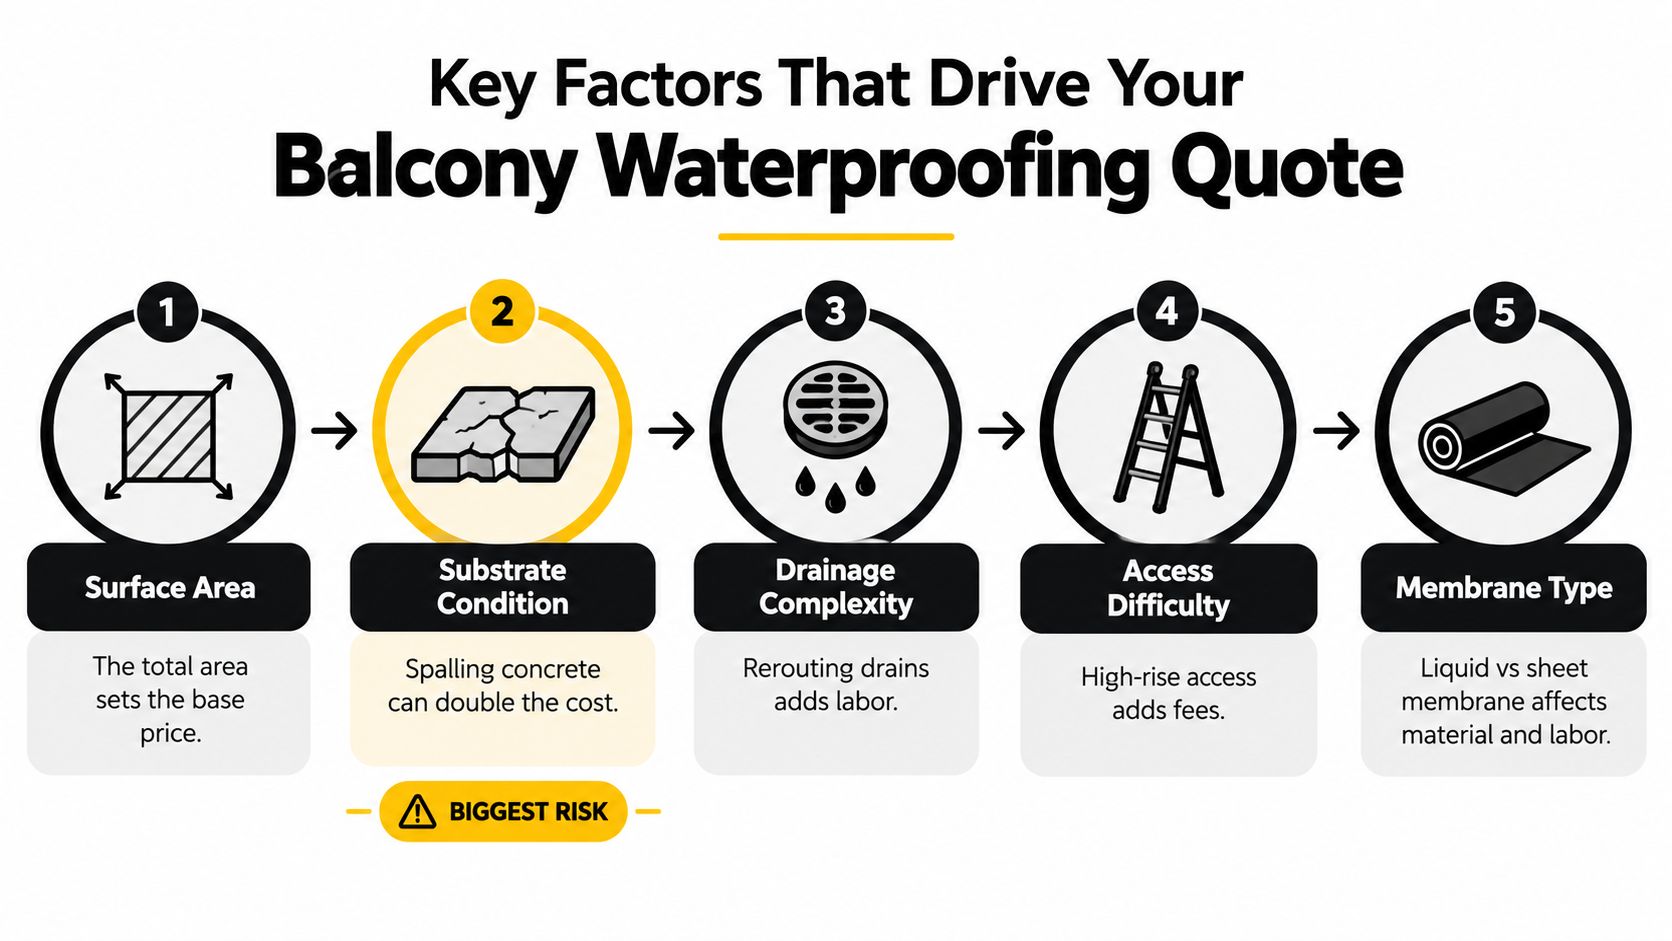
Two balconies can have similar floor areas and radically different prices. Surface area establishes the starting point, but substrate condition usually creates the painful variation.

The five cost drivers

  • Surface area: More floor means more primer, membrane, masking, preparation and finishing. A 10 m² ground-floor recoat may remain near the lower end of the Australian A$85 to A$150 per m² band when the surface is sound, as outlined by Trade Refer's Australian pricing guide.

  • Substrate condition: Spalling concrete, waterlogged screed, loose tiles and failed falls can turn a coating job into demolition. Rectification alone may add about A$80 to A$200 per m² where those defects are present, according to the pricing assumptions supplied for this Melbourne market comparison. On a 14 m² level-three balcony, that can mean an additional A$1,120 to A$2,800 before membrane and reinstatement costs.

  • Access difficulty: A ground-floor balcony reached through a side gate is efficient for delivery and waste removal. A level-three apartment may require scaffold, controlled material handling, protection of common areas and a longer set-up. Those costs don't change the balcony's area, but they change the number of labour hours and site visits.

  • Drainage and edge details: A compliant system needs more than a painted floor. Upturns at walls, door-threshold step-downs, puddle flanges, drip edges and falls that move water away from the building all require careful detailing. Australian guidance also requires balcony and terrace drainage to account for 20-year rainfall intensity events, with overflow provisions at 100-year events, as explained in this AS 4654 waterproofing fact sheet.

  • Compliance and documentation: Balconies must be designed and installed around AS 4654.1 and AS 4654.2 requirements. In apartments, owner corporation processes, insurance documentation and approvals can add administration and inspection costs. The proposed NCC 2025 provisions are estimated by the ABCB to increase balcony-area costs by around 3%, a relatively small addition compared with hidden substrate damage. That estimate is discussed in waterproofing service cost guidance.

An infographic showing five key factors that influence the cost of balcony waterproofing, including surface area and substrate condition.

Practical rule: If the quote doesn't identify the substrate condition, drainage approach and access method, it isn't a reliable balcony price. It's only a starting guess.

For the 10 m² ground-floor recoat, ask whether the contractor is keeping the existing finish and what tests confirm that decision. For the 14 m² level-three remedial balcony, ask for separate allowances for demolition, substrate repair, access, drainage and reinstatement. That split tells you whether the quote reflects the work or hides it inside an attractive headline rate.

Comparing Membrane, Liquid-Applied, and Tile-Over Systems

The cheapest system isn't automatically the right system. A sheet membrane can work well on a broad, regular slab, while a liquid-applied polyurethane system is often more practical around corners, wall upturns and awkward penetrations. A tile-over system makes sense when the balcony is already being stripped and retiled.

The supplied system-specific figures below describe common installed ranges for this comparison, but the broader Australian balcony pricing guidance places complete straightforward waterproofing work around A$80 to A$150 per m², depending on preparation and detailing. A system should be selected against the substrate, traffic, finish and warranty terms, not just its material price.

System Installed $/m² Best for Warranty
Sheet membrane, including bituminous, PVC or EPDM A$40–A$70 Large, regular slabs with fewer penetrations Confirm in writing
Liquid-applied polyurethane or acrylic A$55–A$95 Melbourne remedial work, corners and complex details Confirm product and installer terms
Tile-over membrane or pre-formed tray system A$90–A$140 Balconies being retiled during the same project Confirm system documentation

Where each system earns its place

Sheet membranes offer consistent thickness and can be efficient across a simple rectangular area. Their weakness is detailing. Every penetration, junction, upturn and termination must be properly integrated, and poor workmanship at those points defeats the apparent saving.

Liquid-applied systems are more forgiving around irregular geometry. The applicator can form a continuous layer around corners and transitions, but surface preparation and application thickness matter. A liquid membrane isn't a shortcut around cleaning, priming or curing.

Tile-over systems suit a full replacement where the finished surface will be tiled. They can provide a controlled system beneath the tiles, but they still require correct falls, edge treatment and compatible adhesives. For exterior timber structures, homeowners should also distinguish waterproofing from surface maintenance, such as sealing a pressure treated deck, because a deck sealer isn't a balcony waterproofing membrane.

For a broader explanation of product categories and application conditions, review these waterproofing systems for balconies. My recommendation is straightforward: use a liquid system for a sound but geometrically complicated balcony, a sheet system where the slab is broad and uncomplicated, and a tile-over system when demolition and retiling are already unavoidable.

Breaking Down Labour Versus Materials on the Quote

A simple recoat is labour-heavy even when the balcony looks clean. On a 12 m² recoat, labour commonly accounts for 55% to 65%, or roughly A$650 to A$950, while materials make up the remaining 35% to 45%. Those figures cover the preparation and application effort described in the Australian pricing information from Sparky's balcony waterproofing guide.

The contractor isn't charging only for the product in the drum. Labour includes cleaning, grinding, crack preparation, masking, primer, membrane coats, detailing and return visits around cure times. Materials include membrane, primer, sealants, termination bars and disposal consumables.

Cost component Simple recoat (A$) Strip-and-rebuild (A$)
Labour A$650–A$950 Usually 65%–75% of the total
Membrane and primers Balance of the recoat price Structural primers and new membrane
Preparation and demolition Included at limited level Major demolition, screed removal and disposal
Screed and finish Usually excluded or limited New screed, bedding and finish reinstatement
Access and administration May be limited Scaffold, permits and apartment controls may apply

On a strip-and-rebuild, labour rises to 65% to 75% because demolition, screeding, waterproofing and rebuilding consume the programme. Materials also become broader, covering new screed, membrane, tile bedding and finish components.

A cheap membrane doesn't rescue an expensive demolition, access or retiling scope.

Ask specifically about waste removal, upper-floor scaffold, trafficable topcoats and apartment permits. Those items can add A$500 to A$2,500 when they aren't included in the initial scope, as reflected in the supplied Melbourne quote assumptions. A quote that lists only “waterproof balcony” gives you no way to see whether those costs are included or waiting to appear as variations.

Real-World Quoted Jobs From Melbourne Suburbs

I won't use invented suburb stories to make a pricing point. The verified Australian data supports clear scope bands, but it doesn't provide authenticated itemised jobs in Brunswick, Glen Waverley or South Yarra. Those specific examples cannot be presented as real Melbourne quotations.

What can be assessed is how the three proposed scopes compare with the verified market ranges. A small patch repair sits above the lowest simple recoat allowance once grinding, primer, localised membrane work and access are included. A sound tiled balcony can remain close to the ordinary per-square-metre band, while a full apartment strip-out belongs in the high-cost remedial category.

Job Location Scope Size (m²) Quoted price (A$)
Patch repair Melbourne example not verified Localised repair Not verified From about A$800
Sound-surface waterproofing Melbourne example not verified Straightforward membrane work 12–20 About A$1,100–A$2,500
Full remedial replacement Victoria example not verified Strip-out, re-waterproof and re-tile Not verified About A$8,000–A$22,000+

The first verified reference point is the small patch repair from about A$800, drawn from Australian balcony waterproofing cost patterns. That figure is relevant only where the defect is localised and the surrounding substrate remains usable.

The second is the 12 to 20 m² straightforward job at about A$1,100 to A$2,500, supported by the Melbourne-specific waterproofing pricing guide. This is the bracket many owners expect, and it is achievable only when tiles, screed, falls and access don't demand major intervention.

The third is the full rectification scope, where the same Melbourne guide places strip-out, re-waterproofing and retiling around A$8,000 to A$22,000+. A separate Australian guide reports complex apartment work reaching A$10,000 to A$17,000 for a small balcony where waterproofing replacement and retiling were required. The lesson is more useful than any made-up suburb case study: compare inclusions, not just the quoted total.

How Waterproofing Fits Inside a Larger Renovation Budget

Balcony waterproofing often appears alongside bathroom renovations, ensuite work or wider apartment rectification. A bathroom is governed by a different standard, AS 3740 Internal Wet Area Waterproofing, which Australian wet-area guidance identifies as the deemed-to-satisfy solution for internal wet areas. Bathroom waterproofing commonly costs A$50 to A$85 per m², with a 6 to 10 m² bathroom typically costing A$900 to A$1,800 for professional waterproofing, according to this Australian bathroom waterproofing cost guide.

That comparison matters because balcony waterproofing faces weather, exposed edges and more complicated drainage. Bathroom waterproofing is usually one controlled line within a larger renovation. A balcony repair may trigger demolition, screed correction, tiling and access work.

Keep the budgets separate

Australian renovation guidance commonly allocates bathroom waterproofing at 5% to 10% of the total project budget, while plumbing takes 20% to 25%, tiling another 20% to 25%, and electrical work around 10%, as set out in this bathroom renovation cost guide.

For registered builders handling Melbourne bathroom renovations, a legally compliant full renovation has a bare minimum of about A$15,000, with standard mid-range projects averaging A$18,000 to A$28,000. Mandatory waterproofing in those registered-builder projects adds about A$30 to A$60 per m², according to Melbourne bathroom renovation guidance.

Renovation tier Total budget (A$) Typical waterproofing share (A$) Share
Professional bathroom waterproofing A$15,000 minimum project context A$900–A$1,800 for the wet area 5%–10% commonly allocated
Standard mid-range bathroom renovation A$18,000–A$28,000 Waterproofing included within the renovation 5%–10% commonly allocated
Balcony remedial renovation A$8,000–A$22,000+ for the balcony scope Driven by demolition and reinstatement Varies by scope

Bundling can save mobilisation, site protection and coordination when the same registered builder is already managing trades, permits and access. It won't always reduce the waterproofing itself, because a specialist membrane applicator may still be subcontracted. For broader water-damage context, AMPM Restoration Services explains costs in relation to restoration work, but balcony waterproofing still needs its own technical scope.

Getting Accurate Quotes and Avoiding Costly Surprises

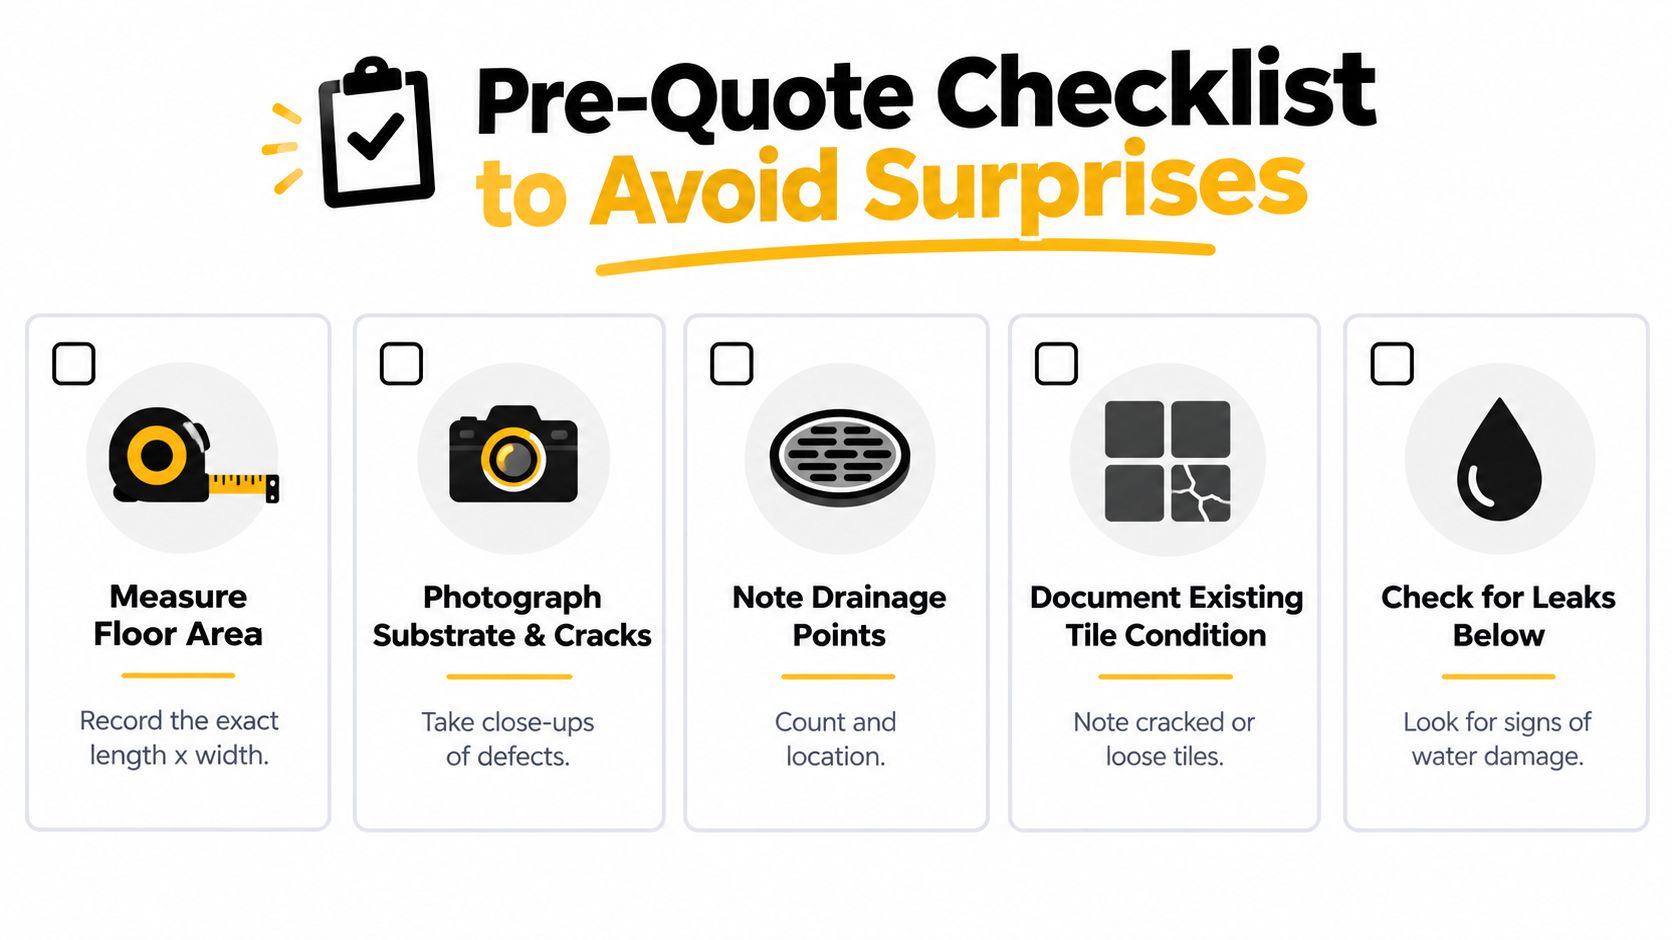
A reliable quote starts before the contractor arrives. Measure the balcony, photograph the surface and underside, record cracks and loose tiles, identify every drain, and check whether water is entering the room below. If the balcony sits above another dwelling, read the owners corporation rules before demolition begins.

A pre-quote checklist for home maintenance including measuring, photographing, checking drainage, tile condition, and looking for leaks.

Ask every contractor the same questions

  • System specification: Which membrane brand and AS 4654 classification are proposed?
  • Preparation: Does the price include grinding, crack repair, cleaning and primer?
  • Falls: Will the existing screed remain, or will the contractor rebuild the falls?
  • Tiling: Is tile lift-and-replace included, excluded or priced as an allowance?
  • Drainage: Are puddle flanges, outlets, overflow provisions and drip edges included?
  • Warranty: What does the written warranty cover, and who is responsible if the finish fails?
  • Making good: Does the price include waste removal, protection of adjoining areas and final reinstatement?

A one-line price is a warning sign. So is a quote that doesn't mention primer, membrane thickness, door thresholds, wall upturns or the written warranty. A contractor who refuses to inspect the balcony properly is asking you to accept the risk of hidden defects.

Watch the video below for a visual introduction to balcony waterproofing considerations.

Get three like-for-like written quotes, insist on a site inspection rather than a drive-by estimate, and verify the contractor's VBA registration before signing. For Victorian documentation requirements, review the waterproofing compliance certificate guidance. The quote should separate the base scope from provisional rectification, so you know what you're paying for now and what could change after demolition.

Putting It All Together and Planning Your Next Step

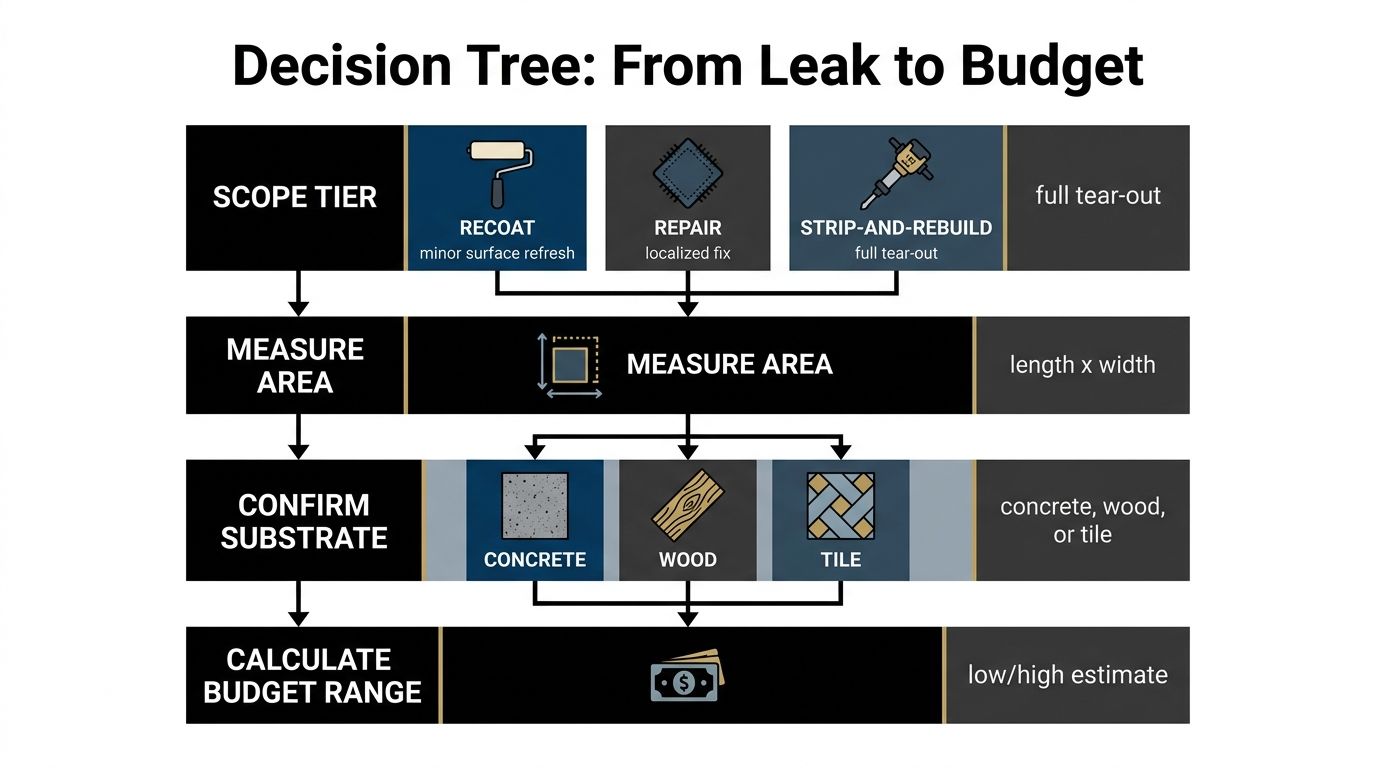
Start with the scope, not the product. Decide whether the balcony needs a recoat, a localised repair or a strip-and-rebuild, then measure the area and establish whether the substrate, screed and drainage can remain. Only after that should you compare liquid, sheet or tile-over systems.

A decision tree infographic titled From Leak to Budget illustrating steps to estimate balcony waterproofing costs.

A defensible budget has five parts:

  1. Scope tier: Identify the actual extent of failure.
  2. Measured area: Use length multiplied by width, then account for edges and details.
  3. Substrate assessment: Confirm whether concrete, screed, tiles and falls are serviceable.
  4. System selection: Match the membrane to exposure, geometry, traffic and finish.
  5. Itemised quotes: Compare at least three offers from VBA-registered builders.

A registered Melbourne builder gives the owner a clearer compliance pathway, coordinated licensed trades and written documentation for the work. That matters when a balcony sits above a bedroom, another apartment or a shared owners corporation area. Australian balcony systems must address AS 4654 requirements, including membrane upturns, thresholds, drainage and edge detailing.

Book an on-site assessment before approving the work. A photograph-based or satellite-measured remedial quote carries a 15% to 25% accuracy risk on complex scopes, based on the supplied planning guidance. Budget against the realistic middle of the matched scope, not the optimistic floor price, because the first day of demolition is where unsupported assumptions become variations.


If your Melbourne balcony is leaking, tiled, pooling water or showing failed joints, Melbourne Tiling Services P/L can assess the waterproofing, screed, drainage and tiling scope together. Request an on-site quote with a written breakdown so you can decide between a recoat, targeted repair or full strip-and-rebuild before the work begins.

Bathroom Waterproofing Paint Guide for Renovations

You've finished a Melbourne bathroom makeover, the tiles are down, and the new shower looks exactly as planned. Then a damp patch appears on the wall beside the recess. A few days later, paint begins to bubble, or the ceiling below develops a stain. The first suspicion is often the bathroom waterproofing paint, but the underlying issue may be a missing membrane, a poorly sealed junction, a drainage fall, or a substrate that was wet before coating began.

Waterproofing paint can be useful, but it's frequently marketed as though one product can protect every bathroom surface. Australian wet-area construction doesn't work that way. A coating must form part of a correctly designed and applied system, particularly around showers, hobs, steps, drains and wall-to-floor junctions.

Table of Contents

Introduction to bathroom waterproofing paint

A Melbourne homeowner carrying out a DIY ensuite renovation may search for waterproofing paint after removing old tiles. The product appears simple. Roll it onto the wall, let it dry, tile over it, and avoid the cost and disruption of a full waterproofing process.

That shortcut becomes risky when the surface receives daily water. A shower recess isn't just a painted wall. It's a coordinated assembly involving the substrate, falls, drain, penetrations, junctions, membrane coverage and tile finish. If one part is incomplete, water can travel behind the visible surface and damage framing, plasterboard or flooring.

Registered builders generally treat liquid-applied products as membrane systems, not ordinary decorative paint. They check the manufacturer's technical data, prepare the substrate, reinforce vulnerable junctions and allow the coating to cure before tiling. The National Construction Code wet-area provisions and AS 3740:2021 also define where waterproofing must extend.

The practical question isn't solely, “Which bathroom waterproofing paint should I buy?” It's, “What level of protection does this area need, and does the complete system meet the required standard?”

Understanding waterproofing paint mechanisms

Bathroom waterproofing paint works only when its formulation, thickness and installation create a continuous barrier. The raincoat analogy is useful: protection comes from an unbroken outer layer, including around seams and openings, rather than from one thick patch. A coating that looks even on an open wall can still fail where the wall meets the floor, a pipe passes through, or the surface changes.

Liquid-applied membranes contain polymers that join together as the product cures. The cured film should remain flexible enough to accommodate ordinary building movement while resisting liquid water. That performance matters at corners, junctions and different substrates. A decorative, water-resistant coating may handle splashes, yet lack the tested elongation, adhesion or wet-area classification expected of a shower system.

One component or two

Single-component products arrive ready to use, though stirring and a compatible primer may still be required. They suit smaller jobs because the installer does not have to combine separate chemical components.

Two-component systems combine a base with a curing component. The mixing ratio affects working time, adhesion and final performance, so it is not a minor instruction. Follow the specified method, use clean tools and apply the product within its stated working window. A mixture that merely looks uniform may still be unsuitable if the proportions are wrong.

A technical data sheet can reveal limits that the tin label does not. Depending on the product, it may state the membrane class, curing time, volatile organic compounds, or VOC, and water vapour transmission. Those details help distinguish an engineered membrane from ordinary bathroom paint. They also apply only to the named product. Compare the exact data sheet, intended use and installation requirements before treating a coating as part of a wet-area system.

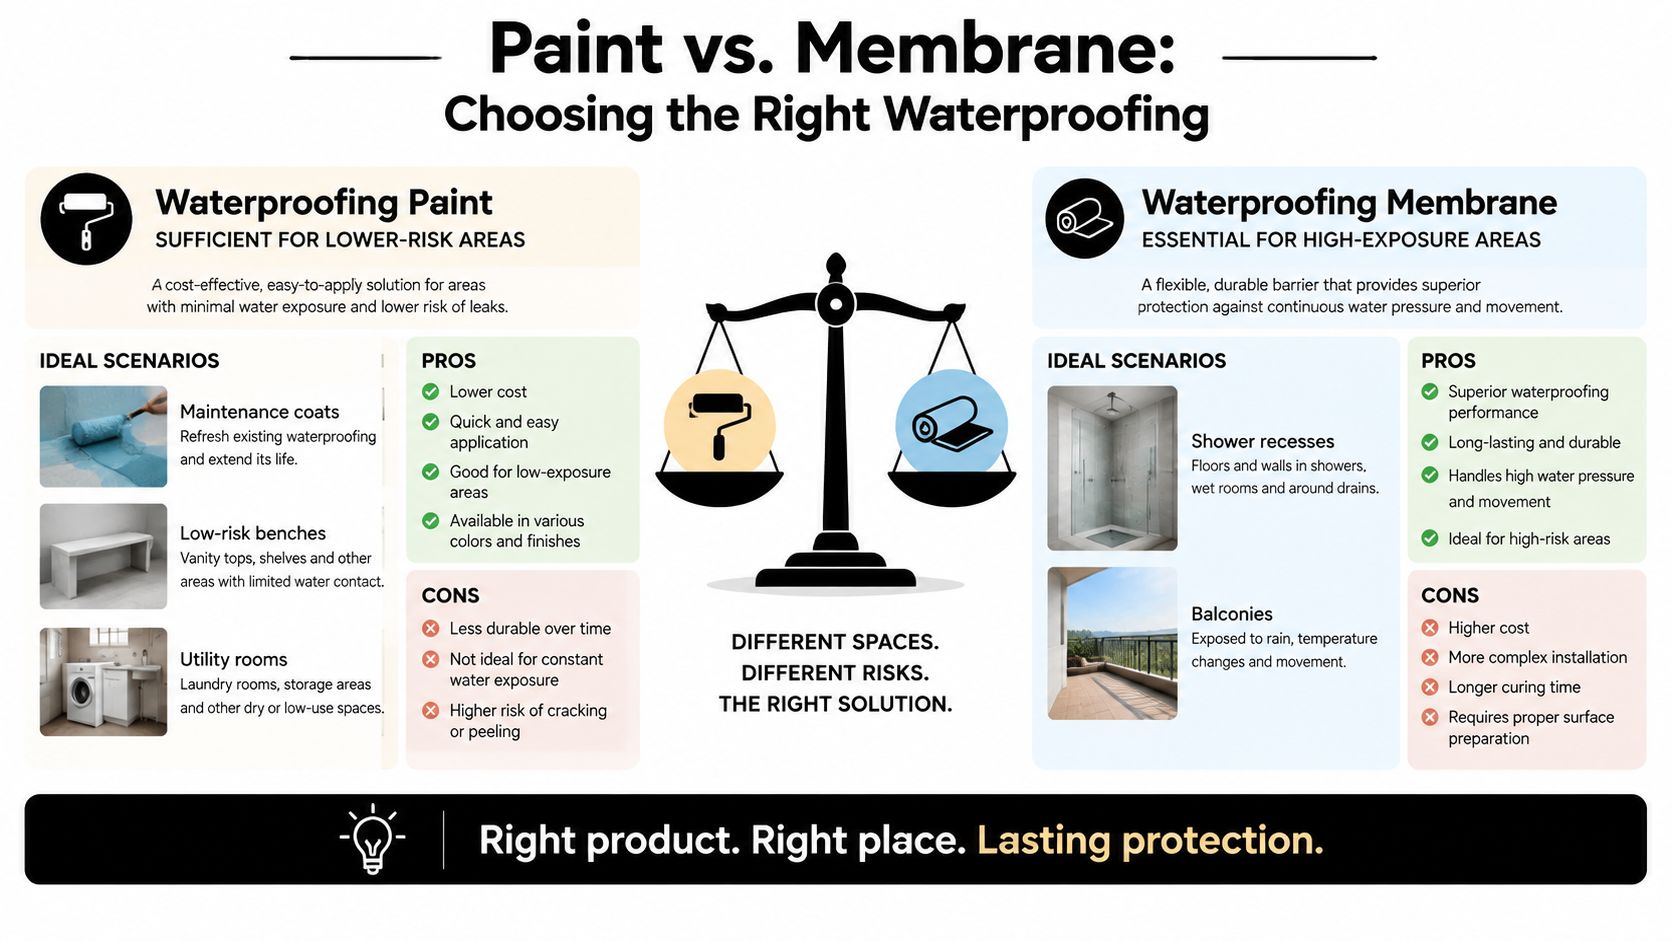
An infographic comparing waterproofing paint and membranes for different areas, explaining when to choose each solution.

Why classification matters

AS/NZS 4858 classifications indicate that a membrane has been tested for relevant wet-area demands. Classification alone does not make every application compliant. The result still depends on substrate preparation, specified coverage, reinforcement at vulnerable points, curing and compatible finishes.

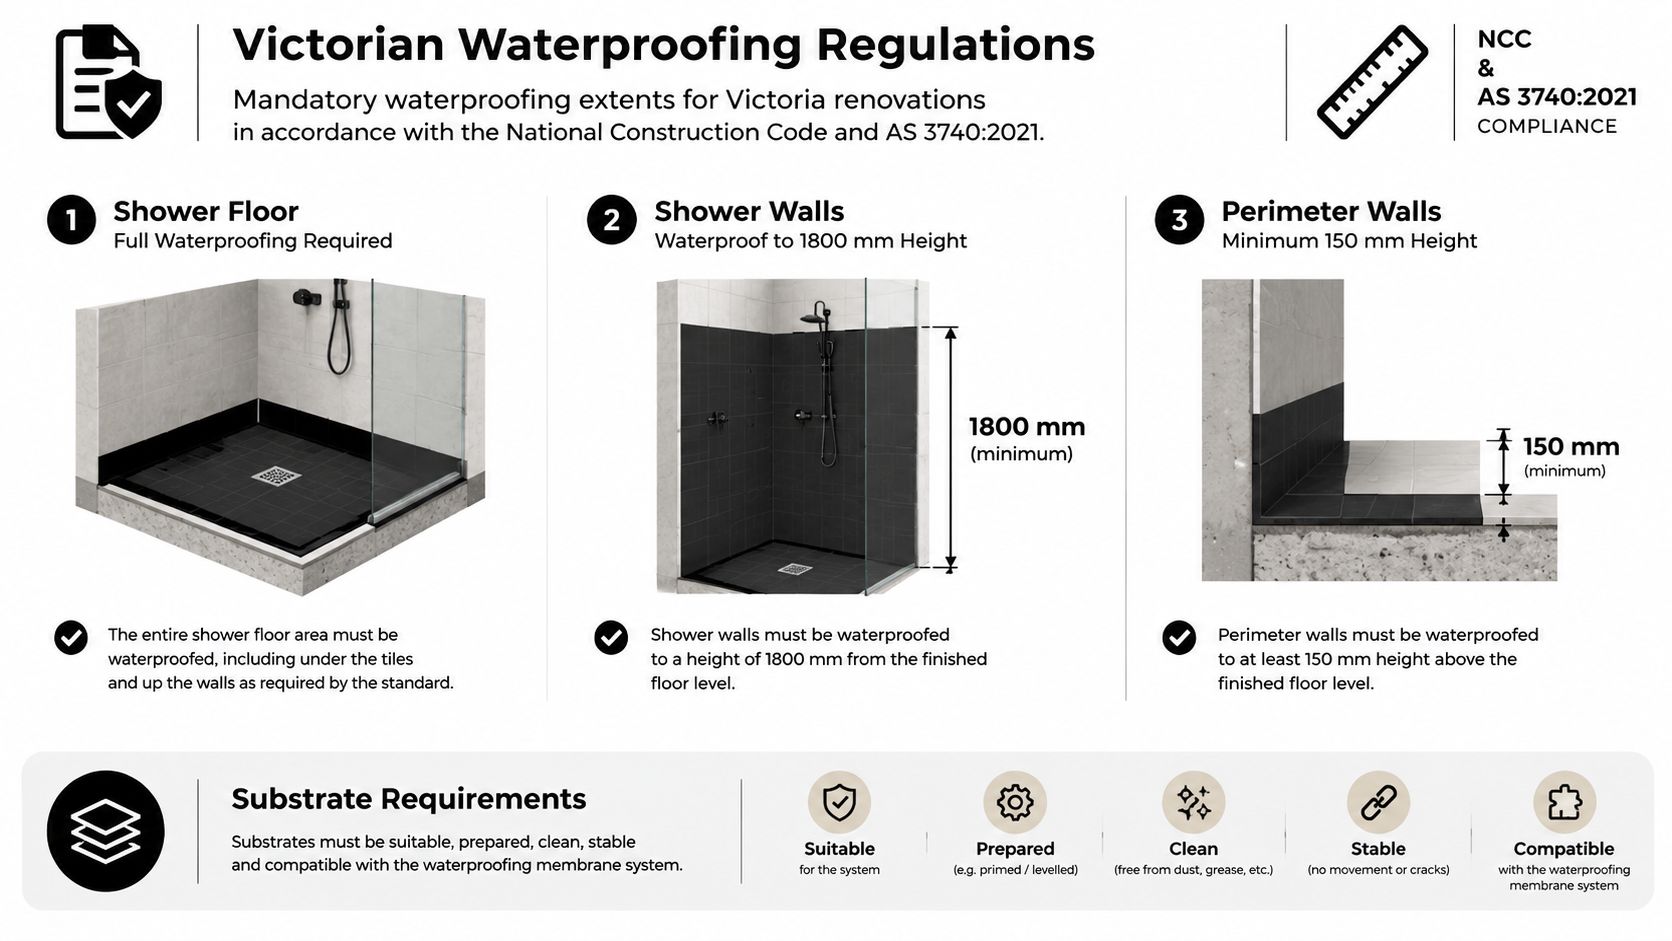
Australian requirements state that shower floors must be waterproofed, shower walls must be waterproofed to at least 1800 mm above the finished floor level, and the wall-to-wall angle in the shower must be waterproofed to at least 1800 mm high (AS 3740:2021 product and standards information). Information about Superior elastomer coatings can clarify how flexible elastomeric materials differ from ordinary paint. The product still needs assessment against Australian wet-area requirements, including its installation instructions and complete system details.

When to use paint and when to use membranes

Bathroom waterproofing paint makes sense only when the surface and exposure match the product's intended use. A low-risk utility-room wall, a bathroom ceiling exposed mainly to steam, or a maintenance coat over an existing sound system presents a different risk from a shower floor above a living area.

The mistake is treating “water-resistant” as “compliant waterproofing system”. A coating may shed surface water while failing at a drain flange, pipe penetration or wall-to-floor corner. Those points need continuity and detailing, not just visible colour.

A practical comparison

Situation Paint or coating role Main concern
Ceiling above a shower Moisture-resistant finish may be suitable Steam and ventilation still affect the finish
Wall outside direct splash Supplementary surface protection Confirm the substrate is sound and dry
Utility room or low-exposure area Possible coating application Follow the product's intended-use instructions
Shower recess Use a compliant membrane system Daily water reaches walls, floor and junctions
Shower floor or hob Membrane coverage is required Drains, falls and junctions must be detailed
Upper-level or timber-floor bathroom Full system planning is especially important Water can damage the structure below

Practical rule: If the area receives direct, repeated shower water, don't choose a product based only on the word “waterproof” on the label.

The pros of a paint-like liquid system are clear. It can be easier to handle than sheet materials, it can cover irregular surfaces, and it can form a continuous layer when applied correctly. The trade-offs are equally important. It still needs careful preparation, controlled coverage and curing, and a decorative coating may not provide the tested performance of a compliant membrane.

Australian wet-area rules require specific membrane extents and sealed junctions, which is why bathroom waterproofing paint is often better treated as a supplementary coating, not a standalone shower solution (wet-area waterproofing requirements). If you're assessing a shower before tiling, compare the proposed scope with a dedicated shower waterproofing membrane rather than assuming the two terms describe the same work.

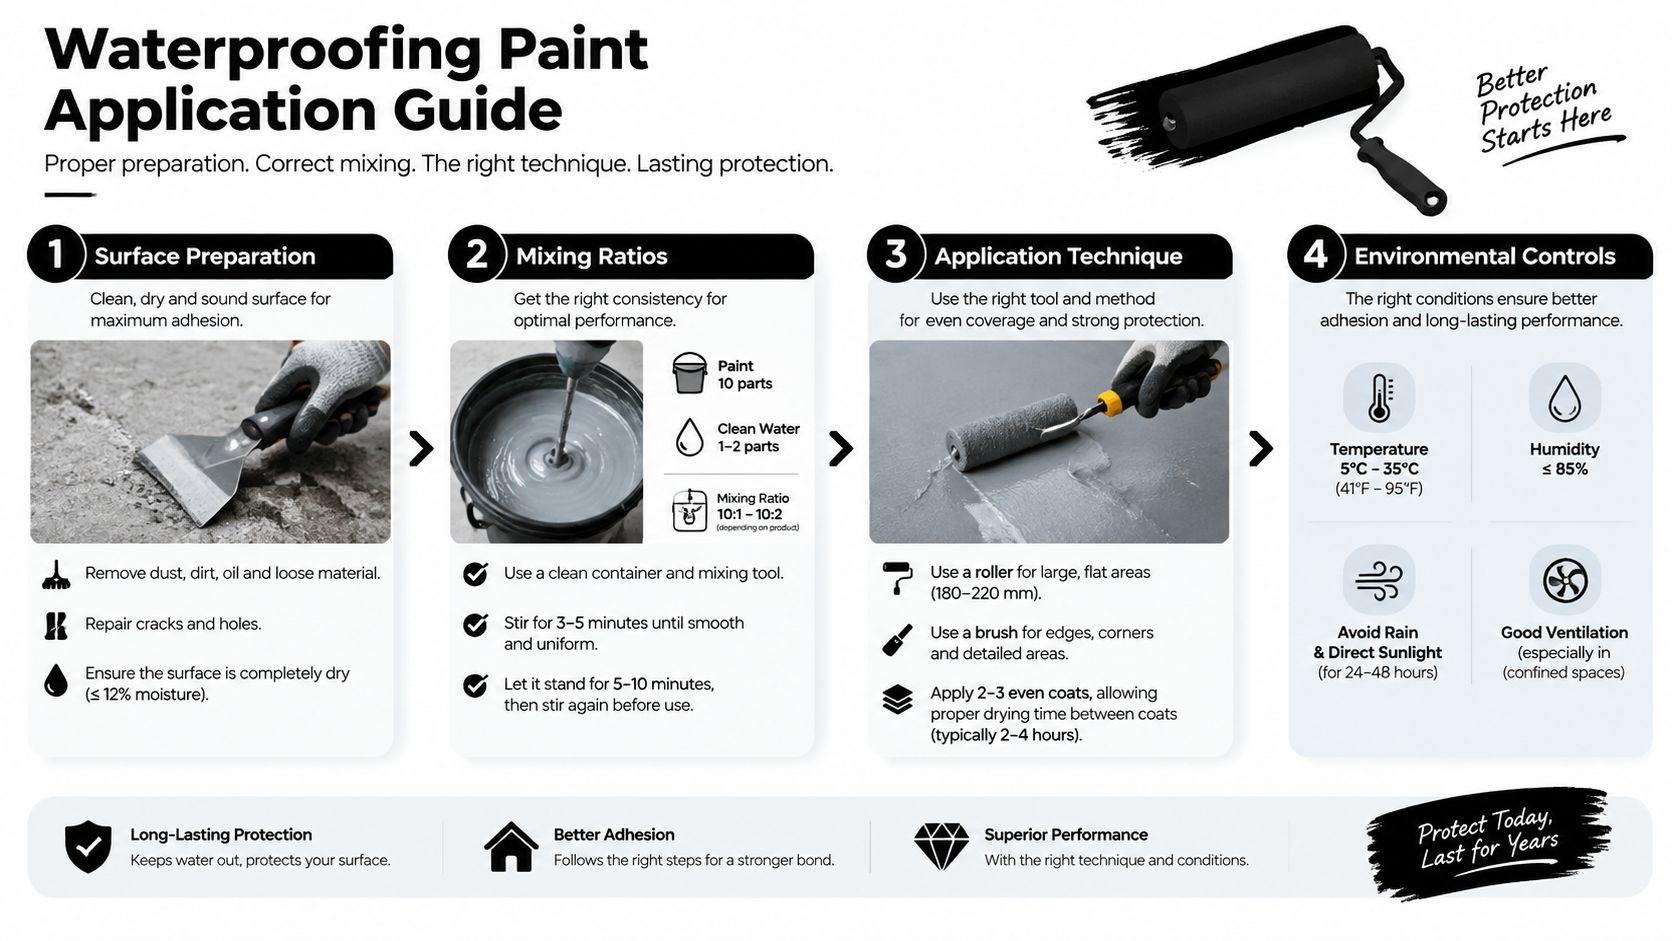
A four-step instructional infographic guide for applying professional waterproofing paint on surfaces for long-lasting protection.

The decision also depends on the floor level and substrate. A ground-floor concrete bathroom may contain a leak with less immediate structural consequence than an upper-level timber bathroom, but neither should rely on a decorative coating where the code requires a membrane. Reworking the drain, correcting the fall or repairing damaged substrate comes before product selection.

Application process and performance insights

A bathroom can look ready for coating while the substrate remains dusty, damp or unstable. Waterproofing follows the condition beneath it, much like paint follows the condition of a wall. Covering movement or trapped moisture only hides the fault until the coating is stressed.

Prepare the substrate

Remove loose material, adhesive residue, laitance, grease and dust. Vacuuming is preferable to sweeping fine particles into corners. Inspect the surface under strong side lighting, checking for cracks, pinholes, swollen plasterboard, open joints and movement around pipe penetrations.

Repair defects with compatible materials and let them dry as directed. If the substrate remains damp, find the cause before applying a product. Water may be entering from plumbing, rising through the floor or remaining after cleaning. A membrane can limit moisture migration, but it cannot repair a leaking pipe or make unstable backing board sound.

Primer is part of the system only when the product instructions specify it. Compatibility matters. A primer designed for porous cement sheet may not suit painted plasterboard, glazed surfaces or old adhesive.

Mix and apply methodically

Single-component products still require thorough stirring. Two-component systems require the stated mixing ratio and working time. Do not add water, solvent or a third-party additive unless the technical data permits it.

Use the specified roller, brush or notched trowel. Work material into corners and around penetrations with a brush, then use the recommended roller or trowel to create an even coat. Check for pinholes, thin edges and puddled material. A membrane performs through continuous coverage and the required dry-film thickness, not through one thick patch over the most visible area.

A practical site sequence is:

  1. Clean and inspect: Remove contaminants and identify cracks, movement and moisture.
  2. Repair and prime: Stabilise the substrate and use compatible preparation products.
  3. Detail junctions: Reinforce corners, joints, drains and penetrations where the system requires it.
  4. Apply coats: Follow recoat windows and do not stretch material beyond its stated coverage.
  5. Inspect before tiling: Check continuity, edges, penetrations and visible defects.
  6. Allow full cure: Keep trades and water away until the technical data permits the next stage.

Temperature, humidity and ventilation affect adhesion and curing. Follow the product's limits. Ventilation can help remove vapours, while forced heat or strong airflow may skin the surface too quickly and leave the layer uneven. Protect the coating from dust as it cures.

Cure time is part of the system

A surface that feels dry may still be unsuitable for tile adhesive. As noted earlier, the example product data requires a 7-day full cure. Touch-dry and hard-cure stages are different, and premature tiling can trap moisture, disturb the membrane or reduce bond performance.

Keep the packaging, batch details and technical data sheet with the renovation records. Photograph the coating before tiles conceal it, especially around drains, hobs and penetrations. These records give a builder, inspector or future repairer a clearer view of what was installed.

Maintain the finished area

Maintenance begins with observation. Look for cracked grout, loose tiles, discoloured surfaces, musty odours or recurring damp patches. These signs do not prove that the paint failed. A drain connection, plumbing defect, building movement, failed sealant or incorrect fall may be responsible.

Clean with products compatible with the tile, grout and sealants. Avoid aggressive abrasion that could damage an exposed coating. Do not apply a new coat over mould, loose paint or damp material. If a maintenance coating suits the system, clean, dry and check adhesion before recoating.

Practical record-keeping and careful preparation support the aim of reducing avoidable defects described in tips for fewer home warranty claims. Where a floor needs protection before tiling, follow a documented bathroom floor waterproofing process rather than treating floor paint as a cosmetic finish. Paint may assist a compliant system, but it does not replace the substrate preparation, detailing and membrane coverage that the installation requires.

A visual guide explaining the Victorian waterproofing regulations for bathroom renovations in accordance with Australian standards.

Compliance requirements for Victoria renovations

A bathroom can look finished while its waterproofing remains non-compliant. In Victoria, renovation work sits within the National Construction Code and the AS 3740:2021 wet-area framework. The shower floor must be waterproof, including a hob or step-down, and shower walls must reach at least 1800 mm above the floor substrate. These requirements describe the protected system, not just the product brushed onto a surface.

Room geometry matters just as much. Paint cannot redirect water from a low point created by an incorrectly formed substrate. For an unenclosed shower, Victorian guidance specifies a 1.5 metre horizontal waterproofing extent from the shower rose connection. Floor falls to a waste must be at least 1:80, while industry guidance identifies a maximum continuous fall of 1:50 (wet-area slope guidance). The surface therefore needs enough fall to drain, without becoming unnecessarily steep.

What changed for renovation planning

The NCC 2022 wet-area provisions were adopted in Victoria from 1 May 2023 (Victorian bathroom standards overview). AS 3740:2021 applies to domestic wet areas in Class 1, Class 2 and Class 4 buildings. Together, these requirements make coverage, junctions, penetrations, drains and substrate preparation part of the installation record. Bathroom waterproofing paint may supplement a suitable system, but it cannot substitute for those details.

Before tiling, document the membrane coverage, substrate condition, drain detailing and falls. Demolition and substrate work may expose older materials or generate hazardous dust, so workers should consider a crystalline silica and asbestos awareness course. Training does not replace site-specific risk controls or professional advice.

For handover records, ask how a waterproofing compliance certificate for Victoria will be issued and stored. A certificate cannot make defective work compliant, but clear documentation helps show what was installed and supports later maintenance.

Deciding between paint and professional systems

Budget matters, but the cost of a coating is only one part of the decision. The larger question is what could be damaged if water passes through the finish. A low-risk wall outside direct splash can justify a simpler treatment. A shower over a timber floor demands a more cautious system because hidden moisture can affect the structure below.

A sound decision rule has three parts: exposure, substrate and consequence. Direct daily shower water increases exposure. Timber, upper-level or movement-prone construction increases substrate risk. Damage to rooms below, framing or finishes increases the consequence of failure.

Use a supplementary coating when

A paint-like product may be suitable where the surface is stable, dry and outside the primary wet-area protection zone. Examples include a ceiling exposed to steam, a wall beyond direct splash, or a maintenance coat over a previously tested and intact membrane. Confirm the product's intended use and don't assume that a maintenance coat restores a failed system.

Choose a complete membrane system when

A shower recess, shower floor, hob, step-down, balcony or wet area with structural exposure needs system planning. The same applies when the substrate has cracks, movement, moisture damage or an altered drain. In these situations, the correct response may include demolition, substrate repair, screeding, fall correction, junction reinforcement and membrane application.

The marketing language around waterproofing products can obscure this distinction. Australian market discussion describes growth in waterproofing solutions and links current change to code-driven efforts to reduce defects, but product availability doesn't remove the need to identify the actual failure mechanism (Australian waterproofing solutions market context).

Include the contract and insurance context

Domestic building work in Victoria over $10,000 must be carried out under a major domestic building contract, and work exceeding $16,000 requires domestic building insurance before it can lawfully proceed (Victorian domestic building contract and insurance information). Those thresholds make the project's scope and contractor arrangements important, particularly when waterproofing forms part of a broader bathroom renovation.

A registered builder can coordinate the licensed trades and sequence the work so plumbing, substrate preparation, waterproofing, tiling and inspection don't conflict. Victoria Building Authority registration material for bathroom, kitchen and laundry renovation builders refers to qualifications, project evidence, technical referee reports, criminal history checks, photo identification and declarations (VBA registration application).

Renovation examples from registered builders

Consider a ground-floor Melbourne ensuite with a sound, previously tested membrane. The homeowner wanted to refresh the room without opening the entire tiled assembly. A registered builder treated the bathroom waterproofing paint as a maintenance coat, not as the original waterproofing layer. The team checked adhesion, cleaned the surface, repaired minor defects and confirmed that the existing membrane and drainage remained suitable before applying the coating.

The lesson is the order of decisions. The product saved disruption because the underlying system was already known and intact. It wouldn't have been an appropriate response to a confirmed leak at the shower drain or a saturated substrate.

An upper-level heritage townhouse presents a different problem. The floor required fall correction and a liquid membrane underlay before tiling. Registered builders coordinated carpenters, plumbers, waterproofers and tilers, protecting the older structure while checking the shower coverage, junction detailing and drainage geometry against AS 3740 requirements.

The paint choice was secondary to the system design. The team first established a stable substrate and reliable path to the waste, then selected compatible waterproofing materials and allowed the membrane to cure before the tiler began. For homeowners, the takeaway is simple: two rooms may both be called bathrooms, but their exposure, substrate and consequences can make the correct waterproofing scope completely different.

Key takeaways and next steps

Bathroom waterproofing paint can resist moisture and support maintenance, but it isn't automatically a compliant shower membrane. The deciding factors are where the product is used, what lies beneath it, how water drains, and whether the complete system meets the relevant requirements.

Before starting, check:

  • Exposure: Is the surface outside direct splash, or inside a shower?
  • Substrate: Is it dry, stable, clean and properly repaired?
  • Drainage: Do the floor falls direct water continuously to the waste?
  • Coverage: Does the membrane reach the required walls, floor, corners and penetrations?
  • Documentation: Do you have the technical data sheet, application records and curing requirements?
  • Contractor: Does the work require a registered builder and coordinated licensed trades?

Ask for a substrate inspection before buying paint. Request the exact product data sheet, confirm its wet-area classification and plan the curing period before tiling or allowing water onto the surface. Check the NCC, AS 3740:2021 and Victorian Building Authority guidance before work begins.

Melbourne Tiling Services P/L provides bathroom renovations, shower and floor waterproofing, substrate preparation, screeding, tiling and coordination with licensed trades across Melbourne and greater Victoria. Visit Melbourne Tiling Services P/L to discuss your bathroom scope, request a quote and plan the waterproofing sequence before tiles conceal the work.

Large Format Tile Guide for Melbourne Renovations

You're standing in a 1990s Hawthorn ensuite, looking at a cracked 200 x 200 mm ceramic floor and deciding what replaces it. A 600 x 600 mm porcelain tile feels like the sensible upgrade. A 1200 x 600 mm large format tile promises fewer grout lines and a calmer, more expensive finish. The decision looks visual in the showroom, but on site it becomes a question of flatness, waterproofing, handling, adhesive coverage and movement.

That's the part many renovation quotes gloss over. A large format tile can make a bathroom feel open and refined, but it won't hide a poor screed or a wavering wall. It will expose them. Australian guidance identifies large format work as more demanding because larger faces magnify substrate irregularities, while current market analysis places large-format products within the premium direction of Australia's expanding ceramic tile sector. Australian ceramic tile market analysis links the trend with fewer grout lines and faster visual coverage.

The practical trade-off is straightforward. You may reduce grout cleaning and create a stronger visual finish, but you'll usually allow more time for substrate preparation, more careful cutting and handling, and a tiler who knows how to move heavy porcelain panels without damaging them. This guide covers the definition, material choices, substrate decisions, installation sequence and Victorian compliance issues that determine whether the result lasts.

Table of Contents

Why a Melbourne Renovation Turns to Large Format Tile

Large format tile is a build-quality decision before it's a style decision. In that Hawthorn ensuite, the choice between 600 x 600 and 1200 x 600 shouldn't be made from a sample board alone. The existing floor may have movement, old adhesive, uneven screed or falls that no longer suit the new drainage layout.

A smaller tile can follow minor changes in a surface because each piece spans less area and the grout grid breaks up the visual effect. A large panel bridges those changes. If the floor dips, the tile may rock, lose adhesive contact or sit higher at one edge. If the wall bows, the finished face can show lippage, meaning an unwanted height difference between adjacent tiles.

Practical rule: If the substrate isn't flat enough for the tile, changing adhesive won't rescue the installation.

The Australian market is moving towards larger formats, particularly porcelain sizes such as 600 x 600 and 600 x 1200, but the growth of the category doesn't make every bathroom suitable for the biggest panel. Current Australian bathroom tile trend coverage also points to structured, matte finishes for wet areas, which matters because a polished large panel may look impressive while offering a poorer floor solution.

The cost calculation homeowners miss

The tile itself is only one part of the decision. A large-format quote may need to account for:

  • Substrate correction: Screeding, grinding, patching or self-levelling can take longer than fixing standard tiles to a serviceable surface.
  • Handling equipment: Suction cups, panel carriers and additional installers become important as the face and weight increase.
  • Cutting and wastage: A single plumbing cut or misplaced panel can affect a much larger piece than a standard tile.
  • Movement control: Perimeters, junctions and changes of plane need flexible detailing rather than rigid grout.
  • Repair access: Replacing one damaged panel is more involved because removal can affect surrounding finishes and the underlying waterproofing system.

A 30-kilogram panel isn't just a bigger version of a small floor tile. It's awkward, vulnerable at the corners and difficult to correct once adhesive has started to grab. Good outcomes are decided during measuring, substrate preparation and layout planning, long before the first panel is lifted into position.

What Counts as a Large Format Tile

In plain terms, a large format tile has a face large enough to demand different planning and installation control from ordinary modular tile. Australian industry guidance commonly defines the category from about 400 mm on one side, while another Australian reference frames the AS 3958 threshold around a tile with an edge exceeding 1.2 metres or a face area greater than 1 square metre. Australian large-format tile guidance describes the local shift from smaller modular formats towards larger tiles and sheets.

The terminology can feel inconsistent because suppliers, standards and technical bulletins use different thresholds for different installation concerns. For a homeowner, the useful point is that the risk profile changes as the face grows. A tile that spans more of a wall or floor needs more accurate flatness, suitable adhesive, controlled handling and a layout that respects the room rather than forcing the room to suit the tile.

Common Melbourne renovation sizes

The categories below reflect the formats regularly discussed in local bathroom and interior renovation work.

Size Typical Use Large Format per AS 3958?
600 x 600 mm Bathroom floors, laundries and general wall applications Depends on the applicable threshold
900 x 450 mm Walls, floors and benchtop-style layouts Depends on the applicable threshold
1200 x 600 mm Bathroom walls, feature floors and full-height applications Yes, where the 1.2 metre edge threshold applies
1200 x 1200 mm Open floors, feature walls and premium interiors Yes
3000 x 1000 mm Feature walls, panels and benchtops Yes

A 300 x 300 tile gives you a familiar grid of relatively small faces. A 1200 x 600 panel is roughly comparable to eight A4 sheets arranged as one broad surface, which explains why a small hollow or hump becomes much more visible across the installation.

Thickness doesn't decide whether a product is large format. A 3 mm Kerlite panel and a 20 mm porcelain paver both belong to the large-format conversation, but their structural demands, weight and adhesive systems differ substantially. Once a panel reaches the larger thresholds, lippage control, adhesive selection and handling equipment need to be specified before ordering materials.

Porcelain, Kerlite, and Stone Compared

Melbourne homeowners usually arrive at one of three material directions: dense porcelain, thin laminated porcelain such as Kerlite, or natural stone. All can produce a premium finish, but they don't tolerate the same substrate, fixing method or maintenance routine.
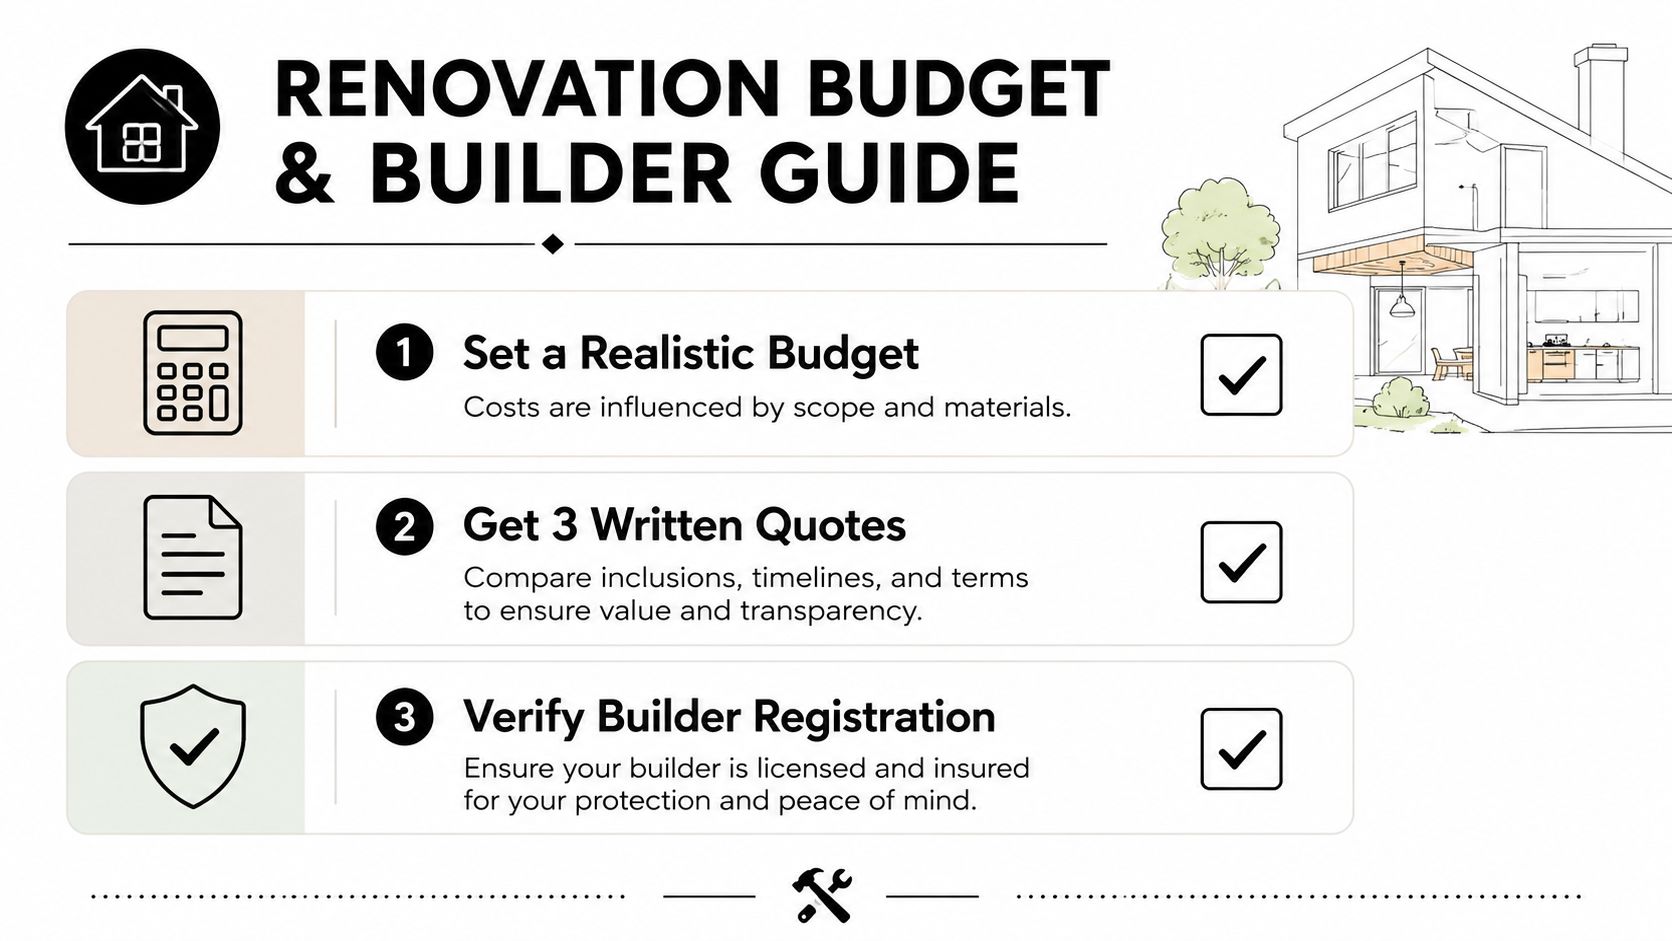
Porcelain is the practical all-rounder. It's available in formats from 600 x 600 through to very large slabs, with polished, matte and textured finishes. A conventional 9 mm porcelain may weigh around 17 kg/m², while a 20 mm paver can reach around 50 kg/m², so the same material family can impose very different loads. Those figures come from the product comparison described in the local Kerlite and porcelain service context at Melbourne Tiling Services' Kerlite tiling information.

Kerlite is a laminated porcelain panel commonly produced between 3 mm and 6.5 mm thick, with face sizes reaching 3000 x 1000 mm and a weight of roughly 7 kg/m². Its lower dead load makes it useful for wall cladding, shower walls and some overlay renovations, but the thin panel leaves little room for a poor background. It needs a compatible fibre-reinforced adhesive and a remarkably flat substrate.

Natural stone, including marble, travertine and bluestone, commonly sits around 20 mm to 30 mm in the applications considered here. It's heavier, may vary in thickness between batches and needs sealing. Stone can be superb on a feature wall or benchtop, but its porosity, maintenance and sensitivity to installation conditions make it a more involved choice in wet zones.

Property Porcelain Kerlite Stone
Typical build Dense ceramic body, often rectified Laminated, thin porcelain panel Natural material with variable thickness
Weight profile Ranges from moderate to very heavy Lower dead load Heavy
Finish options Polished, matte and textured Large printed and design-led surfaces Veining and natural variation
Best-fit rooms Bathrooms, laundries, floors and alfresco areas Wall cladding, shower walls and lighter overlays Feature walls and benchtops
Main risk Weight, handling and substrate flatness Background imperfections and adhesive compatibility Sealing, weight and batch variation

The quick rule is simple: choose porcelain when you need a durable general-purpose surface, Kerlite when low wall load and panel scale matter, and stone when natural variation is central to the design and the maintenance commitment is understood.

Substrate, Adhesive, and Joint Decisions That Decide the Outcome

A large-format bathroom survives because three systems work together: the background is flat, the adhesive transfers load across the face, and the joints allow controlled movement. None of those jobs belongs to the tile itself.

Australian baseline guidance under AS 3958.1 identifies maximum plane variation of 5 mm in 3 m for thin-bed ceramic tile installation on a concrete floor and 4 mm in 3 m for wall installation. Australian tiling standards guidance also reflects the stricter approach now used for large panels, where local technical guidance is moving towards 3 mm in 3 m and 1.5 mm in 500 mm from the high spot. Large-format Kerlite and gauged porcelain can turn a minor hump into a visible edge mismatch or a hollow zone.

Prepare the background before choosing the adhesive

Concrete screeds need to be sound, clean, appropriately primed and sufficiently cured. A timber floor may require a suitable fibre-cement tile underlay or another approved system before the membrane and tile build-up begins. Self-levelling compounds and screeds correct a substrate, but they don't remove the need to confirm compatibility with the waterproofing and adhesive system.

Adhesive selection should follow tile size, weight, substrate and movement. Australian large-format guidance treats those factors as engineering controls, not cosmetic preferences. Australian guidance on fixing large-format and heavy tiles gives examples of maximum weight capacities, including 60 kg/m² on mechanically prepared concrete, 32 kg/m² on sand/cement render and 32 kg/m² on Hebel block walls.

The same guidance recommends double-buttering or double-notching, with vertical notch direction to help collapse adhesive ridges and reduce voids, particularly on tiles over 300 mm. A C2 adhesive with S1 or S2 deformability is commonly selected for large-format porcelain where the product and substrate require it. The installer should be able to explain why that classification suits the specific tile, rather than just naming a bag of adhesive.

Joints are part of the structure

Rectified porcelain often uses narrow joints, commonly around 1.5 mm to 3 mm, but the minimum practical joint depends on tile calibration, warpage, layout and manufacturer requirements. Perimeters, structural transitions and changes of plane need movement detailing, generally with a flexible sealant rather than hard grout.

Ask a quote to identify the substrate correction method, adhesive class, coverage approach and movement-joint locations. Tile adhesive guidance for Australian installations is useful background when you're checking whether a proposal describes a complete fixing system or only lists the tile and labour.

Substrate Flatness Tolerance Adhesive Class Trowel Notch Movement Joint Spacing
Concrete floor Confirm project-specific large-format tolerance, with stricter local guidance where required C2S1 or C2S2 where specified Commonly 12 mm or U-notched Perimeter, transitions and designed field locations
Screed Flat, cured and compatible with the membrane system Deformable class suited to tile and background Selected for full transfer Perimeter and changes of plane
Rendered wall Within applicable Australian tolerance Product-approved deformable adhesive Sized to panel and background Corners, junctions and structural changes
Timber floor with underlay Underlay system must be stable and flat Adhesive compatible with tile and board Selected from coverage testing Perimeters and movement zones

Installing Large Format Tile in a Bathroom or Ensuite

A bathroom is a waterproofed assembly with a tile finish, not a tiled box. The sequence matters because a beautiful panel can't correct a failed membrane, an unsuitable fall or a contaminated background.

A six-step infographic guide detailing the professional installation process for large format tiles in wet areas.

Start with inspection and waterproofing

The installer should inspect the substrate, confirm flatness and resolve cracks, high points and low areas before priming. Wet-area falls need checking before the membrane is applied. Australian wet-area guidance states that shower floors must drain without pooling, and shower areas must be waterproofed across the floor and up the walls to at least 1,800 mm, or 50 mm above the shower rose height, whichever is higher. Walls around baths and laundry tubs require waterproofing to at least 150 mm above the fixture. Bathroom waterproofing and tiling guidance outlines these AS 3740:2021 requirements.

Flood testing and membrane inspection should happen before tile installation. The membrane, corners, penetrations, hob junctions and pipe collars need to be complete and compatible with the adhesive system. A membrane doesn't compensate for an uneven wall, so flattening generally belongs before waterproofing where the system permits, with any subsequent preparation carefully controlled.

Fix panels with full contact

Once the waterproofed background is ready, the installer dry lays the pattern, checks cuts around niches and wastes, and confirms that feature veining or bookmatching runs as intended. Adhesive is combed consistently, the panel is back-buttered, and suction-cup lifters help position the piece without twisting it into place.

The tile is then beaten in with suitable tools, joints are cleaned immediately and levelling clips or wedges may assist where the product and joint design allow. Large-format bathroom installation guidance describes a planar target of plus or minus 3 mm over 2 metres and the use of C2 adhesive with S1 or S2 deformability to reduce cracking risk and support full coverage.

Falls must be designed around the drain and tile geometry. The cited bathroom guidance uses 1:80 for bathrooms and 1:50 for showers as practical fall gradients. A large panel may work on a carefully designed bathroom floor, but a conventional multi-direction shower fall often suits smaller pieces better. Internal corners and changes of plane should receive flexible silicone, not rigid grout.

A short installation overview is also shown below.

Where Fewer Grout Lines Stop Being a Benefit

Fewer grout lines can simplify wiping on a wall, but they don't automatically make a bathroom easier or safer to maintain. A 600 x 1200 floor panel still needs the correct fall, cleaning routine and slip-rated finish. Its broad surface can allow water to travel further before reaching the waste, particularly when the floor geometry hasn't been designed around the tile.

Structured and matte surfaces are often more suitable for wet-area floors than polished finishes, but texture can also hold soap residue and mineral spotting. Melbourne homeowners concerned about hard-water marks should choose a finish they can clean consistently, not just the surface that looks smoothest under showroom lighting.

A large wall tile can reduce grout maintenance. A large shower-floor tile can increase installation risk.

Match format to the surface

Walls are usually the strongest application for large panels because the surface can remain continuous and the layout is easier to control. Floors ask more from the tile. They need drainage, traction, edge support and movement detailing, all while carrying foot traffic and wet contamination.

The slip-resistance category should be confirmed from the product documentation rather than assumed from the tile size. The Australian trend towards matte and structured finishes reinforces the practical point that surface finish and wet-area use must be specified together.

Don't confuse a clean look with a flexible assembly

Large panels don't remove movement from a building. Timber floors, concrete transitions, wall junctions and changes of plane can move differently. Without suitable movement joints, a crack can telegraph across a broad panel instead of stopping at a grout line.
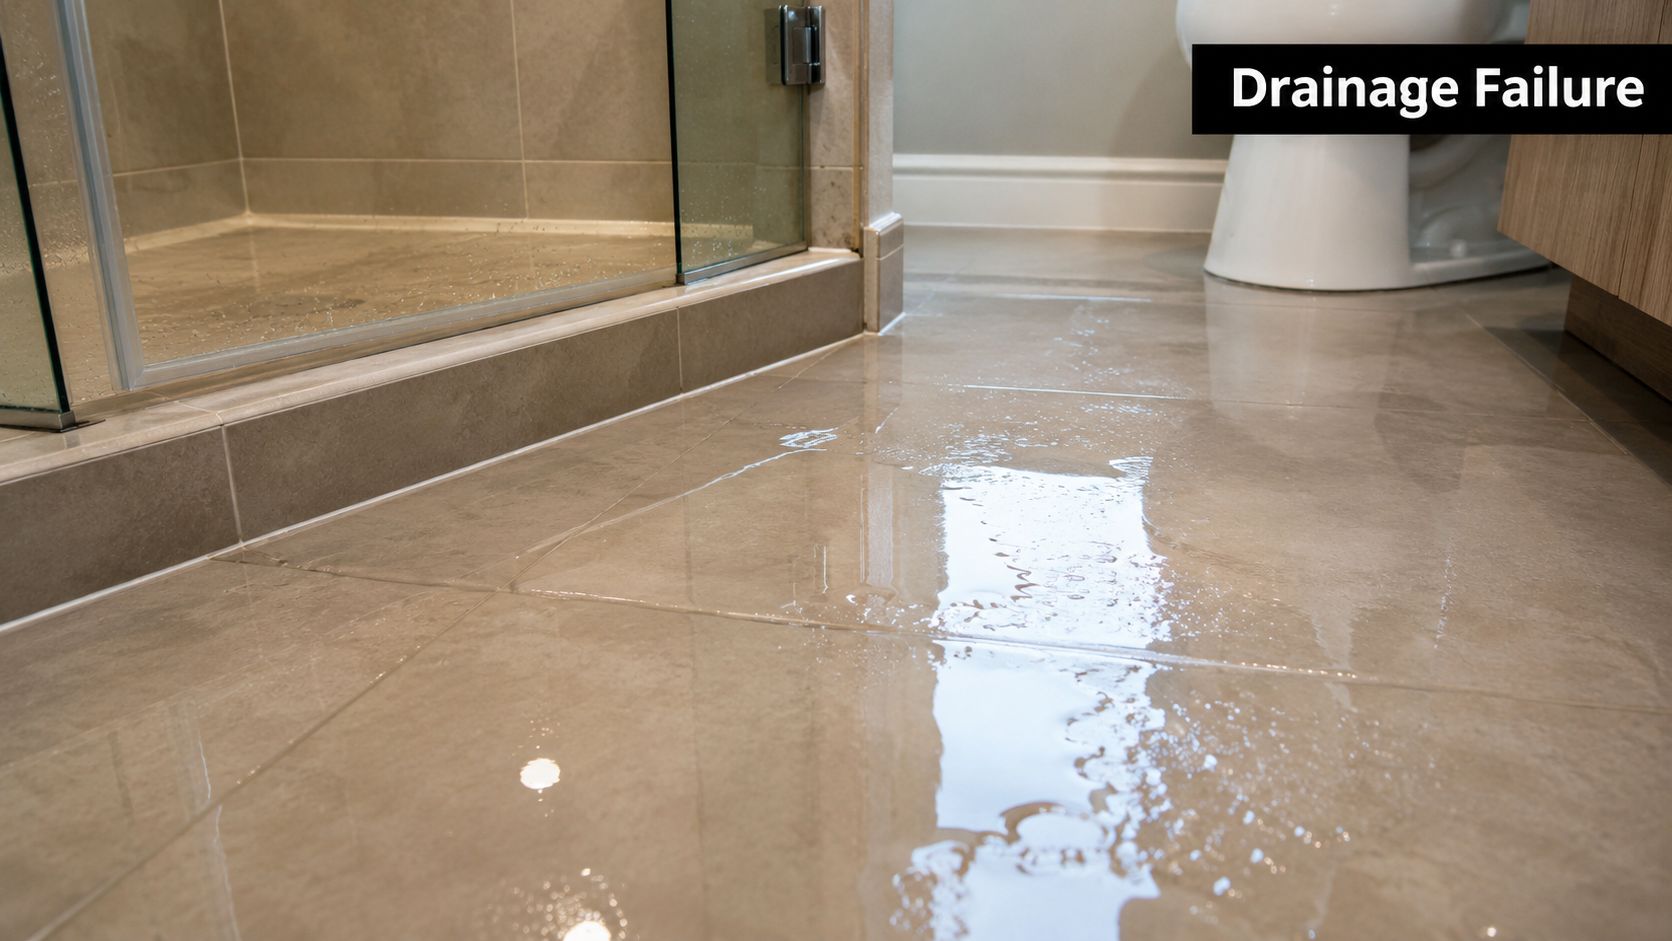
For many Melbourne bathrooms, the sensible arrangement is large format tile on walls, with smaller structured tile or mosaic on a shower floor where the fall and grip demand more flexibility. A linear drain and a carefully designed single-plane fall can make a larger floor format more workable, but that decision belongs in the drainage and substrate design, not after the tile has been ordered.

Registered Builders, Contracts, and Warranty in Victoria

The person laying tile and the person responsible for the domestic building contract aren't always the same person. Tiling by itself isn't a trade category that requires registration in every circumstance, but Victorian domestic building thresholds can make registration and contracting obligations relevant to the renovation as a whole.
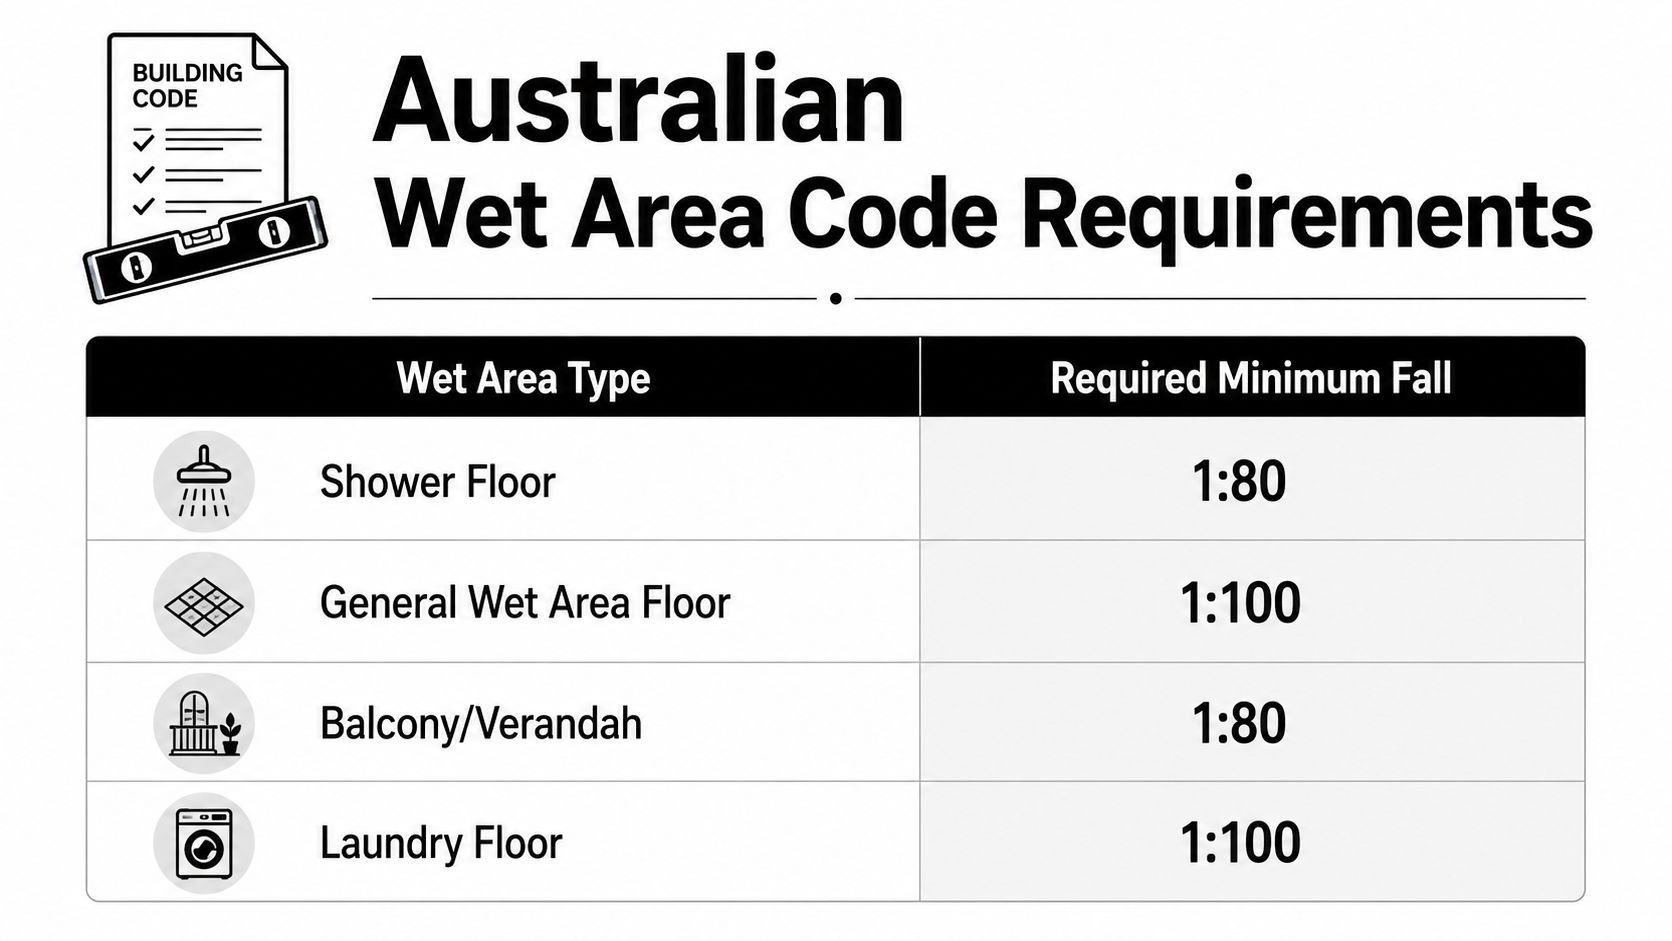
Victoria requires a registered building practitioner for domestic building work where the total cost, including labour and materials, exceeds $10,000, and registration must be approved before work starts. Consumer Affairs Victoria's registration checklist also makes clear that submitting an application isn't the same as holding approved registration.
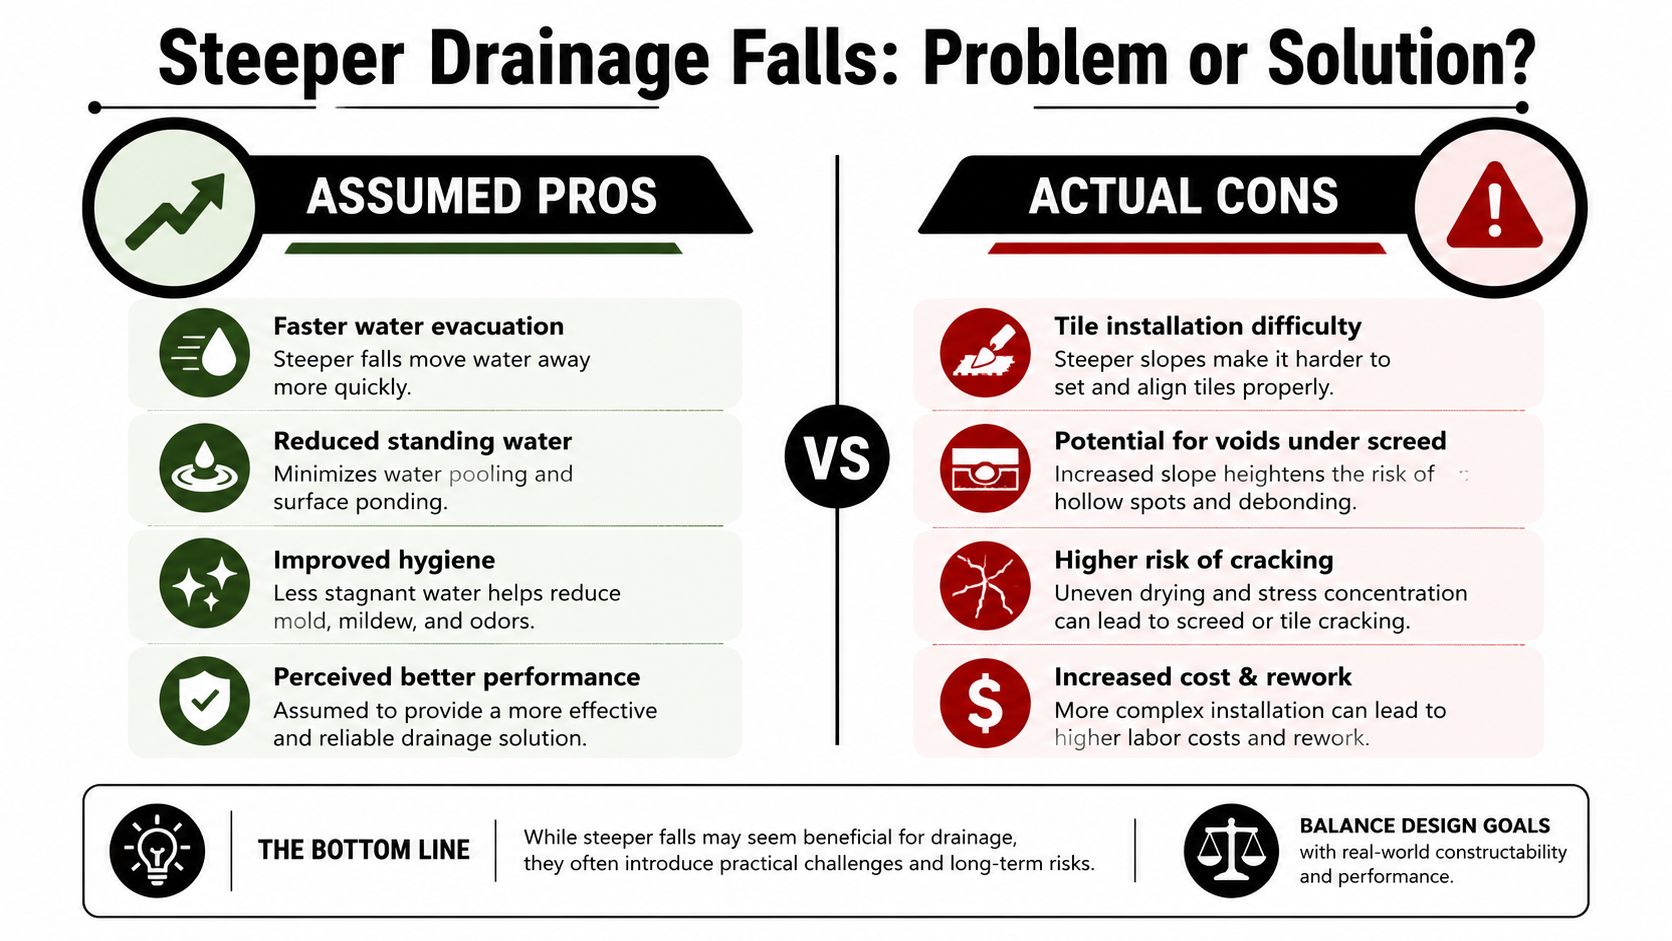
Check who carries responsibility

For a bathroom renovation, ask who is coordinating the waterproofing, screeding, plumbing, electrical work, tiling and certification. If one builder controls the complete scope, that builder should explain the registration category, contract arrangement and responsibility for defects.

Consumer guidance states that a major domestic building contract is required for work worth more than $10,000, and that from 1 July 2026 builders must have Home Warranty insurance for work worth more than $20,000. Victoria's guidance on builders and domestic building projects also identifies wall and floor tiling as work that doesn't require registration by itself, while confirming that the overall domestic-building threshold still matters.

A written scope should identify demolition, substrate correction, waterproofing, falls, tile supply, adhesive, grout, silicone, trims, screens, waste protection, curing and handover documents. Clear records help homeowners reduce project risk with contracts, particularly when several trades work in the same wet area.

An infographic showing five key regulations for builders, contracts, and construction warranties in Victoria, Australia.

What a credible proposal should show

Look for a registration check where relevant, a detailed written scope, named waterproofing responsibility and confirmation of the applicable AS 3740 process. The quote should also state how the substrate will be surveyed and corrected, rather than assuming the existing wall or floor is ready.

Home Warranty insurance and contract requirements don't guarantee a perfect tile installation, but they give the renovation a clearer legal and documentary framework. That framework becomes more valuable as the project involves heavier panels, waterproofing interfaces and expensive finishes.

Putting the Renovation Plan Together

A reliable large-format renovation starts with a drawing and ends with a documented handover. Before ordering tile, confirm the room dimensions, door swings, niche locations, waste positions, shower screen lines and the direction of any feature veining. A beautiful slab pattern can lose its impact if the layout leaves narrow edge cuts or places a joint through the focal point.

A six-step checklist graphic outlining the renovation plan process for large format tiling projects.

Build the specification before the quote

Use the following as a site meeting checklist:

  • Confirm the scope: Record demolition, plumbing, electrical work, waterproofing, screeding, tiling, trims, silicone, shower screens and final cleaning.
  • Survey the substrate: Measure flatness, identify structural transitions and decide whether grinding, patching, screeding or self-levelling is required.
  • Specify the tile system: Note the tile thickness, dimensions, weight, finish, adhesive compatibility and intended room.
  • Design the wet area: Resolve AS 3740 waterproofing extents, falls, penetrations, hobs, niches and waste locations before fixing begins.
  • Map movement joints: Show perimeter gaps, changes of plane and any structural transitions on the tile layout.
  • Protect the finished work: Agree curing time, access restrictions, surface protection and the method for cleaning adhesive and grout residue.

The project should also allow realistic lead times for panels, replacement stock, trims and specialist equipment. Large-format tile installation cost guidance can help a homeowner frame the discussion, but the actual price depends on access, demolition, substrate condition, tile selection and the amount of cutting.

Trends worth planning for

Melbourne projects are using thinner Kerlite slabs, bookmatched veining, broad wall cladding, slip-rated outdoor porcelain and more detailed mitred edges. Those finishes look controlled because the layout and fabrication were controlled first. A mitred niche, for example, needs accurate wall geometry, consistent panel thickness and a fixing sequence that protects exposed edges.

At handover, request as-built drawings where relevant, waterproofing and product warranty certificates, care instructions and a documented maintenance schedule. Keep the tile batch information and spare pieces as well. Future repairs are easier when the exact product, finish and joint colour are recorded.

Melbourne Tiling Services P/L provides bathroom and ensuite renovations, waterproofing, screeding, self-levelling and large-format Kerlite, porcelain and stone installation across Melbourne and greater Victoria. For a site-specific assessment of substrate preparation, waterproofing and panel layout, visit Melbourne Tiling Services P/L and request a renovation discussion before choosing the tile size.

How to Choose Bathroom Tiles: A Melbourne Renovation Guide

You've spent an evening comparing warm white, charcoal, terrazzo-look and stone-effect tiles, then discovered that the tile you prefer may not be suitable for the shower floor. That's a common point of confusion during Melbourne bathroom renovations. A tile can look excellent under showroom lighting and still create problems with slip resistance, waterproofing details, substrate movement, cleaning or future repairs.

The practical answer to how to choose bathroom tiles starts with the room's performance requirements. Work out where water will go, confirm the required slip rating, check the substrate and installation system, then make decisions about colour, format and pattern. A registered builder or experienced tiler can help you keep those decisions aligned instead of treating the tile as a decorative product in isolation.

Table of Contents

Why Tile Selection Goes Beyond Colour and Style

Most homeowners begin with appearance because colour is easy to compare. A display wall makes a large polished porcelain tile look calm and spacious, while a textured mosaic can make a shower feel detailed and luxurious. The problem starts when that showroom preference gets carried directly into a wet area without checking the tile's technical suitability.

A person holding a square gray stone-effect bathroom tile sample against a partially tiled bathroom wall.

In Melbourne homes, the underlying structure can be just as important as the tile itself. Older bathrooms may have uneven floors, timber movement or previous repair work beneath the finished surface. A rigid large-format tile installed over a substrate that hasn't been properly assessed can develop lippage, cracked grout or debonding. Water ingress usually points to a failure in the complete wet-area system, not to an unattractive or low-quality tile.

Start with exposure, not the showroom wall

Separate the room into zones. A shower floor receives direct water and soap residue, a main bathroom floor experiences regular foot traffic, and a vanity wall has a different risk profile from either. Those locations may need different formats and finishes, even when you want one coordinated colour palette.

Australian tile selection is shaped by national safety and waterproofing requirements as well as appearance. AS 4586 guidance for Australian tile selection classifies new pedestrian surfaces by slip resistance, with P-ratings from P0 to P5 and R-ratings from R9 to R13. A common guide for bathroom floors is P3 or R10, while shower floors may need greater traction, such as P4/P5 or R11, depending on exposure.

That means a matte label isn't enough. A product should have technical documentation confirming its intended floor or wall use and its relevant slip rating. Porcelain's low water absorption is useful, but porcelain isn't automatically safe for every wet area, and it doesn't replace a compliant waterproofing system.

Practical rule: Choose the performance category first. Use colour and pattern to narrow the options that remain.

The tile is only one part of the result

A sound installation depends on substrate preparation, adhesive selection, movement joints, grout and continuous waterproofing. Australian bathroom flooring installation guidance stresses the importance of checking flatness, tile thickness, absorption and the intended installation environment before committing to a product.

This approach prevents an expensive mismatch. A tile may be technically suitable, but the floor may need levelling before it can receive the chosen format. A stone product may look perfect, but its maintenance requirements may not suit a busy family bathroom. The right tile is the one that fits the zone, the structure, the installation method and the people using the room.

Comparing Tile Materials for Wet Areas

Material selection affects durability, maintenance, cutting, adhesive requirements and the amount of installation risk. There isn't one universal winner. Porcelain often suits demanding wet areas, ceramic can be practical for walls, natural stone brings variation and upkeep, and large-format Kerlite panels can reduce grout lines while increasing handling and preparation demands.

Material Water Absorption Slip Rating Range Maintenance Level Installation Complexity Best Suited For
Porcelain Low absorption, but verify the product data Varies by product and finish Low to moderate Moderate to high Floors, shower walls and floors when correctly rated
Ceramic More variable, verify wet-area suitability Varies by product and finish Low to moderate Low to moderate Walls, splashbacks and suitable floors
Natural stone Porousness varies by stone Varies by surface treatment Moderate to high High Feature walls, floors and premium details with proper care
Large-format Kerlite panels Low absorption, subject to product specification Varies by product and finish Low to moderate High Large walls and streamlined surfaces with capable installers

Porcelain balances performance with installation discipline

Porcelain is dense, hard and resistant to moisture, which makes it a strong candidate for shower walls and bathroom floors. It's available in stone, concrete and marble effects, so you can achieve a refined appearance without accepting the maintenance profile of every natural material.

The trade-off is installation. Hard porcelain demands suitable cutting equipment, compatible adhesive and a flat substrate. Large pieces expose unevenness quickly, and an installer can't compensate for a poor floor by pressing harder on the tile. For a more detailed material comparison, review this guide to porcelain versus ceramic tiles.

Ceramic remains useful, especially on walls

Ceramic tiles are often easier to cut and handle than dense porcelain. They offer a broad range of colours, glazes and decorative shapes, which makes them useful for shower walls, vanity splashbacks and feature areas. Some products are also suitable for floors, but the technical sheet must confirm that application and the required slip performance.

Ceramic isn't a shortcut around preparation. Adhesive coverage, wall flatness and waterproofing still matter, particularly around niches, corners and plumbing penetrations. A less expensive tile can produce a sound result when it's matched to the correct location and installed properly.

Natural stone rewards care

Marble, limestone, travertine and slate offer natural variation that manufactured surfaces can't reproduce exactly. That visual character comes with responsibility. Stone may need sealing, can react to unsuitable cleaners and can show etching or staining more readily than a glazed manufactured tile.

Use stone where the household can follow the maintenance requirements. If the bathroom needs a simple cleaning routine, a porcelain interpretation of stone may be the more practical choice. If slip safety is a priority, compare the finished surface rather than assuming the raw material tells you enough. Readers planning an accessible bathroom can also consult this practical resource on non slip bathroom flooring for seniors.

Kerlite panels reduce joints but increase precision

Large-format Kerlite panels, including very large wall panels, create a clean surface with fewer grout lines. That can simplify the visual field and reduce the number of joints that need regular cleaning. It doesn't remove the need for careful layout, waterproofing or movement accommodation.

Large-format tiles are less forgiving of lippage and substrate deviation. Before purchase, assess floor tolerance and confirm that the tile thickness, absorption rate and intended installation environment match the adhesive and underlayment. Handling, transport, cutting and future replacement also require planning. A panel that looks perfectly matched today can be difficult to source and match later, so retain suitable offcuts whenever possible.

Understanding Slip Ratings and Waterproofing Requirements

A tile can look suitably matt and still be a poor choice for a wet floor. Slip resistance depends on the zone, water exposure, surface texture, drainage and the completed grout layout. Assess the main bathroom floor, ensuite and shower separately rather than applying one rating to every surface.

Read the rating instead of relying on “matt”

Under AS 4586, new pedestrian surfaces use P and R classifications. A bathroom floor commonly starts around P3 or R10, while a shower floor may require higher traction, such as P4/P5 or R11, depending on water and soap exposure. Treat those figures as a starting point. Check the manufacturer's technical data and the conditions of the installation. The Australian slip and tile guidance explains the classification framework.

A matt finish can reduce glare and feel more secure underfoot, but the word “matt” does not establish compliance. Fine texture can improve grip, while deep texture may collect soap residue and demand more scrubbing. Tile format also changes the result. Smaller pieces provide more grout joints and can offer additional texture underfoot, whereas large pieces leave fewer joints and demand more accurate falls and cutting.

Use the rating with the whole floor design

  • Main bathroom floor: Review the likely splash zone, doorway exposure and cleaning routine. A rating suitable on paper still needs a surface that remains comfortable and practical across the room.
  • Ensuite floor: Allow for water spreading beyond the shower, particularly where the shower has limited separation from the vanity or toilet. Confirm that the selected finish is suitable for the floor, not only for a dry display sample.
  • Shower floor: Check that the tile format can follow the required falls with consistent joints. A very large tile may meet a traction specification yet create awkward cuts, poor drainage or uncomfortable changes in plane.
  • Grout layout: Joint width, joint direction and the quality of the finished falls affect how water moves across the surface. The effective grip of a tile is experienced as an installed system, not as an isolated sample.

For further practical guidance on non-slip bathroom flooring, compare the finished surface, drainage and maintenance requirements together.

An infographic detailing Australian bathroom tile compliance standards for slip ratings and waterproofing requirements for different zones.

Waterproofing sits behind the finish

Tiles and grout are not the waterproof barrier. The membrane beneath them must remain continuous at corners, junctions, penetrations and changes in plane. Under AS 3740:2021, shower walls must be waterproofed to at least 1,800 mm above finished floor level or 50 mm above the shower rose, whichever is higher. The shower floor must be fully waterproofed. On timber or particleboard subfloors, the entire bathroom floor must also be waterproofed. These requirements are summarised in Australian waterproofing and tiling guidance.

Tile selection affects how these details are installed. Large pieces reduce joints, but still require precise cuts around outlets, niches and penetrations. In Victoria, independent inspection before tiling and a formal installation certificate from a licensed waterproofer support sound compliance practice, as outlined in Australian waterproofing guidance for wet areas.

Do not allow tiling to begin until the waterproofing has been inspected and documented. Once adhesive and tiles cover the membrane, many defects are difficult to identify without removing finished work.

Choosing Sizes, Finishes, Colours and Patterns

Tile selection should follow the room's geometry, substrate and maintenance demands. Format changes joint frequency and the amount of flatness an installer needs. Finish affects reflected light, cleaning and underfoot confidence. Colour and grout determine whether water marks, soap residue and everyday wear remain discreet or become the room's main feature.

Match format to the room and substrate

Large-format tiles create fewer grout lines, which can make a compact ensuite feel calmer and give a larger bathroom a restrained appearance. They also demand a suitably flat substrate. Walls that bow, floors with uneven falls and poorly prepared cement sheet can make lippage, inconsistent joints and hollow spots more likely. Large pieces do not hide preparation defects.

Small mosaics and modest-format tiles suit shower floors where the surface must follow falls towards the waste. More joints allow the tile surface to change direction gradually, although they also create more grout lines to clean. The layout should serve drainage and room geometry, rather than follow a style trend.

A professional tiler installing large grey porcelain tiles on a shower floor using a yellow spirit level.

Treat finish as a practical specification

Polished tiles reflect light and give walls a crisp appearance. On floors, that appearance says nothing about wet slip performance, so check the product's technical documentation before approving it. Honed, matte and textured finishes often suit floors better, provided their rating matches the location and intended use.

Texture also changes cleaning effort. Deep relief can hold soap residue, while an extremely smooth surface may show water marks clearly. A moderate texture and a grout colour that does not highlight every mark can be easier to maintain in a busy family bathroom.

Build a palette that can be repaired

Neutral colours coordinate more easily with tapware, cabinetry and later paint changes. They can still have character. Use a stronger pattern in a contained area, such as a niche or vanity wall, while keeping shower walls and other high-exposure surfaces visually simpler.

Check shade and batch information before installation. Tiles from separate production runs may vary, making a later top-up noticeable. Keep labelled spare tiles and clean offcuts for future repairs, particularly in rental properties or high-use family bathrooms. A pattern may also require extra careful placement around niches, outlets and other cuts, so the chosen format should allow the installer to maintain its rhythm.

Ordering Samples, Estimating Costs and Planning Timelines

A physical sample should be approved before the order is placed. Hold it beside the vanity, tapware and cabinetry, then check it under the bathroom's actual lighting. A tile that looks warm in a showroom may read cooler against white sanitaryware. Textured surfaces can also show more soap residue than expected.

Wet the sample to observe how its appearance changes, but treat that as a visual check only. Request the manufacturer's technical sheet, confirm whether the product is suitable for floors or walls, and verify the stated finish and absorption class. Keep the approved sample and documentation with the project records so the delivered tiles can be checked against the specified product.

Order quantity with the layout in mind

Measure every tiled surface separately. Account for the proposed layout, cuts around niches and plumbing penetrations, and the placement required for natural or printed patterns. A simple lineal-metre check can expose an under-order: a wall measuring 2.4 metres wide and 1.8 metres high has 4.32 square metres before openings, cuts or the installation allowance are considered. The final order must reflect the tile format and layout, not just the room's rough dimensions.

Confirm stock, batch details and lead times before demolition. A missing tile can hold up substrate preparation, waterproofing, screeding and following trades once the bathroom is stripped. For several tile types, record each product, finish, batch and intended zone separately rather than relying on one supplier invoice.

Allow for the complete installation system

The tile price covers only part of the work. Include adhesive, grout, trims, substrate repairs, levelling, screeding, waterproofing, delivery, cutting and labour. A cheaper tile may need more surface preparation or produce more difficult cuts. Large panels can reduce grout joints, but they require careful handling, accurate access planning and a well-prepared substrate.

For plumbing-related scope and trade estimating, Exayard plumbing estimating software can help organise plumbing allowances alongside tile and waterproofing work. It does not replace a site inspection. A structured estimate does, however, make it easier to identify interfaces that might otherwise become variations.

Plan the sequence, not just the finish date

A bathroom renovation generally runs through demolition, rough-in work, substrate preparation, waterproofing, inspection, tiling, grouting and final fit-off. Waterproofing requires suitable preparation and curing before tiles cover the membrane. Tile size and weight also affect cutting, handling and installation time.

Keep the tiler's booking conditional on the substrate and waterproofing responsibilities being clear. Confirm who supplies each material, who checks the surface, who records the waterproofing work and who stores spare tiles. For rental properties, retain the samples, batch details, specifications and clean offcuts with the maintenance records. Future repairs are more straightforward when replacement information is available.

Working with Registered Builders and Asking the Right Questions

A registered building practitioner provides more than a name on a contract. In a bathroom, several trades meet at the waterproofing layer, the floor structure, plumbing penetrations, shower niches and wall junctions. Poor coordination can leave a tiler working over an unsuitable surface or a waterproofer dealing with penetrations that weren't planned properly.

In Victoria, bathroom renovation building work valued at $10,000 or more must be carried out by a registered building practitioner. The relevant registration is typically Domestic Builder: Unlimited, DB-U, or Domestic Builder: Limited, DB-L, as outlined in Victorian bathroom renovation regulation guidance.

Verify registration and responsibility

If the renovation requires a building permit, the work must be completed by, or under the supervision of, a registered building practitioner. The Victorian Building Authority provides a public register that homeowners can use to verify registration before hiring anyone. Guidance on Victorian bathroom permits and practitioner checks explains why that verification should happen before the contract is signed.

Ask direct questions:

  • Registration: What is your registration category, and can I verify it through the Victorian Building Authority register?
  • Waterproofing: Who holds the waterproofing licence, and who issues the installation certificate?
  • Inspection: Will the waterproofing be independently inspected before tiling begins?
  • Substrate: How will you assess floor flatness before ordering large-format tiles?
  • Scope: Are demolition, substrate repairs, screeding, levelling, trims, grout and sealants included?
  • Defects: What documentation and warranty cover tile adhesion, grout defects and membrane integrity?

Look for coordinated trade control

Registered builders coordinate licensed carpenters, plumbers, electricians, waterproofers and tilers so each trade leaves the next one a workable surface. That matters around shower roses, floor wastes, niches, balcony junctions and other penetrations where small planning errors can compromise the finished system.

A tiling contractor should be able to explain the adhesive, coverage, joint layout and movement provisions, not just quote a square-metre rate. Homeowners can compare qualified tiling contractors near Melbourne while checking who is responsible for preparation and compliance.

The lowest tile installation price often excludes the work that protects the tile. A properly documented scope may cost more at the start, but it gives you a clearer basis for comparing builders and a better chance of identifying defects before the room is sealed behind finished surfaces.

Your Tile Selection Action Plan

Start by mapping each bathroom zone and its water exposure. Confirm the appropriate slip rating, then compare porcelain, ceramic, stone or Kerlite against maintenance and installation demands. Check substrate flatness before ordering large formats, select the finish and layout, order the required quantity from one batch, and retain offcuts. Before tiling, request waterproofing records, independent inspection evidence and the waterproofer's certificate. Give your registered builder and tiler the product data sheets, approved layout and grout specification, then keep cleaning and maintenance instructions with the renovation documents.


Melbourne Tiling Services P/L provides bathroom renovations, waterproofing, screeding, substrate preparation and porcelain, ceramic, stone and large-format Kerlite tiling across Melbourne and greater Victoria. For a site-specific tile selection, compliance review and coordinated renovation quote, visit Melbourne Tiling Services P/L.

Bathroom Waterproofing Cost in Melbourne: 2026 Guide

A straightforward Melbourne bathroom usually costs about A$500 to A$750 to waterproof, while a more involved project can reach A$1,500 to A$4,000 once size, compliance, second-storey access, or substrate repairs are included. The quote isn't just for membrane, it covers preparation, detailing, labour, drying time, and the documentation needed before tiling.

You may be looking at three bathroom renovation quotes right now, each with a different waterproofing figure and no obvious explanation for the gap. A small ground-floor room on a concrete slab can be relatively predictable. An upstairs bathroom with timber flooring, a shower niche, awkward pipe penetrations, or an old failed membrane is a different trade package entirely.

Melbourne homeowners should treat waterproofing as a structural protection and compliance stage, not a cosmetic add-on. The Australian bathroom waterproofing cost guide places common jobs within a broad range, including an average around A$500 to A$750, while more complex work can rise to A$4,000. The price makes more sense once you separate the quote into labour, materials, substrate preparation, junction detailing, and certification.

Table of Contents

What Bathroom Waterproofing Costs in Melbourne

A 1990s Caulfield brick veneer home can show why quotes differ. The owners may have stripped the old bathroom and asked several tilers to price waterproofing. If the room is compact, sits on a sound concrete slab, has easy access, and needs a standard shower floor and wall system, A$500 to A$750 is a realistic starting band for the waterproofing component. The installer still needs to inspect the substrate before confirming that figure.

A mid-range bathroom commonly falls around A$800 to A$1,500, while a complex job can reach A$1,500 to A$4,000. Australian cost guidance reports a national average of A$800, with a minimum of A$500 and a maximum of A$4,000 in one 2023 guide. The range is outlined in the Australian waterproofing price guide.

Job Type Typical Melbourne Price What's Included
Straightforward ground-floor bathroom A$500 to A$750 Basic preparation, membrane application, standard shower and floor detailing
Mid-range bathroom A$800 to A$1,500 More wall area, additional junctions, repairs, or broader compliant coverage
Complex or second-storey bathroom A$1,500 to A$4,000 Second-storey access, timber substrate, extensive preparation, difficult falls, or replacement work

The line items matter more than the headline price. Labour covers site setup, preparation, membrane application, detailing, and the waiting time between coats. Membrane and reinforcement materials are usually a smaller part of the quote, while damaged substrate, difficult junctions, and removal of failed waterproofing can change the scope quickly.

For budget planning, waterproofing is a small but material part of the renovation allowance. Against a A$10,000 renovation benchmark, it can represent roughly 5% to 10%, depending on the work required. Demolition, plumbing, electrical work, screeding, tiling, fittings, and shower-screen installation sit outside that waterproofing figure. Virtual Tour Easy knows renovation planning checklists can help place this stage within the wider renovation sequence.

The main cost drivers are practical decisions:

  • Second-storey work: Decide whether the access, timber framing, and extra preparation justify the higher labour allowance.
  • Substrate condition: Particleboard, movement, rot, or uneven screed must be addressed before membrane application.
  • Room design: Niches, benches, curbless transitions, baths, and extra penetrations require more detailing.
  • Legacy waterproofing: Ask whether a failed or non-compliant membrane will be removed rather than covered.

Before accepting a quote, confirm whether it covers a basic membrane application or a complete compliant wet-area system, including preparation and documentation. That distinction often explains a cheaper figure.

How Waterproofing Works Behind the Tiles

A tiled shower can look finished while water is already reaching the substrate. Tiles and grout are the visible cladding, not the waterproof barrier. The membrane is the tank, so corners, penetrations, junctions, and waste connections must join into one continuous sealed system.

The installation sequence is practical:

  1. Clean, repair, and prime the substrate.
  2. Apply the first membrane coat to the specified areas.
  3. Reinforce wall-to-floor junctions and internal corners with bond-breaker tape or compatible bandage.
  4. Seal pipe penetrations, wastes, niches, and other openings.
  5. Apply the second coat over the reinforced areas, reaching the product's required thickness.
  6. Allow the membrane to cure before tiling, adding another coat if the system or site conditions call for it.

Drying time forms part of the work, not an optional delay. Applying another coat too soon can disturb the layer underneath, while tiling before the membrane has cured can weaken the bond or trap moisture. The installer should follow the selected product's technical data sheet rather than judge readiness by surface appearance.

A step-by-step infographic illustrating the six-stage professional process for installing waterproofing behind bathroom shower tiles.

Falls and wall coverage

A shower recess needs a pre-formed shower tray or a correctly formed, flood-tested membrane fall that directs water to the waste. If the floor is flat, water can remain where the membrane and tile system face the most exposure.

Shower walls must also be waterproofed to the required height. Under the NCC wet-area provisions, shower floors require waterproofing, shower walls must reach at least 1,800 mm, and houses use that same 1,800 mm shower-area height requirement. The NCC wet-area waterproofing provisions provide the regulatory basis.

Australian guidance also covers waterproofing at least 150 mm above shower floors, 25 mm above finished floors, and fully waterproofing timber floors before tiling. The Australian waterproofing standards overview explains how preparation, layer thickness, and curing affect the finished system. Those steps are part of the quoted work, not just the visible paint-like membrane.

What Drives the Price on a Melbourne Quote

A useful quote should let you trace the price from the bare substrate to the signed compliance paperwork. If it only says “waterproof bathroom” with one lump sum, you can't tell whether the installer has allowed for corners, penetrations, drying days, or damaged flooring.

Preparation comes before membrane

Preparation may include removing old tiles, cleaning adhesive, repairing cracks, correcting screed levels, priming porous surfaces, or replacing unsuitable boards. This is often where a cheap quote becomes unstable. Membrane won't compensate for a loose, contaminated, moving, or poorly graded substrate.

The decision is practical. If the floor is sound and level, you may only need cleaning and primer. If the installer finds rotten particleboard or an uneven shower base, the right response is to repair it before waterproofing, not bury it under another coat.

Materials and junction details

The membrane price depends on the selected system, coverage area, and number of coats. The quote should identify whether it uses a liquid acrylic, polyurethane, cementitious-compatible system, or sheet membrane, along with compatible primers, sealants, tapes, corner pieces, and penetration seals.

Edges and junctions consume time because they carry concentrated movement and water exposure. Ask whether the price includes:

  • Wall-floor junctions: Bond-breaker tape or reinforcing fleece.
  • Internal corners: Reinforcement and compatible sealant.
  • Pipe penetrations: Proper collars or seals rather than a brush of excess membrane.
  • Waste connection: A compatible puddle flange detail.
  • Shower recess: A tray or formed fall, where applicable.

Labour and compliance

Labour is commonly the largest part of a waterproofing quote because the installer must prepare the area, detail weak points, apply coats, return after curing, and check the finished coverage. In Victoria, work valued over A$5,000 requires a Construction Waterproofing Licence from the Victorian Building Authority, which can affect labour pricing, scheduling, and documentation. The Victorian waterproofing licensing and compliance guidance provides the relevant cost and licensing context.

Compliance may include a VBA-recognised certificate, photographic records, and a flood test where appropriate. Victorian wet-area work is governed by AS 3740, and compliance paperwork is expected before tiling proceeds, as outlined in this Victoria waterproofing compliance guide.

Quote Line Item Approx. Share of Cost Homeowner Decision Involved
Substrate preparation Variable Pay for proper repair, or risk sealing an unstable surface
Membrane materials Variable Choose the specified system and required coat coverage
Edges and junctions Variable Confirm corners, penetrations, waste, and niches are included
Labour Usually the largest component Allow for return visits and cure time between coats
Compliance documentation Variable Confirm certificate, photographs, and testing requirements

Don't assume a waterproofing-only quote includes a shower-screen refit, tiling, demolition, plumbing alterations, or rotten-subfloor rectification. Those exclusions can change the final bill substantially. If someone offers to skip a second coat to save A$150, or proposes one coat over particleboard, the saving is attached to the part of the system that protects everything above it.

Comparing Waterproofing Methods and Materials

Melbourne quotes usually refer to a few broad system types. The right choice depends less on the product label than on the substrate, room layout, movement, junction count, and installer competence.

Liquid acrylic and polyurethane membranes are the familiar default for many standard bathrooms. The installer rolls or brushes the product over a prepared substrate, reinforces corners and junctions, then builds the system to the manufacturer's required thickness. They suit many concrete-slab bathrooms and compressed fibre-cement surfaces, but application quality matters. A thin or incomplete coat isn't equivalent to a correctly applied system.

Sheet membranes use PVC, CPE, or another bonded sheet with treated seams, corners, and penetrations. They can offer consistent coverage and make sense where the layout contains difficult junctions or where the installer is experienced with that particular system. The material cost may be higher, but a predictable sheet can reduce some application variability.

Pre-formed polyurethane shower trays provide the fall and waterproofing geometry in one component. They're useful where the waste position and shower layout suit the tray, but they don't remove the need to detail wall junctions and penetrations. A tray can simplify the shower base while adding product and fitting considerations elsewhere.

Method Typical $ per m² Best suited to Expected lifespan Key trade-off
Liquid acrylic membrane Not fixed Standard prepared bathrooms on sound substrates Depends heavily on preparation and application Accessible pricing, but thickness and curing must be controlled
Liquid polyurethane membrane Not fixed Areas needing a flexible liquid-applied system Depends on system specification and installation Flexible coverage, with careful substrate and cure requirements
Sheet PVC or CPE membrane Not fixed Complex junctions or installers trained in sheet systems Depends on seams, corners, and penetrations Consistent sheet coverage, but higher detailing and material requirements
Pre-formed polyurethane tray Not fixed Showers where tray dimensions and waste position suit Depends on compatible installation and surrounding detailing Provides a formed fall, but limits layout flexibility

There isn't a verified universal lifespan or Melbourne dollar-per-square-metre figure that applies to every system, so be wary of quotes promising a fixed service life without naming the product and installation conditions. The shower waterproofing membrane service information is useful when comparing membrane approaches, but your installer should still provide the exact product specification.

For a straightforward concrete-slab bathroom, liquid membrane is often the sensible choice when correctly applied. On an upstairs timber floor or a heavily articulated wet room, a sheet system or tray may justify its higher price because the layout demands more controlled detailing. Premium doesn't automatically mean better. Compatibility and installation quality decide whether the system performs.

Real Melbourne Bathroom Examples and Case Studies

Two bathrooms can have similar floor areas and completely different waterproofing quotes. The difference usually appears under the tiles, at the waste, and around the room's junctions.

Ground-floor ensuite in Glen Waverley

The first example is an anonymised ground-floor ensuite in a 1990s Glen Waverley brick veneer home. The room had a straightforward concrete slab, one shower, reasonable access, and no visible substrate surprise after the old finishes were removed.

The scope was easy to define. Preparation involved cleaning and priming the sound surface, the shower walls received the required coverage, and the installer detailed the floor, corners, penetrations, and waste before applying the membrane system. Because the substrate didn't need major correction, the quote stayed within the straightforward bathroom band.

The homeowner's key decision was whether to keep the existing layout. Keeping the waste and shower position avoided additional falls, complicated junctions, and broader screed work. The clear quote separated preparation, membrane application, detailing, and compliance rather than presenting a bare “waterproofing” allowance.

Second-storey bathroom in Brunswick

The second example is a second-storey bathroom in a 1920s Brunswick terrace. The room sat over timber joists, required levelling, needed an increased fall to the floor waste, and demanded careful treatment as a raised wet area under AS 3740.

The headline price per square metre would have been a poor guide. The waterproofer had to inspect the timber substrate, coordinate repairs and levelling, establish the fall, detail more movement-prone junctions, and document the compliant installation. Access also affected how materials and equipment reached the room.

Site inspection changes the quote: A phone estimate can price surface area, but it can't see rotten boards, movement, waste position, or the quality of the old screed.

These examples show why a free quote based only on room dimensions is unreliable. Send substrate photographs before the inspection, identify whether the room is upstairs, and explain whether the existing tiles are being removed. A site visit should also confirm shower-screen locations, niches, baths, floor wastes, and penetrations.

The difference isn't necessarily profiteering. It reflects scope. A slab-based ensuite can need a controlled membrane installation. A terrace bathroom over timber may need a coordinated substrate and compliance package before the waterproofing can even begin.

Ask the contractor to state which assumptions support the price. If the quote depends on “sound substrate” or “no levelling required”, those conditions should be written down so you know what happens if demolition reveals something else.

Repair or Replace How to Decide

A visible leak doesn't always tell you where the waterproofing failed. Water can travel beneath tiles and emerge away from the original gap, which makes a small surface patch an uncertain fix. Replacing grout or applying sealant may improve the finish, but it won't rebuild a continuous membrane behind the wall.

Use three checks before choosing a repair:

  1. Age: Older membranes deserve closer scrutiny, especially if the installation history and product are unknown.
  2. Leak location: A localised issue at a known penetration may be different from moisture appearing across several walls.
  3. Renovation timing: If tiles and wall linings are already being removed, rebuilding the system is usually more efficient than preserving questionable layers.

A spot repair can make sense when the installer can identify a discrete failure and the surrounding system is sound. Partial re-waterproofing may suit a confined shower zone where the rest of the wet area remains intact. Full replacement is more appropriate when the membrane is damaged broadly, the substrate has moved, or the room is being stripped back for a renovation.

The figures need to be read as scope bands, not promises. Simple work may sit in the common A$500 to A$750 range, while broader re-waterproofing can reach A$1,500 to A$4,000 when access, substrate, and compliance requirements expand. The cost of a failed system can also include tile removal, drying, damaged plasterboard, timber repairs, repainting, and work in the room below. Research cited in the Australian waterproofing defect cost discussion identifies waterproofing as a serious defect category and estimates annual economic costs from defects in new residential apartments at A$121 million to A$314 million, with the wider building estimate reaching as much as A$1.2 billion.

A man looks thoughtfully at a broken washing machine while comparing repair versus replacement options on paper.

Replacement usually wins when: More than one wall shows moisture signs, the membrane is over 15 years old, or tiles are already coming off.

Photograph bubbling paint, swollen skirting, mould, cracked grout, damp ceilings below, loose tiles, and any staining around the shower. Keep those images with the renovation records. They give the waterproofer a starting point and help distinguish a surface maintenance issue from a concealed wet-area failure.

Estimates Guarantees and Smart Budgeting in Melbourne

A useful Melbourne quote should read like a scope of work, not a product receipt. Whether you compare a specialist waterproofer, a tiler, or a bathroom renovation contractor, the estimate should state what happens before the membrane is opened and what evidence you'll receive before tiles cover it.

Read the quote line by line

Look for these items in writing:

  • Substrate preparation: Hours or tasks allowed for cleaning, removal, priming, screed correction, and board replacement.
  • Membrane specification: Product type, brand, system compatibility, coverage area, and coat count.
  • Detailing: Treatment of corners, wall-floor junctions, niches, wastes, pipe penetrations, and shower-screen interfaces.
  • Curing stages: Return visits and waiting periods between coats and before tiling.
  • Compliance certificate: The certificate, photographs, and any testing included in the price.
  • Warranty terms: Separate the product warranty from the installer's workmanship guarantee.

A quote that says “two coats membrane” but doesn't identify the product leaves too much unresolved. So does a price that excludes screed work while assuming the floor is already correctly graded. Ask what triggers a variation and require the contractor to show you the affected area before extra work begins.

For broader bathroom renovations, the legal contracting structure matters. Domestic building work above A$16,000 generally must be carried out by a registered builder in Victoria, and a renovation involving demolition, plumbing, waterproofing, tiling, and fittings commonly reaches that level. The Victorian domestic building guidance explains the registration threshold and its relevance to project supervision.

One industry source states that renovation jobs over A$10,000 require a Registered Builder, while plumbing must be performed by a registered or licensed plumber. Because guidance can differ by project category and source, confirm the current requirement with the relevant Victorian authority and make sure the contract identifies the responsible registered builders and licensed trades. You can also review the role of the Victorian waterproofing compliance certificate before signing.

Set the budget before demolition

For planning purposes, a small ground-floor bathroom may sit around A$500 to A$750, a standard main bathroom around A$1,200 to A$2,500, and a complex second-storey or substrate-replacement project around A$2,500 to A$4,000. These are practical planning brackets, not fixed tariffs, and the final amount depends on the inspected scope.

Against a A$10,000 renovation envelope, keep a contingency of 10% to 15% for surprises behind the tiles. That allowance can cover substrate repairs, levelling, waste alterations, or compliance-related rework, but it shouldn't be used to justify vague pricing. Ask for a written variation with the reason, affected trade, and revised total.

A checklist infographic titled Estimates, Guarantees and Smart Budgeting for renovation projects in Melbourne, Australia.

Before you commit, verify the contractor's registration, insurance details, certificate process, warranty wording, exclusions, and responsibility for coordinating plumbers, tilers, and shower-screen installers. A low initial quote only works if it includes the same scope as the quote beside it.


Melbourne Tiling Services P/L provides bathroom waterproofing, screeding, tiling, leak rectification, and complete bathroom renovation coordination, with written estimates and compliance documentation for Victorian projects. To compare your room's substrate, layout, and waterproofing scope against a clear renovation plan, visit Melbourne Tiling Services P/L and request a quote.

Shower Niche Installation: A Practical Step-by-Step Guide

The bathroom is gutted, the old tiles are stacked outside, and the shower wall is finally open to the studs. That's usually when someone decides they want a recessed niche, only to discover that the position affects framing, plumbing, tile layout and waterproofing all at once. A niche cut into the wrong section of wall can leave pipes in the way, create awkward tile cuts or introduce a leak behind a finish that looks perfect.

Good shower niche installation starts before the saw. In Australia, AS 3740:2021 and NCC 2022 treat the niche as part of the wet-area waterproofing system, not as a decorative box. The niche needs a stable substrate, continuous membrane coverage and a base that drains towards the shower. The following process reflects how the work should be planned on a Melbourne bathroom renovation site, with the legal role of registered builders considered alongside the practical work.

Table of Contents

Before You Cut Into the Wall

A homeowner once showed me a shower wall with the cavity already cut. The opening looked square, but a mixer pipe ran straight through the lower corner, the proposed shelf had no fall, and the remaining studs no longer gave the wall the support it needed. The tiles hadn't been selected yet, so the niche would also have forced narrow slivers into the surrounding layout. The expensive part wasn't cutting the opening. It was undoing the decisions made before anyone checked the wall.

Treat the recess as part of the wet area

Under NCC 2022 wet-area provisions, the shower floor must be waterproof, shower walls must be waterproof to not less than 1800 mm above the floor substrate, and shower-area junctions and joints must be waterproof for not less than 40 mm either side of the junction. The NCC wet-area waterproofing provisions make the practical point clear. A recessed opening interrupts the normal wall surface, so the membrane detail must be planned around it.

AS 3740:2021 adds niche-specific requirements. Every niche surface needs a water-resistant substrate, the niche must be separated from the lining on the opposite side of the wall, all surfaces must be fully waterproofed, and the base must fall at least 1:100 towards the shower. Those requirements are why a niche can't be cut into plasterboard and tiled over.

Confirm the site conditions first

Before the cut-out is marked, confirm:

  • Wall construction: Identify whether the wall is masonry, timber frame or steel frame. Each material changes how the opening is supported and how the lining is fixed.
  • Services: Use a stud finder and inspect the exposed cavity for water, waste and electrical routes. Body sprays, mixers and hand-showers need space around the niche, not through it.
  • Framing strength: Check that removing or modifying studs won't compromise the wall. Add proper side supports, a head and a bottom support before installing the lining.
  • Fall direction: Mark the shelf so water runs back into the shower. A level shelf is a defect waiting to become a maintenance problem.
  • Waterproofing plan: Record the niche dimensions, internal corners, penetrations and shelf junctions for the waterproofer.
  • Contract scope: In Victoria, domestic building work costing more than $10,000 in labour and materials, or any building work requiring a permit, must be performed by a person registered with the Building and Plumbing Commission, with registration approved before work starts. The Victorian waterproofing and tiling guidance explains why this matters during bathroom renovations.

Decide early between a preformed foam insert and a custom tile-in niche. A preformed unit can simplify the shape and membrane detailing. A custom recess gives better control over tile modules, width and shelf design, but leaves more responsibility with the framing and waterproofing trades.

Planning Size, Height, and Framing Layout

The right niche is sized around the bottles, the wall structure and the tile grid, not just the visual proportion of the shower. I normally place the selected tile on the floor or draw its module on the wall before finalising the opening. That exposes problems early, such as a niche edge landing halfway through a feature tile or a shelf that can't carry the intended stone slab.

Choose a footprint that suits the wall

Common planning footprints include:

  • Single 600 × 300 mm niche: A practical horizontal recess for everyday bottles where the wall has limited width.
  • Double 900 × 400 mm niche with split shelf: Useful when products need to be separated, but the divider and extra junction add detailing work.
  • Oversized 1200 × 500 mm niche: Appropriate only where the wall, framing and waterproofing plan can support the larger opening, particularly with multiple shower outlets.

Those dimensions are design examples, not compliance dimensions. The niche must still fit the available cavity and preserve the waterproofing envelope.

The main shelf commonly sits in a height band of 1200 mm to 1500 mm at centre, adjusted for the tallest user and the shower rose. A lower shelf may sit around 300 mm above the bath or floor for foot-level storage, but it mustn't become an obstacle or create a difficult-to-clean recess.

An infographic titled Shower Niche Planning detailing standard sizes, optimal placement, and correct framing layout techniques.

Frame for the cavity, then route services

A niche between two studs is the simplest arrangement. A partial-width niche may need a 90 mm noggin to form the lower or upper support, while a heavy stone shelf should be supported with double noggins and appropriate fixings. Don't rely on tile adhesive to carry a thick shelf.

Plumbing needs to be resolved before the wall is closed. Route body sprays, mixers and hand-showers around the proposed opening, leaving enough room for fittings and penetrations. Moving a tap after the membrane has been applied isn't a small adjustment. It creates a new penetration and requires the affected area to be re-waterproofed under AS 3740.

Document the final cavity width, height, depth and shelf positions on the waterproofing plan. The applicator needs that information to detail bond-breakers, internal corners and shelf-to-wall transitions without guessing on the day.

Tools, Materials, and Substrate Choices

A clean niche depends on having the right materials on site before the wall is closed. Substrate compatibility matters as much as the brand of membrane. A primer designed for fibre cement won't automatically be correct for a foam insert, and an untreated timber support can create problems behind an otherwise sound membrane.

Build the job checklist by stage

Framing and inspection

  • Cutting tools: Use a multi-tool or reciprocating saw for controlled openings.
  • Fixings: Keep a drill-driver and suitable 90 mm screws available for framing work.
  • Supports: Use treated pine noggins, a stud finder, spirit level and laser to set the opening accurately.
  • Service checks: Inspect the cavity before cutting, particularly around plumbing and electrical routes.

Plumbing rough-in

  • Testing equipment: A pressure gauge helps the plumber verify the rough-in before the lining is installed.
  • Penetration preparation: Use thread tape where specified and lagging around services where required to protect pipes and reduce movement.
  • Valve planning: The JMJ Plumbing shower valves resource is useful when confirming valve positions and the relationship between plumbing hardware and the niche opening.

Waterproofing

  • Primer: Match the primer to the substrate and membrane system.
  • Membrane: Use the specified Class III acrylic or polyurethane membrane system.
  • Reinforcement: Allow for 100 mm reinforcing bandage at internal corners and shelf-to-wall junctions.
  • Sealing tools: Have silicone sealant, a brush, hawk and wet film gauge ready.
  • Application control: Follow the membrane manufacturer's coverage and curing instructions rather than judging thickness by colour.

Tiling and finishing

  • Cutting and bedding: Select a notched trowel appropriate to the tile, with spacers, spirit level and a tile cutter or wet saw.
  • Edge protection: Use a lipped tile profile where the niche edge needs a crisp, durable finish.
  • Penetrations: Keep a diamond hole saw available for outlets close to the niche.
  • Junction seal: Use compatible silicone at changes of plane instead of forcing grout into corners.

Fibre-cement sheet, including 6 mm or 9 mm compressed sheet for masonry and 6 mm sheet for stud walls, is a common lining option where the system allows it. Foam preformed inserts can reduce framing complexity, while tiled HardieBacker or another approved fibre-cement lining supports a custom tile-in build. Plasterboard isn't suitable as the wet-area niche substrate for this application, MDF swells when exposed to moisture, and untreated pine can rot behind the membrane.

Stage Item Quantity
Framing Treated noggins and approved screws As required for the opening and shelf supports
Lining Water-resistant substrate or preformed foam insert Enough to line every niche surface
Waterproofing Primer and compatible membrane Enough for complete coverage of all niche surfaces and adjoining details
Reinforcement 100 mm bandage Enough for internal corners and shelf junctions, with additional length for overlaps
Finishing Tile adhesive, trims, grout and silicone Based on the selected tile and niche perimeter

For estimating, measure the full niche perimeter and allow membrane and bandage for every internal corner and shelf junction. A one-metre perimeter isn't one metre of bandage in practice if several corners and overlaps need reinforcement, so measure the actual detail rather than buying only the visible edge length. For substrate preparation before lining, use this guide to substrate preparation.

Step-by-Step Shower Niche Installation

The sequence should read like one continuous build. Framing, lining, plumbing, waterproofing and tiling are separate trades, but the niche only works when each stage leaves the next one a sound, documented surface.

Frame and line the opening

Start by scanning the wall and confirming that no pipe or cable intersects the proposed cut. Mark the opening with a laser or long spirit level, then install double studs at each side where the design requires additional support. Fit a bottom plate or noggin that can carry the shelf and establish the fall towards the shower.

Add a head support and any intermediate noggins needed for a divider, shelf or stone slab. Fix the lining cleanly, keeping approximately 6 mm gaps at corners where the waterproofing system requires room for a membrane turn-up and flexible detailing. Don't pack the cavity with weak offcuts or leave a shelf supported only by the wall sheet.

A step-by-step infographic showing the six stages of installing a preformed shower niche in a bathroom.

The substrate controls the rest of the system. Villaboard, another approved fibre-cement sheet or a foam preformed niche each needs the primer and membrane specified for that surface. A preformed insert still needs to be installed exactly as the manufacturer's system requires. It doesn't excuse gaps, unsealed flanges or missing membrane continuity at the surrounding wall.

Waterproof every surface

Before applying membrane, remove dust and prime the substrate. Install bond-breaker tape at all internal corners, including the base, sides, back and shelf-to-wall junctions. Apply the membrane in the specified coats and use a wet film gauge where the system requires measured thickness. The AS 3740:2021 guidance reinforces the central rule. The niche must be lined on all surfaces, isolated from the opposite wall lining, fully waterproofed and built with a minimum 1:100 fall towards the shower.

Allow the membrane to cure fully before any required flood test or tiling. Rushing because the surface feels dry can trap moisture under adhesive and compromise the bond. Under NCC 2022, the niche detail must connect with the waterproofed shower floor, walls, junctions and penetrations rather than ending at the visible tile edge.

Tile for drainage and movement

Dry-fit the niche tiles before spreading adhesive. Keep the layout aligned with the surrounding courses where possible, and avoid placing mitred joints directly on the niche base where standing water and movement make the detail vulnerable. Set the shelf with its fall intact, then tile the back, sides, top and base in a sequence that leaves clean, supported edges.

Use mould-resistant grout on the tile joints, but don't grout changes of plane. The niche corners and niche-to-wall junction should receive compatible silicone so movement doesn't turn into a hairline crack. A carefully selected designer shower enclosures for UK homes reference can also help when coordinating the niche position with the eventual screen line, door swing and visible hardware.

Troubleshooting Waterproofing and Tile Failures

A niche that looks dry during handover can still be poorly built. The common mistake is treating a visible symptom, such as discoloured grout or a damp corner, instead of correcting the waterproofing detail beneath it.

Ponding at the shelf

Water sitting on the base usually means the shelf was installed too flat, or the fall was directed towards the back of the niche. Adding silicone to the front edge won't correct the geometry and may trap moisture. Remove the affected finish, rebuild the shelf with a compliant fall, then re-prime and re-membrane the repaired area.

The applicable AS 3740 niche rule requires a minimum 1:100 fall towards the shower. Some site discussions use steeper falls for practical drainage, but the installed system still needs to meet the relevant standard and product instructions.

Junction leaks and cracked corners

A leak at the niche-to-wall junction often starts with a missing bond-breaker, an unreinforced corner or a membrane that stops short of the adjoining wall. Surface caulk is the wrong repair when the membrane detail is incomplete. The sound approach is to expose the failed junction, install the specified bond-breaker and lap the membrane at least 100 mm onto the substrate where the system requires that reinforcement.

Efflorescence and grout haze can appear when tiling or grouting starts before the membrane has cured. Let the waterproofing system reach its specified cure before covering it. Moisture trapped under the finish has nowhere useful to go.

An infographic showing common tile failure modes on the left and their correct waterproofing solutions on the right.

Movement, mould and inspection

Hairline cracks along the niche base are usually a movement-joint issue, not a request for harder grout. Use silicone at changes of plane and replace failed grout where appropriate. Mould behind a shelf can point to blocked drainage, poor ventilation or detailing that has trapped moisture behind the finish.

Tile selection also affects maintenance. An architect specification guide by Varun Marbles can help compare marble and vitrified surfaces before the niche is tiled. For a Melbourne-specific waterproofing detail, refer to shower niche waterproofing guidance.

After the shower has been used, inspect the niche base with a torch and moisture meter once the shower has run for 10 minutes. This isn't a substitute for proper testing or inspection, but it can reveal early ponding or dampness before the damage spreads.

Time, Cost, and When to Hire a Registered Builder

A single niche can be a compact job or a coordination problem disguised as a compact job. A preformed insert usually reduces shaping and internal detailing. A custom tile-in niche gives more control over the tile layout, shelf material and proportions, but it demands stronger framing and more careful waterproofing.

The following planning ranges apply to a Melbourne bathroom renovation in 2024 to 2025, as specified for this installation comparison:

Install Type Time Cost (AUD) Skill Required Builder Required?
Preformed niche, fully installed 6 to 10 hours across a tiler-and-waterproofer team over two days $650 to $1,400 Experienced tiling and waterproofing knowledge Depends on total domestic building scope and permits
Custom tile-in niche, excluding surrounding wall tiling 6 to 10 hours across a tiler-and-waterproofer team over two days $1,200 to $2,200 Framing, membrane application, tile layout and finishing Depends on total domestic building scope and permits
Owner-builder custom installation Two full weekends Costs depend on materials and hired trades Must understand membrane testing and AS 3740 data sheets Owner-builder requirements may apply

These figures cover the niche scope described, not the entire bathroom. Extra plumbing, structural alterations, demolition, screeding, wall tiling and screen installation can change the project total.

The Victorian threshold changes the responsible party

In Victoria, domestic building work where the total cost of labour and materials exceeds $10,000, or work that requires a permit regardless of cost, must be carried out by a registered builder approved before work starts. A homeowner may instead act as an owner-builder where the legal requirements and certificate of consent apply. That means a bathroom renovation can move beyond a simple tiler-and-waterproofer arrangement once the total contract includes other trades.

Waterproofing should be performed by a suitably certified applicator, with records and product data retained. If you can't read the AS 3740 data sheet or have never tested a membrane, the apparent saving from doing the detail yourself may not justify the repair risk.

For a coordinated bathroom renovation, Melbourne bathroom renovation specialists can be considered alongside independent tilers, plumbers, waterproofer teams and registered builders. Call a tiler for tile layout and finish, a waterproofer for membrane work and certification, and a registered builder when the overall scope or permit rules require one. An independent waterproofing inspector is useful when the substrate, membrane or sequencing is disputed before tiles conceal the work.

Quick Decision Framework and FAQs

A reliable decision can be made before ordering the niche. Confirm the wall depth, service routes and fall direction first. Then choose the system that gives the waterproofer a clear, continuous detail, rather than choosing a product only because its front edge looks neat.

A quick decision framework checklist for professional shower niche installation, highlighting five key steps for success.

Make the decision in this order

  1. Confirm the cavity: Check stud depth, framing strength and service routes before buying a preformed insert or cutting the wall.
  2. Set the drainage direction: Mark the shelf fall towards the shower and verify it with a spirit level.
  3. Choose the construction: Select a tile-in niche for custom proportions and tile control, or a preformed unit when a controlled, system-based installation is more suitable.
  4. Book the trades in sequence: Plumbing and framing come first, waterproofing follows the completed substrate, and tiling starts only after the membrane is ready.
  5. Check the legal scope: Use a registered builder when the domestic building work exceeds $10,000, or whenever a permit is required, as set out in the NCC wet-area provisions.

Common questions

What minimum cavity depth suits a 90 mm tile-in niche?
Allow the full wall cavity and lining build-up, not just the nominal stud dimension. Confirm the finished internal depth with the niche system and tile thickness before framing.

Does a preformed insert still need a full membrane behind it?
It still needs compliant integration with the wet-area waterproofing system. Seal flanges, junctions and penetrations as specified, and don't leave the surrounding wall membrane discontinuous.

What fall is acceptable inside the niche?
The niche base must fall at least 1:100 towards the shower under AS 3740:2021. The finished surface should drain without ponding.

Can an existing tiled wall be retrofitted?
Yes, but it means opening the wall, checking services and rebuilding the waterproofing detail. Removing only the tiles and inserting a box over the existing surface isn't a compliant shortcut.

Can waterproofing be inspected in Melbourne?
Arrange inspection through an appropriately qualified waterproofing practitioner or building professional, and confirm the individual's current Victorian registration or certification before work starts.


Melbourne Tiling Services P/L coordinates bathroom renovations, shower niche framing, waterproofing, screeding and detailed tiling across Melbourne and greater Victoria. Visit Melbourne Tiling Services P/L to discuss your niche layout, obtain a quote and organise the right sequence of registered builders and wet-area trades for the job.

How to Renovate a Bathroom: Step-by-Step Guide

Melbourne bathroom renovations commonly cost between $24,000 and $38,000, depending on scope, fixtures, and materials. That figure reflects a shift from cosmetic updates to regulated wet-area projects requiring compliant waterproofing and registered builders.

A bathroom renovation can look simple from the doorway, but the visible finishes are only the final layer of a coordinated construction job. Behind the tiles are framing decisions, plumbing connections, electrical work, substrate preparation, waterproofing membranes, drainage falls, inspections and carefully sealed penetrations. If any of those stages are rushed, a beautiful bathroom can still develop leaks, movement or expensive defects.

The safest way to understand how to renovate a bathroom is to treat it as a wet-area building project first and a design project second. The National Construction Code 2022 and Victorian Building Authority guidance set technical expectations that affect the demolition plan, materials, trade sequence and evidence you should retain.

Table of Contents

Starting Your Bathroom Renovation Project

A Melbourne homeowner might begin with a dated bathroom, a cracked grout line and a plan to replace the vanity. Once the first tile comes off, the situation can change quickly. The substrate may be damp, the floor may not drain correctly, the wall sheeting may be unsuitable, or an old shower penetration may have been sealed poorly.

That's why the published Melbourne renovation range of $24,000 to $38,000, and the Australian national median of about $30,000, should be treated as planning context rather than a guaranteed price. The final scope depends on the room's condition, fixture selection, tile specification, plumbing changes, electrical requirements, access and compliance work. These figures and the broader market context are reported in Australian bathroom renovation statistics and cost summaries.

Before demolition, record the existing room carefully. Photograph the floor, wall junctions, shower screen, penetrations, vanity connections and any staining. Check whether the bathroom sits over timber flooring, an upper-storey structure, a balcony-adjacent area or an apartment below another dwelling. Those conditions influence the level of substrate inspection and waterproofing detail required.

A bathroom under construction with framing visible, a bathtub, and Laticrete shower waterproofing membrane on the floor.

Define the work before demolition

A sound scope should identify:

  • Layout changes: Moving a toilet, shower or vanity can increase plumbing coordination and may affect structural or approval requirements.
  • Substrate condition: The builder needs to determine whether existing sheeting, framing and flooring can remain.
  • Wet-area boundaries: Shower zones, wall junctions and floor wastes require planned waterproofing, not improvised patching.
  • Finish level: Standard ceramic tiles, porcelain, marble and large-format products each require different handling and installation preparation.
  • Trade sequence: Carpenters, plumbers, electricians, waterproofers, tilers and shower-screen installers must work in a controlled order.

A written timeline helps you understand when the room will be unusable and when selections must be finalised. For a practical view of sequencing, use this Melbourne bathroom renovation timeline while discussing the project with your contractor.

Demolition also deserves its own allowance and method. Dust control, waste removal, protection of adjoining rooms and careful isolation of water and power all matter. A useful external reference is this guide to bathroom tear-out price ranges, but your contractor should still inspect the property before pricing demolition.

Practical rule: Don't approve demolition until the scope identifies what happens if concealed damage appears. A clear variation process is safer than arguing about unexpected work after the room is open.

The right starting point is an organised assessment, not a tile showroom visit. Decide what must be repaired, what can be retained and which improvements justify the cost before anyone starts stripping the room.

Planning, Budgeting, and Hiring Registered Builders

A bathroom budget is usually decided by what sits beneath the visible finishes. Waterproofing preparation, substrate repairs, drainage changes and tile installation can alter the cost more than the tiles themselves. Layout changes also affect several trades at once, so confirm the scope before choosing fixtures or approving a quote.

Build the budget around defined work packages. Allow for demolition, waste removal, carpentry, plumbing, electrical work, ventilation, fixtures, waterproofing, tiling and compliance documentation. Large-format or heavy tiles may require different substrate preparation and handling, while a new shower position can increase plumbing and floor-work requirements. Use the earlier Australian renovation market reporting as broad context, not as a substitute for a site-specific quote.

Build a quote that can be compared

Ask every contractor to separate labour and materials, then list demolition, substrate preparation, waterproofing, floor screeding, tiling, plumbing, electrical work, fixtures, shower-screen installation and waste removal. A low total may exclude the work that becomes visible only after finishes are removed.

A renovation calculator helps only when it reflects actual selections. Enter the tile size, material, pattern, vanity, tapware, shower configuration, toilet, lighting and ventilation. State whether the existing layout remains. Give each contractor the same written scope so allowances and exclusions can be compared properly.

Use this planning sequence:

  1. Inspect the existing room. Check moisture, movement, drainage, framing and access before pricing the work.
  2. Confirm the layout. Set fixture positions before plumbing rough-in and identify any structural or service constraints.
  3. Choose materials early. Tile thickness, format, weight and pattern affect preparation, handling and installation time.
  4. Confirm approvals. Ask which permits, certificates and inspections apply, and identify who is responsible for arranging them.
  5. Compare written quotes. Check exclusions, allowances, programme, payment stages and variation terms.
  6. Verify registration and insurance. Check the contracting entity and evidence directly rather than relying only on a trading name or online reviews.

A Renovation Budget and Builder Guide infographic listing three essential steps for home improvement projects.

Why registered builders matter

Victoria has a domestic builder licence specifically for bathroom, kitchen and laundry renovations. The Victorian Building Authority application requires industry qualifications, project-work evidence, a technical referee report, a criminal history check, photo identification and declarations. The VBA reviews the applicant's knowledge and experience, conducts a reference check and notifies the applicant of the result. The published application fee is $765.40 for an applicant not already registered in another domestic-building class, or $612.30 for someone already registered in another class, according to the VBA domestic builder application form.

For a homeowner, registration is one part of controlling project risk. Confirm who holds the contract, who coordinates licensed trades and who provides waterproofing records. A single renovation contractor can reduce handover problems when one team controls the sequence, although the contract must still identify each responsibility clearly.

Melbourne Tiling Services P/L describes a workflow involving licensed carpenters, plumbers, electricians, tilers and waterproofers. Other registered builders may organise their teams differently. Compare the actual contract, trade licences, insurance, inclusions and documentation rather than assuming every renovation package covers the same work.

Keep approvals, product information, invoices, certificates, photographs and variation records together. Collect them during the renovation, while each decision and concealed condition can still be verified.

Waterproofing Requirements and NCC 2022 Compliance

Waterproofing is the stage that separates a durable bathroom from a concealed defect waiting to spread. Tiles and grout don't form the waterproofing system. The membrane, compatible substrate, junction treatment, penetrations and drainage design must work together.

Under the National Construction Code 2022 wet-area rules, shower floors must be waterproofed. Wet-area walls must generally be waterproofed to at least 1,800 mm high, and where a floor waste is installed the floor must fall continuously at a minimum of 1:80 toward the waste. In Victoria, the VBA notes that compliance with Part 10.2 of the Housing Provisions or AS 3740 satisfies the wet-area performance requirement. The relevant requirements are set out in the Victorian Building Authority waterproofing and structural integrity guidance.

Follow the correct sequence

A practical workflow is:

  1. Strip out and inspect. Remove old finishes and check framing, flooring and wall sheeting.
  2. Correct the structure. Repair movement, replace damaged materials and make sure surfaces are suitable.
  3. Install compatible sheeting. Pay attention to corners, joints and plumbing penetrations.
  4. Set the falls. Form the drainage plane before applying the membrane, not after tiling.
  5. Apply the waterproofing system. Use the specified primer, membrane, bond breakers, corners and reinforcement.
  6. Allow the system to cure. Follow the product requirements and protect the surface from damage.
  7. Record inspection evidence. Photograph details and retain the relevant compliance documentation.
  8. Tile only after approval to proceed. Tiling can hide defects, so don't use it to cover uncertainty.

Victoria's current practice also creates a common trap in older bathrooms. The VBA material notes that particleboard is no longer permitted as part of the waterproofing system. If an older bathroom relies on particleboard in a way that conflicts with the current system, the builder should address it rather than coating over the problem.

A four-step infographic illustrating the professional pathway for achieving residential bathroom waterproofing compliance.

Inspect the details that fail first

Most waterproofing failures don't begin in the middle of an uninterrupted wall. They begin at floor-to-wall junctions, corners, pipe penetrations, wastes, shower screens and changes between materials. An unenclosed shower needs particular care, with waterproofing extending 1.5 m from the shower rose connection, according to the cited industry guidance on common failure points.

Upper-storey and timber-based floors deserve a higher level of scrutiny because movement can stress junctions and finishes. Wet rooms, balcony-adjacent bathrooms and leak-prone apartments may also justify a higher-spec waterproofing system. Australian pricing guides place standard full-bathroom waterproofing commonly around $800 to $1,800, while larger or more complex areas can reach $1,500 to $3,500 or more, depending on drainage integration, substrate correction and detailing. These ranges are discussed in Australian bathroom waterproofing cost guidance.

A failed wet area can require demolition beyond the original bathroom. Industry coverage citing Queensland warranty data places average bathroom-related rectification claims close to $25,000 when defects are finalised, although the figure relates to that specific data context rather than a guaranteed Victorian repair cost. The practical lesson is clear. Paying for proper preparation and evidence is often more economical than selecting the cheapest membrane application.

For Victorian projects, arrange the required inspection or compliance documentation before tiling begins. You can also review this resource on a Victorian bathroom waterproofing compliance certificate when deciding what records to request from your contractor.

Choosing Tiling Materials and Installation Methods

Tiling decisions affect waterproofing protection, cleaning, slip resistance, substrate preparation and the time required on site. The most expensive tile isn't automatically the most suitable, and the cheapest tile can become costly if its format or installation requirements don't match the room.

Ceramic tiles are often practical for walls and lighter-use applications. They're generally easier to cut than porcelain, which can simplify standard layouts. Porcelain is denser and commonly selected for floors or areas exposed to heavier use, but its hardness demands suitable blades, accurate setting out and an experienced installer. Marble gives a distinctive natural finish, yet it needs careful sealing, compatible cleaning products and a willingness to accept variation in colour and veining.

For a direct comparison of the first two options, use this guide to porcelain versus ceramic tiles.

Match the tile to the room

A compact bathroom with many corners, niches and penetrations can suit a smaller tile because the installer can form falls and manage cuts more easily. Large-format tiles reduce visual joints, but they need a flatter substrate and careful handling. A large sheet can highlight a hump or hollow that a smaller tile might bridge.

Kerlite and similar large-format products can create a clean interior finish and may also suit exterior applications, but the installation method must be planned around handling, adhesive coverage, substrate flatness and cutting. Don't choose a large-format product until the tiler has checked access, wall strength, sheet dimensions and the available lifting method.

Screeding and self-levelling

A bathroom floor should not be assumed to be level just because it looks flat. A shower or wet-room floor needs a controlled fall to the waste, while the surrounding floor may require screeding or self-levelling to provide a stable, tile-ready surface.

These methods aren't interchangeable:

  • Screeding: Builds or shapes a cementitious surface, including designed falls where required.
  • Self-levelling: Corrects suitable unevenness where a level substrate is the objective, but it isn't a substitute for a designed shower fall.
  • Adhesive adjustment: Can accommodate limited variation, but shouldn't be used to conceal major substrate defects.

A professional tiler checks the surface with straightedges, confirms set-out lines and plans cuts before spreading adhesive. The result should place cuts in discreet locations, keep grout lines consistent and avoid narrow slivers around walls or fixtures.

DIY or professional installation

DIY tiling may work for a dry splashback or a straightforward wall, provided the substrate and waterproofing have already been correctly prepared. A full bathroom is less forgiving. Falls, penetrations, heavy porcelain, niches, mitres, movement joints and the relationship between tiles and shower screens all require precision.

Custom patterns can justify additional labour when they support the design, but a simple stacked or brick layout may deliver a cleaner result with fewer complications. Discuss the pattern before ordering, because wastage, batch consistency and tile availability affect the finished appearance.

Frameless shower screens also need accurate walls, stable fixings and properly sealed penetrations. The screen doesn't repair a defective waterproofing system. It must be installed after the tiled surfaces are ready, with fixings positioned so they don't compromise the wet-area detailing.

Finishing Touches and Fixture Selection

Fixtures should be selected for the way the room will be used, not only for showroom appeal. Tapware, vanity hardware, lighting, storage and ventilation all need to work with the tile layout and waterproofing details.

Choose tapware with replacement parts and finishes that suit regular cleaning. Chrome remains practical because damage is easier to identify, while coloured and brushed finishes can require more careful product selection and maintenance. Before the plumber closes walls, confirm the spout reach, handle position, outlet height and compatibility between the rough-in and the selected trim.

For a useful reference on planning the final connections, review these installation tips for water taps. The installer should also test every connection before cabinetry, mirrors and screens conceal access.

A close up view of a person hand adjusting a chrome shower handle in a modern bathroom.

Select finishes that tolerate daily use

A vanity needs sufficient clearance for doors, drawers, plumbing and cleaning. Wall-hung units can make the floor easier to clean, but the wall structure and fixing method must support the load. Open shelving looks light, though it exposes clutter and requires more frequent cleaning.

Lighting should provide even task light at the mirror without creating glare. Electrical work belongs with the licensed electrician, particularly around wet zones, switches, exhaust fans and heated elements. Ventilation needs to discharge appropriately and should be coordinated before the ceiling is closed.

For floors, prioritise a surface that provides suitable grip in wet conditions. A polished stone or glossy tile may look attractive, but it can be a poor choice where water regularly sits. Ask the tiler about the product's intended application and cleaning requirements rather than relying on appearance alone.

Complete a deliberate handover

Before the shower screen is installed, inspect grout lines, tile edges, silicone joints, wastes, floor falls and fixture alignment. After installation, operate every tap, flush the toilet, run the shower and check that water reaches the waste without ponding.

Seal penetrations carefully. Screen fixings, tap outlets, shower arms, vanity plumbing and accessories can all create entry points if installers drill without coordinating with the waterproofing system.

A proper handover should include care instructions, product details, compliance evidence, photographs where available and a written list of touch-ups. Small defects are easier to correct before the trades leave and before cabinetry, mirrors and personal items fill the room.

Bathroom Renovation Checklist for Homeowners

Use this checklist before approving work, during construction and at handover.

Before work starts

  • Define the scope: Record the layout, fixtures, tile formats, storage, lighting, ventilation and screen design.
  • Inspect the existing room: Look for dampness, movement, damaged framing, unsuitable sheeting and drainage problems.
  • Confirm approvals: Ask the registered builder which permits, inspections and certificates apply to the project.
  • Compare written quotes: Check inclusions, exclusions, allowances, waste removal, programme and variation procedures.
  • Verify the team: Confirm the builder's registration and identify the licensed trades responsible for plumbing, electrical, carpentry and waterproofing.
  • Order carefully: Check tile batches, quantities, trims, wastes, tapware and screen measurements before the work begins.

During construction

  • Protect the substrate: Don't allow tiling to cover damaged or unstable surfaces.
  • Set drainage falls first: Confirm the shower and floor-waste arrangement before membrane application.
  • Inspect waterproofing: Check wall coverage, junctions, corners, penetrations and the shower's unenclosed protection zone.
  • Retain evidence: Keep photographs, product information, inspection records and compliance documents.
  • Coordinate the trades: Make sure plumbing and electrical rough-ins are tested before walls and ceilings are closed.

Before final payment

  • Test drainage: Run water through the shower and confirm it travels to the waste without persistent ponding.
  • Check finishes: Inspect grout, silicone, tile alignment, cuts, screen seals, cabinetry and tapware.
  • Test fixtures: Operate taps, shower controls, toilet, exhaust fan, lighting and storage hardware.
  • Request handover records: Collect warranties, care instructions, certificates and agreed rectification notes.
  • Plan the move back in: Protect new surfaces and organise belongings with practical stress-free moving tips for Melbourne.

The central lesson is simple. A reliable bathroom renovation depends less on choosing the trendiest tile than on controlling the sequence from inspection to handover. Registered builders and qualified trades should be able to explain what they're installing, why it complies and what evidence you'll receive when the work is complete.


Melbourne Tiling Services P/L offers start-to-finish bathroom and ensuite renovations, waterproofing, screeding, self-levelling, porcelain, ceramic and marble tiling, large-format Kerlite installation and frameless shower-screen installation across Melbourne and greater Victoria. To discuss your layout, materials and compliance requirements or request a quote, visit Melbourne Tiling Services P/L.

Floor Slope for Drainage: Australian Guide 2026

You've chosen the tiles, ordered the frameless screen and perhaps even removed the old vanity. Then the shower is used for the first time, and water sits along the wall instead of travelling cleanly to the waste. The finish may look expensive, but the floor slope for drainage was decided too late.

That problem is common in Melbourne bathroom renovations, especially where an older timber floor, shallow setdown or poorly positioned waste leaves little room for a compliant screed. A drainage fall isn't a cosmetic detail. It affects waterproofing, tile installation, thresholds, accessibility and the protection of the building below. The correct fall must be planned before demolition and coordinated between the builder, plumber, waterproofing contractor and tiler.

Table of Contents

Why Floor Slope for Drainage Matters in Australian Bathrooms

Ponding water is the visible warning. The less obvious risk is where that water goes afterwards. If a bathroom floor doesn't drain properly, repeated wetting can place pressure on junctions, penetrations and waterproofing details. In timber homes, a poorly resolved wet area can also expose the subfloor and adjoining structure to ongoing moisture.

Australian site drainage has long followed the same basic principle. External surfaces around a slab must grade away from the building, with a minimum fall of 25 mm over the first metre in low-rainfall areas for reasonably impermeable surfaces, or 50 mm over the first metre in other cases, as set out in the NCC Housing Provisions drainage requirements. Those gradients equal 2.5% and 5%, respectively. Internal wet areas apply their own requirements, but the principle is identical: water needs a deliberate path to a waste or away from the building.

Water leaking onto the bathroom floor from a glass shower enclosure indicating a potential drainage failure.

Why Melbourne retrofits are difficult

New construction gives the plumber and builder more control over the waste location, slab recess and finished floor level. A retrofit often gives you an existing slab or timber structure, a fixed bathroom doorway and a waste that sits too far from the shower's lowest point. Raising the floor can create a step into the hallway. Lowering the structure may involve carpentry, structural assessment and changes to plumbing connections.

A standard rule such as “use 1:80” doesn't solve those constraints on its own. The team must calculate the distance from the furthest wet point to the waste, establish the finished tile level, allow for adhesive and tiles, then check that the membrane and substrate can be formed without creating a thin or unstable edge.

Practical rule: Set the waste position and finished floor levels before the screed is ordered. A tile can hide a minor visual irregularity, but it can't correct a missing drainage path.

The same coordination matters in balconies and leak remediation. A balcony may appear reasonably level while still directing water towards a door or wall junction. A bathroom renovation should therefore begin with levels, not tile selection. Take measurements, locate the waste, inspect the substrate and decide whether the proposed shower is enclosed, hobless or accessible before any surface is removed.

Understanding Fall Ratios and Percentage Calculations

A fall ratio describes the drop over a horizontal distance. A 1:80 fall drops one unit for every 80 units travelled, so a 1,200 mm shower run requires a 15 mm drop, while a 900 mm run requires 11.25 mm. The same 1:80 gradient equals 12.5 mm per metre, or 1.25%, according to the Australian wet-area guidance discussed by Wyatt Tiling in its explanation of getting levels right.

The common conversions are straightforward:

  • 1:100 equals 10 mm per metre, or a 1% fall.
  • 1:80 equals 12.5 mm per metre, or a 1.25% fall.
  • 1:60 equals approximately 16.7 mm per metre.
  • 1:50 equals 20 mm per metre, or a 2% fall.

Worked shower examples

For a 900 mm by 900 mm shower, measure from the furthest corner to the waste, not just across one tile. If the waste is positioned centrally, each corner may need a compound fall. A 1:80 calculation over 900 mm gives an 11.25 mm difference. At 1:60, the difference is 15 mm, and at 1:50 it is 18 mm.

A 1,500 mm-wide walk-in shower needs more depth because the water travels further. At 1:80, the required drop is 18.75 mm. At 1:60, it's 25 mm. At 1:50, it's 30 mm. Those figures affect the screed edge, drain channel height, waterproofing details and the transition into the rest of the bathroom.

Shower Dimension 1:80 Fall (mm) 1:60 Fall (mm) 1:50 Fall (mm) Percentage Equivalent
900 mm 11.25 15 18 1.25% to 2%
1,200 mm 15 20 24 1.25% to 2%
1,500 mm 18.75 25 30 1.25% to 2%

The table shows why a longer shower run can change the construction method. If the waste is 25 mm below the finished tile height, the available screed depth must account for the calculated drop as well as the tile and adhesive build-up. A laser level is useful before demolition because it identifies the existing high and low points, while a straight edge helps expose local depressions that an average reading can miss. Practical tile screeding guidance is valuable here, particularly when the shower requires several planes directing water towards one drain.

A balcony or large bathroom floor must be assessed in the same way. Measure the longest drainage route and check the proposed gradient at every edge. A single flat plane may work towards a linear drain, but a central waste usually needs a compound fall. A 1:100 fall can be acceptable in some general wet-area situations, yet it leaves less tolerance for surface irregularities, tile lippage and construction debris than a faster fall.

Australian Code Requirements for Different Wet Areas

Wet-area drainage isn't governed by one universal number. The correct gradient depends on the shower arrangement, the presence of a floor waste, the finished surface and whether the design must accommodate accessibility. The NCC 2022 Housing Provisions require wet areas with a floor waste to be graded so water can drain, while Australian waterproofing guidance aligned with AS 3740:2021 distinguishes between substrate falls and finished surface falls.

For a substrate beneath a membrane, the minimum fall towards a waste is 1:100 where a waste is provided. Finished shower floors generally need a steeper fall. The technical distinction matters because a membrane substrate that ponds can hold moisture beneath the finished layer, while a finished tile surface that drains slowly can affect hygiene, slip resistance and adjacent building elements. The Stormtech technical whitepaper on wet-area drainage explains this relationship between substrate and finished falls.

Three common Australian arrangements

An enclosed shower recess with a hob can retain water within the shower zone, giving the installer a clear boundary and a shorter path to the waste. A hobless shower removes that physical barrier, so the fall, drain position and waterproofing detailing must work together. A linear drain at the shower edge changes the geometry because the floor can fall in one primary direction instead of forming multiple planes towards a central grate.

Accessible and zero-threshold showers require more careful coordination. Victorian guidance notes a continuous fall between 1:80 and 1:50 where a floor waste is installed, while accessible configurations may use 1:60 to 1:80 inside the shower and 1:80 to 1:100 elsewhere. That range reflects a trade-off. The surface must drain, but the surrounding floor also needs to remain suitable for movement and entry.

A chart showing Australian building code requirements for minimum floor drainage slopes in various wet areas.

An external balcony or verandah needs a drainage strategy that protects the building envelope, not just the visible finish. The relevant waterproofing design must account for falls, membrane detailing, door thresholds, overflow paths and junctions. A laundry may need a less aggressive general floor fall than a shower, but the waste position still needs to support practical drainage.

Grate size doesn't replace a correctly formed fall. A larger waste may receive water more easily, but it won't correct a low spot several hundred millimetres away. In a Melbourne renovation, the builder and tiler should also confirm whether the work requires a building permit or triggers other upgrade obligations. Don't assume that a generic diagram or a tile manufacturer's installation note settles the compliance question. The wet-area classification, drain arrangement and accessibility brief must be resolved as one design.

For detailed membrane sequencing and junction treatment, the wet-area waterproofing service guidance can help homeowners understand what should be coordinated before tiling begins.

Construction Methods to Achieve Correct Falls

The construction method determines how much control the installer has over the fall. Traditional sand-cement screeding remains flexible, especially when an existing Melbourne bathroom has an unusual shape or an off-centre waste. Preformed bases offer repeatable geometry. Self-levelling compounds are useful for correction, but the name is misleading when the objective is a directional slope.

Traditional screeding

A skilled tiler can shape a sand-cement screed from the perimeter towards a grate or channel, forming the compound planes needed around a central waste. The method suits custom shower footprints and allows the installer to adjust the build-up around existing levels. Its weakness is workmanship. A screed can appear smooth under a straight edge yet retain a shallow depression that collects water after the tiles are installed.

Preformed shower bases

Preformed systems from manufacturers such as Wedi or Tile Redi provide a manufactured fall and can simplify waterproofing integration. They're useful where the drain position matches the base and the finished height can be coordinated early. The limitations are equally clear. The base dimensions may restrict the layout, the waste must align accurately, and large-format tile layouts may need careful cutting around the formed geometry.

Self-levelling compounds

Self-levelling products can correct minor variations over a sound substrate, but they naturally seek a level surface. They aren't a substitute for a formed screed where water must travel consistently to a waste. Product compatibility, primer selection and waterproofing requirements must be checked before application, particularly where underfloor heating is present.

Method Typical Fall Achieved Setup Time Best For Key Limitation
Sand-cement screed Custom falls from 1:100 to steeper shower gradients Depends on site preparation and curing Irregular layouts and retrofit bathrooms Relies heavily on installer skill
Preformed shower base Factory-formed directional fall Faster once levels and waste are ready Standardised shower footprints Limited by base geometry and drain alignment
Self-levelling compound Minor substrate correction Relatively quick preparation Localised surface irregularities Doesn't reliably create a drainage fall by itself

Screed depth also controls the doorway. If the bathroom floor rises too far, the threshold can become a trip point. If the screed is forced too thin near an edge, cracking or debonding can follow. The plumber, builder and tiler should agree on waste height, setdown and finished tile level before the screed is mixed.

The same principle applies to external slabs and shed surrounds. A practical drainage guide by Firm Foundations is useful background when considering how a hard surface should shed water away from a structure. It reinforces a point that applies indoors too: drainage has to be built into the supporting surface, not painted onto the finish.

When Steeper Falls Create More Problems Than They Solve

A steeper fall can clear water faster, but more slope isn't automatically better. Australian wet-area guidance uses a range from 1:80 to 1:50 for relevant shower floors with a waste, while a substrate fall of 1:100 may apply beneath a membrane in the circumstances described by AS 3740:2021-aligned waterproofing guidance. The installer still has to keep the surface usable, tileable and compatible with the room's access requirements.

Large-format tiles expose poor geometry quickly. When a broad tile crosses several changing planes, the edges can sit at visibly different heights. That can create lippage, uneven adhesive coverage and awkward cuts around a central waste. Small-format mosaics often follow compound falls more easily, while a large porcelain panel needs a much more deliberate layout.

An infographic comparing the pros and cons of implementing steeper drainage falls in floor construction projects.

The accessibility trade-off

A zero-threshold shower has no raised hob to contain water, so the floor must transition smoothly into the surrounding bathroom. An aggressive fall can create a noticeable slope outside the shower, especially when the existing floor envelope is shallow. That may conflict with accessible movement requirements and make the entry uncomfortable or unsafe for someone using mobility equipment.

Water can also bypass a waste if the installer creates the wrong high point. A floor that looks steep overall may still direct water towards a wall, door or screen rather than the grate. This is why the drain position matters as much as the ratio. A laser level, straight edge and test pour before the membrane and tile installation can identify the problem while correction remains practical.

A useful fall is the one that takes water to the waste without making the room difficult to enter, tile or maintain.

Steeper isn't a cure for a misplaced waste, a blocked grate or a poorly detailed membrane. In many retrofits, a carefully designed 1:80 shower fall with a suitable linear drain performs better than a dramatic gradient forced into the wrong layout.

Why Registered Builders Matter for Bathroom Renovations

Floor slope for drainage sits inside a larger construction system. The builder must coordinate structural work, plumbing penetrations, waterproofing, falls, thresholds and finishes. Treating the task as a tiling-only decision is how retrofit problems become expensive.

In Victoria, a person must be registered with the Building and Plumbing Commission before performing domestic building work valued above $10,000, and registration applies to the individual rather than the company, as explained in the Victorian registration guidance. Bathroom projects that combine demolition, carpentry, plumbing, waterproofing, electrical work and tiling can require registration even where an individual trade might otherwise fall within a single-trade exception.

Victoria also has a specific Domestic Builder, limited to bathroom, kitchen and laundry renovation registration category. Applicants for that category must provide qualifications, evidence of project work, a technical referee report, a criminal history check, photo identification and declarations, according to the BPC registration application.

What to check before signing

Start with the individual's registration details, not just the trading name on a van or website. The Victorian consumer guidance on builders and tradespeople explains that single-trade exceptions can include tiling, plumbing, painting, glazing and electrical work, but a combined renovation or work requiring a building permit changes the position.

Ask for a written scope that identifies who is responsible for:

  • Level verification: Existing slab, timber floor and threshold measurements.
  • Drainage design: Waste location, fall direction and overflow considerations.
  • Waterproofing: Membrane system, substrate preparation and inspection points.
  • Trade coordination: Plumbing, carpentry, electrical, screeding and tiling sequence.
  • Documentation: Registration, insurance and relevant compliance certificates.

A registered practitioner isn't automatically a skilled wet-area installer, so check previous bathroom and leak-remediation work as well. Melbourne Tiling Services P/L coordinates bathroom renovations, waterproofing, screeding, self-levelling and tiling with other licensed trades, which is one model for managing the interfaces that determine whether a drainage fall works in practice.

A checklist infographic titled Choosing a Registered Builder for Victorian Renovations with five important professional steps.

Planning Your Drainage Strategy from Start to Finish

A reliable drainage plan follows the construction sequence, not the tile catalogue.

  1. Classify the wet area. Decide whether the project includes an enclosed shower, hobless shower, accessible bathroom, balcony, laundry or another wet-area arrangement.
  2. Map the levels. Locate the waste, measure the longest drainage path and record the existing floor, doorway and adjoining room levels.
  3. Choose the build-up. Compare a formed screed, preformed base or corrective compound against the available depth and chosen tile format.
  4. Coordinate the trades. Confirm plumbing heights before screeding, then schedule waterproofing and inspection hold points before adhesive and tiles conceal the substrate.
  5. Check the paperwork. Verify the builder's registration, contract scope, waterproofing system and any permit or certificate requirements.

For a new build, the plumber can position the waste while the slab and setdown are still adjustable. For a retrofit, the solution may involve a recessed substrate, a linear drain, a smaller shower footprint or a carefully designed threshold. If the property has an active leak or uncertain external drainage, a resource such as emergency drainage help from EZ Plumbing can help frame the broader drainage investigation.

Before tiles arrive, confirm the membrane manufacturer's compatibility with the selected substrate and screed method. A documented drainage system installation sequence also gives the homeowner a clearer record of what was formed, tested and covered.


Melbourne Tiling Services P/L can assess existing levels, design practical shower falls, complete waterproofing and screeding, and coordinate the tiling sequence for bathroom renovations across Melbourne. Visit Melbourne Tiling Services P/L to arrange a quote and discuss whether your project needs a standard shower fall, a zero-threshold solution or leak remediation.