Leaking Balcony Repairs in Melbourne: What Actually Works

102 buildings in Victoria had defective balconies, and 79 of those buildings had water ingress as the primary cause. A proper fix is therefore a waterproofing system job, not a quick layer of grout over the tiles.

You notice it after a Melbourne downpour. A yellow-brown stain spreads across the lounge ceiling below the upstairs balcony, or a soft patch appears beside the sliding door threshold. The grout looks tired, one tile has cracked, and the first quote suggests resealing the surface.

That quote may be treating the symptom, not the leak.

A balcony works as a connected system. The structural slab, screed falls, drainage outlet, waterproof membrane, wall upstands, door thresholds, balustrade penetrations and tiled finish all have to work together. If one link fails, water takes the easiest path, often into the room below.

The right leaking balcony repairs begin with finding that path. Then the builder chooses the smallest repair that fully restores the system.

Table of Contents

Why a Leaking Balcony Is Never Just a Tile Problem

After a Melbourne downpour, a brown ceiling stain appears below the balcony. The grout looks worn, one tile is cracked, and a quick quote recommends resealing the surface. That approach often treats the evidence, not the source.

The tile finish is only the top layer. A balcony depends on the concrete slab, screed falls, waterproof membrane, drainage outlet, movement joints, wall upstands, balustrade penetrations and door threshold working as one system. Water follows the easiest route through a failed junction, poor fall or damaged membrane, then shows up somewhere below.

Victorian defect analysis links balcony failures strongly with water ingress, particularly where waterproofing or workmanship is inadequate (Victorian balcony waterproofing defect analysis). VBA research into apartment balconies also found water ingress was the dominant defect cause, mainly through insufficient waterproofing or poor workmanship. A cracked tile can be part of the problem, but replacing it does not restore the waterproofing system.

What the surface is telling you

Read the pattern across the balcony and the room below, rather than chasing one mark.

  • Bubbling paint or plaster below: Moisture has reached the ceiling lining or wall finish.
  • Efflorescence: White salts around grout or masonry show moisture moving through the build-up.
  • Mould at the threshold: Water may be crossing the junction between the balcony and internal floor.
  • Rust staining: Balustrade fixings or embedded steel may be exposed to ongoing moisture.
  • Cracked or drummy tiles: The tile bed may have lost adhesion or be moving over a compromised substrate.
  • Ponding: The fall, drain or outlet arrangement is not removing water properly.

The repair must match the evidence. If testing confirms a localised seal failure and the membrane and substrate remain sound, a targeted repair can be appropriate. If the membrane has failed or moisture is reaching structural elements, regrouting is a patch job that delays the proper work.

Victoria also has a regulatory boundary. Before accepting a repair scope, confirm whether the work requires a registered builder under VBA requirements, including the applicable building work value threshold. The contractor should explain who is responsible for the waterproofing, structural assessment, permits and sign-off.

For a broader first response to water entering a property, owners can review Total Plumbing leak solutions, particularly where plumbing may be contributing to the leak.

Practical rule: If the quote names tiles and grout but ignores the membrane, falls, drainage and junctions, it is not a proper balcony waterproofing scope.

The Four Real Causes of Balcony Leaks in Melbourne Homes

Victorian defect findings point to waterproofing failures, rather than tiles alone, as a dominant cause of balcony leaks (Victorian defect findings). Four failure patterns appear repeatedly across Melbourne homes and apartment buildings.

1. Failed waterproof membrane

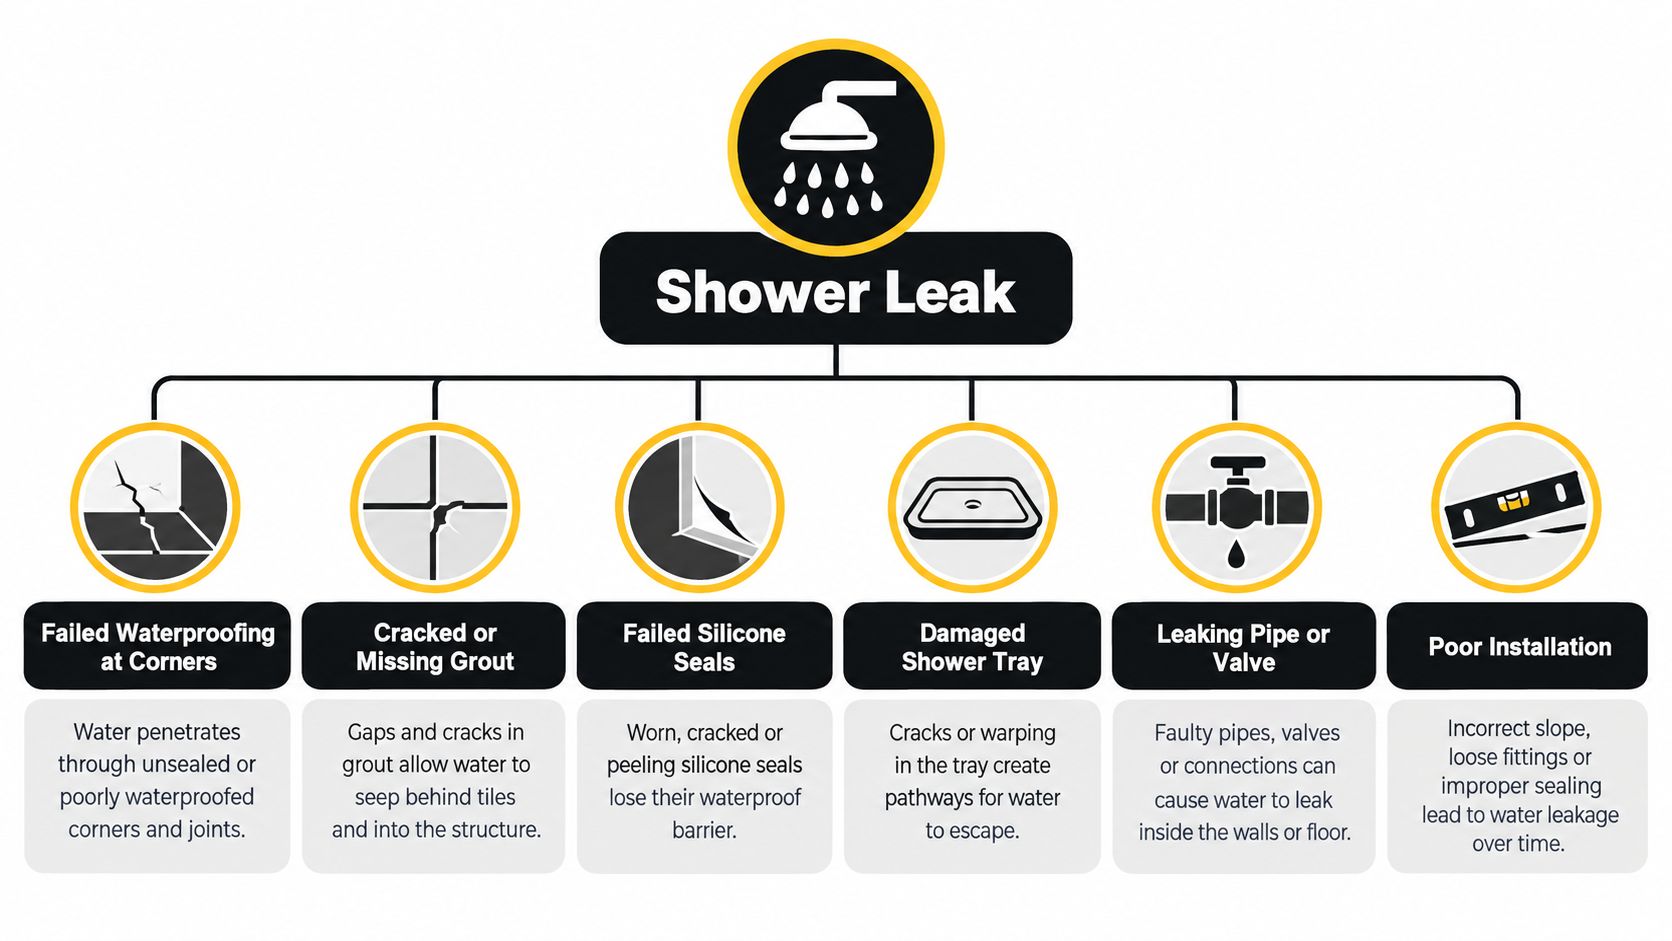
The membrane may be cracked, detached, poorly joined or incompatible with movement in the substrate. Weather exposure and building movement can contribute, but poor installation is a common reason for early failure. Once the membrane stops bridging joints or sealing penetrations, clear sealer over the tiles will not restore the system.

A membrane failure often sits below an otherwise tidy tiled surface. That is why a balcony repair must assess the full waterproofing build-up, not just the finish visible from above.

2. Incorrect fall and ponding

A balcony needs a reliable path to its drain. If the screed is flat, dips around the outlet or falls back towards the building, water stays at weak points and places continuing pressure on joints and junctions. Older tiled balconies, resurfaced decks and areas beside planter boxes commonly develop this problem.

Correcting the fall may require removing the surface and rebuilding the screed. Regrouting does not change the direction of water.

3. Defective junction detailing

Wall upstands, door thresholds, parapets, balustrade posts and pipe penetrations are frequent breakdown points. The membrane may remain sound across the open floor while the edge transition leaks because it was poorly formed, inadequately sealed or punctured by a fixing.

These details connect the balcony to the rest of the building envelope. A repair that ignores them can leave water travelling into the slab, wall or internal floor.

4. Blocked or badly arranged drainage

Leaves, dirt and construction debris can block an outlet. Drainage also fails when the outlet sits too high, the puddle flange is missing or no suitable overflow path exists. Water then seeks another route through the slab, wall or threshold.

Clearing debris may solve a maintenance problem. It will not correct a drain that was installed at the wrong level or lacks the detailing needed to control overflow.

Victorian balcony leakage research identifies common leak locations including pipe penetrations and floor traps, construction joints, cracks, and porous internal walls and slabs (Victorian balcony leakage research). General guidance on how to waterproof your house can explain the principles, but balcony repairs still require a site-specific scope.

Cause Typical signs Common in Patch fix possible?
Failed membrane Damp ceiling, peeling finishes, recurring leaks after rain Ageing tiled balconies and apartment terraces Only if testing proves the failure is localised
Poor fall Persistent puddles, staining near the building edge or door Older balconies and poorly resurfaced decks Usually requires screed correction
Junction failure Leaks near thresholds, walls, parapets or balustrade fixings Apartments, planter-box edges and exposed thresholds Sometimes, if the membrane remains sound
Drainage failure Slow drainage, blocked outlet, water collecting around the drain Balconies with debris, high outlets or inadequate overflows Drain clearing may help, but defective drainage needs rebuilding

How a Tradesperson Diagnoses the Leak Before Touching a Tile

A proper assessment doesn't start with a price for retiling. It starts with evidence.

The first visit should include a visual inspection of the balcony and the area beneath it. The tradesperson checks cracked tiles, deteriorated grout, failed silicone at the wall, ponding marks, rust around balustrade fixings and staining on the underside. They also inspect the door threshold, wall junctions, drains and any penetrations that pass through the surface.

Next comes moisture mapping. A non-invasive moisture meter helps identify where saturation is concentrated around the threshold, internal walls and ceiling below. It won't identify every leak by itself, but it helps separate a damp-looking finish from a wet building element.
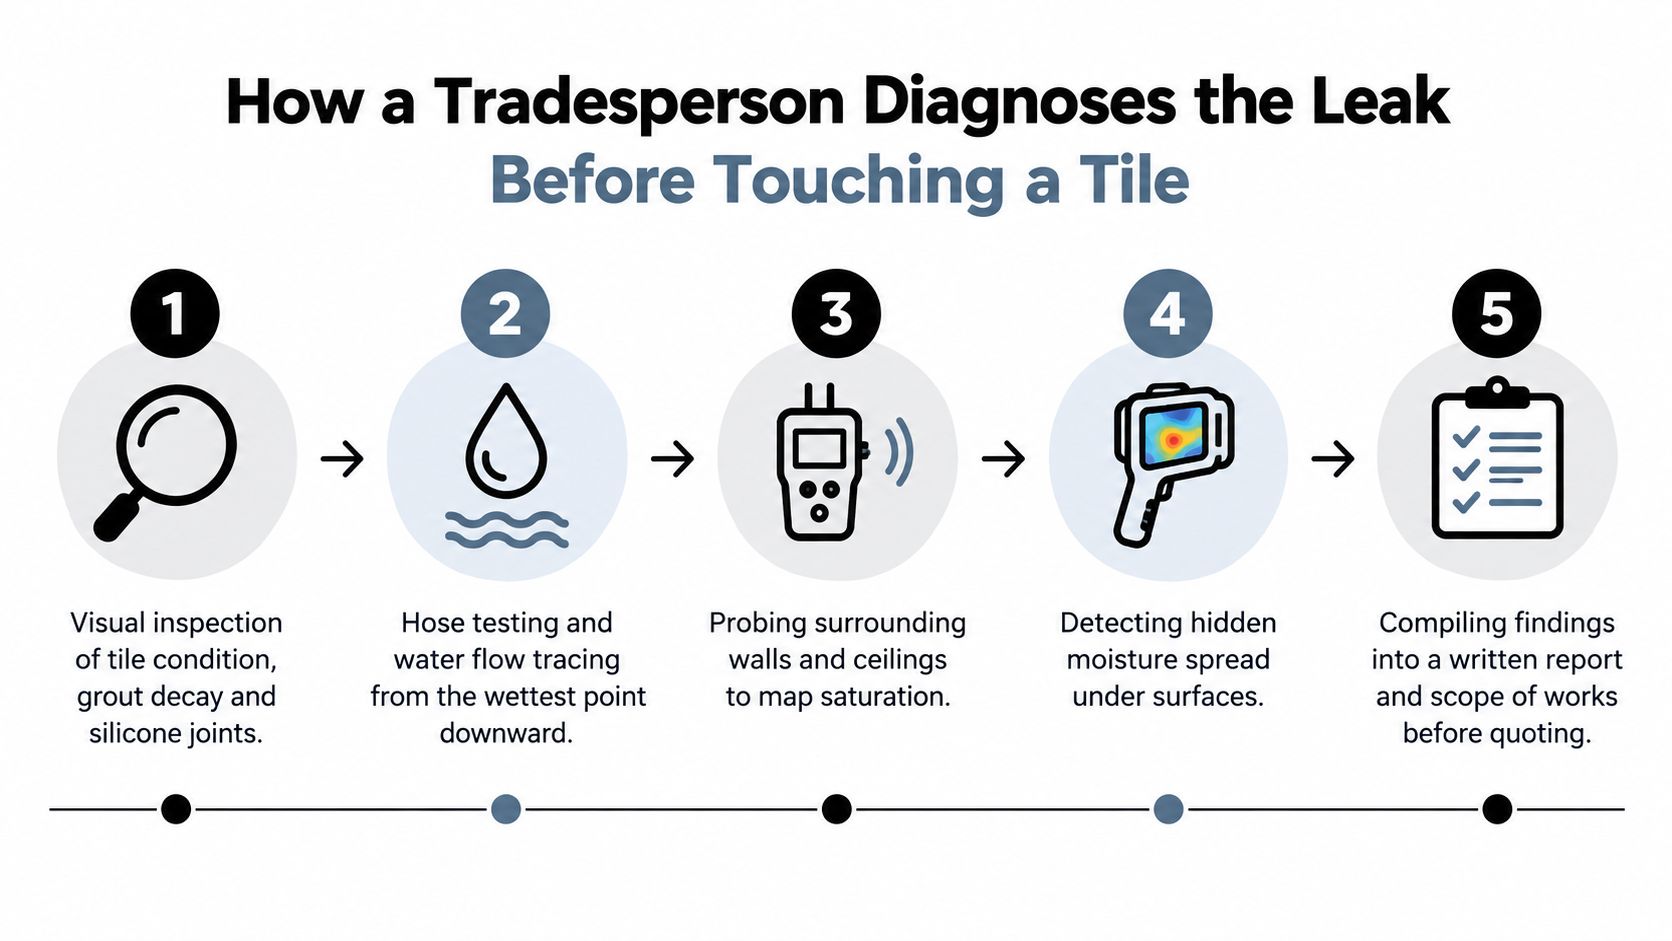
A five-step infographic showing how a professional tradesperson diagnoses a leak before repairing tiles.

Testing the suspected path

A hose test can isolate a threshold, drain, wall junction or balustrade penetration. The operator wets one zone at a time and watches the ceiling, wall or moisture readings below. This is more useful than hosing the entire balcony and then guessing.

Where the construction and access allow it, a controlled flood test checks whether the waterproofing layer holds water. The balcony is isolated, water is introduced in a controlled way, and the area below is monitored. The test must be planned carefully around the building structure, drainage and apartment rules.

For complex apartment work, building managers may need a specialist who can detect leaks in multifamily buildings, especially where water may be moving between several units or common-property elements. A specialist can also use thermal imaging or other non-invasive methods to map hidden spread, but those tools support diagnosis rather than replace sound building judgement.

Ask for photographs, written findings and a scope that identifies the suspected membrane condition, falls, outlet arrangement and junction defects. A ten-minute quote that lists “remove and replace tiles” isn't a diagnosis.

For a Melbourne-specific starting point, property owners can also review balcony leak detection services and compare what the inspection includes.

Repair Options That Fix the Source of the Leak

The correct repair follows the failure, not the finish. A balcony that leaks through cracked grout may need only local reinstatement, while a failed waterproofing system requires demolition and rebuilding. A surface sealer is not a universal fix. It can hide water entry while the slab, edges or room below continue to suffer.

Full membrane replacement

If testing shows membrane failure across the balcony, remove the tiles and screed, expose and prepare the substrate, install a compatible membrane system, then rebuild the finish. External balcony waterproofing repairs must align with AS 4654.2, with materials suited to the substrate and building movement. The Victorian Building Authority guidance on water ingress treats water management as a connected system, not a tile-surface problem.

Before accepting the quote, ask whether the scope crosses the Victorian threshold requiring a registered builder or building practitioner. The contractor should identify who holds responsibility for the work and approvals.

Screed correction

If the membrane remains sound but water ponds because the falls are wrong, reshape or replace the screed. The repair must maintain correct falls to the outlet and include sound detailing at thresholds, edges and junctions. Laying new tiles over a flat or uneven surface only creates a cleaner-looking leak.

Drain and flashing work

A leaking drain, missing puddle flange, failed flashing or poor threshold transition needs detail work, not grout. The repair may require correcting the outlet, restoring membrane continuity and sealing the junction so water has a controlled route away from the building. The drain and surrounding membrane must work together.

Partial tile and grout reinstatement

Use a partial repair only when testing confirms that the membrane and substrate are dry and sound, and the defect is localised. Epoxy grout can help because it is non-porous and water-resistant. The leaking balcony repair guidance also notes that tiles can sometimes remain when the underlying conditions support that approach.

Silicone, regrouting and clear sealers close visible gaps, but they do not correct ponding, a missing membrane upturn or a drain positioned above the waterproofing layer. If the system beneath is wet, a coating can conceal the evidence while damage continues.

Repair option Best for What drives the cost Expected lifespan
Membrane replacement Broad membrane failure or recurring ingress Demolition scope, access, substrate repairs and the specified system Installation quality, system and maintenance
Screed correction Ponding with a sound waterproofing layer Removal, access, new falls, drainage and finish Rebuilt system and ongoing maintenance
Drain and flashing correction Outlet, threshold, penetration or junction leaks Number, condition and complexity of details Compliant detailing and workmanship
Partial tile and grout reinstatement Localised failure over a dry, sound system Area of removal, matching finish and access Condition of the membrane below

Review balcony waterproofing membrane installation when comparing membrane scopes, but use a site inspection to decide which repair applies.

What a Proper Balcony Repair Looks Like Step by Step

A sound repair has a visible sequence. If the contractor can't explain what happens beneath the tiles, you're not being given enough information to approve the work.

The job starts with protection. Internal floors, doorways and adjacent balconies need covering, and apartment projects require a plan for debris, access and communication with occupants. Demolition then removes tiles and screed carefully enough to expose the slab without damaging adjoining finishes or drainage components.

Preparing the structure

Once the substrate is open, the builder checks for cracking, spalling, contamination and areas that won't accept the new system. Concrete repairs happen before priming. A new outlet, puddle flange, flashing or edge detail must be installed while the membrane junctions are accessible.

The membrane system is selected for the substrate and movement conditions. Primer, reinforcement at joints and the specified membrane coats are applied in accordance with the system requirements, with each layer allowed to cure. The VBA describes balcony waterproofing as a system involving substrate, falls, drainage, membranes, toppings, finishes and junction detailing, rather than a product brushed onto a tile surface (VBA balcony leakage research).
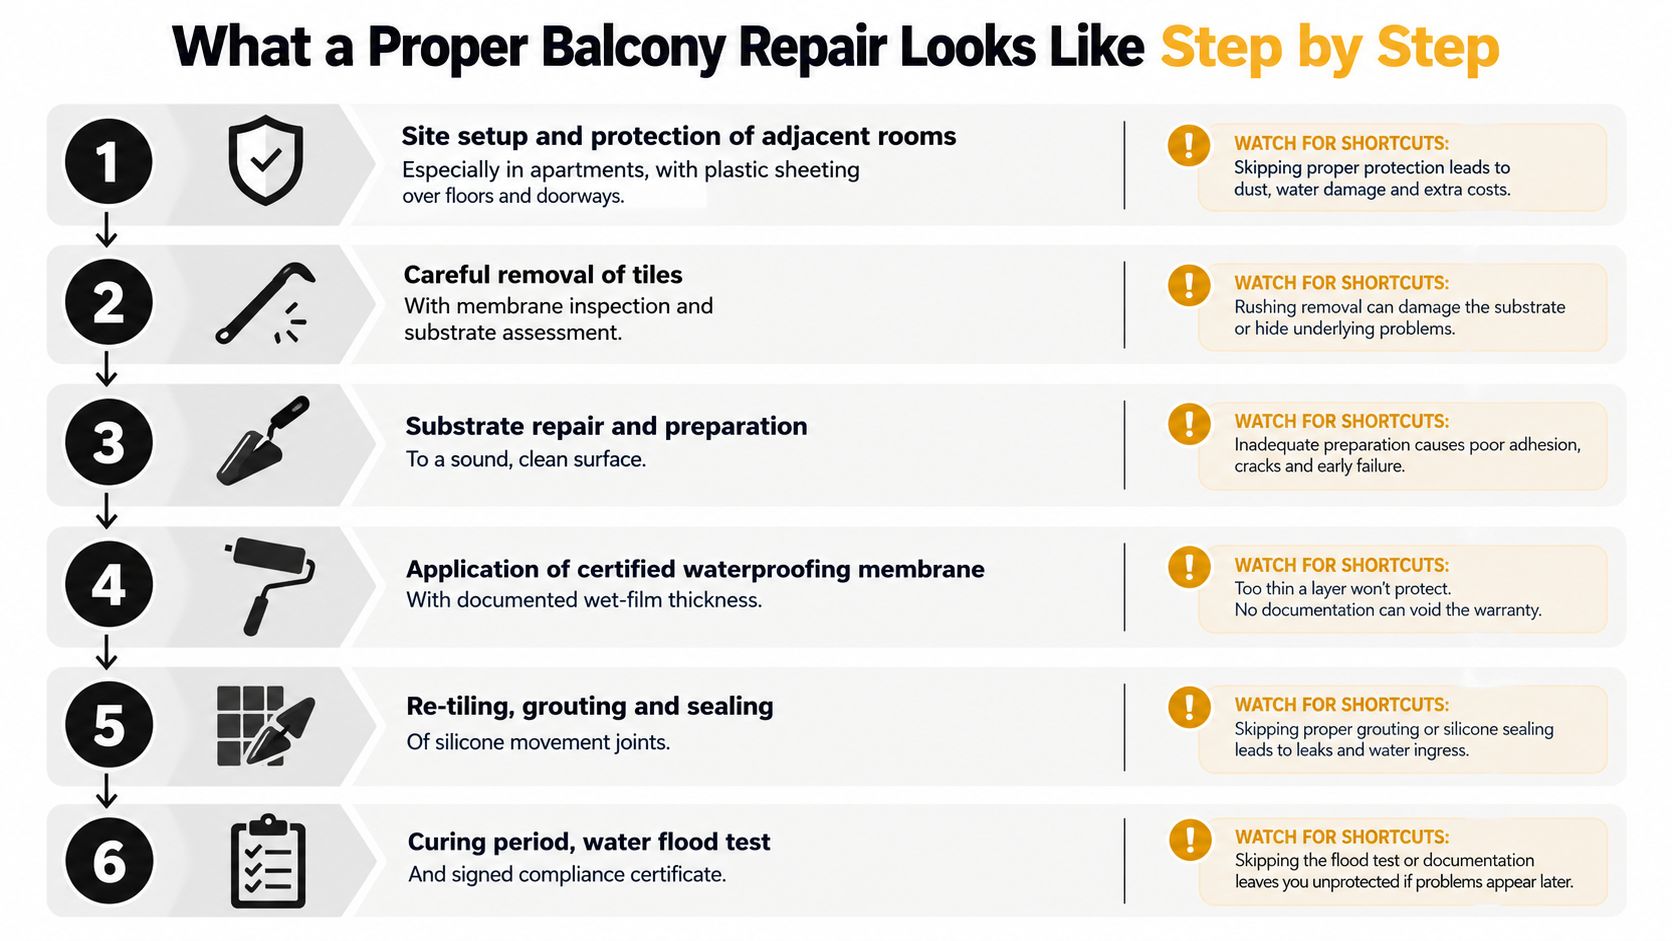
An infographic detailing the six-step process for performing a proper balcony repair, emphasizing quality and best practices.

The checkpoint that can't be skipped

A flood test is the essential checkpoint before the new finish covers the work. The test gives the builder an opportunity to identify membrane or detailing problems while the system is still accessible. After the test passes, the new screed is formed to drain correctly, tiles are installed, movement joints are finished and the perimeter is sealed.

A typical project can take several working days, and apartment work may take longer where body corporate access, shared balconies or lift bookings are involved. The calendar should allow for demolition, substrate repairs, membrane curing, testing and tile installation. Anyone promising a fast finish by skipping cure time is gambling with the repair.

The handover should include photographs of concealed work, product and system details, test records, compliance documentation where applicable and warranty terms. Those documents matter if the property is sold, managed by a body corporate or affected by a future leak.

Why the Builder You Choose Changes Everything

Waterproofing is one of those jobs where the cheapest quote can remove the very steps that make the repair last. A tiler may be excellent at laying porcelain, but a balcony leak can also require substrate repair, drainage work, membrane detailing, contract administration and coordination with licensed trades.

In Victoria, bathroom renovations over $10,000 require a Domestic Building Contract, and where the builder arranges the project, the contract must be written and signed before work starts, according to the Australian bathroom renovation guidance. Registered builders are categorised by class, including domestic builder and domestic builder limited, and a registered domestic builder can manage domestic building work such as bathroom renovations and coordinate the required trades (Victorian builder category information).

Read the scope before the price

A proper quote should identify demolition, substrate repairs, drainage, membrane system, junction detailing, screed, tiles, grout, sealants, testing, waste removal and documentation. Be cautious when the scope only says “repair balcony tiles” or “apply sealer”.

Check the practitioner on the VBA register. Ask for current insurance evidence, relevant waterproofing experience and a written warranty. If the balcony forms part of an apartment or townhouse development, confirm who owns the slab, membrane and drainage elements before approving work.
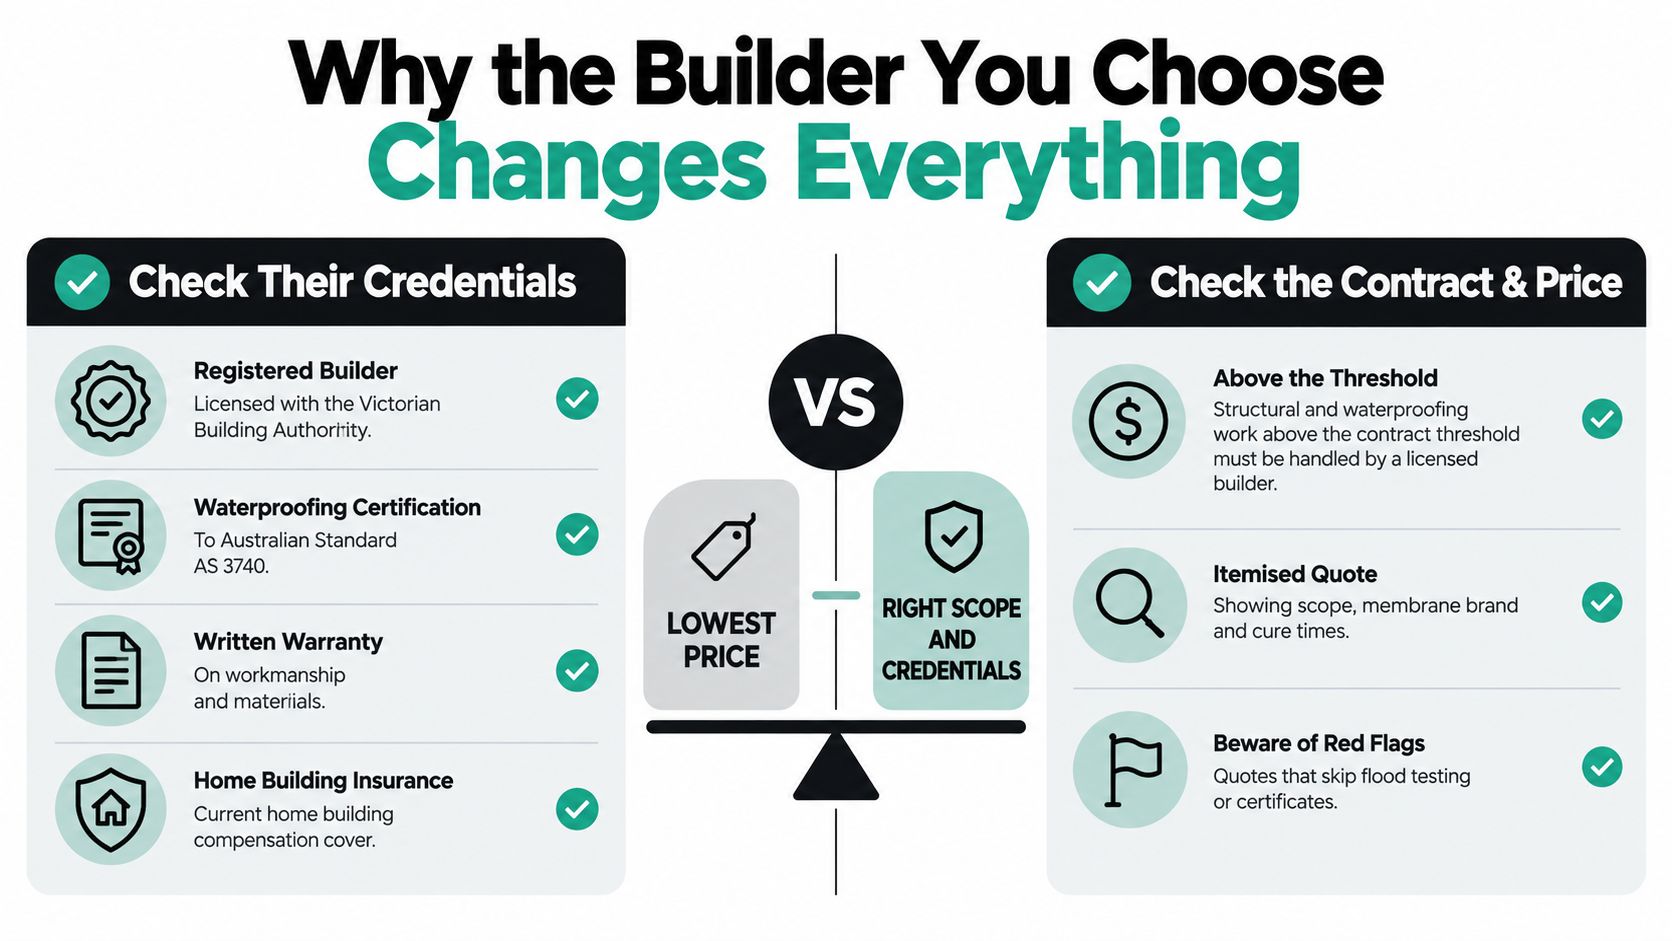
An infographic comparing the importance of credentials and scope over choosing the lowest price for building work.

Red flags include a large upfront payment request, no membrane specification, no written test process, no allowance for substrate discovery and a price that is dramatically below competing quotes. A registered builder doesn't remove every risk, but an undocumented surface patch gives you very little protection when the leak returns.

For projects requiring formal waterproofing documentation, owners can review what a waterproofing compliance certificate in Victoria may form part of in the handover record.

A Real Melbourne Balcony Repair From Inspection to Sign-Off

A South Yarra apartment provides the kind of situation I see regularly. Water marks appeared on the living room ceiling below an upper balcony, and the tiled surface initially looked serviceable.

The inspection found a failed membrane and poor drainage beneath the finish. The tiles were removed so the substrate could be assessed properly, rather than sealed from above and left to hide the problem. The outlet and fall were corrected, the junctions were rebuilt, and the waterproofing system was reinstated before the balcony was finished again.

What the paperwork showed

The owner received photographs of the exposed substrate, records of the membrane installation, drainage details, testing results and the final scope. That information mattered as much as the new tiles because it showed what had been repaired and how the system had been checked.

The project took longer than a surface reseal would have taken. It also produced a repair that addressed the moisture path instead of covering the evidence. In balcony work, speed is useful only after the diagnosis is right.

A balcony isn't finished when the tiles look clean. It's finished when the water has a controlled path to the drain and the concealed system has been documented.

Your Next Steps and Questions to Ask Before Work Starts

Start with evidence. Photograph the leak area, ceiling staining and balcony details. Note whether the staining worsens after rain, and check body corporate rules if the property is in a strata scheme.

Before signing, ask the prospective builder:

  1. What is your VBA registration number?
  2. Does the written scope separate membrane work from tiling?
  3. What membrane brand and system are you proposing?
  4. What warranty terms will I receive in writing?
  5. What are the start and finish dates, including curing allowances?
  6. Is the price fixed, or is it an estimate subject to discovery?
  7. Is flood testing included before the new finish is installed?
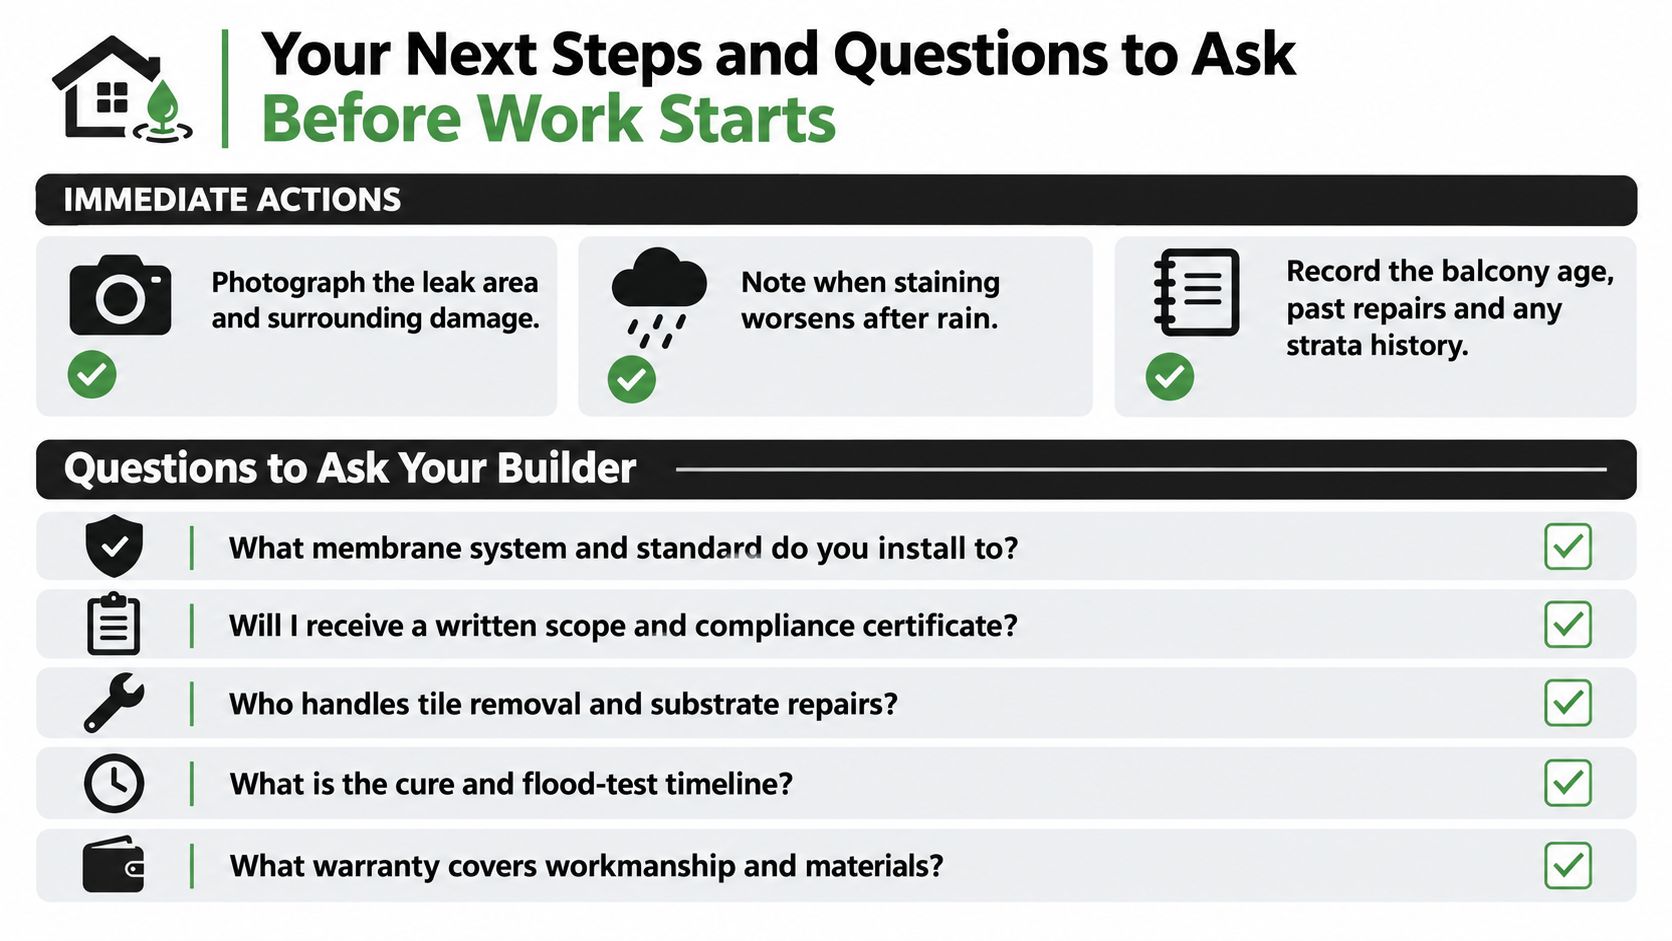
An infographic titled Your Next Steps and Questions to Ask Before Work Starts regarding balcony leak repairs.

If the quote mentions only regrouting or surface sealing, treat it as a red flag and get a second opinion from a registered builder who specialises in balcony waterproofing across Melbourne and greater Victoria. Melbourne Tiling Services P/L handles balcony leak rectification, substrate repairs, screeding, waterproofing, flood testing and retiling, alongside complete bathroom renovations coordinated by registered builders. Visit Melbourne Tiling Services P/L to request a quote and discuss the actual failure before anyone starts lifting tiles.

Screed Shower Base Guide for Melbourne Bathrooms

You can stand in a newly finished Melbourne bathroom, turn on the shower, and see nothing wrong. The tiles look even, the grout lines are clean, and the screen sits neatly on the threshold. Yet the decision that determines whether that bathroom stays dry often sits underneath your feet, in the shaped mortar bed that directs water to the waste.

A screed shower base isn't just a filler layer beneath tiles. It establishes the drainage profile, works with the waterproofing system, and sets the finished height for the tile, grate, screen and adjoining floor. Get those relationships right and the bathroom performs smoothly. Get one wrong and ponding, cracked grout, loose tiles or concealed moisture can appear long before the surface looks obviously damaged.

Table of Contents

Picture the Shower Floor Beneath Your Tiles

A Melbourne bathroom can look finished while its drainage work remains hidden. The shower runs, the porcelain stays intact, and the screen, tapware and vanity attract attention. Underneath, the shaped base is directing water to the waste, and small errors in that profile can determine whether the room remains dry or develops moisture problems later.

Consider a hob-less entry with a channel drain and large-format tiles. The floor needs a continuous path to the outlet, the waterproofing must suit that plane, and the adhesive and tile thickness must finish at the correct level beside the bathroom floor. A few millimetres can affect the screen line, doorway transition and available fall.

The hidden decisions beneath a finished bathroom

A tiler or builder forms a screed base on site. Compared with a factory-made tray, it can be adjusted to the room, waste position, screen line and entry detail. That flexibility helps in older Melbourne homes, where walls may be out of square and plumbing may not align with a standard tray.

The floor build-up generally includes:

  • Structural substrate: A concrete slab or suitable sheet floor supports the shower assembly.
  • Bonding preparation: Primer or another specified bonding material helps the screed adhere to the substrate.
  • Shaped screed: Cementitious mortar creates the drainage fall and fills the planned shower geometry.
  • Waterproofing membrane: The membrane protects the wet-area construction when its location, joints and penetrations are detailed correctly.
  • Tile bed and finish: Adhesive and tile form the visible surface, while their combined thickness controls the finished level.

The screed is therefore a shaped drainage component, not merely a layer that raises the floor.

Practical rule: A shower can have attractive tiles and still contain a poorly formed drainage base.

The National Construction Code permits a membrane above or below a tile bed or screed when the screed is used with the membrane, provided the selected system is designed and installed consistently. Shower floors must be fully waterproofed, and shower walls must be waterproofed to at least 1800 mm. Other bathroom wall and floor requirements apply in specified situations. The NCC wet-area waterproofing provisions provide the framework for the waterproofing arrangement.

Those requirements affect practical sequencing. The builder must allow for membrane placement, screed depth, tile thickness and waste detailing before the floor is formed. If the levels are guessed, the finished fall, screen clearance or adjoining floor transition may be wrong even when the tiling itself looks neat.

What a Screed Shower Base Actually Is

A screed shower base is a cementitious mortar bed laid over the structural floor and shaped towards a waste. The installer places and compacts a sand-and-cement mixture, then uses straight edges, levels and trowels to create a continuous gradient. Tiles are fixed over the completed waterproofing and prepared substrate.

The mixture is commonly made on site from sand and cement. Depending on the specified system, the installer may use an acrylic bonding agent, flexible additive or other compatible product to improve adhesion and accommodate the wet-area conditions. The material needs enough moisture to compact properly, but a mix that's too wet can slump and lose the carefully established fall.

Why the shape matters

A preformed acrylic, fibreglass or pressed-metal tray arrives as a moulded unit. Its footprint, outlet location and falls are already established, so it can provide a fast solution when the room matches the tray. That can work well in a straightforward standard-sized shower on a prepared, level floor.

A screed base takes longer to form, but it gives the installer control over irregular Melbourne bathrooms. The shower can be wider, longer, angled or integrated into a hob-less layout. A channel or linear drain can be positioned to suit the room instead of forcing the plumbing to match a stock product.

That customisation comes with responsibility. The installer must calculate the fall from the relevant perimeter points, allow for the drain and tile build-up, compact the screed without hollows, and coordinate the membrane detail. A factory tray reduces some of that site shaping, but it doesn't remove the need for correct waterproofing, support and connection to the waste.

For a plain-language explanation of mortar beds and their role in tile work, this guide to screed in tiling is useful background. Wet-area assemblies also use different liner and membrane approaches, so a homeowner comparing systems may benefit from Trademaster Construction's shower pan liner guide before approving a detail.

Where a screed base earns its place

Screed is particularly practical when the waste is off-centre, the shower has a non-standard shape, or a designer wants the shower floor to flow into a broader wet-area arrangement. It also allows the tiler to resolve small variations in an existing slab or sheet floor during preparation.

What doesn't work is treating the screed as an opportunity to hide poor planning. If the structural floor is moving, the drain is set too high, or the screen position hasn't been confirmed, the mortar bed can't magically correct every issue. The base needs a coordinated design before anyone mixes material.

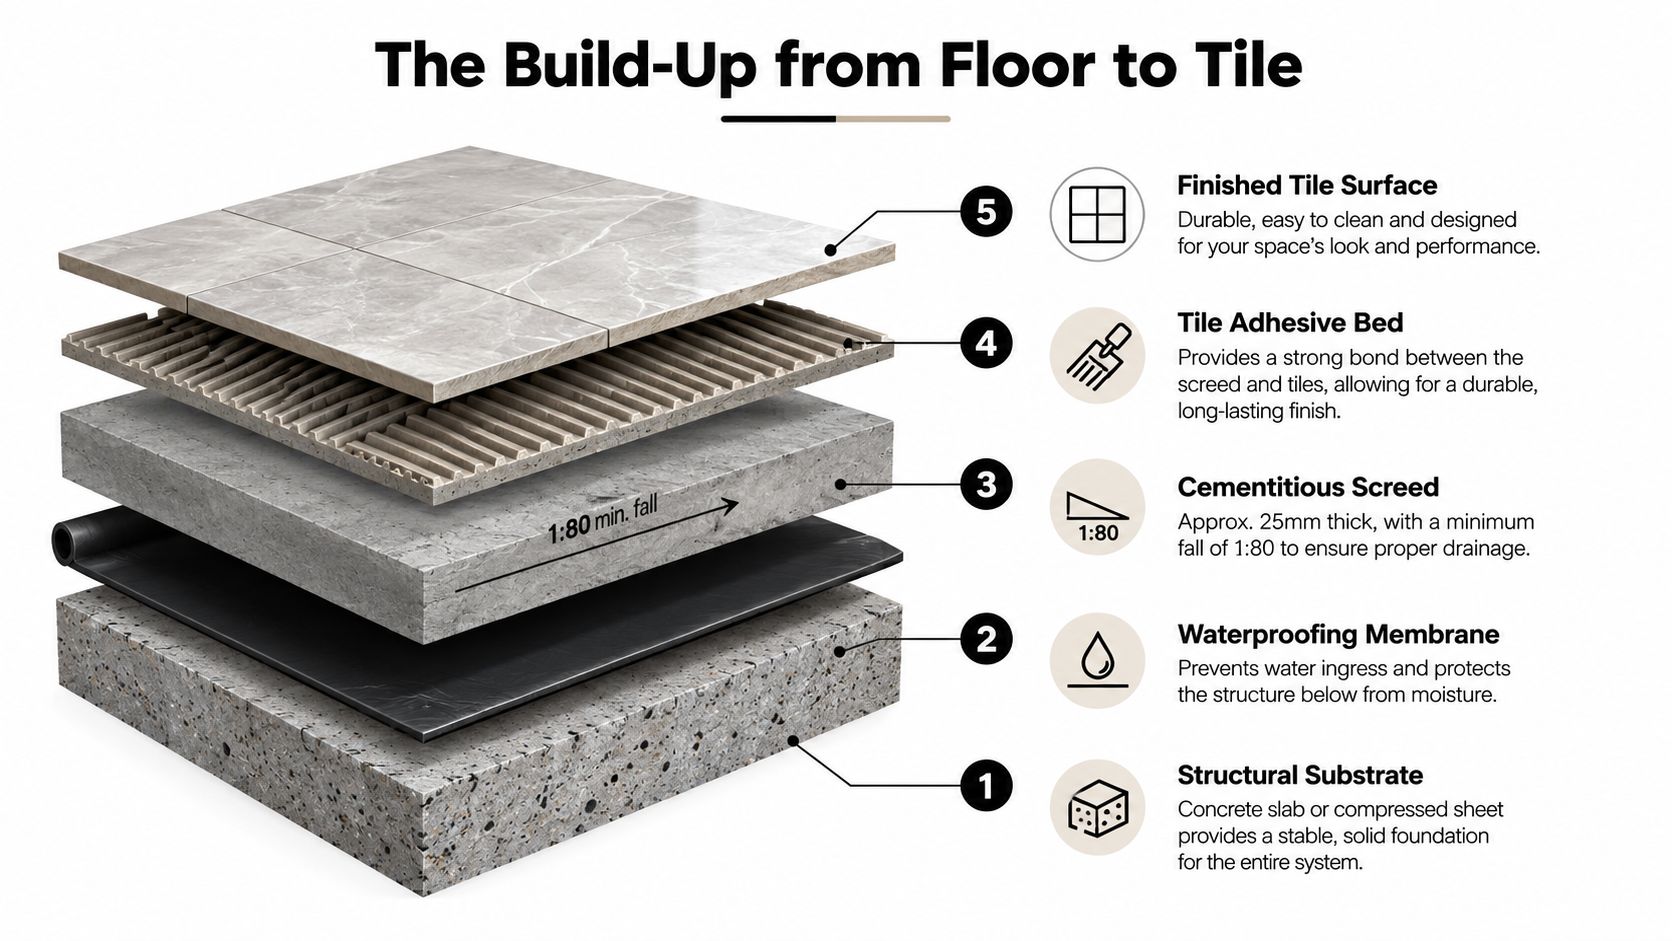
The Build-Up from Floor to Tile

A shower base can look flat and simple once tiled, but beneath it sits a coordinated drainage assembly. The substrate, shaped screed, waterproofing, adhesive and tile must be set out together. A mistake in one layer can leave the waste too high, reduce the available fall or create a finished floor that does not meet the adjoining level.

A diagram illustrating the five layers of a shower floor build-up, from substrate to tiled surface.

1. Structural substrate

Construction usually starts with a concrete slab or compressed sheet flooring. It must be sound, clean and suitable for the specified bonding method. Dust, contamination, movement and poorly detailed sheet joints can affect the build-up before the waterproofing is installed.

On concrete, the installer may need a primer or bonding slurry specified by the screed system. Sheet flooring requires its own substrate and movement details. Applying a concrete method to a sheet floor can lead to movement, cracking or loss of bond.

2. Screed and its formed fall

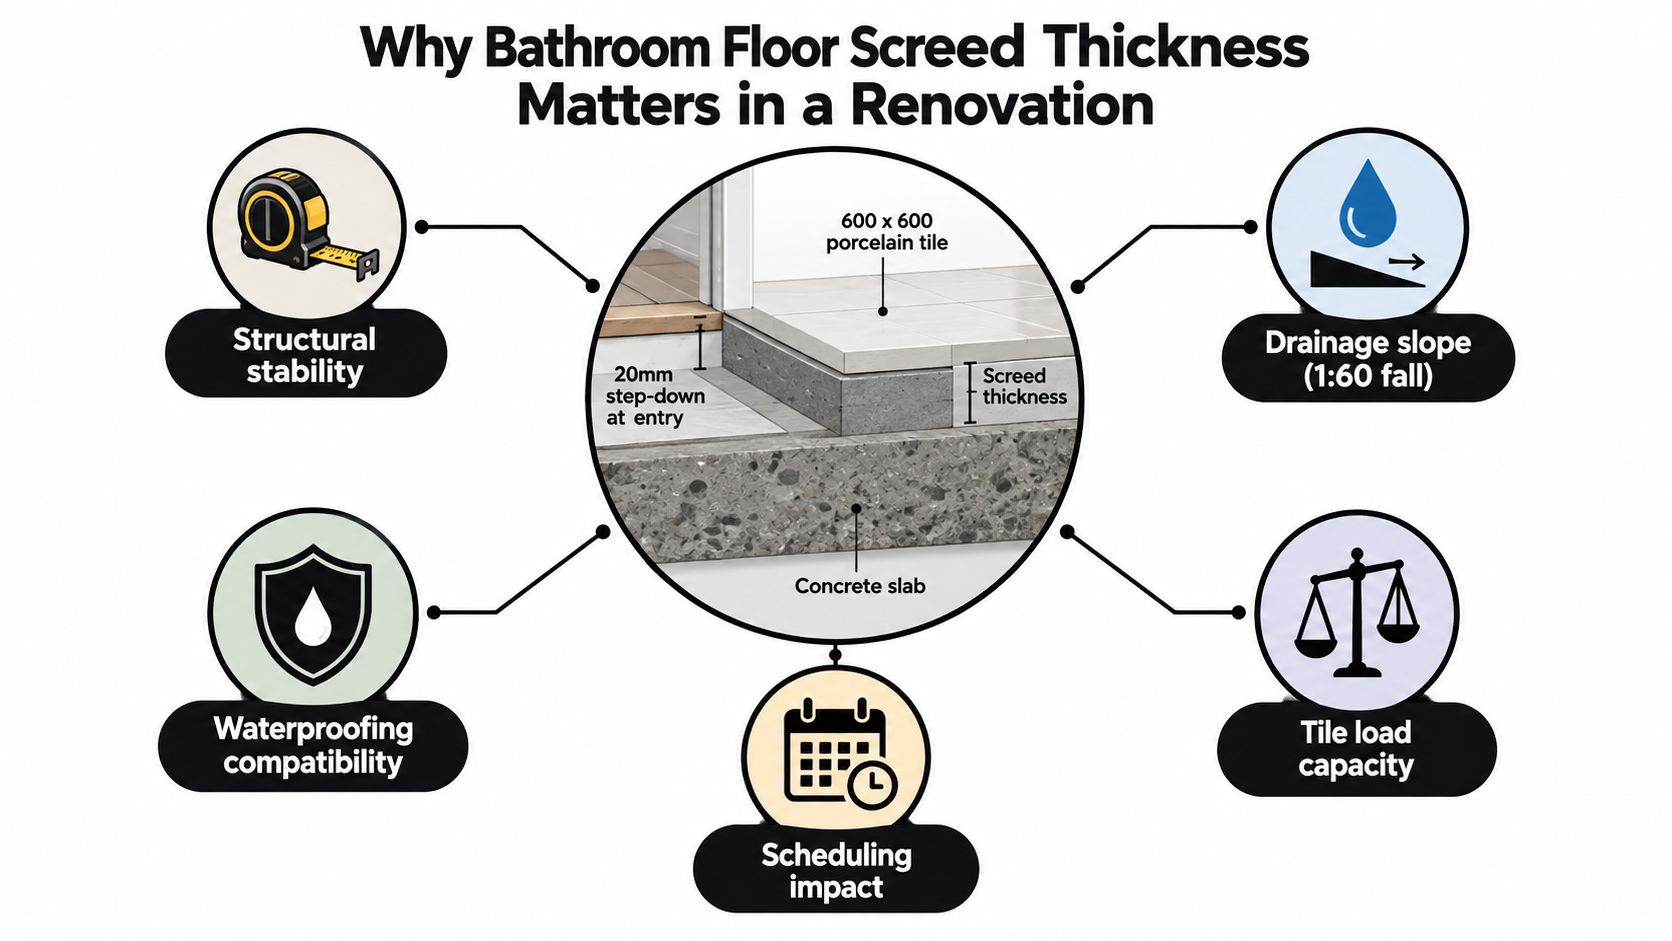
The screed is compacted and shaped to direct water towards the waste. Technical guidance on Australian bathroom floor screed thickness identifies minimum build-ups of 50 mm for cement-and-sand screed, 35 mm for fibre-reinforced screed and 65 mm for floating screed over insulation.

Those figures still need to be checked against the selected product, substrate and drainage detail. The thin edge is often the difficult point. It must retain enough strength while preserving the required fall, connecting to the waste and meeting the surrounding floor height. If the tile is thicker than allowed for, the screed profile and drain position may need to change before installation starts.

3. Membrane, drain and junction details

The membrane system must suit the screed, waste and tile assembly. At the outlet, a puddle flange or equivalent detail provides a controlled membrane connection. Corners and wall-to-floor junctions need the specified bond-breaker treatment, because changes in plane concentrate movement and membrane stress.

Membrane placement also affects the usable height of the build-up. The installer must confirm whether the system sits above or below the screed and follow its preparation, curing and reinforcement requirements.

4. Adhesive and tile

Adhesive and tile add the final height. Large-format porcelain, stone and mosaics can produce different levels over the same screed, so the waste, threshold and adjoining floor must be set out for the selected finish. Victorian compliance depends on the completed wet-area assembly, not the mortar bed alone.

The screed is correct only when the finished tiled surface still drains properly and meets the required levels.

Getting the Falls Right

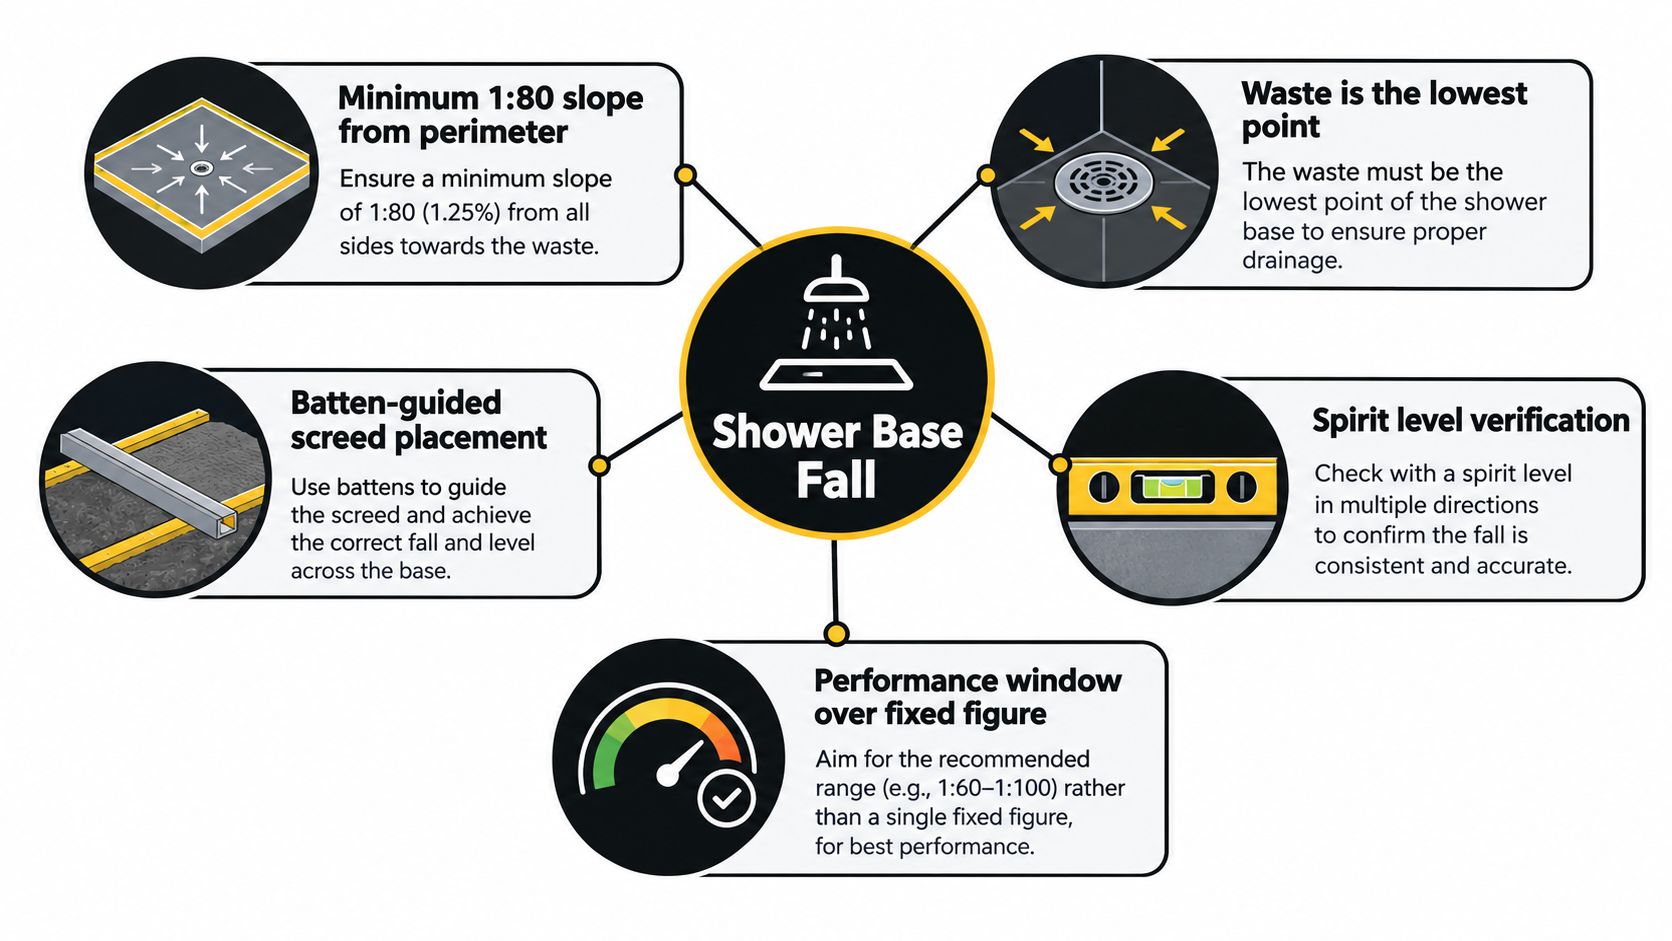
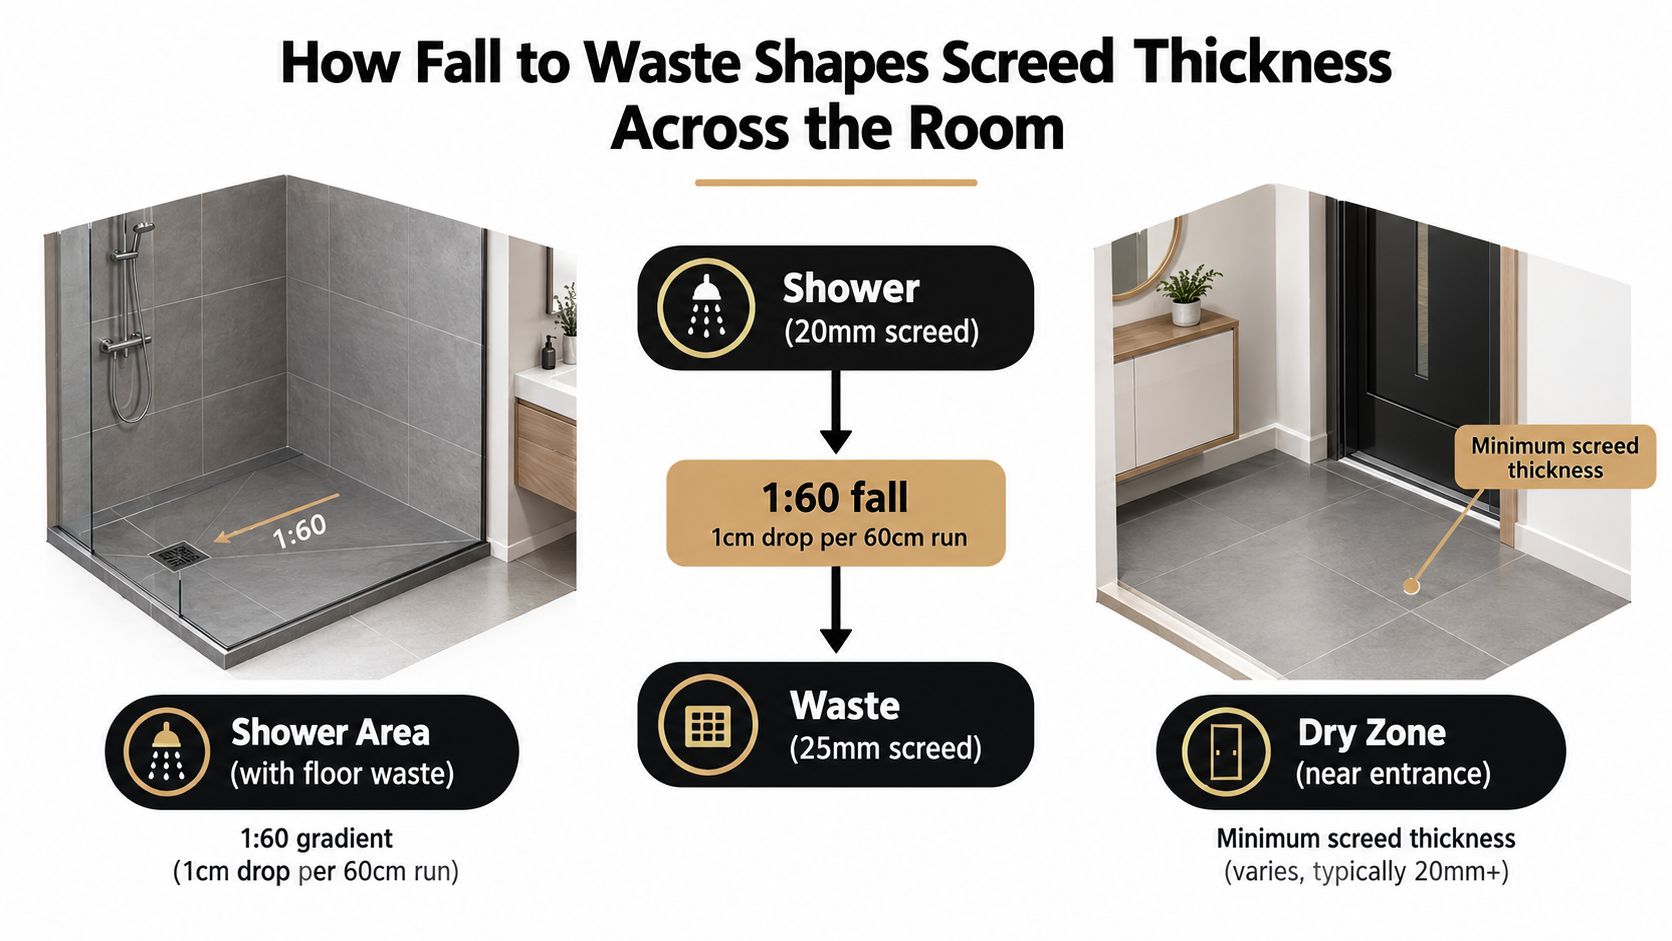
A shower floor can look level after tiling and still hold water. The screed must create a continuous drainage path to the waste, with the finished surface meeting the required fall. For a tiled shower floor, the commonly specified minimum is 1:80, equal to about 11 mm over a 900 mm run or 19 mm over a 1500 mm run. The finished wet-area assembly, rather than the screed alone, determines whether the result performs correctly.

The installer sets a reference height around the perimeter, measures each run to the lowest drainage point, then shapes the screed between those levels. A centre waste creates several sloping planes. A channel drain creates one dominant plane, but the wall lines, screen position and drain length still require accurate set-out. AS 3740:2021 provides the relevant Australian Standard reference for these fall requirements.

A performance window, not a race to the steepest point

A shallow or inconsistent fall can leave birdbaths and back-falls. Excessive fall can feel awkward underfoot, make tile set-out harder and move outside the acceptable performance range. Victorian guidance identifies a maximum continuous fall of 1:50, so adding slope is not a substitute for correcting a poor drainage layout. The VBA waterproofing fact sheet addresses both the required fall and the upper limit.

The membrane substrate and finished tile surface are measured separately. Where a floor waste is provided, the membrane substrate requires a minimum 1:100 fall, while a Category 1 shower floor finish requires at least 1:80. Membrane thickness, adhesive variation, tile geometry and the drain detail can all reduce the effective fall visible at the finished surface.

ARDEX guidance reflects the practical choice to form shower recess screeds up to 1:60 and internal wet areas to at least 1:80, giving the installer room to manage local variation without creating an excessively steep floor. The selected product data and installation requirements still govern the work.

How the installer checks the shape

A competent tiler checks more than one line. The screed is compacted, ruled with straight edges or battens, checked across multiple directions and inspected for flat strips beside the screen line. A long level can reveal a gradual back-fall that a short tool misses.

Older timber subfloors add movement to the calculation. Deflection can crack a rigid build-up or loosen the tile bed, so the substrate, reinforcement and flexible products need to be selected as one system.

For practical guidance, review this guide to floor slope for drainage.

An infographic showing best practices for creating a proper slope in a shower base using screed.

A visual demonstration shows how perimeter height, drain position and screed guides work together:

Screed Base Versus Preformed Tray

The right choice depends on the room, not on a blanket claim that one system is always superior. A preformed tray is efficient when its dimensions, waste position and edge details suit the project. Screed is more adaptable when the bathroom has an unusual footprint or the drainage layout can't follow a catalogue product.

Factor Screed Base Preformed Tray
Shape Can be formed around odd walls, nibs and custom screen lines Limited to available moulded footprints
Drain position Can accommodate centre, offset or channel layouts when designed correctly Must match the tray's outlet and plumbing arrangement
Installation Requires site mixing, shaping, checking and curing Drops into a prepared area when the substrate is suitable
Falls Created by the installer and must be verified across the whole surface Factory-formed, but still depends on correct support and installation
Waterproofing Membrane and waste detail are installed as part of the wet-area system Tray connections and surrounding membrane details remain critical
Repairs Can often be locally retiled or repaired when the underlying assembly remains sound A cracked or failed tray may require replacement and disturbance to adjacent work

The cost trade-off is broader than the product

A tray may appear cheaper because it arrives ready to place. The genuine comparison includes floor preparation, waste relocation, support, waterproofing transitions, screed labour, curing time, adhesive and tile work. A screed base may carry more site labour, but it can avoid expensive compromises where a stock tray doesn't fit.

Melbourne apartments can create a different decision again. A second-storey slab may already have set falls or fixed penetrations, and the installer must work with those conditions. In a narrow ensuite, a custom screed can make space for a nib wall or unusual screen position that a standard tray cannot accommodate.

Repairability matters

A sound screed assembly can often be retiled or locally repaired without replacing a moulded tray. That doesn't mean every leak is a small repair. If the membrane has failed broadly, the fall is wrong or the substrate has moved, rectification may involve removing the tile and screed before rebuilding the wet area.

A tray makes sense where speed and repeatability outweigh custom geometry. Screed earns its place where the room requires control. The mistake is choosing the product before confirming the waste, finished levels and waterproofing strategy.

Waterproofing Around a Screed Base

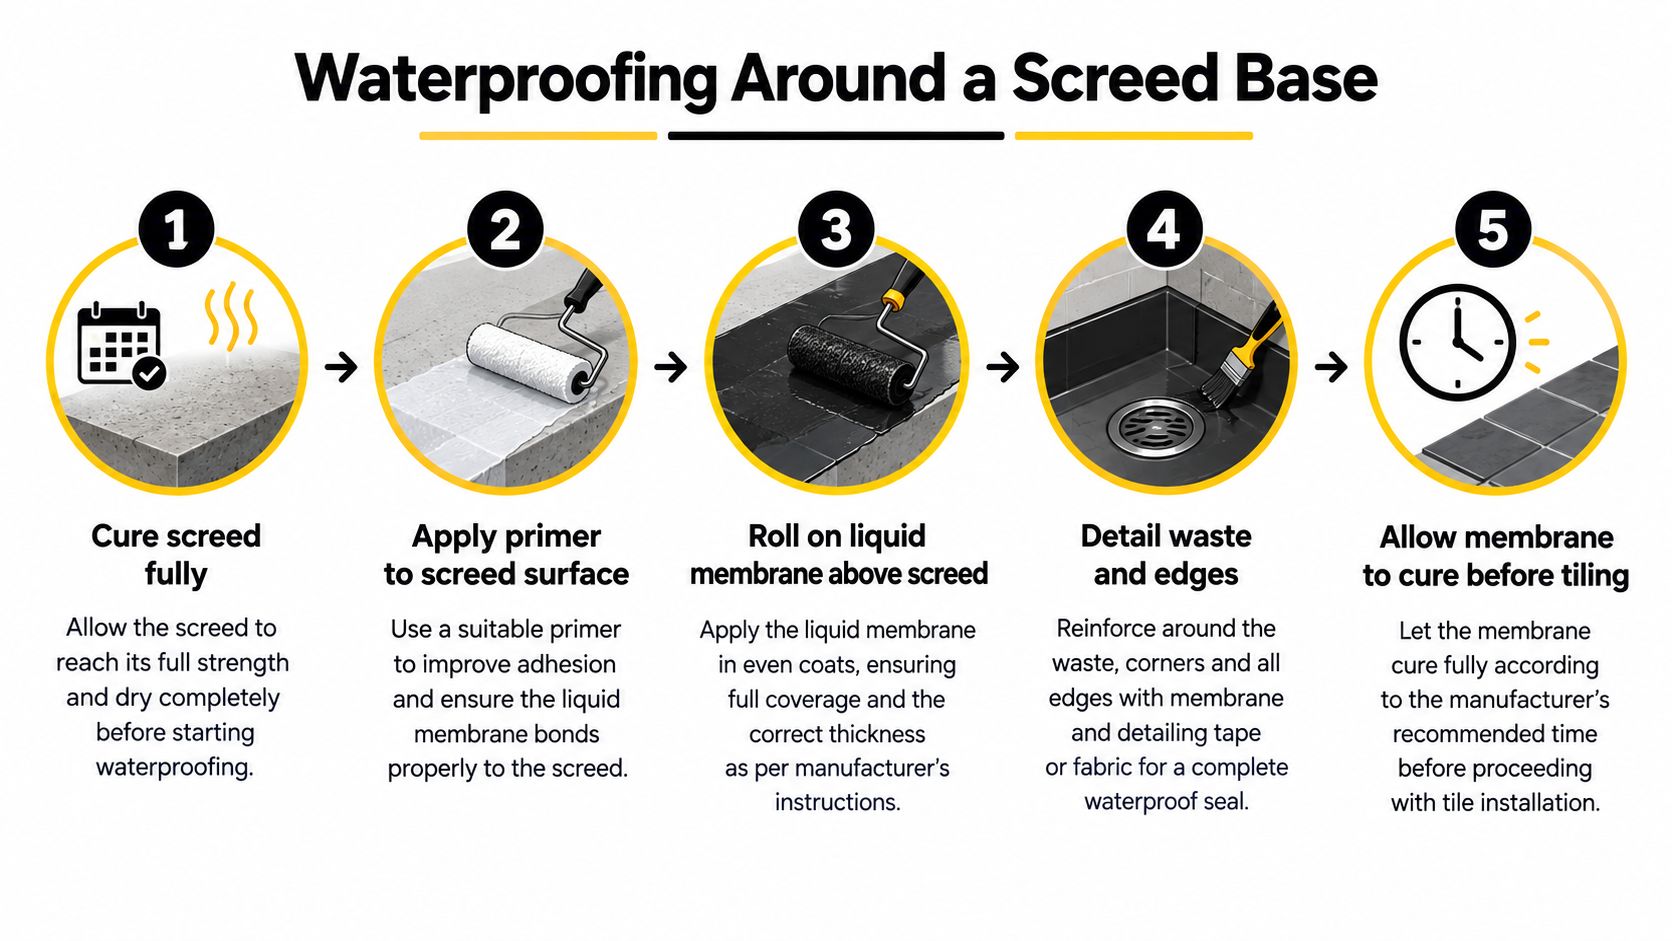
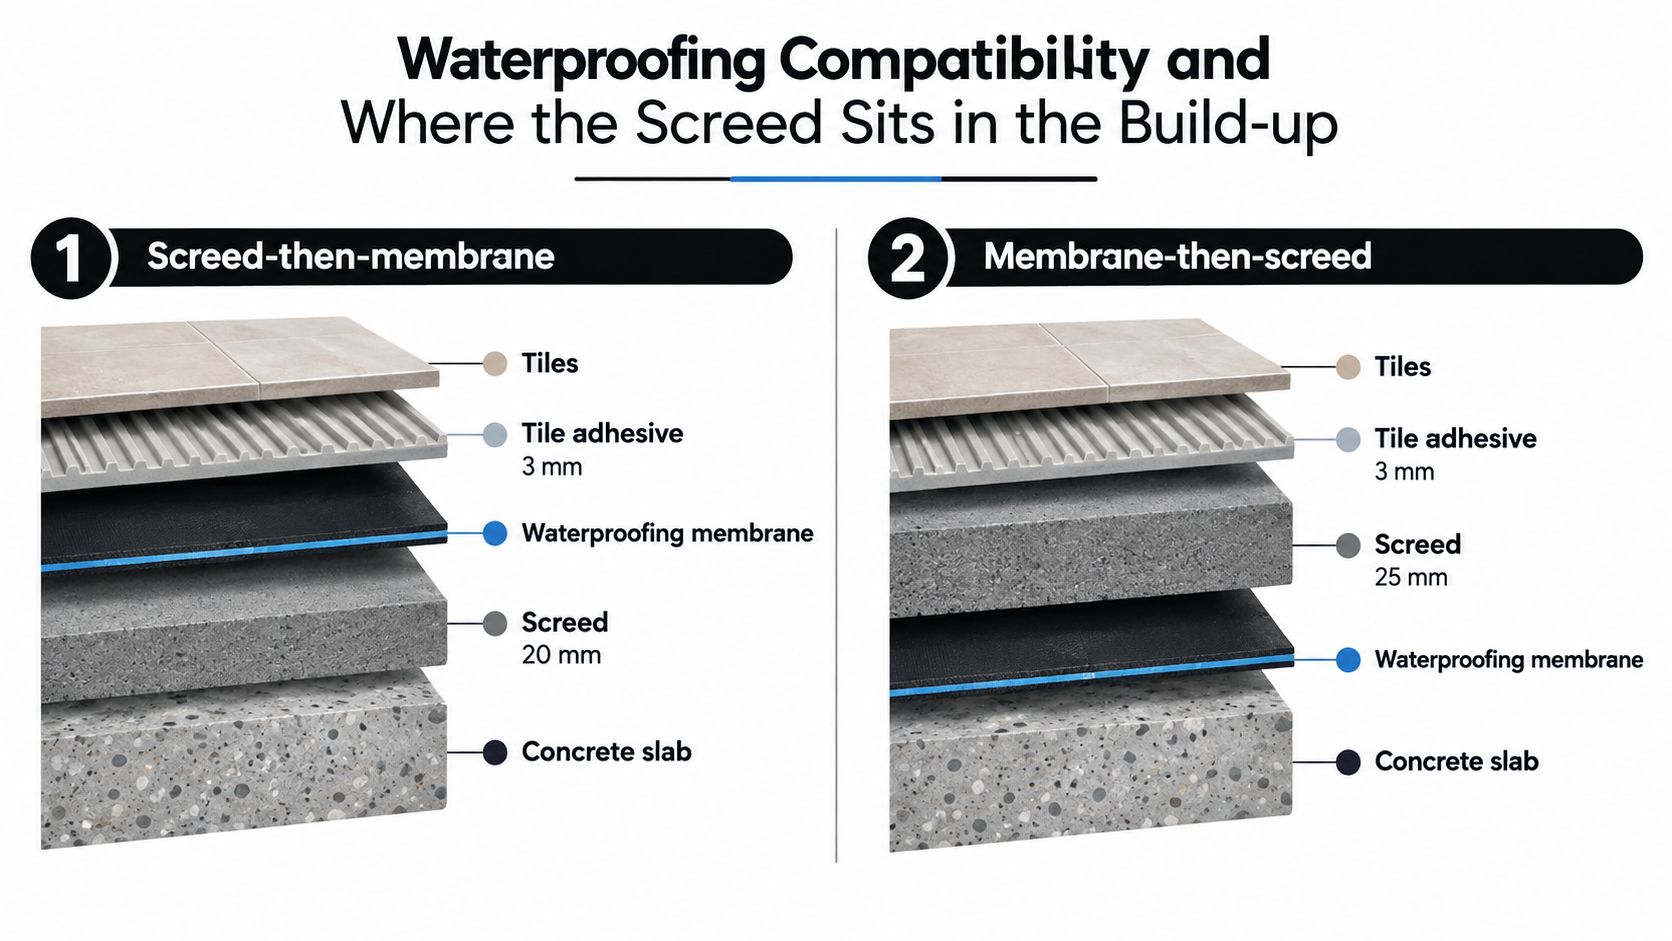
A screed shower base is a shaped drainage surface, so the membrane must follow the finished falls without interrupting drainage or leaving weak points at the edges. On many Melbourne projects, the specified arrangement is membrane above the cured screed. The screed forms the slope, the membrane follows it, and tiles go down only after the membrane has been detailed and cured.

This arrangement follows industry guidance for wet areas using a screed. The screed establishes the formed drainage surface, while the membrane protects the substrate from water. The VBA waterproofing webinar explains how substrate falls, finished falls and waterproofing work together.

Membrane placement and critical junctions

For a full walkthrough of membrane selection and detailing, see this guide to the shower waterproofing membrane. The installation sequence is simple to describe, but each part affects the finished drainage system:

  1. Cure and prepare the screed. Remove dust and weak material, then apply the specified primer.
  2. Apply the membrane. Use the approved liquid or sheet system over the shower base and the required wall areas.
  3. Detail the waste. Connect the membrane to the puddle flange or compatible waste flange using the manufacturer's method.
  4. Treat changes of plane. Bond-breaker tape or reinforcing fabric may be required at wall-floor junctions and other movement points.
  5. Protect penetrations. Niches, pipe outlets and future screen fixings need compatible detailing, not casual sealant.

Tile thickness also affects the drain connection and final falls. Confirm the finished levels before waterproofing, because a membrane cannot correct a screed that drains poorly or a waste set too high.

Waterproofing can extend beyond the visible shower area. In an unenclosed shower, waterproof flooring and water-resistant walling must extend 1500 mm from the shower rose. The James Hardie wet-area construction guide sets out this geometry for unenclosed showers and shower-over-bath arrangements.

A five-step infographic showing the process of waterproofing a screed shower base before tiling the floor.

Why tiling must wait

Tiles and adhesive conceal membrane defects. Tiling before the membrane has cured, or before the details have been checked, creates avoidable leak risk. A registered waterproofer should complete the wet-area work and provide the required sign-off before the tiler covers the system.

A membrane-below-screed arrangement may be permitted within a compatible system, but the screed and drainage design above it must then protect the waterproofing strategy. The selected products, drain, substrate and installation sequence must work together. Mixing details from unrelated systems is a common cause of failure.

Cost, Time, and Builder Registration in Melbourne

A shower floor can look like a simple line item until the quote separates the work properly. Allow for substrate preparation, waste and plumbing changes, screed forming, waterproofing, tiles, grout, trims, and repairs to nearby floors or walls. Comparing a bag of screed with a preformed tray gives an incomplete cost picture.

A screed shower base usually takes more on-site shaping because it is formed to the waste and the required falls. It also needs enough curing time for the specified waterproofing system. A preformed tray may shorten forming time when the existing floor is level and the tray suits the room, but it still needs preparation, accurate waste connection, membrane transitions, and coordination with the finished tile height.

Timing affects the programme

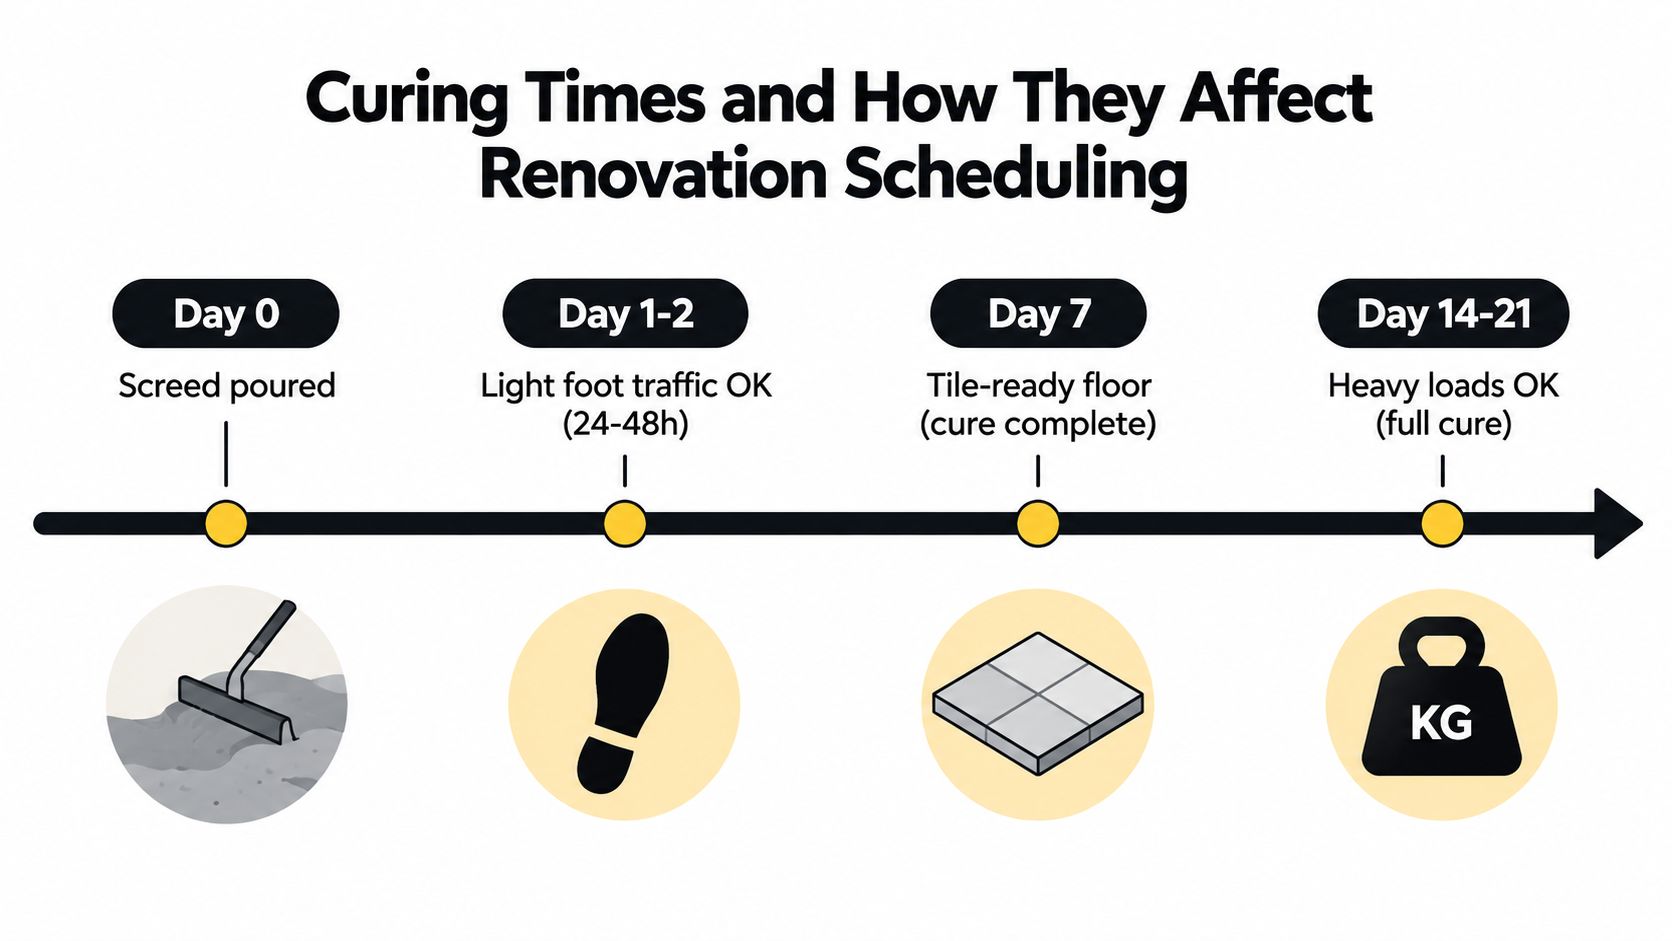
The screed must harden and dry sufficiently before waterproofing. Allow 24 to 48 hours as a minimum curing window before waterproofing, with longer drying in a cold or unheated room. Treat this as a planning allowance, not a guarantee. Product requirements, screed thickness, ventilation and site conditions can extend the wait.

Tile thickness also affects the programme because the finished floor level must be set before the membrane and adjoining surfaces are completed. A few millimetres can alter the waste connection, doorway transition or screen clearance. Confirm those levels during set-out, rather than trying to correct them with extra adhesive later.

After membrane application, the waterproofer must allow the product to cure before tiling. Rushing that stage for handover can trap moisture, damage the membrane or weaken the adhesive bond. A workable programme includes inspection, drying and corrections between trades.

Registration isn't an administrative detail

Victoria has a domestic builder pathway limited to bathroom, kitchen and laundry renovation work. The application requires industry qualifications, project-work evidence, a technical referee report, a criminal history check, photo identification and declarations. The VBA bathroom, kitchen and laundry renovation application sets out the formal requirements for that category.

Domestic building work over A$10,000 must generally be performed by a registered builder or building company, with an exception where the work involves only one trade. Use the Victorian domestic building guidance to check the applicable registration and Home Warranty insurance requirements, then confirm the position with the VBA or Consumer Affairs Victoria before work starts.

That exception does not remove the need to coordinate responsibility on a bathroom renovation. Waterproofing, plumbing, carpentry, electrical work, tiling and structural changes can affect one another, particularly in a hob-less shower or reconfigured room. Confirm who holds the relevant registration, who controls the wet-area sequence, and whether the work needs a building permit or VBA notification.

Registration does not guarantee a sound screed. The person forming the base still needs to set the waste, falls, membrane position, tile thickness and finished levels correctly.

Maintenance, Repairs, and Long-Term Care

A screed shower base is protected by the complete tiled and waterproofed system, not by grout alone. Routine inspection helps identify surface failures before moisture reaches vulnerable junctions or adjoining rooms.

Check grout and silicone joints periodically, especially around the wall-floor junction, screen threshold and corners. Look for hollow or loose tiles near the waste, persistent discolouration, efflorescence or a joint that has separated from the surface.

Signs that deserve prompt attention

  • Damp at the screen base: This can indicate failed silicone, poor drainage at the threshold or water escaping the intended shower area.
  • Musty smells nearby: Odours in an adjoining room can point to persistent moisture behind the wet-area lining or under the floor.
  • Drummy tiles: A hollow sound or movement underfoot may indicate a weak bond, substrate movement or water affecting the tile bed.
  • Recurring ponding: A low spot can reflect a surface defect, an obstructed waste or a poorly formed fall that cleaning won't correct.

Not every problem requires removing the whole base. Regrouting or replacing failed silicone may solve a surface-junction issue when the membrane and substrate remain sound. A localised tile removal with a compatible membrane patch can be suitable where the damage is limited and the underlying fall still performs.

If the membrane has failed broadly, the screed is cracked from movement or the drainage profile is wrong, the repair becomes much larger. Tiles, screed and waterproofing may all need removal before the base is rebuilt and retiled.

Use pH-neutral cleaning products and avoid aggressive acidic descalers on cement-based materials. Keep the waste clear, don't drill through waterproofed areas without a coordinated detail, and replace failed silicone rather than allowing water to sit at the joint.


Melbourne Tiling Services P/L provides bathroom renovations, screed shower bases, waterproofing, puddle flange installation, tiling and leak rectification across Melbourne and greater Victoria. For a coordinated assessment of your shower floor levels, falls and waterproofing build-up, visit Melbourne Tiling Services P/L and request a quote for the renovation work.

Marble Tile Large

You're standing in a Melbourne tile showroom with a sample of Calacatta marble in one hand and a renovation quote in the other. The surface looks like the obvious choice for a new bathroom, until someone asks where the shower waste will sit, how flat the floor is, whether the existing timber doorway can accept the new build-up, and who is responsible for waterproofing certification. That's the point where large marble tile stops being a style decision and becomes a construction decision.

Real marble can produce a depth and veining pattern that printed porcelain still struggles to copy. It can also expose poor preparation, complicate movement, increase maintenance, and create avoidable risk in a wet area. In Melbourne bathroom renovations, the right material is the one that suits the substrate, waterproofing system, use of the room, and capability of the builder and tiler.

Table of Contents

Why Large Marble Tile Changes a Bathroom Renovation

A Brunswick heritage terrace can make 600 x 600 mm Calacatta marble look simple on paper. On site, the timber floor may flex, the walls may be out of square, and the doorway may meet old boards that cannot be covered without raising the finished floor. Shower falls, waterproofing levels and waste locations then become part of the tile decision.

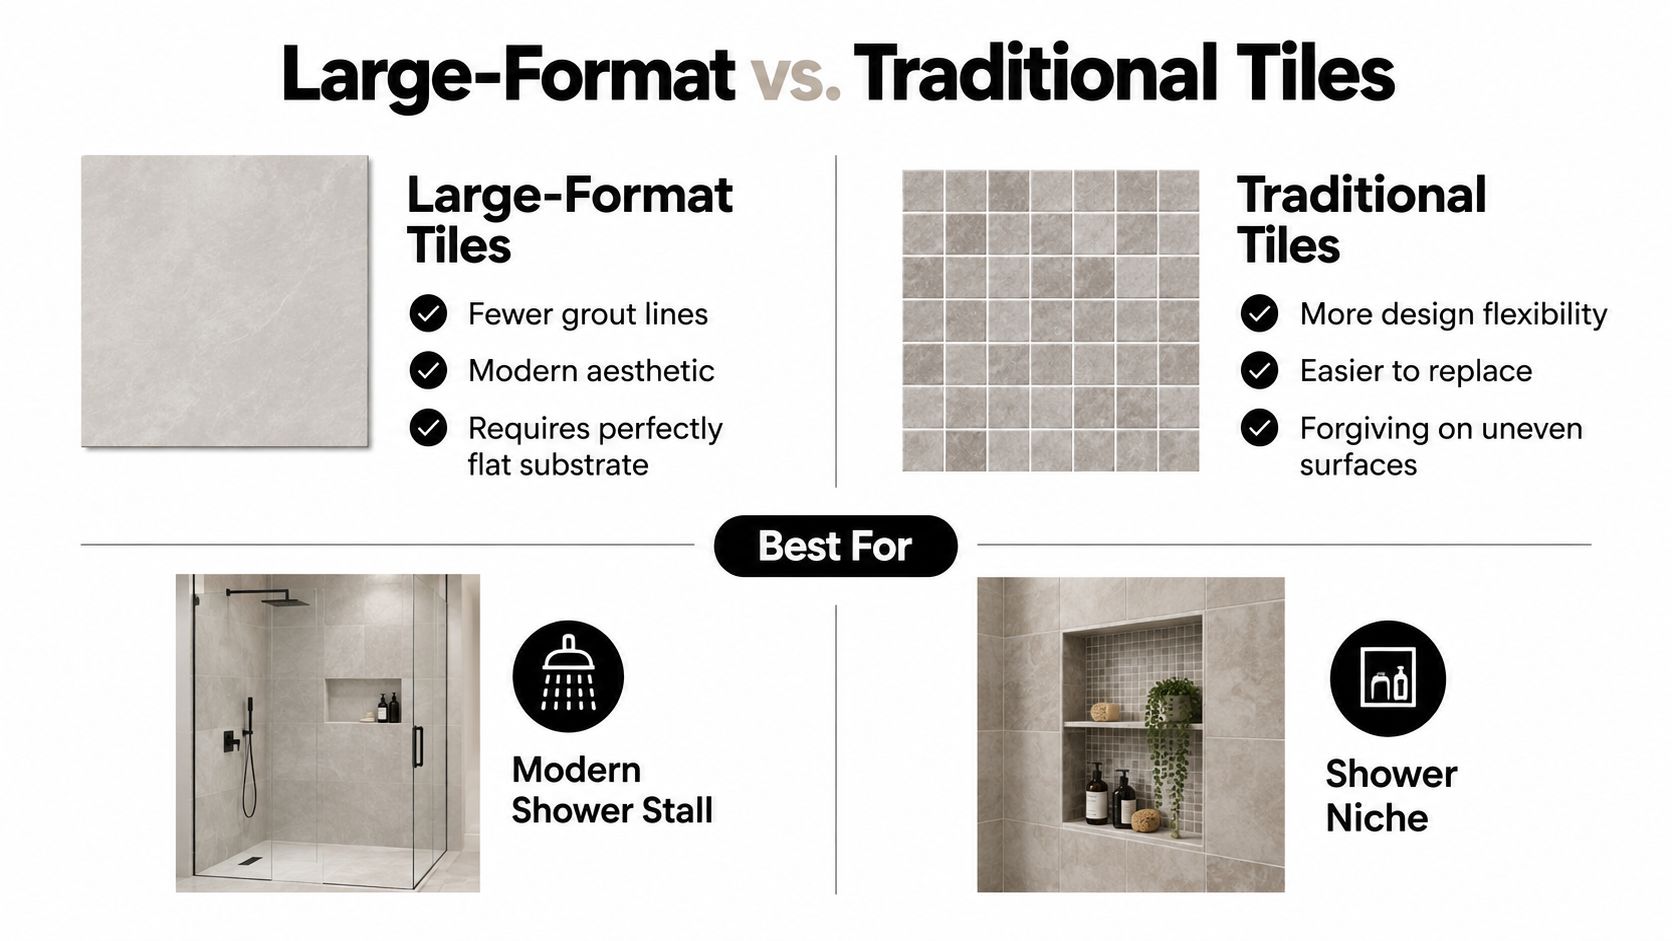
Large marble tile is therefore a risk-managed construction choice, not only a finish. Real marble rewards careful preparation with depth and natural veining, but it also shows uneven backgrounds, increases handling demands and needs more maintenance in a wet room. Porcelain can reduce some of those risks, although it does not reproduce every stone pattern or surface variation.

Australian trade guidance commonly treats large-format tile as starting at an edge length of 400 mm. Premium bathroom interiors also use 600 x 1200 mm and larger panels. The older 15 mm allowable lipping figure often repeated in the trade is not validated by a current Australian tiling standard. Polished marble makes edge variation easy to see because reflected light travels across the surface.

Start with the room build-up

Set out the complete assembly before ordering stone:

  • Screed height: Confirm the levelling and falls-to-waste work required on the floor.
  • Waste position: Check that the selected format can meet the grate without narrow, awkward cuts.
  • Doorway transition: Allow for waterproofing, screed, adhesive and marble thickness beside existing timber.
  • Shower channels: Fix linear waste and screen-channel positions before finished levels are established.
  • Wall returns: Measure reveals, niches, corners and window trims so the layout avoids thin slivers.

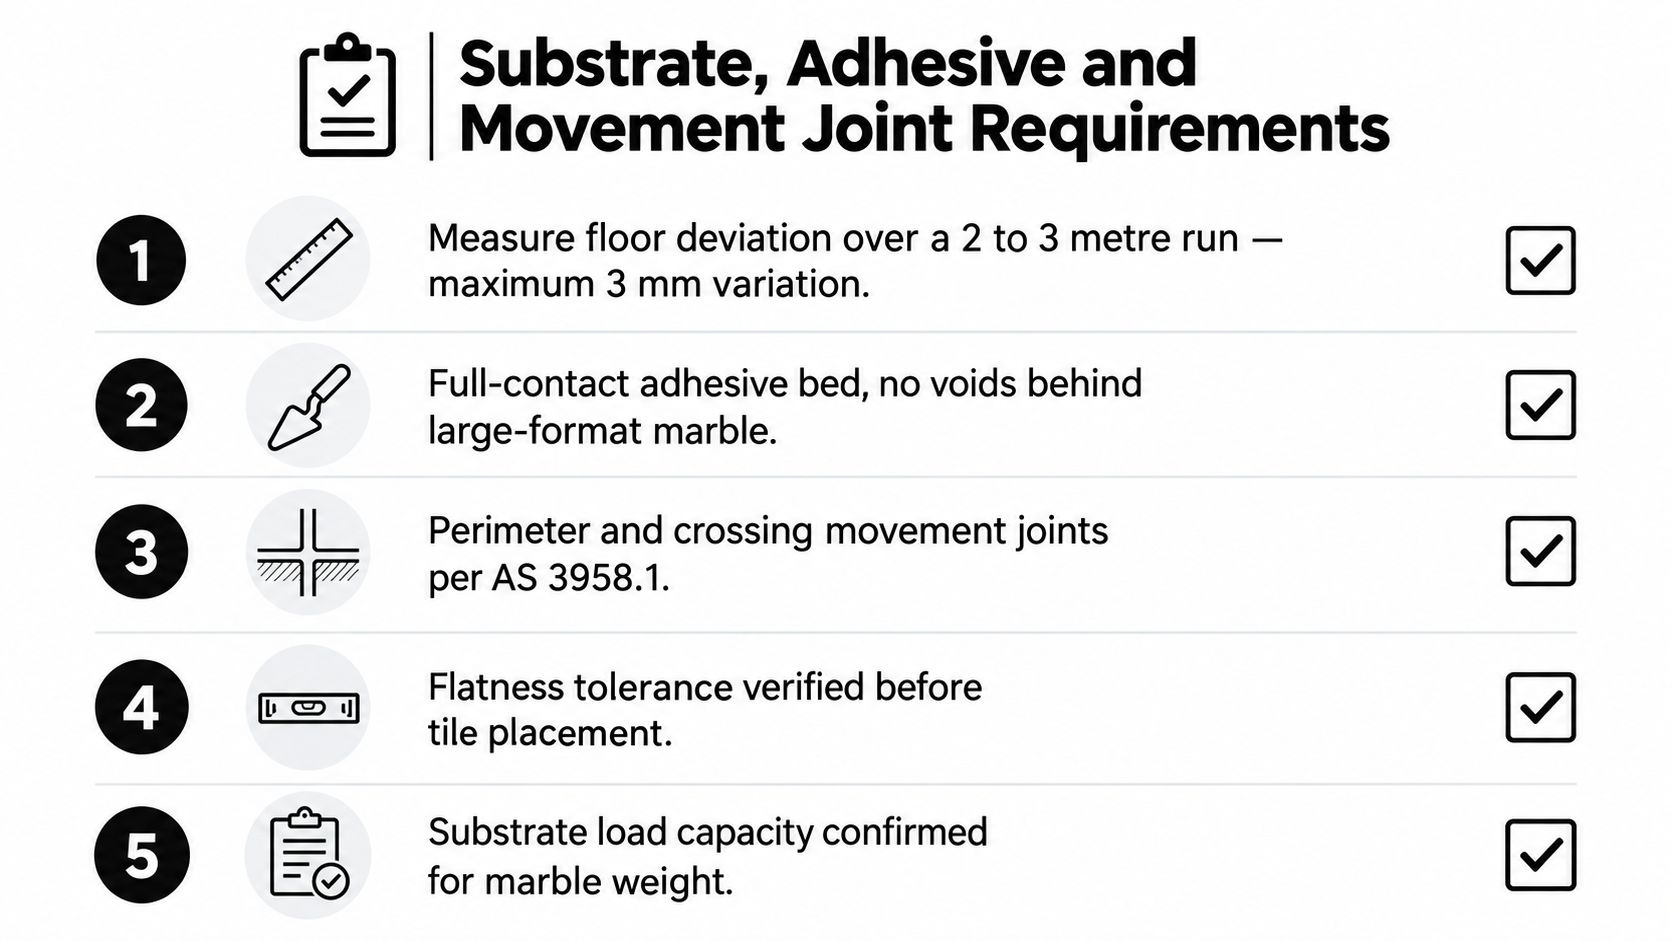
The substrate must be flat enough for thinset large-format installation. Australian technical guidance describes no more than 5 mm out over 3 m, with tighter guidance moving towards 3 mm over 3 m and 1.5 mm over 500 mm, measured from the high spot. Check the actual background rather than assuming a new screed or plasterboard is ready.

Waterproofing certification, substrate preparation and trade coordination also need clear responsibility. In Victoria, most full bathroom scopes of this size legally require a registered builder. The work commonly combines demolition, plumbing, waterproofing, carpentry, electrical work, screeding and tiling, so sequencing errors can affect both compliance and the finished marble.

For early planning, this large-format tile installation guide outlines practical handling and installation constraints. Measure the room, confirm the build-up and resolve waterproofing details before committing to a stone order.

What Counts as Large Marble Tile in Australia

A 600 x 1200 mm panel may look manageable in a showroom, then become difficult once it meets a narrow doorway, uneven wall or crowded shower. In practice, large marble tile is defined by more than its printed dimensions. The longest edge, weight, access route, cutting method and substrate preparation all affect whether the format is suitable.

Australian suppliers commonly move from 300 x 600 mm tiles into formats such as 600 x 1000 mm, 600 x 1200 mm and larger premium panels. A practical site classification is:

Format Band Edge Length Common Bathroom Use Handling Notes
Standard Up to 300 mm Small floors, mosaics, detailed areas Easier to follow falls and accommodate irregular rooms
Large 300 to 600 mm Main walls, floors and vanity areas Requires accurate setting-out and flatter backgrounds
Extra-large 600 to 1000 mm Feature walls, open floors and shower walls Needs controlled handling, full adhesive coverage and careful levelling
Slab-format 1000 mm+ Book-matched walls, full-height features and premium panels Often requires specialist transport, lifting and cutting equipment

Tile, panel and slab are different products

A rectified marble tile is an individual manufactured piece with accurately finished edges and planned grout joints. A gauged panel or stone slab is a much larger sheet, usually chosen for continuous veining or book-matched layouts. It may require different transport, storage, reinforcement, cutting and fixing arrangements.

Calacatta, Carrara and Statuario appearances are available in formats including 600 x 1200 mm and 800 x 1600 mm. CNC cutting can make service openings and repeated production more practical, but it does not remove access or installation constraints. Doorways, stairs, window reveals, shower returns and numerous penetrations can make 600 mm a more workable limit on many bathroom walls.

Large formats also expose dimensional variation. Australian stone guidance allows marble panel face tolerances of around ±2.0 mm for flatness or twist on panels over 0.6 m². (Australian tile and stone covering guidance) On site, panels over that area need two-person lifting, dry checking and careful setting out before adhesive is spread. Nominal carton dimensions are not enough.

Before pricing, confirm whether the quote covers tile, gauged panel or slab fabrication. Edge treatment, reinforcement, lifting equipment, cutting time and installation labour can differ substantially. The correct choice is the format that suits the room's access, substrate and waterproofed build-up, rather than only the largest sheet available.

Honest Pros and Cons of Large Marble Tile

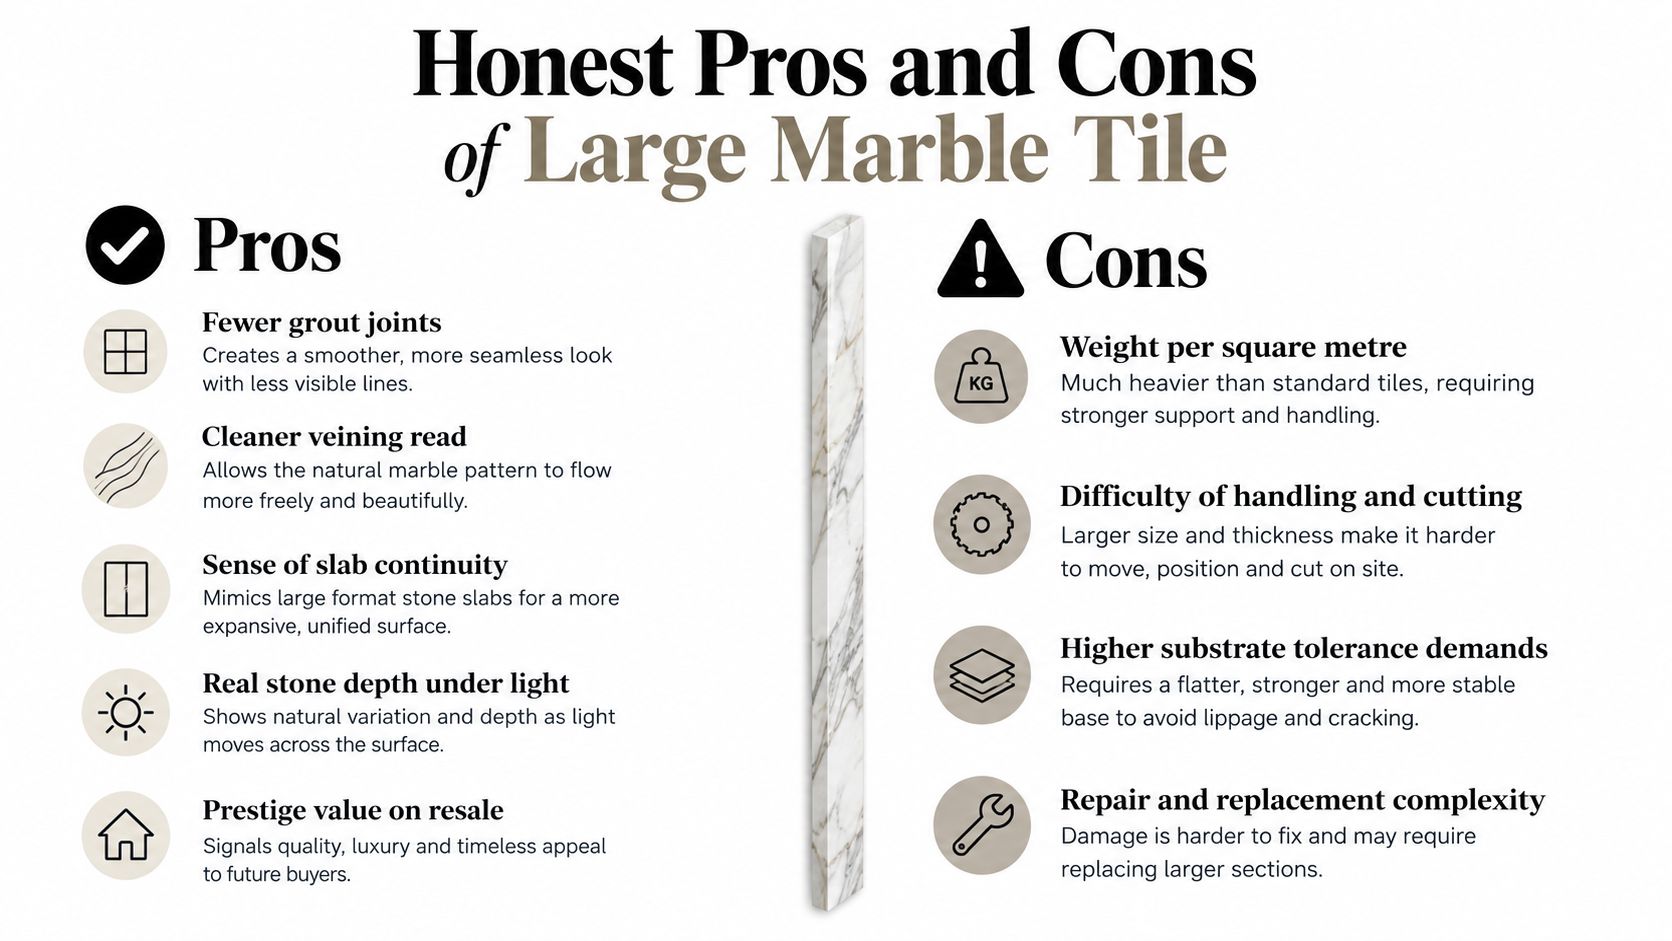
A large marble wall can look exceptional at handover, then expose every shortcut once daylight hits it. Real stone gives a bathroom character that printed patterns cannot match, but it also turns substrate preparation, waterproofing details and maintenance into risk decisions rather than purely aesthetic choices.

Natural veining varies from piece to piece, and changing light reveals genuine colour movement and depth. Fewer joints create a quieter field on a full-height shower wall or vanity feature, with fewer grout lines to scrub.

A comparison chart outlining the professional advantages and disadvantages of installing large format marble tiles.

What real marble does well

  • Fewer grout joints: A wall or floor can read as a more continuous surface, and there are fewer grout lines to clean.
  • Clearer veining: Bigger pieces let the pattern run across the wall instead of breaking into small fragments.
  • Natural depth: Stone responds to daylight with variation that gives the room a tactile finish.
  • Feature value: A selected floor, shower wall or vanity wall can become the bathroom's architectural focus.

Where the risks appear

Weight needs checking before delivery. A 20 mm marble panel can weigh 24 to 30 kg/m², affecting wall fixings, lifting, storage and, in some buildings, the supporting structure. Verify that figure against the selected product because thicknesses vary. A stone panel needs different handling from lightweight ceramic tile.

Flatness matters just as much. A 2 mm edge difference on polished marble is visible from a doorway because reflected light runs across the field. Poor adhesive coverage, a rocking panel or a badly positioned waste can remain obvious after the room is finished. Set out the panels dry, check junctions and confirm openings before fixing.

Polished marble may become slippery when wet. Natural stone can also etch from acids, some cleaners and personal-care products. Australian installation guidance treats marble in wet areas as porous natural stone, so it requires a penetrating sealer at installation and ongoing resealing. (Australian marble installation guidance)

Sealing reduces absorption, not every risk. It does not make marble stain-proof or stop acid from dulling a polished face. Replacement can be difficult when the original batch, vein direction or finish is unavailable. For grout care and stone-surface maintenance, homeowners can find tile grout experts, while selecting pH-neutral, stone-safe products for marble.

Substrate, Adhesive and Movement Joint Requirements

A large marble tile exposes errors in the base quickly. If the substrate is uneven, the panel can rock, show lippage, leave hollow areas or carry stress into the stone. Treat preparation as risk control, not a cosmetic step.

Use a straightedge across the proposed floor, then make closer checks around wastes, doorways, walls and changes in material. Australian large-format guidance sets the tolerances used for this assessment, including the tighter control needed where a large polished surface will reveal irregularities. (Australian substrate flatness guidance)

A checklist illustrating requirements for substrate, adhesive, and movement joints for installing large-format marble floor tiles.

Prepare the base before opening adhesive

Concrete may require grinding, patching or a compatible levelling system. Timber floors often need structural sheeting and a plan for controlling movement. A proposal such as 15 mm compressed fibre cement over joists at 450 mm centres must be checked against the actual floor construction, manufacturer instructions and structural requirements. It is not a universal fix.

Choose adhesive for both the substrate and the stone. A premium polymer-modified cement-based adhesive, commonly specified at C2S1 or better, is suitable only when its documentation confirms compatibility with the selected marble and site conditions. White adhesive is generally used with pale natural stone to reduce the chance of visible darkening or interaction through the tile. This tile adhesive guide explains how adhesive choice affects coverage and curing.

Back-buttering is required for natural stone, tiles over 400 x 400 mm, and tiles in wet or external areas under the Australian guidance referenced here. Comb adhesive onto the substrate, skim the back of the marble, then press the tile into a continuous bed. Voids can create hollow spots, concentrated stress and cracking under service loads. The installation principle also matters when you install porcelain tiles correctly, although porcelain and marble still require product-specific adhesive advice.

Movement joints belong at perimeters, internal corners and across larger fields. Follow the project design for their locations. Where joints are specified at roughly 4.5 metre centres, use a suitable flexible sealant such as silicone rather than rigid grout. Coordinate these joints with the waterproofing and tile layout before fixing begins, because cutting them in later can compromise both appearance and movement control.

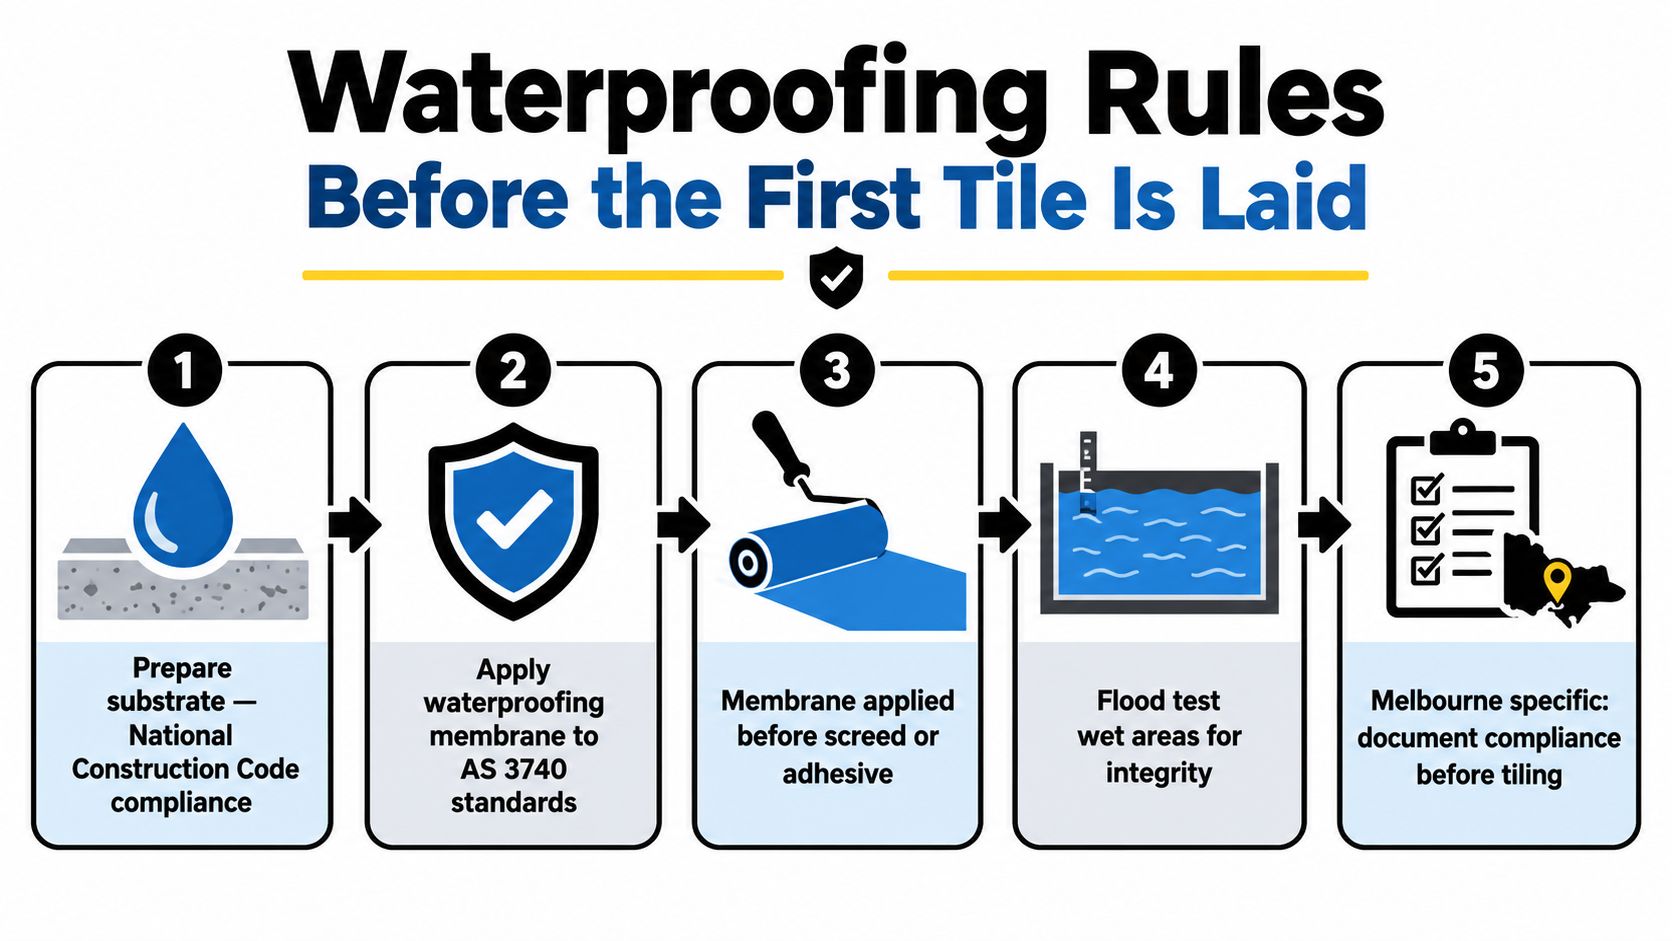
Waterproofing Rules Before the First Tile Is Laid

A large marble floor can look finished while water is already finding a weakness beneath it. In a Melbourne bathroom, the membrane, junction details, falls, penetrations and documentation must be resolved before the first marble piece is placed. Tiles and grout form the wearing surface, not the waterproofing system.

The NCC requires shower floors to be waterproof, shower walls waterproofed to at least 1800 mm above the floor substrate, and shower junctions, wall-to-floor junctions and penetrations waterproofed. It also requires shower-area wall junctions and joints to be waterproof to at least 40 mm either side of the junction. (NCC wet-area waterproofing provisions)

An infographic showing five essential rules for waterproofing wet areas before installing marble tile large format flooring.

Sequence the work in the right order

The usual control points are:

  1. Prepare the substrate: Remove contamination, repair defects and form the required falls.
  2. Detail junctions: Install compatible corner reinforcement, bond-breaker treatments and penetration details.
  3. Apply the membrane: Install the specified system to the manufacturer's instructions and AS 3740 requirements.
  4. Inspect and document: Arrange inspection before screed or tile layers conceal the waterproofing.
  5. Screed and tile: Protect the membrane while forming levels, then install marble over the approved assembly.

On Melbourne projects, inspection should occur before tiling, while junctions, puddle flanges and penetrations remain visible. Photograph the completed membrane and retain the product details, inspection record and certificate with the renovation documentation. Fixing a missed detail after large-format marble is installed usually means removing expensive, difficult-to-match material.

Australian guidance tied to NCC 2022 and AS 3740 notes that a wet area with a timber-based floor requires the entire wet-area floor to be fully waterproofed. Victorian practice described in the same guidance includes independent inspection before tiling and a formal Installation Certificate from a licensed waterproofer. (Victorian bathroom waterproofing documentation)

Falls must direct water to the waste rather than leave ponding beneath stone. The fall design depends on the waste, room layout and applicable requirements, so set it out and check it before the screed is installed. Large pieces expose changes in plane quickly, making a flat, correctly formed base and a documented waterproofing sequence part of the material decision, not paperwork added at the end.

Real Marble vs Marble-Look Porcelain at Large Formats

At 600 x 1200 mm and larger, real marble and marble-look porcelain may appear nearly identical in a showroom. On a Melbourne bathroom site, they create different risks. The practical choice depends on exposure to water, substrate accuracy, waterproofing compliance and the maintenance the owner will actually accept.

Real marble provides genuine veining, translucency and variation. Those qualities give a bathroom character manufactured surfaces cannot fully reproduce, but they demand planning. Dry-lay the pieces before fixing them, then sequence the layout so veins work through niches, returns, wastes and corners. A damaged or incorrectly cut piece may be difficult to replace with a close match.

Marble-look porcelain gives more control over appearance and performance. It generally has low porosity, consistent manufacture and finishes available with slip ratings. It also avoids much of the sealing and acid-etching risk associated with porous natural stone. Check the product data carefully for wet floors, because a polished porcelain panel is not automatically suitable underfoot.

Attribute Real Marble Marble-Look Porcelain
Appearance Natural variation, depth and unique veining Printed or manufactured stone appearance with more consistent repetition
Porosity Porous natural stone requiring penetrating sealing and resealing Lower-maintenance surface, subject to product specification
Cleaning pH-neutral products and prompt removal of acidic or staining substances Usually simpler routine care, with grout still requiring maintenance
Wet-floor suitability Polished finishes can be slippery when wet Choose the manufacturer's wet-area and slip-rated finish
Installation Needs a flatter substrate, controlled coverage and careful handling Still demands accurate preparation, especially in panel formats
Repairs Matching a damaged piece can be difficult Replacement is often easier when the product remains available
Design role Feature floors, vanity walls and areas where natural character matters Shower walls, splashbacks and busy family bathrooms where practicality leads

Decide by exposure, not showroom emotion

Australian guidance identifies polished marble as potentially slippery when wet, recommends pH-neutral cleaning and indicates resealing every 1 to 2 years. (Australian bathroom tile selection guidance) That routine suits an owner who wants genuine stone and will maintain it carefully. It can frustrate a household expecting a bathroom surface to perform like ordinary ceramic.

Porcelain often suits shower walls, splashbacks and heavily used family bathrooms. Its lower porosity reduces the sealing burden, while a suitable textured finish can provide more predictable wet-area performance. Real marble remains appropriate for a feature floor, vanity surround or controlled ensuite where its natural character justifies the extra care.

Neither material compensates for poor preparation. Large marble and porcelain pieces both show substrate irregularities, and a failed waterproofing system can damage the renovation regardless of the tile selected. Treat the material decision as risk management: confirm the substrate is flat, select an adhesive and finish suited to the installation, and ensure the wet area is completed by the required practitioners.

The consequences of a failed membrane can include demolition, drying, replacement and disruption to adjoining finishes. Remedial work is therefore a project risk, not a reason to claim that porcelain prevents waterproofing failure. Porcelain may reduce staining, etching and replacement-matching problems, but it cannot correct non-compliant construction.

For a closer comparison of the alternative, review this guide to marble-look porcelain tiles before confirming the specification.

When You Need a Registered Builder in Victoria

A bathroom renovation can become regulated building work as soon as the scope extends beyond replacing finishes. In Victoria, domestic building work worth more than $10,000 must generally be carried out by a registered builder or building company. A narrow, single-trade job may fall outside that requirement, so confirm the scope and practitioner status through the Victorian practitioner search.

Large marble tile work rarely stands alone. A typical renovation may include demolition, framing, plumbing, electrical work, waterproofing, screeding, tiling, cabinetry and shower-screen installation. Once the project changes a wet area or coordinates several trades, someone must manage sequencing, responsibility and compliance, not only the tile placement.

Victoria recognises Domestic Builder limited to bathroom, kitchen and laundry renovation registration, DBL-L. A DBL-L practitioner may undertake the renovation work covered by that category, such as removing and rebuilding a bathroom, replacing its waterproofed floor and walls, or coordinating associated fixtures and finishes. A practitioner with Domestic Builder Unlimited, DBU, has broader domestic building authority. The referenced Victorian guidance states that bathroom renovation work must be completed by a practitioner holding either DBU or DBL registration. (Victoria bathroom renovation registration pathway)

Check the practitioner before signing

Ask for evidence and verify it independently:

  • Search the VBA register: Confirm the practitioner appears in the official search.
  • Check current status: Make sure the registration is current and not suspended.
  • Confirm the category: Verify that it covers the proposed bathroom work.
  • Read the contract: Check the registered category and number, defined scope, timeline and payment terms.
  • Confirm wet-area responsibility: Identify the licensed waterproofer, inspection process and Installation Certificate.
  • Record the standards: Ensure the documentation addresses AS 3740 and applicable NCC wet-area provisions.

A straightforward re-tiling job may involve less coordination. Replacing a substrate, altering a shower, moving a waste or repairing a leaking wet area changes the risk profile. Waterproofing sign-off must come from the appropriate licensed waterproofer, while structural changes may require further professional assessment.

Problems often appear after the bathroom looks finished. A cracked marble panel can indicate movement below. Staining, loose tiles or damp adjoining timber can point to preparation or waterproofing failure. If an unregistered person coordinated the work, the owner may later face uncertainty about insurance, contractual responsibility and defect rectification.

Registered builders provide a clearer chain of responsibility. Melbourne Tiling Services P/L operates as a registered unlimited builder and coordinates licensed carpenters, plumbers, electricians, tilers and waterproofers for bathroom and ensuite renovations involving waterproofing, screeding, marble, porcelain and ceramic tiling. That coordinated scope suits large-format stone where substrate, waterproofing and finished levels must work together.

For a Melbourne bathroom renovation, Melbourne Tiling Services P/L can assess the substrate, waterproofing sequence, screed levels and large-format marble or porcelain layout before materials are ordered. Visit Melbourne Tiling Services P/L to arrange a quote and discuss a compliant, properly coordinated renovation.

Renovation Cost Per Square Metre: Melbourne Guide

You've measured the bathroom, multiplied the floor area by a rate you found online, and arrived at a figure that feels reassuring. Then a builder asks whether the plumbing is moving, the walls are square, the floor needs levelling, and the shower requires a new waterproofing system. Suddenly, the simple renovation cost per square metre calculation no longer resembles the quote.

That's normal. Floor area is only one part of the price. Scope complexity, fixed trade costs, materials, access, compliance and coordination often matter more, particularly in Melbourne bathrooms and ensuites. A small room can cost more per square metre than a larger one because the same demolition, plumbing, waterproofing and certification tasks are concentrated into fewer square metres.

Table of Contents

Understanding Bathroom Renovation Costs in Melbourne

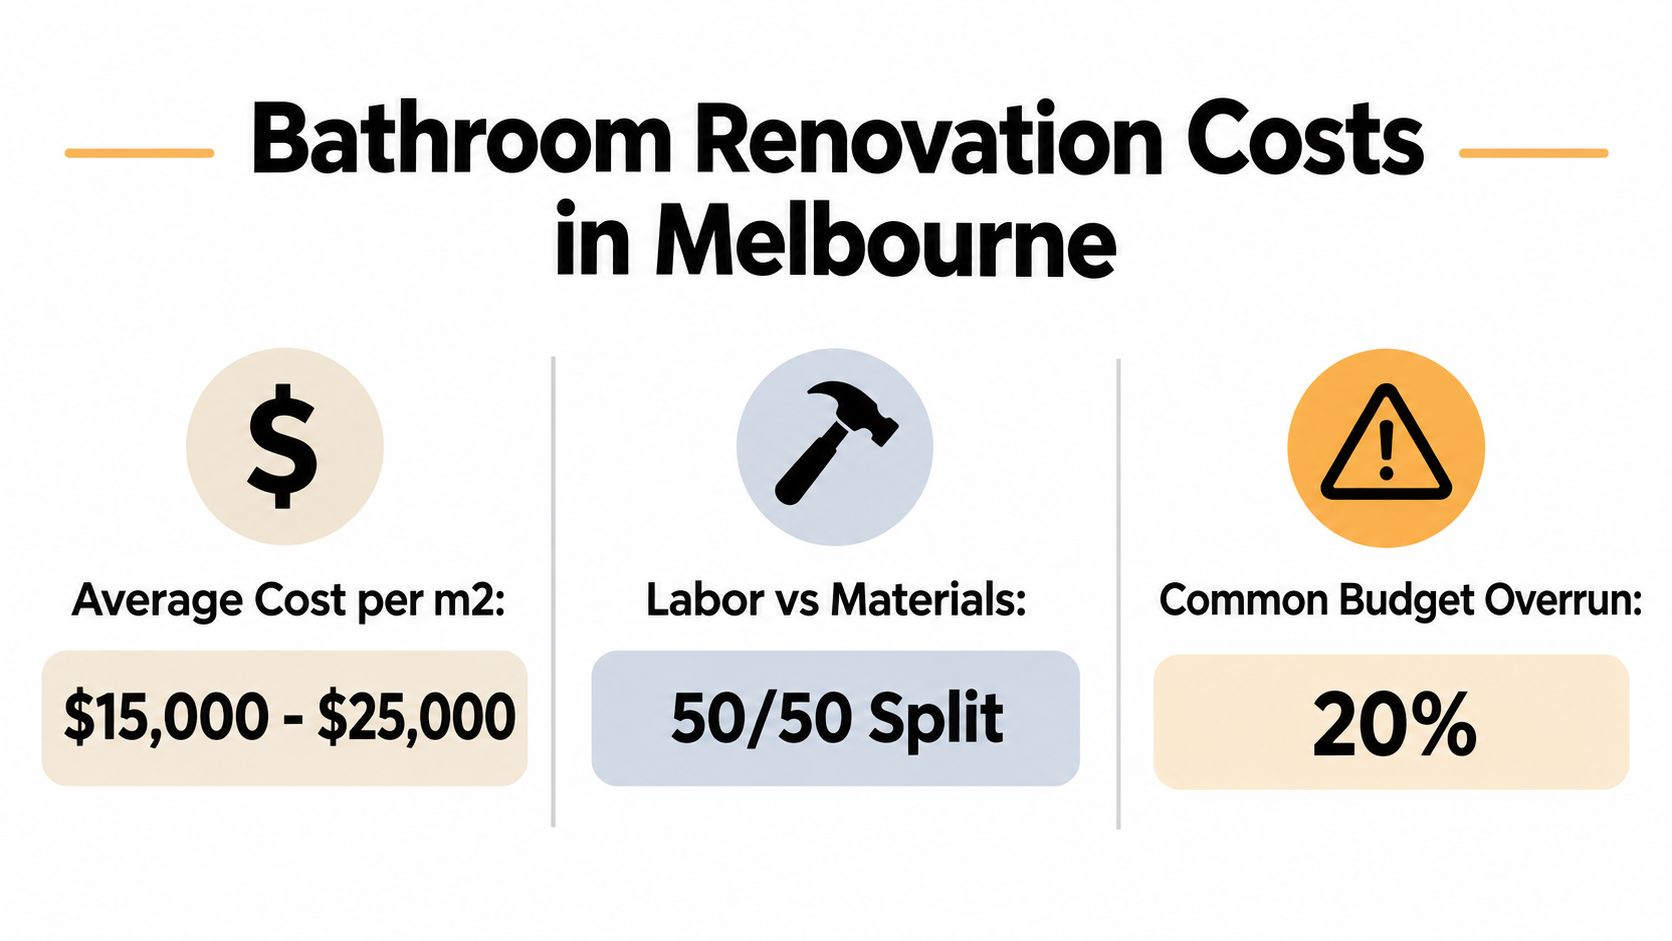
A homeowner might start with a calculator, see a national renovation range, and assume the result will translate directly to a Melbourne bathroom. A commonly cited Australian benchmark for a standard home renovation is A$1,600 to A$3,700 per square metre, with the figure attributed to SOHO in a 2025 Canstar summary, as outlined by this Victorian bathroom renovation pricing guide. That's useful as a first filter, but it isn't an itemised bathroom quote.

The calculation becomes unreliable when the scope changes. Replacing fittings in their existing positions is very different from demolishing the room, relocating a toilet, correcting a sloping substrate, installing a tiled niche and rebuilding the shower with compliant waterproofing. Both projects may occupy the same floor area, yet they demand different trades, sequencing and inspection requirements.

Melbourne conditions also affect how a project is priced. Labour availability, site access, waste removal, older housing stock and the need to coordinate licensed trades can all influence the final figure. A bathroom in a compact terrace with difficult access may require more handling and protection than a larger room on a clear ground-floor site.

An infographic showing bathroom renovation cost estimates, labor-to-material split, and potential budget overruns in Melbourne.

The rate is a starting point, not a promise

I treat a per-square-metre figure as a sense-check. It helps identify whether a proposed budget is obviously too low for the stated finish, but it doesn't replace a scope of work and an itemised quotation. The scope should identify what's being demolished, retained, relocated, supplied, installed, tested and finished.

Builder's rule: If a quote gives you only a rate and no defined scope, you still don't know what you're buying.

For Melbourne and greater Victoria, the most useful early comparison is between a cosmetic refresh and a full wet-area rebuild. The first may preserve services and limit demolition. The second can involve waterproofing, plumbing, electrical work, substrate preparation, tiling and compliance documentation. Homeowners comparing contractors can also review the Melbourne bathroom renovation cost guide to understand which parts of the work need to be separated before comparing prices.

How Scope Determines Your Price per Square Metre

The phrase “renovation cost per square metre” hides several different project types. A cosmetic refresh may involve new paint, fittings, accessories and selected surface work while keeping the layout intact. A full renovation removes more of the existing room and rebuilds the wet areas, services and finishes.

A 2026 Australian renovation guide places metropolitan cosmetic projects at roughly A$2,000 to A$2,500 per square metre, mid-range full renovations at about A$2,800 to A$4,500 per square metre, and premium architect-designed work at more than A$6,000 per square metre, according to Canstar's Australian renovation cost guide. These bands help with planning, but a bathroom shouldn't be classified by appearance alone.

Cosmetic work

Cosmetic work works best when the existing layout is serviceable and the concealed building elements are sound. Keeping the toilet, vanity, shower waste and major plumbing in place can reduce disruption. It doesn't eliminate the need to check the substrate, falls and waterproofing, especially if the shower is being altered.

This approach stops working when the room has leaks, movement, damaged flooring or services that no longer suit the layout. Covering a defect with new tiles isn't a renovation strategy. It's postponing the cost and potentially making the eventual repair more disruptive.

Mid-range full renovation

A mid-range full renovation usually includes demolition, replacement fixtures, new wall and floor finishes, electrical and plumbing coordination, waterproofing and surface preparation. The cost rises because the trades work in sequence, and each stage affects the next. The tiler can't produce a durable finish if the substrate is uneven, the waterproofing is incomplete or the waste falls aren't correct.

The most useful document is a detailed scope of work, often called an SOW. For readers who manage properties or maintenance programmes, this SOW definition for facility managers explains why clear inclusions and exclusions make contractor comparisons more meaningful.

Premium and structural work

Premium work can include natural stone, complex patterns, custom joinery, concealed systems, architectural details and extensive substrate correction. A higher finish level also increases handling, protection and quality-control requirements. Large-format products may reduce grout lines, but they demand accurate walls, careful transport and experienced installation.

Structural changes add another layer. Removing walls, changing openings or altering floor levels can require design input, engineering or additional approvals. The floor area hasn't changed, but the scope has, which is why a single rate can mislead.

Practical test: Compare two quotes by matching the scope line by line, not by choosing the lowest rate per square metre.

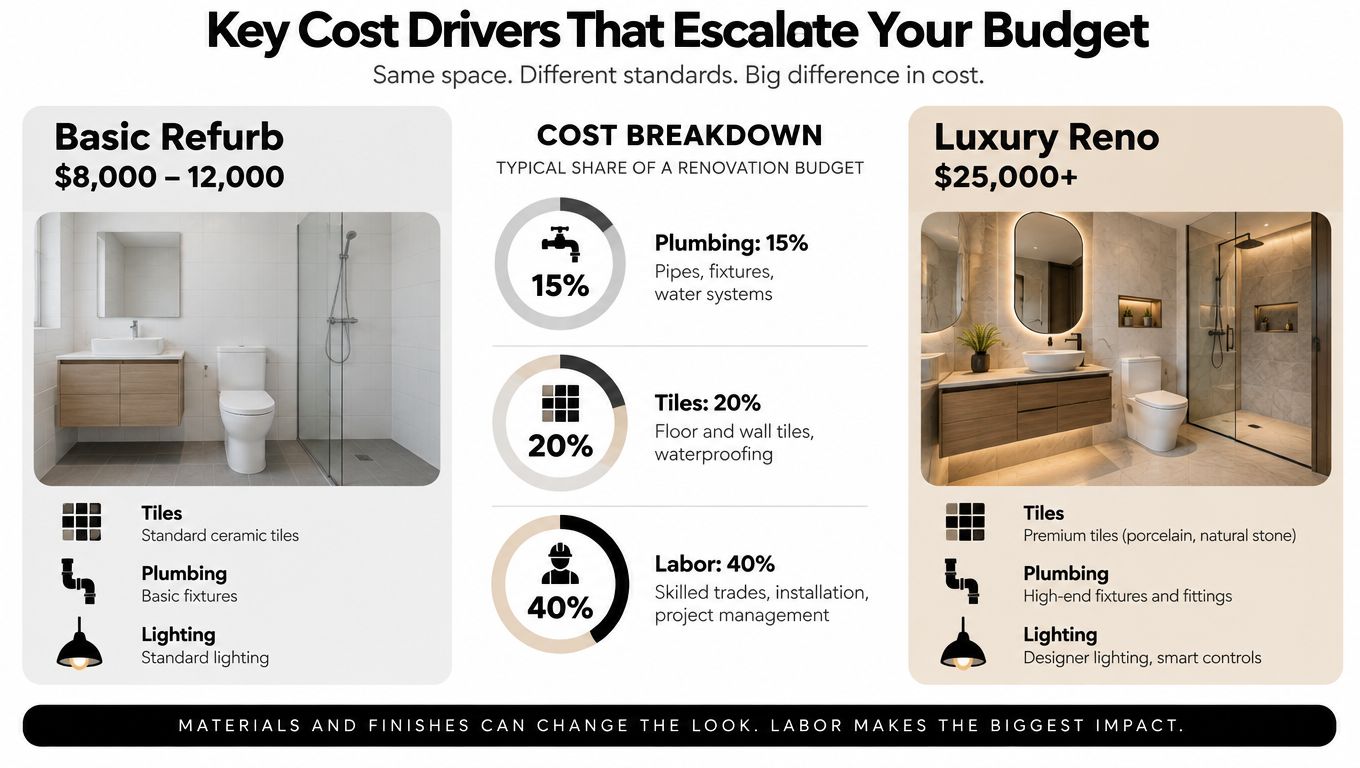
Key Cost Drivers That Escalate Your Budget

Two bathrooms with the same floor area can have very different prices. One may need straightforward ceramic tiling over a sound substrate. The other may require demolition, re-levelling, plumbing relocation, premium porcelain, a recessed niche and a complete waterproofing system.

Australian trade pricing illustrates the spread. Tiler labour is commonly quoted at A$30 to A$170 per square metre, waterproofing at A$35 to A$200 per square metre, standard tile supply at A$30 to A$120 per square metre, premium stone at A$80 to A$130 or more per square metre, and tile removal at A$45 to A$60 per square metre, based on the Australian bathroom renovation cost breakdown from Service.com.au.

A comparison infographic showing cost drivers for bathroom renovation between basic and luxury standards with percentage breakdowns.

Tiles and substrate

Standard ceramic can be practical for a controlled budget, particularly where the format is manageable and the walls are reasonably true. Large-format porcelain and natural stone create a different installation environment. The sheets are heavier, handling is more demanding, and the substrate must be flatter to avoid lippage and stress.

Screeding, self-levelling and re-levelling aren't decorative extras. They prepare the surface for the finish and help establish correct falls. Skipping that preparation may produce a cheaper initial quote, but it can create visible defects, poor drainage and premature failures.

Waterproofing and wet-area work

Waterproofing is one of the least visible parts of the job and one of the worst places to cut corners. A bathroom renovation needs coordinated preparation, compatible products, correctly treated junctions and adequate curing time. The tiler's finish can look excellent while a failure behind the tiles creates expensive remedial work.

Plumbing relocation also carries more impact than the visible fixture cost. Moving a shower or toilet can affect pipe routes, penetrations, floor preparation and sequencing. A layout change may improve the room, but it shouldn't be priced as if it were a simple fitting replacement.

Labour and coordination

Trade labour includes more than time spent laying tiles. It can include protection, demolition, rubbish handling, preparation, set-out, cutting, cleaning, testing and return visits. A builder coordinating plumbers, electricians, waterproofers, carpenters and tilers also carries responsibility for sequence and access.

The most reliable savings come from reducing unnecessary scope, not from removing essential preparation. Choose a simpler tile pattern, retain sound services where practical and finalise fixtures before work begins. Don't save money by omitting waterproofing checks or substrate correction.

Calculating Renovation Cost per Square Metre

Start with the floor area, but don't stop there. Measure the length and width of the room, calculate the floor area, then record the wall areas that will be tiled separately. The floor figure helps with broad comparison, while the wall and wet-area details reveal the actual tiling and preparation workload.

For full Australian bathroom renovations, commonly quoted benchmark pricing sits around A$2,300 to A$4,600 per square metre, with smaller bathrooms often landing at the higher end because demolition, waterproofing, plumbing relocations and compliance work are spread across fewer square metres, according to Homes to Love's bathroom renovation cost guidance.

A useful calculation method

  1. Measure the room: Calculate the floor area and note ceiling height, wall lengths, openings and any areas that won't receive tiles.

  2. Define the scope: Write down whether the project is a refresh, a full strip-out, a layout change or a structural alteration. Include demolition, disposal, plumbing, electrical work, waterproofing, screeding, tiling, fixtures and finishing.

  3. Choose a finish band: Use a lower band only when the scope is strictly cosmetic. A full wet-area rebuild belongs in a different planning category from a surface refresh.

  4. Separate fixed costs: Allow for site setup, demolition, waste, trade mobilisation, compliance work and coordination. These costs don't shrink in proportion to floor area.

  5. Request an itemised quote: Ask each contractor to identify labour, materials, exclusions, provisional items and assumptions. A per-square-metre price is useful only when the inclusions match.

The inverse relationship is straightforward. A compact ensuite still needs demolition, a plumber, an electrician, waterproofing, tiling, fixtures and cleaning. Those fixed tasks are divided by fewer square metres, so the unit rate rises. A larger bathroom may require more tiles, but the same service and setup costs are distributed across a broader area.

The same measurement principle applies in adjacent trades. If you're comparing area-based pricing outside the Australian bathroom market, this guide to price per square foot for painters in shows why unit measurements need to be read alongside preparation and scope. For local tiling assumptions, the Melbourne tiling cost per square metre guide can help separate tile supply from installation and preparation.

Real-World Examples for Melbourne Bathrooms

A compact ensuite can produce a surprisingly high cost per square metre. Consider a 4.5 m² ensuite at the upper end of the full-renovation benchmark. The floor-area calculation gives roughly A$10,000 to A$21,000 before any plumbing relocation is priced, based on the benchmark from Hipages' bathroom renovation cost article. The calculation provides a starting point, not a final quote. Access, materials, layout changes and concealed damage determine where the project lands.

A compact ensuite

Small rooms carry most of the same trade requirements as larger bathrooms. A complete strip-out may involve demolition, waste removal, plumbing, electrical work, waterproofing, wall and floor tiling, fixture installation and final cleaning. Those fixed tasks are divided across fewer square metres, which raises the unit rate.

The plumber still needs to isolate and reconnect services. Waterproofing must cover the required wet-area surfaces, and the tiler must work around wastes, niches, corners and fittings. Premium tiles, restricted access or substrate repairs can increase labour even when the tiled area is limited.

A price based only on floor area can therefore understate the work. Price the ensuite as a defined package first, then use the square-metre rate as a sense-check.

A larger family bathroom

A larger family bathroom usually contains more floor and wall surface, fixtures, storage, screens and finishing work. Some setup and service costs are spread across a wider area, so the rate per square metre may fall. Keeping the vanity, toilet and shower in their existing positions can reduce plumbing labour further.

The total project can still be substantial. Australian consumer guidance places bathroom renovation costs around $10,000 to $30,000 or more, depending on design, materials and labour, according to Service.com.au's bathroom renovation cost breakdown. The final scope matters more than floor area alone.

What a quote should reveal

Check whether the quote includes demolition, disposal, waterproofing certification, substrate preparation, tile trims, silicone, fixtures, screens, painting and final cleaning. Ask the contractor to identify exclusions, provisional items and assumptions as well.

A reliable comparison starts with matching work packages. A cheaper quote may omit preparation, waste removal or finishing, leaving those costs to appear later as variations. Compare the inclusions before comparing the price.

Important Rules for Registered Builders

In Victoria, domestic building work valued at more than $10,000 must be carried out by a registered builder or registered building company, and the project must use a major domestic building contract. Consumer Affairs Victoria says the requirement applies to renovations, extensions and repairs. Some single-trade jobs, including tiling, painting or plumbing, can be exempt when that is the only work being performed, as explained by Consumer Affairs Victoria's guidance on builders and tradespeople.

A professional builder in a hard hat and high visibility vest hands a contract to a woman.

Check who holds responsibility

A bathroom renovation often combines several trades. If one contractor is managing demolition, carpentry, plumbing, electrical work, waterproofing and tiling, confirm whether the contracting entity is registered for the work and whether the required contract is being used. Don't assume that a trade licence automatically makes the person a registered builder.

Ask for the registration details, written scope, contract terms, insurance information and a clear payment schedule. Verify the practitioner through the Victorian practitioner search rather than relying only on a business card or online profile.

The registration rule protects more than paperwork. It helps establish who is responsible for coordinating the work, addressing defects and complying with the applicable domestic building requirements. A cheap quote can become expensive if nobody accepts responsibility for the complete sequence.

Compliance check: Before signing, confirm the contractor's registration status and make sure the contract describes the entire renovation, not just the visible tiling.

The following video provides a useful visual introduction to the role of construction builders and contract administration:

Single-trade exemptions don't remove the need for competent workmanship or correct coordination. If several trades are involved, treat the project as a managed renovation rather than a collection of unrelated tasks.

Using Free Quotes and Calculators to Plan

A calculator is most useful before you speak to contractors. Enter the room measurements, identify whether the layout changes, select a finish level and list the work that must be included. Then use the result to prepare questions, not to demand that every contractor match one headline figure.

The Melbourne bathroom renovation calculator can help organise an early budget around scope. Pair it with at least one detailed, site-based quote and ask each contractor to identify exclusions, provisional items, substrate assumptions, waterproofing requirements and fixture responsibilities.

Before accepting a price, ask:

  • What demolition and disposal are included?
  • Are plumbing and electrical relocations included?
  • Who supplies tiles, fixtures, screens and accessories?
  • What preparation is allowed for floors and walls?
  • Is waterproofing documented and certified?
  • Who coordinates the registered builder and specialist trades?

A clear scope makes the renovation cost per square metre meaningful. Without it, you're comparing incomplete promises.


Melbourne Tiling Services P/L provides start-to-finish bathroom and ensuite renovations, waterproofing, screeding, self-levelling, ceramic, porcelain, marble and large-format Kerlite tiling across Melbourne and greater Victoria. Visit Melbourne Tiling Services P/L to request a free quote, discuss your scope and use practical planning tools before work begins.

Ceramic Floor Tile Installation: A Homeowner Guide

You've chosen the tiles, cleared the room and watched enough installation videos to feel confident. Then the first tile rocks on the floor, the cut around the toilet doesn't line up, or a bathroom renovation reveals a damp substrate underneath. That's when ceramic floor tile installation stops looking like a weekend decorating job and starts looking like the precision trade it is.

In Melbourne homes, the visible tile is only the final layer of a system. The substrate, falls, waterproofing, adhesive coverage, movement joints and grout all determine whether the finished floor stays sound. A homeowner can handle some straightforward dry-area work, but wet areas, structural changes and larger projects deserve a much more cautious decision about whether registered builders and specialist trades need to be involved.

Table of Contents

Planning Your Ceramic Floor Tile Installation

Most homeowners worry about chipping an expensive tile. The more serious risk is installing a complete floor over a surface that was never suitable in the first place. A good plan protects the tiles, but it also protects the adhesive bond, drainage, room transitions and future maintenance.

Map the job in six phases:

  1. Inspect the subfloor. Identify whether you're working over concrete, screed, timber or an existing finish. Check for movement, cracks, contamination, dampness and changes in level.
  2. Correct the substrate. Fill defects, remove weak material and establish a suitable, sufficiently flat plane before adhesive is mixed.
  3. Plan waterproofing and movement. Bathroom renovations require waterproofing and drainage decisions before tiles cover the work. Larger floors and exposed areas also need movement joints placed deliberately.
  4. Set out the tiles. Dry-fit rows from the room's main sightlines. A layout that leaves narrow slivers at a doorway will look poor even if every tile is technically bonded.
  5. Fix the tiles. Select an adhesive compatible with the tile, substrate and conditions, then spread it with the appropriate trowel and bed the tiles consistently.
  6. Grout and finish. Allow the adhesive to cure according to its product instructions, then grout, clean and seal where the selected materials require it.

A five-step infographic showing the planning process for a ceramic floor tile installation project.

Decisions to make before buying tiles

Tile format affects more than appearance. Large-format ceramic and porcelain products make a room feel calmer, but they expose substrate irregularities and are harder to handle. Mosaics suit shower gradients and curved details, yet their many joints demand accurate setting and careful cleaning.

Buy the tile, adhesive, grout, trims and movement-joint materials as one system. Check the manufacturer's installation requirements rather than assuming a general-purpose adhesive will suit every surface. For a complex bathroom, establish who is responsible for waterproofing certification, falls, plumbing interfaces and final tile fixing before work starts.

Practical rule: A tile isn't a levelling tool. If the floor is wrong before adhesive goes down, the finished surface will show it.

Subfloor Preparation and Waterproofing Essentials

A sound tile floor begins with a sound base. Dust, paint, old adhesive, loose screed and movement beneath the surface can prevent a reliable bond, while a floor that looks flat by eye may still be unsuitable for large-format tiles.

For thin-bed ceramic tile installation, guidance associated with AS 3958.1 states that a concrete floor shouldn't vary by more than 5 mm over 3 m, while wall substrates shouldn't vary by more than 4 mm over 2 m. The practical sequence is simple, though the correction work can be demanding: inspect, measure with a straightedge, repair defects, level where necessary, then recheck before fixing begins. The detailed principles of substrate preparation for tile work are worth understanding before you commit to adhesive.

A professional construction worker applying blue waterproof sealant to a wooden floor with a paint roller.

Flatness is different from level

A floor can slope gently and still be flat enough for tiles. A floor can also be level but contain humps and hollows that leave adhesive coverage inconsistent. That distinction matters in bathrooms, where the finished surface must fall towards the waste rather than sit perfectly level.

Large-format products are especially unforgiving. A tile may bridge a hollow, leaving a void beneath its centre, or pivot over a high spot and create lippage at the adjoining edge. Use a long straightedge and mark problem areas before choosing between patching compound, grinding, screed or a levelling system.

Waterproofing comes before the finish

The National Construction Code requires wet-area waterproofing to comply with AS 3740, and AS 3740:2021 sets minimum requirements for waterproofing materials, design and installation in domestic wet areas across relevant building classes, as explained in Australian wet-area waterproofing guidance.

In Victorian shower work, the VBA guidance requires a shower floor to fall towards the waste at a minimum of 1:80 and no more than 1:50, with shower walls waterproofed to 1800 mm above the floor substrate. These details must be checked before tiling. A tile and grout layer isn't a substitute for a correctly installed membrane, sealed penetrations and properly formed junctions.

The floor should drain without ponding, the membrane should be compatible with the substrate and adhesive system, and the waterproofing should be allowed to cure as specified. If a bathroom renovation involves moving wastes, rebuilding the shower base or altering wall linings, bring the appropriate licensed trades into the project rather than trying to hide defects under tile.

Laying Tiles and Mastering Cuts

Once the base has passed inspection, mark the layout before opening the adhesive. Find the main visual axis of the room, dry-lay several rows and check how the pattern meets walls, cabinetry, doorways and floor wastes. The centre of the room isn't always the best starting point. A bathroom may look better if the most visible wall receives full or balanced cuts, while a hidden vanity edge takes the smaller pieces.

Spread only as much adhesive as you can cover within its open time. Comb the bed in one direction, then press and slide each tile into place rather than dropping it onto the ridges. For larger formats, back-butter where the adhesive system requires it and lift an occasional tile to check coverage. Hollow corners and weak edges are common when the installer relies on a few adhesive dabs instead of a properly compressed bed.

Choose the trowel notch from the adhesive and tile manufacturer's instructions, not from habit. A small ceramic wall tile and a thick large-format floor tile don't place the same demands on the adhesive bed. Keep joints consistent with spacers or a suitable levelling system, but don't use clips to force tiles over an uneven substrate.

Cuts decide whether the job looks professional

A manual cutter works well for clean, straight cuts on compatible ceramic tiles. Use a wet saw with a suitable diamond blade for harder products, narrow strips, mitres and cuts close to visible edges. Hole saws help with pipe penetrations, while an angle grinder can shape difficult cuts, but it creates dust and can chip glazed faces if handled aggressively.

Measure each cut at the actual location. Walls aren't always square, and a tile measured from the opposite side of the room can be wrong by enough to ruin the fit. Leave the specified perimeter gap rather than wedging tiles tightly against walls, cabinets or fixed structures. That space is part of the movement strategy and is later covered with an appropriate flexible sealant or trim.

A clean layout can make an ordinary tile look expensive. A poor layout can make a premium tile look like a rushed repair.

Grouting and Sealing for Durability

Grout isn't there to compensate for bad setting. It fills the designed joints, helps keep debris out and gives the floor its finished appearance, but it can't repair poor adhesive coverage, uneven edges or movement beneath the tiles.

Wait until the adhesive has cured according to the product instructions. Mixing too much grout at once often leads to rushed application, while adding extra water later can weaken colour consistency and leave a powdery surface. Work the grout firmly across the joints, hold the float diagonally to the tile edges and remove excess before it hardens.

Cement-based grout suits many domestic floors when the joints, tile surface and exposure are appropriate. Epoxy grout costs more and requires disciplined application, but it can provide strong resistance to staining and moisture in demanding areas. The decision depends on the tile, joint width, cleaning expectations and the installer's ability to work within the product's pot life. The differences are set out clearly in this comparison of epoxy grout and cement grout.

Cleaning is part of the installation

Wash the surface in controlled passes with a damp sponge, rinsing frequently. Too much water can pull pigment from cement grout, while leaving residue on the tile face creates a stubborn haze. Textured ceramic surfaces need extra attention because grout can lodge in their profile.

After the grout has firmed, polish remaining film with the method recommended by the manufacturer. Don't use an acidic cleaner on a surface or grout that the product instructions say could be damaged by acid. Protect the floor from traffic, dirt and trades until the grout and any sealant have reached their specified cure.

Not every ceramic tile needs sealing. Some cementitious grouts do, while many glazed ceramic surfaces don't. Seal the materials that require it, test an inconspicuous area first and maintain the floor with products compatible with the grout and tile. In Melbourne's damp winter conditions, good ventilation and prompt removal of standing water matter just as much as the initial finish.

Common Mistakes to Avoid

The expensive failures usually begin before the first tile is placed. A rushed installer may focus on the visible pattern while ignoring the substrate, drainage and movement conditions that carry the load underneath it.

Where installations go wrong

  • Skipping the straightedge check: Excessive variation leaves voids, lippage and unstable corners. Correct the base before spreading adhesive.
  • Treating waterproofing as tile preparation: A membrane must be designed and installed as part of the wet-area system. Grout lines won't stop water reaching a failed junction.
  • Forgetting movement joints: Australian guidance tied to AS 3958:2023 limits external floor joint spacing to 4.5 m. Internal floors need joints where a dimension exceeds 9 m, with spacing no greater than 4.5 m. In direct sunlight, internal floors exceeding 6 m also require that spacing. These requirements are explained in Australian movement-joint guidance.
  • Blocking the perimeter: Tiles jammed tightly against walls have nowhere to accommodate movement, especially where sunlight, temperature changes or structural movement affect the floor.
  • Rushing cure times: Early foot traffic can disturb alignment and weaken the developing bond. Keep other trades off the surface until the adhesive and grout are ready.
  • Ignoring slip performance: A tile's appearance doesn't tell you enough about wet safety. Australian guidance distinguishes testing for new and existing surfaces under AS/NZS 4586 and AS 4663, and practical residential wet-area targets commonly sit around P3 to P4, with higher ratings needed for more exposed locations, as outlined in Australian ceramic tile testing guidance.

The right response to a defect is to investigate its cause, not cover it with more grout or silicone. Cracking, tenting, hollow sounds and persistent dampness usually indicate a system problem that needs proper diagnosis.

When to Hire a Registered Builder

A homeowner can reasonably tackle a small, uncomplicated dry-area floor when the substrate is sound, no plumbing or structure is changing, and the installation remains within their skill level. Measuring, dry-laying, cutting a few straight edges and grouting carefully are manageable tasks. The risk rises sharply when the project includes a shower, balcony, extensive demolition, structural alterations or several trades working in sequence.

Project situation DIY may be reasonable Professional coordination is safer
Dry room with a sound concrete base Small format, simple layout and accessible edges Large-format tiles, extensive levelling or difficult thresholds
Bathroom floor refresh Only where waterproofing remains intact and no wet-area system is disturbed New shower base, membrane, waste, falls or wall waterproofing
Whole bathroom renovation Cosmetic work with no trade interfaces Plumbing, electrical, carpentry, waterproofing and tiling together
Commercial or large residential floor Rarely suitable without the right equipment and experience Detailed set-out, movement planning, scheduling and compliance records

Victorian registration rules need careful reading. A person or company generally must be registered with the Building and Plumbing Commission for domestic building work worth more than $10,000, but an exception applies to work involving only one type of work, including wall and floor tiling, according to the BPC practitioner search and guidance. If the job combines skills such as plastering and painting, registration may still be required.

That exception doesn't turn a wet-area renovation into a simple tiling job. Victorian consumer guidance says builders or tradespeople carrying out work worth more than $10,000 must be registered with the BPC, and an unregistered builder means you can't obtain Home Warranty insurance. Homeowners should verify registration before signing a major domestic building contract through Victorian builder and tradesperson guidance.

For bathroom renovations, use a registered builder or properly coordinated licensed team when the scope goes beyond isolated tiling. You're paying for sequencing, documentation and accountability, not merely someone to spread adhesive.

Essential Tools and Next Steps

The right tools don't rescue a poor plan, but the wrong tools make accurate work much harder. Start with measuring and inspection equipment, then add cutting and mixing tools suited to the selected tile.

Useful equipment includes:

  • Inspection tools: A long straightedge, tape measure, level, pencil, chalk line and moisture-checking approach suitable for the substrate.
  • Preparation tools: Scrapers, grinders where appropriate, patching tools, buckets and cleaning equipment.
  • Setting tools: The specified notched trowel, margin trowel, rubber mallet, spacers, levelling components and a mixing paddle.
  • Cutting tools: A quality manual cutter for straight ceramic cuts, plus a wet saw or diamond hole saw for harder materials and penetrations.
  • Finishing tools: Rubber grout float, sponges, sealant gun, profiling tools and protective knee pads.

A detailed tiling tools guide can help you match equipment to the tile format instead of buying a random kit. Large-format work may also require safe handling equipment and a second person, while dusty cutting needs proper site controls.

A practical start-to-finish checklist

  1. Confirm the tile, adhesive, grout and sealant are compatible.
  2. Inspect the substrate and measure flatness with a straightedge.
  3. Resolve cracks, hollows, contamination and unsuitable surfaces.
  4. For wet areas, confirm waterproofing, penetrations and falls before tiling.
  5. Dry-lay the pattern and decide where cuts will fall.
  6. Allow for perimeter and movement joints in the set-out.
  7. Cut a small batch, test the fit and protect visible edges.
  8. Spread adhesive within its open time and check coverage by lifting tiles.
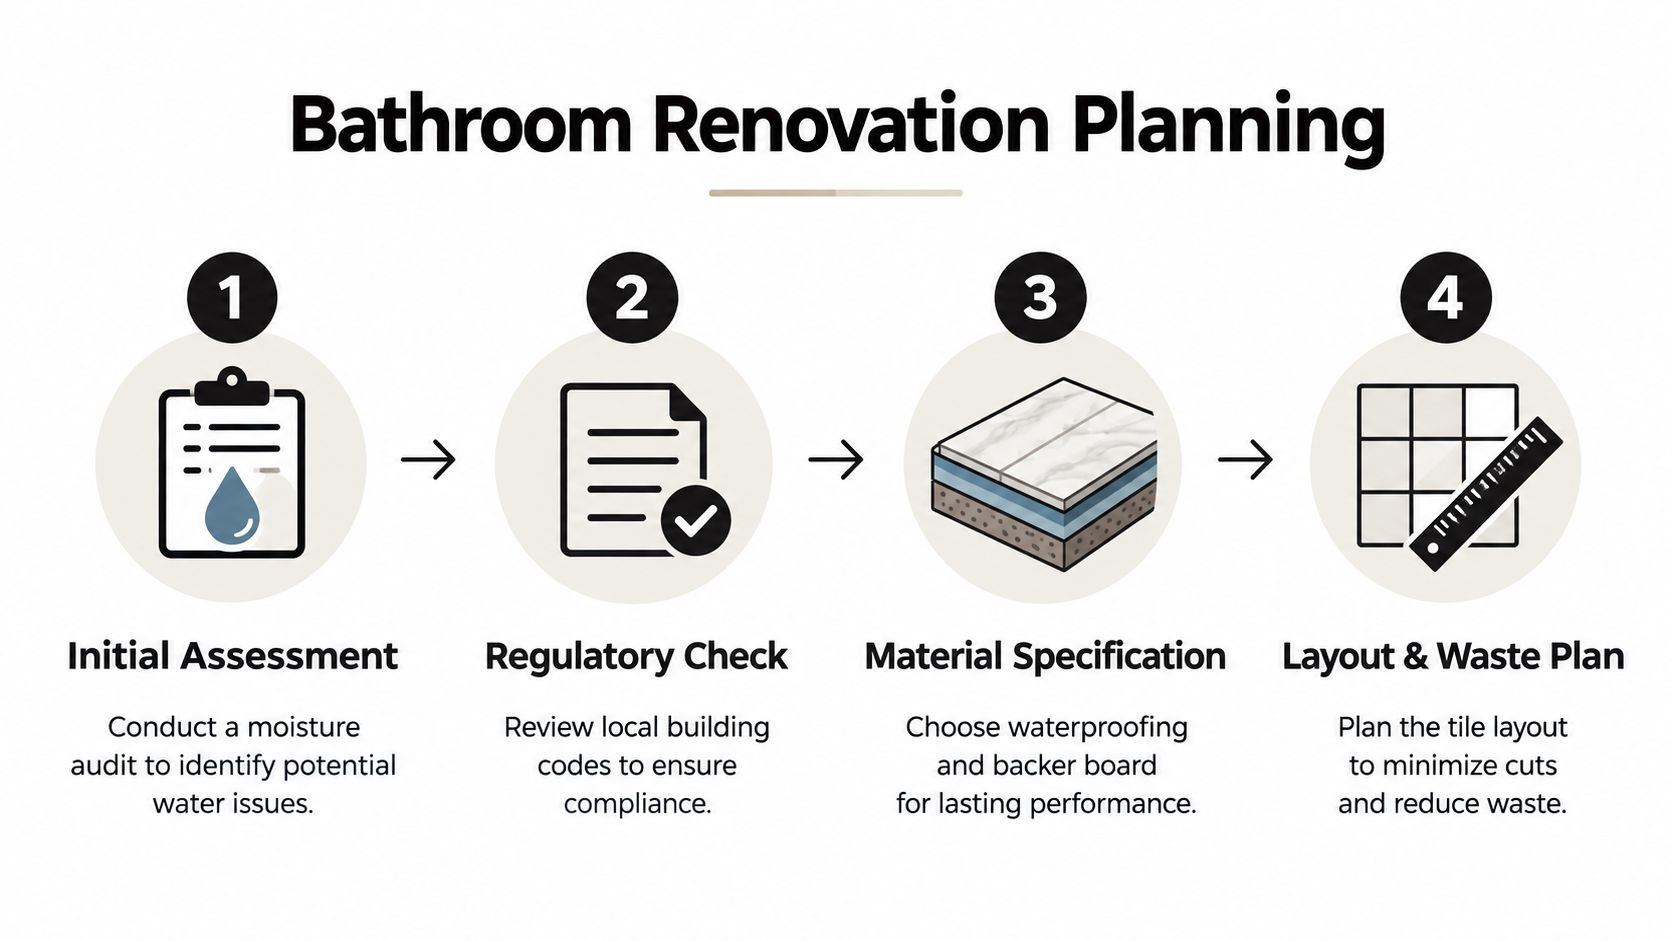
  9. Protect the installation during curing.
  10. Grout, clean, seal where required and follow the maintenance instructions.

Costs and timelines depend on demolition, substrate repairs, tile format, access, waterproofing and the number of trades involved. A cheap quote that excludes preparation or treats waterproofing as an afterthought isn't a saving. It's a transfer of risk to the homeowner.

Ceramic tiling is one part of a bathroom system. If the project includes a shower rebuild, leak rectification, self-levelling, screeding or coordination with plumbers and electricians, Melbourne Tiling Services P/L provides ceramic and other floor tiling alongside bathroom renovation and waterproofing services across Melbourne and greater Victoria.


Melbourne Tiling Services P/L can assess the substrate, coordinate wet-area waterproofing and install ceramic floor tiles as part of a broader bathroom or ensuite renovation. Visit Melbourne Tiling Services P/L to discuss your layout, request a quote and decide which parts of the work are safe to handle yourself.

Self Levelling Compound Underfloor Heating Guide

You've chosen the tiles, booked the electrician and measured the ensuite. Then the floor shows a dip beside the shower, the heating mat sits proud of the slab, and the tiler warns that a quick pour could leave ridges, voids or a cracked finish. In a Melbourne bathroom renovation, the leveller is not just a smoothing product. It controls floor height, moisture, heat transfer and the point at which the next trade can safely start.

A successful self levelling compound underfloor heating installation depends on the complete floor system. The substrate, primer, heating element, compound depth, curing conditions and compliance paperwork all need to work together. A fast-setting bag can be useful in a tight programme, but it can also punish poor preparation.

Table of Contents

When Self Levelling Compound Is the Right Call Over Underfloor Heating

A Melbourne ensuite can look straightforward until the heated floor goes wrong. On one failed job, the installer selected a compound designed for shallow correction, then used it to bury a deeper uneven area. The mix was placed too thickly in one zone, too thinly over the heating mat in another, and the edges weren't isolated. The tiles eventually reflected the movement and the heated floor developed uneven warm spots. The expensive part wasn't the bagged compound. It was removing the tile, correcting the build-up and starting the wet-area work again.

The decision checklist is simple, but it has to be applied before ordering materials.

What the compound does

A self-levelling compound is a polymer-modified cementitious pour. Over electric cables, mats or low-build hydronic components, it creates a flat layer that protects the heating element and gives tile adhesive a consistent surface. It also provides a more continuous path for heat than isolated blobs of adhesive or a rough hand-applied screed.

The height advantage matters in Melbourne apartments. A leveller build-up is commonly around 10–40 mm, while a traditional sand-cement screed is commonly around 40–70 mm, as outlined in Australian trade guidance from Melbourne Tiling Services on self-levelling compound for concrete. Saving floor depth can preserve a bathroom threshold, keep a door swinging freely and reduce the chance of creating a step into a second-storey ensuite.

Self-leveller is usually the sensible choice for:

  • Electric cable or mat systems: The low-profile element can be encapsulated without the height of a full screed.
  • Low-build hydronic retrofits: A suitable compound can cover shallow pipework where the manufacturer permits it.
  • Minor slab correction: A concrete floor needing roughly 1–15 mm of correction is a natural candidate for a finishing layer.

When the pour is the wrong tool

Deep hollows beyond the product's permitted thickness need a bulk-fill approach, not a single thin leveller poured into a large depression. Construction joints and structural movement joints must remain active through the floor build-up. A leveller also isn't a substitute for stiffening a flexible timber joist floor.

Site rule: Choose the compound after measuring the floor and heating system together. Don't choose it because the label says “self-levelling”.

The cost-versus-risk calculation is practical. A thinner pour can save height and reduce drying mass, but it leaves less room for error. A deeper liquid screed can solve a badly uneven slab, but it adds weight, height and curing considerations. For broader heating options and layout decisions, the bathroom heating guide 2026 Western is a useful companion resource. The right product is the one that matches the floor build-up, not automatically the fastest product on the shelf.

Electric and Hydronic Systems Compared for Leveller Compatibility

Electric and hydronic floors behave differently before the compound is even mixed. An electric mat or cable system is generally low profile, while hydronic pipework occupies more of the available floor depth and relies on the slab or screed as thermal mass. That difference determines whether a thin levelling coat is realistic.

Electric systems suit bathroom renovations where the floor height is tight. The cable and mesh may occupy roughly 4–6 mm, and a compatible leveller can provide a practical covering layer in the 10–25 mm range. The main installation risk is trapped air around cable loops. A mix that's too stiff won't flow under and around the element, leaving voids that create cold patches and weaken support below the tile.

Hydronic systems are a different proposition. Pipework commonly sits around 16–20 mm, so the installer may need a deeper cap in the 30–50 mm range or a full liquid screed pour, depending on the system design. The floor responds more slowly than electric heating, but the additional mass can hold warmth for longer. A compound must be approved for the pipe system, the intended depth and the final floor finish.

Attribute Electric Mat/Cable Hydronic Pipe
Heat-up behaviour Generally faster response Slower response, greater thermal mass
Typical pour depth About 10–25 mm where approved About 30–50 mm cap, or a designed liquid screed
Leveller type Compatible cement-based leveller, securely fixed element Compatible cement-based leveller or liquid screed system
Build-up height Lower profile Greater depth around pipework
Cost band per m² Must be quoted for the selected system and floor area Must be quoted for the selected system, pipe layout and floor area

The table gives planning direction, not a product approval. Read the technical data sheet for the exact compound. Australian product data, including Sika Australia's Sikafloor Level Ultra information summarised for heated-floor planning, identifies suitability for underfloor heating and gives tile and moisture-sensitive flooring windows at 23°C. Those times depend on temperature, humidity, thickness and ventilation.

Most cement-based levellers can be selected for either system when the manufacturer permits it. Anhydrite screeds require particular care under electric cable systems and may need a primer barrier. The heating element must also be fixed firmly. A fluid pour can float loose mesh or displace poorly secured cable, leaving the finished floor with a heating pattern that doesn't match the design.

Preparing the Substrate Before You Pour

Day one starts with the slab, not the bag. I begin by checking movement because a smooth surface won't correct a moving substrate.

Check movement and moisture first

Shrinkage cracks crossing a planned cable run need assessment before the heating is installed. Some require repair or stitching, while construction joints must be carried through the leveller rather than buried. If the joint is concealed, the finished tile layer may crack along the same line.

Moisture comes next. Use a hygrometer or a plastic sheet test to identify residual damp. A reading above 75% RH, or visible dampness, blocks the pour until the moisture source is addressed and the specified moisture-barrier primer is used, as reflected in Australian levelling guidance from Melbourne Tiling Services on self-levelling compound primer.

Then profile the surface. Concrete may need mechanical keying or a compatible primer. Existing tile needs degreasing, removal of contaminants and a bonding primer such as ARDEX P9 or Mapei Eco Prim Grip, provided the selected system approves that substrate and primer combination.

Secure the system before covering it

Electric cable needs a resistance test recorded before pouring. Hydronic pipework needs to be securely clipped and pressure-tested. These tests create a baseline, so a later fault can be separated from a pre-existing installation issue.

Seal the perimeter with a 10 mm compressible foam expansion strip. The strip allows the heated floor to move independently at the walls and helps prevent the compound from escaping beneath skirtings, door frames or temporary dams.

My pre-pour checklist is short:

  • Clean surface: Dust, laitance, grease and loose material removed.
  • Correct primer: Applied evenly and allowed to reach the specified condition.
  • Sealed edges: Perimeter foam and threshold dams fixed.
  • Heating secured: Cable or pipe cannot float, fold or move during the pour.
  • Tests recorded: Electric resistance or hydronic pressure results placed in the project file.
  • Datum confirmed: Finished compound height checked against doors, wastes and shower falls.

If the substrate isn't ready, mixing another bucket only makes the mistake more expensive.

Mixing Ratios and Application Technique

The bag's technical sheet controls the water ratio. For standard products such as ARDEX K15 or Davco K10, a working reference is commonly 4.5–5.0 litres per 20 kg bag, while some rapid-set variants shift closer to 4.0–4.25 litres. Confirm the exact figure for the product on site, because excess water reduces strength, encourages pinholes and changes the flow behaviour.

An instructional infographic detailing the mixing ratios and application steps for self-levelling compound over underfloor heating systems.

Mix consistently, then keep moving

Set up two clean buckets and a low-speed drill paddle. Measure water into the first bucket, add powder gradually and mix until lump-free. Allow the batch to slake for around 2 minutes, then remix before pouring. The second bucket keeps production continuous while the first batch is being placed.

Don't add water to rescue a batch that has started to stiffen. That re-tempering weakens the material and produces inconsistent curing across the floor.

For a standard fibre-reinforced leveller approved for the application, the permitted single-pour range may sit around 1–40 mm. Directly over electric cable or mat, the practical covering layer may reduce to around 5–10 mm so the element is properly encapsulated without creating an unnecessary thermal build-up. Product limits always override a general range.

Place depth gauges at 1 m centres and set them to a confirmed datum. Pour from the farthest point towards the exit, maintaining a wet edge. Spread with a gauge rake or smoothing tool, then use a spiked roller while the compound still flows. Roll carefully across the area to release trapped air, but don't drag the cable or disturb the mesh.

Practical rule: A continuous pour gives the compound its best chance to flow as one surface. Stop-start placement creates ridges that later appear as tile lippage.

A rapid-set product changes the crew requirement. Working time can collapse from 30 minutes to 10 minutes, so a 3 x 3 m ensuite needs the substrate, buckets, gauges, dams and tools ready before the first bag is opened. I'd use two people, pre-cut foam strips at thresholds and a clear route from mixing station to pour area. Fast set is valuable only when preparation is faster than the material.

Drying Times and the Heating-Up Schedule

Drying time isn't the same as full commissioning. A floor can be walkable while still containing moisture that must be managed before adhesive, membrane or final tile work proceeds.

Leveller family Typical walk-on window Tile-ready window
Standard cement-based About 4–6 hours About 24 hours
Rapid-set About 2–3 hours About 4–6 hours
Fibre-reinforced bulk fill About 12 hours About 24–48 hours

These are planning ranges, not guarantees. Australian product guidance notes that some compounds suitable for underfloor heating can accept tiles after around 5–6 hours and moisture-sensitive flooring after around 7–8 hours at 23°C, while other systems take longer. Thickness, temperature, humidity and ventilation can move the window considerably.

A chart detailing drying times for cement-based and rapid-set compounds and a heating-up schedule for floors.

Commission the embedded system carefully

For heated substrates, the commissioning sequence matters more than a rushed tile date. ARDEX guidance for Australia requires the heating units to run for a minimum of seven days before floor covering is laid, then be switched off 48 hours before installation and kept off until 48 hours after completion, as set out in this Australian technical bulletin for self-levelling compound over heated floors.

For hydronic systems, raise water temperature by 5°C per day until operating temperature, hold it for 48 hours, then cool at the same rate before tiling. Follow the heating manufacturer's commissioning instructions where they are more specific. Never energise an electric mat early to force drying. Early heat can drive uneven moisture loss and create micro-cracking beneath the tile layer.

Before tiling, confirm the compound is ready with a flooring moisture test. A commonly used benchmark is below 75% RH, or a calcium chloride result below 55 g/m²/24 h, where that test is appropriate to the flooring system. Record the result with the product batch and site conditions rather than relying on a calendar date alone.

Troubleshooting Common Failure Modes

The fastest cure doesn't automatically produce the safest floor. Rapid products shorten the window for mixing, spreading and correcting defects, so they reward organised crews and expose poor preparation quickly.

Failure Mode Likely Cause Fix if Caught Early Rebuild Scope if Late
Cracking over cable zones Pour too thin, no fibre where required, or heating started early Stop heating, assess cracks and follow the compound repair system Remove affected tiles and unstable compound, then rebuild the heated floor layer
Debonding at the perimeter Foam strip missing or primer skipped, especially on timber Cut out loose edge, isolate movement and repair with approved materials Strip the debonded perimeter and retile after correcting the bond
Pinholes and air bubbles Over-watered mix, poor rolling or a re-tempered bucket Prime or patch the surface as permitted before tiling Remove weak areas and re-level if voids compromise support
Soft spots that powder Damp or frost-affected bag, or pour over a cold slab below 10°C Remove soft material locally and test the remaining substrate Break out the affected pour and replace it under controlled conditions
Uneven finish at the shower screen Depth gauges weren't set to a common datum Grind high spots or apply a compatible finishing layer Remove and re-pour where tile lippage or drainage cannot be corrected
Cold zones over heating loops Compound bridged over cable and left voids Inspect, fill compatible voids if the system allows it Lift the floor finish and rebuild the encapsulation around the loop

The diagnosis should follow the pattern of the defect. A cable-shaped crack points towards thickness, movement or premature heating. A cold strip beside a warm strip suggests the compound hasn't fully surrounded the element. A powdery patch isn't a cosmetic flaw. It's a bond failure waiting for tile adhesive.

The quick fix is only valid while the compound is sound. Once it powders, debonds or moves, tile adhesive won't turn it into a stable substrate.

Older Melbourne homes on stumps often need a different solution altogether. A thin leveller finish around 1–10 mm can correct final tolerance, but it isn't bulk structural fill. Where the floor needs a deeper correction, a liquid screed or bulk-fill system in the 10–40 mm range may be more appropriate, subject to the product and floor design. Australian guidance also distinguishes liquid screeds that can bulk-fill substantially uneven slabs from thin levellers intended to finish the tolerance over heating systems. Pouring a standard finishing compound into a deep hollow is how a neat-looking floor becomes a cracked floor.

Melbourne and VIC Compliance for Heated Bathroom Renovations

Technical quality doesn't remove the legal requirements. In Victoria, domestic building work valued above $10,000 must be carried out by a registered builder or tradesperson, and the rule can also apply below that value when the work combines multiple trade skills, according to Consumer Affairs Victoria's guidance on builders and tradespeople. That matters in a bathroom because waterproofing, drainage, electrical heating, floor preparation and tiling rarely sit in one trade package.

A small ensuite can cross the threshold once the heating, leveller, waterproofing and coordination are added together. For work above $10,000, Victoria requires a written major domestic building contract. For work above $16,000, the builder must provide current domestic building insurance before taking a deposit or starting, as explained in Consumer Affairs Victoria's renovation checklist.

Registration and owner-builder decisions

Owner-builders need to obtain a Certificate of Consent from the Building and Plumbing Commission before carrying out domestic building work above $16,000, while work above $10,000 still requires registered builders for the relevant scope. Structural work requires registration and a building permit regardless of price. A floor assembly change, structural alteration or wet-area intervention should be checked with the appropriate Victorian authority before demolition begins.

The electrical element must be installed and connected by a licensed A-grade electrician under AS/NZS 3000, with RCD protection and a clearly identified circuit at the switchboard. Waterproofing must follow the applicable wet-area requirements, including NCC 2022 Volume Two Part 3.8.1 and AS 3740. Confirm the current permit and certification pathway rather than assuming a leveller is only a tiling issue.

Work Scope Registration Required Key Standard / Trigger
Electric heating connection Licensed electrical contractor AS/NZS 3000, RCD protection and circuit identification
Bathroom waterproofing Qualified registered trade or builder for the scope NCC 2022 Volume Two Part 3.8.1 and AS 3740
Structural floor changes Registered builder Building permit required regardless of price
Multi-trade renovation above $10,000 Registered builder or appropriately registered trades Victorian domestic building rules
Domestic building work above $16,000 Current domestic building insurance before deposit or start Written contract and insurance requirements
Owner-builder work above $16,000 Certificate of Consent before starting Building and Plumbing Commission requirements

The completion documents matter as much as the pour records. Depending on the work, a Form 2 or Form 7 may be required at completion. Keep the compound data sheet, batch details, moisture readings, heating tests, electrical certificate, waterproofing records and permit documents together.

For readers comparing how other markets coordinate premium bathroom work, this example of high-end bathroom fitting Dublin shows why heating, plumbing and finish trades are often planned as one system, even though Victorian compliance must be checked against local rules. Before signing, verify the contractor's current registration and insurance, and use the Melbourne bathroom waterproofing standards guide to understand the wet-area documentation you should expect.


Melbourne Tiling Services P/L coordinates bathroom renovations, substrate preparation, self-levelling, waterproofing, heated-floor tiling and licensed trade work for residential projects across Melbourne. If your ensuite needs a measured floor build-up rather than a rushed pour, visit Melbourne Tiling Services P/L to discuss the layout, compliance pathway and a practical renovation quote.

Bathroom Floor Screed Thickness: A Practical Guide

You're standing in a Melbourne bathroom with the old tiles removed, a concrete slab exposed and a new 600 x 600 porcelain tile already chosen. The entry has only a modest step-down from the adjoining room, the waste sits away from the door, and every millimetre of finished floor height matters. The obvious question is, “What bathroom floor screed thickness do I need?” The practical answer depends on the screed system, the required fall, the waterproofing position, the substrate and the tile build-up.

A screed is more than a flat layer poured to a standard depth. It forms the drainage geometry, supports the finished floor and has to fit between the existing slab and the final threshold. In a Melbourne renovation, the right specification is the one that delivers a stable, tile-ready surface without creating a trip at the doorway or leaving the waste too high.

Table of Contents

Why Bathroom Floor Screed Thickness Matters in a Renovation

Consider a 1990s bathroom with a concrete slab, a 20 mm step-down at the entry and a 600 x 600 porcelain tile specification. The available height has to accommodate the substrate, primer, screed, waterproofing membrane, tile adhesive and tile. If the screed starts at 15 mm in one corner but needs to rise to 45 mm at the perimeter to form the drainage fall, the total build-up can quickly consume the available threshold clearance.

That's why bathroom floor screed thickness is a system design decision, not a universal number. A bonded screed may work at a relatively shallow point where the slab is sound and the system permits it. An unbonded screed over a separating layer needs substantially more depth because it can't rely on a direct bond to the concrete for support. The tile format also matters. Large porcelain and stone show changes in flatness that small mosaics can visually absorb.

Read the floor as a complete build-up

Before ordering materials, mark the proposed finished tile level at the doorway and compare it with the adjoining room. Then work backwards through the build-up:

  1. Confirm the existing slab or substrate level.
  2. Identify whether the screed will bond to the substrate or sit over a membrane or separating layer.
  3. Draw the fall from the perimeter and shower area to the waste.
  4. Allow for waterproofing, adhesive and the selected tile.
  5. Check the finished level against the door, skirting, shower screen and adjacent floor.

A 15 mm screed at one point can become 45 mm elsewhere when the fall geometry demands it. That difference isn't a defect. It's often the result of directing water properly while maintaining the minimum depth required by the screed system.

A diagram illustrating the five key reasons why bathroom floor screed thickness matters during renovation projects.

A useful starting point is to understand what screed is in tiling, then apply that definition to the actual bathroom cross-section rather than relying on a single number from a generic renovation quote.

Bonded Versus Unbonded Screeds and Why the Numbers Differ

The first specification question is simple: what is the screed sitting on?

A bonded screed is installed directly onto a mechanically prepared and primed substrate. The cementitious layer is intended to work with the base as a combined system. Australian practice commonly treats bonded cementitious screed as starting at 10 mm, while bonded proprietary levellers can be applied from around 3 mm, depending on the product and substrate requirements.

That shallow approach only works when the base is suitable and the product data allows it. A bonded screed that loses adhesion can crack, sound hollow or move under the finished tiles. It doesn't have the same tolerance for debonding as an unbonded layer.
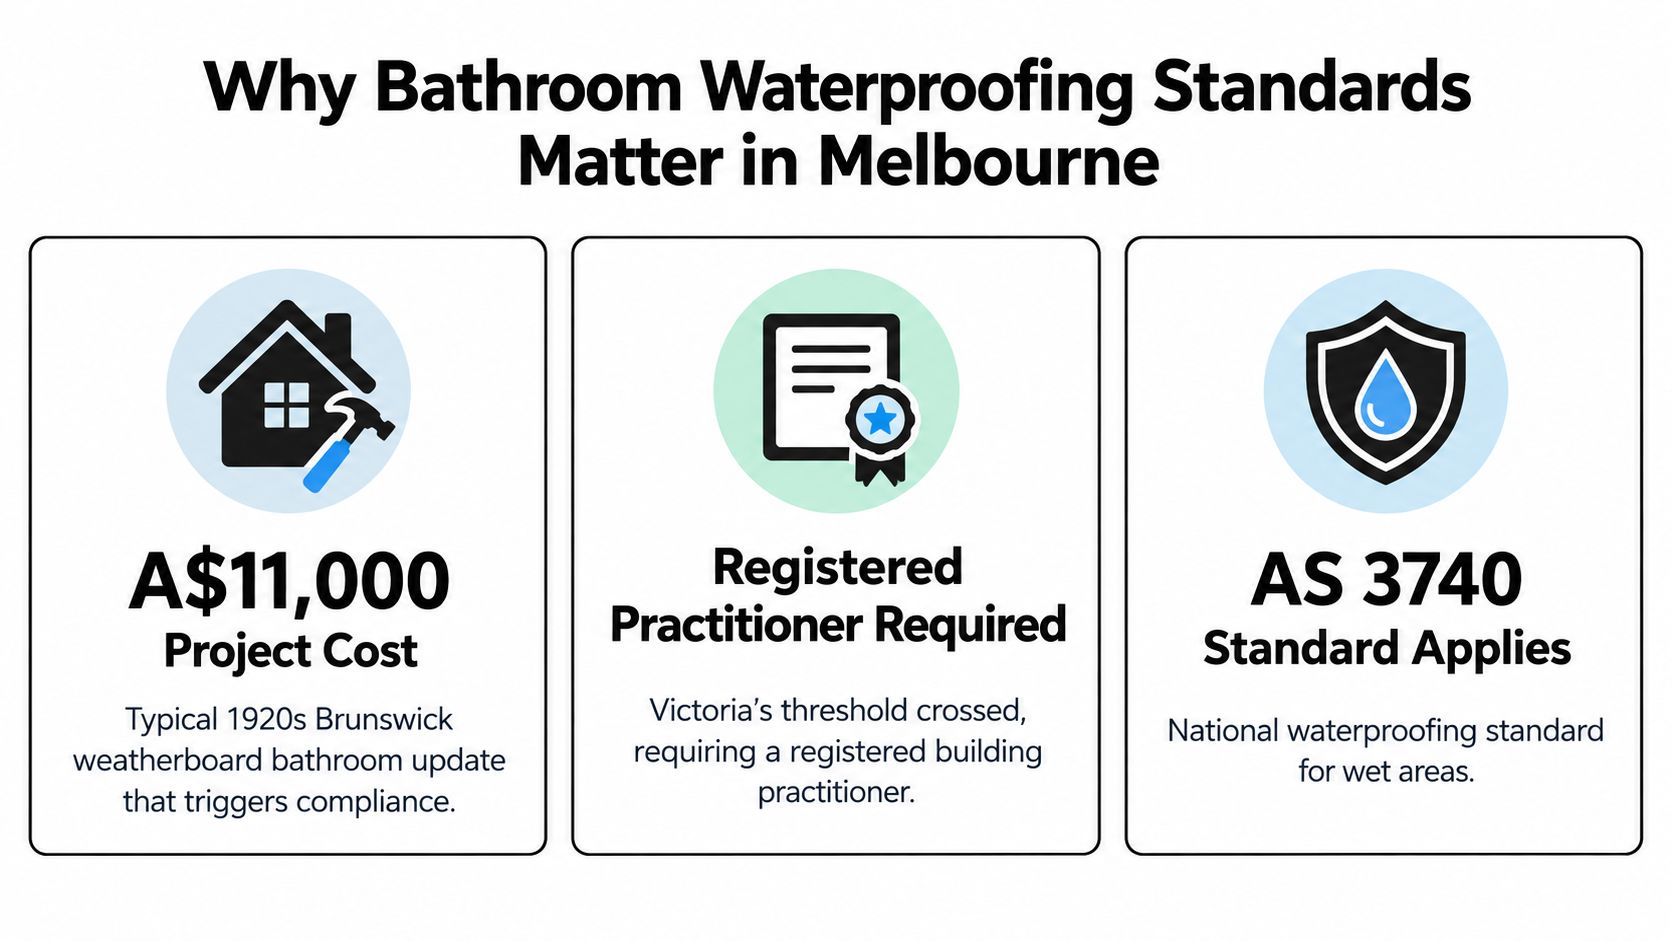
An unbonded screed sits over a separating layer or damp-proof membrane and moves independently from the substrate. Australian guidance commonly specifies 50 mm minimum for cement and sand and 35 mm for fibre-reinforced mixes, because the screed has to resist curling, point loads and movement without relying on a direct bond to the slab. A floating screed over insulation is generally treated as a heavier build-up, with a 65 mm minimum commonly used in the cited guidance. These figures are discussed in Australian trade guidance on floor screeding practice.

Screed Type Substrate Condition Minimum Thickness Typical Use
Bonded cementitious screed Prepared and primed concrete 10 mm Repairs, falls and levelling where the substrate can provide support
Bonded proprietary leveller Compatible prepared substrate 3 mm Localised correction and low-build-up levelling
Unbonded cement and sand screed Separating layer or DPM 50 mm Wet areas where the screed is isolated from the slab
Unbonded fibre-reinforced screed Separating layer or DPM 35 mm Systems designed to improve resistance to movement
Floating screed Insulation layer 65 mm Floors requiring a floating construction over insulation

The practical Australian bathroom renovation figures homeowners often hear, 40 mm minimum and 50 mm preferred in some wet-area applications, relate to the particular unbonded bathroom system rather than replacing every bonded screed rule. The correct number must come from the specified system, substrate and fall design, not from choosing the thinnest option that fits the doorway.

How Fall to Waste Shapes Screed Thickness Across the Room

Fall geometry determines where the thin point sits and how much build-up the perimeter requires. Screed thickness therefore changes across the room unless the slab already contains the required slope. The edge generally needs more material, while the surface tapers towards the waste.

Australian wet-area guidance commonly uses a 1:60 fall for shower areas and 1:80 for general bathroom floors. A 1:60 gradient drops 1 mm for every 60 mm of horizontal run. At 1:80, it drops 1 mm for every 80 mm. The run to the waste, rather than the room's overall size alone, sets the height required.

For example, a 1500 mm shower run to a centre waste needs 25 mm of fall at 1:60. A 2400 mm general bathroom run needs 30 mm at 1:80. The screed must retain its specified minimum thickness at the thin point, then gain enough depth at the perimeter to create the gradient. Use this Australian bathroom floor slope guidance when checking whether the proposed floor build-up has sufficient room for drainage.

Practical rule: Measure the fall from the highest finished edge to the waste, not merely from one side of the room to the other.

That measurement should be checked against the renovation's height budget. A pre-fall in the concrete slab can reduce the screed depth. A flat or uneven slab increases it, especially where the waste is low and the doorway or adjoining floor level cannot move. A fall below 1:100 is treated in the supplied Australian guidance as non-compliant for the relevant wet-area application and can leave water ponding behind the tiles.
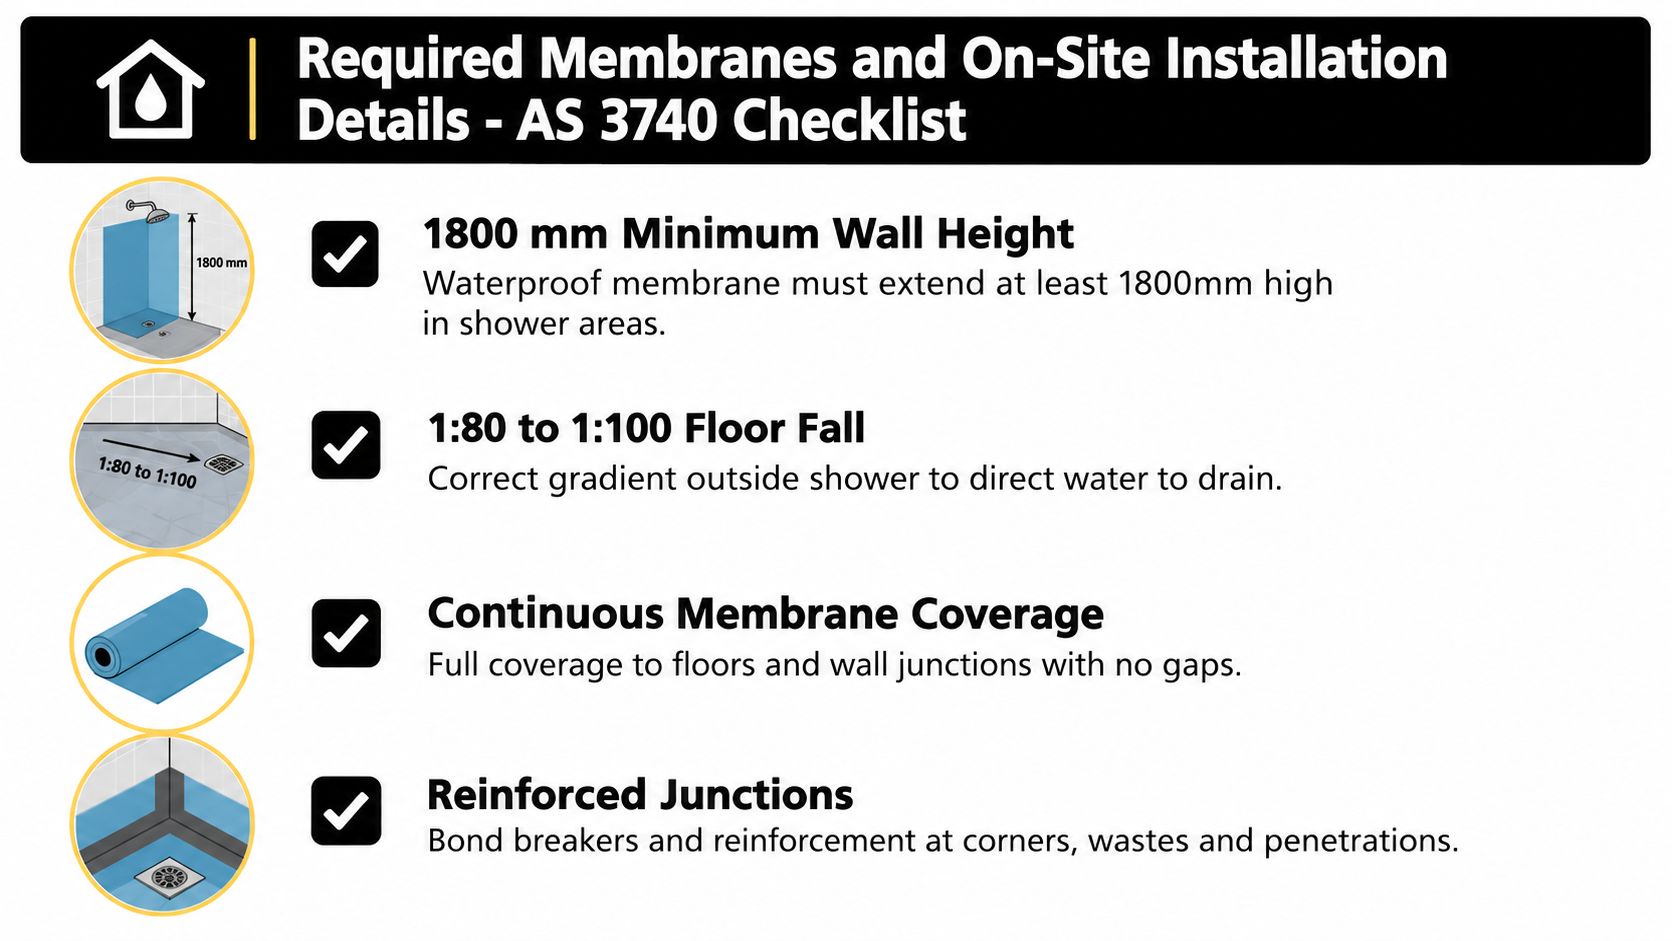
A diagram illustrating how fall to waste affects bathroom floor screed thickness with measurements for optimal drainage.

Waste position changes the profile too. A centre waste creates falls from several directions, while a linear drain supports a more controlled single-plane or two-plane arrangement. Draw the screed profile before placement, marking the thin point, high point and finished tile level. That drawing exposes clashes with thresholds and large-format tile requirements before the screed is installed.

Matching Screed Thickness to Tile Type and Stone Choice

The tile choice often arrives before the screed specification, but it still changes the preparation required. Small ceramic mosaics can follow modest variations in the substrate because their individual pieces and grout joints break up the visual effect. Large-format porcelain and natural stone are less forgiving.

For a bonded system on a sound substrate, installers commonly work around 15 to 20 mm where the product and site conditions permit. A 600 x 600 porcelain floor may need around 25 to 30 mm in the relevant build-up, especially where the installer has to establish a controlled fall and maintain a flat setting plane. Larger slabs and stone commonly push an unbonded bathroom floor towards 40 to 50 mm, subject to the system design and membrane location.

Large rectified tiles expose high spots, low spots and changes in plane. The supplied trade guidance refers to a flatness target of about 3 mm under a 2 m straightedge for large-format work. If the slab misses that benchmark, correction can add around 5 to 10 mm across parts of the floor, although the exact amount depends on where the defects are and whether a leveller can be used.

Tile Type Format Size Bonded Screed Min Unbonded Screed Min
Ceramic mosaic Small pieces 15 to 20 mm where permitted 40 mm or more in common bathroom systems
Standard porcelain Around 300 x 300 mm 15 to 20 mm where permitted 40 mm or more
Large-format porcelain 600 x 600 mm 25 to 30 mm commonly allowed for in the build-up 40 to 50 mm commonly allowed for in the system
Large porcelain slab 900 mm or more System-specific 40 to 50 mm commonly allowed for in the system
Natural stone Format-dependent System-specific, with careful substrate control 40 to 50 mm commonly allowed for in the system

AS 3958.1 tile-fixing practice and Australian Tile Council guidance on format size should inform the installation, particularly where rectified edges, stone sensitivity and lippage risk are involved. A tile can be correctly selected yet still fail visually if the base isn't flat enough for the format.

Waterproofing Compatibility and Where the Screed Sits in the Build-up

Two floor build-ups appear regularly in Australian wet areas. In the first, the installer forms the screed, allows it to cure and applies the waterproofing membrane over the screed. In the second, the membrane is applied first and the screed is placed over it.

Screed first, membrane second

The screed-then-membrane sequence gives the installer a cementitious surface to shape and cure before waterproofing. It's commonly preferred in Melbourne renovations because the membrane protects the prepared wet-area surface and the tiler can work from a defined, stable plane.

The screed still needs the correct primer and surface preparation before the membrane is applied. Polyurethane, acrylic and sheet membranes have different preparation requirements, and the selected system must be compatible with the screed and associated puddle flange detail. Guidance connected with bathroom floor waterproofing should be read alongside the product data sheet, not used as a substitute for it.

Membrane first, screed second

A membrane-then-screed build-up is used where the waterproofing layer and waste detail require the screed to sit above the membrane. A bonded screed over the membrane can add around 15 to 25 mm, depending on the system and the required fall. That extra layer can be the difference between a clean entry and a threshold that needs redesigning.

The membrane itself may add around 1 to 2 mm to the overall build-up. Shower recesses, puddle flanges and linear drains also change the local depth because the membrane must connect continuously to the drainage detail.

A diagram comparing two bathroom floor construction methods featuring screed thickness and waterproofing membrane placement relative to tiles.
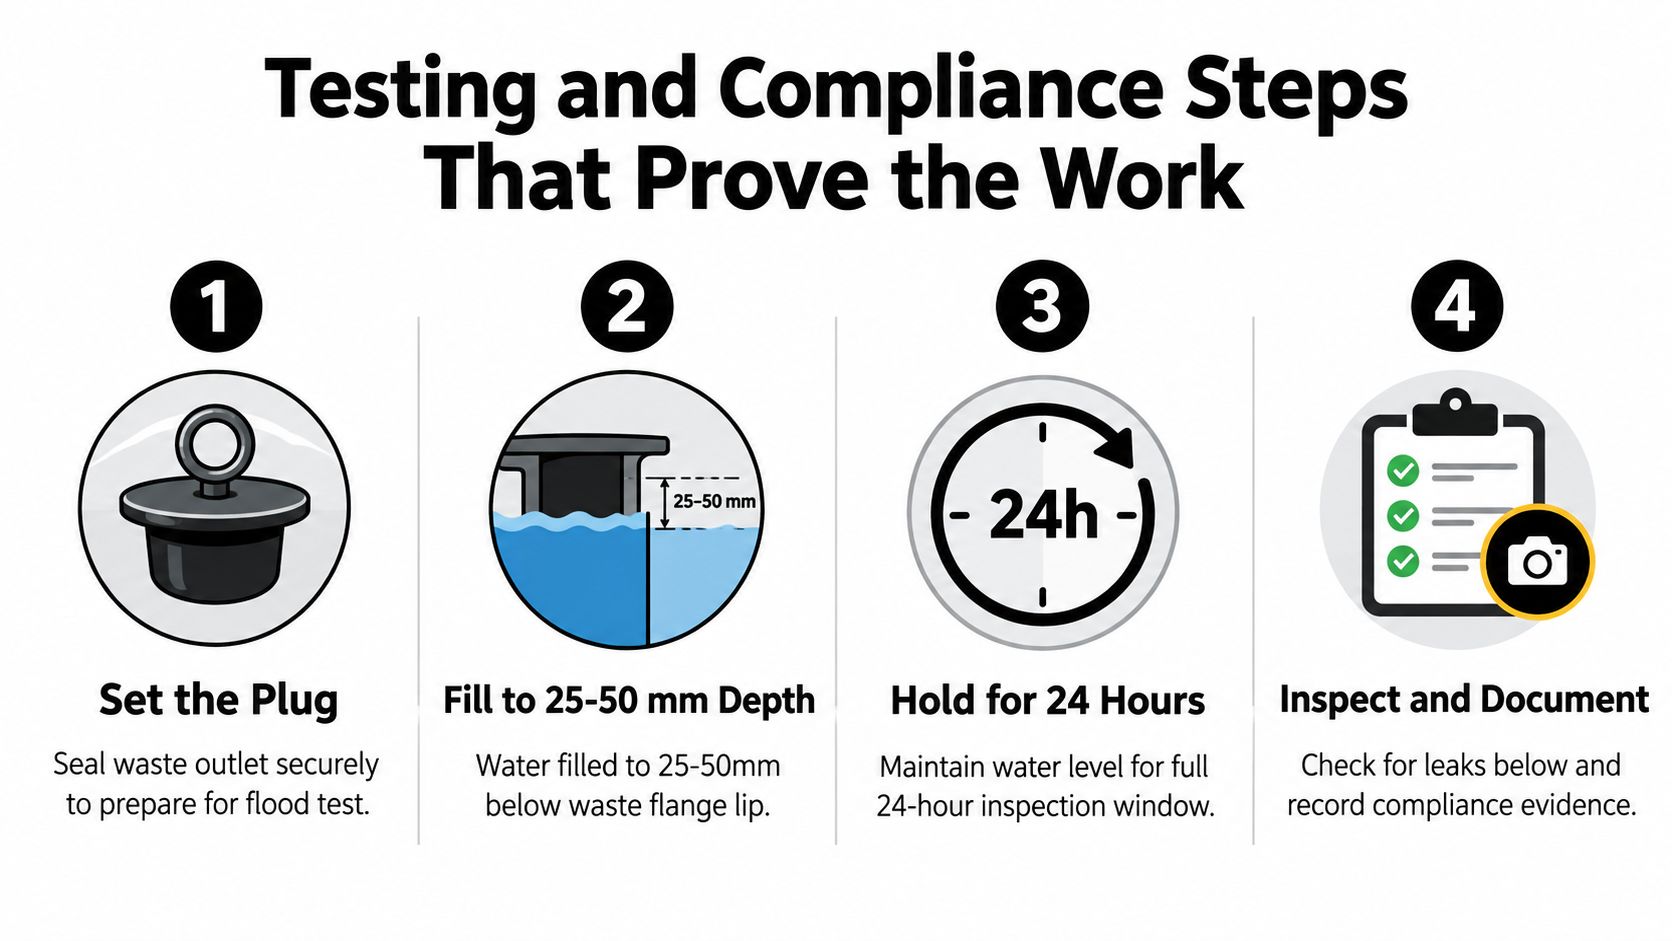
Don't choose the sequence after the screed has been poured. Put the membrane line, waste flange, screed profile, adhesive bed and tile into one cross-section first. The waterproofing standard and system instructions then control the final details.

Curing Times and How They Affect Renovation Scheduling

A screed has two separate scheduling milestones. It must first gain enough strength to be walked on and worked over, then it must dry sufficiently for waterproofing or tiling. Those are not the same test.

A standard cement-based screed may take 24 to 48 hours before light foot traffic and around 7 days before waterproofing or tile work begins, according to the supplied renovation guidance. Beyond 40 mm, a commonly used planning allowance is about one day per millimetre for full drying, although site conditions and the product specification govern the actual result.

Product choice changes the programme

Rapid-set or modified screeds may accept tiles after 4 to 6 hours, but they usually cost more and give the installer less working time. Calcium sulphate, or anhydrite, screeds require mechanical scabbling before tiling and moisture testing below 75% relative humidity in the supplied guidance.

Melbourne conditions influence the outcome. Cold winter air, poor ventilation and low substrate absorption can slow drying, while warm, ventilated conditions may improve it. Forced drying without following the product instructions can create surface cracking or leave moisture trapped beneath the membrane.

A timeline chart illustrating the stages of curing times for a floor screed renovation project.

A 40 mm unbonded screed can add roughly 7 to 10 days to a bathroom renovation programme in the supplied trade guidance. That delay matters when the bathroom is the only one in the house. The quote and construction schedule should identify the screed cure, moisture checks, waterproofing and tile installation as separate steps.

Melbourne Renovation Rules Including the Registered Builder Threshold

In Victoria, domestic building work costing more than A$10,000 must be carried out by a registered builder, and work over A$16,000 requires domestic building insurance under the supplied Victorian guidance from Butler Build. A bathroom renovation can cross those thresholds even when the screeding itself is only one part of the contract.

The wet-area membrane also needs proper trade responsibility. A tiler may install tiles and screed, but waterproofing certification and regulated plumbing or building work can involve separately licensed or registered practitioners. Ask who is responsible for the membrane, which practitioner signs the relevant work and how the completed wet area will be documented.

Protect the height budget before work starts

Melbourne terrace homes and apartments often have fixed door clearances, adjoining floor finishes and stair landings. A large unbonded screed can perform well structurally yet be the wrong solution if it raises the bathroom above the hall or prevents the door from opening.

Set a finished floor datum before choosing the screed type. Include the tile, adhesive and membrane, then compare the proposed level with the entry and adjacent rooms. Check the builder's registration through the Victorian Building Authority and confirm insurance requirements before ordering materials or accepting a renovation scope.

Quick Reference Table for Common Bathroom Screed Scenarios

The table below is a starting point for site discussions, not a substitute for a drawn floor section or product data sheet. The minimum band must still preserve the required fall, waterproofing detail and finish-floor level.

Screed Type Substrate Tile or Stone Finish Minimum Thickness
Bonded cementitious screed Prepared concrete slab Ceramic tile 15 to 20 mm in common bathroom practice where the system permits
Bonded screed Prepared concrete slab with fall requirements 600 x 600 porcelain Around 25 to 30 mm commonly allowed for in the build-up
Unbonded cement and sand screed Concrete over a separating layer or membrane Porcelain tile 40 mm commonly specified, with 50 mm preferred in some applications
Unbonded fibre-reinforced screed Separating layer or DPM Large-format porcelain Around 40 mm or more, subject to the product system
Screed over waterproofed slab Membrane-protected substrate Natural stone Commonly 40 to 50 mm in an unbonded system
Fall-only screed Prepared bathroom slab or shower base Hobless shower tile finish Thickness varies from the waste to the perimeter, with the minimum system depth maintained at the thin point

A self-leveller may replace a traditional sand and cement screed for local correction when the product is approved for the substrate, wet-area exposure and intended tile finish. It isn't automatically suitable for forming a bathroom fall or for use over a membrane.

Balcony work needs its own exterior waterproofing and drainage specification. Don't use an interior bathroom row as a balcony design, even where the finished tile is similar.

Decision Rules and a Pre-Build Checklist for Homeowners

A screed quote is easier to assess when it answers five questions in order.

  1. Identify the substrate. Is it a sound concrete slab, an existing membrane, timber or insulation? The answer determines whether a bonded, unbonded or floating system is appropriate.
  2. Confirm the finish. Record the tile format, thickness and material before setting the finished floor level. Large porcelain and stone need a flatter, more controlled base.
  3. Calculate the fall. Mark the waste, measure the run and confirm the required ratio. The thin point must not fall below the specified system minimum.
  4. Locate the membrane. Show whether waterproofing sits over the screed or beneath it, including the puddle flange, shower recess and drain connection.
  5. Check the height budget. Compare the finished bathroom floor with the hallway, door leaf, skirting and shower screen track.

Pause the job if the quote contains any of these warning signs:

  • An unexplained thin bonded screed: A specification below 20 mm needs a clear product and substrate justification, particularly where falls or large tiles are involved.
  • No membrane in the section: The quote should show where waterproofing sits and how it connects to the waste.
  • No documented fall: A contractor should state the fall ratio and show the high and low points.
  • No curing allowance: The programme should identify when the screed becomes suitable for waterproofing and tiling.

Before work begins, ask for the screed product data sheet, the proposed mix, any fibre or mesh inclusion, the required primer and the standard or system the mix is designed to meet. Also ask who will verify moisture readiness before the membrane or tiles are installed.

Frequently Asked Questions About Bathroom Floor Screed Thickness

Balcony screed follows a different design rule from an interior bathroom. It must accommodate exterior drainage, waterproofing, exposure and the specified 1:100 fall, while still meeting the system's minimum thickness at the low point. Substrate condition, membrane type, waste locations and the finished surface determine the final depth.

How much cover does a heated floor need?

Hydronic pipes and electric cables need sufficient compatible screed cover to protect them and spread heat evenly. Allow around 30 to 40 mm over heating pipes for planning, then follow the heating manufacturer's installation instructions for the final cover, mix and curing requirements.

What happens if the screed is too thin?

A layer that is too thin or poorly supported can debond, crack or flex under load. The results may include hollow-sounding tiles, cracked grout around the waste and lippage at thresholds. The thin point must meet the specified system minimum after the fall is formed.

What happens if it is too thick?

Extra depth uses the renovation's floor-height budget. It can affect doors, adjoining floors and shower-screen details, while also extending curing and drying. Allow for those programme and level impacts before approving additional material.

Can late foot traffic cause waterproofing problems?

Yes. Foot traffic before the screed or membrane is ready can damage the surface, create pinholes or alter the fall. Keep other trades out until the installer confirms that the screed, membrane and adhesive are ready for the next stage.

Melbourne Tiling Services P/L provides bathroom screeding, shower-base preparation, waterproofing and tiling, with floor levels and falls assessed before installation. For a site-specific bathroom floor screed thickness review and renovation quote, contact the company.

Tiling a Bathroom: Guide for Renovations

A mid-range bathroom tiling and renovation project in Melbourne typically costs around $10,000, and waterproofing compliance under AS 3740 isn't optional if you want to avoid expensive leaks. If the room is already open, this is the moment to treat tiling as part of the whole wet-area system, not just the finish you see.

Most homeowners start with tile samples and end up dealing with falls, membranes, junctions, and registration rules they didn't expect. That's where a bathroom can shift from a cosmetic refresh to a regulated renovation, especially once you're working in a Victorian home with mixed substrate conditions, older framing, or a shower that's never been detailed properly.

Table of Contents

Planning a Bathroom Renovation with Tiling in Mind

A typical Melbourne bathroom renovation starts with a simple question, what tiles look good? In practice, the core question is what the room needs beneath the finish so the bathroom stays dry, straight, and compliant for years. Melbourne Tiling Services P/L notes that a mid-range project is commonly around $10,000, which is a realistic figure when you factor in preparation, waterproofing, and labour rather than just the tile box itself.

A four-step infographic illustrating the bathroom renovation planning process, including assessment, regulation, materials, and layout.

Start with the room, not the sample board

A good renovation begins with assessment. If the floor is out, the walls are bowed, or the shower recess has hidden moisture, tile choice comes second to rectification. That's why many practical renovation checklists begin with a moisture audit, then move to product selection and layout planning.

The best way to think about tiling a bathroom is as a sequence of linked trades. Screeding, waterproofing, tiling, plumbing, and sealing all rely on each other, so a shortcut in one stage usually shows up later as cracked grout, lippage, or leaks. For a useful overview of the renovation flow, the bathroom renovation process guide is a solid starting point before you lock in scope.

Practical rule: tile selection should follow substrate assessment, not the other way around.

A renovation also needs enough room in the budget for the hidden work. Waterproofing, levelling, and careful layout planning don't look dramatic on day one, but they're what stop the bathroom becoming a repair job two years later. If you're comparing ideas with other homeowners, the bathroom remodel projects page is useful because it shows how tile work sits inside the broader renovation process, not outside it.

Cosmetic refresh or compliant renovation

A cosmetic refresh can mean new grout, a few replacement tiles, or a surface-level update. A compliant renovation means the wet area is treated as a controlled system, with substrate preparation, membrane continuity, and correct detailing around doors, floors, and junctions. Those are not the same job.

In older Melbourne homes, this difference matters even more because old walls and floors often aren't ready for straight, large-format tile work without correction. If the room is being fully renewed, the tile budget should be set with contingencies for levelling and waterproofing, not just the decorative finish. That's what separates a neat-looking bathroom from one that can handle daily use.

Understanding Waterproofing Standards and Defect Risks

A bathroom can look finished while moisture is already moving behind the tiles. In Melbourne renovations, waterproofing is the part of the build that protects the structure, not a coating added for appearance. AS 3740:2021 sets the domestic wet-area benchmark, while the National Construction Code also includes waterproofing requirements. Tile installation is therefore one stage in a compliant wet-area system, not a substitute for membrane work AS 3740:2021 standard.
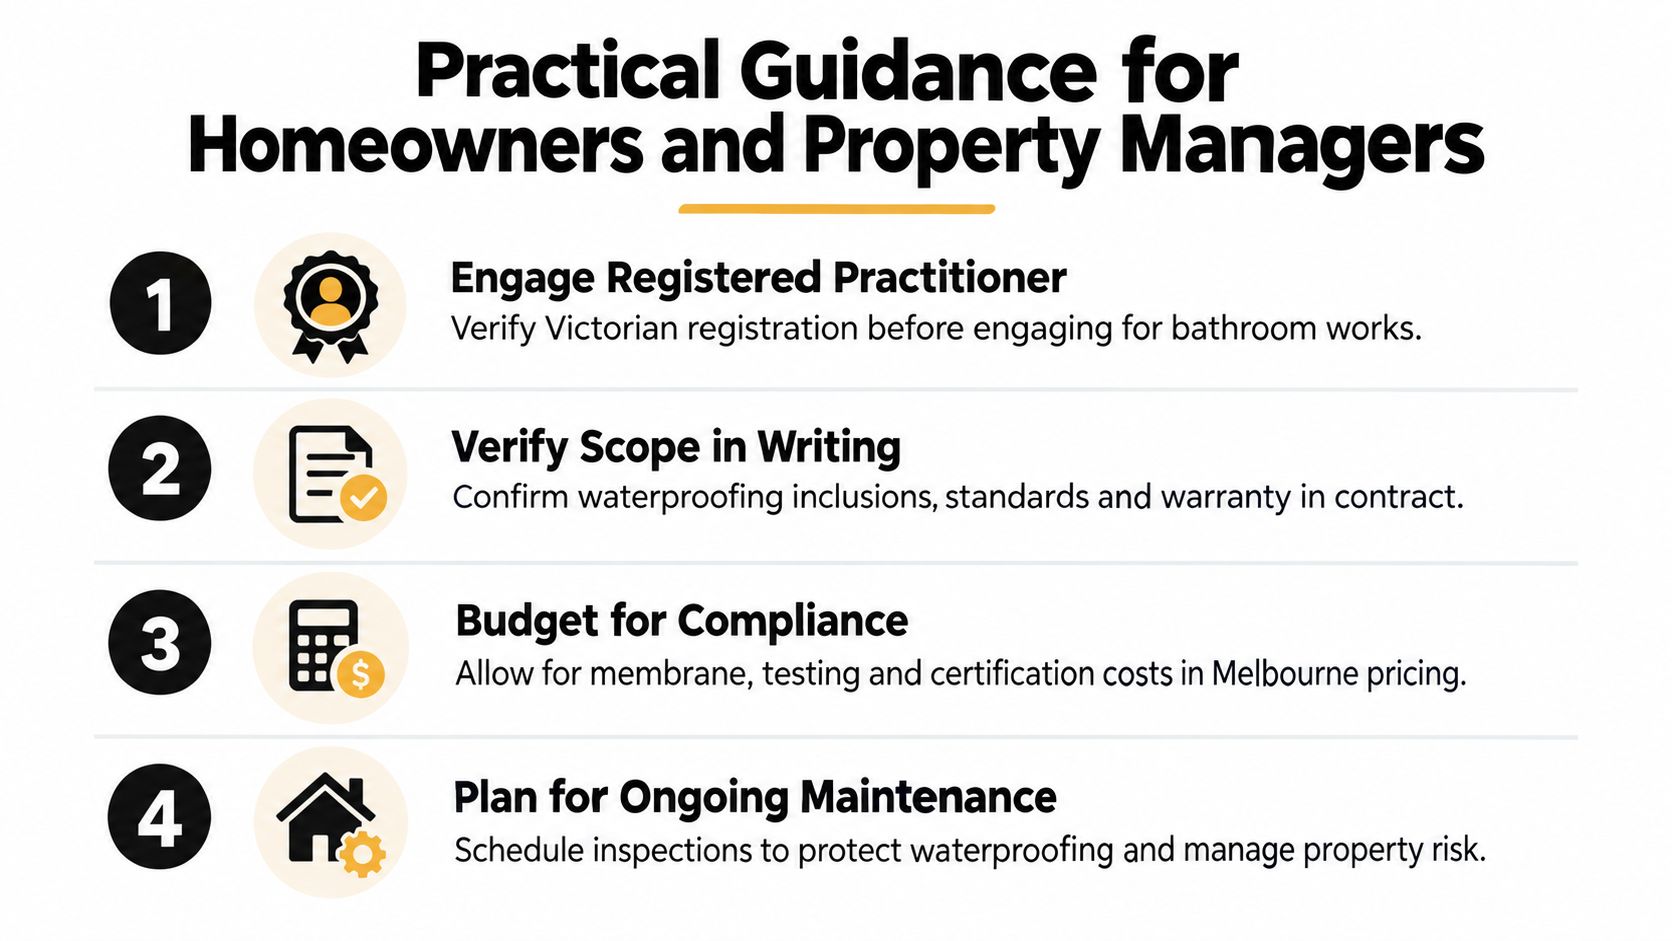
What the membrane has to do

The membrane must remain continuous beneath the tiles and connect correctly at wall-to-floor junctions, drains, pipe penetrations, and door frames. Australian technical guidance specifies waterproofing shower walls to 1500 mm above the shower floor or 25 mm above a fixed shower screen. The shower floor must be fully covered, the membrane must extend 150 mm beyond the shower threshold onto the bathroom floor, and adjacent walls must rise 100 mm above the bath rim technical waterproofing guidance.

These measurements control where water can travel. Grout is not the waterproof barrier, so a neat grout line cannot correct a gap, poorly sealed penetration, or broken membrane.

Wall-to-floor junctions and service penetrations deserve particular attention. Bond breakers, compatible tapes, and correct sequencing allow the membrane to move and seal as intended before adhesive is applied. Once tiles cover the surface, defective preparation becomes difficult to see and expensive to investigate.

If the membrane is wrong, the tile isn't the problem, it's the camouflage.

Inspection evidence supports that concern. Western Australia's General Inspection Report Six recorded compliance at only 58% of inspection points against the Building Code of Australia and AS 3740-2010 WA inspection report. For Victorian homeowners, the figure is a practical warning to document the membrane stage and use an appropriately qualified waterproofing contractor.

Why failure is expensive

Waterproofing defects often require more than replacing a few tiles. Demolition, drying, substrate repairs, membrane rectification, and retiling can affect adjoining rooms and delay the renovation. NSW strata defect research found waterproofing in 42% of buildings with serious defects, while Queensland Home Warranty data put bathroom claim rectification close to AUD 25,000 in 2024–2025 defect analysis.

That cost changes the renovation decision. Saving on membrane preparation can create a much larger legal and construction bill if water reaches framing, finishes, or neighbouring property. Complete the waterproofing, allow the system to cure as specified, and check the details before tiling proceeds. The bathroom waterproofing standards guide provides practical context alongside the standard.

The Step-by-Step Tiling Workflow from Substrate to Finish

A professional construction worker uses a notched trowel to spread thin-set mortar on a subfloor for tiling.

A bathroom can look ready for tiles while the work underneath is still unsuitable. The floor may need new falls, the walls may be out of plane, and the waterproofing may not yet form a continuous system. Follow the sequence carefully, because a tile finish cannot correct a moving substrate, poor drainage, or missing membrane details.

Prepare the substrate first

Start with the base required by the entire tile system, not just the surface visible beneath the tiles. Remove loose material, correct uneven areas, and establish the required falls before waterproofing begins. In a shower, water must run to the waste rather than collect in low spots.

Screeding and self-levelling set the plane for the room. They are practical preparation work, particularly with large-format tiles, which show humps and hollows more readily than smaller formats. Check the substrate for stability, cleanliness, and suitable moisture conditions before applying the membrane.

Waterproof before the first tile

Australian practice places waterproofing before tiling. AS 3740 is the domestic benchmark for wet areas, so the tiles must follow a compliant substrate rather than compensate for a weak one. The membrane provides the water protection, while the tile is the wearing surface.

Check bond breakers at wall-to-floor junctions and seal penetrations around taps, mixers, outlets, and wastes. Where the system allows it, complete a post-installation water test before tiling starts. A short verification stage is far less disruptive than removing finished tiles and repairing concealed damage.

Set out the tiles with the room in mind

Set-out determines whether the finished bathroom looks planned or improvised. Balance edge cuts, align visible joints with the room, and check how the pattern meets niches, shower entries, vanity splashbacks, and fittings. Review the layout from standing height, because a plan that looks tidy on paper can produce awkward narrow pieces in the room.

Adhesive selection and trowel technique also affect the result. Use a spread suited to the tile size, and work in sections small enough to prevent the adhesive skinning before the tile is bedded. Check coverage, keep faces aligned, and control lippage as you go. Do not leave all corrections until the grout stage.

For homeowners comparing formats or planning professional work, large-format tile information explains the preparation behind a clean finish. Melbourne Tiling Services P/L provides bathroom tiling, screeding, self-levelling, waterproofing, and wet-area renovation services. Those stages need to work together, because a neat surface finish depends on the substrate and waterproofing beneath it.

Choosing Between Large-Format Tiles and Traditional Formats

Large-format tiles look sharp because they reduce grout lines and create a cleaner visual field. Traditional formats feel more forgiving, especially in older homes where walls and floors are rarely perfectly true. The choice is less about style and more about the condition of the room you're tiling.

A comparison infographic between large-format tiles and traditional tiles, showing their advantages and best applications.

The trade-off is flatter surfaces versus easier handling

Large-format tiles demand flatter substrates and tighter handling tolerance. That means more time spent preparing the room before the tile setter even opens a box. In an older Victorian bathroom, that prep can be the difference between a clean finish and a frustrating patch-up.

Traditional ceramic and porcelain tiles are more forgiving on slightly uneven surfaces and easier to work around awkward geometry. They can also be simpler to replace if one section gets damaged. If the bathroom has lots of corners, a niche, or a tricky shower recess, smaller formats often give more control.

Cost and budget pressure in Melbourne

Victorian tiling prices vary widely. Reported installed bathroom-floor tiling is around $50 to $120 per square metre, shower tiling is $60 to $150 per square metre, and waterproofing adds another $30 to $60 per square metre Victorian tiling price benchmarks. Those figures help explain why tile size isn't a pure design decision, it changes the labour and preparation load as well.

Rule of thumb: if the room isn't flat, large-format tiles can make the problem more expensive, not more attractive.

That doesn't mean large slabs are a bad choice. It means they're a better fit for rooms where the substrate has already been corrected and the layout is planned with movement joints, waste, and cut positions in mind. If you want to compare how a specialist approaches this side of the job, hire a large tile installer in Cumming is a useful example of how professional installation is framed around handling tolerances rather than just the look of the tile.

When to Hire Registered Builders for Your Renovation

In Victoria, bathroom work gets serious fast once the price rises and the scope includes waterproofing, plumbing coordination, and structural interfaces. Bathroom renovation work valued at $5,000 or more must be carried out by a registered building practitioner, and the registration must be either Domestic Builder: Unlimited or Domestic Builder: Limited for bathroom work Victorian registration threshold. That's not bureaucracy for its own sake, it's the system that helps keep wet-area work accountable.

Why registration matters

A registered builder brings the right trades together in the right order. Tilers, plumbers, carpenters, electricians, and waterproofers need to coordinate around the membrane, the falls, and the finish layer. If one trade jumps ahead of another, the whole room can end up with a fault that only shows after the tiles are down.

Registered-builder status also matters for insurance, documentation, and sign-off. Industry listings in Melbourne routinely identify renovation firms as registered builders, which shows how concrete that credential is in the local market Melbourne bathroom company guidance and Melbourne renovation profiles. In practice, that credential is part of the risk control, not just the branding.

Where DIY ends

DIY can work for small, low-risk surface updates if the room is dry, stable, and already compliant. It stops making sense when the job involves waterproofing, falls, penetrations, or a full strip-out. Once the work moves into regulated wet-area construction, the cost of getting it wrong can outweigh the savings very quickly.

A simple way to judge it is this, if the project would be painful to demolish and redo, it's probably not a DIY candidate. Bathrooms are unforgiving because the final look hides the part that matters most. If you want that hidden work handled by one team, Melbourne Tiling Services P/L is one option for bathroom renovations, wet-area waterproofing, screeding, self-levelling, and full tiling coordination in Melbourne and greater Victoria.

Finishing Touches and Quality Checks for Long-Term Durability

Grout and sealant are the last line of defence, but they're not a substitute for good waterproofing. The finish should be checked for hollow spots, uneven joints, poor cuts, and any sign that the membrane or tile bed was disturbed during installation. If those issues show up early, they're still fixable without opening the whole bathroom again.

A practical finishing routine also means choosing products suited to wet areas and keeping maintenance simple. If you're unsure how to treat a porcelain surface or what needs sealing, Neasden Hardware sealer advice is a useful reminder that not every tile needs the same maintenance approach.

Keep the bathroom dry where possible, clean up grime before it settles into grout lines, and watch for movement around corners or shower edges. That kind of attention protects the room long after the final clean-up is done.


If you're planning tiling a bathroom in Melbourne and want the job handled as a proper wet-area renovation, Melbourne Tiling Services P/L can help with waterproofing, screeding, self-levelling, large-format tile work, and full bathroom renovations. Visit Melbourne Tiling Services P/L to discuss your room, your budget, and the right scope before the first tile is set.

Why Is My Shower Leaking and How to Fix It Fast

You notice damp skirting outside the shower after your morning routine. A musty smell has appeared, the paint beside the bathroom feels swollen, or water is collecting on the floor beyond the screen. The tiles still look intact, so you may be wondering, why is my shower leaking?

For Melbourne homeowners, landlords and property managers, the visible symptom is often several steps away from the actual defect. Water can travel behind tiles through a failed junction, a pipe penetration, a poorly sealed screen track or a shower floor that holds water instead of directing it to the waste. By the time staining appears in an adjoining room, the shower may have been allowing moisture into the building system for some time.

A quick silicone patch can sometimes contain surface water, but it can't repair a failed membrane or incorrect fall. This guide explains how a shower is designed to stay watertight, which failure points deserve attention, how to carry out safe observations at home and when bathroom renovations or registered builders are the sensible next step.

Table of Contents

Introduction Why Your Shower Leak Needs Attention Now

You finish a shower and notice a dark mark beside the bathroom. The floor outside the screen feels damp, or a skirting board has started to soften. Nothing looks seriously wrong inside the shower, yet the moisture keeps returning. That is often how a concealed leak begins to announce itself.

A shower can remain usable while water is escaping from the system around it. Moisture may pass through a failed joint, pipe penetration, screen seal or membrane, then travel sideways before appearing in a wall, ceiling or adjoining room. The visible stain is therefore more like the end of a trail than a map of the original defect.

Possible sources include concealed plumbing, mixer cartridges, showerheads, hoses, wall penetrations, grout, seals and membranes. Recent guidance on common shower leak causes also separates leaks that occur during use from moisture that becomes visible after the shower has finished. That timing can help narrow the investigation, but it does not prove that the wettest spot is the source.

Why the tiles aren't the whole barrier

Tiles provide the hard, washable surface you see and touch. They are part of the finish, not the complete waterproofing system. The layers behind them work together, much like a sealed container with a protective outer surface. If the hidden barrier is interrupted at a corner, wall-to-floor junction, hob, step-down or pipe penetration, water can enter the structure while the tiles still look sound.

Grout can crack, powder or allow surface water through, but replacing grout alone will not restore a membrane that has been damaged or poorly connected. A recurring damp patch should be treated as a building-system problem until inspection shows that a simple seal is the only fault.

What to do first

Do not start by assuming regrouting will solve the leak. Note whether the dampness appears during showering or later, photograph stains and loose finishes, and keep the area as dry as practical. Avoid removing tiles or cutting into walls before the source has been assessed, because those actions can hide useful evidence and create further damage.

Arrange an inspection if the moisture returns, spreads, smells musty or affects another room. The next steps are to identify how a shower is designed to stay watertight, then separate safe temporary containment from repairs that require a qualified plumber or waterproofer.

How a Shower Is Supposed to Stay Watertight

A properly built shower keeps water moving through connected layers. The substrate supports the walls and floor, the screed creates the fall, the waterproof membrane blocks moisture from reaching the structure, and tiles protect the finished surface. Flexible sealant joints accommodate movement where walls meet, floors change direction and fittings pass through the surface.

The membrane works like a raincoat beneath a shirt. Tiles provide the visible, hard-wearing finish, while the membrane stops water entering the building. Grout fills tile joints, but neither grout nor tiles should be treated as the primary waterproof barrier. A shower can therefore look sound while its hidden system is failing.

The barrier must continue through vulnerable points

The NCC 2022 wet-area provisions require waterproofing across the shower floor, including a hob or step-down. Shower walls must be waterproofed to at least 1800 mm above the floor substrate. The waterproofing must also continue through wall junctions, wall-to-floor junctions and penetrations within the shower area, with not less than 40 mm either side of wall junctions within the shower area.

These measurements correspond to places homeowners can see. A shower rose can wet an area well above a low splash line, and corners repeatedly expand and contract as they become wet and dry. A mixer, shower rose or screen fixing interrupts the wall surface, so the membrane detail around each penetration must remain continuous.

The floor needs to move water, not store it

The floor screed should guide water towards the waste. Australian wet-area guidance aligned with AS 3740 commonly cites a shower fall of about 1:80 to 1:100, while other guidance may use about 1:80 to 1:50 depending on the application. Waterproofing and tiling guidance explains how falls, drainage and testing work together. This practical overview of shower and wet-area falls also explains the geometry that helps prevent ponding.

A flat or interrupted fall leaves water sitting beside the waste, at the base of the screen, against a wall junction or near a threshold. Even with an intact membrane, standing surface water keeps grout, silicone and perimeter details visibly wet. It can also mask a deeper fault behind the tiles.

A diagram illustrating common causes of shower leaks, including cracked grout, failed seals, and poor installation.

For a closer look at the construction sequence, this guide to how to waterproof a shower shows why surface preparation and junction detailing matter as much as the final tile finish.

Common Reasons Why Your Shower Is Leaking

A shower leak can follow several pathways, and the visible clue depends on where water leaves the system. A stained skirting board may point to moisture moving through a wall, while a puddle outside the screen may be a surface containment problem. The same symptom can have different causes, so avoid treating the first damaged joint as conclusive proof.

Six failure pathways to check

Failed membrane at corners and junctions is a high-probability cause because these areas require continuous waterproofing. If the membrane stops short, wrinkles, separates or fails around a wall-to-floor transition, water can pass behind the tiles and migrate into the substrate. Loose tiles, swollen skirtings and staining in an adjacent room may appear after repeated use rather than immediately.

Cracked or missing grout can allow water into the tile assembly, especially where joints have opened or tiles move. Regrouting may improve the surface, but it won't restore a missing membrane beneath the finish. Cracks beside corners, fixtures or a shower waste deserve more attention than an isolated cosmetic mark.

Failed silicone seals often appear as peeling, mould-stained or separated beads at changes of plane. Silicone is a flexible surface joint, not a substitute for waterproofing. If water is entering because the substrate or membrane is defective, applying a new bead only covers the symptom.

Screen seals and tracks can direct water outside the shower even when the wall system is sound. A worn bottom seal, blocked track or poorly sealed frame may leave a neat trail across the bathroom floor. This is a surface escape, but persistent water at the screen base can also expose weaknesses in the floor junction.

Leaking plumbing connections can occur at the mixer, shower rose, flexible hose, valve or another wall penetration. Water that appears when the shower is running suggests one set of possibilities, while dripping after the shower is off may indicate a concealed valve or cartridge problem. Don't cut into the wall to investigate. A licensed plumber can test the fitting and identify whether the source is plumbing rather than waterproofing.

Waterlogged substrates, screeds or adjoining wet areas can confuse the diagnosis. Moisture from a balcony, neighbouring bathroom or shared wall may travel into the same room and imitate a shower leak. Substandard original construction, inadequate falls and missing or poorly installed flashings are why surface patching often fails to deliver lasting results, as discussed in this Australian review of waterproofing failures.

An infographic titled At-Home Leak Diagnosis providing six steps to identify and prevent shower water leaks.

A useful first distinction is whether water escapes visibly during showering or appears later as delayed staining. The first pattern often points towards the screen, hose, showerhead or surface joints. Delayed moisture is more consistent with water moving through concealed building or plumbing components, although only inspection can confirm that.

How to Diagnose Where the Leak Is Coming From

Start with observation, not demolition. Dry the bathroom as thoroughly as practical, note the condition of the floor and nearby walls, then record what changes when the shower operates. A simple timeline can separate a leak that happens at the fixture from moisture that travels through the building after use.

Work from visible water to concealed defects

  1. Observe the timing. Does water appear while the shower is running, shortly afterwards or without recent use? A showerhead or hose connection is easier to suspect when droplets appear directly during operation. Moisture that returns later needs a wider inspection.

  2. Inspect the grout and silicone. Look for open joints, hairline cracks, peeling beads and mould concentrated along a corner. These observations help identify entry points, but they don't prove the membrane below has failed.

  3. Check the screen and track. Run your eyes along the bottom seal, corners and frame. Water escaping at the screen can be a containment defect rather than a waterproofing defect.

  4. Watch the waste. During normal use, look for water pooling at the wall, screen track or threshold instead of moving steadily to the waste. Poor geometry can keep the perimeter wet and increase pressure on joints.

  5. Inspect nearby rooms. Check skirtings, flooring, cupboards, ceilings below and the reverse side of the shower wall. Don't rely only on the point directly outside the shower, because moisture can travel laterally.

  6. Record evidence. Photograph damaged finishes and write down when the mark changes. This gives a waterproofer or plumber useful information without invasive testing.

For concealed valve problems, this guide on how to spot hidden shower valve leaks offers helpful background on why a fitting behind the wall can mimic a waterproofing failure. If the shower continues dripping when it isn't being used, arrange a plumbing assessment rather than sealing over the visible fitting.

A specialist service such as shower leak detection in Melbourne can then use controlled inspection and targeted testing to narrow the source before repair work begins.

Shower leak clues and what they suggest

What You See Most Likely Source Next Check
Water runs outside the screen during use Screen seal, track or surface containment Inspect the bottom seal, frame corners and track
Damp skirting appears after showering Membrane, junction or plumbing penetration Photograph timing and inspect the adjoining wall
Showerhead drips after being turned off Showerhead connection, hose, valve or cartridge Check visible washers and arrange plumbing inspection if it persists
Water sits at the wall or screen base Poor fall, ponding or blocked drainage path Observe movement towards the waste
Loose tiles or staining near a corner Failed junction waterproofing or substrate moisture Avoid surface-only patching and seek professional assessment
Mould is concentrated in silicone Persistently wet joint or poor ventilation Clean safely, dry the area and inspect the underlying cause

Don't remove tiles or drill inspection holes unless a qualified professional has planned the investigation. Uncontrolled opening can damage waterproofing further and make the original moisture path harder to identify.

Temporary Fixes You Can Try Before Calling a Professional

Temporary work is useful when it reduces water exposure while you arrange a proper assessment. It becomes risky when it creates confidence that a failed waterproofing system has been repaired. Keep that distinction clear.

Clean and dry surface joints first. Remove loose residue from a failing silicone bead, allow the area to dry, then apply a compatible bathroom-grade silicone only where the defect is clearly a surface seal. Follow the product instructions and keep the shower unused for the required curing period.

Low-risk containment measures

  • Limit water spread: Use a shower curtain or temporary barrier where appropriate, dry the floor after use and keep towels away from prolonged contact with damp skirtings.
  • Improve ventilation: Run the exhaust fan, open suitable windows and leave the bathroom dry between uses. Ventilation won't repair a membrane, but it can reduce lingering humidity.
  • Check visible fittings: A loose shower hose or showerhead connection may respond to careful tightening or a replacement washer. Don't force corroded fittings or disturb concealed wall connections.
  • Monitor the result: Photograph the area before and after the temporary measure, then record whether dampness returns during or after use.

A leaky pipe with repair tools and tape displayed on a white background, suggesting plumbing solutions.

What patches can't achieve

Painting grout with a surface sealer, adding silicone over mouldy joints or spreading a waterproof coating across tiles won't rebuild a failed membrane. It also won't correct a reversed fall, repair a waterlogged screed or seal a pipe penetration hidden behind the wall.

A proper caulking service in Melbourne may be suitable when the inspection confirms that a deteriorated surface joint is the actual source. If dampness continues after the patch, stop repeating the same repair and arrange a system-level diagnosis.

Don't use the shower if water is reaching electrical fittings, causing a slip hazard or spreading into flooring and walls. A short period of careful containment is reasonable, but persistent moisture needs a qualified plumber, waterproofer, tiler or builder to identify the cause and specify the correct rectification.

Bathroom Renovations and When to Call Registered Builders

A leak becomes a renovation issue when access to the failed component requires removal of tiles, screed, substrate or fittings. At that point, replacing one visible joint can leave the surrounding system untouched. Coordinating the work properly matters because waterproofing, plumbing, falls, tiling and screen installation must work together.

Registered Unlimited Builders can manage that coordination by engaging licensed carpenters, plumbers, electricians, tilers and waterproofers. For a Melbourne bathroom or ensuite, the scope may include removing affected finishes, checking framing and substrate, rebuilding screeds, correcting falls, applying a compliant membrane, testing the wet area and reinstalling the selected finishes.

What a durable rectification should include

The repair brief should identify the suspected source, the areas requiring removal and the tests planned before the bathroom is closed up again. Australian guidance aligned with AS 3740 and current wet-area practice commonly describes a flood test holding water to a minimum depth of 25 mm for at least 24 hours, with no drop in level. This waterproofing reference also explains the practical importance of continuous shower waterproofing under NCC requirements.

A controlled test before tiling gives the team an opportunity to find membrane or drainage problems while the work remains accessible. It is much more useful than discovering a leak after the screen, vanity and finished floor have been installed.

Choosing the right renovation scope

A registered builder should explain whether the work is a local repair, a partial rebuild or a full bathroom renovation. Ask for a written scope that covers demolition, waste removal, plumbing alterations, substrate preparation, waterproofing, testing, tile installation, silicone joints and screen reinstatement.

Premium finishes such as porcelain, marble and large-format Kerlite can be installed successfully, but they still depend on a correctly prepared base. Three-dimensional drawings and a renovation calculator can help homeowners understand layout, material choices and the likely scope before work starts. In the publisher's stated planning information, a typical renovation budget is discussed around a median $10,000, though the actual price depends on the condition, design and finishes of each project.

Landlords and property managers should also keep inspection records, photographs and compliance documents. Those records help separate a fixture repair from concealed building damage and make it easier to plan urgent access without approving a cosmetic fix that won't address the source.

Take Action Before a Small Leak Becomes Major Damage

A shower can look presentable while moisture is reaching framing, flooring or an adjoining room. Start by documenting the timing, location and visible clues. Then reduce water exposure, avoid invasive DIY work and ask a qualified professional to determine whether the source is a fitting, screen, fall, substrate or waterproofing detail.

A practical when-to-call checklist

  • Call a plumber when water drips from a mixer, showerhead, hose or concealed valve, especially when dripping continues while the shower is off.
  • Call a waterproofer or builder when tiles loosen, staining spreads, dampness is delayed or the shower repeatedly fails after surface repairs.
  • Ask about testing before approving retiling. The scope should address falls, membrane continuity, junctions, penetrations and pre-tile flood testing.
  • Record the damage with photographs and dates, including the reverse side of walls, skirtings, cupboards and ceilings below.
  • Clean mould carefully with suitable precautions. This resource on how to clean shower mould safely can help with surface hygiene, but mould removal doesn't replace leak rectification.

For Melbourne and greater Victoria, request a free inspection and quote that explains the cause and the proposed repair sequence. A durable result comes from correcting the system behind the tiles, not only making the visible joint look new.


Melbourne Tiling Services P/L provides bathroom renovations, shower leak rectification, waterproofing, screeding, tiling and shower-screen installation across Melbourne and greater Victoria, with registered builder coordination for connected trades. Visit Melbourne Tiling Services P/L to arrange an inspection, request a free quote and discuss the right repair scope for your leaking shower.

Bathroom Waterproofing Standards: A Practical Guide

In Victoria, bathroom renovation work valued at A$5,000 or more must be carried out by a registered building practitioner (Hipages on bathroom water and renovation regulations by state). AS 3740:2021, first published on 23 July 2021, now sets the minimum waterproofing requirements for domestic wet areas and is the edition referenced through NCC 2022 and the wet-area provisions carried into NCC 2025 (AS 3740:2021 PDF).

If you're reading this, there's a good chance your bathroom is either leaking already, or you're about to renovate and want to avoid ending up with a failed shower in two years. In Melbourne, that concern is justified. A lot of local bathrooms sit over timber floors, older homes move more than people expect, and a tidy tile finish can hide bad waterproofing for a long time.

The part many owners miss is that tiles and grout aren't the waterproofing. The membrane, the falls, the junction detailing, and the way the substrate is prepared are what decide whether the bathroom lasts. Bathroom waterproofing standards aren't just paperwork. On site, they determine whether water reaches the drain or disappears into framing, sheet joins, and the room below.

Table of Contents

Why Bathroom Waterproofing Standards Matter in Melbourne

A typical Melbourne leak job starts the same way. The shower still looks presentable, the grout has been patched once or twice, and there is a faint stain on the ceiling below or swelling at the skirting outside the bathroom. Once the tiles come off, the problem usually shows up in the corners, around the waste, at sheet joints, or in a timber floor that has been taking water for years.

An infographic detailing bathroom waterproofing standards in Melbourne, showing project costs, practitioner requirements, and compliance regulations.

Melbourne bathrooms deserve closer attention than a generic national guide suggests. A large share of rectification work here is in older houses with suspended timber floors, mixed substrates, and previous renovations layered over original framing. Those jobs move more, deflect more, and hide damage better than bathrooms built on a sound concrete slab. A neat tile finish proves very little.

The Victorian renovation setting matters too. Once bathroom work reaches the threshold that requires a registered building practitioner, the expectation is not just a tidy finish but compliant wet-area construction, including waterproofing that suits the actual structure beneath it, as noted earlier from the Hipages guidance on Victorian renovation requirements. On site, that changes how the job should be approached. Existing floors need to be checked for bounce, damaged sheet flooring needs to be replaced, and the falls have to work before the membrane goes down.

Older Melbourne bathrooms fail in familiar ways:

  • Timber floors flex: Movement at floor-to-wall junctions and around wastes is a regular starting point for membrane failure.
  • Past water damage gets covered over: New tiles laid over a weak or contaminated substrate do not fix the cause.
  • Water travels sideways: Leaks often show up at a doorway, in an adjoining room, or through the ceiling below rather than at the shower outlet.
  • Falls are often poor or reversed: Water sits at corners, outside the shower screen, or against the wall base and keeps feeding the defect.

In leak rectification, grout is rarely the issue. Grout and tiles are the wear surface. The result depends on the membrane, the bond breakers, the set-down or hob detail where required, the puddle flange connection, and whether the floor falls push water to the waste instead of letting it pond.

Standards matter because they set the minimum line for details that are easy to get wrong and expensive to reopen later. In Melbourne, that usually comes back to practical site questions. Is the timber floor stiff enough for the system being used? Has the shower area been formed so the required falls can be achieved without creating a lip at the doorway? Is there enough height at the wall upturns and enough care at penetrations to stop water getting behind the lining? Those are the gaps that turn a bathroom renovation into a defect claim.

Understanding AS 3740 and the NCC Framework

A Melbourne owner strips out a 1970s bathroom, keeps the old timber floor, and assumes new tiles and a fresh membrane will satisfy code. Then the shower leaks into the hall three months later because the floor classification was read too loosely, the falls were never properly formed, and nobody treated the doorway and waste connection like the risk points they are.

That is the practical job AS 3740 does. It sets the minimum rules for waterproofing domestic wet areas in residential buildings, and the NCC pulls those rules into the compliance framework builders, waterproofers, certifiers, and insurers work under. On site, that means AS 3740 is not a product brochure or a suggestion. It is the reference point for how the wet area is classified, what gets waterproofed, where the membrane must continue, and how the whole assembly is expected to perform once the room is in use.

The part many generic guides miss is that the standard is only the starting point. In Victoria, the pressure comes from how those minimums meet older housing stock, especially timber-framed bathrooms in Melbourne's east, north, and bayside suburbs. A detail that is technically acceptable on a new slab can become risky on a springy first-floor renovation if the substrate prep, sheeting, and movement treatment are marginal.

How the wet-area categories affect the scope

AS 3740 does not treat every bathroom the same. It separates wet areas by exposure and layout, and that changes the required detailing.

In practice, the categories work like this:

Category Typical situation What it means on site
Category 1 Shower areas, including enclosed and open shower zones Highest water exposure. Full shower-area waterproofing, careful waste detailing, and correct wall and floor treatment matter most here.
Category 2 Bathroom areas outside higher-exposure shower zones The broader bathroom still needs water-resistance measures, but the scope differs from the shower proper.
Category 3 Lower-exposure wet areas, often depending on layout and enclosure Some floor areas are treated less aggressively, but only where the room configuration genuinely supports that approach.

This classification step is where renovation jobs often start drifting off course. An open or semi-open shower changes the risk to the whole room. A shower-over-bath changes the logic again. An enclosed shower in a small apartment bathroom may reduce the required treatment outside the enclosure, but only if the rest of the layout supports that classification and the installation matches it.

The other point that matters in Victoria is responsibility. Once the bathroom renovation value crosses registered-builder thresholds, or the work forms part of domestic building work that needs the right level of registration and documentation, the standard is no longer just a technical reference for the waterproofer. It becomes part of the builder's compliance trail. That is why the paperwork side, including a proper waterproofing compliance certificate in Victoria, needs to line up with what was built on site.

AS 3740 and the NCC are related, but they are not the same document

The NCC sets the legal performance and deemed-to-satisfy framework. AS 3740 gives the detailed wet-area method commonly used to meet that framework for internal domestic bathrooms, laundries, and similar spaces.

That distinction matters during disputes. I regularly see leak-rectification jobs where one trade quotes the NCC at a high level, another points to a product data sheet, and nobody has checked whether the installed system matches the AS 3740 wet-area detail for that room type. The result is a tiled bathroom that looks finished but has no reliable line of defence at the wall-floor junction, around penetrations, or at the waste.

Internal bathrooms also need to be kept separate from external waterproofing logic. Balconies, planters, and podiums are different assemblies with different exposure conditions and different detailing priorities. Applying external-area habits inside a bathroom can create unnecessary build-ups, bad transitions, or incompatible junctions. The reverse mistake is worse. Treating an exposed external area like an internal bathroom nearly always ends badly.

Industry commentary has also pointed out that residential teams can get into trouble by mixing AS 3740 references with other housing provisions without checking which pathway applies to the project scope. Chalkline's AS 3740 compliance note is a useful reminder that compliance is not just about quoting the right document. It is about using the right document in the right context.

Standards did not become central to wet-area work by accident. They grew out of repeated failures, trade specialisation, and insurance pressure, which is part of the broader history of plumbing trade in North America as well.

For Melbourne bathrooms, the takeaway is simple. AS 3740 tells you the minimum accepted method. The NCC gives that method its compliance force. Older timber floors, tight renovation set-downs, and poorly planned shower layouts are where that framework gets tested hardest.

Required Membranes and On-Site Installation Details

An upstairs shower in a Brunswick weatherboard can look perfect on handover and still be leaking into the hallway wall a month later. I see that pattern in rectification work all the time. The tiles are straight, the grout is clean, and the failure sits underneath at the waste, the hob, the screen line, or a floor that never had proper fall to begin with.

An infographic checklist for AS 3740 bathroom waterproofing standards, illustrating required membrane heights, floor falls, and junction reinforcement.

The dimensions that matter on site

On a compliant internal shower, the membrane is carried up the walls in the shower area to 1800 mm above the floor substrate. The shower floor also needs a continuous fall to the waste within the range set out by the NCC for wet areas, with no birdbaths, no back-falls, and no flat strip trapped under the screen line (NCC waterproofing and water-resistance requirements for wet areas).

That sounds straightforward on paper. It often is not on a Melbourne renovation.

Older timber-framed bathrooms are where the details get tight. There may be no set-down. The joists may already be undersized. The client wants a flush entry. The plumber has set the waste too high. The tiler is then asked to create fall, keep build-up down, and still hit the doorway level. That is how showers end up with compliant-looking wall membrane and a floor that holds water at the perimeter.

The weak points are predictable:

  • shower-to-bathroom transitions where the water stops short of the waste
  • floor-to-wall junctions that were not reinforced properly
  • tap penetrations and mixer points that were cut oversized or left poorly sealed
  • puddle flanges and floor wastes that were never integrated properly with the membrane
  • hobs, nib walls, and screen fixings where water tracks through small breaks in the system

Silicone does not fix any of that. Silicone is a maintenance joint. The waterproofing has to be continuous underneath.

Membrane choice and compatibility

The membrane itself has to suit the substrate, the movement you expect, and the full system around it. Liquid-applied membranes used internally are generally selected to meet AS 4858. Sheet-applied systems are selected under the relevant product and installation pathway, and external membrane standards such as AS 4654.1 are not a substitute for internal wet-area detailing unless the manufacturer and the project scope clearly support that assembly.

That compatibility question matters most in rectification and renovation work. On an older Fitzroy or Northcote bathroom, there may be fibre cement patching next to compressed sheet, old sand-cement falls in one area, and fresh levelling compound in another. If the primer, bond breaker, membrane, adhesive, and sealant are not specified as one system, the failure usually turns up at the change of plane first.

A proper scope should name the membrane system, the primer, the reinforcement method at junctions, and the waste detail. "Waterproof bathroom" is not a scope. It is a gap.

This walkthrough is useful if you want to see the sequence visually:

For owners comparing systems before signing off on a renovation, this guide to shower waterproofing membrane options gives a practical summary of where different membrane types suit the job.

In Victoria, the paperwork side matters too. Once bathroom renovation cost or scope pushes the project into registered-builder territory, vague waterproofing notes become a real risk for everyone involved. If I am reviewing a leak after the fact, one of the first things I look for is whether the installed build-up matched a documented system, or whether trades were left to sort it out on site. That gap is where failed showers start.

How Substrate Type Changes Waterproofing Requirements

A shower over a 1930s timber floor in Brunswick is not waterproofed the same way as a new ensuite on a concrete slab in Point Cook. The floor finish might be the same porcelain tile in both rooms, but the substrate underneath changes the whole job. If that difference is ignored, the leaks usually show up at the waste, the wall-floor junction, or a sheet join that kept moving after handover.

In Melbourne renovations, mixed substrates are common. Part of the floor might be original timber sheeting, part might be new fibre cement, and the shower area might have been packed or levelled during rectification work. Each surface absorbs primer differently, moves differently, and places different stress on the membrane. One membrane detail applied across all of it is where many failed bathrooms begin.

Timber floors need full attention, not partial treatment

On timber or particleboard floors, the practical approach is full-floor waterproofing because any escape of water can damage the structure below. Timber movement is the main issue. The floor deflects under load, sheet joints can telegraph through, and moisture getting into the substrate can lead to swelling, loss of bond, and cracked grout that owners often mistake for a tiling problem.

Older Melbourne homes make this harder. Joists are not always straight, previous repairs are common, and the floor may already be carrying some bounce before demolition even starts. If the substrate is not stiff enough, the membrane is being asked to cope with movement it was never meant to absorb. That is why substrate assessment matters before anyone starts talking about tiles.

Concrete behaves differently, but it still fails for predictable reasons

Concrete does not swell like timber, but slab jobs have their own failure pattern. The usual problems are poor falls, weak or dusty screeds, shrinkage cracking, and rough waste detailing. A membrane can be applied neatly and still fail in service if water sits against a screen channel, ponds outside the shower, or tracks through an unsealed penetration.

On slab renovations, I often see the membrane blamed for what is really a geometry problem. If the floor does not fall cleanly to the waste, waterproofing alone will not fix shower performance.

Substrate Primer requirement Typical membrane approach Fall method Common failure point
Timber or particleboard floor Primer matched to the sheet or board surface and any patched areas Full-floor liquid membrane or compatible sheet system, with careful treatment at joints and junctions Falls built into the floor build-up or formed with a suitable underlay system before tiling Deflection, sheet-joint movement, moisture damage below floor level
Concrete slab Primer matched to slab condition, porosity, and any screed or levelling layer Liquid or sheet membrane suited to the slab and waste detail Falls corrected with screed or floor preparation before membrane application Ponding, screed debonding, cracking, poor bonding around wastes

Mixed substrates are where good specifications matter

A lot of renovation bathrooms are not one clean substrate from wall to wall. They are patched. They have transitions. They have old and new materials meeting in the same wet area. That is where membrane systems get caught out if the installer has not allowed for reinforcement, cure times, and compatible primers across every change in surface.

This is also where registered-builder threshold jobs in Victoria need clearer documentation than they often get. If the scope only says "waterproof bathroom", the installer is left to make product and preparation decisions on site that should have been resolved before work started.

For owners and project managers, proper wet-area substrate preparation is usually the point that decides whether the membrane has a stable base or is covering over movement, dust, patchwork repairs, and poor falls.

Testing and Compliance Steps That Prove the Work

A shower can look finished, be fully tiled, and still be leaking into the hallway or ceiling below. I see that pattern regularly in Melbourne rectification work, especially in older timber-floor bathrooms where movement at the waste, screen line, or wall-floor junction was never picked up before handover. Testing is what separates a bathroom that only looks complete from one that has been proved.

A four-step infographic illustrating standard bathroom waterproofing flood testing procedures for compliance and quality assurance.

What a flood test should show

On site, a flood test is the simplest way to check whether the membrane, corners, penetrations, and waste detailing hold water before tile finishes hide everything. It is particularly useful on renovations, because patched substrates and rebuilt shower bases are where small installation gaps tend to show up.

A useful test process looks like this:

  1. Seal the waste properly: A loose plug gives a false fail, and no plug gives no test at all.
  2. Fill the shower area to a defined level: The aim is to load the membrane and junctions, not just wet the surface.
  3. Hold the water long enough to observe performance: On many projects, that means a 24-hour hold period so slow leaks have time to show themselves.
  4. Check the level and inspect surrounding areas: Look for any drop in water level, moisture at adjacent rooms, and staining or seepage below if there is access from underneath.

On a concrete slab, a failed test often shows up as leakage at the waste or poor detailing at wall-floor junctions. On an older timber floor in a Victorian renovation, movement is the extra problem. The membrane might look sound when dry, then open up under load where the base flexes or where new sheeting meets old framing.

Flood testing also has limits. It does not prove the falls are right, and it does not excuse bad screen detailing or poor silicone work later. A shower can pass a water hold test and still perform badly if water sits at the entry, runs out through an uncontained opening, or ponds because the finished floor falls were not checked.

What to ask for: Photos of the set-up, the water level at the start, and the result at the end, with dates. On leak-rectification jobs, ask for photos of the waste seal, corners, and penetrations before tiling as well.

The paperwork that matters

Compliance is not just a membrane bucket and an invoice. The record should show what standard and manufacturer system the installer followed, what preparation was carried out, where the waterproofing was applied, and how it was tested.

For a bathroom renovation or shower rebuild, owners should expect:

  • a written scope of works
  • the membrane product details and data sheets
  • substrate and pre-tile installation photos
  • flood-test records
  • any relevant compliance documents for plumbing work completed by the licensed trade involved

That matters more in Victoria than many owners realise. Once the job value triggers registered-builder requirements, the paperwork trail becomes harder to ignore. It also matters on older Melbourne homes where leak claims often turn into disputes about whether the failure came from waterproofing, plumbing, movement in the floor, or later tile and screen work.

Good documentation will not stop a leak. It does make the cause easier to trace, the responsibility easier to sort out, and the rectification scope easier to justify if the shower has to come back out.

Common Defects and Real-World Rectification Examples

Rectification work teaches the lessons that new-build brochures leave out. Most failed bathrooms don't fail because one dramatic thing went wrong. They fail because several small decisions lined up badly.

A failed shower over timber

A typical example is a Melbourne bathroom from the 1990s over a timber floor. The shower starts leaking at the screen line, the skirting outside the bathroom softens, and the ceiling below develops staining. Once the shower base and lower wall tiles come up, the pattern is obvious. The membrane never had continuous perimeter coverage, the junction detailing was poor, and water had been tracking into the subfloor for a long time.

The fix usually isn't surgical. It means demolition back to a sound base, replacing damaged timber, rebuilding the substrate so it is stable, reinstalling compliant wet-area detailing, and only then retesting and retiling. If the owner is hoping for a grout-and-silicone repair, that's the point where expectations need resetting.

Key signs this kind of shower needs proper rectification:

  • Soft or drummy floor areas: Often a clue that moisture has affected the build-up below.
  • Swollen trims or adjacent skirting: Water has already moved beyond the shower zone.
  • Recurring mould at wall bases: Surface cleaning won't solve a concealed membrane failure.

External waterproofing failures are a different category

A second scenario is a leaking second-storey balcony tied to the bathroom or ensuite. The owner assumes it's the same problem as a shower recess. It isn't. External areas are governed separately, and balcony detailing fails for different reasons. Poor terminations, bad falls, weak door threshold treatment, or an incompatible membrane system can all send water into the unit below.

That matters because a trade can be competent inside bathrooms and still mishandle a balcony. The membrane may need to be stripped, falls corrected, terminations resealed, and the whole external build-up rebuilt to suit the relevant external standard rather than internal bathroom rules.

Leak rectification isn't a membrane-only exercise. If the substrate, falls, or terminations are wrong, the waterproofing system is only part of the repair.

The lesson owners should take from both

The common thread is simple. Once leakage is established, the question isn't "What membrane should I use?" It's whether the existing structure, geometry, and detailing are still worth saving. Some showers can be rebuilt efficiently. Others need a full strip-out because every layer under the tile has already been compromised.

Practical Guidance for Homeowners and Property Managers

A common Melbourne renovation scenario goes like this. The old ensuite on a timber floor is stripped, the quote looks tidy, and everyone assumes waterproofing is covered because the word appears on page one. Then the builder opens the floor, finds sheet movement around the waste, discovers the room has almost no fall, and decisions start. If the scope was vague from the start, the owner ends up arguing about variations instead of getting a bathroom that will stay dry.

An infographic providing four steps of practical guidance for homeowners and property managers on bathroom waterproofing.

In Victoria, the registration threshold for bathroom renovation work has already been noted earlier in this article. The practical point for owners and managers is simple. Check who is taking responsibility for the wet-area build-up before demolition starts, especially in older apartments and post-war homes where timber floors, patched sheeting, and out-of-level framing are common.

What to put in the contract

A workable contract does more than say "renovate bathroom" or "waterproof wet area". It needs enough detail that everyone can tell what is included once the tiles are off and the substrate is exposed.

On renovation jobs, I want to see these items written clearly:

  • The compliance target: State that internal wet-area work is to comply with AS 3740:2021 and the relevant NCC requirements.
  • Demolition and make-good: Identify what gets removed and what happens if damaged sheeting, rot, or loose flooring is found.
  • Substrate preparation: Record whether floor levelling, screeding, sheet replacement, bedding around the waste, or framing correction is included.
  • Waterproofing system: Name the membrane brand and system, including primers, bond breakers, sealants, and compatible tile adhesives where relevant.
  • Set-downs, thresholds, and falls: If the room has limited height, say how the contractor will achieve compliant falls and water containment without creating a trip point at the door.
  • Proof before tiling: Require progress photos and, where appropriate, a flood test before tiles hide the work.

That last point matters on leak-rectification jobs. Plenty of failed showers in Melbourne look acceptable once retiled. The problem sits underneath.

For managers comparing repair scopes, the overview of Good Boy Plumbing for bathroom repairs is a useful example of how repair categories can be explained in plain language, even though the compliance checks still need to match Victorian requirements.

How to read a quote properly

Cheap quotes usually leave out the parts that cause disputes later. On older timber floors, that is often the structural preparation needed to stop movement and create proper falls to the waste. Membrane applied over a bouncing floor or a flat shower base is money spent in the wrong order.

Ask direct questions and get written answers:

  • Who holds the builder registration for the renovation scope?
  • Who is carrying out the waterproofing, and what system are they applying?
  • Is allowance made for replacing swollen fibre cement sheet, damaged villaboard, or loose flooring?
  • Are the shower falls being checked and corrected before waterproofing starts?
  • Is flood testing included, and who signs off on it?
  • What is the variation process if demolition exposes rotten framing or non-compliant plumbing set-out?

Property managers should also ask who will be dealing with access, tenant coordination, and drying time if a leak has already affected the unit below. Those practical delays are rarely captured in the lowest quote.

One practical option in Melbourne is Melbourne Tiling Services P/L, which coordinates bathroom renovation trades including waterproofing and leak rectification as part of full wet-area scopes. The useful part of that model is accountability. One party manages the substrate preparation, membrane stage, tiling sequence, and handover records instead of leaving gaps between trades.

What to keep before final payment

Do not rely on texts and verbal assurances.

Keep the contract, approved variations, product data sheets, invoices, progress photos, and any flood-test record. If the bathroom is in an older building with body corporate involvement, keep correspondence about access, leak reports, and any direction from the owners corporation as well.

Before releasing final payment, confirm that the completed work matches the written scope. That includes the practitioner details, the membrane system used, and the documented evidence that the waterproofing stage was completed before tiling covered it. On rectification work, that paper trail often matters as much as the tile finish, because if the shower leaks again, the first question is whether the failure was repaired or just covered up.