Leaky Shower Valve Repair: A Melbourne Homeowner’s Guide

A dripping shower handle is one of those problems Melbourne homeowners tend to ignore for too long. It starts as a faint tick, a wet stain on the vanity, or a shower floor that never quite dries out, then turns into a bathroom that smells musty and costs more to live with every month.

In older inner-suburb homes and renovated apartments across Melbourne, that drip is rarely just an annoyance. It can point to a worn cartridge, a tired washer, a showerhead issue, or something more serious behind the tiles. If the leak is allowed to keep going, the repair often gets bigger, because hidden moisture can move into wall cavities, finishes, and framing. That's why leaky shower valve repair is really about diagnosis first, not just parts replacement.

Table of Contents

That Dripping Shower Handle Is Telling You Something

A Bayside ensuite that never quite shuts off tells a familiar story. The tenants move out, the owner notices a slow drip from the spout, and suddenly the vanity edge has a water mark that wasn't there before. The handle feels a bit loose, the shower head hisses after use, and the bathroom has started asking for attention.

That symptom matters because shower efficiency and leak awareness aren't cosmetic issues in Australia. The Australian Government's WELS scheme has applied nationally since 1 July 2006, and it rates showerheads by star efficiency to reduce household water use. In practical terms, even a small drip matters in a country where household leaks can waste large volumes of water, and the U.S. EPA's WaterSense data shows a single showerhead leaking at 10 drips per minute wastes more than 500 gallons per year. Household leaks can waste more than 10,000 gallons annually as well, so the logic for fixing a shower leak is tied to water loss, bills, and moisture damage, not just comfort EPA WaterSense leak guidance.

A drip that seems minor at first can stay hidden for months, then show up as staining, swelling, or mould in the wrong place.

The visible leak isn't always the real fault

A handle leak often gets blamed on the valve because that's the part you can see and touch. Sometimes that's right. A worn cartridge or washer is common, and in many bathrooms the fix is straightforward if the rest of the installation is sound.

But Melbourne renovations tell a second story. Older bathrooms, especially ones updated before modern membrane standards, can leak because water is travelling behind the wall lining and out through the valve opening. When that happens, the drip is just the symptom, not the diagnosis. A sensible repair starts by asking whether the valve is failing, or whether the wall system around it has already failed.

Is It Really the Valve? Quick Checks Before You Touch Anything

Before you pull the handle apart, run a few checks that separate a simple valve fault from a showerhead or concealed-wall problem. The point is to avoid opening up a working valve and chasing the wrong part. A ten-minute diagnosis can save an unnecessary tile repair later.
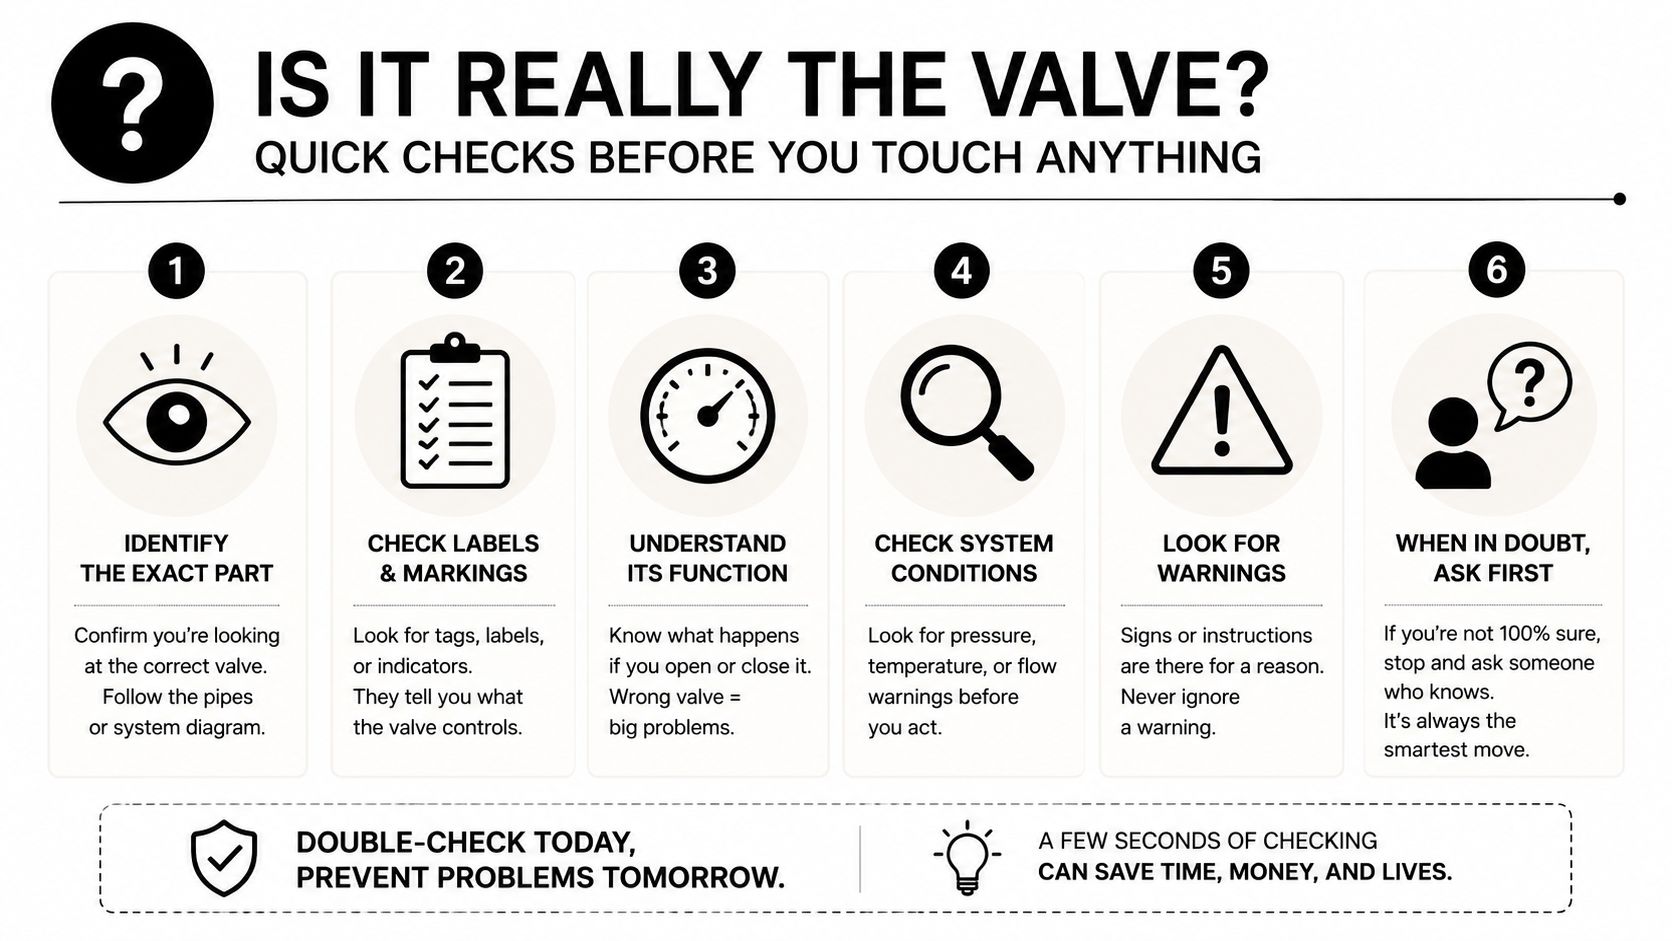
A safety infographic showing six numbered steps to check before working on industrial valves and equipment.

Start with the drip pattern

Watch what happens when the handle is fully off. If the drip slows down after the shower is left alone, that often points to an internal seal, cartridge, or washer issue. If it keeps going steadily, especially after a while, the problem may be pressure-related or coming from somewhere else in the assembly.

Next, isolate hot and cold if the setup allows it. Some valves behave differently depending on which side is under pressure, and that clue helps narrow the fault before anything is dismantled. If there are supply-stop valves behind the trim, they can help localise the issue without shutting off the whole property.

Check the showerhead and the wall around it

A showerhead can mimic a valve leak, especially if mineral buildup or a loose threaded connection is involved. Feel the shower arm joint, check the head, and look for water tracking along the fitting rather than from the valve body. A wrap of fresh PTFE thread tape or a tightened head may solve a joint leak, but don't assume that's the whole story if water is showing up elsewhere.

Then look outside the shower. Bubbling paint, swollen skirting, staining on adjacent walls, or a musty smell in the next room are red flags. Those signs usually mean the problem has moved beyond a trim-level repair and may involve a concealed wall failure. For homeowners wanting a local diagnostic starting point, this Melbourne shower leak detection resource is worth keeping handy.

Tools, Parts and Safe Isolation in a Melbourne Bathroom

A proper repair starts with the right tools on the bench, not half-way through the job. For most valve repairs, the practical kit is simple, but every item earns its place. You'll want an adjustable spanner, Phillips and flathead drivers, an allen key set, needle-nose pliers, plumber's grease, thread tape, a torch, and a phone or camera so you can photograph the assembly before you pull it apart.

The parts side matters just as much. Don't guess the cartridge by shape alone. Match it by brand and model where possible, especially in older Melbourne bathrooms where imported mixers and long-discontinued Australian valves still show up in renos and strata stock.

Isolate the water properly

Find the main bathroom stop tap first, then test it before touching the valve. Open the shower handle after shutting the supply to confirm pressure is off, because a trapped line can still surprise you. If mini isolation valves are hidden behind the trim plate, use them only if you can identify them clearly and they move freely.

If you can't confirm isolation, stop there. A dribbling valve is annoying, but a live line behind a wall opening turns a simple repair into a much bigger one.

Once the supply is off, photograph the trim, retaining clip, and cartridge orientation before removal. That single habit prevents a lot of reassembly mistakes. If you're dealing with a bathroom that's tied into a wider renovation, this Melbourne shower repair guide is a useful companion for the practical side of the work.

Replacing the Cartridge or Washer Step by Step

A good cartridge swap feels calm, not rushed. The handle comes off first, then the cap and trim plate, and only then do you get access to the valve body. The retaining clip is usually the part that turns a simple job into a frustrating one, so pull it carefully and keep it somewhere visible.
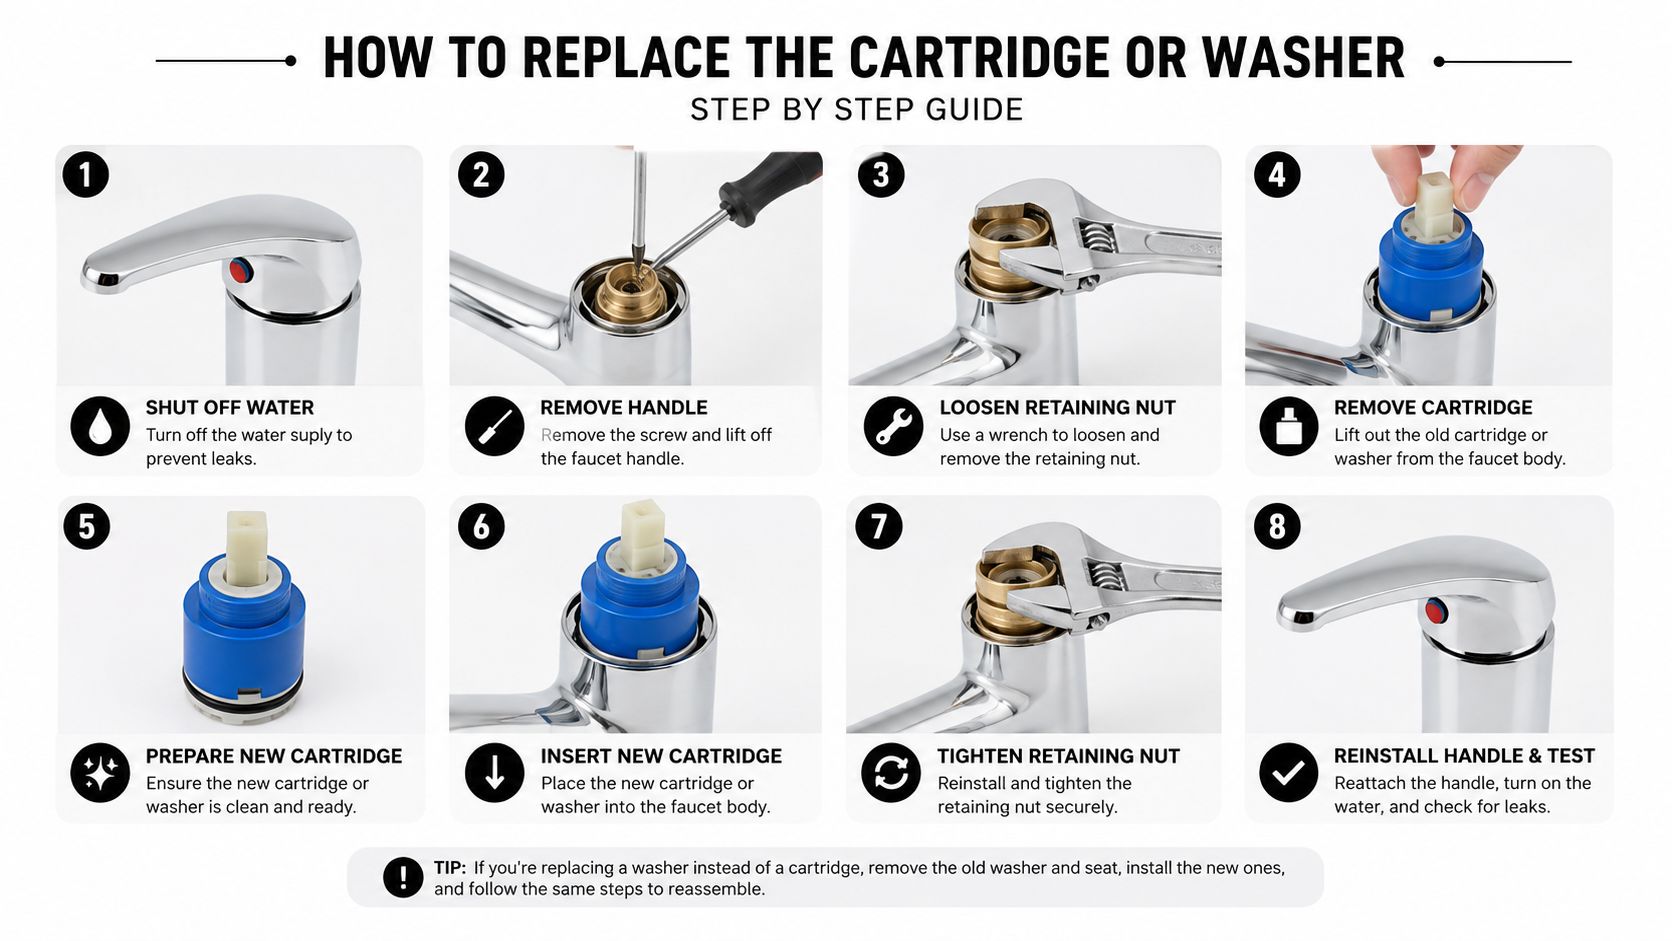
A step-by-step infographic showing how to replace a leaky faucet cartridge or washer in eight simple steps.

Remove straight, then match the part exactly

Pull the cartridge or stem straight out without twisting it if you can avoid it. If it's seized, that's where a stuck puller or a little patience comes in, especially in 1990s bathrooms where old cartridges can bind in place. Gentle heat can help, but forcing it usually damages the body or seats.

The replacement needs to go back with the orientation lugs matched to the valve body. Hot and cold sides matter, and so does the cartridge's seating depth. If you reuse a tired seal or clip it back in crooked, the shower can still drip after reassembly, which is why cartridge orientation and retaining-clip seating are the most common failure points in repair work.

Reassemble, grease, and test twice

Before reassembly, lightly grease the o-rings and any contact surfaces that need it. Then work in reverse order, trim plate first, handle last, and don't over-tighten cosmetic fittings. Once everything is back together, test under live flow, then shut it off and test again after residual pressure returns.

The real finish line isn't “it looked fine when I turned it on.” It's “it stayed dry after the line settled back down.”

That post-test check matters because some leaks only show once pressure returns to the line. If the valve still drips, the issue may be the seat, the cartridge, or the hot/cold side rather than the part you just changed. At that point, another round of guesswork usually costs more than getting the right diagnosis.

Repair Versus Full Replacement in Older Melbourne Homes

Older Melbourne homes often hide the decision in the wall. A cartridge or washer replacement is the right answer when the valve body is sound, the part is still available, and the seal surfaces haven't been chewed up by years of use. Full replacement makes more sense when the body is corroded, the threads are stripped, the valve has been over-tightened too many times, or the part is no longer easy to source.

The cost picture makes that choice worth thinking about early. National reference ranges commonly place shower valve repairs around $150 to $350 and full valve replacement around $225 to $575 Modernize cost reference. In Melbourne, that gap matters more in older housing stock, where labour, access, and part compatibility can shift a simple repair into a more involved rectification.

A practical comparison

Factor Cartridge or Washer Repair Full Valve Replacement
Typical fit Good when the body is sound and the part is available Better when the valve is corroded, stuck, or obsolete
Access impact Usually limited to the trim and internal parts Often more disruptive, especially in older walls
Risk level Lower if the right part is matched and seated correctly Lower long term if the existing valve is worn out
Best use case Early leak, clean body, known brand Repeated leaks, corrosion, failed parts supply
Renovation value Keeps costs down for a straightforward fix Makes sense during a planned bathroom upgrade

When replacement is the smarter call

If you're already planning bathroom renovations, replacement can be the cleaner path. That's especially true where the existing valve is incompatible with modern parts or where a newer pressure-balanced or thermostatic unit would improve reliability. WELS-rated fixture choices also make sense when a bathroom is being refreshed, because water efficiency is part of the long-term value equation in Australia.

Melbourne homeowners usually feel the trade-off in the labour bill, not just the parts box. A cheap repair that fails twice isn't cheap at all. A full replacement done at the right time can save a second callout and avoid chasing the same leak through an old valve body.

When the Leak Is Really a Waterproofing and Building Compliance Job

A shower that keeps leaking after a cartridge swap is telling you something different. The water may not be coming from the valve hardware at all. It can be tracking through failed waterproofing, moving through a degraded membrane, or collecting in the substrate and showing up where the trim meets the wall.

That's where the visible clues matter. Efflorescence on grout lines, soft or hollow-sounding tiles, mould at the shower base, or moisture readings on adjoining walls point to a concealed problem rather than a tidy valve fix. If those signs are present, a handle repair won't close the system back up.
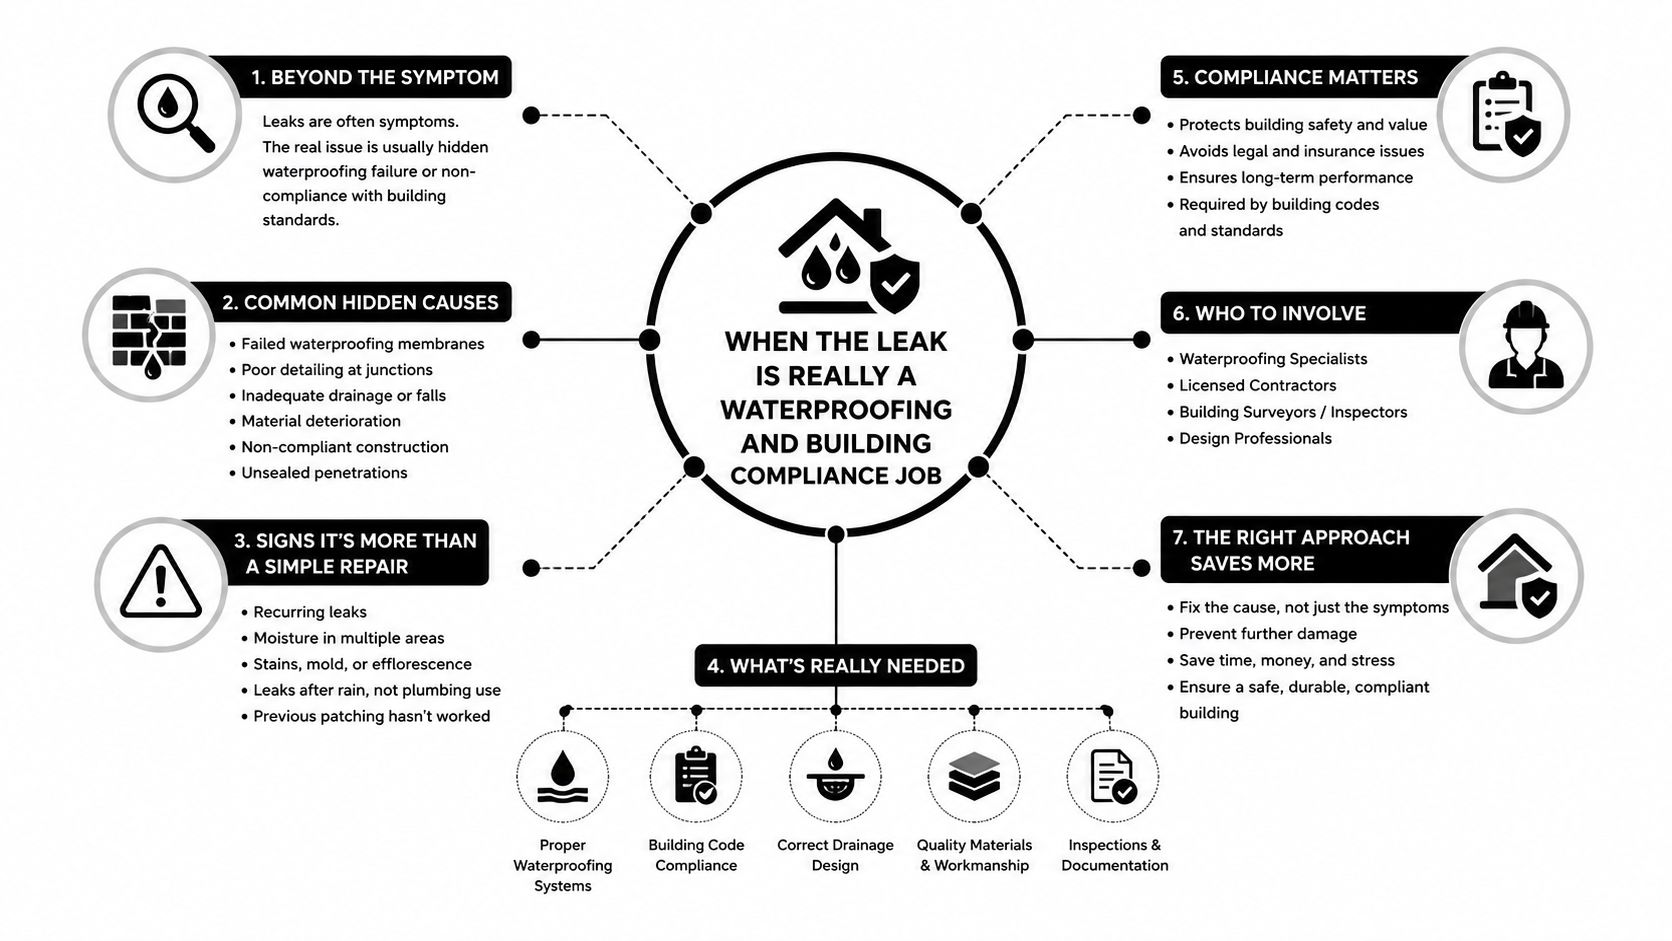
A diagram explaining that building leaks are often due to waterproofing and compliance issues, not just repairs.

Why compliance changes the job

Australia's National Construction Code and waterproofing requirements make shower waterproofing mandatory in compliant bathroom construction. That means leak repair can become a building compliance issue as soon as the wall lining, membrane, or tile substrate needs to be opened up. In Victoria, structural changes, plumbing changes, or waterproofing work generally pull the job beyond minor repair territory and into registered-practitioner work.

That's also where the role split matters. A licensed plumber handles the pipework and valve side. A registered waterproofing applicator addresses membrane failure. A Registered Unlimited Builder can coordinate the broader rectification across carpentry, plumbing, waterproofing, and tiling, which is often what a Melbourne bathroom needs once the leak has moved behind the tiles. Melbourne Tiling Services P/L also publishes guidance on waterproofing compliance in Victoria, which is a useful reference point when the repair starts looking like a renovation.

What not to ignore

If the wall feels soft, the skirting has swollen, or the shower base is holding damp longer than it should, the issue has likely moved past the valve. At that stage, the smartest move is to stop treating it like a small plumbing fix. A proper leak rectification may start with a handle, but it can end with a membrane repair, tile replacement, and compliant rebuild.

Your Decision Framework After the Drip Stops

Once the dripping stops, the key question is which path got you there. A clean DIY cartridge swap is the right result when the valve was easy to isolate, the part matched properly, and the shower stayed dry after the pressure test. That outcome usually suits a straightforward, recent installation with no hidden wall damage.

A licensed plumber call-out makes sense when the valve is stubborn, the isolation isn't clear, or the leak doesn't behave like a simple worn seal. That path is also the safer one when you're dealing with an older mixer, unknown parts, or repeat dripping after reassembly. The time signal is usually obvious, because a few minutes of DIY turns into a stalled bathroom and a pile of trim pieces.

The third path is the one Melbourne homeowners often miss. If the leak comes with tile movement, damp walls, or signs of waterproofing failure, the job has crossed into rectification and likely needs a registered builder to coordinate the repair properly. That's the point where bathroom renovations and leak repairs overlap, and it's better to treat the wall system correctly than keep swapping parts that aren't the core issue.
Screenshot from https://melbournetilingservices.com.au

If your shower drip looks like a simple valve fault, Melbourne Tiling Services P/L can help assess whether it's a quick plumbing fix or a wider waterproofing problem. If the leak has started to affect tiles, membranes, or adjoining finishes, visit Melbourne Tiling Services P/L to organise a quote and talk through the repair or renovation scope with a Melbourne specialist.
High End Bathroom Cabinets: A Melbourne Guide

Most advice on high end bathroom cabinets starts in the wrong place. It talks about door profiles, timber tones, and handle finishes, then treats moisture damage as an installation afterthought. In Melbourne bathrooms, that's backwards, because a cabinet only stays premium if its materials, set-out, and waterproofing interface survive steam, splash exposure, and constant movement around plumbing and walls.

The market is still being pulled by renovation activity rather than simple replacement demand. Grand View Research places the global bathroom furniture market at USD 136.20 billion in 2024, rising to USD 195.27 billion by 2030 at a 6.6% CAGR, and names home renovation and remodelling as a key driver, which matters in Australia because premium vanities are usually bought as part of a full bathroom upgrade rather than as a stand-alone item. Cabinet-style storage is also growing faster than the broader cabinet category, with Mordor Intelligence forecasting bathroom cabinets at 7.87% CAGR through 2031, ahead of the overall cabinet market at 5.04% CAGR for 2026 to 2031, driven by integrated power, drawer organisers, and textured finishes. Those trends line up with what's happening in Melbourne, where homeowners want cleaner, more concealed storage, but still need something that survives the wet zone.

Table of Contents

Why Expensive Cabinets Fail in Australian Bathrooms

Paying more doesn't automatically buy durability in a bathroom. I've seen beautifully finished cabinetry fail early because the carcass wasn't suited to humidity, the cut edges weren't sealed properly, or the cabinet was fitted before the waterproofing and plumbing details were resolved. The failure usually isn't dramatic at first, it starts with swelling at the base, softened edges around penetrations, or drawers that drag because the cabinet has moved slightly after exposure to moisture.

The visible finish hides the real weak point

A high-gloss door can look premium on day one and still be the wrong product for a wet-area renovation. The trouble is usually inside the box, at the back rail, around hinge cups, and wherever the cabinet meets wall, floor, and basin services. That's why wet-area compliance matters more than surface polish, because the National Construction Code requires waterproofing in wet spaces, and cabinetry has to work with that reality rather than ignore it.

Practical rule: if the cabinet details don't account for moisture, plumbing, and movement, the finish won't save it.

Melbourne bathrooms expose weak specification choices

Melbourne renovations often combine stone tops, timber-look faces, recessed storage, and compact layouts. Those combinations can look sharp, but they also create more chances for water ingress and fit issues if the cabinet isn't dimensioned and installed properly. In older homes, slight wall irregularities can leave gaps that get filled badly, then fail later when seals separate or substrate movement opens the joints again.

The true test of high end bathroom cabinets is simple. Can they stay straight, sealed, and serviceable after repeated steam exposure and daily splash contact? If the answer depends on perfect behaviour from the homeowner, the product isn't premium enough for an Australian bathroom.

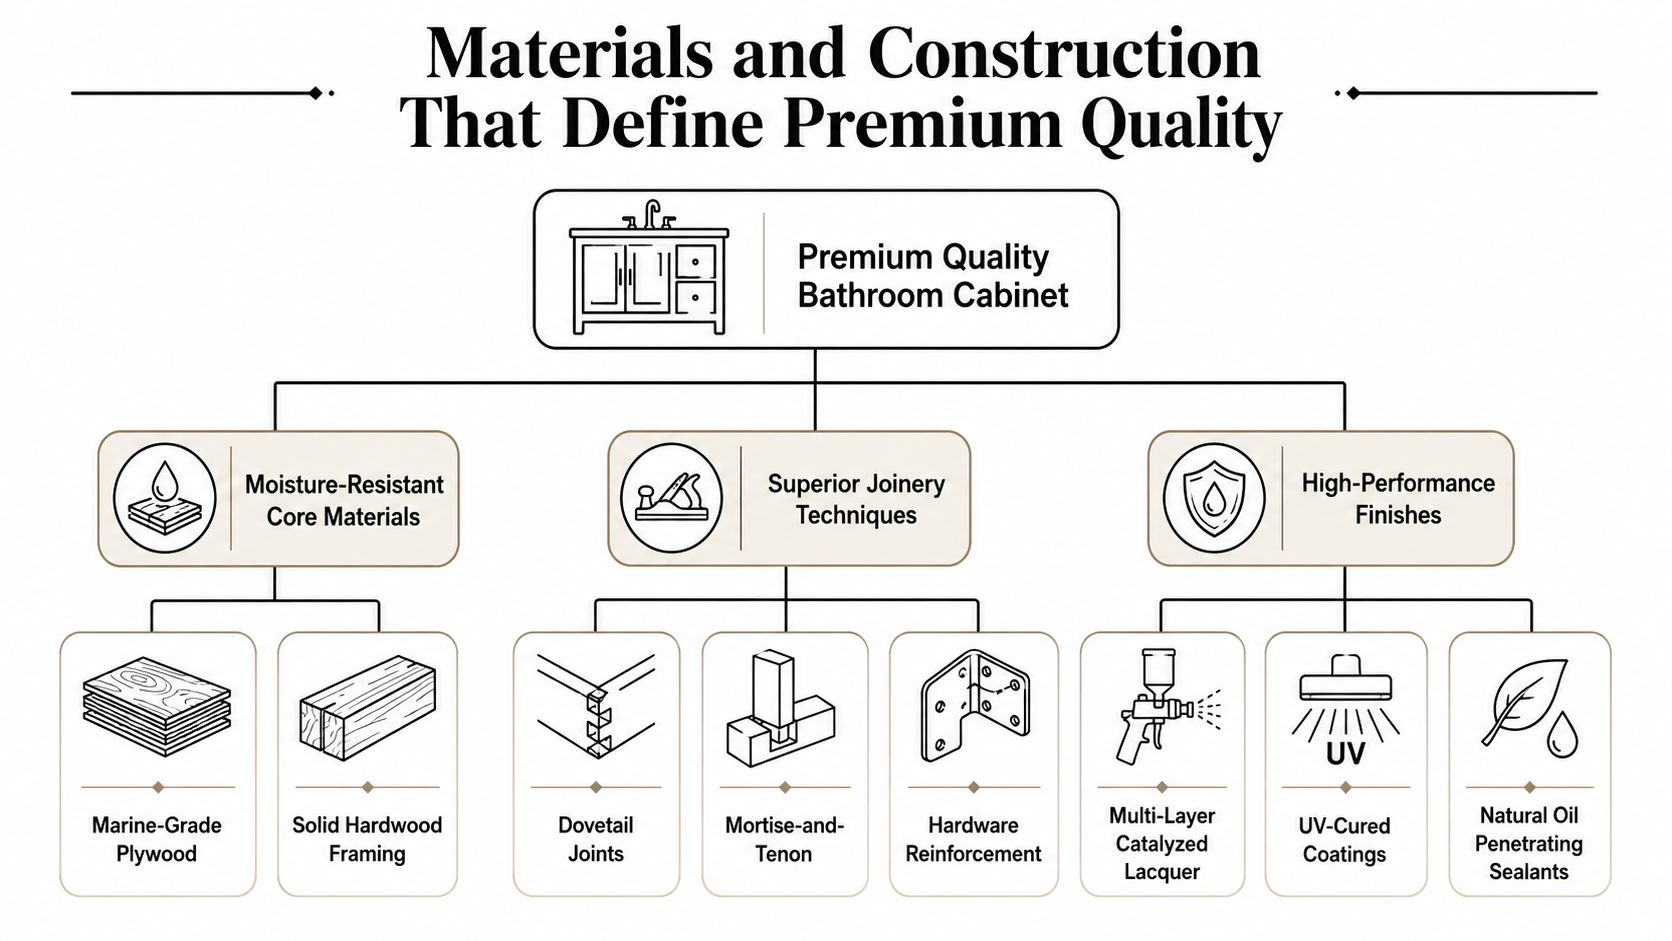
Materials and Construction That Define Premium Quality

Premium bathroom joinery lives or dies in the substrate, edge treatment, and service access. A good showroom face can hide a weak carcass for a while, but Melbourne bathrooms punish poor board selection, sloppy sealing, and awkward rough-ins very quickly. In wet areas, I look first at whether the cabinet is built to cope with moisture, movement, and maintenance access, because those are the failures that show up after the installer has left.

A diagram illustrating the premium quality materials and construction techniques used to build bathroom cabinets.

Australian low-emitting composite timber products are commonly chosen because they align with national formaldehyde limits under the Australian Standard framework. That matters in moisture-prone internal joinery, where board stability and indoor air quality both affect long-term performance. If the substrate swells, telegraphs through the finish, or opens at the cut edge, the cabinet stops behaving like premium joinery.

The service void is not wasted space

A 45 mm service void at the back of base units gives plumbing and electrical services room to run without cutting into the carcass. That is especially useful when drawers need to stay full-extension and the back of the cabinet still has to clear waste traps, pipework, and service entries. If the site crew has to cut the unit heavily on installation day, the specification has already failed.

Practical rule: a cabinet that needs invasive site cutting is usually a cabinet that was measured too loosely or specified too rigidly.

Hardware and carcass geometry need to work together

Premium units commonly sit around 21 to 22 inches, about 533 to 559 mm deep, with tops projecting beyond the carcass, and larger formats can extend to around 1620 mm wide or 1538 mm high in taller storage pieces. Those dimensions only work if the wall set-out, waterproofing, and plumbing rough-ins are accurate. A deeper carcass gives better drawer capacity and hides services more cleanly, but it also makes poor alignment more obvious, especially with soft-close, full-extension undermount slides.

That is where coordination with a registered builder and the waterproofing trades matters. If the cabinet footprint clashes with membrane returns, pipe positions, or wall build-outs, the joinery may look fine on paper and still be awkward to install in a compliant wet area. For a practical guide to the sequencing issues, see Australian bathroom waterproofing requirements in Melbourne.

What to look for in the spec sheet

  • Moisture-resistant substrate: suitable for humidity, not just an attractive veneer.
  • Sealed cut edges: every cut end should be protected, especially near basins and plumbing exits.
  • Reinforced carcass construction: needed for deeper drawers and heavier tops.
  • Accessible service space: so plumbers and electricians are not forced to damage the cabinet later.
  • Low-emission board selection: sensible in enclosed internal joinery.

The biggest mistake is confusing a premium finish with premium construction. A cabinet earns the label only when the hidden details are as disciplined as the visible ones, and when the design respects the way moisture, plumbing, and wall movement behave in an Australian bathroom.

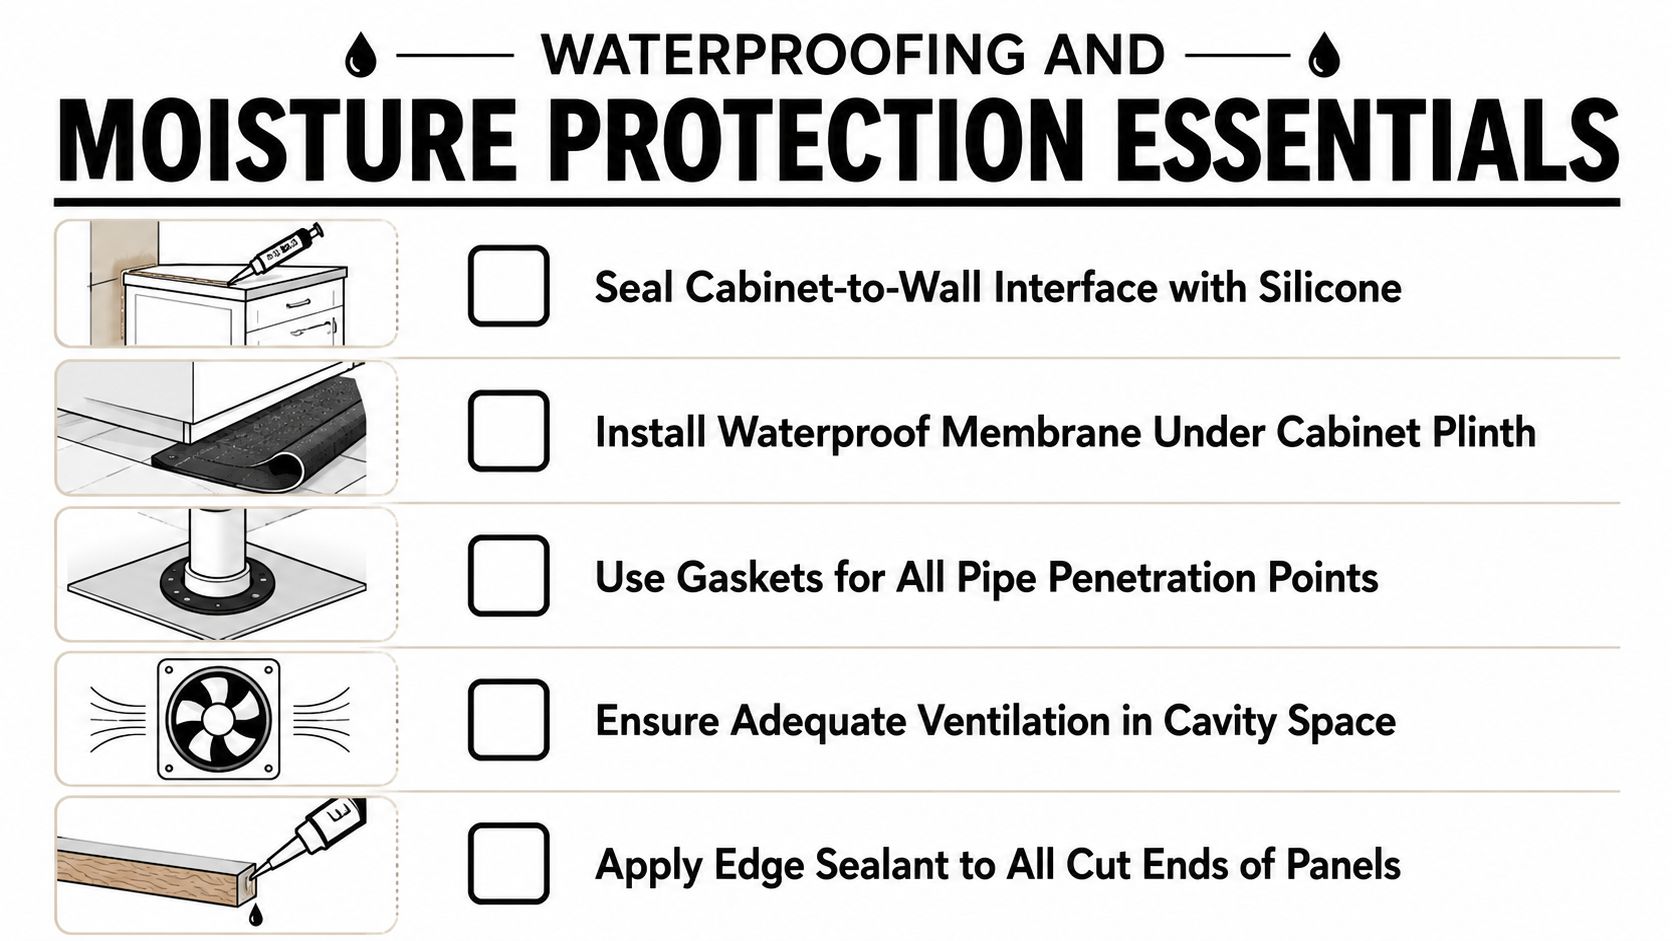
Waterproofing and Moisture Protection Essentials

Even a perfectly installed cabinet can fail if the moisture interface is sloppy. The weak point is the meeting point between the cabinet, wall, floor, waterproofing membrane, and pipe penetrations. In Melbourne bathroom renovations, that interface has to be planned before the cabinet arrives, not patched after the fact.

A checklist illustrating essential waterproofing and moisture protection tips for installing bathroom cabinets and kitchen fixtures.

Start with the cabinet-to-wall line

The back of a wall-hung or floor-standing vanity should meet a sealed, prepared surface. If there is movement, gaps, or an uneven substrate, the sealant line becomes vulnerable and the joinery starts working against the wall instead of with it. Measure around pipes, skirting, and door swing before ordering anything, because awkward clearances often force the install team to trim panels in places they should avoid.

Protect the hidden cavity

Any enclosed space behind or under the cabinet should not trap condensation. Humidity and poor airflow shorten the life of even well-made joinery, especially in tight ensuites where steam lingers and surfaces stay damp longer than people expect. The practical answer is to coordinate ventilation, membrane continuity, and cabinet placement before final fit-out.

The guidance in Melbourne waterproofing practice is useful because the cabinet does not sit outside the wet area, it sits inside the system that protects it. That is the mindset that keeps premium joinery from becoming expensive repair work.

Don't ignore pipe penetrations and cut ends

Every pipe entry, bolt hole, and sawn panel edge is a risk point. Use gaskets where services pass through, seal every exposed end, and make sure any plinth or support detail does not interrupt the waterproofing strategy. Stone tops and recessed storage look elegant, but they are only worth specifying if the substrate, membrane, and sealant line are all planned as one sequence.

Custom Joinery Versus Off-the-Shelf Solutions

Custom joinery gets blamed for being expensive, but in the right room it solves problems that stock units can't. Off-the-shelf cabinets can still work well when the layout is straightforward, the plumbing is already set, and the wall geometry is square enough to accept standard dimensions. The decision should come down to fit, not ego.

Where custom joinery earns its keep

Older Melbourne homes often have walls that are slightly out of square, which makes rigid cabinetry harder to install cleanly. In those rooms, templating matters more than catalogue browsing because the cabinet has to meet a real wall, not an ideal one. Custom joinery also gives you control over awkward rooms, integrated storage, and concealment of services without ugly filler panels.

Where stock units are the smarter buy

If the renovation is simple, the room is generous, and the plumbing rough-ins already suit standard widths, a quality off-the-shelf vanity can save time without looking cheap. That's especially true when the main job is to upgrade the room visually, not redesign its bones. A simpler cabinet can outperform a fancier one in a tight ensuite if circulation and door clearance are the primary constraints.

A more expensive cabinet isn't automatically the better cabinet. In small bathrooms, a precise flat-wall or recessed solution can beat a larger corner unit if movement space is the limiting factor.

The planning tools that prevent mistakes

3D planning, accurate templating, and checking the actual wall angle before ordering all reduce rework. The practical issue isn't only how the cabinet looks, it's whether it can be installed without clashing with skirting, doors, or service pipes. If the room has a tricky corner or a narrow return wall, measure first and decide later.

Hardware Finishes and Storage Configuration

Hardware is where premium cabinetry either feels refined every day or turns annoying very quickly. Soft-close hinges are expected, but in a deeper vanity they're not enough on their own. Full-extension undermount slides, properly reinforced drawer boxes, and a sensible internal layout matter more than decorative details once the cabinet starts getting used.

Storage has to match the drawer depth

Deep drawers can swallow a lot, but they also make things harder to reach if the internal layout is sloppy. That's why drawer organisers, divider trays, and concealed power points have become common in the premium segment, as noted in the broader cabinet market trend data from earlier. The point isn't just more storage, it's storage you can use without rummaging.

Handleless fronts can look cleaner in a modern bathroom, but they demand tighter tolerances and cleaner finger pulls. If the cabinet is near splash zones, corrosion-resistant hardware is worth specifying because bathroom air is harsher than most homeowners expect. Cheap fittings show their age quickly when steam, cleaners, and constant use all hit them at once.

Choose hardware for the way the room is used

  • Shared bathrooms: prioritise organised drawers and easy-open fronts.
  • Ensuites: focus on concealed storage and daily-access items.
  • Tall cabinets: use internal shelving that doesn't waste vertical space.
  • Deep vanities: use organisers so contents don't disappear into the back.

Melbourne Tiling Services P/L lists vanity installation as part of its bathroom renovation service offering, which makes sense because the cabinet, tiling, and waterproofing details are linked on site. That coordination matters more than the brand name stamped on the drawer runner.

Budget Ranges and Cost Drivers Explained

Cabinet pricing only makes sense when you separate the box, the finish, and the installation complexity. A premium-looking vanity can sit in a moderate budget if it uses standard dimensions and simple hardware, while a modest-looking cabinet can cost more once custom set-out, waterproofing coordination, and plumbing adjustments are added. The cabinet itself is only one line in the larger renovation scope.

High End Bathroom Cabinet Cost Ranges

Cabinet Tier Price Range (AUD) Key Features Best For
Entry premium Lower custom range, varies by size Moisture-resistant board, soft-close hardware, standard finishes Smaller ensuites and straightforward replacements
Mid premium Moderate custom range, varies by specification Tailored dimensions, full-extension drawers, better edge sealing Family bathrooms and most Melbourne renovations
High custom Higher custom range, varies by layout complexity Bespoke sizing, concealed services, integrated storage Awkward rooms, luxury fit-outs, design-led projects

If you want a practical budgeting reference tied to installation, the vanity installation cost guide is a useful starting point because it frames the cabinet as part of the wider bathroom scope, not an isolated purchase.

What drives the price up

  • Custom dimensions: every non-standard cut adds complexity.
  • Better hardware: full-extension slides and premium hinges cost more, and they should.
  • Moisture-ready materials: sealed, low-emission, and stable substrates are worth the spend.
  • Installation difficulty: out-of-square walls, service relocation, and tight access all increase labour.
  • Compliance coordination: when the renovation is part of domestic building work over AUD 10,000, the Victorian Building Authority says it must be covered by a major domestic building contract, which changes the formal project framework.

Where premium spending pays off

Spend on construction integrity, service access, and moisture resistance. Spend carefully on decorative extras that won't improve durability, because those often look good on a quote and disappear in daily use. The cabinet that stays straight, sealed, and serviceable is the one that keeps its value.

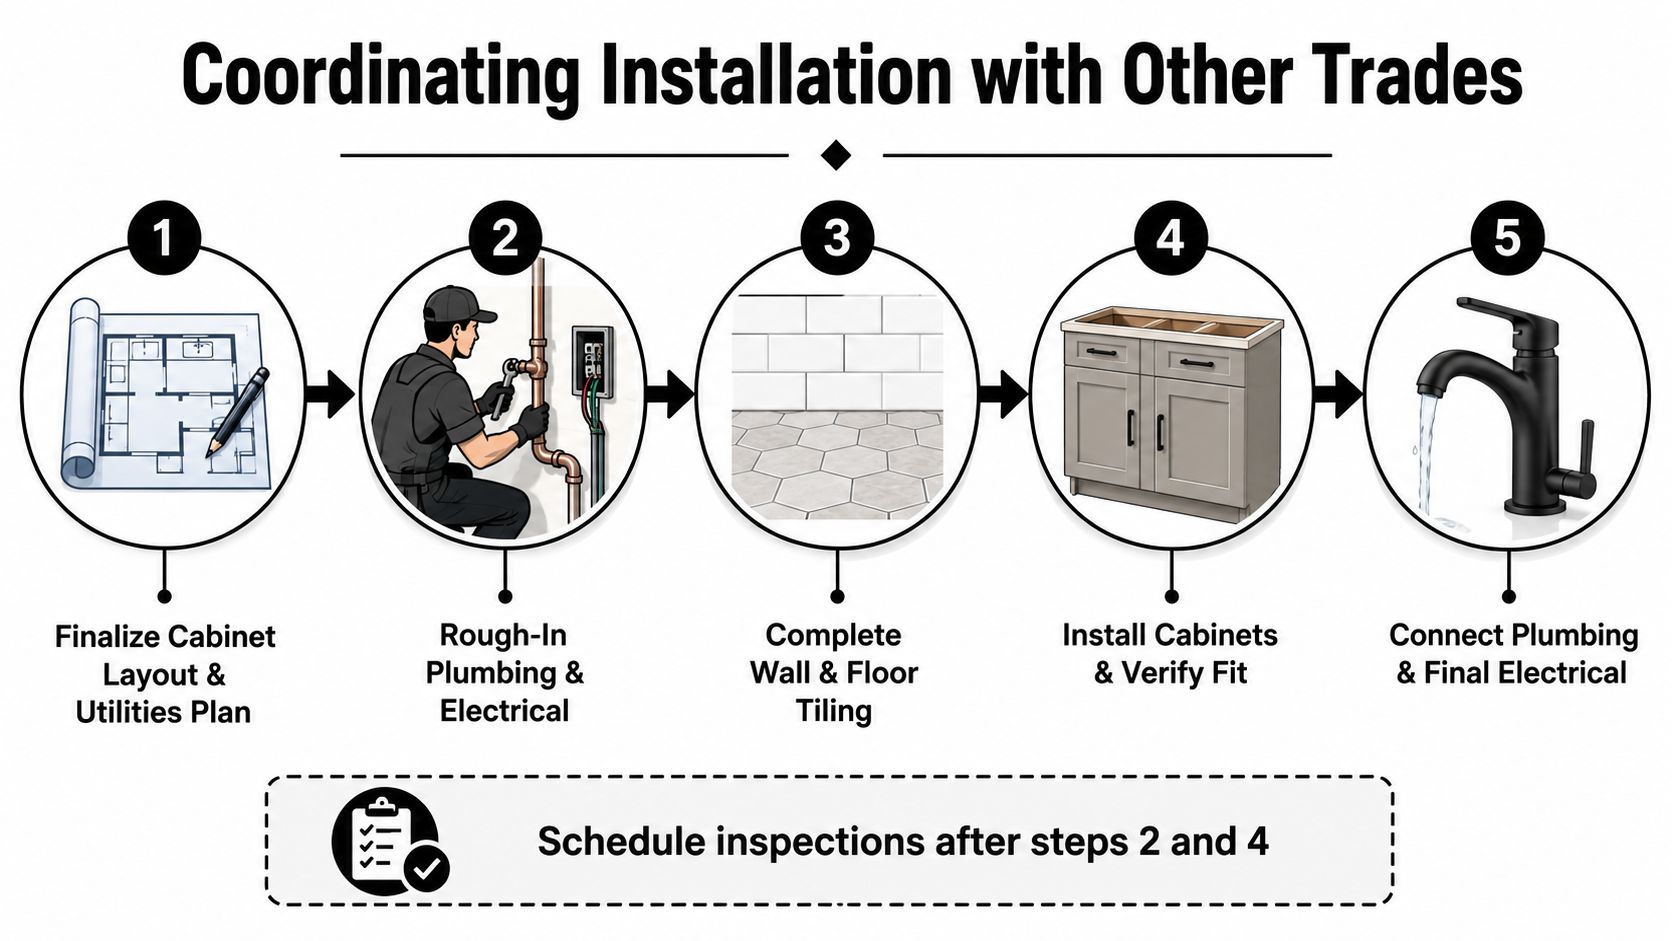
Coordinating Installation with Other Trades

A cabinet install can fail even when the product is right because the trades were sequenced badly. The cabinet arrives before plumbing is set, the tiler leaves an uneven substrate, or electrical outlets end up inside the opening that should've been reserved for drawers. Good builders prevent that by locking in the order before anyone turns up on site.

A five-step infographic showing the process of coordinating bathroom cabinet installation with other professional trade services.

The sequence that avoids rework

  1. Finalise the cabinet layout and utility plan.
  2. Complete plumbing and electrical rough-ins.
  3. Finish wall and floor tiling.
  4. Install cabinets and verify fit.
  5. Connect plumbing and final electrical.

Why the handoff points matter

The rough-ins must be complete before the cabinet is locked in place, because service clashes are one of the fastest ways to damage a new vanity. Tiling should be finished before final cabinet install unless the designer has deliberately planned the set-out around a floating detail. After the cabinet is fitted, the plumber and electrician can return to finish their connections without pulling the unit apart.

What to ask the project manager

  • Have the rough-ins been checked against the final cabinet drawing?
  • Has the waterproofing been inspected before the cabinet goes in?
  • Are the outlet and lighting positions clear of drawer paths?
  • Has the installer allowed for the service void and pipe movement?

The Victorian framework around registered builders matters here because bathroom renovations often involve structural, plumbing, or waterproofing work that can't be handled casually. Registered builders coordinate those trades so the vanity doesn't become the first thing blamed for a sequencing problem.

Sourcing Tips and Long-Term Maintenance

The easiest cabinets to maintain are the ones that were chosen with moisture in mind from the start. A supplier should be able to explain the substrate, edge sealing, hardware, and service clearances without hand-waving. If they can only talk about colour and door style, keep looking.

What to ask before you order

Ask for the cabinet specifications in writing, not just the showroom story. You want to know what the substrate is, how the cut edges are sealed, how the cabinet handles wet-area exposure, and what's covered under warranty if the bathroom gets damp in normal use. Warranty language often tells you more than the display sample does.

If a supplier won't talk plainly about moisture exposure, they probably don't want you reading the fine print too closely.

Maintenance that actually helps

Use mild cleaners, wipe standing water quickly, and check silicone lines where the cabinet meets the wall and top. Don't flood the cabinet with water, don't use abrasive pads on glossy coatings, and don't let a slow leak sit under the basin because that's where small problems become expensive ones. For homes with poor airflow, the bathroom ventilation requirements guide is worth reviewing, since good ventilation protects the cabinet as much as it protects the room.

A realistic routine

  • Weekly: wipe splash zones and inspect visible seals.
  • Monthly: check drawer action, hinge alignment, and under-basin dryness.
  • After any plumbing work: inspect the service void and the base edges.
  • Seasonally: look for swelling, soft spots, or finish lift around penetrations.

A cabinet that is kept dry, ventilated, and properly sealed can stay looking premium for years. The ones that fail are usually the ones nobody checks until the finish has already started to move.


If you're planning a Melbourne bathroom renovation and want the cabinet, waterproofing, tiling, and trade sequencing handled as one coordinated job, Melbourne Tiling Services P/L can assist with the technical side of the fit-out. Visit Melbourne Tiling Services P/L to discuss a bathroom or ensuite project that needs proper set-out, waterproofing, and cabinet installation done with care.

Rising Damp Solutions for Melbourne Homes

You're usually not standing in front of a wall thinking about capillary action. You're looking at a shower wall with a tide mark, a skirting board that's swollen, or a balcony tile that's just started to lift, and you want the problem gone before the next quote turns into a bigger renovation. In Melbourne bathrooms, that moment matters, because the finish you can see is often only the last symptom of a moisture problem that started lower down in the wall or outside at ground level.

Table of Contents

Why Rising Damp Shows Up When You Start a Renovation

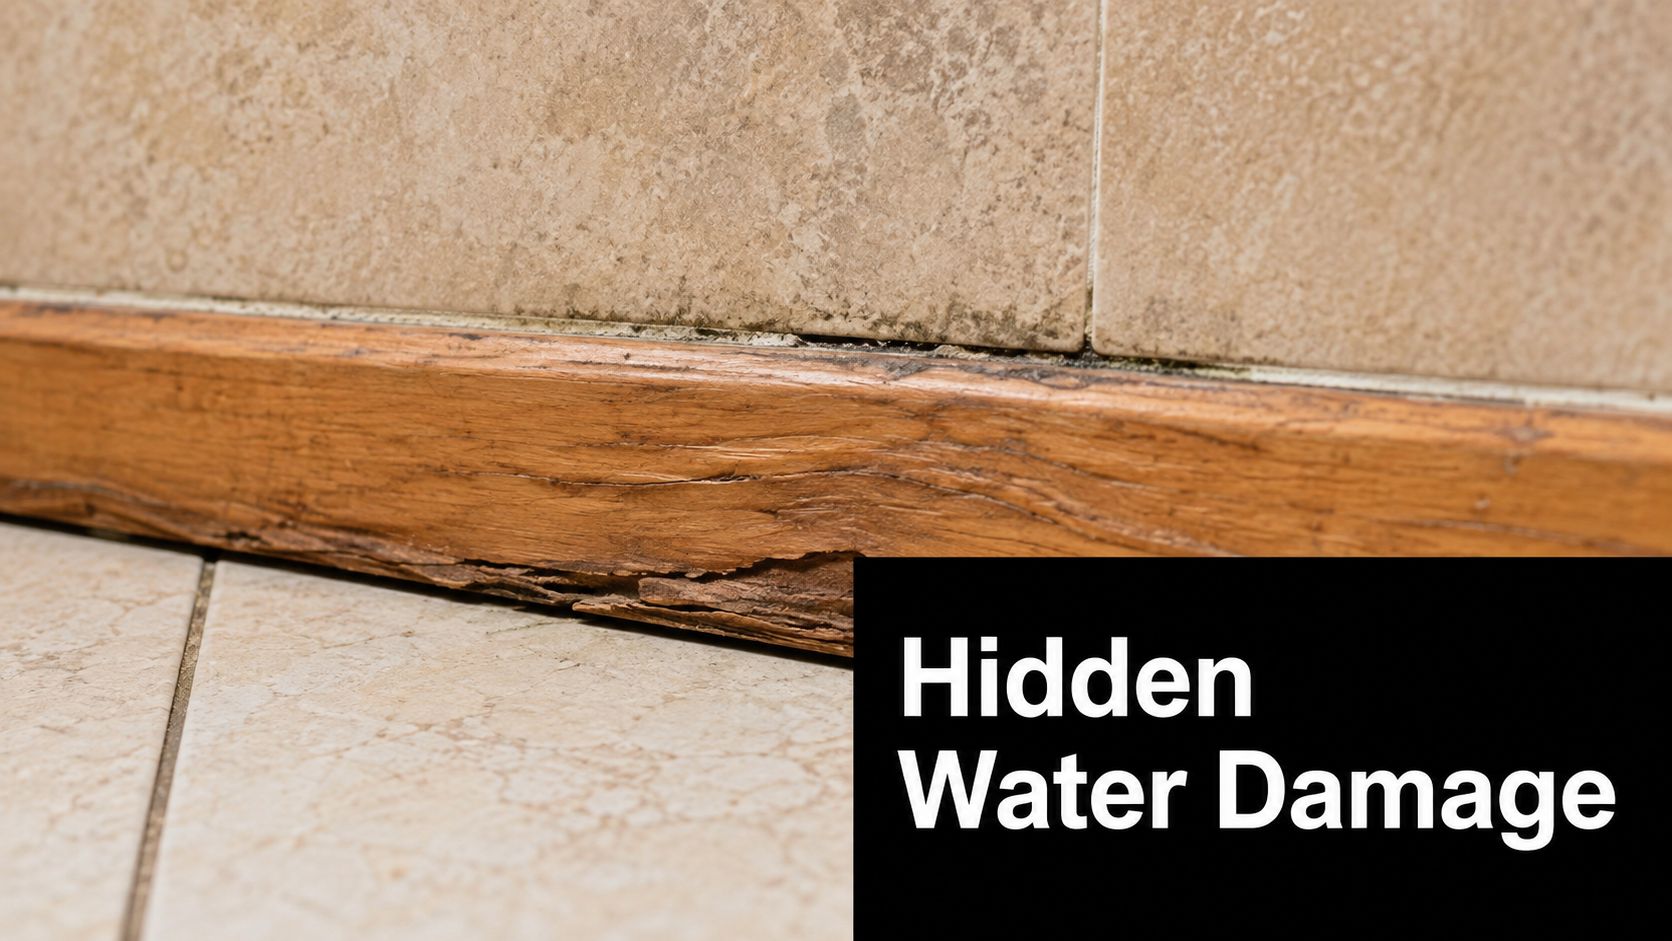
The call usually starts with a tile problem, not a wall problem. A homeowner sees a line of staining in a shower, a balcony edge that sounds hollow, or paint that keeps blistering at the bottom of a plaster wall, then asks for a tile repair because that feels like the cheapest fix.

Close-up view of wooden baseboard showing severe water damage and wood rot near tiled bathroom floor.

The quote changes the minute moisture enters the picture

That first quote often gets wider the moment the substrate is inspected properly. Australian guidance treats rising damp as a building-defect issue tied to moisture movement through masonry, not just a surface stain, and NSW Environment notes that the moisture source, drainage, and barriers all need attention if the repair is going to last. NSW Environment salt attack and rising damp guide

A tidy finish over damp masonry is just a temporary disguise.

That's the hard lesson many owners only learn after a repaint or re-grout fails. The visible damage, whether it's plaster decay, paint failure, or efflorescence, is usually the end point of a longer moisture pathway, so the scope changes from “repair the tile” to “treat the wall base, then rebuild the finish.”

What the renovation sequence needs to answer

The right sequence is driven by four questions. Is it really rising damp, what caused it, what can be left in place, and what has to come out before new tile work begins?

In older Melbourne homes, those questions matter even more because past renovation layers can trap moisture behind newer finishes. That's why a builder who understands moisture source control will often slow the job down at demolition, even when the owner wants the tiling back fast.

The practical takeaway is simple. If the inspection only looks at the stain, the job is probably being priced as a cosmetic patch. If the inspection starts at the wall base, the ground around it, and the drainage path, the repair has a real chance of holding.

What Rising Damp Actually Is and Why It Keeps Coming Back

A damp patch at the bottom of a wall often starts in the ground, then works its way into the masonry through capillary action. Porous brick, mortar, and render can pull moisture upward through tiny voids when the base of the wall stays wet. NSW Environment describes the problem in those terms, and the same guidance links the moisture movement with salts that travel into the wall and crystallise as it dries. NSW Environment salt attack and rising damp guide

Why the damage appears where it does

The wall usually does not fail in a neat, even pattern. The damage tends to show up low on the wall as plaster decay, paint failure, or efflorescence, because evaporation leaves the salts behind at the surface. A fresh paint job can look fine for a short time, then start blistering, peeling, or breaking down again once the moisture keeps moving.

Australian heritage and conservation guidance treats this as a long-term maintenance and building fabric issue, not a one-off stain. The repair has to stop the moisture source and reduce further salt loading, otherwise the same contamination keeps travelling through the wall and spoiling the finish.

Why surface repairs don't hold

A surface patch can hide the symptom, but it leaves the moisture behaviour unchanged. Repainting, re-grouting, or sealing a patch of plaster usually buys a short reprieve, then fails again if the masonry below is still damp.

The repair has to work at the base of the wall, or the problem just comes back through the finish.

Time also matters. By the time the stain is obvious, the moisture pathway has often been active long enough for salts to build up in the masonry. Once that happens, the contaminated finish often needs to come off before a proper rebuild can start, because trapped salts keep attacking the new surface.

A bathroom or laundry renovation makes that pattern easier to see, which is why source finding belongs before the tiles go back. A proper inspection may also need leak detection in Melbourne if the wall base, shower base, or nearby plumbing could be feeding the damp. Rising damp is a moisture movement problem that only shows up as a tiling issue once it reaches the room.

How to Tell Rising Damp Apart From Lookalike Problems

Many homeowners searching for rising damp solutions are dealing with a different moisture source. NSW Environment guidance on heritage maintenance, along with the SPAB, points to lookalikes such as external ground levels, bridged cavity walls, leaking gutters and downpipes, plumbing leaks, and poor site or sub-floor drainage. NSW Environment heritage maintenance rising damp sheet

The five common imposters

Before anyone starts drilling a wall, check for these first.

  • External ground too high: If paving or soil sits too close to the wall base, it can bypass the intended barrier.
  • Bridged cavities or finishes: Tiled floors, screeds, or render can create a moisture bridge across the DPC line.
  • Gutter and downpipe faults: Overflow or poor discharge can keep the wall base wet.
  • Plumbing leaks: A leaking shower or pipe can mimic damp that looks like it's coming up from below.
  • Poor drainage around the building: If water stays near the foundations, the wall base keeps getting fed moisture.

A bathroom leak often gets mistaken for rising damp because the symptoms can spread across the same lower wall area. If the shower base, wastes, or nearby pipework are suspect, leak detection in Melbourne should come before any wall treatment.

What to look for on site

A quick field check usually tells you a lot. Rising damp tends to show a lower-wall pattern, often with salts or white deposits near the base rather than random patches higher up. A wall that feels cold and wet at the bottom points more toward masonry moisture, while a clammy wall higher up can suggest condensation or another source.

Layered renovations need extra care. New tiles, altered bathroom levels, or raised external paving can bridge the damp-proof course and make a wall look like it has rising damp when the problem is a detail failure at the base.

The decision point is practical. If there is a clear external water source or a bridge at the DPC line, fix that first. If the wall base is still wet after those causes are removed, the damp diagnosis is worth pursuing, because the finish will only fail again if the source stays active.

Comparing DIY Fixes, Handyman Repairs and Full Remediation

Not every damp job needs a full wall rebuild, but the cheap path is usually cheap only once. Surface coatings, sealants, and patch repairs can improve appearance, yet they don't alter the movement of moisture through porous masonry, so the finish often fails again when salts and damp keep working behind it.

Repair pathways compared

Repair Path Typical Cost Band (Melbourne) Disruption Realistic Lifespan
DIY surface fix Low upfront, materials only Low at first, then repeated touch-ups Short, because the source stays active
Handyman patch repair Moderate Moderate, with partial finish removal Better than paint, but still vulnerable if the base remains wet
Full professional remediation Higher upfront Highest, because the contaminated finish and moisture source are addressed The strongest option when diagnosis is correct and the rebuild is done properly

Why the cheapest option often costs more

Anti-mould paint, silicone, and bitumen patches all work on the visible layer. They can hide staining for a while, but they don't recreate a continuous barrier where the moisture is entering, and they don't remove salts already sitting in the wall. That means the underlying problem stays alive.

A handyman repair can help if the issue is limited and the moisture source has already been removed. But if the wall is still bringing groundwater up through the masonry, skim coats and partial re-renders often just give the next tradie a harder job later.

When full remediation makes sense

Full remediation is the only path that deals with the wall as a system. It means diagnosing the source, removing contaminated finishes where needed, installing or restoring the barrier, and then rebuilding the finish on a dry, stable substrate.

That doesn't mean every room needs the most invasive option. It does mean the repair should match the diagnosis, not the sale pitch on the tin.

The Professional Remediation Pathway Step by Step

A credible damp repair starts at the wall base, not at the tile colour. The right sequence is source control first, then barrier creation, then rebuild, because each stage depends on the one before it. As noted earlier, that is the part many quick fixes miss.

Inspection, drilling and injection

The physical work starts by opening up contaminated finishes where needed and checking the wall, the skirting line, and the surrounding ground for ingress, bridging, or a failed damp-proof course. Chemical DPC systems are then installed into mortar beds or selected brick courses, using drilled holes at 6 to 8 inch intervals, about 150 to 200 mm, with hole depth around one-half to three-quarters of wall thickness. For thicker walls, access from both sides improves penetration. Safeguard Europe rising damp book

Pressure control matters too. Preservation procedure guidance specifies 50 to 100 psi and staged pumping in 4-inch to 6-inch increments so the treatment distributes evenly rather than pooling in one spot. GSA treating rising damp by injecting chemical dampproofing

Dry-out, strip-out and rebuild

After injection, the wall needs time to dry before the next trade starts closing it in. The holes are plugged with sand-cement mortar after the initial dry-out period, then the contaminated plaster or lining comes out back to sound material. If the finish stays wet or salt-loaded, the new tile system is sitting on a weak base from the start.

Practical rule: if someone wants to retile before the wall has dried and the barrier has settled, the job is being rushed.

That rebuild has to suit the wall, not fight it. Compatible finishes matter because the new surface cannot be forced to sit against residual salts, trapped moisture, or bridging details, and that is where the coordination between carpenter, waterproofing trade, tiler, and Registered Builder pays off. The wall base gets corrected first, then the lining is rebuilt to match the drying profile and the intended wet-area finish.

For balcony work, the same logic applies but the edge details change the risk. External tiling can bridge the DPC line, hold moisture against the wall edge, and create a path back into the substrate, so balcony waterproofing in Melbourne has to be planned around drainage fall, edge treatment, and substrate flatness from the start.

The quote should spell out the diagnosis, the injection layout, the dry-out period, the replastering scope, and the rebuild detail. If those parts are not itemised, the repair has not been thought through as a whole.

Bathrooms, Balconies and the Tiling Finish on Top

A damp wall can be treated properly and still fail if the finish above it is built carelessly. In bathrooms and laundries, the waterproofing, screed, tile choice, grout, and substrate flatness all shape how easily moisture can work its way back into the repaired wall.

Wet areas need clean transitions

Where waterproofing is required, the National Construction Code sets wet-area waterproofing expectations, including an upturn of at least 150 mm above the finished floor level in shower areas and other wet areas where the membrane is required. That detail matters more after a damp repair, because a membrane that stops short or gets bridged by a later finish can undo the wall work.

The sequence on site has to stay disciplined. Correct the damp source first, let the wall dry, then install compatible render or lining, followed by waterproofing, then screed or levelling, then tile installation, and finally grout and sealant detailing.

Balconies need a different eye

Balconies fail in a different way because external tiling can bridge the DPC line and hold moisture against the wall edge. Drainage fall, edge detailing, and substrate flatness become critical, especially with large-format porcelain, Kerlite, or stone, where movement and uneven support show up quickly.

For balcony-specific waterproofing and detailing, see balcony waterproofing in Melbourne.

A balcony can look perfect and still be wrong if the drainage path feeds the wall base.

A Registered Unlimited Builder earns their keep here. They should coordinate the sequence so the membrane, screed, and tiling do not create a new bridge over the repaired DPC, particularly around shower screens, thresholds, and balcony edges.

Once the wall is treated, the finish on top still has to function as a wet-area system with proper waterproofing transitions. If the base beneath it is still moving moisture, even premium materials are only hiding a structural mistake.

Quotes, Costs and Choosing the Right Team in Melbourne

A proper quote for damp remediation and bathroom renovation should read like a scope of work, not a guess. It needs to itemise diagnosis, injection works, dry-out time, replastering, waterproofing, screed or levelling, tile supply and installation, and the finish details that stop moisture bridge-back.

What to ask before you sign

  • Who diagnosed the cause: Ask whether the team checked for bridged DPCs, gutter faults, plumbing leaks, or drainage problems before proposing injection.
  • Who is coordinating the job: A Registered Unlimited Builder should be able to sequence the trades, not just quote the tile layer.
  • How the waterproofing is detailed: The membrane upturn, junctions, and transitions should be specified clearly.
  • How the rebuild avoids bridge-back: You want to know how new tiles, screeds, and thresholds will stay clear of the repaired moisture path.

Reading the scope, not just the price

A quote that only mentions “damp proofing” is too thin. A quote that explains the repair stages tells you the contractor understands that moisture source control comes before finishes.

That matters in Melbourne bathrooms because the wrong sequence can turn a renovation into a repeat job. The clean-looking finish is only reliable when the wall base has been treated, the contaminated material has been dealt with, and the waterproofing system has been rebuilt around the repaired substrate.

For compliance and waterproofing documentation in Victoria, see waterproofing compliance in Victoria.

The usual budget conversation in renovation planning is simple enough, but the better question is whether the scope covers moisture control or only surface renewal. If the team can't explain the difference, they're probably pricing the visible work and hoping the hidden work won't matter later.


If you're planning a bathroom, ensuite, or balcony repair in Melbourne and the wall base looks suspicious, Melbourne Tiling Services P/L can help you sort out the source first and rebuild the finish properly. Visit Melbourne Tiling Services P/L to discuss damp-affected renovations, waterproofing, and tiling work that's built to last.

How to Remove Marble Floor Tile Without Breaking

You can be halfway through a bathroom renovation and still not be at the hard part yet. The hard part is staring at a marble floor that looks too good to destroy, knowing the next trades need the substrate clear, and realising one wrong swing could turn reusable stone into landfill. In Australian bathroom renovations, that's where patience matters more than speed, especially when the floor sits inside a larger sequence of waterproofing, levelling, and finish work that registered builders have to coordinate carefully.

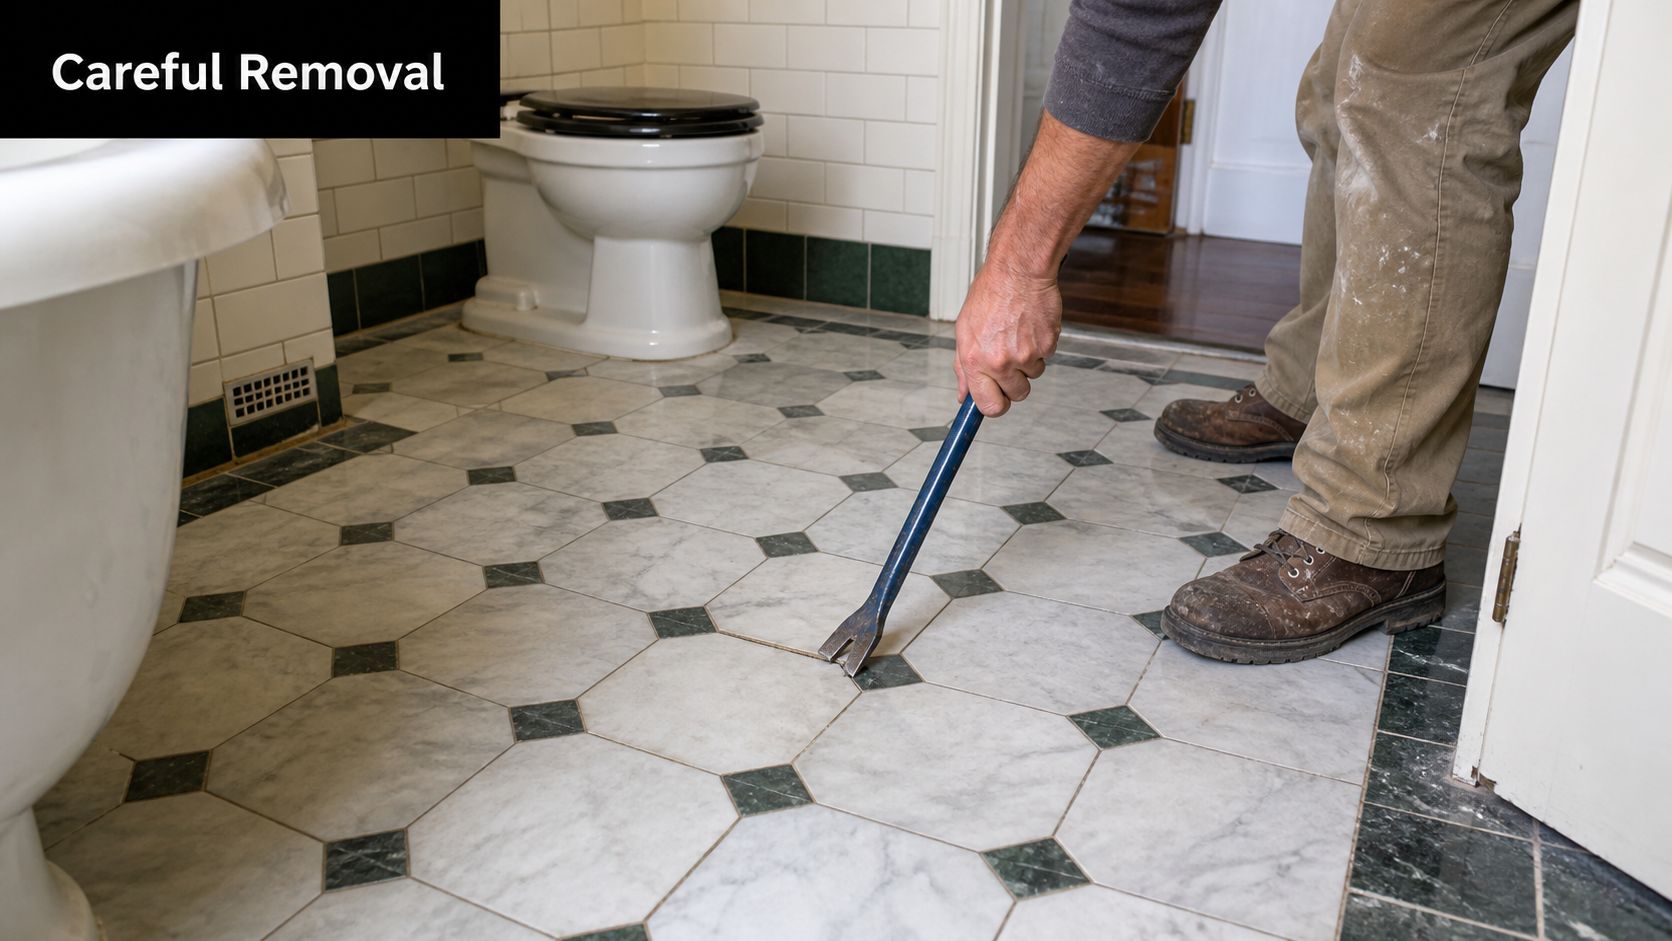
A construction worker uses a blue pry bar to carefully remove a marble floor tile in a bathroom.

Table of Contents

Introduction to Marble Tile Removal

A typical Melbourne renovation starts with optimism, then the floor reminds you who's in charge. The marble looks immaculate, the veining still carries the room, and the idea of reusing it feels sensible until you test the first tile and hear that brittle little click that tells you the stone and the bond are fighting back. Marble is beautiful, but it's also unforgiving when you rush it.

Australian housing patterns help explain why this job comes up so often in serious renovation work. The Australian Bureau of Statistics reported around 10.8 million households in the 2021 Census, and owner-occupied dwellings with a mortgage made up 36.1% of all households in that same census, which sits behind a lot of bathroom upgrade activity and value-adding repair work in homes across the country, as recorded by the ABS in the 2021 Census. In that setting, careful tile salvage isn't a niche skill, it's part of practical renovation planning, especially where homeowners want to keep a premium finish or match existing stone later in the job. See the ABS household figures in the 2021 Census household snapshot.

Practical rule: if the tile is worth reusing, treat removal like precision work, not demolition.

The challenge with marble floor tile removal is that it is never just about lifting one piece. It's about preserving the adjacent tiles, protecting the substrate, and stopping the bond from tearing the stone before the perimeter is fully released. In Australian stone and tiling guidance, the recommended pattern is consistent: grout first, edge access second, then controlled lifting, because marble's value drops fast once it fractures. If you're working inside an ensuite or main bathroom, that approach also keeps the broader renovation sequence intact for the next trade.

The cleanest jobs start with restraint. The fastest jobs usually cost more later.

Gathering the Right Tools and Safety Gear

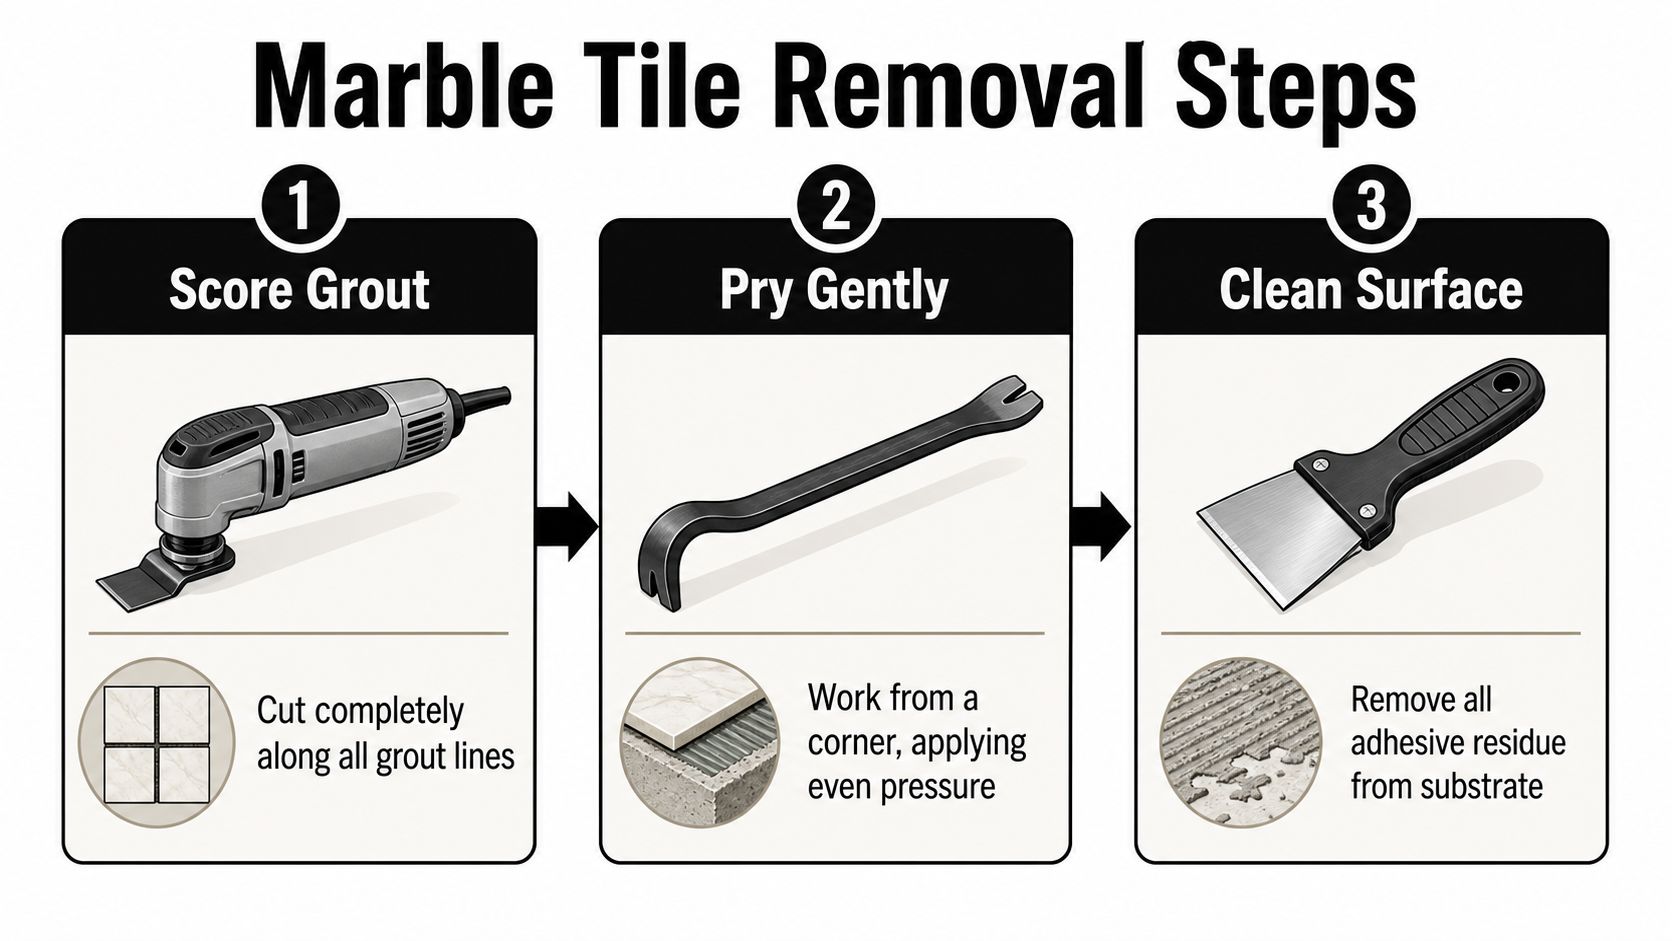
The first mistake people make is treating marble like ceramic. Marble punishes that assumption fast, so the tool kit has to suit stone removal, not generic demo work. An oscillating multi-tool with grout blades, a narrow putty knife, a masonry chisel, a rubber mallet, and a sturdy pry bar are the core tools that let you work at the edge of the tile instead of through the middle of it.

Build the toolkit around control

Start with the grout removal stage, because that's what isolates the tile. An oscillating multi-tool gives you the cleanest way to cut grout all the way to the substrate, and a grout saw can do the same job where the joint is shallow or awkward. A putty knife or thin chisel then gives you a shallow entry point, while the rubber mallet supplies light tapping instead of brute force. The pry bar is the last tool in the chain, not the first.

Use this article on practical tiling tools for renovation work as a reference point if you're comparing gear before you start.

Treat silica control as part of the job

Australian work health and safety regulators have tightened controls since the model WHS laws were introduced from 2011 onward, and Safe Work Australia lists respirable crystalline silica as hazardous dust generated when cutting, grinding, drilling, or removing stone and concrete materials. That matters here because marble removal can create dust from both the tile and the adhesive bed. A P2 respirator, safety goggles, and heavy-duty gloves aren't optional extras, they're the basic setup that keeps the work moving without unnecessary exposure. You can read the hazard listing in Safe Work Australia's silica guidance.

Protect the room before you touch the tile.

Dust control protects the finish you're trying to save. Drop cloths, tape, and clean edges around the work zone make the whole job easier to manage.

Use drop cloths over nearby fixtures, tape off doorways, and seal any obvious dust escape paths. That keeps debris from scratching finished surfaces and makes cleanup manageable once you start lifting. It also helps if you're working in a bathroom where access is tight and every bit of dust seems to settle on the one surface you didn't mean to touch.

The Step-by-Step Removal Process

The safest way to remove marble floor tile without breaking it is to work from the perimeter inward and let the bond fail in stages. The first tile is usually the hardest because it's bonded on all sides, so don't judge the whole floor by that first fight. Once you get a clean entry, the rest of the room follows the same pattern.

Start by isolating the tile completely

Cut the grout lines all the way to the substrate with an oscillating multi-tool or grout saw. That gives the tile its own boundary and reduces the sideways stress that cracks neighbouring pieces. Australian removal guides consistently point to this as the step that decides whether a tile comes up intact or shatters as soon as force starts.

After the joints are open, work from an edge or weak point. Slide a putty knife or masonry chisel in at about a 30° angle, then tap lightly to create a small gap before you apply any real lifting force. That angle matters because it spreads the load across the tile instead of driving a wedge straight through it. For a marble floor, the aim is to break the adhesive bond, not to force the stone upwards.

Increase leverage only after the bond loosens

Once the tile starts to move, keep the pressure incremental. A pry bar can help, but only after the perimeter has lifted enough that the bar is supporting movement rather than causing it. If the tile resists, go back to the edge, widen the gap a little more, and continue from the weak point rather than trying to win in one motion.

Practical rule: if the tile hasn't opened at the edge, the pry bar is too early.

Work the tile up gradually, then rotate it as it loosens so the remaining adhesive breaks cleanly instead of peeling the underside. That's especially important when you're hoping to salvage the stone for later use. Once a marble tile fractures, you still have to clean adhesive from the back by hand, and the time saved by rushing disappears fast.

Keep the sequence consistent

The same pattern applies tile by tile. Grout first, edge access second, controlled lifting last. If you keep the process disciplined, you protect the surrounding floor and reduce the chance that one cracked tile sets off a chain reaction. In a bathroom, that means less risk to waterproofing edges and less chance of damaging the finish you're trying to preserve for the next stage of the renovation.

An infographic showing three steps to remove marble floor tiles: scoring grout, prying tiles, and cleaning surface.

Adapting Techniques for Different Adhesives and Substrates

Not every marble floor was installed the same way, and that's where a lot of DIY jobs go wrong. A clean lift on one floor can become a repair job on another because the adhesive bed, mesh backing, or substrate changed under the stone. If you want the tile to survive, you have to read the floor before you start prying.

Compare what's under the marble

Adhesive and Substrate Comparison for Marble Tile Removal
Adhesive/Substrate Type Removal Method Difficulty Key Consideration
Direct-bond marble tile Grout removal first, then shallow edge lifting with chisel or putty knife Lower Best chance of intact salvage if the bond breaks cleanly
Mortar-bed system More invasive edge work, often with partial breakage Higher The tile may come up with mortar attached, which risks the substrate
Mesh-backed marble Controlled prying, slower release, careful underside cleaning Higher Mesh or bonded backing makes salvage harder
Waterproofed bathroom floor Minimal force, precise removal to protect membrane and screed High Substrate integrity matters as much as tile recovery

The difference is simple. Direct-bond tiles usually lift more cleanly because the adhesive bond is easier to separate. Mortar-bed and mesh-backed systems often resist salvage because the tile comes up with extra material attached, which can force more invasive removal and subfloor repair. Australian installers warn that these systems are far less forgiving, especially in bathrooms where the layer beneath the tile may be more valuable than the tile itself.

Match your method to the substrate

If the floor sits on a sound slab or screed, you still need to work gently, but you have more room to isolate and lift. If there's waterproofing below the tile, the goal becomes substrate preservation, not speed. That's why experienced tilers stop treating marble removal as a demolition task and start treating it as a controlled separation job.

Use this guide to tile adhesive types if you're trying to identify what you're dealing with before you start. The right read on the adhesive saves more tiles than any single tool.

Preserving Tiles and Troubleshooting Common Issues

Even careful removal runs into stubborn adhesive, slight fractures, and tiles that seem to have welded themselves to the floor. The difference between a salvageable tile and a wasted one often comes down to how you handle those interruptions. Patience keeps the tile usable. Panic turns a manageable problem into a pile of fragments.

Work the bond, not the stone

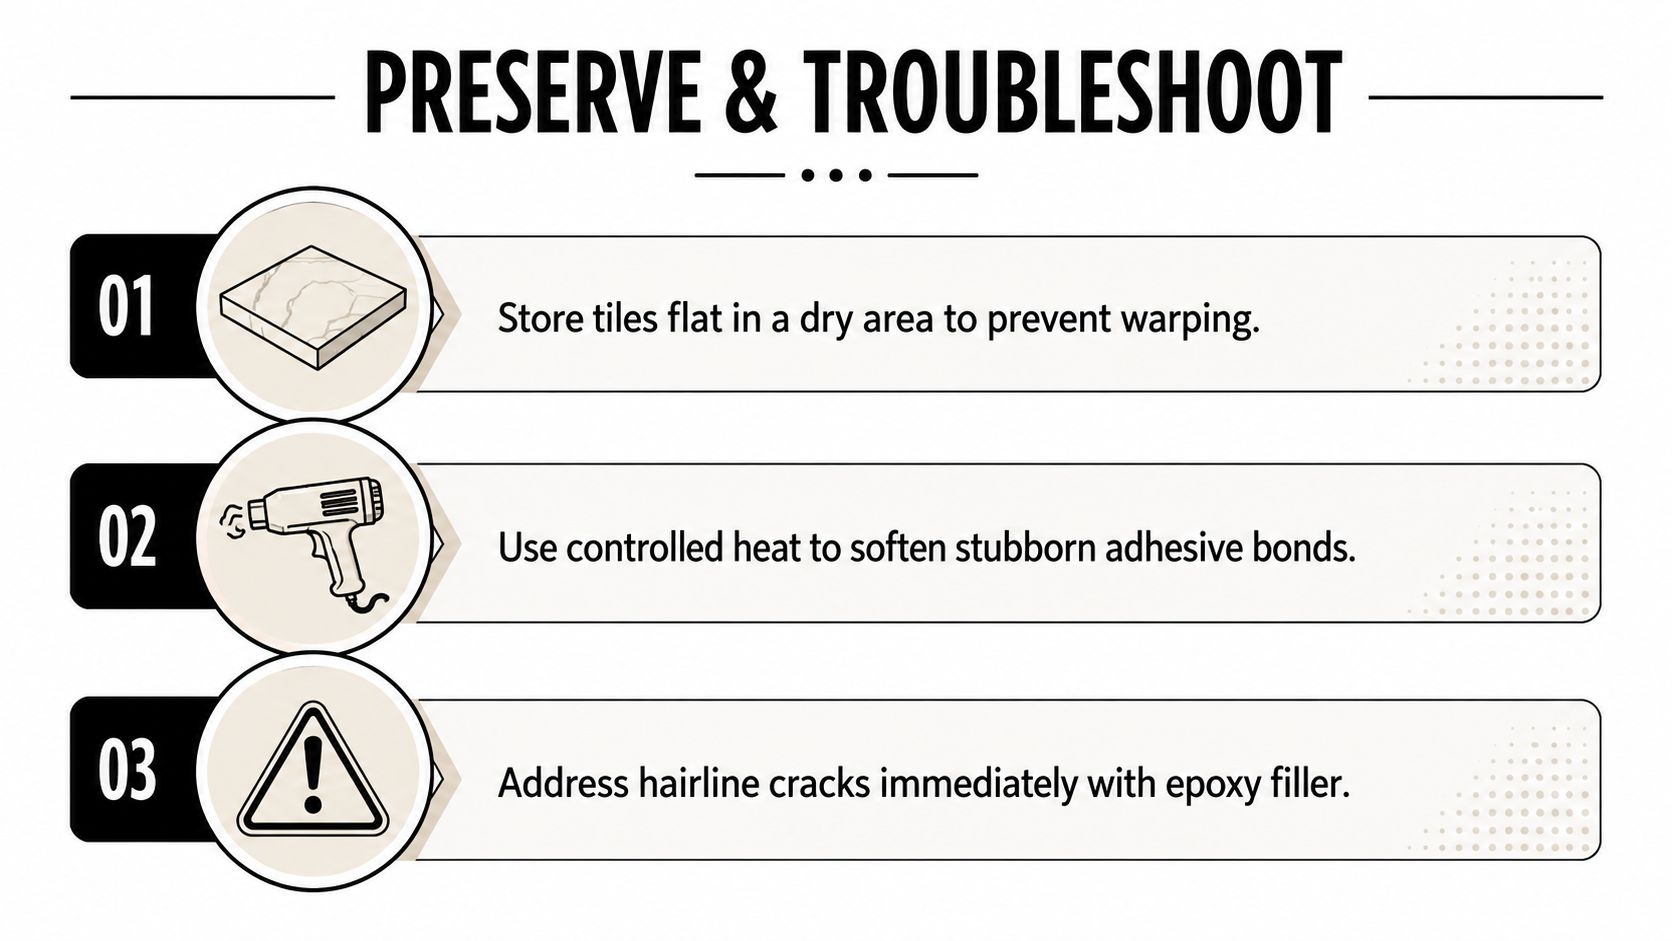
If a tile won't budge, don't hit harder. Try to soften the bond locally with controlled heat or a suitable solvent, but only after testing a small area first so you don't mark the marble surface. Once the adhesive gives a little, go back to the edge and repeat the shallow-angle lift rather than forcing a wider pry.

The workflow from removal guides pays off. Light tapping creates a gap, the gap grows slowly, and the tile comes away because the bond has been weakened in stages. That approach is far more reliable than trying to lever the tile up in one movement. It also keeps the underside cleaner, which matters if you're planning to reinstall the stone later.

Handle the back of the tile with care

Once a marble tile is off the floor, adhesive usually stays on the underside. Clean that residue manually so the tile can be reused, but don't scrape aggressively enough to scratch the back or bruise the edges. A cracked tile can still have value in some situations, but once it fractures badly, the reuse options drop quickly and the labour on the next stage increases.

Store the removed tiles flat in a dry area so they don't warp or chip while the rest of the renovation continues. That's especially useful in a bathroom project where tiles might sit around while waterproofing, screeding, or fixture work is still underway.

Practical rule: salvage ends where uncontrolled force begins.

Use this stone sealing guide if you're preparing the tiles for future reuse or want to think ahead about how their finish will be protected once they're reinstalled.

Keep the troubleshooting simple

  • If the tile refuses to lift: return to the grout line and edge, because the bond is still holding too much of the perimeter.
  • If the underside is clogged with adhesive: clear it by hand in stages, not with hard scraping that can nick the stone.
  • If a hairline crack appears: set the tile aside and assess whether it still suits a low-visibility reuse point.
  • If the substrate starts to crumble: stop and reassess, because the next finish may depend on keeping that layer intact.

This is the part that gets underestimated. Preserving marble isn't about winning every tile. It's about keeping enough of the good ones intact to make reuse worthwhile.

An infographic titled Preserve and Troubleshoot, displaying three numbered steps for managing and repairing tile flooring.

Knowing When to Hire a Professional

DIY marble removal reaches its limit faster than you might expect. Once you're dealing with widespread cracking, unknown substrate conditions, or a bathroom where the next trade depends on a perfect base, the risk shifts from manageable to expensive. That's the point where a registered builder becomes the safer choice, not the fancy one.

Watch for the signs that the job has outgrown DIY

If the floor is part of a larger bathroom renovation and you can't see how the waterproofing, screed, and tile removal all fit together, pause before you keep prying. If the marble is installed over a mortar bed or mesh backing, the chance of clean salvage drops sharply. If the home is older and there's any concern about hazardous materials in adjacent building layers, a professional assessment is the sensible move before more demolition starts.

A registered builder also makes sense when the floor removal affects the whole sequence of works. Once tiles come up, the room may need substrate repair, waterproofing, and re-laying in a strict order. That's not just a tiling problem, it's a coordination problem, and bathroom renovation delays usually happen when those layers aren't managed together.

Compare the real trade-offs

DIY looks cheaper at the start because you're paying in time and tools instead of labour. The hidden cost is the cracked tile, the damaged screed, or the membrane that gets nicked because the prying was too aggressive. Professional removal costs more upfront, but it can save the floor, shorten the rework, and keep the renovation moving cleanly.

If you're comparing contractors, ask whether they're a registered builder, whether they handle the tile removal and the bathroom rebuild together, and whether they can manage waterproofing, levelling, and new stone installation as one scope. That matters more than a polished pitch.

A good contractor protects the substrate first, because a perfect tile install means nothing on a damaged base.

If you're planning a marble floor removal as part of a bathroom upgrade, Melbourne Tiling Services P/L can handle the tile work, waterproofing, and full renovation sequence with a registered builder on the job. They offer start-to-finish bathroom renovations, free quotes, and 3D drawings, so you can see how the new space comes together before the old floor comes out. Visit Melbourne Tiling Services P/L to discuss your marble removal and bathroom renovation with a team that works across Melbourne and greater Victoria.

Vanity Installation Cost: A Complete 2026 Pricing Guide

In Australia, a straightforward vanity installation typically lands between A$400 and A$2,500 depending on whether the existing plumbing stays in place, and Melbourne bathroom renovations often move past A$10,000 once regulated work is included. Once you factor in plumbing, waterproofing, tiling and finish repairs, the vanity stops being a cabinet purchase and becomes a small coordination job.

That's the part most homeowners don't see at first. You're standing in a showroom, comparing two quotes that both say “vanity install”, and one looks cheap enough to sign on the spot. The other is higher, but it's often the one that includes the work older Melbourne bathrooms tend to need.

Table of Contents

Why a Vanity Quote Is Never Just About the Vanity

A couple walked into a bathroom showroom in Melbourne with two quotes in hand and the same question every builder hears. One quote was bare bones, the other had a longer breakdown and a noticeably higher total. The cheaper one looked cleaner on paper, but it didn't say much about plumbing movement, wall repairs or disposal, which is exactly where bathroom jobs start to drift.

That's why vanity installation cost in Australia is rarely a single line item. A vanity touches cabinetry, tapware, waste plumbing, waterproofing interfaces, tiling edges and, in many older homes, the wall structure behind the unit. If the rough-in lines up perfectly, the job stays simple. If it doesn't, the price changes quickly.

For Melbourne homeowners, the regulatory side matters too. Once a bathroom renovation includes wet-area work, the project sits inside the world of bathroom renovations and registered builders, not just a cabinet swap. Victorian projects that involve multiple trades need proper sequencing and compliance, which is why a quote that ignores scope is often the one that causes grief later. The practical test is simple, if a tradesperson can't explain how the old vanity comes out, how the new one connects, and what happens if the wall is damaged, the quote probably isn't complete.

Practical rule: the cheapest quote is only the cheapest if it includes the same scope.

The other reason this article exists is the gap between showroom pricing and site reality. Bathroom pricing in Australia is usually discussed as part of a broader renovation budget, because cabinetry, joinery and wet-area labour are where costs tend to move. For homeowners, that means the primary question isn't “What does a vanity cost?”, it's “What does this specific bathroom need to make the vanity fit properly?”

See the compliance angle in more detail at Victorian waterproofing certificate requirements.

What a Typical Vanity Installation Costs in Australia

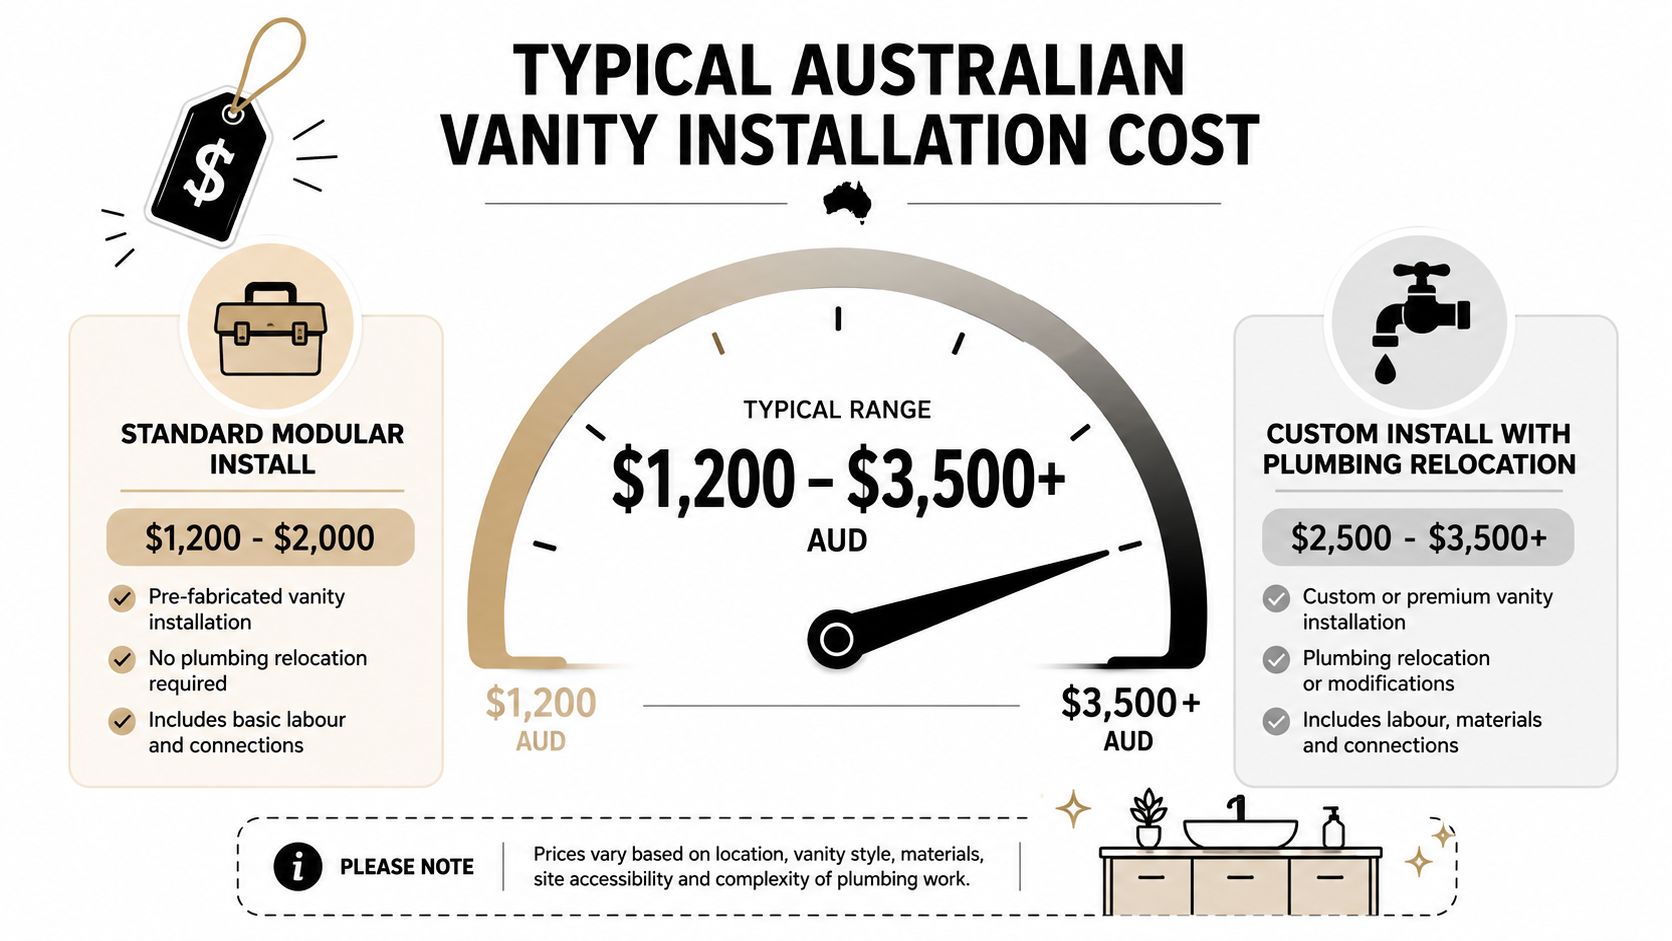
A vanity install is priced as a range because the cost is largely determined by the site conditions, not just the cabinet. In the AU market, a simple vanity swap is usually far cheaper than a full bathroom strip-out if the installer can leave the existing rough-in and waste position alone. Current trade pricing references put standard vanity installation at about A$400 to A$2,500, with basic freestanding units around A$400 to A$900 and larger or custom units climbing above A$2,500 Trusted Tradie Network.

Older Melbourne bathrooms rarely stay in the simple end for long. Once the existing vanity has to come out, the job can expose uneven walls, tired pipework, damaged tiles and awkward clearances that were hidden behind the old unit.

What the low end really assumes

The lower end generally assumes the plumbing stays in place, the vanity matches the existing footprint, and the wall finish behind it needs little or no repair. That is the sort of install where the cabinet arrives ready to fit, the old unit comes out cleanly, and the new one goes back without chasing pipes or reworking tiles. Newer bathrooms with predictable layouts make that job straightforward, but a lot of older homes do not give you that luxury.

Why the upper end climbs fast

Wall-hung cabinetry, stone tops, off-centre tapware and custom widths push the job into a different category. The installer is no longer only fitting a cabinet, the work can also involve carpentry, plumbing adjustment, wall reinforcement and extra labour to get all the details aligned. That is why the same vanity can sit near the bottom of the range in a newer apartment and near the top in a renovation with ageing services.

The quote also sits inside the wider bathroom budget, because vanity installation often triggers related work that sits outside the cabinet price. NSW Government Renovate or Build guidance notes that bathroom renovations can run from about $10,000 for a basic cosmetic refresh to more than $35,000 for a full renovation, with cabinetry and joinery as major drivers NSW Government Renovate or Build guidance. If you want a clearer picture of how vanity work sits inside a larger job, see typical bathroom renovation cost in Melbourne.

A gauge chart illustrating the typical Australian vanity installation cost range between $1,200 and $3,500 plus.

An Itemised Breakdown of Where the Money Goes

A proper quote separates the vanity from the work around it. That matters because the cabinet itself is only one part of the job, and in Melbourne bathrooms, the hidden scope often costs more than people expect. Older homes especially tend to need patching, plumbing adjustment and tidy-up work once the old unit comes out.

The best way to read the quote is to trace each cost bucket back to a trade task. That's also where a serious builder or installer earns trust, because itemisation tells you what's included and what isn't. A lump sum with no breakdown is usually the quote that leaves room for disputes later.

Cost Bucket What It Covers What Pushes Cost Up
Vanity unit Cabinet carcass, doors, drawers, finish Custom sizing, wall-hung design, premium materials
Benchtop and basin Laminate, stone, integrated or drop-in basin Stone tops, integrated basins, non-standard cut-outs
Plumbing labour and fittings Disconnecting, reconnecting, traps, wastes, tap alignment Plumbing relocation, awkward rough-ins, licensed plumbing work
Waterproofing interfaces Sealing disturbed wet-area joins Any wall opening, membrane disruption, old shower-adjacent damage
Demolition and removal Taking out the old vanity Heavy built-in units, tight access, stone tops
Disposal Haul-away and waste handling Large units, stone tops, difficult site access
Tiling patch or repair Repairing splashback edges or wall finishes Mismatched tiles, large footprint changes, damaged substrate
Electrical adjustments Shaver points, lighting, nearby outlets New mirror cabinets, moved outlets, compliance work
Builder coordination Sequencing trades and checking finish quality Multi-trade jobs, heritage homes, regulated renovation work

The removal side is worth watching closely. Disposal costs are often bundled, but not always, and vanity removal pricing can vary depending on size and material. Professional removal and disposal is commonly quoted separately from install work, which is why you should ask whether the old unit is being carted away or left onsite vanity removal cost guidance.

For a wider renovation quote that includes surrounding work, see Melbourne bathroom renovation cost guidance.

A clear quote should show how the vanity, the plumbing and the wall finish connect. If one of those pieces is missing, the final bill usually gets larger, not smaller.

The Factors That Quietly Change the Price

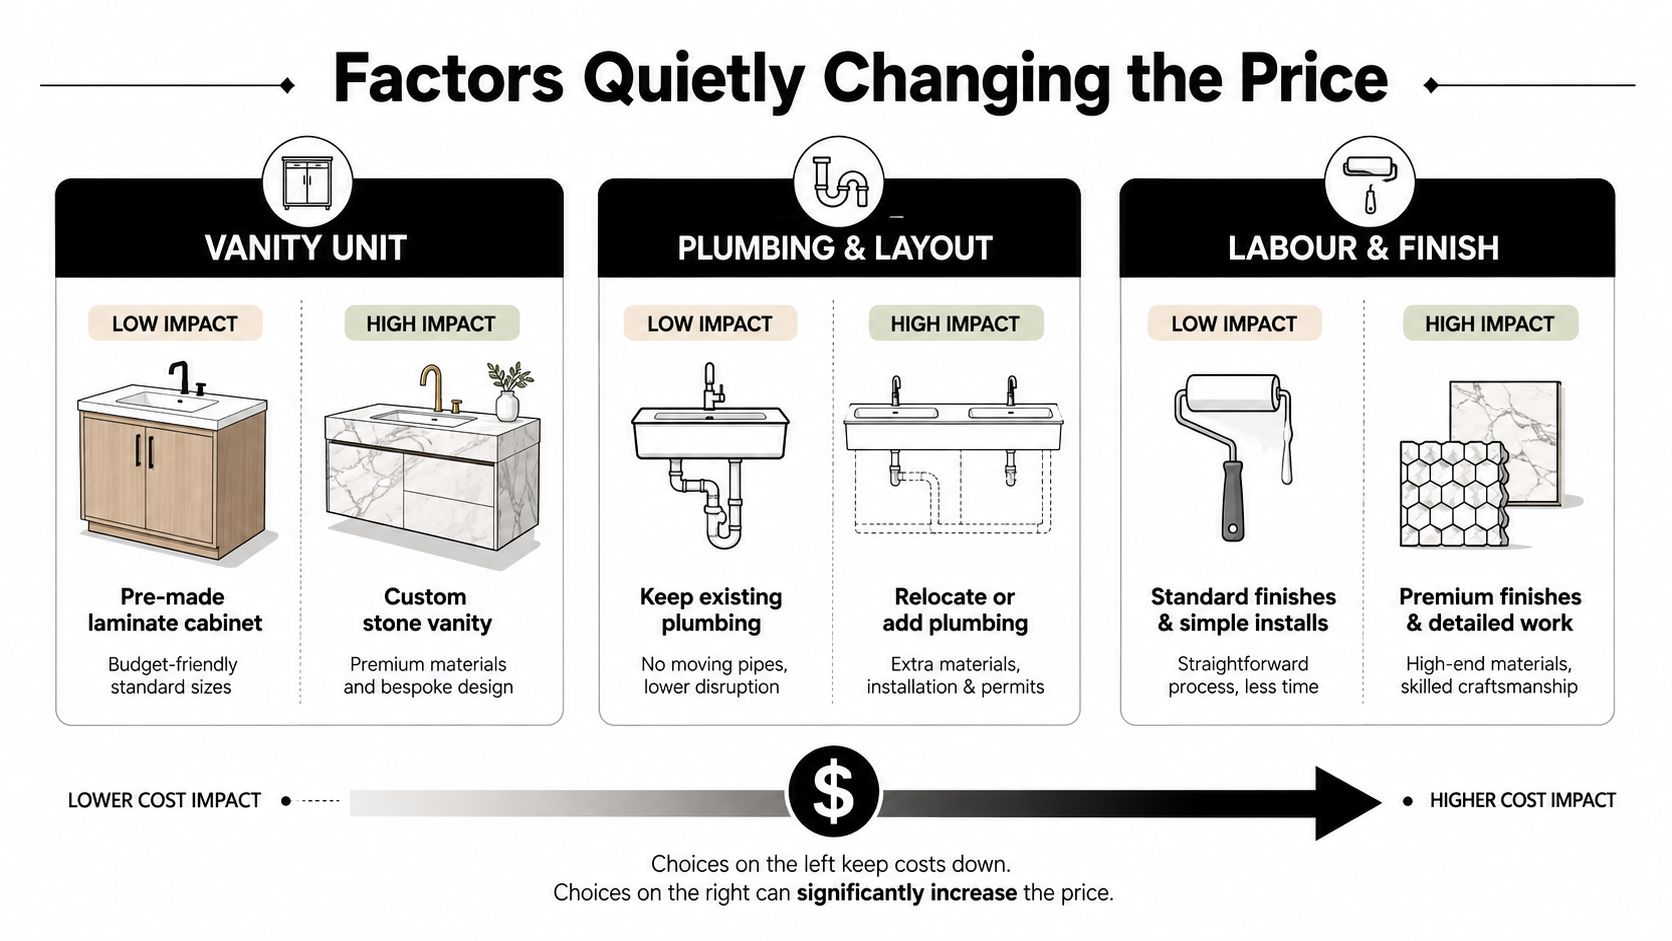
The number on the quote moves fastest when the homeowner changes the geometry of the job. A vanity can look small on a plan and still create a lot of extra labour if the basin shifts, the tap centre changes or the cabinet no longer fits the old opening. That's why two cabinets that look similar in a showroom can produce very different installation totals.

Size, material and cabinet style

A wider vanity costs more to move, more to fix in place and more to line up with the surrounding wall finishes. Materials matter too, because laminate is easier to handle than a stone top, and a custom cabinet usually needs more careful measuring than an off-the-shelf modular unit. Wall-hung vanities also add work because the wall has to carry the load properly.

Plumbing location and wall structure

Keeping the existing plumbing rough-in in place is the simplest path. Move the waste or water lines, and the job becomes a plumbing coordination exercise, not a swap. In many older Melbourne bathrooms, that also means patching tiles, fixing the substrate and sometimes reinforcing the wall behind a floating vanity so the fixings land where they should.

Here's the rule I use when quoting:

  • Low scope: same size, same style, same plumbing position.
  • Mid scope: different vanity or basin, minor plumbing changes, small wall repairs.
  • High scope: wall-hung unit, plumbing relocation, tiling patching, reinforcement or electrical changes.

That's the practical difference between a quick installation and a project that needs trade sequencing. The more the new vanity differs from the old one, the more the job spreads across carpentry, plumbing, tiling and finishing. In older homes, the hidden cost is usually not the cabinet, it's the correction work around it.

Matching the install type to the room

A floor-mounted unit in a neat apartment bathroom is one thing. A floating vanity in a tight heritage room with old services is another. If the layout is changing at all, expect the quote to reflect labour, not just product. That's normal, and it's also why low headline pricing can be misleading when the worksite isn't new.

An infographic illustrating factors affecting bathroom vanity installation costs, comparing budget-friendly options against premium, high-impact choices.

Melbourne Case Studies Across Three Budget Tiers

A newer apartment in Melbourne's inner suburbs usually gives you the cleanest vanity installation. The cabinet is often a like-for-like replacement, the waste line stays put, and the wall finish may only need a small repair where the old unit came off. In that kind of job, the quote sits near the lower end because the work is mostly removal, refit, and connection, with little hidden scope.

Budget-friendly swap in a newer apartment

This version usually uses a standard modular vanity, a basic basin, and the existing plumbing position. The job stays straightforward because the new cabinet matches the old footprint and the install does not force other trades into the room. If the wall and floor are in decent condition, the price is driven by clean labour rather than repair work.

Mid-range ensuite refresh with custom joinery

A mid-range ensuite often brings in a custom vanity, a stone top, and a more exact basin position. That adds coordination because the cabinet maker, plumber, and installer all need the same measurements to line up properly. In practice, the job stops being a simple cabinet change once splashback tiles or nearby fittings need touch-ups. If the room also needs associated finishing, tile installation services can become part of the scope.

Higher-scope heritage bathroom

Heritage bathrooms are where the quote often grows fastest. Old pipe positions rarely suit a modern wall-hung unit, and the surrounding wall finish usually needs repair after the old vanity comes out. If waterproofing or tile edges are affected, the job turns into a sequence of trades, and registered builders have a clear role in keeping that sequence coordinated.

That coordination is reflected in the total cost, not just the cabinet line. Bathroom renovations in Australia are labour-heavy because plumbing, waterproofing, tiling, and cabinetry all interact, and the Housing Industry Association commentary, as summarised in the Australian renovation context, reflects how sensitive wet-area work is to specification changes Housing Industry Association commentary, as summarised in the Australian renovation context. The lesson is simple, the more the room changes, the less useful a flat vanity price becomes.

A trustworthy Melbourne quote should show each tier clearly. If the installer talks only about the cabinet and leaves out the surrounding trades, the job is probably not being priced at the depth the bathroom needs.

DIY Versus Professional Installation

A DIY vanity swap can work when the job is simple. If the cabinet is the same size, the plumbing lines are already in the right place and you're not opening up wet areas, a competent homeowner can handle removal and refit with basic tools. The moment you touch plumbing alterations or waterproofing, the risk profile changes fast.

The biggest reason to hire a professional in Victoria is compliance. Once the work crosses into plumbing, membrane disturbance or broader bathroom renovation scope, the project stops being a casual weekend job and starts looking like regulated building work. That's where registered builders and licensed trades matter, because they coordinate the sequence and keep the work in the right legal lane.

If you can remove a cabinet without touching the plumbing or the wall finish, DIY can be sensible. If you need a plumber or a waterproofing repair, it usually stops being a DIY saving.

There's also the insurance and resale side. Non-compliant work can create problems later if a pre-purchase inspection flags it, and homeowners don't want to explain an unlicensed bathroom fix when selling. A professional install also carries the practical advantage of accountability, because if something leaks or lifts later, you're dealing with an accountable trade rather than your own weekend patch-up.

For readers comparing a swap with a larger bathroom scope, tile installation services become relevant as soon as splashback repairs or edge tiles need to be matched back in.

How to Get an Accurate Quote You Can Trust

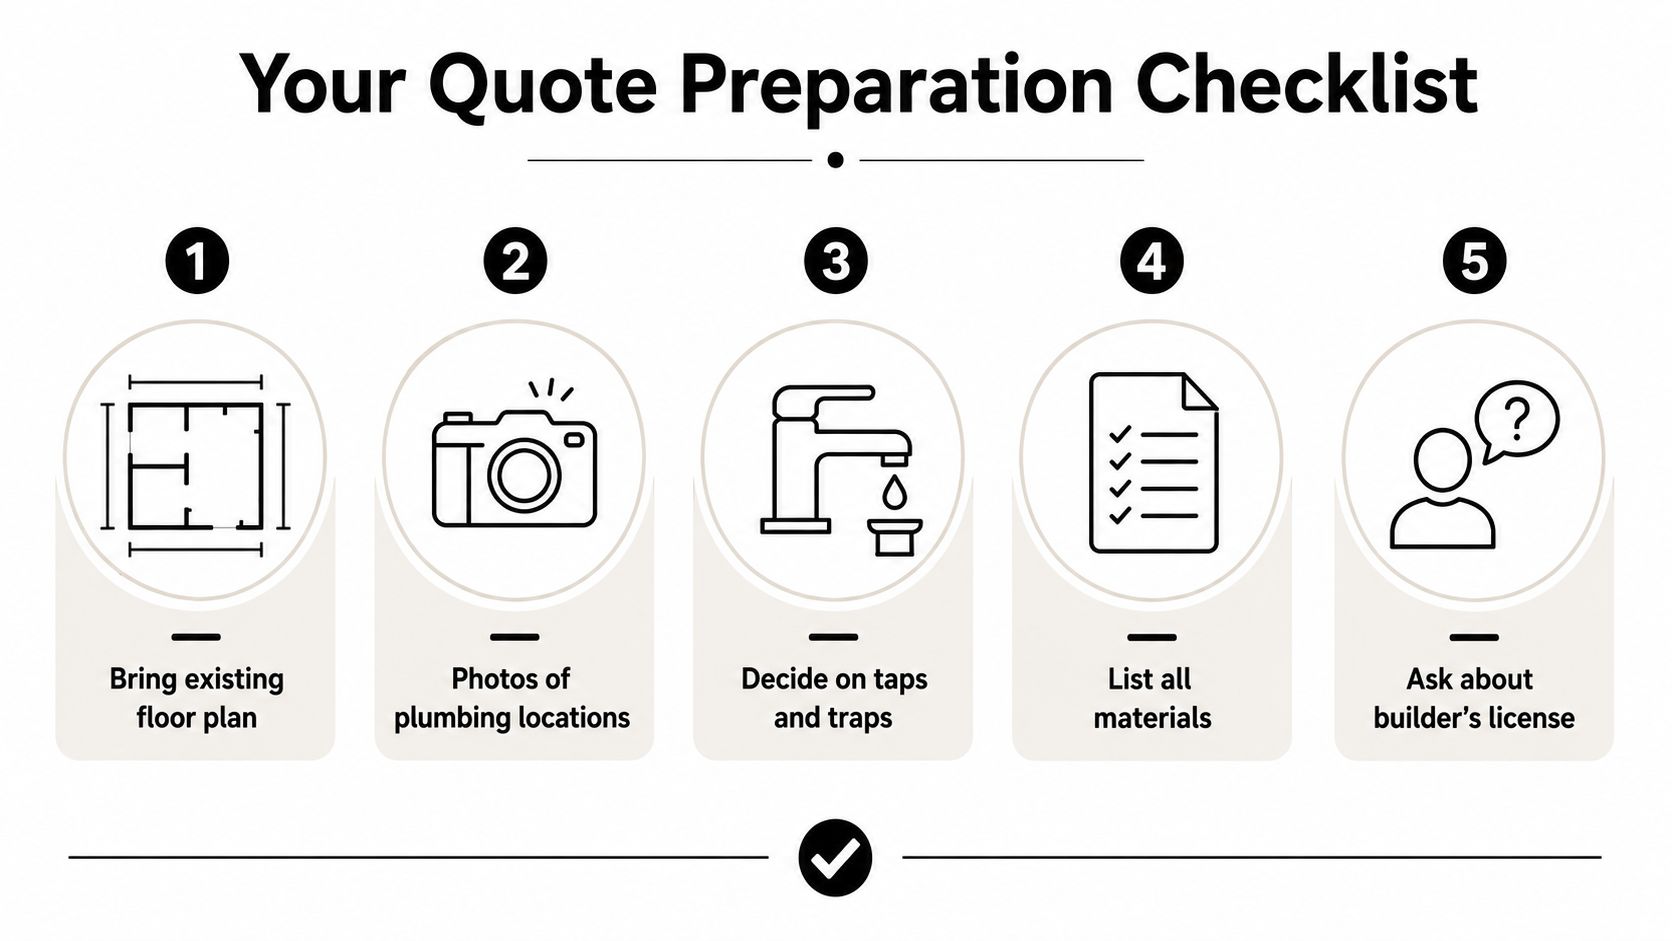
Good quotes start with good information. Before you call anyone, take photos of the bathroom from several angles, note where the taps and waste sit, and keep the existing floor plan handy if you have it. If you know the vanity size, basin type and whether the wall is masonry or framed, include that too.

A serious tradesperson will want to know what's already behind the old cabinet. If you can tell them whether the waterproofing has been recently redone, whether the existing plumbing is centred, and whether the wall is being opened up, they can price the install much more accurately. That saves you from the false economy of the cheapest number on the page.

What to ask every quote giver

  • Scope clarity: Ask whether removal, disposal, plumbing reconnects and patching are included.
  • Compliance proof: Ask who will carry the plumbing or builder responsibility where needed.
  • Fixing method: Ask how the vanity will be anchored if it's wall-hung.
  • Finish work: Ask what happens to the splashback edge, the silicone lines and any broken tile.
  • Exclusions: Ask what's not included, and have them write it down.

A quote without a labour breakdown is a warning sign. So is one that ignores waterproofing, disposal or any mention of wall repair. Those omissions are exactly what create change orders halfway through the job, especially in older Melbourne bathrooms where nothing behind the old vanity is guaranteed to be neat.

The best quotes line up with the itemised buckets earlier in this article. If the scope list and the price structure don't match, the lowest number probably isn't comparing the same job. Ask for like-for-like quotes, then compare the details line by line instead of chasing the cheapest total.

A five-step checklist illustrating the essential items needed to prepare for a home renovation quote.

Smart Ways to Reduce Cost and Avoid Hidden Fees

The cleanest way to save money is to reduce change, not cut corners. Keep the existing plumbing position where you can, choose a vanity width that suits the current opening and avoid custom work unless the room needs it. Those choices limit the chance of extra labour, disposal charges and emergency plumbing call-outs halfway through the project.

Material selection matters too. A simple modular cabinet with a compatible basin is cheaper to install than a heavily customised setup, because the installer spends less time adjusting around it. Bundling the vanity with other planned bathroom works can also help, since the setup and coordination happen once instead of being repeated later.

The hidden fee trap is the quote that sounds cheap because it excludes the hard bits. Disposal, wall repair, tile patching and waterproofing touch-ups are exactly the items that tend to appear once the old vanity is removed. A properly scoped quote from a registered builder usually costs less in total than the lowest headline install price, because it prices the work that has to happen.

If you want help turning a vanity change into a properly scoped bathroom plan, Melbourne Tiling Services P/L handles bathroom renovations, tiling and waterproofing across Melbourne and greater Victoria, with the coordination needed when vanity work crosses into a larger bathroom job. Visit Melbourne Tiling Services P/L to compare your room, your scope and your quote before you sign anything.

Tile Adhesive for Wet Areas: A Complete Melbourne Guide

You're standing in a bathroom renovation, the tiles look perfect on the showroom board, and the quote has a cheap adhesive line that seems harmless enough. The problem is that wet areas don't forgive shortcuts, and the adhesive is only one part of a system that has to deal with moisture, heat, movement and daily use in Melbourne homes. In bathrooms and showers, the right choice is less about grabbing a bag off the shelf and more about matching the adhesive to the membrane, the substrate and the tile itself.

Table of Contents

Why Wet Areas Demand a Different Tile Adhesive

A bathroom can look finished on day one and still be on the way to failure. Melbourne wet areas deal with shower steam, temperature swings, cleaning chemicals, and movement in the structure, so tile adhesive for wet areas has to do more than hold a tile in place. It needs to work with the membrane, keep its grip on dense porcelain, and stay stable through repeated wetting without turning soft or brittle.

An infographic explaining the risks of using standard tile adhesive in wet areas like bathrooms and kitchens.

What attacks the bond

Wet areas are not just splash zones. They are humid spaces where vapour pressure pushes moisture into joints and edges, while the substrate flexes under people, fixtures, and thermal change. Cleaning products and soap residue can also work on the bond surface over time, especially if the adhesive was never meant for regular wetting.

Practical rule: if the adhesive cannot stay sound under a membrane, it does not belong in a shower.

That is why the old idea of “it sticks, so it is fine” causes trouble. Dense, low-absorption tiles now make up a large share of the market, and Wacker's technical paper notes that many tiles used worldwide have water absorption at 0.5% or lower under ASTM C373, which is the kind of dense tile often specified for wet areas in Australia (Wacker technical paper). When the tile does not absorb much, the adhesive has to do more of the work.

The wet-area system: substrate, membrane, adhesive, tile

A wet-area job lasts when the whole assembly works together, substrate, membrane, adhesive, and tile. A Registered Unlimited Builder does not treat adhesive as a moisture barrier, because it is only one layer in the system. The substrate needs to be sound, the membrane needs to control water at the right plane, the adhesive needs to suit the tile and the waterproofing chemistry, and the tile itself needs to match the movement and exposure the room will see.

Australian guidance treats adhesives in bathrooms and showers as water-resistant, not waterproof (wet-area adhesive guidance). That distinction matters on site. If moisture gets past the tile and into the grout lines, the interfaces between tile and adhesive, adhesive and membrane, and membrane and substrate are where the bond gets tested first.

I also point clients to tile adhesive basics explained when they want the plain version of how the product sits inside the full wet-area build-up.

The main point is simple. If the adhesive does not suit the tile, the membrane, and the substrate together, the shower can look finished and still fail early. Melbourne's seasonal movement makes that risk worse, not better.

The Four Adhesive Families That Work in Wet Areas

An infographic showing the four types of tile adhesives used for wet areas in Australia.

Tile adhesive basics explained

A shower might look finished the day the last tile is set, but the bond only lasts when the adhesive suits the other three parts of the wet-area system, the substrate, the membrane, and the tile. That is the way I assess a bathroom on site in Melbourne. If the backing board is moving, the membrane has the wrong cure or chemistry, or the tile is too dense for the adhesive to grab properly, the install starts working against itself. A Registered Unlimited Builder coordinates those parts so the product choice fits the room, the waterproofing method, and the movement the house will see through summer heat, winter cold, and daily shower use.

Polymer-modified cementitious adhesive

This is the workhorse. In wet-area work, polymer-modified cementitious adhesive is the product most Melbourne tilers reach for because it gives a better blend of grab, flexibility and wet performance than basic mortar. The polymer modification helps the adhesive stay bonded to dense tile backs and common wall or floor substrates, which matters when the tile is large, heavy or low-porosity.

It suits most bathroom floors, shower walls and general wet-zone renovations where the substrate has been prepared properly and the membrane system is compatible. In practice, that usually means a C2-grade cementitious adhesive, and C2 + S1 is the safer call where movement, tile size or substrate behaviour raises the risk. Tile adhesive basics explained covers the plain-language version of how that product sits inside the build-up.

Rapid-set cementitious adhesive

Rapid-set products are the time-sensitive specialist. They are useful when a room needs to return to service quickly, or when a builder is managing a tight sequence around waterproofing, tiling and grouting. The trade-off is less working time, so the tiler has to move fast and stay organised.

That speed can help on small repairs or shutdowns, but it does not forgive poor prep. If the substrate is uneven or the membrane is not cured, a fast adhesive will not fix the job. It just locks in the mistake sooner.

Ready-mixed acrylic adhesive

This one gets oversold in retail aisles. Ready-mixed acrylic products can suit lighter-duty interior wall applications, but they are not the first choice over a waterproofing membrane in a bathroom shower. In wet-area practice, products that cure chemically are generally the safer match once the membrane is part of the assembly.

That matters because a product can feel simple to use and still be wrong for the system. The short-term convenience often turns into a repair bill later, and the owner ends up paying for the mismatch between the adhesive, the membrane, and the exposure the room sees.

Two-component epoxy adhesive

Epoxy sits at the premium end. It is the most resistant option for harsh chemical exposure, demanding commercial conditions and some submerged or near-submerged applications. The upside is strong resistance, but the downsides are cost, mixing discipline and installation difficulty.

A lot of bathroom renovators do not need epoxy everywhere. A Registered Unlimited Builder usually reserves it for specific conditions, not as the default answer. That is the right call, because the adhesive has to suit the room, the membrane, and the substrate, not the other way around.

Decoding Australian Standards and Adhesive Classifications

A shower can look finished and still be wrong. The failure usually starts below the tile, where the substrate, membrane, adhesive and tile have to work as one system. In Australian wet-area work, that system sits under AS 3740:2021 for domestic waterproofing and AS 3958.1 for tiling installation, and a builder has to coordinate the trade sequence so each layer does its part. For Melbourne jobs, that usually means checking the waterproofing detail first, as set out in waterproofing in Melbourne, then choosing an adhesive that matches the membrane and the tile load.

A technical infographic illustrating Australian standards for waterproofing membranes in wet areas, covering substrate, application, and termination.

Reading the product codes without the jargon

Most datasheets follow EN 12004-style classifications. C1 and C2 identify cementitious adhesive strength, with C2 the higher-performance class that is usually selected for wet areas. S1 and S2 refer to flexibility, which matters when a substrate moves or the tile format gets larger. T means reduced slip, and E means extended open time, which gives the tiler more time before the adhesive skins over.

ARDEX breaks that into a practical wet-area split. Its guidance classifies Type 1 as dry-area only and Type 2 as the minimum for wet areas (ARDEX internal wet-area guidance). That is the sort of wording that helps on a quote, because it turns a standards discussion into a clear buying decision.

What the wet-area numbers mean on site

Wet-area adhesive data commonly asks for minimum tensile adhesion of 1 N/mm² in wet condition, and bathroom and shower guidance often points to C2 products, with C2 + S1 used where the room needs more flexibility. Tensile adhesion is the figure that tells you whether the bond survives repeated moisture and movement, not just a neat-looking test on a bench.

Mapei's Australian large-format tile adhesive datasheet gives a useful example of that kind of specification. It lists a bond strength after water immersion of 1.2 N/mm², along with an open time of more than 30 minutes and adjustability of about 45 minutes (Mapei AU datasheet).

If the product sheet does not state wet-area suitability, bond strength and membrane compatibility, keep looking.

That is where trade judgment matters. A product can carry the right code and still be a poor fit if the membrane finish, the substrate movement or the tile size pushes it outside its comfort zone. The right adhesive is the one that matches the standard, the membrane and the layout the room demands.

Matching Adhesive to Substrate, Tile and Waterproofing Membrane

The adhesive isn't chosen in isolation. It has to suit what it's sticking to, what it's holding up, and what sits underneath it. A concrete slab, fibre-cement wall, plasterboard lining, old tile surface or flexible timber floor all ask something different from the adhesive, and so do dense porcelain, natural stone and large-format panels.

Common pairings and the adhesive grade that usually fits

Substrate Tile Type Recommended Adhesive Why
Concrete slab Dense porcelain floor tile C2 or C2S1 cementitious Handles dense tile backs and everyday movement in wet zones
Fibre-cement wall Large-format porcelain or Kerlite C2S1, often with non-slip and extended open time Better wall support and working time for big tiles
Plasterboard in a bathroom Ceramic wall tile C2 cementitious, system-compatible with membrane Keeps the bond stronger than a basic wall adhesive
Existing tile surface Smaller-format ceramic or porcelain High-bond cementitious or epoxy, depending on prep Needs strong adhesion to a non-porous surface
Flexible timber floor Wet-area floor tile C2S1 or higher-flexibility system Movement control is critical

Why membrane compatibility matters

Membranes are not all the same. Acrylic, polyurethane and epoxy-based systems each create a different surface for the adhesive to grab onto, so the product has to be checked against the membrane manufacturer's guidance. A bathroom can be perfectly waterproofed and still fail if the tiler uses an adhesive that doesn't cure properly over that membrane.

That's why I like to see a written system on wet-area jobs. A waterproofing membrane guide from Melbourne Tiling Services P/L can be found in their shower waterproofing resources, and the useful point isn't marketing, it's that the membrane, adhesive and substrate should be treated as one specification rather than three loose purchases (shower waterproofing membrane reference).

Two real-world combinations

A 600 x 600 porcelain tile on a concrete slab in a main bathroom usually points toward a C2S1 cementitious adhesive. The tile is dense, the format is large, and the installer needs enough open time to maintain coverage without skimming the surface.

A Kerlite panel on a fibre-cement wall in a walk-in shower needs even more discipline. Large-format panels reward a flatter substrate, careful trowel selection and strict membrane compatibility. In that job, the wrong adhesive can make the panel look fine at install and then fail at the edges later.

Common Failure Modes and How to Prevent Them

A wet-area tile failure usually shows itself in stages. A shower may start with a faint hollow sound, then grout staining, then tile movement, and only later a leak behind the wall. By the time the damage is visible, the adhesive problem has usually become part of a bigger system failure.

Four failures I see most often

Failure What it looks like How to prevent it
Debonding over membrane Tiles lift or sound dead behind the surface Use an adhesive that is compatible with the cured membrane and suits the substrate beneath it
Hollow tiles or poor coverage Tapping the tile sounds empty in patches Use the right trowel notch, spread the adhesive properly, and back-butter where the tile format calls for it
Grout cracking or movement Hairline cracks, especially on walls or corners Use the right adhesive for the substrate and tile, then allow movement joints to do their job
Efflorescence or staining White residue, patchy grout colour, damp looking joints Keep the membrane, adhesive and grout system aligned, and avoid trapping moisture in voids

The pre-mixed adhesive trap

The mistake I keep seeing is a pre-mixed product being used where a chemically curing adhesive belongs. In wet areas, that shortcut can leave you with slow cure, weaker bond development and a tile layer that never really settles into the membrane system the way it should. A shower can look finished on day one and still be setting up a failure behind the surface.

Practical rule: if the room has a membrane, treat the adhesive as part of that membrane system, not as a shortcut around it.

Coverage matters too. ARDEX's wet-area tiling guidance says the adhesive layer should be at least 2.5 mm thick under the tile, with at least 90% contact coverage for internal wet-area floors and walls, and back-buttering for tiles larger than 400 x 400 mm to help achieve that target (ARDEX wet-area tiling guidance). In practice, poor coverage is one of the fastest routes to failure because the voids hold moisture and movement. Once the load, water and seasonal movement start working on those gaps, the bond begins to break down.

A Practical Selection Checklist for Melbourne Renovations

When I review a bathroom quote, I look for the adhesive spec before I look at the tile picture. If the line item just says “tile adhesive”, that's not enough detail for a wet area. A proper renovation file should name the substrate, membrane, adhesive class, coverage target and curing sequence.

A checklist you can use on the day you approve the job

  • Confirm the substrate: concrete, fibre cement, plasterboard, existing tile or timber all change the adhesive choice.
  • Confirm the tile format: large-format porcelain, Kerlite, ceramic or stone all need different levels of support.
  • Confirm the membrane system: the adhesive has to suit the waterproofing layer under it.
  • Ask for the adhesive class: look for C2 at minimum, and C2S1 where flexibility matters.
  • Check the wet-condition rating: 1 N/mm² is a common minimum benchmark in wet use guidance.
  • Ask how coverage will be achieved: 90% to 95% contact, with back-buttering on larger tiles.
  • Confirm the curing sequence: membrane cure first, then adhesive, then grout.
  • Ask for the flood test timing: it should happen before the room is put into service.

One Melbourne bathroom I saw failed because a decent porcelain tile was bonded over a membrane with the wrong pre-mixed product. The tiles stayed put for a while, then the shower floor started sounding hollow and the grout joints stained because moisture was getting into the voids. The repair was not cheap in labour, and the homeowner ended up paying twice for demolition and reinstallation.

Another job held up well because the builder and tiler matched a C2S1 adhesive to the membrane, flattened the substrate and back-buttered the large tiles. The room didn't look exotic, just well managed, and that's usually what a good wet-area job looks like after two years, then five, then ten.

A premium polymer-modified adhesive can add a modest cost to a bathroom renovation, but the budget shock comes from tearing out a failed shower and rebuilding the waterproofing, lining and tilework. That's why the adhesive choice belongs in the quote, not as a last-minute substitution.

Working with Registered Builders on Wet-Area Tiling

Wet-area tiling is a coordination job as much as a tiling job. The screeder has to deliver a flat base, the waterproofer has to build a continuous membrane, the tiler has to use the right adhesive and coverage, and the plumber or electrician may need to finish their rough-ins before the room is closed up. A Registered Unlimited Builder in Melbourne sits at the centre of that sequence and makes sure no trade jumps ahead of the one before it.

A proper quote should name the products, the standards, the cure times and the waterproofing method statement. It should also make clear who is responsible for membrane inspection, substrate readiness and the final handover. That level of paperwork isn't bureaucracy, it's how you protect the homeowner when the room is under warranty or inspected later.

Melbourne Tiling Services P/L is one example of a builder-tiler team that coordinates bathroom renovations, waterproofing, screeding and tile installation under one roof, which is useful because the adhesive only performs if the earlier steps are already right. The point isn't the brand name, it's the structure of the job. If the membrane isn't cured or the substrate isn't stable, even a good adhesive won't save the shower.


If you're planning bathroom renovations in Melbourne and want the wet-area system checked from substrate to tile, speak with Melbourne Tiling Services P/L about the adhesive, membrane and sequencing before you lock in the quote. They can assess whether your renovation needs standard polymer-modified adhesive, a higher-flexibility system or a full wet-area rebuild, and they'll do it in the context of a properly managed renovation.

Tiling Cost Per Square Meter: Melbourne Guide 2026

Melbourne tiling costs typically land around A$65 to A$135 per square metre for standard ceramic and porcelain once you factor in labour and installed materials, but bathroom wet areas often push higher once waterproofing and substrate preparation are included. The popular advice that a single rate tells you everything is wrong, because the cheapest number on a quote is usually the one that leaves out the work that matters.

Table of Contents

Why a Single Tiling Rate Misleads Most Homeowners

An infographic explaining why a single tiling cost per square meter rate is misleading for customers.

A headline tiling cost per square metre rate sounds tidy, but it hides the budget drivers. In practice, the final figure changes depending on whether the job is a simple straight-set floor, a bathroom wet area, or a renovation that needs levelling, waterproofing, and compliance work.

Labour-only rates are only part of the story

Australian cost guidance puts labour-only straight-set floor tiling at A$45–A$70 per square metre, while more complex patterns rise to A$80–A$120/m² for herringbone or chevron and A$100–A$150/m² for mosaic work (Australian tiling benchmark). That range is useful, but only if you know what it includes.

A cheap quote often looks attractive because it's scoped tightly. It may cover laying tiles on a clean, ready surface, then leave out the things that blow out real bathroom budgets, like membrane work, substrate correction, adhesive, grout, or removal of old finishes.

Practical rule: compare quotes only after you've confirmed whether they're labour-only or fully installed.

Why bathroom quotes shift so much

Bathrooms punish vague quoting. Wet areas bring compliance costs that aren't optional, and that's why a bare floor rate doesn't hold up once the job includes a shower recess, a balcony fall issue, or a cracked slab that needs rectification. The Australian benchmark notes that tile supply can add A$20–A$200/m², and waterproofing under AS 3740 adds another A$20–A$45/m² (Australian tiling benchmark).

That's the trap. A homeowner compares two numbers, picks the lower one, and then discovers that the “cheaper” quote didn't include the work that makes the bathroom watertight or level enough to tile properly.

An infographic comparing the cost factors between standard ceramic tiles and large-format porcelain tile installation projects.

Breaking Down Every Cost Component in a Tiling Quote

A proper quote splits the job into separate line items. That matters because a tile price alone says very little about the installed cost, especially in Melbourne bathrooms where prep and compliance can outweigh the tile itself.

The main items you should expect

The first layer is tile supply. Australian quotation tools commonly place installed pricing around A$35–A$60/m² for budget ceramic, A$50–A$95/m² for mid-range porcelain, and A$65–A$135/m² for large-format tile once labour is included (installed cost benchmark). The tile itself is only part of that number, and the more visually impressive the product, the more carefully the substrate has to be prepared.

Setting materials come next. That includes adhesive and grout, which aren't glamorous, but they're what hold the whole system together. If a quote lumps them into a vague allowance, ask for a breakdown, because cheap materials usually show up later as hollow spots, weak bond strength, or inconsistent joints.

A clean quote names the tile, the prep, the waterproofing, and the labour separately.

What often gets missed

The most common omissions are the ones that are hardest to spot on paper. Surface preparation can add cost because levelling, priming, and substrate correction are usually charged separately (installed cost benchmark). In wet areas, the quote should also include membrane work, because that's not a decorative extra, it's part of making the room compliant and durable.

Here's the practical checklist I use when reading a quote for a bathroom or ensuite:

  • Tile supply: Is the tile price based on budget ceramic, porcelain, or large-format product?
  • Setting materials: Are adhesive and grout included, or treated as extras?
  • Labour: Does the rate assume straight-set work, or a pattern that slows installation?
  • Waterproofing: Is the membrane included for wet areas?
  • Preparation: Does the quote allow for levelling, priming, or repairs?
  • Removal: Are old tiles, adhesive, and waste disposal included?

The difference between a tidy quote and a realistic one often comes down to those details. For a practical Melbourne reference point, see this tile installation cost overview for Melbourne.

How Tile Type and Format Change the Final Price

Tile selection changes the budget faster than many expect. The shape, size, and material all affect how long the installer spends on site, how much preparation is needed, and how much waste gets cut off the sheet or the board.

Standard ceramic versus larger formats

Budget ceramic is usually the easiest to install. It's lighter, simpler to handle, and more forgiving of minor substrate imperfections. Mid-range porcelain costs more to supply in many cases, but the bigger budget swing often comes from the labour side, especially if the tile is large enough to demand tighter tolerances and more careful set-out.

Large-format tile is where quotes climb. Bigger tiles need more adhesive coverage, flatter substrates, and slower placement. The result is a more precise finish, but not a quicker one. That's why a straight tile price understates the installed cost unless the quote also includes adhesive, grout, and prep allowances.

Pattern and format matter as much as material

Complex patterns slow work down. Australian labour benchmarks put herringbone and chevron at A$80–A$120/m², while mosaics sit at A$100–A$150/m² (Australian tiling benchmark). Those rates aren't about the tile label on the box alone, they reflect how much more time the pattern takes to set out, cut, and align.

Large-format Kerlite and similar thin panels are popular in high-end Melbourne work because they look crisp and modern, but they reward careful planning rather than optimism. A bad substrate or a rushed layout can turn a premium product into a messy one fast.

The most useful question isn't “What does the tile cost?” It's “How much time will this tile take to install properly?”

For more detail on complex jobs, the large-format tile installation cost guide is the right place to start.

A price breakdown table showing tiling costs in Melbourne for a compact ensuite, standard bathroom, and luxury wet room.

Real Bathroom Tiling Cost Calculations for Melbourne Homes

Bathroom pricing gets clearer when you stop chasing one magic number and start measuring the room properly. The tile rate, waterproofing, prep, and labour each need their own allowance, otherwise you end up with a quote that looks affordable until the extras land.

A compact ensuite can still add up quickly

For a small ensuite, the surface area may be modest, but the fixed components still bite. A labour-only floor rate can look manageable, yet the moment you add supply, waterproofing, and prep, the number moves into a very different band. That's why compact rooms often feel expensive relative to their size, even when they use standard finishes.

A full bathroom tiling job in Australia is estimated at $3,000 per bathroom on the low end, $6,000 per bathroom on average, and $10,000 per bathroom on the high end (Australian bathroom tiling estimate). Those figures are useful because they capture the combined cost of floors and walls, not just one surface.

Use the quote as a calculation tool

Start with the measured floor and wall areas, then add the allowances that apply to the job. If the bathroom includes a shower recess, waterproofing becomes part of the base scope. If the slab or wall substrate is uneven, prep must be included before the first tile goes down.

Budget from the substrate outwards, not from the tile showroom inwards.

A practical way to think about it is this. A mid-range bathroom with porcelain tiles will not price like a dry laundry. A high-end renovation with large-format panels and remediation work will not price like a simple splashback either.

The right budget range is the one that reflects your actual room, not a generic square-metre headline. That's the only way to avoid the classic surprise where the quote is “cheap” until the waterproofing, levelling, and labour are added back in.

Why Registered Builders Matter for Bathroom Renovations

Bathroom work is not just about getting tiles on the wall. In Victoria, compliance matters, and the person managing the job can affect your insurance position, contract structure, and the quality of the coordination across trades.

Registration isn't paperwork, it's risk control

The Victorian Building Authority states that a Domestic Building Contract is required for work over $10,000, and it also distinguishes registered builders from other domestic building practitioners, who must be appropriately registered or licensed for the work they perform (Victorian Building Authority). That matters because bathroom renovations often sit right on the edge where formal contract and builder obligations kick in.

A registered builder is more likely to coordinate the moving parts properly. Bathroom jobs can involve waterproofing, plumbing, electrical work, carpentry, and tiling. If one trade slips or the sequence is wrong, the tile layer ends up building over a problem instead of solving it.

Why that matters in real bathrooms

The risk isn't abstract. A cheap quote from someone outside the right framework can leave you with gaps in insurance cover, unclear responsibility if something fails, and expensive rectification work later. Once a bathroom leaks, the cost of fixing the substrate and rebuilding finishes can swamp whatever looked like a saving at the start.

For waterproofing-focused work, this waterproofing guidance for Melbourne projects is worth reading before you sign anything.

A compliant renovation also tends to be calmer on site. The builder coordinates the sequence, the trades know when they're expected, and the homeowner isn't left trying to manage who comes first, who signs off, and who owns the problem if the room fails inspection or starts leaking.

Practical Ways to Reduce Your Tiling Budget

Cutting tiling costs doesn't mean cutting corners. The best savings come from simplifying decisions that add labour, not from buying the cheapest product in the showroom and hoping the rest works itself out.

Spend where it protects the room

Mid-range porcelain is often a sensible choice for busy floors, because it balances durability and cost better than chasing premium natural stone everywhere. Complex patterns also add cost quickly, so a straight layout usually makes more sense in secondary spaces where the design brief doesn't demand a feature floor.

Reuse of an existing substrate can help too, but only if it's structurally sound and compliant. If the floor or wall already needs correction, pretending otherwise is a false economy. Saving a little on prep rarely survives the first sign of movement or moisture.

Ask sharper questions before you sign

A quote should tell you more than the price. If it doesn't, you're comparing numbers without context.

  • Registration: Is the contractor a registered builder or appropriately licensed for the scope?
  • Insurance: What cover is in place for the project?
  • Inclusions: Do waterproofing, levelling, adhesive, grout, and removal of old tiles appear on the quote?
  • Warranty: What's covered if a tile lifts or a membrane fails?
  • Timing: How long will the project take, and what trades are involved?

The cheapest quote is often the one that leaves out the most.

One more thing. Bundling work can sometimes make sense when the same substrate, waterproofing, or labour setup applies across areas. It's not always cheaper, but it's often cleaner and easier to manage than splitting a small job into multiple visits.

A four-point infographic guide displaying practical strategies to lower costs for home tiling projects.

How Melbourne Tiling Services P/L Delivers Transparent Pricing

Opaque quotes create most of the frustration around tiling costs. A transparent process fixes that by showing the scope, the materials, and the compliance work before anyone starts on site.

What a clear quoting process should look like

Melbourne Tiling Services P/L has been operating since 2003, works from Highett, VIC, and offers start-to-finish bathroom and ensuite renovations with free quotes, 3D bathroom drawings, and a transparent renovation calculator. The company is described as Registered Unlimited Builders, and it coordinates licensed carpenters, plumbers, electricians, tilers, and waterproofers.

That combination matters because it makes the pricing legible. Instead of guessing whether the quote includes waterproofing, levelling, or premium finishes, the homeowner can see where the money is going and what the scope covers.

Why transparency solves the real budgeting problem

The best renovation process doesn't just produce a nicer bathroom. It removes the hidden-cost problem that makes comparison shopping so frustrating. If the quote is itemised, the homeowner can tell whether a higher number reflects better materials, more preparation, or a more honest scope.

Melbourne Tiling Services P/L also works with large-format Kerlite installations, leak rectification for showers and balconies, and premium marble and porcelain finishes. That mix matters for complex projects because those jobs usually need more than a tile setter, they need proper coordination from the start.

If you're budgeting a bathroom or ensuite and want a quote that shows the full cost rather than a stripped-back headline number, visit Melbourne Tiling Services P/L to organise a free quote and plan the work with proper scope, proper compliance, and no guesswork.

What Is Tile Adhesive: A Complete Guide

Tile adhesive is a factory-blended, polymer-modified bonding layer engineered to secure tiles mechanically and chemically, and C2 products are built for tougher jobs than basic C1 products. The wrong adhesive is one of the fastest ways to turn a bathroom renovation or balcony job into cracked grout, hollow spots, or debonding.

Many people still call it “glue”, but that framing is too simple for Melbourne conditions. In real tiling work, the adhesive has to suit the tile, the substrate, the moisture load, and the amount of movement the surface will see.

Table of Contents

Tile Adhesive Is Not Just Glue

The biggest mistake homeowners make is treating tile adhesive like a commodity. It's not just glue, it's a performance layer that has to bond, hold, and sometimes flex while the structure beneath it moves, dries, or heats up.

A construction worker spreading thin-set mortar on a floor using a notched trowel to prepare for tiling.

In Australian bathrooms, that distinction matters because the tiled surface sits inside a wet-area system, not a dry decorative finish. Adhesive choice has to work with waterproofing, substrate preparation, and the tile format, which is why the wrong product can fail even when the install looks neat on day one. Tile adhesive usage is tied closely to renovation and high-performance tiling applications, especially where moisture resistance and flexibility matter.

What the bond actually does

Tile adhesive creates two kinds of hold. It forms mechanical interlock with the substrate and tile back, and it also cures into a bonded layer that resists lifting, sliding, and separation. That's why surface condition, trowel coverage, and curing matter as much as the label on the bag.

Practical rule: If the substrate is moving, dusty, slick, or poorly prepared, a premium adhesive still won't save the job.

That's the reason professionals treat adhesive as one part of a system. Screeding, leveling, waterproofing, tile type, and adhesive classification all affect the final outcome. If you're planning bathroom renovations, the adhesive choice should sit alongside the surface prep work, not after it. Screeding is often the step that makes the adhesive perform properly.

Why this matters more in Melbourne renovations

Melbourne homes throw up real-world complications. Older slabs can be uneven, balconies can move, and renovated bathrooms often combine new board substrates with waterproofed wet zones. A generic product might hold a kitchen splashback, but that same product can struggle in a shower recess or on a balcony where temperature swings and moisture exposure are part of daily life.

That's why the better question isn't “what is tile adhesive?” in the simple sense. It's “what engineering job does this adhesive need to do on this specific surface?” Once you ask that, the product category starts to make sense fast.

The Main Types of Tile Adhesive Explained

Tile adhesive comes in a few practical families, and each one behaves differently once it hits the wall or floor. The type you choose affects how you mix it, how fast you can work, and how forgiving the job will be.

Cement-based powder adhesives

This is the professional default for most tiled floors and walls. It's mixed on site with water, which gives the tiler control over consistency and working time, and it's the most common choice for everyday installations because it balances cost and performance well. Market data also shows cementitious adhesives leading with 36.6% of the market in 2024 in one global market view, which lines up with their broad use in routine wall and floor work (Grand View Research).

Powder adhesives are also the right starting point when the job involves porcelain, larger formats, or wet-area work. For bathroom renovations, that flexibility matters because the adhesive often has to bridge different substrates and hold up under moisture.

Epoxy adhesives

Epoxy is the tougher, more specialised option. It's used when chemical resistance, stain resistance, or heavy-duty wet-area performance is required, and it's less about convenience than resilience. Most homeowners won't need epoxy everywhere, but in demanding commercial zones or very exposed conditions, it earns its place.

Acrylic-modified adhesives

Acrylic-modified products are chosen for added flexibility and improved bond behaviour. They can help where the surface isn't perfectly forgiving, but they still need to match the tile and substrate properly. A flexible product doesn't excuse poor prep.

Ready-mix tub products

Ready-mix products are the ones many homeowners recognise first because they're easy to open and apply. They can suit small, dry-area wall tiles, but they're not interchangeable with powder products in wet zones, large-format installs, or floors that need stronger performance. That's where a lot of DIY confusion starts.

The simplest way to sort them is this, powder products cover most serious renovation work, epoxy handles demanding environments, acrylic-modified products add flexibility, and premixed tubs are limited in scope.

For larger projects, especially those involving wall-to-floor continuity, the adhesive type has to line up with the tile weight and the substrate. That's why many tilers look at large-format tiles and the adhesive together, not separately.

Understanding Performance Classifications and Technical Criteria

The codes on a technical sheet only look abstract until you map them to the job in front of you. On site, they tell you whether an adhesive can handle a waterproof bathroom, a balcony with movement, or a feature wall carrying heavier tiles. That is the actual value, because tile adhesive works as an engineered performance system, not generic glue.

What the codes mean in practice

A C1 adhesive meets the standard bond-strength baseline. A C2 adhesive is the improved class, and it gives more confidence on porcelain, large-format tiles, and moisture-exposed surfaces. Technical guidance also ties these classes to minimum tensile adhesion values, which is one reason installers usually move to C2 for tougher residential work, especially where the substrate has been waterproofed or the tile is carrying more weight (Wacker).

Classification Meaning Typical Use Case
C1 Standard bond strength General interior tiling where conditions are stable
C2 Improved bond strength Porcelain, large-format tiles, wet areas, moisture-exposed substrates
T Reduced slip Vertical wall work where sag control matters
E Extended open time Jobs that need a wider window for placement and adjustment

For homeowners planning a renovation, those letters matter because they tell you where a product is built to perform and where it is likely to struggle. If the tile is dense, the room is wet, or the installation includes a substrate that has already been waterproofed, the extra margin from a C2 adhesive is usually worth having.

Why S1 and S2 matter

The S1 and S2 classes describe deformability, which is the adhesive's ability to cope with small movement without losing the bond. S1 is the flexible class most DIYers hear about, and it sits in the moderate deformability range in the technical standard. That matters when a substrate moves slightly, because a rigid adhesive can crack or let the tile lose contact. The same technical guidance also frames S2 as highly deformable, which pushes it into more specialist territory for jobs where movement is more likely.

Practical rule: Flexibility helps with movement, but it does not fix a bad floor, bad screed, or poor waterproofing.

In Melbourne bathrooms, I treat deformability as insurance against minor movement, not a shortcut around preparation. If the substrate is unstable, the adhesive is only one part of the system, and it cannot carry the whole problem.

Open time and adjustment time

Workability matters just as much as strength. One AU-relevant technical sheet for large-format tile adhesive specifies more than 30 minutes open time, about 45 minutes adjustment time, and 24-hour foot-traffic readiness. Those figures matter because large tiles are unforgiving once they are bedded in, and installers need enough time to correct alignment without the adhesive skinning over too early (Mapei technical data sheet_10c709f9b9a64d3bb0605fbf4612ba43.pdf?sfvrsn=f8939151_0)).

That is especially relevant on bathroom floors, where you are juggling falls, drains, and waterproofing details at the same time. A product with the wrong working time can turn a careful layout into a rushed fix, and rushing is where tile lines start drifting.

Slip resistance on walls

The T classification is there for vertical work. It reduces the risk of tiles sliding before the adhesive grabs, which is especially useful with heavier wall tiles and larger formats. In practice, that is a quiet detail that keeps a bathroom wall line straight and saves a lot of re-setting later.

If you are comparing products across tile types, it helps to cross-check the adhesive class with the tile material itself. A good place to start is a practical overview of tile materials for bathroom and renovation work, then match the adhesive to the demands of the tile, the substrate, and the room.

Matching Adhesive to Tile Material and Installation Environment

Tile adhesive has to be matched to the tile, the substrate, and the room conditions. A product that behaves well on a small ceramic splashback can be the wrong call for porcelain, natural stone, or a balcony that moves with Melbourne's weather.

Tile material changes the adhesive choice

Ceramic tiles are usually more forgiving than dense porcelain, so many standard wall jobs feel straightforward. Porcelain is denser and often needs higher bond performance, which is why C2 products are usually the safer choice. Natural stone adds another layer of care because staining, colour bleed, and movement sensitivity can affect the result, so the adhesive and grout system both need to suit the stone.

Large-format tiles, including thinner slab-style products such as Kerlite, call for a different approach. The adhesive needs enough working time to stay open, enough body to resist slumping, and enough coverage under more of the tile back. If the bed is uneven, the result can be lipping, hollow sounds, or bond failure later.

Wet areas, balconies, and heated floors

Bathrooms and ensuites are wet areas first and decorative spaces second. Adhesive selection has to work with waterproofed substrates and handle the regular moisture load around showers, vanities, and floor waste transitions. The same applies to balconies, where external exposure and movement put more pressure on flexibility and bond strength.

Situation What to prioritise What usually fails
Shower or ensuite Moisture resistance, coverage, compatibility with waterproofing Cheap premix products in wet zones
Balcony Flexibility, external durability, movement tolerance Rigid adhesive on a moving substrate
Large-format floor tile Extended open time, high bond strength, good bed support Fast skinning and poor coverage
Stone feature wall Material compatibility and careful product selection Generic adhesive chosen only for price

For a practical overview of tile materials for bathroom and renovation work, the key point is simple, the tile, the substrate, and the room need to be matched before the adhesive is chosen.

That trade-off is clearer on the jobs that fail first. Exterior areas and heavier internal installs place more demand on the bond, which is why adhesive specification matters more as the installation gets more exposed or more demanding.

Your Tile Adhesive Selection Checklist

A good quote should tell you more than a price and a tile brand. It should show that the installer has matched the adhesive to the material, substrate, and room conditions.

A checklist infographic titled Tile Adhesive Selection Checklist, featuring six numbered steps for choosing the right adhesive.

What to ask before you sign off

  • What tile size and material are being used? Dense porcelain, ceramic, natural stone, and large-format panels don't behave the same way.
  • Where is the tile going? Wall, floor, shower, balcony, and exterior areas each put different demands on the adhesive.
  • What is the substrate? Concrete, fibre-cement board, waterproofed wall systems, and old tile overlays all need different preparation.
  • Does the project need flexibility? Movement joints, underfloor heating, and balcony conditions can change the adhesive class you need.
  • What open time does the job require? Large-format tiling often needs a more forgiving product so the bed doesn't skin over too fast.
  • Is colour important? White adhesive is often chosen where light stone or translucent finishes are involved.

Red flags in a quote

If a quote says “tile adhesive included” with no further detail, ask for the actual product class. If a premixed product is being used in a wet area, that's another question mark unless the installer can justify it for a very specific application. If waterproofing compatibility isn't mentioned at all, the system hasn't been thought through properly.

Ask for the adhesive class, not just the brand name. The class tells you more about suitability than the marketing label does.

A clear quote should also show whether the installer has allowed for substrate work before the tiles go down. In bathroom renovations, the adhesive is only as good as the surface underneath it.

When Professional Installation and Registered Builders Matter

A good adhesive can still fail in the hands of a rushed installer. Wet-area tiling is a system job, and the system includes waterproofing, screeding, service coordination, tile setting, and cure time.

Why the installer matters as much as the product

Professional tilers don't just spread adhesive and walk away. They check substrate flatness, set trowel size, manage coverage, and choose a product that suits the tile and room. In showers and balconies, that judgement matters because moisture, movement, and transitions are where defects show up first.

Bathroom renovations also bring multiple trades into the same space. Plumbers, electricians, carpenters, waterproofers, and tilers all affect the final result, so the schedule and sequence have to line up. If one trade cuts corners, the adhesive often gets blamed for a problem that started elsewhere.

Registered builders and coordination

In Victoria, registered unlimited builders play a useful role in that coordination because they can manage the whole renovation sequence rather than treating each trade as an isolated task. That matters in bathrooms where waterproofing must be completed before tiling, and where screeding or self-levelling can determine whether the adhesive bed performs the way it should.

The technical side also matters on specialist jobs. Large-format Kerlite and similar systems need careful handling, even bed coverage, and the right adhesive class for the substrate and tile weight. A builder or tiler who has seen enough failure points will ask different questions before the first bag is mixed.

For some homeowners, a full-service tiling and renovation outfit such as Melbourne Tiling Services P/L is one practical option because it coordinates tiling, waterproofing, screeding, and bathroom renovation work under one roof. That kind of setup can reduce handover errors when the job involves wet areas or complex floor preparation.

Melbourne Considerations for Tile Adhesive and Tiling Projects

Melbourne jobs tend to expose weak products and weak prep quickly. Temperature swings affect exterior work, older homes can hide uneven substrates, and apartment balconies add movement and waterproofing pressure that basic products don't always handle well.

Bathroom renovations in older Melbourne homes often need more surface correction than new builds. That's where screeding, levelling, and the right adhesive class come together, because a poor base will show through as soon as the tiles go down. For balcony remediation, the product choice also has to account for external exposure and structural movement, not just appearance.

The local market is also shifting toward premium formats, especially large-format porcelain and Kerlite-style panels. That pushes adhesive selection away from the “cheap bag of glue” mindset and toward a more technical approach, because the tile format can dictate the open time, slip resistance, and deformability required.

Melbourne homeowners planning a renovation should expect a tiler to ask practical questions before quoting. What's the substrate, what's the waterproofing state, what tile size is being installed, and is the area wet or exposed? Those answers drive the adhesive choice, and the adhesive choice drives the durability of the result.


If you're planning bathroom renovations in Melbourne and want the adhesive, waterproofing, screeding, and tile selection handled as one system, visit Melbourne Tiling Services P/L to request a quote and discuss the right setup for your bathroom, balcony, or large-format tiling project.

How to Clean Marble Bathroom Tiles: A 2026 Guide

You've got a marble bathroom that looks great in daylight, then turns a bit cloudy around the shower, the vanity splashback, or the base of the screen no matter how often you wipe it down. The usual mistake is reaching for whatever bathroom spray is closest, then wondering why the shine fades and the stone starts looking tired. Marble needs a different routine, and once you treat it like the calcium-carbonate stone it is, the clean becomes easier and the finish lasts longer.

Table of Contents

Why Marble Bathroom Tiles Need a Different Approach

A polished marble bathroom in Melbourne can look flawless one month and dull the next if the wrong cleaner keeps touching it. The problem isn't usually neglect, it's chemistry. Marble is a calcium-carbonate stone, so acids and alkalis can mark it on contact, and guidance for marble tiles warns that vinegar, lemon juice, bleach, and many generic bathroom sprays can etch the stone rather than clean it. The safe baseline is simple, pH-neutral products, a soft cloth or mop, warm water, and a stone-safe cleaner, not a “stronger” spray.

A very common job I see is a shower sill or vanity ledge where glass cleaner has dripped week after week. In a Melbourne ensuite, that can leave cloudy rings that homeowners think are soap residue, but the stone has been dulled by repeated contact. Once marble loses its polish, the surface starts looking patchy even when it's technically clean.

Practical rule: if a product is built to strip grime fast, it's usually the wrong fit for marble.

The cleaning method matters as much as the cleaner because marble doesn't forgive rough treatment. Aggressive scrubbing, abrasive pads, and the habit of leaving moisture to air-dry all increase the chance of visible marking. The change in modern marble care is pretty clear, too, it's moved away from old “all-purpose cleaner” habits and toward daily wipe-downs, spill removal, and moisture control. That shift is especially relevant in marble tile bathroom work in Melbourne, where bathrooms often get a lot of shower runoff and repeated contact with wet surfaces.

The rule that governs the rest is straightforward. Use neutral cleaner, keep tools soft, and dry after use. Once that becomes the default, most damage you see on marble stops getting worse.

The Weekly Cleaning Method That Protects the Polish

The safest weekly routine starts dry, not wet. A soft microfiber dust mop lifts grit before it can turn into fine scratches under a damp mop, and that's the part homeowners usually skip. After that, use warm water with a pH-neutral soap or stone cleaner, applied with a well-wrung microfiber mop or sponge. Marble doesn't need soaking, it needs controlled contact.

A step-by-step infographic illustrating a six-step weekly cleaning method to safely maintain polished car paint surfaces.

Work in sections, not floods

If you flood a bathroom floor, especially a shower recess, the water sits in grout lines and around cuts in the stone. That's where residue builds up, and where etching risk rises if someone has used the wrong product earlier. Clean a small section at a time, then rinse with clean water and dry immediately with a separate microfiber cloth or towel.

Don't let marble air-dry if you can avoid it. Water spots and soap residue show up fastest on polished stone that's left wet.

The biggest mistake I see is an over-wet mop. People treat marble the way they'd treat ceramic, then wonder why the floor looks streaky. A damp, not dripping, mop keeps the cleaner on the surface instead of pushing it deep into joints and edges. If the rinse bucket starts looking cloudy, change the water right away. Dirty rinse water just redeposits film.

For benchtops and vanity ledges, a soft towel works better than a squeegee in most homes. Squeegees can drag grit or leave marks on softer marbles if someone presses too hard. A towel gives you more control around taps, splashbacks, and the little curved edges where water tends to sit.

Used properly, this routine doesn't take long, and it doesn't need special equipment. It just needs consistency and a light hand. That's what keeps the polish intact.

Cleaners and Tools Worth Using and What to Keep Out of the Bathroom

The safest cleaners are boring in the best possible way. Look for pH-neutral stone soaps or cleaners labelled for marble and natural stone, ideally the sort sold through tile suppliers or hardware stores rather than generic “bathroom heavy duty” shelves. On Melbourne jobs, that usually means a neutral spray-and-wipe or a diluted stone wash that's designed to clean without cutting into the finish. Melbourne Tiling Services P/L also offers marble tile cleaning services and marble tile sealing services as part of broader marble care, which suits jobs where the surface needs more than a quick wipe.

What belongs under the sink

  • pH-neutral stone cleaner: Safe for regular wipe-downs and weekly washing when used correctly.
  • Microfiber mop and cloths: Soft enough for polished marble, as long as they're clean and free of trapped grit.
  • Soft sponge: Useful around tap bases and shower edges where residue collects.
  • Stone-safe spray bottle: Best for controlled application on splashback areas and vanity tops.

What stays out

  • Vinegar and lemon juice: Both are acidic and can etch marble.
  • Bleach and ammonia-based glass cleaners: Too harsh for calcium-carbonate stone.
  • Citrus sprays and acid bathroom cleaners: These are made for ceramic and metal, not marble.
  • Scouring powders and melamine sponges: They can dull a polished face.
  • Abrasive nylon pads and worn toothbrushes: They seem gentle, but they scratch more than you might expect.

A cleaner that says “bathroom heavy duty” should make you pause. If the label lists acid or bleach, leave it on the shelf. The same goes for reused microfiber that has already picked up grit from another job. Once grit is trapped in the cloth, it turns a soft wipe into a scratch risk.

The best habit is simple. Read the label, choose neutral, and avoid anything that promises a hard reset. Marble rewards restraint, not force.

Dealing With Soap Scum and Hard-Water Spots Without Etching the Stone

Soap scum, hard-water spotting, and etching all look pale and hazy at a glance, but they need different responses. Soap scum is usually a film from body wash and shampoo residue. Hard-water spots are the chalky rings and crust that show up around taps, shower roses, and the base of a screen. Etching is different again, it's a dull patch caused by chemical contact, and no amount of scrubbing will bring the original polish back.

Read the surface before you clean harder

If the tile darkens when it gets wet, then dries back normally, the stone is still acting like sealed marble. If it darkens and stays absorbed, the sealer is probably failing and the issue is no longer just surface cleaning. That's the point where the job shifts from maintenance into a sealer problem.

Soap scum usually responds to a stone-safe cleaner left to dwell for a short period, then worked with a soft brush along grout lines and rinsed clean. Don't rush straight to abrasive pads. Hard-water deposits are more stubborn. If you catch them early, a dry microfiber buff can remove the light residue before it sets. If you need a mineral remover, it must explicitly state that it's safe for marble. A standard bathroom descaler is the wrong product because it relies on acid.

Good marble habit: remove the deposit, rinse, then dry straight away. Repeating the same wet cycle only feeds the spotting.

The difficult part for homeowners is that the problem usually isn't dirt alone. In Australian bathrooms, mineral-rich water and shower runoff can leave a persistent haze even when the tile has been cleaned properly. The answer is controlled cleaning, not stronger chemistry. If the spots return quickly after neutral cleaning and drying, the surface may need resealing rather than another round of scrubbing.

If you're unsure whether you're dealing with residue or etching, look at the sheen. Soap scum and mineral spotting sit on top of the stone. Etching sits in it. That difference changes everything.

Targeted Stain Removal and Simple Grout Care

Some marks on marble are manageable at home, but only if you treat them like stains, not grime. Oil-based marks from cosmetics or hair products often need an oil poultice, which draws the contamination out of the stone instead of pushing it deeper. Organic stains, such as tea or makeup, can often be handled with a hydrogen-peroxide-based poultice. These are slow methods, not quick fixes, but that's the point.

Know when to stop

Rust is different. A rust stain from a shaving tin base or a metal container usually means the metal has reacted with the stone. That's not a surface wipe, and it often needs a professional poultice or honing to correct properly. Scrubbing harder just roughs up the surrounding marble and makes the patch stand out more.

Grout and silicone are often the primary reason a bathroom looks dirty. A pale marble floor can look tired if the grout lines are dark, mouldy, or breaking down at the edges. Use a soft-bristle brush with a stone-safe cleaner on the grout itself, keeping the cleaner off the marble face as much as possible. For mould on grout, a dilute hydrogen-peroxide mist can help if it stays on the grout line and doesn't sit on the marble surface.

There's a point where regrouting is the honest answer. If the joints are cracked, powdery, or repeatedly stained, no cleaner will make them look new for long. That's when a tiler should assess whether the grout needs replacement rather than another round of spot treatment.

If the stain doesn't move with the right method, don't escalate to a harsher one. Change the approach or call a tiler.

A lot of homeowners are really cleaning around a failed joint or a stubborn stain source, not the stain itself. Once that's identified, the fix gets a lot more sensible.

Sealing, Resealing and a Simple Maintenance Schedule

A penetrating sealer helps marble resist absorption, but it doesn't make the tile waterproof. That distinction matters in a bathroom, where constant moisture and soap residue keep testing the surface. The easiest way to check a shower floor is the water test. Put a small amount of clean water on the stone, watch how it behaves, and read the result.

What the water test tells you

If the water beads and stays near the surface, the sealer is still doing useful work. If the stone darkens quickly and absorbs the water within about a minute, the sealer is overdue for attention. That doesn't always mean the stone is damaged, it usually means protection has worn thin and the tile is taking on moisture too readily.

For a Melbourne bathroom, a workable schedule is simple. Wipe down wet areas after each shower. Do the weekly routine already outlined. Give the room a deeper clean monthly. In heavy-use wet areas such as a main bathroom or ensuite, reseal roughly every 6 to 12 months, which matches common stone-care guidance for showers and other wet zones. That interval is especially relevant in Melbourne and coastal Victoria, where bathrooms often cop repeated moisture exposure.

The sealer choice matters too. A standard penetrating sealer suits most marble floors and walls because it protects without changing the look much. A colour-enhancing sealer can suit honed marble when a richer finish is wanted. Film-forming top-coat sealers are usually a poor match for bathroom floors because they can trap moisture and go cloudy.

For homeowners who want help beyond routine care, Melbourne Tiling Services P/L sealing stone tiles is the kind of service you look at when the surface needs restoration support, not just cleaning.

A simple maintenance rhythm

  • After every shower: Dry the splash zones and floor edges.
  • Weekly: Dust mop, wash with neutral cleaner, rinse, dry.
  • Monthly: Check for spotting, residue, and grout breakdown.
  • When the water test fails: Reseal before the surface starts absorbing more moisture.

That schedule keeps the stone in maintenance mode instead of repair mode. Once marble starts darkening too quickly, it's already telling you it needs attention.

When Cleaning Crosses Into Renovation Work in Victoria

There's a clear line between cleaning marble and doing bathroom renovation work. Routine washing, sealing, and even regrouting an existing shower are usually maintenance tasks. The moment the work touches the waterproofing membrane, alters plumbing, changes drainage, or replaces the substrate, the job moves into regulated building and plumbing territory in Victoria.

That matters because bathroom renovation work in Victoria must comply with the Victorian Plumbing Regulations and the National Construction Code, and plumbing work is generally required to be done by a licensed or registered plumber. For domestic building work above the legal threshold, builders must be registered with the Victorian Building Authority, and the state uses categories including unlimited registration for builders who can contract and manage a broad range of domestic building work. The legal side also matters under the Domestic Building Contracts Act 1995, which requires a written contract when the value is over $10,000 and involves insurance requirements for work over specified thresholds through domestic building insurance.

If you're already at the point where a shower keeps leaking, grout keeps cracking after replacement, or the marble loses polish because moisture is coming from below, cleaning isn't the answer anymore. That's renovation work, and it should be handled by the right people.

A registered builder becomes the sensible call when:

  • Cracked grout returns quickly: The movement or waterproofing problem hasn't been solved.
  • The shower base stays damp: The drainage or membrane may need investigation.
  • Tiles keep losing polish despite proper cleaning: The issue may be underlying moisture or chemical damage that needs restoration.
  • Waterproofing or plumbing is being altered: That's regulated work, not simple maintenance.

For Victorian homeowners, waterproofing compliance in Victoria is the sort of topic that belongs in the same conversation as tile care once the bathroom starts failing at the edges. Cleaning can preserve good marble, but it can't fix a bad membrane or a tired shower system.


If your marble bathroom tiles are already showing dull patches, spotting, or grout breakdown, Melbourne Tiling Services P/L can help with marble cleaning, sealing, restoration, and full bathroom renovation work when the problem has gone beyond maintenance. Visit Melbourne Tiling Services P/L to book a quote and get the right fix before the damage spreads.

Toilet Installation Cost: A Practical 2026 Guide

For a standard like-for-like toilet replacement in Melbourne, expect roughly A$350 to A$800 installed, with A$1,500+ once the job involves relocating the pan, adding a concealed cistern, or tying into waterproofing work. That range is the one I'd use when a homeowner rings me about a tired, wobbling pan and wants a realistic number before the plumber turns up.

A lot of people are in that exact spot. The old toilet has already been removed, the bathroom is half finished, and the next quote feels like the moment the whole renovation either stays on budget or starts drifting.

Table of Contents

What Melbourne Homeowners Pay for a New Toilet

A Bayside homeowner standing in a half-tiled bathroom usually wants one thing, a number they can trust before the plumber arrives. If the job is a clean swap, the working range in Melbourne is usually A$350 to A$800 installed, based on current install-only benchmarks for a standard replacement in Victoria and wider Australian pricing guides that sit around A$250 to A$800 for a basic swap-out (Plumbing Tips Today, Homewyse). When the toilet moves, the cistern hides in the wall, or the bathroom needs compliance-related plumbing work, the job can push to A$1,500+ and beyond (Plumbing Tips Today).

A chart showing estimated toilet installation cost price ranges in Melbourne for 2026 across three service levels.

The spread exists because the toilet unit is often the smallest part of the invoice. In Victorian bathroom work, the price usually reflects labour, plumbing changes, disposal, fittings, and whatever the plumber finds once the old pan is lifted. A simple swap can sit near the low end, while concealed cisterns, wall-hung systems, and renovation-grade jobs climb much higher, especially when the toilet is only one line inside a broader project.

That matters in Melbourne because a toilet install is often tied to a larger bathroom scope, not a stand-alone call-out. Once the plumbing change, wall repair, tiling repair, or fixture coordination starts to stack up, the quote starts to look more like a trade package. That is where a renovation coordinator starts asking what is included, what is provisional, and whether the plumber is pricing the obvious job or the hidden repair work that appears after demolition. For a wider view of how a toilet line item sits inside bathroom renovations, the plumbing figure only makes sense once the full bathroom scope is on the table.

What bracket does your job fall into

If the toilet is staying in the same place, the rough-in matches, and the floor is sound, you are probably in the lower bracket. If you are changing the style, reworking the wall, or coordinating the toilet with the rest of the room, the invoice starts behaving like a trade package, not a single plumbing task.

Practical rule: if the quote feels too close to the price of the porcelain alone, something is probably missing.

A lot of homeowners miss that part. A retail toilet might be easy to compare online, but the installed price in Melbourne is shaped by labour, trade coordination, and the risk of repair work that only shows up once the old unit comes out. That is also where the Victorian $10,000 building contract threshold starts to matter, because once a bathroom job is bundled with other trades, the paperwork, scope control, and contract structure deserve the same attention as the fixture price.

Reading the Quote Line by Line

A decent Melbourne quote tells you what the plumber is taking responsibility for. The parts I'd expect to see are the toilet pan and cistern supply, isolation valve, connector kit, seal, silicone, labour, and disposal. If one of those items is missing, ask why before you approve anything.

Here's the way I read an invoice on site. First, check whether the toilet is being supplied by the plumber or by you, because that changes how the quote should be structured. Next, look for the valve and connector kit, because an old valve behind a toilet is one of the easiest ways to create a call-back after the job.

Typical Melbourne toilet installation invoice line items Indicative range Notes
Toilet pan and cistern supply Varies by model Standard suites cost less than concealed or smart systems
Isolation valve and connector kit Varies by job Often replaced during a proper swap
Wax or rubber seal Included or itemised Should be replaced during installation
Silicone and consumables Usually minor Finishes the base and contact points
Labour Fixed job or hourly Depends on access and complexity
Removal and disposal Sometimes included Confirm before signing
Call-out fee Sometimes included More common on smaller repair jobs

Labour in Victoria is often quoted as a fixed job for a basic replacement, or as a time-based charge when the plumber expects complications. The strongest pricing guides for installation-only work show labour sitting inside a broader job context, with the overall replacement price commonly landing around A$350 to A$800 and more complex jobs rising to A$1,500+ (Homewyse, Plumbing Tips Today). That's useful because it tells you the invoice isn't just a labour ticket, it's a risk assessment on access, fittings, and what might need replacing.

The same logic applies when the toilet is one part of a tiling scope, not a standalone fix. If the bathroom is being reworked, it helps to understand the surrounding finish work too, which is why many homeowners compare the plumbing quote against tile installation cost in Melbourne before they lock in the build sequence.

A quote that names the toilet but ignores the valve, seal, and disposal usually leaves room for an unpleasant “variation” later.

That's the part to press on. If a plumber can't tell you what's included, the cheapest number on paper can become the most expensive one on the day.

Standard, Wall-Hung, and Smart Toilets Compared

The toilet you choose changes the whole job. A standard close-coupled suite is the simplest option because the cistern and bowl sit together and the plumbing is straightforward. Wall-hung and concealed-cistern systems move the installation into structural and finishing territory, while smart toilets add an electrical layer as well as plumbing.

A comparison chart showing the installation costs, footprint, and features of standard, wall-hung, and smart toilets.

A standard two-piece toilet is the lowest-friction option in renovation work, with installation pricing commonly sitting around A$200 to A$950 (Fixr). A wall-hung or wall-mounted system usually climbs to about A$500 to A$2,000 installed, because the carrier frame, in-wall cistern, and finishing work add complexity (Fixr). Smart toilets can reach A$4,000+ installed, which reflects both the fixture and the extra coordination around power and advanced features (Fixr, HomeServe).

What actually drives the upgrade cost

The bowl isn't the hard part. The hard part is the wall behind it. A concealed system needs the carrier set correctly, the waste aligned, the cavity framed, and the surface finished cleanly. A smart toilet can also require an electrical outlet, which means another trade has to be part of the plan (Checkatrade, HomeServe).

For homeowners, that means the decision is partly about design, but it's also about wall structure and access. If you want a sleek finish and hidden plumbing, the toilet stops being a simple replacement and becomes part of a built assembly. That's why the price curve rises so sharply once the cistern disappears into the wall.

If you're choosing between styles, choose the one your wall can honestly support, not the one that looks cheapest on a showroom tag.

That advice saves grief. The wrong toilet choice often creates the most expensive plumbing quote in the room.

The Hidden Costs Most Quotes Forget

The nastiest surprises usually sit behind the old pan. I've seen quotes look tidy until the plumber lifts the toilet and finds a corroded shut-off valve, a leaking seal, or floor damage that had been hidden by the old fixture. Those are not optional extras, they're the difference between a proper install and a leak waiting to happen.

A concealed-cistern job is where hidden scope becomes obvious. The carrier frame needs to be built, the waste position checked, and the tiled face restored around the access point. If waterproofing tie-ins are needed, the toilet is no longer just a plumbing swap, it's part of the bathroom envelope, which is why homeowners should treat it as renovation work and not only as a fixture replacement. The issue is especially relevant in Victorian bathroom projects where the toilet is being replaced alongside other wet-area work, and waterproofing compliance often sits inside the broader bathroom build process (Melbourne Tiling Services waterproofing compliance information).

The extras that change the invoice

The hidden work most often includes waste relocation, concealed cistern framing, waterproofing tie-ins, and tile reinstatement. Each one adds labour days because the plumber may need to return after carpentry or tiling, or coordinate with another trade before the toilet can be fixed off properly.

Don't ask only “what does the toilet cost”, ask “what happens if you find damage under the old pan?”

That single question changes the quote conversation. It forces the plumber to spell out whether the job includes disposal, whether the base will be resealed, and whether the existing floor or pipework could trigger extra labour.

The practical mistake is to compare only the fixture price and the visible labour. A more honest comparison is whether the job is a straight replacement or a mini-renovation. In older Melbourne homes, especially those with previous patchwork repairs, the second version is far more common than cost guides admit.

DIY vs Licensed Plumber in Victoria

A straight toilet swap sounds simple until the legal and practical limits show up. In Victoria, the work that really matters is the work that touches plumbing, and most Melbourne bathrooms are not set up for casual DIY beyond the narrowest replacement scenario. Once you're altering waste, moving the fixture, touching the wall-hung carrier, or dealing with an apartment stack, you're in licensed territory.

A comparison infographic between DIY plumbing and hiring a licensed plumber in Victoria regarding legalities and risks.

The clearest benchmark in Victoria is that a major domestic building contract applies once the work is over $10,000, and that category includes renovating, improving, or repairing a home, as well as alterations, additions, demolition, or re-erection work (Horow guide on Victorian installation and building context). That matters because a bathroom renovation can move quickly from a small plumbing task into regulated domestic building work once the toilet sits inside a wider project.

What a DIY swap can and can't cover

A very limited DIY scenario is a direct replacement with the rough-in intact, no plumbing alteration, and no wall or floor changes. Even then, the risk sits with leaks, failed seals, and the lack of warranty or compliance support if something goes wrong. In apartments and in most upgraded bathrooms, that narrow window closes fast.

A licensed plumber is the safer choice for anything involving the toilet waste line, carrier system, or compliance-sensitive work. The practical gain is not just legality, it's insurance cover, warranty confidence, and a paper trail if the bathroom is part of a registered renovation.

If you're also comparing finishes and layout changes, the toilet decision doesn't sit on its own. It has to fit the broader bathroom sequence, especially where a registered builder is coordinating trades and the toilet install has to line up with tiling, waterproofing, and final fit-off.

If the toilet sits inside a renovation, the plumber should be thinking about the bathroom, not just the bowl.

That mindset is what keeps the job clean. DIY can look cheaper on day one, but it's the weakest choice the moment the work crosses into structure, drainage, or compliance.

Three Realistic Melbourne Cost Scenarios

A Bayside unit swap is the simplest case, and it's the one homeowners usually hope for. The old toilet comes out, the new one goes in the same location, the floor is sound, and the installer only has to deal with normal replacement parts and labour. That kind of job is where the market still tends to sit near the lower end of the Melbourne range, around A$350 to A$800 installed (Plumbing Tips Today, Homewyse).

A concealed-cistern ensuite is a different animal. The toilet itself may not be the expensive part, but the frame, in-wall cistern, finish reinstatement, and any drainage adjustment push the labour up quickly. Once you're in that territory, the broader installed pricing can move into the A$1,500+ bracket because the job is no longer a simple replacement (Plumbing Tips Today, Fixr).

A full bathroom renovation coordinated by a registered builder sits in its own category. The toilet is only one line in a larger build sequence, and the final number depends on how the plumber, tiler, waterproofing crew, and builder sequence their work. That's where the cost conversation has to widen beyond the toilet and into the bathroom as a whole, which is why many renovation budgets are better planned as a package rather than as disconnected trade quotes.

A simple way to read the three stacks

  • Bayside unit swap: toilet supply, seal, labour, disposal.
  • Concealed cistern ensuite: fixture, framing, waste alignment, finishing, return visits.
  • Full renovation integration: plumbing plus tiling, waterproofing, builder coordination, final fit-off.

The point of these scenarios is not to chase the cheapest option. It's to know which job you're buying before the invoice arrives. A homeowner who understands the stack can spot when a quote is missing labour, finishing, or compliance-sensitive work.

Timeline, Permits, and How to Save Without Cutting Corners

A straight replacement is usually a short job, but a renovation-grade toilet install isn't measured by the screwdriver alone. A simple swap can be done in a few hours, while a full bathroom sequence involving framing, waterproofing, and tiling stretches over several days. Once the toilet is part of a bigger build, the schedule follows the trades, not the porcelain.

The Victorian $10,000 major domestic building contract threshold matters because it's the point where the job can move from a small plumbing task into a regulated renovation framework (Horow guide on Victorian installation and building context). That's the moment where a registered builder becomes useful, because someone has to coordinate the toilet around the rest of the bathroom scope, especially when other wet-area work is already underway.

Ways to keep the bill under control

  • Supply your own suite: buying the toilet yourself can help you control the model and style.
  • Prepare the access: clear the room and make sure the plumber can get straight to the work.
  • Bundle the visit: combining toilet fit-off with other bathroom work reduces wasted call-outs.
  • Document the existing plumbing: photos before demolition help the trades understand what they're dealing with.
  • Choose standard where you can: the more complex the toilet system, the more labour and coordination it usually needs.

The savings only work when compliance stays intact. Cutting corners on seals, valves, or waterproofing is false economy, because the repair bill is where the pain starts. For Melbourne homeowners planning bathroom renovations, the smartest move is to price the toilet as part of the room, not as a standalone purchase.


If you're planning a bathroom renovation or a toilet replacement in Melbourne, Melbourne Tiling Services P/L can help coordinate the plumbing, tiling, waterproofing, and builder side of the job so the quote reflects the full scope. Visit Melbourne Tiling Services P/L to discuss your renovation, compare options, and get a clearer plan before the work starts.