Best Commercial Tiler Melbourne: 2026 Guide

You're often not looking for “a tiler”. You're looking at a tenancy handover date, a leaking bathroom block, a retail floor that can't fail under foot traffic, or a café refit where the plumber, electrician, waterproofer and tiler all need to work in the right order. That's a different problem entirely.

In Melbourne, commercial tiling sits inside a large and crowded trade market. The Australian tiling and carpeting services industry is forecast to reach $8.0 billion in revenue in 2026, with 20,099 businesses operating in the sector, after annualised growth over the five years through 2025–26, according to IBISWorld's Australian tiling and carpeting services industry data. For clients, that doesn't make selection easier. It makes due diligence more important.

The finish people notice is the tile. The work that decides whether it lasts is underneath it.

Table of Contents

Why Your Melbourne Commercial Project Needs More Than a Tiler

A shopfront re-tile or office bathroom renovation looks simple on paper. Remove old finishes, prepare the area, waterproof if needed, lay tiles, grout, clean up. On site, it rarely runs that neatly.

Commercial work usually involves live services, access constraints, after-hours scheduling, compliance requirements, and surfaces that have already moved, cracked, settled, or been altered by other trades. If the floor falls are wrong, water sits. If the substrate is out, large-format tiles show every defect. If penetrations aren't planned early, you end up cutting around mistakes instead of building properly.

That's why a commercial tiler melbourne clients can rely on often needs to be more than a tile installer. The better fit for many projects is a contractor who understands the whole build sequence and can manage the work as a system.

The difference between a tiler and a registered builder

A tiler-only scope can work on straightforward jobs where the substrate is already right, waterproofing is complete, services are set, and the layout has been resolved. Commercial jobs often aren't in that condition when the tiling package begins.

A Registered Builder brings a different lens:

  • Trade coordination: plumbing rough-ins, electrical penetrations, carpentry framing, shower screen set-outs and tiling all need to align.
  • Structural judgement: not every cracked screed or loose sheet is a “tile problem”. Sometimes the base needs remediation before any adhesive is opened.
  • Risk control: defects in bathrooms, balconies and amenities blocks don't stay cosmetic for long.
  • Program management: sequencing matters when tenancies, staff access and inspections are in play.

Commercial tiling failures usually start before the first tile is laid.

Why this matters in bathroom renovations

Bathroom renovations are where weak project management gets exposed fast. Commercial bathrooms need more than neat joints and square cuts. They need consistent falls, reliable waterproofing interfaces, service penetrations that are planned instead of improvised, and fixtures that land where the tile set-out says they should.

For builders, facility managers and owners, that means the question isn't just “Who lays tiles well?” It's “Who can deliver the wet area properly, coordinate the trades, and leave a compliant, durable result?”

A good-looking finish can hide poor construction for a while. It can't protect you from a failed membrane, a hollow floor, or recurring movement.

Verifying Your Tiler's Credentials in Victoria

If someone is taking control of a commercial wet area, bathroom renovation, amenities upgrade or leak rectification job, credentials aren't paperwork for later. They're part of the selection process.

A professional man in a suit reviewing construction documents and a digital tablet in an office.

Why registration changes the job

The practical gap between an installer and a Registered Builder shows up when the site stops being straightforward. A builder is used to looking at substrate defects, framing tolerances, sequencing between trades, wet-area detailing and responsibility across the whole package, not just the tile face.

That matters on projects such as:

  • Office bathroom upgrades: where plumbing, waterproofing, partitions and tiling all intersect
  • Retail refits: where speed matters but rework costs more than a careful start
  • Hospitality wet areas: where drainage, hygiene and durability all have to work together
  • Commercial leak repairs: where a cosmetic re-tile won't solve a membrane or fall problem

If a contractor can only discuss tile selection and grout colour, you're probably talking to the wrong scope holder for a complex commercial job.

Practical rule: If the project involves waterproofing, rectification, bathroom renovations, structural preparation or multiple trades, treat registration and insurance as baseline requirements.

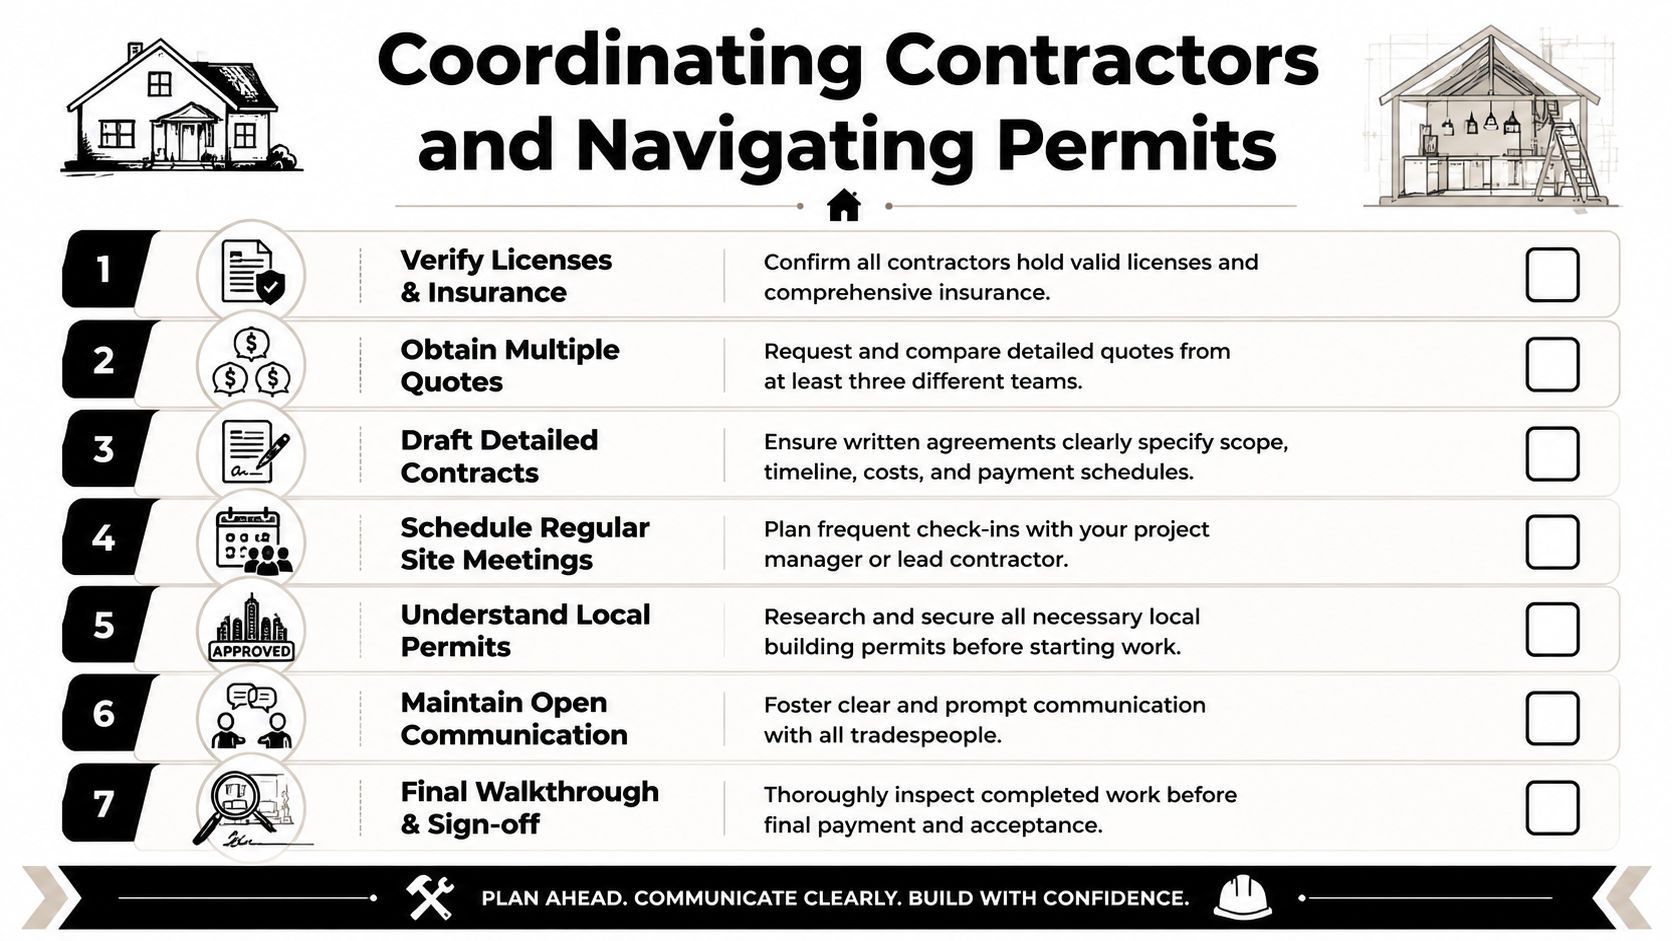
What to check before work starts

The right checks are simple, but they need to be done before deposits, demolition or material orders.

Item What you want to confirm Why it matters
Registration Current builder registration in Victoria Confirms the contractor is operating within the proper framework for broader building work
Insurance Public liability and any other project-relevant cover Protects the site, client and contractor if something goes wrong
Scope clarity Written inclusions, exclusions, sequencing and responsibility Stops disputes over who handles prep, waterproofing, trims, penetrations and defects
Wet-area documentation What will be provided for waterproofing and compliance Important for handover, records and future defect discussions
Trade coordination Who manages plumbers, electricians, carpenters and glazing Reduces delay and finger-pointing between trades

For wet-area work, it also helps to ask how documentation will be handled. If your project needs evidence of compliant waterproofing work in Victoria, ask early about records and certificates rather than trying to chase them after the tiles are on. This guide on a waterproofing compliance certificate in Victoria is a useful reference point for what clients should clarify before work proceeds.

A careful contractor won't resist these questions. They'll answer them clearly, in writing, and with defined responsibility.

A Guide to Specialised Commercial Tiling Services

Commercial tiling stops being basic the moment the project has performance requirements. That can mean chemical resistance, heavy cleaning cycles, large-format specification, disabled-access transitions, wet-area compliance, leak rectification, or a bathroom renovation where the finish has to look sharp and hold up under constant use.

The broad service list matters less than whether the contractor understands what each system is meant to solve.

An infographic titled Commercial Tiling Services highlighting industrial flooring, epoxy grouting, waterproofing, custom mosaic, and repair services.

Where specialised work matters most

Not every commercial surface should be built the same way.

Large-format tile installation needs tight substrate tolerances and disciplined layout control. On walls and open-plan floors, large tiles reduce visual breaks, but they also make lippage, bowing and poor set-out more obvious. Projects using slim or architectural large-format systems need installers who understand handling, cutting and bedding methods rather than treating them like standard ceramics. For clients considering oversized finishes, this overview of large-format tiles is a useful starting point.

Epoxy grouting suits environments where hygiene, chemical resistance or dense cleaning cycles matter more than ease of install. It's not a default choice for every site, but in commercial kitchens, service areas and some amenities spaces, the extra care at install can make sense.

Feature walls and custom mosaic work have branding value in hospitality, retail and reception spaces. They also need better planning than plain field tiling. Sheet alignment, lighting, reveals and edge treatment become part of the finish.

Bathroom renovations need integration, not patchwork

Commercial bathroom renovations fail when they're approached as disconnected tasks. Demolition happens first, then someone discovers framing movement, bad falls, damaged sheeting, poor service positions or a membrane that can't be trusted. At that point, the cheapest quote on tiling usually becomes the most expensive pathway.

Waterproofing deserves special attention. In Victoria, scrutiny over building waterproofing has tightened significantly, and defects in wet areas like bathrooms and balconies remain a major source of rectification work, as noted in this discussion of Melbourne tiling companies and waterproofing concerns. In practice, the key decisions are rarely cosmetic. They sit around membrane selection, correct falls to drainage, crack-isolation, self-levelling where needed, and whether the job is a true leak repair or just a re-finish.

A few practical distinctions matter:

  • A cosmetic re-tile replaces the visible finish.
  • Leak rectification starts by identifying where the system failed and rebuilding the assembly properly.
  • Balcony and exterior work needs movement planning and drainage attention, not just exterior-rated tiles.
  • Wet-area bathroom upgrades need service penetrations and waterproofing interfaces resolved before set-out is locked in.

If a contractor talks about waterproofing as an add-on instead of part of the system, that's a warning sign.

One provider in this space is Melbourne Tiling Services P/L, which states that it handles bathroom renovations, waterproofing, screeding, self-levelling, frameless shower screens, leak rectification, and large-format installations as part of a coordinated registered-builder service. That integrated model suits projects where tiling depends on broader building control rather than standalone install labour.

Your Commercial Tiling Project Stages and Timeline

Most commercial clients want the same thing at the start. They want to know what happens first, what can hold the job up, and who is responsible for each stage. That's reasonable. Tiling is one trade package, but on site it sits between demolition, framing, waterproofing, services, fit-off and handover.

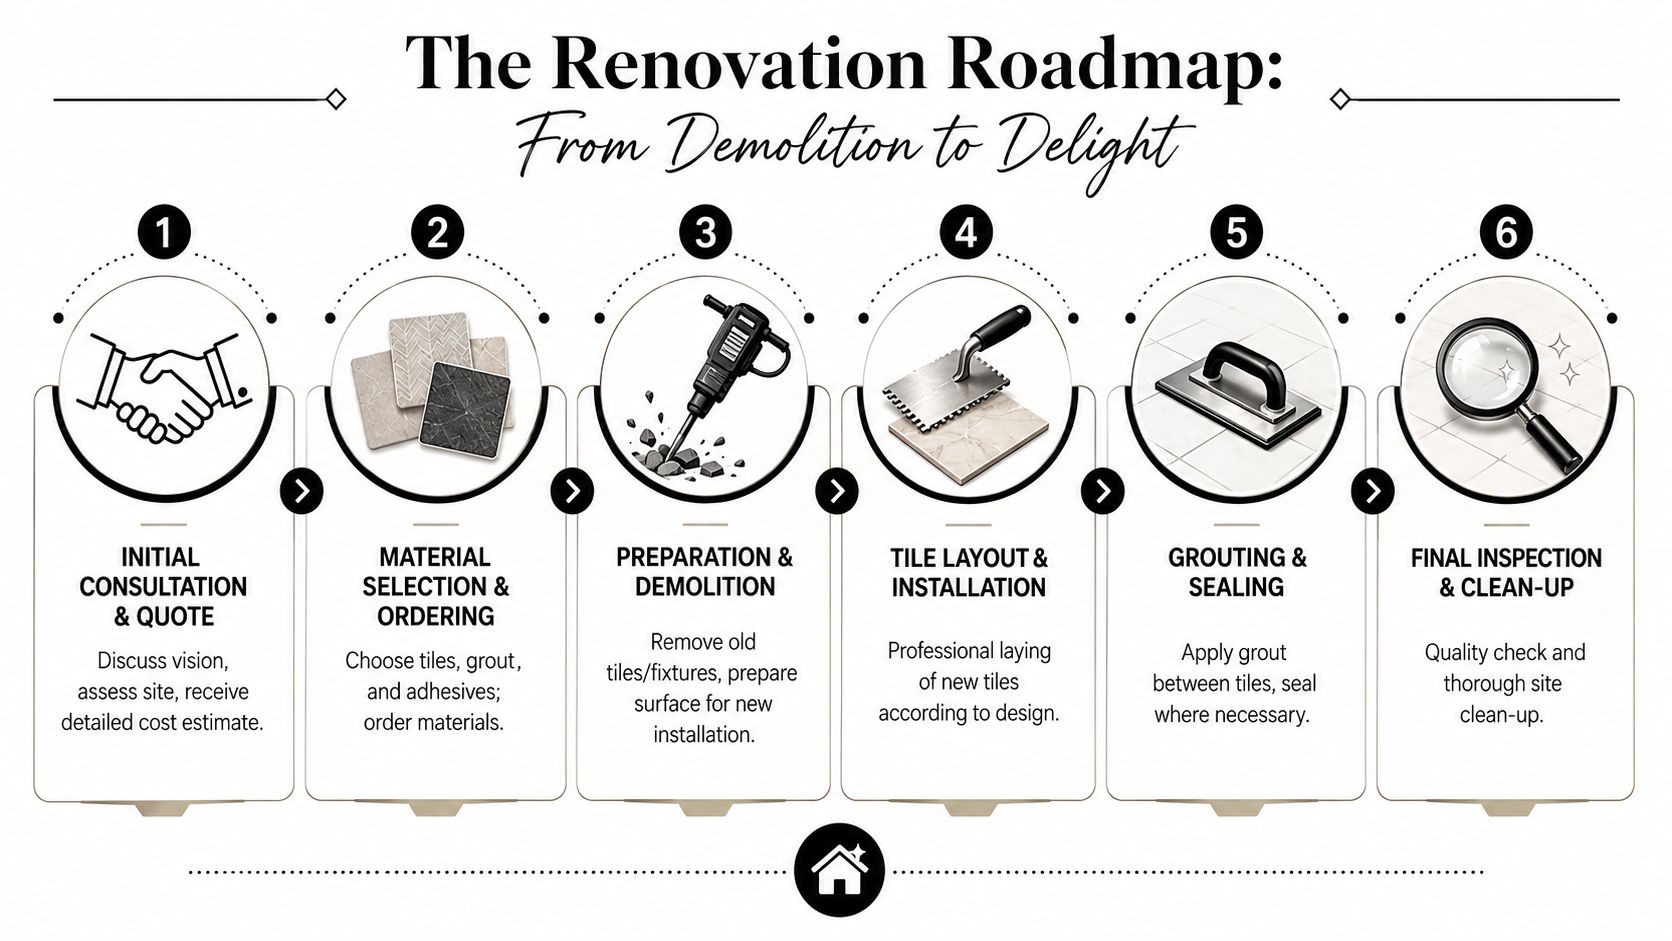
A clean project usually follows a disciplined sequence. Melbourne commercial tilers consistently work through site consultation and assessment, material selection, substrate preparation, installation, grouting and sealing, then final inspection and cleanup. Industry guidance also treats substrate preparation as the critical stage because a base that isn't flat, clean, dry and structurally sound is where debonding, cracking and movement issues begin, as outlined in this Melbourne guide to commercial tiling process and substrate preparation.

A six-stage infographic illustrating the commercial tiling project process from consultation to final handover.

How a commercial job actually unfolds

A typical job starts with the site visit. That's where the actual scope is checked against the assumed scope. Existing levels, drainage positions, substrate condition, access, tile format, edge details, penetrations and staging all need to be looked at on site. On bathroom renovations, this is also where fixture locations and service conflicts get picked up.

After that comes pricing and take-off. Good estimating is not guesswork. Quantities need to reflect layout, waste, format and the actual geometry of the site. On builder-focused take-off guidance, each wall elevation should be measured separately, small penetrations usually aren't deducted unless the scope calls for it, and adhesive coverage changes with tile format. For example, guidance cited for take-offs notes roughly 10 pods per m² for 300×300 mm tiles, 8 pods per m² for 300×600 mm, and 6 pods per m² for 600×600 mm tiles in the relevant application context, which is why poor ordering can stall labour and delay the program, according to this guide on professional tile take-offs for builders and tiling companies.

Here's a useful visual summary of the process:

Once the quote and scope are agreed, the schedule gets built around site readiness. On a builder-managed project, that includes plumbers, electricians, carpenters, waterproofers and glazing where needed. This stage decides whether the job runs once or gets revisited in pieces.

Where timelines usually slip

It's rarely the tile laying itself that causes the biggest problem. Delays usually come from conditions that weren't resolved early.

  1. Substrate defects discovered late
    Uneven slabs, damaged sheets, loose screeds and contaminated surfaces stop installation. If the base isn't right, the finish won't be right.

  2. Trade overlap
    Tilers can't work cleanly around unfinished rough-ins, changing plumbing points or late electrical penetrations.

  3. Material mismatch
    Large-format and premium tiles often require more careful handling, planning and edge detailing than standard stock lines.

  4. Unclear authority on site
    If no one is clearly managing the sequence, small issues become site-wide stoppages.

A realistic timeline is built from dependencies, not optimism.

The final stages should be predictable. Install, grout, seal where required, clean, inspect, defect-check, then hand over with any agreed documentation. Clients usually value this stage most when the earlier planning has been disciplined, because handover becomes confirmation rather than argument.

The Ultimate Site Preparation Checklist

A commercial tiling crew can only move as fast as the site allows. If access is blocked, rough-ins are incomplete, lighting is poor, or the substrate is still dirty from other trades, the program slows down and everyone starts paying for avoidable downtime.

This checklist is the practical version of “site ready”.

A six-step checklist for professional tile site preparation to ensure a high-quality installation process.

What the site manager should confirm

  • Clear access
    Confirm the crew can move tiles, cutters, adhesives and protection materials from unloading point to work zone without obstruction.

  • Other trades are completely finished
    Plumbing and electrical rough-ins should be complete, tested where relevant, and not likely to shift after set-out starts.

  • Substrate is ready for inspection
    The floor or wall base should be exposed, not partly covered by debris, packaging, temporary fixings or leftover demolition material.

  • Power and water are available
    Don't assume this. Confirm it. Cutting, mixing, cleaning and general site workflow depend on it.

  • Adjoining finishes are protected
    Commercial sites often have joinery, glazing, painted surfaces or live circulation paths close to the work area.

  • Access timing is agreed
    If the site is occupied, lock in when the crew can work, where materials can be stored, and what noise restrictions apply.

What shouldn't be left to guesswork

Some site conditions sound minor but create expensive friction.

Site item Why it matters
Lighting Set-out, lippage checks and finish inspection all suffer in poor light
Ventilation Important for curing conditions, worker safety and wet-area drying
Waste path Demolition and packaging need a clear removal route
Floor protection outside the work zone Stops damage claims from traffic, trolleys and tools
Wet-area shutdown planning Bathrooms and amenities need a clear temporary-use plan if the business is operating

For bathroom renovations and commercial amenities upgrades, one more point matters. Confirm who has authority to approve discoveries once demolition exposes the underlying condition of the base. If no one can approve remedial work quickly, the crew waits and the sequence breaks.

A prepared site doesn't guarantee a good outcome on its own. It does remove the avoidable problems that should never have reached the tiling stage.

Melbourne Commercial Tiling FAQs

Common questions from owners and project managers

How much does a commercial bathroom renovation in Melbourne cost?
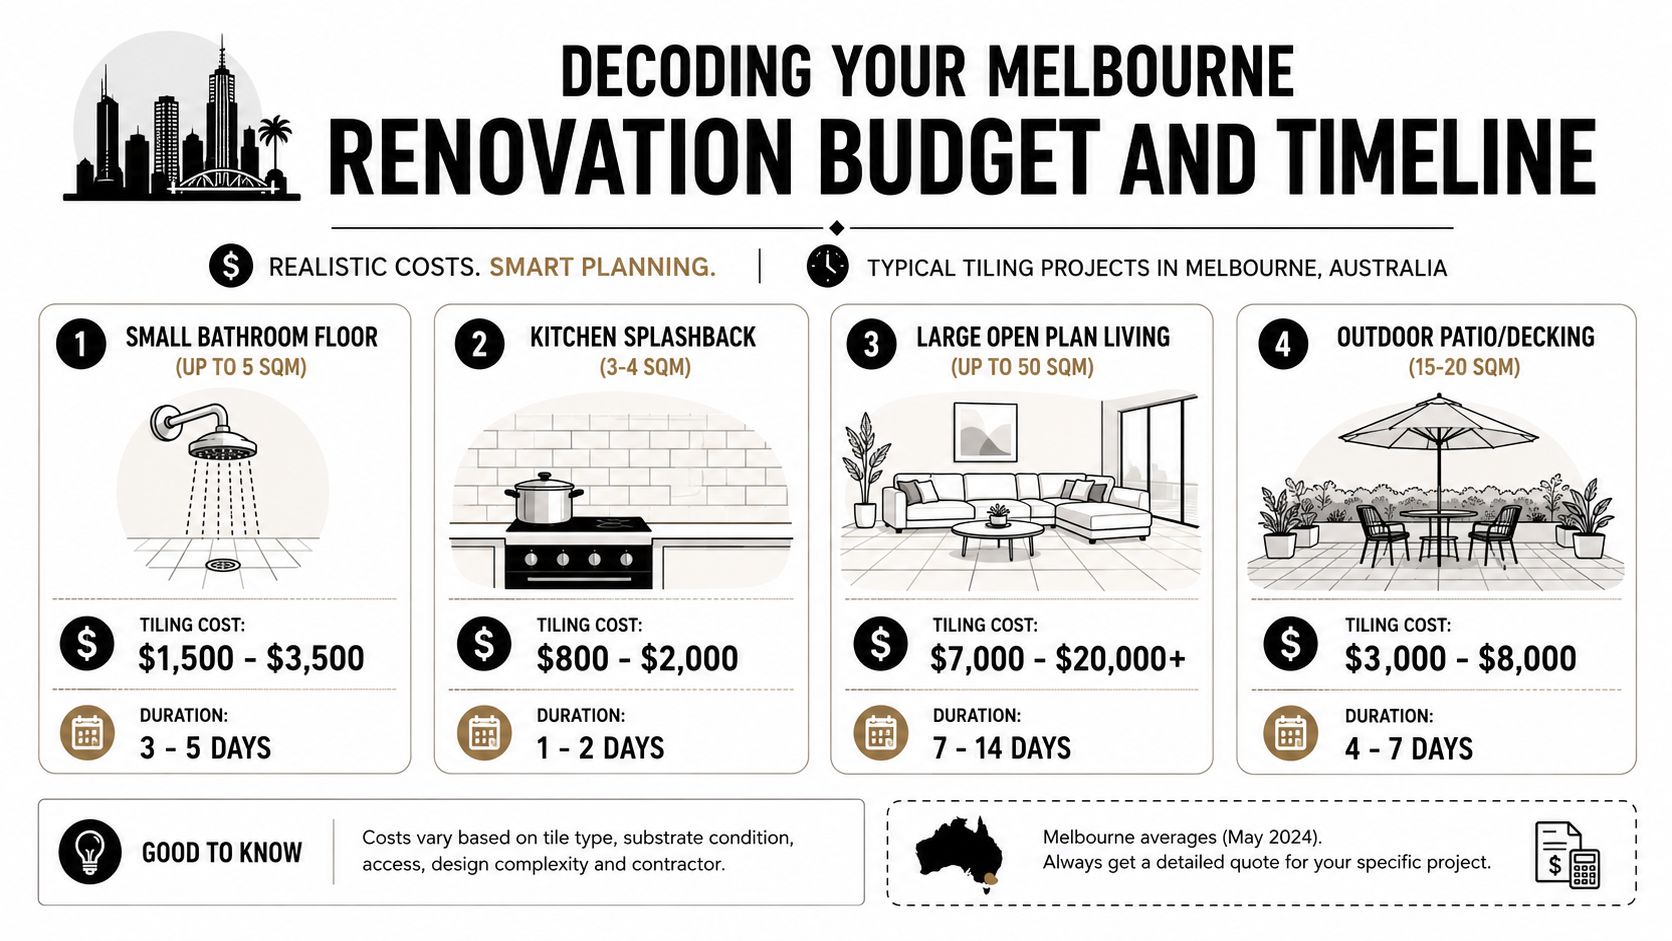
It depends on scope, access, demolition, fixture changes, waterproofing needs, tile selection, substrate condition and whether the business stays operational during works. A simple amenities refresh is a very different job from full wet-area rectification. The useful way to price it is by clarified scope, not by square metre alone.

How long does a commercial tiling project take?
That depends on demolition, drying times, site access, substrate remediation, waterproofing requirements, tile format and trade coordination. Small jobs can move quickly if the site is properly ready. Projects involving bathroom renovations, leak repairs or live business environments need more careful staging.

What's the main difference between commercial and residential tiling?
Commercial work is less forgiving. Foot traffic is higher, cleaning is harsher, downtime matters more, and failures affect staff, customers, tenants or compliance obligations. There's also more coordination with builders, facility managers and other trades.

Why do some commercial tiling quotes vary so much?
Because not every quote includes the same work. One may assume a perfect substrate and no remedial preparation. Another may include demolition, levelling, waterproofing, trims, sealants, protection and coordination. If the inclusions schedule is vague, the cheapest number usually isn't the cheapest finished job.

How important are material take-offs?
They're central to cost and program control. Builder-focused guidance notes that adhesive coverage changes with tile size, with approximately 6 pods per m² for 600×600 mm tiles and approximately 10 pods per m² for 300×300 mm tiles in the cited method, which is why poor calculations can stop a project and inflate labour costs. If you want a plain-English overview of the questions clients usually ask before booking work, this commercial tiling questions and answers page is a practical reference.

Can tiling be done while the business keeps operating?
Often yes, but only with staging. That usually means isolating work zones, controlling dust and waste routes, protecting adjacent finishes, and scheduling noisy or disruptive tasks carefully. It works best when one person has authority over sequencing.

Do I need a registered builder for a tiling project?
If the job is a straightforward tile replacement with no wider building implications, maybe not. If it includes bathroom renovations, wet-area rebuilding, structural preparation, waterproofing risk, or multiple trades, a registered builder is usually the safer choice because the job needs broader responsibility, not just installation labour.

What should I ask before accepting a quote?
Ask who is responsible for substrate preparation, waterproofing, material ordering, penetrations, trims, movement joints, sealing, cleanup, defect rectification and coordination with other trades. Also ask what isn't included. That answer is often more useful than the headline price.


If you're planning a commercial fit-out, bathroom renovation, leak rectification job or wet-area upgrade and need a contractor who can manage the build sequence as well as the finish, Melbourne Tiling Services P/L is one option to contact for a detailed site assessment and written quote.

Balcony Waterproofing Melbourne: A Builder’s Guide (2026)

A lot of Melbourne homeowners first notice a balcony problem from inside the house, not outside it. It's the water stain on the ceiling below, the bubbling paint near a door, the musty smell after a run of rain, or the grout line that never seems to dry out. By the time those signs appear, water has usually been getting in for a while.

That's why balcony waterproofing melbourne isn't a cosmetic job. It's a building-envelope job. If the cause is diagnosed properly and the system is rebuilt properly, the balcony stays dry and the rooms below stay protected. If the cause is guessed at, you end up paying twice.

Table of Contents

Your Guide to a Leak-Free Melbourne Balcony

If you're reading this because your balcony has started leaking, don't assume the fix is just “paint on a new membrane”. That's one of the most expensive mistakes owners make. A balcony is a full assembly made up of slab, falls, drainage, membrane, terminations, tile bed, tiles, grout, sealants and penetrations. If one part is wrong, the whole system is compromised.

This isn't a fringe problem either. A Victoria-focused balcony defects study found that 52% of assessed apartment buildings had defective balconies caused by water ingress, with a further 19% showing explicit waterproofing issues. For homeowners and apartment owners in Melbourne, that tells you two things. First, balcony leaks are common. Second, you need a methodical repair, not a rushed patch-up.

What a proper starting point looks like

A seasoned builder won't begin by talking about brands and colours. The first job is diagnosis.

A proper site inspection should look at:

  • Where the water shows up: Ceiling below, internal wall, door threshold, slab edge, balustrade fixing or tile joints.
  • How the balcony sheds water: Whether water runs to drains cleanly or ponds on the surface.
  • What's been done before: Regrouting, silicone touch-ups, patch membranes or retiling over an old problem.
  • Whether movement is involved: Cracks at corners, wall junctions and around posts usually point to stress points, not just surface wear.

Practical rule: If someone quotes to re-waterproof your balcony before checking falls, drainage and penetrations, they're pricing a symptom, not the cause.

What homeowners need to demand

You don't need to know every clause in a standard to make a good decision. You do need to insist on a contractor who can explain the failure path in plain English.

Ask them to identify:

  1. where water enters,
  2. how it travels,
  3. why the existing system failed,
  4. what has to be removed,
  5. how the repaired system will be verified before finishes go back on.

That's the difference between a temporary improvement and a durable repair.

Why Balconies Really Leak The Culprits Beyond the Membrane

The membrane gets blamed for almost every balcony leak in Melbourne. Sometimes that's fair. Often it isn't. In practice, balconies usually leak because several small failures combine. Water ponds where it shouldn't, a sealant line cracks, a threshold is poorly detailed, or a drain can't cope because the geometry was wrong from the start.

The Victorian Building Authority guidance on water ingress in balconies, decks and terraces says balcony water ingress is often caused by poor design, inadequate water diversion, blocked drains, failed sealants, inappropriate external materials and other drainage-related defects, not just membrane failure. That's the most important mindset shift for owners. Replacing the membrane without fixing the water path often means the leak comes back.

An infographic detailing five primary causes of balcony leaks including poor design, installation, materials, movement, and penetrations.

The failure points that show up most often

Some causes are obvious once you know where to look.

  • Poor falls: Water sits on the surface instead of moving to the outlet. Standing water always finds weakness.
  • Blocked or badly located drains: Even a sound membrane struggles if the outlet arrangement is poor.
  • Failed sealants: Door frames, balustrade bases and threshold joints are frequent entry points.
  • Penetrations: Every post, flange and pipe passing through the surface creates a risk point.
  • Surface cracking and movement: Buildings move. Rigid details fail first at corners and junctions.

Many owners focus on cracked grout because that's what they can see. Grout matters, but it's usually not the primary waterproof layer. If the balcony underneath has poor falls or bad detailing at a threshold, regrouting won't solve the leak.

Why patch jobs usually disappoint

Silicone over joints. A waterproof paint from the hardware store. Replacing a few cracked tiles. These fixes can reduce symptoms for a while, but they rarely address the assembly underneath.

A proper diagnosis usually includes checking the balcony in wet conditions if possible, reviewing the edge details, examining drain setup, and tracing whether the leak appears after heavy rain, routine washing, or only wind-driven weather. Those patterns help identify whether the issue is surface ponding, overflow, a threshold problem or a penetration failure.

The best repair isn't the one with the biggest product list. It's the one that removes the actual entry point and controls where water goes.

If you want balcony waterproofing melbourne done properly, start with water management. The membrane matters. The drainage path matters just as much.

Choosing Your Waterproofing System A Melbourne Perspective

A leaking balcony often gets sold a membrane before anyone has chosen the right system for the build. That is how owners pay twice. The product matters, but the better question is whether the system suits the substrate, the finish, the movement in the structure, and the way the balcony sheds water in Melbourne weather.

For many projects here, a liquid-applied membrane with reinforced corners and junctions, installed in at least two coats to achieve the required dry-film thickness, is a practical choice, as described in this Melbourne balcony waterproofing guide. It works well on balconies with awkward edges, multiple penetrations, and detailed junctions. It also leaves less room for sloppy application. If the installer guesses coverage rates or rushes recoat times, the membrane can fail even though the surface looks finished.

An infographic comparing different balcony waterproofing systems suitable for the variable climate in Melbourne, Australia.

What builders usually compare first

Balcony Waterproofing Systems Compared Best For Pros Cons
Liquid-applied membrane Concrete balconies, complex shapes, detailed junctions A continuous, joint-free surface, good around corners and penetrations, widely used in remediation Thickness must be controlled properly, cure times matter, poor application creates weak spots
Sheet membrane Larger open areas where consistent sheet installation is practical Factory-controlled thickness, durable when seams and terminations are done properly Seams are critical, detailing around penetrations can be more demanding
Tile-over remediation systems Existing tiled balconies where demolition may be avoidable in limited cases Can reduce disruption when the substrate and existing finish are genuinely suitable Only works if the underlying structure is stable and the existing problem is not trapped below

The trade-off is straightforward. Liquid systems are more forgiving of complex shapes. Sheet systems are more controlled across big open runs. Tile-over systems can save time on the right balcony, but they are often oversold to owners who should be opening the assembly up and fixing the causes underneath.

That last point matters in Melbourne strata buildings. If the leak involves a balcony over another lot, a threshold tied into the building envelope, or balustrade fixings connected to common property, system choice is not just a product decision. It affects scope, access, approvals, and who should be carrying out the repair.

Where each system works and where it doesn't

Liquid systems suit many Melbourne balconies because they can be worked into drain flanges, floor-to-wall junctions, door upstands, and irregular slab edges without forcing extra joins into risky spots. I use them often in remedial work for that reason. The catch is quality control on site. Wet film thickness, reinforcement at change-of-plane areas, and curing conditions all need to be checked, not assumed.

Sheet membranes can be excellent on a new build or a stripped-back balcony with clean geometry. The material gives consistent thickness straight off the roll. The risk sits at the laps, terminations, and penetrations. One poor seam or badly finished outlet detail can undo an otherwise sound installation.

Tile-over remediation systems need the hardest scrutiny. They only make sense where the existing substrate is stable, the adhesion is reliable, moisture is not trapped below, and the balcony geometry already works. If the falls are wrong, if the threshold height is marginal, or if movement has already broken the surface assembly, going over the top usually hides the defect rather than fixing it.

A proper scope usually includes more than selecting the membrane:

  • Substrate preparation: remove contaminants, weak material, and anything that will interfere with adhesion
  • Crack and joint treatment: detail movement areas before the field membrane goes down
  • Drain and edge integration: make sure outlets, drips, terminations, and threshold details work with the chosen system
  • Compatibility checks: confirm primers, adhesives, screeds, tiles, and sealants are approved to work together
  • Verification: check dry-film thickness, inspect the finished work, and use flood testing where the detail allows it

Melbourne Tiling Services P/L handles balcony waterproofing together with tiling, screeding, and renovation work. That broader scope matters because balcony failures are often shared between trades. The membrane installer, tiler, screeder, and builder all affect whether the finished balcony stays dry.

The Rules of the Game Australian Standards and VBA Compliance

Balcony waterproofing isn't just a trade preference. It sits inside a compliance framework. If the work is external above-ground waterproofing, the technical benchmark in Melbourne is AS 4654.2, and the Victorian Building Authority notes that NCC compliance for balconies requires membranes to comply with AS 4654.1 and AS 4654.2 in a complete system, not just as a coating product. The VBA fact sheet on water ingress research insights also points directly to AS 4654.2 for the minimum details needed to comply.

That matters because many failed balconies weren't undone by the middle of the membrane field. They were undone at a transition, an edge, a drain, a post or a door.

What compliance means on site

Compliance in practical terms means the builder has to think in assemblies.

That includes checking:

  • Substrate suitability: The base must be sound and appropriate for the selected system.
  • Termination heights: Membrane returns and upturns have to be detailed so water can't overrun them.
  • Penetration detailing: Balustrade fixings, pipes and outlets need proper sealing and integration into the waterproofing system.
  • Evidence of installation quality: Inspection, thickness confirmation and testing matter more than a glossy finished look.

On-site reality: A balcony can look perfectly tiled and still be non-compliant underneath.

Many cheap quotes often fall apart. They price demolition, membrane, tile and grout as if the job is linear. Real waterproofing work isn't linear. It's detail-heavy. The slow parts are usually the parts that prevent leaks later.

Why registered builders matter

For homeowners, engaging registered builders matters because balcony leak repairs often touch more than one trade. You may need demolition, carpentry repairs, screeding, waterproofing, tiling, plumbing around drains, and joinery or threshold adjustments at door openings.

That's also why the overlap with bathroom renovations is so strong. The same discipline applies. Membranes have to suit the substrate. Falls have to be formed correctly. Penetrations have to be planned before finishes lock everything in. A contractor who understands only one layer of that process often misses the defect that sits in the next layer down.

More Than a Balcony Why Your Waterproofing Expert Should Be a Renovation Pro

A leaking balcony and a failed shower recess usually come from the same kind of mistake. Somebody treated waterproofing as a product instead of a system. In both settings, water is controlled by falls, junctions, penetrations, drainage, movement detailing and finish sequencing. That's why the best balcony repairers are often the same people who understand bathroom renovations at a high level.

A professional tiler carefully installing a large dark ceramic floor tile onto adhesive in a bathroom.

Balconies and bathrooms fail in similar ways

The principle is identical. Water sits on or behind a finished surface, then moves through the weakest detail.

Common crossover issues include:

  • Bad falls: Water doesn't move to the waste or outlet.
  • Weak corners: Floor-to-wall junctions crack first if they aren't reinforced and detailed properly.
  • Poor penetration sealing: Shower fittings and balcony posts create similar risk points.
  • Finish-first thinking: People focus on the tile they can see, not the waterproofing they can't.

That's why a contractor who also handles bathroom renovations often has a stronger grip on sequencing. They know the screed can't be an afterthought. They know the drain detail can't be improvised once tiling starts. They know movement joints aren't optional just because the tile layout looks cleaner without them.

One trade alone usually isn't enough

Owners sometimes hire a tiler because tiles are cracking, or a waterproofer because there's a leak, or a handyman because the job “looks minor”. That can work for small surface maintenance. It usually doesn't work for recurring failures.

A durable balcony repair often needs coordinated work across:

  1. Assessment and strip-out
  2. Substrate repair and fall correction
  3. Drainage and threshold detailing
  4. Waterproofing installation
  5. Tiling, sealing and final verification

If the person quoting can only talk about membrane brand but not screed, drainage, door heights or tile build-up, they probably don't control the whole risk.

That's why homeowners are usually better served by a renovation-minded contractor who understands wet-area systems from slab to finish.

Hiring Your Contractor Questions to Ask and Red Flags to Avoid

Choosing the contractor is where most owners either protect themselves or create a bigger problem. Balcony waterproofing melbourne attracts everyone from capable registered builders to people who mainly sell “quick reseals”. The difference isn't always obvious from a photo gallery.

Use the checklist below before you accept a quote.

An infographic titled Hiring Your Contractor listing five essential questions and five red flags for waterproofing.

Questions that reveal real competence

  • Registration and insurance: Ask for the builder registration details and proof of current insurance. A professional won't hesitate.
  • Failure diagnosis: Ask what they believe is causing the leak. If they can't explain the likely path of water entry, keep looking.
  • System build-up: Ask exactly what layers are included. Demolition, substrate prep, screed correction, membrane, flood or water testing, tiling, sealant and finishes should be clear.
  • Compliance evidence: Ask how they verify membrane thickness, terminations and penetrations before tiling over.
  • Occupied-apartment experience: If you're in strata, ask how they deal with access, approvals, neighbours below and Owners Corporation communication.

For apartment owners, responsibility is a major part of the conversation. The Melbourne balcony repair FAQ notes that the waterproofing membrane is often the lot owner's responsibility, while the structural slab underneath may be common property, depending on the title, plan and source of the defect. A competent contractor should be able to explain where their scope starts and where Owners Corporation involvement may be needed.

A short explainer can help if you're comparing quotes:

Red flags that usually lead to trouble

Some warning signs are consistent across bad waterproofing jobs.

Red flag Why it matters
Verbal quote only If the scope isn't written down, exclusions and shortcuts appear later
Focus on regrouting alone Regrouting may improve appearance, but it rarely solves a system failure by itself
No discussion of falls or drainage That usually means the contractor is treating the symptom
No mention of testing or inspection Good work is verified, not assumed
Pressure to choose the cheapest option Cheap waterproofing often becomes expensive rectification

Ask one simple question: “What are you doing to stop water getting in at the threshold, corners and penetrations?” The answer tells you a lot.

In strata buildings, also ask who they want copied into communication. Good contractors are usually comfortable dealing with owners, building managers, and Owners Corporations because responsibility can be split across finishes, membrane and structure.

Your Next Steps to a Dry and Durable Balcony

You usually find out a balcony has been leaking after the water has already travelled. A stained ceiling below, swollen skirting near the adjoining room, loose tiles at the doorway, rust marks on the slab edge. By then, the membrane may be only part of the problem.

The next step is to get the cause identified properly. On Melbourne balconies, leaks often start with poor drainage, blocked outlets, failed junctions at thresholds and balustrade penetrations, or movement that has opened up the system over time. If the balcony sits in a strata building, confirm who is responsible before work starts. The surface finishes may sit with the lot owner, while the slab, structure, or parts of the defect may involve the Owners Corporation.

Good repair work starts with a written scope. It should set out what will be removed, whether falls need correcting, how drainage will be dealt with, what waterproofing system will be installed, and how the work will be checked before tiles or finishes go back on.

Do not approve a patch job unless the contractor can show why it will work.

I tell owners the same thing on site. If the quote jumps straight to resealing grout lines or adding more silicone, the leak path probably has not been traced. Water rarely respects the visible crack. It follows the easiest route, then shows up somewhere else.

For homeowners, landlords, and apartment owners, the safest option is to use registered builders who understand waterproofing, screeding, tiling, and renovation sequencing together. Balcony failures are often assembly failures, not just membrane failures, so the repair needs to be coordinated that way.

If you need a practical assessment of a leaking balcony, Melbourne Tiling Services P/L can inspect the issue, identify the likely cause, and provide a written scope for compliant repair work, including related tiling, screeding, waterproofing, and renovation requirements.

Shower Screen Installation Cost: 2026 Melbourne Guide

In Melbourne, a standard frameless shower screen installation usually sits between AUD 1,200 and AUD 3,500, and the final figure changes with glass thickness, hardware, labour, waterproofing, and how complex the bathroom is. If you're planning a renovation, that shower screen price only makes sense when you look at it as part of the full bathroom build, not as a stand-alone product.

That's where many homeowners get caught. They start by pricing a nice piece of glass, then later discover the real job includes site measure, tile tolerances, waterproofing interfaces, hardware choice, compliance, and the sequencing of trades. By the time the screen goes in, the room should already be built correctly for it.

A shower screen is one of the last visible items in a bathroom renovation, but it depends on almost everything that came before it. If the walls are out, the tiles aren't plumb, or the waterproofing hasn't been handled properly, the glazier inherits a problem and you inherit a bigger invoice.

Table of Contents

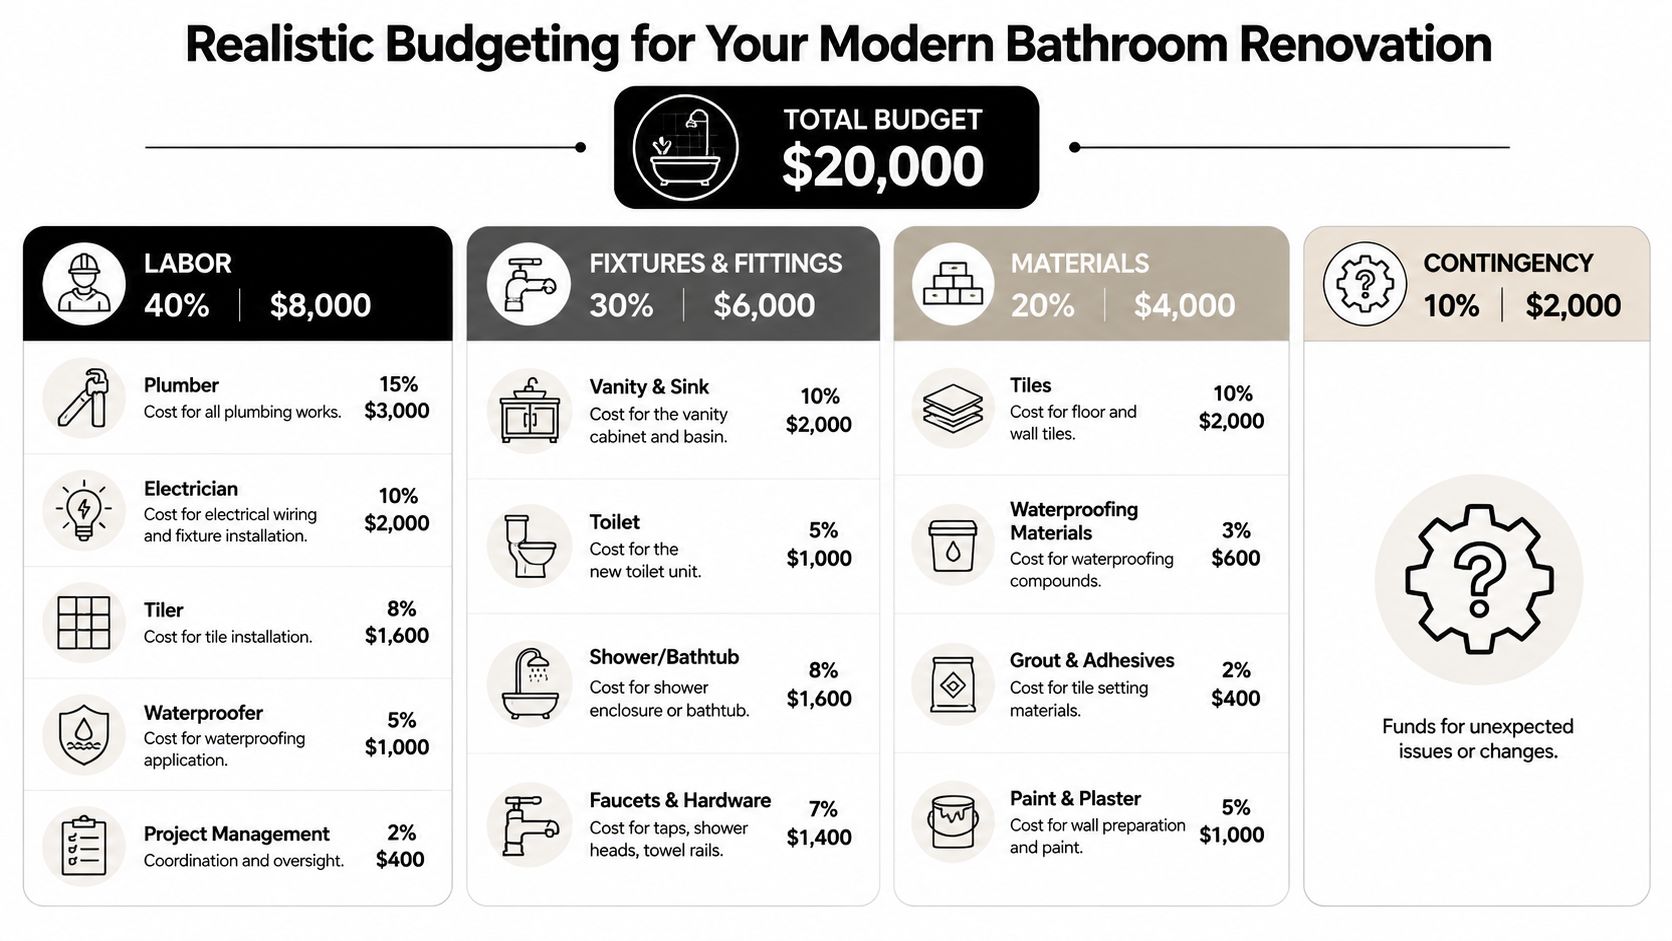
Planning Your Bathroom Renovation Budget

Homeowners typically begin in the same place. They're standing in an older bathroom, looking at dated aluminium frames, tired silicone, and tiles that have seen better years. They search for shower screen installation cost and get pages of pricing that don't match what local trades are quoting.

That confusion isn't your fault. A lot of online content still leans on US pricing, and that's a poor guide for a Melbourne renovation. As noted by This Old House's shower glass door cost guide, much of the content in circulation cites US averages of $530 to $1,390, while Victorian homeowners face different labour rates, Australian standards, and the added cost of bundling shower screens with tiling and waterproofing. The same source notes that homeowners here can underestimate total costs by 50%+ when they treat the screen as an isolated purchase.

A person in a green hoodie stands in a modern bathroom looking at a glass shower enclosure.

The practical way to budget is to start with the whole bathroom, then place the shower screen inside that scope. If you're comparing options early, a bathroom renovation calculator for Melbourne projects is a better starting point than a generic product page because it forces you to consider waterproofing, tiling, labour coordination, and finish level together.

Why isolated pricing causes trouble

A shower screen doesn't sit on its own. It touches wall straightness, floor level, tile layout, hob detail, drainage, and the condition of the substrate behind the tiles.

If one of those elements is off, the screen may still be installable, but the job becomes slower and more delicate. That extra labour often surprises owners who thought they were just buying glass and hinges.

Practical rule: Budget for the screen after you've decided the renovation scope, not before. In bathrooms, sequence drives cost.

What a realistic budget mindset looks like

A homeowner planning a basic refresh may still choose a simpler screen to control cost. A homeowner doing a full ensuite renovation usually gets better value by coordinating the screen with the tiling and waterproofing package from the start.

That's the key trade-off. The cheaper decision at the product stage can become the expensive decision once rework, delays, and compliance are added to the project.

Typical Shower Screen Installation Costs in Melbourne

If you want a clean starting point, use local ranges rather than overseas examples. In Melbourne, a premium frameless shower screen installation typically ranges from AUD 1,200 to AUD 3,500, with cost influenced by 10 to 12 mm tempered safety glass required by AS/NZS 1288 and certified glazier labour at AUD 80 to 120 per hour, according to HomeAdvisor's shower door installation cost reference.

What most homeowners actually pay for

There isn't one universal number because “shower screen” covers very different products. A compact replacement with standard hardware is a different job from a custom frameless panel with premium fittings and exact tile alignment.

The table below is the most practical way to compare options.

Screen Type Typical Cost Range (AUD) Pros Cons
Framed 800 to 1,500 Lowest upfront cost, more forgiving on uneven walls, easier to source Bulkier look, more frame lines to clean, less suited to high-end bathroom renovations
Semi-frameless Around 2,100 median for common installs Good balance of cost and appearance, lighter visual feel, suits many standard bathrooms Still has visible framing, less seamless than full frameless
Frameless 1,200 to 3,500 Premium finish, open look, strong resale appeal, works well in modern bathrooms Highest cost, relies on accurate walls and tiles, hardware quality matters more

Choosing between framed, semi-frameless, and frameless

A lot of homeowners start out wanting frameless, then pull back when they see the top end of the range. That's reasonable. Frameless looks excellent, but it only performs properly when the bathroom has been prepared to suit it.

Semi-frameless is often the middle ground that makes sense. It gives a cleaner result than framed, but it usually places less pressure on the room being perfectly true.

You can also compare local style and product options through Melbourne shower screen installation services, especially if you're still deciding which format suits your renovation scope.

Frameless is usually the right choice when the rest of the bathroom is being rebuilt properly. It's often the wrong place to spend if the room around it is still compromised.

For budget-focused projects, framed screens still have a place. They can be practical in rental properties, basic updates, or where the goal is to replace a failing enclosure without rebuilding the room.

For a full bathroom renovation, though, most owners want the cleaner line and lighter feel of semi-frameless or frameless. The screen becomes part of the design, not just a barrier to keep water in.

Deconstructing Your Quote Materials vs Labour

A proper quote should tell you more than the total. It should show where the money is going and why. That's how you compare one proposal against another without getting fooled by a low headline number.

A refreshing green drink with ice cubes and lemon slices beside a technical drawing diagram.

In Melbourne, frameless shower screen labour can range from $100 to $276 per task, and bundling installation with waterproofing membranes and self-levelling screeds through a registered builder can reduce total outlay by 10 to 15% by coordinating trades and avoiding rework, according to Airtasker's shower screen installation cost guide.

What you are paying for in materials

The glass itself is only the starting point. In a frameless setup, thicker toughened safety glass, cut-outs, polished edges, and exact sizing all push the materials cost upward.

Then there's hardware. Hinges, brackets, channels, handles, and finish colour all matter. Cheaper hardware can look fine on day one and start showing play, corrosion, or poor door movement later.

A better quote usually spells out items such as:

  • Glass specification. Thickness, safety compliance, edge finish, and whether the panels are standard or custom.
  • Hardware finish. Chrome, matte black, or another finish that matches tapware and bathroom fittings.
  • Sealing components. Channels, silicone, and any junction detail needed where the screen meets tile, hob, or wall.

What labour should include

Labour is where experience shows. Good installers don't just arrive and mount the panel. They check dimensions, wall condition, tile plumb, fixing points, and clearances before they start drilling.

For integrated bathroom renovations, labour may also include site protection, coordination with the tiler or waterproofer, and making sure the screen sits correctly against finished surfaces. That's why bundled jobs often cost less overall than separately managed trades.

Cheap labour usually means one of two things. The scope is missing important steps, or someone else will be asked to fix the result later.

A decent quote should account for measuring, handling heavy glass, installation, sealant work, and cleanup. If those items are vague, ask for them in writing.

Later in the process, homeowners often find it useful to watch a clear installation overview before signing off on the scope:

Key Factors That Influence Your Final Cost

Two shower screens can look similar in photos and land at very different prices on a quote. The difference usually comes down to hidden complexity, not sales padding.

A flowchart infographic titled Factors Affecting Shower Cost, listing glass type, hardware quality, and layout complexity.

The biggest cost drivers

The first driver is glass specification. Frameless designs rely on thicker glass and tighter tolerances. If the opening is non-standard, the panel often needs custom fabrication rather than a stock size.

The second driver is hardware quality. Better hinges and brackets cost more, but they also handle heavy glass better and hold alignment longer. In a bathroom, that matters.

The third is layout complexity. A straight screen on square walls is one thing. A screen that has to work around an awkward nib wall, a sloping ceiling, a recessed channel, or a tight door swing becomes a more exact installation.

Here's the hierarchy most homeowners should keep in mind:

  1. Custom sizing and shape
    Custom panels, unusual returns, and non-standard openings generally move the quote faster than any cosmetic choice.

  2. Bathroom condition before the screen arrives
    Out-of-plumb walls, bowed substrates, poor tile cuts, and inconsistent floor level all make the glazier's work harder.

  3. Finish selections
    Premium hardware finishes and higher-spec components lift cost, but they're often easier to justify in a quality renovation because they stay visible every day.

What works and what usually doesn't

What works is designing the shower screen with the bathroom, not after it. If the tiler knows the screen detail in advance, grout lines, falls, hob size, and wall build-up can all support a clean fit.

What usually doesn't work is trying to “make frameless fit” into a room that wasn't set up for frameless. That's when installers start compensating for poor surfaces, and the final result can still look compromised.

A shower screen exposes errors. Frames can hide some of them. Frameless rarely does.

Another practical point is restraint. Not every bathroom needs multiple panels, expensive coatings, or boutique fittings. In many homes, a standard layout with solid hardware gives the best result for the money.

Sample Quote Scenarios for Melbourne Homes

The easiest way to understand shower screen installation cost is to look at real-world renovation patterns. Not exact invoices. The shape of the job.

Scenario one simple replacement

A small apartment bathroom in Kew has an old framed screen that's leaking at the corners and looks tired. The owner isn't rebuilding the whole room. They want a neat replacement that improves appearance without opening up the walls.

A framed or semi-frameless option usually makes sense in this context. The lower-cost path is framed, commonly sitting around AUD 800 to AUD 1,500 based on the verified Melbourne and Victorian ranges already noted earlier in this article. It suits a like-for-like replacement because it's more forgiving if the bathroom isn't perfectly square.

Typical quote shape:

  • Supply of standard screen with basic hardware
  • Removal of old enclosure
  • Installation and resealing
  • Minor making-good where practical

The mistake here is forcing a premium frameless screen into an older bathroom with existing tiles and limited rectification scope. The product can be good and still be the wrong fit for the room.

Scenario two full ensuite renovation

A family home in Highett is doing a complete ensuite renovation. The walls are being rebuilt, waterproofing is redone, large-format porcelain is going in, and the owners want a custom frameless screen in a dark hardware finish.

This is exactly the type of project where a frameless screen earns its keep. The room is being prepared correctly, so the screen isn't trying to solve existing defects. Because the bathroom renovation is integrated, the builder can coordinate the waterproofing, screeding, tiling, and final glass measure in the right order.

The total bathroom spend matters more than the isolated screen number here. Homeowners who focus only on the cost of glass usually miss the value in sequencing and avoiding rework.

Scenario three architectural feature

A Brighton new build has a larger shower zone, more open space, and a strong design brief. The screen is no longer just a practical divider. It's a visible architectural element in the bathroom.

This kind of job often pushes toward the upper end of the local frameless range because the design asks more of the materials and the installation. The panel spans are larger, the visual lines matter more, and the tolerance for imperfect alignment is lower.

A premium result here usually depends on three things:

  • Early detailing with the bathroom design
  • High-grade hardware that suits heavier glass
  • An installer working from true surfaces, not patched ones

The common thread across all three scenarios is simple. The right screen is the one that matches the condition of the bathroom and the scope of the renovation, not the one with the best showroom photo.

Compliance Timelines and The Role of a Registered Builder

A shower screen is fitted late in the job, but compliance starts much earlier. If the waterproofing, substrate prep, plumbing positions, and tiling sequence aren't managed properly, the shower screen stage becomes slower, riskier, and more expensive.

In Victoria, shower screen installation costs rose 18% annually from 2022 to 2025, driven by standards including AS 3740 for waterproofing, and those compliance requirements add 10 to 15% to labour fees because certified installers are needed, according to Wellfor's 2025 shower door installation cost breakdown.

A construction worker uses a green level to ensure a glass shower screen is perfectly vertical.

Why timing matters

The screen installer should be arriving to a bathroom that is ready, dry, tiled, and dimensionally reliable. If waterproofing certificates are unclear, tile set-out hasn't considered fixing points, or wall lines are inconsistent, everyone starts improvising.

That's when jobs drift. The glazier delays. The owner waits. Another trade gets called back. Small sequencing mistakes create expensive friction.

For homeowners dealing with renovation paperwork, waterproofing records and certification matter as much as the visible finish. If you're unsure what should be documented in Victoria, it helps to review a waterproofing compliance certificate guide for Victorian bathroom works.

Why registered builder coordination saves money

A registered builder brings order to the sequence. The builder doesn't just appoint trades. They manage handover points between waterproofing, screeding, tiling, plumbing, and final screen installation.

That matters because shower screens rely on all of those earlier stages. A registered builder can catch issues before the glass is measured, not after.

Good bathroom renovations are coordinated backwards from the finish. If the final screen needs straight lines and clean fixing points, the builder has to protect that outcome from day one.

Trying to run separate trades yourself can work on a very simple job. On anything more substantial, it often creates overlap, uncertainty, and avoidable cost.

How to Hire the Right Installer and Save Money

The cheapest quote isn't always the cheapest job. If the installer doesn't understand how the screen interacts with waterproofing, tile tolerances, and compliance, you can save at the front and pay later.

Australia's BCA and NCC-related waterproofing obligations are often missed in basic online pricing. As noted in Horow's 2025 installation cost guide, compliance items tied to strict mandates can add 20 to 35% or $400 to $1,200 to base costs for certificates and leak-testing. That's why cutting corners on who manages the work can be expensive.

A shortlist that protects your budget

When you speak to installers or builders, ask for the basics in writing:

  • Registration and insurance. If bathroom renovations are involved, confirm they're appropriately registered and insured for the scope.
  • A detailed written quote. You want materials, labour, inclusions, and exclusions clearly listed.
  • Recent Melbourne bathroom work. Not generic gallery photos. Recent work in homes similar to yours.
  • Trade coordination plan. Ask who handles waterproofing, tiling, measurements, and final installation timing.

Where to save and where not to

There are sensible ways to reduce shower screen installation cost without lowering the standard of the bathroom.

  • Keep the layout standard if you can. Straight runs and standard panel sizes are usually easier to price and install.
  • Spend on preparation. Plumb walls and good tile work make every later trade more efficient.
  • Avoid bargain hardware in wet areas. It's touched daily and carries the stress of heavy glass.
  • Bundle works under one manager when the bathroom is being fully renovated. That usually prevents call-backs and mismatch between trades.

A good installer protects the bathroom. A good registered builder protects the whole sequence.


If you're planning a bathroom renovation and want a realistic view of shower screen installation cost in Melbourne, Melbourne Tiling Services P/L can help you price the full project properly. Their team handles bathroom renovations, waterproofing, tiling, screeding, and frameless shower screens as an integrated build, which is the safest way to avoid leaks, delays, and expensive rework.

Terrazzo Bathroom Tiles: 2026 Melbourne Design Guide

You're probably in the same spot as a lot of Melbourne homeowners. You want a bathroom that feels sharper than the standard white box, but you don't want to spend good money on something that dates quickly, stains easily, or starts showing movement cracks after a couple of winters and a few hot showers.

That's where terrazzo bathroom tiles come into the conversation. They've got character, they work in both older Victorian homes and newer apartments, and they can look either quiet and refined or bold enough to carry the whole room. But terrazzo only performs well when the renovation is handled properly from the framing and substrate through to waterproofing, slip resistance, tile selection, and final finishing.

In Melbourne, that matters more than most style-led blogs admit. Bathroom renovations here often involve uneven floors, old timber structures, moisture issues, and compliance requirements that can't be left to guesswork. A registered builder who understands the whole assembly, not just the tile face, is what separates a polished result from an expensive rectification job.

Table of Contents

Why Terrazzo Is the Timeless Choice for Melbourne Bathrooms

You see it most clearly five or ten years after the renovation. The bathroom still looks current, the floor still feels solid underfoot, and the tile choice has not dated the room.

That long life is why terrazzo keeps turning up in well-planned Melbourne bathroom renovations. It has visual movement, so it does not read flat or cheap, but it also avoids the short shelf life that comes with many highly patterned trends. A good terrazzo selection can blend into the background or carry the whole design, depending on the chip size, base colour, and finish.

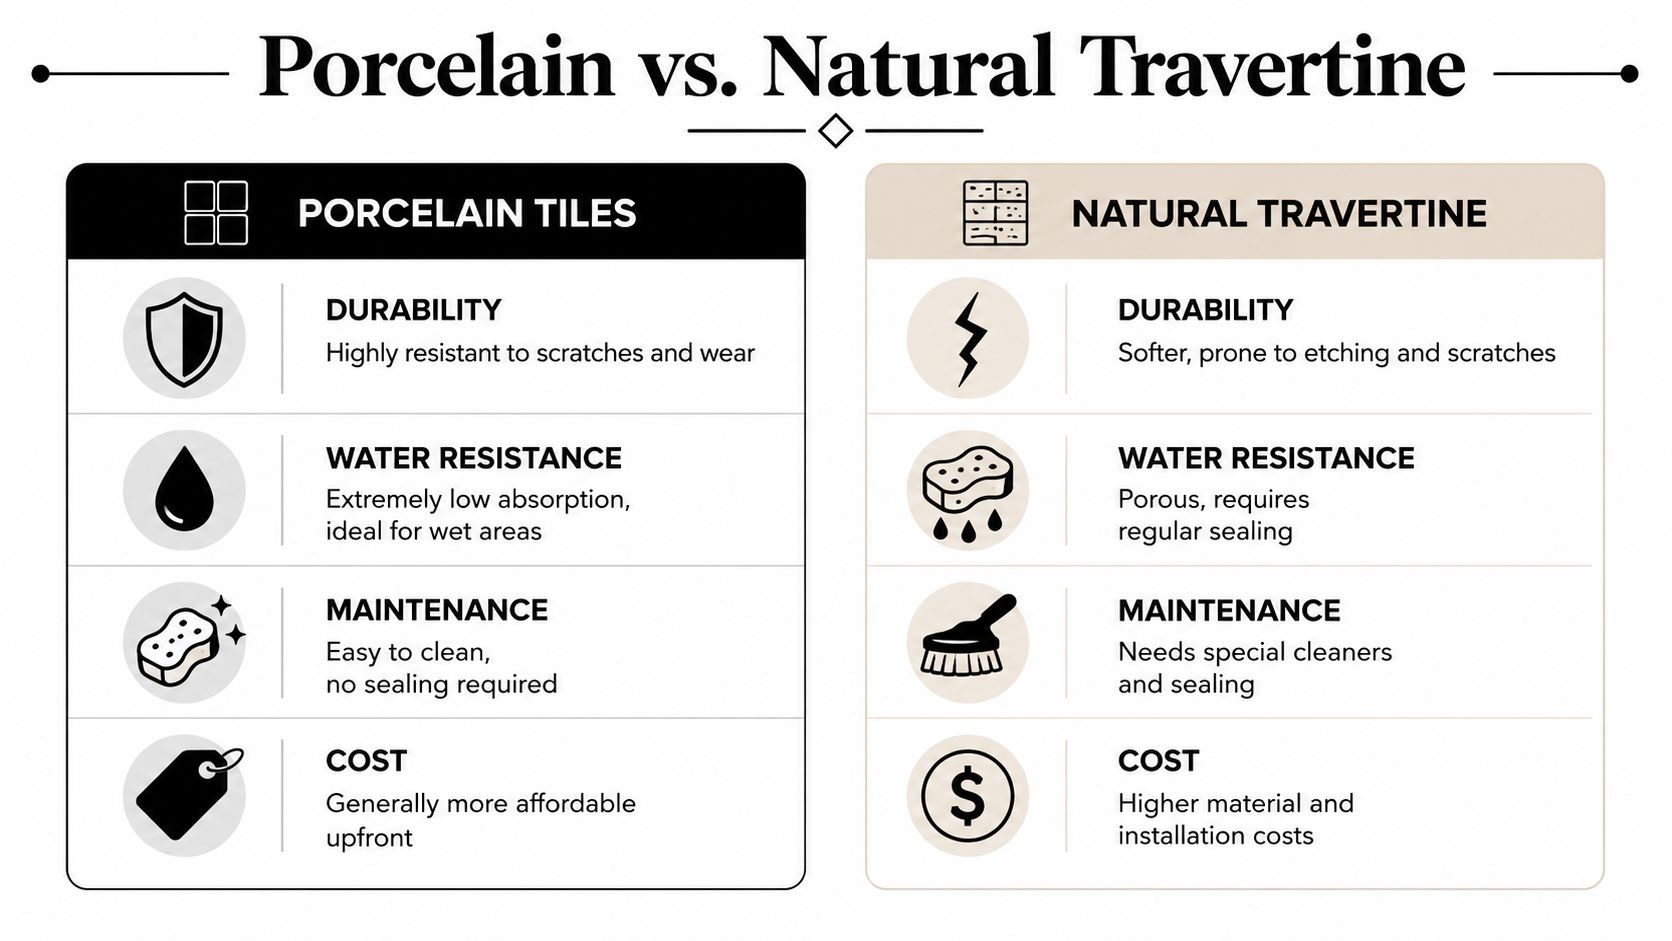
Melbourne homes benefit from that flexibility. In an Edwardian or Californian bungalow, terrazzo can pick up the softer, heavier character of the house without feeling faux-heritage. In a new apartment or townhouse, the same material can look sharp and restrained. If you are still comparing options, it helps to understand how terrazzo sits alongside stone, porcelain, and ceramic in a bathroom renovation. This guide to bathroom tiling materials and finishes is a useful starting point.

It suits both period homes and modern apartments

The material gives you range without losing durability. Fine-chip terrazzo in warm white, pale grey, or muted beige works well in bathrooms where the joinery, tapware, or lighting is doing the heavy lifting. Larger aggregate, stronger contrast, or coloured chips bring more energy and suit powder rooms, feature walls, and bolder schemes.

That matters in Melbourne, where many renovations are trying to balance resale, daily use, and the character of the existing home.

Practical rule: If you want a bathroom to hold up visually, choose a finish that gives you design flexibility without creating maintenance headaches. Terrazzo usually does that better than trend-driven decorative tiles.

It rewards a full renovation approach

Terrazzo performs best in bathrooms that are rebuilt properly, not patched around old problems. In Melbourne, that often means dealing with uneven subfloors, tired wall linings, out-of-level framing, and wet area details that no longer meet current expectations.

As a registered builder and tiler, I look at terrazzo as part of the whole bathroom build. Floor waste position, falls, sheet set-out, waterproofing build-up, movement joints, and transition heights all affect whether the finished room looks premium or disappointing. The tile may be the feature people notice first, but the result depends on the structure and preparation underneath it.

That is one reason terrazzo has stayed relevant. It rewards good design, but it also rewards proper construction, which is exactly what a full bathroom renovation should deliver.

What Exactly Are Terrazzo Tiles?

Terrazzo is easiest to understand as a recipe. You've got decorative chips, called aggregate, and you've got a binder that holds those chips together. Once the mix cures, the surface is ground and polished or honed to expose the pieces and create the finished pattern.

An infographic showing the four-step production process of terrazzo including ingredients and finishing techniques.

The basic recipe

The aggregate is where the look comes from. That can include marble, quartz, granite, or glass fragments. The binder is what changes the behaviour of the tile.

Most homeowners will come across three categories:

  • Cement-based terrazzo uses a cement matrix with aggregate mixed through it. It has a more traditional feel and more natural variation.
  • Epoxy-based terrazzo uses a resin binder. It's commonly chosen where a more uniform, less porous finish is wanted.
  • Terrazzo-look porcelain isn't true terrazzo, but it reproduces the look on a porcelain body and is often the simpler option for standard residential bathrooms.

If you're comparing materials for a renovation, it helps to understand the broader differences between stone, porcelain, ceramic and specialty tile products before locking anything in. This guide to bathroom tiling materials and finishes is useful for that early selection stage.

Comparison of terrazzo tile types

Attribute Cement-Based Terrazzo Epoxy-Based Terrazzo Terrazzo-Look Porcelain
Composition Cement binder with stone or glass aggregate Resin binder with decorative aggregate Porcelain tile with terrazzo-style printed surface
Look Natural, solid-body, traditional depth Cleaner, more uniform, often more seamless in appearance Highly consistent and easier to match across batches
Best use Floors and feature areas where mass and authenticity matter Commercial-style wet areas and low-maintenance surfaces Standard residential walls and floors
Maintenance May need more ongoing attention depending on finish and sealing Lower maintenance in many wet-area applications Straightforward everyday care
Installation demands Heavier and more dependent on sound substrate prep Demands proper system selection and adhesion Usually the most familiar format for residential tilers
Budget position Often premium Often premium Usually the easier entry point

Terrazzo isn't one single product. Clients often use one word for three very different materials, and that's where bad selections start.

The important part is this. If you change the binder, the tile body, or the way the face is made, you also change weight, installation method, maintenance, and cost. That's why the selection shouldn't be based on appearance alone.

Is Terrazzo a Good Choice for Your Bathroom?

A client walks into a period home in Melbourne, points at a terrazzo sample, and says they want that same finish across the floor, shower, and vanity wall. The right answer depends on more than the sample board. It depends on the structure under the room, the slip rating of the selected tile, the waterproofing build-up, and whether the product suits the way the bathroom will be used.

In a well-managed renovation, terrazzo is a strong bathroom choice. It wears well, it has real visual depth, and it suits both contemporary and older Melbourne homes. But it only performs properly when the tile selection, substrate preparation, falls, waterproofing, and movement control are handled like part of the building work, because that is exactly what they are.

A modern bathroom vanity featuring black cabinets, a marble countertop, and colorful terrazzo style wall tiles.

Where terrazzo performs well

Terrazzo earns its place in bathrooms that need to last.

It handles regular foot traffic, cleaning, moisture exposure, and the knocks that come with family use. It also gives a room more character than a flat plain tile, without forcing a loud pattern into a small space. In tight ensuites, that balance matters. You get movement and texture, but the room can still feel calm and controlled.

It also works well when the bathroom is being planned as a full renovation rather than a cosmetic update. If comfort is part of the brief, terrazzo can be incorporated with under tile heating in a bathroom renovation, provided the floor build-up, adhesive system, and expansion allowances are set out properly from the start.

Where terrazzo can go wrong

The failures are usually predictable.

The first is structural. Many Melbourne bathrooms sit over older timber floors or mixed substrates that have already moved over time. Cement-based terrazzo and larger-format terrazzo tiles are far less forgiving than clients expect. If the floor has deflection, poor sheet fixing, patchy levelling, or inconsistent screed thickness, the finished surface will show it.

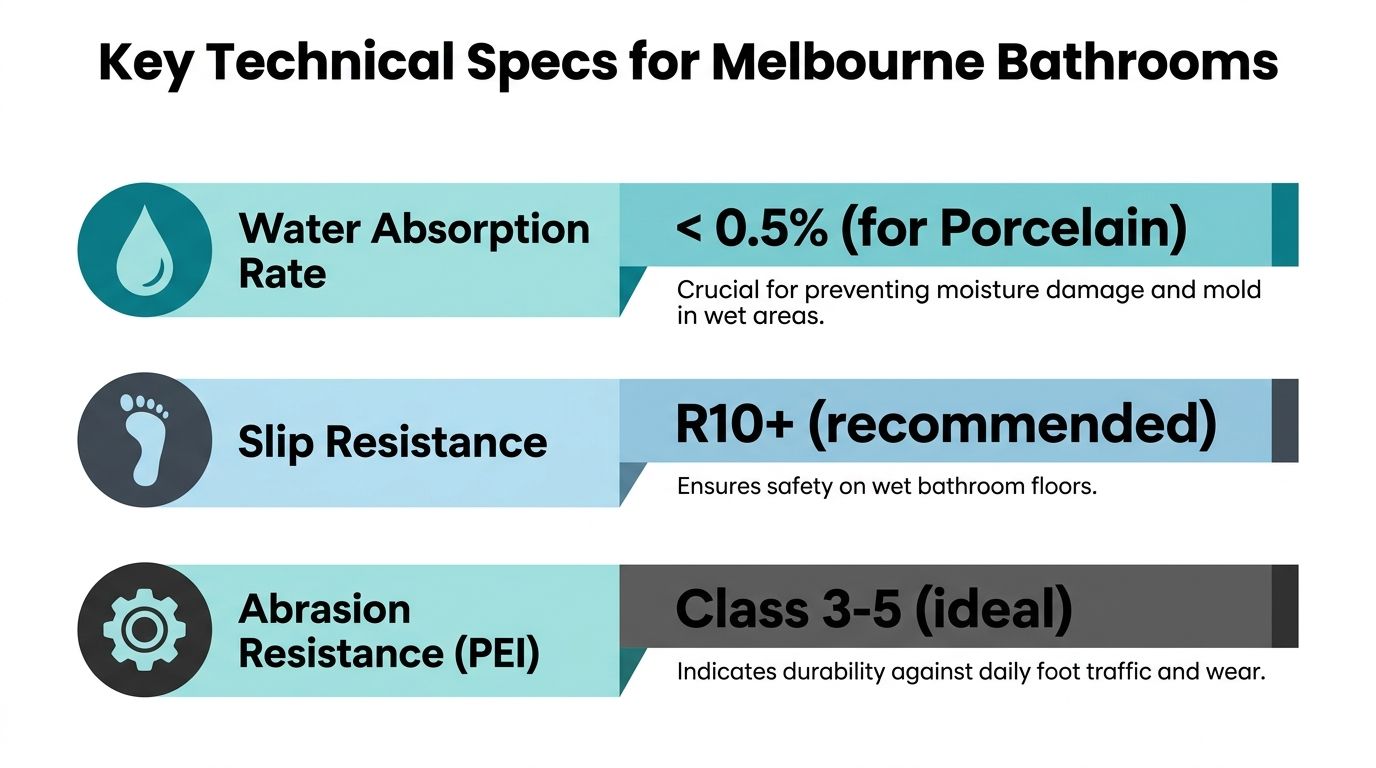
The second is safety. A polished terrazzo sample can look excellent under showroom lighting and still be the wrong floor for a wet area. For bathroom floors, the product has to be checked against the required slip resistance classification, including the practical realities of bare feet, soap residue, and regular water exposure. In Australia, that means looking closely at AS 4586 test information before the tile is approved for use.

The third is maintenance expectation. Some clients want authentic cementitious terrazzo because they like the natural depth and variation. They also want porcelain-level simplicity and a lower install cost. Those goals can conflict. A builder should set that out early, before the tile order is placed and before waterproofing heights and floor transitions are locked in.

The practical decision

Terrazzo suits owners who want a bathroom built for long-term use and are prepared to spend money where it counts. That means stable substrates, compliant waterproofing, correct adhesives, proper falls to waste, and a finish selected for the right location.

If the project budget is tight, the existing floor is marginal, or the bathroom is being refreshed without correcting underlying building issues, terrazzo may not be the smartest choice. In those cases, a more forgiving tile can produce a better result.

Used in the right bathroom, and installed properly, terrazzo is not a risky design move. It is a durable, high-end finish that rewards good building practice.

Designing Your Dream Bathroom with Terrazzo

A good terrazzo bathroom doesn't happen by choosing a random speckled tile from a display wall. It comes from controlling three design decisions properly. Finish, aggregate, and base colour.

A modern bathroom featuring a terrazzo sink and matching bathtub set against a large decorative terrazzo wall.

Start with the finish

On walls, a smoother and more polished face can work beautifully because it reflects light and lifts the room. On floors, the decision has to be more disciplined. In a wet bathroom, safety and feel underfoot matter more than showroom shine.

A honed or matte finish usually gives the room a more grounded, architectural look anyway. It also hides water spotting better than an overly glossy finish. That matters in family bathrooms where the room gets used hard, not staged for photos.

If you're planning comfort features at the same time, terrazzo also sits well within a broader bathroom build that includes heating and upgraded floor systems. If that's part of your renovation brief, look at under tile heating for bathroom renovations before final tile selections are locked in.

Choose the aggregate and base colour

The room's personality shows up here.

Small aggregate in a close-toned base gives a quieter finish. That suits compact ensuites, bathrooms with strong brassware, or homes where you want the tile to feel expensive without shouting. Larger chip terrazzo is bolder. It's great for a feature wall, vanity splashback, or a powder room where you want more energy.

A straightforward approach:

  • Fine chip plus soft grey or warm white base gives a more refined, almost monolithic feel.
  • Mid-size marble aggregate adds classic texture without looking busy.
  • High-contrast or multicolour chip works best when the rest of the room is restrained.

Don't choose from a tiny sample alone. View the tile beside your vanity finish, tapware colour, shower screen trim, and actual bathroom lighting. Terrazzo changes character a lot depending on the surrounding materials.

Where large format terrazzo-look panels fit

Large-format terrazzo-look slabs are becoming more common in Melbourne bathrooms, especially on walls where clients want fewer grout joints and a cleaner visual plane. A recent Melbourne-focused trend is the use of Kerlite slabs up to 3 x 1.5m, with imports reported to have surged 40% in 2025, and the attraction is obvious because fewer grout lines mean easier cleaning and a more continuous finish. The trade-off is that they need precise substrate preparation and licensed installation in humid Victorian conditions, as noted in this discussion of modern terrazzo-look slab applications.

This short video gives a useful visual reference for the kind of finish clients are often trying to achieve with terrazzo in contemporary bathrooms.

Large format surfaces can look outstanding, but they're less forgiving than standard tile modules. If the walls aren't straight, the corners aren't true, or the substrate hasn't been prepared correctly, the result won't look premium no matter how expensive the slab is.

Getting the Terrazzo Installation Right

A terrazzo bathroom can look first-rate on handover and still fail early if the build-up underneath is wrong. In Melbourne renovations, I see the same causes come up again and again. Poor falls, movement in old timber floors, the wrong finish under wet feet, and waterproofing that was treated as a paperwork item instead of a construction sequence.

Slip resistance comes before shine

Clients often start with the face of the tile. In a bathroom, I start with how it performs when wet.

Terrazzo on bathroom floors needs to suit AS 4586 slip resistance requirements. That usually points to a honed or otherwise slip-rated finish on the floor, especially in shower zones and on the main bathroom path where people step out with wet feet. A polished surface can still work well on walls, vanity cladding, or other low-risk areas, but floor selections need a different standard.

That trade-off matters in real use. A finish that photographs well under showroom lighting can feel risky at 6am on a cold winter morning.

A bathroom floor should feel secure every day, not just look good on install day.

Waterproofing and adhesion decide whether the room lasts

Tiles are the wear surface. They are not the waterproofing system.

In a full bathroom renovation, the sequence matters. Substrate correction comes first, then falls, sheeting, junction treatment, membrane application, and only then tiling. If those steps are out of order, or if products are mixed without checking compatibility, terrazzo will not hide the mistake. It usually highlights it through drummy tiles, cracked grout, stained edges, or moisture showing up in adjoining rooms.

For that reason, I always look closely at:

  • Substrate stiffness and deflection, especially in older Victorian and post-war homes with timber floors
  • Falls to wastes, so water moves to the drain instead of sitting against walls or glass
  • Membrane detailing at corners, hobs, niches, and penetrations
  • Adhesive selection and coverage, particularly with heavier terrazzo or low-porosity terrazzo-look porcelain
  • Movement joints and perimeter allowances, so the tiled surface has room to behave properly

If you are reviewing a renovation scope, ask who is responsible for waterproofing compliance and what documentation is issued at completion. A proper Victorian waterproofing compliance certificate for wet areas is part of a properly managed build, not an optional extra.

Substrate prep in Melbourne homes

At this stage, many bathroom budgets are often strained.

A lot of Melbourne homes have floors and walls that are out of plane before demolition even starts. Once the old finishes come off, you can find bouncing joists, patched sheet substrates, old screeds, or previous work laid over surfaces that should have been removed. Terrazzo, particularly larger modules and heavier material, wants a stable base. If the floor moves or the walls are not true, the finished room never looks as crisp as the sample board.

In practice, that can mean sistering or correcting joists, resheeting walls, rebuilding shower bases, screeding for proper falls, or using levelling compounds to get walls and floors within tolerance. None of that is decorative work. It is the part that allows the visible finish to sit flat, drain properly, and stay bonded.

Tile thickness matters too, but it needs to be assessed against the product type, substrate, and application rather than treated as a shortcut on price. In a builder-managed renovation, the right question is not “what is the thinnest tile we can use?” It is “what assembly suits this room, this structure, and this waterproofing system?”

The installation standard has to match the tile choice

Terrazzo can be natural cement-based material, resin-based product, or terrazzo-look porcelain. They do not all install the same way.

Cementitious terrazzo is heavier and less forgiving of movement. It also needs good handling, clean cutting, and proper sealing where specified. Porcelain terrazzo-look tiles are usually easier to maintain and more dimensionally consistent, but they still need proper substrate prep, full adhesive support, and accurate set-out if you want the room to read as premium rather than patched together. Large chips, directional patterns, and strong colour variation all need planning before the first tile is fixed.

Set-out is often overlooked. I would rather spend more time resolving grout lines, drains, niches, and threshold transitions on paper than try to solve them with small cuts on the day. That is usually the difference between a bathroom that feels resolved and one that looks close, but not quite right.

Good terrazzo installation is careful work. The finish gets the attention, but the result comes from the prep, the sequence, and the compliance behind it.

Budgeting and Caring for Your Terrazzo Bathroom

A terrazzo bathroom can look expensive for the right reasons, or expensive for the wrong ones. The difference usually comes down to what was allowed for before the first tile was ordered.

Clients often focus on the tile rate per square metre. In a full Melbourne bathroom renovation, that is only one part of the budget. The bigger swings usually come from floor correction in older homes, wall straightening, waterproofing, drainage detailing, and the labour needed to set terrazzo out properly so the room reads clean and intentional.

Where the money actually goes

Terrazzo sits across a wide price range. Cementitious terrazzo, resin-based products, and terrazzo-look porcelain all carry different supply costs, handling requirements, and maintenance demands. The right choice depends on the room, the substrate, and how much ongoing care you are comfortable with.

In practice, budget pressure tends to show up in four places:

  • Substrate repairs and preparation for movement, deflection, out-of-level floors, or poor past renovation work.
  • Wet-area construction including screeds, shower falls, waterproofing, and compliant junction detailing.
  • Tile size, weight, and cutting complexity, especially around linear drains, niches, hobless entries, and tight bathroom footprints.
  • Finishing work such as trims, mitres, expansion joints where required, and cleaner transitions at doorways and fixtures.

I often observe poor decisions made. Cheapening the build by reducing prep, rushing set-out, or choosing a product unsuited to the structure rarely saves money once rectification is on the table.

A good quote should break the job into clear parts: demolition, carpentry or builder's rectification work, plumbing, electrical, waterproofing, tiling, glazing, cabinetry, and fittings. If those items are bundled too loosely, it becomes hard to see whether the allowance is realistic or whether costs have been pushed to variations later.

How to look after it properly

Maintenance is straightforward if the material is matched to the bathroom and installed properly.

  • Use pH-neutral cleaners on a regular basis. Acidic cleaners can mark or dull some terrazzo surfaces.
  • Keep soap scum and mineral build-up under control with routine cleaning, especially in showers and around basins.
  • Reseal cement-based terrazzo if the manufacturer calls for it. Maintenance schedules vary by product.
  • Repair chips, cracked grout, or failed sealant early so water does not track into the assembly.

Porcelain terrazzo-look tiles are usually the easiest option for busy households. They are consistent, simple to clean, and less demanding over time. Cementitious terrazzo has more depth and character, but it asks for better product selection, more care during installation, and a bit more attention after handover.

That trade-off is worth making for some bathrooms. It is not the right move for every one. A builder-managed renovation should price the material accurately, explain the upkeep clearly, and match the specification to the way the bathroom will be used.

Your Next Steps for a Perfect Terrazzo Bathroom in Melbourne

A Melbourne bathroom can look straight, clean, and ready for tile, then show its real condition the moment demolition starts. I see it often in older homes. Uneven floors, patched sheeting, out-of-square walls, and tired framing all affect whether terrazzo will finish sharply or fight the build the whole way.

Start with the room, not the colour chart. Check the substrate, the shower set-down or floor waste layout, the amount of natural light, and who will use the bathroom every day. A terrazzo tile that looks refined in a showroom can read busy in a compact ensuite, especially under warm downlights or against veined stone and brushed metal finishes.

Get samples in hand. Put them on the floor and against the wall finish. View them morning, afternoon, and at night with the actual lighting switched on. That simple step avoids a lot of second-guessing once the tile order is placed.

Then choose the team who will carry the whole wet-area build. Terrazzo works best when the builder, waterproofer, tiler, plumber, and electrician are working to one plan and one set of tolerances. In a full renovation, that matters more than the tile itself. Falls need to be right, junctions need to be clean, movement needs to be allowed for, and the waterproofing system needs to suit the substrate and layout.

That is why a registered builder is often the right lead on a terrazzo bathroom in Melbourne. Victorian homes regularly need correction before tile goes down, and those adjustments sit across several trades, not just tiling. One party coordinating demolition, rectification, compliance, and finishes usually gives a better result than splitting the job between separate contractors.

Ask for a quote that shows the build sequence clearly, the tile specification, who is responsible for substrate preparation, and how waterproofing and slip resistance will be handled. If those items are vague, the risk usually turns up later as delays, variations, or finishing compromises.

A terrazzo bathroom can look outstanding for years. The projects that stay that way are the ones where the builder gets the structure, the wet-area detailing, and the tile setting right before anyone starts talking about styling.
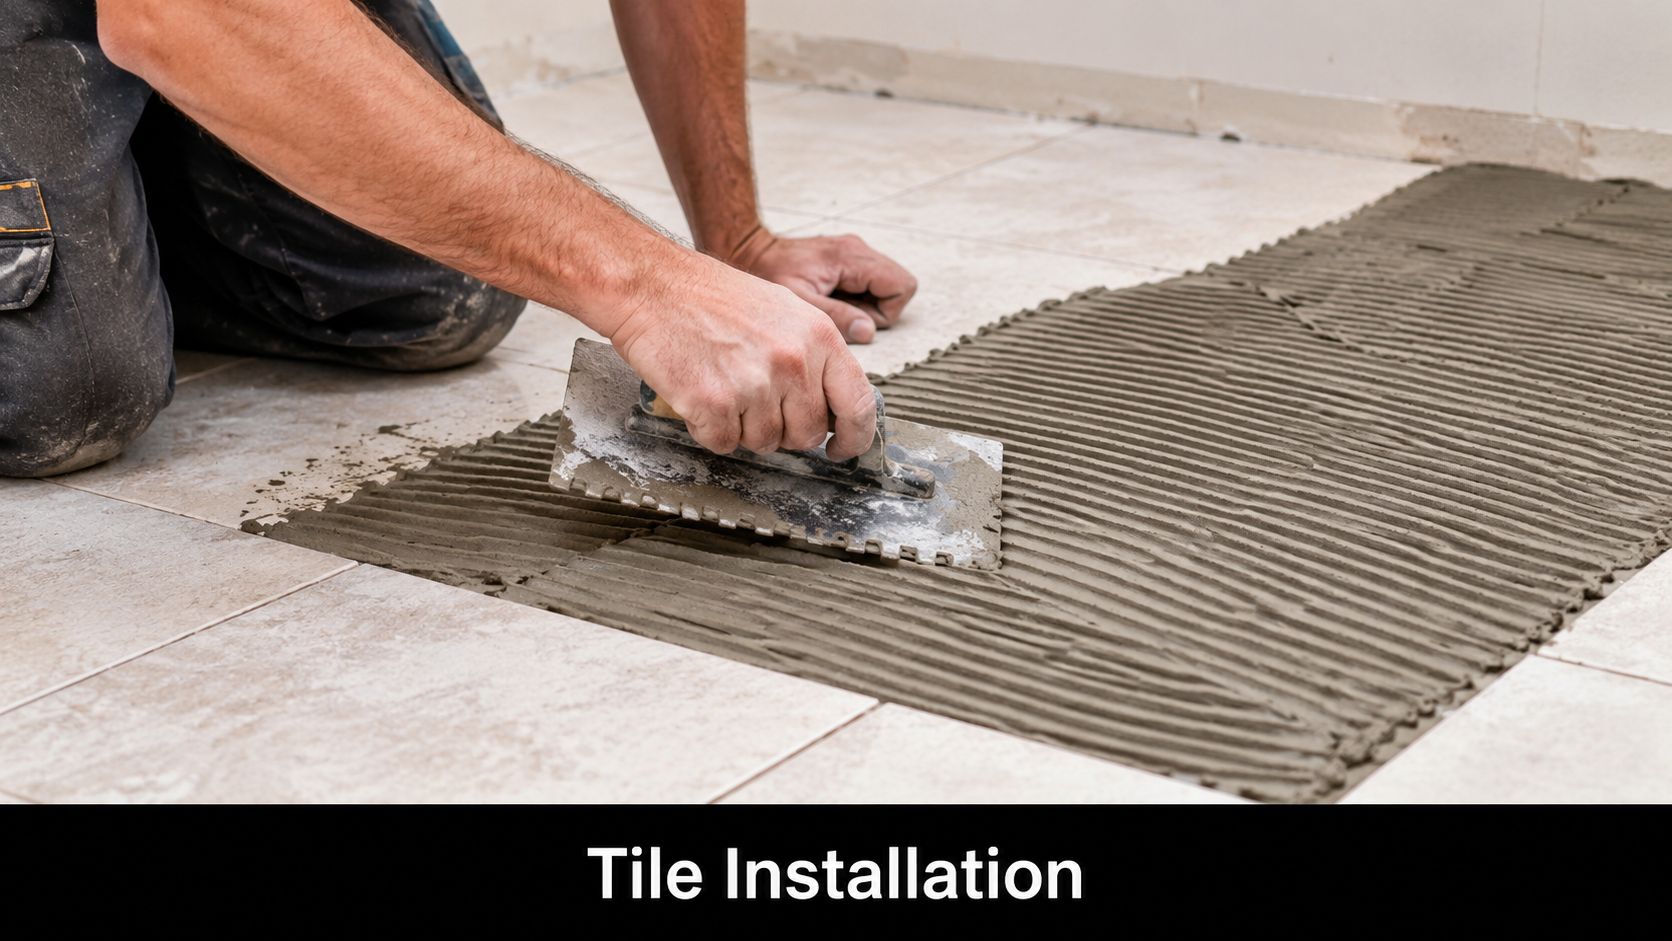
If you're planning a terrazzo bathroom renovation and want one team to handle the design, waterproofing, substrate prep, tiling, and builder coordination properly, talk to Melbourne Tiling Services P/L. They deliver start-to-finish bathroom renovations across Melbourne and greater Victoria, with registered builder oversight, compliant wet-area systems, and the kind of detail work terrazzo demands.

Waterproofing Compliance Certificate Victoria: 2026 Guide

You've probably started with the exciting parts of the renovation. Tiles, tapware, vanity, layout, lighting. Then someone mentions a waterproofing compliance certificate and the whole bathroom project suddenly feels more technical than expected.

That reaction is normal. Most Melbourne homeowners don't think about the membrane hidden under the tiles until a builder, surveyor, buyer, or insurer asks for paperwork. By then, the wrong answer can turn a straightforward bathroom renovation into a dispute about leaks, liability, and whether the work was even signed off properly.

A waterproofing compliance certificate victoria issue usually isn't about paperwork for paperwork's sake. It's about proving that the wet area was built to the required standard, by the right practitioner, with traceable accountability if something goes wrong later. In practical terms, that certificate can matter when the bathroom is being built, when the home is sold, and when water damage shows up where it shouldn't.

The biggest trap in Victoria is the gap between smaller jobs and larger renovations. Some works sit in a grey area where homeowners assume they're covered because the bathroom looks finished and the invoice has been paid. That assumption can be expensive.

Table of Contents

Your Bathroom Renovation and the Certificate You Can't Ignore

A bathroom renovation looks simple from the outside. Demolition starts. Plumbing gets roughed in. The room takes shape. Then the part that matters most gets covered up. That's why the certificate matters. It records that the unseen waterproofing work wasn't guessed, rushed, or left to an unqualified trade.

For homeowners, this document protects more than the shower recess. It helps protect adjoining walls, floors, skirtings, ceilings below, and the long-term value of the home. If water gets past the membrane, the damage often stays hidden until mould, swelling, staining, or movement appears somewhere else.

A modern bathroom renovation with green floor tiles, open shelving, exposed pipes, and a waterproofing compliance certificate.

If your project involves a full bathroom renovation in Melbourne, the waterproofing stage is one of the few moments where compliance has to be taken seriously before finishes go on. Once tiles, grout, screens, and joinery are installed, inspecting the membrane becomes much harder and any repair usually means demolition.

Practical rule: If a contractor treats waterproofing like a minor step between screeding and tiling, that's a warning sign. In a wet area, it's one of the core structural protection tasks in the whole job.

The certificate also changes the conversation from trust to proof. A homeowner shouldn't have to rely on “we always do it this way” or “it'll be fine.” You want a traceable record that the work met the required standard and that somebody with the right registration stands behind it.

What Is a Waterproofing Compliance Certificate?

A homeowner usually sees the problem too late. The bathroom looks finished, the silicone is neat, the tiles are straight, and six months later paint starts lifting on the wall outside the shower or a ceiling stain appears below. By that point, the membrane is buried under the finished work and proving what was done becomes much harder.

A waterproofing compliance certificate is the document that ties that hidden work to a clear standard and a legally accountable party. In practical terms, it records that the wet area waterproofing was carried out in accordance with the relevant building requirements and by someone permitted to stand behind that work.

In Victoria, that means the waterproofing behind a bathroom renovation must meet the requirements of AS 3740 and the NCC Volume 2. The certificate matters because waterproofing is one of the few parts of a bathroom you cannot properly judge once tiling is complete. If the membrane is missing, poorly bonded, interrupted at a corner, or badly detailed around a waste or tap penetration, the room can still look first-class at handover.

What the certificate is actually confirming

A proper certificate is evidence that the waterproofing system was installed over a suitable substrate, with the right preparation, set-out, bond breakers where required, and continuity through the areas most likely to fail.

That includes details such as:

  • Internal corners and wall-to-floor junctions that move slightly over time
  • Shower areas and adjacent splash zones where water exposure is repeated
  • Pipe penetrations and tap bodies where small gaps become leak paths
  • Doorways, hobs, and floor transitions where water can escape the wet area
  • Falls and drainage points that affect how long water sits on the surface

Those are the details that separate a bathroom that lasts from one that starts causing damage behind the scenes.

For homeowners, the core issue is not paperwork for its own sake. It is proof. On a smaller job under the common minor works threshold, people often assume the compliance risk is low because the renovation scope feels modest. In reality, the waterproofing risk is the same whether you are rebuilding the whole bathroom or just replacing the shower area. Water does not care what the contract value was.

Why this matters more than many owners expect

The gap between minor works and larger renovations catches a lot of people out in Victoria. A homeowner may hire someone for a bathroom refresh, assume the waterproofing side is routine, and only later find there is no clear certification trail and no registered builder taking responsibility for the full wet area package.

That is where the trade-off sits. A lower upfront price can also mean weaker documentation, blurred responsibility between trades, and a much harder path if defects show up later.

A certificate helps establish who carried out the work, what standard it was expected to meet, and who is exposed if it fails. That can become important if:

  • A leak appears after handover and responsibility is disputed
  • An insurer asks for renovation records
  • A future buyer or conveyancer wants evidence of compliant work
  • Parts of the bathroom need to be opened up and the original workmanship is questioned

From a builder's point of view, this is why registered oversight matters. Waterproofing sits between carpentry, plumbing, screeding, and tiling. If those stages are not coordinated properly, the membrane is often where the failure shows up first, even when the underlying cause started earlier. A registered builder closes that gap by taking responsibility for the sequence, the substrate, the detailing, and the documentation, not just the final tile finish.

A finished bathroom can hide a lot. A compliance certificate gives the homeowner something far more useful than a verbal assurance. It gives them a document that connects the hidden waterproofing work to a recognised standard and a party who can be held to it.

When a Waterproofing Certificate Is Legally Required in Victoria

Many bathroom renovations become complicated at this stage. Homeowners learn that waterproofing must adhere to the standard, but they also find that not every minor project is certified through the same process. Both concepts can be accurate, and the space between them is where people often encounter issues.

Victoria's regulatory framework changed significantly in 2018. The key thresholds often discussed in practice are these: work by unregistered tradespersons can be carried out up to $10,000 without requiring a compliance certificate, while projects valued over $16,000 require VBA registration and formal certification, according to the Victorian waterproofing regulatory changes summary.

The practical threshold problem

Most homeowners don't think in regulatory bands. They think in renovation scope. Replace the shower. Retile the room. Move the vanity. Rebuild the ensuite. The trouble is that the legal and compliance consequences can change depending on who is doing the work, the value of the work, and how the contract is structured.

That creates a real trade-off.

A smaller bathroom job may appear cheaper or simpler if someone says it can be done without the same formal sign-off. But the lower the paperwork, the more important it becomes to check who is responsible if moisture damage appears later. Once a bathroom is stripped, re-sheeted, waterproofed, tiled, and fitted off, it behaves like major building work even if the owner originally saw it as a cosmetic upgrade.

Victorian Waterproofing Certificate Requirements 2026

Project Value Practitioner Certificate Required?
Up to $10,000 Unregistered tradesperson Not required under the threshold described in the 2018 Victorian framework
Between $10,000 and $16,000 This is where homeowners often face uncertainty The framework highlights a practical compliance gap, so verification matters
Over $16,000 VBA-registered practitioner Formal certification required

That middle band is the problem area in real bathroom renovations. It's where homeowners can assume the project is “too big to be casual” but still not receive the clear compliance pathway they expected.

What works and what doesn't

What works is treating wet area waterproofing as regulated building work from the start, regardless of whether the quote lands just under a threshold. That means checking registration early, clarifying who is responsible for sign-off, and making the certificate part of the contract discussion before demolition begins.

What doesn't work is trying to split a larger bathroom renovation into smaller parts to make it feel like a minor job. On site, the water doesn't care how the invoices were separated. If the room fails, the entire assembly gets judged by the outcome.

A practical homeowner question is simple: who is taking legal responsibility for the waterproofing and what document proves it? If nobody can answer that clearly, stop there.

Who Can Legally Issue a Waterproofing Certificate

This is one of the most confusing parts of waterproofing compliance in Victoria, and homeowners aren't imagining the confusion. Different websites, trades, and even industry conversations often give different answers.

According to this overview of common waterproofing issues in Victoria, there is significant homeowner confusion because sources conflict on whether the certificate comes from a VBA-registered waterproofing contractor, a licensed plumber, or a builder, with thresholds discussed from $5,000 to $16,000. The practical takeaway is clear. Verify the practitioner's VBA registration before work starts.

Why homeowners get mixed answers

Part of the confusion comes from the fact that bathroom renovations involve several trades whose responsibilities overlap physically but not legally.

A plumber handles plumbing work. A waterproofer applies the membrane system. A tiler installs the finish. A builder may manage the whole renovation, coordinate sequencing, and carry the broader responsibility for compliant delivery. On site, those roles interact closely. On paper, they aren't interchangeable.

That's why the answer to “can my tiler issue the certificate?” is usually the wrong question. The better question is: what registration does that person hold, and are they authorised to certify this exact work?

Here's the practical split homeowners should keep in mind:

  • Tilers: A tiler can be excellent at finishes and still not be the person who can lawfully issue a waterproofing compliance certificate.
  • Plumbers: A plumber can certify plumbing work within their own scope, but that doesn't automatically resolve waterproofing certification.
  • Waterproofing contractors: They may perform the membrane application, but homeowners still need to confirm the registration status and whether the issued documentation is valid for the project.
  • Registered builders: On full bathroom renovations, a registered builder often provides the clearest line of accountability because the wet area work sits within the broader building scope.

The safest way to approach sign-off

From a homeowner's point of view, the least risky setup is the one with a single accountable party overseeing the renovation and using correctly licensed specialists where needed. That avoids the common site problem where each trade says the next one is responsible.

If three different trades are pointing at each other when you ask about certification, you don't have compliance. You have a future argument.

In practice, registered builders are often the most reliable option on bathroom renovations because they can coordinate the sequence properly. Waterproofing only works when the substrate, plumbing penetrations, falls, sheet linings, membrane system, and tiling are all aligned. That's difficult to manage when the owner hires separate trades and assumes certification will sort itself out at the end.

What doesn't work is relying on verbal assurances. Ask for registration details. Check them. Ask who issues the final compliance document. Get that answer before any membrane is applied.

Your Roadmap to Obtaining a Compliance Certificate

A common Melbourne bathroom scenario goes like this. The room is half-demolished, the plumber has finished rough-in, the tiler is booked, and only then does the owner ask who will handle the waterproofing certificate. By that point, the risk is already on site.

The better approach is to set up certification before work starts, especially in the grey area between minor works under $10,000 and larger bathroom renovations. Smaller jobs often get treated casually, even though the same leak can still damage framing, swell skirtings, stain ceilings below, and trigger an insurance dispute. A registered builder closes that gap by taking responsibility for the whole sequence, not just one trade task.

A six-step infographic showing the roadmap to obtaining a waterproofing compliance certificate for building projects.

Homeowners should also discuss the actual membrane build-up early. The certificate only has value if the underlying work is suitable for the room, the substrate, and the fixtures being installed. Our guide to waterproofing systems used in bathroom renovations helps explain what should be decided before the first coat goes down.

Before work starts

Start by locking in responsibility. Ask three direct questions. Who is carrying out the waterproofing work, who is supervising it, and who will issue the compliance paperwork at the end?

If those answers are vague during quoting, they usually stay vague during construction.

This matters most on projects that sit between a simple refresh and a full structural renovation. Homeowners often split these jobs across separate trades to save money. Sometimes that works. Often it creates a gap where no one owns the compliance side properly. A registered builder usually gives a clearer path because the waterproofing, substrate preparation, plumbing penetrations, sheet lining, falls, and tiling all need to line up.

Before signing off on the job, confirm:

  1. Who is responsible for certification
    Get the name of the practitioner or builder who will stand behind the wet area work.

  2. What the bathroom scope includes Confirm whether the room is being stripped to framing, back to substrate, or partly retained. The certificate process depends on what is being altered.

  3. Which wet areas are included
    The quote should identify shower areas, bathroom floors, wall returns, niches, hobs, and any other sections being waterproofed.

  4. Which products will be used
    Ask for the membrane system, primer, bond breaker, sealant, and accessories. Mixed systems cause problems if components are not compatible.

During the waterproofing stage

Good certification starts with disciplined site work. By the time waterproofing begins, the surfaces should be stable, clean, and ready for the membrane system being used. If the substrate is dusty, moving, cracked, or still too wet, the final paperwork will not save a failed installation.

On site, I look for a few things straight away. Floor to wall junctions need proper treatment. Penetrations at wastes, taps, and mixers need to be sealed with components that suit the system. Corners, hobs, niches, and transitions need careful detailing because those are the places that usually fail first.

Photo records matter here. Once tiling starts, the evidence disappears.
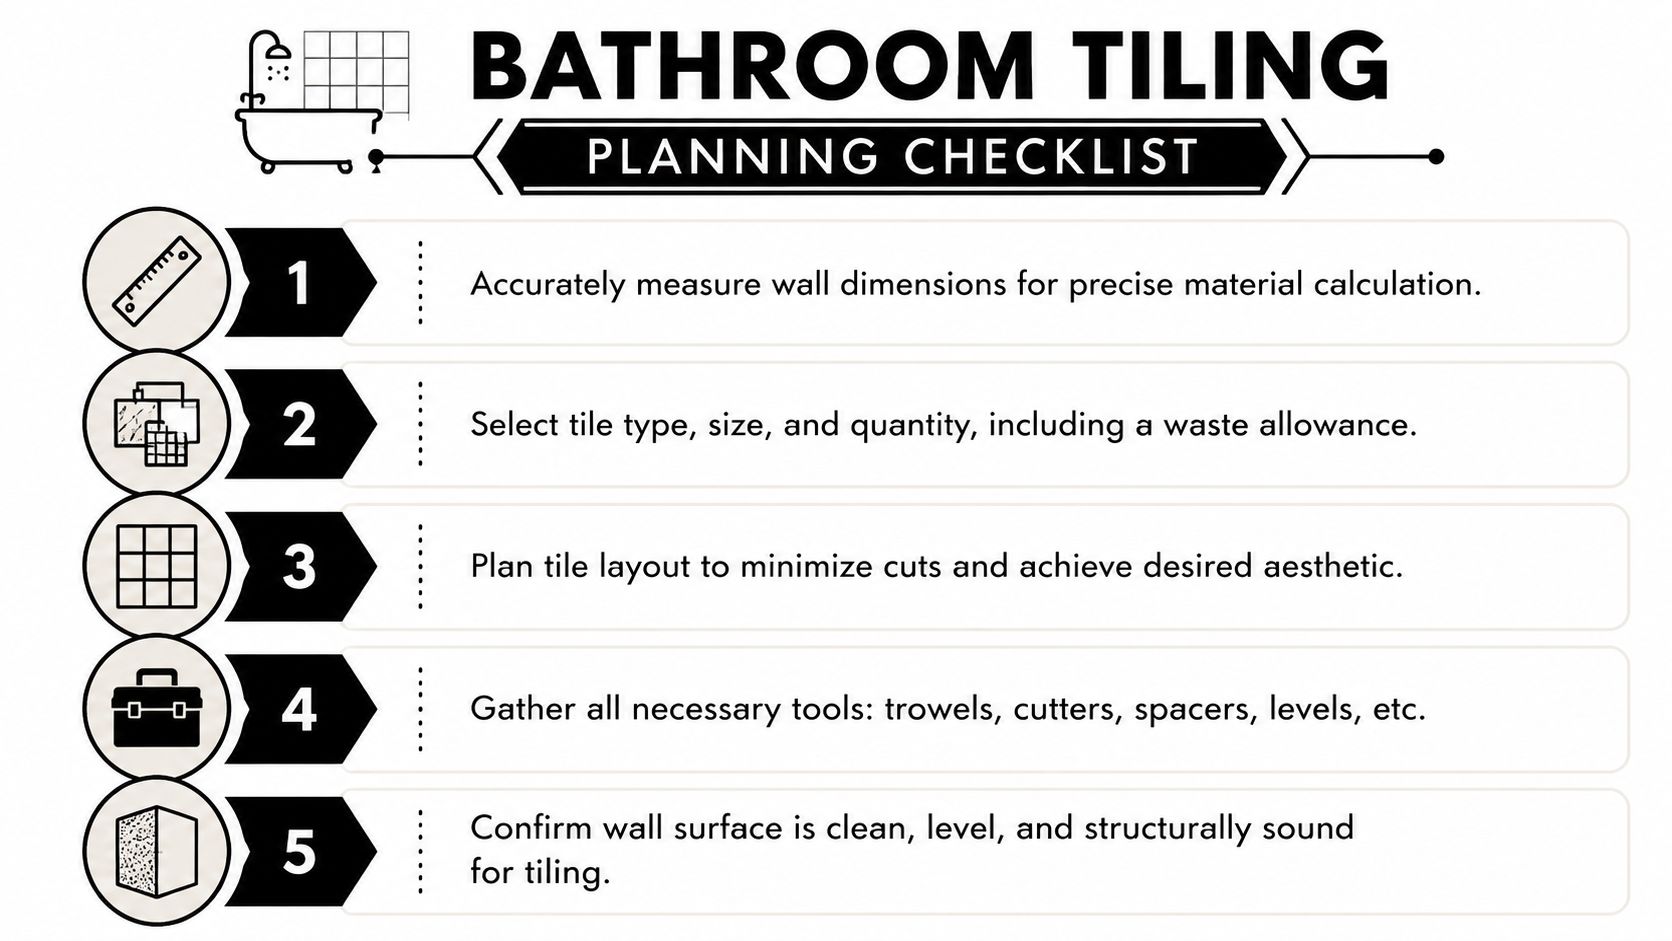
A practical site checklist includes:

  • Substrate readiness with no loose material, contamination, or movement
  • Correct junction treatment at wall and floor changes
  • Compatible detailing around wastes, flanges, tap bodies, and penetrations
  • Clear photos taken after membrane application and before tiling
  • Sequencing control so no trade damages the waterproofing before covering works proceed

Homeowners do not need to become waterproofing inspectors, but they should ask to see the membrane before it is covered. That single step solves a lot of disputes later.

What you should receive at handover

At handover, the paperwork should match the work on site. If the bathroom has been rebuilt properly, there should be a clear record of who did the waterproofing, what system was used, and what evidence supports the sign-off.

For owners, the practical handover pack should include:

  • The compliance certificate
  • The responsible practitioner or business details
  • The waterproofing product details
  • Photos of the membrane before tiling
  • Any written warranty documents that apply to the job

Do not leave this until weeks after completion. If final payment is made and everyone has moved on to the next project, missing documents become much harder to chase.

That is the fundamental difference between a patched-together bathroom job and one run properly. On a larger renovation, responsibility is usually clearer. On smaller or mid-range jobs, it often is not. Hiring a registered builder helps close that liability gap before it turns into a leak claim, a resale issue, or an argument about who was supposed to certify what.

Common Pitfalls and the True Cost of Non-Compliance

Most failed bathrooms don't start with a dramatic event. They start with a shortcut that seemed harmless at the time. A rushed membrane. No photo record. A trade working outside their actual registration. A homeowner being told that a certificate isn't necessary because the room is “only a small reno”.

A person standing in a damaged room next to the text Costly Mistakes written on a black background.

The broad compliance culture in Victoria is not casual. Between July 2024 and June 2025, Victorian water corporations commenced 3,670 investigations into alleged breaches of the Water Act 1989, according to Victoria's water compliance report for 2024 to 2025. That report relates to water regulation, not bathroom certificates directly, but it shows the wider regulatory environment takes water compliance seriously.

Where bathroom renovations go wrong

The first pitfall is assuming waterproofing is just part of tiling. It isn't. Tiling is the surface finish. Waterproofing is the protective system underneath. Good tilers understand this distinction. Cheap operators often blur it.

The second pitfall is trying to save money by treating a substantial bathroom renovation like a minor patch-up. Homeowners sometimes break work into smaller pieces or use separate cash jobs across demolition, waterproofing, and tiling. That can leave nobody clearly accountable for the finished wet area.

The third pitfall is failing to inspect the hidden stage. Once the membrane is covered, your influence drops. If there are no photos, no checklist, and no proper certificate, proving what happened later becomes much harder.
Common warning signs include:

  • Vague answers about certification
  • No registration details provided upfront
  • Pressure to move quickly through curing and tiling
  • No mention of pre-tiling photos
  • A contractor saying the certificate “isn't really needed”

Why shortcuts fail later

The actual cost of non-compliance usually appears after the bathroom looks finished. Water tracks into framing, adjoining rooms, or the ceiling below. Mould develops where you can't clean it. Timber swells. Paint bubbles. Tiles debond. Then the owner learns that fixing the membrane means removing the new bathroom to get back to the failed layer.

This video gives a useful visual sense of how hidden defects can turn into expensive rectification work.

A bathroom leak rarely stays in the bathroom. It spreads into the parts of the home that cost the most to open up and repair.

What works is slower, more disciplined, and less glamorous. Proper preparation. The right practitioner. Clear sign-off. A documented chain from substrate to finished tile. Homeowners remember the stone and the fittings. The house remembers whether the waterproofing was done properly.

How Melbourne Tiling Services Ensures Your Peace of Mind

For homeowners, the biggest relief is having one accountable team manage the bathroom renovation properly from start to finish. That matters because waterproofing compliance only works when the builder, waterproofer, plumber, and tiler are all working in sequence, with the same scope and the same standard in mind.

Melbourne Tiling Services P/L operates as Registered Unlimited Builders, which is exactly the kind of structure that helps close the risk gap between minor works assumptions and major renovation realities. Instead of leaving the owner to coordinate separate trades and chase paperwork afterwards, the process can be managed as one compliant building scope with proper trade supervision and documentation.

That's especially valuable on bathroom renovations where the waterproofing layer disappears behind finishes very quickly. A registered builder-led process means the critical checks happen before the room is closed up. It also means the homeowner has a clear point of accountability rather than a chain of subcontractors passing responsibility around.

If you need a team that handles wet area compliance as part of the build, not as an afterthought, see Melbourne waterproofing services for the practical side of how that work is delivered on site.


If you're planning a bathroom renovation and want the waterproofing compliance handled properly from the start, Melbourne Tiling Services P/L can help you build it once, document it properly, and avoid the grey areas that catch so many homeowners later.