Expert Tiling Narre Warren: Free 3D Design & Quote

You're probably reading this because your bathroom has reached the point where patch jobs aren't cutting it. The grout keeps discolouring, the shower base feels tired, tiles sound hollow underfoot, or the whole room looks older than the rest of the house. In Narre Warren, that usually means the decision isn't just about new tiles. It's about whether the room is still watertight, safe, and worth upgrading properly.

That's where tiling in Narre Warren needs a more disciplined approach than most homeowners are first told. A bathroom renovation isn't only a style exercise. It involves substrate preparation, waterproofing, falls to waste, tile selection, and legal coordination when the project becomes a full renovation. Done well, the room feels calm, clean and easy to maintain. Done poorly, it looks acceptable for a short time and then starts showing movement, leaks or lippage.

Table of Contents

Your Vision for a New Bathroom in Narre Warren

A common Narre Warren scenario goes like this. The bathroom still works, technically, but only just. The shower leaks at the corners, the old wall tiles date the whole home, storage is poor, and every small fix uncovers another issue underneath.

A woman looks thoughtfully at an outdated shower stall in her bathroom, contemplating a home renovation project.

Most homeowners don't begin with tile specifications. They begin with a simple goal. They want a bathroom that feels clean, modern, easier to use, and free from nagging leak concerns. That's a sensible starting point, because the right renovation should solve both the visible problems and the hidden ones.

What homeowners usually want from the space

Some want an ensuite that feels more refined. Others need a family bathroom that handles daily wear without constant maintenance. In both cases, the brief usually comes down to a few priorities:

  • Better function: More practical layouts, improved shower access, smarter storage and easier cleaning.
  • Better finish: Straighter lines, more balanced tile layouts, cleaner transitions around niches, drains and corners.
  • Better durability: A bathroom that doesn't start failing where water, movement and poor preparation usually expose shortcuts.

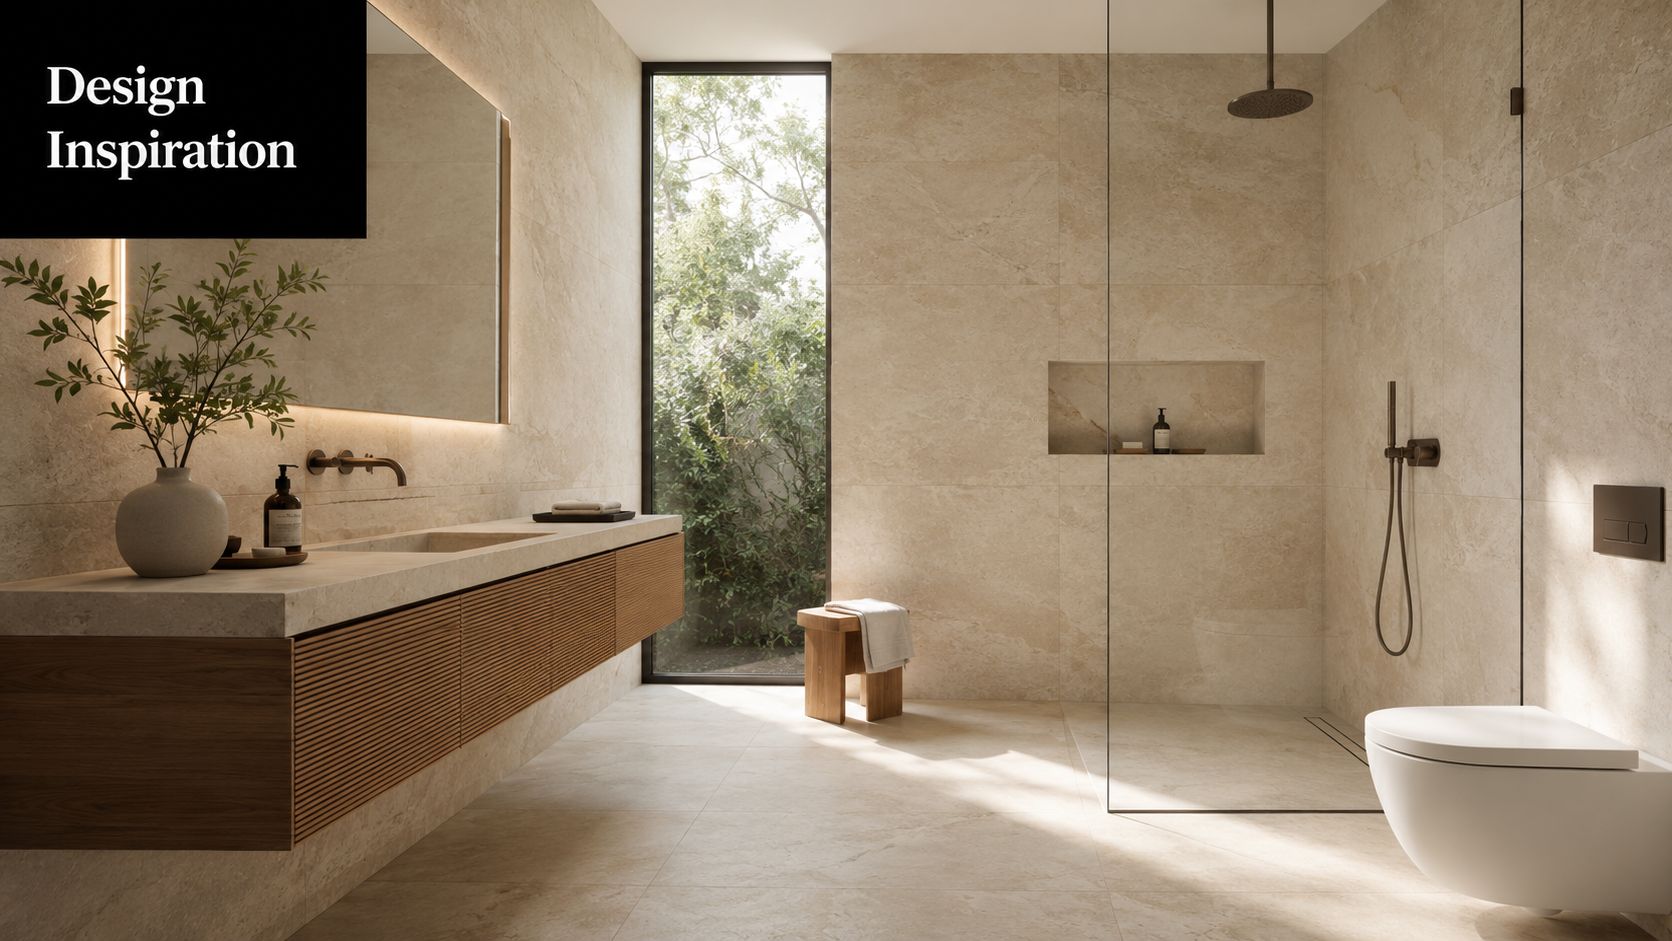
For inspiration on current finishes and layouts, it helps to browse examples of modern bathroom tiling ideas for Melbourne homes.

A bathroom should feel simple to use. That simplicity takes a lot of careful work behind the tiles.

There's also a trust issue that many owners don't realise until they've spoken to a few trades. One contractor says they can tile it. Another says they can waterproof it. A third says you'll need separate plumbing and electrical coordination. That fragmented setup is where bathroom renovations often become stressful.

The better path is a start-to-finish renovation handled by registered professionals who understand not only tiling, but the full sequence of the room. That matters because the finish you see at handover depends on what was checked before a single tile went on the wall.

Our Complete Tiling and Renovation Services

A proper bathroom upgrade in Narre Warren usually needs more than one specialist task. The strongest projects are built as a system. Demolition, levelling, waterproofing, tiling, glazing and finishing all have to work together.

Full Bathroom Renovations

Bathroom renovations work best when the room is assessed as a whole instead of being treated as a cosmetic resurface. If the layout is awkward, the falls are poor, or the substrate has movement, replacing tiles alone won't solve much.

A full renovation usually covers the practical decisions homeowners care about most:

  • Layout changes: Repositioning fixtures to improve circulation and daily use.
  • Material coordination: Matching wall tiles, floor tiles, vanity finishes, tapware and shower details so the room feels resolved.
  • Build sequencing: Organising demolition, rough-in work, waterproofing, tiling and fit-off in the right order so one trade doesn't compromise the next.

That sequence is where many cheaper jobs fall apart. If trades overlap badly, waterproofing gets damaged, set-outs get rushed, and the finished bathroom can look tighter on paper than it does on site.

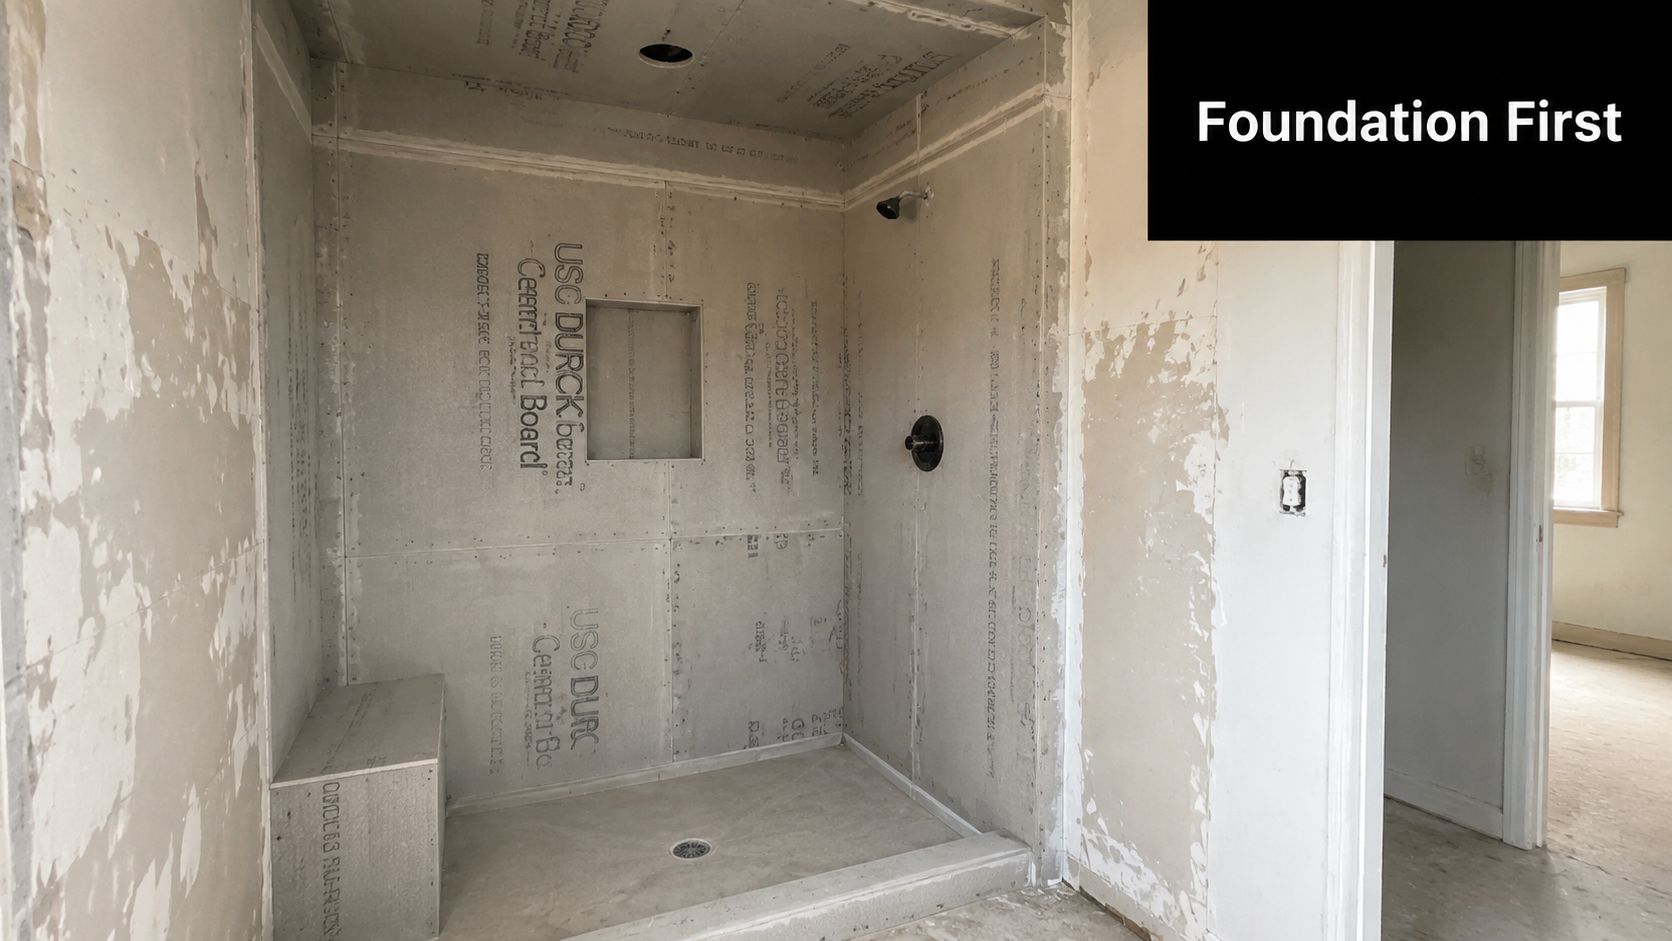
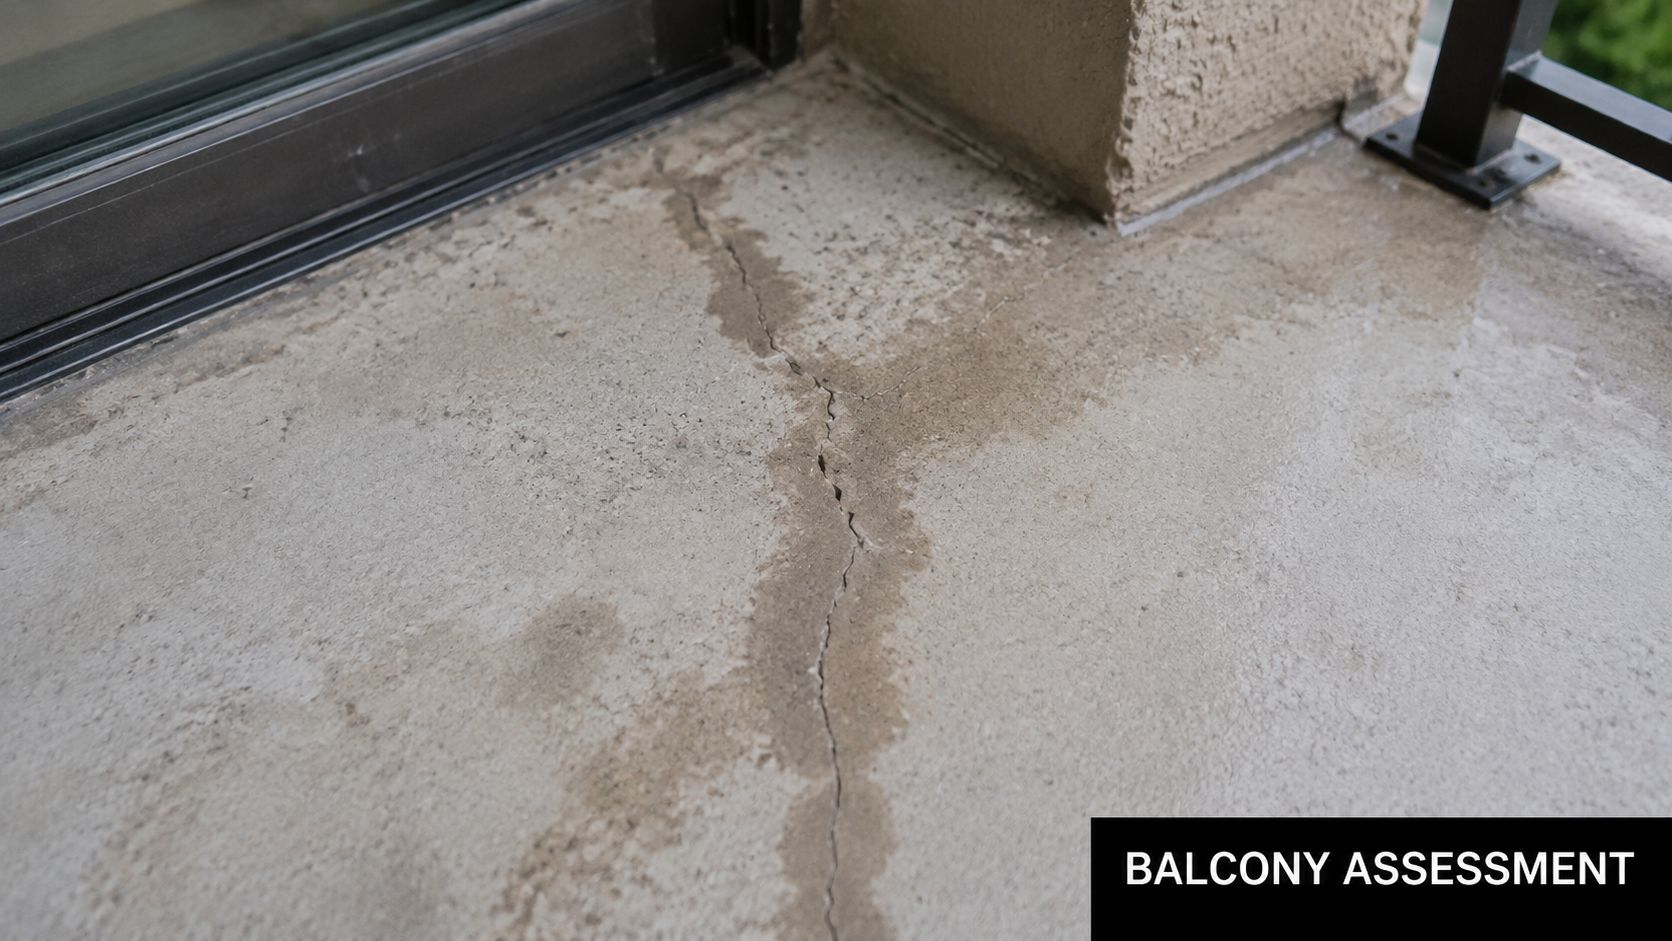
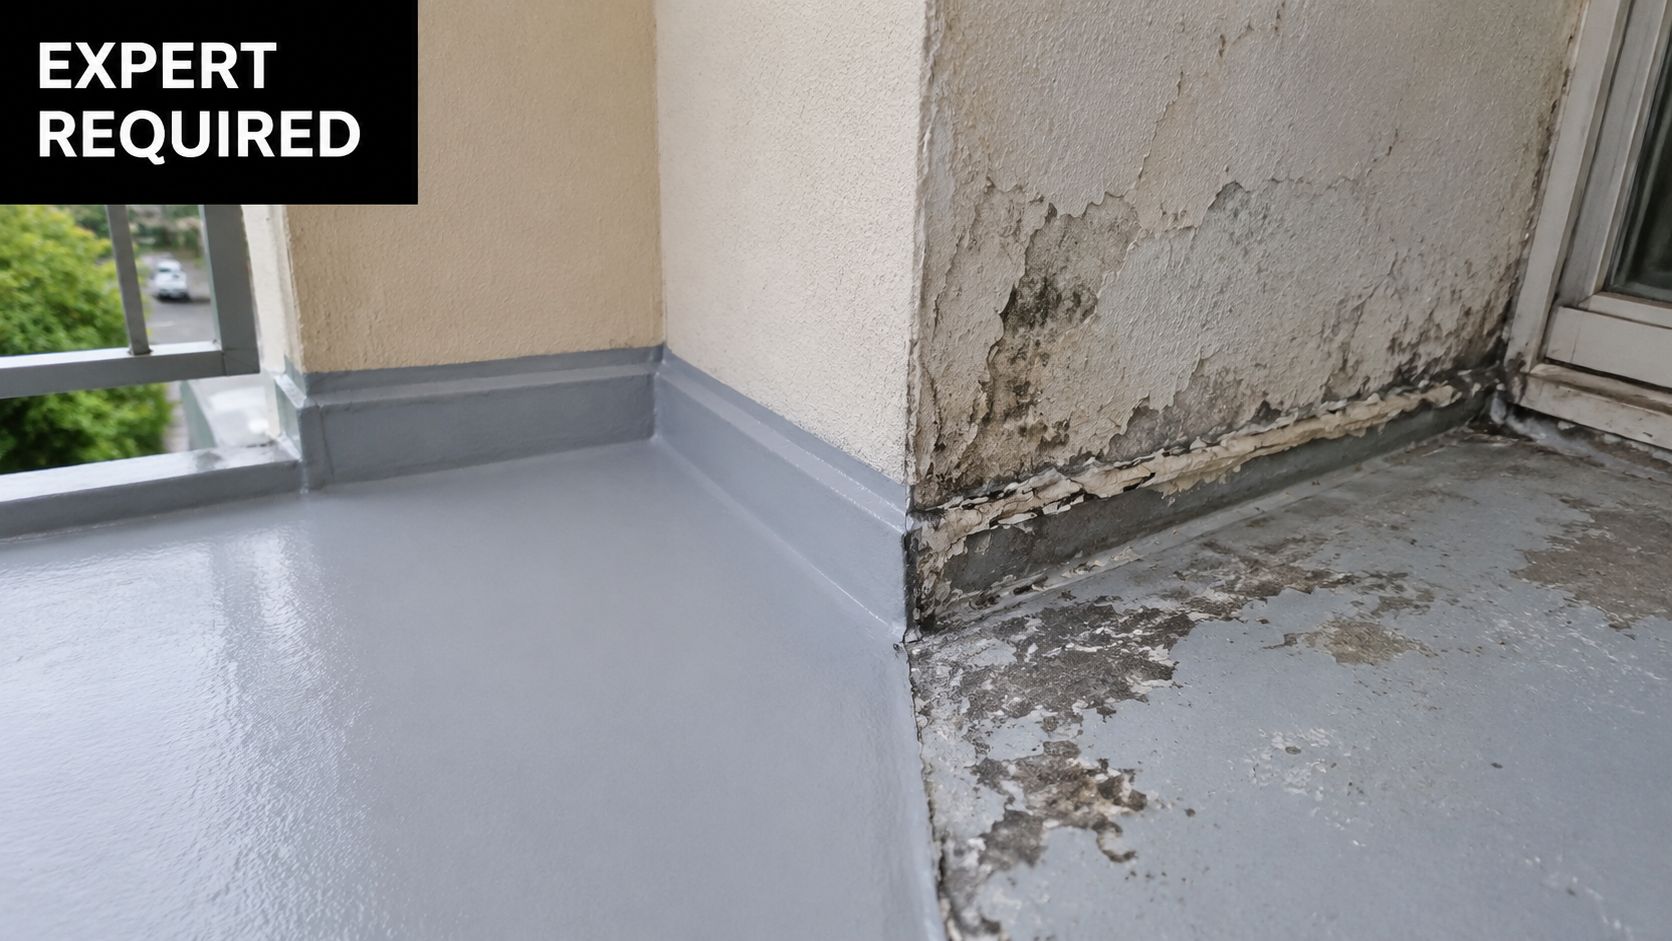
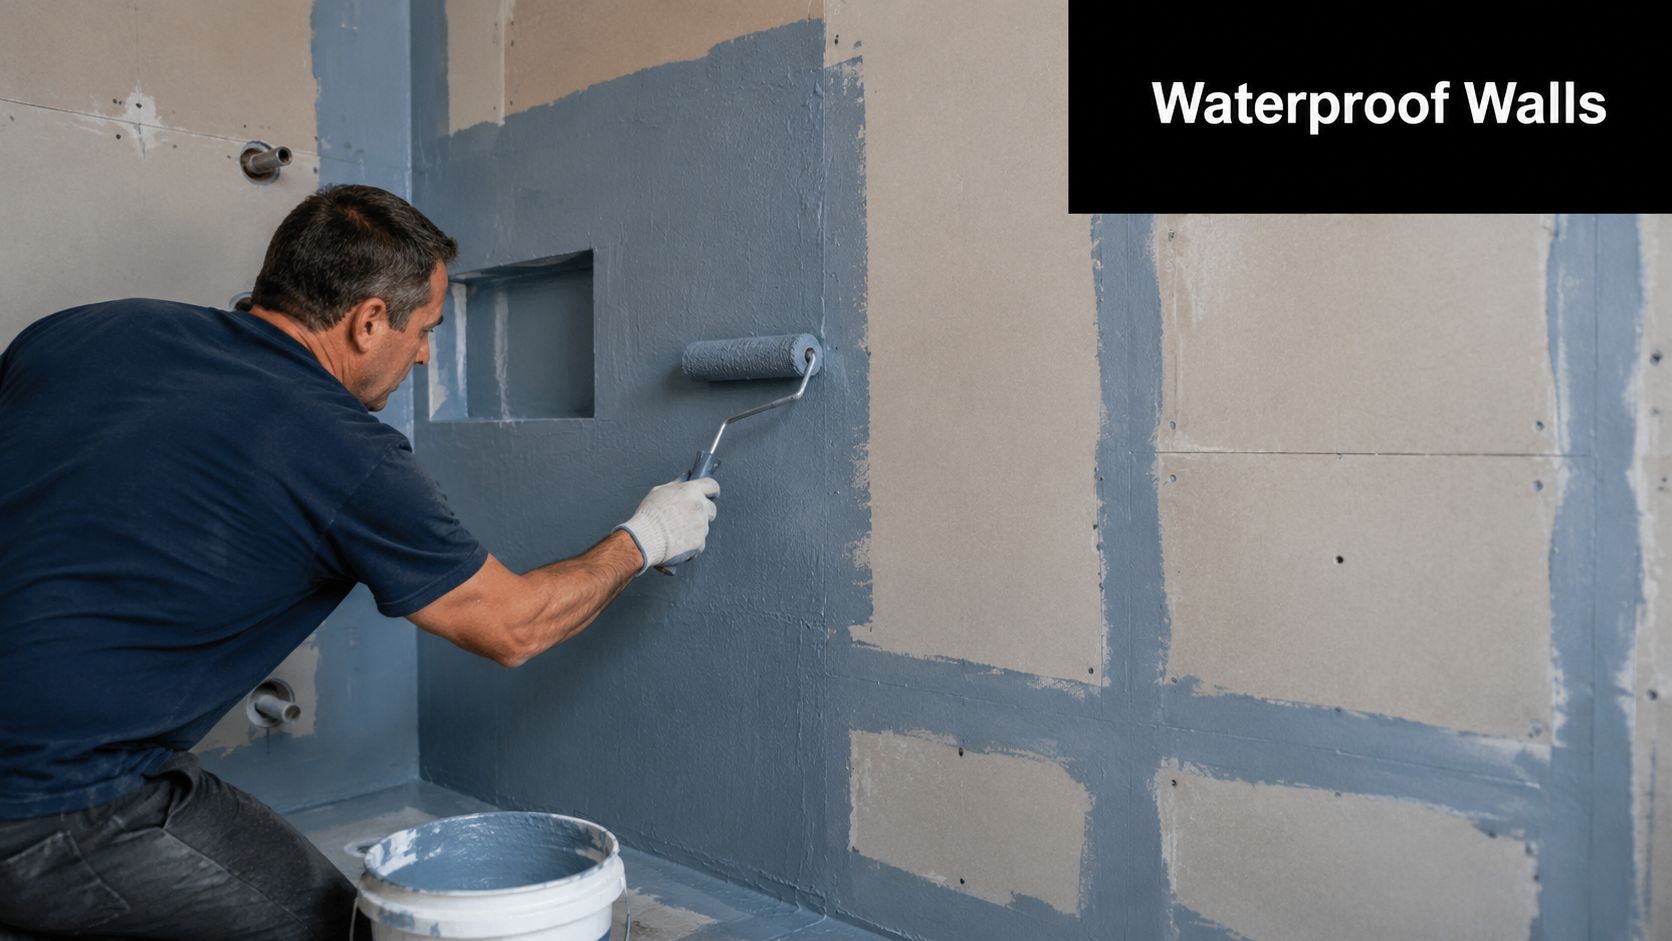
Advanced Waterproofing and Leak Rectification

Leak rectification is not the same as hiding symptoms. Regrouting over a failed system might improve appearance briefly, but it won't stop moisture if the membrane, joints or substrate have already been compromised.

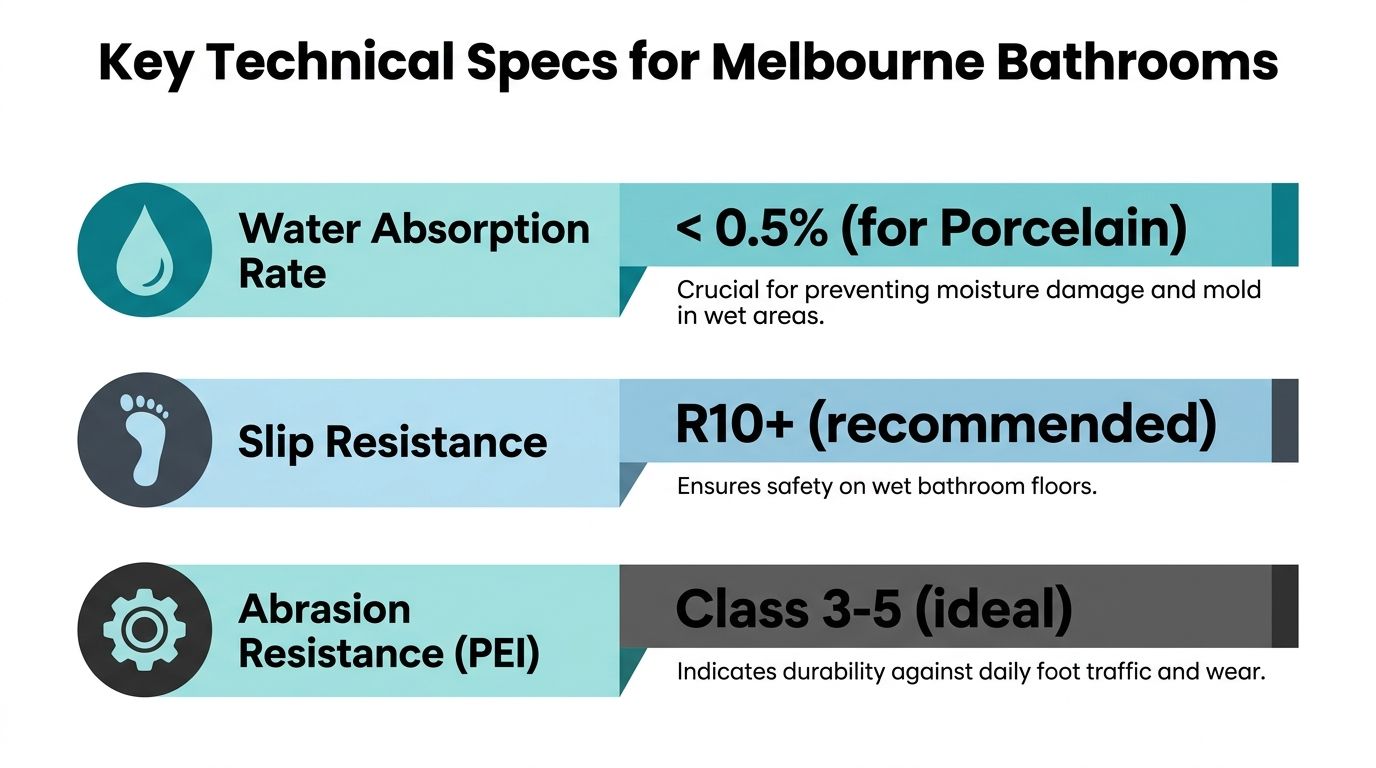
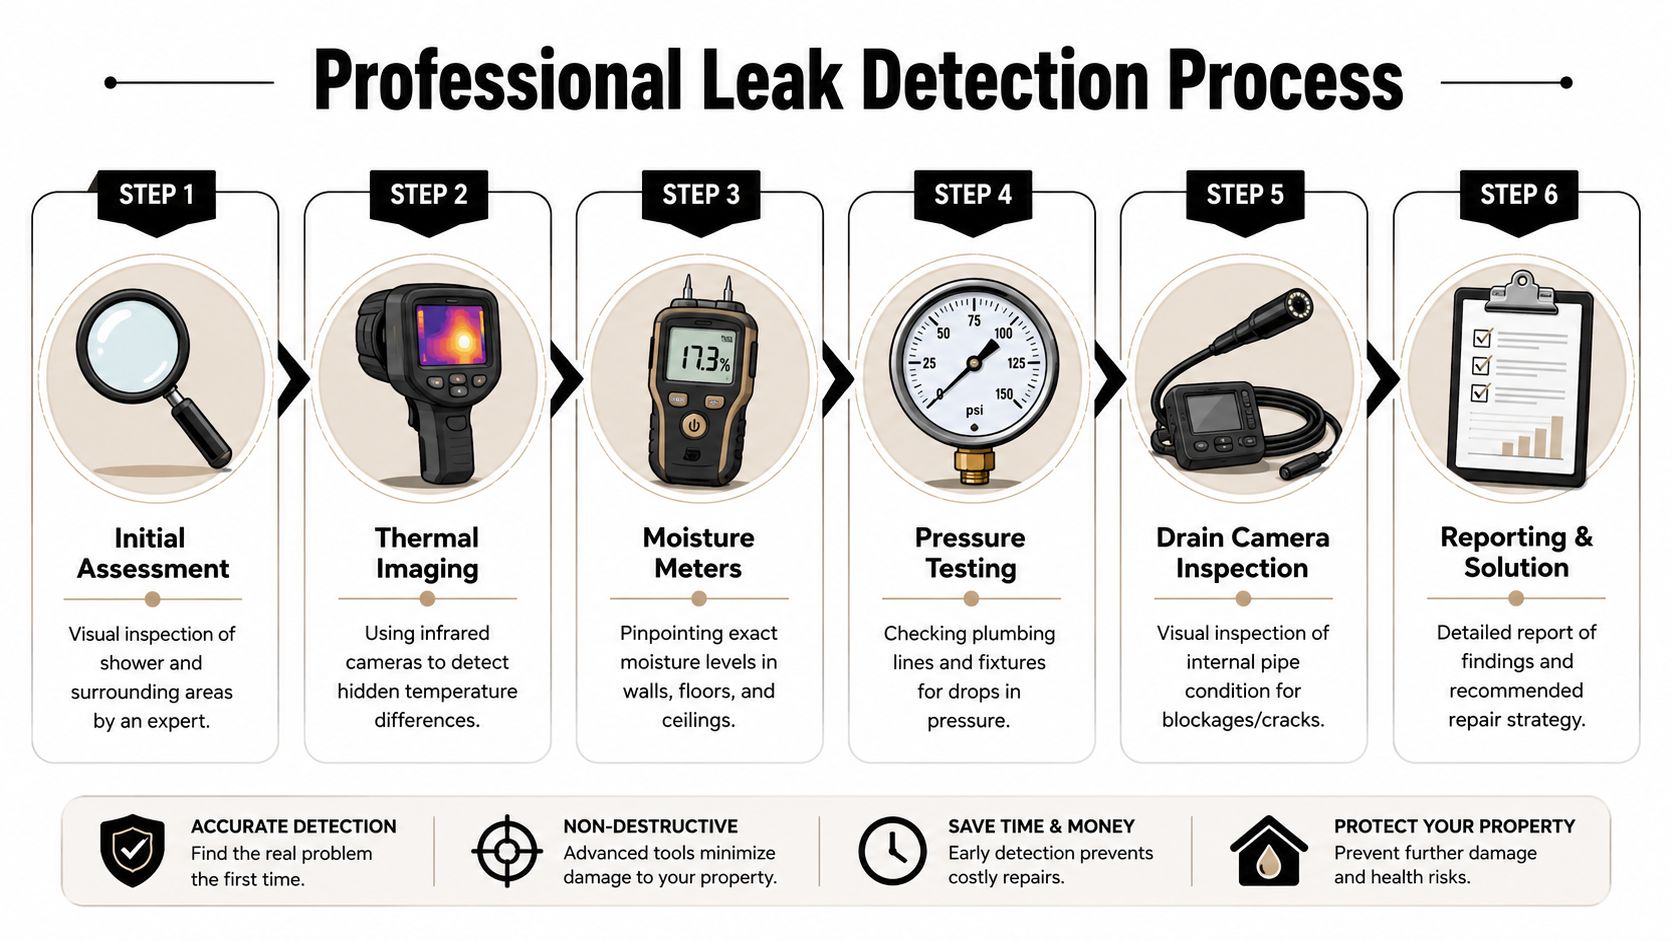
For bathroom renovations in Narre Warren, waterproofing protocols require a minimum 2-hour water immersion test for shower substrates, as mandated by the National Construction Code guidance referenced in this tiling specification. That test matters because it checks whether the system is holding water where it should, before the bathroom is treated as complete.

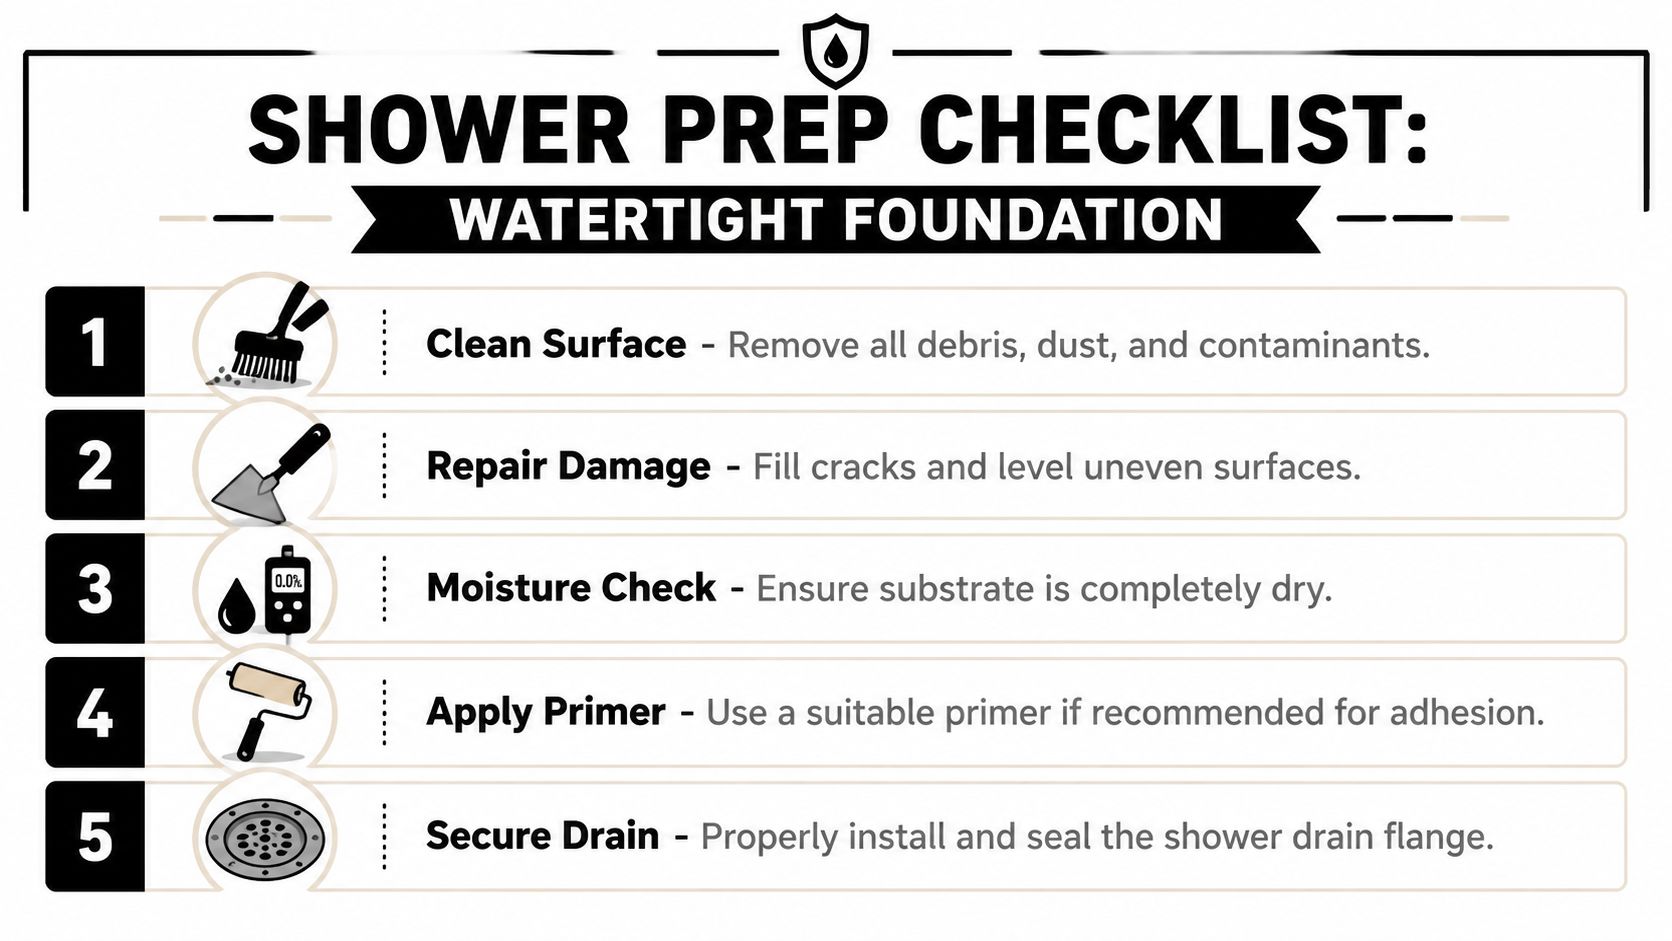
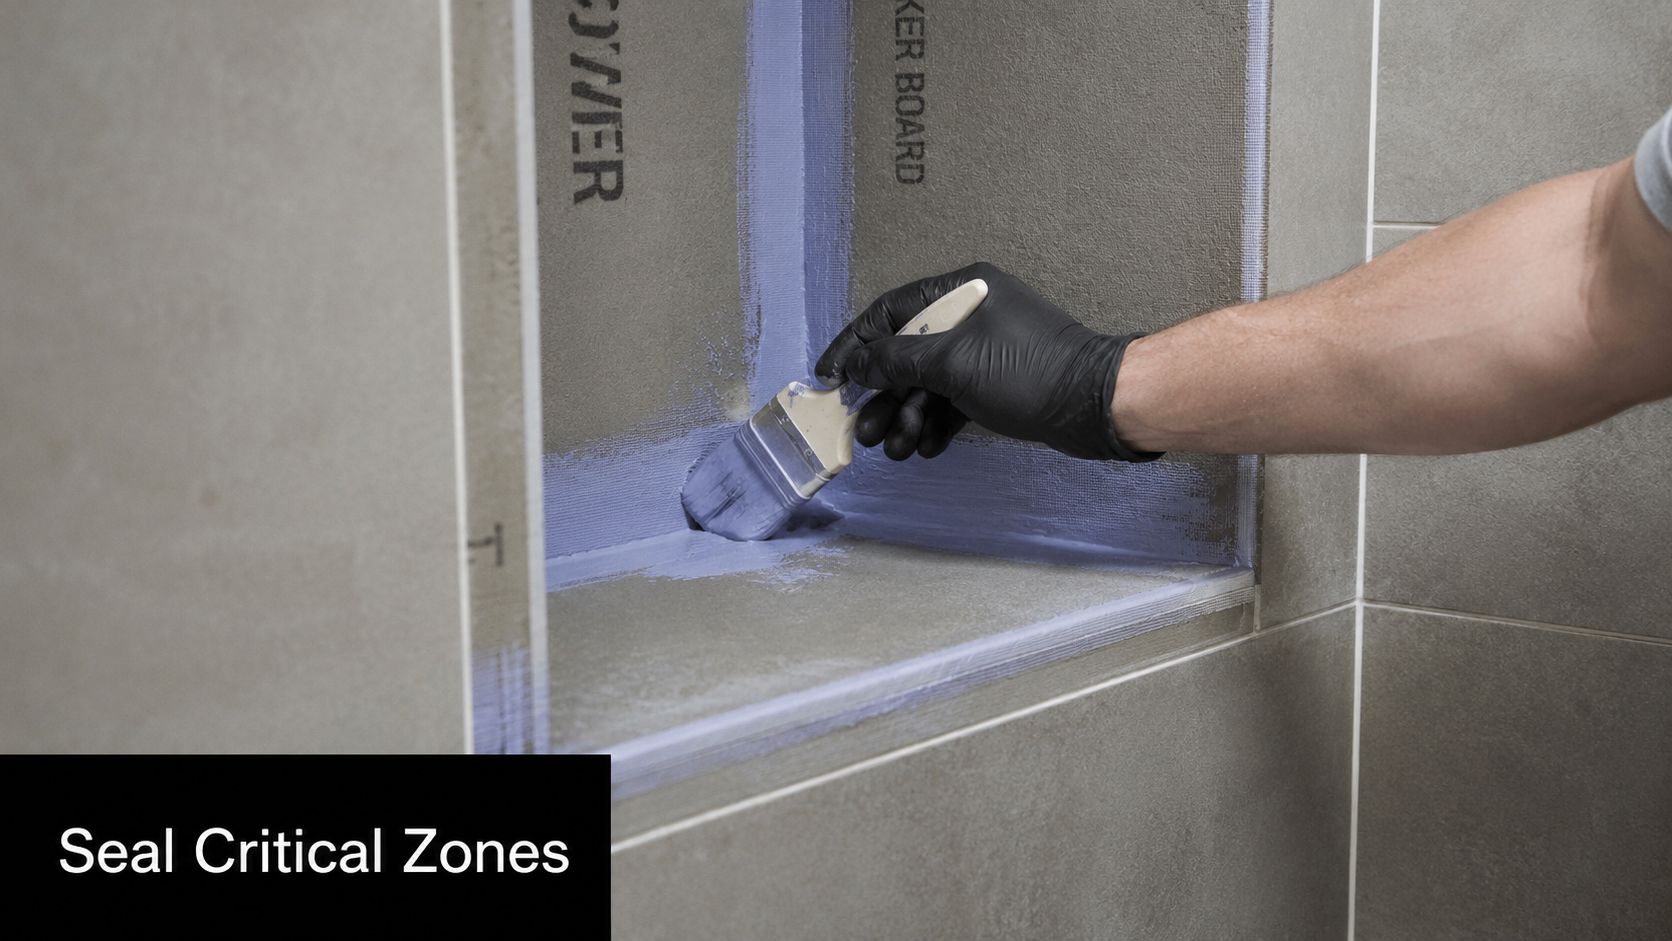
What good waterproofing includes

  • Membrane continuity: The membrane needs to be applied consistently through corners, wall junctions and penetrations.
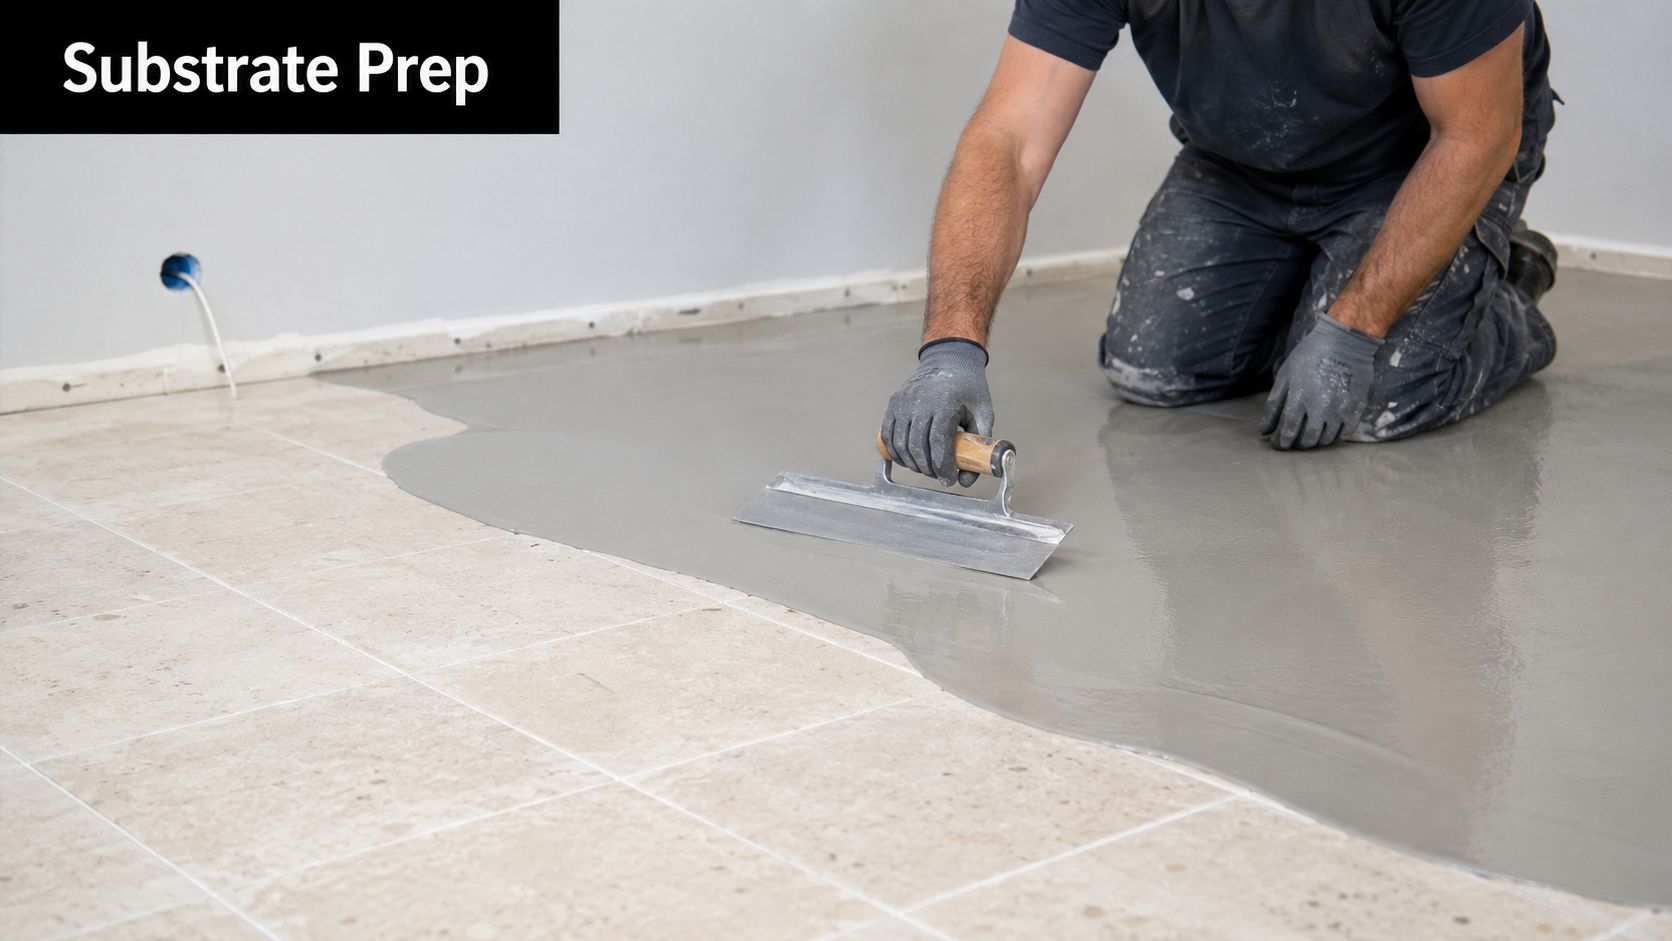
  • Substrate preparation: Membranes don't perform well over unstable, contaminated or poorly levelled surfaces.
  • Testing before finish: A water test helps identify issues before they become internal damage.

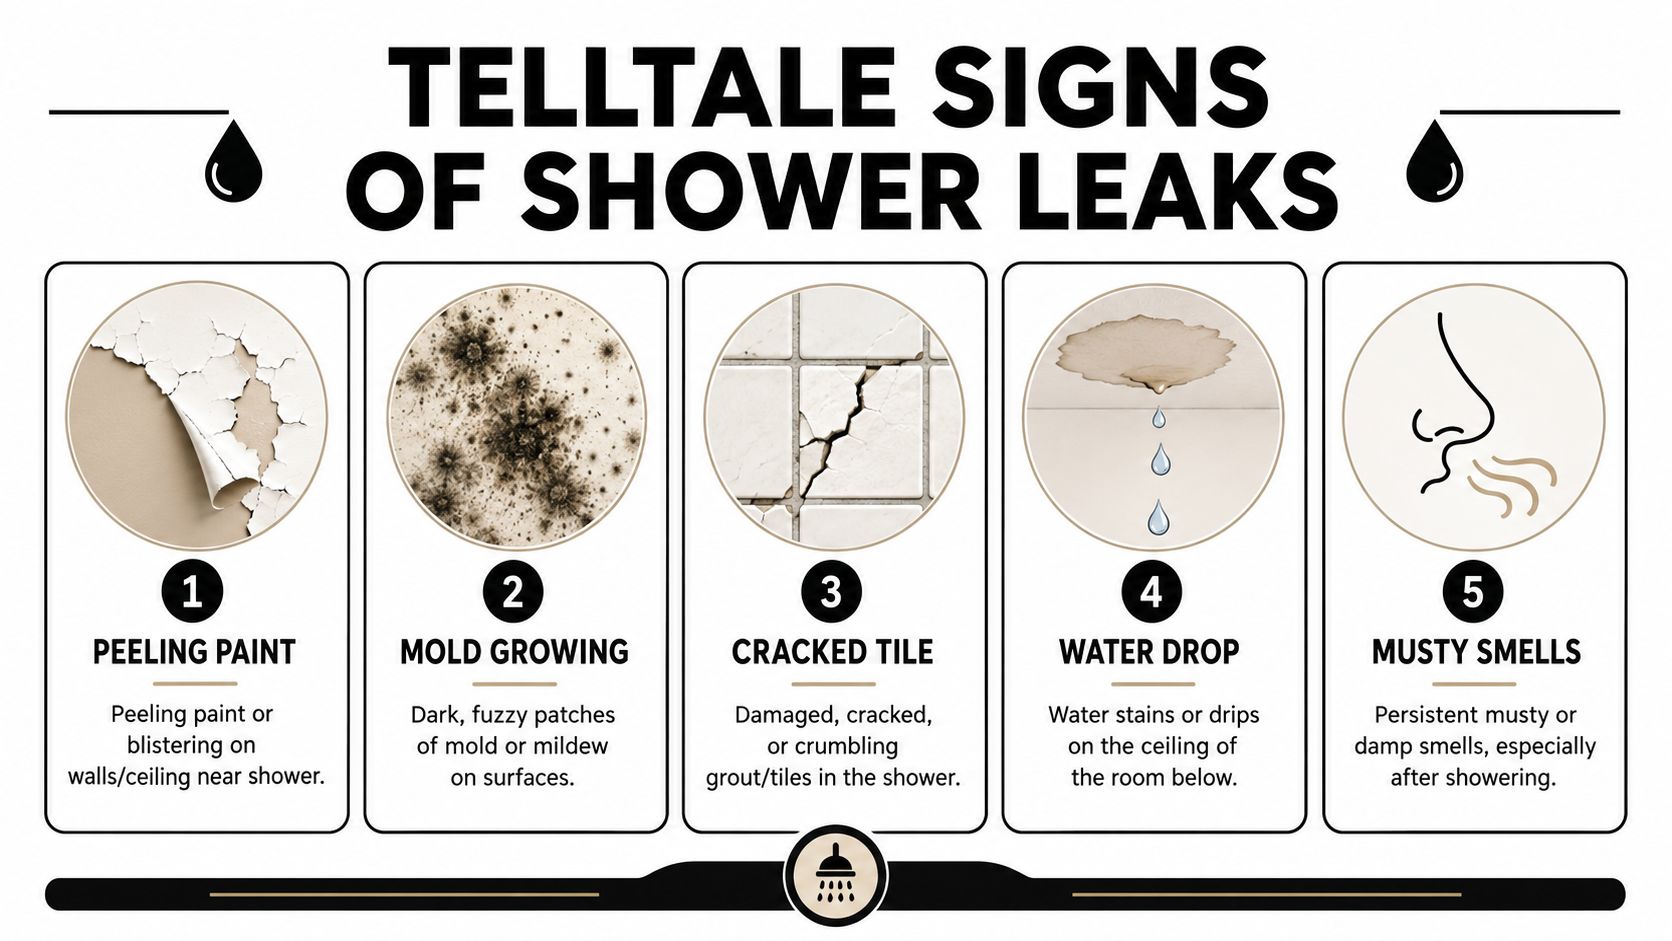
Practical rule: If a bathroom has a leak history, don't assume the visible crack is the real problem. Water often shows up far from where it entered.

In real site conditions, the failures are rarely dramatic at first. More often, it's a persistent damp smell, swollen skirting outside the room, loose silicone, or grout that never seems to dry properly.

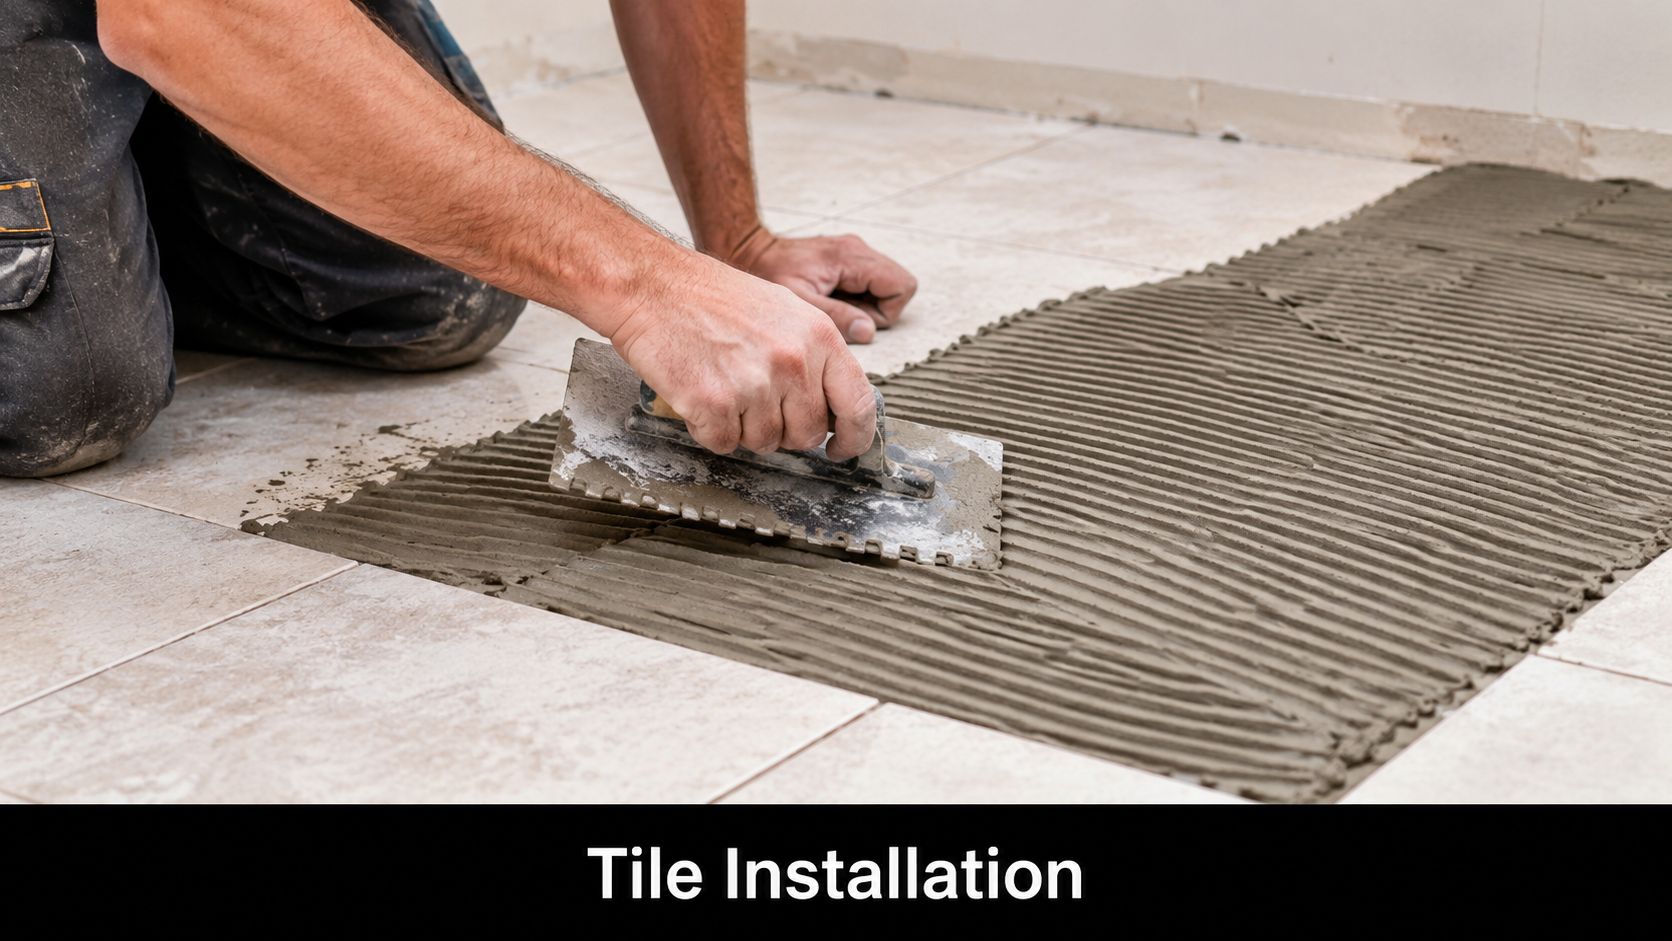
Specialist Large-Format Tiling

Large-format tiles can make a bathroom look cleaner and more spacious, but they are less forgiving than smaller ceramics. They demand flatter substrates, tighter set-out decisions and better handling on site.

For tiling in Narre Warren, this is especially relevant when homeowners choose porcelain panels or premium products such as Kerlite. These formats can look excellent on walls, floors and wet areas, but only when the installer pays close attention to flatness, edge alignment and movement in the base.

A large tile amplifies every mistake. If the wall isn't prepared correctly, the room will show it.

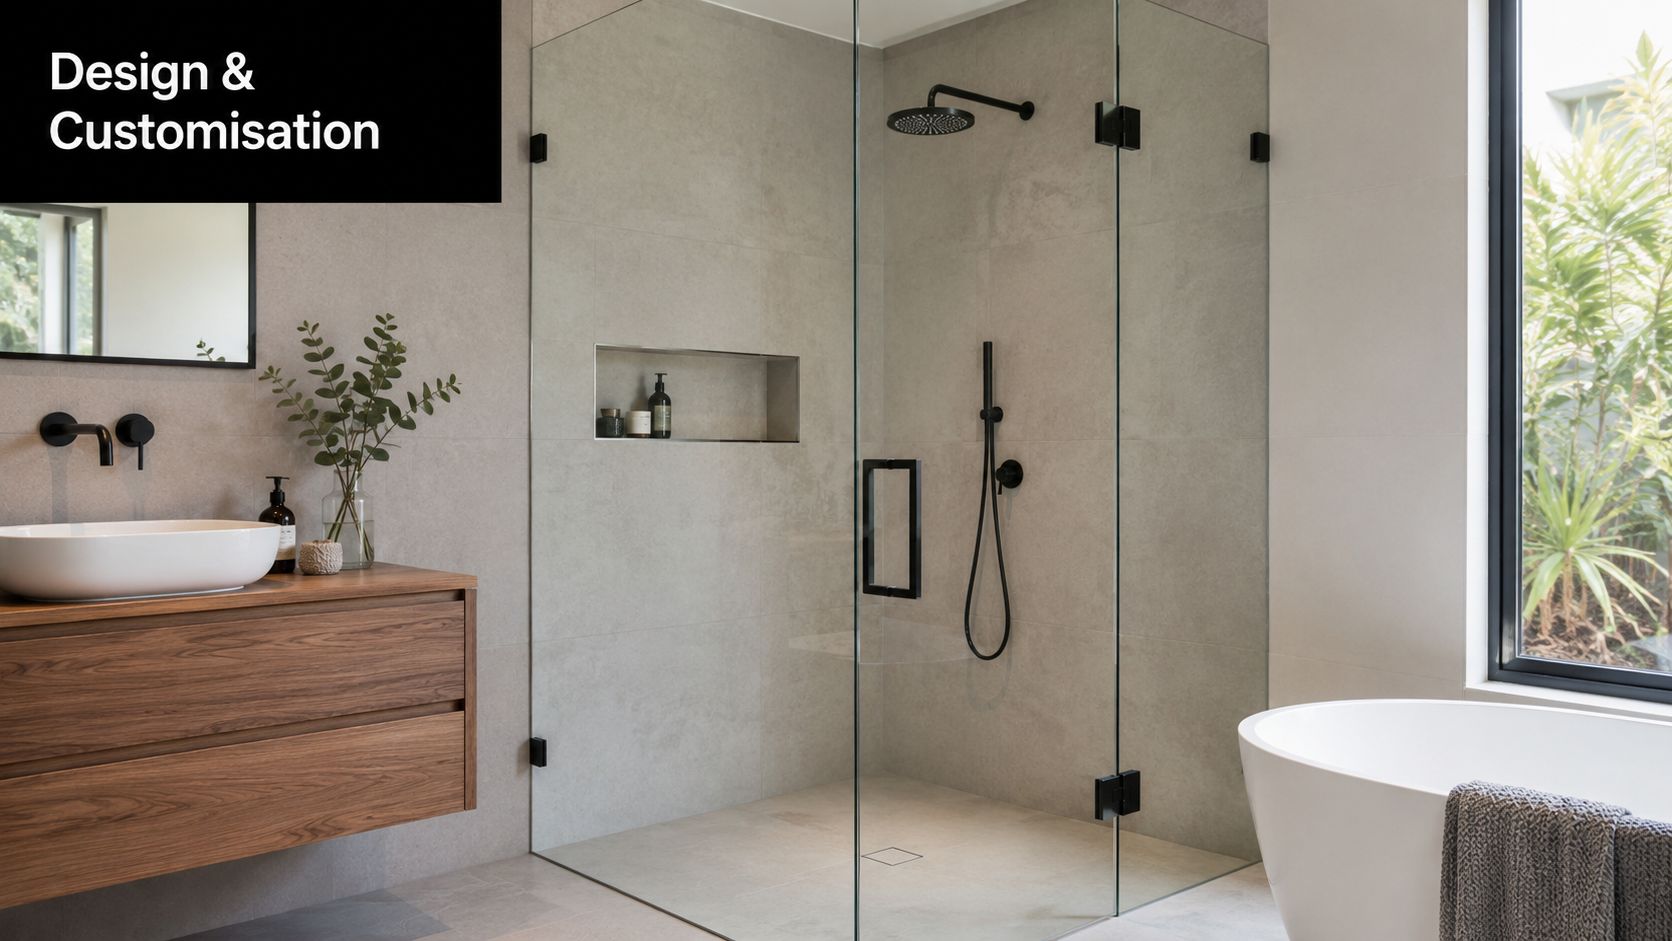
Custom Frameless Shower Screens

Frameless shower screens finish the room visually, but they also expose whether the preceding work was accurate. If the floor falls are wrong, if the walls are out, or if the hob and tile lines aren't true, the shower screen installation becomes difficult fast.

A good frameless setup depends on:

  • Straight tiled planes: The glass installer needs true surfaces.
  • Accurate dimensions: Openings must be measured after tiling, not guessed earlier.
  • Clean water management: The screen should work with the bathroom's falls and waterproofing, not against them.

This part of the job often looks simple from the outside. On site, it rewards careful trade coordination and punishes rushed work.

The Registered Builder Advantage for Your Peace of Mind

Homeowners often assume any experienced tiler can run a full bathroom renovation. In Victoria, that isn't the standard you should rely on when the project crosses into regulated building work.

A professional contractor discussing home renovation blueprints with a female client in a modern house interior.

In Victoria, bathroom renovations exceeding $10,000 must be coordinated by Registered Builders. Melbourne Tiling Services P/L operates as a Registered Unlimited Builder, enabling them to legally manage all licensed trades for a start-to-finish project, ensuring full compliance with VBA requirements.

That single distinction changes the homeowner experience in practical ways. Instead of trying to line up a tiler, plumber, electrician and waterproofer separately, the project can be coordinated under one compliant structure. That reduces confusion around timing, scope and accountability.

Why registered builders matter in bathroom renovations

A bathroom isn't just a tile job. It's a chain of dependent work where one missed step can affect every trade after it. Registered builders are equipped to manage that chain properly.

Project issue What often happens without proper coordination What a registered builder approach solves
Trade sequencing Trades arrive out of order or work over each other The build follows a controlled schedule
Compliance Homeowners are left to work out who is responsible Responsibility stays with a properly qualified project lead
Scope changes Variations become messy and hard to track Decisions are handled within a structured renovation process

There's also peace of mind in knowing who is legally responsible for managing the job. Bathroom renovations involve wet area compliance, trade licensing, and workmanship standards that shouldn't be pieced together casually.

Homeowners wanting to understand the compliance side in more detail can review information about waterproofing compliance certificates in Victoria.

Choosing a registered builder isn't about buying a label. It's about knowing the whole bathroom can be managed lawfully and in the right order.

The trust factor homeowners feel on site

This advantage becomes obvious once work starts. Questions come up about drainage, screeding, fixture locations, wall straightness, and whether a design detail is practical to build. When one qualified party coordinates the room, decisions get made faster and with fewer compromises.

That's especially valuable in tiling Narre Warren bathrooms where homeowners want more than a cosmetic refresh. They want a finished room that performs well after handover, not just on the day the silicone goes in.

Our Proven Five Step Renovation Process

A renovation becomes much less stressful when the sequence is clear. Most homeowner frustration comes from uncertainty. Not knowing what happens first, when selections are locked in, or when costs become fixed.

A five-step renovation journey infographic showing the process from initial consultation to the final handover.

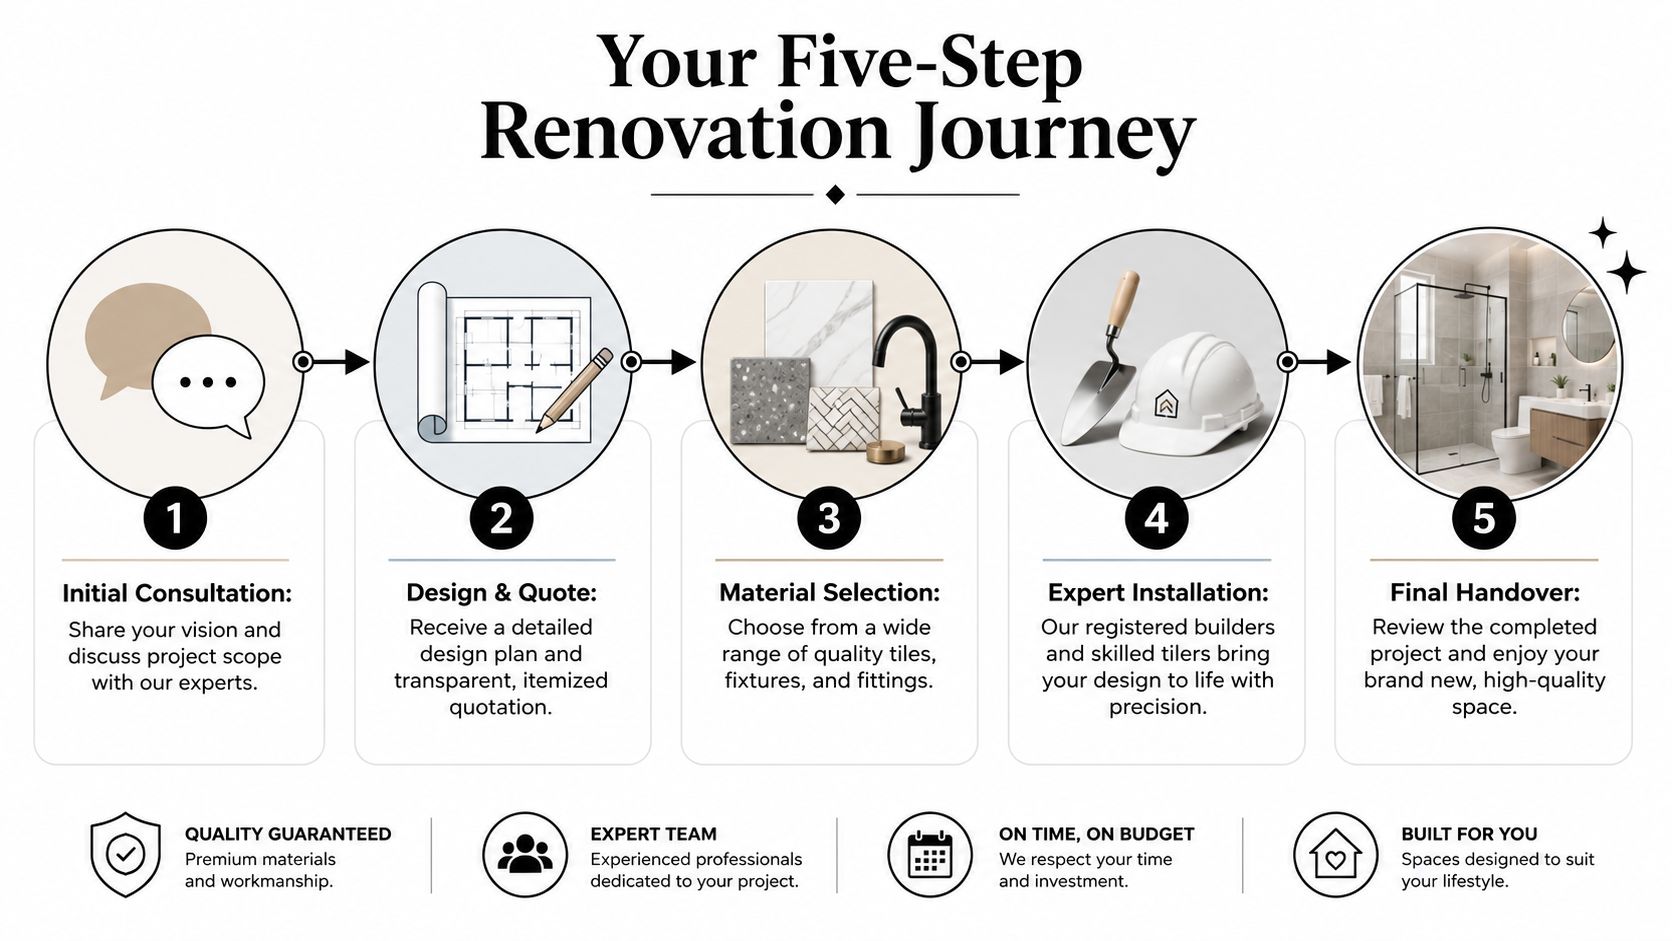
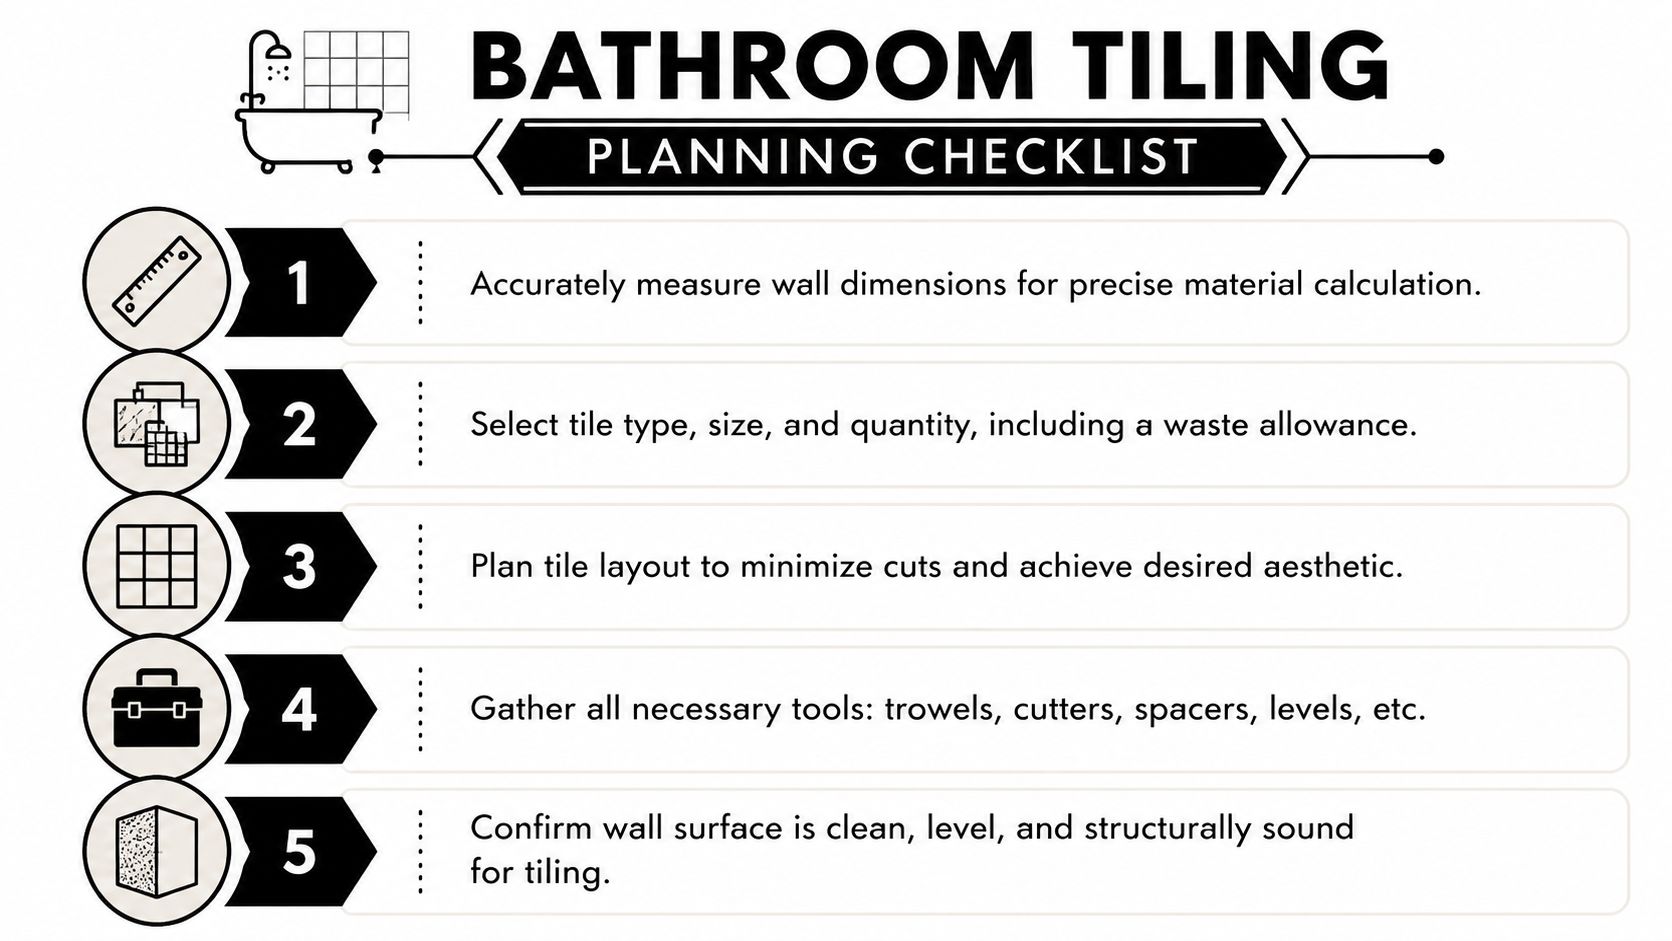
Step 1 In-home consultation and site review

The first step is seeing the existing room properly. Measurements matter, but so do the less obvious site conditions. Floor levels, wall plumb, access, natural light, and the way the bathroom connects to adjoining rooms all influence the final result.

At this stage, homeowners usually clarify whether they want to keep the layout or rethink it completely. That decision affects nearly everything after it.

Step 2 Design planning and material selection

The feasibility of ideas must be considered. A tile may look excellent in a showroom and still be the wrong choice for the room if the format doesn't suit the wall lengths, drainage points or feature details.

Selections usually become easier when they're narrowed down by function:

  • For walls: Large-format porcelain often creates a cleaner visual field.
  • For floors: Slip resistance, grout line planning and drainage performance matter more than appearance alone.
  • For focal points: Niches, feature walls or stone-look finishes should support the room, not crowd it.

A 3D design helps homeowners see proportion, balance and layout before work begins. That prevents a lot of site-based second guessing.

Step 3 Fixed-price quote and scope confirmation

A good quote should make the scope easier to understand, not harder. Homeowners need clarity on what is included, what assumptions are being made, and where premium material choices may affect the total.

This stage is where many poor renovation experiences can be avoided. If the scope is vague, disputes usually show up later around waste removal, substrate repair, tile patterning, trim selections or fixture installation responsibilities.

Clear quoting protects both sides. It gives the homeowner confidence and gives the builder a precise standard to deliver against.

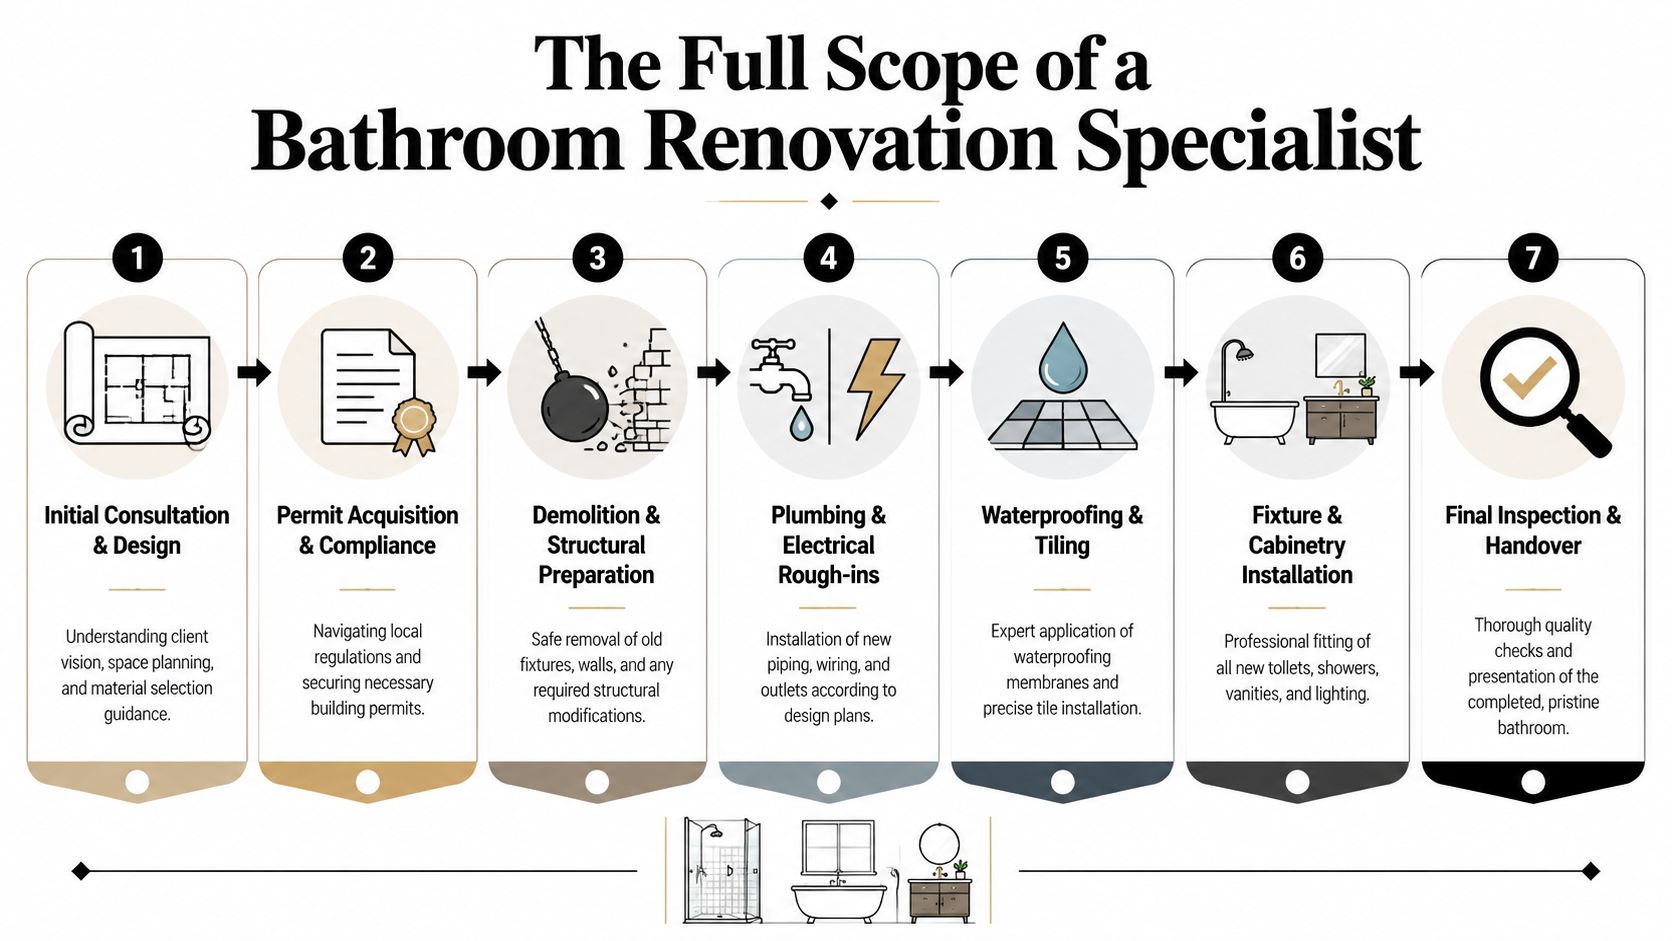
Step 4 On-site construction and installation

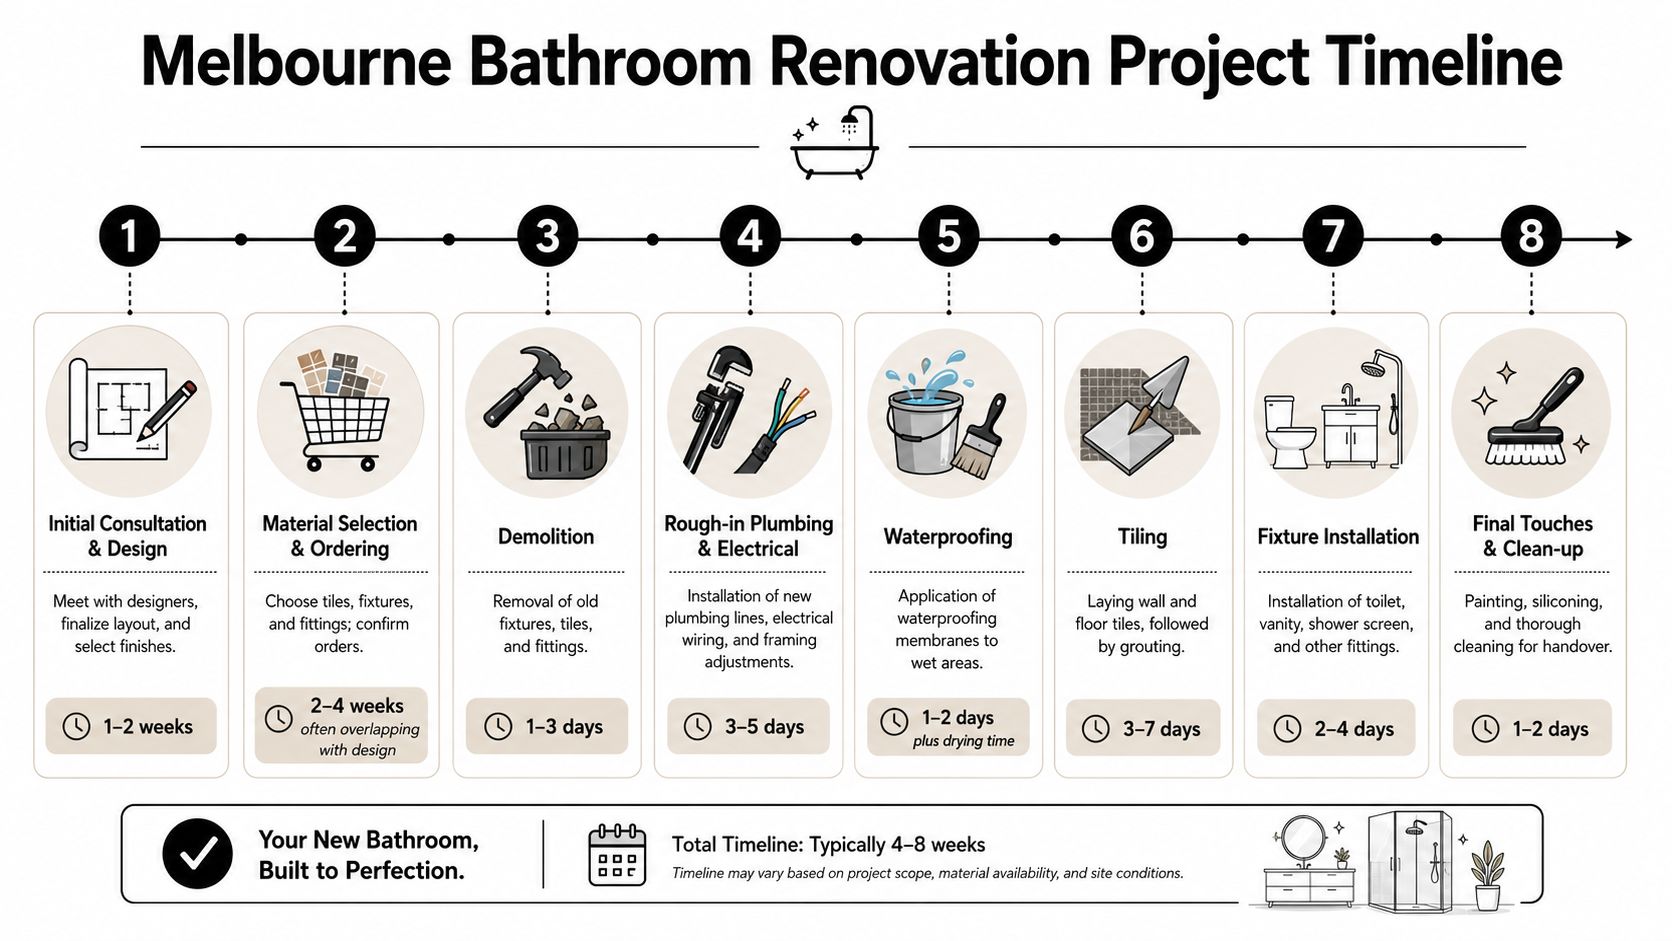
Once work starts, the room moves through demolition, preparation, waterproofing, tiling and fit-off in a controlled order. At this stage, trade discipline matters most.

The best-looking bathrooms usually come from jobs where the unglamorous work was taken seriously first:

  1. Preparation of the substrate
  2. Accurate screeding and floor correction
  3. Waterproofing application and testing
  4. Tile set-out before adhesive goes down
  5. Finishing details around trims, fixtures and glazing

Step 5 Final handover and post-completion review

The last stage isn't only about visual presentation. It's where the room is checked as a completed system. Tile alignment, grout finish, silicone detailing, drainage behaviour, fixture fit-off and screen operation all need to be right.

Homeowners should finish the project understanding how to maintain the room properly. That includes cleaning methods, what sealants to monitor over time, and what not to use on premium tile finishes.

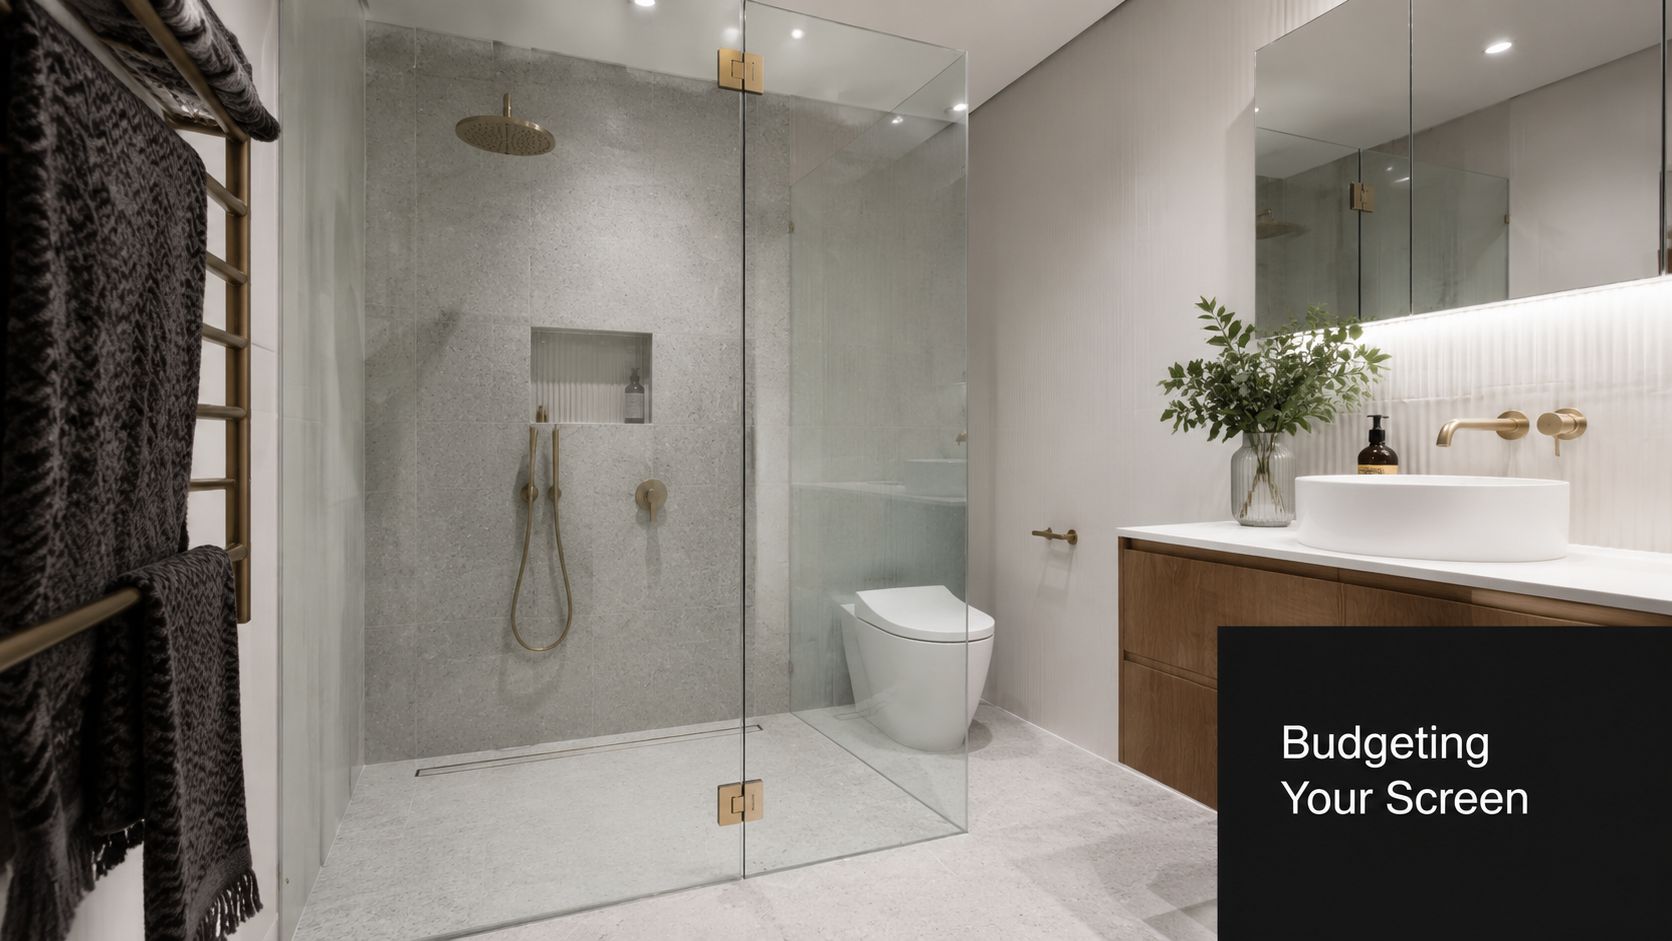
Understanding Your Narre Warren Renovation Budget

Budget matters early, not as an afterthought. Most homeowners can accept a realistic project cost. What they struggle with is unclear scope, soft quoting, and late surprises.

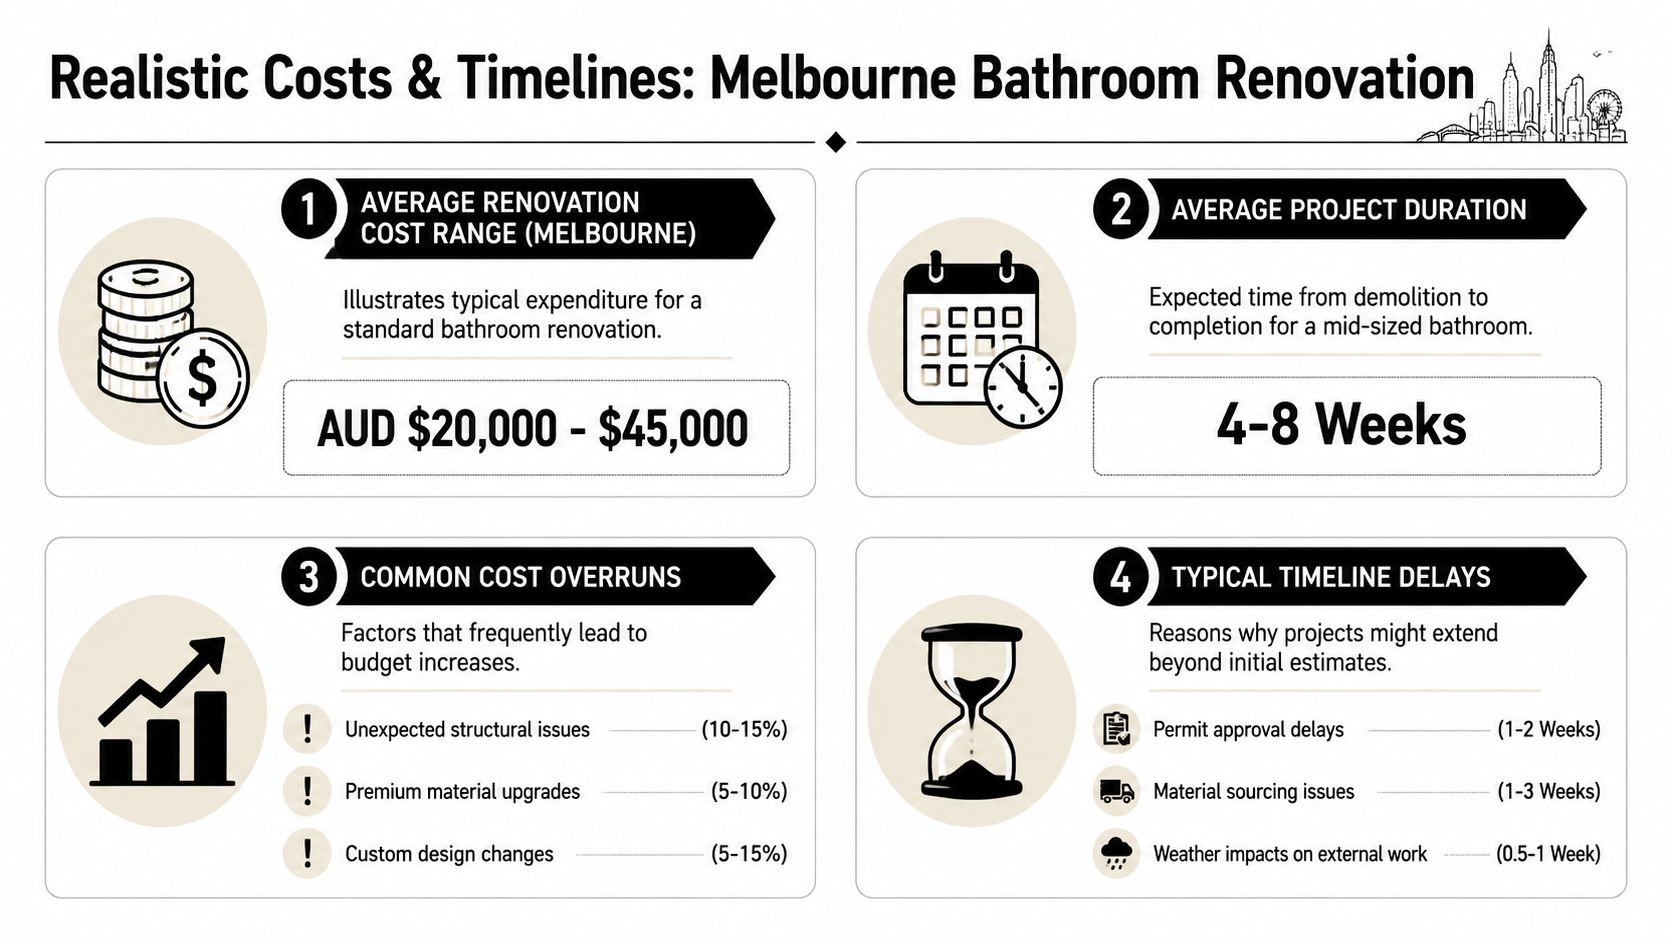
For a complete Melbourne bathroom renovation, the median project cost is approximately $10,000. As Registered Builders, Melbourne Tiling Services P/L is legally qualified to provide fixed-price contracts for projects of this scale, offering budget certainty and financial protection.

What usually pushes a budget up or down

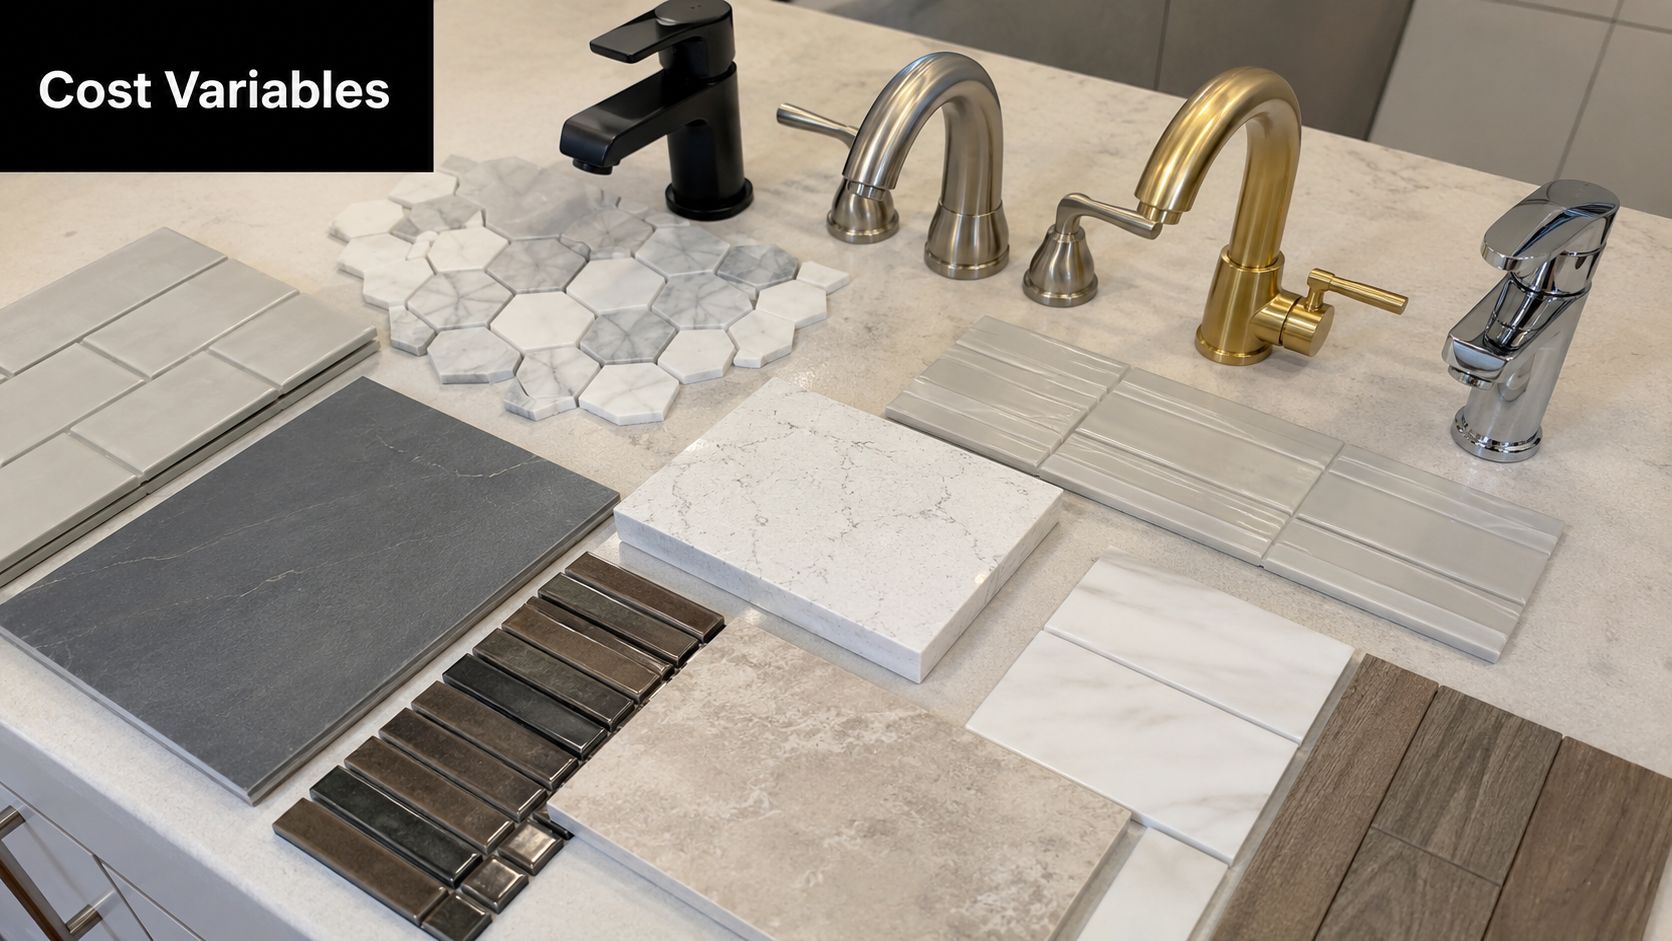
The final cost doesn't come from tiles alone. It comes from the combination of demolition needs, preparation, waterproofing complexity, fixture quality and labour intensity.

Here's a practical breakdown:

  • Room condition: A bathroom with poor floors, damaged walls or leak history usually needs more corrective work before tiling begins.
  • Tile choice: Standard ceramics install differently from premium large-format porcelain or Kerlite.
  • Layout changes: Moving plumbing points or changing the room configuration increases coordination and trade work.
  • Finish level: Mitred edges, niches, custom screens and tighter detailing raise labour demands.

Cost trade-offs worth making

Some upgrades improve the room's look but don't always improve performance. Others are less visible and are worth every dollar.

Spend area Usually worth prioritising Better treated carefully
Waterproofing and prep Yes. Failure here affects the whole room Never trim this to save money
Tile format Worth it when the substrate suits it Don't force large-format into a poor base
Fixtures and fittings Choose durable mid-to-premium quality Ultra-trendy finishes can age quickly

Homeowners comparing options can get a clearer sense of scope through a Melbourne bathroom renovation cost guide and calculator.

There's another legal point that matters. Once your bathroom renovation moves beyond a minor cosmetic update and into a project of this scale, builder registration isn't just a nice extra. It becomes part of doing the work properly and lawfully.

Our Commitment to Quality and Lasting Results

Quality in tiling Narre Warren bathrooms doesn't come from a glossy finish alone. It comes from what was corrected before the finish became visible.

A close-up view of precision installed stone tiles in a corner area near a bright white window.

For large-format tiles, Australian Standard AS 3958.1 requires a substrate flatness tolerance of 3mm over 3m, and that technical benchmark is noted in this AS 3958.1 flatness reference. In practical terms, that level of preparation helps prevent cracking and supports a cleaner finished floor.

What lasting work looks like on site

Homeowners don't usually inspect a bathroom with a straight edge or laser level, but they do notice the outcomes of disciplined work:

  • Tile lines look calm and intentional
  • Corners feel neat rather than patched
  • Shower areas drain properly
  • The floor feels solid underfoot
  • Glass, trims and fixtures fit without awkward gaps

That's the difference between a bathroom that photographs well and one that holds up.

Craftsmanship is visible in the details

Good tiling isn't loud. It shows in consistency. The cut around a waste. The way a niche aligns with grout joints. The absence of lippage that catches light and shadow. The choice to correct a wall before chasing speed.

The strongest bathroom finishes are usually the ones that don't call attention to themselves. Everything just looks right.

That's what homeowners should expect from a serious renovation. Not drama, not excuses, just accurate work that stays serviceable and looks resolved long after handover.

Frequently Asked Questions About Tiling and Renovations

How long does a bathroom renovation usually take

The exact timing depends on the room size, material selections, drying times and whether the layout is changing. A straightforward update moves differently from a full bathroom renovation involving demolition, waterproofing, multiple trades and custom glass. The best approach is to judge the timeline by scope, not by optimistic promises made before the site has been inspected.

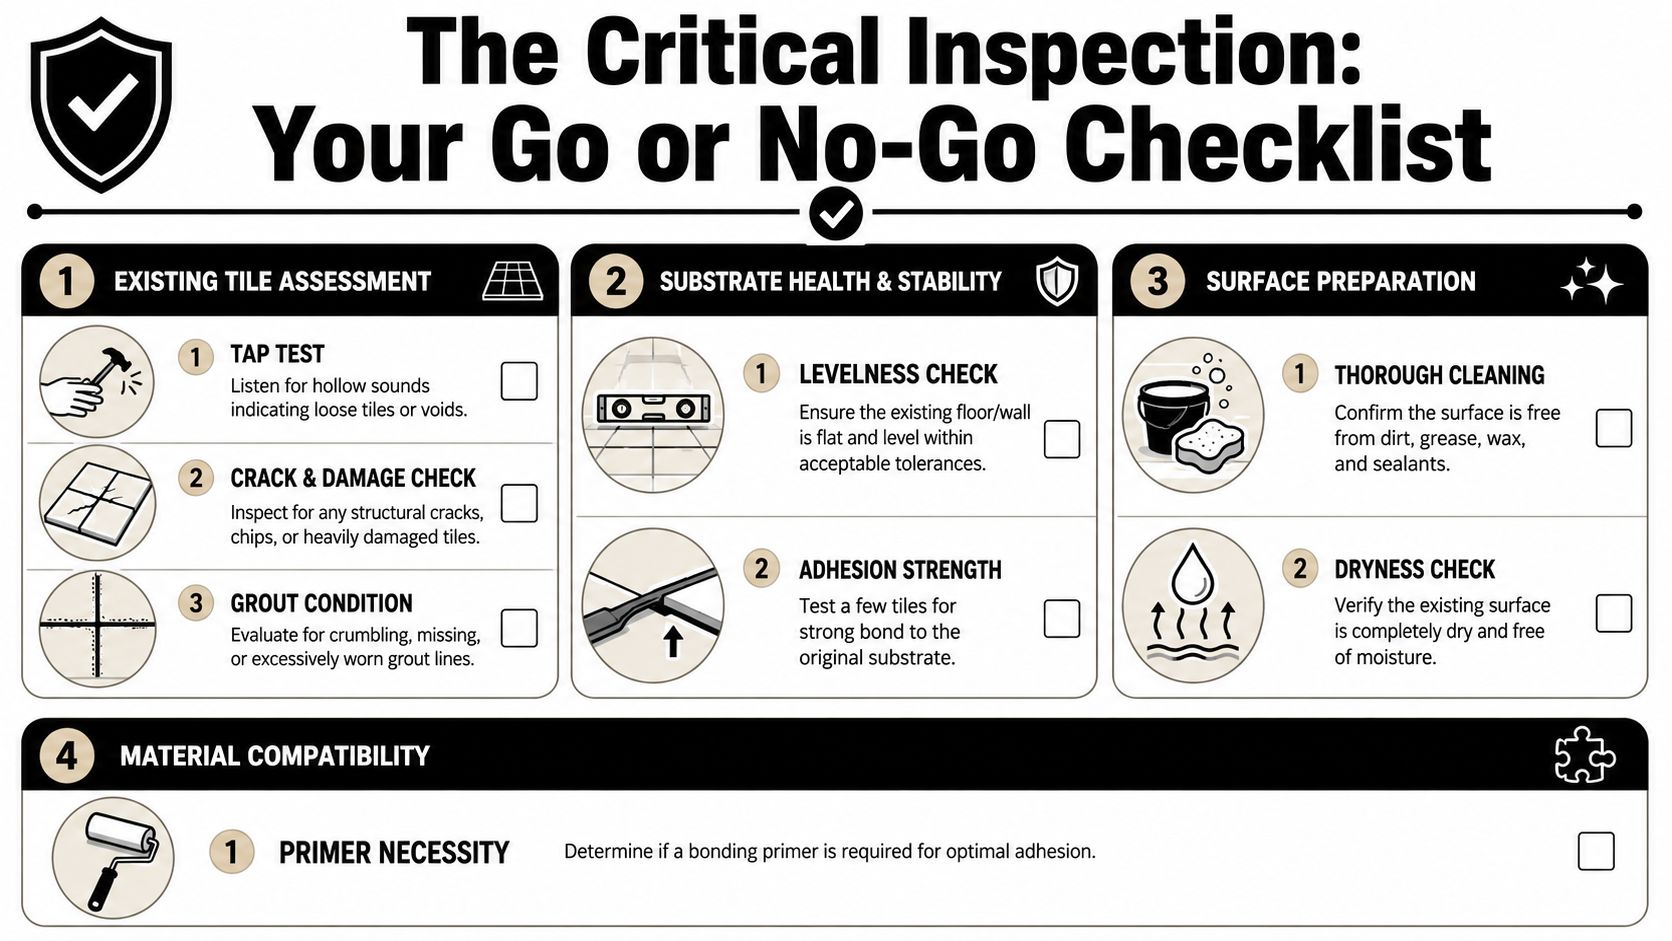
Can you tile over existing tiles

Sometimes it's technically possible, but it's rarely the first recommendation for a bathroom that already has age, movement or moisture concerns. Tiling over tiles can preserve height issues, hide substrate problems, and limit proper inspection of the wet area underneath. In many Narre Warren bathrooms, removal and proper preparation produce the better long-term result.

What should I do before renovation work begins

Clear personal items, arrange access, and decide early which fixtures, tile ranges and finishes you want approved before installation starts. If the bathroom is your only one, temporary arrangements matter too. Renovations run more smoothly when selections are made upfront and the work area is easy for trades to access safely.

Do large-format tiles always make a bathroom look better

Not automatically. Large-format tiles can create a sleek, high-end result, but only if the room proportions, substrate condition and drain planning suit them. In smaller rooms, the right tile size depends on set-out, cuts, feature placement and how the floor falls are managed. Good design comes from fit, not just from choosing the biggest tile available.

Do you service areas around Narre Warren

Yes. Narre Warren projects are often part of a wider South-East Melbourne service area. If your property is nearby and you need bathroom renovations, waterproofing advice or specialist tiling, it's worth asking based on your location and project type.


If you're planning a bathroom upgrade and want the job handled by a team that understands compliant bathroom renovations, registered builders, waterproofing, and high-end tiling detail, speak with Melbourne Tiling Services P/L. They provide free quotes, 3D design support, and start-to-finish project management for homeowners across Melbourne and greater Victoria.

Travertine Look Porcelain Tiles: Ultimate Guide 2026

You're probably in the same spot as a lot of Melbourne homeowners planning bathroom renovations. You love the warm, calm look of travertine, but once you start comparing products, the doubts creep in. Will real stone stain? Will it need sealing? Is it the right choice for a busy family bathroom, an ensuite that gets daily steam, or an older home where one leak can turn into a major repair?

That tension is real. The bathroom has to look good, but it also has to survive daily use, cleaning, moisture, movement in the structure, and the realities of Australian standards. In older Melbourne homes especially, the finish you see is only half the job. The tile choice, substrate prep, waterproofing system, and the way a registered builder coordinates trades all affect whether the renovation still performs years later.

Table of Contents

The Enduring Appeal of Travertine Without the Upkeep

A lot of clients walk into a tile showroom wanting the same thing. They want a bathroom that feels settled and natural, not glossy, cold or overdesigned. Travertine has that appeal. Its soft movement, sandy tones and quiet texture suit almost every style, from a contemporary ensuite to a renovated cream-brick home in the suburbs.

Then the practical questions start. Real travertine is a natural stone. That means variation, visible pores, ongoing care, and more caution around water, soap residue and cleaning products. In a bathroom, those aren't minor details. They shape how the room lives day to day.

That's why travertine look porcelain tiles have become such a strong option in Melbourne renovations. They give you the look people are usually chasing from stone, but with a more predictable finish and far fewer maintenance demands. If you like the idea of a warm, natural palette but don't want a surface that asks for special treatment, porcelain usually makes more sense.

The look people want is still achievable

In practice, most homeowners aren't asking for geology. They're asking for atmosphere. They want a bathroom that feels calm in the morning and easy to keep clean on a weeknight. Travertine-look porcelain does that well because it can carry the colour variation and vein pattern of stone without inheriting the same level of vulnerability.

Practical rule: In wet areas, choose the surface that suits the way you actually live, not the one you admire only in a showroom.

That matters even more in family homes, rentals and properties managed by landlords. A tile that needs less intervention is usually the better long-term decision.

Why this matters more in Melbourne bathrooms

Melbourne renovations often involve older wall lines, mixed substrates, awkward room sizes and ageing plumbing locations. In that setting, a forgiving, stable finish matters. So does compliance. A bathroom isn't just a design project. It's a wet area assembly that needs to work as a system.

The strongest bathroom results usually come from balancing three things:

  • Appearance: The room still needs warmth, scale and visual consistency.
  • Performance: Wet floors, shower walls and splash zones need durable, low-absorption materials.
  • Installation quality: Good tiles can still fail over poor prep or bad waterproofing.

Travertine look porcelain tiles sit in that sweet spot for many bathroom renovations. They're attractive, practical and easier to specify properly than natural stone in most wet-area applications.

What Exactly Are Travertine Look Porcelain Tiles

Travertine look porcelain tiles are not a compromise product. They're a purpose-built one. Manufacturers design them to reproduce the veining, tonal movement and subtle surface character of natural travertine, but on a much denser tile body that handles bathroom conditions far better.

A useful way to think about it is this. Standard ceramic is like a more absorbent biscuit. Porcelain is more like a fired dense plate. Both are tile, but they don't behave the same once water, steam and cleaning cycles become part of everyday use.

How the look is created

Modern travertine-look porcelain is produced through controlled manufacturing rather than natural quarry variation. The pattern and texture are engineered onto the tile surface so the finished piece can resemble filled, honed, cross-cut or vein-cut travertine depending on the range.

The result is a tile that gives designers and homeowners much tighter control over the final room. You can dry-lay samples, check pattern repetition, plan mitred corners and match floor-to-wall transitions with far more predictability than you get with natural stone.

That consistency is useful when you're trying to achieve:

  • Minimal grout lines: Especially with rectified formats.
  • A calm palette: Without random colour jumps.
  • Large uninterrupted surfaces: Such as shower walls and feature panels.

Why porcelain behaves differently in wet areas

The key difference is density. As noted in this travertine-look porcelain overview, travertine-look porcelain tiles are engineered to replicate the natural veining and texture of travertine stone while offering significantly higher durability and water resistance; porcelain tiles typically have water absorption rates below 0.5%, which places them within the lowest absorption category per ASTM standards and makes them suitable for wet bathroom environments such as showers and tub surrounds in Australia, where moisture exposure is a key design consideration.

That's why porcelain is usually the safer specification for showers, bathroom floors and tub surrounds. Low absorption reduces the chance of moisture getting into the tile body itself. It also means the tile won't ask for the same sealing regime that natural travertine does.

A tile can look like stone without behaving like stone. In a bathroom, that's often the whole point.

There's also a practical installation advantage. Because the product is manufactured to tighter tolerances, it's easier to plan layouts, align joints and deliver a cleaner finish around niches, strip drains and frameless shower screens.

For homeowners, the takeaway is simple. Travertine look porcelain tiles aren't just “stone style”. They're a high-performance surface built for spaces where water, hygiene and durability matter every day.

Porcelain vs Natural Travertine An Honest Comparison

Natural travertine still has genuine appeal. It's a real stone with natural variation that some people will always prefer. If you want authenticity above everything else, it can be a beautiful finish. But bathrooms punish weak decisions, and that's where porcelain usually separates itself.

Travertine-look porcelain tile has gained significant traction in Australia, representing approximately 37% of all ceramic porcelain tile sales by volume, up from 27% in 2015, according to this market summary on travertine-look tile. That shift is especially visible in bathroom and wet-area work because homeowners increasingly want low-maintenance, water-resistant surfaces.

A comparison chart outlining the key differences between porcelain tiles and natural travertine stone materials.

Where natural travertine still appeals

Real travertine offers variation that no printed surface can replicate perfectly. Every piece is different. That can be an asset in a powder room feature wall or a low-splash area where the stone is there to be admired rather than tested.

Still, the trade-off is straightforward. Natural travertine is porous, softer than porcelain, and more sensitive to staining, etching and maintenance lapses. In a busy bathroom, especially one used by children, tenants or guests, those risks are harder to ignore.

Where porcelain usually wins

Porcelain is the product most builders and tilers would rather stand behind in a wet room. Not because it's fashionable, but because it's more predictable. It handles water better, cleans more easily, and doesn't need the ongoing sealing routine that natural travertine requires.

Here's the side-by-side view most clients need:

Feature Travertine-Look Porcelain Natural Travertine
Water behaviour Dense, low-absorption surface suited to wet areas Porous stone that needs sealing and ongoing care
Maintenance Easy day-to-day cleaning, no tile sealing required Regular sealing and more careful product selection
Consistency Controlled colour, pattern and sizing Natural variation, which can be beautiful but less predictable
Bathroom suitability Strong choice for floors, walls and showers Better suited where owners accept more upkeep
Installation planning Easier to lay out for minimal joints and repeating modules More variation to sort and blend on site

A few practical observations from renovation work:

  • For family bathrooms: Porcelain is usually the smarter choice. It copes better with routine use and rushed cleaning.
  • For ensuites: Either can work aesthetically, but porcelain gives you more freedom with larger formats and lower maintenance.
  • For landlords and property managers: Natural travertine creates more future care obligations.
  • For older homes: Porcelain's predictability helps when walls aren't perfect and layouts need tighter control.

If a client loves the travertine look but doesn't want a bathroom that needs babysitting, porcelain is the honest recommendation.

That doesn't make natural stone wrong. It just makes it a deliberate choice for someone who understands the upkeep and is willing to commit to it. Most households want the visual warmth, not the maintenance contract that comes with it.

Technical Specifications That Matter for Melbourne Bathrooms

A bathroom tile should never be chosen on colour alone. The specs matter because they affect safety, cleanability, durability and compliance. In Melbourne, where bathrooms often sit inside older structures with mixed substrates and renovation-era surprises, those details matter even more.

A technical specification chart for selecting bathroom tiles in Melbourne, highlighting water absorption, slip resistance, and abrasion ratings.

Water absorption and why it matters

For wet areas, low absorption isn't just a nice feature. It's one of the reasons porcelain performs so well. According to the verified technical data linked via ISO 10545-3 water absorption information, travertine-look porcelain tiles exhibit water absorption rates below 0.5% due to being fired at temperatures of 1,200–1,250°C. That dense, non-porous matrix is especially useful in Melbourne bathrooms and balconies because it helps minimise the risk of efflorescence and spalling, and it removes the need for the sealing regime associated with natural stone.

That doesn't mean the tile itself replaces waterproofing. It doesn't. But low absorption does support a more durable wet-area finish when the rest of the system is built correctly.

For a broader look at suitable bathroom porcelain options, see these porcelain tiles for bathrooms.

Slip ratings, DCOF and floor safety

Slip resistance is where many renovations go wrong. People pick the smoothest surface because it looks refined under showroom lighting, then realise too late that a bathroom floor has to perform with wet feet, shampoo residue and steam.

Travertine-look porcelain tiles used in Australian bathrooms and wet areas typically meet or exceed AS 4586:2013 requirements for slip resistance, and many matte-engineered products achieve DCOF values above 0.42, which aligns with the recommended threshold for level internal wet areas such as bathrooms and laundries. In practical terms, a matte finish with a documented DCOF of 0.42 to 0.6 is suitable for most residential and light commercial interiors in Melbourne.

When checking samples, ask for documented performance, not just a salesperson's description of “good grip”.

  • Matte finishes: Usually the safest all-round choice for bathroom floors.
  • Micro-textured surfaces: Helpful where slip resistance matters but you still want easy cleaning.
  • Highly polished surfaces: Better reserved for walls or low-risk areas.

The right bathroom floor tile should feel safe under wet feet without feeling rough enough to trap grime.

Rectified edges and large format choices

Rectified tiles are mechanically finished to consistent dimensions with sharp edges. That allows tighter grout joints and a cleaner, more contemporary look. On travertine-look porcelain, this usually suits the stone aesthetic well because it reduces visual interruption.

Large formats can also work brilliantly in Melbourne bathrooms, especially on walls. Fewer joints create a calmer surface and make cleaning easier. But there's a catch. Bigger tiles demand flatter substrates, better planning around falls, and more discipline in setting out. A large-format tile won't hide poor prep. It exposes it.

When choosing between sizes, think about the room as built, not just the showroom panel. Drain location, door swings, vanity widths, window heights and ceiling lines all influence what will look balanced on site.

Design and Layout Ideas for Your Renovation

Travertine-look porcelain works because it can shift style without feeling forced. The same material can read soft and minimal in a new ensuite, grounded and practical in a family bathroom, or surprisingly sympathetic in an older Melbourne home that needs updating without losing its identity.

A modern bathroom featuring elegant travertine look porcelain tiles, a wooden vanity, and a glass-enclosed shower area.

Making a modern ensuite feel warm

A lot of modern bathrooms fail because they lean too hard into cold minimalism. Travertine-look porcelain softens that. Pair a matte stone-look tile with a timber vanity, brushed metal tapware and a frameless shower screen, and the room feels cleaner without becoming sterile.

For ensuites, large wall tiles often work best when the floor finish stays slightly more tactile. That gives you visual calm on the walls and better underfoot confidence where it matters. A niche lined in the same tile usually looks stronger than switching to a busy mosaic just for contrast.

Good combinations include:

  • Soft ivory or beige tile with oak cabinetry: Warm, easy, timeless.
  • Silver-toned travertine look with white joinery: More architectural and restrained.
  • Natural finish walls with matte floor tile: A practical balance between texture and maintenance.

Getting large format tiles right in older homes

In Victoria, approximately 40% of housing stock sits within 1940s to 1990s contexts, according to the Victorian housing style report reference. That matters because many bathroom renovations happen inside homes that weren't designed for oversized contemporary finishes.

Older Melbourne bathrooms often have lower ceiling lines, tighter widths, off-square corners and existing plumbing positions that limit layout freedom. Large formats such as 600 x 1200 mm can still work well, but only if the room proportions and set-out support them. In a narrow bathroom, one oversized tile choice can make every cut look awkward. In the right room, the same tile can make the space feel calmer and more open.

A simple approach usually works best:

  • Respect the scale of the room: Don't force huge panels into a cramped layout if every edge ends in a sliver cut.
  • Match tone to the age of the home: Warmer travertine shades often sit better in cream-brick, weatherboard and mid-century settings.
  • Use minimal grout thoughtfully: It looks modern, but it still has to suit existing skirtings, trims and fittings.

A short visual walkthrough helps when comparing finishes and room moods:

The best period-sensitive renovations don't try to fake heritage detailing with modern tile. They keep the room proportions honest, use a warm material palette, and let improved waterproofing and cleaner detailing do the heavy lifting.

Installation Waterproofing and Why a Registered Builder Matters

The tile is the finish you see. It is not the waterproofing system. That distinction matters because plenty of failed bathrooms still look good on handover day. The problems show up later, when movement opens a junction, a penetration hasn't been sealed properly, or water tracks beyond the shower area and starts damaging the structure.

For bathroom renovations, compliance starts below the tile. Substrate preparation, bond breakers, membrane application, falls, drainage, joint treatment and curing all affect whether the room remains watertight.

Tiles are the finish, not the waterproofing system

Australian Standard AS 3740:2021 sets strict requirements for wet-area waterproofing and installation practice. As noted in this summary of porcelain tile versus travertine in wet areas, the registered builder is responsible for coordinating trades to ensure compliant membranes and detailing around joints and penetrations, which is essential for the long-term performance of travertine-look porcelain tiles in bathrooms.

That's the part many homeowners underestimate. A premium tile won't rescue poor detailing. If the membrane is wrong, the falls are poor, or the penetrations are handled badly, the bathroom can fail regardless of how much was spent on the finish.

For a closer look at local wet-area practice, review this guide to waterproofing in Melbourne.

What registered builders actually control

A registered builder's value isn't just paperwork. It's coordination and accountability. In a proper bathroom renovation, multiple trades touch the same space and the same risk points. If no one controls the sequence, defects slip through the joins between trades.

The critical points usually include:

  • Substrate readiness: The surface must suit the membrane and tile system.
  • Membrane continuity: Corners, hob details, upturns and penetrations need careful treatment.
  • Set-out and falls: Tile layout must work with drainage, not fight it.
  • Trade coordination: Plumbers, waterproofers and tilers need the same plan, not separate assumptions.

A leak-proof bathroom isn't built by one good trade working in isolation. It's built by several trades following one disciplined sequence.

This is especially important in older homes. Movement, legacy repairs, timber floors, patched walls and uneven framing all increase the demand for proper supervision. If you're renovating a bathroom in Melbourne, the question isn't only which tile you like. It's who is responsible for the entire wet-area system, and whether that responsibility is clear from day one.

Choose Melbourne Tiling Services for a Flawless Finish

Travertine look porcelain tiles make sense for many Melbourne bathrooms because they combine the warmth of stone styling with the practical advantages that wet areas demand. They're easier to maintain, easier to specify for showers and floors, and easier to integrate into modern layouts with clean lines and controlled grout joints.

But the tile choice is only half the decision. The long-term result depends on the people planning the set-out, preparing the substrate, managing the membrane system and coordinating every trade in the right order. That's where many bathroom renovations succeed or fail.

Melbourne Tiling Services P/L is set up for that full-scope work. The team operates as Registered Unlimited Builders, not just tile installers, which matters when a bathroom needs genuine trade coordination and code-aware project management. They handle start-to-finish bathroom and ensuite renovations, with in-house tilers and certified waterproofers working as part of the same process rather than as disconnected subcontractors.

Screenshot from https://melbournetilingservices.com.au

That's valuable if you're dealing with an older Melbourne home, a leak-prone shower, or a bathroom that needs more than a cosmetic refresh. Their work also includes 3D drawings, free quotes, premium material selection and end-to-end oversight, which helps clients make better decisions before demolition starts.

If you're comparing contractors, it's worth looking at experienced tiling contractors near you in Melbourne who understand not only finishes, but also waterproofing, falls, compliance and renovation sequencing. That's what protects the investment.

A bathroom should still look right years after handover. The finish matters. The system underneath matters more.


If you're planning a bathroom renovation and want travertine look porcelain tiles installed with proper waterproofing, compliant detailing and builder-led project management, contact Melbourne Tiling Services P/L for a free quote and expert guidance on a durable, leak-resistant finish.

Frameless Shower Screen Melbourne: Your 2026 Guide

You're usually looking at the shower screen near the end of the job.

The tiles are selected. The vanity is in. Tapware finishes are locked in. The waterproofing, falls, screed, set-out, and trim details have already done the heavy lifting. Then one decision changes how the whole room reads. Open and architectural, or boxed in and busy.

That's why a frameless shower screen in Melbourne shouldn't be treated as a simple glass add-on. In a proper bathroom renovation, it's part of a larger system. The screen has to suit the layout, respect the waterproofing, work with the tile joints, and perform well in daily use. If the renovation is being run by registered builders, that coordination is much easier to get right because one party is looking at the room as a whole, not just one trade item.

Table of Contents

The Final Touch to Your Melbourne Bathroom Renovation

A lot of homeowners get to the same point. The renovation has been disruptive, expensive, and full of decisions. Then the bathroom finally starts to look like a room again. You can see the tile pattern, the vanity proportions, and the way the light moves across the walls. The shower screen becomes the final call that either keeps that space feeling open or cuts it up visually.

In Melbourne renovations, that choice matters even more because many bathrooms are compact, older, or shaped by earlier building methods. A bulky enclosure can make a neat room feel tight. A well-planned frameless screen can do the opposite. It keeps sightlines cleaner and lets the tilework carry more of the design.

That's the appeal. Frameless glass feels quiet. It doesn't compete with stone, porcelain, feature tiling, or brushed metal finishes. It also tends to suit the direction many homeowners want from a modern bathroom renovation, which is less visual clutter and better use of light.

A frameless screen only looks effortless when the renovation behind it has been organised properly.

From a builder's point of view, the screen isn't the hero by itself. It's the finishing element that reveals whether the preceding work was done with care. If the walls are out, the falls are poor, the niche projects too far, or the waterproofing has been handled badly, frameless glass won't hide any of it. It will expose it.

That's why registered builders often push the discussion earlier than homeowners expect. The right time to decide on a frameless shower screen in Melbourne is during layout and waterproofing planning, not after the tiler has packed up.

What Exactly Is a Frameless Shower Screen

It's not just glass without a frame

A frameless shower screen is a shower enclosure made without the perimeter metal frame you see in older or more budget-driven systems. The structure comes from the glass itself, along with hinges, brackets, clamps, channels, or other discreet fixings.

In Australia, frameless shower screens are generally built with 10 mm toughened safety glass and must comply with AS 2208, with industry guidance also noting a common finished height of about 2100 mm for local supply and installation norms, including Melbourne bathroom renovations, as outlined in this guidance on frameless shower screen safety. That's a practical point, not just a specification. The glass has to do the work that a frame would otherwise help with.

This is why homeowners often notice frameless systems feel heavier, cleaner, and more premium at the same time. The edges are polished, the hardware is more deliberate, and every alignment line matters because there's nowhere to hide mistakes.

Shower Screen Types Compared

Feature Frameless Semi-Frameless Framed
Appearance Minimal, open, premium Lighter than fully framed, but still defined by metal lines Most visually enclosed
Structure Thick toughened safety glass with discreet fixings Mixed support from glass and partial framing Frame carries much of the structure
Water containment Good when well designed, but more sensitive to layout and sealing details Often easier to manage in tighter or splash-prone layouts Usually the most forgiving for sealing
Cleaning Fewer frame edges to collect grime Moderate cleaning effort More frame lines and corners to maintain
Cost position Usually the premium option Mid-range Usually the most budget-oriented
Best fit Design-led renovations with solid wet-area planning Good balance of looks and practicality Utility-first bathrooms and tighter budgets

Where frameless works well and where it doesn't

Frameless works well when the bathroom layout supports it. That usually means sensible shower orientation, enough room for door swing if hinged, good falls to the waste, and clean set-out around tiles, hob lines, or recesses.

It's also a strong option when the renovation is aiming for visual simplicity. If you've invested in rectified porcelain, stone-look slabs, or a custom vanity, a framed screen can interrupt the result. Frameless lets those finishes read properly.

There are trade-offs though.

  • Water control matters more: Frameless systems rely on layout, seals, clearances, and installation accuracy. They aren't as forgiving as framed units in difficult splash zones.
  • Tolerance is tighter: If walls are out of square or the floor isn't true, those issues have to be managed before fabrication.
  • Upfront cost is higher: You're paying for thicker glass, premium hardware, custom measurement, and more exact installation.
  • Not every room suits a hinged door: In narrow recesses, conflict points with vanities, toilets, or towel rails can make the design awkward fast.

A good renovation team doesn't push frameless glass into every bathroom. They use it where it improves the room and where the rest of the build can support it.

Design and Customisation for Your Bathroom

A modern bathroom featuring a frameless glass shower screen, wooden vanity, and a freestanding white bathtub.

The visual decisions homeowners notice first

Once the layout works, design choices start to matter, allowing a frameless shower screen in Melbourne to be tuned to the rest of the renovation rather than dropped in as a standard item.

The main variables usually come down to glass appearance, hardware finish, and door operation. Clear glass keeps the room feeling larger. Frosted or obscure treatments can add privacy. Tinted glass can work well in darker, moodier bathrooms, but it needs to be balanced carefully with the tile colour and available light.

Hardware changes the character quickly. Chrome stays neutral. Matte black creates stronger outlines. Brushed brass or warm metallics can tie the screen into tapware, cabinet handles, and mirror trims if the rest of the palette has been resolved properly.

A few common configurations include:

  • Fixed panel only: Good for open walk-in layouts where splash can be controlled by room planning.
  • Hinged door and panel: Often chosen when full enclosure and easier heat retention matter.
  • Sliding arrangement: Useful where swing space is limited.
  • Return panel setup: Helps when the shower needs more controlled containment from two sides.

Practical rule: Choose the door style after the room has been measured, not before.

The structural decisions that sit behind the look

Not every design idea is buildable in the exact way it's sketched. Technical guidance from the Australian Glass and Window Association notes that the maximum safe width of a fixed frameless shower panel depends on glass thickness, which means sizing is a structural decision affecting door swing stability, hinge loading, and deflection control, not just an aesthetic one, as explained in AGWA's technical note on shower screens.

That's why a good builder or screen specialist will sometimes reshape the design slightly. They may reduce a door width, add a return panel, alter hinge placement, or recommend a different opening method. Those decisions protect long-term alignment and reduce stress on the hardware.

In practice, the best-looking result is usually the one that respects those constraints early. Trying to force a wide dramatic panel into a room that doesn't support it often creates a screen that looks elegant on day one and troublesome later.

Why Professional Installation Is Non-Negotiable

A shower screen sits on top of critical wet-area work

Homeowners often think of shower screen installation as the last easy step. In reality, it lands on top of the most failure-sensitive part of the bathroom. By the time the glass arrives, the waterproofing, falls, tile build-up, wall straightness, and fixing locations have already determined whether the result will perform well.

That's why professional installation matters. The screen has to be fitted in a way that works with the wet-area system, not against it. Poor drilling locations, bad sealant practice, incorrect clearances, and sloppy set-out can all create problems that don't show up on handover day.

Australian guidance on shower screens points to an important issue that sales-led content often misses. Waterproofing, leak risk, and compliance trade-offs should drive the product choice in many bathrooms, especially in high-use rentals or showers with existing defects, where substrate quality and installation method can matter more than aesthetics, as discussed in this shower screen and wet-area guidance.

If you're trying to understand the wet-area side before choosing glass, it helps to review how bathroom waterproofing in Melbourne fits into the renovation sequence.

What a proper installation process looks like

A professional process should be calm, methodical, and measured twice before anything is fabricated or fixed.

A diagram outlining the professional five-step installation process for a high-quality frameless shower screen.

Key steps usually include:

  1. Final measure after finishes are complete: Frameless glass should be measured from actual finished surfaces, not drawings alone.
  2. Assessment of tile lines and substrate condition: The installer needs to know where fixings can go and what sits behind the tile.
  3. Fabrication to the measured opening: Out-of-square conditions and required tolerances are built into the glass and hardware plan.
  4. Controlled installation on site: Packing, levelling, hinge adjustment, alignment, and sealing all need patience.
  5. Operational check: The door should swing correctly, gaps should be consistent, and the water path should make sense.

Where a registered builder is managing the bathroom renovation, that coordination is easier because the screeder, waterproofer, tiler, and screen installer aren't working in isolation. Melbourne Tiling Services P/L is one example of a company that handles bathroom renovations, waterproofing, tiling, and frameless shower screen installation under the one project scope.

Cheap installs usually fail in familiar ways

The same defects keep appearing.

  • Misaligned doors: Usually caused by bad measure-up, rushed hinge positioning, or movement in weak fixing zones.
  • Persistent leaks: Often linked to poor falls, wrong panel layout, or unrealistic expectations about what an open frameless design can contain.
  • Cracked tiles around fixings: A sign the installer treated the job like general hardware fitting instead of wet-area work.
  • Premature hardware issues: Loose hinges, dragging doors, and seal failures often come back to the original install quality.

If the installer never asks about waterproofing, substrate, or wall straightness, they're only looking at the glass, not the bathroom.

That's the difference between a product install and a renovation-standard install. In a proper bathroom renovation, the frameless screen is fitted as part of a system.

Budgeting for Your Frameless Shower Screen in Melbourne

A modern bathroom featuring a frameless glass shower screen with brushed brass fixtures and wood vanity.

What you're actually paying for

A frameless shower screen quote usually has three moving parts. The glass, the hardware, and the labour. Homeowners often compare only the bottom-line number, but that misses where quality differences sit.

For the labour side alone, Melbourne's market is active. Airtasker lists 90 local shower screen installation services in Melbourne, and its service page shows an average installer cost of $150–$350, while also noting common screen dimensions of 900 mm to 1500 mm wide, which gives a useful benchmark for installation only, not a full premium frameless package, as shown on Airtasker's Melbourne shower screen installation page.

The rest of the quote depends on what's being supplied and how custom the job is. If you want a clearer breakdown of labour and scope, this guide to shower screen installation cost is a practical place to start.

What pushes the quote up

Not all frameless screens are equal to fabricate or install. Some bathrooms are straightforward. Others need custom work because the room itself is difficult.

Common quote drivers include:

  • Custom sizing: Non-standard openings, returns, and recesses usually need exact fabrication.
  • Complex glass processing: Cut-outs around fixtures, nib walls, or unusual details add work.
  • Premium hardware selections: Hinge finish, handle style, and mounting method all affect cost position.
  • Access and handling: Carrying heavy glass through tight internal spaces is slower and riskier than a clear run.
  • Layout complications: Older bathrooms often introduce tolerance issues that require more planning and fitting time.

A cheap quote can still be the expensive option if it leaves out site complexity, proper adjustment, or coordination with the bathroom renovation team. Good quotes are usually specific. They tell you what's included, what assumptions have been made, and what could change if site conditions differ from the original measure.

How to Choose a Trusted Melbourne Installer or Builder

A step-by-step guide on how to choose a professional frameless shower screen installer in Melbourne.

Questions worth asking before you sign

The product matters, but the person fitting it matters just as much. If the shower screen is part of a larger bathroom renovation, a registered builder usually gives you better accountability because one party is responsible for how the tiling, waterproofing, carpentry, and glazing decisions meet on site.

Ask direct questions. Good operators won't dodge them.

  • Who is responsible for the final measure-up: If no one owns this clearly, errors get blamed across trades.
  • How do you handle out-of-square walls: The answer should involve actual tolerance planning, not “we'll make it work”.
  • What is included in the install scope: You want clarity on hardware, seals, drilling, adjustment, and final fit.
  • How is waterproofing protected during installation: This is one of the most important questions in the room.
  • Who coordinates defects if there's a problem later: Multiple subcontractors can create a blame loop if nobody is leading the renovation.

The safest choice is usually the contractor who talks most clearly about risk, not the one who talks most about style.

Older Melbourne homes need better planning

The value of experience is clear. Guidance aimed at Melbourne homeowners points to a real gap in most consumer content. Fit, tolerance, and awkward-layout planning are major issues in older bathrooms, especially where custom-made frameless screens may be necessary and hardware adjustment has limits, as discussed in this Melbourne frameless shower screen planning article.

In practical terms, watch for these red flags:

  • Walls that aren't straight: Frameless glass doesn't hide taper or bowing.
  • Tight recesses: A hinged door may clash with a vanity, toilet pan, or heated towel rail.
  • Protruding services: Pipes, ledges, and trims can complicate both measurement and door path.
  • Sloping ceilings or heritage irregularities: These often push the job into custom territory.

If the installer treats every bathroom like a standard square opening, move on. Melbourne housing stock includes plenty of rooms that need custom thinking. A builder who manages bathroom renovations regularly will usually spot the risks before the glass is ordered.

Frequently Asked Questions

Do frameless shower screens leak more

They can if the layout is wrong or the installation is rushed. A frameless design depends heavily on falls, panel placement, door swing, seals, and how the shower is used. In a well-planned bathroom renovation, they perform well. In a poorly planned one, they expose mistakes quickly.

Why is there a small gap around the door

Because the door has to move freely and the hardware needs operating clearance. Frameless systems aren't built like framed boxes. A small gap is normal. The important question is whether the overall design controls water in the right direction.

Can frameless glass work in an older bathroom with uneven walls

Sometimes yes, but not always in the exact style you first imagined. Older homes often need custom measurement, hardware adjustments, or a different door configuration. In some rooms, a fixed panel or semi-frameless option is more practical than a hinged frameless recess door.

What's the best way to keep the glass clean

Use a squeegee regularly and don't let soap residue sit on the glass for long periods. Keep the hardware dry where possible and avoid harsh abrasive cleaners. If hard water marks are already established, don't attack the glass aggressively. Start with the mildest suitable method and protect the surrounding finishes.

Should the shower screen be chosen before waterproofing

Yes, or at least the type and likely layout should be. The screen affects opening size, fixing logic, and water containment strategy. If you're planning the wet area from scratch, it helps to understand how to waterproof a shower properly before the glass is measured.


If you're planning a frameless shower screen as part of a bathroom renovation, Melbourne Tiling Services P/L can help coordinate the full job from waterproofing and tiling through to final screen installation, with registered builders overseeing compliance, finish quality, and long-term performance.

Tiling Over Existing Tiles: Melbourne Reno Guide 2026

You're probably looking at a bathroom that still works, but doesn't look the part anymore. The tiles are dated, the grout is tired, and the thought of full demolition means dust through the house, trades in and out for longer, and a bathroom that's offline when you still need to live in the property.

That's why tiling over existing tiles comes up so often in Melbourne bathroom renovations. On the right job, it can be a practical renovation method. On the wrong job, it just buries defects, adds risk, and creates a more expensive failure later. From a registered builder's perspective, the key question isn't whether it can be done. It's whether the existing bathroom gives you a sound, dry, stable base that won't compromise the new work or the value of the home.

Table of Contents

Is Tiling Over Tiles a Shortcut or a Smart Solution

You see this decision at the start of a lot of bathroom jobs in Melbourne. The tiles look dated, the family still needs the room in use, and no one wants demolition dust through the house if it can be avoided. In the right bathroom, tiling over existing tiles can cut mess, shorten downtime, and keep the job simpler.

The problem is that people often treat it as a cosmetic decision when it is really a risk decision.

From a registered builder's perspective, tile-over-tile work only makes sense when the existing installation is already doing its job properly. The old tiles, the substrate under them, and the room itself all need to be stable. If they are, overlaying can be a sensible way to renovate. If they are not, the new finish just inherits the old failure.

That distinction matters most in bathrooms. A leaking shower, failed waterproofing, loose wall sheeting, or movement in the floor does not improve because a new tile goes on top. It gets covered. Then the repair usually costs more because there are now two layers to remove instead of one.

Builder's rule: Tiling over tiles is a suitable finish upgrade on a sound base. It is not a fix for moisture damage, movement, or a bathroom that is already breaking down.

A good candidate is usually a room where the issue is age or appearance, not performance. The tiles are firmly bonded, the layout can handle the added height, and there are no signs that water has been escaping into surrounding materials. In that situation, keeping the existing layer can be a practical call.

A poor candidate shows warning signs before any adhesive is opened. Hollow or loose tiles, cracked joints that keep reopening, swollen trims, stained junctions, soft skirtings, persistent mould patterns, and uneven surfaces all point to a deeper problem. In those bathrooms, a full strip-out is the smarter option because it gives access to the substrate, the waterproofing, and any hidden damage.

There is also a value question. Covering over a defective bathroom can make the room look newer for a while, but it does nothing to protect the structure or the resale value of the home. If I suspect the room has moisture issues or movement, I would rather stop the shortcut and fix the cause properly. That is the call that holds up better over time.

The Critical Inspection Your Go or No Go Checklist

A tile-over-tile job is approved or rejected at inspection. That decision should happen before anyone orders finishes, because the existing tiled surface becomes the substrate for everything that follows.

A comprehensive checklist titled The Critical Inspection for evaluating if existing tiles are suitable for retiling over.

What makes an existing tiled surface acceptable

Start with bond. I tap every area methodically, not just the obvious problem spots, and I listen for hollow or drummy sections. One loose tile is enough to turn a cosmetic upgrade into a failure risk, because the new layer is only as reliable as the old one underneath.

Then check flatness with a long straightedge across multiple directions. Large-format tiles punish small substrate errors, and even standard tiles will show lippage if the old surface has humps, dips, or patched areas. If the floor is out, you may need corrective work before tiling, and in some cases that means looking at proper floor screeding for tiles rather than forcing adhesive to do a levelling job it was never meant to do.

Visible defects matter, but the pattern matters more than the defect itself. A single chipped tile can be isolated damage. Repeating cracks through grout joints, broken corners in several locations, or failed grout at stress points usually point to movement, poor adhesion, or moisture getting where it should not.

Pay close attention around floor wastes, shower perimeters, wall-floor junctions, penetrations, and doorway transitions. Those are the places that expose the truth first.

Fresh tiles can hide a problem for a while. They do not remove it.

The builder's risk checks

A registered builder has to assess more than appearance. The central question is whether covering the old surface protects the building or increases the risk of a more expensive failure later.

In Melbourne bathrooms, moisture evidence outside the tiled area often decides the job. Swollen skirtings, stained architraves, peeling paint beside the shower, soft plaster, musty smells, or movement in trims tell you to stop and investigate further. If I see those signs, I do not treat the room as a tile replacement job. I treat it as a building defect question first.

Weight and build-up also need checking. A second tile layer adds dead load to walls and floors, changes finished heights, and can create problems at doors, shower screens, wastes, and adjoining rooms. In wet areas, added height can also affect falls and drainage. If the existing bathroom already has marginal falls or awkward thresholds, overlaying tiles often makes the room less compliant and harder to use.

That is why bathrooms deserve a harder yes or no test than a laundry splashback or an entry floor. A failed bathroom affects framing, sheeting, waterproofing, and resale value. A full strip-out costs more upfront, but it is often the only sensible choice when there is any doubt about what is happening behind the tile face.

Use this checklist before approving a tile-over-tile job:

  1. Tap every section for hollow spots and debonding. Include corners, shower areas, and around wastes.
  2. Check flatness with a long straightedge. Do not assess it by eye or with a short level.
  3. Look for repeating cracks, loose grout, and broken edges. Repetition usually signals a deeper issue.
  4. Inspect adjacent materials for moisture damage. The warning signs often sit outside the tiled area.
  5. Measure height changes at doors, drains, fixtures, and screens. Build-up can create practical and waterproofing problems.
  6. Confirm the substrate can carry another finished layer. The tile face is only part of the system.

If those checks are clean, tiling over tiles can be a practical option. If they raise doubts, stop there. From a builder's point of view, uncertainty is not a green light.

Preparation is Everything Your Step-by-Step Substrate Plan

A successful tile-over-tile job is won before the first new tile goes down. The installer has to treat the old tiled surface as a substrate that needs rebuilding for bond, not as a finished surface that can be covered directly.

A professional flooring contractor applying a self-leveling compound over existing tile for a smooth surface.

Phase one clean like bond strength depends on it

It does.

Bathrooms carry soap film, body oils, cleaning residue, waxes, and sometimes silicone contamination around edges and fittings. Any of that left behind can compromise adhesion. The first stage is a serious clean, not a quick wipe-down.

Focus on residues that builders see all the time in used bathrooms:

  • Soap scum and shampoo build-up in shower walls
  • Waxes and polishes from previous cleaning products
  • Grease and airborne residue near vanities and exhaust paths
  • Old sealants at corners and fixtures

Mechanical prep applied over contamination is wasted effort. You'll roughen the dirt, not the tile.

Phase two abrade the glaze

Glazed ceramic is low porosity. Tile specialist guidance says the surface should be washed clean and then mechanically roughened with a carborundum disk or sander because the bond relies on mechanical keying, and primer alone is not a substitute, as described in Tile Doctor's guide to tiling over existing tile.

That's the part many failed DIY jobs skip. People assume a bonding primer can solve everything. It can't. On a glossy, contaminated or insufficiently abraded tile, the system starts with a weak link.

A proper prep routine usually includes:

  • Mechanical abrasion across the full field: Not just a few scratches here and there.
  • Attention to corners and edges: These areas often get missed.
  • Dust removal after grinding: Fine dust left on the surface interferes with primer and adhesive.
  • Spot repairs where damaged tiles were removed: Low areas need correcting before installation.

If the surface needs flattening after repairs or abrasion, that correction matters just as much as cleaning and priming. On floors, screeding for tiles may be part of getting the substrate ready for a clean, even install.

Primer helps a prepared surface. It does not rescue an unprepared one.

Phase three prime the surface properly

Once the surface is clean, abraded and dust-free, use a primer designed for non-porous tile-on-tile applications. This isn't the same thinking as priming a porous cement sheet or raw screed. The old tile face needs a primer that suits a dense, previously finished surface.

Application matters. Patchy primer, puddling, contamination between coats, or rushing the drying stage can undermine the rest of the system. Good prep work is methodical and boring. That's exactly why it lasts.

The pattern is simple. Clean first. Abrade properly. Prime the right surface with the right product. Reverse that order or cut one out, and you're building failure into the job.

Choosing the Right Materials for a Lasting Bond

Good prep can still be undone by the wrong product stack. I see that regularly in bathroom renovation work. The old tiles are solid, the surface has been ground and primed, then someone reaches for a basic adhesive because it is cheaper or already on site. That is where the risk shifts from preparation to bond failure.

A bucket of Bostik adhesive, Mapei bonding primer, and a bag of ARS flexible grout for tiling.

Why standard adhesive is the wrong gamble

Tile-over-tile work puts extra demand on the adhesive because it is bonding to a dense, previously finished surface rather than a fresh porous base. In practice, that means using a flexible adhesive rated for this type of installation, not a general-purpose product picked for price.

The same logic applies to the whole system. Primer, adhesive, grout, and sealant need to suit each other and the room they are going into. Mixing brands and product types can work if the specifications align, but it also creates more room for error, and that is a poor trade in a bathroom.

A sound material stack usually includes:

Material What it needs to do
Non-porous primer Bond to the prepared tile face and support the adhesive system
Flexible tile adhesive Hold on a dense substrate and cope with minor movement
Appropriate grout Suit the tile type, joint width, and cleaning demands
Sealants at movement joints and junctions Allow controlled movement where rigid grout should not be used

For anyone comparing products, these tiling materials used in renovation work need to be chosen as a compatible system, not as isolated items pulled from different shelves.

What matters in a bathroom renovation

Bathrooms need a stricter standard because the tile finish sits over a wet-area assembly. Tiles and grout are not the waterproofing. If there is moisture trapped below, a failed membrane, swelling in surrounding linings, or movement through the floor, no premium adhesive fixes the underlying problem.

That is the builder's view of material selection. The question is not only what sticks best. The question is whether this bathroom is a sensible candidate for overlay at all. In a dry, stable bathroom with a sound build-up, the right material system can perform well. In a shower with suspected leaks, drummy wall sheets, loose fittings, or movement at the floor, a full strip-out is usually the only smart option if you want to protect the property and avoid paying twice.

Cheap adhesive does not make the job cheaper. It lowers the cost of causing a failure.

As registered builders, we at Melbourne Tiling Services P/L approach this as a system, coordinating the tiling with the broader wet-area scope when required. That matters in Melbourne bathrooms, where the right call is sometimes to proceed with an overlay, and sometimes to stop, open the area up, and rebuild it properly before any new tile goes down.

Installation Guide for Tiling Over Tiles

A tile overlay can still fail after a good inspection and careful prep if the install is rushed. Most failures I see at this stage come from poor set-out, weak coverage, ignored movement, or bad decisions around edges and penetrations. The surface may look straight on handover and still let you down later.

A professional construction worker spreading mortar adhesive on a floor while installing ceramic tiles.

Start with the finished height, not the first tile

Before adhesive goes down, check the full build-up against the room as a whole. An overlay lifts the finished level enough to affect door swings, thresholds, shower screens, wastes, toilet pan set-out, vanity legs, skirtings, and transitions into hallways or adjoining bedrooms.

Bathrooms are less forgiving than dry areas. A few millimetres in the wrong place can leave a door rubbing, a screen sitting awkwardly, or a floor finish dying into the next room with no clean transition. On builder-led work, this is the point where I decide whether the overlay still makes sense or whether the extra height starts creating more defects than it solves.

Mark control lines first. Dry-lay key rows. Check where cuts fall at the doorway, around the floor waste, and at the most visible wall. Clean symmetry matters, but so does serviceability.

Spread adhesive for full support

Overlay work needs consistent bedding. Voids under the tile create weak spots, drummy sound, and a higher chance of cracked grout or broken corners once the room is back in use.

A sound install sequence is simple:

  1. Spread adhesive with the trowel size suited to the tile and substrate
  2. Back-butter tiles where needed to improve contact
  3. Bed each tile firmly and move it across the ridges to collapse them
  4. Lift tiles regularly to confirm coverage instead of guessing
  5. Keep checking joint width, level, and surface plane as the work progresses

Corners, edges, and traffic paths deserve extra attention. These are the areas that show failure first.

This video gives a useful visual reference for installation technique and site handling:

Control lippage before it travels across the room

Lippage rarely starts as a whole-floor problem. It starts with one tile sitting slightly high, then the next one is adjusted to suit it, and the error keeps going. On an overlay, small irregularities in the old surface can telegraph straight through if the installer is not checking constantly.

Use straight edges. Check multiple directions. Reset a tile early if it is wrong. Waiting until the adhesive starts to firm up usually turns a small correction into a bigger repair.

Rectified porcelain gives very little visual forgiveness. That crisp look is exactly why clients choose it, but it demands tighter control from the installer.

Large-format tiles raise the standard

Large-format tiles are popular in Melbourne bathroom renovations because they reduce grout lines and give a cleaner finish. They also expose every dip, hump, and bedding inconsistency. A floor that was acceptable for a smaller ceramic tile may be unsuitable for a large rectified porcelain overlay without additional correction.

In practice, larger tiles usually require:

  • A flatter surface than small-format tiles
  • More back-buttering and more frequent coverage checks
  • Closer control of adhesive skinning time
  • Levelling clips or similar systems where appropriate
  • More care at corners, niches, and fixture penetrations

Bigger tiles give a sharper finish only when the substrate and installation standard are good enough to support them.

Treat wet-area details as a building issue, not a tiling detail

This matters most in bathrooms. Tile and grout are the wearing surface. They are not the waterproofing system. If the job includes a shower area, floor waste detail, or any doubt about the wet-area assembly, the right question is whether the existing waterproofing remains compliant and defensible. For Victorian projects, that often means checking what records exist and whether a waterproofing compliance certificate in Victoria should form part of the decision-making before the room is closed up again.

From a registered builder's perspective, that is the risk check that protects the property. A neat overlay means very little if moisture gets trapped, detailing is compromised, or the bathroom cannot be properly accounted for later.

Finish cleanly or the shortcuts will show

Good overlay work is won at the margins. Silicone joints need to be placed where movement is expected. Trims and transition profiles need to suit the new height. Fittings should be refitted neatly, not forced to suit a build-up that was never properly planned.

The last part of the install is also where rushed jobs advertise themselves. Uneven cuts at the doorway, chipped drill holes, thin adhesive at edges, and badly resolved floor wastes all point to the same problem. The installer focused on sticking tiles down, not on delivering a bathroom that works as a complete assembly.

Risks Costs and Hiring a Registered Builder in Melbourne

A bathroom overlay can look like a tidy saving on day one, then turn into a much more expensive correction once the room is back in use. From a builder's perspective, the main issue is not whether new tiles will stick. The main issue is whether the existing bathroom can still perform properly after another layer is added on top.

Overlaying tiles changes levels, affects door clearances, alters transitions, and can make wastes, screens, and fittings harder to resolve cleanly. Those are manageable on the right job. They are expensive on the wrong one.

When strip-out is the only sensible choice

Some bathrooms are poor candidates from the start. In those cases, keeping the old tile work in place hides defects that should be opened up and assessed properly.

Signs the safer decision is full demolition

  • Widespread hollow or loose tiles
  • Cracking that points to movement in the base, not just surface damage
  • Evidence of water entry around corners, junctions, shower screens, or adjoining rooms
  • An old substrate that may not handle more build-up with confidence
  • Floor heights that will create awkward thresholds, trip points, or poor waste falls
  • Any uncertainty about the wet-area build-up in a shower or bathroom floor

I give very direct advice on this. If there is doubt about the waterproofing, especially in a Melbourne bathroom, strip-out is usually the smarter call. Tile and grout do not make a bathroom waterproof. If the assembly underneath cannot be verified, covering it up adds risk, not value.

The cost problem is also misunderstood. A failed overlay rarely means replacing a few tiles. It often means removing two bonded layers, repairing the substrate, redoing waterproofing, and paying for trades to revisit work that should have been dealt with the first time.

Why builder oversight matters

A registered builder assesses the room as a building assembly, not just a tiling surface. That means checking substrate condition, moisture risk, penetrations, movement, set-downs, plumbing interfaces, screen fixing points, and whether the finished result will still be serviceable and defensible later.

That distinction matters most in bathrooms.

A neat overlay can still be the wrong decision if it traps an existing problem, complicates compliance, or leaves the owner with no clear record of what sits beneath the finish. If waterproofing forms part of the scope or the history of the wet area is unclear, it helps to review what a waterproofing compliance certificate in Victoria covers before the room is closed up again.

Good builder oversight also protects resale and future maintenance. Buyers, building inspectors, and later trades all benefit when the decision to overlay was made for sound reasons and documented properly. In my experience, the best tile-over-tile jobs are the ones that could survive scrutiny before the first tile is laid.

If you're planning a bathroom renovation and want a straight answer on whether tiling over existing tiles is a sound option, Melbourne Tiling Services P/L can inspect the bathroom, assess the risks, and advise whether an overlay or full strip-out makes more sense for your project.

How to Waterproof a Shower: 2026 DIY Guide

You've pulled the old shower out. Studs are exposed, the tray area is bare, and you're standing there wondering whether waterproofing is just a coat-on product you can knock over in an afternoon.

That's where a lot of bathroom renovations in Melbourne start drifting off course.

A shower doesn't fail dramatically on day one. It fails subtly. Water gets into a corner, behind a niche, around a mixer penetration, or through a missed seam. Months later, the damage shows up somewhere else. Swollen skirting outside the bathroom. Damp plaster in the room behind. Musty smells that don't go away. By then, the tiles you paid for are often the least expensive part of the repair.

If you want to know how to waterproof a shower properly in Victoria, start with this: compliance is not optional. The National Construction Code and AS 3740 set the benchmark. If the job isn't built and waterproofed to standard, it isn't a shortcut. It's a defect waiting to surface.

Table of Contents

Why Shower Waterproofing Is a Non-Negotiable First Step

A lot of owners treat waterproofing like a middle step. Strip-out first, tile selection next, and waterproofing somewhere in between. In practice, it's the foundation of the whole shower. If that layer fails, the finish above it doesn't matter.

I've seen bathrooms in older Melbourne homes where the visible issue was just cracked grout near the base of the shower wall. Once opened up, the actual problem was behind the surface. Wet framing, degraded sheet material, mould around penetrations, and movement where the wall and floor junction had been taking moisture for too long. The repair then stops being a simple shower refresh. It turns into rectification.

A shower under construction with cement board installed, a built-in bench, and a plumbing fixture ready.

The law matters here

In Australia, shower waterproofing sits under the National Construction Code and AS 3740. That means the work isn't just about what seems sensible on site. It has to meet the required system and detailing standard for internal wet areas.

That matters for bathroom renovations because a shower can look neat and still be wrong. Tiles don't waterproof a shower. Grout doesn't waterproof a shower. Silicone by itself definitely doesn't waterproof a shower. The membrane system and the junction treatment do the heavy lifting.

Practical rule: If the waterproofing isn't compliant before tiling starts, tiling only hides the problem.

Why skipping steps gets expensive fast

The common mistake is believing the shower base is the only area that matters. It isn't. Water hits walls, corners, recesses, and plumbing penetrations every day. A shower is a system, not a tray with tiles around it.

For homeowners in Victoria, there's another issue. Once wall linings are off, you may uncover framing repairs, poor plumbing set-out, or out-of-square surfaces that affect the waterproofing build-up. If you ignore those and coat over them, the membrane ends up bridging defects instead of bonding to a stable substrate.

That's why waterproofing comes first in the decision-making, even before final tile layout. The right question isn't, “What product should I buy?” It's, “Is the shower build-up ready for a compliant waterproofing system?”

Preparing Your Shower for a Watertight Future

Waterproofing starts long before the first coat. The membrane only performs as well as the surface under it. If the substrate is loose, dusty, damp, cracked, or moving, you're building failure into the job.

A five-step checklist for preparing a shower floor surface for a watertight foundation installation.

Start with the substrate, not the membrane bucket

In Australia, shower waterproofing is governed by the National Construction Code and AS 3740, which requires internal wet-area walls in showers to be waterproofed to at least shower rose height. One Australian-system guide also specifies that the membrane should be allowed to dry for at least three days before tiling begins, which is a useful planning milestone for renovation sequencing, as noted in this Australian-system waterproofing guide.

That single point changes how you plan the job. If you're trying to waterproof on Friday and tile on Saturday, your schedule is already wrong.

Before any membrane goes on, check these basics:

  • Substrate type: Cement sheet, suitable backing board, masonry and concrete are common shower substrates. If a wall lining isn't suitable for a wet area system, coating it won't fix that.
  • Fixing quality: Loose sheets, proud fasteners, and movement at joints must be addressed first.
  • Flatness and damage: Hollows, chips, and rough patches need repair. Membranes don't level surfaces well, and they don't like sharp ridges.
  • Cleanliness: Dust kills adhesion. So do soap residue, release agents, and old sealants.
  • Dryness: A surface that looks dry isn't always dry enough. If moisture is trapped under the system, cure and bond can suffer.

What to check before waterproofing starts

The prep on a Melbourne renovation often depends on what the old bathroom leaves behind. In brick veneer homes, you may find patched masonry or mixed substrates in one shower. In apartments, you may be working around tight falls, service penetrations, and limited floor build-up. Those conditions need sorting before the membrane stage.

A practical prep sequence looks like this:

  1. Strip back to sound material. Any soft, swollen, mould-affected or delaminating material needs removal.
  2. Set the shower geometry. Walls should be plumb enough for board and tile. The floor area needs proper falls to the waste.
  3. Repair and fill. Cracks, voids and damaged spots get repaired so the membrane sits on a continuous surface.
  4. Prime if the system requires it. Follow the membrane manufacturer's instructions for substrate compatibility and adhesion.
  5. Check the drain set-out. The drain flange and surrounding area need to work with the chosen waterproofing system.

The clean-up stage is where many DIY jobs lose the room. If the prep is rushed, the membrane becomes a patch over defects instead of a sealed layer bonded to a stable base.

A lot of capable homeowners can handle demolition, cleaning, and even some substrate preparation if they understand what they're looking at. Where people get into trouble is mistaking “paintable” for “ready.”

If framing is out, the floor needs correction, or there's any doubt about the wet-area build-up, bring in a registered builder. That's not about gatekeeping. It's about responsibility. On a proper bathroom renovation, the builder coordinates the plumbing, carpentry, sheeting, and waterproofing so each trade hands over a substrate the next trade can trust.

Choosing Your Armour Liquid vs Sheet Membranes

If you're learning how to waterproof a shower, the first product decision is usually liquid-applied membrane versus sheet membrane. Both can work. Both can fail. The difference is in how they suit the shower shape, the substrate, and the installer's skill.

When liquid membranes make more sense

Liquid membrane is common in residential bathroom renovations because it adapts well to site conditions. It's useful where the shower has a niche, a bench, returns, odd framing, or small geometry changes that would make sheet detailing fiddly.

It also gives you flexibility when the room isn't perfectly square, which is common in older Melbourne housing stock. You can brush and roll into corners, around penetrations, and over transitions without trying to force a factory-made sheet into a shape it doesn't naturally want to hold.

That said, liquid systems punish sloppy application. If the coating is thin in one area, pinholed at a corner, or missed at a junction, you may not know until the shower is in service.

When sheet membranes are the better call

Sheet membranes offer consistency. Thickness is controlled by the product itself rather than by how heavy-handed or light-handed the installer is with a roller or brush.

That makes them attractive for straightforward shower layouts with clean lines and good access. On a standard rectangular shower with simple wall runs, a sheet system can produce a very predictable result. The risk shifts to seam work, corner folds, overlap control, and drain integration.

If the joins are poor, the advantage disappears quickly.

Feature Liquid-Applied Membrane Sheet Membrane
Best fit Complex shapes, niches, irregular surfaces Straightforward layouts with cleaner geometry
Thickness control Depends on correct application Built into the product
Detailing difficulty Easier around penetrations and awkward shapes More demanding at seams and folded corners
DIY risk Missed spots, thin coats, pinholes Poor overlaps, fishmouths, bad seam treatment
Renovation use Flexible for site variability Good when substrate and layout are well controlled

The real trade-off

The wrong way to choose is by asking which system is “better” in general. The right way is to ask which one is harder to get wrong in your shower.

For example:

  • Rectangular alcove shower: A sheet system may be efficient if the installer is confident with seam and corner work.
  • Niche-heavy ensuite: Liquid membrane often handles the geometry more practically.
  • Custom design shower: The detail load increases fast, so the installer's experience matters more than the product category.
  • Repair or remedial work: Compatibility with the existing substrate and drain arrangement becomes a deciding factor.

For a broader look at membrane options and assemblies used in wet areas, it helps to compare different waterproofing systems used in bathroom construction.

A membrane doesn't save a poor detail. Good waterproofing comes from the whole assembly working together, especially at changes of plane and around the drain.

If you're a capable homeowner tackling a basic shower rebuild, liquid membrane is often the more forgiving path on shape alone. If you're building a custom shower with angled returns, curved walls or multiple recesses, product choice matters less than whether the person installing it knows how to manage corners and overlaps without creating weak points.

The Art of Application Corners Niches and Junctions

Most shower leaks don't start in the middle of a wall. They start where one material changes to another, where the wall meets the floor, where a pipe comes through, where a niche interrupts a flat surface, or where someone assumed a bit of sealant would do the job.

A professional construction worker uses a brush to apply blue waterproof sealant to a shower niche joint.

The leak points are nearly always the details

For Australian showers using liquid-applied membranes, the practical benchmark is two coats with a 24-hour wait before the second coat and another 24 hours before the shower is used, because liquid membranes only work properly when the first coat cures and the second coat closes up pinholes. A common failure mode is incomplete coverage at corners and seams, so installers typically reinforce board joints with 2-inch alkali-resistant mesh tape before coating, as described in this guide to shower waterproofing methods.

That's why professional installers slow down at the details. The broad wall areas are the easy part. The risk sits in the transitions.

How to handle corners, board joints and penetrations

A practical liquid-membrane process usually looks like this:

  • Treat board joints first. Reinforce them properly so movement and shrinkage don't print through the membrane.
  • Detail changes of plane. Wall-to-wall and wall-to-floor junctions need proper system treatment, not just extra paint-on product.
  • Seal penetrations carefully. Mixer bodies, outlets and pipe penetrations are classic leak paths if the membrane is broken or thin around them.
  • Build the coats methodically. Bunnings' Australian guidance specifies applying the first coat with vertical brush strokes and the second with horizontal strokes to improve film continuity and help catch missed spots before tiling.
  • Inspect after drying. Look for pinprick holes, exposed mesh, skipped seams, and thin edges around fittings.

This is also where the wrong fastener placement causes grief. If somebody fixes a screen channel, accessory, or board too low in a vulnerable zone, they can compromise the system long after the membrane looked finished. That's one reason caulking and sealing details in wet areas need to be treated as part of the overall assembly, not as cosmetic finishing.

Here's a useful visual on sequencing and detail work in wet areas:

Complex showers need a different mindset

Standard rectangular showers are one thing. Custom showers are another.

Niches multiply internal corners. Benches create horizontal surfaces and front-edge transitions. Neo-angle and curved layouts introduce geometry that can't be waterproofed properly by guessing where a fold should land. Those shapes require planning before the membrane is opened. You need to know where laps will fall, how corners will be built, and whether a sheet wants a pre-cut mitered piece instead of a forced fold.

“If a corner looks awkward before waterproofing, it will usually become a leak point after tiling unless the detail is reworked.”

For a homeowner, this is often the line between DIY and professional work. A straight shower recess with clean board joints and no niche is one thing. A custom ensuite with a bench seat, niche stack, angled entry, linear drain and mixed substrates is a builder-managed waterproofing job.

The lesson is simple. Don't judge the difficulty by square metres. Judge it by junction count. The more corners, penetrations, returns and interfaces the shower has, the less forgiving the waterproofing becomes.

Curing Testing and Proving Your Work Is Watertight

A shower isn't finished when the membrane changes colour or feels dry to the touch. It's finished when the system has cured properly, been inspected properly, and been tested in a way that would catch a failure before tiles hide it.

Dry enough is not cured enough

One of the biggest DIY mistakes is impatience. People waterproof late in the week, the membrane looks set by the next day, and they start tiling over it. That can undermine the bond, trap defects, or leave weak areas at precisely the points most exposed to water.

A key technical benchmark used in shower waterproofing systems is a minimum 50 mm overlap at membrane joints and intersections, together with multiple coats and cure time before the area is put back into service. Regional product instructions also specify a 24-hour cure after the first coat, then a second coat, and then another 6 to 8 hours before tiling in one system, while another recommends at least 24 hours between coats and 24 more hours before shower use. Those staged timeframes are set out in this shower waterproofing installation guide.

That's why waterproofing should be scheduled, not squeezed in.

What a proper flood test actually checks

Professional guidance emphasises flood testing, protecting weep holes, and avoiding fasteners low on the wall or curb. It also points out that many shower leaks are caused by transitions such as drains, corners, screw penetrations, and curb interfaces, not just the membrane field itself, as outlined in this guide to proving a shower is watertight.

A sensible verification routine includes:

  • Visual inspection first: Check for pinholes, missed seams, weak coating around penetrations, and irregular edges.
  • Drain setup: Plug the drain correctly without blocking or damaging the drainage function the assembly relies on.
  • Controlled water hold: Keep water in the shower base long enough to reveal a problem if one exists.
  • External checks: Inspect adjoining rooms, below-floor areas if accessible, and perimeter zones for signs of loss or seepage.
  • No fast fixes: If the test reveals a failure, don't tile and hope adhesive or grout will save it. Repair the waterproofing detail and re-test.

For Victorian projects where documentation matters, especially on managed renovations and rectification work, a waterproofing compliance certificate in Victoria can be part of proving the job was completed to the required standard.

Site check: If you can't explain how the shower was tested, you can't be confident it's ready to tile.

The Final Stage Tiling and When to Call the Professionals

Once the shower is cured and proven watertight, tiling can begin. Many homeowners relax too early once tiling begins. But the tile stage still matters because poor tile installation can damage finished waterproofing, especially at drains, wall bases, and penetrations.

What capable DIYers can usually handle

A careful DIY renovator can often manage demolition, cleaning, product research, and some straightforward preparation work. Some can even tile competently in a simple shower if the substrate, set-out and waterproofing have already been handled correctly.

Where DIY usually falls apart is coordination. Bathrooms aren't one trade. They're carpentry, plumbing, sheeting, waterproofing, tiling, sealing and compliance all crossing over each other. If one stage is off, the next trade inherits the defect.

What should go to a registered builder

Most guides focus on standard rectangular showers and don't explain the geometry, overlaps and corner detailing needed in custom builds like neo-angle or curved showers. Those shapes require specific techniques where failure risk concentrates, which is why they create problems in design-led bathroom renovations, as shown in this installation example covering custom shower geometry.

That's where a registered builder matters. If the job involves structural correction, custom shower design, altered plumbing locations, unusual substrate conditions, or remedial leak work, you want someone who can manage the entire build and remain accountable for compliance. That's especially true in Melbourne renovations where old housing stock often reveals surprises once the bathroom is opened up.

A registered builder doesn't just organise trades. They control the sequence, ensure the waterproofing system suits the shower design, and stop the project from becoming a chain of assumptions between separate contractors.


If you're planning a shower rebuild, ensuite upgrade, or leak rectification job in Victoria, Melbourne Tiling Services P/L is one option for builder-managed bathroom renovations, waterproofing, tiling, and compliance-focused wet-area work.

Waterproofing Balcony in Melbourne: A Builder’s Guide 2026

If you're reading this after seeing a damp ceiling below your balcony, loose tiles at the doorway, or white chalky marks creeping across the grout, you're already past the cosmetic stage. Most leaking balconies in Melbourne don't fail because someone chose the wrong brand of membrane. They fail because the whole assembly wasn't assessed, detailed, drained, and finished as one system.

That's the part many owners only discover after paying for a balcony to be "waterproofed" once already. The tiles look new. The joints are fresh. Then winter arrives, water tracks into the room below, paint blisters, and everyone starts blaming the membrane. In practice, the actual fault often sits at the wall junction, the drain, the balustrade penetrations, the substrate, or the falls.

As a Melbourne Registered Builder, I've seen the same pattern in balcony repairs and in bathroom renovations. Water doesn't care which trade touched the job last. If the substrate moves, the flashing is wrong, the outlet isn't integrated, or the tiling team covers a membrane before it's ready, the leak returns. Waterproofing balcony areas properly is never a one-product decision. It's a building-envelope decision.

Table of Contents

How to Properly Assess Your Balcony's Condition

A common Melbourne callout goes like this. The balcony was "waterproofed" a few years ago, the tiles still look serviceable, yet the ceiling below is stained and the door frame is starting to swell. In that situation, the membrane brand is rarely the first question. The primary question is where the assembly is failing. Movement, drainage, junctions, and termination details cause many of the leaks I see, and a surface-level inspection misses them.

Start by reading the symptoms as a builder would, not as a painter or tiler would. Efflorescence on grout lines, tile edges, concrete soffits, or nearby walls means moisture is travelling through the build-up and evaporating at the surface. Drummy tiles matter too. A hollow sound often points to bond failure after water has sat beneath the finish or after the substrate has moved beyond what the tile system can tolerate.

Ponding is another giveaway. If water sits after rain, especially at corners, door thresholds, or around outlets, the balcony may have poor falls, blocked drainage, or a badly set outlet height. That is how a balcony can leak even after someone has applied a membrane. The water is still being trapped and pushed toward weak points.

Close up view of a concrete balcony floor showing a significant structural crack and water damage.

The inspection has to go beyond the walking surface. Check the soffit and the room below for staining, swollen plaster, mould, or peeling paint. Check the wall-to-floor junction, door threshold, balustrade posts or base plates, edges, and drip details. These are the spots where unqualified repairs usually fall short. A quick reseal over grout or a coating over old tiles does nothing if water is entering at a threshold, a cracked screed, or a poorly detailed penetration. If internal damage is already showing, arrange leak detection in Melbourne before approving any repair scope.

One rule saves a lot of money. Assess the whole system before touching the finish.

Separate surface wear from system failure

Some defects are maintenance issues. Others point to a failed assembly that needs demolition and rebuilding in line with Australian Standards, including AS 4654.1 and AS 4654.2. The skill is knowing the difference.

Warning signs that usually indicate more than cosmetic wear include:

  • Recurring cracks in grout or tiles: Repeated cracking often points to structural movement, substrate deflection, or missing movement joints.
  • Loose edge tiles, lifted trims, or failing balcony fronts: Perimeters cop a lot of water and movement. If the edge is failing, the detailing below it often is too.
  • Persistent damp below the balcony: Water has usually passed the tile layer and is affecting the substrate, framing, soffit, or adjacent wall.
  • Blocked, undersized, or badly integrated outlets: Drainage defects place constant pressure on the membrane and surrounding junctions.
  • Sealant failure at doors and wall junctions: Once these interfaces open up, water tracks into the areas that are hardest to dry and hardest to repair.

DIY repairs and cheap trade fixes often target the visible symptom. Regrout the tiles. Replace a bead of sealant. Roll on a coating. Those methods can tidy the surface, but they do not address falls, substrate cracking, membrane termination heights, outlet integration, or movement. As a Registered Builder, I treat a balcony with multiple symptoms as a building-envelope problem, not a tiling problem. The remedy may involve strip-out, substrate repair, re-screeding to correct falls, compliant waterproofing, flood testing, and only then re-tiling. That full sequence is what stops repeat leaks.

Choosing the Right Waterproofing System for Melbourne

The right system depends on the substrate, exposure, detailing complexity, traffic, finish requirement, and whether you're dealing with new work or remediation. Melbourne conditions make that choice more demanding because balconies cop wind-driven rain, temperature swings, and strong UV over time.

Compliance comes before product selection

In Australia, balcony waterproofing isn't just a product selection exercise. It must comply with AS 4654.1 and AS 4654.2, and cited Australian guidance notes that membranes used as part of external wall construction should terminate at least 150 mm above finished floor level, with balcony materials also needing to meet relevant fire-performance expectations in the cited guidance. The same guidance recommends inspecting balcony waterproofing and rainwater outlets twice yearly because these areas sit within the external envelope and are exposed to ongoing weather and UV stress, as outlined in this Australian best-practice waterproofing reference.

That requirement alone rules out a lot of casual repair methods. If someone suggests coating over the tile surface without dealing with upturns, terminations, outlets, thresholds, and interfaces, the job is already heading in the wrong direction.

For owners comparing systems, it helps to understand the trade-offs rather than chasing a miracle product. Melbourne projects often involve liquid-applied membranes, sheet membranes, or cementitious systems. The better question is whether the chosen system suits the substrate and detailing conditions. For a broader overview of waterproofing systems used in Melbourne projects, look at the whole build-up, not just the membrane label.

Balcony Waterproofing System Comparison

System Type Best For Pros Cons
Liquid membrane Complex shapes, detailed junctions, renovations with multiple penetrations Seamless application, good for irregular layouts, practical around corners and penetrations Heavily dependent on substrate prep, coverage control, curing, and detailing discipline
Sheet membrane Larger open areas, projects where consistent thickness is critical Factory-made thickness, reliable for broad spans, useful where flat planes dominate Junctions and laps need very careful execution, less forgiving on awkward geometry
Cementitious system Specific concrete-based applications and selected remediation scopes Compatible with some mineral substrates, useful in certain assemblies Not a universal answer for every balcony, still depends on crack repair, detailing, and drainage

What usually works and what usually doesn't

What works is a system matched to the actual balcony. Porous concrete and non-porous sheeted surfaces don't behave the same way, so primers and membranes need to be paired properly. Australian technical guidance also stresses that the substrate must be clean, dry, and sound before any membrane goes on. That applies just as much to balconies as it does to wet areas inside a home.

What doesn't work is selecting a membrane first and hoping the rest of the balcony adapts to it. That approach is common with DIY jobs and unqualified trades. They see a leak, buy a coating, and ignore the failed falls, the wall flashing, or the post penetrations. The balcony looks refreshed for a short period, then the same water path reappears.

A compliant balcony isn't defined by the bucket or the roll. It's defined by how the entire assembly sheds water.

The Critical Steps of a Compliant Installation

Most failed balcony jobs don't fail at the obvious stage. They fail earlier, when the substrate wasn't properly prepared, when details were left unresolved, or when the finish trade moved too quickly. A compliant installation has a sequence, and each part relies on the one before it.

Preparation decides the result

Surface preparation is where many DIY and low-cost jobs fall apart. Australian technical guidance is clear that adhesion failures often start with poor preparation. The surface must be confirmed as clean, dry, and sound, joints and penetrations must be treated before membrane application, and allowing a 48-hour weather buffer before starting is common field practice so moisture and rain don't compromise bond or curing, as described in this Australian substrate preparation guidance.

That means a proper installer doesn't just sweep the balcony and start rolling on product. The substrate gets inspected for contamination, laitance, cracks, hollows, weak patches, and movement. Unsound screed is removed. Cracks and gaps are repaired. Falls are checked. If the balcony needs grinding, patching, or corrective screeding, that happens first.

Details are where balconies are won or lost

Once the base is ready, the membrane system only succeeds if the details are resolved properly. Corners, wall-floor junctions, drain flanges, threshold transitions, movement joints, and balustrade penetrations all need deliberate treatment. That's where bond breakers, reinforcement bandage, compatible primers, puddle flanges, angle fillets, and flashing integration matter.

A professional sequence usually looks like this:

  1. Substrate correction first: Repair cracks, stabilise weak areas, and create proper falls if the balcony holds water.
  2. Primer matched to surface: The primer has to suit the substrate and membrane combination. Wrong pairing is a common cause of failure.
  3. Detail treatment before field coating: Corners, joints, and penetrations get reinforced ahead of the main membrane area.
  4. Drainage elements integrated early: Outlets, flashings, edge trims, and thresholds are set so the membrane can tie into them continuously.
  5. Membrane applied in controlled stages: Coverage is checked carefully instead of trying to rush the whole balcony in one pass.
  6. Protection before finishes: The membrane must be protected from damage by following trades during tiling or topping works.

For larger or more complex jobs, a Victorian waterproofing compliance certificate process can be part of the documentation trail owners should ask about.

If a penetration is added after the membrane goes down and nobody re-details it properly, the waterproofing system has already been compromised.

Curing, protection, and paperwork

A membrane that looks dry isn't always ready for the next trade. Installers need to respect manufacturer cure windows and site conditions. They also need to keep other trades off the surface or protect it properly. A dropped trowel, dragged tile stack, or rushed adhesive application can damage a sound membrane before the balcony is even finished.

Builder-led coordination matters. On balcony and bathroom renovations alike, sequencing avoids the classic handover dispute where every trade blames the one before. A compliant job leaves behind more than new tiles. It leaves behind evidence that the balcony was assessed, prepared, waterproofed, protected, and finished in the right order.

Why Properly Waterproofed Balconies Still Fail

The most frustrating balcony leaks are the ones that happen after the owner has already paid for waterproofing. In many of those cases, the membrane wasn't the actual weakness. The weak point was somewhere the eye doesn't go first.

The membrane isn't always the real problem

Australian technical commentary consistently points to junctions, penetrations, and drainage points as the main failure locations. It also makes a point many homeowners miss. Adding more membrane doesn't fix structural movement or incorrect slope. Those underlying issues have to be corrected first, as highlighted in this Australian commentary on balcony failure points.

That's why a balcony can leak even when the installed product itself is compliant. A few common examples:

  • Wall interfaces fail: Water gets behind the system where the balcony meets the wall because the flashing or termination is wrong.
  • Balustrade posts are the weak link: A post fixed through the waterproofing layer creates an obvious risk if the penetration wasn't detailed properly.
  • Movement cracks open new paths: If the substrate or structure moves, the stress often shows up at corners, joints, or edges.
  • Poor falls keep water in the wrong place: A membrane under constant ponding pressure is being asked to do more than it should.
  • Drainage details are incomplete: The outlet might exist, but the membrane isn't properly tied into it.

An infographic titled Why Waterproofed Balconies Fail, listing six common causes of structural waterproofing system failures.

When a contractor looks only at the visible surface, these causes get missed. A Registered Builder looks at the assembly as a whole. That often changes the remedy from "apply another coat" to "remove the finish, correct the falls, repair the flashing, then rebuild the system properly."

Why overlays over old tiles often disappoint

Waterproofing over existing tiles sounds attractive because it appears faster and less disruptive. Sometimes an overlay system can be viable. Often it isn't. The issue isn't whether an overlay product exists. The issue is whether the existing tiles, screed, bond, falls, and drainage can support a compliant new system.

If the old balcony has ponding, drummy tiles, trapped moisture, cracked screed, or failed edges, covering it can lock defects into the build-up. The leak path may shift rather than disappear. Owners then end up paying for demolition later, after already paying once for the shortcut.

A balcony can be freshly coated and still be fundamentally wrong underneath.

This is the point many unqualified trades miss. They treat waterproofing balcony work like painting. It isn't. It's remediation of an exposed structural surface over occupied space.

Tiling and Testing for a Bulletproof Finish

A balcony can look finished on Friday and leak by the first decent rain if the membrane was tiled over too early, damaged during installation, or locked under a tile bed that cannot cope with movement. I see that sequence often in Melbourne remedial work. The failure is then blamed on the membrane product, even though the underlying problem sits in the handover between waterproofing, testing, and tiling.

Testing before the tiles go down

Once the membrane has cured in line with the manufacturer's requirements, it needs to be inspected before any adhesive goes on. That means checking corners, upturns, puddle flanges, door thresholds, terminations, and any patched areas. Small defects at this stage are still easy to fix. After tiling, they are expensive to find and harder to prove.

Where the system and site conditions allow it, flood testing is a practical way to confirm the membrane is holding water and draining as intended. It can expose pinholes, weak junctions, and areas where detailing looked acceptable dry but fails under standing water. On a balcony over habitable space, that test is worth doing properly.

Patience matters here. A membrane that feels dry to the touch is not always ready for traffic, adhesive, or trapped moisture above it.

Tiling has to work with the waterproofing below

The tile finish is part of the weather-exposed assembly. If the tiler treats it as a cosmetic layer only, the waterproofing below is put at risk from day one. Exterior balconies in Melbourne move with temperature changes, moisture, and normal building settlement. The tiling system has to allow for that movement, not fight it.

Good practice includes:

  • Using exterior-rated compatible materials: Adhesive, grout, primer, sealant, and tile type need to suit the substrate, the membrane, and external exposure.
  • Protecting the membrane during tiling: Dropped tools, ladders, sharp tile edges, and stacked materials can puncture or bruise a cured membrane before the finish is even laid.
  • Keeping movement joints clear and correctly located: If a tiler bridges control joints or fills movement joints with rigid materials, cracking usually returns through the tiled surface.
  • Maintaining drainage through the finish: Adhesive build-up, poor tile selection, or bad set-out around outlets can reduce falls and create ponding that should have been avoided.
  • Finishing perimeters and penetrations properly: Balconies often leak at edges, balustrade bases, and threshold interfaces where the tile work looks neat but the waterproofing continuity has been compromised.

In balcony waterproofing, a lot of DIY jobs and unqualified trade-led jobs frequently come undone. The membrane may be compliant on paper, but the balcony still fails because the tiling stage ignored movement, blocked drainage, or damaged a detail that was already doing a hard job. A bulletproof finish comes from treating assessment, membrane installation, testing, and tiling as one controlled build sequence, not four separate tasks.

Hiring a Licensed Expert vs a DIY Disaster in Melbourne

A leaking balcony often pulls in more than one trade. You may need demolition, substrate repair, screeding, waterproofing, carpentry, plumbing attention to outlets, and then external tiling. That's exactly why these jobs go wrong when owners hire individual trades without anyone taking responsibility for the full sequence.

A close up view of a balcony showing damaged, peeling wall paint and concrete near a waterproofed section.

Why builder oversight matters

A tiler can lay tiles. A waterproofer can apply a membrane. A plumber can deal with outlet components. But once the balcony needs diagnosis, demolition decisions, fall correction, flashing review, and coordination between trades, a Registered Builder is often the person who can hold the whole job together.

That matters even more when owners ask whether they can waterproof over existing tiles. Industry guidance on remediation notes that this is only viable when the existing tiles, screed, and slope are sound. Where ponding or extensive cracking is present, partial demolition and re-profiling are commonly required before a compliant new system can be installed, as discussed in this balcony remediation guidance for tiled substrates.

In practice, builder oversight reduces a common problem. One trade says the leak is in the grout. Another says it's in the flashing. Another says the membrane failed. A builder looks at all of it, works out the sequence, and makes sure the remedial scope matches the cause.

For owners comparing providers, Melbourne Tiling Services P/L is one example of a contractor that combines tiling, waterproofing, screeding, and registered builder oversight for renovation and leak-rectification work. That's relevant on balconies for the same reason it matters in bathroom renovations. The wet-area risk sits across multiple trades, not one.

What to ask before you hire anyone

Use a short checklist before signing anything:

  • Ask who is responsible for the full scope: If screeding, waterproofing, tiling, and rectification are split between unrelated subcontractors, ask who carries final accountability.
  • Ask how they assess overlays versus demolition: Anyone who recommends coating over old tiles without discussing slope, substrate soundness, and trapped moisture is skipping the hard part.
  • Ask about standards and documentation: They should be comfortable discussing Australian Standards, membrane compatibility, detail treatment, and completion records.
  • Ask how they sequence trades: A good answer should include substrate prep, membrane curing, protection, and final finishes.
  • Ask about similar leak rectification work: Balcony remediation is different from simple external tiling.

The video below gives useful context on what professional balcony work should look like when failures have already appeared.

DIY balcony waterproofing usually fails for the same reason cheap repair scopes fail. They focus on the surface symptom and ignore the build-up underneath. By the time water shows inside, the job has already moved beyond a weekend coating fix.


If you need practical advice on a leaking or ageing balcony, Melbourne Tiling Services P/L can help assess whether the issue is a surface repair, a drainage and detailing defect, or a larger remediation job involving screeding, waterproofing, and re-tiling under registered builder oversight.

Shower Leak Detection Melbourne: Expert Guide 2026

You notice it in stages. First, a damp smell that lingers after the bathroom should've dried out. Then a paint blister on the wall outside the shower, or a yellowish mark on the ceiling below. In some homes, the clue is underfoot. A hollow tile, a grout joint that keeps darkening, or skirting that starts to swell.

That's usually the point where worry kicks in. Is it the grout. A pipe. The shower base. The whole bathroom.

In Melbourne homes, the answer isn't always obvious from what you can see. A shower can look fine on the surface while water is moving into framing, flooring, or adjacent walls behind the tiles. That's why the smart approach is calm and methodical. Confirm the symptoms. Isolate the likely source. Then decide whether you're dealing with a local repair, a waterproofing failure, or a bathroom that's reached the point where broader rectification makes more sense.

Table of Contents

The Unwelcome Discovery A Guide for Melbourne Homeowners

A lot of shower leak calls start the same way. Someone has cleaned the bathroom, regrouted a small section, maybe replaced a shower rose, and still the stain gets bigger or the smell comes back. They're not careless. They're trying to solve the problem before it spreads.

The trouble is that shower leaks don't behave neatly. Water follows gaps, gravity, framing, and old building materials. The wet patch you can see may be well away from the defect that caused it. In a tiled shower, moisture can travel behind finishes and show up in the hallway, in a robe on the other side of the wall, or on the ceiling below.

That's especially true across Melbourne's mixed housing stock. A newer ensuite can have a junction detail problem. A period home may have movement, ageing substrates, and an old membrane that no longer performs. An apartment can involve common property concerns and access limits that make diagnosis harder.

Practical rule: Don't assume the first visible symptom is the source. Treat it as a clue.

The right mindset is simple. Don't panic. Don't start ripping tiles off blindly. Don't keep applying surface products in the hope that one of them will magically stop water moving behind the scenes.

Use a structured process instead. Confirm whether the leak is active. Work out whether it points to supply plumbing, waste, or waterproofing. Then look at the bathroom as a whole. If the shower is leaking because the assembly itself is at the end of its serviceable life, the smartest fix may be broader than the original stain suggested.

Telltale Signs and Common Causes of Shower Leaks

Some signs are obvious. Others are easy to dismiss until the damage becomes harder to ignore. If you're searching for shower leak detection Melbourne, these are the symptoms worth taking seriously early.

An infographic detailing five common signs of shower leaks including peeling paint, mold growth, and cracked tiles.

What you can usually see and smell

The first category is visual damage outside the shower itself. That includes:

  • Peeling paint or blistering finishes on nearby walls or the ceiling below
  • Mould or mildew that keeps returning after cleaning
  • Darkened grout lines that stay wet long after use
  • Swollen skirtings or trim outside the bathroom
  • Water marks in adjoining rooms or downstairs areas

Then there are the structural clues inside the shower.

  • Loose tiles can mean moisture has affected the bond.
  • Cracked grout often signals movement or water entry points.
  • Failed silicone at junctions around wall-to-floor changes and screens can let water into vulnerable areas.
  • A soft or drummy feel underfoot may suggest substrate trouble beneath the tile layer.

The smell matters too. A persistent musty odour, especially after showering, usually means moisture is sitting where it shouldn't.

What's often causing it underneath

Not every leak is a burst pipe. In Melbourne bathrooms, many shower leaks come back to the shower assembly itself rather than a visible plumbing fixture.

A common culprit is failed waterproofing. In Victoria, the minimum plumbing work standard for shower waterproofing is governed by AS 3740-2021 and the National Construction Code, and practical leak detection guidance puts early focus on waterproofing failures, junctions, and membrane defects because water can track into walls or floors while the surface still looks relatively dry. That same guidance explains why staged testing is used to separate pressurised supply leaks from waste or waterproofing failures in a shower cubicle (Victorian shower waterproofing guidance and staged leak testing).

Other common causes include:

Likely cause What it tends to look like
Worn silicone joints Localised leakage near corners, screens, or penetrations
Cracked tiles or grout Water entry through repeated wetting and movement
Plumbing fixture issues Leaks linked to tapware, mixers, shower roses, or supply lines
Drainage defects Problems that show up during use rather than when the shower sits idle
Ageing bathroom build-up Multiple small failures happening at once

One practical reason to avoid guessing is the DIY trap. A Melbourne shower leak page notes that 68% of Australian shower leak complaints involve homeowners attempting DIY fixes first, leading to a 42% increase in secondary damage costs (DIY shower leak attempts and secondary damage costs). That doesn't mean you can't inspect carefully. It means cosmetic fixes often come before proper diagnosis, and that's when time and money get lost.

Simple DIY Checks to Isolate the Problem

A lot of Melbourne homeowners reach the same point. They notice a damp skirting outside the bathroom, a stain on the ceiling below, or silicone that never quite dries out, and they want to know whether this is a simple maintenance issue or the start of a bigger bathroom problem.

That is the right time for a few careful checks at home. Keep them non-destructive. The job here is to narrow the possibilities and decide whether the shower needs a registered builder or leak specialist to assess the full bathroom assembly, not just the obvious wet spot.

A man kneels on a bathroom floor inspecting a shower enclosure frame for leaks using a magnifying glass.

Safe checks worth doing first

Start by drying the shower and the floor outside it, then leave it unused for a day if you can. If fresh moisture appears while the shower has not been used, the problem may sit with a pressurised plumbing connection, tapware, or water tracking from another source. If the area stays dry until someone showers, that points more towards the enclosure, waste, or waterproofed areas.

Then inspect the obvious weak points closely. Check silicone in the internal corners, around the base, where the screen meets tile, and around penetrations such as taps and outlets. Look for splits, lifting edges, mould that returns quickly after cleaning, swollen trims, or grout that stays dark long after the rest of the shower dries.

A basic isolation check also helps. Run water straight into the waste with as little splash as possible for a few minutes. Later, use the shower normally. If the leak only shows up during normal showering, the drain itself may not be the main issue. The problem can sit higher up, where water hits walls, junctions, or screen connections under regular use.

Check the fixtures too. Dry around the mixer, shower rose, rail mounts, and any exposed joints. Come back later and look again. Moisture showing up around fittings without a full shower points to a different repair path than water escaping only when the enclosure is wet.

For homeowners trying to understand what a minor repair might involve, this guide on how to fix leaking showers gives a useful overview.

When DIY needs to stop

DIY checking has a limit. Once the next step involves removing tiles, cutting into walls, resealing over damp materials, or guessing which product might hold, the risk goes up fast.

If the pattern is unclear, damage is spreading outside the shower, or the leak keeps returning after small repairs, stop patching and get the bathroom assessed properly.

That matters because a shower leak is not always a shower-only problem. In older Melbourne bathrooms, I often find more than one failure at the same time. A leaking screen junction might be obvious, but there can also be movement in the substrate, degraded waterproofing, poor falls, or water damage in adjacent walls. Patching the visible point buys time at best and traps moisture at worst.

A short demonstration can help you understand what professionals are trying to isolate before they recommend repairs.

The decision point is simple. If your checks suggest a single maintenance issue, a targeted repair may be enough. If the signs overlap, or the bathroom is older and showing wear in several places, it is time to bring in a registered builder for a whole-of-bathroom assessment. That approach looks at the leak, the waterproofing, the condition of the substrate, and whether a proper renovation will cost less than repeated repairs over the next few years.

How Melbourne Professionals Find Hidden Shower Leaks

A proper leak investigation starts with one question. Are we dealing with a plumbing fault, a drainage issue, failed waterproofing, building movement, or a mix of them?

That matters because hidden shower leaks rarely announce themselves at the source. Water can travel under tiles, through screed, along framing, and into the room next door before a stain shows up. In older Melbourne bathrooms, I often see the visible damage sitting well away from the actual entry point.

Why staged testing matters in Victorian bathrooms

Good operators work in stages because each test rules something in or out. They start with the history of the leak, when it happens, how long it has been going on, whether it shows after showering or all the time, and what sits on the other side of the shower wall. Then they check the bathroom layout, likely water paths, and the condition of joints, penetrations, wastes, and adjoining finishes.

A six-step infographic detailing the professional leak detection process for plumbing, including inspection and reporting.

After that, non-invasive testing helps narrow the field before anything is opened up. The point is not to confirm that moisture exists. By the time a homeowner calls, that part is usually obvious. The point is to identify the likely source, trace the path, and work out whether a local repair makes sense or whether the bathroom needs broader rectification.

That distinction saves money.

If the issue is a loose outlet, failed seal at a screen junction, or a pressure-side plumbing defect, the repair scope can stay tight. If testing points to membrane failure, poor falls, damaged substrate, or moisture spread into adjacent materials, the conversation changes. At that stage, a builder needs to assess the bathroom as a whole, including the condition of the waterproofing system and whether proper bathroom waterproofing in Melbourne can be reinstated through a repair or only through renovation.

The tools that narrow the search

Different tools answer different questions, so professionals use them together instead of relying on a single reading.

  • Thermal imaging helps spot cooler areas that may show moisture movement or water tracking behind finishes.
  • Acoustic listening equipment is useful for active pressurised leaks where sound can help locate the defect.
  • Pressure testing checks whether supply lines hold pressure or lose it over time.
  • Drain cameras help inspect waste lines and traps where access is limited.
  • Moisture meters help map how far water has moved into plaster, timber, skirtings, or nearby wall linings.

Used properly, those tests give a clearer picture before demolition starts. They also reduce the chance of pulling up the wrong section of tile or opening a wall that was never the problem.

On site: The best result is a clear diagnosis with a repair scope. Homeowners need to know where the water is getting in, where it has travelled, and whether the fix belongs to a plumber, a waterproofer, or a registered builder managing a larger bathroom repair.

The final step is judgment. Tools help locate moisture and isolate defects, but someone still needs to read the pattern of failure in the context of the bathroom's age, construction, and overall condition. That is usually the point where DIY should stop. If the findings suggest more than one failing component, the smart call is a registered builder who can assess the leak and the long-term health of the bathroom before money goes into patchwork.

Beyond Detection Repair Waterproofing and Renovation

Finding the leak is only half the job. The bigger question is what the leak says about the overall state of the bathroom.

When a patch is enough and when it isn't

Some defects are local. A failed fitting, a minor penetration issue, or an isolated screen junction can sometimes be rectified without rebuilding the shower. But many leaking showers aren't failing at a single visible point. They're failing as a system.

That's why a practical detection workflow uses non-invasive methods first. When thermal imaging, acoustic testing, and pressure testing are used together, the value is in narrowing the source before demolition starts. This kind of triangulation improves the odds of removing only what's necessary and avoiding false assumptions about the leak path (non-invasive leak localisation and triangulation).

Once the issue points to waterproofing, repair usually moves beyond cosmetic work. The process may involve removing tiles, checking the screed or substrate, replacing damaged materials, reinstating a compliant membrane, and then retiling and resealing. If moisture has affected adjacent framing, flooring, architraves, or skirtings, those items need attention too.

A good decision test is whether the shower has one isolated fault or several signs of age at once:

  • Patch repair may suit a contained issue with otherwise sound bathroom construction.
  • Broader rectification is often smarter if tiles are loose, substrates are compromised, or the waterproofing assembly has plainly failed.
  • Full renovation deserves consideration when the bathroom is dated, access is poor, or you're facing repeat work on finishes that are already near the end of their life.

Why registered builders matter on bigger bathroom repairs

Homeowners often make an incorrect comparison. They compare the cost of a tube of sealant to the cost of a proper repair. That's not the actual trade-off. The actual trade-off is between a short-term patch and a bathroom that's sound again.

In Melbourne, larger shower leak repairs often cross trades. There may be plumbing, waterproofing, carpentry, tiling, shower screen reinstatement, and finish work. If the leak has spread, there can also be subfloor or wall rectification. That's where registered builders become valuable. They can assess the leak in the context of the whole bathroom, coordinate the right licensed trades, and decide whether the sensible path is a local repair or a proper renovation.

Screenshot from https://melbournetilingservices.com.au

If you're already weighing up whether to repair or rebuild, it's worth understanding what compliant waterproofing involves in a renovation context. This overview of waterproofing in Melbourne is a sensible place to start.

A leaking shower often isn't just a leak. It's the bathroom telling you the original build-up no longer has enough life left in it.

For many homeowners, that's the decision point. Keep patching and hope. Or treat the leak as the prompt to create a dry, durable bathroom that won't need revisiting every time another small failure appears.

Shower Leak Detection Costs and Timelines in Melbourne

The honest answer on cost is that it depends on where the leak is, how far water has travelled, and whether the fix is local or structural. Without testing, any firm number is guesswork. That's why good operators inspect first and scope second.

What affects the final cost

The cost of shower leak detection in Melbourne is usually shaped by a few practical factors:

Cost driver Why it changes the scope
Leak location A fixture issue is different from failed waterproofing
Access Apartments, tight bathrooms, and occupied homes can slow work
Extent of damage Adjacent rooms, ceilings, or framing add repair scope
Bathroom age and condition Older bathrooms often reveal more than one defect
Repair standard Temporary patching and full compliant rectification are not the same job

If you're budgeting, think in stages rather than one line item. There's the initial assessment and testing. Then there's the repair itself. In some homes, that repair is minor. In others, leak detection leads directly into partial rebuild work or a full bathroom renovation.

That's why the useful question isn't “what does a leak cost”. It's “what level of work does this leak require”.

For a closer look at service scope, this page on leak detection in Melbourne helps frame what inspection and rectification can involve.

How long the process usually takes

Detection is usually the shortest part of the job. A site visit, testing sequence, and findings can often be worked through in a relatively contained appointment, especially when access is straightforward and the symptoms are clear.

Repairs take longer because bathrooms need proper sequencing. If tiles have to come up, the area must be prepared correctly. Waterproofing needs to be applied to the right standard. Materials need curing and drying time before retiling, grouting, and sealing. If there's hidden substrate damage, the timeline stretches because the room has to be made sound before finishes go back on.

A practical way to plan is this:

  • Diagnosis first
  • Scope confirmed second
  • Drying, waterproofing, and reinstatement allowed the time they need

Rushing the repair phase is one of the easiest ways to end up paying for the same bathroom twice.

Frequently Asked Questions About Shower Leaks

Can I claim shower leak repairs on insurance

It depends on your policy and the cause of the damage. Insurers often distinguish between sudden damage and defects related to wear, deterioration, or maintenance issues. The safest approach is to document the symptoms, keep records of testing and findings, and ask your insurer what evidence they need before repair work begins.

Are shower leaks more common in older Melbourne homes

Older homes do tend to raise more leak questions because bathrooms may have ageing membranes, movement in the structure, older plumbing, and finishes that have been repaired multiple times. That doesn't mean newer bathrooms are immune. Newer showers can still fail at junctions, penetrations, screens, falls, or workmanship details.

What's different in apartments and townhouses

Apartments and townhouses add access, strata, and neighbour impact. A shower leak can present in another lot or in common areas, which complicates responsibility and timing. In those settings, it's important to confirm the source before authorising work, because the visible damage and the original defect may sit in different places.

Can regrouting fix a leaking shower

Sometimes regrouting improves appearance, but it often doesn't solve the underlying leak if water is already getting past the tile layer or through failed junctions and membrane defects. Grout is not a substitute for a sound waterproofing system.

Should I keep using the shower if I suspect a leak

If moisture is spreading, a ceiling below is staining, or finishes are deteriorating, continued use usually increases the damage. Limiting or stopping use until the issue is tested is often the safer choice.

When should I call a registered builder instead of a leak detector alone

Call a registered builder when the leak appears tied to the broader bathroom build-up, when there's visible movement or substrate damage, or when you're already considering bathroom renovations. At that point, you don't just need the source identified. You need someone to assess the repair pathway for the whole room.


If you need a clear answer on whether your shower needs local rectification or a broader rebuild, Melbourne Tiling Services P/L can help. As Registered Unlimited Builders, they handle bathroom renovations, waterproofing, leak rectification, tiling, and full trade coordination across Melbourne, with free quotes, 3D drawings, and a renovation calculator to help you plan the next step with confidence.

Bathroom Renovation Specialists: Melbourne Expert Guide

You're probably doing what most Melbourne homeowners do at the start of a bathroom renovation. You've saved inspiration photos, picked out a vanity style, maybe even chosen tiles, then realised the hard part isn't the look. It's figuring out who can pull the job together without turning your house into a mess of delays, leaks, and cost blowouts.

That concern is justified. A bathroom renovation isn't a decorating exercise. It's a wet-area rebuild with compliance, sequencing, and defect risk baked into every stage. And because industry cost guides commonly place a standard bathroom renovation in the tens of thousands of dollars, with higher-end projects rising substantially when waterproofing upgrades, layout changes, and premium tiles are added, this is not the place to gamble on the cheapest quote or the nicest Instagram gallery, as noted in this Australian bathroom remodel cost guide.

Most first-time renovators think they need a good tiler. Sometimes they think they need a plumber who “does bathrooms”. In Victoria, that's often the wrong starting point. Instead, you need a registered builder who specialises in bathrooms, manages licensed trades properly, and treats waterproofing and compliance as the backbone of the project.

That's what separates a bathroom that merely looks new from one that performs properly for years.

Table of Contents

Your Bathroom Renovation Dream and the Reality

A typical renovation starts with excitement. You're tired of cracked grout, dated fittings, poor storage, and a shower that never quite drains properly. You want a bathroom that feels cleaner, sharper, and easier to live with.

Then reality arrives. The vanity you want affects plumbing positions. The new shower screen changes set-out. The tile you love needs flatter walls and tighter prep. The “simple refresh” starts picking up questions about substrate condition, falls, waterproofing, extraction, lighting, and whether the last renovation was done properly in the first place.

The gap between a nice bathroom and a sound bathroom

Many projects often go sideways. Homeowners focus on finishes because they're visible. Builders focus on what sits underneath because that's what fails.

A bathroom renovation specialist understands both. They know the room must look right, but they also know that beauty means nothing if the floor doesn't fall correctly to the waste, the membrane is weak at penetrations, or the trades arrive in the wrong order.

A bathroom is one of the smallest rooms in the house, but it demands some of the tightest coordination.

That's why I push homeowners to think beyond “Who can tile this?” and ask a better question. Who can take responsibility for the whole wet area from demolition to handover?

Why specialist management matters from day one

Good bathroom renovation specialists don't start with tile samples. They start with scope. They assess what stays, what moves, what needs diagnosis, and what carries compliance risk. That early discipline protects your budget and your sanity.

Here's what that means in practice:

  • They check the existing room properly. Not just measurements, but signs of prior leaks, movement, poor ventilation, rotten skirtings, and failed silicone patch jobs.
  • They plan the sequence. Demolition, rough-in, substrate prep, waterproofing, tiling, fit-off, and final detailing must happen in the right order.
  • They price the complete job. Not a cosmetic fantasy that falls apart once walls are opened.
  • They coordinate trades. Bathrooms involve more than one trade almost every time. Someone has to own that coordination.

If you want a renovation that feels smooth, don't hire for one visible skill. Hire for control. A specialist should reduce decision fatigue, keep quality consistent, and stop avoidable defects before they're buried behind tile adhesive and grout.

The Full Scope of a Bathroom Renovation Specialist

A real bathroom specialist is effectively the general contractor for one of the most technical spaces in your home. That role has nothing to do with sounding impressive and everything to do with reducing failure points.

What the homeowner sees and what the specialist controls

From your side, the job may look straightforward. Remove the old bathroom, install the new one, done. On site, it's much more exacting.

An infographic showing the seven stages of a bathroom renovation project by a specialist.

A bathroom renovation specialist usually handles or coordinates:

  1. Consultation and layout planning
    The room has to work before it looks good. Door swing, shower width, vanity depth, storage, towel rail positions, and cleaning access all matter.

  2. Demolition and preparation
    Old bathrooms often hide poor patchwork, damaged sheeting, out-of-level floors, and moisture problems. If prep is rushed, everything after it suffers.

  3. Plumbing and electrical coordination
    A proper renovation needs licensed trades working to a clear plan, not improvising on the day.

  4. Substrate correction and screeding
    Large-format tiles, niches, frameless screens, and linear drains all demand accuracy. If the surfaces aren't straight and the falls are wrong, the finish won't save the job.

  5. Waterproofing and tiling
    Many failures originate in these stages. If you want a deeper look at how these two stages interact, this guide on tiling and waterproofing in Melbourne bathrooms is useful.

  6. Fixture installation and finishing
    Vanities, toilets, tapware, screens, mirrors, trims, sealants, and final alignment all affect usability and longevity.

Why sequencing matters more than style

In Victoria, the National Construction Code requires waterproofing of wet areas to be installed in accordance with AS 3740:2021, and the Victorian Building Authority treats failures in bathroom waterproofing as a major source of residential defects, as outlined in this Victorian waterproofing compliance guidance.

That one point should change how you hire.

If waterproofing is a major defect-risk area, then the person running your job must understand membrane continuity, junction treatment, penetrations, shower recess preparation, and what can't be covered up before it's right. A tiler who only wants to “get on with the tiles” is not enough.

Practical rule: If the contractor talks more about tile colours than substrate prep and waterproofing detail, keep looking.

A specialist also knows where modern bathrooms become technically demanding:

  • Large-format porcelain and Kerlite panels need flatter surfaces and cleaner set-out than many older bathrooms can provide without extra prep.
  • Frameless shower screens rely on accurate levels, plumb walls, and finished dimensions that don't drift mid-job.
  • Walk-in showers need disciplined fall creation. If water sits outside the wet zone, the design has failed no matter how good it photographs.

A homeowner sees one room. The specialist sees a chain of dependencies. That mindset is exactly why bathroom renovation specialists earn their keep.

Why Your Specialist Must Be a Registered Builder

If your renovation involves multiple trades, wet-area compliance, and meaningful spend, a registered builder isn't a nice extra. It's the right level of responsibility.

A tiler installs finishes, a builder carries the project

A good tiler is valuable. A good plumber is valuable. A good electrician is valuable. None of them, acting alone, should be treated as the person responsible for the whole bathroom unless they're legally and professionally equipped to take that role.

A registered builder specialising in bathrooms does more than organise trades. They carry accountability for sequencing, coordination, workmanship standards, and project control. That matters when the job moves beyond replacing like-for-like fittings and into real renovation territory.

Many homeowners get trapped. They hire the trade they understand best, then discover too late that no one is properly managing interfaces between demolition, rough-in, waterproofing, tiling, cabinetry, and final fit-off. Once that happens, problems get pushed downstream. Everyone blames the previous trade. You're left sorting it out.

You want one responsible party, not a circle of subcontractors explaining why the defect belongs to someone else.

For bathroom floors alone, details such as falls, waste positioning, tile set-out, and transitions need careful planning. That's why even a focused element like bathroom floor tiling should sit inside a bigger managed scope rather than being treated as an isolated task.

Choosing your bathroom professional

The differences are clearer when you put them side by side.

Attribute Handyman / Tiler Bathroom Renovation Specialist (Unregistered) Registered Builder (Specialising in Bathrooms)
Primary focus One trade or small repair scope Renovation coordination without full formal protection Full bathroom project responsibility
Trade coordination Limited May coordinate informally Coordinates licensed trades as part of a managed build
Compliance mindset Often finish-focused Varies widely Should treat compliance as core project work
Accountability across the whole job Narrow Often unclear Clearer single-point responsibility
Risk if hidden issues appear Higher Higher if scope isn't formalised Better equipped to diagnose, re-scope, and manage
Suitability for full bathroom renovation Poor to moderate Moderate Strong
Best use case Minor maintenance or isolated tiling Small cosmetic projects with low complexity Full wet-area renovations and higher-risk projects

The main point is simple. Bathrooms are small, but they're not simple. If the work requires design judgement, compliance discipline, multiple trades, and defect prevention, hire at the level the project demands.

That's the difference between buying labour and buying a properly managed result.

Setting Realistic Costs and Timelines in Melbourne

Most budget problems don't start with greed. They start with false simplicity. Homeowners are shown a neat before-and-after price idea, but the actual room needs waterproofing work, plumbing changes, substrate correction, and compliance-driven upgrades that weren't part of the original mental budget.

Why Melbourne budgets drift

Public bathroom cost advice is often broad and national. That's not much help when your actual project is a Melbourne wet-area renovation in an older home or apartment. A better way to think about budgeting is this: the visible items are only part of the spend. The hidden work often determines whether the budget holds.

Recent Australian industry reporting has highlighted that many public cost guides are national averages, while small wet-area jobs in Melbourne are especially vulnerable to scope creep from waterproofing, plumbing, and compliance upgrades, which is exactly why cheap headline estimates so often unravel, as discussed in this Melbourne bathroom renovation cost article.

An infographic showing realistic costs and timelines for a bathroom renovation project in Melbourne, Australia.

For local planning, this page on the cost of bathroom renovation in Melbourne is a more relevant starting point than generic interstate advice.

Here's where homeowners often underestimate:

  • Waterproofing-related rectification if the old bathroom has already failed
  • Plumbing adjustments when fixtures move or old connections need upgrading
  • Subfloor or wall correction for modern tile formats and frameless installations
  • Compliance-driven changes that weren't visible at quote stage
  • Finish upgrades that seem minor individually but add up quickly

What a realistic programme looks like

The timeline problem follows the same pattern. People think in terms of tile installation days. Builders think in terms of dependencies, curing times, inspections, procurement, and fit-off coordination.

A sensible programme usually includes:

  • Pre-construction decisions
    Final selections, measurements, site review, and ordering. Delays here ripple through everything.

  • Strip-out and diagnosis
    Hidden leaks, movement, poor framing, or failed past work are often revealed during this stage.

  • Rough-in and prep
    Plumbing and electrical changes happen before the room can be closed up and prepared.

  • Waterproofing, setting, and curing
    This stage can't be rushed because later layers depend on it.

  • Tiling, fit-off, and defect check
    The last phase often looks fast, but it still needs discipline.

Fast bathrooms are often expensive bathrooms later.

The right expectation isn't “How quickly can someone finish?” It's “How cleanly can someone move from one stage to the next without compromising the work?” If you approach cost and time with that mindset, you'll make better decisions from the first quote onward.

Your Guide to Vetting and Hiring a Specialist

You meet two contractors. One talks about tile colours, quick turnaround, and a sharp price. The other starts with builder registration, scope control, waterproofing responsibility, and how variations will be documented if demolition reveals a problem. Hire the second one.

That decision saves people from expensive bathroom failures in Victoria. A bathroom renovation is not a tiling job with a few extras attached. It is a building project with legal, sequencing, and compliance obligations. If the person pricing the work cannot explain how the whole room will be managed, they are not the right specialist to trust with it.

Screenshot from https://melbournetilingservices.com.au

Questions that expose weak operators fast

Ask direct questions. Then judge the quality of the answer, not the confidence of the delivery.

A registered builder who specialises in bathrooms should answer clearly, explain their process, and tell you who carries responsibility from demolition through fit-off. If they dodge, generalise, or keep pulling the conversation back to finishes, keep looking.

Use this checklist:

  • Builder registration
    Ask whether they are a registered builder in Victoria and what class of work they are taking responsibility for.

  • Single-point responsibility
    Ask who is accountable for the full bathroom outcome, including defects, coordination, and compliance, not just tiling or waterproofing in isolation.

  • Waterproofing method
    Ask how they prepare substrates, treat junctions and penetrations, and verify the bathroom is ready before tiles go down.

  • Trade coordination
    Ask who sequences the plumber, electrician, carpenter, waterproofer, tiler, and glazier, and who checks each stage before the next starts.

  • Hidden condition procedure
    Ask what happens if demolition exposes rot, leaks, out-of-square framing, or failed past work. You want a documented process for scope review, pricing, and approval.

  • Experience with your type of bathroom
    Ask for recent examples that match your project, whether that means an apartment ensuite, an older Melbourne home, a curbless shower, or large-format tile.

  • Protection of the rest of the house
    Ask how they manage dust, waste removal, access, and protection to adjoining finishes while the room is under construction.

Good operators hear these questions every week. Poor ones get irritated because they rely on assumptions.

How to read a quote properly

A short quote is a risk document disguised as a low price.

You are not comparing numbers alone. You are comparing scope definition, risk control, material assumptions, and whether someone has priced the job as a managed renovation or as a patchwork of trades. Bathrooms blow out when the quote leaves too much unsaid.

Check for these items:

What to check Why it matters
Detailed scope of works Stops disputes about what was included in the contract price
Named materials or specifications Prevents quiet substitutions that reduce quality
Clear exclusions Shows what you may still need to pay for separately
Allowance language Identifies items that can change once selections or site conditions are confirmed
Builder-led coordination Shows whether one party is managing sequencing and responsibility across the whole job
Variation process Protects you when hidden issues are found after demolition

If one quote is cheap because it is vague, it is not cheap. It is unfinished.

What to look for in a portfolio

Judge a portfolio like a record of build quality, not a collection of pretty photos.

Styled images hide the details that matter. Ask for whole-room shots, close-ups around wastes and niches, and projects that show difficult conditions rather than only clean new builds. A specialist bathroom builder should be able to show controlled set-out, straight lines, balanced cuts, and fixtures that align with the tile grid.

Look for:

  • Straight cuts and disciplined set-out around corners, niches, wastes, and doorways
  • Consistent joints across walls, floors, and returns
  • Level fixture alignment at vanities, mirrors, mixers, and accessories
  • Evidence of problem-solving in older homes, tight layouts, or awkward existing structures
  • Photos of complete bathrooms with enough detail to assess workmanship, not just styling

Later in the process, it helps to watch how an experienced installer thinks about execution, not just presentation.

If you narrow it down to two similar prices, choose the contractor who gives clearer documentation, sharper answers, and stronger control of the full bathroom scope. In this trade, ambiguity is where defects and disputes start.

Common Pitfalls and What Success Looks Like

You finish the bathroom, everything looks neat, and six months later the shower starts leaking into the wall behind it. That usually happens because the job was treated like a tiling project instead of a building project. Surface finishes looked fine. The assembly underneath was wrong.

The most common failures

A common scenario in Victoria involves homeowners looking for a fast fix to a shower leak and getting advice about grout colour, tile style, or resealing, when the actual problem sits behind the tiles. In older homes and apartments, leak rectification depends on defect diagnosis, substrate condition, waterproofing continuity, and the order of work, not cosmetic touch-ups.

The failures I see most often are predictable:

  • Treating leaks as surface problems
    Regrouting, resealing, or replacing silicone does not fix a failed waterproofing system or a moving substrate.

  • Hiring by trade, not by accountability
    A plumber handles one part, a tiler handles another, and nobody takes responsibility for compliance, sequencing, or the finished room as a whole.

  • Ignoring floor falls and drainage behaviour
    If water sits in corners or escapes the shower zone, the bathroom has failed, no matter how good the tiles look.

  • Locking in finishes before checking the room
    In older bathrooms, rotten framing, out-of-plumb walls, and damaged sheeting change the scope. You find that out before selections matter.

  • Using silicone to hide bad set-out or bad detailing
    Silicone is a sealant, not a substitute for proper construction.

Good bathroom work starts with diagnosis. Then it moves to scope, documentation, sequencing, and build quality. That is why a registered builder who specialises in bathrooms gives you a better result than a good tiler working without full project control.

What a well-run bathroom renovation looks like

A successful bathroom renovation feels organised from the start. The room is measured properly. Existing defects are identified early. Trades arrive in the right order. Fixtures, tile set-out, waterproofing details, and drainage outcomes are resolved before installation starts.

The finished room should do more than photograph well. Water should drain properly. Fixtures should align cleanly. Tile cuts should look deliberate. Doors should clear. Niches should sit in the right place. Nothing should rely on last-minute patching to look acceptable.

A heritage home update shows the difference clearly. The owner wants better function, but the room still has to suit the house. A bathroom specialist who is also a registered builder checks the structure, confirms what can stay, adjusts the scope to suit the existing conditions, and rebuilds the room so it performs properly without looking out of place.

An apartment ensuite is another test. Access is tighter. Service locations matter more. Noise, waste removal, neighbours, and body corporate conditions can affect how the job runs. A bathroom builder with registration and bathroom-specific experience controls those constraints and delivers a room that meets performance, compliance, and finish standards.

That is the benchmark. A bathroom renovation in Victoria should be treated as a controlled wet-area rebuild with one party responsible for the outcome. Hire bathroom renovation specialists who understand compliance, sequencing, waterproofing, and defect prevention, not just finishes. If you get that part right, you protect the room, the budget, and the value of the home.

If you're planning a bathroom renovation in Melbourne and want a registered builder's view before committing to scope, layout, or finishes, speak with Melbourne Tiling Services P/L. They handle bathroom renovations, waterproofing, tiling, leak rectification, and full trade coordination for residential projects across Melbourne and greater Victoria.

Bathroom Renovation Cost Melbourne 2026: Your Complete Guide

In Melbourne, a full bathroom renovation usually lands between $15,000 and $35,000, while a smaller cosmetic refresh can start from around $8,000. If your plan includes layout changes, premium finishes, or structural work, costs often move beyond that range.

That's the part most homeowners want answered first. The harder part is working out what those numbers include, and whether the quote in front of you covers a real end-to-end renovation or just a collection of partial trade costs.

A lot of the stress around bathroom renovation cost in Melbourne comes from comparing apples with oranges. One price might include demolition, waterproofing, tiling, plumbing, electrical, and project coordination. Another might leave out fixture installation, waste removal, compliance, or the cost of fixing what turns up once the room is stripped back. On paper, both can look similar until the work starts.

That's why the builder model matters. When a Registered Builder manages the renovation, you're not just paying for labour on site. You're paying for scope control, trade sequencing, responsibility for licensed work, cleaner handovers, and fewer gaps between what was quoted and what gets built.

Table of Contents

Understanding Your Melbourne Bathroom Renovation Budget

The first budget mistake is treating a bathroom like a simple fixture swap. It isn't. Once you involve demolition, waterproofing, tiling, plumbing, electrical, and finishing trades, the price moves into full construction territory.

The clearest benchmark for homeowners is this: the Housing Industry Association-backed guide puts the average bathroom renovation in Australia at about A$26,000, with a practical spread of roughly A$8,000 to A$35,000+, depending on scope, materials, and whether it's a basic or high-end rebuild, as outlined in Canstar's bathroom renovation cost guide.

What that means in a Melbourne home

A cosmetic refresh sits at the lower end. That usually means keeping the layout largely intact and avoiding major changes to plumbing or electrical positions. It can improve the look of the room, but it won't solve every underlying issue.

A full renovation is different. It typically includes strip-out, preparation, waterproofing, tiling, licensed trade work, and new fixtures installed properly. In Melbourne, where labour and finish expectations are generally higher, that's where many standard bathrooms sit.

Practical rule: If the quote sounds cheap for a full bathroom rebuild, check what's missing before you compare it with anything else.

Why a Registered Builder changes the cost conversation

Homeowners often ask whether it's cheaper to organise a plumber, electrician, tiler, waterproofer, and shower screen installer themselves. On paper, it can look that way. In practice, self-managing trades often creates scope gaps, scheduling clashes, and disputes over who's responsible when one stage affects the next.

A Registered Builder gives you a single point of accountability. That matters in bathrooms because every stage depends on the one before it being done correctly. If framing is off, tiling suffers. If waterproofing is delayed or incomplete, the whole job is exposed. If fixtures arrive late, trades stand around or get rescheduled.

Budgeting for the whole job, not the cheapest line item

Those looking into bathroom renovation cost Melbourne usually want to answer one practical question: what will I really spend to get the room finished properly? The useful number is the all-in cost, not the cheapest trade-by-trade estimate.

That all-in figure should account for:

  • Site preparation and demolition
  • Licensed plumbing and electrical work
  • Waterproofing and compliance
  • Wall and floor tiling
  • Fixture installation and finishing
  • Project management by one responsible party

That's the difference between a room that looks done and a renovation that is complete.

Bathroom Renovation Scopes and Typical Price Ranges

“Bathroom renovation” can describe three very different jobs. That's where homeowners get caught. They ask for a quote on a renovation, but one contractor prices a refresh while another prices a full rebuild.

Cosmetic refresh

At the lower end, projects can start from around $8,000, which aligns with the lower bracket noted in the verified cost guides. This scope usually suits a small bathroom or ensuite where the layout stays put and the work focuses on presentation rather than major reconfiguration.

A cosmetic refresh often includes selected updates such as:

  • Replacing dated fixtures while keeping plumbing points where they are
  • Refreshing surfaces without changing the room structure
  • Upgrading the look with simpler tile choices and standard fittings
  • Avoiding major trade complexity by not moving the toilet, shower, or vanity positions

This scope can work well for landlords, resale preparation, or homeowners who want the room improved without opening up every hidden issue in the walls and floor.

What it doesn't usually allow for is significant redesign. If you want a walk-in shower where a bath used to be, a floating vanity with altered services, or a more custom finish, you're usually past refresh territory.

Standard full renovation

This is the range most Melbourne homeowners shop in. A standard full renovation typically sits between $15,000 and $35,000, which matches the national benchmark and practical spread in the verified data.

This scope usually means the bathroom is stripped back and rebuilt properly. It may include new waterproofing, new tiling, updated plumbing and electrical, new fixtures, and a more cohesive finish throughout. It's the right category for bathrooms that are tired, leaking, poorly laid out, or due for a proper reset.

A standard full renovation tends to suit:

Scope type Typical range Usually includes
Cosmetic refresh $8,000 to $15,000 Surface-level improvements, minor fixture changes, limited disruption
Standard full renovation $15,000 to $35,000 Demolition, licensed trades, waterproofing, tiling, new fixtures
High-end custom renovation $35,000+ Layout changes, premium materials, bespoke detailing, structural complexity

The trade-off is straightforward. You spend more upfront, but you're paying to rebuild the wet area correctly rather than just cover over ageing materials.

A cheap refresh can make an old bathroom look newer. It won't necessarily make it perform like a new one.

High-end custom renovation

Once the job includes structural changes, high-end stone or porcelain, custom joinery, frameless screens, or specialist tile installation, costs frequently move beyond $35,000. That aligns with the upper end of the verified benchmarks for premium bathrooms.

Design decisions begin to drive labour just as much as materials. Large-format tiling, feature niches, flush finishes, and layout changes all require more precision. Premium bathrooms also tend to involve more planning because tolerances are tighter and the visual standard is higher.

Common triggers that push a bathroom into this category include:

  • Moving plumbing locations to create a different layout
  • Using premium tiling materials such as marble or specialist porcelain
  • Installing custom frameless shower screens
  • Reworking structure or openings as part of the new design
  • Adding bespoke joinery and detail work instead of off-the-shelf pieces

Why scope clarity matters before you request pricing

Homeowners often think they need “a bathroom quote” when what they need is a scope decision. If you don't decide whether you want a refresh, a full rebuild, or a custom redesign, every quote will be based on different assumptions.

That's one reason managed bathroom renovations tend to produce clearer pricing. A builder-led quote is more likely to define what's included, what's excluded, and what level of finish the price is based on. That saves a lot of confusion later.

An Itemised Breakdown of Renovation Costs

A bathroom can be one of the smallest rooms in the house and still be one of the most labour-heavy. Every stage depends on the one before it being done properly. Strip-out affects set-out. Set-out affects waterproofing. Waterproofing affects tiling. That flow is a big reason an all-in builder quote often gives a clearer picture of the actual cost than a stack of separate trade prices.

Typical Bathroom Renovation Cost Breakdown in Melbourne

For a mid-range Melbourne bathroom around the $25,000 mark, the budget usually spreads across the job like this. The exact split changes with the room, the finish level, and whether services stay put.

Cost Component Typical Cost Range (for a ~$25k reno) Percentage of Budget
Demolition and strip-out Often A$1,000 to A$2,500 depending on access, waste removal, and how much is being removed Lower share
Carpentry and preparation Often A$1,500 to A$4,000 depending on framing repairs, floor correction, and wall straightening Lower to mid share
Plumbing Often A$2,500 to A$6,000 depending on fixture count and whether services move Mid share
Electrical Often A$1,000 to A$2,500 depending on lighting, power points, heated rails, and exhaust upgrades Mid share
Waterproofing Usually a modest line item compared with the full budget, but a failure here is expensive to rectify Smaller but critical share
Tiling labour Often one of the bigger labour costs, especially with large-format tiles, niches, mitres, or difficult set-outs Mid to high share
Shower screen Usually A$800 to A$2,000+ depending on framed, semi-frameless, or custom frameless glass Mid share in premium jobs
Fixtures and fittings Can range from budget retail selections to several thousand dollars in tapware, vanity, toilet, and accessories Mid share
Labour and project management A major share of the budget once trade coordination, supervision, scheduling, and defect responsibility are included Major share

The line items that catch homeowners out are usually the ones that are hard to compare online. Preparation is one. If walls are out, floors need packing, or the old substrate is not fit to tile over, the room needs extra work before finishes can start. That work is not glamorous, but it decides how the finished bathroom performs.

Tiling is another area where quotes can vary sharply. The tile itself is only part of the cost. Labour changes with tile size, pattern, substrate condition, waste allowance, trims, and the number of cuts around wastes, niches, windows, and tap penetrations. If you are comparing floor tiling services in Melbourne, check whether the price covers floor preparation, tile pattern, edge details, and final set-out, not just square metres.

The costs homeowners often miss when managing trades themselves

The biggest gap in owner-managed budgets is usually not a single trade rate. It is the coordination sitting between the trades.

If you hire the demo crew, plumber, waterproofer, tiler, electrician, glazier, and painter separately, someone still has to book them in the right order, make sure each stage is ready, answer questions on site, and carry the cost if one trade delays the next. In practice, that someone is usually the homeowner. The price may look lower at the start, but the risk sits with you.

A builder-managed renovation wraps those costs into one all-in number and puts responsibility in one place. That matters when:

  • the plumber opens a wall and finds damaged framing
  • the tiler needs falls adjusted before waterproofing can proceed
  • the shower screen cannot be measured until final tile lines are confirmed
  • one trade blames another for a defect or delay

That is where many "cheaper" bathrooms get expensive. Extra site visits, rebooking fees, repeated labour, and small scope gaps add up fast.

Where the budget is best spent

Money is usually best spent on the parts buried behind the finishes. Straight walls, correct falls, sound waterproofing, reliable plumbing rough-in, and careful tile installation have a bigger effect on the end result than upgrading a mixer from one retail range to another.

A vanity, basin, or tap can be changed later. Replacing failed waterproofing or redoing poor tile falls means pulling the bathroom apart.

The practical way to assess bathroom renovation cost in Melbourne is to look at the complete, managed build cost for a finished wet area that is compliant, functional, and properly handed over. That number tells you far more than a collection of low trade quotes that leave gaps between them.

Key Factors That Influence Your Final Cost

A bathroom budget isn't fixed just because you've set one. The final cost moves with design choices, site conditions, and how clearly the work is scoped before demolition starts.

An assortment of interior design material samples, including faucets, tiles, and stone countertop slabs for renovation.

One of the more important facts homeowners should know is that approximately 40% of renovation projects in Australia go over budget due to poor planning or unexpected structural issues, according to Hipages' summary of 2023 HIA bathroom renovation data. In Melbourne, older homes and higher trade costs make those surprises more painful.

Layout changes cost more than most people expect

The biggest jump in price often comes from changing the wet-area layout. Moving a toilet, relocating the shower waste, or shifting the vanity wall seems simple on a plan, but each change can trigger extra plumbing, extra labour, and more coordination between trades.

If the current layout works reasonably well, keeping services in place usually protects the budget better than almost any other decision.

Material selection changes labour as well as supply cost

Premium materials don't just cost more to buy. They can also cost more to install. Large-format tiles, mitred edges, natural stone, and tighter visual detailing slow the job down and demand more care.

That's especially true in bathrooms where wall straightness, floor falls, and trim detail are obvious at close range. The room may be small, but there's nowhere to hide poor workmanship.

For wet areas, the practical side matters just as much as the look. That's why proper waterproofing in Melbourne should be treated as an essential part of the scope, not an afterthought.

Existing conditions can change everything

The unknowns are usually behind the tiles. Once demolition starts, builders sometimes find water damage, unstable substrates, out-of-square framing, or signs that previous work wasn't done well. Those aren't luxury upgrades. They're issues that need to be corrected before the new bathroom goes in.

A renovation usually blows out when the quote was based on hope instead of inspection.

Homeowners who coordinate trades themselves often come unstuck. One contractor strips the room, another discovers a problem, and then everyone starts debating who owns the extra work and how the schedule shifts.

The type of finish affects the amount of site time

A clean, straightforward bathroom with standard porcelain, a simple niche, and an off-the-shelf vanity is faster to deliver than a room with feature walls, custom cuts, stone, recessed storage, and a frameless screen that needs exact tolerances.

That difference matters because bathrooms are labour-heavy jobs. More detail means more hours on site, more checking, and tighter sequencing.

A short visual walk-through helps explain where those details add time and cost:

What homeowners can control

You can't eliminate every surprise, but you can reduce the expensive ones. The best cost control usually comes from a few disciplined decisions:

  • Lock the layout early unless there's a strong reason to change it
  • Choose materials before quoting so labour assumptions are realistic
  • Inspect the site properly instead of pricing from photos alone
  • Use one responsible party to manage sequencing, quality, and trade accountability

That's how budgets stay closer to plan. Not through unrealistically low allowances, but through clearer decisions before work begins.

Sample Budgets and A Typical Project Timeline

A budget feels more real when you attach it to an actual type of project. Melbourne bathrooms vary a lot, but most jobs fall into one of three common patterns.

Three sample budget scenarios

A smaller ensuite refresh in Highett might land around the lower end of the market if the layout stays the same and the selections are straightforward. That kind of job usually focuses on lifting presentation, replacing tired fixtures, and keeping disruption under control.

A family bathroom in Hawthorn often sits in the mid-range. That's the category where many homeowners want a proper rebuild, better waterproofing, improved storage, and a cleaner tile finish throughout.

A master bathroom in Toorak can move into premium territory quickly when the brief includes large-format tile, custom detailing, frameless glazing, and more design-led finishing. The room may still be a bathroom, but the labour profile is different.

The suburb doesn't set the price. The scope does. But in practice, premium expectations often mean more site time and tighter tolerances.

Why labour makes such a difference in Melbourne

For Victoria, the average spend on a bathroom renovation is approximately $19,000, but Melbourne's demand for higher-end finishes lifts median project costs to $22,000 to $29,000, with labour accounting for 40% to 65% of the total, according to OpenAgent's renovation cost guide. The same source notes plumbers commonly charge $100 to $150 per hour and electricians $80 to $100 per hour.

That's why two bathrooms of similar size can price very differently. If one needs more electrical work, more plumbing alteration, or more detailed tile installation, the labour share climbs fast.

A practical timeline homeowners can expect

The pricing discussion is only half the story. Time on site affects access, family routine, and how quickly trades need to be sequenced.

An infographic showing the 8-step timeline for a professional bathroom renovation project in Melbourne.

The broad pattern is consistent even when exact timing varies:

  1. Initial consultation and design
    Layout decisions, finish selections, and scope clarification.

  2. Material selection and ordering
    Tiles, tapware, vanity, screen, and fittings need to be locked in.

  3. Demolition
    Existing fixtures, tiles, and finishes are removed.

  4. Rough-in plumbing and electrical
    Services are adjusted before walls and floors are closed up.

  5. Waterproofing
    Wet areas are prepared and treated before tiling.

  6. Tiling
    Walls and floors are laid, detailed, and grouted.

  7. Fixture installation
    Vanity, toilet, taps, screen, and fittings are installed.

  8. Final touches and clean-up
    Silicone, painting touch-ups, testing, and handover.

What delays a bathroom renovation

Delays usually come from late selections, missing materials, hidden damage, or poor trade coordination. This is another reason a builder-led process often runs smoother. Someone is tracking dependencies before the job stalls.

If you're trying to compare timelines between quotes, ask one question: who is coordinating every trade from demolition to handover? The answer matters as much as the quoted duration.

How to Get an Accurate Quote from Registered Builders

A homeowner gets three bathroom quotes. One looks cheap, one looks high, and one sits in the middle. Then the true comparison starts. Does the low quote include waterproofing, waste removal, fixture installation, compliance paperwork, and trade coordination, or are those costs about to land on you later?

That is why an accurate quote depends on more than price. It depends on scope, responsibility, and whether one Registered Builder is pricing the whole job from demolition to handover.

What to decide before requesting quotes

You do not need every finish selected before asking for pricing. You do need enough detail for the builder to price the same job each time.

The key decisions are practical:

  • Keep or change the layout
    Keeping plumbing and drainage in place usually keeps the price tighter. Moving a shower, toilet, or vanity adds plumbing work, patching, and often extra electrical work.

  • Set the finish standard
    Basic tiles and standard fittings produce a very different quote from large-format tiles, custom joinery, recessed niches, underfloor heating, or frameless glass.

  • Be clear about retained items
    If the mirror cabinet, window, or door stays, say so upfront. If you are unsure, the quote may carry allowances or exclusions that make comparison harder.

  • Disclose known problems
    Water damage, mould, rotten subfloors, out-of-plumb walls, and previous patch repairs affect labour and risk. Hiding them does not save money. It only shifts the cost to a variation later.

A simple written brief and a few site photos can improve quote quality fast.

What a good builder quote should make clear

A proper builder quote should read like a build plan, not a one-line price.

Look for detail in the following areas:

Quote item What you want to see
Scope Clear inclusions and exclusions
Trade coverage Demolition, plumbing, electrical, waterproofing, tiling, carpentry, installation
Site assumptions Access, parking, apartment rules, waste removal, protection of adjacent areas
Layout assumptions Whether services remain in place or move
Material assumptions Tile range, tapware level, vanity type, shower screen type
Compliance items Waterproofing, testing, certificates, and any permit-related work if required

The best quotes also explain who is supplying what. That matters. If you plan to supply your own tiles, tapware, vanity, or toilet suite, the builder should state whether delivery timing, breakage, missing parts, and warranty responsibility sit with you or with them.

That is one of the biggest differences between an all-in price from a Registered Builder and a pile of separate trade quotes. With separate trades, gaps open up fast. The plumber blames the tiler, the tiler waits on the waterproofer, the screen installer says the walls are out, and you end up coordinating the dispute while the bathroom sits unfinished.

Why Registered Builders are easier to compare

A Registered Builder is usually pricing the whole sequence of work, not just their own part of it. That gives you a clearer picture of the actual all-in cost.

It also makes risk easier to see.

If one quote covers demolition, waterproofing, tiling, plumbing fit-off, electrical fit-off, carpentry, screen install, rubbish removal, supervision, and defect rectification, you are comparing a finished bathroom. If another quote only covers tiles and labour, you are comparing a partial job with missing costs still to come.

Documentation matters too. Ask how the builder handles waterproofing records and handover documents, including any waterproofing compliance certificates in Victoria. A quote that ignores compliance is not cheaper. It is incomplete.

One practical way to compare quotes properly

Put the quotes side by side and mark up three things.

First, check what is excluded.
Second, check who is coordinating every trade.
Third, check who carries responsibility if something goes wrong.

That last point gets overlooked. Homeowners who hire individual trades themselves can save money on paper, but they also take on scheduling, supplier follow-up, site access, defect disputes, and missed handovers between trades. In practice, that often costs more than expected.

A reliable quote gives you a realistic total, a defined scope, and one party responsible for the result. That is the quote worth taking seriously.

Plan Your Melbourne Bathroom Renovation with Confidence

A lot of budget blowouts start the same way. A homeowner lines up separate quotes for plumbing, tiling, waterproofing, electrical, and shower screen installation, then finds out each trade is pricing only its own piece. The total looks cheaper at first. The true cost shows up later in return visits, delays between trades, missing scope, and arguments over who is responsible when one stage affects the next.

A bathroom renovation is easier to budget properly when one Registered Builder prices and manages the full job. That gives you an all-in figure tied to a defined scope, a build sequence that works, and one point of responsibility from demolition through to handover. It also cuts down the hidden costs that come with coordinating trades yourself.

Start with the room you have, not a square metre estimate pulled out of context. Site access, wall condition, floor levels, fixture locations, and product choices can shift the final price quickly.

A simple way to assess your next step

  1. Test the likely budget range
    Use a calculator or early estimate to work out whether your project sits closer to a cosmetic update, a standard renovation, or a full rebuild with layout changes.

  2. Get the room inspected on site
    A site quote picks up the items that often get missed early, including difficult access, damaged framing or flooring, older plumbing, and electrical work that needs upgrading.

  3. Ask for one fully scoped price
    The quote should cover demolition, waste removal, waterproofing, tiling, plumbing, electrical, carpentry, fittings, supervision, and defect rectification. If those items are split across multiple quotes, the total cost is still incomplete.

For homeowners weighing up builder-led renovations against self-managed trade packages, Melbourne Tiling Services P/L is one local example offering bathroom renovations through Registered Builders, along with free quotes, 3D drawings, and a renovation calculator. That approach gives homeowners a clearer price for the finished bathroom, not a collection of partial trade costs that still need to be coordinated.

Screenshot from https://melbournetilingservices.com.au

The safest budget is the one that reflects the whole build. That is usually what saves money in the end.

How to Tile a Bathroom Wall: A Melbourne Guide 2026

Individuals often start in the same place. They stand in an outdated bathroom, look at the stained grout, the tired wall tiles, the crooked lines around the shower mixer, and think tiling a new wall can't be that hard. Buy the tiles, grab some adhesive, watch a few videos, and get stuck in.

That's the part where bathroom renovations usually split into two paths. One becomes a clean, durable finish that still looks right years later. The other looks fine for a few weeks, then the corners crack, a row drifts out, or moisture finds its way behind the wall because the prep was wrong from the start.

In Melbourne, the second path is common in older homes. Solid-looking bathrooms often hide walls that are out of plumb, patched substrates, old movement cracks, and framing that was never set up for large-format wall tile. That's why knowing how to tile a bathroom wall properly means understanding more than tile adhesive and a spirit level. It means knowing where tiling ends and compliant wet-area construction begins.

Table of Contents

The Reality of a Flawless Tiled Wall

A flawless tiled wall is built long before the first tile goes up. The visible part is the finish. The real work sits behind it in the set-out, substrate correction, waterproofing, and movement detailing.

In older Melbourne homes, I regularly see bathrooms where the wall looks serviceable until a long straight edge goes on it. Then the problems show up fast. One side bellies out, the corner isn't square, the nib wall leans, or an old repair has left a hump exactly where a large porcelain tile needs to sit flat. None of that gets fixed by pushing on more adhesive.

There's also a big difference between a cosmetic re-tile and a proper bathroom renovation. If you're replacing a splashback outside a wet zone, a capable DIYer can sometimes manage it. If you're working inside a shower area, around penetrations, niches, wall-to-floor junctions, and waterproofed surfaces, the stakes go up sharply. A pretty finish won't save a wall system that isn't compliant.

Practical rule: If water will regularly hit the wall, treat the job as wet-area construction first and tiling second.

A lot of online guides miss that distinction because they assume flat walls, generic room layouts, and standards that don't apply in Australia. Melbourne bathrooms don't always play nicely. Period homes, post-war homes, and fast-renovated investment properties all throw up their own versions of the same issue. The wall behind the tile often needs more work than the tile itself.

That's also why registered builders matter in bathroom renovations. A proper builder doesn't just look at tile colour and grout width. They coordinate substrate repair, waterproofing, plumbing penetrations, and sequencing so the wall system works as one assembly.

A good tiled bathroom wall should do three things at once:

  • Look balanced: full tiles or larger cuts land where the eye goes first.
  • Stay bonded: no hollow spots, sagging, lippage, or weak bedding.
  • Manage movement and moisture: corners, junctions, and wet zones are detailed correctly.

If one of those is missing, the job usually tells on itself.

Planning Your Layout and Materials

The cleanest bathroom wall jobs are usually won before any adhesive is opened. Planning decides how the wall will look, how much material you'll need, and whether the install can be built without ugly compromises.

Start with the wet area rules

In Australia, bathroom wall tiling sits within the framework of the National Construction Code and AS 3740, and shower wall linings are commonly detailed to extend to at least 1800 mm above the finished floor. For estimating, a standard allowance is at least 10% extra tile, with 20% or more often needed for complex layouts, patterned tile, or difficult cuts, as outlined in this bathroom tile measurement guide.

That matters at the planning stage because your tile height, waterproofing extent, substrate, trim selection, and fixture set-out all need to line up. If they don't, the wall can end up looking improvised even when the workmanship is neat.

A checklist infographic titled Bathroom Tiling Planning Checklist with five numbered steps for successful wall tile installation.

For homeowners choosing finishes, a practical place to compare options is this guide to tiling materials for bathroom renovations.

Measure the wall like a tiler, not a shopper

Don't just measure width by height and order off that. Measure each wall separately, then note every interruption.

Use a tape, laser, and a notepad. Record:

  • Openings and penetrations: windows, doors, niches, mixer bodies, shower outlets, and power points.
  • Termination points: where tile stops at architraves, ceilings, benchtops, screens, or trims.
  • Out-of-square conditions: check the width at the top, middle, and bottom, not only once.

Then lay out the tile grid on paper or with a story pole. Dry planning tells you where your cuts will land. The goal is simple. Keep cut tiles larger and place them in lower-visibility areas instead of creating thin slivers in the first thing people see.

Narrow cuts at eye level are rarely a tile problem. They're usually a planning problem.

Choose tile size with the wall in mind

Ceramic wall tile is forgiving. Porcelain is tougher and often cleaner looking, but it's less forgiving to cut and heavier on the wall. Large-format panels and Kerlite can look excellent in a modern ensuite, but they demand a flatter substrate and tighter control over set-out.

A quick trade-off table helps:

Tile type What works well What catches people out
Ceramic Easier cutting, good for standard walls Can look busy with many grout joints
Porcelain Dense finish, sharp modern look Harder cuts, heavier handling
Large-format or Kerlite Fewer joints, premium appearance Exposes uneven walls fast

If the wall is patchy, bowed, or out of plumb, a smaller format often gives you more forgiveness. If the design calls for large-format tile, sort the wall first. Don't expect adhesive to rescue the finish.

Wall Preparation and Waterproofing

The best-looking tile in the showroom won't compensate for a bad wall. If the substrate moves, is damp, is powdery, or is out of plane, the tiled finish is already in trouble.

A tiled wall only performs as well as the substrate

Start with a hard inspection. Tap the wall. Check for drummy patches, loose sheeting, old swelling from moisture, soft plaster, or cracked cement render. Then check flatness and plumb with a straight edge and level.

If the wall is visibly uneven, fix the wall. Don't try to hide it with thick blobs of adhesive. That approach creates inconsistent bedding, poor bond, and a much higher chance of lippage on the face.

A professional construction worker applies waterproof membrane sealant onto bathroom wall boards using a paint roller.

In older Melbourne bathrooms, this stage often decides whether the project stays DIY-friendly. Minor patching is one thing. Re-sheeting walls, correcting bad framing, and rebuilding shower substrates is another.

Waterproofing isn't a decorative extra

In wet areas, waterproofing is part of the system. It isn't something you squeeze in because the tiles are nearly ready to go. Corners, wall-to-floor junctions, and changes of plane all need to be treated as movement points, and expert guidance is clear that these areas should use flexible sealant, not grout. The same guidance also recommends back-buttering tiles when coverage is uncertain so you don't leave voids on vertical surfaces, which can lead to bond failure, as explained in this bathroom wall tile installation guide.

If you're working on a full renovation, at this stage many homeowners should stop and bring in the right trade team. Waterproofing compliance is not the place to guess. If there's any doubt about membrane selection, penetration treatment, or wet-area detailing, get a qualified waterproofer involved and have the work coordinated properly. For system-level context, this page on bathroom waterproofing systems is a useful reference point.

What DIYers usually get wrong

The common failures are nearly always behind the tile, not on it.

  • They tile over a poor base: dusty sheeting, weak old plaster, or walls that aren't flat enough.
  • They grout movement joints: internal corners and fixture junctions crack later because the assembly can't move.
  • They ignore penetrations: mixer points, outlets, and niche corners need careful detailing before the finish goes on.

If the wall needs waterproofing, sealant strategy should be decided before tile layout, not after grouting.

Another trap is sequencing. Plumbing rough-in, sheeting, waterproofing, set-out, tile installation, grouting, and silicone all need to happen in the right order. Registered builders are useful here because they don't treat the tiler in isolation. They coordinate the whole bathroom renovation so one trade doesn't undo the next.

Setting Tiles From Adhesive to Final Cut

This is the stage commonly thought of when considering how to tile a bathroom wall. It's also the stage where rushed work becomes visible immediately.

Set out first, then mix adhesive

A reliable wall-tiling method starts with set-out, not adhesive. Dry-lay the field tiles, establish a reference line from the most visible area, and push smaller cuts into less noticeable corners. On bathroom walls, pros also recommend using a notched trowel at about 45° and pressing each tile with a slight twist to collapse the ridges properly. For ordering, a practical benchmark is about 15% extra tile to cover cuts, breakage, and pattern matching, especially where penetrations and niches increase waste, as noted in this tile-setting guide.

A tiler carefully installs a grey marble-look wall tile onto mortar during a bathroom renovation.

Mark your verticals and horizontals clearly. If the floor isn't perfectly level, don't trust it as your starting point. Use a straight batten or laser line and build the wall from a known level reference.

For the actual setup, I'd keep the process disciplined:

  1. Dry-check the layout so you know where your cuts, trims, and fixture openings will fall.
  2. Mix adhesive in small batches so it doesn't skin over while you're still adjusting tiles.
  3. Spread only what you can tile in a short run on a vertical wall.
  4. Comb in one direction and keep the notch lines consistent.
  5. Use spacers and keep checking level rather than assuming the first row will carry the rest.

How to place each tile so it actually bonds

The tile has to be bedded properly, not just stuck on. Press it in, give it a slight twist, and check the first few pieces by lifting one back off if needed. You're looking for proper adhesive transfer, especially on porcelain and large-format tile.

Back-buttering helps when the tile back pattern or wall condition makes full contact less certain. It's a simple habit that prevents hollow spots and weak corners.

The biggest practical mistakes happen fast:

  • Over-spreading adhesive: the surface skins and the bond suffers.
  • Letting joints wander: one bad line multiplies across the wall.
  • Forcing a tile to correct a crooked wall: the face may look close, but the bedding will be inconsistent.

This video shows the kind of careful handwork wall tiling needs, especially around alignment and tile placement.

Large-format tiles on Melbourne walls

Large-format tile is where many bathroom wall jobs stop being forgiving. On a straight, well-prepared wall, it can look sharp and modern. On an older Melbourne wall with a belly, twist, or patched substrate, it exposes every flaw.

That's why set-out and substrate correction matter more with bigger tiles. A small ceramic can ride over slight inconsistency. A large porcelain tile won't. It will telegraph the defect, bridge a low area, or leave a void if the installer tries to cheat the wall with adhesive thickness.

For cuts around taps, outlets, windows, and niches, measure twice and cut with the finished edge in mind. Good wall jobs aren't judged only by the full tiles. They're judged by the cuts around the details.

Good tilers don't just install the field neatly. They make the awkward cuts look intentional.

If the room has sloping ceilings, angled walls, difficult niches, or premium large-format panels, that's often the point where a professional install makes more sense than learning on the wet wall of your own bathroom.

Applying Grout and Sealing for a Perfect Finish

A tiled wall can be set well and still be spoiled in the final stage. Grouting and sealing need patience, clean timing, and a clear understanding of where grout belongs and where it doesn't.

Grouting without ruining the joints

Wait until the tiles are properly set before you start. Then mix the grout to a smooth, workable consistency and apply it with a rubber float on an angle, forcing it firmly into the joints from more than one direction.

The cleanup matters as much as the application. Wipe too early and you drag grout back out of the lines. Wipe too aggressively and you wash out the face of the joint so it dries shallow and patchy.

A tidy routine works best:

  • Pack the joints fully: don't skim over them and hope the sponge fixes it.
  • Strike off diagonally: this helps avoid pulling grout from the gaps.
  • Use a well-wrung sponge: too much water weakens the finish and makes a mess of the joints.

If haze forms later, deal with it carefully. Don't panic and flood the wall. Most grout cleanup problems come from using too much water, too early.

Where grout must stop

Many DIY bathroom walls fail early at internal corners, wall-to-floor junctions, and the edges around fixtures. These are movement points. They should be sealed with a quality flexible silicone sealant, not filled with grout.

As noted earlier, grout in those areas will crack because the wall system moves. Once that line opens up, moisture has a path.

A simple division keeps the finish durable:

Area Use
Tile joints in the field Grout
Internal corners Flexible sealant
Around fixtures and changes of plane Flexible sealant

The neatest bathroom wall finish usually comes from restraint. Clean joints, clean silicone lines, and no attempt to grout every gap in sight.

Colour matching also matters. If the silicone clashes with the grout, the finish looks patched even when the detailing is correct. Professional tilers spend time here because this is the point the client stares at from close range.

Troubleshooting and When to Call a Registered Builder

Some bathroom wall problems are cosmetic. Others are warning signs that the system behind the tile isn't right.

Problems you can sometimes fix

Minor grout haze can often be cleaned up. A small low spot in a grout line can usually be repaired. A chipped edge at a trim may be improved if it's isolated and accessible.

Other issues are more serious:

  • Lippage: one tile sits proud of the next. This usually points to poor substrate prep or poor bedding.
  • Hollow-sounding tiles: often a sign of inadequate adhesive coverage or voids behind the tile.
  • Cracked corner joints: commonly caused by grout being used where flexible sealant should have been used.

Screenshot from https://melbournetilingservices.com.au

If a shower has angled planes or tricky drainage geometry, caution matters even more. Recent VBA data shows that 22% of bathroom leak complaints in 2024–2025 stemmed from improper tile-to-drain alignment in angled showers, which is exactly the kind of issue generic tutorials usually ignore.

Red flags that need a professional

If any of these apply, I'd stop treating the project as a casual DIY wall-tiling job:

  • The walls aren't straight or plumb: common in older Melbourne homes and hard to correct without proper prep work.
  • The shower area needs full wet-area compliance: membrane detailing, penetrations, and junctions can't be guessed.
  • You're using large-format tile or Kerlite: these materials demand better substrate control and handling.
  • The layout includes niches, windows, sloping ceilings, or awkward returns: the cutting and sequencing get technical quickly.

A registered builder earns their keep when the bathroom renovation needs coordination across trades, not just tile setting. That includes sheeting, waterproofing, plumbing points, screeding, electrical clearances, and final finish alignment. One practical option for homeowners dealing with failed sections or localised defects is to start with a tile repair assessment in Melbourne.

For full bathroom renovations, Melbourne Tiling Services P/L is one example of a registered builder-led contractor that handles tiling as part of the broader wet-area build sequence rather than as a standalone cosmetic trade.

If you're confident, organised, and working on a straightforward wall outside the highest-risk wet areas, some parts of the job are achievable. If the bathroom has movement, moisture risk, uneven walls, or premium finishes, professional help isn't overkill. It's good judgement.


If your bathroom wall project has moved beyond a simple DIY refresh and into full wet-area work, Melbourne Tiling Services P/L can help with bathroom renovations, waterproofing, substrate preparation, tile installation, and repair work across Melbourne. As registered builders, they coordinate the full process so the finished wall looks right and performs properly.